KE970 - Cellphone LG - Free user manual and instructions
Find the device manual for free KE970 LG in PDF.

User questions about KE970 LG
0 question about this device. Answer the ones you know or ask your own.
Ask a new question about this device
Download the instructions for your Cellphone in PDF format for free! Find your manual KE970 - LG and take your electronic device back in hand. On this page are published all the documents necessary for the use of your device. KE970 by LG.
USER MANUAL KE970 LG
text_image
ENGLISH FRANÇAIS PORTUGUES LG Life's Good IKE9701 User Guide LG Life's Good LG Electronics Inc. Born to Shine BLACK LABEL SERIES Some of contents in this manual may differ from your phone depending on the software of the phone or your service provider. www.lgmobile.com P/N : MMBB0235845(1.0) H CE 0168IKE970I User Guide

ENGLISH
FRANÇAIS
PORTUGUÉS

natural_image
Abstract white starburst graphic with radiating lines on black background (no text or symbols)Born to Shine
BLACK LABEL SERIES
Some of contents in this manual may differ from your phone depending on the software of the phone or your service provider.
CE 0168
IKE970 User Guide I - English
natural_image
Illustration of a LG phone showing front and side views (no text or symbols on body)Contents
Introduction 5
For your safety 6
Guidelines for safe and efficient use 7
KE970 features 12
Parts of the phone
Display information 16
On-Screen Icons
Installation 18
Installing the SIM card and the handset battery
Charging the Battery 20
Disconnecting the charger 21
Inserting the memory card 22
Removing the memory card
General functions 23
Making a Call
Answering a Call 24
Entering Text 25
Selecting functions and options 29
In-call menu 30
During a Call
Conference Calls 31
Menu Tree 34
Profiles 37
Activate
Personalise
Browser 39
Home 40
Bookmarks
Go to URL
History 41
Settings
Network profiles
Cache 42
Cookies
Security certificates
Information
Multimedia 43
MP3 player
Camera 47
Video camera 49
Voice recorder
Call history 51
All calls
Missed calls
Dialled calls
Received calls 52
Call duration
Call costs 53
Data information
Messaging 54
New message
Text
Multimedia 55
Email 57
Inbox 58
Email box 59
Drafts 60
Outbox
Sent 61
Listen to voicemail
Info message
Read 62
Topics
Templates
Text
Multimedia 63
Settings 64
Text message
Multimedia message
Email 65
Voicemail number 67
Push message
Info message
Contacts 68
Search
New contact 69
Speed dials
Groups 70
Copy all
Delete all
Settings 71
Information
My stuff 72
Images
Sounds 73
Videos 74
Documents 75
Others 76
Games & Apps 77
External memory
Contents
Tools 79
Alarm clock
Calendar
Calculator 81
Memo
Stop watch 82
Unit converter
World clock
SIM services
Settings 83
Date & Time
Set date
Date format
Set time
Time format
Auto update
Languages
Display 83
Wallpaper
Backlight timer
Brightness 84
Home screen shortcut
Menu style
Dialing style
Standby text
Network name
Connectivity
Bluetooth
Network 87
USB connection 89
Call 90
Call divert
Answer mode 91
Send my number
Call waiting 92
Minute minder
Auto redial
Send DTMF
Security 93
PIN code request
Phone lock
Call barring 94
Fixed dial number 95
Change codes
Flight mode 96
Power saving
Reset default
Memory status
Q&A 97
Accessories 100
Technical data 101
Introduction
Congratulations on your purchase of the advanced and compact KE970 mobile phone, designed to operate with the latest digital mobile communication technology.
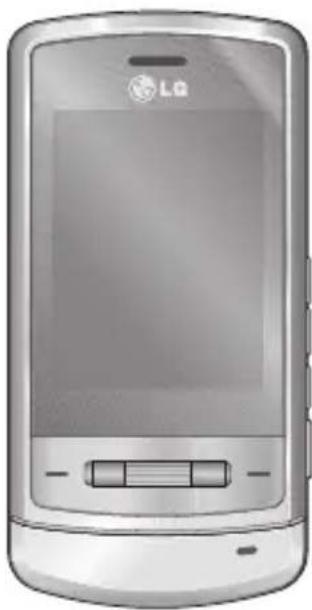
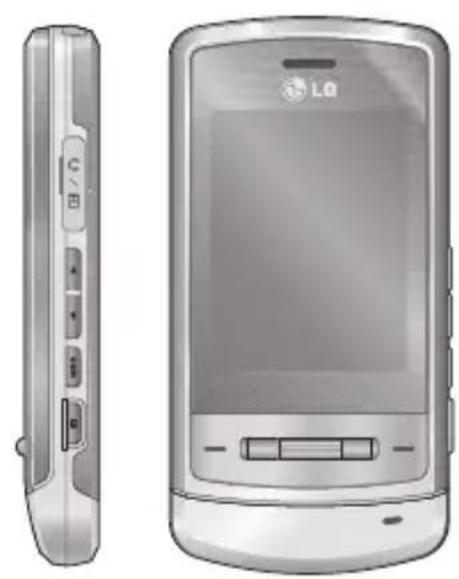
natural_image
Front view of a silver LG mobile phone with a blank screen and control buttons (no visible text or symbols)This user's guide contains important information on the use and operation of this phone. Please read all the information carefully for optimal performance and to prevent any damage to or misuse of the phone. Any changes or modifications not expressly approved in this user's guide could void your warranty for this equipment.
For your safety
Warning!
- Mobile Phones must be switched off at all times in aircrafts.
- Do not hold the phone in your hand while driving.
- Do not use your phone near petrol stations, fuel depots, chemical plants or blasting operations.
- For your safety, use ONLY specified ORIGINAL batteries and chargers.
- Do not handle the phone with wet hands while it is being charged. It may cause an electric shock or seriously damage your phone.
- Keep the phone in a safe place out of small children's reach. It includes small parts which, if detached, may cause a choking hazard.
Caution!
- Switch off the phone in any area where required by special regulations. For example, do not use your phone in hospitals or it may affect sensitive medical equipment.
• Emergency calls may not be available under all mobile networks. Therefore, you should never depend solely on your mobile phone for emergency calls. - Only use ORIGINAL accessories to avoid damage to your phone.
- All radio transmitters carry risks of interference with electronics in close proximity. Minor interference may affect TVs, radios, PCs, etc.
- Batteries should be disposed of in accordance with relevant legislation.
- Do not dismantle the phone or battery.
- Risk of explosion if battery is replaced by an incorrect type.
Guidelines for safe and efficient use
Please read these simple guidelines. Not following these guidelines may be dangerous or illegal. Further detailed information is given in this manual.
Exposure to radio frequency energy
Radio wave exposure and Specific Absorption Rate (SAR) information
This mobile phone model KE970 has been designed to comply with applicable safety requirements for exposure to radio waves. This requirement is based on scientific guidelines that include safety margins designed to assure the safety of all persons, regardless of age and health.
The radio wave exposure guidelines employ a unit of measurement known as the Specific Absorption Rate, or SAR. Tests for SAR are conducted using standardised methods with the phone transmitting at its highest certified power level in all used frequency bands.
▶ While there may be differences between the SAR levels of various LG phone models, they are all designed to meet the relevant guidelines for exposure to radio waves.
The SAR limit recommended by the International Commission on Non-Ionizing Radiation Protection (ICNIRP) is 2W/kg averaged over ten (10) gram of tissue.
The highest SAR value for this model phone tested by DASY4 for use at the ear is 0.443(stainless case) or 0.417(aluminum case) W/kg (10g) and when worn on the body is 0.245 (stainless case) or 0.483(aluminum case) W/kg (10g).
▶ SAR data information for residents in countries/regions that have adopted the SAR limit recommended by the Institute of Electrical and Electronics Engineers (IEEE), which is 1.6 W/kg averaged over one (1) gram of tissue (for example USA, Canada, Australia and Taiwan).
Guidelines for safe and efficient use
Product care and maintenance
Warning! Only use batteries, chargers and accessories approved for use with this particular phone model. The use of any other types may invalidate any approval or warranty applying to the phone, and may be dangerous.
▶ Do not disassemble this unit. Take it to a qualified service technician when repair work is required.
- Keep away from electrical appliances such as a TV's, radios or personal computers.
The unit should be kept away from heat sources such as radiators or cookers.
▶ Never place your phone in a microwave oven as it will cause the battery to explode.
▶ Do not drop.
▶ Do not subject this unit to mechanical vibration or shock.
The coating of the phone may be damaged if covered with wrap or vinyl wrapper.
▶ Do not use harsh chemicals (such as alcohol, benzene, thinners, etc.) or detergents to clean your phone. There is a risk of this causing a fire.
▶ Do not subject this unit to excessive smoke or dust.
▶ Do not keep the phone next to credit cards or transport tickets; it can affect the information on the magnetic strips.
▶ Do not tap the screen with a sharp object as it may damage the phone.
▶ Do not expose the phone to liquid or moisture.
▶ Use accessories, such as earphones and headsets, with caution. Ensure that cables are tucked away safely and do not touch the antenna unnecessarily.
▶ Please remove the data cable before powering on the handset.
Electronic devices
All mobile phones may get interference, which could affect performance.
▶ Do not use your mobile phone near medical equipment without requesting permission. Avoid placing the phone over pacemakers (i.e. in your breast pocket.)
▶ Some hearing aids might be disturbed by mobile phones.
▶ Minor interference may affect TVs, radios, PCs, etc.
Road safety
Check the laws and regulations on the use of mobile phones in the areas when you drive.
▶ Do not use a hand-held phone while driving.
▶ Give full attention to driving.
▶ Use a hands-free kit, if available.
▶ Pull off the road and park before making or answering a call if driving conditions so require.
RF energy may affect some electronic systems in your motor vehicle such as a car stereo or safety equipment.
If your vehicle is equipped with an air bag, do not obstruct it with installed or portable wireless equipment. It can cause serious injury due to improper performance.
If you are listening to music whilst out and about, please ensure that the volume is at a reasonable level so that you are aware of your surroundings. This is particularly imperative when attempting to cross the street.
Guidelines for safe and efficient use
Avoid damage to your hearing
Damage to your hearing can occur if you are exposed to loud sound for long periods of time. We therefore recommend that you do not turn on or off the handset close to your ear. We also recommend that music and call volumes are set to a reasonable level.
Blasting area
Do not use the phone where blasting is in progress. Observe restrictions, and follow any regulations or rules.
Potentially explosive atmospheres
Do not use the phone at a refuelling point. Don't use near fuel or chemicals.
▶ Do not transport or store flammable gas, liquid, or explosives in the compartment of your vehicle, which contains your mobile phone and accessories.
In aircraft
Wireless devices can cause interference in aircraft.
▶ Turn off your mobile phone before boarding any aircraft.
▶ Do not use it on the ground without crew permission.
Children
Keep the phone in a safe place out of small children's reach. It includes small parts which if detached may cause a choking hazard.
Emergency calls
Emergency calls may not be available under all mobile networks. Therefore, you should never depend solely on your mobile phone for emergency calls. Check with your local service provider.
Battery information and care
-
You do not need to completely discharge the battery before recharging. Unlike other battery systems, there is no memory effect that could compromise the battery’s performance.
▶ Use only LG batteries and chargers. LG chargers are designed to maximize the battery life.
▶ Do not disassemble or short-circuit the battery pack. -
Keep the metal contacts of the battery pack clean.
▶ Replace the battery when it no longer provides acceptable performance. The battery pack may be recharged hundreds of times until it needs replacing.
▶ Recharge the battery if it has not been used for a long time to maximize usability.
▶ Do not expose the battery charger to direct sunlight or use it in high humidity, such as the bathroom.
▶ Do not leave the battery in hot or cold places, this may deteriorate the battery performance.
Risk of explosion if battery is replaced by an incorrect type. - Dispose of used batteries according to the manufacturer's instructions.
KE970 features
Parts of the phone
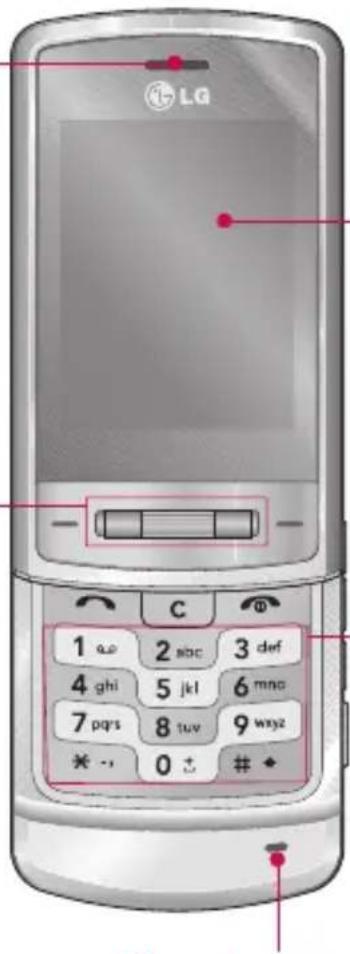
Front view
Navigation key
In standby mode:
Briefly ↑: List of Message

Briefly ↓:List of Profiles
Briefly press: Menu

Briefly press: List of
Contacts

Briefly press: List of
Favourites
In menu: scroll up & down

Briefly press: OK key
With the up/down scrolling navigation key, you can select menu and functions more easily.
Earpiece
text_image
LG 1 aa 2 sbc 3 def 4 ghi 5 jkl 6 mno 7 pqs 8 tuv 9 wxyz * - 0 # ◆Microphone
LCD
▶ Top: Signal strength, battery level and various function
▶ Bottom: Soft key indications
Alpha numeric keys
▶ In standby mode: Input numbers to dial Hold down
text_image
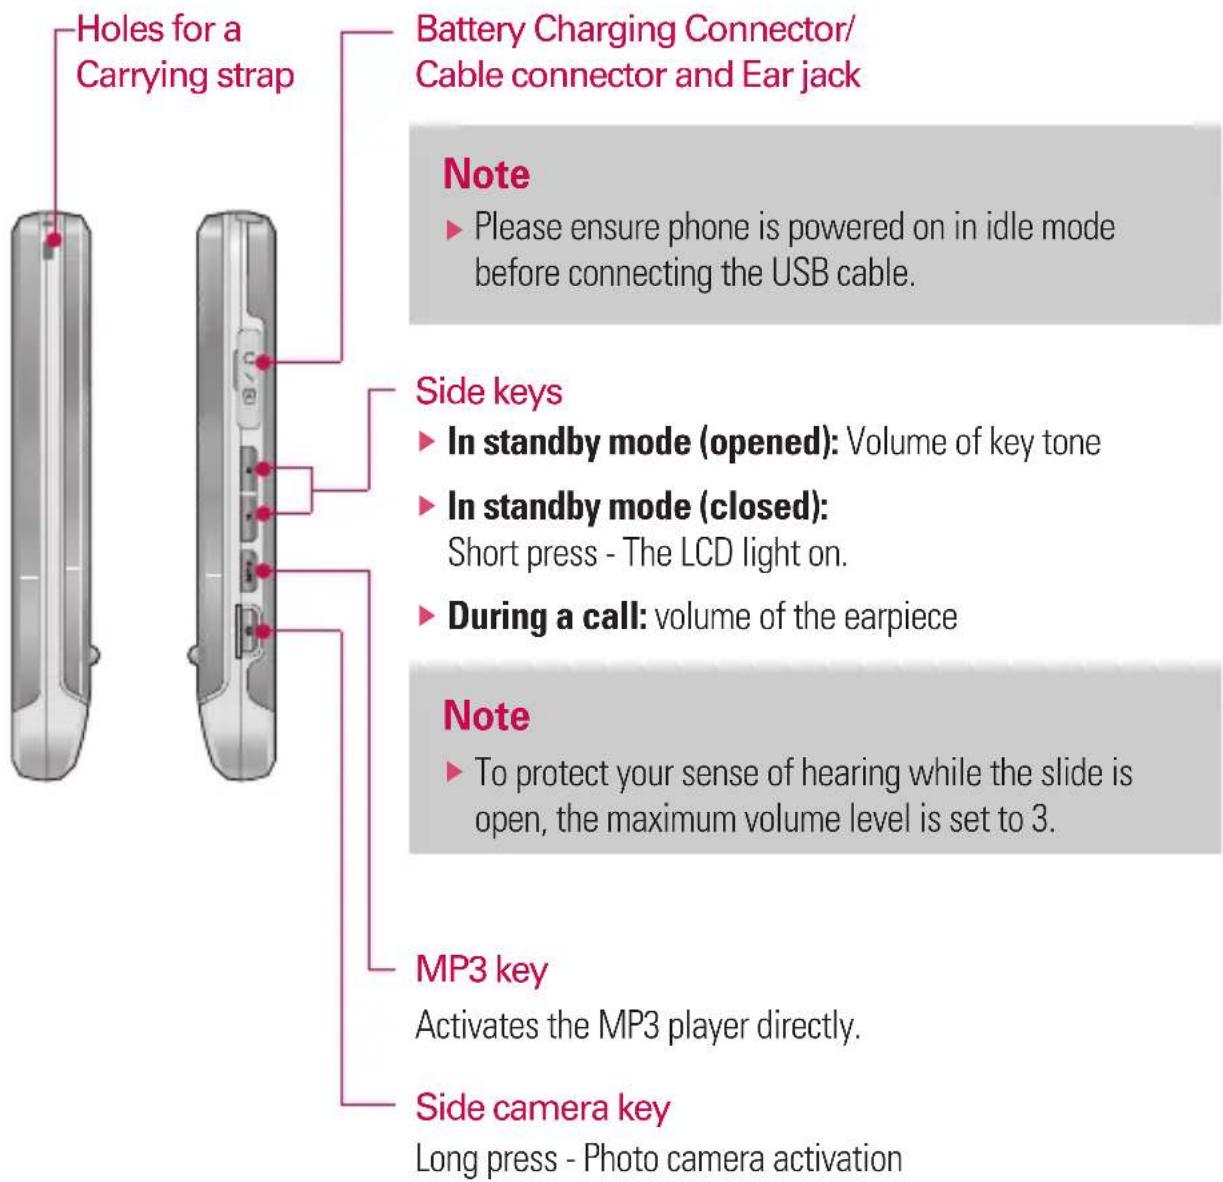
0 - International calls 1 - Activate Voice mail centre menu 2 to 9 - Speed dialsIn editing mode: Enter numbers & characters
text_image
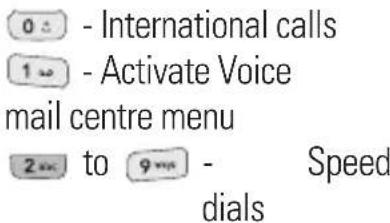
Diagram of a device rear panel with labeled buttons and indicators, including 'C' and 'Φ'Left soft key/ Right soft key
These keys perform the function indicated in the bottom of the display.
End key
▶ Switch on/off (hold down)
▶ End or reject a call.
Clear key
Deletes a character with each press. Hold the key down to clear all input. Use this key to go back to a previous screen.
Send key
▶ Dial a phone number and answer a call.
In standby mode: shows recently dialled, received and missed calls.
KE970 features
text_image
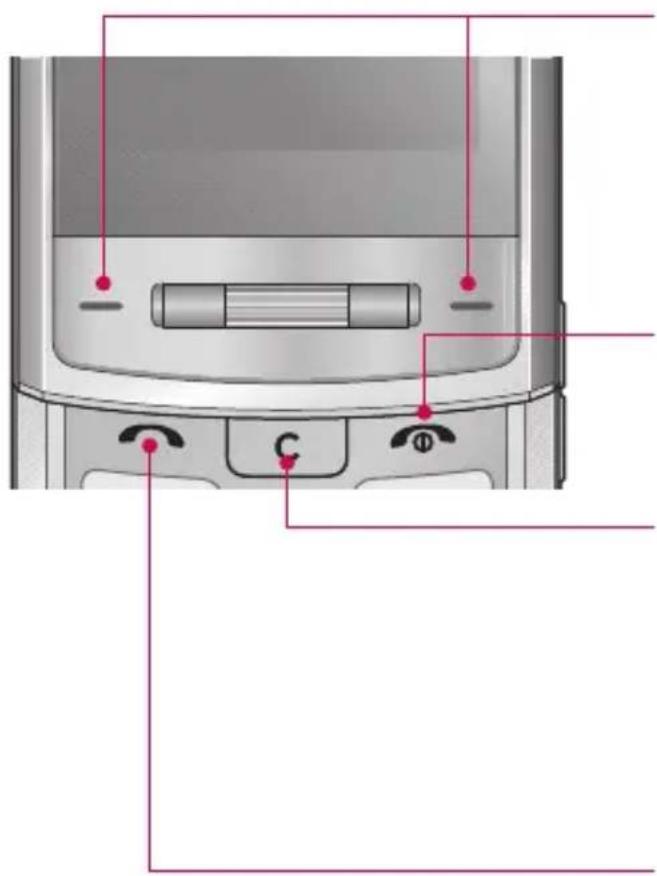
Holes for a Carrying strap Battery Charging Connector/ Cable connector and Ear jack Note ► Please ensure phone is powered on in idle mode before connecting the USB cable. Side keys ► In standby mode (opened): Volume of key tone ► In standby mode (closed): Short press - The LCD light on. ► During a call: volume of the earpiece Note ► To protect your sense of hearing while the slide is open, the maximum volume level is set to 3. MP3 key Activates the MP3 player directly. Side camera key Long press - Photo camera activationRear view
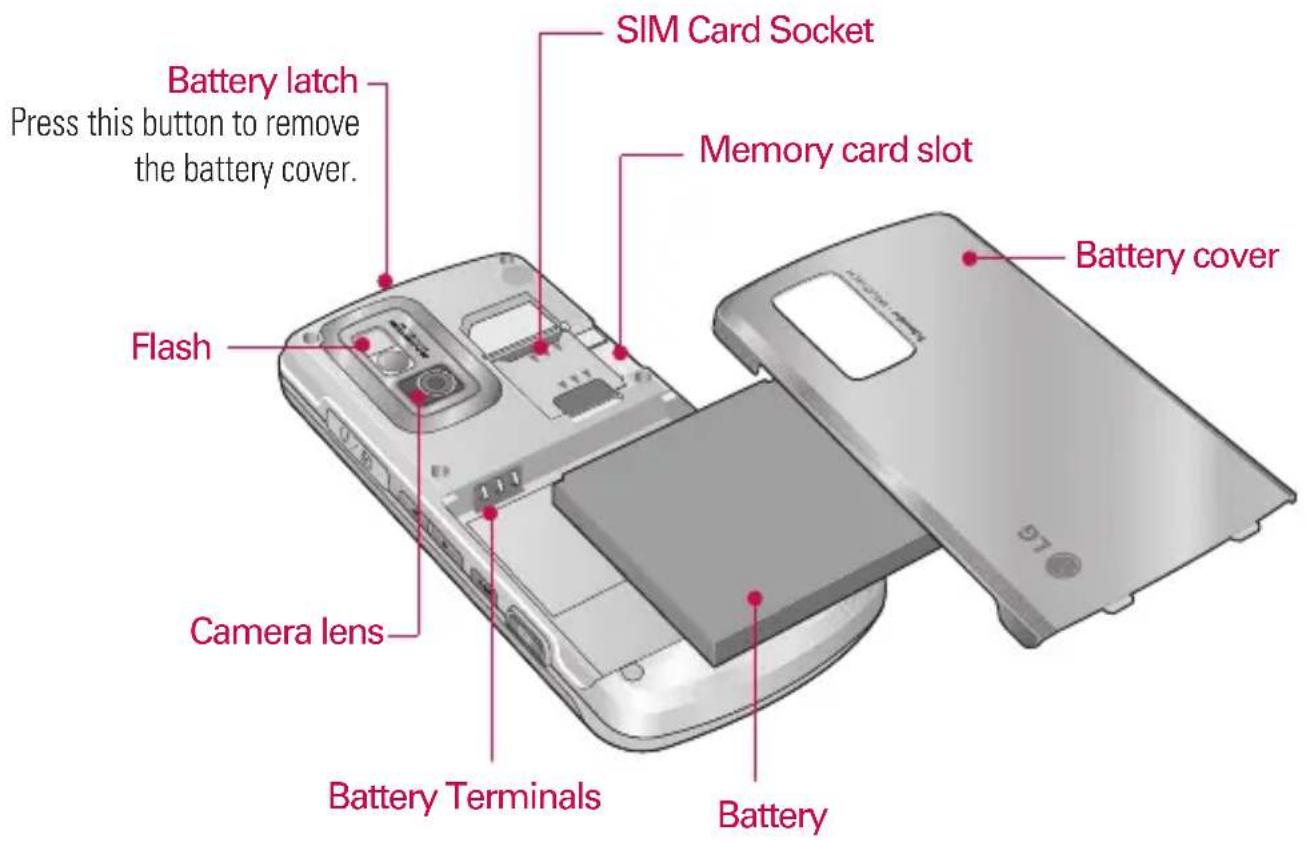
text_image
SIM Card Socket Battery latch Press this button to remove the battery cover. Memory card slot Battery cover Flash Camera lens Battery Terminals BatteryKE970 features
KE970 features
Display Information
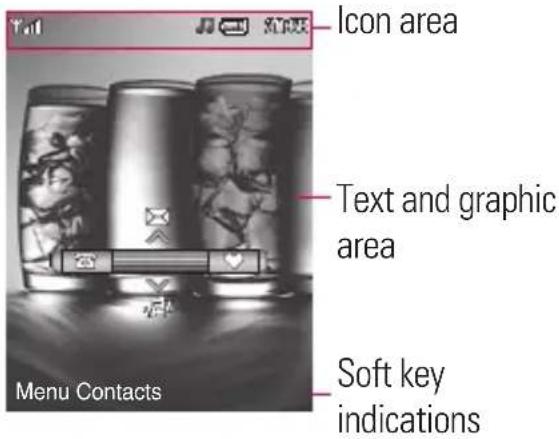
text_image
Icon area Text and graphic area Soft key indications Menu ContactsArea Description
| First line | Displays various icons. |
| Middle lines | Display messages, instructions and any information that you enter, such as number to be dialled. |
| Last line | Shows the functions currently assigned to the two soft keys. |
The screen displays several icons. These are described below.
On-Screen Icons
Icon Description

Tells you the strength of the network signal.*
* The quality of the conversation may change depending on network coverage. When the signal strength is below 2 bars, you may experience muting, call drop and poor audio. Please refer to this signal as an indicator for your calls. When there are no bars, that means that there is no network coverage: in this case, you won't be able to access the network for any service (call, messages and so on).
| Icon Description | |
| Call is connected. | |
| G | You can use GPRS service. |
| Shows that you are using a roaming service. | |
| The alarm has been set and is on. | |
| Tells you the status of the battery. | |
| You have received a text message. | |
| You have received a voice message. | |
| Vibrate only menu in profile. | |
| General menu in profile. | |
| Outdoor menu in profile. | |
| Silent menu in profile. | |
| Headset menu in profile. | |
| Icon Description | |
| Diverted call. | |
| Indicates that the phone is accessing WAP. | |
| Indicates that you are using GPRS. | |
| You have activated the Bluetooth menu. | |
| E | Shows the EDGE service is available. Connection to the EDGE service allows you to transfer data at a speed of 200Kb/s (depending on network availability). Check with your operator for network coverage and service availability. |
Installation
Installing the SIM card and the handset battery
Make sure the power is off before you remove the SIM card or battery.
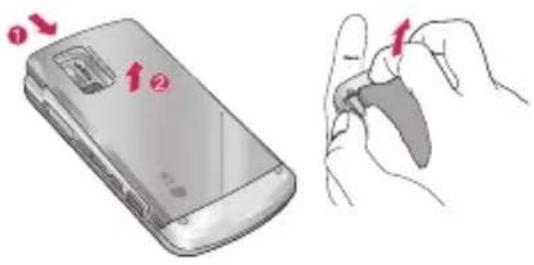
1. Remove the battery.
Press and hold down the battery release button and lift off the battery cover. Turn the phone up-side down, as shown, then lift up the battery with your fingers and pull-out the battery.
text_image
Diagram showing a smartphone with red arrows indicating motion and a hand holding a key, illustrating the process of moving or interacting.Note
Removing the battery from the phone when the power is on may cause the phone to malfunction.
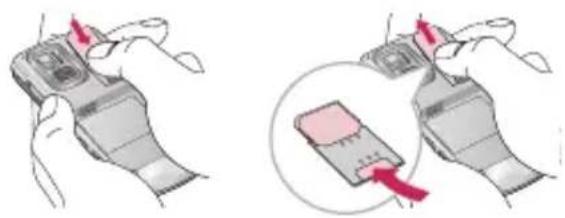
2. Install the SIM card.
Insert and slide the SIM card into the SIM card holder. Make sure that the SIM card is inserted properly and that the gold contact area on the card is facing downwards. To remove the SIM card, press down lightly and pull it in the reverse direction.
natural_image
Illustration of two hands holding a handheld device, one with red arrows indicating force or movement (no text or symbols present)To insert the SIM card To remove the SIM card
Note
The metal contact of the SIM card can be easily damaged by scratches. Pay special attention to the SIM card while handling. Follow the instructions supplied with the SIM card.
WARNING!
- Do not replace or remove the SIM card while your phone is being used or turned on, or data may be lost or the SIM card might be damaged.
3. Install the battery.
Insert the the battery into the battery compartment as metal contacts meet in the middle of the phone.
Push down the top of the battery until it snaps into place. Place the battery cover to the phone as shown.
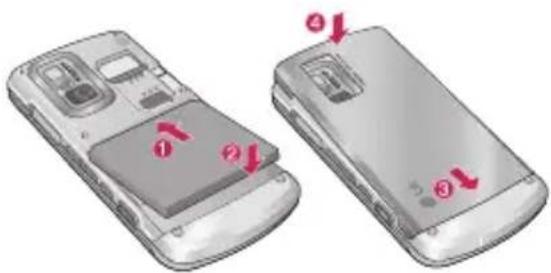
natural_image
Two views of a mobile phone showing front and back compartments with red arrows indicating internal components (no text or symbols present)Installation
Charging the Battery
Before connecting the travel adapter to the phone you must first install the battery.

natural_image
Close-up of a computer interface showing a USB cable connected to a device, with a magnified view of the cable being inserted (no text or symbols visible)- Ensure the battery is fully charged before using the phone for the first time.
- With the arrow facing you as shown in the diagram push the plug on the battery adapter into the socket on the side of the phone until it clicks into place.
- Connect the other end of the travel adapter to the mains socket. Use only the charger included in the box.
- The moving bars of battery icon will stop after charging is complete.
CAUTION!
- If the battery is completely discharged, the charging display will appear on the LCD approximately 1 to 1.5 minutes after connecting TA.
- Do not force the connector as this may damage the phone and/or the travel adapter.
- Insert the battery pack charger vertically to wall power outlet.
- If you use the battery pack charger out of your own country, use an attachment plug adaptor for the proper configuration.
- Do not remove your battery or the SIM card while charging.
WARNING!
- Unplug the charger during lightning storms to avoid electric shock or fire.
• Make sure that no sharp-edged items, such as animal teeth or nails, come into contact with the battery. There is a risk of this causing a fire.
Disconnecting the charger
Disconnect the charger from the phone by pulling the connector, not the cord.
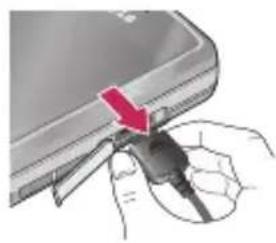
natural_image
Close-up of a hand holding a plug inserted into a device (no visible text or symbols)Installation
Inserting the memory card
Insert the memory card into the slot until the memory card is fully inserted into the slot, as shown in the figure below:
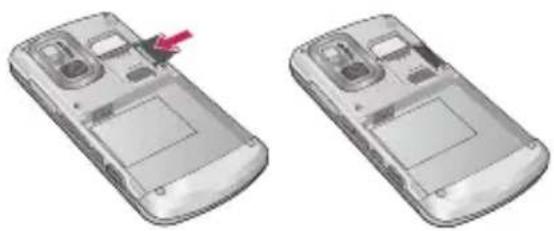
natural_image
Two views of a mobile phone casing showing internal components and a red arrow pointing to a component (no text or symbols)Removing the memory card
Carefully remove the memory card out of the soket, as shown in the figure below:
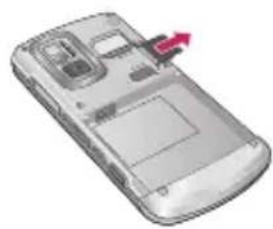
natural_image
Illustration of a smartphone with a red arrow pointing to the screen (no text or symbols visible)Note
▶ Only use memory cards that have been approved by the manufacturer. Some memory cards might not be compliant with the handset.
Warning
Do not replace or remove the memory card while your phone is on, or data could be lost and the memory card might be damaged.
General functions
Making a Call
- Make sure your phone is powered on.
- Enter a phone number including the area code.
To edit a number on the display screen, simply press the key to erase one digit at a time.
▶ Press and hold the key to erase the entire number.
- Press the key to call.
- When you want to finish, press the key.
Making a Call by Send Key
- Press the key, and the most recent incoming, outgoing and missed phone numbers will be displayed.
- Select the desired number by using the navigation key.
- Press the key.
Making International Calls
- Press and hold the key for the international prefix. The '+' character can be replaced with the international access code.
- Enter the country code, area code, and the phone number.
- Press the key.
Ending a Call
When you have finished a call, press the key.
Making a Call From the Contact list
You can store names and phone numbers dialled frequently in the SIM card as well as the phone memory known as the Contact list.
You can dial a number by simply looking up a name in the contact list.
General functions
Adjusting the Volume
During a call, if you want to adjust the earpiece volume, use the side keys of the phone.
In idle mode, you can adjust the key volume using the side keys.
Answering a Call
When you receive a call, the phone rings and the flashing phone icon appears on the screen. If the caller can be identified, the caller's phone number (or name/photo if stored in your Address Book) is displayed.
-
Slide up and press the key or the left soft key to answer an incoming call. If the Any Key menu option (Menu 9.5.2), has been set to any key press will answer a call except for the key or the right soft key.
-
End the call by closing the phone or pressing the key.
Note
You can answer a call while using the Address Book or other menu features. If the phone is connected to a PC via USB cable, incoming calls will be rejected, but after disconnecting the phone from the PC you will see a Missed call window.
Signal Strength
If you are inside a building, being near a window may give you better reception. You can see the strength of your signal by the signal indicator ( ) on your phone's display screen.
Entering Text
You can enter alphanumeric characters by using the phone's keypad. For example, storing names in the Address Book, writing a message, creating scheduling events in the calendar all require entering text. The following text input methods are available in the phone.
Note
Some fields may allow only one text input mode (e.g. telephone number in address book fields).
T9 Mode
This mode allows you to enter words with only one keystroke per letter. Each key on the keypad has more than one letter. The T9 mode automatically compares your keystrokes with an internal linguistic dictionary to determine the correct word, thus requiring far fewer keystrokes than the traditional ABC mode.
ABC Mode
This mode allows you to enter letters by pressing the key labeled with the required letter once, twice, three or four times until the letter is displayed.
123 Mode (Numbers Mode)
Type numbers using one keystroke per number. To change to 123 mode in a text entry field, press key until 123 mode is displayed.
General functions
Symbolic Mode
This mode allows you to enter special characters.
Changing the Text Input Mode
- When you are in a field that allows characters to be entered, you will notice the text input mode indicator in the upper right corner of the display.
- If you want to change modes, press # + . The available modes are changed.
Using the T9 Mode
The T9 predictive text input mode allows you to enter words easily with a minimum number of key presses.
As you press each key, the phone begins to display the characters that it thinks you are typing based on a built-in dictionary.
As new letters are added, the word changes to reflect the most likely candidate from the dictionary.
Note
▶ You can select a different T9 language from the menu option or press hold down the key. The default setting for T9 is set to disabled mode.
- When you are in the T9 predictive text input mode, start entering a word by pressing keys to Press one key per letter
The word changes as letters are typed-ignore what's on the screen until the word is typed completely.
If the word is still incorrect after typing completely, press the down navigation key once or more to cycle through the other word options.
Example: Press


3 to type Good.
▶ If the desired word is missing from the word choices list, add it by using the ABC mode.
2. Enter the whole word before editing or deleting any key strokes.
3. Complete each word with a space by pressing the key or key.
To delete letters, press . Press and hold down to erase the letters continuously.
Using the ABC Mode
Use the to keys to enter your text.
- Press the key labeled with the required letter:
▶ Once for the first letter.
▶ Twice for the second letter.
▶ And so on.
2. To insert a space, press the key once. To delete letters, press the c key. Press and hold down the key to erase the letters continuously.
General functions
Note
▶ Refer to the table below for more information on the characters available using the keys.
| Key | Characters in the order display | |
| Upper Case Lower Case | ||
| .,?!''1-()@/:_,?!''1-()@/:_ | ||
| ABC2ÀÂÄÆÇ abc2àâæç | ||
| DEF3ÉÈÊE def3éèêë | ||
| GHI4ÎIghi4îi | ||
| JKL5jkl5 | ||
| MNO6ÑÔÖOE mno6ñôöoe | ||
| PQRS7pqrs7 | ||
| TUV8Ûtuv8û | ||
| WXYZ9ŴYwxyz9'w'y | ||
| Space Space0 (long press) 0 (long press) | ||
Using the 123 (Numbers) Mode
The 123 Mode enables you to enter numbers in a text message (a telephone number, for example).
Press the keys corresponding to the required digits before manually switching back to the appropriate text entry mode.
Using the Symbol Mode
The Symbol Mode enables you to enter various symbols or special characters.
To enter a symbol, press the key. Use the navigation keys to select the desired symbol and press the [OK] key.
Selecting functions and options
Your phone offers a set of functions that allow you to customise the phone. These functions are arranged in menus and sub-menus, accessed via the two soft key smarked and . Each menu and sub-menu allows you to view and alter the settings of a particular function.
The roles of the soft keys vary according to the current context; the label on the bottom line of the display just above each key indicates its current role.
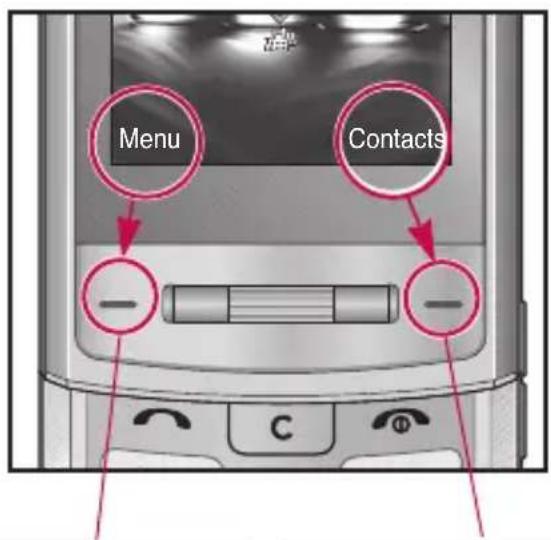
text_image
Menu ContactsPress the left soft key to access the available Menu.
Press the right soft key to access the Contacts menu.
In-call menu
Your phone provides a number of control functions that you can use during a call. To access these functions during a call, press the left soft key [Options].
During a Call
The menu displayed on the handset screen during a call is different than the default main menu displayed when in idle screen, and the options are described below.
Making a Second Call (Network Dependent)
You can get a number you wish to dial from the Address Book to make a second call.
Swapping Between Two Calls
To switch between two calls, press key or the left soft key, and then select Swap Call.
Answering an Incoming Call
To answer an incoming call when the handset is ringing, simply press the 📤 key. The handset is also able to warn you of an incoming call while you are already on a call. A tone sounds in the earpiece, and the display will show that a second call is waiting.
This feature, known as Call waiting, is only available if your network supports it. For details of how to activate and deactivate it see Call waiting (Menu 9.5.4).
If Call Waiting is on, you can put the first call on hold and answer the second, by pressing the left soft key
Rejecting an Incoming Call
You can reject an incoming call without answering by simply pressing the key.
During a call, you can reject an incoming call by pressing the key.
Muting the Microphone
You can mute the microphone during a call by pressing the [Mute] key. The handset can be unmuted by pressing the [Unmute]. When the handset is muted, the caller cannot hear you, but you can still hear them.
DTMF tones while calling
To switch on DTMF tones while calling (e.g. to use the phone with an automatic switchboard) press the key [Options] followed by Send DTMF on. Select DTMF off to disable DTMF tones. DTMF tones are normally on.
Conference Calls
The conference service provides you with the ability to have a simultaneous conversation with more than one caller, if your network service provider supports this feature. A conference call can only be set up when you have one active call and one call on hold, both calls having been answered.
Once a conference call is set up, calls may be added, disconnected or separated (that is, removed from the conference call but still connected to you) by the person who set up the conference call. These options are all available from the In-Call menu. The maximum callers in a conference call are five. Once started, you are in control of the conference call, and only you can add calls to the conference call.
In-call menu
Making a Second Call
You can make a second call while currently on a call. Enter the second number and press the 📄
When the second call is connected, the first call is automatically placed on hold. You can swap between calls, by pressing the 🔗 key.
Setting Up a Conference Call
To set up a conference call, place one call on hold and while the active call is on, press the left soft key and then select the Join menu of Conference call.
Activate the Conference Call on Hold
To activate a conference call on hold, press the key. Alternatively press the left soft key [Options] and select Join all/Hold all calls. Other users on hold will stay connected. To return to conference call mode, press the left soft key [Options] followed by Conference call.
Adding Calls to the Conference Call
To add a call to an existing conference call, press the left soft key, and then select the Join menu of Conference call.
Private Call in a Conference Call
To have a private call with one caller from a conference call, display the number of the caller you wish to talk to on the screen, then press the left soft key. Select the Private menu of Conference call to put all the other callers on hold.
Ending a Conference Call
Currently displayed caller from a conference call can be disconnected by pressing the key.
Menu Tree
The menu in this phone can be displayed in 2 ways. One is by list type or secondly in grid format. Please note that menu number options are different in each view.
The default setting on the phone is set to show the menu in list type, so therefore all the menu number selections throughout the manual are shown according to that setting.
The following illustration shows the available menu structure and indicates the:
▶ Number assigned to each menu option.
▶ Page where you can find the feature description.
You can go to the desired menu using the left soft key [Menu], navigation keys and the [OK] key. And you can also take a shortcut by pressing the corresponding number key of desired menu after pressing the left soft key [Menu].
| 1. Profiles |
| 1.1 General |
| 1.2 Silent |
| 1.3 Vibrate only |
| 1.4 Outdoor |
| 1.5 Headset |
| 2. Browser |
| 2.1 Home |
| 2.2 Bookmarks |
| 2.3 Go to URL |
| 2.4 History |
| 2.5 Settings |
| 2.6 Information |
| 3. Multimedia |
| 3.1 MP3 player |
| 3.2 Camera |
| 3.3 Video camera |
| 3.4 Voice recorder |
| 4. Call history |
| 4.1 All calls |
| 4.2 Missed calls |
| 4.3 Dialled calls |
| 4.4 Received calls |
| 4.5 Call duration |
| 4.6 Call costs |
| 4.7 Data information |
| 5. Messaging |
| 5.1 New message |
| 5.2 Inbox |
| 5.3 Email box |
| 5.4 Drafts |
| 5.5 Outbox |
| 5.6 Sent |
| 5.7 Listen to voicemail |
| 5.8 Info message |
| 5.9 Templates |
| 5.0 Settings |
| 6. Contacts |
| 6.1 Search |
| 6.2 New contact |
| 6.3 Speed dials |
| 6.4 Groups |
| 6.5 Copy all |
| 6.6 Delete all |
| 6.7 Settings |
| 6.8 Information |
Menu Tree
| 7. My stuff |
| 7.1 Images |
| 7.2 Sounds |
| 7.3 Videos |
| 7.4 Documents |
| 7.5 Others |
| 7.6 Games & Apps |
| 7.7 External memory |
| 8. Tools |
| 8.1 Alarm clock |
| 8.2 Calendar |
| 8.3 Calculator |
| 8.4 Memo |
| 8.5 Stop watch |
| 8.6 Unit converter |
| 8.7 World clock |
| 8.8 SIM services |
| 9. Settings |
| 9.1 Date & Time |
| 9.2 Languages |
| 9.3 Display |
| 9.4 Connectivity |
| 9.5 Call |
| 9.6 Security |
| 9.7 Flight mode |
| 9.8 Power saving |
| 9.9 Reset default |
| 9.0 Memory status |
Profiles
In Profiles, you can adjust and customise the phone tones for different events, environments, or caller groups.
There are five preset profiles: General, Silent, Vibrate only, Outdoor and Headset.
Each profile can be personalised. Press the left soft key [Menu] and select Profiles using up/down navigation keys.
Activate (Menu 1.X.1)
- A list of profiles is displayed.
- In the Profiles list, scroll to the profile you want to activate and press the left soft key [OK] or OK key.
- Then, select Activate.
Personalise (Menu 1.X.2)
Scroll to the desired profile in the Profile list. After pressing the left soft key or the OK key, select Personalise.
The profile setting option opens. Set the option as required.
▶ Call alert type: Set the alert type for incoming calls.
Ring tones: Select the desired ring tone from the list.
▶ Ring volume: Set the volume of the ringing tone.
▶ Message alert type: Set the alert type for messages.
▶ Message tones: Select the alert tone for messages.
▶ Keypad tones: Select the desired keypad tone.
▶ Keypad volume: Set the volume of keypad tone.
▶ Slide tones: Allows to set the flip tone for adjusting environment.
▶ Effect sound volume: Set the volume of effect sound.
Profiles
▶ Power on/off volume: Set the volume of the ringing tone when switching the phone on/off.
▶ Auto answer: This function will be activated only when your phone is connected to the handsfree kit.
- Off: The phone will not answer automatically.
• After 5 secs: After 5 seconds, the phone will answer automatically.
• After 10 secs: After 10 seconds, the phone will answer automatically.
Note
▶ All profiles cannot be renamed.
Browser
You can access various WAP (Wireless Application Protocol) services such as banking, news, weather reports and flight information. These services are specially designed for mobile phones and they are maintained by WAP service providers.
Check the availability of WAP services, pricing and tariffs with your network operator and/or the service provider whose service you wish to use. Service providers will also give you instructions on how to use their services.
Once connected, the homepage is displayed. The content depends on the service provider. To exit the browser at any time, press the ( ) key. The phone will return to the idle menu.
Navigating with the WAP browser
You can surf the Internet using either the phone keys or the WAP browser menu.
Using the phone keys
When surfing the Internet, the phone keys function differently to phone mode.
| Key | Description |
| ↑,↓ Scrolls each line of the content area | |
| Returns to the previous page | |
| Selects options and confirms actions |
Using the WAP browser menu
There are various menu options available when surfing the Mobile Web.
Note
The WAP browser menus may vary, depending on your browser version.
Browser
Home
Menu 2.1
Connects to a homepage. The homepage will be the site which is defined in the activated profile. It will be defined by the service provider if you have not defined it in the activated profile.
Bookmarks
Menu 2.2
This menu allows you to store the URL of favourite web pages for easy access at a later time.
To create a bookmark
- Press the left soft key [Options].
- Select Add new and press the OK key.
- After entering the desired URL and title, press the OK key.
After selecting a desired bookmark, the following options are available.
Connect: Connects to the selected bookmark.
▶ View: You can see the selected bookmark.
▶ Edit: You can edit the URL and/or the title of the selected bookmark.
▶ New bookmark: Select this to create a new bookmark.
▶ Send URL via: Sends the selected bookmark via Text/Multimedia message and Email.
Go to URL
Menu 2.3
You can connect directly to the site you want. After entering a specific URL, press the OK key.
History
Menu 2.4
This menu will shows the recent browsing pages.
Settings
Menu 2.5
You can set the profile, cache and security related to internet service.
Network profiles (Menu 2.5.1)
A profile is the network information used to connect to the Internet.
There are default profiles for some operators, stored in phone memory. It's impossible to rename default profiles.
Each profile has submenus as follows:
▶ Activate: Activates the selected profile.
▶ View: You can see the selected profile.
▶ Edit: You can edit the selected profile.
▶ New profile: You can add a new profile.
▶ Delete: Deletes the selected profile from the list.
▶ Delete all: Deletes all profile from the list.
▶ Reset all: Allows you to reset all profiles.
Browser
Cache (Menu 2.5.2)
The information or services you have accessed are saved in the cache memory of the phone.
Note
▶ A cache is a buffer memory, which is used to save data temporarily.
Cookies (Menu 2.5.3)
Check whether a cookie is used or not.
Security certificates (Menu 2.5.4)
You can see the list of personal.
Certificates that have been stored in your phone.
Information
Menu 2.6
You can view the information of WAP browser version.
Multimedia
You can enjoy various multimedia functions on your phone such as camera, voice recorder, MP3 for your fun and convenience.
Note
When the status of the battery indicates low, you may not use the Camera or Multimedia function.
▶ While using Multimedia function, the status of the battery is changeable.
MP3 player
Menu 3.1
The KE970 has an integrated MP3 player built-in. You can enjoy listening to MP3 music files on your phone using a compatible headset or via the internal loudspeaker.
Note
Because of the small dimension of the speaker, in some cases the audio could be distorted, especially at maximum volume and when there are lots of bass sounds. Therefore, we recommend you to use the stereo headset in order to appreciate the high quality of your music.
The music player supports:
- MPEG-2 Layer III, MPEG-2.5 Layer III: Sampling frequency up from 8KHz to 48KHz. Bit rate up to 320Kbps, stereo.
- AAC: ADIF, ADTS formats (Sampling frequency from 8KHz to 48KHz)
- AAC+: V1: (Bit rate 16\~128Kbps) V2: (Bit rate 16\~48Kbps) (Sampling frequency from 8KHz to 48KHz)
Multimedia
Note
KE970 doesn't support the variable bit rate of all mentioned file types. Therefore, you can't change the file from MP3 format to AAC.
You can transfer MP3 files from a compatible PC to the memory in your phone using the Mass Storage. When you connect the phone to a PC using the USB cable(supplied in the same package), this will be displayed as a removable disk through Windows Explorer. If you are using Win98 SE, you will have to install the Mass storage driver for Windows 98 on CD-ROM.
Note
▶ You should copy MP3 to Sounds/MP3 folder. If you copy to another folder, you will not be able to view the MP3 files.
The PC should run Windows 98 SE, Windows ME, Windows 2000, Windows XP operating system.
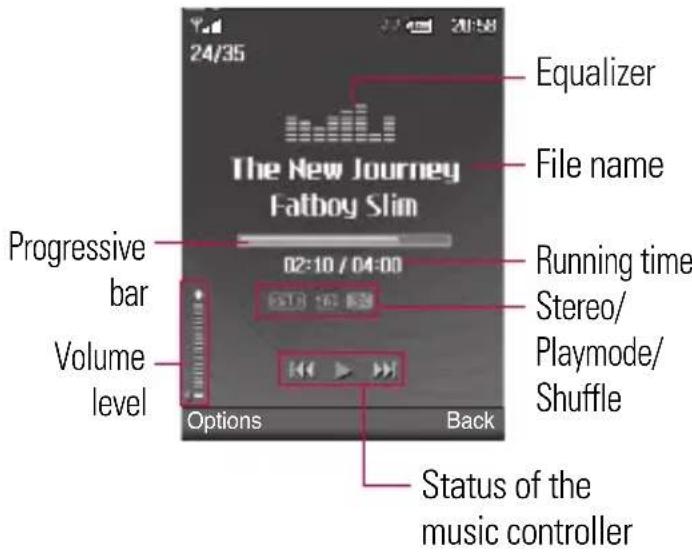
text_image
24/35 The New Journey Fatboy Slim Equalizer File name Progressive bar Volume level 02:10 / 04:00 Running time Stereo/ Playmode/ Shuffle Options Back Status of the music controller| Repeat | |
 | Play all |
 | Repeat all |
 | Repeat one |
Note
In case that any invalid file is included in the playlist, an error message will pop and go back to the prior screen.
- Press Multimedia menu, and then select MP3 player.
- Press the left soft key [Options] to access the following menus.
▶ Pause: You can pause the playing MP3 file.
▶ View playlist: You can select another file on the MP3 list.
▶ Set as ringtone: You can set the current music on playing MP3 file as a ringtone
Multimedia
▶ Settings
- Equalizer: This menu helps you to adjust to a variety of environments when listening to music.
- Play mode: This menu allows to set the play mode: Repeat one, Repeat all, Play all.
- Set shuffle: It you select On, you can listen to the music at random.
- Visual effect: You can select the visual effect menus: Real spectrum, Fake. This menu allows to change the background of main LCD on playing MP3 file.
Note
Music is copyright protected in international treaties and national copyright laws. It may be necessary to obtain permission or a license to reproduce or copy music. In some countries national law prohibits private copying of copyrighted material. Please check the national legislation of the applicable country concerning the use of such material.
Camera
Menu 3.2
Using the camera module built in your phone, you can take pictures or record videos. Additionally, you can send photos to other people and select photos as wallpaper.
Note
When using the camera, power consumption increases. If this icon appears on the wallpaper, indicating low battery, recharge the battery before use.
For your convenience, rotate phone as shown below when taking picture.
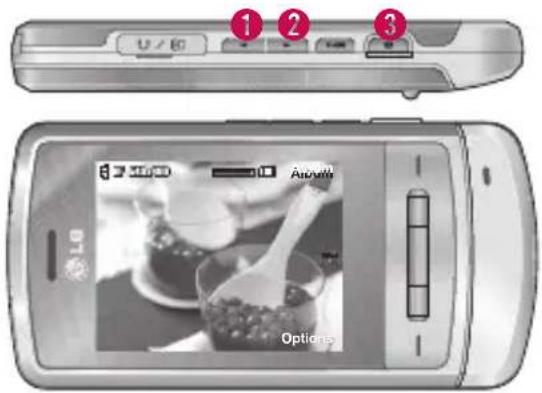
text_image
U / E ① ② ③ 6 300000 Options①/② Zoom in/Zoom out
3 Camera
Shutter sound or video recording sound is omitted even when setting mode, including manner mode .
• To take a picture
Hold down the camera button. The camera will be ready to use and you may want to rotate the screen into a horizontal position.
- To take clear pictures, press the camera button while holding the camera without any movement.
- Appropriately adjust distance to the object that you want take a picture of (more than 50 cm).
- Handle carefully since the camera is vunerable to shock and use a soft cloth when cleaning the camera lens.
- Do not disassemble or modify the camera as this may lead to fire or malfunctioning.
Multimedia
- Auto Focus function is enabled when taking a picture or sticker shot. Press the camera button half way to adjust focus.
- Hold down the in standby mode.
- Focus on the subject to capture the image, and then press the key.
- If you want to save it, press the key.
Note
▶ You can adjust the brightness by using the □ ↑ ↓.
▶ Shot mode [ ]: Allows you to set the shot mode from Marco, Auto focus On and Off.
▶ Resolution [ ] Allows you to set the image size.(1600x1200), (1280x960) (640x480) and (320x240). Multishot is only available with the (320x240), (640x480) pixel resolution.
Quality [ ] Allows you to set the image quality from Normal, Fine and Super fine.
▶ Flash [ ] Allow you to set the flash when you take a photo in dark place.
▶ Self timer [ ] Allows you to select the delay time (Off, 3 seconds, 5 seconds, 10 seconds). Then the phone takes a photo after the specified time.
▶ Save to [You can set the space after taking a picture. (External/Phone)
▶ Multi shot [ ] lows to take multishot photos successively.
▶ Metering [☐] determines the lighting based on a little part of the subject. You can select the Centred and Combined which is to be exposed correctly.
▶ Colour effect [1:4 settings are available.
(Negation/Mono/Sepia/Colour)
▶ White balance [W] allows you to change the settings according to the environment. (Night mode/Fluorescent/Cloudy/Incandescent/Daylight/Auto)
▶ Shutter tone [ ] You can set the sound when taking a picture.
▶ Reset settings [ ] Allows you to reset the settings.
Video camera
Menu 3.3
- Select Video camera menu.
- Video camera settings menu is the same with Photo camera settings, except following items:
▶ Mode [ ] allows you to set, to send a video file through MMS or General.
▶ Resolution [ ] You may select the following resolution: 128x96, 176x144.
Voice recorder
Menu 3.4
You can record voice memo. The following [Options] menus are available.
Storage
You can choose Phone or External memory.
Recording mode
You can choose General mode of unlimited recording or MMS mode of recording up to 30 seconds.
Record
- Press OK to start recording. Once recording is started, the message Recording and the counter is displayed.
- If you want to pause or resume recording, press left soft key or OK key.
- If you want to finish recording, press right soft key [Stop].
Multimedia
Album
You can view the Sounds folder which lists all sound files saved in the memory.
Call history
You can check the record of missed, received, and dialled calls only if the network supports the Calling Line Identification (CLI) within the service area.
The number and name (if available) are displayed together with the date and time at which the call was made. You can also view call times.
All calls
Menu 4.1
You can view all lists of outgoing or incoming calls.
Missed calls
Menu 4.2
This option lets you view the last 50 unanswered calls. You can also:
▶ View the number if available and call it, or save it in the Address Book
▶ Enter a new name for the number and save both in the Address Book
▶ Send a message by this number
▶ Delete the call from the list
Dialled calls
Menu 4.3
This option lets you view the last 50 outgoing calls (called or attempted). You can also:
▶ View the number if available and call it or save it in the Address Book
▶ Enter new name for the number and save both in the Address Book
▶ Send a message by this number
▶ Delete the call from the list
Call history
Received calls
Menu 4.4
This option lets you view the last 50 incoming calls. You can also:
▶ View the number if available and call it or save it in the Address Book
▶ Enter new name for the number and save both in the Address Book
▶ Send a message by this number
▶ Delete the call from the list
Call duration
Menu 4.5
Allows you to view the duration of your incoming and outgoing calls. You can also reset the call times.
The following timers are available:
▶ Last call: Length of the last call.
▶ Dialled calls: Length of the outgoing calls.
▶ Received calls: Length of the incoming calls.
▶ All calls: Total length of all calls made and incoming calls since the timer was last reset.
Call costs
Menu 4.6
Allows you to check the cost of your last call, all calls, remaining and reset the cost. To reset the cost, you need to enter PIN2 code.
Data information
Menu 4.7
You can check the amount of data transferred over the network through the GPRS information option.
In addition, you can also view how much time you are online.
Messaging
New message
Menu 5.1
This menu includes functions related to SMS (Short Message Service), MMS (Multimedia Message Service), Email, voice mail, as well as the network's service messages.
Text (Menu 5.1.1)
You can write and edit text message.
- Enter the New messages menu by pressing the left soft key [OK].
- If you want to write a new message, select Text.
- To make text input easier, use T9.
- Press [Options] to attach the followings.
Options
▶ Send to: Sends text messages.
- Enter numbers of recipient.
-
Press □ ↓ key to add more recipients.
-
You can add phone numbers in the address book.
- Press the [Option] and then press send after entering numbers.
Insert
- Symbol: You add special characters.
- Image: You can insert the Default graphics or graphics in My pictures that are available for short messages.
- Sound: You can insert sounds that are available for short messages.
- Default images: You can insert Animations stored.
- Default sounds: You can insert Sounds stored.
-
Text template: You can use Text templates already set in the phone.
-
Contacts: You can add phone numbers or e-mail addresses in address book.
- My business card: You can add your Business card to the message.
▶ Save to drafts: Store the messages in draft.
▶ T9 languages: Select the language for T9 input mode. You can also deactivate T9 input mode by selecting 'T9 off'.
▶ New T9 word: Select the New T9 word for inputting New word into the dictionary.
▶ Clear text: You can clear text while writing SMS.
▶ Exit: If you press Exit while writing a message, you can end the writing message and back to the new Message menu. The message you have written is not saved.
Multimedia (Menu 5.1.2)
You can write and edit multimedia messages, checking message size.
- Enter the New message menu by pressing the left soft key [OK].
- If you want to write a new message, select Multimedia.
- You can create a new message or choose one of the multimedia message templates already made.
Maximum available file size, that can be inserted to MMS-message, is 300 kb.
Options
▶ Send to: You can send multimedia messages to multiple recipients, priorities your message, and make it sent later as well.
▶ Insert: You can add Symbol, Image, Video, Sound, New slide, Text template, Contact, Business card, Others.
Messaging
Note
All messages will be automatically saved in the outbox folder, even after a sending failure.
▶ Preview: You can preview multimedia messages you have created.
▶ Save: You can save multimedia messages To drafts or As templates
▶ Edit subject: Allows you to modify the multimedia message you have chosen.
▶ Slide duration: You can set the duration of slide of multimedia message.
▶ T9 languages: Select the language for T9 input mode. You can also deactivate T9 input mode by selecting 'T9 off'.
▶ New T9 word: Select the New T9 word for inputting New word into the dictionary.
▶ Exit: You can get back to the Message menu.
Note
If you select a picture with a large file size (200K for example) on writing multimedia message, the loading duration will take around 10 seconds. Furthermore, you can't activate any keys during the loading time. After about 10 seconds, you should be able to write the message.
Email (Menu 5.1.3)
To send/receive an email, you should set up the email account.
- You can input up to 20 email addresses in the To and Cc field.
Tip: To input "@", press the and select "@". - Key in the subject of the mail and press OK.
- After writing an email message, press the left soft key [Options]. You can access the following option menus.
▶ Send to: You can edit recipients.
▶ Insert: You can add Symbol, Text template, Contact and Signature.
▶ Attachment: You can attach file with this menu.
▶ Preview: You can preview the writing mail.
▶ Save to drafts: Select this to save the message in Drafts.
▶ Edit subject: You can edit the subject.
▶ T9 languages: Select the language for T9 input mode. You can also deactivate the T9 input mode by selecting 'T9 off'.
▶ New T9 word: Select the New T9 word menu for inputting a new word into the dictionary.
▶ Clear text: You can clear text while writing the message.
▶ Exit: If you select this while writing the message, you can exit from writing message and go back to the previous screen. The message you have written is not stored.
Messaging
Note
For each e-mail account you may save up to 40 messages (totally 200 for five accounts). In Inbox folder you may save not more than 20 messages, in Drafts and Outbox folders - 5 messages, and in Sent folder up to 10 messages. In case Drafts Outbox or Sent folder is full, and you try to save new message to one of this folders, first saved message will be automatically deleted.
▶ Maximum size for one sent message is 300 kb with attachments, and maximum size for one received message is 300 kb. In case you have received message with more than 5 attachments, only 5 of them will be received. Some attachment may display incorrectly.
Inbox
Menu 5.2
You will be alerted when you have received messages. They will be stored in Inbox.
If the phone shows 'No space for SIM message', you have to delete only SIM messages from Inbox. If the phone displays 'No space for message', you can make space of each repository as deleting messages, media and applications.
\* SIM message
SIM message means the message exceptionally stored in SIM card. You can move this message to the phone.
For notified multimedia message, you have to wait for downloading and processing of the message.
To read a message, select one of the messages by pressing the left soft key
▶ View: You can view the received messages.
▶ Delete: You can delete the current message.
▶ Reply: You can reply to the sender.
▶ Reply to all: You can reply to all of the sender.
Forward: You can forward the selected message to another party.
▶ Return call: You can call back to the sender.
Information: You can view information about received messages; Sender's address, Subject (only for Multimedia message), Message date & time, Message type, Message size.
▶ Multi delete: After selecting the messages you want to remove, you can delete the selected messages.
▶ Delete all read: You can delete all messages read.
▶ Delete all: You can delete all messages.
Email box
Menu 5.3
When you access this menu, you can either connect to your remote mailbox to retrieve your new email messages, or you can view the previously retrieved email messages without logging in to the email server.
You can check the saved emails, drafts, outbox, and sent emails. In the Inbox, up to 20 emails are stored.
(Outbox stores up to 5, Draftes store up to 5, Sent stores up to 10)
Messaging
Drafts
Menu 5.4
Using this menu, you can preset multimedia messages that you use most frequently. This menu shows the preset multimedia message list.
The following options are available.
▶ View: You can see the multimedia messages.
▶ Edit: Modifies the message you choose.
▶ Delete: Deletes the message you choose.
▶ Information: You can view information about the message you choose.
▶ Multi delete: After selecting the messages you want to remove, press OK and you can delete the selected messages.
▶ Delete all: Deletes all of the messages in the folder.
Outbox
Menu 5.5
This menu allows you to view the message which is about to send or is failed sending.
After sending the message successfully, the message will be moved to sent box.
▶ View: You can view the message.
▶ Delete: You can delete the message.
▶ Resend: You can resend the selected message.
▶ Edit: Modifies the massage you choose.
▶ Information: You can check information of each message.
▶ Multi delete: Select and delete the selected messages.
▶ Delete all: You can delete all messages in outbox.
Sent
Menu 5.6
This menu allows you to view the messages which are already sent. You can check the time and the contents of message.
Listen to voicemail
Menu 5.7
Once this menu has been selected, simply press the left soft key [OK] to listen to voice mail. You can also hold down the 1\~ key in standby mode to listen to voice mail.
Note
When you receive a voice mail, your phone displays the icon and you hear an alert. Please check with your network provider for details of their service in order to configure the handset correctly.
Info message
Menu 5.8
(Dependent to network and subscription)
Info service messages are text messages delivered by the network to GSM. They provide general information such as weather reports, traffic news, taxis, pharmacies, and stock prices.
Each type of has the number; therefore, you can contact service provider as long as you have input the certain number for the information.
When you have received an info service message, you can see the popup message to show you that you have received a message or the info service message is directly displayed.
To view the message again or not in standby mode, follow the sequence shown below;
Messaging
Read (Menu 5.8.1)
-
When you have received an info service message and select Read to view the message, it will be displayed on the screen. You can read another message by scrolling or [Next].
-
The message will be shown until another message is reached.
Topics (Menu 5.8.2)
(Dependent to network and subscription)
▶ View list: You can see Info service message numbers which you added. If you press [Options], you can edit and delete info message category which you added.
▶ Active list: You can select info service message numbers in the active list. if you activate an info service number, you can receive messages sent from the number.
Templates
Menu 5.9
Text (Menu 5.9.1)
You have 6 text templates as below;
- Please call me back.
• I'm late. I will be there at - Where are you now?
- I'm on the way
- Urgent! Please contact.
• I love you
The following options are available.
▶ Edit: Use this to write a new message or edit the selected template message from the text template list.
▶ Send via
- Text message: Use this to send the selected template message by SMS.
- Multimedia message: Use this to send the selected template message by MMS.
- Email: This menu allows you to edit, delete or add an email account.
▶ Delete: Deletes the template.
▶ New template: Use this to create new template.
▶ Delete all: Allows you to delete all multimedia messages.
Multimedia (Menu 5.9.2)
After saving new template, you can use the following options.
▶ Save: Allows you to save new multimedia templates you have created.
▶ Insert: You can add Symbol, Image, Video, Sound, New slide, Text template, Contact, Business card and Others.
Preview: You can preview multimedia templates you wrote.
▶ Edit subject: Allows you to modify the multimedia message you have chosen.
▶ Slide duration: You can set the duration of slide of multimedia message.
▶ T9 languages: Select the desired language for T9 input mode. You can also deactivate T9 input mode by selecting 'T9 off'.
▶ Exit: Will take you back to the Message menu.
Messaging
Settings
Menu 5.0
Text message (Menu 5.0.1)
▶ Message types:
Text, Voice, Fax, Paging, X.400, Email, ERMES
Usually, the type of message is set to Text. You can convert your text into alternative formats. Contact your service provider for the availability of this function.
▶ Validity period: This network service allows you to set how long your messages will be stored at the message centre.
▶ Delivery report: If you set to Yes, you can check whether your message is sent successfully.
▶ Reply charging: When a message is sent, it allows the recipients to reply and charge the cost of the reply to your telephone bill.
▶ Message centre number: If you want to send the text message, you can receive the address of SMS centre through this menu.
▶ Bearer setting: You can set the bearer setting such as GSM, GPRS.
Multimedia message (Menu 5.0.2)
Subject: You can enter multimedia messages subject when this menu is on.
▶ Slide duration: Display the duration of each page when writing the message.
▶ Priority: You can set the priority of the message you choose.
▶ Validity period: This network service allows you to set how long your text messages will be stored at the message centre.
▶ Delivery report: If it is set to Yes in this menu, you can check whether your message is sent successfully.
▶ Read report: You can receive the report whether the receiver read the message or not.
▶ Auto download: If you select On, you receive multimedia messages automatically. If you select Off, you receive only notification message in the inbox and then you can check this notification. If you select Home network only, you receive multimedia messages depends on Homenetwork.
▶ Network profile: If you select multimedia message server, you can set URL for multimedia message server.
▶ Permitted message type
Personal: Personal message.
Advertisement: Commercial message.
Information: Necessary information.
Email (Menu 5.0.3)
▶ Email account
This menu allows you to edit, delete or add an email account.
• View: You can see the Email.
- Set as default
- Edit
Account name: Account name.
Email address: Enter the email address given to you by your service provider.
My name: You can make your nickname.
Incoming mail server: Enter the POP3 address and Port number of the that receives your email.
User name: Enter your email ID.
Password: Enter your email password.
Messaging
Outgoing mail server: Enter the SMTP address and Port number of computer that sends your email.
- Advanced settings
Protocol type: Choose your protocol type. (POP3/IMAP4)
Maximum receive size: View the Maximum size that you can receive mails.
Save to server: Select Yes to leave the messages on the server.
Insert signature: Select Yes to attach your signature to your email messages.
Reply email address: Email address that you can receive the reply.
Incoming port number: Allows to edit POP3 port number.
Outgoing port number: Allow you to edit SMTP port number.
Outgoing mail authentication:
when you send the mail, you can set authentication whether or not.
Outgoing server ID/password:
Enter the ID and password for sending your email.
- New account: You can set up to 5 email accounts by selecting New account menu. Using the Edit menu, you can set the following values.
- Delete: Deletes the selected account from the list.
- Delete all: You can delete all account lists.
▶ Network profile
A profile is the network information used to connect to the Internet. There are default profiles for some operators, stored in phone memory. It's impossible to rename default profiles.
▶ Signature
You can make your signature.
Voicemail number (Menu 5.0.4)
You can receive the voicemail if your network service provider supports this feature. When a new voicemail is arrived, the symbol will be displayed on the screen. Please check with your network service provider for details of their service in order to configure the phone accordingly.
Push message (Menu 5.0.5)
You can set the option whether you will receive the message or not.
Info message (Menu 5.0.6)
Receive
Yes: If you select this menu, your phone will receive Info service messages.
No: If you select this menu, your phone will not receive Info service messages any more.
Alerts
Yes: Your phone will beep when you have received Info service message numbers.
No: Your phone will not beep even though you have received info service messages.
Language
You can select the language you want by pressing OK key. Then, the info service message will be shown in the language that you selected.
Contacts
Search
Menu 6.1
- Select Search by press the left soft key [OK].
- Enter the name that you want to search.
Note
▶ Instant searching is available by inputting the initial letter of the name.
- If you want to edit, delete, copy an entry, or to add the voice to one, select left soft key [Options].
The following menu will be displayed.
▶ View: You can view each entry in details.
▶ Edit: You can edit the name, number, group, ringtone and picture by using the navigation key.
▶ New message: After you have found the number you want, you can send a message(Text/Multimedia/Email) to the selected number.
▶ Send via: You can send the data of phone book via Text message, Multimedia message, Bluetooth or Email.
▶ Delete: You can delete an entry.
▶ New contact: After selecting the place (SIM/Phone) you want to save, you can add to the phonebook list.
▶ Multi delete: Allows you to remove a number of files selected.
▶ Copy to handset/SIM: You can copy an entry from SIM to phone or from phone to SIM.
▶ Main number: If a contact has more than one number stored, select the one that you use most often. This main number will be displayed first.
New contact
Menu 6.2
You can add phonebook entry by using this function. Phone memory capacity is 1000 entries. SIM card memory capacity depends on the cellular service provider. The number of character is SIM dependent feature.
Note
▶ Maximum stored name and number length depends on SIM-card type.
- Select New contact by press left soft key [OK].
- Input a name.
- Press ↓, then you can input a number.
- You can set a group for the entry by pressing □, □.
- You can set a ringtone and a photo for the entry by press left soft key [Options].
Speed dials
Menu 6.3
You can assign any of the keys to with a Name list entry. You can call directly by long pressing this key.
- Open the phonebook first by pressing the right soft key [Contacts] in standby mode.
- Scroll to Speed dial, then press the left soft key [OK].
- If you want to add speed dial, select
by pressing the left soft key [Assign]. Then, you can search the name in phonebook. - After assigning the number as speed dial, you can change and delete the entry. You can also make a call or send a message to this number.
Contacts
Groups
Menu 6.4
You can list up to the members per each group. There are 7 groups you can make lists to.
▶ View members: Shows the group members you have selected.
▶ Group ringtone: Allows you to specify ring tone for the group members' call.
▶ Group icon: Allows you to select the icon dependent on Group.
▶ Add member: You can add group members.
▶ Remove member: You can remove the member from the Group member list. But the name and the number will be remained in phonebook.
▶ Remove all members: Allows you to delete all the members in the group.
▶ Rename: You can change a group name.
Copy all
Menu 6.5
You can copy entries from SIM card memory to Phone memory and vice versa.
▶ SIM to phone: You can copy the entry from SIM Card to Phone memory.
▶ Phone to SIM: You can copy the entry from Phone memory to SIM Card.
Delete all
Menu 6.6
You can delete all entries from SIM or Phone.
Settings
Menu 6.7
- Press the right soft [Contacts] in standby mode.
- Scroll to Settings, then press the left soft key [OK].
▶ Default memory
You can set the default memory from Always ask, SIM or Handset.
▶ View options
Scroll to highlight View options, and then press the left soft key [OK]. - Name only: Set the phonebook list which displays only name.
- With picture: Set the phonebook list with the information of character and picture.
Information
Menu 6.8
▶ Service dial numbers
Use this function to access a particular list of services provided by your network operator (if supported by the SIM card).
▶ Own numbers (SIM dependent)
You can save and check your own number in SIM card.
Business card
This option allows you to create your own business card featuring Name and a mobile phone number
To create a new business card, press the left soft key [New] and enter the information into the fields.
If you want to edit, delete or to send a business card, select left soft key [options].
My stuff
Images
Menu 7.1
Show the list of image files at My media\Photos in Multimedia memory.
▶ View: You can see the JPG file when pressing OK key or selecting View menu of Option menus.
▶ Delete: Delete a file.
Set as
- Full image wallpaper: Currently selected image can be set as a wallpaper.
- Landscape wallpaper: Currently selected image can be displayed horizontally as a wallpaper.
- Picture ID: Currently selected image can be set as a Picture ID.
▶ Send via: Allows you to send a image through MMS/Bluetooth/Email.
▶ File
- Rename: Change the file name of selected file. You can not change the extension of file.
Note
You can't use the following characters \/ : * ? " <> |
- Move to folder: Move the file to the selected folder.
- Move to external memory: Move the selected file to the Multimedia memory/external memory.
Warning!
If you remove the external memory during data transfer, it can seriously damage the phone.
- Copy to external memory: Copy the selected file to the Multimedia memory/external memory.
Warning!
If you remove the external memory during data transfer, it can seriously damage the phone.
- Information: Shows the files information.
▶ Print via Bluetooth: Most pictures that you’ve taken in the camera mode and downloaded through WAP can be transmitted via Bluetooth to a printer.
▶ Slide show
You can view a slide show of the files you stored.
▶ New folder: You can create a new folder.
▶ Multi delete: You can remove a number of files you selected.
▶ Delete all: Delete all files in the list.
▶ List view: Allows you to set the view type.
Sounds
Menu 7.2
Show the list of MP3, MP4, AAC, M4A files at My media\Music in Multimedia memory.
▶ Play: You can play the MP3 file when pressing OK key or selecting Play menu of Option menu.
▶ Set as: Currently selected sound can be set as a Ringtone/Ringtone ID.
▶ File info: Show the file information.
My stuff
Videos
Menu 7.3
Shows the list of 3GP, 3G2 files at My media\Videos in Multimedia memory. Supported file types are 3gp files, that are encoded with MPEG4 and h.263 video-codecs and AMR audio-codec.
▶ Play: You can play the video file when pressing OK key or selecting Play menu of Option menus.
▶ Delete: Delete a file.
▶ Send via: Send the selected file to another device via Multimedia message, Bluetooth or Email.
Note
You may send files via Bluetooth only if they are stored in phone memory, not on memory card. To send file from external memory, please, firstly copy it to internal phone memory.
▶ File: You can save/move/copy the folder or external memory.
- Rename: Change the file name of selected file. The maximum length of characters is 36. And you can not change the extension of file.
Warning!
You can't use the following characters \/: *? "<> |
- Move to folder: Move the selected file to the folder.
- Move to external memory: Move the selected file to the Multimedia memory\external memory
Warning!
If you remove the external memory during data transfer it will cause serious damage to your phone.
- Copy to external memory: Copy the selected file to the Multimedia memory\external memory.
- Information: Shows the file information.
▶ New folder: You can create a new folder.
▶ Multi delete: You can remove a number of files you have selected.
▶ Delete all: Delete all the files in the list.
Documents
Menu 7.4
This menu enables you to view document files (txt, ppt, pdf, doc and excel).
You can use the following Options menu
▶ View: You can see the document file when pressing the OK key or selecting View menu of Option menus.
▶ Information: Show the file information.
My stuff
Others
Menu 7.5
Shows the list of files in My media\Others in the Multimedia memory.
Note
▶ You may send files via Bluetooth only if they are stored in the phone memory, not on the memory card. To send files from the external memory you must first copy it to the internal phone memory.
Note
When you connect the phone with a PC via Bluetooth, you can both send and receive files to the Music and Video folders. You can copy any file type to the Others. You can only receive files from the Photos, Sounds, and Images folders. You can only view or play files in the Others folder if the file types are supported. When connecting with a PC via USB cable you will only see the following folders in the internal memory: Images, Sounds, Videos, and Others. You can see all folders in the external memory.
Games & Apps
Menu 7.6
In this menu, you can manage the Java applications installed in your phone. You can play or delete downloaded applications, or set the connect option.
External memory
Menu 7.7
This menu allows you to view Images, Sounds, Videos, Documents and Others in memory card. If the external memory is not available, a pop up message “Please insert external memory” is displayed.
Note
The SIM card must be installed in order for the phone to be recognized as a removable disk.
New Fantastic LG
The KE970 works as a mass storage device. If you connect the USB cable, you can use the phone as a Removable Disk. You can download MP3 files, photos, videos, text files etc. this gives you fast access from the PC to phone, by just connecting the USB cable.
Note
▶ MASS STORAGE function will only work when the phone is in idle mode.
DO NOT remove the cable while you are downloading files. After you download the files, you need to click "Safely Remove Hardware" on the PC and then disconnect the cable.
My stuff
When you copy a file to the removable disk, you can see a message on the display "transferring". It means MASS STORAGE is working and data is being transferred. While "transferring", do not disconnect the cable. If you disconnect the cable while "transferring", data will be lost or corrupted and possibly damage the phone.
▶ While phone in MASS storage call and message are not available or wireless service will be deactivated.
Tools
Alarm clock
Menu 8.1
You can set the alarm clock to go on at a specified time.
- Select On and enter the alarm time you want.
- Select the repeat period: Once, Mon-Fri, Mon-Sat, Sat-Wed, Sat-Thu, Everyday.
- Select the alarm tone you want and press [Save].
Calendar
Menu 8.2
When you enter this menu a calendar will show up. On top of the screen there are sections for date. Whenever you change the date, the calendar will be updated according to the date. And square cursor will be used to locate the certain day. If you see marked date in the calendar, it means that there is a schedule or memo that day. This function helps to remind you of your schedule and memo. The phone will sound an alarm tone if you set this for the note.
To change the day, month, and year.
| Key Description | |
| 1, 3 cm | Yearly |
| 7 mm, 9 mm | Monthly |
| ↑, ↓ | Weekly |
| , □ | Daily |
Tools
In the scheduler mode, press left soft key

[Options] as follows;
▶ View
View all schedules and memo for the chosen day.
Use □ ↑, ↓ to browse through the note lists.
If you want to view the note in detail, press left soft key [OK]. Press left soft key
[Options] to View, Delete, New schedule, Send via Text message/Multimedia message/Bluetooth/Email, Edit, Calendar, Scheduler tone, All schedules, Go to date, Multi delete and Delete all.
▶ New schedule
Allows you to add new schedule and memo for the chosen day.
You can store up to 100 notes. Input the subject and then press left soft key [OK].
You enter the appropriate information in the follow section; Time, Repeat and Alarm.
▶ Scheduler tone
You can set the alarm tone of each chosen date.
All schedules
View all schedules and memo for the chosen day.
Use □ ↑, ↓ to browse through the note lists. If you set alarm for the note, the alarm icon is displayed.
▶ Go to date
You can go to the chosen date directly.
▶ Delete old
You can delete the past schedule that you have already been notified of.
▶ Delete all
You can delete for the all notes.
Calculator
Menu 8.3
This contains the standard functions such as +, -, x, ÷ : Addition, Subtraction, Multiplication, and Division.
Furthermore, you can use the various function of calculator such as +/-, sin, cos, tan, log, ln, exp, sqrt, deg, rad.
- Input the numbers by pressing numeric keys.
- Use a navigation key to select a sign for calculation.
- Then input the numbers.
- Press key to view the result.
- To input the decimal number, press * key.
- To end Calculator, press the right soft key [Back].
Memo
Menu 8.4
- Select the Memo by pressing the left soft key [OK].
- If the entry is empty, press the left soft key [New].
- Input the memo and then press left soft key [Options] > [Save].
Note
If you want to change the text input mode, press the in order.
Tools
Stop watch
Menu 8.5
- Press [Start] to take time and record the lap time by pressing [Lap].
- Press [Stop] to ascertain the record of lap time.
- Press [Reset] to default condition.
Unit converter
Menu 8.6
This converts any measurement into a unit you want. There are 7 types that can be converted into units: Currency, Area, Length, Weight, Temperature, Volume and Velocity.
- You can select one of unit types by pressing [OK] key.
- Select the unit you want to convert by pressing □ ↑, ↓. It's impossible to input "-" symbol in unit converter.
- Select the standard value by using □, □.
World clock
Menu 8.7
You can check the current time of Greenwich Mean Time (GMT) and major cities around the world, using the left/right navigation keys and left soft key [Zoom in].
The screen shows the city name, current date and time.
To select the time zone in which you are located, proceed as follows:
- Select the city corresponding to your time zone by pressing the left/right navigation keys and left soft key [Zoom in] one or more times. The local date and time are displayed.
- If you want to change the time display in standby mode to the selected time, press [OK] key.
SIM services
Menu 8.8
This menu depends on SIM and the network services.
Settings
Date & Time
Menu 9.1
You can set functions relating to the date and time.
Set date (Menu 9.1.1)
You can enter the current date.
Date format (Menu 9.1.2)
You can set the Date format such as YYYY/MM/DD, DD/MM/YYYY, MM/DD/YYYY.
(D: Day / M: Month / Y: Year)
Set time (Menu 9.1.3)
You can enter the current time.
Time format (Menu 9.1.4)
Your can set the time format between 24 hours and 12 hours.
Auto update (Menu 9.1.5)
Select On, the phone will automatically update the data and time.
Languages
Menu 9.2
You can change the language for the displayed texts in your phone. This change will also affect the Language Input mode.
Display
Menu 9.3
Wallpaper (Menu 9.3.1)
You can select the background pictures in standby mode.
Backlight timer (Menu 9.3.2)
You can set the light-up duration of the display.
(Off/10 secs/20 secs/30 secs/60 secs)
Settings
Brightness (Menu 9.3.3)
You can set the brightness of LCD: 100%, 80%, 60%, 40%
Home screen shortcut (Menu 9.3.4)
Selecting On displays the functionalities of 4 Navigation keys and Menu key as pictures on the middle of the idle window. (Profiles/Messaging/ Favourites/Contacts)
Your phone provides you with Grid and List menu themes. Set the menu style by scrolling and pressing the left soft key [OK].
Dialing style (Menu 9.3.6)
Your phone provides you with four dialing styles. (Color style/Beads style/Digital style/Sketchbook style)
Standby text (Menu 9.3.7)
If you select On, you can edit the text which is displayed in standby mode.
Network name (Menu 9.3.8)
If this function is activated, network name will be displayed on LCD.
Connectivity
Menu 9.4
Bluetooth (Menu 9.4.1)
Bluetooth enables compatible mobile devices, peripherals and computers that are in close proximity to communicate directly with each other without wires. This handset supports built-in Bluetooth connectivity, which makes it possible to connect them with compatible Bluetooth headsets, computer applications and so on.
Note
If you use LG PC Sync via Bluetooth, you can exchange the data only within phonebook
When you receive data from another Bluetooth device, the phone requests confirmation. After confirming the transfer, the file will be copied on to your phone.
▶ Depending on the file type, it will be stored in the following folders:
- Video (.3gp, mp4): Videos folder
- Image (.bmp, gif, jpg, png):
Images folder
- Sound (.amr, wav, aac): Sounds folder
- MP3 (.mp3): Sounds/MP3 folder
- Other files (.txt, html): Others folder
Bluetooth on/off
You can activate or cancel the Bluetooth function.
▶ Device list
You can view all devices which your KE970 is already paired to. If you enter Paired devices, you can access the options.
- Connect / Disconnect: After pairing with headset or stereo headset, you should connect with those devices. Then you can use those devices.
Settings
- Add new: Allows to search new Bluetooth devices and add them to your phone's list of paired devices. When you select Add new your handset will start to search for Bluetooth devices within range. Once the device you wish to pair appears on the list press the right soft key [Stop]. Scroll to the desired device and press the left soft key [Pair]. You will then be asked to enter a passcode. The passcode can be any code you wish to use (the same passcode must be used by both devices) or is one that is predetermined by the manufacturer of the device you are trying to pair with. Please check the User Manual of the device you are initiating the pair with to see if it already has a predetermined passcode in place.
- Rename: Allows you to change the name of the paired Bluetooth device and how it is displayed on the handset.
- Set as authorised/Set as unauthorised: Allows you to set an authorised connection between each Bluetooth device. For example if you regularly use a Bluetooth headset with your phone then setting the connection as authorised will mean the headset will automatically connect to the handset each time the headset is powered on.
- Remove: Allows you to delete a paired Bluetooth device.
- Remove all: Allows you to delete all the paired Bluetooth devices.
Bluetooth settings
- My visibility: This indicates whether or not your handset will be visible to other Bluetooth devices.
- My name: You can set the name of Bluetooth device. The default name is LG KE970.
- My address: You can view the address of your Bluetooth device.
Network (Menu 9.4.2)
You can select a network which will be registered either automatically or manually.
Network selection (Menu 9.4.2.1)
Usually, the network selection is set to Automatic.
▶ Automatic: If you select Automatic mode, the phone will automatically search for and select a network for you. Once you have selected "Automatic", the phone will be set to "Automatic" even though the power is off and on.
▶ Manual: The phone will find the list of available networks and show you them. Then you can select the network which you want to use if this network has a roaming agreement with your home network operator. The phone let you select another network if the phone fails to access the selected network.
▶ Preferred: You can set a list of preferred networks and the phone attempts to register with first, before attempting to register to any other networks. This list is set from the phone’s predefined list of known networks.
Settings
GPRS attach (Menu 9.4.2.2)
You can set GPRS attach service.
Power on
If you select this menu, the phone is automatically registered to a GPRS network when you switch the phone on. Starting a WAP or PC dial-up application created the connection between phone and network and data transfer is possible. When you end the application, GPRS connection is ended but the registration to the GPRS network remains.
When needed
If you select this menu, the GPRS connection is established when you connect a WAP or application service and closed when you end the WAP or application connection.
Network profile (Menu 9.4.2.3)
▶ Data connections
- Name: You can type the network name.
- Bearer: You can set the bearer data service. 1 Data/2 GPRS
Appears only if you select Data Settings as a Bearer/service.
- Dial number: Enter the telephone number to dial to access your WAP gateway.
- User ID: The users identity for your dial-up server (and NOT the WAP gateway).
- Password: The password required by your dial-up server (and NOT the WAP gateway) to identify you.
-
Call type: Select the type of data call; Analogue or Digital (ISDN).
-
Call speed: The speed of your data connection; 9600 or 14400 (Depends on Operator)
- Linger time: You need to enter timeout period.
After entering that, the WAP navigation service will be unavailable if any data is not input or transferred.
- Primary server: Input the IP address of the primary DNS server you access.
- Secondary server: Input the IP address of the secondary DNS server you access.
The service settings are only available when GPRS is chosen as a bearer service.
- APN: Input the APN of the GPRS.
- User ID: The users identify for your APN server.
-
Password: The password required by your APN server.
-
Primary server: Input the IP address of the primary DNS server you access.
- Secondary server: Input the IP address of the secondary DNS server you access.
USB connection (Menu 9.4.3)
You can choose one mode of Data service and Mass storage.
When you have finished using the phone memory, click Exit and take the following steps.
Caution
Before you remove the cable, it is necessary that you click Exit. Or, the integrity of transferred data is not guaranteed.
- Click on the notification area.
[Unplug or Eject Hardware]
Settings
- Select USB Mass Storage Device, click on Stop.
The following message will appear:
"The 'USB Mass Storage Device' device can now be safely removed from the system" - Then remove the cable.
Call
Menu 9.5
You can set the menu relevant to a call by pressing [Select] in the Setting menu.
Call divert (Menu 9.5.1)
The Call divert service allows you to divert incoming voice calls, fax calls, and data calls to another number. For details, contact your service provider.
All voice calls
Diverts voice calls unconditionally.
If busy
Diverts voice calls when the phone is in-in-call.
▶ If no reply
Diverts voice calls which you do not answer.
▶ If out of reach
Diverts voice calls when the phone is switched off or out of coverage.
All data calls
Diverts to a number with a PC connection unconditionally.
All fax calls
Diverts to a number with a fax connection unconditionally.
▶ Cancel all
Cancels all call divert service.
The submenus
Call divert menus have the submenus shown below.
- Activate
Activate the corresponding service.
To voice mailbox
Forwards to message centre. This function is not shown at All data calls and All fax calls menus.
To other number
Inputs the number for diverting.
Divert to another number.
You can check recent 5 diverted numbers.
- Cancel
Deactivate the corresponding service.
- View status
View the status of the corresponding service.
Answer mode (Menu 9.5.2)
▶ Slide open
If you select this menu, you can receive an incoming call when you open the slide.
▶ Any key
If you select this menu, you can receive a call by pressing any key except [End] key.
▶ Send key only
If you select this menu, you can receive a call by only pressing [Send] key.
Send my number (Menu 9.5.3)
(network and subscription dependent)
▶ Set by network
If you select this, you can send your phone number depending on two line service such as line 1 or line 2.
Settings
On
You can send your phone number to another party.
Your phone number will be shown on the receiver's phone.
▶ Off
Your phone number will not be shown.
Call waiting (Menu9.5.4)
(network dependent)
Activate
If you select Activate, you can accept a waiting (receiving) call.
Cancel
If you select Cancel, you cannot recognize the waiting (receiving) call.
▶ View status
Shows the status of Call waiting.
Minute minder (Menu 9.5.5)
If you select On, you can check the call duration by a beep sound given every minute during a call.
Auto redial (Menu 9.5.6)
On
When this function is activated, the phone will automatically try to redial in the case of failure to connect a call.
▶ Off
Your phone will not make any attempts to redial when the original call has not connected.
Send DTMF (Menu 9.5.7)
You can send touch tones during an active call to control your voice mailbox or other automated phone services.
Security
Menu 9.6
PIN code request (Menu 9.6.1)
In this menu, you can set the phone to ask for the PIN code of your SIM card when the phone is switched on.
If this function is activated, you'll be requested to enter the PIN code.
- Select PIN code request in the security settings menu, and then press [OK].
- Set On/Off.
- If you want to change the setting, you need to enter PIN code when you switch on the phone.
-
If you enter wrong PIN code more than 3 times, the phone will lock out. If the PIN is blocked, you will need to key in PUK code.
-
You can enter your PUK code up to 10 times. If you put wrong PUK code more than 10 times, you can not unlock your phone. You will need to contact your service provider.
Phone lock (Menu 9.6.2)
You can use a security code to avoid unauthorized use of the phone. Whenever you switch on the phone, the phone will request security code if you set phone lock to When switch on.
If you set phone lock to When SIM changed, your phone will request security code only when you change your SIM card.
Settings
Call barring (Menu 9.6.3)
The Call barring service prevents your phone from making or receiving certain category of calls. This function requires the call barring password. You can view the following submenus.
▶ All outgoing
The barring service for all outgoing calls.
Outgoing international
The barring service for all outgoing international calls.
▶ O/G international except home country
The barring service for all international outgoing calls except home network.
All incoming
The barring service for all incoming calls.
▶ Incoming when abroad
The barring service for all incoming calls when roaming.
▶ Cancel all barrings
You can cancel all barring services.
▶ Change password
You can change the password for Call Barring Service.
The submenus:
- Activate
Allows to request the network to set call restriction on.
- Cancel
Set the selected call restriction off.
- View status
View the status whether the calls are barred or not.
Fixed dial number (Menu 9.6.4)
(SIM dependent)
You can restrict your outgoing calls to selected phone numbers. The numbers are protected by your PIN2 code.
On
You can restrict your outgoing calls to selected phone numbers.
▶ Off
You can cancel fixed dialling function.
List view
You can view the number list saved as Fixed dial number.
Change codes (Menu 9.6.5)
PIN is an abbreviation of Personal Identification Number to prevent use by unauthorized person.
You can change the access codes:
Security code, PIN1 code, PIN2 code.
- If you want to change the Security code/PIN1/ PIN2 code input your original code, and then press [OK].
- Input new Security code/PIN/PIN2 code and verify them.
Settings
Flight mode
Menu 9.7
This allows you to use only the phone's features that do not require the use of the wireless network when you are in an airplane or in places where the wireless network is prevented.
If you set the flight mode on, the icon will be displayed on the screen instead of the network signal icon.
On: You cannot make (or receive) any calls, including emergency calls, or use other features that require network coverage
▶ Off: You can deactivate the flight mode and restart your handset to access the network.
Power saving
Menu 9.8
If you set On, you can save the power when you don't use the phone.
Reset default
Menu 9.9
You can initialize all factory defaults. You will need Security code to activate this function.
Memory status
Menu 9.0
You can check free space and memory usage of each repository, Internal memory and Multimedia memory. You can go to each repository menu.
Q&A
Please check to see if any problem which you may have with your phone is described here before taking it for service or calling a service engineer.
Q How do I view the list of outgoing calls, incoming calls and missed calls?
A Press
Q Connection is poor or is not audible in certain areas.
A In certain areas, signal strength can vary dramatically. Try moving to a different location. Heavy network traffic may affect the ability to connect, or the stability of the call.
Q Connection is poor even when established.
A In certain areas, signal strength can vary dramatically. Try moving to a different location. Heavy network traffic my affect the ability to connect, or the stability of the call.
Q LCD does not turn on.
A Remove and replace the battery and turn on the power. If the phone still does not turn on, charge the battery and try again.
Q An echo can be heard during connection with a certain telephone in a certain area.
A It is called 'Echo Phenomenon'. It occurs if the volume is too high or caused by special properties (semi electronic telephone exchange) of the machine on the other end.
Q&A
Q The phone gets warm.
A During long calls, or if games/Internet are used for a long time, the phone may become hot. This is perfectly normal and has no effect upon the life of the product or performance.
Q The bell does not ring, or lamp or LCD blinks only.
A The phone is set to 'Vibrate' or 'Silent' in the Profiles menu. Please select 'General' or 'Outdoor'.
Q Standby duration of the phone gradually becomes shorter.
A Batteries have a limited life. When the battery lasts for half its original time, it requires replacement. Only use authorised replacement parts.
Q Usage time of battery becomes shorter.
A If the battery time is short, it may be due to the user environment, or large volume of calls, or weak signals.
Q No number is dialled when you recall a phonebook entry.
A Check that the numbers have been saved correctly, by using the phonebook Search feature. Resave them, if necessary.
Q You cannot be contacted.
A Is your phone switched on (pressed for more than three seconds)? Are you accessing the right cellular network? Have you set an incoming call barring option?
Q I cannot find the lock, PIN, or PUK code, or password?
A The default lock code is '0000'. If you forget or lose the lock code, contact your phone dealer. If you forget or lose a PIN or PUK code, or if you have not received such a code, contact your network service provider.
Accessories
There are various accessories for your mobile phone. You can select these options according to your personal communication requirements.
Standard Battery
natural_image
3D-rendered gray square object with a small white circular mark on top (no text or symbols)Hands free earmicrophone
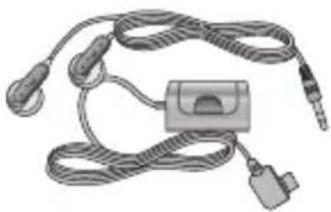
natural_image
Coiled medical or electronic device with connectors and a central connector (no visible text or symbols)Travel Adapter
This charger allows you to charge the battery while away from home or your office.

Data cable/CD
You can connect your phone to PC to exchange the data between them.
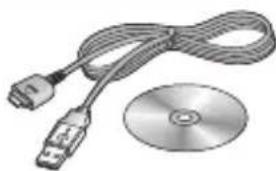
natural_image
Illustration of a USB cable and CD/DVD drive (no text or symbols)Note
▶ Always use genuine LG accessories.
▶ Failure to do this may invalidate your warranty.
Accessories may be different in different regions; please check with our regional service company or agent for further inquires.
Technical data
General
Product name: KE970
System: GSM 900 / DCS 1800 / PCS 1900
Ambient Temperatures
Max: +55°C
Min: -10°C
Declaration of Conformity

LG Electronics
Suppliers Details
Name
LG Electronics Inc
Address
: LG Twin Tower 20, Yeoudo-dong, Yeangdeungpo-gu Seoul Korea 150-721
Product Details
Product Name
GSM 900 / DCS 1800 / PCS 1900 T1 Band Terminal Equipment
Model Name
KE970
Trade Name
LG
CE 0168
Applicable Standards Details
R&TTE Directive 1999/5/EC
EN 301 489-01 v1.6.1 / EN 301 489-07 v1.3.1 / EN 301 489-17 v.1.2.1
EN 300 328 V 1,5,1
EN 60950-1:2001
EN 50360EN 50361:2001
EN 301 511 V9.0.2
Supplementary Information
The conformity to above standards is verified by BABT.
Declaration
I hereby declare under our sole responsibility that the product mentioned above to which this declaration relates complex with the above mentioned standards and Directures
LG Electronics Logistics and Services B.V.
Velwezoom 15, 1327 AEAlmere, The Netherlands
Tel: 031-38-547-8940. email: seokm@be.com
Name
Issued Date
Jin Seog, Klm / Director
- Aug. 2007
A.
Signature of representative
natural_image
Illustration of a LG mobile phone showing front and side views (no text or symbols on body)
natural_image
Front view of a silver LG mobile phone with a blank screen and control buttons (no visible text or symbols)text_image
Diagram of a device rear panel with labeled buttons and indicators, including 'C' and 'Φ'Touches de fonction
text_image
Diagram showing a smartphone with labeled parts and a hand holding a key, illustrating the process of inserting or removing a device.Remarque
natural_image
Illustration of a hand holding a handheld device with a red arrow pointing to the left side (no text or symbols present)natural_image
Illustration of a hand holding a device with a magnified view showing a small component (no text or symbols)natural_image
Two views of a mobile phone showing front and back compartments with red arrows indicating internal components (no text or symbols present)Installation
natural_image
Close-up of a computer interface showing a cable inserted into a device, with a magnified view highlighting the cable's internal structure (no text or symbols visible)natural_image
Close-up of a hand holding a USB cable with a red arrow pointing to the cable (no text or symbols visible)natural_image
Two views of a mobile phone casing showing internal components and a red arrow indicating a location (no text or symbols present)Installation
natural_image
Illustration of a smartphone with a red arrow pointing to the screen (no text or symbols present)Avertissement!
Texte, Vocal, Fax, Pagination, X.400, E-mail, ERMES
▶ Tous appels entrants
natural_image
Gray square electronic component with a small circular mark on top (no text or symbols visible)natural_image
Illustration of a USB cable and CD/DVD disc (no text or symbols)natural_image
Illustration of a handheld device with a cable and connector (no text or symbols)natural_image
Coiled medical or electrical device with connectors and a central connector (no visible text or symbols)Accessoires
Remarque
Details standard applicables
R&TTE Directive 1999/5/EC
EN 301 489-01 v1.6.1 / EN 301 489-07 v1.3.1 / EN 301 489-17 v.1.2.1
EN 300 328 V 1.6.1
N 60950-1:2001
EN 50360/EN 50361:2001
EN 301 511 V9.0.2
(British Approvals Board of Telecommunications).
Déclaration
LG Electronics Logistics and Services B.V.
Veluwezoom 15, 1327 AE Almere, Pays-Bas
Tél: +31 - 36- 547 - 8940, e-mail: seokim@ lge.com

text_image
Life's Good LGPORTUGAL

natural_image
Abstract black-and-white graphic with radiating lines and a central dark spot (no text or symbols)QUICK START GUIDE
Born to Shine
BLACK LABEL SERIES
natural_image
Diagram of two identical cylindrical devices with internal components and red connection lines (no text or symbols)text_image
Diagram showing a smartphone with labeled parts and a hand holding a clip, illustrating step-by-step instructions for cleaning or adjusting the device.text_image
Diagram showing two-step instructions for inserting a device into a device, labeled with arrows and numbered positions.text_image
Diagram showing two smartphones with labeled parts and directional arrows indicating movement or change.natural_image
Close-up of a USB cable connector with a magnified view showing the internal structure (no text or symbols visible)natural_image
Close-up of a hand holding a black plug with a red arrow pointing to a device tip (no text or symbols visible)natural_image
Two views of a smartphone showing internal components and a red arrow pointing to a component (no text or symbols present)natural_image
3D rendering of a mobile phone casing with a red arrow pointing to the internal panel (no text or symbols visible)Multimédia
Leitor MP3
natural_image
Close-up of a USB cable connector with a magnified inset showing the cable's tip and arrow (no text or symbols visible)text_image
PC sync Connecting... ExitLG offers you a limited warranty that the enclosed phone and its enclosed accessories will be free from defects in material and workmanship, according to the following terms and conditions:
(1) The limited warranty for the product extends the warranty period beginning on the date of purchase of the product.
(2) The limited warranty extends only to the original purchaser of the product and is not assignable or transferable to any subsequent purchaser/end user.
(3) This warranty is good only to the original purchaser of the product during the warranty period, but limited to certain country if specified.
(4) The external housing and cosmetic parts shall be free of defects at the time of shipment and, therefore, shall not be covered under these limited warranty terms.
(5) Upon request from LG, the consumer must provide information to reasonably prove the date of purchase.
(6) The customer shall bear the cost of shipping the product to the Customer Service Department of LG. LG shall bear the cost of shipping the product back to the consumer after the completion of service under this limited warranty.
2. WHAT THIS WARRANTY DOES NOT COVER :
(1) ) Defects or damages resulting from use of the product in other than its normal and customary manner.
(2) Defects or damages from abnormal use, abnormal conditions, improper storage, exposure to moisture or dampness, unauthorized modifications, unauthorized connections, unauthorized repair, misuse, neglect, abuse, accident, alteration, improper installation, or other acts which are not the fault of LG, including damage caused by shipping, blown fuses, spills of food or liquid.
(3) Breakage or damage to antennas unless caused directly by defects in material or workmanship.
(4) That the Customer Service Department at LG was not notified by consumer of the alleged defect or malfunction of the product during the applicable limited warranty period.
(5) Products which have had the serial number removed or made illegible.
(6) This limited warranty is in lieu of all other warranties, express or implied either in fact or by operations of law, statutory or otherwise, including, but not limited to any implied warranty of marketability or fitness for a particular use.
(7) Damage resulting from use of non-LG approved accessories.
(8) ) All plastic surfaces and all other externally exposed parts that are scratched or damaged due to normal customer use.
(9) Products operated outside published maximum ratings.
(10) Products used or obtained in a rental program.
(11) Consumables (such as fuses).
3. CONDITIONS :
No other express warranty is applicable to this product.
THE DURATION OF ANY IMPLIED WARRANTIES, INCLUDING THE IMPLIED WARRANTY OF MARKETABILITY, IS LIMITED TO THE DURATION OF THE EXPRESS WARRANTY HEREIN. LG ELECTRONICS INC. SHALL NOT BE LIABLE FOR THE LOSS OF THE USE OF THE PRODUCT, INCONVENIENCE, LOSS OR ANY OTHER DAMAGES, DIRECT OR CONSEQUENTIAL, ARISING OUT OF THE USE OF, OR INABILITY TO USE, THIS PRODUCT OR FOR ANY BREACH OF ANY EXPRESS OR IMPLIED WARRANTY, INCLUDING THE IMPLIED WARRANTY OF MARKETABILITY APPLICABLE TO THIS PRODUCT.
Some do not allow the exclusive of limitation of incidental or consequential damages or limitations on how long an implied warranty lasts; so these limitations or exclusions may not apply to you. This warranty gives you specific legal rights and you may also have other rights which vary from country to country.

LG Electronics Inc.
text_image
Life's Good LGLG Mobile Phone Service Centers in Middle East & Africa

text_image
LG Customer Service☐ Service for LG Mobile Phone is available in the following countries
(List includes Only the Main Service Centers. Other area's customers can contact the Headquarter of their countries for further information)
Middle East Countries

12 Countries
UAE
Saudi Arabia
Qatar
Oman
Kuwait
Bahrain
Yemen
Iran
Iraq
Egypt
Syria
Jordan
Africa Countries

7 Countries
Morocco
Tunisia
Libya
Algeria
Kenya
Nigeria
South Africa
Other Countries

2 Countries
Turkey
Pakistan
Middle East Countries
UAE □
Saudi Arabia
Qatar □
Oman □
Kuwait □
Bahrain □
Yemen □
Iran
Iraq
Egypt □
Syria □
Jordan
UAE
Headquarter
☐ Agent Name: Jumbo Electronics Co. Ltd.
Address : Telecommunication Division, P.O. Box 3426, Dubai, UAE
☐ Telephone No.: +97143367999 (LG Customer Information Center: 800 54)
Fax No.: +97143340821
Web Site : http://www.jumbocorp.com
Email: Roby.George@jumbo.ae
Service Centers
| Area Address Telephone | Phone No. Fax No. | ||
| Dubai (Karama) Near | Strand Cinema, P.O. Box 3426, Dubai +97143362621 | +97143360847 | |
| Abudhabi Regional | Service Center P.O. Box 3832, +971267 | 32201 +97126733930 | |
| Al Ain | Regional Service Center P.O. Box 15444 | +97137542898 | +97137557898 |
| Sharjah | Regional Service Center P.O. Box 5331 | +97165599725 | +97165538365 |
| Fujairah | Regional Service Center P.O. Box 868 | +97192221406 | +97192221828 |
| Ras Al Khaimah | Regional Service Center P.O. Box 1054 | +97172272571 | +97172271881 |
UAE
Headquarter
☐ Agent Name: Al Sayegh Brothers Trading L.L.C
Address : Al Sayegh Brothers Building, Muraqqabat, Deira, P.O. Box 55106, Dubai, UAE
☐ Telephone No.: +97142663200 (LG Customer Information Center: 800 54)
Fax No.: +97142669964
Web Site : www.alsa-g.com
Email : helpdesk@alsa-g.com
Service Centers
| Area Address Telephone | Phone No. Fax No. | ||
| Dubai Al Sayegh Brothers Building, Muraqqabat, Deira P.O. box 55106 | +97142622770 +97142669964/+97142680340 | ||
| Abu Dhabi Lotus Tower, Airport road, P.O. Box 7993 | +97124452111 +97124462040 | ||
| Sharjah | Al Sayegh Brothers Main SVC Center Industrial area #6. | +97165436221 +97165437422 | |
UAE
Headquarter
☐ Agent Name: Axiom Telecom
Address : World Trade Centre, P. O. Box 9266, Dubai UAE
☐ Telephone No.: 04 3318555 (LG Customer Information Center: 800 54)
Fax No.: 04 3318855
Web Site : www.axiomtelecom.com
Email: atcc@axiomtelecom.com
Service Centers in UAE
| Area Address Telephone | Phone No. Fax No. | ||
| Dubai Shk Zayed Road | ad, Al Kawakeb Building, Block C, P O Box 9266, Dubai, UAE | 00971 43210600 00971 43210400 | |
| Abu Dhabi | Defense Road, Block A 4, Next to Al Sultan Restaurant. Abu Dhabi, UAE | 00971 26417144 00971 26417076 | |
| Sharjah | Shop no 78, Crystal Plaza, Buhaira Corniche Road , Shj UAE | 00971 65751503 | 00971 65751404 |
Saudi Arabia
Headquarter
☐ Agent Name: Axiom Telecom
Address: 9th Floor, Al Subaiee Tower, Abdul Aziz Highway, Al Khobar, KSA, P O Box 4742
Telephone No.: 00966 38019000
Fax No.: 00966 38019051
Web Site : www.axiomtelecom.com
Email: ksasupport@axiomtelecom.com
Service Centers in KSA
| Area Address Telephone | Phone No. Fax No. | ||
| KHOBAR 9, Al Fanar | Complex, Khobar-Dammam Highway, Khobar 31952, KSA | 00966 38587922 00966 38587910 | |
| RIYADH Olaya Main | Street, Nr. Al Owais Market, Riyadh, KSA | 00966 12698255 00966 12698355 | |
| JEDDAH City Plaza Centre, Price Sultan Street, Jeddah, KSA | 00966 26922764 00966 26924575 | ||
Saudi Arabia
Headquarter
☐ Agent Name: AL Farida Telecom Co. Ltd. (SKY)
Address : P.o. box 359, Riyadh 11411, Riyadh, Saudi Arabia.
☐ Telephone No. : +96612112345
Fax No.: +96612112311
Email: marwan.alshare@alhokair.com.sa
Service Centers
| Area Address Telephone | Phone No. Fax No. | ||
| Riyadh P.o. box 359 | Riyadh 11411, Riyadh, Saudi Arabia | +966121112345 +96612112311 | |
Saudi Arabia
Headquarter
☐ Agent Name : Itsalat International Co.
Address : P.O. Box 9798, Dammam, 31423, Saudi Arabia.
☐ Telephone No.: +96638343000
Fax No.: +96638334664
Web Site : http://www.itsalat.com
Email: ashraf.hassan@itsalat.com, headoffice@itsalat.com
Service Centers
| Area Address Telephone No. Fax No. | ||
| Jeddah Palestine st. Soukal Jawal, Jeddah +96626677988 +96626643618 | ||
| Riyadh Mursalat, Neat STC, Riyadh | +96614559106 +96612645766 | |
| Dammam Malik Fahd Road | +96638411111 +96638469055 |
QATAR
Headquarter
☐ Agent Name : Video Home & Electronics Center
Address : Musherib Street, P.O.Box 4668, Doha, Qatar
☐ Telephone No.: +9744315865
Fax No.: +9744437876
□ Web Site : http://www.jumboqatar.com
Email: alexjacob@jumboqatar.com
Service Centers
| Area Address Telephone No. Fax No. | ||
| Doha Musherib street, P.O.Box 4668, Doha, Qatar +9744315865 | +9744437876 |
OMAN
Headquarter
☐ Agent Name: Oman Gulf Enterprises L.L.C
Address : P.O. Box 175, PC 117, Muscat, OMAN
☐ Telephone No.: +96824502866/8
Fax No.: +96824502019
□ Web Site : http://www.otegroup.com
Email: sudhirk@otegroup.com
Service Centers
| Area Address Telephone | Phone No. Fax No. | ||
| Salalah P.O. Box 211 | PC2823, Salalah, OMAN +96823210684 +96823210145 | ||
| Sur | P.O. Box 480, PC 411, Sur, OMAN | +96825545107 +96825545107 | |
| Nizwah | P.O. Box 784, PC 611, Nizwah, OMAN | +96825412549 | +96825412549 |
| Sohar | P.O. Box 205, PC 321, Al Tarif, Sohar, OMAN | +96826843942 | +96826843942 |
OMAN
Headquarter
☐ Agent Name: Cellucom and Partners L.L.CI
Address : Office No 7, Makha Business Center, Ruwi High Street, Muscat, Oman
☐ Telephone No. : +96824835010
Fax No.: +96824834234
Web Site: http://cellucom.com
Email: info@cellucom.com
Service Centers
| Area Address Telephone No. Fax No. | ||
| Muscat, Oman Office No 7, Makha Business Center, Ruwi High Street, Muscat, Oman | +96824835010 +96824834234 | |
KUWAIT
Headquarter
☐ Agent Name: Cellucom Kuwait WLL
Address : Salem Al Mubarak Street, Shaha Complex, P.O. Box: 4019, Salmiya, Kuwait
☐ Telephone No. : +9655710801
Fax No.: +9655710803
Web Site : http://cellucom.com
Email: info@cellucom.com
Service Centers
| Area Address Telephone No. Fax No. | ||
| Salmiya, Kuwait Salem Al Mubarak Street, Shaha Complex,P.O. Box: 4019, Salmiya, Kuwait | +9655710801 +9655710803 | |
BAHRAIN
Headquarter
Agent Name: AJM Kooheji & Sons
Address: P.O. Box 74, Manama Bahrain.
Telephone No.: +97317403304
Fax No.: +97317403800
Web Site : http://www.ajmkooheji.com
Email: habib@ajmkooheji.com
Service Centers
| Area Address Telephone No. Fax No. | ||
| Sehla P.O. Box 74, M | anama Bahrain. +97317401919 +97317405654 |
BAHRAIN
Headquarter
☐ Agent Name: Cellucom WLL
Address : Shop no 5&6, Gosi commercial Complex, Manama, Kingdom of Bahrain
☐ Telephone No. : +97317294026
Fax No.: +97317294046
Web Site : http://cellucom.com
Email: info@cellucom.com
Service Centers
| Area Address Telephone No. Fax No. | ||
| Manama, Bahrain Shop no 5&6, Gosi commercial Complex, Manama, Kingdom of Bahrain | +97317294026 +97317294046 | |
BAHRAIN
Headquarter
Agent Name: Fono
Address : Gosi Complex, Exhibition Rd, Manama, Bahrain
☐ Telephone No.: 00973 17312001
Fax No.: 00973 17310884
Web Site : www.axiomtelecom.com
Email: fcc@almoayyedintl.com.bh
Service Centers in Bahrain
| Area Address Telephone No. Fax No. | ||
| Bahrain Fono, Gosi Complex, Exhibition Rd, Manama, Bahrain | 00973 17312001 00973 17310884 | |
YEMEN
Headquarter
☐ Agent Name: Al Mutarreb
Address : Hada st.Al Mutarreb for Trading, P.O. Box-19272
Telephone No.: +9671503240
Fax No.: +9671500878
Email: mutarreb@y.net.ye
Service Centers
| Area Address Telephone No. Fax No. | ||
| Yemen Hada st. Al Muttrieb for Trading P.O. Box 19272 | +9671503240 | +9671500878 |
IRAN
Headquarter
☐ Agent Name: Persian Telecom (Al Raheel General Trading Co., L.L.C.)
Address: First florr, No.140, Ghaem Magham St., Tehran, IRAN
Telephone No.: +982188302922/+982188827100
Fax No.: +982188302921
Web Site : http://www.persiantelecomclub.com
Email: bahrami@persiantelecom.ir
Service Centers
| Area Address Telephone No. Fax No. | ||
| Tehran First florr, No.140, Ghaem Magham St., Tehran, IRAN | +982188302922 +982188827100 | +982188302921 |
| Tehran No.69&70, Ground Floor, Aladdin Trade complex, Jomhori Ave, Tehran, IRAN | +982166722675 +982166724173 | +982166724173 |
IRAQ
Headquarter
☐ Agent Name : Al-Seera Communication Company
Address : 14th Ramadan Road, Al-Mansour Street, Baghdad, Iraq
☐ Telephone No.: +9647901393615
Fax No.: +96415427798
Web Site : http://www.alseera.com
Email: seeracom@hotmail.com, mohammed_d_r@hotmail.com
Service Centers
| Area Address Telephone No. Fax No. | ||
| Baghdad 14th Ramadan Road, Al Mansour Street +9647901393615 +96415427798 |
IRAQ
Headquarter
☐ Agent Name : Delta General Trading
Address : #907 Al Riqqa Palace, Al Maktoum St. P.O. Box 112121 Dubai UAE
☐ Telephone No.: +97142249159
Fax No.: +97142249079
Web Site : http://www.deltairaq.net
Email : haydar.hussain@deltairaq.net
Service Centers
| Area Address Telephone | No. Fax No. | ||
| Baghdad Street 13- | Bldg.5/7 Mahalla 609, MansourBaghdad, Iraq | +9647901905965 | |
| Erbil 30th Metru St. | Near to Bayiz Café, Erbil Iraq +964662540070 +964662540071 | ||
| Bashra | El Jazaier St. Bldg.139/54, No. 1 in front of Lahim Ibageem Eljandoul Restaurant, Bashra Iraq | +96440622146 |
EGYPT
Headquarter
☐ Agent Name: Delta Communication
Address : 39 M Tawfik Diab – Makram Ebied, Nasar City, Egypt
☐ Telephone No.: +2027487100 (LG Customer Information Center: 19960)
Fax No.: +2025201241
Email: salahezz@delta-group.org
Service Centers
| Area Address Telephone No. Fax No. | ||
| Nasar City 39 M Tawfik Diab – Makram Ebied,Nasar City, Egypt | +2027487100 +2025201241 | |
EGYPT
Headquarter
☐ Agent Name: Axiom Telecom
Address : 8, Al Oboor Buildings, Salah Salem Street, Cairo, Egypt
☐ Telephone No.: 002 02 4015050/4013939
Fax No.: 002 02
Web Site : www.axiomtelecom.com
Email : menon@axiomtelecom.com
Service Centers
| Area Address Telephone | Phone No. Fax No. | ||
| AXIOM-CAIRO | 3, Abdul Fida Street, Zamalik, Cairo Province, Egypt | 002 02 7377881 | 002 02 7377882 |
| AXIOM- ALEXANDRIA | 10, Victoria Square Amanwel, Zahrat Al Kotn Building, Somooha, Alexandria, Egypt | 002 02 4242529 |
SYRIA
Headquarter
☐ Agent Name : ECC (Z.Ghreiwati Sons Co.)
Address : Abo Romaneh Shakib Arslan str.
☐ Telephone No.: +963113347720/1/3/4/5/6, +963113347465
Fax No.: +963113333825
Email: ecc@net.sy
Service Centers
| Area Address Telephone | Phone No. Fax No. | ||
| Damascus Kaboon - facing the bus Pullman station +963119345 +963114537010 | |||
| Aleppo Jameilia beside Alseddeik Mosque +963212284002 +963212122367 | |||
JORDAN
Headquarter
☐ Agent Name: Itisalcom Company
Address : Lana Complex bldg, Al Rabeyah, Amman, Jordan
☐ Telephone No.: +96265510137
Fax No.: +96265539358
Email: lgsupport@nets.com.jo
Service Centers
| Area Address Telephone No. Fax No. | ||
| Amman Al Rabeyah, Amman, Jordan +96265510137 +96265539358 |
Africa Countries
Morocco
Tunisia
Libya □
Algeria
Kenya □
Nigeria
South Africa
MOROCCO
Headquarter
☐ Agent Name : LGEMC (LG Electronics Morocco S.A.R.L)
☐ Address : Immebule 2, Zenith Millenium, Sidi Maarouf, Lotissement Attaw q, casa, Morocco
☐ Telephone No. : 081005454 (LG Customer Information Center)
Fax No.: +21222975959
□ Email : abdelhamid@lge.com
Service Centers
| Area Address Telephone No. Fax No. | ||
| Cetelec 5 rue Albouhtouri casa anfa Maroc +21222270790 +21222203748 | ||
| Lineatec 105 Avenue Fal ould oumaeir Number 1, Agdal, Rabat | +21237776506 +21237671040 |
TUNISIA
Headquarter
☐ Agent Name : TTE (Tunisian Telecom Electric Distribution)
Address : Tunisian telecom Distribution, 22 Rue 8600 ZI Charguia, Tunis, Tunisia
☐ Telephone No. : +21670838424
Fax No.: +21670838422
Web Site : http://www.tte.com.tn
Email : f.hamdi@tte.com.tn
Service Centers
| Area Address Telephone No. Fax No. | ||
| Tunis 22 Rue 8600 Zl Charguia, Tunis, Tunisia +21670838424 +21670838422 |
LIBYA
Headquarter
☐ Agent Name : PCNA (PC North Africa Company)
Address : Noofleen ben Jaber Street, Benghazi, Libya.
☐ Telephone No. : +218213405695
Fax No.: +218213405957
Email: nafrica@lttnet.net, ahmad_al_shebani@hotmail.com
Service Centers
| Area Address Telephone No. Fax No. | ||
| Benghazi Islamic center +218619094079 +218619094079 | ||
| Tripoli Aldhara, Al Wadan Street +218213344333 +218213344333 | ||
| Mostra Aldees Street +21851626294 +21851626294 |
ALGERIA
Headquarter
Agent Name: Algerika
Address : 409, Lotissement El-Bouroudj, Ain-Allah Delly Brahim Alger.
☐ Telephone No.: +21321917494
Fax No.: +21321917505
Email : garantie@algerie-k.com
Service Centers
| Area Address Telephone No. Fax No. | ||
| Algiers 409, Lotissement El-Bouroudj, Ain-Allah DellyBrahim Alger | +21321917494 +21321917505 | |
KENYA
Headquarter
Agent Name: Skytel Limited
Address : Wilson Airport, PO Box 42444, Nairobi, Kenya
Telephone No.: +25420252240/1
Fax No.: +25420252240
Email: alex.kabuagi@xcom.co.ke
Service Centers
| Area Address Telephone No. Fax No. | ||
| Nairobi Wilson Airport, PO Box 42444, Nairobi, Kenya | +25420252240/1 +25420252240 | |
NIGERIA
Headquarter
☐ Agent Name : LGEAL (LG Electronics Antwerp Logistics N.V.)
Address : 65C, Opebi Road, Ikeja Lagos. Nigeria
☐ Telephone No.: +23418935454 (LG Customer Information Center)
Fax No.: +23417936510, 4977753
Email: cland@lge.com
Service Centers
| Area Address Telephone No. Fax No. | ||
| Lagos 65C, Opebi Road, Ikeja Lagos. Nigeria +23418927777 +23417936510 |
SOUTH AFRICA
Headquarter
☐ Agent Name : LG Electronics (Customer Care Only, no on-site repairs)
Address: 181 Barbara Road, Elandsfontein, Johannesburg, SA
☐ Telephone No.: +27861545454
Fax No.: +27115716969
Web Site : http://www.lgmobile.com
Customer Care only (no on-site repairs)
| Area Address Telephone No. Fax No. | |||
| Elandfontein, Johannesburg | 181 Barbara Road, Elandfontein, Johannesburg, SA | +2711861545454 | +27115716969 |
SOUTH AFRICA
Headquarter
☐ Agent Name: LG Mobile Care Lounge
☐ Address: Monte Casino, Fourways
☐ Telephone No.: +27115110185
Fax No.: +27115510189
Email: http://www.lgmobile.com
Service Centers
| Area Address Telephone No. Fax No. | ||
| Fourways, Johannesburg | Monte Casino, Fourways, Johannesburg, SA. +27115 | 110185 +27115510189 |
SOUTH AFRICA
Headquarter
Agent Name: IXIA
Address: 44 Old Pretoria Rd, Midrand, Blue Glass Building
☐ Telephone No.: +27116558118
Fax No.: +27866340735
Web Site : http://www.ixia.co.za
Email: silvin@ixia.co.za
Service Centers
| Area Address | Telephone No. Fax No. | ||
| MidrandJohannesburg | 44 Old Pretoria Rd, Midrand, Blue Glass Building(Gauteng and surrounding areas up to Rustenburg) | +27116558118 or +270861545454 | +27866340735 |
| Durban Collection arranged +27116558118 or +270861545454 | +27866340735 | ||
| Cape Town Collection arranged +27116558118 or +270861545454 +27866340735 | |||
| Port Elizabeth | Collection arranged +27116558118 or +270861545454 +27137554183 | ||
| East London Collection arranged +27116558118 or +270861545454 +27866340735 | |||
| Newcastle | Collection arranged +27116558118 or +270861545454 +27866340735 | ||
| Polakwane Collection arranged +27116558118 or +270861545454 +27866340735 | |||
| Bloemfontein | Collection arranged +27116558118 or +270861545454 +27866340735 | ||
| Kimberley | Collection arranged +27116558118 or +270861545454 | +27866340735 | |
SOUTH AFRICA
Headquarter
Agent Name: Cumi Electronics
Address : Atlas Lifestyly Center, 1st Floor Cnr Atlas & Northrand Rd, Bardene, Boksburg
Telephone No.: +27119186851
Fax No.: +27865159850
Email: pclark@cumi.co.za
Service Centers
| Area Address Telephone No. Fax No. | ||
| BoksburgJohannesburg | Atlas Lifestyly Center, 1st Floor Cnr Atlas & Northrand Rd, Bardene, Boksburg | +27119186851/7 +27865159850 |
SOUTH AFRICA
Headquarter
Agent Name: Pope & Sons
Address: 2 Marais Street, Durbanville, Cape Town
☐ Telephone No.: +27119751888
Fax No.: +27119765800
Email: kevin@itecape.com
Service Centers
| Area Address Telephone No. Fax No. | ||
| Durbanville, Cape Town | 2 Marais Street, Durbanville, Cape Town +27119751888 +27119765800 |
SOUTH AFRICA
Headquarter
Agent Name: Vodacare
Address : ARC, Ground Floor, east wing, Vodacom Service Park, Vodacom Boulevard, Vodavalley, Midrand, SA
☐ Telephone No.: +27(0)821944
Fax No.: +27115464005
Web Site : http://www.vodacom.co.za
Email: vodacarecallcentre@vodacom.co.za
Service Centers (please refer to www.vodacom.co.za for outlets in your region)
| Area Address Telephone No. Fax No. | ||
| Midrand ARC, Ground Floor, east wing, Vodacom Service Park, Vodacom Boulevard, Vodavalley, Midrand, SA | +27115464039 | +27115464005 |
SOUTH AFRICA
Headquarter
Agent Name: MTN SP
Address : 311 15th Rd, Midrand, Johannesburg, SA
☐ Telephone No.: +27118484329
Fax No.: +27118484445
Web Site : http://www.mtn.co.za
Email: theart_m@mtn.co.za
Service Centers (please refer to www.mtn.co.za for outlets in your region)
| Area Address Telephone No. Fax No. | ||
| Midrand 311 15th Rd, Midrand, Johannesburg, SA +27118484329 +27118 | 484445 |
Other Countries
Turkey □
Pakistan
TURKEY
Headquarter
☐ Agent Name : Teleservice Int. Telefon
Address: Dr. Fahrettin Kerim Gökay Cad. No:31-1 Altunizade Üsküdar TR-34662 Istanbul
☐ Telephone No.: +902165450404
Fax No.: +902165445656
Web Site : http://www.teleservice.com
Email: sinan.kus@teleservice.com
Service Centers
| Area Address Telephone No. Fax No. | ||
| Istanbul Dr. Fahrettin Kerim Gökay Cad. No:31-1 Altunizade Üsküdar TR-34662 Istanbul | +902165450404 +902165445656 | |
| Ankara Mithatpasa cad. No:31 A TR-06420 Kızılay/ Ankara | +903124301222 +903124353365 | |
| Diyarbakır | Inönü Cad. 4/C Büyük Hotel Altı Dağkapı TR-21090 Diyarbakır | +904122287785 +904122288088 |
| Izmir | Gazi Bulvari No:90/B TR-35230 Çankaya/Izmir | +902324458600 +902324457775 |
PAKISTAN
Headquarter
☐ Agent Name: New Allied Mobile Communication
☐ Address : 3/3 Ground Floor, Rabbiya Garden, M.C.H.S., Shaheed-e-Millat Road, Karachi, Pakistan.
☐ Telephone No.: +92214388271/74
Fax No.: +92214388278
Email: zpalg@yahoo.com
Service Centers
| Area Address Telephone No. Fax No. | ||
| Karachi N-1, 4th Floor, Al -Haroon, 10 Aga Khan III Road, Karachi. 74400. | +92212729722 +92212729722 | |
| Lahore Suite # 10, 2nd Floor Hafeez Centre Gulburg III, Lahore | +92425759157 +92425714684 | |
| Multan 352 Hithar Road Behind Hussain Agahi Road, Multan | +926145184012 | +92616561456 |
| Faisalabad | 63, Gulistan Market, Street # 3, Near Taj Cinema, Railway Road, Faisalabad | +92412640655 |
| Islamabad | 2 / B, N.H.S.P Centre, Near Utility Store Head Office, Fazal-e-Haq Road, Blue Area | +925128282734 |

text_image
LG Customer ServiceVisit us on
http://www.lgservice.com
http://www.lgmobile.com