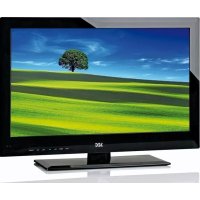
Minnesota - Television SEG - Free user manual and instructions
Find the device manual for free Minnesota SEG in PDF.



| Product Type | LED TV |
| Brand | SEG |
| Model | Minnesota |
| Screen Size | 32 inches (diagonal) |
| Resolution | 1920 x 1080 pixels (Full HD) |
| Audio Power | 2 x 6 W |
| Power Supply | 100-240 V, 50/60 Hz |
| Power Consumption | < 120 W |
| Standby Consumption | < 1 W |
| Weight | 9.20 kg |
| Connectivity | HDMI (x3), VGA, SCART (mini SCART), USB (x2), YPbPr, Coaxial audio output, Headphone |
| TV Reception | Analog (PAL), Digital Terrestrial (DVB-T), Satellite (DVB-S) |
| Multimedia Functions | USB playback (photo, music, video, text), PVR recording, timeshift |
| Special Functions | Parental control, channel lock, EPG, teletext |
| Wall Mounting | Compatible VESA 200 x 200 mm |
| Included Accessories | Remote control, batteries, power cable, adapter cables (mini SCART, YPbPr, AV), user manual |
| Maintenance and Cleaning | Soft dry cloth; do not use solvents |
| Safety | Do not expose to water, do not obstruct ventilation, unplug during storms |
| General Information | Energy class not specified; manufacturer warranty 2 years |
Frequently Asked Questions - Minnesota SEG
User questions about Minnesota SEG
0 question about this device. Answer the ones you know or ask your own.
Ask a new question about this device
Download the instructions for your Television in PDF format for free! Find your manual Minnesota - SEG and take your electronic device back in hand. On this page are published all the documents necessary for the use of your device. Minnesota by SEG.
USER MANUAL Minnesota SEG
natural_image
Line drawing of a flat-screen monitor with blank screen (no text or symbols)Fernseher
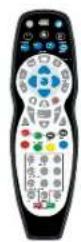
Fernbedienung
natural_image
Line drawing of a flat-screen monitor with blank screen and base (no text or symbols)LED-Anzeige
natural_image
Front view of a silver convertible sports car on display (no visible text or symbols)TV-Liste
Mein Album
service@schmid-electronics.de
service@schmid-electronics.de
oder per E-mail:
sertronics
The following table provides the information in English:
SAFETY INFORMATION ....3
Headphone Warning....4
Where to install....4
LCD Screen....4
Unit and Accessories 5
Getting Started....5
Front view....5
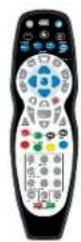
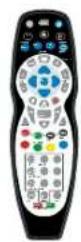
Remote Control....6
Functions of remote control buttons....6
To Set the Multi-Satellite Mode button 8
Installing Batteries in the Remote Control 9
Using the Remote Control....9
Aerial connection....9
Connecting the TV Antenna 9
Connecting external devices 9
HDMI Lead....9
SCART Lead....9
VGA Cable 9
CONNECTIONS 11
PC connection....11
VGA, HDMI PC Connection....11
Connecting Video camera and Video recorder 12
Connecting an audio system 12
Connecting a DVD player 12
Common Interface Slot....13
USING YOUR COMMON INTERFACE SLOT 13
Auto installation setup....13
Power On / Off the LED TV.... 13
Source Menu 14
Menu Settings 14
CHANNEL MENU 14
PICTURE MENU 14
SOUND MENU....14
TIME MENU 15
LOCK MENU....15
SETUP MENU....15
CHANNEL MENU 15
Picture Menu 16
Sound Menu 17
Time Menu....17
Lock Menu....17
Setup Menu 17
Multimedia Operation....18
Photo 18
Music....19
Movie 19
Text....19
Recording Operation 20
PVR Settings....20
Recorded List 20
Schedule List....20
Timer Record....20
Recording 21
Time shift 21
EPG Recording....21
MAIN SATELLITE MENU....22
1) SETUP....22
2) TV/Radio 23
3) MULTIMEDIA....25
4) GAME 25
TROUBLE SHOOTING GUIDE 26
TECHNICAL SPECIFICATIONS ......26
TV Specifications 26
DVBS Specifications 26
Wall Mounting 27
Waste Electrical Recycling 27
Correct disposal of Product....27
Introduction
Thank you for purchasing this LED TV which has been designed and manufactured to give you many years of trouble free service.
You may already be familiar with using a similar product but please take time to read these instructions which have been written to ensure you get the very best from your purchase.
HDMI
HDMI (High Definition Multimedia Interface) is the next generation of digital interface. Unlike conventional connections, it transmits uncompressed digital and audio signals using a single cable. This TV supports high-definition video input via the HDMI socket on the back of the TV.
Safety is important
To ensure your safety and the safety of others, please read the safety precautions BEFORE you operate this product.
Disclaimer
The illustrations of the LCD-TV, accessories and menus shown in this User's Manual may differ from the actual product.
SAFETY INFORMATION
IMPORTANT SAFETY INSTRUCTIONS - READ CAREFULLY BEFORE USE.
Take note of the following safety information which appears on the back of the TV.


CAUTION: TO PREVENT ELECTRICAL SHOCK, DO NOT REMOVE ANY COVER SCREWS, NO USER SERVICEABLE PARTS INSIDE, REFER SERVICING TO QUALIFIED SERVICE PERSONNEL.
This symbol indicates that there are important operating maintenance instructions in the literature accompanying this unit.
This symbol indicates that dangerous voltage constituting a risk of electric shock is present within this unit.
Keep these instructions
- Do not use this TV near water.
- Clean only with a slightly damp cloth.
- Do not block any ventilation openings.
• Install in accordance with the supplied Quick Start Guide and this User Guide. - Protect the power chord from being walked on or pinched, particularly at plugs, and the point where it exits from the TV.
- Do not allow the power chord to overhang the edge of a table.
- Unplug this TV during lightening storms or when unused for long periods of time.

WARNING! TO REDUCE THE RISK OF FIRE OR ELECTRICAL SHOCK, DO NOT EXPOSE THIS TV TO RAIN OR MOISTURE. THE TV MUST NOT BE EXPOSED TO DRIPPING AND SPLASHING AND NO OBJECTS FILLED WITH LIQUIDS SHOULD BE PLACED ON THE TV.
NOTE: No naked flames such as candles should be placed on the TV.
NOTE: When displaying the same still picture for more than 2 hours without any interruption, the picture contours of the continuously displayed contents may remain visible on screen, i.e. a persistent image remains. The same applies, when displaying for more than 2 hours:
• the same background/wallpaper
- logos, video games, computer images, Teletext
- contents with a non-filling aspect ratio (e.g. 4:3 format)
These do not represent any malfunction and will not be covered by the manufacturer's warranty
This unit has been produced according to all current safety regulations. The following safety tips should safeguard users against careless use and the dangers connected with such use.
- Although this appliance has been carefully manufactured and rigorously checked prior leaving the factory, as with all electrical appliances it is possible for problems to develop. If you notice smoke, an excessive build up of heat or any other unexpected phenomena, you should disconnect the plug from the mains power socket immediately.
- Ensure that the unit is sufficiently ventilated! Never place next to or underneath curtains!
- The mains plug or appliance coupler is used as the disconnect device, the disconnect device shall remain readily operable.
- This set should only be connected to a mains power supply which matches that stated on the label on the rear of the TV - do not attempt to connect it to any other type of supply.
- The socket - outlet must be installed near the equipment and easily accessible.
- To prevent overload, don't share the same mains supply socket with too many other items of equipment.
- Apparatus with Class 1 construction shall be connected to a mains socket outlet with a protective earth connection.
- Keep away from rodents. Rodents enjoy biting into electric flexes.
- Always hold the plug when pulling out the plug from the mains supply socket. Do not pull on the flex, the flex can become overloaded and cause a short circuit.
- Set up the unit so that no one is able to trip over the flex.
- Do not place heavy items on the flex, which may damage it.
• Take note that the flex cannot be reached and pulled by young children, avoiding injury. - Do not set up the unit near to heat sources. The casing and the flex could be damaged by the impact of heat.
- The screen is made of plastic and can break if damage is done to it. Be careful when collecting sharp edged plastic splinters to avoid injury.
- Avoid placing the unit on any surfaces that may be subject to vibrations or shocks.
- To protect the unit during a thunderstorm unplug the AC power cable and disconnect the aerial. Caution: Do not touch the aerial (RF) connector.
- When you leave your home for long periods of time, unplug the AC power cable for safety reasons.
- The unit becomes warm when in operation. Do not place any covers or blankets on the unit in order to prevent overheating. The ventilation holes are not to be blocked. Do not set up near radiators. Do not place in direct sunshine. When placing on a shelf leave 5 cm (2") free space around the whole unit.
- Do not allow water or moisture to enter the TV. Do NOT use in wet or moist areas such as Bathrooms,
steamy kitchens or near swimming pools.
- Do not use this unit when moisture condensation may occur
- Any repairs must be carried out by qualified personnel only.
- Do not open this unit. A non-expert attempting to re-pair the unit could be dangerous and potentially cause a fire hazard.
- Liquids spilt into the unit can cause serious damage. Switch the set OFF and disconnect the mains power supply, then consult a qualified service person before attempting to use the unit again.
- Do NOT remove the safety covers. There are no use-able or serviceable parts inside. You may invalidate the warranty. Qualified personnel must only service this apparatus.
- Do NOT tap or shake the screen, you may damage the internal circuits. Take good care of the remote control, do not drop.
- Never place hot objects or open flame sources on or close to the TV.
• High temperatures can melt plastic and lead to fires. - To clean the TV use a soft dry cloth. Do NOT use solvents or petrol based fluids. For stubborn stains, you may use a damp cloth with dilute detergent.
Headphone Warning

Loud music can damage your hearing irreversibly, therefore do not set the volume to a high level when listening through headphones, particularly for lengthy listening periods.
Where to install
Locate the television away from direct sunlight and strong lights, soft indirect lighting is recommended for comfortable viewing. Use curtains or blinds to prevent direct sunlight falling on the screen. Place the TV on a sturdy platform of which the surface should be flat and steady. This will prevent it from falling over.
Make sure the television is located in a position where it cannot be pushed or hit by objects, as pressure will break or damage the screen, and so that small objects cannot be inserted into the ventilation slots or openings in the cabinet.
LCD Screen
The LCD display panels are manufactured using an extremely high level of precision technology, however sometimes some parts of the screen may be missing picture elements or have luminous spots. This is not a sign of malfunction.
Unit and Accessories
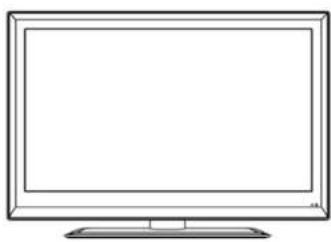
natural_image
Line drawing of a flat-screen monitor with blank screen (no text or symbols)TV set
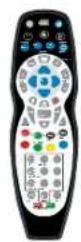
Remote Control
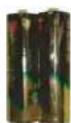
Batteries for Remote Control
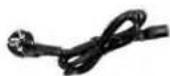
Power cable
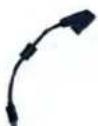
Converter cable for MINI-SCART
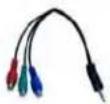
Converter cable for YPbPr video
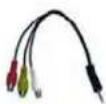
Converter
cable for
AV IN
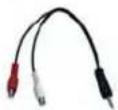
Converter cable for YPbPr audio
User Guide
Packaging materials are no toys. Please keep away from children. Plastic bags can cause suffocation when pulled over the head.
Getting Started
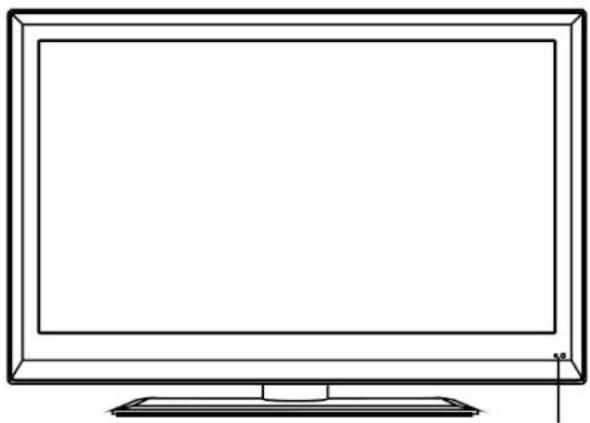
Front view
natural_image
Line drawing of a flat-screen monitor with blank screen and base (no text or symbols)LED Indicator
Remote Control Window (keep clear)
Remote Control
Remote control may differ in shape from actual remote
Functions of remote control buttons
Depending on the model of the Television some keys will have no function
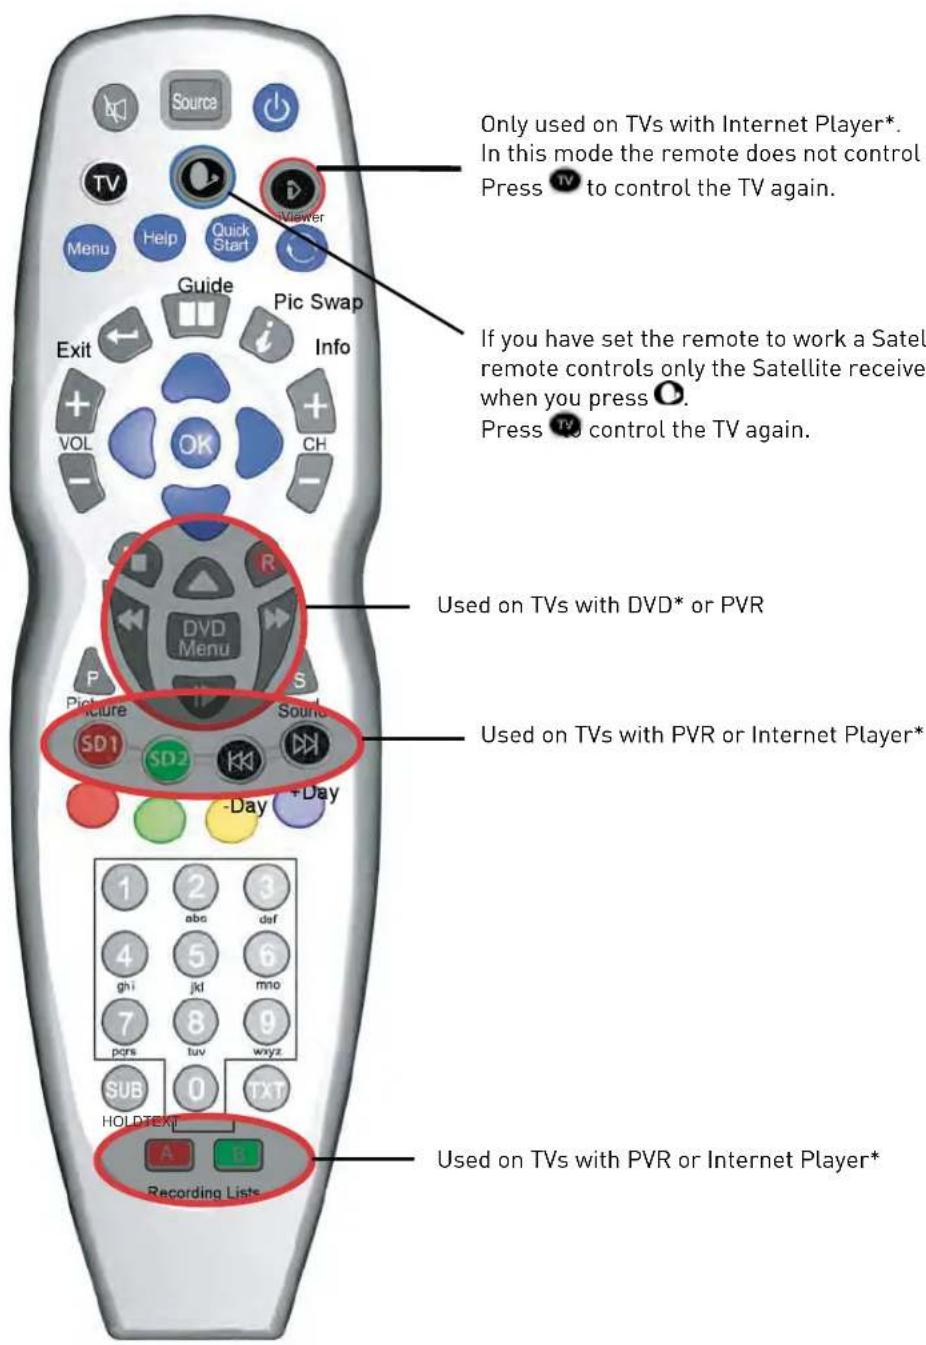
* Depending on the model
Remote control (continued)
Dependant on the Model of the TV some keys will have no function
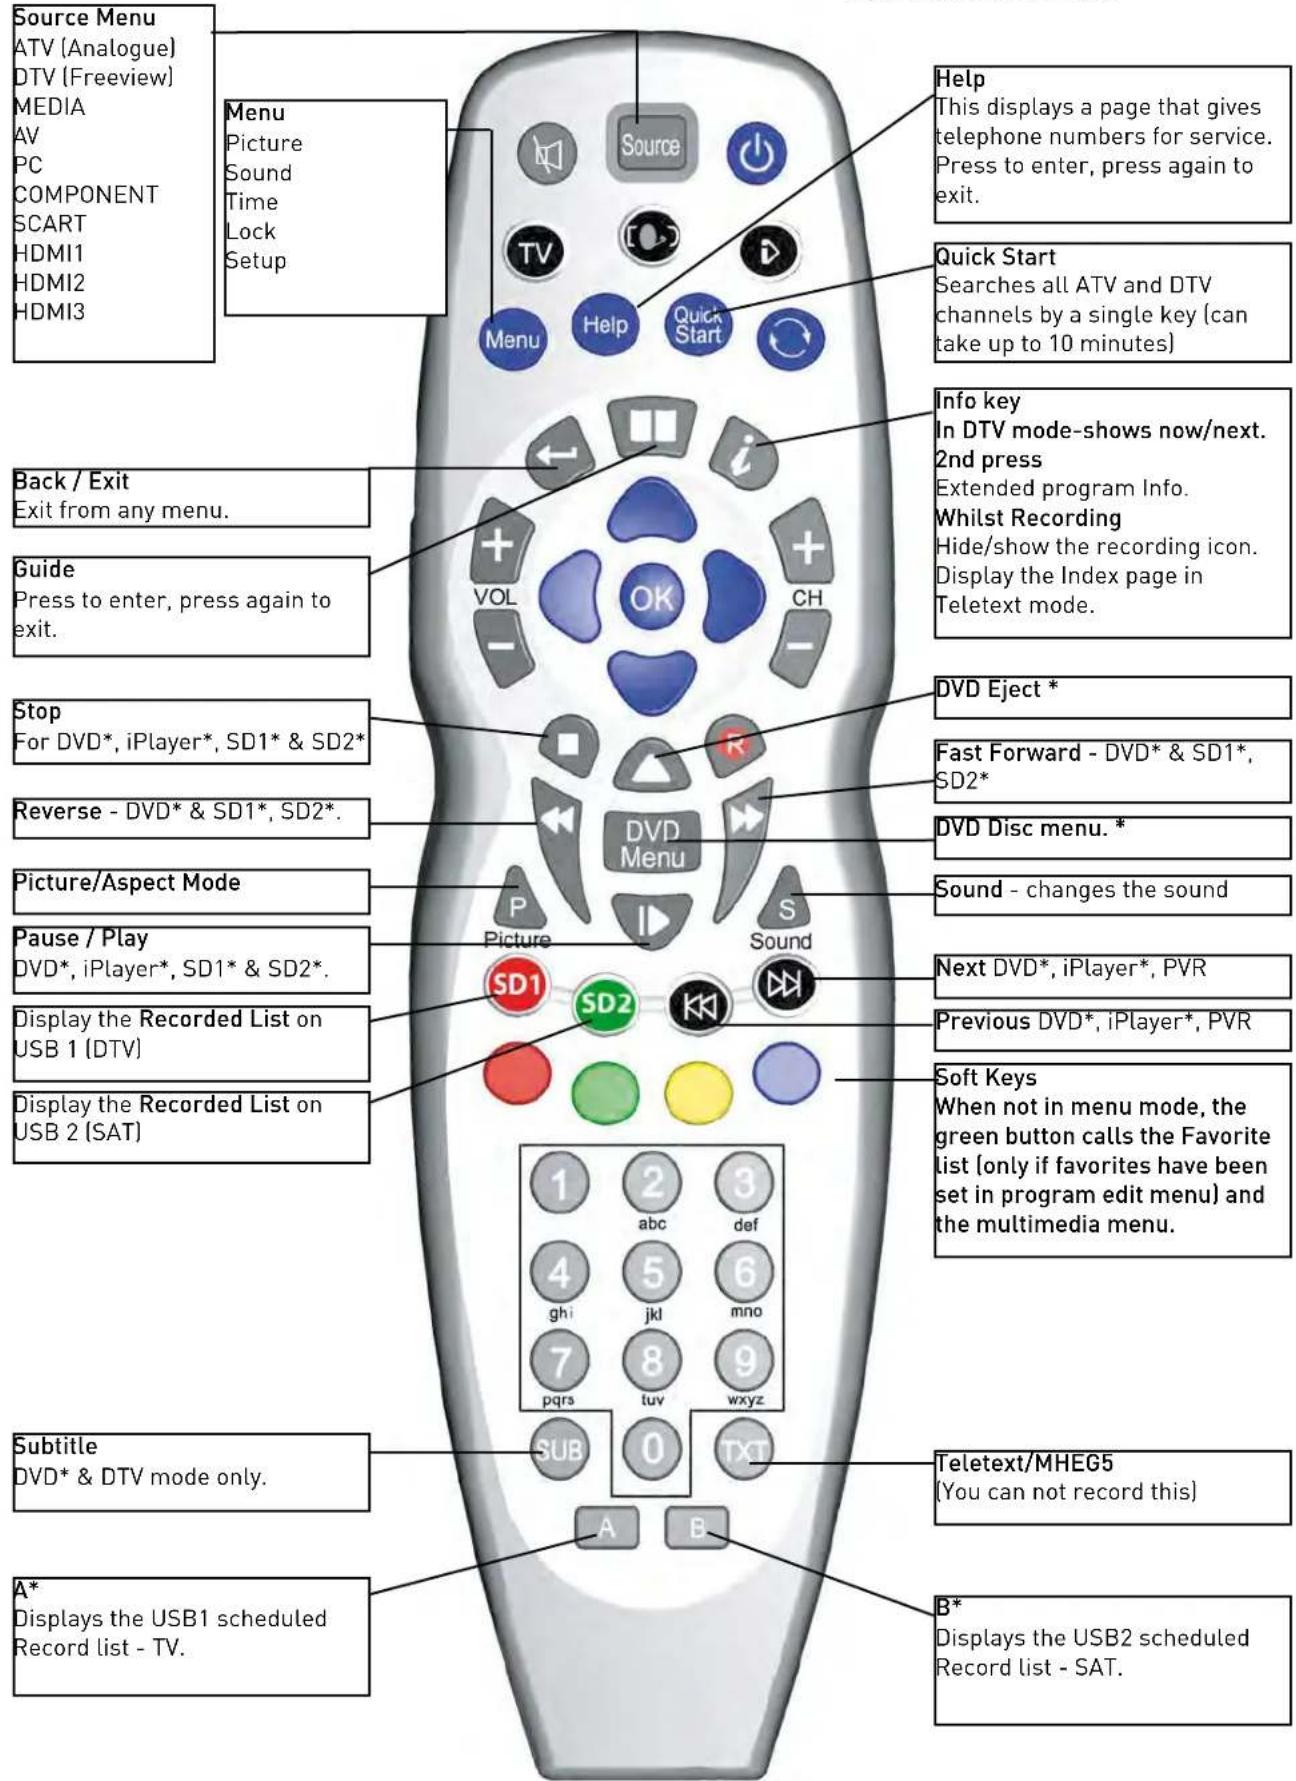
Remote control (continued)
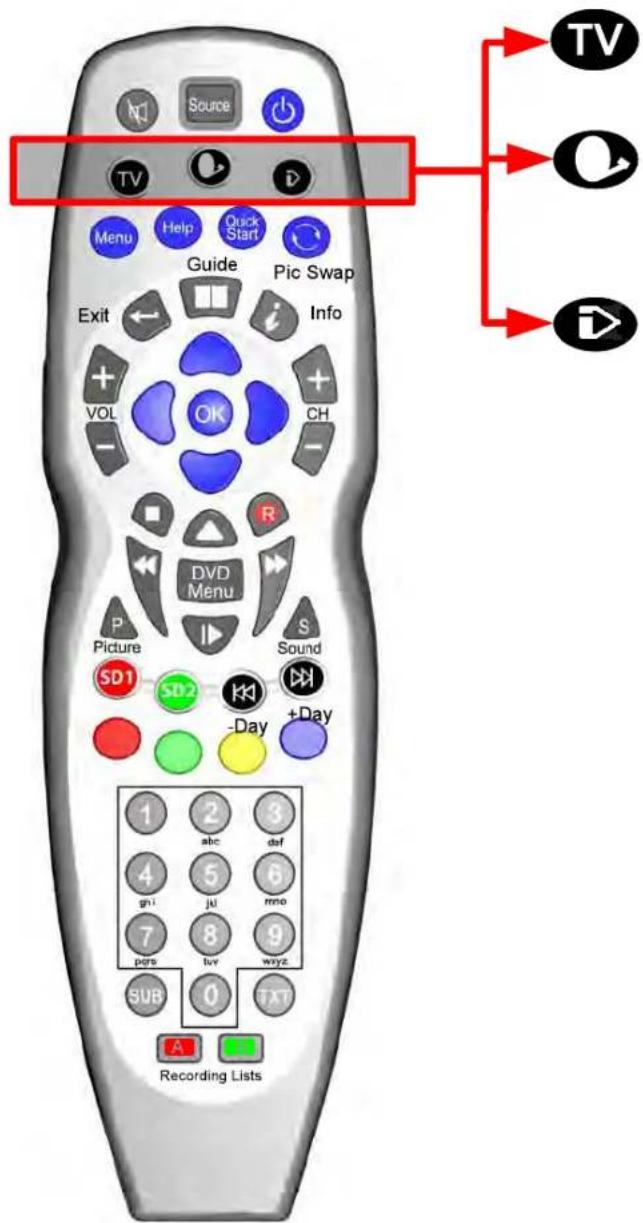
Dependant on the model of TV some keys will have no function
*Dependant on Model
This button puts the Remote in TV control mode
This button puts the Remote in a Multi Satellite control mode
* A number of modes are available. See below for details
This button puts the Remote into an Internet Player mode
* This is only used on some TVs and Digital Boxes
To Set the Multi-Satellite Mode button
The Sat button is programmable in the remote and can be set as follows:
To set the button if you have no Satellite Receiver: Press and at the same time press 0.
If you have a Satellite Receiver with Recorder (Known as "Plus" type)
Press and at the same time press 1.
If you have a Satellite Receiver with High Definition (Known as "HD" type)
Press and at the same time press 2.
If you have a normal Digital Satellite Receiver (Known as "Digital" type)
Press Q and at the same time press 3.
If you want to use this button to switch on the DVD Player*
Press and at the same time press 4.
O + 0 \~ NO SAT RECEIVER
Q + 1 \~ SAT +
Q + 2 \~ SAT HD
Q + 3 \~ SAT DIGITAL
Q + 4 \~ FTA DVBS
Installing Batteries in the Remote Control
-
Remove the battery compartment cover at the rear of the remote control by pushing the retaining clip forward and pulling up.
-
Install the supplied batteries, ensuring the polarity matches what is shown in the battery compartment.
-
Replace the battery compartment cover.
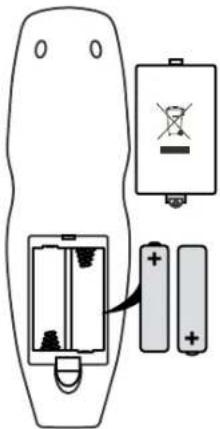
Using the Remote Control
To use the remote control point it at the TV and press the required buttons. You must be within 6 meters and at an angle of less than 30 degrees from the center of the TV.
NOTE: Sunshine or other strong light sources may interfere with the signal from the remote control. In this situation turn the TV away from the light source.

WARNING! DO NOT LEAVE BATTERIES IN THE REMOTE CONTROL FOR EXTENDED PERIODS AS THEY CAN LEAK OR CORRODE CAUSING DAMAGE TO THE REMOTE CONTROL. CHECK THEM PERIODICALLY AND REPLACE THEM AS REQUIRED.

WARNING! DO NOT MIX BATTERY TYPES. WHEN INSERTING BATTERIES, REPLACE ALL BATTERIES AT THE SAME TIME. DO NOT MIX OLD AND NEW BATTERIES.

WARNING! EXHAUSTED BATTERIES MUST BE TREATED WITH CARE AND DISPOSED OF ACCORDING TO ANY SAFETY OR RECYCLING REGULATIONS IN FORCE IN YOUR LOCAL AREA, NEVER DISPOSE OF BATTERIES INTO GENERAL WASTE, OR FIRE.

WARNING! NEVER EXPOSE BATTERIES TO EXCESSIVE HEAT SUCH AS SUNSHINE, FIRE OR THE LIKE.
Aerial connection
WARNING! ENSURE THE TV AND ALL ANCILLARY EQUIPMENT IS UNPLUGGED FROM THE MAINS BEFORE MAKING ANY CONNECTIONS!
Connecting the TV Antenna
Connect the TV antenna to the aerial socket with a 75 ohm co-axial plug. For best results use a high gain TV aerial, preferably roof or loft mounted.
- To improve picture quality in a poor signal area, purchase and install a signal amplifier.
- If the antenna needs to be split for two TVs, use a 2-Way Signal Splitter (not supplied).
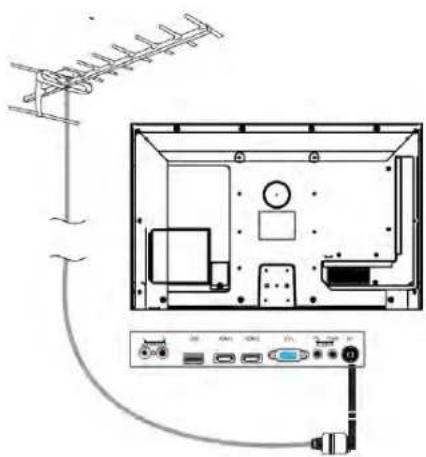
Connecting external devices
This instruction manual shows the simplest and most effective way of connecting your TV to ancillary equipment. Alternate methods are listed below.
HDMI Lead
You can connect this TV to a compatible device using a HDMI lead. This method will give the best picture.
Connect the cable from the HDMI equipment to the TV HDMI socket.
SCART Lead
You can connect this TV to a compatible device using a SCART lead. The connection uses component video signals, i.e. the red, green and blue (RGB) content of the video are sent on separate signals.
VGA Cable
You can use your TV as a monitor for your personal computer by using a VGA cable. Sound from your personal computer may also be played through the TV.
Connecting external devices (continued)

Connecting external devices (continued)
CONNECTIONS
| Name Function | Description |
| AC POWER IN | Connect to power supply |
| HDMI 1, 2, 3 | Connect to the HDMI socket of your DVD or Satellite Box |
| VGA | Connect to the PC VGA output to display PC graphics |
| PC-IN PC audio input | |
| mini YpbPr | Connect to the YPbPr output on external devices |
| RCA audio out | Audio output to audio amplifier |
| mini YPbPr Audio | Audio signal input for AV(Shared with YPbPr) |
| USB Connect to | USB device for multimedia |
| mini SCART | Connect to the Scart input / output of external devices |
| RF Connect to antenna or cable source | |
| Headphone Connect Headphone | |
| CI CI slot (pay as you view card slot) | |
| USB (DVB-S) | Connect to USB device for multimedia and PVR |
| Coax Output to audio amplifier | |
Caution:
Before connecting external devices:
- Makes sure to disconnect the appliances from the power supply in order to avoid any potential damage from occurring.
• Make sure to establish the required connection. - Make sure that the connectors are properly and correctly attached before connecting the appliances to the power supply.
PC connection
As PCs are sometimes still supplied with a 'conventional' CRT monitor, you may need to adjust the display settings of your PCs graphics card, otherwise the pictures may not appear correctly. Switch on your PC (still with your original monitor connected) now select the screen resolution, and select 60Hz refresh rate. Switch off your PC, then connect it to your TV while both appliances are still switched off.
VGA, HDMI PC Connection
Use a PC-VGA cable (not supplied) to connect the TV to your PC. You can also use an HDMI cable to connect to your PC (if your PC Graphic card supports HDMI). When the HDMI cable is used, the PC audio cable is no longer required. If you use the HDMI to DVI cable, you will need to use the PC audio cable. Connect all cables carefully and do not bend or break the connector pins.
When using the VGA cable
- Switch on the TV
- Switch on the PC
-
Select PC/VGA as input source
When using the HDMI cable -
Select HDMI as input source
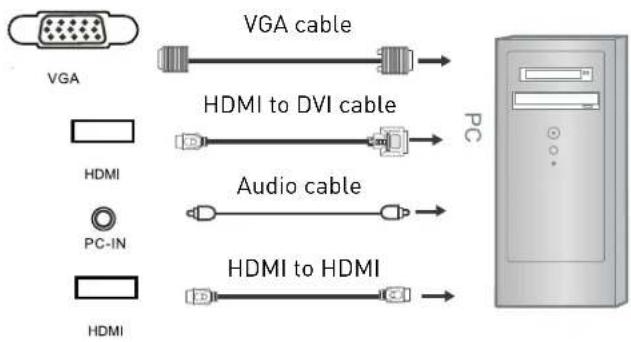
(All illustrated cables are not supplied)
Connecting Video camera and Video recorder Video camera
- Connect the AV cable to the TV and to the video camera.
- Turn on both video camera and the TV.
- Select AV/CVBS source
- You can now see the playback picture from the video camera. Note:
- To connect the video camera using other cables, refer to the video camera instruction manual.
Video recorder
- Connect the Scart cable to the TV and video recorder.
- Turn on both video recorder and the TV.
- Select Scart source
- You can now see the playback picture from the video recorder.
Note:
- To connect the video recorder using other cables, refer to the video recorder instruction manual.
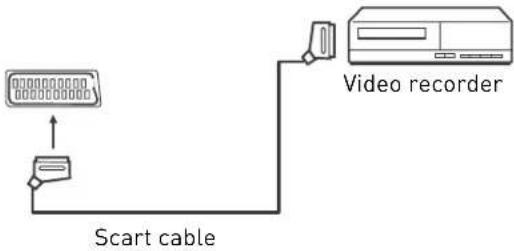
Use Scart adapter cable
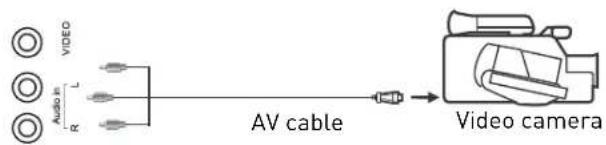
(All illustrated cables are not supplied)
Connecting an audio system
You can supply the TV sound to the stereo system (A) with the Scart socket. Use a special Scart cable SCART to RCA. (Please consult your hi-fi instructions for details). If you have a surround sound amplifier/decoder (B) Use the Scart cable or the special Scart cable Scart to RCA.
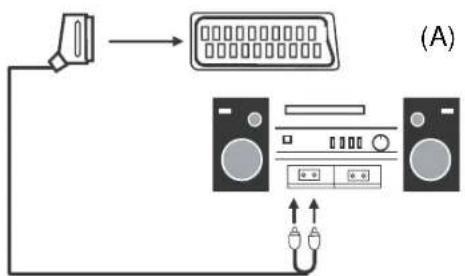
flowchart
graph TD
    A["Device"] --> B["LED Display"]
    B --> C["Audio Unit 1"]
    B --> D["Audio Unit 2"]
    C --> E["Output"]
    D --> F["Output"]
Scart to RCA cable
(B)
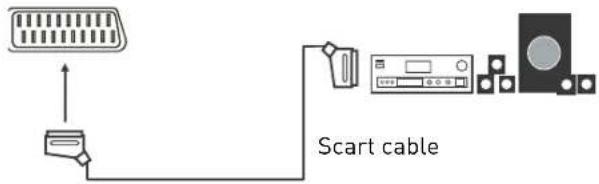
(All illustrated cables are not supplied)
Connecting a DVD player
Connect a DVD player using either a SCART cable or the HDMI cable. (only if your external equipment supports HDMI).
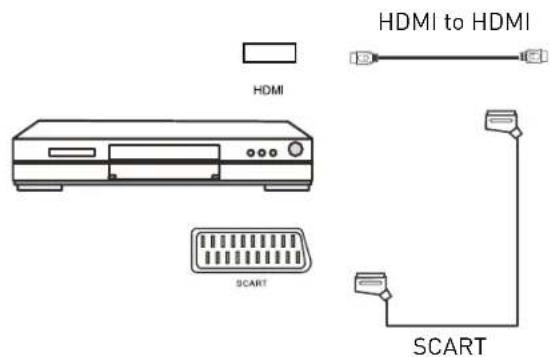
(All illustrated cables are not supplied)
When using the SCART cable
- Switch on the TV
- Switch on the DVD player
- Select SCART as input source
When using the HDMI cable
- Select HDMI as input source
Common Interface Slot
USING YOUR COMMON INTERFACE SLOT
Common Interface
The Common Interface (CI) slot is designed to accept the Conditional Access Module (CAM) and Smart Card in order to view the pay TV programmes and additional services. Contact your Pay Per View TV service provider to get more information about the modules and subscriptions.
NOTE: Conditional Access Module and Smart Cards are sold separately.
WARNING! SWITCH OFF YOUR TV BEFORE ANY MODULE IS INSERTED INTO THE COMMON INTERFACE SLOT, THEN ADD THE SMART CARD TO THE CAM.
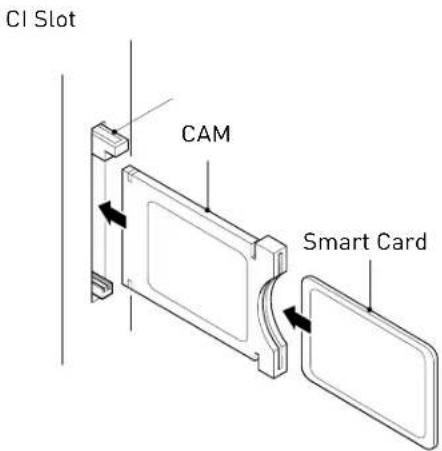
- Turn on the TV and ensure 'DTV' Source is selected.
- If the CAM is detected the TV will display the following message on the screen. "Common Interface Module inserted" wait for a few moments until the card is activated.
- Select the relevant digital Pay Per View channel.
- Detailed information on the Smart Card in use is displayed
- Press the Ok button to access the card menu. Refer to the Module Instruction Manual for setting details.
- When the module is removed, the following message will appear on the screen. "Common Interface module removed".
Auto installation setup
Power On / Off the LED TV
Power Switch On / Off
Press the power switch to setting and the standby indicator will light red.
To turn on the LED TV
Press the power button on the LED TV or the ⏻ button on the remote control, the standby indicator will light green.
To turn off the LED TV
Press the power button on the LED TV or the ⏻ button on the remote control, the standby indicator will light red.
To turn the LED TV off completely press the power switch to setting 📄 and the standby indicator light will extinguish.
When you initially turn on the LED TV you will see the first time installation menu as below:
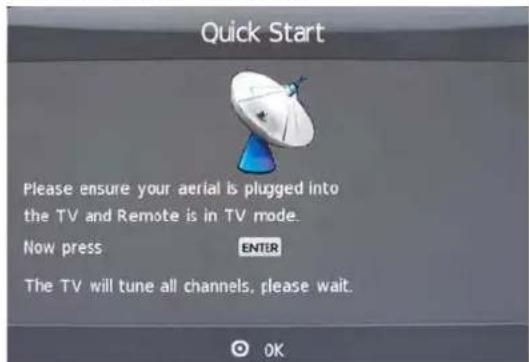
Ensure that the aerial is plugged in to the TV, Make sure your Remote is in TV mode (by pressing TV button), switch on the TV by pressing You will see the first time installation menu.
Press the OK button on the remote control to start the tuning procedure. This process will find all available ATV and DTV channels and store them.
By pressing the Quick Start button the first time installation can be recalled at any time.
Source Menu
You can select the input source menu by pressing the Source button on the remote control or the TV / AV button on the LED TV.
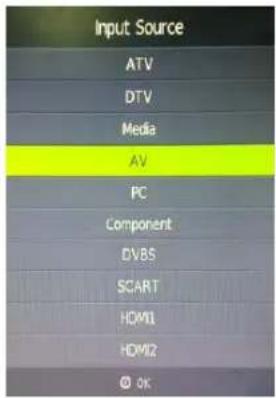
Press Source button on the remote control.
Use ▲▼ to move to the desired input source
Press OK to select.
Menu Settings
- Turn the LED TV on.
- Press the MENU button on the Remote Control.
- Use the ◀ and ▶ buttons to navigate through the menu.
- Press the EXIT button to exit the Menu.
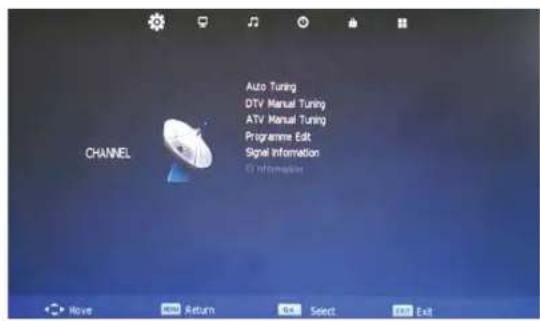
CHANNEL MENU
Allows you to search channels and set up a variety of channel options. (Select DTV source for example)
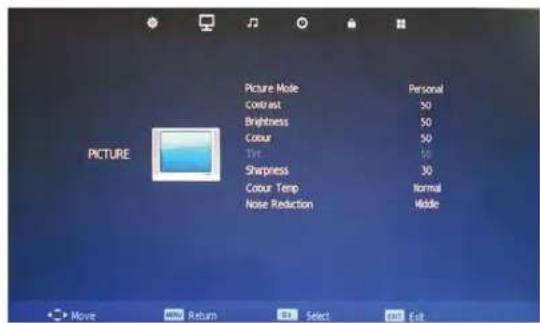
PICTURE MENU
Allows you to make adjustments to your picture settings. (Select DTV source for example)
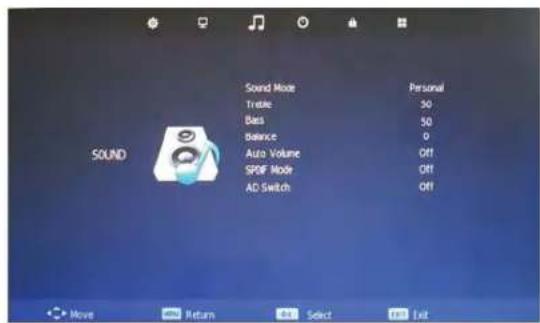
SOUND MENU
Allows you to customize the sound options and effects. (Select DTV source for example)
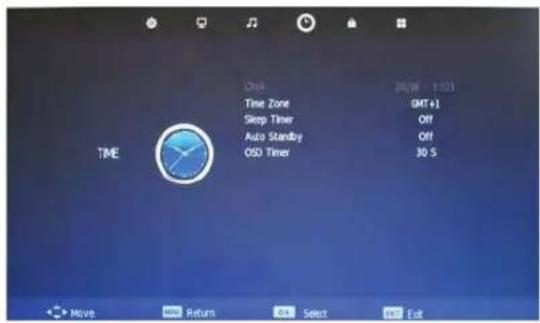
TIME MENU
Allows you to setup a variety of time options. (Select DTV source for example)
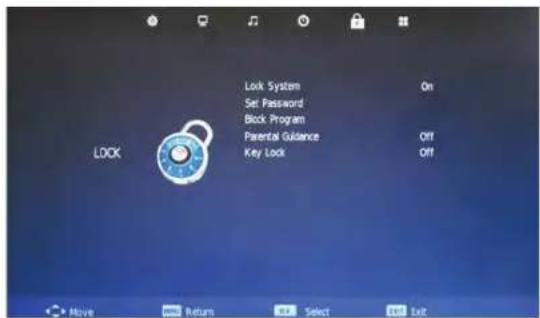
LOCK MENU
Allows you to set up a variety of lock options. (Select DTV source for example)
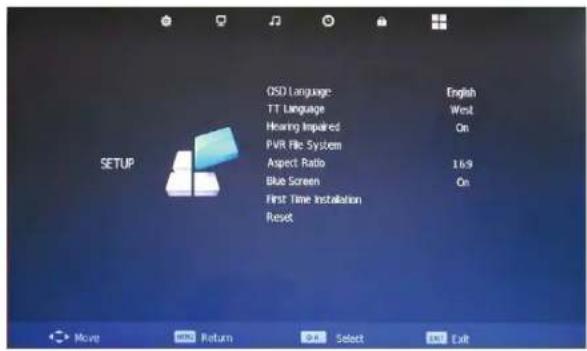
SETUP MENU
Allows you to set up a variety of options. (Select DTV source for example)
CHANNEL MENU
Use the ◀ and ▶ buttons to select the CHANNEL menu (as the picture above), press ▼ button to enter the menu.
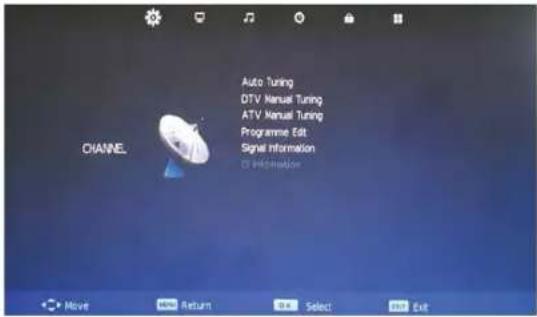
The CHANNEL menu includes the following options :
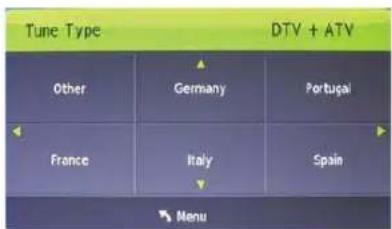
| Auto Tuning Press the OK button to enter the language menu, and press ◀▶ buttons to select the tuning mode. Then press ▼ button and use ▲▼◀▶ buttons to select the country, then press the Ok button to start the auto tune. |
| DTV Manual Tuning | Allows you to manually tune a selected DTV channel. |
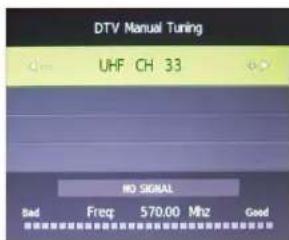
| ATV Manual Tuning | Allows you to manually tune a selected ATV channel. |
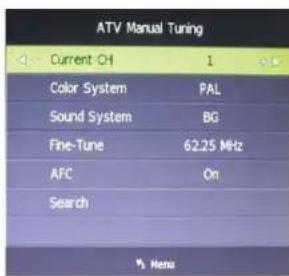
Press OK button to enter the ATV manual Tuning menu.
Current CH: Select a channel for storing the programme
Colour System: Select from PAL and AUTO
Sound System: Select from I, BG, DK
Search: Press ◀▶ button to manual search
Fine Tune: Press ◀▶ button to fine-tune
AFC: Automatic Frequency control ON/OFF
| Programme Edit | Opens the Programme Edit window where you can organise (delete, re-name, move, etc.) your channels. |
| Signal Information | Displays information about the signal strength and quality (DTV mode only). |
| CI Information | Displays information about the inserted CI Pay-TV card (if any). |
Programme Edit
Press OK button to enter the Programme Edit menu as the following picture.
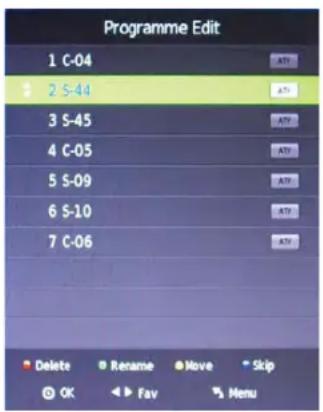
Delete: Select a channel and press RED button, "Delete" will appear on the right of the programme edit menu next to the channel you have chosen, then press RED button again, the programme will be deleted. However if you decide not to continue to delete press the menu button to quit.
Rename: Select an ATV channel and press the GREEN button to change the name of the channel by buttons.
Move: Select an ATV channel and press YELLOW button, then you can use ◀▶ buttons to exit and it will automatically save the current setting.
Skip: Select a channel and press the BLUE button to label the channel, as long as the channel has a skip label it will be skipped when searching through the channels with the CH+/- buttons.
Picture Menu
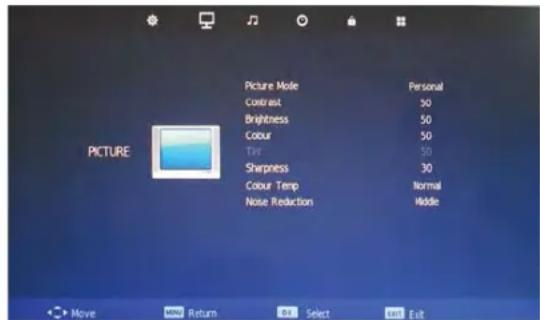
Picture Mode: Choose from Standard, Dynamic, User and Mild
Note: Contrast, Brightness, Colour and Sharpness are only available and can be adjusted in the User mode option.
Contrast: Controls the difference between the brightest and darkest regions of the picture.
Brightness: Controls the overall brightness of the picture.
Color: Controls the colour
Sharpness: Increase this setting to see crisp edges in the picture, decrease it for soft edges
Tint: Controls the (Tint / Hue) NTSC mode only.
Color Temp: Choose from Medium, Cool, User and Warm.
Noise Reduction: Choose interference noise modes from OFF, LOW, MIDDLE, HIGH and DEFAULT
Sound Menu
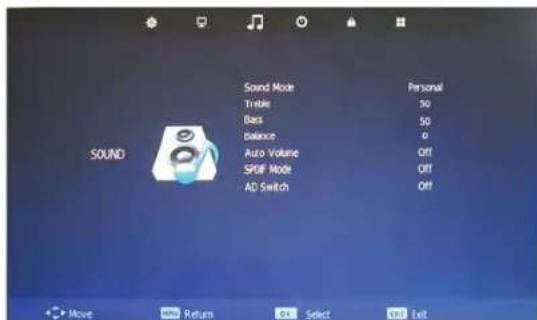
Sound Mode: Allows you to select Standard, Music, Movie, Sports or User. Note: Treble, Bass, Balance can only be adjusted when set in User mode.
Treble: Controls the relative intensity of higher pitched sounds
Bass: Controls the relative intensity of lower pitched sounds
Balance: Controls the volume between the left and right speaker.
Auto Volume: Controls the TVs volume automatically when ON is selected
SPDIF mode: Select the SPDIF mode AD Switch: Audio Descriptor ON/OFF
AD Switch: Audio Descriptor ON/OFF
Time Menu
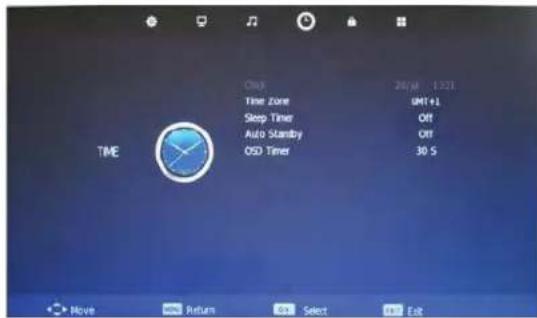
Clock: Display the time
Time Zone: Allows you to select the time zone
Sleep Timer: Allows you to setup the sleep timer among 10min, 20min, 30min, 60min, 90min, 120min, 180min, 24-0min and off
Auto Standby: Turn ON/OFF the auto standby function
OSD Timer: Allows you to select how long the menu is displayed on screen.
Lock Menu
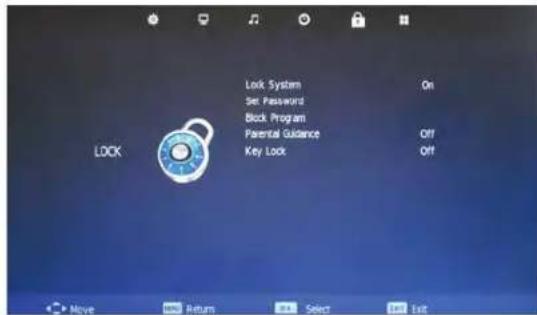
Lock System: Turn ON/OFF the lock system function
Note: you should enter the code to operate the menu (Default code is 0000)
Set Password: If the code has been changed you must enter the current password.
New: Enter new password
Confirm: Enter new password
Block Program: Use ▲▼ buttons to select the channel and press the GREEN button on the remote control to lock the channel.
Note: You must enter your password to view channels that have been blocked.
Parental Guidance: Allows you to select the parental guidance mode.
Key Lock: Lock the buttons on the TV set when you turn on this function.
Setup Menu
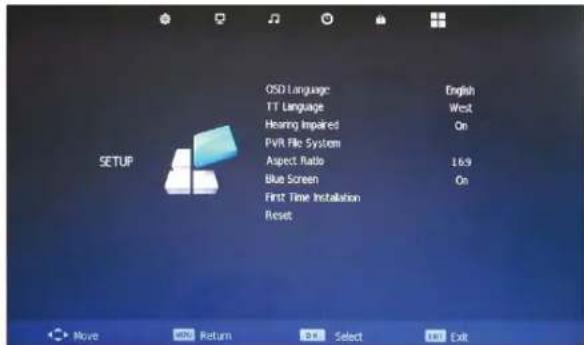
OSD Language: choose the menu language
TT Language: Allows you to select teletext language
Hearing Impaired: Turn ON/OFF the hearing impaired function
PVR File System: Setup the PVR file system
Aspect Ratio: AUTO, 4-3, 16:9, Zoom1, Zoom2, just scan and Panorama
Blue Screen: Turn ON/OFF the blue screen function
First Time Installation: Display the First Time Installation menu
Reset: Press OK to restore factory default settings
Multimedia Operation
Hints and informations of USB device
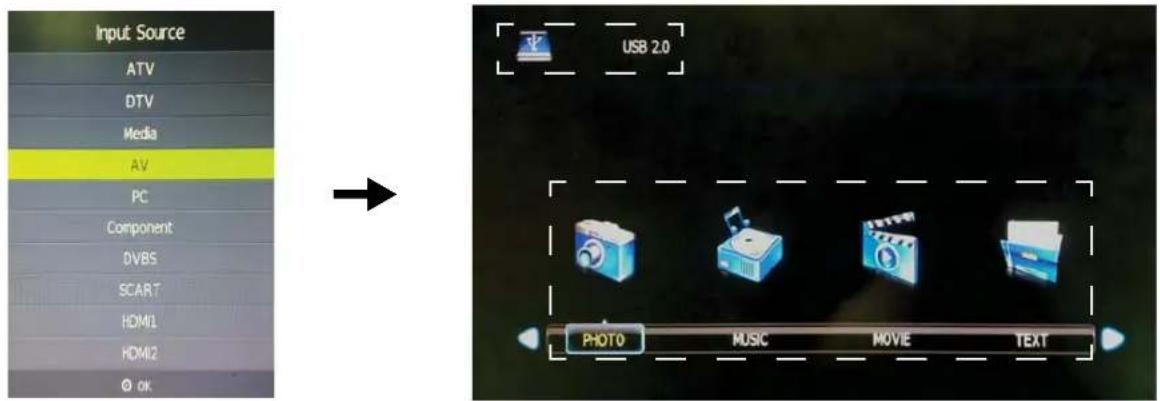
Press the source button to display the Input source menu and select MEDIA, press the OK button to enter the MEDIA menu as seen in picture above.
Insert USB device and select the type of files you want to listen too or view from PHOTO, MUSIC, MOVIE and TEXT. Then Press OK to enter the menu and choose the folder or file you wish to activate.
Return - Return to previous folder or menu Press play/pause button to preview files
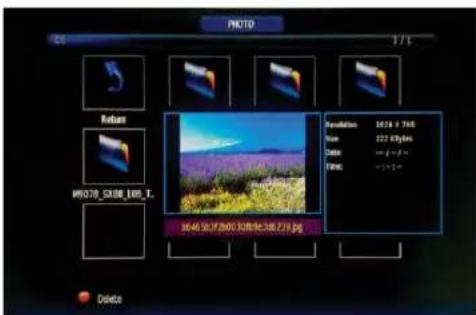
Press up/down/left/right arrow buttons to select and the OK button to activate the file or open the folder. Press OK to play the files in full screen mode. When in full screen mode press the OK button to show the navigation menu on the bottom of the screen or press stop button to return to files.
Note: Press RED button to delete any files
Photo
Photo viewing
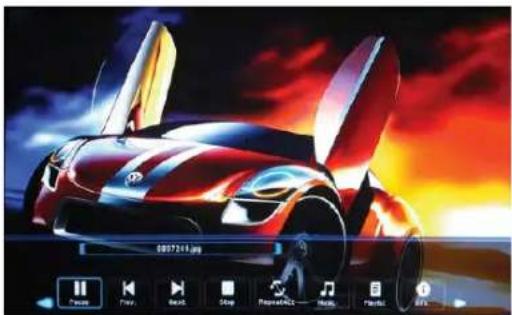
Press ◀▶ buttons to select the option on the navigation menu and press OK to activate.
natural_image
Illustration of a futuristic sports car with glowing red and orange panels against a fiery sky (no text or symbols)Pause: play/pause the photo viewing
Prev/Next: View the Previous or Next photo
Stop: Stop the photo viewing
Repeat: Select the repeat mode from REPEAT ALL, REPEAT 1 and OFF
Music: Play/Pause the music
Playlist: Display the playlist on screen
Info: Display the file information
Rotate: Turn the photo clockwise or counter clockwise
Zoom: Zoom IN/OUT of the photo.
Move View: Move the photo in Zoom in mode.
Music
Play the music
Press ◀▶ buttons to select the option on the menu and press OK button to activate.
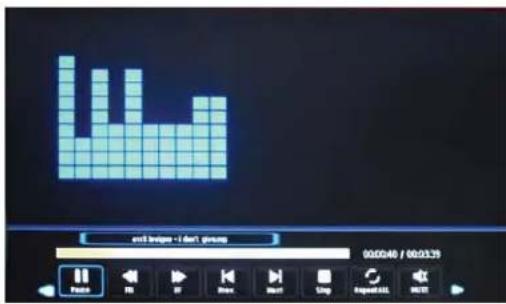
Pause: Play/Pause the music
FB/FF: Fast back and Fast forward
Prev/Next: Play the previous or next file
Stop: Stop the music
Repeat: Select from REPEAT ALL, REPEAT 1 and OFF
Mute: Mute the Audio
Playlist: Display the playlist on screen
Goto Time: Play the music or audio book from the time you set
Movie
Play the movie
Press ◀▶ buttons to select the option on the menu and press OK button to activate.
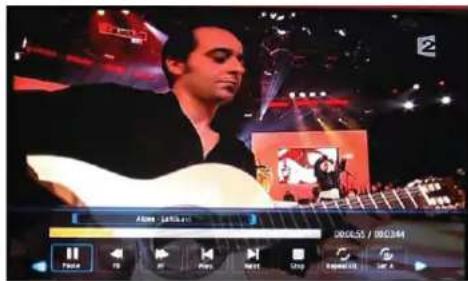
Pause: Play/Pause the movie
FB/FF: Fast back and Fast forward
Prev/Next: Play the previous or next file
Stop: Stop the movie playback
Set A-B: Select and play a chosen part of the movie file by setting A as start point and B as end. Press OK button to cancel.
Playlist: Display the playlist on screen
Slow forward: Play the movies at slow speed, press ▶ for normal playback speed.
Step forward: Step quickly through the movie using this option
Goto Time: Play the movie from the time you set
Zoom: Zoom IN/OUT of the movie screen.
Aspect Ratio: Select the size of the screen display
Move View: Move the photo in Zoom mode
Text
View text files
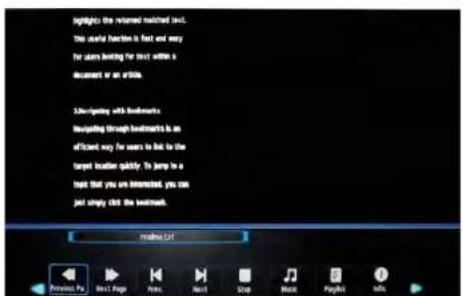
Prev/Next Page: Turn to the Previous or Next page
Prev/Next: Turn to the previous or next file
Music: Play/Pause the music programme
Playlist: Display the playlist on screen
Info: Display the file information
Stop: Stop the text viewing

Recording Operation
PVR Settings
PVR File System Press the MENU button and select SETUP menu, choose PVR File System and press OK.
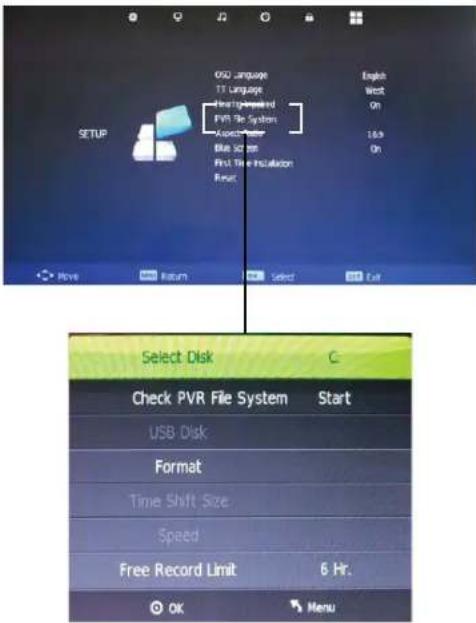
Select Disc: Select the USB device to record on.
Check PVR File System: Check the system of the USB device
USB Disc: Displays information
Format: Format the USB device for PVR operating
Time Shift Size: Displays the memory size of the USB device
Speed: Displays the speed of the USB device
Free Record Limit: Set the record time limit
Recorded List
Press the SD1 button on the remote control to display the recorded list
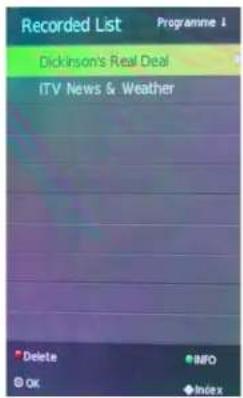
Note: Delete any scheduled recordings out of this list with the RED button.
Schedule List
Press the A button on the remote control to display the recorder schedule list

Note: Delete any scheduled recordings out of this list with the RED button
Timer Record
When selecting a programme in the EPG for Timer record the Recorder menu will appear. Press OK and the Timer will set automatically from the EPG data. If you choose to manually programme the Recorder menu you can.
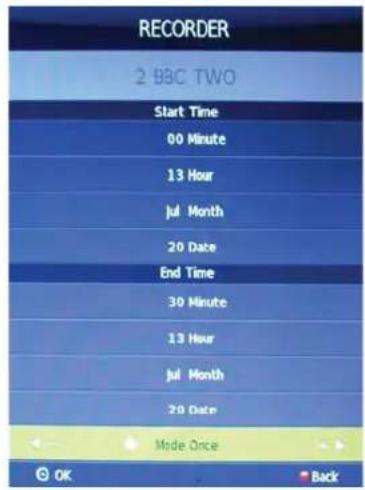
Channel: Select the channel you want to record
Mode: Select the recording mode
Start time: Select the record time begin
End time: Select the record time end
Press the OK button to save and exit the menu
Recording
Record and Time shift function buttons
When you press the Rec button the navigation menu will display on screen.
Note: Display and exit the navigation menu by pressing the Ⓞ button. While you are recording you can press the play button and watch what has already been recorded.
![[0000:28] Play 16 FF Prev. Next Pause Stop (0000:53:10) 2 RBC TWO 13:99](/content/2026/02/377709/images/51b4b0189fa14462d40efb12ebfc477da3b3a38d0c83690b0c69054e9f6beec5.jpg)
Recording: Press to start instant recording
Pause: Press ▶ to activate the time shift function and pause live TV.
Stop: Press ■ to stop the recording or the time shift process.
Remote Control button SD1: Displays the recorded List
Remote Control button A: Displays the Recording Schedule List
Time shift
When you press the EXIT Rec button the navigation menu will display on screen.
Note: Display and exit the navigation menu by pressing the EXIT button While you are recording you can press the play button and watch what has already been recorded.
When you press the ▶ Pause/Play button the picture will be paused and the navigation menu will displayed on screen
![[00:00:04/00:00:09] Play FB PF Prev. Next Pause Stop 13:08](/content/2026/02/377709/images/8e3c6ad4946184a98ddc288a47ecb45b417562d8df84be7b61e3116be02c958e.jpg)
While you are doing a time shift recording you can press the play button and watch what has already been recorded
EPG Recording
Display the programme guide by pressing the GUIDE button
Select a programme to record by navigating through the EPG with the ▲▼◀▶ buttons.
![PROGRAMME GUIDE 20 Jul 2005 13:00-13:30 20 Jul 2005 13:07 Essex Marshes: Not a flash car nor a gold chain in sight on the timeless Essex Marshes, fishing smacks and saling barges around as we discover the TBA Essex man [ADST] 20 Jul 1 BBC ONE 13:00-13:30 This Land 2 BBC TWO 13:30-14:00 Working Lunch 3 BBC THREE 14:00-14:50 The Future Is Wild 4 BBC NEWS 24 14:50-15:00 The Flying Gardener 5 BBCI 15:00-15:30 Country Cops 6 CBC Channel 15:30-16:30 Living in the Sun 7 TV4 Göteborg 16:30-17:15 Ready Steady Cook 8 CNN 17:15-18:00 The Weakest Link Record Display #Schedule #Remind Have View Hi/Frey Day #Next Day @OK](/content/2026/02/377709/images/0e72e1d4779e9f9edb3db0d1725f03014d851464cfbd65310e215117a5a87191.jpg)
Record: Press the RED button to display the recorder menu and set the timer record. When the programme starts it will be recorded to the USB device.
Display: Press the GREEN button to display the information of the programme
Schedule: Press YELLOW button to display the recording Schedule List
Remind: Press BLUE button to display the remind menu. Once the programme starts the TV will automatically switch to this programme.
MAIN SATELLITE MENU
All the important settings and features of your receiver can be operated in Main Menu. The Main Menu consists of five sub-menus: "SETUP", "TV", "Radio", "Multimedia" and "Game". Press the MENU button when the menu is off, the MAIN MENU screen will appear.
Note: In Satellite mode the menus have a different appearance to TV mode. This is helpful to ensure you are in the correct mode.
Enter the menu of each mode by first selecting the mode (using Source key) and then press MENU.
1) SETUP
In MAIN MENU screen, press ◀▶ to select SETUP, this menu consists of the "Installation", "TV Setup", "Password", "Advance Timer", "SW Update" and "Set Default".
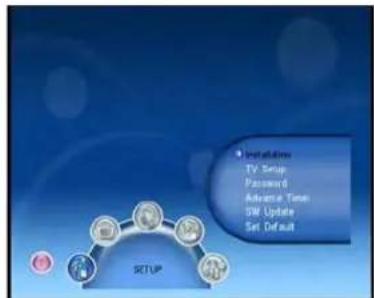
Installation
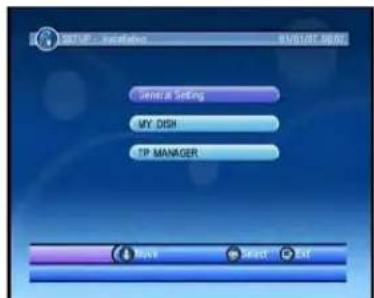
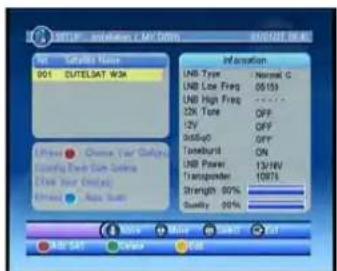
In SETUP menu, press ▲▼ to select Installation, then press OK key to enter Installation menu. In this menu, you can set General Setting, MY DISH, TP MANAGER.
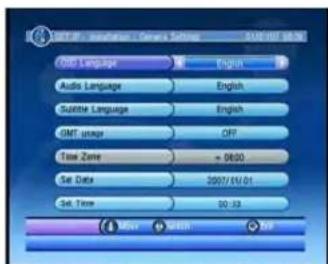
General Setting: In this menu, you can set OSD Language, Audio Language, Subtitle Language, GMT usage, Time Zone, Set Date and Set Time.
MY DISH: In this menu, you can add satellite by pressing RED key, delete satellite by pressing GREEN key, edit satellite by pressing YELLOW key and auto scan by pressing BLUE key.
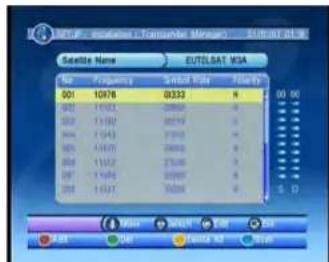
TP MANAGER: In this menu, press ◀▶ to switch satellite, press ▲▼ to switch Frequency, then press RED key, you can add Frequency, press GREEN key, you can delete Frequency, press YELLOW key, you can delete all.
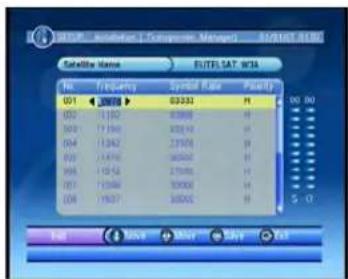
Press OK key, you can edit Frequency.
TV Setup
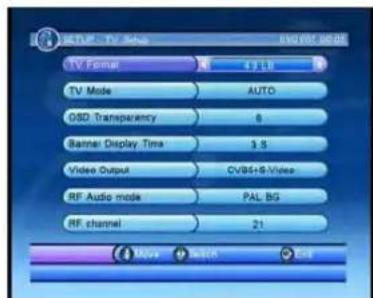
In SETUP menu, press ▲▼ to select TV Setup, then press OK key to enter TV Setup menu. In this menu, you can set TV Mode (Auto, PAL), OSD Transparency (1\~8), Banner Display Time (1S, 3S, 5S, 10S, 30S, Always),
Password
In SET UP menu, press ▲▼ to select Password, then press OK key to enter Password menu (if supported by the broadcasting channel). In this menu, you can setup Menu Lock(ON/OFF), Channel Lock (ON/OFF), Censorship Lock (No Block, Total Block, 02-18), and Change Password (NO/YES). The Master password is 0000.
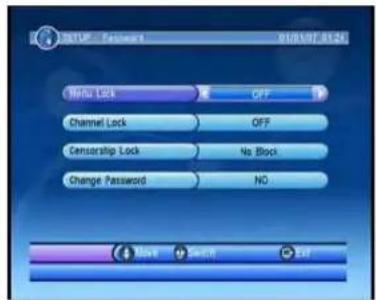
Advance Timer
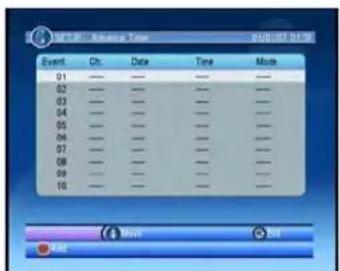
In SET UP menu, press ▲▼ to select Advance Timer, press OK key to enter this menu. In this menu, you can add timer by pressing RED key, you can setup Channel Type, Channel No., Channel Name, Start Date (Y/M/D), Start Time, End Time, Mode and Timer Mode, then press OK key to save.
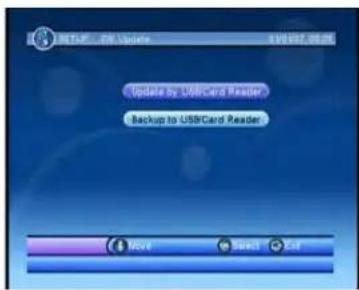
In SET UP menu, press ▲▼ to select SW Update, press OK key to enter this menu. In this menu, you can update the software by USB and backup to USB.
Set Default
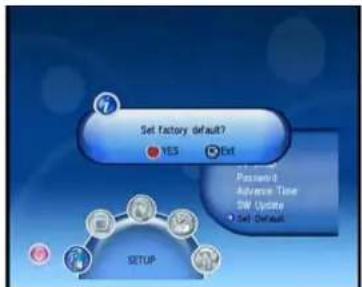
Select Set Default and press OK key, then press OK key. This will delete all user settings and installed channels.
2) TV/Radio
The Radio operation is the same as TV.
In MAIN MENU screen, press ◀▶ to select TV, this menu consists of the "TV List" and "TV Guide".
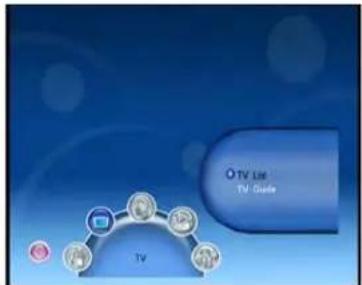
TV List
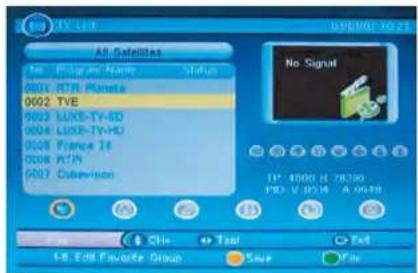
Select TV List and press OK key to enter TV List menu, in this menu, you can add channels to different favorite groups, Lock channels, Edit channels, Move channels, Sort channels, Delete channels.
Favorites: Press ▲▼ button to select a channel, press ◀▶ button to select Favorites, then press 1\~8 key to add the channel to the favorite group which you want to add to.
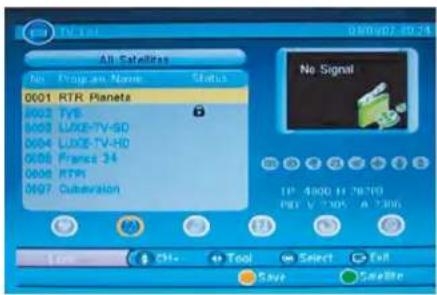
Lock: Press ▲▼ button to select a channel, press ◀▶ button to select Lock, then press OK key to lock the channel, press OK key again to cancel lock. Press YELLOW button to save.
Edit: Press ▲▼ button to select a channel, press ◀▶ button to select Edit, then press OK key to enter the Program Info menu, in this menu, you can see the program information and rename the channel,
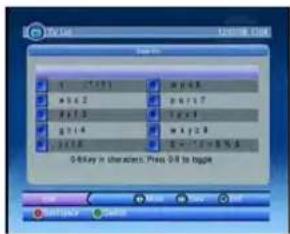
Move: Press ▲▼ button to select a channel, press ◀▶ button to select Move, press OK key, then press ▲▼ button to move the channel to the position where you want to move.
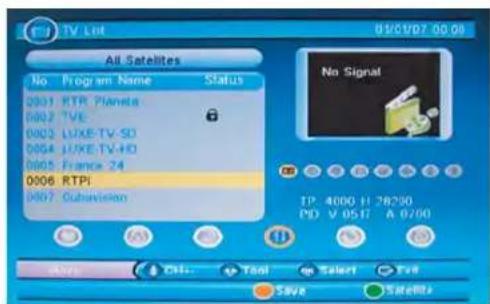
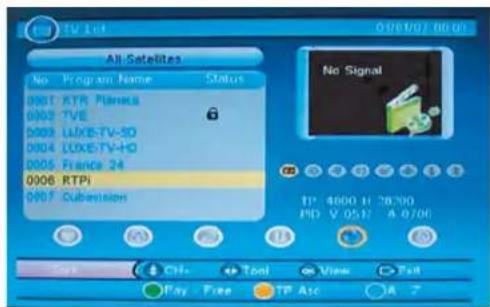
Sort: Press ▲▼ button to select a channel, press ◀▶ button to select Sort, you can sort the channels by "A-Z/Z-A", "Free-Pay/Pay-Free", "TP Asc./TP Desc.".
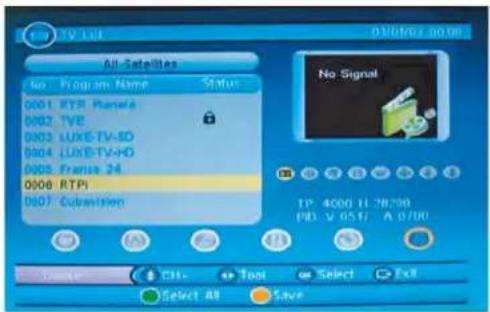
Delete: Press ◀ button to select Delete, press OK key to delete the selected channel. Press GREEN button to delete all channels.
TV Guide
Select TV Guide and press OK key to enter TV Guide menu, in this menu, you can view the channel guide.
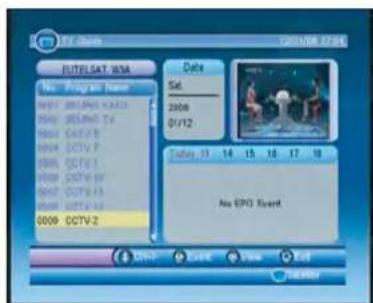
Press Guide button to enter the program guide. Press ▲▼ to select a program. Press Red button to book the program for recording.
3) MULTIMEDIA
In MAIN MENU screen, press ◀ to select MULTIMEDIA, this menu consists of the "My Album", "My Music", "My Movie" and "My Recorder".
You can also select this menu directly from viewing mode by the Media key (Yellow button)
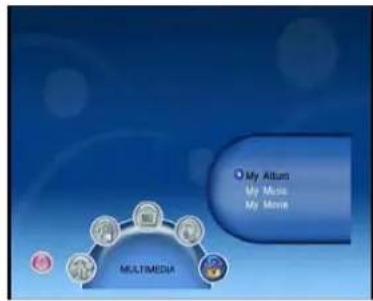
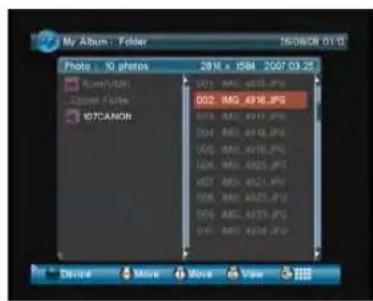
My Album
Select My Album and press OK key, then press BLUE button to choose you photo folder, select a photo and press OK key to view.
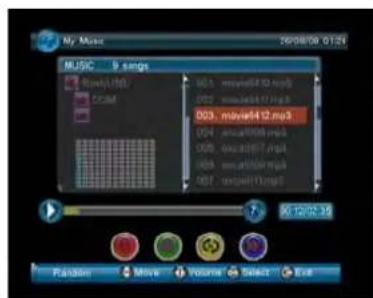
My Music
Select My Music and press OK key to enter, press ▲▼ button to choose a song, press OK or RED button to play, in playing, press RED button to pause, press GREEN button to stop, press YELLOW button to cycle and press BLUE button to speed
My Movie
Select "My Movie" and press the OK key. Select folder through Menu structure on the left of screen. Use the ▲▼ keys to select a movie file. Press the OK key to play selected file. Press ▲▼ keys to play the previous movie or next movie, press ◀▶ to change the volume.
My Record
This menu consists of three sub-menus; "Recorded List", "Recording Device" and "Recording Preference".
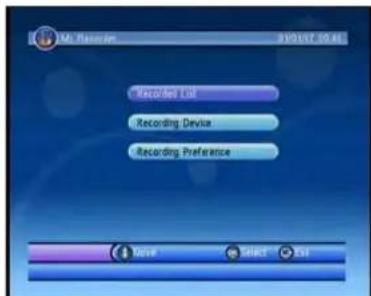

Recorded List (You can also enter this list directly using the SD2 button)
In this menu, you can view your record information and play your record. Press ▲▼ keys to select the program, and press OK key to play.
Recording Device: In this menu, you can view the recording device and format disk. Recording Preference: In this menu, you can setup the Recording Preference.
(Scheduled recordings List: You can see a list or recordings you have scheduled by Pressing the B button)
4) GAME
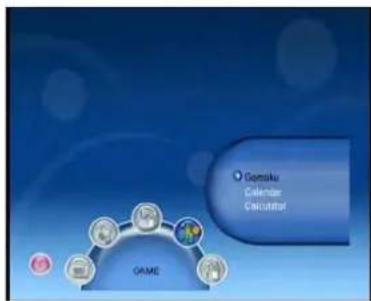
In MAIN MENU screen, press ◀▶ to select GAME, in this menu, you can play the game, view the calendar and use the calculator.
TROUBLE SHOOTING GUIDE
To assist in locating possible faults use the help guide below.
| SYMPTOM SOLUTION | |
| No Picture, no sound Check that | the TV is correctly plugged in. Check that the TV is connected to a suitable power source. Check the electrical supply is turned on. |
| No Picture Ensure that the TV is | powered on. Check that the cables are fitted securely. Ensure the aerial and/or external sources are connected. Press the SOURCE button to change the source. Turn the TV on or off. |
| No Sound Press the MUTE button | and check if Mute mode is set. Switch to another channel and see if the same problem occurs. Press V+ button to see if the problem can be solved. |
| No picture on some channels Check that correct channel is selected. Adjust the antenna. | |
| No colour on some channels (black &white) | Check if the same problem exists on other channels. Ensure the correct picture settings are selected. |
| Noisy, Snowy, Ghosting picture. Check the antenna is connected correctly. Check that the antenna Is in good condition. Try moving the antenna. | |
If none of the suggestions seem to work, try switching your TV off and then on again. If this does not work contact our technical helpline.
NOTE: The TV must only be repaired by a qualified registered service person. Never attempt to remove the back cover as the TV has dangerous voltages inside that may cause fatality or fire.
TECHNICAL SPECIFICATIONS
Specifications of the TV that you have just purchased may vary from the information in this table due to technical innovations.
TV Specifications
| TV System PAL/BG/DK/I | |
| Audio System BG/DK/I | |
| Screen size 32” (Diagonal) | |
| Resolution 1920 x 1080 Pixels (RGB) | |
| Aerial input 75 Ohm (unbalanced) | |
| Audio output power 2 x 6W | |
| Power requirements 100-240V ~ 50/60Hz | |
| Power consumption < 120W | |
| Standby power consumption | <1W |
| Weight | 9.20 kg |
DVBS Specifications
| DVBS Module | YES |
| TV-Radio | YES |
| LNB | Universal / 22KHz / DiSeqC |
| LNB Power | 500mA |
| EPG | YES |
| Quick-start tuning | YES |
| Favorite list | YES |
| Multimedia playback | USB |
| Sockets | LNB in & out, USB |
| DVBS PVR Function | YES |
| Instant recording | YES |
| Timer recording | YES |
| Watch same bouquet while recording | YES |
| Recording media | YES |
Remote control specifications
| Type Infrared | |
| Control distance 5m | |
| Control angle 30 degrees (Horizontal) | |
| Batteries 2 x 1.5V, Size AA | |
| Dimensions 60 x 204 x 32 mm | |
| Weight 140g (without batteries) | |
Wall Mounting
- The stand must first be removed. Place the TV face down.
- Remove the four screws at the bottom underneath the stand. Press the retaining clips forward to release the base of the stand. Remove the one screw inside of the trunk of the stand still attached to the TV. Remove the three screws on the back of the TV to release the remaining part of the stand.
- Remove and store the stand and screws.
- Use four machine screws to mount the TV on the bracket.
This unit is VESA-Compliant and designed to be wall mounted with a VESA-Compliant 200mm x 200 mm mounting kit. Mount this unit according to the instructions of the wall bracket (not supplied)
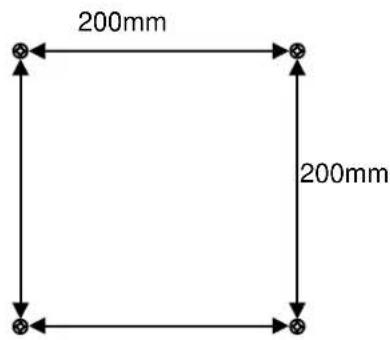
4 Mounting holes Screw size MB4 x 15
Waste Electrical Recycling
Correct disposal of Product
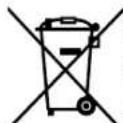
This sign indicates that this product may not be disposed of with your regular household waste. The recycling and separate collection of such products is your responsibility. Please drop off the above mentioned waste at a designated place for recycling waste electrical and electronic equipment. If you do not know where to drop off your waste equipment for recycling, please contact your local city office or household waste collection service.
The crossed out wheeled dust bin symbol indicates that batteries and/or accumulators must be collected and disposed of separately from household waste.
Hg Cd Pb
If the battery or accumulator contains more than the specified values of lead (Pb), mercury (Hg), and/or cadmium (Cd) defined in the Battery Directive (2006/66/EC), then the chemicals Hg Cd Pb symbols for lead(Pb), mercury (Hg) and/or cadmium (Cd) will appear below the crossed out wheeled dust bin symbol.
ating in separate collection of batteries, you assure the proper disposal of products and thus help to prevent potential negative conse- or the environment and human health.
For more detailed information about the collection and recycling programmes available in your country, please contact your local city office or the shop where you purchased this product.

This appliance complies with European Safety and Electrical directives. It fulfils the following EU regulations:
En55013:2001+A1:2003+A2:2006
EN55020: 2007
EN61000-3-2: 2006 EN61000-3-3:1995+A1:2001+A2:2005
EN55022:2006(CLASS-A)
EN55024:1998+A1:2001+A2:2003
Manufacturer:
D-66780 Rehlingen-Siersburg (Germany)
Fon: +49(0)6835 92350-0
Fax: +49(0)6835 92350-500


Contenu
natural_image
Line drawing of a flat-screen monitor with blank screen (no text or symbols)Téléviseur
Télécommande
natural_image
Line drawing of a flat-screen monitor with blank screen and base (no text or symbols)Voyant

natural_image
Illustration of a desktop computer tower with ventilation slots and indicator lights (no text or symbols)Modification programme
natural_image
Front view of a silver 9f sports car on display with no visible text or symbols in the image itself.![Live 1 BBC ONE [00:00:15] [00:00:12:46] 13:11](/content/2026/02/377709/images/25a577440188b343af3653f429e7674703a04086dd683fbac2b6c02eb7e8d8bb.jpg)
Configuration TV
Liste TV
FR
Slot Common Interface....13
UTILIZZARE LO SLOT COMMON INTERFACE 13
natural_image
Line drawing of a flat-screen monitor with blank screen (no text or symbols)TV
Telecomando
natural_image
Line drawing of a flat-screen monitor with a blank screen and base (no text or symbols)Indicatore LED
Uso del telecomando

Slot Common Interface
UTILIZZARE LO SLOT COMMON INTERFACE
Common Interface
Sist. file PVR: Imposta Sistema file PVR
Rapporto del formato: AUTO, 4:3, 16:9, Zoom1, Zoom2, Solo scan e Panorama
natural_image
Blue sports car with silver body and headlights, displayed in a studio setting (no visible text or symbols on the car itself)




- TV-Liste
- Mein Album
- service@schmid-electronics.de
- SAFETY INFORMATION ....3
- Getting Started....5
- Remote Control....6
- Aerial connection....9
- Connecting external devices 9
- Common Interface Slot....13
- Auto installation setup....13
- Source Menu 14
- Menu Settings 14
- Multimedia Operation....18
- Recording Operation 20
- MAIN SATELLITE MENU....22
- TROUBLE SHOOTING GUIDE 26
- TECHNICAL SPECIFICATIONS ......26
- Wall Mounting 27
- Waste Electrical Recycling 27
- Introduction
- HDMI
- Safety is important
- Disclaimer
- SAFETY INFORMATION
- Headphone Warning
- Where to install
- LCD Screen
- Remote Control
- Functions of remote control buttons
- Remote control (continued)
- To Set the Multi-Satellite Mode button
- Installing Batteries in the Remote Control
- Using the Remote Control
- Aerial connection
- Connecting the TV Antenna
- Connecting external devices
- HDMI Lead
- SCART Lead
- VGA Cable
- Connecting external devices (continued)
- Caution:
- PC connection
- VGA, HDMI PC Connection
- Connecting Video camera and Video recorder Video camera
- Video recorder
- Connecting an audio system
- Connecting a DVD player
- Common Interface Slot
- USING YOUR COMMON INTERFACE SLOT
- Common Interface
- Auto installation setup
- Source Menu
- Menu Settings
- CHANNEL MENU
- PICTURE MENU
- SOUND MENU
- TIME MENU
- LOCK MENU
- SETUP MENU
- Programme Edit
- Multimedia Operation
- Photo
- Photo viewing
- Music
- Play the music
- Movie
- Play the movie
- Text
- View text files
- Recording Operation
- PVR Settings
- Recorded List
- Schedule List
- Timer Record
- Recording
- Record and Time shift function buttons
- Time shift
- EPG Recording
- MAIN SATELLITE MENU
- 1) SETUP
- Installation
- TV Setup
- Password
- Advance Timer
- Set Default
- 2) TV/Radio
- TV List
- TV Guide
- 3) MULTIMEDIA
- My Album
- My Music
- My Movie
- My Record
- 4) GAME
- TROUBLE SHOOTING GUIDE
- TECHNICAL SPECIFICATIONS
- Wall Mounting
- Waste Electrical Recycling
- Correct disposal of Product
- Hg Cd Pb
- Manufacturer:
- Contenu
- Modification programme
- Configuration TV
- Liste TV
- Slot Common Interface....13
- Uso del telecomando
- Slot Common Interface
- UTILIZZARE LO SLOT COMMON INTERFACE
Brand : SEG
Model : Minnesota
Category : Television