BB 1201 - TV SEG - Free user manual and instructions
Find the device manual for free BB 1201 SEG in PDF.
Download the instructions for your TV in PDF format for free! Find your manual BB 1201 - SEG and take your electronic device back in hand. On this page are published all the documents necessary for the use of your device. BB 1201 by SEG.
USER MANUAL BB 1201 SEG
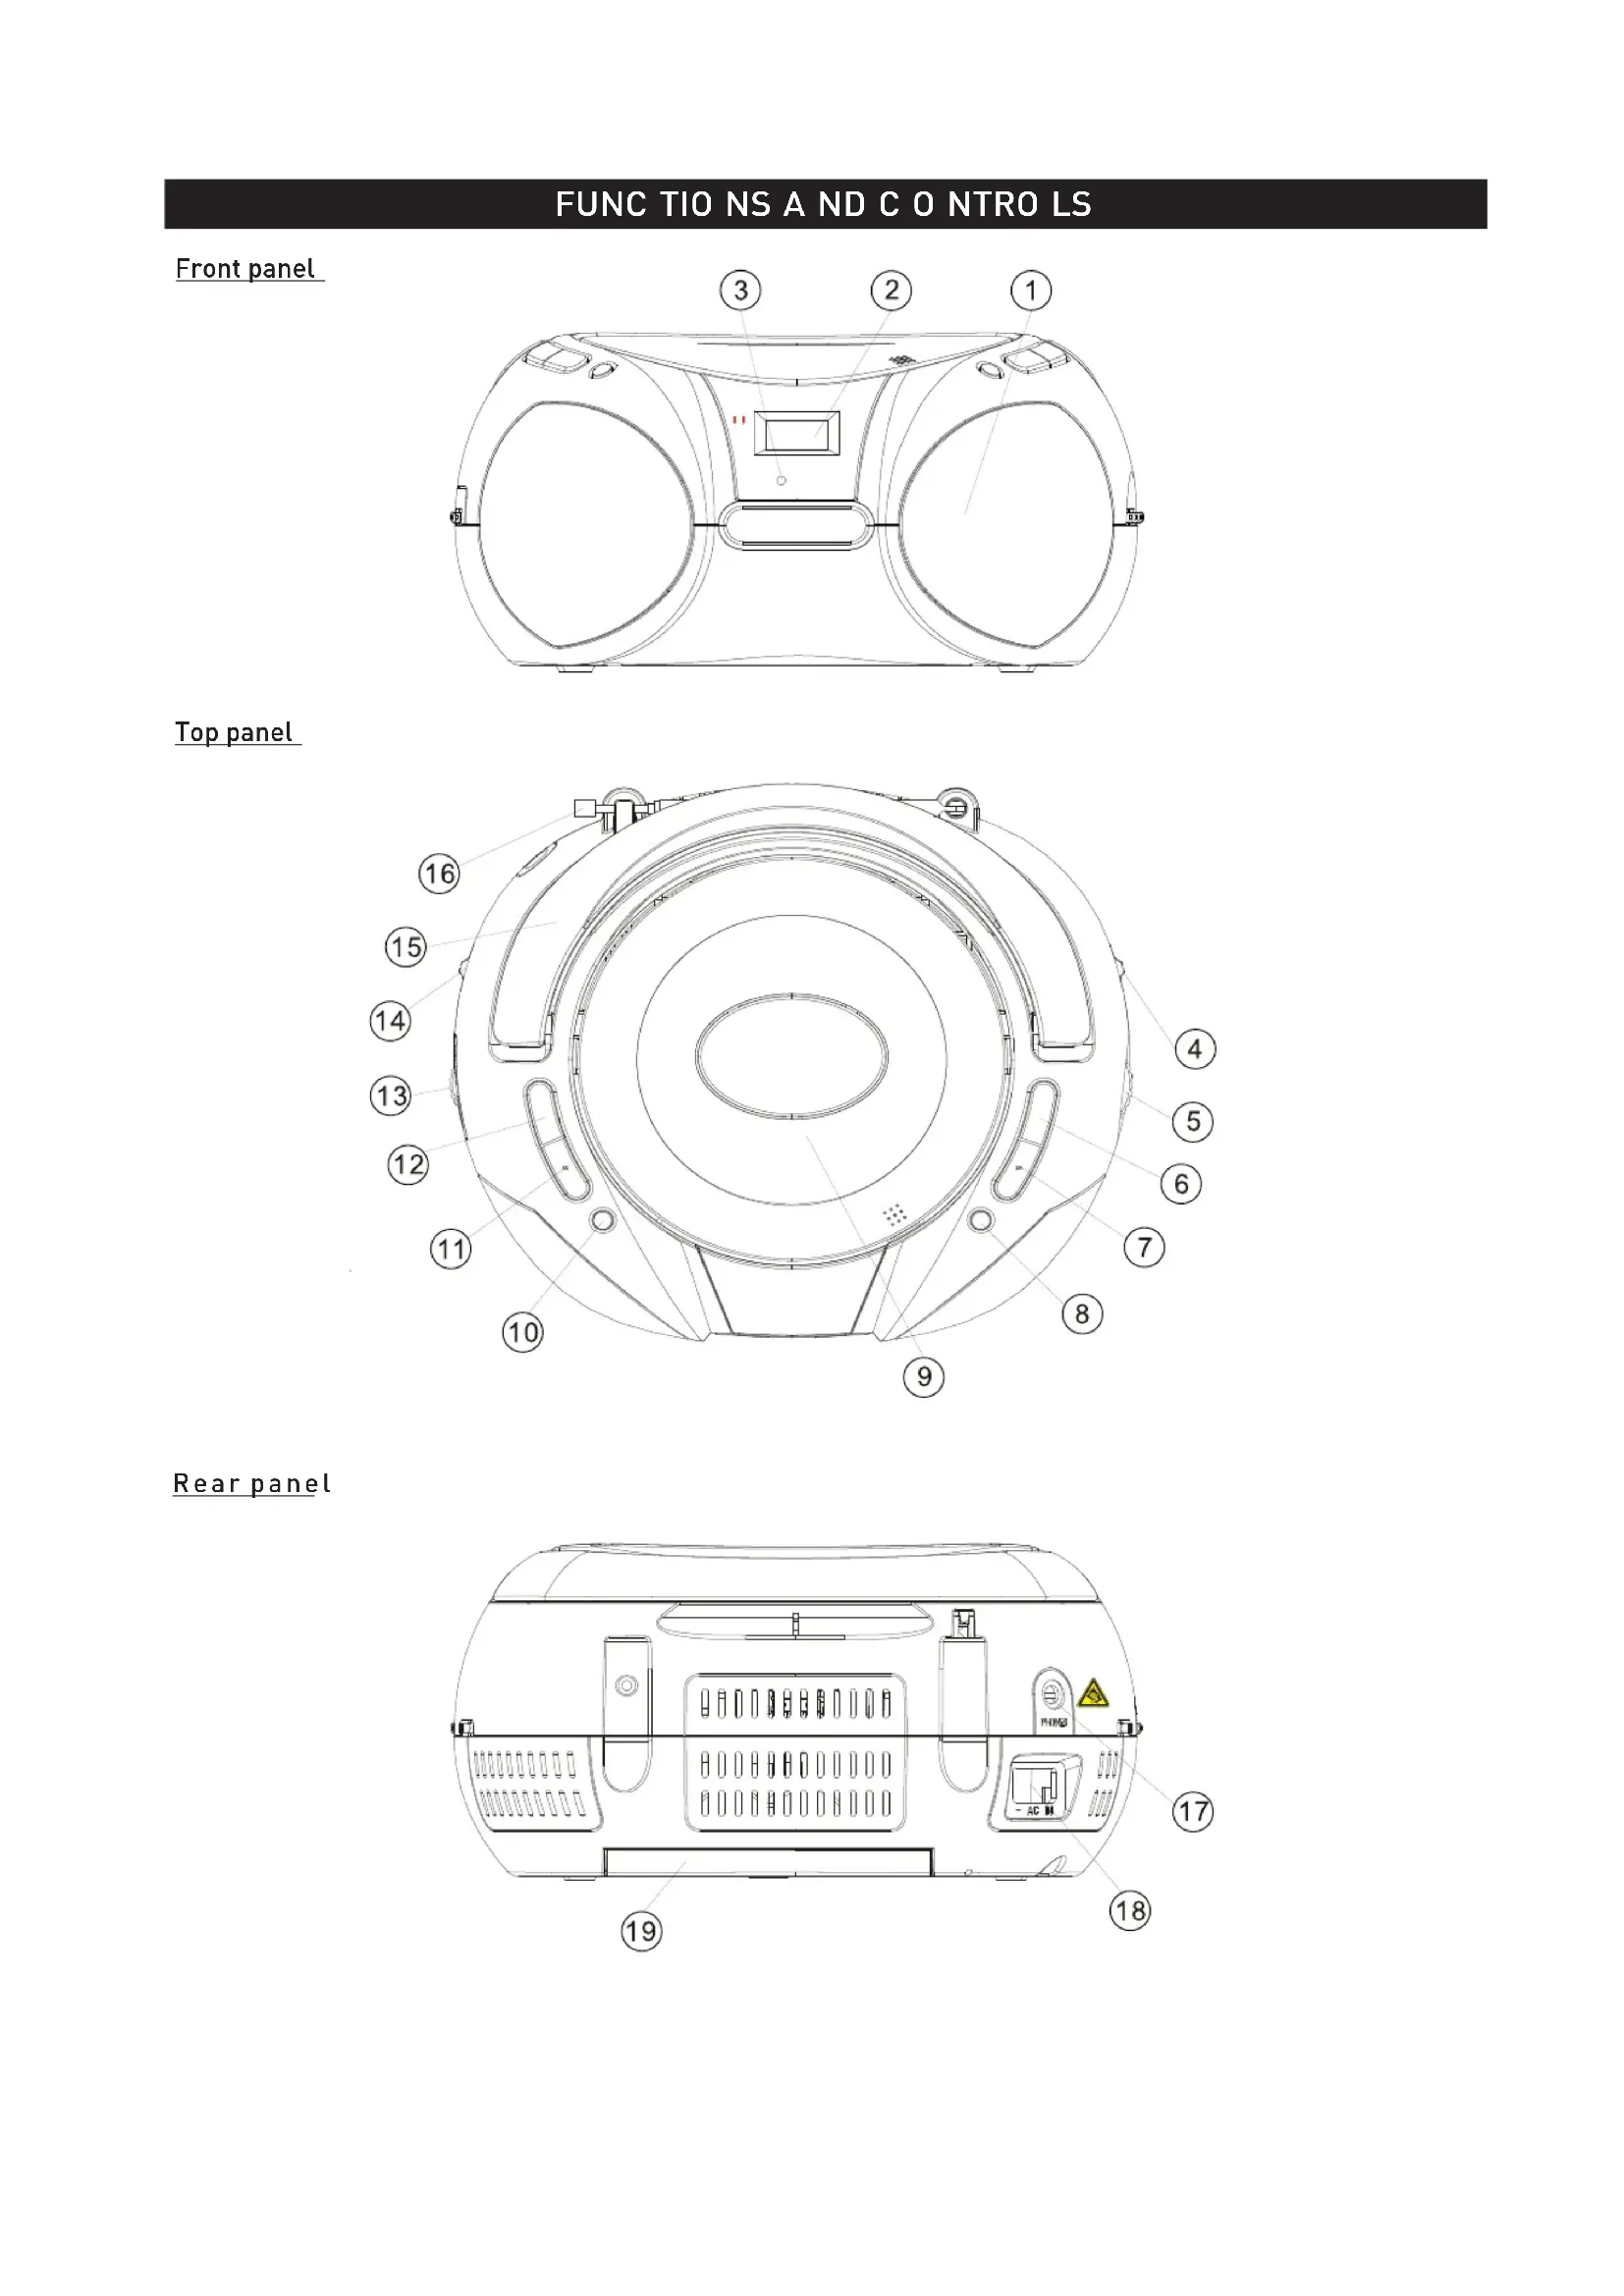
FUNC TIO NS A ND C O NTRO LS Front panel Top panel Rear panelREAR PANEL
17. STEREO H EA DPHO NE J A C K
- connect for the 3.5mm stereo headphone.
18. A C P O WER S UPPLY
- p ower supply cord connection.
19. B ATTERY C O MPA RTMENT
- opening of the battery c ompartment. FUNC TIO NS A ND C O NTRO LS FRO NT,TO P A ND S IDE P A NEL
R EPEAT CD: repeat a track/CD/program.
N EX T C D: next tracks.
PLAY/PAUSE C D: start or pauses C D p layback. FM S TEREO I NDIC ATO R - display of FM stereo indications.
STOP C D: stops C D p layback or delete a p rogram. BA ND S ELEC TO R ( A M•FM•FM S T.) - frequency band selection: AM, FM o r FM S T.
BACK C D: return to the previous track.
PROGRAM C D: programming and control of programmed track number. DISPLAY - display of C D functions.
HANDLE C D D O O R - CD c ompartment door open/close mark ( O PEN/C LO SE).
TELESCOPIC ANTENNA - improvement of FM reception.
- AM/FM/FM S T. stations selector.
- Health injury: extremely high audio volumes can damage your hearing perma- nently. Therefore carefully adjust the volume, specially if you enjoy sound via headphones or earphones. Constant high volume use can lead to permanent hearing loss. Connect the headphones or earphones to the device (if available - option) prior to power- ing it on, as connecting it when already powered on can produce high sound levels causing damage to your hearing.POWER SUPPLY If you would like, the electrical power supply can be used to save the batteries. Make sure that the unit is unplugged from the wall outlet before inserting the batteries. US ING T HE D C P O WER S UPPLY Batteries (not included) O pen the battery compartment and insert 8 R14 batteries with respect to the "+" and "-" polarity indications in the compartment. Warnings relating t o t he u se o f b atteries Batteries must be inserted taking care to match the polarities shown. Make sure that the (+) and (-) terminals are placed in the right direction. Never use batteries that show signs of electrolyte leaks or cracking. Never dispose of used batteries in an open fire. Keep batteries out of reach of children. Never recharge disposable batteries. Never short circuit battery terminals. Always remove used batteries from the appliance c ase. Do not try to open the batteries. O nly use batteries of the recommended or equivalent type. Remove batteries from the appliance before disposing of it at the end of its service life. Important: When replacing the batteries, make sure you dispose of the old batteries in accordance with applicable regulations. They should be disposed of in a location specifically designated for that purpose so they can be recycled safely a nd without posing a ny risk for the environment. Do not burn or bury them. Warnings: excessive sound pressure from earphones and headphones can caused hearing loss. US ING T HE A C P O WER S UPPLY
1. Make sure that the voltage indicated on the manufacturer's nameplate in the battery compartment
corresponds to the voltage supplied by your electrical installation. If this is not the case, consult your dealer or service center.
2. C onnect the electrical power cable the unit then plug it into the wall outlet. The wall outlet must be
located near the product and be easily a ccessible.
3. To turn power to the apparatus off, unplug the power supply cable from the wall outlet.
4. To protect the unit during violent thunderstorms, unplug the power supply cable from the wall outlet.
Batteries: Keep batteries away from children. Always replace all the batteries at the same time (never mix old and new batteries), use batteries of the same type. Never use different types of batteries together. Do not short-circuit any batteries. Keep batteries away from any heat sources (direct sun radiation, fire etc.). There is risk of explosion when misusing the batteries. To use the appliance with batteries, disconnect the AC power cord from it.
- Connecting to the Power Supply: do not use the device if the device or its cables present visible damage. Connect the device only to the voltage indicated on the corresponding rating label on the product. Never connect the device to a different voltage. Connecting to other power source may damage the unit. Connect the device to grounded power outlets that comply with the corresponding safety standards only. Do not bend or squeeze the cables.
WARNING: Inside the device there is dangerous voltage. Never open the housing of the device: there is risk of
personal injury by electric shock. In order to completely disconnect the device from the mains, the power plug must be pulled out from the wall outlet. Make sure that you can remove the power plug at any time. Always pull the power cord from the plug and never from the cable itself. Electric storms may damage any electric equipment; therefore disconnect the power plug from the wall outlet during a thunderstorm. It is also recommended to disconnect the device from the mains and to remove any batteries when you are intending not to use the device for a longer time.GENERAL OPERATION GENERAL OPERATION
1. S elect the source by setting the FUNC TIO N S ELEC TO R to RADIO , O FF or CD.
2. S et the desired volume level using the V O LUME C O NTRO L.
3. To turn off the unit, set the FUNC TIO N S ELEC TO R to O FF.
2. P osition the BA ND S ELEC TO R on the desired band: AM, F M or FM S T.
3. Turn the TUNING K NO B to search for the desired station.
NO TE: The FM stereo indicator comes on if the BA ND S ELEC TO R is set on FM stereo and you have tuned the radio to an FM stereo station.
4. Adjust VO LUME C O NTRO L for the desired volume level.
5. When you have finished listening to the radio, position the FUNC TIO N SELECTO R to O FF to turn the
unit off. Notes: As automatic tuning depends on the signal strength of the transmitters, weak transmitters are sometimes skepped. In such a case, tuner manually to find the weaker transmitters. O n the other hand, with a very strong signal, the tuner may stop before it reaches the optimum setting. Tune manually for the best reception. Helpful hints: To improve radio reception To listen to the FM radio, extend the telescopic antenna and orient it for optimum reception. Reduce the length of the a ntenna if the signal is too strong (if you are v ery near the transmitter, for example). As the unit is equipped with a built-in antenna, the telescopic antenna does not have to be used to listen to AM stations. Move the entire unit to orient the built-in antenna.
STEREO HEADPHONE JACK
Plug stereo headphones (not included), equipped with a 3 .5mm mini-plug, into the PHO NES jack for private listening, without disturbing those around y ou. Reduce the V O LUME to a low level before putting on the headphones. Yo u can then adjust the V O LUME progressively to a c omfortable level. Noted: The speakers will be muted when headphones are connected to the set.CD PLAYER O PERATION This C D player plays Audio Discs including C D-R and C D-RW. MP3 C D RO Ms, C D-I, C DV, V CD, DV D or computer CDs are not possible for playback on this set. Note: Even if this portable radio-C D player is able to read C D-R and CD-RW discs, in addition to conventional compact discs, it is not possible to offer a 100% guarantee that all CD-R/RW discs can be read; playback depends on the quality and condition of the blank discs that you use, among other things. A playback failure does not necessarily indicate that the unit is malfunctioning. IMPO RTANT: C Ds encoded with copyright protection technologies by some record companies may be unplayable by this product.
1. Adjust FUNCTION SELECTOR to CD.
2. To open the C D door, raise it by the c orner marked O PEN/C LO SE.
3. Insert a C D with the printed side facing up and press the C D door gently to close.
( Display shows - - and later the total number of tracks)
4. S tart playback by pressing PLAY /PA US E.
5. P ress PLAY /PA US E to interrupt or resume playback.
6. To stop C D p layback, press STO P.
NO TE: C D p layback stops automatically when: t he C D c ompartment is opened; t he R ADIO f unction is selected; t he C D is finished. SELEC TING A D IFFERE NT T RA C K P ress NEX T or BA C K once o r repeatedly until the desired track number appears in the display. I n the stop/pause position, press PLAY /PAUS E to start playback. SEA RC HING F O R A PAS S A G E O N A TRA C K
1. D uring playback, press and hold down BAC K or NEX T. (The C D is played at high speed and low volume.)
2. W hen you recognize the passage you want release BAC K or NEX T. (Normal playback resumes.)
NO TE: W hen your searching reaches the end of the last track, the C D g oes to stop mode. REPEAT Repeat: playback of the c urrent track continuously. Repeat All: playback of the entire C D c ontinuously. PRO G R A MMING O F T RA C K N UMBERS Yo u may store up to 20 tracks ( in CD mode) the desired sequence. If you like, store any track more han once.
1. In S TO P mode, press PRO G to a ctivate programming. (Display: PRO G and “P01” flash.)
2. P ress BA C K or NEX T to select your desired track. (Display: PRO G and your desired track number flash.)
3. Press PRO G to store the desired track number. (Display: PRO G and “P01” flash for you to program the
4. R epeat stop 2 to 3 to select and store all desired tracks in this way.
5. To play y our program, press PLAY /PA US E. (Display: PRO G flash during program playback.)
NO TE: If you try to store more than 20 tracks, no track can be selected and the display will show flashing C D FUL or MP3/ USB FUL. PRO G R A M C HEC K In S TO P mode, press the PR O G repeatedly to see y our stored track numbers.
Perform the following operations to delete the memory: open the C D door; select the R ADIO s ource; press S TO P once.
- Objects inside the device: make sure that no foreign objects or liquids enter the device via the ventilation holes or other openings. Do not put anything except a compact disc into the compartment. Keep the compartment closed when not in use to prevent dirt and dust from entering the mechanism. Foreign objects can damage the mechanism. Furthermore, there is risk of electric shock, damage to the device and short-circuit. In case of any emergency, immediately pull the power plug and contact a qualified service technician. tMA INTENA NCE & S A FETY SAFETY INFORMATION Place the unit on a h ard, flat and stable surface so that the system does not tilt. Do not expose the unit, batteries, CDs to humidity, rain, sand or excessive heat caused by heating equipment or direct sunlight. Do not expose the apparatus to dripping or splashing. Adequate ventilation with a minimum gap of 15cm between the ventilation holes and surrounding surfaces is necessary to prevent heat build-up. The ventilation should be impeded by covering the ventilation openings with items, such as newspapers, table-cloths, curtains, etc... No objects filled with liquids, such as v ases, shall be placed on the apparatus. No naked flame sources, such as lighted candles, should be placed on the a pparatus. The mechanical parts of the set contain self-lubricating bearings and must not be oiled or lubricated. To clean the set, use a dry cloth. Do not use any cleaning agents containing alcohol, ammonia, benzene o r abrasives as these may harm the housing. CLEANING C Ds Use a s oft and clean cloth to wipe away fingerprints or dust from the surface of the disc. Wipe in a straight motion from the center to the edge. Very small dust particles and slight smudges have a bsolutely no effect on the sound quality. Never use chemical products such as sprays for conventional (vinyl) records, anti-static aerosols, benzene o r thinners to c lean your CDs. To reduce the risk of scratches, always store C Ds in their case when not used. Do not expose CDs to direct sunlight, high humidity or excessively high temperatures for long periods of time. Never write or affix labels to the C D's surfaces.
If the lens is dirty, the sound may skip and the C D may not be read correctly. O pen the C D door and clean the lens as follows: Unplug the power cord. Dust or dry particles: Blow on the lens several times using a camera lens brush, then wipe it gently with the brush to remove the dust. Then blow again on the lens. Fingerprints: If you are unable to clean the lens with the camera lens brush, use a dry cotton swab to clean the surface, from the c enter to the outside.TROUBLESHOOTING Environmental information All unnecessary packaging materials has been omitted. The packaging can be easily separated into three materials: cardboard, polystyrene and plastic. Your set consists of materials which can be rec y cled if disassembled by a spec ialized c ompany. Please observ e the local regulations regarding the disposal o f packaging, dead batteries and old equipment. Notes: Make sure the C D is not encoded with Copy right protection technolo gies, a s s ome d o n ot c onform to t he C o mpact Disc s tandard. - - indication No C D inserted. Insert a C D. C D b adly scratched or dirty. Replace/clean C D, see M aintenance. Laser lens steamed up. Wait until lens has cleared. C D-R(W) is blank or not finalized. Use a finalized CD-R(W) or suitable C D Audio disc only. Problem Possible cause Remedy No sound/power V olume not adjusted. Adjust the v olume. Power cord not securely c onnected. C heck the AC p ower cord properly. Batteries dead/incorrectly inserted. Insert (fresh) b atteries c orrectly. CD contains non-audio files. Press BACK or NEXT once or more to skip to a C D a udio track, instead of the data file. Display does no t function properly /No reac tio n to o peration o f any o f the c o ntro ls Electrostatic discharge. Switch off and unplug the set. R econnect after a few seconds. The C D s kips t racks C D d amaged or dirty. Replace or clean C D. Program is active. Q uit program mode. If a fault occurs, first check the points listed below before taking the set for repair. If you are unable to remedy a p roblem by following hints, consult your dealer or service center. WA RNING : Do n ot o pen the unit as t here is a r isk o f elec tric s ho ck. U nder no c irc umstances should y ou t ry t o repair the s et y o urself; a s t his w ill invalidate the g uarantee.SPECIFICATIO NS Power supply CD Player Pick Up: D/A Converter: Earphone terminal: Output power Power consumption Operating conditions Dimensions of main unit Weight of main unit (kg) Signal/ Noise ratio (audio) This product fulfils the following EU regulations: EN 61000-3-3: 2008 Specification EN 60065: 2002 + A1: 2006 + A11: 2008 EN 55013: 2001 + A1: 2003 + A2: 2006 EN 55020: 2007 EN 61000-3-2: 2006 3 Beam Laser Pick Up 1 Bit, 8 Times Over Sampling DA Converter 2 x 1.0 W AC: 230 V~ 50Hz DC : Battery: 8 X UM-2.
:$N+R+NNP! :$N+R+NNP!:$N+R+NNP! :$N+R+NNP!