
Aspire One Happy 2 - Laptop ACER - Free user manual and instructions
Find the device manual for free Aspire One Happy 2 ACER in PDF.
| Product type | Notebook laptop |
| Brand | Acer |
| Model | Aspire One Happy 2 |
| Power supply | AC adapter 100-240V AC and lithium-ion battery |
| Display | LCD screen (size not specified) |
| Processor | Intel Atom (estimate) |
| RAM | 1 GB or 2 GB (estimate) |
| Hard drive | 160 GB or 250 GB (estimate) |
| Network | Ethernet, Wi-Fi, Bluetooth (depending on model) |
| Ports | USB 2.0, headphone jack, microphone |
| Keyboard | AZERTY with integrated numeric keypad and Windows keys |
| Touchpad | Touchpad with two buttons |
| Security | Kensington security slot, BIOS password |
| Battery | Lithium-ion, rechargeable, variable battery life |
| Maintenance | Clean with a slightly damp cloth, unplug before |
Frequently Asked Questions - Aspire One Happy 2 ACER
User questions about Aspire One Happy 2 ACER
0 question about this device. Answer the ones you know or ask your own.
Ask a new question about this device
Download the instructions for your Laptop in PDF format for free! Find your manual Aspire One Happy 2 - ACER and take your electronic device back in hand. On this page are published all the documents necessary for the use of your device. Aspire One Happy 2 by ACER.
USER MANUAL Aspire One Happy 2 ACER
© 2010 All Rights Reserved
Aspire One Series Generic User Guide
Original Issue: 12/2010
Model number: ____
Serial number: ____
Date of purchase: ____
Place of purchase: ____
Information for your safety and comfort
Safety instructions
Read these instructions carefully. Keep this document for future reference. Follow all warnings and instructions marked on the product.
Turning the product off before cleaning
Unplug this product from the wall outlet before cleaning. Do not use liquid cleaners or aerosol cleaners. Use a damp cloth for cleaning.
CAUTION for plug as disconnecting device
Observe the following guidelines when connecting and disconnecting power to the power supply unit:
Install the power supply unit before connecting the power cord to the AC power outlet.
Unplug the power cord before removing the power supply unit from the computer.
If the system has multiple sources of power, disconnect power from the system by unplugging all power cords from the power supplies.
CAUTION for Accessibility
Be sure that the power outlet you plug the power cord into is easily accessible and located as close to the equipment operator as possible. When you need to disconnect power to the equipment, be sure to unplug the power cord from the electrical outlet.
CAUTION for bundled dummy cards (only for certain models)
Your computer shipped with plastic dummies installed in the card slots. Dummies protect unused slots from dust, metal objects or other particles. Save the dummies for use when no cards are in the slots.
CAUTION for Listening
To protect your hearing, follow these instructions.
- Increase the volume gradually until you can hear clearly and comfortably.
- Do not increase the volume level after your ears have adjusted.
• Do not listen to music at high volumes for extended periods.
- Do not increase the volume to block out noisy surroundings.
- Decrease the volume if you can't hear people speaking near you.
iv
Warnings
- Do not use this product near water.
- Do not place this product on an unstable cart, stand or table. If the product falls, it could be seriously damaged.
- Slots and openings are provided for ventilation to ensure reliable operation of the product and to protect it from overheating. These openings must not be blocked or covered. The openings should never be blocked by placing the product on a bed, sofa, rug or other similar surface. This product should never be placed near or over a radiator or heat register, or in a built-in installation unless proper ventilation is provided.
- Never push objects of any kind into this product through cabinet slots as they may touch dangerous voltage points or short-out parts that could result in a fire or electric shock. Never spill liquid of any kind onto or into the product.
- To avoid damage of internal components and to prevent battery leakage, do not place the product on a vibrating surface.
- Never use it under sporting, exercising, or any vibrating environment which will probably cause unexpected short current or damage rotor devices, HDD, optical drive, and even exposure risk from lithium battery pack.
- The bottom surface, areas around ventilation openings and AC adapter may get hot. To avoid injury, ensure they do not come in contact with your skin or body.

Note: Reduce the risk of heat-induced injury or fire by adhering to the following:
1) Do not place the computer or AC adapter on a soft surface, such as a bed.
2) Do not rest the computer or AC adapter on your lap for extended periods.
3) Use the computer on a flat, hard surface, such as a desk.
4) Ensure that the ventilation is not obstructed.
- Your device and its enhancements may contain small parts. Keep them out of the reach of children.
Using electrical power
- This product should be operated from the type of power indicated on the marking label. If you are not sure of the type of power available, consult your dealer or local power company.
- Do not allow anything to rest on the power cord. Do not locate this product where people will walk on the cord.
- If an extension cord is used with this product, make sure that the total ampere rating of the equipment plugged into the extension cord does not exceed the extension cord ampere rating. Also, make sure that the total rating of all products plugged into the wall outlet does not exceed the fuse
rating.
- Do not overload a power outlet, strip or receptacle by plugging in too many devices. The overall system load must not exceed 80% of the branch circuit rating. If power strips are used, the load should not exceed 80% of the power strip's input rating.
- This product's AC adapter is equipped with a three-wire grounded plug. The plug only fits in a grounded power outlet. Make sure the power outlet is properly grounded before inserting the AC adapter plug. Do not insert the plug into a non-grounded power outlet. Contact your electrician for details.

Warning! The grounding pin is a safety feature. Using a power outlet that is not properly grounded may result in electric shock and/or injury.

Note: The grounding pin also provides good protection from unexpected noise produced by other nearby electrical devices that may interfere with the performance of this product.
•The system can be powered using a wide range of voltages: 100 to 120 or 220 to 240 V AC. The power cord included with the system meets the requirements for use in the country/region where the system was purchased. Power cords for use in other countries/regions must meet the requirements for that country/region. For more information on power cord requirements, contact an authorized reseller or service provider.
Product servicing
Do not attempt to service this product yourself, as opening or removing covers may expose you to dangerous voltage points or other risks. Refer all servicing to qualified service personnel.
Unplug this product from the wall outlet and refer servicing to qualified service personnel when:
•The power cord or plug is damaged, cut or frayed.
•Liquid was spilled into the product.
•The product was exposed to rain or water.
•The product has been dropped or the case has been damaged.
- The product exhibits a distinct change in performance, indicating a need for service.
- The product does not operate normally after following the operating instructions.

Note: Adjust only those controls that are covered by the operating instructions, since improper adjustment of other controls may
result in damage and will often require extensive work by a qualified technician to restore the product to normal condition.
Guidelines for safe battery usage
This notebook uses a Lithium-ion battery. Do not use it in a humid, wet or corrosive environment. Do not put, store or leave your product in or near a heat source, in a high temperature location, in strong direct sunlight, in a microwave oven or in a pressurized container, and do not expose it to temperatures over 60^ C ( 140^ F). Failure to follow these guidelines may cause the battery to leak acid, become hot, explode or ignite and cause injury and/or damage. Do not pierce, open or disassemble the battery. If the battery leaks and you come into contact with the leaked fluids, rinse thoroughly with water and seek medical attention immediately. For safety reasons, and to prolong the lifetime of the battery, charging will not occur at temperatures below 0^ C ( 32^ F) or above 40^ C ( 104^ F).
The full performance of a new battery is achieved only after two or three complete charge and discharge cycles. The battery can be charged and discharged hundreds of times, but it will eventually wear out. When the operation time becomes noticeably shorter than normal, buy a new battery. Use only the approved batteries, and recharge your battery only with the approved chargers designated for this device.
Use the battery only for its intended purpose. Never use any charger or battery that is damaged. Do not short-circuit the battery. Accidental short-circuiting can occur when a metallic object such as a coin, clip or pen causes direct connection of the positive (+) and negative (-) terminals of the battery. (These look like metal strips on the battery.) This might happen, for example, when you carry a spare battery in your pocket or purse. Short-circuiting the terminals may damage the battery or the connecting object.
The capacity and lifetime of the battery will be reduced if the battery is left in hot or cold places, such as in a closed car in summer or winter. Always try to keep the battery between 15°C and 25°C (59°F and 77°F). A device with a hot or cold battery may not work temporarily, even when the battery is fully charged. Battery performance is especially limited in temperatures well below freezing.
Do not dispose of batteries in a fire as they may explode. Batteries may also explode if damaged. Dispose of batteries according to local regulations. Please recycle when possible. Do not dispose as household waste.
Wireless devices may be susceptible to interference from the battery, which could affect performance.
Replacing the battery pack
The notebook uses lithium batteries. Replace the battery with the same type as that which came bundled with your product. Use of another battery may present a risk of fire or explosion.

Warning! Batteries may explode if not handled properly. Do not disassemble or dispose of them in fire. Keep them away from
children. Follow local regulations when disposing of used batteries.
Operating environment

Warning! For safety reasons, turn off all wireless or radio transmitting devices when using your laptop under the following conditions. These devices may include, but are not limited to: wireless LAN (WLAN), Bluetooth and/or 3G.
Remember to follow any special regulations in force in any area, and always switch off your device when its use is prohibited or when it may cause interference or danger. Use the device only in its normal operating positions. This device meets RF exposure guidelines when used normally, and it and its antenna are positioned at least 1.5 centimeters (5/8 inches) away from your body. It should not contain metal and you should position the device the above-stated distance from your body. To successfully transmit data files or messages, this device requires a good quality connection to the network. In some cases, transmission of data files or messages may be delayed until such a connection is available. Ensure that the above separation distance instructions are followed until the transmission is completed. Parts of the device are magnetic. Metallic materials may be attracted to the device, and persons with hearing aids should not hold the device to the ear with the hearing aid. Do not place credit cards or other magnetic storage media near the device, because information stored on them may be erased.
Medical devices
Operation of any radio transmitting equipment, including wireless phones, may interfere with the functionality of inadequately protected medical devices. Consult a physician or the manufacturer of the medical device to determine if they are adequately shielded from external RF energy or if you have any questions. Switch off your device in health care facilities when any regulations posted in these areas instruct you to do so. Hospitals or health care facilities may be using equipment that could be sensitive to external RF transmissions.
Pacemakers. Pacemaker manufacturers recommend that a minimum separation of 15.3 centimeters (6 inches) be maintained between wireless devices and a pacemaker to avoid potential interference with the pacemaker. These recommendations are consistent with the independent research by and recommendations of Wireless Technology Research. Persons with pacemakers should do the following:
•Always keep the device more than 15.3 centimeters (6 inches) from the pacemaker
- Not carry the device near your pacemaker when the device is switched on. If you suspect interference, switch off your device, and move it.
Hearing aids. Some digital wireless devices may interfere with some hearing aids. If interference occurs, consult your service provider.
viii
Vehicles
RF signals may affect improperly installed or inadequately shielded electronic systems in motor vehicles such as electronic fuel injection systems, electronic anti-skid (anti-lock) braking systems, electronic speed control systems, and air bag systems. For more information, check with the manufacturer, or its representative, of your vehicle or any equipment that has been added. Only qualified personnel should service the device, or install the device in a vehicle. Faulty installation or service may be dangerous and may invalidate any warranty that may apply to the device. Check regularly that all wireless equipment in your vehicle is mounted and operating properly. Do not store or carry flammable liquids, gases, or explosive materials in the same compartment as the device, its parts, or enhancements. For vehicles equipped with an air bag, remember that air bags inflate with great force. Do not place objects, including installed or portable wireless equipment in the area over the air bag or in the air bag deployment area. If in-vehicle wireless equipment is improperly installed, and the air bag inflates, serious injury could result. Using your device while flying in aircraft is prohibited. Switch off your device before boarding an aircraft. The use of wireless teledevices in an aircraft may be dangerous to the operation of the aircraft, disrupt the wireless telephone network, and may be illegal.
Potentially explosive environments
Switch off your device when in any area with a potentially explosive atmosphere and obey all signs and instructions. Potentially explosive atmospheres include areas where you would normally be advised to turn off your vehicle engine. Sparks in such areas could cause an explosion or fire resulting in bodily injury or even death. Switch off the device at refueling points such as near gas pumps at service stations. Observe restrictions on the use of radio equipment in fuel depots, storage, and distribution areas; chemical plants; or where blasting operations are in progress. Areas with a potentially explosive atmosphere are often, but not always, clearly marked. They include below deck on boats, chemical transfer or storage facilities, vehicles using liquefied petroleum gas (such as propane or butane), and areas where the air contains chemicals or particles such as grain, dust or metal powders. Do not switch the notebook on when wireless phone use is prohibited or when it may cause interference or danger.
Emergency calls
Warning: You cannot make emergency calls through this device. To make an emergency call you shall dial out through your mobile phone or other telephone call system.
Disposal instructions
Do not throw this electronic device into the trash when discarding. To minimize pollution and ensure utmost protection of the global environment, please recycle. For more information on the Waste from Electrical and Electronics Equipment (WEEE) regulations, visit www.acer-group.com/public/Sustainability/sustainability01.htm.

Mercury advisory
For bulb-inside projectors or electronic products containing a non-LED-backlit-LCD/CRT monitor or display: Lamp(s) inside this product contain mercury and must be recycled or disposed of according to local, state or federal laws. For more information, contact the Electronic Industries Alliance at www.eiae.org. For lamp-specific disposal information, check www.lamprecycle.org.

ENERGY STAR

ENERGY STAR
Acer's ENERGY STAR qualified products save your money by reducing energy cost and protecting the environment without sacrificing features or performance. Acer is proud to offer our customers products with the ENERGY STAR mark.
What is ENERGY STAR?
Products that are ENERGY STAR qualified use less energy and prevent greenhouse gas emissions by meeting strict energy efficiency guidelines set by the U.S. Environmental Protection Agency. Acer is committed to offering products and services worldwide that help customers save money, conserve energy and improve the quality of our environment. The more energy we can save through higher energy efficiency, the more we reduce greenhouse gases and the risks of climate change. More information refers to www.energystar.gov or www.energystar.gov/powermanagement.
Acer ENERGY STAR qualified products: (only for certain models)
- Produce less heat and reduce cooling loads, and warmer climates.
- Automatically go into "display sleep" and "computer sleep" mode after 10 and 30 minutes of inactivity respectively.
- Wake the computer from sleep mode by pushing keyboard or moving mouse.
- Computers will save more than 80% energy at "sleep" mode.
ENERGY STAR is only available for certain models and have the ENERGY STAR certification mark on the palm rest.
ENERGY STAR and the ENERGY STAR mark are registered U.S. marks
x
Tips and information for comfortable use
Computer users may complain of eyestrain and headaches after prolonged use. Users are also at risk of physical injury after long hours of working in front of a computer. Long work periods, bad posture, poor work habits, stress, inadequate working conditions, personal health and other factors greatly increase the risk of physical injury.
Incorrect computer usage may lead to carpal tunnel syndrome, tendonitis, tenosynovitis or other musculoskeletal disorders. The following symptoms may appear in the hands, wrists, arms, shoulders, neck or back:
- Numbness, or a burning or tingling sensation.
- Aching, soreness or tenderness.
•Pain, swelling or throbbing. - Stiffness or tightness.
•Coldness or weakness.
If you have these symptoms, or any other recurring or persistent discomfort and/or pain related to computer use, consult a physician immediately and inform your company's health and safety department.
The following section provides tips for more comfortable computer use.
Finding your comfort zone
Find your comfort zone by adjusting the viewing angle of the monitor, using a footrest, or raising your sitting height to achieve maximum comfort. Observe the following tips:
•Refrain from staying too long in one fixed posture.
- Avoid slouching forward and/or leaning backward.
- Stand up and walk around regularly to remove the strain on your leg muscles.
•Take short rests to relax your neck and shoulders.
- Avoid tensing your muscles or shrugging your shoulders.
• Install the external display, keyboard and mouse properly and within comfortable reach.
- If you view your monitor more than your documents, place the display at the center of your desk to minimize neck strain.
Taking care of your vision
Long viewing hours, wearing incorrect glasses or contact lenses, glare, excessive room lighting, poorly focused screens, very small typefaces and low-contrast displays could stress your eyes. The following sections provide suggestions on how to reduce eyestrain.
Eyes
- Rest your eyes frequently.
- Give your eyes regular breaks by looking away from the monitor and focusing on a distant point.
- Blink frequently to keep your eyes from drying out.
Display
- Keep your display clean.
- Keep your head at a higher level than the top edge of the display so your eyes point downward when looking at the middle of the display.
- Adjust the display brightness and/or contrast to a comfortable level for enhanced text readability and graphics clarity.
- Eliminate glare and reflections by:
- placing your display in such a way that the side faces the window or any light source
- minimizing room light by using drapes, shades or blinds
- using a task light
- changing the display's viewing angle
• using a glare-reduction filter - using a display visor, such as a piece of cardboard extended from the display's top front edge
- Avoid adjusting your display to an awkward viewing angle.
- Avoid looking at bright light sources for extended periods of time.
Developing good work habits
The following work habits make computer use more relaxing and productive:
•Take short breaks regularly and often.
- Perform some stretching exercises.
- Breathe fresh air as often as possible.
•Exercise regularly and maintain a healthy body.

Warning! We do not recommend using the computer on a couch or bed. If this is unavoidable, work for only short periods, take breaks regularly, and do some stretching exercises.

Note: For more information, please refer to "Regulations and safety notices" on page 36.
xii
First things first
We would like to thank you for making an Acer notebook your choice for meeting your mobile computing needs.
Product Registration
When using your computer for the first time, it is recommended that you immediately register it. This will give you access to some useful benefits, such as:
- Faster service from our trained representatives
•Membership in the Acer community: receive promotions and participate in customer surveys
•The latest news from Acer
Hurry and register, as other advantages await you!
How to Register
During the initial startup of your notebook or desktop, a window will invite you to register. Please fill in the mandatory fields and click Next. The second window you'll see contains optional fields that will help us to provide you with a more personable customer service experience.
Another Option
Another way to register your Acer product is to visit our website at http://registration.acer.com. Choose your country and follow the simple instructions.
After we receive your product registration, you will be sent a confirmation email with important data that you should keep in a safe place.
Your guides
To help you use your Acer notebook, we have designed a set of guides:
First off, the setup poster helps you get started with setting up your computer.
The Aspire One Series User Guide contains useful information applying to all models in the Aspire One product range. It covers basic topics such as Acer eRecovery Management, using the keyboard, audio, etc. Please understand that due to its nature, the Generic User Guide as well as the AcerSystem User Guide will occasionally refer to functions or features which are only contained in certain models, but not necessarily in the model you have purchased. Such instances are marked in the text with language such as "only for certain models".
The Quick Guide introduces you to the basic features and functions of your new computer. For more on how your computer can help you to be more productive, please refer to the AcerSystem User Guide, which contains detailed information
on such subjects as system utilities, data recovery, expansion options and troubleshooting. In addition it contains warranty information and the general regulations and safety notices for your notebook. It is available in Portable Document Format (PDF) and comes preloaded on your notebook. Follow these steps to access it:
1 Click Start > All Programs > AcerSystem.
2 Click AcerSystem User Guide.

Note: Viewing the file requires Adobe Reader. If Adobe Reader is not installed on your computer, clicking on AcerSystem User Guide will run the Adobe Reader setup program first. Follow the instructions on the screen to complete the installation. For instructions on how to use Adobe Reader, access the Help and Support menu.
Basic care and tips for using your computer
Turning your computer on and off
To turn on the computer, simply press and release the power button below the LCD screen. Please refer to "Quick Guide" for the location of the power button.
To turn the power off, do any of the following:
• Use the Windows shutdown command: click Start then Click Shut Down.
- Use the power button.
You can also put the computer in sleep mode by pressing the sleep hotkey

Note: If you cannot power off the computer normally, press and hold the power button for more than four seconds to shut down the computer. If you turn off the computer and want to turn it on again, wait at least two seconds before powering up.
Taking care of your computer
Your computer will serve you well if you take care of it.
- Do not expose the computer to direct sunlight. Do not place it near sources of heat, such as a radiator.
- Do not expose the computer to temperatures below 0^ C (32°F) or above 50^ C (122°F).
- Do not subject the computer to magnetic fields.
- Do not expose the computer to rain or moisture.
- Do not spill water or any liquid on the computer.
xiv
- Do not subject the computer to heavy shock or vibration.
- Do not expose the computer to dust or dirt.
- Never place objects on top of the computer.
- Do not slam the computer display when you close it.
- Never place the computer on uneven surfaces.
Taking care of your AC adapter
Here are some ways to take care of your AC adapter:
- Do not connect the adapter to any other device.
- Do not step on the power cord or place heavy objects on top of it. Carefully route the power cord and any cables away from foot traffic.
- When unplugging the power cord, do not pull on the cord itself but pull on the plug.
- The total ampere ratings of the equipment plugged in should not exceed the ampere rating of the cord if you are using an extension cord. Also, the total current rating of all equipment plugged into a single wall outlet should not exceed the fuse rating.
Taking care of your battery pack
Here are some ways to take care of your battery pack:
- Use only batteries of the same kind as replacements. Turn the power off before removing or replacing batteries.
- Do not tamper with batteries. Keep them away from children.
- Dispose of used batteries according to local regulations. Recycle if possible.
Cleaning and servicing
When cleaning the computer, follow these steps:
1 Turn off the computer and remove the battery pack.
2 Disconnect the AC adapter.
3 Use a soft, moist cloth. Do not use liquid or aerosol cleaners.
If either of the following occurs:
•The computer has been dropped or the body has been damaged;
•The computer does not operate normally
Please refer to "Frequently asked questions" on page 19.
Information for your safety and comfort iii
Safety instructions iii
Operating environment vii
Medical devices vii
Vehicles viii
Potentially explosive environments viii
Emergency calls viii
Disposal instructions ix
Mercury advisory ix
ENERGY STAR ix
Tips and information for comfortable use x
First things first xii
Product Registration xii
How to Register xii
Another Option xii
Your guides xii
Basic care and tips for using your computer xiii
Turning your computer on and off xiii
Taking care of your computer xiii
Taking care of your AC adapter xiv
Taking care of your battery pack xiv
Cleaning and servicing xiv
Acer eRecovery Management 1
Creating a recovery backup (Optical drive) 2
Creating a recovery backup (USB flash drive) 4
Recovering your system (Optical drive) 6
To recover your system 6
Types of recovery 6
Recovering pre-installed software and drivers 6
Returning to a previous system condition 7
Returning your system to its factory condition 8
Recovering your system (USB flash drive) 10
To recover your system 10
Types of recovery 10
Recovering pre-installed software and drivers 10
Returning to a previous system condition 11
Returning your system to its factory condition 12
Touchpad 14
Touchpad basics (with two buttons) 14
Using a computer security lock 15
Using the keyboard 16
Lock keys and embedded numeric keypad 16
Windows keys 17
Special keys (only for certain models) 18
Frequently asked questions 19
Requesting service 21
Before you call 21
Battery pack 22
Battery pack characteristics 22
Maximizing the battery's life 22
Installing and removing the battery pack 23
Charging the battery 24
Checking the battery level 24
Optimizing battery life 24
Battery-low warning 24
Taking your notebook PC with you 26
Disconnecting from the desktop 26
Moving around 26
Preparing the computer 26
What to bring to meetings 27
Taking the computer home 27
Preparing the computer 27
What to take with you 27
Special considerations 28
Setting up a home office 28
Traveling with the computer 28
Preparing the computer 28
What to take with you 28
Special considerations 29
Traveling internationally with the computer 29
Preparing the computer 29
What to take with you 29
Special considerations 29
Securing your computer 30
Using a computer security lock 30
Using passwords 30
Entering passwords 31
Setting passwords 31
Expanding through options 32
Connectivity options 32
Built-in network feature 32
Universal Serial Bus (USB) 33
BIOS utility 33
Boot sequence 33
Enable disk-to-disk recovery 33
Password 34
Power management 34
Troubleshooting 35
Troubleshooting tips 35
Error messages 35
Regulations and safety notices 36
FCC notice 36
LCD pixel statement 37
Radio device regulatory notice 37
General 37
European Union (EU) 38
The FCC RF safety requirement 38
Canada — Low-power license-exempt
radio communication devices (RSS-210) 40
LCD panel ergonomic specifications 40
Acer eRecovery Management
If your computer experiences problems that are not recoverable by other methods, you may need to reinstall the Windows operating system and factory-loaded software and drivers. To ensure you can recover your computer when needed, you should create a recovery backup as soon as possible.

Note: The following content is for general reference only. Actual product specifications may vary.
Acer eRecovery Management consists of the following functions:
1 Backup:
- Create Factory Default Backup
- Create Drivers and Applications Backup

Note: Models that do not have a built-in ODD will allow you to make backup copies to a USB drive or an external ODD.
2 Restore:
- Restore Operating System to Factory Defaults
- Restore Operating System and Retain User Data
- Reinstall Drivers or Applications
This chapter will guide you through each process.
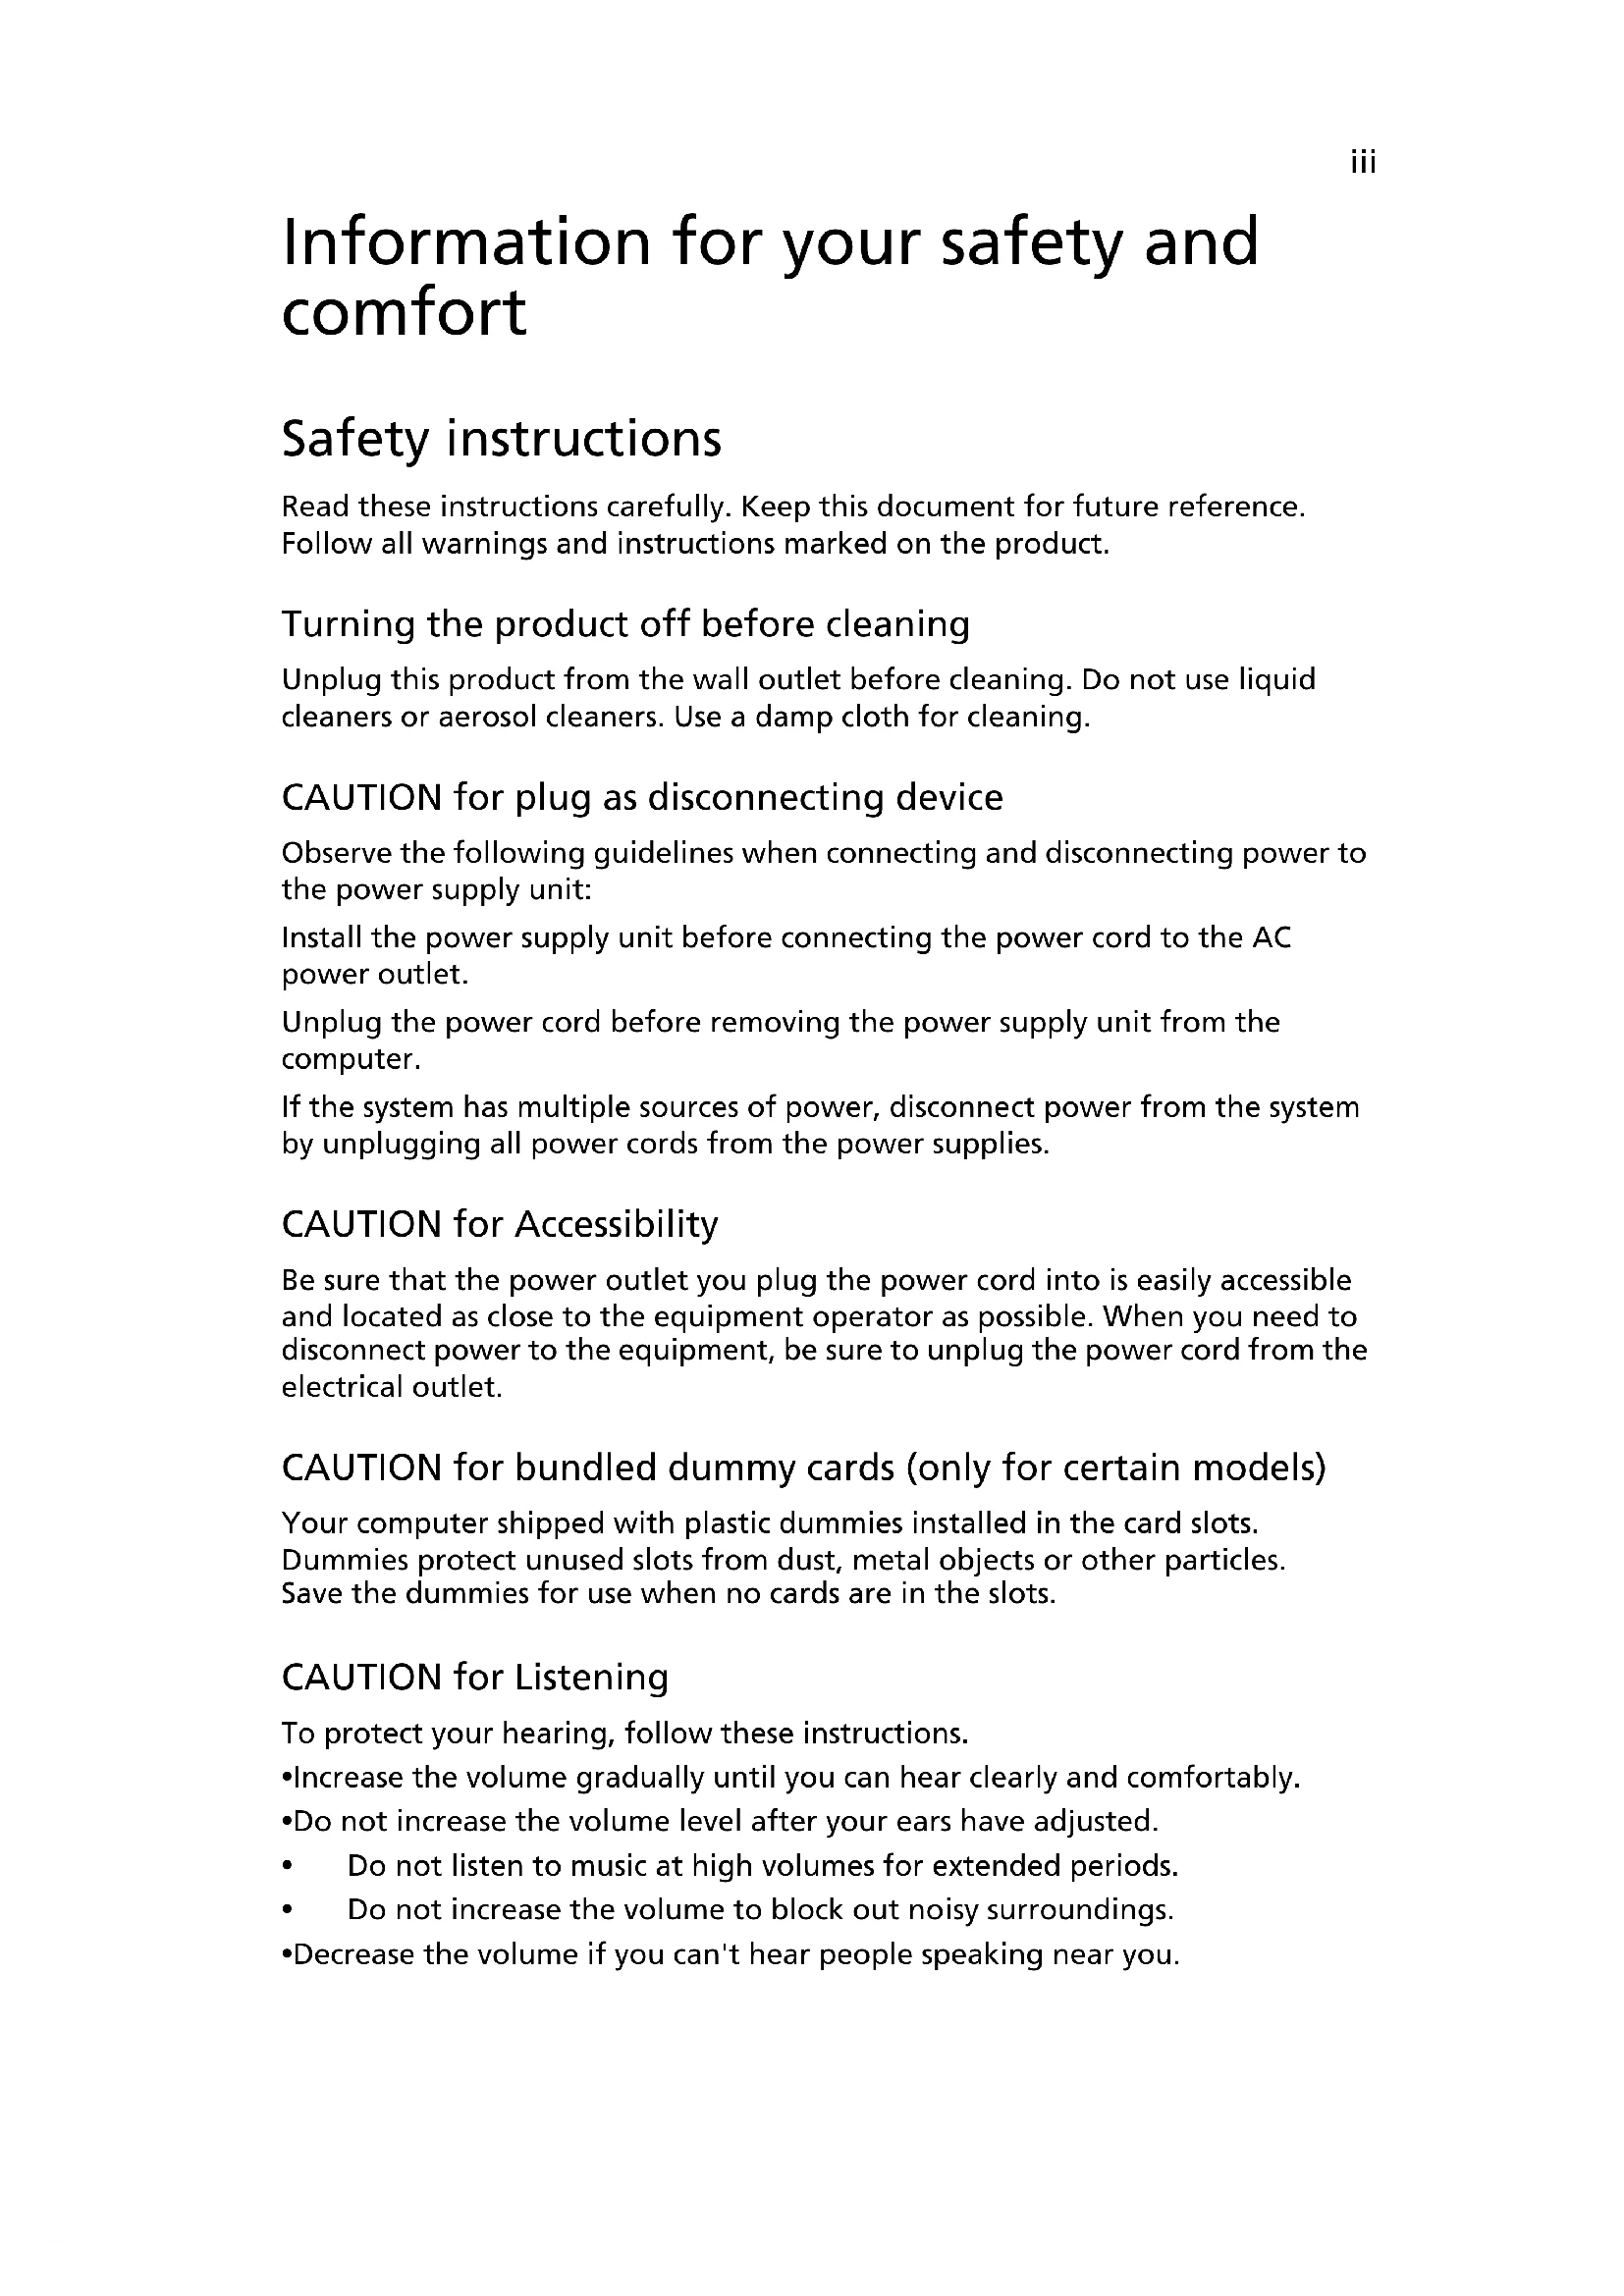
To use the password protection feature of Acer eRecovery Management, you must first set the password. The password is set by launching Acer eRecovery Management and clicking Settings.
text_image
Acer eRecovery Management Backup Restore Settings Help Password for Restore Process Password Protection: Disabled Create a New Password acerCreating a recovery backup (Optical drive)
To reinstall using a backup on optical discs, you must create the recovery disc beforehand. Throughout the process, you will be guided by onscreen instructions. Please read them carefully!
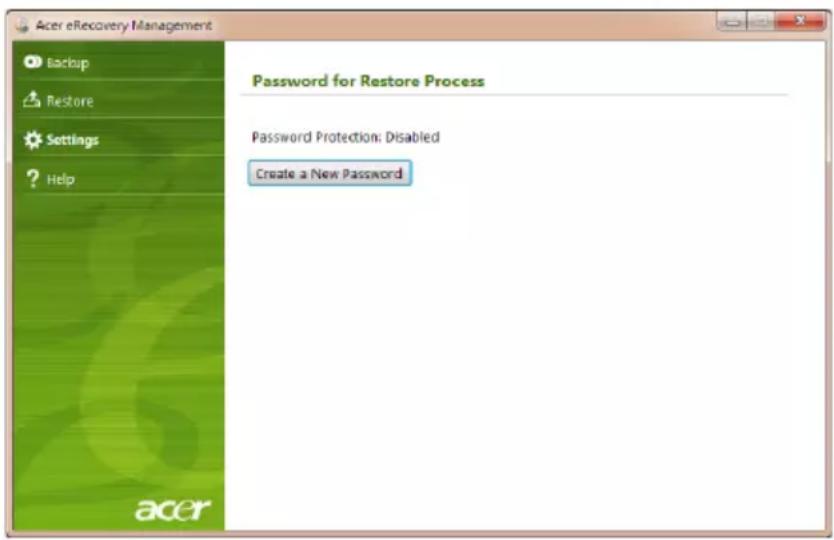
1 Click St art > All Programs > Acer, then click Acer eRecovery Management.
text_image
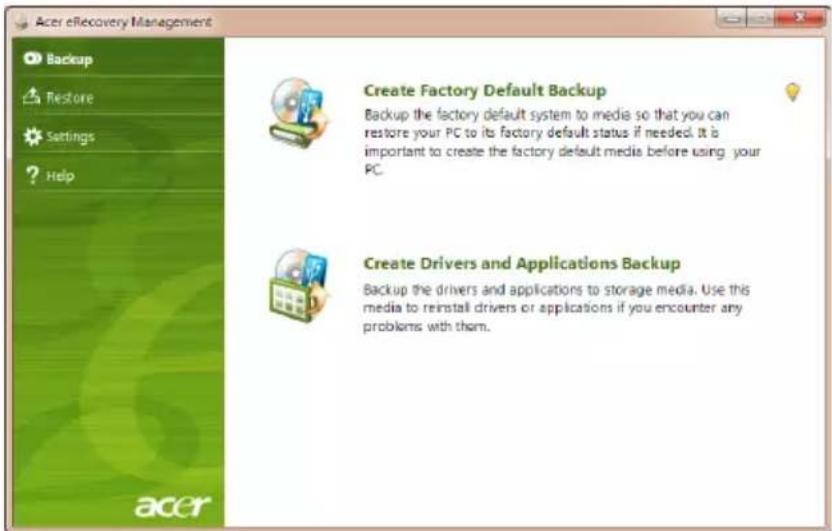
Acer eRecovery Management Backup Restore Settings ? Help Create Factory Default Backup Backup the factory default system to media so that you can restore your PC to its factory default status if needed. It is important to create the factory default media before using your PC. Create Drivers and Applications Backup Backup the drivers and applications to storage media. Use this media to reinstall drivers or applications if you encounter any problems with them.2 To create recovery discs for the hard drive's entire original contents, including Windows and all factory-loaded software and drivers, click Create Factory Default Backup.
- OR -
To create a recovery disc for only the factory-loaded software and drivers, click Create Drivers and Applications Backup.

Important: We recommend that you create each type of recovery backup as soon as possible.
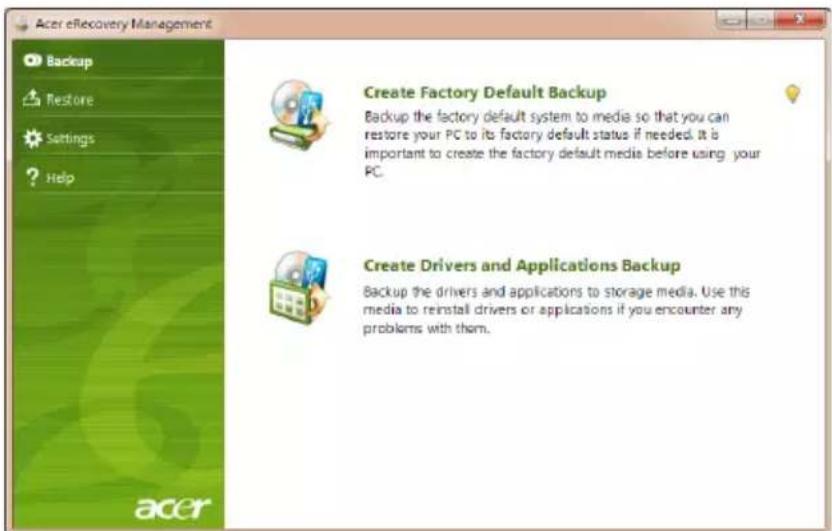
The Create Factory Default Backup dialog box tells you the number of blank, recordable discs you will need to complete the recovery discs. Make sure that you have the required number of identical, blank discs ready before continuing.
text_image
Acer eRecovery Management Backup Restore Settings Help Create Factory Default Backup Backup to: (G) Options: BD-ROM BC-5500S Estimated size: 3.54 GB It needs 2 blank DVD(s) to burn. Label: Recovery Do not disconnect the storage media while creating the backup. Click Start to begin creating the backup. Start Cancel acer
Note: The number of blank DVDs required varies depending on the operating system installed.
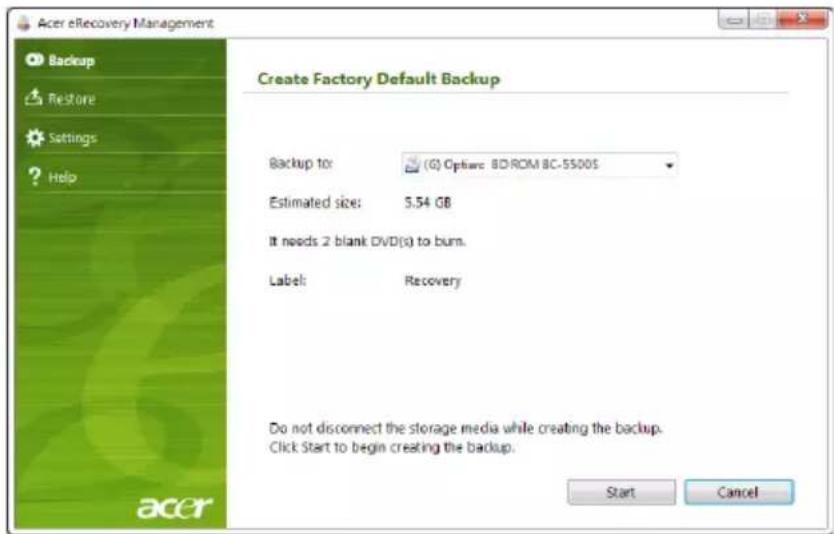
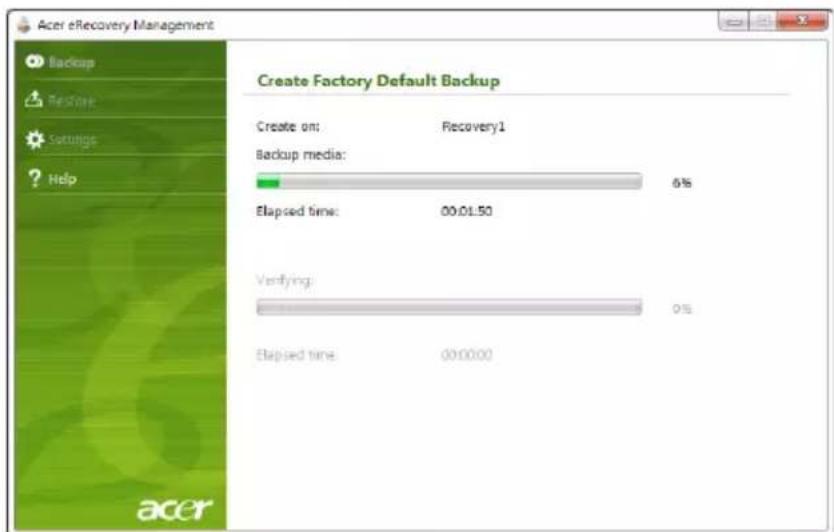
3 Insert a blank disc into the drive indicated in the Backup to list, then click Next. You will be shown the backup progress on the screen.
text_image
Acer eRecovery Management Backup Restore Settings ? Help Create Factory Default Backup Create on: Recovery1 Backup media: 6% Elapsed time: 00.01.50 Verifying: 9% Elapsed time: 00.00.00 acerThe drive ejects each disc as it completes burning it.
4 Remove the disc from the drive and mark it with a permanent marker.

Important: Write a unique, descriptive label on each disc, such as 'Windows Recovery Disc 1 of 2' or 'Apps/Drivers Recovery disc'. Make sure you keep the discs in a safe place that you will remember.
5 If multiple discs are required, insert a new disc when prompted, then click OK. Continue recording discs until the process is complete.
Creating a recovery backup (USB flash drive)
To reinstall using a backup on a USB flash drive, you must create the recovery backup beforehand. Throughout the process, you will be guided by onscreen instructions. Please read them carefully!

Important: If you are using a USB flash drive, ensure it is at least 12 GB and does not contain any previous data.
1 Click Start > All Programs > Acer, then click Acer eRecovery Management.
text_image
Acer eRecovery Management Backup Restore Settings ? Help Create Factory Default Backup Backup the factory default system to media so that you can restore your PC to its factory default status if needed. It is important to create the factory default media before using your PC. Create Drivers and Applications Backup Backup the drivers and applications to storage media. Use this media to reinstall drivers or applications if you encounter any problems with them.2 To create recovery backup for the hard drive's entire original contents, including Windows and all factory-loaded software and drivers, click Create Factory Default Backup.
- OR -
To create a recovery backup for only the factory-loaded software and drivers, click Create Driver and Applications Backup.

Important: We recommend that you create each type of recovery backup as soon as possible.
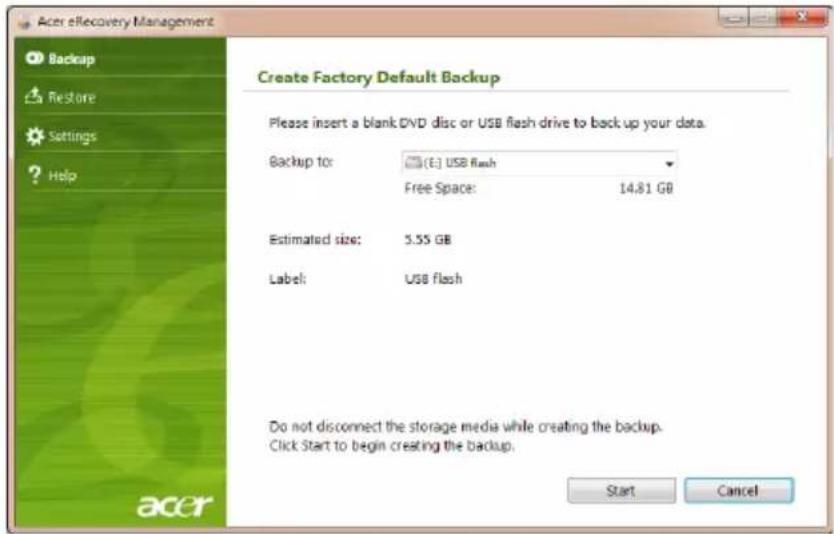
The Create Factory Default Backup dialog box opens. This dialog box tells you the estimated size of the backup file on your USB flash drive.
text_image
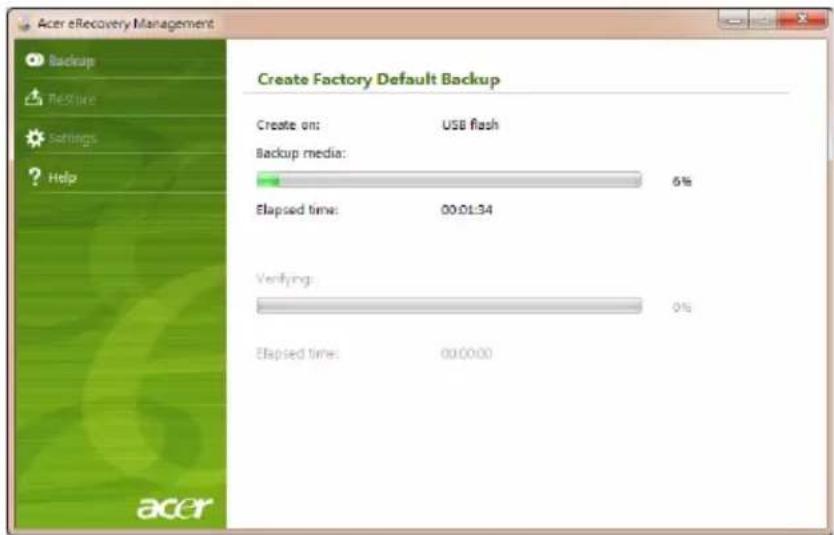
Acer eRecovery Management Backup Restore Settings Help Create Factory Default Backup Please insert a blank DVD disc or USB flash drive to back up your data. Backup to: (E) USB flash Free Space: 14.81 GB Estimated size: 5.55 GB Label: USB flash Do not disconnect the storage media while creating the backup. Click Start to begin creating the backup. Start Cancel3 Plug in the USB disk, then click Start. You will be shown the backup progress on the screen.
text_image
Acer eRecovery Management Backup Restore Settings Help Create Factory Default Backup Create on: USB flash Backup media: 6% Elapsed time: 00:01:34 Verifying: 0% Elapsed time: 00:00:00 acer4 Unplug the USB flash drive and mark it with a permanent marker.

Important: Write a unique, descriptive label on each backup, such as 'Windows Recovery Backup' or 'Apps/Drivers Recovery Backup'. Make sure you keep the USB flash drive in a safe place that you will remember.
Recovering your system (Optical drive)
If calling Acer support did not help fix your problem, you can use the Acer eRecovery Management program. This will restore your computer to the same state as when you purchased it, while giving you an option to retain all settings and personal data for later retrieval.
To recover your system
1 Perform minor fixes.
If only one or two items of software or hardware have stopped working correctly, the problem may be solved by reinstalling the software or the device drivers. To recover software and drivers that were pre-installed at the factory, see "Recovering pre-installed software and drivers" on page 6. For instructions on reinstalling software and drivers that were not pre-installed, see that product's documentation or technical support Web site.
2 Revert to a previous system condition.
If reinstalling software or drivers does not help, then the problem may be solved by returning your system to a previous state when everything was working correctly. For instructions, see "Returning to a previous system condition" on page 7.
3 Reset your system to its factory condition.
If nothing else has solved the problem and you want to reset your system to factory condition, see "Returning your system to its factory condition" on page 8.
Types of recovery
Recovering pre-installed software and drivers
As a troubleshooting step, you may need to reinstall the software and device drivers that came pre-installed on your computer from the factory. You can recover using either your hard drive or the recovery discs you have created.
- New software: If you need to recover software that did not come pre-installed on your computer, you need to follow that software's installation instructions.
- New device drivers: If you need to recover device drivers that did not come pre-installed on your computer, follow the instructions provided with the device.
To recover your pre-installed software and drivers:
1 Click Start > All Programs > Acer, then click Acer eRecovery Management. - OR -
If you are recovering from your driver and application recovery disc, insert it into the disc drive, then go to Step 3 after the Acer Application Recovery main menu opens.
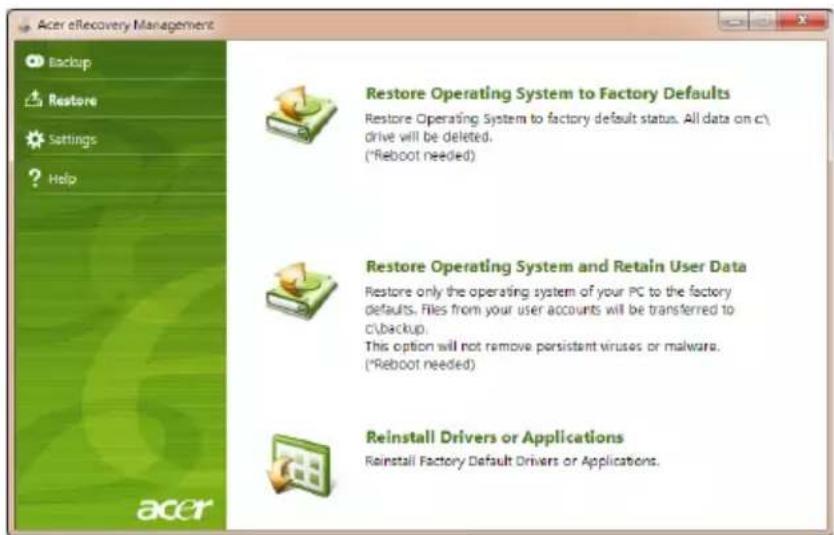
2 Click the Restore t ab, then click Reinstall Drivers or Applications to display the Acer Application Recovery main menu.
text_image
Acer eRecovery Management Backup Restore Settings ? Help Restore Operating System to Factory Defaults Restore Operating System to factory default status. All data on c\ drive will be deleted. (*Reboot needed) Restore Operating System and Retain User Data Restore only the operating system of your PC to the factory defaults. Files from your user accounts will be transferred to c\backup. This option will not remove persistent viruses or malware. (*Reboot needed) Reinstall Drivers or Applications Reinstall Factory Default Drivers or Applications.3 Click Contents to show a list of software and device drivers.
4 Click the install icon for the item you want to install, then follow the onscreen prompts to complete the installation. Repeat this step for each item you want to reinstall.
Returning to a previous system condition
Microsoft System Restore periodically takes 'snapshots' of your system settings and saves them as restore points. In most cases of hard-to-resolve software problems, you can return to one of these restore points to get your system running again.
Windows automatically creates an additional restore point each day, and also each time you install software or device drivers.

Tip: For more information about using Microsoft System Restore, click Start, then click Help and Support. Type windows system restore in the Search Help box, then press Enter.
To return to a restore point:
1 Click St art > Control Panel > System and Security > Action Center, then click Recovery.
2 Click O pen System Restore, then Next.
3 Select the restore point you want, click Next, then Finish. A confirmation message box will appear.
4 Click Yes. Your system is restored using the restore point you specified. This process may take several minutes, and may restart your computer.
Returning your system to its factory condition
If your computer experiences problems that are not recoverable by other methods, you may need to reinstall everything to return your system to its factory condition. You can reinstall using either your hard drive or the recovery discs you have created.

Warning: This complete recovery deletes everything on your hard drive, then reinstalls Windows and all software and drivers that were pre-installed on your system. If you can access important files on your hard drive, back them up now.
If you can still run Windows, see "Recovering from within Windows" on page 8.
If you cannot run Windows and your original hard drive is still working, see "Recovering from the hard drive during startup" on page 9.
If you cannot run Windows and your original hard drive has been completely reformatted or you have installed a replacement hard drive, see "Recovering from your recovery discs" on page 9.
Recovering from within Windows
To reinstall Windows and all pre-installed software and drivers:
Click Start > All Programs > Acer, then click Acer eRecovery Management.
Click the Restore tab, then Restore Operating System to Factory Defaults.
Click Yes, then Start. A dialog box will display information about the hard drive that the operating system will be recovered to.

Warning: Continuing the process will erase all files on your hard drive.
Click OK. The recovery process begins by restarting your computer, then continues by copying files to your hard drive. This process may take a while, the Acer eRecovery Management screen displays the progress.
When the recovery has finished, a dialog box will prompt you to restart your computer.
Click OK to restart your computer.
Follow the onscreen prompts for first-time system setup.
Recovering from the hard drive during startup
To reinstall Windows and all pre-installed software and drivers:
1 Turn on your computer, then press
2 Click Restore Operating System to Factory Defaults.

Warning: Continuing the process will erase all files on your hard drive.
3 Click Next. Your hard drive's original, factory-loaded contents will be recovered. This process will take several minutes.
Recovering from your recovery discs
To reinstall Windows and all pre-installed software and drivers:
1 Turn on your computer, insert the first system recovery disc into your optical disc drive, then restart your computer.

Warning: Continuing the process will erase all files on your hard drive.
If it is not already enabled, you must enable the F12 Boot Menu:
Press
Use the left or right arrow keys to select the Main menu.
Press the down key until F12 Boot Menu is selected, press
Use the left or right arrow keys to select the Exit menu.
Select Save Changes and Exit and press Enter. Select OK to confirm.
Your computer will restart.
2 During startup, press
3 Use your arrow keys to select the line CDROM/DVD (this line may start with 'IDE 1...'), then press
4 Insert the second recovery disc when prompted, then follow the onscreen prompts to complete the recovery.
Recovering your system (USB flash drive)
If calling Acer support did not help fix your problem, you can use the Acer eRecovery Management program. This will restore your computer to the same state as when you purchased it, while giving you an option to retain all settings and personal data for later retrieval.
To recover your system
1 Perform minor fixes.
If only one or two items of software or hardware have stopped working correctly, the problem may be solved by reinstalling the software or the device drivers. To recover software and drivers that were pre-installed at the factory, see "Recovering pre-installed software and drivers" on page 10. For instructions on reinstalling software and drivers that were not pre-installed, see that product's documentation or technical support Web site.
2 Revert to a previous system condition.
If reinstalling software or drivers does not help, then the problem may be solved by returning your system to a previous state when everything was working correctly. For instructions, see "Returning to a previous system condition" on page 11.
3 Reset your system to its factory condition.
If nothing else has solved the problem and you want to reset your system to factory condition, see "Returning your system to its factory condition" on page 12.
Types of recovery
Recovering pre-installed software and drivers
As a troubleshooting step, you may need to reinstall the software and device drivers that came pre-installed on your computer from the factory. You can recover using either your hard drive or the backup you have created.
- New software: If you need to recover software that did not come pre-installed on your computer, you need to follow that software's installation instructions.
- New device drivers: If you need to recover device drivers that did not come pre-installed on your computer, follow the instructions provided with the device.
To recover your pre-installed software and drivers:
1 Click Start > All Programs > Acer, then click Acer eRecovery Management. - OR -
If you are recovering from your driver and application recovery backup, insert the USB flash drive into a USB port. Open the USB flash drive in Windows Explorer and double-click Recovery.
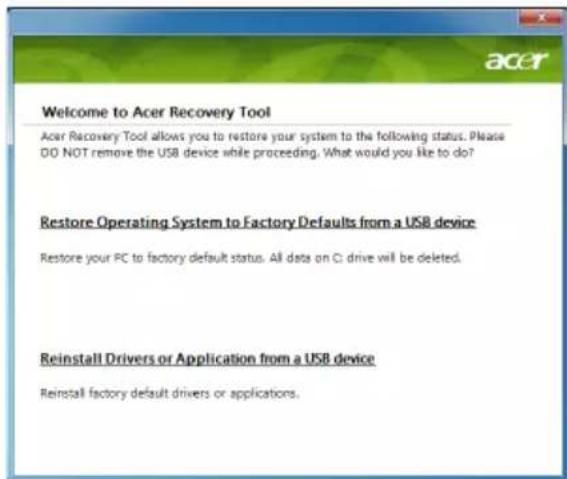
2 Click Reinstall Drivers or Application from a USB device.
text_image
Welcome to Acer Recovery Tool Acer Recovery Tool allows you to restore your system to the following status. Please DO NOT remove the USB device while proceeding. What would you like to do? Restore Operating System to Factory Defaults from a USB device Restore your PC to factory default status. All data on CI drive will be deleted. Reinstall Drivers or Application from a USB device Reinstall factory default drivers or applications.3 Click Contents to show a list of software and device drivers.
4 Click the install icon for the item you want to install, then follow the onscreen prompts to complete the installation. Repeat this step for each item you want to reinstall.
Returning to a previous system condition
Microsoft System Restore periodically takes 'snapshots' of your system settings and saves them as restore points. In most cases of hard-to-resolve software problems, you can return to one of these restore points to get your system running again.
Windows automatically creates an additional restore point each day, and also each time you install software or device drivers.

Tip: For more information about using Microsoft System Restore, click Start, then click Help and Support. Type windows system restore in the Search Help box, then press Enter.
To return to a restore point:
1 Click Start > Control Panel > System and Security > Action Center, then click Recovery.
2 Click O pen System Restore, then Next.
3 Select the restore point you want, click Ne xt, then Finish. A confirmation message box will appear.
4 Click Yes. Your system is restored using the restore point you specified. This process may take several minutes, and may restart your computer.
Returning your system to its factory condition
If your computer experiences problems that are not recoverable by other methods, you may need to reinstall everything to return your system to its factory condition. You can reinstall using either your hard drive or the recovery backup you have created.

Warning: This complete recovery deletes everything on your hard drive, then reinstalls Windows and all software and drivers that were pre-installed on your system. If you can access important files on your hard drive, back them up now.
If you can still run Windows, see "Recovering from within Windows" on page 12.
If you cannot run Windows and your original hard drive is still working, see "Recovering from the hard drive during startup" on page 13.
If you cannot run Windows and your original hard drive has been completely reformatted or you have installed a replacement hard drive, see "Recovering from your recovery backup" on page 13.
Recovering from within Windows
To reinstall Windows and all pre-installed software and drivers:
Click Start > All Programs > Acer, then click Acer eRecovery Management.
Click the Restore tab, then Restore Operating System to Factory Defaults to open the Confirm Restoration dialog box.
Click Yes, then Start. A dialog box will display information about the hard drive that the operating system will be recovered to.

Warning: Continuing the process will erase all files on your hard drive.
Click OK. The recovery process begins by restarting your computer, then continues by copying files to your hard drive. This process may take a while, the Acer eRecovery Management screen displays the progress.
When the recovery has finished, a dialog box prompts you to restart your computer.
Click OK to restart your computer.
Follow the onscreen prompts for first-time system setup.
Recovering from the hard drive during startup
To reinstall Windows and all pre-installed software and drivers:
1 Turn on your computer, then press
2 Click Restore Operating System to Factory Defaults.

Warning: Continuing the process will erase all files on your hard drive.
3 Click Next. Your hard drive's original, factory-loaded contents will be recovered. This process will take several minutes.
Recovering from your recovery backup
To reinstall Windows and all pre-installed software and drivers:
1 Plug in the USB flash drive and turn on your computer.

Warning: Continuing the process will erase all files on your hard drive.
If it is not already enabled, you must enable the F12 Boot Menu:
Press
Use the left or right arrow keys to select the Main menu.
Press the down key until F12 Boot Menu is selected, press
Use the left or right arrow keys to select the Exit menu.
Select Save Changes and Exit and press Enter. Select OK to confirm.
Your computer will restart.
2 During startup, press
3 Use your arrow keys to select the line USB HDD, then press
4 Follow the onscreen prompts to complete the recovery.
Touchpad
The built-in touchpad is a pointing device that senses movement on its surface. This means the cursor responds as you move your finger across the surface of the touchpad. The central location on the palmrest provides optimum comfort and support.
Touchpad basics (with two buttons)
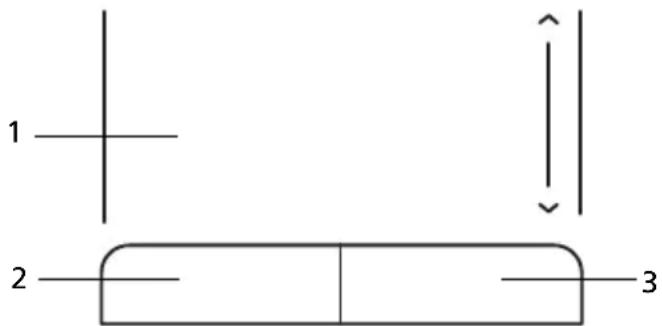
text_image
1 2 3The following items show you how to use the touchpad with two buttons.
- Move your finger across the touchpad to move the cursor.
- Press the left and right buttons located beneath the touchpad to perform selection and execution functions. These two buttons are similar to the left and right buttons on a mouse. Tapping on the touchpad is the same as clicking the left button.
| Function Left button (2) | Right button (3) | Main touchpad (1) |
| Execute Quickly click twice. | Tap twice (at the same speed as double-clicking a mouse button). | |
| Select Click once. Tap once. | ||
| Drag Click and hold, then use finger on the touchpad to drag the cursor. | Tap twice (at the same speed as double-clicking a mouse button); rest your finger on the touchpad on the second tap and drag the cursor. | |
| Access context menu | Click once. | |

Note: Illustrations for reference only. The exact configuration of your PC depends on the model purchased.

Note: When using the touchpad, keep it — and your fingers — dry and clean. The touchpad is sensitive to finger movement; hence, the lighter the touch, the better the response. Tapping harder will not increase the touchpad's responsiveness.

Note: By default, vertical and horizontal scrolling is enabled on your touchpad. It can be disabled under Mouse settings in Windows Control Panel.
Using a computer security lock
The notebook comes with a Kensington-compatible security slot for a security lock.
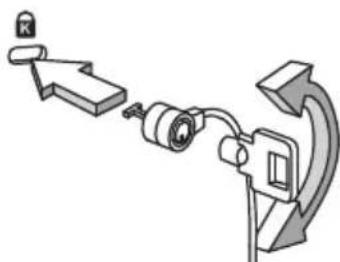
natural_image
Mechanical assembly diagram showing a tool interacting with a mounted component (no text or symbols visible)Wrap the computer security lock cable around an immovable object such as a table or handle of a locked drawer. Insert the lock into the notch and turn the key to secure the lock. Some keyless models are also available.
Using the keyboard
The keyboard has full-sized keys and an embedded numeric keypad, separate cursor, lock, Windows, function and special keys.
Lock keys and embedded numeric keypad
The keyboard has three lock keys which you can toggle on and off.
Lock key Description
Caps Lock When Caps Lock is on, all alphabetic characters typed are in uppercase.
Num Lock

Note:
Scroll Lock
The embedded numeric keypad functions like a desktop numeric keypad. It is indicated by small characters located on the upper right corner of the keycaps. To simplify the keyboard legend, cursor-control key symbols are not printed on the keys.
Desired access Num Lock on Num Lock off
| Number keys on embedded keypad | Type numbers in a normal manner. | |
| Cursor-control keys on embedded keypad | Holdwhile using cursor-control keys. | Holdwhile using cursor-control keys. |
| Main keyboard keys | Holdwhile typing letters on embedded keypad. | Type the letters in a normal manner. |
Windows keys
The keyboard has two keys that perform Windows-specific functions.
Key Description

Windows key Pressed alone it launches the Start menu. It can also be used with other keys for other functions:
<®>: Open or close the Start menu
< > +
< > +
< > +
< 📋> +
< > +
<|content_end|> +
<> +
<图标> +
< > + : Open Ease of Access Center
<|content_end|> +
<图标> +
<◆> +
< img> +

Note: Depending on your edition of Windows, some shortcuts may not function as described.

Application key This key has the same effect as clicking the right mouse button; it opens the application's context menu.
Special keys (only for certain models)
You can locate the Euro symbol and the US dollar sign at the upper-center of your keyboard.
The Euro symbol
1 Open a text editor or word processor.
2 Hold

Note: Some fonts and software do not support the Euro symbol. Please refer to www.microsoft.com/typography/faq/faq12.htm for more information.
The US dollar sign
1 Open a text editor or word processor.
2 Hold

Note: This function varies according to the language settings.
Frequently asked questions
The following is a list of possible situations that may arise during the use of your computer. Easy solutions are provided for each one.
I turned the power on, but the computer does not start or boot up.
Look at the power indicator:
- If it is not lit, n o power is being supplied to the computer. Check the following:
- If you are using on the battery, it may be low and unable to power the computer. Connect the AC adapter to recharge the battery pack.
- Make sure that the AC adapter is properly plugged into the computer and to the power outlet.
- If it is lit, check the following:
- Is a non-bootable (non-system) disk in the external USB floppy drive? Remove or replace it with a system disk and press to restart the system.
Nothing appears on the screen.
The computer's power management system automatically blanks the screen to save power. Press any key to turn the display back on.
If pressing a key does not turn the display back on, three things might be the cause:
- The b-rightness level might be too low. Press <Fn> + <> (increase) to adjust the brightness level.
- The display de vice might be set to an external monitor. Press the display toggle hotkey
+ to toggle the display back to the computer. - If the Sleep in indicator is lit, the computer is in Sleep mode. Press and release the power button to resume.
No audio is heard from the computer.
Check the following:
- The vo lume may be muted. In Windows, look at the volume control (speaker) icon on the taskbar. If it is crossed-out, click the icon and deselect the Mute all option.
- The volume level may be too low. In Windows, look at the volume control icon on the taskbar. You can also use the volume control buttons to adjust the volume.
- If head phones, earphones or external speakers are connected to the line-out port on the computer, the internal speakers automatically turn off.
The keyboard does not respond.
Try attaching an external keyboard to a USB port on the computer. If it works, contact your dealer or an authorized service center as the internal keyboard cable may be loose.
The printer does not work.
Check the following:
- Make sure that the printer is connected to a power outlet and that it is turned on.
- Make sure that the printer cable is connected securely to a USB port and the corresponding port on the printer.
I want to restore my computer to its original settings without recovery CDs.

Note: D2D Recovery is only available in notebook models fitted with a hard drive.

Note: If your system is the multilingual version, the operating system and language you choose when you first turn on the system will be the only option for future recovery operations.
This recovery process helps you restore the C: drive with the original software content that is installed when you purchase your notebook. Follow the steps below to rebuild your C: drive. (Your C: drive will be reformatted and all data will be erased.) It is important to back up all data files before using this option.
Before performing a restore operation, please check the BIOS settings by pressing
1 Check to see if Acer disk-to-disk recovery is enabled or not.
2 Make sure the D2D Recovery setting in Main is Enabled.
3 Exit the BIOS utility and save changes. The system will reboot.
To start the recovery process:
1 Restart the system.
2 While the Acer logo is showing, press
3 Refer to the onscreen instructions to perform system recovery.

Important! This feature occupies 6 GB in a hidden partition on your hard disk.
Requesting service
Before you call
Please have the following information available when you call Acer for online service, and please be at your computer when you call. With your support, we can reduce the amount of time a call takes and help solve your problems efficiently. If there are error messages or beeps reported by your computer, write them down as they appear on the screen (or the number and sequence in the case of beeps).
You are required to provide the following information:
Name: ____
Address: ____
Telephone number: ____
Machine and model type: ____
Serial number: ____
Date of purchase: ____
Battery pack
The computer uses a battery pack that gives you long use between charges.
Battery pack characteristics
The battery pack has the following characteristics:
- Employs current battery technology standards.
- Delivers a battery-low warning.
The battery is recharged whenever you connect the computer to the AC adapter. Your computer supports charge-in-use, enabling you to recharge the battery while you continue to operate the computer. However, recharging with the computer turned off results in a significantly faster charge time.
The battery will come in handy when you travel or during a power failure. It is advisable to have an extra fully charged battery pack available as backup. Contact your dealer for details on ordering a spare battery pack.
Maximizing the battery's life
Like all other batteries, your computer's battery will degrade over time. This means that the battery's performance will diminish with time and use. To maximize your battery's life, you are advised to adhere to the recommendations set out below.
Conditioning a new battery pack
Before you use a battery pack for the first time, there is a conditioning process that you should follow:
1 Insert the new battery without turning the computer on.
2 Connect the AC adapter and fully charge the battery.
3 Disconnect the AC adapter.
4 Turn on the computer and operate using battery power.
5 Fully deplete the battery until the battery-low warning appears.
6 Reconnect the AC adapter and fully charge the battery again.
Follow these steps again until the battery has been charged and discharged three times.
Use this conditioning process for all new batteries, or if a battery hasn't been used for a long time. If the computer is to be stored for more than two weeks, you are advised to remove the battery pack from the unit.

Warning: Do not expose battery packs to temperatures below 0^ C ( 32^ F) or above 45^ C ( 113^ F). Extreme temperatures may adversely affect the battery pack.
By following the battery conditioning process you condition your battery to accept the maximum possible charge. Failure to follow this procedure will prevent you from obtaining the maximum battery charge, and will also shorten the effective lifespan of the battery.
In addition, the useful lifespan of the battery is adversely affected by the following usage patterns:
- Using the computer on constant AC power with the battery inserted. If you want to use constant AC power, you are advised to remove the battery pack after it is fully charged.
- Not discharging and recharging the battery to its extremes, as described above.
- Frequent use; the more you use the battery, the faster it will reach the end of its effective life. A standard computer battery has a life span of about 300 charges.
Installing and removing the battery pack

Important! Before removing the battery from the unit, connect the AC adapter if you want to continue using your computer. Otherwise, turn off the computer first.
To install a battery pack:
1 Align the battery with the open battery bay; make sure that the end with the contacts will enter first, and that the top surface of the battery is facing up.
2 Slide the battery into the battery bay and gently push until the battery locks in place.
To remove a battery pack:
1 Slide the battery release latch to release the battery.
2 Pull the battery from the battery bay.
Charging the battery
To charge the battery, first make sure that it is correctly installed in the battery bay. Plug the AC adapter into the computer, and connect to a mains power outlet. You can continue to operate your computer on AC power while your battery is charging. However, charging the battery with the computer turned off results in a significantly faster charge time.

Note: You are advised to charge the battery before retiring for the day. Charging the battery overnight before traveling enables you to start the next day with a fully charged battery.
Checking the battery level
The Windows power meter indicates the current battery level. Rest the cursor over the battery/power icon on the taskbar to see the battery's present charge level.
Optimizing battery life
Optimizing battery life helps you get the most out of battery operation, prolonging the charge/recharge cycle and improving recharging efficiency. You are advised to follow the suggestions set out below:
•Purchase an extra battery pack.
• Use AC power whenever possible, reserving battery for on-the-go use.
- Eject a PC Card if it is not being used, as it will continue to draw power (for selected models).
- Store the battery pack in a cool, dry place. The recommended temperature is 10^ (50°F) to 30^ (86°F). Higher temperatures cause the battery to self-discharge faster.
- Excessive recharging decreases the battery life.
- Look after your AC adapter and battery.
Battery-low warning
When using battery power pay attention to the Windows power meter.

Warning: Connect the AC adapter as soon as possible after the battery-low warning appears. Data will be lost if the battery to become fully depleted and the computer shuts down.
When the battery-low warning appears, the recommended course of action depends on your situation:
Situation Recommended Action
| The AC adapter and a power outlet are available. | 1. Plug the AC adapter into the computer, and then connect to the mains power supply.2. Save all necessary files.3. Resume work.Turn off the computer if you want to recharge the battery rapidly. |
| An extra fully charged battery pack is available. | 1. Save all necessary files.2. Close all applications.3. Turn off the computer.4. Replace the battery pack.5. Turn on the computer and resume work. |
| The AC adapter or a power outlet is unavailable. You have no spare battery pack. | 1. Save all necessary files.2. Close all applications.3. Turn off the computer. |
Taking your notebook PC with you
This section gives you tips and hints to consider when moving around or traveling with your computer.
Disconnecting from the desktop
Follow these steps to disconnect your computer from external accessories:
1 Save any open files.
2 Remove any media, floppy disks or compact disks from the drive(s).
3 Shut down the computer.
4 Close the display cover.
5 Disconnect the cord from the AC adapter.
6 Disconnect the keyboard, pointing device, printer, external monitor and other external devices.
7 Disconnect the Kensington lock if you are using one to secure the computer.
Moving around
When you are just moving within short distances, for example, from your office desk to a meeting room.
Preparing the computer
Before moving the computer, close and latch the display cover to place it in Sleep mode. You can now safely take the computer anywhere you go within the building. To bring the computer out of Sleep mode, open the display; then press and release the power button.
If you are taking the computer to a client's office or a different building, you may choose to shut down the computer:
Click Start then click Shut Down.
Or:
You can put the computer in Sleep mode by pressing
When you are ready to use the computer again, unlatch and open the display; then press and release the power button.

Note: If the Sleep indicator is off, the computer has entered Hibernation mode and is turned off. If the power indicator is off but the Sleep indicator is on, the computer has entered Sleep mode. In both cases, press and release the power button to turn the computer back on. Note that the computer may enter Hibernation mode after being in Sleep mode for a period of time.
What to bring to meetings
If your meeting is relatively short, you probably do not need to bring anything with you other than your computer. If your meeting will be longer, or if your battery is not fully charged, you may want to bring the AC adapter with you to plug in your computer in the meeting room.
If the meeting room does not have an electrical outlet, reduce the drain on the battery by putting the computer in Sleep mode. Press
Taking the computer home
When you are moving from your office to your home or vice versa.
Preparing the computer
After disconnecting the computer from your desktop, follow these steps to prepare the computer for the trip home:
- Check that you have removed all media and compact discs from the drive(s). Failure to remove the media can damage the drive head.
- Pack the computer in a protective case that can prevent the computer from sliding around and cushion it if it should fall.

Caution: Avoid packing items next to the top cover of the computer. Pressure against the top cover can damage the screen.
What to take with you
Unless you have some items at home, take the following items with you:
•AC adapter and power cord.
•The printed User's Guide.
Special considerations
Follow these guidelines to protect your computer while traveling to and from work:
- Minimize the effects of temperature changes by keeping the computer with you.
- If you need to stop for an extended period of time and cannot carry the computer with you, leave the computer in the trunk of the car to avoid exposing the computer to excessive heat.
- Changes in temperature and humidity can cause condensation. Allow the computer to return to room temperature, and inspect the screen for condensation before turning on the computer. If the temperature change is greater than 10^ C ( 18^ F), allow the computer to come to room temperature slowly. If possible, leave the computer for 30 minutes in an environment with a temperature between outside and room temperature.
Setting up a home office
If you frequently work on your computer at home, you may want to purchase a second AC adapter for use at home. With a second AC adapter, you can avoid carrying the extra weight to and from home.
If you use your computer at home for significant periods of time, you might also want to add an external keyboard, monitor or mouse.
Traveling with the computer
When you are moving within a larger distance, for instance, from your office building to a client's office building or traveling locally.
Preparing the computer
Prepare the computer as if you were taking it home. Make sure that the battery in the computer is charged. Airport security may require you to turn on your computer when carrying it into the gate area.
What to take with you
Take the following items with you:
- AC adapter
- Spare, fully-charged battery pack(s)
•Additional printer driver files if you plan to use another printer
Special considerations
In addition to the guidelines for taking the computer home, follow these guidelines to protect your computer while traveling:
•Always take the computer as carry-on luggage.
- If possible, have the computer inspected by hand. Airport security X-ray machines are safe, but do not put the computer through a metal detector.
- Avoid exposing floppy disks to hand-held metal detectors.
Traveling internationally with the computer
When you are moving from country to country.
Preparing the computer
Prepare the computer as you would normally prepare it for traveling.
What to take with you
Take the following items with you:
- AC adapter
• Power cords that are appropriate for the country to which you are traveling - Spare, fully-charged battery packs
•Additional printer driver files if you plan to use another printer
•Proof of purchase, in case you need to show it to customs officials
•International Travelers Warranty passport
Special considerations
Follow the same special considerations as when traveling with the computer. In addition, these tips are useful when traveling internationally:
- When traveling in another country, check that the local AC voltage and the AC adapter power cord specifications are compatible. If not, purchase a power cord that is compatible with the local AC voltage. Do not use converter kits sold for appliances to power the computer.
- If you are using the modem, check if the modem and connector are compatible with the telecommunications system of the country you are traveling in.
Securing your computer
Your computer is a valuable investment that you need to take care of. Learn how to protect and take care of your computer.
Security features include hardware and software locks — a security notch and passwords.
Using a computer security lock
The notebook comes with a Kensington-compatible security slot for a security lock.
Wrap a computer security lock cable around an immovable object such as a table or handle of a locked drawer. Insert the lock into the notch and turn the key to secure the lock. Some keyless models are also available.
Using passwords
Passwords protect your computer from unauthorized access. Setting these passwords creates several different levels of protection for your computer and data:
- Supervisor Password prevents unauthorized entry into the BIOS utility. Once set, you must enter this password to gain access to the BIOS utility. See "BIOS utility" on page 33.
- User Password secures your computer against unauthorized use. Combine the use of this password with password checkpoints on boot-up and resume from Hibernation for maximum security.
- Password on Boot secures your computer against unauthorized use. Combine the use of this password with password checkpoints on boot-up and resume from Hibernation for maximum security.

Important! Do not forget your Supervisor Password! If you forget your password, please get in touch with your dealer or an authorized service center.
Entering passwords
When a password is set, a password prompt appears in the center of the display screen.
- When the Supervisor Password is set, a prompt appears when you press
to enter the BIOS utility at boot-up. - Type the Supervisor Password and press
to access the BIOS utility. If you enter the password incorrectly, a warning message appears. Try again and press . - When the User Password is set and the password on boot parameter is enabled, a prompt appears at boot-up.
- Type the User Password and press
to use the computer. If you enter the password incorrectly, a warning message appears. Try again and press .

Important! You have three chances to enter a password. If you fail to enter the password correctly after three tries, the system halts. Press and hold the power button for four seconds to shut down the computer. Then turn on the computer again, and try again.
Setting passwords
You can set passwords using the BIOS utility.
Expanding through options
Your notebook PC offers you a complete mobile computing experience.
Connectivity options
Ports allow you to connect peripheral devices to your computer as you would with a desktop PC. For instructions on how to connect different external devices to the computer, read the following section.
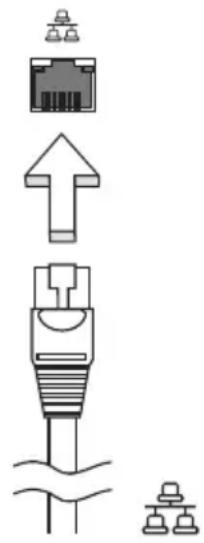
Built-in network feature
The built-in network feature allows you to connect your computer to an Ethernet-based network.
To use the network feature, connect an Ethernet cable from the Ethernet (RJ-45) port on the chassis of the computer to a network jack or hub on your network.
text_image
Diagram showing various types of connectors and components with Chinese labelsUniversal Serial Bus (USB)
The USB 2.0 port is a high-speed serial bus which allows you to connect USB peripherals without taking up precious system resources.

text_image
Diagram showing three types of electronic devices: a camera, a USB connector with USB symbol, and a digital camera.BIOS utility
The BIOS utility is a hardware configuration program built into your computer's BIOS.
Your computer is already properly configured and optimized, and you do not need to run this utility. However, if you encounter configuration problems, you may need to run it.
To activate the BIOS utility, press
Boot sequence
To set the boot sequence in the BIOS utility, activate the BIOS utility, then select Boot from the categories listed at the top of the screen.
Enable disk-to-disk recovery
To enable disk-to-disk recovery (hard disk recovery), activate the BIOS utility, then select Main from the categories listed at the top of the screen. Find D2D Recovery at the bottom of the screen and use the
Password
To set a password on boot, activate the BIOS utility, then select Security from the categories listed at the top of the screen. Find Password on boot: and use the
Power management
This computer has a built-in power management unit that monitors system activity. System activity refers to any activity involving one or more of the following devices: keyboard, mouse, hard disk, peripherals connected to the computer, and video memory. If no activity is detected for a period of time (called an inactivity timeout), the computer stops some or all of these devices in order to conserve energy.
This computer employs a power management scheme that supports the advanced configuration and power interface (ACPI), which allows for maximum power conservation and maximum performance at the same time. Windows handles all power-saving chores for your computer.
Troubleshooting
This chapter shows you how to deal with common system problems. Read it before calling a technician if a problem occurs. Solutions to more serious problems require opening up the computer. Do not attempt to open the computer yourself; contact your dealer or authorized service center for assistance.
Troubleshooting tips
This notebook PC incorporates an advanced design that delivers onscreen error message reports to help you solve problems.
If the system reports an error message or an error symptom occurs, see "Error messages" below. If the problem cannot be resolved, contact your dealer. See "Requesting service" on page 21.
Error messages
If you receive an error message, note the message and take the corrective action. The following table lists the error messages in alphabetical order together with the recommended course of action.
| Error messages Corrective action | |
| CMOS battery bad Contact your dealer or an authorized service center. | |
| CMOS checksum error Contact your dealer or an authorized service center. | |
| Disk boot failure | Insert a system (bootable) disk, then pressto reboot. |
| Equipment configuration error | Press(during POST) to enter the BIOS utility, then press Exit in the BIOS utility to reboot. |
| Hard disk 0 error Contact your dealer or an authorized service center. | |
| Hard disk 0 extended type error | Contact your dealer or an authorized service center. |
| I/O parity error Contact your dealer or an authorized service center. | |
| Keyboard error or no keyboard connected | Contact your dealer or an authorized service center. |
| Keyboard interface error | Contact your dealer or an authorized service center. |
| Memory size mismatch | Press(during POST) to enter the BIOS utility, then press Exit in the BIOS utility to reboot. |
If you still encounter problems after going through the corrective measures, please contact your dealer or an authorized service center for assistance.
Regulations and safety notices
FCC notice
This device has been tested and found to comply with the limits for a Class B digital device pursuant to Part 15 of the FCC rules. These limits are designed to provide reasonable protection against harmful interference in a residential installation. This device generates, uses, and can radiate radio frequency energy and, if not installed and used in accordance with the instructions, may cause harmful interference to radio communications.
However, there is no guarantee that interference will not occur in a particular installation. If this device does cause harmful interference to radio or television reception, which can be determined by turning the device off and on, the user is encouraged to try to correct the interference by one or more of the following measures:
- Reorient or relocate the receiving antenna.
- Increase the separation between the device and receiver.
- Connect the device into an outlet on a circuit different from that to which the receiver is connected.
- Consult the dealer or an experienced radio/television technician for help.
Notice: Shielded cables
All connections to other computing devices must be made using shielded cables to maintain compliance with FCC regulations.
Notice: Peripheral devices
Only peripherals (input/output devices, terminals, printers, etc.) certified to comply with the Class B limits may be attached to this equipment. Operation with non-certified peripherals is likely to result in interference to radio and TV reception.
Caution
Changes or modifications not expressly approved by the manufacturer could void the user's authority, which is granted by the Federal Communications Commission, to operate this computer.
Operation conditions
This device complies with Part 15 of the FCC Rules. Operation is subject to the following two conditions: (1) this device may not cause harmful interference, and (2) this device must accept any interference received, including interference that may cause undesired operation.
Notice: Canadian users
This Class B digital apparatus complies with Canadian ICES-003.
Declaration of Conformity for EU countries
Hereby, Acer, declares that this notebook PC series is in compliance with the essential requirements and other relevant provisions of Directive 1999/5/EC.
Compliant with Russian regulatory certification

text_image
C iP PCT ME61LCD pixel statement
The LCD unit is produced with high-precision manufacturing techniques. Nevertheless, some pixels may occasionally misfire or appear as black or red dots. This has no effect on the recorded image and does not constitute a malfunction.
Radio device regulatory notice

Note: Below regulatory information is for models with wireless LAN and / or Bluetooth only.
General
To prevent radio interference to the licensed service, this device is intended to be operated indoors.
This product complies with the radio frequency and safety standards of any country or region in which it has been approved for wireless use. Depending on configurations, this product may or may not contain wireless radio devices (such as wireless LAN and/or Bluetooth modules). Below information is for products with such devices.
European Union (EU)
R&TTE Directive 1999/5/EC as attested by conformity with the following harmonized standard:
• Article 3.1(a) Health and Safety
• EN60950-1
• EN62311
• Article 3.1(b) EMC
• EN301 489-1
- EN301 489-3 (Applicable to non-bluetooth wireless keyboard mouse set)
• EN301 489-7
• EN301 489-17
• EN301 489-24
• Article 3.2 Spectrum Usages
• EN300 440-2 (Applicable to non-bluetooth wireless keyboard mouse set)
• EN300 328
• EN301 511
• EN301 893 (Applicable to 5 GHz high performance RLAN)
• EN301 908-1
EN301 908-2

List of applicable countries
EU member states as of July 2009 are: Belgium, Denmark, Germany, Greece, Spain, France, Ireland, Italy, Luxembourg, the Netherlands, Austria, Portugal, Finland, Sweden, United Kingdom, Estonia, Latvia, Lithuania, Poland, Hungary, Czech Republic, Slovak Republic, Slovenia, Cyprus, Malta, Bulgaria and Romania. Usage is allowed in the countries of European Union, as well as Norway, Switzerland, Iceland and Liechtenstein. This device must be used in strict accordance with the regulations and constraints in the country of use. For further information, please contact local office in the country of use. Please see ec.europa.eu/enterprise/rtte/ implement.htm for the latest country list.
The FCC RF safety requirement
The radiated output power of the wireless LAN Mini PCI Card and Bluetooth card is far below the FCC radio frequency exposure limits. Nevertheless, the
notebook PC series shall be used in such a manner that the potential for human contact during normal operation is minimized as follows:
1 Users are requested to follow the RF safety instructions on wireless option devices that are included in the user's manual of each RF option device.

Caution: To comply with FCC RF exposure compliance requirements, a separation distance of at least 20 cm (8 inches) must be maintained between the antenna for the integrated wireless LAN Mini PCI Card built in to the screen section and all persons.
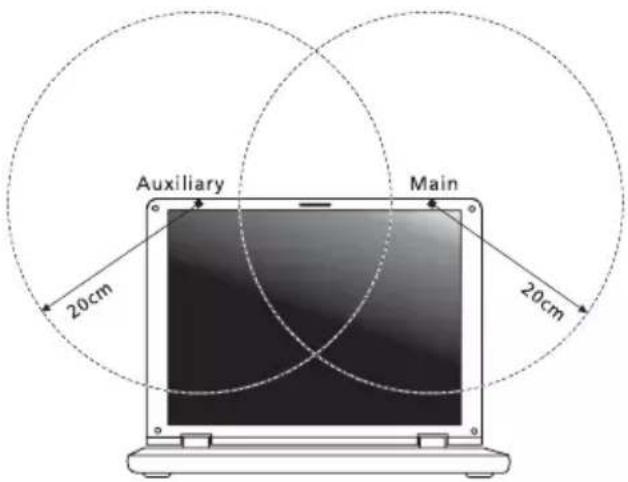
text_image
Auxiliary Main 20cm 20cm
Note: The wireless Mini PCI adapter implements a transmission diversity function. The function does not emit radio frequencies simultaneously from both antennas. One of the antennas is selected automatically or manually (by users) to ensure good quality radiocommunication.
2 An improper installation or unauthorized use may cause harmful interference to radio communications. Also any tampering of the internal antenna will void the FCC certification and your warranty.
Canada — Low-power license-exempt radio communication devices (RSS-210)
a Common information
Operation is subject to the following two conditions:
- This device may not cause interference, and
- This device must accept any interference, including interference that may cause undesired operation of the device.
b Operation in 2.4 GHz band
To prevent radio interference to the licensed service, this device is intended to be operated indoors and installation outdoors is subject to licensing.
LCD panel ergonomic specifications
| Design viewing distance 500 mm | |
| Design inclination angle 0.0° | |
| Design azimuth angle 90.0° | |
| Viewing direction range class Class IV | |
| Screen tilt angle 85.0° | |
| Design screen illuminance | Illuminance level:[250 + (250cosα)] lx where α = 85°Color: Source D65 |
| Reflection class of LCD panel(positive and negative polarity) | Ordinary LCD: Class IProtective or Acer LCD: Class III |
| Image polarity Both | |
| Reference white:Pre-setting of luminance and color temperature @ 6500K (tested under BM7) | Ynu'nv'n |
| Pixel fault class Class II | |
Gamme Aspire One
Acer eRecovery Management 1
LCD panel ergonomic specifications 45
Acer eRecovery Management
text_image
Acer eRecovery Management Backup Restore Settings Help Password for Restore Process Password Protection: Disabled Create a New Password acertext_image
Acer eRecovery Management Backup Restore Settings Help Create Factory Default Backup Backup the factory default system to media so that you can restore your PC to its factory default status if needed. It is important to create the factory default media before using your PC. Create Drivers and Applications Backup Backup the drivers and applications to storage media. Use this media to reinstall drivers or applications if you encounter any problems with them.text_image
Acer eRecovery Management Backup Restore Settings1 Help Create Factory Default Backup Backup to: (Q) Optarc BD ROM BC-5500S Estimated size: 5.54 GB It needs 2 blank DVD(s) to burn. Label: Recovery Do not disconnect the storage media while creating the backup. Click Start to begin creating the backup. Start Cancel
text_image
Acer eRecovery Management Backup KRestore Settings Help Create Factory Default Backup Create on: Recovery1 Backup media: 6% Elapsed time: 00:01:50 Verifying: 0% Elapsed time: 00:00:00 acertext_image
Acer eRecovery Management Backup Restore Settings Help Create Factory Default Backup Backup the factory default system to media so that you can restore your PC to its factory default status if needed. It is important to create the factory default media before using your PC. Create Drivers and Applications Backup Backup the drivers and applications to storage media. Use this media to reinstall drivers or applications if you encounter any problems with them.text_image
Acer eRecovery Management Backup Restore Settings Help Create Factory Default Backup Please insert a blank DVD disc or USB flash drive to back up your data. Backup tcc: (E) USB flash Free Space: 14.81 GB Estimated size: 5.55 GB Label: USB flash Do not disconnect the storage media while creating the backup. Click Start to begin creating the backup. Start Canceltext_image
Acer eRecovery Management Backup Restore Settings Help Create Factory Default Backup Create on: USE flash Backup media: 6% Elapsed time: 00:01:34 Verifying: 0% Elapsed time: 00:00:00 acertext_image
Acer eRecovery Management Backup Restore Settings ? help Restore Operating System to Factory Defaults Restore Operating System to factory default status. All data on c) drive will be deleted. (*Reboot needed) Restore Operating System and Retain User Data Restore only the operating system of your PC to the factory defaults. Files from your user accounts will be transferred to c)backup. This option will not remove persistent viruses or malware. (*Reboot needed) Reinstall Drivers or Applications Reinstall Factory Default Drivers or Applications.text_image
Welcome to Acer Recovery Tool Acer Recovery Tool allows you to restore your system to the following status. Please DO NOT remove the USB device while proceeding. What would you like to do? Restore Operating System to Factory Defaults from a USB device Restore your PC to factory default status. All data on C: drive will be deleted. Reinstall Drivers or Application from a USB device Renstall factory default drivers or applications.natural_image
Diagram of a mechanical device with a knob and directional arrow, no text or symbols presenttext_image
Diagram showing various types of electrical connectors and components with Chinese labelsUniversal Serial Bus (USB)
text_image
Diagram showing the installation of a digital camera module via USB, with labeled components and an upward arrow indicating process flow.Utilitaire du BIOS
This Class B digital apparatus complies with Canadian ICES-003.
text_image
Auxiliary Main 20cm 20cm
LCD panel ergonomic specifications
| Design viewing distance 500 mm | |
| Design inclination angle 0.0° | |
| Design azimuth angle 90.0° | |
| Viewing direction range class Class IV | |
| Screen tilt angle 85.0° | |
| Design screen illuminance •Illuminance level:[250 + (250cosα)] lx where α = 85°•Color: Source D65 | |
| Reflection class of LCD panel(positive and negative polarity) | •Ordinary LCD: Class I•Protective or Acer LCD: Class III |
| Image polarity Both | |
| Reference white:Pre-setting of luminance and color temperature @ 6500K (tested under BM7) | •Yn•u'n•v'n |
| Pixel fault class Class II | |
Aspire One Serie
Acer eRecovery Management 1
(disk-to-disk recovery) 37
Kennwort 37
LCD panel ergonomic specifications 45
Acer eRecovery Management
text_image
Acer eRecovery Management Backup Restore Settings Help Password for Restore Process Password Protection: Disabled Create a New Password acertext_image
Acer eRecovery Management Backup Restore Settings Help Create Factory Default Backup Backup the factory default system to media so that you can restore your PC to its factory default status if needed. It is important to create the factory default media before using your PC. Create Drivers and Applications Backup Backup the drivers and applications to storage media. Use this media to reinstall drivers or applications if you encounter any problems with them.text_image
Acer eRecovery Management Backup Restore Settings Help Create Factory Default Backup Backup to: (©) Optarc BD ROM BC-5500S Estimated size: 5.34 GB It needs 2 blank DVD(s) to burn. Label: Recovery Do not disconnect the storage media while creating the backup. Click Start to begin creating the backup. Start Cancel
text_image
Acer eRecovery Management Backup Restore Settings ? help Create Factory Default Backup Create on: Recovery1 Backup media: 6% Elapsed time: 00:01:50 Verifying: 0% Elapsed time: 00:00:00 acertext_image
Acer eRecovery Management Backup Restore Settings Help Create Factory Default Backup Backup the factory default system to media so that you can restore your PC to its factory default status if needed. It is important to create the factory default media before using your PC. Create Drivers and Applications Backup Backup the drivers and applications to storage media. Use this media to reinstall drivers or applications if you encounter any problems with them.text_image
Acer eRecovery Management Backup Restore Settings Help Create Factory Default Backup Please insert a blank DVD disc or USB flash drive to back up your data. Backup to: (E:) USB flash free Space: 14.81 GB Estimated size: 5.55 GB Label: USB flash Do not disconnect the storage media while creating the backup. Click Start to begin creating the backup. Start Canceltext_image
Acer eRecovery Management Backup Restore Surgery Help Create Factory Default Backup Create on: US$ flash Backup media: 6% Elapsed time: 00:01:34 Verifying: 0% Elapsed time: 00:00:00 acertext_image
Acer eRecovery Management Backup Restore Setting1 Help Restore Operating System to Factory Defaults Restore Operating System to factory default status. All data on c\ drive will be deleted. ('Reboot needed) Restore Operating System and Retain User Data Restore only the operating system of your PC to the factory defaults. Files from your user accounts will be transferred to c\backup. This option will not remove persistent viruses or malware. ('Reboot needed) Reinstall Drivers or Applications Reinstall Factory Default Drivers or Applications.text_image
Welcome to Acer Recovery Tool Acer Recovery Tool allows you to restore your system to the following status. Please DO NOT remove the USB device while proceeding. What would you like to do? Restore Operating System to Factory Defaults from a USB device Restore your PC to factory default status. All data on C: drive will be deleted. Reinstall Drivers or Application from a USB device Renstall factory default drivers or applications.natural_image
Diagram of a mechanical device with a sensor and directional arrow, no text or symbols presenttext_image
Diagram showing various types of connectors and components with Chinese labelstext_image
Diagram showing three connected devices: a digital camera, a USB flash unit, and a digital camera with an LED indicator.BIOS-Dienstprogramm
This Class B digital apparatus complies with Canadian ICES-003.
natural_image
Abstract black and white logo with circular and stylized elements (no text or symbols)
ME61
LCD-Pixel-Hinweis
text_image
Auxiliary Main 20cm 20cm
LCD panel ergonomic specifications
| Design viewing distance 500 mm | |
| Design inclination angle 0.0° | |
| Design azimuth angle 90.0° | |
| Viewing direction range class Class IV | |
| Screen tilt angle 85.0° | |
| Design screen illuminance • Illuminance level:[250 + (250cosα)] lx where α = 85°• Color: Source D65 | |
| Reflection class of LCD panel(positive and negative polarity) | • Ordinary LCD: Class I• Protective or Acer LCD: Class III |
| Image polarity Both | |
| Reference white:Pre-setting of luminance and color temperature @ 6500K (tested under BM7) | • Yn• u'n• v'n |
| Pixel fault class Class II | |
Serie Aspire One
Acer eRecovery Management 1
LCD panel ergonomic specifications 42
Acer eRecovery Management
text_image
Acer eRecovery Management Backup Restore Settings Help Password for Restore Process Password Protection: Disabled Create a New Password accrtext_image
Acer eRecovery Management Backup Restore Settings Help Create Factory Default Backup Backup the factory default system to media so that you can restore your PC to its factory default status if needed. It is important to create the factory default media before using your PC. Create Drivers and Applications Backup Backup the drivers and applications to storage media. Use this media to reinstall drivers or applications if you encounter any problems with them.text_image
Acer eRecovery Management Backup Restore Settings Help Create Factory Default Backup Backup to: (©) Optarc BD ROM BC-5500S Estimated size: 5.54 GB It needs 2 blank DVD(s) to burn. Label: Recovery Do not disconnect the storage media while creating the backup. Click Start to begin creating the backup. Start Cancel
text_image
Acer eRecovery Management Backup HISTORE Settings Help Create Factory Default Backup Create on: Recovery1 Backup media: 6% Elapsed time: 00:01:50 Verifying: 0% Elapsed time: 00:00:00 acertext_image
Acer eRecovery Management Backup Restore Settings Help Create Factory Default Backup Backup the factory default system to media so that you can restore your PC to its factory default status if needed. It is important to create the factory default media before using your PC. Create Drivers and Applications Backup Backup the drivers and applications to storage media. Use this media to reinstall drivers or applications if you encounter any problems with them.text_image
Acer eRecovery Management Backup Restore Settings ? help Create Factory Default Backup Please insert a bank DVD disc or USB flash drive to back up your data. Backup to: (E:) USB flash Free Space: 14.81 GB Estimated size: 5.35 GB Label: USB flash Do not disconnect the storage media while creating the backup. Click Start to begin creating the backup. Start Canceltext_image
Acer eRecovery Management Backup Restore Settings Help Create Factory Default Backup Create on: USE flash Backup media: 6% Elapsed time: 00:01:34 Verifying: 0% Elapsed time: 00:00:00 acertext_image
Acer eRecovery Management Backup Restore Settings ? help acer Restore Operating System to Factory Defaults Restore Operating System to factory default status. All data on c1, drive will be deleted. (*Reboot needed) Restore Operating System and Retain User Data Restore only the operating system of your PC to the factory defaults. Files from your user accounts will be transferred to c1,backup. This option will not remove persistent viruses or malware. (*Reboot needed) Reinstall Drivers or Applications Reinstall Factory Default Drivers or Applications.text_image
Welcome to Acer Recovery Tool Acer Recovery Tool allows you to restore your system to the following status. Please DO NOT remove the USB device while proceeding. What would you like to do? Restore Operating System to Factory Defaults from a USB device Restore your PC to factory default status. All data on C: drive will be deleted. Reinstall Drivers or Application from a USB device Reninstall factory default drivers or applications.natural_image
Diagram of a mechanical device with a knob and directional arrow, no text or symbols presenttext_image
Diagram showing various types of connectors and components with Chinese labelsUniversal Serial Bus (USB)
text_image
Diagram showing the installation of a digital camera module via USB, with labeled components and directional arrows.Utilità BIOS
This Class B digital apparatus complies with Canadian ICES-003.
text_image
Auxiliary Main 20cm 20cm
LCD panel ergonomic specifications
| Design viewing distance 500 mm | |
| Design inclination angle 0.0° | |
| Design azimuth angle 90.0° | |
| Viewing direction range class Class IV | |
| Screen tilt angle 85.0° | |
| Design screen illuminance •Illuminance level:[250 + (250cosα)] lx where α = 85°•Color: Source D65 | |
| Reflection class of LCD panel(positive and negative polarity) | •Ordinary LCD: Class I•Protective or Acer LCD: Class III |
| Image polarity Both | |
| Reference white: | •Yn |
| Pre-setting of luminance and color temperature @ 6500K (tested under BM7) | •u'n•v'n |
| Pixel fault class Class II | |
Serie Aspire One
www.acer-group.com/public/Sustainability/sustainability01.htm.

Acer eRecovery Management
1
LCD panel ergonomic specifications 46
Acer eRecovery Management
text_image
Acer eRecovery Management Backup Restore Settings Help Password for Restore Process Password Protection: Disabled Create a New Password acertext_image
Acer eRecovery Management Backup Restore Settings Help Create Factory Default Backup Backup the factory default system to media so that you can restore your PC to its factory default status if needed. It is important to create the factory default media before using your PC. Create Drivers and Applications Backup Backup the drivers and applications to storage media. Use this media to reinstall drivers or applications if you encounter any problems with them.text_image
Acer eRecovery Management Backup Restore Settings Help Create Factory Default Backup Backup to: (©) Optarc BD ROM BC-5500S Estimated size: 5.34 GB It needs 2 blank DVD(s) to burn. Label: Recovery Do not disconnect the storage media while creating the backup. Click Start to begin creating the backup. Start Cancel
text_image
Acer eRecovery Management Backup Restore Settings ? help Create Factory Default Backup Create on: Recovery1 Backup media: 6% Elapsed time: 00:01:50 Verifying: 0% Elapsed time: 00:00:00 acertext_image
Acer eRecovery Management Backup Restore Settings ? Help Create Factory Default Backup Backup the factory default system to media so that you can restore your PC to its factory default status if needed. It is important to create the factory default media before using your PC. Create Drivers and Applications Backup Backup the drivers and applications to storage media. Use this media to reinstall drivers or applications if you encounter any problems with them.text_image
Acer eRecovery Management Backup Restore Settings Help Create Factory Default Backup Please insert a blank DVD disc or USB flash drive to back up your data. Backup to: (E) USB flash Free Space: 14.81 GB Estimated size: 5.55 GB Label: USB flash Do not disconnect the storage media while creating the backup. Click Start to begin creating the backup. Start Canceltext_image
Acer eRecovery Management Backup Backup Settings ? Help Create Factory Default Backup Create on: USB flash Backup media: 6% Elapsed time: 00:01:34 Verifying: 0% Elapsed time: 00:00:00 acertext_image
Acer eRecovery Management Backup Restore Settings ? Help Restore Operating System to Factory Defaults Restore Operating System to factory default status. All data on c1, drive will be deleted. ("Reboot needed) Restore Operating System and Retain User Data Restore only the operating system of your PC to the factory defaults. Files from your user accounts will be transferred to c1/backup. This option will not remove persistent viruses or malware. ("Reboot needed) Reinstall Drivers or Applications Reinstall Factory Default Drivers or Applications.text_image
Welcome to Acer Recovery Tool Acer Recovery Tool allows you to restore your system to the following status. Please DO NOT remove the USB device while proceeding. What would you like to do? Restore Operating System to Factory Defaults from a USB device Restore your PC to factory default status. All data on C: drive will be deleted. Reinstall Drivers or Application from a USB device Renstall factory default drivers or applications.natural_image
Diagram showing a connector with a sensor and directional arrow, no text or symbols presenttext_image
Diagram showing various types of connectors and socket symbols, including a network switch, up/down arrow, and socket arrangement.Universal Serial Bus (USB)
text_image
Diagram showing three components of a device: a camera, a USB flash unit, and a digital camera, with an upward arrow indicating the process.La utilidad BIOS
Aviso: Canadian users
This Class B digital apparatus complies with Canadian ICES-003.
natural_image
Abstract black and white logo with stylized 'C' and 'iP' symbol (no text or numbers)
ME61
text_image
Auxiliary Main 20cm 20cm
LCD panel ergonomic specifications
| Design viewing distance 500 mm | |
| Design inclination angle 0.0° | |
| Design azimuth angle 90.0° | |
| Viewing direction range class Class IV | |
| Screen tilt angle 85.0° | |
| Design screen illuminance •Illuminance level:[250 + (250cosα)] lx where α = 85°•Color: Source D65 | |
| Reflection class of LCD panel(positive and negative polarity) | •Ordinary LCD: Class I•Protective or Acer LCD: Class III |
| Image polarity Both | |
| Reference white:Pre-setting of luminance and color temperature @ 6500K (tested under BM7) | •Yn•u'n•v'n |
| Pixel fault class Class II | |
Série Aspire One
Acer eRecovery Management 1
LCD panel ergonomic specifications 44
Acer eRecovery Management
text_image
Acer eRecovery Management Backup Restore Settings Help Password for Restore Process Password Protection: Disabled Create a New Password acertext_image
Acer eRecovery Management Backup Restore Settings ? Help Create Factory Default Backup Backup the factory default system to media so that you can restore your PC to its factory default status if needed. It is important to create the factory default media before using your PC. Create Drivers and Applications Backup Backup the drivers and applications to storage media. Use this media to reinstall drivers or applications if you encounter any problems with them.text_image
Acer eRecovery Management Backup Restore Settings Help Create Factory Default Backup Backup to: (©) Optarc BDROM BC-55005 Estimated size: 5.54 GB It needs 2 blank DVD(s) to burn. Label: Recovery Do not disconnect the storage media while creating the backup. Click Start to begin creating the backup. Start Cancel
Nota: O número de DVDs virgens varia consoante o sistema operativo instalado.
text_image
Acer eRecovery Management Backup restore Settings ? Help Create Factory Default Backup Create on: Recovery1 Backup media: 6% Elapsed time: 00:01:50 Verifying: 0% Elapsed time: 00:00:00 acertext_image
Acer eRecovery Management Backup Restore Settings Help Create Factory Default Backup Backup the factory default system to media so that you can restore your PC to its factory default status if needed. It is important to create the factory default media before using your PC. Create Drivers and Applications Backup Backup the drivers and applications to storage media. Use this media to reinstall drivers or applications if you encounter any problems with them.text_image
Acer eRecovery Management Backup Restore Settings Help Create Factory Default Backup Please insert a blank DVD disc or USB flash drive to back up your data. Backup to: (E:) USB flash Free Space: 14.81 GB Estimated size: 5.35 GB Label: USB flash Do not disconnect the storage media while creating the backup. Click Start to begin creating the backup. Start Canceltext_image
Acer eRecovery Management Backup Restore Settings Help Create Factory Default Backup Create on: US$ flash Backup media: 6% Elapsed time: 00:01:34 Verifying: 0% Elapsed time: 00:00:00 acertext_image
Acer eRecovery Management Backup Restore Settings ? help Restore Operating System to Factory Defaults Restore Operating System to factory default status. All data on c\ drive will be deleted. (*Reboot needed) Restore Operating System and Retain User Data Restore only the operating system of your PC to the factory defaults. Files from your user accounts will be transferred to c\backup. This option will not remove persistent viruses or malware. (*Reboot needed) Reinstall Drivers or Applications Reinstall Factory Default Drivers or Applications.text_image
Welcome to Acer Recovery Tool Acer Recovery Tool allows you to restore your system to the following status. Please DO NOT remove the USB device while proceeding. What would you like to do? Restore Operating System to Factory Defaults from a USB device Restore your PC to factory default status. All data on C: drive will be deleted. Reinstall Drivers or Application from a USB device Reninstall factory default drivers or applications.natural_image
Diagram of a mechanical device with a knob and directional arrow, no text or symbols presenttext_image
Diagram showing various types of connectors and socket symbols with Chinese labelsUniversal Serial Bus (USB)
text_image
Diagram showing three types of devices connected to a central device with an LED, including a USB port and a digital camera.Utilitário BIOS
Aviso: Canadian users
This Class B digital apparatus complies with Canadian ICES-003.
natural_image
Abstract black and white logo with stylized 'C' and 'iP' symbols (no text or numbers)
ME61
text_image
Auxiliary Main 20cm 20cm
LCD panel ergonomic specifications
| Design viewing distance 500 mm | |
| Design inclination angle 0.0° | |
| Design azimuth angle 90.0° | |
| Viewing direction range class Class IV | |
| Screen tilt angle 85.0° | |
| Design screen illuminance •Illuminance level:[250 + (250cosα)] lx where α = 85°•Color: Source D65 | |
| Reflection class of LCD panel(positive and negative polarity) | •Ordinary LCD: Class I•Protective or Acer LCD: Class III |
| Image polarity Both | |
| Reference white:Pre-setting of luminance and color temperature @ 6500K (tested under BM7) | •Yn•u'n•v'n |
| Pixel fault class Class II | |
Aspire One Serie
Acer eRecovery Management 1
LCD panel ergonomic specifications 43
Acer eRecovery Management
text_image
Acer eRecovery Management Backup Restore Settings Help Password for Restore Process Password Protection: Disabled Create a New Password acertext_image
Acer eRecovery Management Backup Restore Settings Help Create Factory Default Backup Backup the factory default system to media so that you can restore your PC to its factory default status if needed. It is important to create the factory default media before using your PC. Create Drivers and Applications Backup Backup the drivers and applications to storage media. Use this media to reinstall drivers or applications if you encounter any problems with them.text_image
Acer eRecovery Management Backup Restore Settings Help Create Factory Default Backup Backup to: (©) Optarc BDIOM BC-5500S Estimated size: 5.54 GB It needs 2 blank DVD(s) to burn. Label: Recovery Do not disconnect the storage media while creating the backup. Click Start to begin creating the backup. Start Cancel
text_image
Acer eRecovery Management Backup Restore Settings Help Create Factory Default Backup Create on: Recovery1 Backup media: 6% Elapsed time: 00:01:50 Verifying: 0% Elapsed time: 00:00:00 acertext_image
Acer eRecovery Management Backup Restore Settings Help Create Factory Default Backup Backup the factory default system to media so that you can restore your PC to its factory default status if needed. It is important to create the factory default media before using your PC. Create Drivers and Applications Backup Backup the drivers and applications to storage media. Use this media to reinstall drivers or applications if you encounter any problems with them.text_image
Acer eRecovery Management Backup Restore Settings Help Create Factory Default Backup Please insert a blank DVD disc or USB flash drive to back up your data. Backup to: (E:) USB flash free Space: 14.81 GB Estimated size: 5.55 GB Label: USB flash Do not disconnect the storage media while creating the backup. Click Start to begin creating the backup. Start Canceltext_image
Acer eRecovery Management Backup Restore Sensions Help Create Factory Default Backup Create on: US$ flash Backup media: 6% Elapsed time: 00:01:34 Verifying: 0% Elapsed time: 00:00:00 acertext_image
Acer eRecovery Management Backup Restore Settings Help Restore Operating System to Factory Defaults Restore Operating System to factory default status. All data on c\ drive will be deleted. (*Reboot needed) Restore Operating System and Retain User Data Restore only the operating system of your PC to the factory defaults. Files from your user accounts will be transferred to c\backup. This option will not remove persistent viruses or malware. (*Reboot needed) Reinstall Drivers or Applications Reinstall Factory Default Drivers or Applications.text_image
Welcome to Acer Recovery Tool Acer Recovery Tool allows you to restore your system to the following status. Please DO NOT remove the USB device while proceeding. What would you like to do? Restore Operating System to Factory Defaults from a USB device Restore your PC to factory default status. All data on C: drive will be deleted. Reinstall Drivers or Application from a USB device Reninstall factory default drivers or applications.natural_image
Diagram of a mechanical device with a knob and directional arrow, no text or symbols presenttext_image
Diagram showing various types of connectors and components with Chinese labelstext_image
Diagram showing three types of devices connected to a central USB port, with arrows indicating direction of connection.BIOS utility
This Class B digital apparatus complies with Canadian ICES-003.
text_image
Auxiliary Main 20cm 20cm
LCD panel ergonomic specifications
| Design viewing distance 500 mm | |
| Design inclination angle 0.0° | |
| Design azimuth angle 90.0° | |
| Viewing direction range class Class IV | |
| Screen tilt angle 85.0° | |
| Design screen illuminance •Illuminance level:[250 + (250cosα)] lx where α = 85°•Color: Source D65 | |
| Reflection class of LCD panel(positive and negative polarity) | •Ordinary LCD: Class I•Protective or Acer LCD: Class III |
| Image polarity Both | |
| Reference white:Pre-setting of luminance and color temperature @ 6500K (tested under BM7) | •Yn•u'n•v'n |
| Pixel fault class Class II | |
Aspire One-serien
Acer eRecovery Management 1
LCD panel ergonomic specifications 41
Acer eRecovery Management
Hvis det oppstår problemer på datamaskinen som ikke kan løses på andre måter, kan det hende at du må installere Windows-operativsystemet og fabrikkinstallert programvare og drivere på nytt. Hvis du vil sikre at du kan gjenopprette datamaskinen når du har behov for det, bør du lage en sikkerhetskopi så snart som mulig.

text_image
Acer eRecovery Management Backup Restore Settings Help Password for Restore Process Password Protection: Disabled Create a New Password acertext_image
Acer eRecovery Management Backup Restore Settings Help Create Factory Default Backup Backup the factory default system to media so that you can restore your PC to its factory default status if needed. It is important to create the factory default media before using your PC. Create Drivers and Applications Backup Backup the drivers and applications to storage media. Use this media to reinstall drivers or applications if you encounter any problems with them.text_image
Acer eRecovery Management Backup Restore Settings Help Create Factory Default Backup Backup to: (©) Optarc BD ROM BC-5500S Estimated size: 5.54 GB It needs 2 blank DVD(s) to burn. Label: Recovery Do not disconnect the storage media while creating the backup. Click Start to begin creating the backup. Start Cancel
text_image
Acer eRecovery Management Backup RESTORE Settings Help Create Factory Default Backup Create on: Recovery1 Backup media: 6% Elapsed time: 00:01:50 Verifying: 0% Elapsed time: 00:00:00 acertext_image
Acer eRecovery Management Backup Restore Settings Help Create Factory Default Backup Backup the factory default system to media so that you can restore your PC to its factory default status if needed. It is important to create the factory default media before using your PC. Create Drivers and Applications Backup Backup the drivers and applications to storage media. Use this media to reinstall drivers or applications if you encounter any problems with them.text_image
Acer eRecovery Management Backup Restore Settings Help Create Factory Default Backup Please insert a blank DVD disc or USB flash drive to back up your data. Backup to: (E:) USB flash Free Space: 14.81 GB Estimated size: 5.35 GB Label: USB flash Do not disconnect the storage media while creating the backup. Click Start to begin creating the backup. Start Canceltext_image
Acer eRecovery Management Backup Restore Settings Help Create Factory Default Backup Create on: US$ flash Backup media: 6% Elapsed time: 00:01:34 Verifying: 0% Elapsed time: 00:00:00 acertext_image
Acer eRecovery Management Backup Restore Settings Help Restore Operating System to Factory Defaults Restore Operating System to factory default status. All data on c\ drive will be deleted. (*Reboot needed) Restore Operating System and Retain User Data Restore only the operating system of your PC to the factory defaults. Files from your user accounts will be transferred to c\backup. This option will not remove persistent viruses or malware. (*Reboot needed) Reinstall Drivers or Applications Reinstall Factory Default Drivers or Applications.text_image
Welcome to Acer Recovery Tool Acer Recovery Tool allows you to restore your system to the following status. Please DO NOT remove the USB device while proceeding. What would you like to do? Restore Operating System to Factory Defaults from a USB device Restore your PC to factory default status. All data on C: drive will be deleted. Reinstall Drivers or Application from a USB device Reninstall factory default drivers or applications.natural_image
Diagram of a mechanical device with a sensor and directional arrow, no text or symbols present< >+ : Åpne Ease of Access Center
< >+
<>
text_image
Diagram showing various types of connectors and components with Chinese labelsUniversal Serial Bus (USB)
text_image
Diagram showing the installation of a USB device via USB port, connected to a camera and a digital camera.BIOS-verktøy
This Class B digital apparatus complies with Canadian ICES-003.
text_image
Auxiliary Main 20cm 20cm
LCD panel ergonomic specifications
| Design viewing distance 500 mm | |
| Design inclination angle 0.0° | |
| Design azimuth angle 90.0° | |
| Viewing direction range class Class IV | |
| Screen tilt angle 85.0° | |
| Design screen illuminance • Illuminance level:[250 + (250cosα)] lx where α = 85°• Color: Source D65 | |
| Reflection class of LCD panel(positive and negative polarity) | • Ordinary LCD: Class I• Protective or Acer LCD: Class III |
| Image polarity Both | |
| Reference white:Pre-setting of luminance and color temperature @ 6500K (tested under BM7) | • Yn• u'n• v'n |
| Pixel fault class Class II | |
Aspire One Seriens
Acer eRecovery Management 1
LCD panel ergonomic specifications 42
Acer eRecovery Management
text_image
Acer eRecovery Management Backup Restore Settings Help Password for Restore Process Password Protection: Disabled Create a New Password acertext_image
Acer eRecovery Management Backup Restore Settings Help Create Factory Default Backup Backup the factory default system to media so that you can restore your PC to its factory default status if needed. It is important to create the factory default media before using your PC. Create Drivers and Applications Backup Backup the drivers and applications to storage media. Use this media to reinstall drivers or applications if you encounter any problems with them.text_image
Acer eRecovery Management Backup Restore Settings Help Create Factory Default Backup Backup to: (©) Optarc BD ROM BC-5500S Estimated size: 5.54 GB It needs 2 blank: DVD(s) to burn. Label: Recovery Do not disconnect the storage media while creating the backup. Click Start to begin creating the backup. Start Cancel
text_image
Acer eRecovery Management Backup Restore Settings Help Create Factory Default Backup Create on: Recovery1 Backup media: 6% Elapsed time: 00:01:50 Verifying: 0% Elapsed time: 00:00:00 acertext_image
Acer eRecovery Management Backup Restore Settings Help Create Factory Default Backup Backup the factory default system to media so that you can restore your PC to its factory default status if needed. It is important to create the factory default media before using your PC. Create Drivers and Applications Backup Backup the drivers and applications to storage media. Use this media to reinstall drivers or applications if you encounter any problems with them.text_image
Acer eRecovery Management Backup Restore Settings Help Create Factory Default Backup Please insert a blank DVD disc or USB flash drive to back up your data. Backup to: (E:) USB flash Free Space: 14.81 GB Estimated size: 5.35 GB Label: USB flash Do not disconnect the storage media while creating the backup. Click Start to begin creating the backup. Start Canceltext_image
Acer eRecovery Management Backup Restore Settings Help Create Factory Default Backup Create on: USB flash Backup media: 6% Elapsed time: 00:01:34 Verifying: 0% Elapsed time: 00:00:00 acertext_image
Acer eRecovery Management backup Restore Settings ? Help Restore Operating System to Factory Defaults Restore Operating System to factory default status. All data on ci, drive will be deleted. ("Reboot needed) Restore Operating System and Retain User Data Restore only the operating system of your PC to the factory defaults. Files from your user accounts will be transferred to c\backup. This option will not remove persistent viruses or malware. ("Reboot needed) Reinstall Drivers or Applications Reinstall Factory Default Drivers or Applications.text_image
Welcome to Acer Recovery Tool Acir Recovery Tool allows you to restore your system to the following status. Please DO NOT remove the USB device while proceeding. What would you like to do? Restore Operating System to Factory Defaults from a USB device Restore your PC to factory default status. All data on C: drive will be deleted. Reinstall Drivers or Application from a USB device Reninstall factory default drivers or applications.natural_image
Diagram of a mechanical device with a knob and directional arrow, no text or symbols present< > + : Åbner Ease of Access Center
< > +
text_image
Diagram showing various types of connectors and components with Chinese labelsUniversal Serial Bus (USB)
text_image
Diagram showing three connected devices: a digital camera, a USB flash unit, and a digital camera with USB port.BIOS programmet
This Class B digital apparatus complies with Canadian ICES-003.
text_image
Auxiliary Main 20cm 20cm
LCD panel ergonomic specifications
| Design viewing distance 500 mm | |
| Design inclination angle 0.0° | |
| Design azimuth angle 90.0° | |
| Viewing direction range class Class IV | |
| Screen tilt angle 85.0° | |
| Design screen illuminance •Illuminance level:[250 + (250cosα)] lx where α = 85°•Color: Source D65 | |
| Reflection class of LCD panel(positive and negative polarity) | •Ordinary LCD: Class I•Protective or Acer LCD: Class III |
| Image polarity Both | |
| Reference white:Pre-setting of luminance and color temperature @ 6500K (tested under BM7) | •Yn•u'n•v'n |
| Pixel fault class Class II | |
Aspire One-serien
Acer eRecovery Management 1
LCD panel ergonomic specifications 42
Acer eRecovery Management
text_image
Acer eRecovery Management Backup Restore Settings Help Password for Restore Process Password Protection: Disabled Create a New Password acertext_image
Acer eRecovery Management Backup Restore Settings ? Help Create Factory Default Backup Backup the factory default system to media so that you can restore your PC to its factory default status if needed. It is important to create the factory default media before using your PC. Create Drivers and Applications Backup Backup the drivers and applications to storage media. Use this media to reinstall drivers or applications if you encounter any problems with them.text_image
Acer eRecovery Management Backup Restore Settings ? Help Create Factory Default Backup Backup to: (G) OptStart: BD ROM BC-5500S Estimated size: 5.54 GB It needs 2 blank DVD(x) to burn. Label: Recovery Do not disconnect the storage media while creating the backup. Click Start to begin creating the backup. Start Cancel
text_image
Acer eRecovery Management Backup Bustone Settings Help Create Factory Default Backup Create on: Recovery1 backup media: 6% Eapsed time: 00:01:50 Verifying: 6% Eapsed time: 00:00:00 acertext_image
Acer eRecovery Management Backup Restore Settings ? Help Create Factory Default Backup Backup the factory default system to media so that you can restore your PC to its factory default status if needed. It is important to create the factory default media before using your PC. Create Drivers and Applications Backup Backup the drivers and applications to storage media. Use this media to reinstall drivers or applications if you encounter any problems with them.text_image
Acer eRecovery Management Backup Restore Settings Help Create Factory Default Backup Please insert a blank DVD disc or USB flash drive to back up your data. Backup to: (E:) USB flash Free Space: 14.81 GB Estimated size: 5.55 GB Label: USB flash Do not disconnect the storage media while creating the backup. Click Start to begin creating the backup. Start Canceltext_image
Acer eRecovery Management Backup Restore Settings Help Create Factory Default Backup Create on: USE flash Backup media: 6% Elapsed time: 00:01:34 Verifying: 0% Elapsed time: 00:00:00 acertext_image
Acer eRecovery Management Backup Restore Settings Help Restore Operating System to Factory Defaults Restore Operating System to factory default status. All data on c\ drive will be deleted. (*Reboot needed) Restore Operating System and Retain User Data Restore only the operating system of your PC to the factory defaults. Files from your user accounts will be transferred to c\backup. This option will not remove persistent viruses or malware. (*Reboot needed) Reinstall Drivers or Applications Reinstall Factory Default Drivers or Applications.text_image
Welcome to Acer Recovery Tool Acer Recovery Tool allows you to restore your system to the following status. Please DO NOT remove the USB device while proceeding. What would you like to do? Restore Operating System to Factory Defaults from a USB device Restore your PC to factory default status. All data on C: drive will be deleted. Reinstall Drivers or Application from a USB device Renstall factory default drivers or applications.natural_image
Diagram showing a device with a sensor connected to a cursor, with directional arrows indicating motion (no text or symbols)text_image
Diagram showing various types of connectors and connectors with Chinese labels, including a top connector, upward arrow, and base connections.text_image
Diagram showing three connected devices: a digital camera, a USB connector with USB symbol, and a digital camera.Aktivera disk-to-disk recovery
This Class B digital apparatus complies with Canadian ICES-003.
natural_image
Abstract black and white logo with stylized 'C' and 'iP' symbols (no readable text or numbers)
ME61
LCD pixelanmärkning
text_image
Auxiliary Main 20cm 20cm
LCD panel ergonomic specifications
| Design viewing distance 500 mm | |
| Design inclination angle 0.0° | |
| Design azimuth angle 90.0° | |
| Viewing direction range class Class IV | |
| Screen tilt angle 85.0° | |
| Design screen illuminance •Illuminance level:[250 + (250cosα)] lx where α = 85°•Color: Source D65 | |
| Reflection class of LCD panel(positive and negative polarity) | •Ordinary LCD: Class I•Protective or Acer LCD: Class III |
| Image polarity Both | |
| Reference white:Pre-setting of luminance and color temperature @ 6500K (tested under BM7) | •Yn•u'n•v'n |
| Pixel fault class Class II | |
Aspire One -sarja
Peruskäyttäjän opas
Acer eRecovery Management 1
LCD panel ergonomic specifications 42
Acer eRecovery Management
text_image
Acer eRecovery Management Backup Restore Settings Help Password for Restore Process Password Protection: Disabled Create a New Password acertext_image
Acer eRecovery Management Backup Restore Settings Help Create Factory Default Backup Backup the factory default system to media so that you can restore your PC to its factory default status if needed. It is important to create the factory default media before using your PC. Create Drivers and Applications Backup Backup the drivers and applications to storage media. Use this media to reinstall drivers or applications if you encounter any problems with them.text_image
Acer eRecovery Management Backup Restore Settings Help Create Factory Default Backup Backup to: (Q) Optarc BD ROM BC-5500S Estimated size: 5.54 GB It needs 2 blank DVD(s) to burn. Label: Recovery Do not disconnect the storage media while creating the backup. Click Start to begin creating the backup. Start Cancel
text_image
Acer eRecovery Management Backup Restore Semaings Help Create Factory Default Backup Create on: Recovery1 Backup media: 6% Elapsed time: 00:01:50 Verifying: 0% Elapsed time: 00:00:00 acertext_image
Acer eRecovery Management Backup Restore Settings Help Create Factory Default Backup Backup the factory default system to media so that you can restore your PC to its factory default status if needed. It is important to create the factory default media before using your PC. Create Drivers and Applications Backup Backup the drivers and applications to storage media. Use this media to reinstall drivers or applications if you encounter any problems with them.text_image
Acer eRecovery Management Backup Restore Settings Help Create Factory Default Backup Please insert a blank DVD disc or USB flash drive to back up your data. Backup to: (E:) USB flash Free Space: 14.81 GB Estimated size: 5.55 GB Label: USB flash Do not disconnect the storage media while creating the backup. Click Start to begin creating the backup. Start Canceltext_image
Acer eRecovery Management Backup HISTORE Settings ? help Create Factory Default Backup Create on: US$ flash Backup media: 6% Elapsed time: 00:01:34 Verifying: 0% Elapsed time: 00:00:00 acertext_image
Acer eRecovery Management Backup Restore Settings ? help acer Restore Operating System to Factory Defaults Restore Operating System to factory default status. All data on c1, drive will be deleted. (*Reboot needed) Restore Operating System and Retain User Data Restore only the operating system of your PC to the factory defaults. Files from your user accounts will be transferred to c1,backup. This option will not remove persistent viruses or malware. (*Reboot needed) Reinstall Drivers or Applications Reinstall Factory Default Drivers or Applications.text_image
Welcome to Acer Recovery Tool Acer Recovery Tool allows you to restore your system to the following status. Please DO NOT remove the USB device while proceeding. What would you like to do? Restore Operating System to Factory Defaults from a USB device Restore your PC to factory default status. All data on C: drive will be deleted. Reinstall Drivers or Application from a USB device Reninstall factory default drivers or applications.natural_image
Diagram showing a device with a sensor connected to a cursor, with directional arrows indicating motion (no text or symbols)www.microsoft.com/typography/faq/faq12.htm.
US-dollarin merkki
text_image
Diagram showing various types of connectors and connectors with Chinese labels, including a top connector, upward arrow, and base connections.USB-väylä
text_image
Diagram showing the installation of a digital camera module via USB, with labeled components and directional arrows.BIOS-sovellus
This Class B digital apparatus complies with Canadian ICES-003.
text_image
Auxiliary Main 20cm 20cm
LCD panel ergonomic specifications
| Design viewing distance 500 mm | |
| Design inclination angle 0.0° | |
| Design azimuth angle 90.0° | |
| Viewing direction range class Class IV | |
| Screen tilt angle 85.0° | |
| Design screen illuminance •Illuminance level:[250 + (250cosα)] lx where α = 85°•Color: Source D65 | |
| Reflection class of LCD panel(positive and negative polarity) | •Ordinary LCD: Class I•Protective or Acer LCD: Class III |
| Image polarity Both | |
| Reference white:Pre-setting of luminance and color temperature @ 6500K (tested under BM7) | •Yn•u'n•v'n |
| Pixel fault class Class II | |
Серия Aspire One
www.acer-group.com/public/Sustainability/sustainability01.htm.

Acer eRecovery Management
LCD panel ergonomic specifications 46
Acer eRecovery Management
text_image
Acer eRecovery Management Backup Restore Settings ? Help Password for Restore Process Password Protection: Disabled Create a New Password acertext_image
Acer eRecovery Management Backup Restore Settings ? Help Create Factory Default Backup Backup the factory default system to media so that you can restore your PC to its factory default status if needed. It is important to create the factory default media before using your PC. Create Drivers and Applications Backup Backup the drivers and applications to storage media. Use this media to reinstall drivers or applications if you encounter any problems with them.text_image
Acer eRecovery Management Backup Restore Settings Help Create Factory Default Backup Backup to: (O) Optarc BD ROM BC-55005 Estimated size: 5.04 GB It needs 2 blank DVD(s) to burn. Label: Recovery Do not disconnect the storage media while creating the backup. Click Start to begin creating the backup. Start Cancel
text_image
Acer eRecovery Management Backup Restor Settings Help Create Factory Default Backup Create on: Recovery1 Backup media: 6% Elapsed time: 00:01:50 Verifying: 0% Elapsed time: 00:00:00 acertext_image
Acer eRecovery Management Backup Restore Settings ? Help Create Factory Default Backup Backup the factory default system to media so that you can restore your PC to its factory default status if needed. It is important to create the factory default media before using your PC. Create Drivers and Applications Backup Backup the drivers and applications to storage media. Use this media to reinstall drivers or applications if you encounter any problems with them.text_image
Acer eRecovery Management Backup Restore Settings Help Create Factory Default Backup Please insert a blank DVD disc or USB flash drive to back up your data. Backup to: (E:) USB flash Free Space: 14.81 GB Estimated size: 5.55 GB Label: USB flash Do not disconnect the storage media while creating the backup. Click Start to begin creating the backup. Start Canceltext_image
Acer eRecovery Management Backup Rantors Settings Help Create Factory Default Backup Create on: US$ flash Backup media: 6% Elapsed time: 00:01:34 Verifying: 0% Elapsed time: 00:00:00 acertext_image
Acer eRecovery Management Backup Restore Settings ? Help Restore Operating System to Factory Defaults Restore Operating System to factory default status. All data on c\ drive will be deleted. (*Reboot needed) Restore Operating System and Retain User Data Restore only the operating system of your PC to the factory defaults. Files from your user accounts will be transferred to c\backup. This option will not remove persistent viruses or malware. (*Reboot needed) Reinstall Drivers or Applications Reinstall Factory Default Drivers or Applications.text_image
Welcome to Acer Recovery Tool Acir Recovery Tool allows you to restore your system to the following status. Please DO NOT remove the USB device while proceeding. What would you like to do? Restore Operating System to Factory Defaults from a USB device Restore your PC to factory default status. All data on C: drive will be deleted. Reinstall Drivers or Application from a USB device Renstall factory default drivers or applications.natural_image
Diagram showing a mechanical device connected to a cursor with a lock icon (no text or symbols present)text_image
Diagram showing various types of electrical connectors and socket components with Chinese labelstext_image
Diagram showing the internal structure of a device with labeled components including a camera, USB plug, and a digital camera.Утилита BIOS
This Class B digital apparatus complies with Canadian ICES-003.
natural_image
Abstract black and white logo with a stylized 'C' and 'iP' symbol (no text or numbers present)
ME61
text_image
Auxiliary Main 20cm 20cm
LCD panel ergonomic specifications
| Design viewing distance 500 mm | |
| Design inclination angle 0.0° | |
| Design azimuth angle 90.0° | |
| Viewing direction range class Class IV | |
| Screen tilt angle 85.0° | |
| Design screen illuminance •Illuminance level:[250 + (250cosa)] lx where a = 85°•Color: Source D65 | |
| Reflection class of LCD panel(positive and negative polarity) | •Ordinary LCD: Class I•Protective or Acer LCD: Class III |
| Image polarity Both | |
| Reference white:Pre-setting of luminance and color temperature @ 6500K (tested under BM7) | •Yn•u'n•v'n |
| Pixel fault class Class II | |
Komputer serii Aspire One
Acer eRecovery Management 1
LCD panel ergonomic specifications 45
Acer eRecovery Management
text_image
Acer eRecovery Management Backup Restore Settings ? Help Password for Restore Process Password Protection: Disabled Create a New Password acertext_image
Acer eRecovery Management Backup Restore Settings Help Create Factory Default Backup Backup the factory default system to media so that you can restore your PC to its factory default status if needed. It is important to create the factory default media before using your PC. Create Drivers and Applications Backup Backup the drivers and applications to storage media. Use this media to reinstall drivers or applications if you encounter any problems with them.text_image
Acer eRecovery Management Backup Restore Settings Help Create Factory Default Backup Backup to: (0) Optarc BD ROM BC-5500S Estimated size: 5.34 GB It needs 2 blank DVD(s) to burn. Label: Recovery Do not disconnect the storage media while creating the backup. Click Start to begin creating the backup. Start Cancel
text_image
Acer eRecovery Management Backup Restore Settings Help Create Factory Default Backup Create on: Recovery1 Backup media: 6% Elapsed time: 00:01:50 Verifying: 0% Elapsed time: 00:00:00 acertext_image
Acer eRecovery Management Backup Restore Settings ? Help Create Factory Default Backup Backup the factory default system to media so that you can restore your PC to its factory default status if needed. It is important to create the factory default media before using your PC. Create Drivers and Applications Backup Backup the drivers and applications to storage media. Use this media to reinstall drivers or applications if you encounter any problems with them.text_image
Acer eRecovery Management Backup Restore Settings Help Create Factory Default Backup Please insert a blank DVD disc or USB flash drive to back up your data. Backup to: (E:) USB flash Free Space: 14.81 GB Estimated size: 5.55 GB Label: USB flash Do not disconnect the storage media while creating the backup. Click Start to begin creating the backup. Start Canceltext_image
Acer eRecovery Management Backup Backup Settings Help Create Factory Default Backup Create on: US$ flash Backup media: 6% Elapsed time: 00:01:34 Verifying: 0% Elapsed time: 00:02:00 acertext_image
Acer eRecovery Management Backup Restore Settings ? help Restore Operating System to Factory Defaults Restore Operating System to factory default status. All data on c): drive will be deleted. (*Reboot needed) Restore Operating System and Retain User Data Restore only the operating system of your PC to the factory defaults. Files from your user accounts will be transferred to c): backup. This option will not remove persistent viruses or malware. (*Reboot needed) Reinstall Drivers or Applications Reinstall Factory Default Drivers or Applications.text_image
Welcome to Acer Recovery Tool Acer Recovery Tool allows you to restore your system to the following status. Please DO NOT remove the USB device while proceeding. What would you like to do? Restore Operating System to Factory Defaults from a USB device Restore your PC to factory default status. All data on C: drive will be deleted. Reinstall Drivers or Application from a USB device Renstall factory default drivers or applications.natural_image
Diagram of a mechanical or electrical component with directional arrows and a labeled connector (no text or symbols present)www.microsoft.com/typography/faq/faq12.htm.
Znak dolara USA
text_image
Diagram showing various types of connectors and socket symbols, including a resistor, socket, and cable connections.text_image
Diagram showing three connected devices: a digital camera, a USB flash unit, and a digital camera with USB port.natural_image
Abstract black and white logo with a stylized 'C' and 'iP' inside, no readable text or symbols.
ME61
text_image
Auxiliary Main 20cm 20cm
LCD panel ergonomic specifications
| Design viewing distance 500 mm | |
| Design inclination angle 0.0° | |
| Design azimuth angle 90.0° | |
| Viewing direction range class Class IV | |
| Screen tilt angle 85.0° | |
| Design screen illuminance •Illuminance level:[250 + (250cosα)] lx where α = 85°•Color: Source D65 | |
| Reflection class of LCD panel(positive and negative polarity) | •Ordinary LCD: Class I•Protective or Acer LCD: Class III |
| Image polarity Both | |
| Reference white: | •Yn |
| Pre-setting of luminance and color temperature @ 6500K (tested under BM7) | •u'n•v'n |
| Pixel fault class Class II | |
Aspire One sorozat
Acer eRecovery Management 1
LCD panel ergonomic specifications 44
Acer eRecovery Management
text_image
Acer eRecovery Management Backup Restore Settings Help Password for Restore Process Password Protection: Disabled Create a New Password acertext_image
Acer eRecovery Management Backup Restore Settings Help Create Factory Default Backup Backup the factory default system to media so that you can restore your PC to its factory default status if needed. It is important to create the factory default media before using your PC. Create Drivers and Applications Backup Backup the drivers and applications to storage media. Use this media to reinstall drivers or applications if you encounter any problems with them.text_image
Acer eRecovery Management Backup Restore Settings Help Create Factory Default Backup Backup to: (©) Optarc BD ROM BC-55005 Estimated size: 5.54 GB It needs 2 blank DVD(s) to burn. Label: Recovery Do not disconnect the storage media while creating the backup. Click Start to begin creating the backup. Start Cancel
text_image
Acer eRecovery Management Backup Restore Settings Help Create Factory Default Backup Create on: Recovery1 Backup media: 6% Elapsed time: 00:01:50 Verifying: 0% Elapsed time: 00:00:00 acertext_image
Acer eRecovery Management Backup Restore Settings Help Create Factory Default Backup Backup the factory default system to media so that you can restore your PC to its factory default status if needed. It is important to create the factory default media before using your PC. Create Drivers and Applications Backup Backup the drivers and applications to storage media. Use this media to reinstall drivers or applications if you encounter any problems with them.text_image
Acer eRecovery Management Backup Restore Settings Help Create Factory Default Backup Please insert a blank DVD disc or USB flash drive to back up your data. Backup to: (E:) USB flash Free Space: 14.81 GB Estimated size: 5.35 GB Label: USB flash Do not disconnect the storage media while creating the backup. Click Start to begin creating the backup. Start Canceltext_image
Acer eRecovery Management Backup restore Settings Help Create Factory Default Backup Create on: US$ flash Backup media: 6% Elapsed time: 00:01:34 Verifying: 0% Elapsed time: 00:00:00 acertext_image
Acer eRecovery Management Backup Restore Settings ? help acer Restore Operating System to Factory Defaults Restore Operating System to factory default status. All data on c\ drive will be deleted. (*Reboot needed) Restore Operating System and Retain User Data Restore only the operating system of your PC to the factory defaults. Files from your user accounts will be transferred to c\backup. This option will not remove persistent viruses or malware. (*Reboot needed) Reinstall Drivers or Applications Reinstall Factory Default Drivers or Applications.text_image
Welcome to Acer Recovery Tool Acer Recovery Tool allows you to restore your system to the following status. Please DO NOT remove the USB device while proceeding. What would you like to do? Restore Operating System to Factory Defaults from a USB device Restore your PC to factory default status. All data on C: drive will be deleted. Reinstall Drivers or Application from a USB device Reninstall factory default drivers or applications.natural_image
Diagram of a mechanical device with a knob and directional arrow, no text or symbols presentnatural_image
Diagram showing a multi-pin electrical connector with an upward arrow and three small icons below (no text or labels)Universal Serial Bus (USB)
text_image
Diagram showing the installation of a digital camera module, including an LED display, USB plug, and a digital camera.BIOS segédprogram
This Class B digital apparatus complies with Canadian ICES-003.
text_image
Auxiliary Main 20cm 20cm
LCD panel ergonomic specifications
| Design viewing distance 500 mm | |
| Design inclination angle 0.0° | |
| Design azimuth angle 90.0° | |
| Viewing direction range class Class IV | |
| Screen tilt angle 85.0° | |
| Design screen illuminance •Illuminance level:[250 + (250cosα)] lx where α = 85°•Color: Source D65 | |
| Reflection class of LCD panel(positive and negative polarity) | •Ordinary LCD: Class I•Protective or Acer LCD: Class III |
| Image polarity Both | |
| Reference white:Pre-setting of luminance and color temperature @ 6500K (tested under BM7) | •Yn•u'n•v'n |
| Pixel fault class Class II | |
Řada Aspire One
Acer eRecovery Management
LCD panel ergonomic specifications 41
Acer eRecovery Management
text_image
Acer eRecovery Management Backup Restore Settings Help Password for Restore Process Password Protection: Disabled Create a New Password acertext_image
Acer eRecovery Management Backup Restore Settings ? Help Create Factory Default Backup Backup the factory default system to media so that you can restore your PC to its factory default status if needed. It is important to create the factory default media before using your PC. Create Drivers and Applications Backup Backup the drivers and applications to storage media. Use this media to reinstall drivers or applications if you encounter any problems with them.text_image
Acer eRecovery Management Backup Restore Settings Help Create Factory Default Backup Backup to: (G) Optarc BD ROM BC-5500S Estimated size: 5.54 GB It needs 2 blank DVD(s) to burn. Label: Recovery Do not disconnect the storage media while creating the backup. Click Start to begin creating the backup. Start Cancel
text_image
Acer eRecovery Management Backup Restore Settings Help Create Factory Default Backup Create on: Recovery1 Backup media: 6% Elapsed time: 00:01:50 Verifying: 0% Elapsed time: 00:00:00 acertext_image
Acer eRecovery Management Backup Restore Settings Help Create Factory Default Backup Backup the factory default system to media so that you can restore your PC to its factory default status if needed. It is important to create the factory default media before using your PC. Create Drivers and Applications Backup Backup the drivers and applications to storage media. Use this media to reinstall drivers or applications if you encounter any problems with them.text_image
Acer eRecovery Management Backup Restore Settings Help Create Factory Default Backup Please insert a blank DVD disc or USB flash drive to back up your data. Backup to: (E) USB flash free Space: 14.81 GB Estimated size: 5.55 GB Label: USB flash Do not disconnect the storage media while creating the backup. Click Start to begin creating the backup. Start Canceltext_image
Acer eRecovery Management Backup Restore Settology Help Create Factory Default Backup Create on: US$ flash Backup media: 6% Elapsed time: 00:01:34 Verifying: 0% Elapsed time: 00:00:00 acertext_image
Acer eRecovery Management Backup Restore Settings Help Restore Operating System to Factory Defaults Restore Operating System to factory default status. All data on c\ drive will be deleted. (*Reboot needed) Restore Operating System and Retain User Data Restore only the operating system of your PC to the factory defaults. Files from your user accounts will be transferred to c\backup. This option will not remove persistent viruses or malware. (*Reboot needed) Reinstall Drivers or Applications Reinstall Factory Default Drivers or Applications.text_image
Welcome to Acer Recovery Tool Acer Recovery Tool allows you to restore your system to the following status. Please DO NOT remove the USB device while proceeding. What would you like to do? Restore Operating System to Factory Defaults from a USB device Restore your PC to factory default status. All data on C: drive will be deleted. Reinstall Drivers or Application from a USB device Reninstall factory default drivers or applications.natural_image
Diagram of a mechanical device with a knob and directional arrow, no text or symbols presenttext_image
Diagram showing various types of connectors and connectors with Chinese labelstext_image
Diagram showing three connected devices: a digital camera, a USB flash unit, and a digital camera with an LED indicator.Nástroj BIOS
This Class B digital apparatus complies with Canadian ICES-003.
text_image
Auxiliary Main 20cm 20cm
LCD panel ergonomic specifications
| Design viewing distance 500 mm | |
| Design inclination angle 0.0° | |
| Design azimuth angle 90.0° | |
| Viewing direction range class Class IV | |
| Screen tilt angle 85.0° | |
| Design screen illuminance •Illuminance level:[250 + (250cosα)] lx where α = 85°•Color: Source D65 | |
| Reflection class of LCD panel(positive and negative polarity) | •Ordinary LCD: Class I•Protective or Acer LCD: Class III |
| Image polarity Both | |
| Reference white: | •Yn |
| Pre-setting of luminance and color temperature @ 6500K (tested under BM7) | •u'n•v'n |
| Pixel fault class Class II | |
Séria Aspire One
www.acer-group.com/public/Sustainability/sustainability01.htm.

Informácie o ortuti
Acer eRecovery Management 1
LCD panel ergonomic specifications 41
Acer eRecovery Management
text_image
Acer eRecovery Management Backup Restore Settings Help Password for Restore Process Password Protection: Disabled Create a New Password acertext_image
Acer eRecovery Management Backup Restore Settings ? Help Create Factory Default Backup Backup the factory default system to media so that you can restore your PC to its factory default status if needed. It is important to create the factory default media before using your PC. Create Drivers and Applications Backup Backup the drivers and applications to storage media. Use this media to reinstall drivers or applications if you encounter any problems with them.text_image
Acer eRecovery Management Backup Restore Settings Help Create Factory Default Backup Backup to: (©) Optarc BDI ROM BC-55005 Estimated size: 5.54 GB It needs 2 blank DVD(s) to burn. Label: Recovery Do not disconnect the storage media while creating the backup. Click Start to begin creating the backup. Start Cancel