
SHV500LR - Loudspeaker PIONEER - Free user manual and instructions
Find the device manual for free SHV500LR PIONEER in PDF.
| Product type | Compact 2-way satellite speaker |
| Brand | Pioneer |
| Model | SHV500LR |
| Cabinet type | Sealed |
| Impedance | 8 Ω |
| Frequency response | 170 Hz – 32 kHz |
| Sensitivity | 76 dB (total 82 dB) |
| Maximum input power | 100 W |
| Crossover frequency | 1.5 kHz |
| Dimensions (horizontal orientation) | 207 (W) x 100 (H) x 100 (D) mm |
| Dimensions (vertical orientation) | 100 (W) x 225 (H) x 100 (D) mm |
| Weight | 0.4 kg |
| Orientation | Horizontal or vertical (with supplied base) |
| Wall mounting | Yes, with brackets (screws not supplied, 95 mm spacing) |
| Protection function | Auto-regression (temporary shutdown in case of overload) |
| Cabinet maintenance | Dry cloth or diluted neutral detergent; do not use wax, benzene or thinner |
| Safety | Do not place on unstable surface, do not stand on, avoid prolonged distortion |
| Included accessories | Base (x2), stand arms (x2), brackets (x2), screws, hexagonal nuts, gaskets, warranty card, instruction manual |
| Climate class | Indoor use only |
Frequently Asked Questions - SHV500LR PIONEER
User questions about SHV500LR PIONEER
0 question about this device. Answer the ones you know or ask your own.
Ask a new question about this device
Download the instructions for your Loudspeaker in PDF format for free! Find your manual SHV500LR - PIONEER and take your electronic device back in hand. On this page are published all the documents necessary for the use of your device. SHV500LR by PIONEER.
USER MANUAL SHV500LR PIONEER
Thank you for buying this Pioneer product.
Please read through these operating instructions so you will know how to operate your model properly. After you have finished reading the instructions, put them away in a safe place for future reference.
Before you start
S-HV600B/S-HV500-LR
- This speaker system has an impedance of 8 , and should be connected only to an amplifier designed with a load impedance of 8 (the amplifier's speaker output connector should clearly be labeled "8Ω").
In order to prevent damage to the speaker system resulting from input overload, please observe the following precautions:
- Do not supply power to the speaker system in excess of the maximum permissible input.
- When using a graphic equalizer to emphasize loud sounds in the high-frequency range, do not use excessive amplifier volume.
- Do not try to force a low-powered amplifier to produce loud volumes of sound (the amplifier's harmonic distortion will be increased, and you may damage the speaker).
Caution: installation
- Do not place the speaker on an unstable surface, as doing so may cause the speaker to fall and cause damage or bodily injury.
- Switch off and unplug your AV equipment and consult the instructions when connecting up components. Make sure you use the correct connecting cables.
- If you intend to install the speakers on a wall, first confirm that the wall is capable of supporting the weight of the speaker systems (S-HV600B: 1.7 kg, S-HV500-LR: 0.4 kg). If you are uncertain about the load-bearing capacity of the wall, consult a building specialist. Installing the speakers on an insecure wall is extremely dangerous, since the speakers could fall, leading to grave personal injury.
- After mounting, confirm the safety of the installation. Make periodic safety checks thereafter as well to confirm that the speakers continue to be mounted securely.
Caution: in use
- Do not use the speaker to output distorted sound for long periods of time. This can result in damages to the speaker and poses a potential fire hazard.
- Do not place heavy or large objects on top of the speaker. Doing so could provoke the speaker to fall, causing damages or bodily injury.
- Do not connect these speakers to devices other than an AV amplifier or other audio component, since malfunctions could result.
- This product incorporates autoregression technology to protect the speakers. If the speakers stop emitting noise when receiving too large a signal, turn the volume down on the amp and wait a few seconds. The protection feature disables itself automatically.
S-SLW500
- This product is a passive subwoofer, and must be combined with the VSX-S300 or other audio device provided with a built-in subwoofer amplifier.
- This speaker system has an impedance of 4 and should be connected only to an amplifier designed with a load impedance of 4 (the amplifier's speaker output connector should clearly be labeled "4Ω").
In order to prevent damage to the speaker system resulting from input overload, please observe the following precautions:
- Do not supply power to the speaker system in excess of the maximum permissible input.
- When using a graphic equalizer to emphasize loud sounds in the high-frequency range, do not use excessive amplifier volume.
- Do not try to force a low-powered amplifier to produce loud volumes of sound (the amplifier's harmonic distortion will be increased, and you may damage the speaker).
Caution: installation
- Do not place the speaker on an unstable surface, as doing so may cause the speaker to fall and cause damage or bodily injury.
- Switch off and unplug your AV equipment and consult the instructions when connecting up components. Make sure you use the correct connecting cables.
- Do not attach these speakers to the wall or ceiling, as they may cause injury in the event of a fall.
- Do not install your speakers overhead on the ceiling or wall.
Caution: in use
- Do not use the speaker to output distorted sound for long periods of time. This can result in damages to the speaker and poses a potential fire hazard.
- Do not place heavy or large objects on top of the speaker. Doing so could provoke the speaker to fall, causing damages or bodily injury.
- Do not sit or stand on the speaker, or let children play on the speaker. Doing so could provoke the speaker to fall, causing damages or bodily injury.
- The speaker system grill cannot be removed. Do not try to forcibly remove it since doing so may damage the grille.
Pioneer is not responsible for any accidents or damage that result from improper installation, misuse or modification of the product, or natural disasters.
Cleaning the speaker cabinet
With normal use, wiping with a dry cloth should be sufficient to keep the cabinet clean. If necessary, clean with a cloth dipped in a neutral cleanser diluted five or six times with water, and wrung out well. Do not use furniture wax or cleansers.
Never use thinners, benzine, insecticide sprays or other chemicals on or near this unit since these will corrode the surfaces.
What's in the box
S-HV600B
- Bracket x 2
Non-skid pads × 2 - Wiress stays 4
Warranty card x 1 (European model only) - Operating instructions (this document)
S-HV500-LR
- Base x 2
- Standarmx2
- Bracket x 2
- Screw (Bind head) x 2
- Screw (Flathead) x 4
- Hexagonal nut x 2
- Sealx2
Warranty card x 1 (European model only) - Operating instructions (this document)
S-SLW500
- Speaker cord (3 m) x 1
Non-skid pads × 4
Sealx4
Warranty card x 1 (European model only)
Features
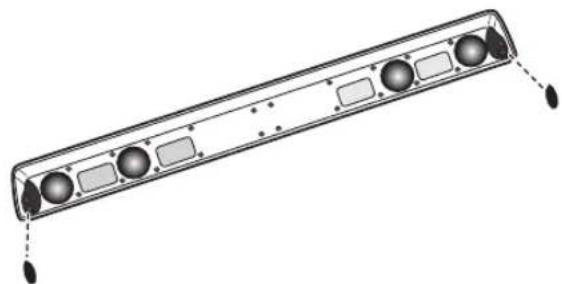
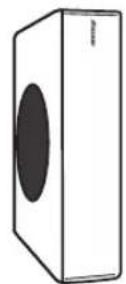
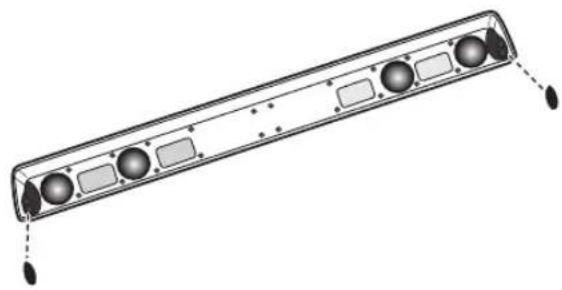
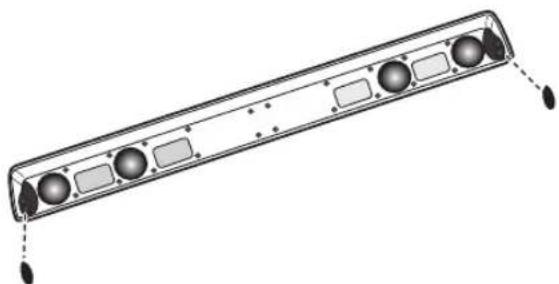
Sound is produced from both sides (grille net) of the speaker.
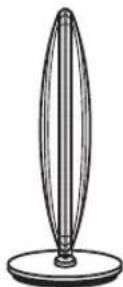
- This speaker features full sound directed in every direction. In contrast to ordinary speakers, the orientation shown below is the "front." To enjoy optimum sound quality, orient the speaker so that this "front" side is pointed toward your listening position.
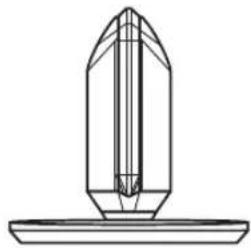
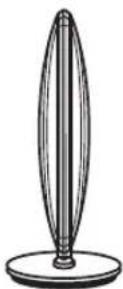
S-HV500-LR: Horizontal orientation

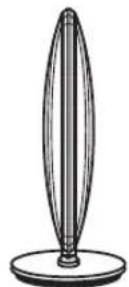
S-HV500-LR: Vertical orientation
Assembly
S-HV600B
1 Apply the non-skid pad to the bottom surface of the leg.
S-HV500-LR
Horizontal orientation
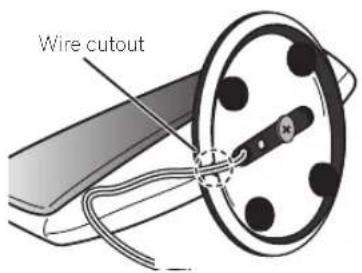
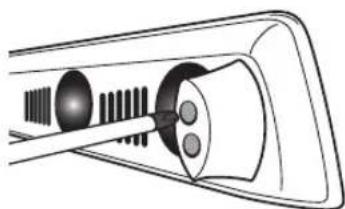
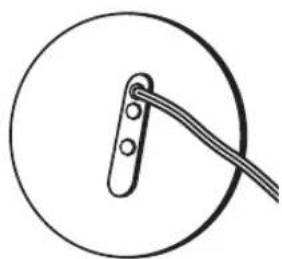
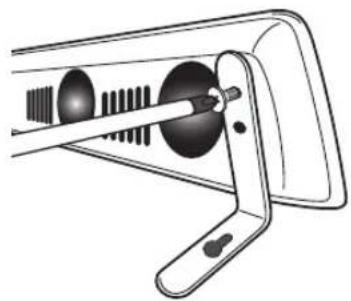
1 Pass the speaker cord through the hole in the base.

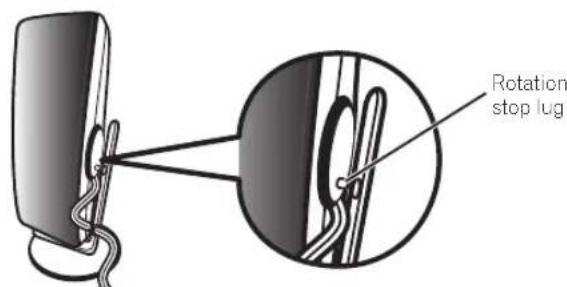
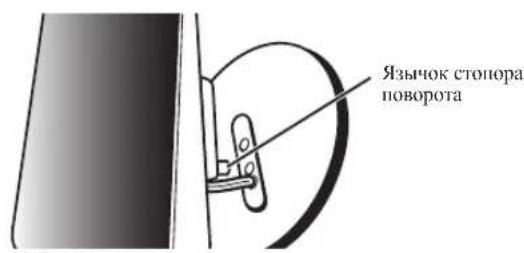
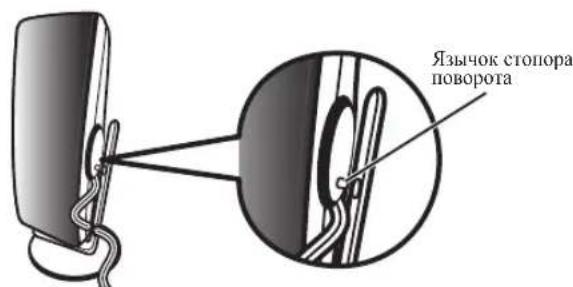
2 Align the rotation stop lug with the hole in the base.
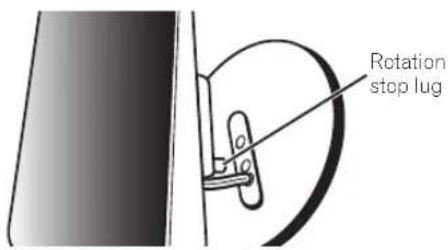
3 Fasten the speaker to the base use the horizontal mounting screw from the back side of the base.
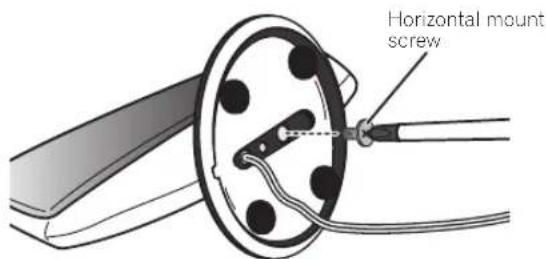
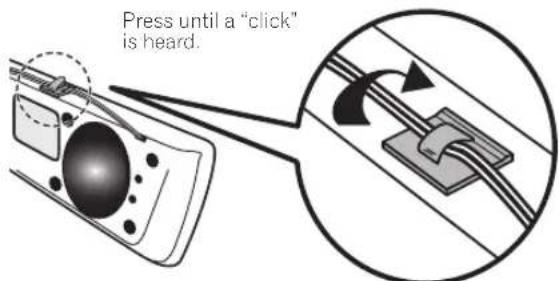
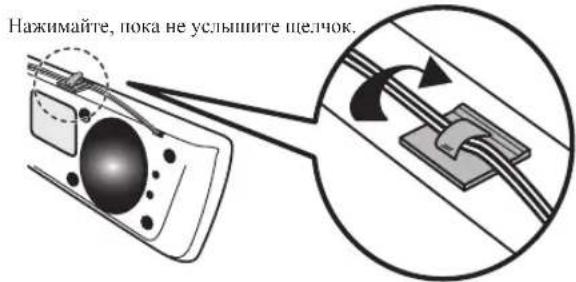
4 Set the speaker so that the speaker cord passes through the groove in the base.
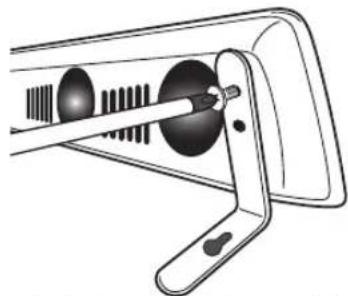
Vertical orientation
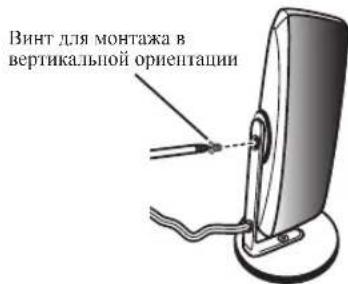
1 Align the vertical mounting stay with the hole in the base.
2 Fasten the vertical mount stay to the base using the vertical mount bolt and hex nut. Be sure the hex nut fits into the hexagonal groove in the bottom of the base.
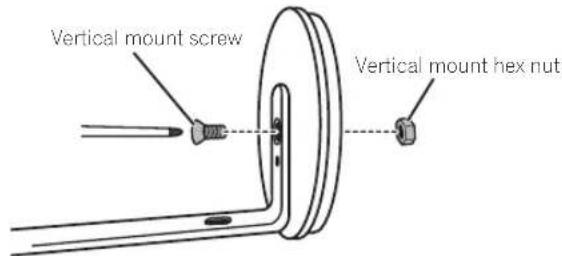
3 Pass the speaker cord through the vertical mount satay hole.

4 Align the speaker's rotation stop lug with the hole in the vertical stay.
5 Fasten the speaker to the vertical stay, using the vertical mount screw.

S-SLW500
Installing the subwoofer
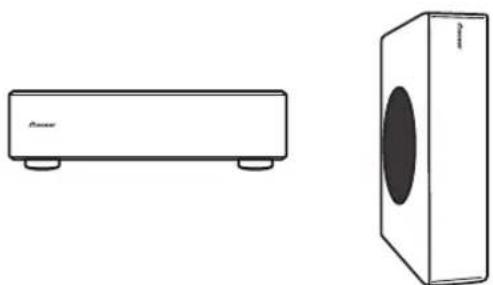
The subwoofer can be mounted in either vertical or horizontal orientation. The factory default is horizontal orientation.
For vertical orientation installation
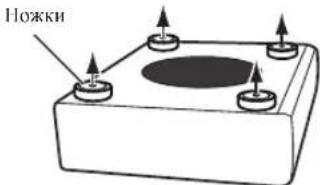
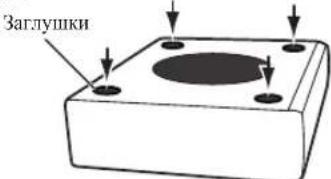
1 The feet are attached with Phillips screws; use a Phillips screwdriver to remove them.
2 Apply the accessory seals to the place the feet were located to hide the screw holes.
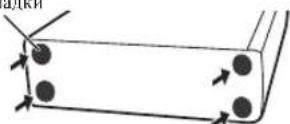
3 Apply the non-skid pads to the four corners of the surface where the subwoofer is to be mounted. Note that the non-skid pads may not be fully effective on all surfaces, so do not install in slippery locations.
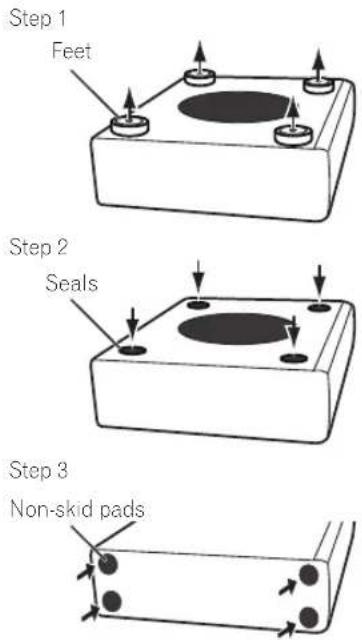

CAUTION
- Do not attempt to perform these procedures while tilting the unit at an angle. Lay the unit on its side on soft cloth or other material that will not scar the unit.
Installation
Mounting location
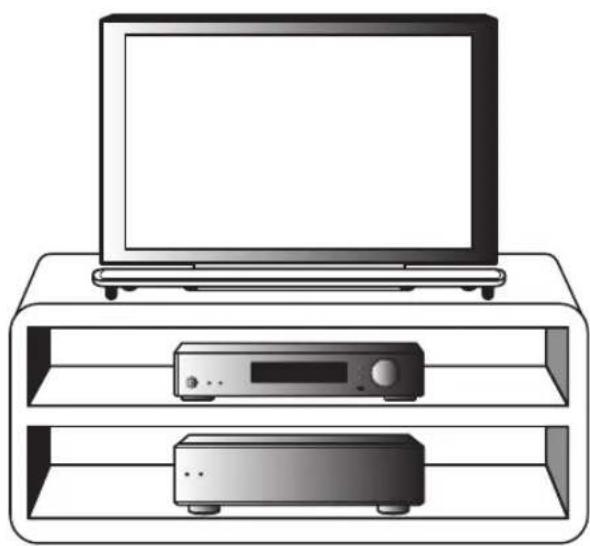
Installation example: For both S-HV600B and S-SLW500
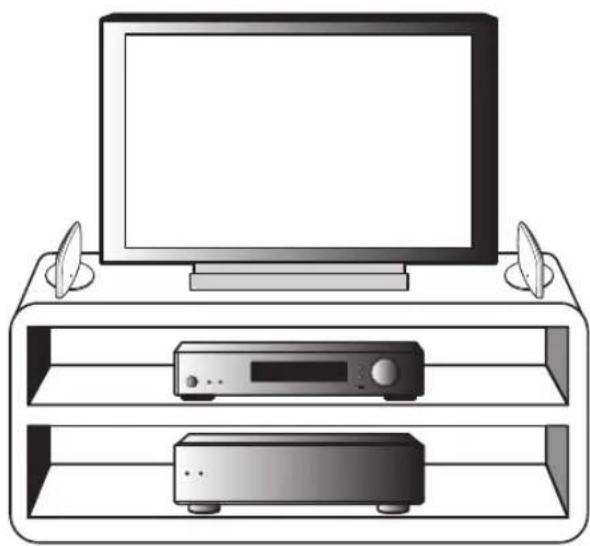
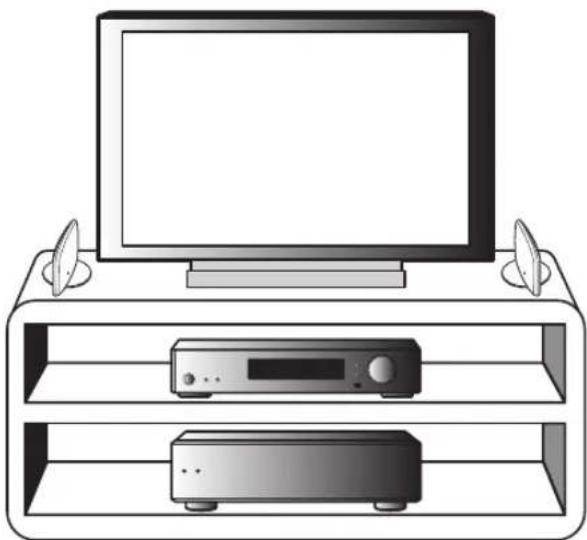
Installation example: For both S-HV500-LR and S-SLW500
S-HV600B
- Sounds played through speaker systems are easily affected in subtle ways by the conditions in the listening space.
- This speaker system does not feature a magnetically shielded design. As a result, color distortion may occur if the speaker is placed near a conventional CRT television. In this event, move the speaker farther away from the television. In addition, devices easily affected by magnetism (magnetic media cards, wrist-watches, video tapes, etc.) should not be placed near this speaker.
- If the room has a lot of reverberation, we recommend hanging heavy fabric on the walls, and/or putting a carpet on the floor to damp the sound. For best results, cover walls completely.

CAUTION
- Mounting the speakers in an unstable location is extremely dangerous and should not be attempted.
- Do not install the speakers on top of a television set or other unstable location. The speakers may fall, causing damage or personal injury.
S-HV500-LR
- Sounds played through speaker systems are easily affected in subtle ways by the conditions in the listening space.
- Can be mounted vertically or horizontally.
- When using a thin-profile television, place the speakers to the sides of the television, separated from the television by 5 cm or more.
- When using a CRT television, separate the speakers from the television by 10cm . Since these speakers are designed for low-magnetic-flux leakage, some color smearing may be experienced depending on the installation conditions. In this case, turn off the power to the television and wait for 15 minutes to 30 minutes. If color smearing continues, separate the speaker systems farther from the television.
- If the room has a lot of reverberation, we recommend hanging heavy fabric on the walls, and/or putting a carpet on the floor to damp the sound. For best results, cover walls completely.

CAUTION
- Mounting the speakers in an unstable location is extremely dangerous and should not be attempted.
- Do not install the speakers on top of a television set or other unstable location. The speakers may fall, causing damage or personal injury.
S-SLW500
- The subwoofer reproduces ultra-low sounds in monaural, using the fact that the human ear has little directional sensitivity to sounds in the low frequencies. As a result, the subwoofer can be located in a variety of places, but if placed too distant, the linkage between sounds of the subwoofer and other speakers may seem unnatural. The intensity of the sound from the subwoofer can be adjusted by changing the distance from the wall.
- Front speakers installed to the right and left should be separated by about 1.8m to 2.7m distance. They should be installed at equal distances from the television, and at equal heights from the floor.
- Optional speaker stands can be purchased to facilitate optimal mounting of the surround speakers at or slightly above the listener's ear height.
The surround effect will be diminished if the surround speakers are mounted at extreme distances from the listener's position. - The subwoofer is not magnetically shielded and so should not be placed near a TV or monitor, as the interaction of magnetic materials can cause distortion of the colors on your TV screen. Devices easily affected by magnetism (magnetic media cards, wrist-watches, video tapes, etc.) should not be placed near the subwoofer.

CAUTION
- When installing the speaker system on a TV rack or AV rack, the rack or other audio components may vibrate due to vibrations generated by the speaker. Caution should be taken to assure that the rack shelves or other components do not shift positions due to the vibration.
-
Do not place disc media (DVD, CD) players on top of the subwoofer since sound skipping may occur due to vibration.
-
When installing, allow at least 10cm space between the rear of the unit and any wall; when installing vertically, also allow at least 10cm space between the unit's left side and any wall. If insufficient distance is taken, the unit may display inadequate performance, or may malfunction.
- Since the speaker system is heavy, installation in unstable locations is extremely dangerous and should not be attempted. A falling speaker may cause damage or personal injury.
Wall mounting the speakers (S-HV600B/S-HV500-LR)
Before mounting
- Remember that the speaker system is heavy and that its weight could cause the screws to work loose, or the wall material to fail to support it, resulting in the speaker falling. Make sure that the wall you intend to mount the speakers on is strong enough to support them. Do not mount on plywood or soft surface walls.
- Mounting screws are not supplied. Use screws suitable for the wall material and support the weight of the speaker.

CAUTION
If you are unsure of the qualities and strength of the wall, consult a professional for advice.
- Pioneer is not responsible for any accidents or damage that result from improper installation.
S-HV600B
1 Use a Phillips screwdriver to remove the two screws holding the stands to the speaker.
2 Using the two screws removed in step 1, fasten the wall mounting fixtures to the speaker.
3 Affix the supplied wire stays to the top of the unit as shown and collect the cable there.
4 Mount on wall.
- Wall mounting screws are not included. Purchase appropriate screws taking into consideration the type of wall and the weight of the speaker system.
Open two holes in the wall 818 mm apart.

S-HV500-LR Wall mounting
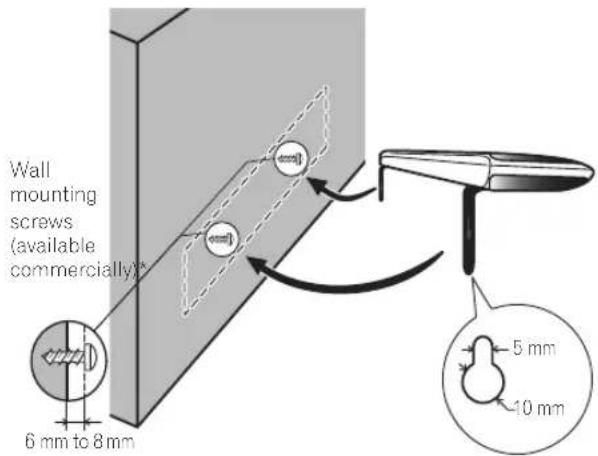
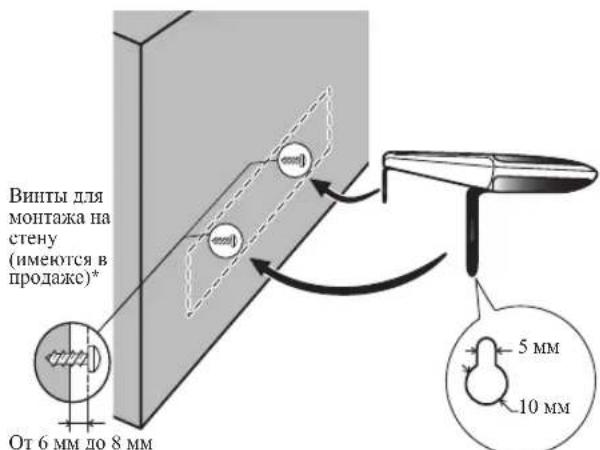
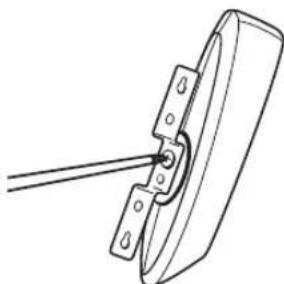
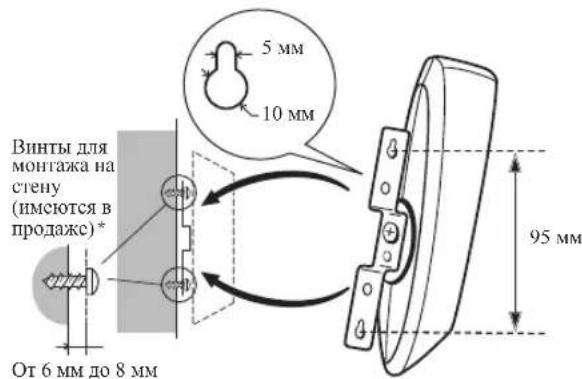
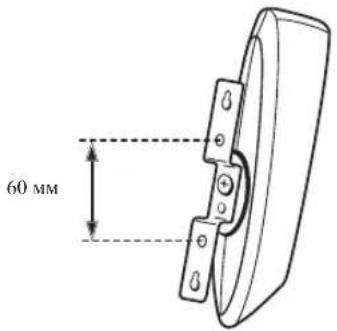
To mount the unit on a wall, first use the vertical-installation screw to fasten the wall-mount brackets to the unit, then fasten the bracket to the wall.
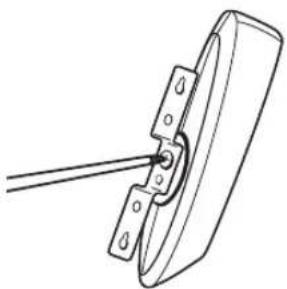
When mounting the unit on a wall, confirm that the wall construction is of a type that allows the mounting screws (available commercially) to tighten fully and hold the speaker securely.
A wall made from weak material or of insufficient strength will be unable to support the weight of the speaker, potentially resulting in the speaker's falling.
Open two holes in the wall 95 mm apart.
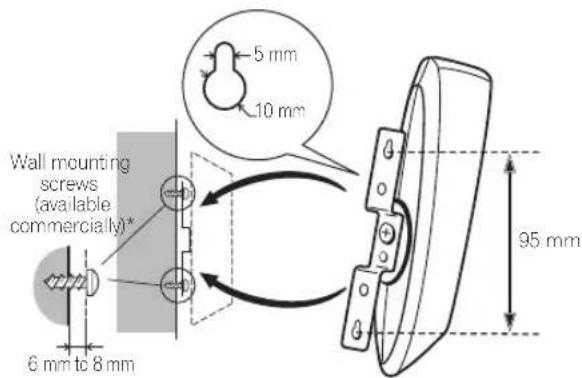
- Wall mounting screws are not included. Purchase appropriate screws taking into consideration the type of wall and the weight of the speaker system.
CAUTION
- When mounting the unit on a wall, unit weight and mounting methods may result in the danger of tipping or falling. Be very careful to prevent accidents.
- During installation, take care to confirm that the location chosen is fully able to support the weight of the unit. If you are uncertain about the strength of the wall, consult a building specialist.
- Pioneer takes no responsibility for damage or injury resulting from faulty or improper installation, modification of the unit, or natural disasters.
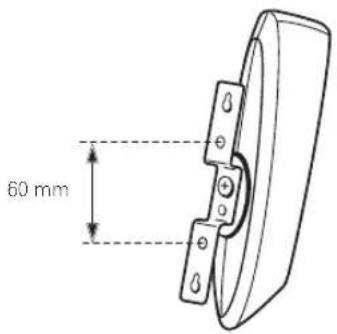
When mounting the unit on speaker stand
Use the accessory bracket when mounting the unit on any speaker stand or base other than those provided.
Use M5 screws for installation. Mounting screws are not provided. Follow the instructions accompanying your selected speaker stand or base.
Connection
Connecting the cord
S-HV600B/S-HV500-LR
1 Switch off the power to your amplifier.
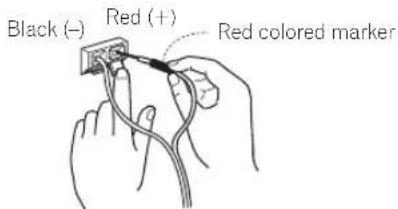
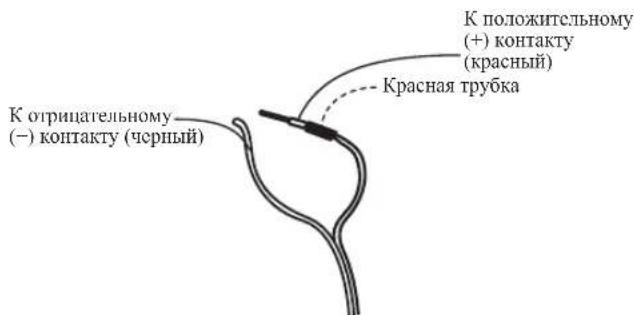
- Connect the wire with the colored marker to the red (+) terminal; the plain wire to the black (-) terminal.
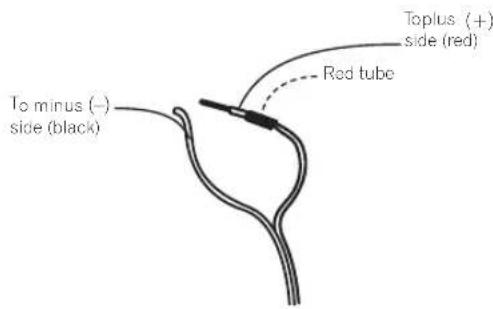
2 Connect the other ends of the cords to the amp's speaker output terminals (for more details, refer to your amp instruction manual).
S-SLW500
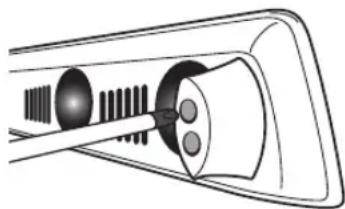
1 Attach one end of the supplied speaker cord to the rear of the each speaker.
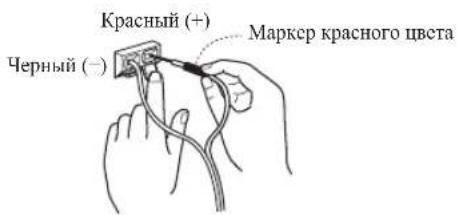
- Connect the wire with the colored marker to the red (+) terminal; the plain wire to the black (-) terminal. Press down the spring-loaded tab and insert the wire, as shown below. Release the tab to secure the wire.
2 Connect the other ends of the cords to the amp's speaker output terminals (for more details, refer to your amp instruction manual).

CAUTION
These speaker terminals carry HAZARDOUS LIVE voltage. To prevent the risk of electric shock when connecting or disconnecting the speaker cords, disconnect the power cord before touching any uninsulated parts.
- After connecting the plugs, pull lightly on the cords to make sure that the ends of the cords are securely connected to the terminals. Poor connections can create noise and interruptions in the sound.
- If the cords' wires happen to be pushed out of the terminals, allowing the wires to come into contact with each other, it places an excessive additional load on the receiver. This may cause the amp to stop functioning, and may even damage the receiver.
- When using a set of speakers connected to an receiver, you won't be able to obtain the normal stereo effect if the polarity (+, -) of one of the speakers (left or right) is reversed.
Operation (S-HV600B/S-HV500-LR)
Since the S-HV600B/S-HV500-LR are designed as compact satellite speakers, it is recommended that they be used in combination with a sub-woofer to provide full base sound. In this case, set your amplifier (receiver) speaker setting to "small" and the crossover frequency to 200 Hz.
Specifications
S-HV600B
Enclosure Closed type
Configuration .2-Way
Woofer/Tweeter .5.7 cm x 3 cm (Double sided) x 4pcs / 2 cm Dome type x 4pcs
Impedance 8Ω
Frequency range. 130 Hz to 32 kHz
Sensitivity 76 dB (Total 82 dB*)
Maximum input power. 100 W
Crossover frequency. 1.5 kHz
Exterior dimensions. 900 (W) mm × 66 (H) mm × 93 (D) mm
Weight 1.7 kg
Supplied accessories
Bracket 2
Non-skid pads 2
Wire stays 4
Warranty card (European model only) 1
Operating instructions (this document)
S-HV500-LR
Enclosure Closed type
Configuration 2-way
Woofer/Tweeter .5.7 cm x 3 cm (Double sided) x 2pcs / 2 cm Dome type x 2pcs Impedance .8Ω
Frequency range. 170 Hz to 32 kHz
Sensitivity 76 dB (Total 82 dB*)
Maximum input power. 100 W
Crossover frequency. 1.5 kHz
Exterior dimensions
Horizontal orientation . 207 (W) mm x 100 (H) mm x 100 (D) mm
Vertical orientation. 100 (W) mm x 225 (H) mm x 100 (D) mm
Weight 0.4 kg
Supplied accessories
Base 2
Stand arm 2
Bracket. 2
Screw (Bind head) 2
Screw (Flat head) 4
Hexagonal nut. 2
Seal 2
Warranty card (European model only) 1
Operating instructions (this document)
S-SLW500
Enclosure Bass-reflex bookshelf type
Configuration 16 cm cone
Impedance 4Ω
Frequency range. 35 Hz to 2.0 kHz
Sensitivity .78 dB
Maximum input power. 100 W
Exterior dimensions
Horizontal orientation 435 (W) mm x 121 (H) mm x 360 (D) mm
Vertical orientation. . . . . . 108.5 (W) mm x 435 (H) mm x 360 (D) mm
Weight 4.5 kg
Supplied accessories
Speaker cord (3 m). 1
Non-skid pads. 4
Seal 4
Warranty card (European model only). 1

Note
The S-HV500-LR is shipped with two speaker systems per package.
- Specifications and design subject to possible modification without notice, due to improvements.
- Since these speakers produce sound from both sides, the output is doubled. Sound volume is equivalent to 82 dB with ordinary speakers.
© 2011 PIONEER CORPORATION.
All rights reserved.
For European model

If you want to dispose this product, do not mix it with general household waste. There is a separate collection system for used electronic products in accordance with legislation that requires proper treatment, recovery and recycling.
Private households in the member states of the EU, in Switzerland and Norway may return their used electronic products free of charge to designated collection facilities or to a retailer (if you purchase a similar new one).
For countries not mentioned above, please contact your local authorities for the correct method of disposal.
By doing so you will ensure that your disposed product undergoes the necessary treatment, recovery and recycling and thus prevent potential negative effects on the environment and human health.
K058b_A1_En
Avant de commencer
S-HV600B/S-HV500-LR
Precautions: Installation
Precautions: Installation
S-HV500-LR: Orientation vertical
Assemblage
S-HV600B
© 2011 PIONEER CORPORATION.
© 2011 PIONEER CORPORATION.
.207 (L) mm x 100 (A) mm x 100 (P) mm
Orientamento verticale 100 (L) mm x 225 (A) mm x 100 (P) mm
Peso. 0.4 kg
.435 (L) mm × 121 (A) mm × 360 (P) mm
© 2011 PIONEER CORPORATION.
© 2011 PIONEER CORPORATION.
Orientation vertical
© 2011 PIONEER CORPORATION.
Operação (S-HV600B/S-HV500-LR)
© 2011 PIONEER CORPORATION.
© 2011 PIONEER CORPORATION.
Kopiering forbjuden.
© 2011 af PIONEER CORPORATION.
Thank you for buying this Pioneer product.
S-HV500-LR: Vertical stilling

Sett forra
Montering
S-HV600B
1 For à sikre en stabil oppstilling bör du feste glimotvirkende briketter på undersiden av høytalerfoten.
S-HV500-LR
Horizontal stilling
© 2011 PIONEER CORPORATION.
Alle rettigheter reservert.
Modell for Europa

Hvis du onsker á kaste dette produits, mà du ilke blande det med vanlig husholdningsavfall. Det finnes et separat innsamlingssystem for bruke elektronikkprodukter, som i henhold til lovivningen krever korrekt spezialbehandling, gjenbru k og gjenvinning.
© 2011 PIONEER CORPORATION.
S-HV500-LR:B ropn3oHTaIbHoiOpneHTaun
(Bu1 cnepeH)
S-HV500-LR: B BepTnKaIbHoI opneTaun
C6opka
S-HV600B
1 PnpKpEnIte K NOBepxHocTn OCHOBaHm HOXe npedoxpaHntbHbIe HeckoJIb3Kne NOknaKn.
S-HV500-LR
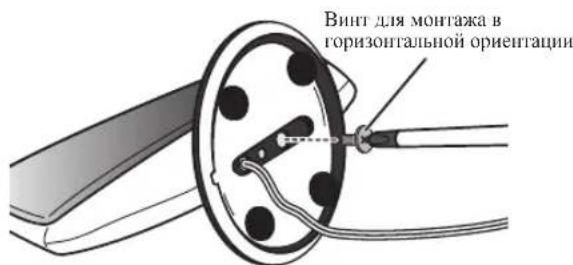
Topn3OHTaIbHaI opneHTaIua
1 Pponyctnte KOHOOHbI Ka6enb Yepe3 OTBepCTne B OCHOBAHm.
2 COBmCTHTe 3bIyOK CTONopa NOBOPoTc OTBepCTHeM B OCHOBAHNI.
3 PnKpEnTe KONoHky K OCHOBaHHo C NOMOuBIO KpeNEXHO BnHTa DnA MOHTaKa B ROpN3OHTaNbHOI OPneHTaCn C o6paTHo CTOpHOI OCHOBaHHa.
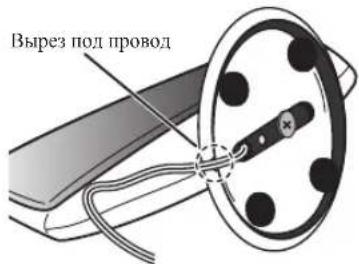
4 YctaHOBHTe KOJIOHky TaKIM O6pa3OM, Yo6bl KOJOHOUHbI Ka6eNb npOweN yepe3 na3 B OCHOBAHn.
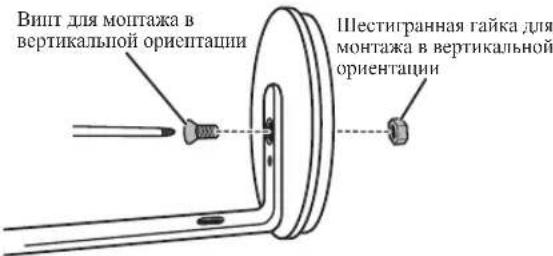
BepTKaJIbHaOpHeTaUHa
1 CoBmctnte cToKy dIa BepTKKaJIbHOro MOnTaKa C OTBepCTHEM B OCHOBAHN.
2 PnKpEnIe CToKy DnB BepTKaHbHOrO MoTaxKa K OCHOBaHHo C NOMOuBo BVHTa DnR MOtAxa B BepTKaHbHOOpNEtauNN WeCTNrpAHHO raKN. O6raTeNbHO nocAdte WeCTNrpAHHy rAky B WeCTNYrohHy BO BiEMky B DNHIe OCHOBaHHa.
3 PpOncyTHe KOHOOHbI Ka6eJIb Yepe3 OTBepCTHe B CToIKe DnA BePTKAnbHOro MOnTaJa.
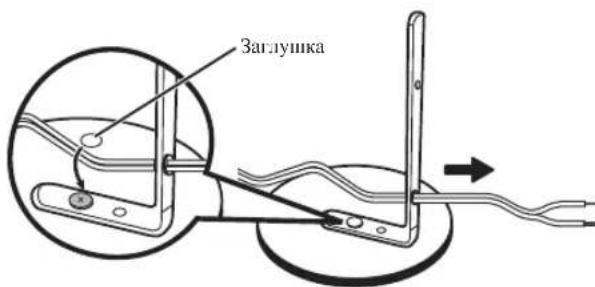
4 CoBmecTe Ra3bUOK cTOnopa noBOPota KOnOHKn C OTBepCTnEM B BepTKKaIbHOH cTOnKe.
5 HaedxHo npKpenTe KOLOHky K BepTnKaIbHOi CToKe c NOMOsbIO BNHTa DnBepTnKaIbHOr MOHTaJa.
S-SLW500
YctaHOBka ca6Bypepa
Ca6byepMOKHO CMOHTPOBArbKa B BePTKaJIbHO, TaH IROP3OHTaJIbHOI OPeHTaIIHH. 3aBOJcKa KOnΦhrypaIIHA IIpeIIIOJaeraT MOHTaK B ROp3OHTaJIbHOI OPeHTaIIHH.
Ja yctaHOBKn B BeptnKaIbHoJ opneTaun
1 HoXKn KpeIaTc n NOMOuB BuHTOB c KpeToo6pa3Hoi roNobKo; CHMnTe Hx C NOMOuB KpeToo6pa3HO iTBeptKn.
2 PnpKpEnHte npnlaraeMbIe B KOMNJIeKTe NocTaBKn 3aRJyUKN B MecTax, IHe HxOAnuNCb HOXKn, YTObbl cPnPaTb pe36oBBie OTBepCTn.
3 PnKpEnIte noYetbIpem yrIaM NOBepxHocTn KOpnyac ToI CTopoHbI, KOtOPO ca6ByΦep 6yEt YcTaHaBnBaTbcA, PnIraeMbIe npDeoxpaHnteNbHbIe HeCKoNb3KHe nOdkn. O6paTe BnHMaHne, yTo npDeoxpaHnteNbHbIe HeCKoNb3KHe NOKnAknMOrT 6bITb He NOnHO tbo 3ΦΦeKTHBbI Ha BCex NOBepxHocTnx, No3Tomy He BBINOJIHNe YcTaHOBky B COKJb3KNX MecTaX.
IIIar 1
IIIar 2
IIIar 3
PtpdoxpaHHTeJIbHeI HeCKoJIb3KHe IIOJIkaJIK

BHIMAHHE
He IIbIaIIteB bblIOJIINb 3TH DeIcTBHn, HAKIOHO yCTPOIcTBO IOIyIOM. IIOJOKHTe KOIOIKy Ha60K NOBepx MmKoTKaIH INI INpyrTO MATEpHAnA, He OCTABIIHOero HA KOPHyce IapAHII.
YctaHOBka
MecTo yctaHOBKn
Ppimep ycTaHOBKn: Iy S-HV600B u S-SLW500

PpimepyctaHOBKn:IgS-HV500-LR n S-SLW500
S-HV600B
YCIOBBAIOMIEHHINPOcIyHINBAHNOKA3bBAOTTOHKOe BO3HeCTBHe HA KaecCTBO 3ByKOB,BOcIIPOH3BOIDHMbIXYepe3 aKyctHcckHCnCTcEMbl.
JaHHa akycTHuecka cHcTeMa He ochaHeHa MaHHTHbIM OKpaHHPOBaHHcM. PO3OMy Hp pa3McUeCHHH KOIOHK PdIOM C 06b4HbIM TcCBN3Opm Ha 6a3c 3JT MoIYT BO3HKaTb IBCTOBbc HCKaKeHH. B 3OM cIyuae nepemecHTte KOIOHK pOdaJIbIE ot
TeJIeBH3Opa.KpOMe TOrO,ycTPOCTBa,IOIBePKeHHbIE BO3JeCTBnHO MaHHTHBx BOIH (MaHHTHBme MeJINHMe KapTBI, HApuyIIbe YacBI,BHJeONIIeIKHI T.I.)Ie CJIeJyET pa3MeIaTb BOJINHOTOn KOJIOnKII.
EeINB KOMHATE Ha6IbOaETc3HaHTeJIbHbM 3000eKTEpeBepeaHH, peKOMEIIyETcIOBecHTb IIOTIHyIO MATEPHIO IaCTEHN/INIOCTeIHb HAIOJ KOEBpIJINPnIRyIHHENH3Byka.1IOCTHXKeHH HAnTyHHXpe3yIbTaOB IOINHOCTbIO 3AkpoITeEHMaTepeHII.

BHIMAHNE
MoITAK KOJOHOK B HcycToHbBx MecTx IpeCTABJrct Uc3BBuAHyIOaCHOctb, HO3OMY cRO CIEyCT H6Crtb.
He yctaHabHHBaHTe KOIOHKn HA TcJIcB3OpE CBepx HIN BpyTHX HeCyTOUHHBbIX MecTax. KOIOHKa MOKcT yHaCTb H IN pHUNHHTb HMyIeCTBeHHbYyIep6 HIN TpaBMbl.
S-HV500-LR
YcIOBnB HOMCIIeHHH IpocJyIHHBaHHOka3bHaOT TOHKOC BO3JeCTBHe Ha KaYeCTBO 3ByKOB, BOCIpOH3BOIMBX Yepe3 aKyCTHneckHe cHCTeMBI.
MoKeT yCTaHaBJIHbATbCBA BepIHKaJIbHOM IIIN TOpH3OHTaJIbHOM IIOJIOKeIIHH.
IIpn HcnoIb3ObaHH TeJIeBH30pa c ToIIHm IpophiJiem pa3MeiHaTRE KOIOHKn H6OKaM TeJIeBH30pa Ha pacCToHnH 5cm HIN 6OJIee OTeJIeBH30pa.
Ipn HcnoB3OBaHH TeleB3Opa Ia 6a3e OJT yctaaHbHbaIte KOIOHKn Ha paccToHHN 10 cm OT TeleB3Opa. NocKoJIbKy JaHbHe KOIOHKn HMeOT KOHCTpyKIIHO C Hn3KM MaHHTbIM paCCeeHEM, B 3ABHCNOCTN OT YcIOBHN YCTaIOBKN MOKeT NaHIODaTbcN HeKOTopar PA3MbTOCTb IBETOB. BOTOM CIyAc BkIOHNTe IIITAIHE TeLEB3Opa HIOOJOHTe OT 15 Do 30 MHHyt. EChn Ipo6Iema Pa3MbTOCTh IBETOB COxPAHHTc, OTOBHNbTe AkyCTHneCKHe CNCTeMBe EIe DaJIbHIOTe TELEB3Opa.
EeINB KOMHATE Ha6JIHOaETc3HaHTeJIbHbM 3000eKTe peBep6epaHH, peKoMeHnyETcIOBeCHb IIOTHYO MaTePHIO HA CTHeH N/IIH IOCTCJITb HA IIOI KOBeP JII INHpyUHCHN 3ByKa. DIOIOCTHXH HAnIyUHx pc3yIbTaOB IOHIOCTbIO 3AkpoHTE CTHeM MaTepHei.

BHIMAHINE
MOHTAK KOLOHOK B HeycToHINBBIX MecTAX IIpeCTABJAE Tpe3BbuaHny OAnachOctb, HO7OMy cTO CIEcYET H6eTaTb.
He yctaHabHbaTe KOIOHK Hn TeJeBH3ope CBepxy HIN BpyTHX HeycToHHBHX MecTx. KoIOHK MoKet yIacTB H IIpHHTB HMyIeCTBCHHbYIcP6 HIN TpaBMbl.
S-SLW500
Ca6ByfepeBOcPOH3BOJHT CBePxHH3KoHaCTOTHbIe 3ByKn B MOHOOHOHHeCKOMpeKHM,IOJIb3yJcB TEm,HTO HeJOBEeCKOE yXO IIOXo paCHO3HaET HAnpaJIeHHOCt 3ByKOB B H3KoHaCTOTHOM IINaHOIIe. Bpe3yIbTaTe,ca6Byfepe MoKeT pa3MeIaTbCn B cMbIX pa3HOo6pa3HbIX MecTAX,HO INH eTO pa3MeIeHH Ha CJIINKOM 6OJIbIHOM yJaIEHH COOTHOIIeHHe MeKJy 3ByKaAMH, BOcPPOH3BOHIMMH Ca6ByfepaMH, H 3ByKaMH, BOcPPOH3BOHIMMbHm JpyTHM KOJIOHKAMH,MOKeT NOKa3aTbCn IeCCCTeTBeIHbIM. IHITcHbIHooCTb 3ByaAHIIra Ca6ByfepaMOKIO OTPeYJInPoBaTb, H3MeHnPa cactoRHe OT CTHebl.
IpeCIOHc KOIOHKn, yctAHABINBaCmBc CnPaba H cJIeBa, IOJHKnHb HaxoHTbcApyrO Tpyra Ha pacCTOBHH O1,8Mdo2,7M.Hx CNeIyET yCTaHaBnBaTb Ha OINHaKOBOM yJaTeHHN OT TeJEBH3opa H HA OINHaKOBoB BbICOTe HdIOJOM.
BbMoKeTe pHNo6peCTH OINHOHHbIe CTOnKH NIO KOLOHKN JIIy npOHeHr ONTHMaJIbHOrO KpeJIteHn KOJOHOK 06BeMHORO 3ByaHnHa yPoBHe HIN HCMHO r Bblc BbcOTbl yHccl cyuHATJI.
306bEMHOrO 3ByaHHn OKAKCTc HNKe, cJIN KOJOHOHn 06bEMHOrO 3ByaHHn 6ydyT 3AkpcJIeHb Ha CJINIKOM 6OJIbIOM ydaJIeHHN OT IO3NIHH CNYIIATEJI.
Ca6Byep He 3aHINHcH MaHHTHbIM 3KpaHnPOBaHHeM, H0TOMy ero He cJIeIyET pa3MeIHATb B6IN3N TEJEBH3Opa H1N MOHTOPa, IIOCKOJIbKY 3BAHMOBIIHIIHE MaIHITIIbIX MaTePbAIOB MOKeT Bb3BaTb IIeTOBIE HcKaKeIIHa IIa OKpAlE TeJIeBH3Opa. YcToPiCTBa, IOIeBpeKeIIIbIe BO3JeCTBIO MAHIHTIIbIX BOIII (MaHHHTbIe MeIINHbIe KapTb, HApYHbIe HaCbI, BHJeONJIeHKn H T.I.), He cJIeIyET pa3MeIHATb B6IN3N ca6Byepa.

BHIMAHNE
- IIpy yctaIOBKe AkyCTHueCKo CnCTeMbI B TeLEBHNIOH O CTOKe HIN B CTOINKC DII ayHO-/BUNCOyCTPOiCTB, CTOKA HIN IpyTHc ayINOKOMNOHeHTb MOrY T BN6pHPOBaTb, IOINBePraCB BN6paHH, RENEHPyEmoI rPOMKOROBOpHTeJIeM. HeoXIOHMIO pIHHMATb MEPb IITRA TORO, YTO6bI IIOJKN CTOnIKH INI PyTHe KOMIOHEHTb HE CMEUJIHCb IIOJ BO3DCNTBcHc BN6paHH.
He pa3MeIaIte IPOHrBbIaTeJI INCKOBBXH HOCHTeJIe (DVD, CD) Ha ca6Bycpc, IIOCKOJIbKy Bn6paIIHH MOKCT Bbl3BaTb IIPOCKAKNBAHHe 3Byka. - Pn yctaHOBKe octabJIHHeIe IIO KpaIIHeI Mepe 10 cm CBO6OJHOI OIOCTpAHCTBa MEJy 3aHHe II HAcJIbIO YcTPOiCTBa II IO6oI CTEOH, Pn yctaHOBKe B BEPTKHa.IbHOM POJOKeHHI TAKKe OCTABJIHTe IIO KpaIIHeI Mepe 10 cm CBO6OJHOI POcTpAHCTBa MEJy IeBoII NaIEIIbIO YcTPOiCTBa II IIO6oI CTEOH. Ipn HCIOCTaTOHOM PACCTOHH BO3MOKHi CB0H Pa6Ote HIN HENIOJIaIKYcTPOiCTBa.
Iockoibky akcyueckcna chtema OTJHuaetc6oJIbHM BECOM, yctaHOBka cHTeMb B Hecta6HbHbIX MecTAX IpeCTaBJeT 4pe3BvauHyIO OAnCIOCTb, IOOTOMy ee CJEyET H36eATb. IIpn IaDeHHKoJIOnKa MoKeT IIpHnIHITb HMyIecTBeHHbIyep6HIN TpaBMbl.
MOHTaK KOJohok Ha CTeHe
(S-HV600B/S-HV500-LR)
Ipeed BbInonHeHnem MOHTaka
IOMHHTe, TTO akCyTHueckKa cnCTeMa HMeet 3HaHTeJIbHbI BEc. IIO ee TaKecTbIO BHTb MOrTy ocAbeTb, a MATEpHaI CTeHb He BbIepeKaTb Ha py3Kn, TTO MoKcET IIpHBCCTN K HAeCHHO KOIOHKn. Y6cIIITcB b TOM, TTO cTeHa, HA KOTOpoi IIaHHPcyCTc MoTHTpOBaTb KOIOKH, HMeCt IOCTaTOHy IOPOHOCb, YTO6bl yepKaTb Hx. He MOHTpyHte Ha dahepbix cTeHax HIN cTeHax C MaTKHM IOKpBuTHem.
K peeKHbE BnHTM He npHJaraIOTc. HcnoJIyTe BnHTb, COOTBeCTByIOIIHe MaTePHaIy cTeHb H cNoCo6Hbe BILepKHBaT BCC KOJOHOH.

BHIMAHNE
EeHbHeYBepeHbXapakTePncTHkax Hecyuee cnooc6hoctn CTHb,obpaHTtec3a KOICyIbTaIIeH K CneHaJIHCTy.
KOMIIHnPioneer He Hecet OTBETCTBEHHOCt 3a KaKHe-JIb60 IecyactIIbIe CUYaH HIN y6bITKN, Bb3BaIIbIe HIN NIOIECEIIbIe BCIECTBNC HcHaJIeKaIeYcTaHOBKn.
S-HV600B
1 C nomoubkopecToo6pa3HOn OTBeptKn OTBnHTne DBA BnHTa, KOTOpBM cToK Kn KpenTcK KOJohKe.
2 C nOMOUIBIO DByX BINTOB, CHrTbIX B WARE 1, HApExHO npHKpeHnTe KpenexKhIbe yCTpoNCTBa K KOJOnHe.
3 Pnpkpennte npnlaeraBle B KOMnJIeKTe NOCTaBN DEpKaTeN IPOBOLOKKN BEPXHeu YAcTNI KOHOKN, KAK noka3aHO, IN pponyCTne Upe3 Hx Ka6eNB.
4 YcTaHOBnTe Ha CTeHy.
BHHTI JIO MOHTaKa H A CTeH Ye IINJARAOOTc. IIpHOOpTeHTe COOTBCTCYIOIIHE BHIITb, IINIIIB BO BIHHMAIHe TIII CTEHb BEC AkyCTHHeCKO CHCTEMb.
IPOCBEPHTE JBA OTBEPCTHBA CTHe Ha pacctOHH 818 MM ppyr ot pyra.

S-HV500-LR
MOHTAX Ha CTeHy
TTObI yCTaHOBHT bKOIOHcy Ha cTeHy, CHaHaI c HMOIO bBO BHTA JINB BEPTKAbIOH yCTaHOBKH IIaJeKIO IPhKpeINTE KpeIeKIIbe cKObIMJ MOITAKa IIa cTeHy K KOIOKe, a 3aTEM IIaJeKIO 3aKpeINTE KpeIeKHYO cKOy K cTeHe.
PnH yctAHOBKE KOJIOHNHa CTcHcy U6eHTTECB BTOM, TTO KOHcTpyKINCTeHb COOTBETCTBYeTTHNY, PO3BOJHOIIeMy IOJIHOCTbIO 3AKpeIITb H HAJIEXKHO yDEpKHBaT KJOIOHN C IIOMOIIbIO KpeIeKHBIX BHITOB (HMcIOIHXC B HPOJaKe).
Cteha H3 cIabix HIN HMEOHHx HeIOCTaOHyIO IpOCHcB MaTePnAIOB 6yIeT HeCIOco6Ha yIepKHBatB Bec KOIOHKN, YTO MOKeT CO3dAIB NOIEHHaIIbHyIO ONACIOCTb PAJIeHH KOTOKHN.
IpocBepJIHTe Iba OTBepCTHBA CTEII HA paCCTOHH 95 MM ppyr ot pyra.
BHHHIMONMTaKa HcTeHy He npHraIarOTc.IpHOBpeHTC COOTBECTBYIOHHE BHHbI,IIpHHAB BO BHMHAMHHe TTH CTeHb I BEC AkyCTHueCKO CHCTeM.

BHIMAHNE
IIpy yctaIOBKe KOIOIKH Ha cTeHy BEc KOIOIKH H MeToIb MOHTaKa MOrYT Co3JaBaTb OAnCHOCTb OIIPOKJIbIBaHN HIN HAIEHHKOIOHK. ByIbTe OChEb OCTOPOKHb, HTO6bl HpeOTBpaTHb BO3MOXHHe HeCHaCTHbe CUYHn.
BoBpemrYCTaHOKBnO63aTeJIbHoY6eHTHeB TOM,TO Bb6paIIIOeIJyCTaIOOBKMeCTO NIOIIIOCTBO CMOKET BILIEpKATB BEc yTPOIcTB.AEINB bI IIE yBepENB B IpouHOCTH cTeII, O6paTHTECB 3a KOHCyJIbTaIHHe K CnHHaHcTBy.
KOMIIHII Pioneer He Iecet OTBcTBeHHIOCTb 3a HecactHIE cIyauH HIN TpaBMbl, Bb3BaIIHbIe HINpapBHLHOH HIN HeHaJIeKaIIeYcTaHOBKOJ,MOHnPKaIIHe H3JeHN HIN CTHXHbIMN6dCTBHM.
Pn yctahOBke yCTPOINCTBa Ha cTOnKy nOd KOJIOHNK
IIpH MoITaKe yctPoIcTaBa II KaKkyIO-JIbO cTOnKy HIN IOCTaBky IOn KIoTIky, KpOme IIpHJIaReAeMoH, HcIOJIb3yIte KpeIeKHiYIO cKOby, IIpHJIaReAeMyIO B KOMJIeKTE IOCTaBKn.
Iy yctAHOBKN HIOJIb3yHrTe BHTM M5.KpeIeKHe BHTBt He npHIIaIaIOTc. CteIyIe HIICTpyKIIHM, IIpHIIraEEMM K Bb6paIIIOI cTOnKe HIN IOCTaBKe IIOI KOIIIOKy.
CoeHHHeHn
IopocoeHHeHKe Ka6eJr
S-HV600B/S-HV500-LR
1 BbiknIOuHTe nTuHne ycunnteJra.
PiOioeHHHTIPOBOICIBETOBIOIMAPKHPOBKOIKpachOMy(+) KOHTAKTY,aPBO63MapKPbOBKIN-KepHOMY(-) KOHTAKTY.
2 PocoeHHnTe DpyrHe KOHcbl Ka6eNe K BbIXoHbIM pa3bemam Ha rPOMKOrOBOpntEn yCnHtEnra (3a 0one noDpO6HoH nHΦopMaunE o6paauTecb K HnCTpyKuMaM no 3KnPyatauNN yCnHtEnra).
S-SLW500
1 PoiocoeHHTE OINH KOHeu npnlaraeMoro KOnHOUHOro Ka6eJIa K KOHTaKTam B 3aHHe YacTn KaKdoi KOnOHKn.
IIOcoeHHHTe IPOBOI C IBETOBOIMapKHPOBKOIKpAcHOMy(+) KOHTAKTY,aIPBOID63MapKHPOBKN- KHePbOMY(-)KOHTAKTY. HaKMHTeHaIpyKHHBIIABHOKKJIEMMBIBCTABBeIPOBOI,KaK 3TOIOKA3AHOHNKE.OTHyCTHEA3bHOK,HTo6b3aHKKCHPOBAIb IIPOBOI.
2 PocoeHHTe pyrHe KOHcI Ka6eNe K BbIXoHbIM pa3beMaHa rPOMKOrOBOpHTeY cHnITeY (3a 6Oone np06Ho HnΦopMaueNe O6paauTecb K nHCTpyKuMaM no 3Knlyataun yCnNTeY).

BHIMAHNE
KoHTAKHIE KJIEMMBKOIOHOKHXOJITCRHOI OHACHbIM HAIIPRAKEHENM.Buejnx IpeoTbpaaHnphcKaIopakene H3JEKTPHueckHM TOKOM IIpH BbIOJIHeHHNIOIDCOeIHHeHHN OTOeHNHeHHK KOIOHOHbIX Ka6JIe,IIpei TEM KAK IIpHKacatbcK KaKHM-ⅡH60 HeH3OJIHPoBaIIbIM HaCTM,OTcoeHNHITc HHTAHHA.
PiocicIOIOOCHHH HHTIECCH CJIeKa NOTAHHTc 3a Ka6ch, TTObIy6cbNTbCBnTOM, YTO KOHbI Ka6ChnHaDCHO 3aKpeIIeHb B KOHTAKTHbIX pa3beMax. IIOX0I KOHTAKMOKET cTaB IIpHNNHO BO3HHKOBHeHH IIIMOB II pOpaAHH3ByKa.
EIOPOOa Ka6cHb6yUyt cHyuaHBOBepHyTb H3 KOHTAOKTHbIX pa3bEMOB H BOUY T B KOHTAK MEKdy C6oH, 3TO B30EBt Ype3MepHYIO JOONIHITeJIbHYIO HARpy3KY Ha pecHBep. 3TO MOKET IHPBCCTN K c6oAM B pa6OTe H daKE K IOLOMK peCNBepa.
KoHa HcHIOHB3yETCR KOMIIEKT KOJOHOK, HOcOeHHCHBHX K pcHbepy,Bb HC CMOKCTC HOJYHTB HopMaJIbHbI 0fKeKT cTepeoOHHueCKOTo 3ByaHH, ECIN HOJARPHoCTb HOJIIOHOHn (+,-) OIOH H3KOIOHok (JeBOH IIII IpaBO) IIIMeIIHa Ha 06paHHyIO.
3Kcnpnyataza (S-HV600B/S-HV500-LR)
IocKoJIbky S-IV600B/S-IV500-LR cKOHcTppyHpOBAHb B KaueeCTBe KOMIIaKTbIX CATeTIITbIX KOIOHOK, peKOMeHcyTeC HIOJIb3OBaTb Hx B COcTaAHn C caBcypePOM IIN ObccHeYCHN IIIOHO Hn3KoAcaTcTOHOr 3ByaHa. B 3tOM cIyae ycTaHaBJIbBaHTe HAcTPOJNy npAMeTpA IIN rPOMKOHorOpHTeHa yChInTeJe (pechBepe) Ha «Hn3KnI yPoBeH» N acToTy pa3IeJIeHHa 200 TII.
TexHnueckne xapaKTepeNCTnKN
S-HV600B
Kopnyc. 3akpbTOrToTHIIa KOnHpyraa 2IOIOcb
HH3KoactOTHb/BBICOKOACTOTHb DHHAMHK 5,7cmx3cm (BBycTOPOHH) x4. /2 cm KYIOIBHOI TOHIAx4 HtI.
NoTHoe coipoTHBHeHc 8Ω
JHannaooh TactoT or 130 Tn do 32 K
76B(PiH82)
MaKcHMaJIbIaBxOJHAR MoIIIOCTb. 100 Br
HaTota pa3eHn. 1,5 K
Fa6apHTbIe pa3Mepbl 900 (III) MM x 66 (B) MM x 93 (Γ) MM
Bec. 1,7 kr
NoctabIeMbIe B KomnIeKTe npHaIeXHocTn
Kpenecknaycko6a 2
IpeOxApaHHTe.IbHbHe HecKoJIb3KHe IIOKaJIAaKn 2
JepkaTeJIH IpoBoIOKn 4
TapaHTHHHcepTHKKat (ToJIbKO dIa MoDeJIe, paCIIPOCTpaHReMbIX B EbpOIIe) 1
HctpyKnnn no 3KnnyataaHH (JaHHb nnokymeHT)
S-HV500-LR
Kopnyc. 3akpbitoro Tnna
KoHpypana 2 noocb
HHKoactOTHBH/BBICOKOACTOTHBH HAMHKN 5,7cmx3cm (BycropoHH) x2.1 /2 cm KyoIbHO rHnA x 2 nT.
HIOHOe coipoINBJIeHne 8Ω
Dnannaoh qactor . or 170 fu do 32 kU
76 1b (H0Ha8 82 b*)
MaKcHMaTbHaB BXOTHaMOnIHocTb 100Br
Yactota pa3JeHn .1,5Kt
TabapHTbIc pa3McpB BropH3oHTa.bHOJ opHeHTaHH 207 (III) MM x 100 (B) MM x 100 (F) MM
B BepTKaJIbHOJ opHeHTauHH 100 (III) MM x 225 (B) MM x 100 (Γ) MM
Bec 0,4KT
NoctabJIaRbIeB KOMnJIeKTe npHaJdNExKHOCTN
Octobattnc 2
Onopa cTouKn 2
Kpeeknckncko6a 2
BHT (Hn3KaI nnHHdpueckra roIOBka). 2
BHT (IIIOCKaI ROIOBka) 4
IIecturpaTmraTnKa 2
3ar.tymka. 2
IapaHTHIIcepTHΦHKAT(ToJIbKO DnMoDeJIe,paCIIpOcTpaIIHeMbxB Ebpone) 1
HctpykuHH no 3Kcn.nyaataaHH (naHHbI JOKymeHT)
S-SLW500
Kopnyc 110IOuHOro TIIa, c OIpaKaTeIeM bacob KonHpyaHa 16cm KOHyc
TIOJHoe coipoTHBJIeHHe 4Ω
Hana3OH hacto 35TIO2,0K THyBCTBHTeJIbHOCTb 78
MaKcHMaJIbHaB BxOJHaMOnIHocTb. 100 Br
T6apHTHbc pa3McpbB TOpH3OHraJIbHOJ opHeHaauHH 435 (I1) MM x 121 (B) MM x 360 (I) MM BBePHKaJIbHOJ opHeHaauHH
108,5 (III) MM x 435 (B) MM x 360 (Γ) MM Boc. 4,5 KI
Noctabnembe B KOMnneKeTepnHaJnxHocTH
KoIOHOHbI KaeB (3M) 1
IpeoxpahntHeBhhe HeckoJIb3KHe IIOkJaikn. 4
3aIyka. 4
TapaHTHHbI cepTHΦHKAT (ToJIbKO IIN MoJeJIeI, paCIIPOCTpaHReMbIX B EbpOnc) 1

3aMeaHne
MoJIbS-HV500-LRIOCTaBJIeTcCAByMaKyCTHueCKHMn CHCTeMaMH B KOMIIJIeKeTe.
TexHHueckHe xapaKTepeHcTHKn H KOHCTpyKIIHH MOYr H3MeHrTbc8e3IpeBapHTeJIbIO r yBeIOJMeIHn, B CBr3H C BIOCHIMBMYNcoBepHIIECTBOBAIIHHM.
*IOCKOBKYdIINIIe rPOMKOROBOPHTeHHBOCIPON3BOJNT 3ByK c 06eHXCTOPOH, BIXXODYDABHBAeTc. YpOBeIHrPOMKOCTH 3ByKa KKBHBAJIeHTeH82dBcO6bUHbIMn rPOMKOROBOPHTeJIHM.
PIONEER CORPORATION, 2011.
Bce npaba 3aunnuehbl.
Длma moDEJIe, paCnpoCTpaHReMbIX B Ebpone

Ecnn Bbl Jnnae TynnnnepoBb TaanHHe, He bIbpaBbAte Ero BMCTe C 0bNbIM bIbTOBIM MycOpom. CyueceBTyET OTeNbHnCtema c6bopaNCnOJIbOaBHnx3NEKToPbHbIX N3EINBI B COOTBeTCTBN C 3aHOHaTeBCTBM, KOtopar npEiOnNaerat CoOTBeTCTbUOeSe 6oapaeHne, Bo3pAr n nepepaBoTKy.
Aacthble kIneHTb-BrpaHax-ueHex EC, B WBeuapnnn HOpbernn Moryt 6ecnnaTHo BO3Bpaaatb nCnonb3ObaHHbte 3neKtpoHHbte 3dennr B COOTBEcTByHOUe nyHKtb c6op a nn dunepe (pnp nokynke cxoHoro HOBO rno 3dennr).
B ctpanax, He nepeueicneneHHbix Bblwe, Iy nolyeHn Hfopmaun O npabnlbblcx cnocobax ytnin3aun obaaaiTeCB B COOTBeTcByouane ypejckdneH.
IocTynar TAKIM 6pa3OM, Bbl MoKTe 6b1b YBepeHb I TOM, 40 yTINn3NpyEmbI npOyKT 6yET COOTBcTByoUm 6pa3OM 6pa6oTah, nepeaH B COOTBcTByoUm NnykT n nepeapobTaH 6e3 Bo3MOxHBIX HeRaTHBbIX nocnEcdTBn dIn OkpykaIouee cpeBn 3doOpBbNIOdeN.
K058b_A1_Ru
開始之前
S-HV600B/S-HV500-LR
http://www.pioneer.co.uk
http://www.pioneer.fr
http://www.pioneer.de
http://www.pioneer.it
http://www.pioneer.nl
http://www.pioneer.be
http://www.pioneer.es
http://www.pioneer.pt
http://www.pioneer.se
http://www.pioneer.dk
http://www.pioneer.no
http://www.pioneer.fi
http://www.pioneer-rus.ru
http://www.pioneer.eu
© 2011 PIONEER CORPORATION
All rights reserved.
© 2011 PIONEER CORPORATION
PIONEER CORPORATION, 2011
Bce npaba 3aunueneHbI.
PIONEER CORPORATION
1-1, Shin-ogura, Saiwai-ku, Kawasaki-shi, Kanagawa 212-0031, Japan
Kopnpaunna Painonnp
1-1, CnH-Orypa, CaBaa-Ky, r. Kabacakn, npefekktypa Kaharaba, 212-0031, Jnohna
HmnpTeP:OOO"NIOHEP PYC"
125040, Poccnr, r. MockBa, yn. PpaBbI, d.26 Ten.: +7(495) 956-89-01
PIONEER ELECTRONICS (USA) INC.
P.O. BOX 1540, Long Beach, California 90801-1540, U.S.A. TEL: (800) 421-1404
PIONEER ELECTRONICS OF CANADA, INC.
340 Ferrier Street, Unit 2, Markham, Ontario L3R 2Z5, Canada TEL: 1-877-283-5901, 905-479-4411
PIONEER EUROPE NV
Haven 1087, Keetberlaan 1, B-9120 Melsele, Belgium TEL: 03/570.05.11
PIONEER ELECTRONICS ASIACENTRE PTE. LTD.
253 Alexandra Road, #04-01, Singapore 159936 TEL: 65-6472-7555
PIONEER ELECTRONICS AUSTRALIA PTY. LTD.
5 Arco Lane, Heatherton, Victoria, 3202, Australia, TEL: (03) 9586-6300
PIONEER ELECTRONICS DE MEXICO S.A. DE C.V.
Blvd.Manuel Avila Camacho 138 10 piso Col.Lomas de Chapultepec, Mexico, D.F. 11000 TEL: 55-9178-4270
K002_B4_Ru
- Before you start
- S-HV600B/S-HV500-LR
- Caution: installation
- Caution: in use
- S-SLW500
- Cleaning the speaker cabinet
- What's in the box
- S-HV600B
- S-HV500-LR
- Features
- S-HV500-LR: Horizontal orientation
- S-HV500-LR: Vertical orientation
- Assembly
- Horizontal orientation
- Vertical orientation
- Installing the subwoofer
- For vertical orientation installation
- CAUTION
- Installation
- Mounting location
- Wall mounting the speakers (S-HV600B/S-HV500-LR)
- Before mounting
- Mount on wall.
- S-HV500-LR Wall mounting
- When mounting the unit on speaker stand
- Connection
- Connecting the cord
- Attach one end of the supplied speaker cord to the rear of the each speaker.
- Connect the other ends of the cords to the amp's speaker output terminals (for more details, refer to your amp instruction manual).
- Operation (S-HV600B/S-HV500-LR)
- Specifications
- Supplied accessories
- Note
- For European model
- Avant de commencer
- Precautions: Installation
- S-HV500-LR: Orientation vertical
- Assemblage
- Orientation vertical
- Operação (S-HV600B/S-HV500-LR)
- S-HV500-LR: Vertical stilling
- Montering
- Horizontal stilling
- Modell for Europa
- S-HV500-LR:B ropn3oHTaIbHoiOpneHTaun
- S-HV500-LR: B BepTnKaIbHoI opneTaun
- C6opka
- Topn3OHTaIbHaI opneHTaIua
- BepTKaJIbHaOpHeTaUHa
- YctaHOBka ca6Bypepa
- Ja yctaHOBKn B BeptnKaIbHoJ opneTaun
- BHIMAHHE
- YctaHOBka
- MecTo yctaHOBKn
- Ppimep ycTaHOBKn: Iy S-HV600B u S-SLW500
- PpimepyctaHOBKn:IgS-HV500-LR n S-SLW500
- BHIMAHNE
- BHIMAHINE
- MOHTaK KOJohok Ha CTeHe
- (S-HV600B/S-HV500-LR)
- Ipeed BbInonHeHnem MOHTaka
- MOHTAX Ha CTeHy
- Pn yctahOBke yCTPOINCTBa Ha cTOnKy nOd KOJIOHNK
- CoeHHHeHn
- IopocoeHHeHKe Ka6eJr
- BbiknIOuHTe nTuHne ycunnteJra.
- PocoeHHnTe DpyrHe KOHcbl Ka6eNe K BbIXoHbIM pa3bemam Ha rPOMKOrOBOpntEn yCnHtEnra (3a 0one noDpO6HoH nHΦopMaunE o6paauTecb K HnCTpyKuMaM no 3KnPyatauNN yCnHtEnra).
- PoiocoeHHTE OINH KOHeu npnlaraeMoro KOnHOUHOro Ka6eJIa K KOHTaKTam B 3aHHe YacTn KaKdoi KOnOHKn.
- PocoeHHTe pyrHe KOHcI Ka6eNe K BbIXoHbIM pa3beMaHa rPOMKOrOBOpHTeY cHnITeY (3a 6Oone np06Ho HnΦopMaueNe O6paauTecb K nHCTpyKuMaM no 3Knlyataun yCnNTeY).
- 3Kcnpnyataza (S-HV600B/S-HV500-LR)
- TexHnueckne xapaKTepeNCTnKN
- NoctabIeMbIe B KomnIeKTe npHaIeXHocTn
- NoctabJIaRbIeB KOMnJIeKTe npHaJdNExKHOCTN
- Noctabnembe B KOMnneKeTepnHaJnxHocTH
- 3aMeaHne
- 開始之前
- PIONEER CORPORATION
- Kopnpaunna Painonnp
- HmnpTeP:OOO"NIOHEP PYC"
- PIONEER ELECTRONICS OF CANADA, INC.
- PIONEER EUROPE NV
- PIONEER ELECTRONICS ASIACENTRE PTE. LTD.
- PIONEER ELECTRONICS AUSTRALIA PTY. LTD.
- PIONEER ELECTRONICS DE MEXICO S.A. DE C.V.
Brand : PIONEER
Model : SHV500LR
Category : Loudspeaker