
DB820 - Alarm clock radio Renkforce - Free user manual and instructions
Find the device manual for free DB820 Renkforce in PDF.

| Product Type | DAB+/FM clock radio |
| Brand | Renkforce |
| Model | DB820 |
| Dimensions (L x H x D) | 115 x 73 x 94 mm |
| Weight | 230 g |
| Power supply | Power adapter 100-240 V / 50/60 Hz, output 5 V DC |
| Power consumption | 5 W max. |
| Frequency ranges | 174-240 MHz (DAB Band III), 87.5-108 MHz (FM RDS) |
| Number of alarms | 2 (Alarm 1 and Alarm 2) |
| Wake-up modes | Once, daily, weekdays, weekends |
| Snooze | 5 minutes |
| Sleep function | Up to 90 minutes, adjustable in 5-minute steps |
| Station presets | 10 stations per band (DAB and FM) |
| Display | Screen with station info, time, signal |
| Maintenance and cleaning | Soft, dry cloth, no harsh detergents |
| Safety | Use only the supplied adapter, do not open, avoid moisture, unplug during storms |
| Repairability | Power adapter not repairable, must be replaced entirely. Device requires no internal maintenance. |
Frequently Asked Questions - DB820 Renkforce
User questions about DB820 Renkforce
0 question about this device. Answer the ones you know or ask your own.
Ask a new question about this device
Download the instructions for your Alarm clock radio in PDF format for free! Find your manual DB820 - Renkforce and take your electronic device back in hand. On this page are published all the documents necessary for the use of your device. DB820 by Renkforce.
USER MANUAL DB820 Renkforce
Initial Commissioning 32
General Operation 33
DAB Operation 33
FM Operation 37
Alarm Function 39
Display of the Software Version 42
Handling 43
Maintenance and Care 44
Disposal 44
Technical Data 45
Introduction
Dear Customer,
Thank you for purchasing this product.
This product complies with the national and European legal requirements. We kindly request the user to follow the operating instructions, to preserve this condition and to ensure safe operation!
These operating instructions relate to this product. They contain important information concerning commissioning and handling. Please bear this in mind when passing on the product to a third party. Keep these operating instructions for future reference!
All company names and product names are trademarks of the respective owner. All rights reserved.

Fon. +49 9604 / 40 88 80
Fax +49 9604/408848
e-mail: tkb@conrad.de
Mon to Thurs 8.00am to 4.30pm
Fri 8.00am to 2.00pm
The DAB radio serves receipt and playback of digital and analogue radio programmes in the DAB/ DAB+ and FM areas. It also provides an alarm function.
The product must only be supplied with power through the included plug-in mains adapter.
The plug-in mains adapter is only approved for connection to 100 - 240 V/50/60 Hz alternating voltage.
It is intended for indoor use only. Do not use it outdoors. Contact with moisture, dripping or splashing water, e.g. in bathrooms, must be avoided under all circumstances.
Any use other than that described above can damage the product and may involve additional risks such as short circuit, fire, electric shock, etc.
The entire product must not be modified or converted, and the casing must not be opened.

Observe all safety information in these operating instructions!
Symbols

The exclamation mark symbol indicates that the user must read these operating instructions before commissioning of the device, and observe them during operation.

The "Hand" symbol indicates special advice and operating information.
Safety Information

In case of damage caused by non-compliance with these operating instructions, the warranty/guarantee will expire. We do not assume any liability for consequential damage!
Nor do we assume any liability for damage to property or personal injury caused by improper use or failure to observe the safety information. In such cases the warranty/guarantee will expire.
- For safety reasons, any unauthorized conversions and/or modifications to the device are not permitted.
- The device may only be supplied with energy through the enclosed plug-in mains adapter. never try to operate the device with any other power supply.
- The enclosed plug-in mains adapter is constructed according to protection class II.
- The voltage source for the mains adapter must be a proper wall socket (100 - 240 V/5060 Hz) of the public mains grid.
- To disconnect the DAB radio completely from the mains, the mains plug has to be pulled out of the socket.
- Never replace a damaged connection cable of the mains adapter. If the connection cable is damaged, the mains adapter is unusable and must be disposed of. It must not be repaired.
- Devices that are operated with mains voltage have no place in the hands of children. Therefore, be particularly careful when operating the product in the presence of children, in particular if they try pushing objects into a device through the housing opening. There is the risk of a potentially fatal electric shock.
- Check the product for damage from time to time. If the mains adapter or the DAB radio is damaged, do not touch it. First cut off the power supply to the relevant mains socket (e.g. via the circuit breaker) and then carefully pull the mains adapter out of the mains socket. Do not operate the product anymore afterwards, but take it to a specialist workshop.
Safety Information
- Do not place any containers with liquids, e.g. glasses, buckets, vases or plants in the immediate proximity of the product. Liquids may get into the housing and impair electrical safety. This also poses great danger of fire or potentially fatal electric shock! In such a case, switch off the mains socket to which the product is connected (e.g. switch off automatic fuse) and unplug the mains adapter from the mains socket. The product must not be operated anymore after this. Take it to a specialist workshop.
- Do not expose the product to any high temperatures, moisture, dripping or splashing water, strong vibrations or heavy mechanical stress.
- Do not place any open sources of fire, such as burning candles, on or directly next to the device.
- Consult an expert if you are unsure as to the function, safety or connection of the product.
- Do not leave any packing material unattended. It may become a dangerous toy for children.
- Never operate the device unattended.
- Do not use the device in a tropical climate.
- If you are not sure about the correct connection or operation or if questions arise which are not covered by the operating instructions, please do not hesitate to contact our technical support or another specialist.
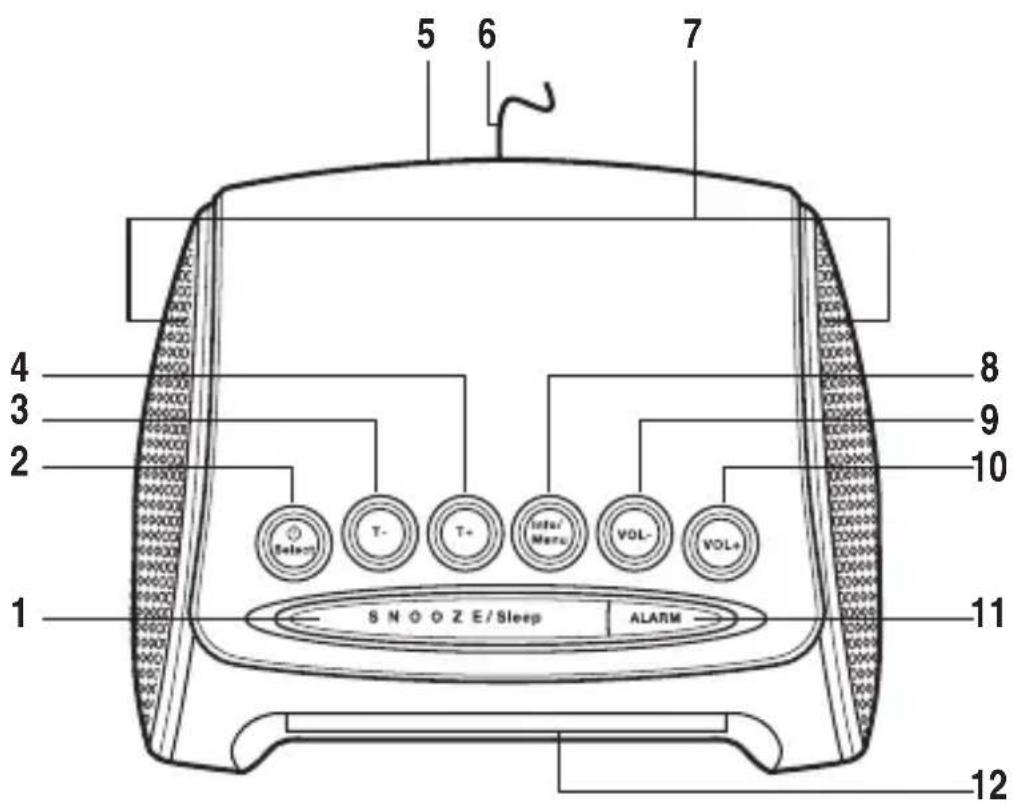
(1) SNOOZE/sleep button
(2) / Select button
(3) T- button
(4) T+ button
(5) Connection DC 5V
(6) Aerial
(7) Speakers
(8) Info/Menu button
(9)VOL- button
(10) VOL+ button
(11) ALARM button
(12) Display

Do not drill or screw additional screws into the casing in order to fasten the device; this would damage the device.
When setting up the device, make sure that it has a stable footing and place it on a stable underground, since falling off of the DAB radio may injure persons.
When setting up the device, make sure that the connection cables are neither pinched nor damaged by sharp edges.
Always place cables so that no one can trip over them or be caught in them. Danger of injury!

Due to the diversity of furniture paints and polishes used, it is possible that the device's feet will leave visible residue on furniture. The device therefore should not be placed on valuable furniture surfaces without any suitable protection.
- Place the device on a level and dry surface.
- Unroll the aerial (6) completely.

The radio reception strongly depends on the aerial alignment. If reception is impaired in operation, try aligning the aerial differently.
- When selecting a place of set-up, make sure it is not exposed to direct solar radiation, vibrations, heat, cold and moisture.
- There also must not be any strong transformers or motors in the area of the DAB radio, since they may influence the device and its reception.
Mains Connection

Only the enclosed plug-in mains adapter must be used for the mains connection.
The plug-in mains adapter is only approved for connection to 100-240 V/50/60Hz alternating voltage. Never try to operate the device with any other voltage.
Make sure when connecting that the connection cable is not squeezed or damaged by sharp edges.
The mains outlet to which the mains adapter is connected must be easily accessible so that the mains adapter can be separated from the mains voltage quickly in case of an error.
- Connect the low-voltage plug of the mains adapter to the DC 5V connection (5).
- Plug the mains adapter into a wall socket.
Initial Commissioning
- After connection to the power supply, WELCOME will be displayed briefly before the display switches to 0:00 (12).
- If a DAB-station can be received, the time will automatically adjust after a brief time.

If the time has not set itself automatically after approx. 2 minutes, the DAB reception at the current setup location is insufficient. In this case, try to change the direction of the antenna or select a different setup location.
- Push the button / Select (2) to switch on the device.
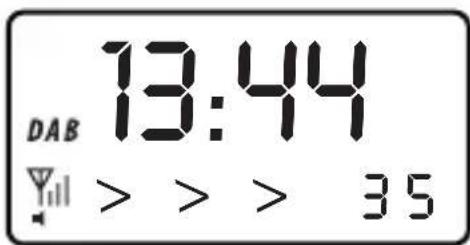
- The display shows SCANNING. The device scans for received DAB stations. The arrows in the display show how far station search has progressed.
- If stations are found, the first station found is played back.
- If no stations are found, the display shows OFF AIR. In this case, place the device in another location or try aligning the aerial (6) differently. The signal strength icon in the display shows whether there is any DAB signal and how strong it is.
- To switch off the device again, keep the button / Select (2) pushed until the device switches off.
- The last station set is received again when the deceive is switched on again.
Operation
General Operation
- Push the button Select (2) to switch on the device or a select a menu option.
- Push and hold the button / Select (2) to switch off the device.
- Push the button VOL+ (10) to increase volume.
- Push the button VOL- (9) to reduce volume.
- Push the button T+ (4) or T- (3) to set menu options or scan for channels in the FM range.
- Briefly push the Info/Menu (8) to call various information on the set station.
- Push the button Info/Menu (8) for a longer time to display the menu.
DAB Operation
- Switch on the device with the button Select (2).
- If the device is not set to DAB reception yet, keep the button Info/Menu (8) pushed for a longer time to display the menu.
- Use the button T+ (4) or T- (3) to select the entry TO DAB and confirm the selection with the button / Select (2).
Selecting Station
- Select the desired station from the station list with the button T+ (4) or T- (3). The station is displayed in the bottom display line.
- Push the button / Select (2) to confirm your selection.
Saving station
Up to 10 DAB stations can be stored in the station memory.
- Select other station to be stored as described above.
- Push the button Info/Menu (8) for a longer time to display the menu.
- Use the button T + (4) or T - (3) to select the entry STORE and confirm the selection with the button / Select (2).
- The currently selected station memory slot appears at the lower right of the display.
- Select the desired station slot with the button T + (4) or T - (3).
- Push the button / Select (2) to save the current station in the desired station slot.
Calling station memory
- Push the button Info/Menu (8) for a longer time to display the menu.
- Use the button T + (4) or T - (3) to select the entry RECALL and confirm the selection with the button / Select (2).
- Use the button T + (4) or T - (3) to select the desired memory slot and confirm the selection with the button / Select (2).
Operation
Station search
If you use the device in a different site or want to scan for new stations, you may update the station list.
- Push the button Info/Menu (8) for a longer time to display the menu.
- Use the button T + (4) or T- (3) to select the entry AUTOSCAN and confirm the selection with the button Select (2).
- The device performs and automatic search run and saves all stations received in the station list. If a station list is already present, it is overwritten.
Manual station search
The manual station search is particularly helpful if a station was not found by automatic station search. This function may also help in aerial alignment of selection of the site of setup.

For this function, the DAB channel or the respective broadcast frequency must be known.
- Push the button Info/Menu (8) for a longer time to display the menu.
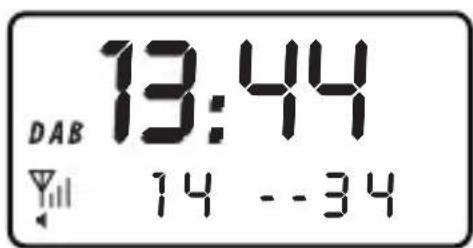
- Use the button T + (4) or T - (3) to select the entry MANUAL and confirm the selection with the button / Select (2).
- Use the button T + (4) or T - (3) to select the desired DAB channel or broadcast frequency and confirm the selection with the button / Select (2).
- If a signal is received, the device indicates the signal strength.
- Push the button / Select (2) again to switch back to regular DAB reception.
Calling station information
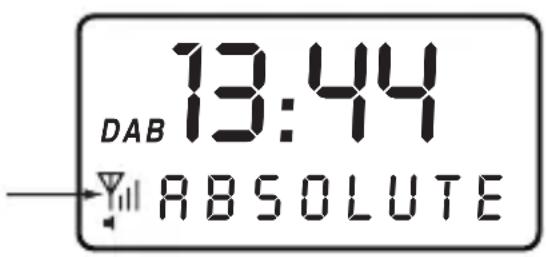
Push the button Info/Menu (8) repeatedly to call the following information in sequence:
Station name
Running display (DLS) - Stations usually show details on the current programme here.
Type of programme - Genre of the music that is broadcast.
Station group - Usually, several stations are broadcast on one frequency in DAB-broadcasting.
These stations are combined into a station group.
Date
Weekday
Channel frequency - Shows the station's frequency and channel.
Bit rate - Shows the compression rate of your station (the higher, the better the station's audio quality).
Signal strength
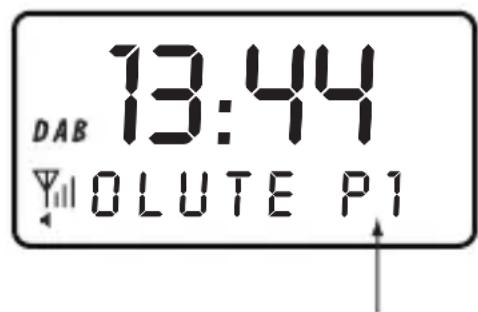
Additional services
Some DAB stations broadcast additional services, i.e. a second programme can be received.
- If the station display shows “>”, additional services are being received.
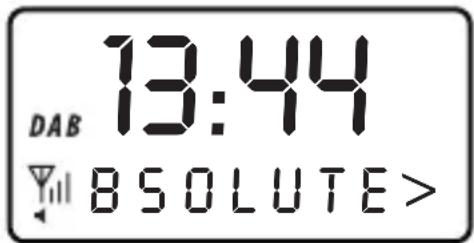
- Push the button / Select (2) to receive these additional services.
- During reception of an additional service, the “>”-icon is shown in front of the station display.
- Push the button / Select (2) again to switch back to the original programme.
Operation
FM Operation
- Switch on the device with the button Select (2).
- If the device is not set to FM reception yet, keep the button Info/Menu (8) pushed for a longer time to display the menu.
- Use the button T+ (4) or T- (3) to select the entry TO FM and confirm the selection with the button / Select (2).
Station search
- Push the button T + (4) or T - (3) to set the desired broadcast frequency.

If you keep the button pushed for about 1 second, a station scan starts and stops at the next station received.
- When a station has been found, it is played back and the broadcast frequency is displayed in the bottom display line. For an RDS station, the station name will be displayed after a moment.
Saving channel
Up to 10 FM stations can be stored in the station memory.
- Select other station to be stored as described above.
- Push the button Info/Menu (8) for a longer time to display the menu.
- Use the buttons T+ (4) or T- (3) to select the entry STORE and confirm the selection with the button / Select (2).
- The currently selected station memory slot appears at the lower right of the display.
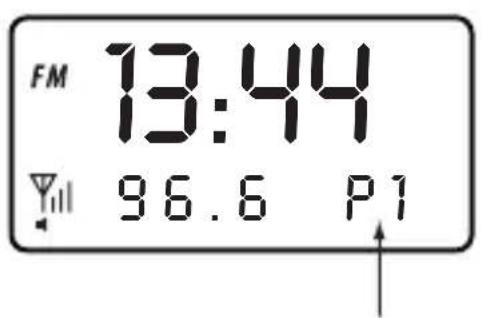
- Select the desired station slot with the button T + (4) or T - (3).
- Push the button / Select (2) to save the current station in the desired station slot.
Calling station memory
- Push the button Info/Menu (8) for a longer time to display the menu.
- Use the button T + (4) or T - (3) to select the entry RECALL and confirm the selection with the button / Select (2).
- Use the button T + (4) or T - (3) to select the desired memory slot and confirm the selection with the button / Select (2).
Calling station information
Push the button Info/Menu (8) repeatedly to call the following information in sequence:
Station name or station frequency (for non-RDS-stations)
Running display (DLS) - Stations usually show details on the current programme here.
Type of programme - Genre of the music that is broadcast.
Date
Weekday
Signal strength
Switching between stereo and mono
- Push the button / Select (2) briefly to select stereo or mono operation.

If reception is bad, switching to mono operation reduces interferences.
Operation
Alarm Function
The DAB radio has 2 alarm functions (alarm 1 and alarm 2).
Programming alarm times
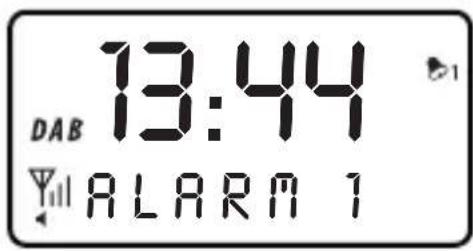
- Push the button ALARM (11).
- ALARM 1 will be displayed.
- Select the desired alarm function (alarm 1 or alarm 2) with the button T + ( 4) or T - ( 3) .
- Push the button / Select (2) and then use the button T+ (4) or T- (3) to activate (ON) or deactivate (OFF) the respective alarm function. Choose ON here to programme the corresponding alarm function.
- Push the button / Select (2) and then use the button T + (4) or T - (3) to set the hours display for the alarm time.
- Push the button / Select (2) and then use the button T + (4) or T - (3) to set the minutes display for the alarm time.
- Push the button /Select (2) and then use the button T + (4) or T - (3) to set the repeat options:
ONCE - once
DAILY - daily
WEEKDAYS - weekdays only
WEEKENDS - weekends only
- If you have set ONCE in the step above, you need to set the year, month and day additionally as described for setting the hours and minutes, and confirm each with the button / Select (2).
- In the next step, use the button T+ (4) or T- (3) to set the alarm signal type:
BUZ - Alarm by alarm buzzer
DAB - Alarm by DAB radio (last station set)
FM - Alarm with FM radio (last station set)
- Push the button / Select (2) and then use the button T+ (4) or T- (3) to set the volume for the alarm signal.

Set the volume to make sure that you will wake up.
- Push the button Select (2) to save the settings. SAVED will be displayed.
- The alarm symbol for the activated alarm time appears in the display. The programmed alarm time is automatically active.
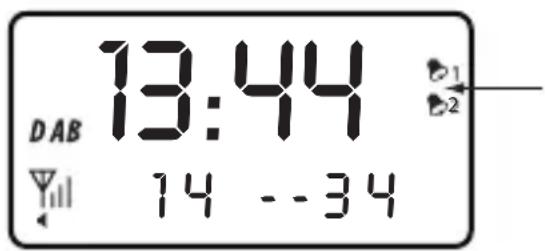
- Repeat the programming for the second alarm time.
Operation
Switching the alarm function on and off
- To deactivate an alarm time programmed before, push the button ALARM (11).
- Select the desired alarm function with the button T + (4) or T- (3).
- Push the button / Select (2) to select OFF.
- Push the button / Select (2) again to deactivate the respective alarm time.
- To activate a previously programmed alarm time again, proceed as above but select ON instead of OFF.
- Push the button / Select (2).
- To avoid having to make all settings again, you may also push the button ALARM (11) twice to return to regular display.
Calling alarm options
- Push the button ALARM (11) and then use the button T+ (4) or T- (3) to select the desired alarm function.
- Push the button / Select (2) repeatedly to call the settings.
- If you want to change the settings, do this by pushing the button T + (4) or T - (3) as described in "Programming alarm times".
- Push the button / Select (2) to save the settings and return to the regular display.
Deactivating alarm signal
- Push the button ALARM (11) during the alarm signal to switch it off.
Alarm repetition
- Push the button SNOOZE/Sleep (1) during the alarm signal to interrupt the alarm signal for 5 minutes.
After the end of 5 minutes, the alarm signal sounds again.

You may repeat this process for up to one hour. Then the alarm signal switches off automatically.
Snoopze function
You may set the duration after which the device switches off automatically.
The function is suitable, e.g. to fall asleep with music.
- Switch on the device.
- Push the button SNOOZE/Sleep (1) and then use the button T+ (4) or T- (3) to set the desired operating time.
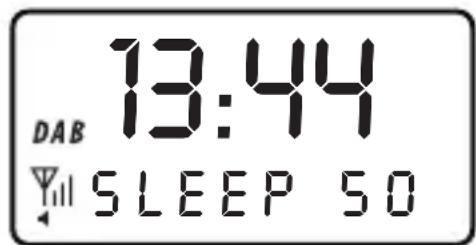

The operating time may be set in 5-minute steps from 0 (OFF) to 90 minutes.
- Push the button / Select (2) to save the settings.
- After the set time has elapsed, the device deactivates automatically.
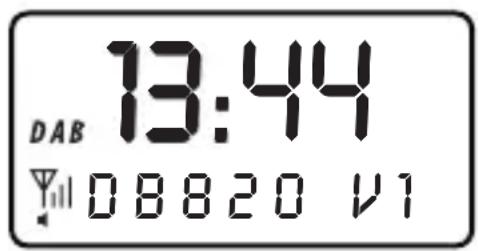
Display of the Software Version
You may display the software version as follows:
- Switch on the device with the button / Select (2).
- Push the button Info/Menu (8) for a longer time to display the menu.
- Use the buttons T + (4) or T - (3) to select the entry VERSION and confirm the selection with the button / Select (2).
Handling
- Never plug the power plug into a mains socket immediately after the device has been taken from a cold to a warm environment. The resulting condensation may destroy the device.
Allow the device to reach room temperature before connecting it. Wait until the condensation has evaporated. This may take several hours. - Never plug in or unplug mains adapters when your hands are wet.
- Never pull mains adapters from the mains socket by pulling the cable. Always pull the mains plug from the mains socket by the intended grip areas.
- Unplug the mains adapter from the mains socket if you do not use the device for some time.
- To warrant sufficient ventilation, an area of 5cm must be kept free around the device and mains adapter. Air circulation also must not be impaired by any objects like magazines, tablecloths, curtains, etc.
- For safety reasons, disconnect the mains adapter from the mains socket in case of an electrical storm.
- Do not listen to excessively loud music over an extended period of time. This may damage your hearing.
Maintenance and Care
Always observe the following safety information before cleaning or servicing the device:

Unplug the mains adapter from the mains socket.
Only qualified experts familiar with the hazards involved and the relevant regulations must perform repairs or open the device.
The device is maintenance-free and you should therefore never open it.
Clean the exterior of the device with a soft, dry cloth or brush only. Never use any aggressive cleansing agents or chemical solutions since these may damage the casing or impair its function.
Regularly check the technical safety of the device, e.g. for damaged casing, mains adapter, etc.
If you have reason to believe that the device can no longer be operated safely, disconnect it immediately and make sure it is not unintentionally operated.
It can be assumed that safe operation is no longer possible if:
- there is visible damage to the device or to the mains adapter,
- if the device or mains adapter no longer works,
- the device was stored under unfavourable conditions for an extended period of time or
- after exposure to extraordinary stress caused by transport
Disposal

Electronic devices are recyclable waste and must not be disposed of in the household waste!
Dispose of the product according to the applicable statutory provisions at the end of its service life.
Technical Data
Operating voltage 100 - 240 V/50/60 Hz (mains adapter)
5 V/DC (DAB radio)
Power consumption 5 W (max.)
Reception range 174 - 240 MHz (DAB band III)
87.5 - 108 MHz (UKW with RDS)
Alarm times 2
Alarm modes once/daily/weekdays/weekends
Snooze time 5 minutes
Dimensions 115x73x94mm
Weight 230g
Table des matieres
Chere cliente, cher client,