
MAG592 - Microwave Oven Pelgrim - Free user manual and instructions
Find the device manual for free MAG592 Pelgrim in PDF.

| Product type | Combination microwave oven (microwave, hot air, grill) |
| Brand | Pelgrim |
| Model | MAG592 |
| Power supply | 220-240 V ~ single-phase, 16 A, thermal protection 16 A |
| Microwave power | 1000 W (adjustable from 100 W to 1000 W) |
| Grill power | 3 levels (GP1, GP2, GP3) |
| Hot air temperature range | 50 °C to 250 °C (in 10 °C increments) |
| Capacity | Approximately 25 L (estimate) |
| Main functions | Microwave, hot air, grill, combined microwave+hot air, combined microwave+grill, automatic defrost, automatic cooking, reheating, keep warm, rapid preheat, timer, child lock |
| Automatic programs | Vegetables (fresh/frozen), fish, poultry, beef, pork, ready meals, pizza (fresh/frozen) |
| Included accessories | Metal rack, glass plate, enamel plate, 2 side racks (3 levels) |
| Safety | Child lock, automatic stop when door open, smoke detection, wave protection |
| Dimensions (W x H x D) mm | 592 x 456 x 400 (estimate) |
| Net weight | Approximately 25 kg (estimate) |
| Maintenance and cleaning | Clean with a damp sponge and mild soap; do not use steam cleaner or abrasive products; lower the grill heating element to clean the ceiling |
| Repairability | Repair by qualified professional; spare parts available via after-sales service |
Frequently Asked Questions - MAG592 Pelgrim
User questions about MAG592 Pelgrim
0 question about this device. Answer the ones you know or ask your own.
Ask a new question about this device
Download the instructions for your Microwave Oven in PDF format for free! Find your manual MAG592 - Pelgrim and take your electronic device back in hand. On this page are published all the documents necessary for the use of your device. MAG592 by Pelgrim.
USER MANUAL MAG592 Pelgrim
natural_image
Exterior view of a modern stainless steel oven with digital display and control knobs (no text or symbols visible)
natural_image
Gradient gray background with no text, symbols, or identifiable objectsMEDEDELING VOOR DE GEBRUIKER
natural_image
Diagram of a chicken inside a tray with directional arrows indicating movement or force, labeled Fig.01 (no text or symbols on diagram itself)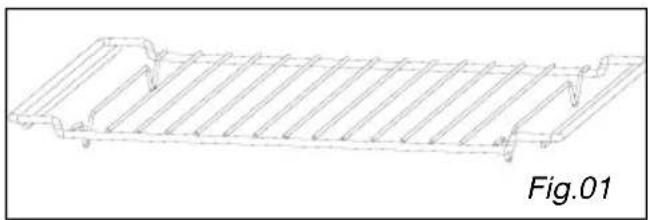
natural_image
Technical line drawing of a structural component with ribbed top and flanged side (no text or symbols)
natural_image
Line drawing of a rectangular container with dashed internal lines, labeled Fig.02 (no text or symbols on the diagram itself)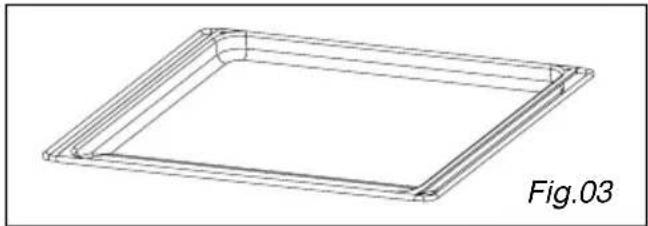
natural_image
3D wireframe diagram of a square frame with rounded corners, labeled Fig.03 (no text or symbols on the diagram itself)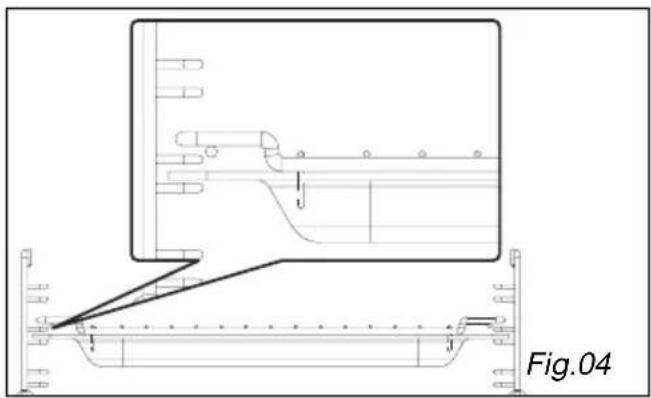
natural_image
Technical line drawing of a mechanical assembly with no visible text or symbols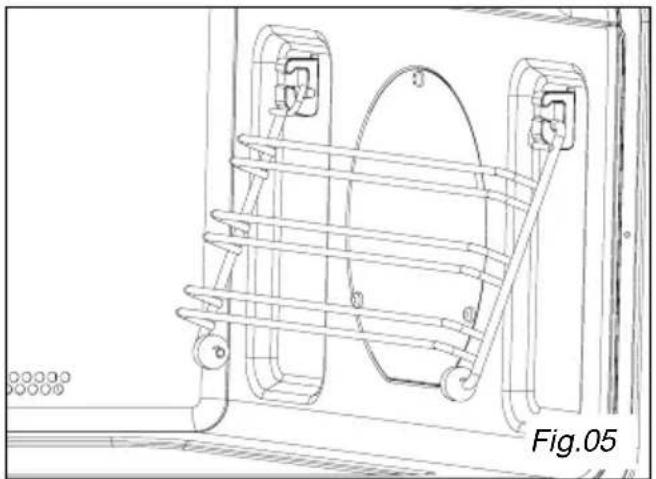
natural_image
Technical line drawing of a mechanical assembly with no visible text or symbolsde bedieningen


natural_image
Technical line drawing of a mechanical component with internal components and a diagonal tool, labeled Fig. 12 (no text or symbols on the diagram itself)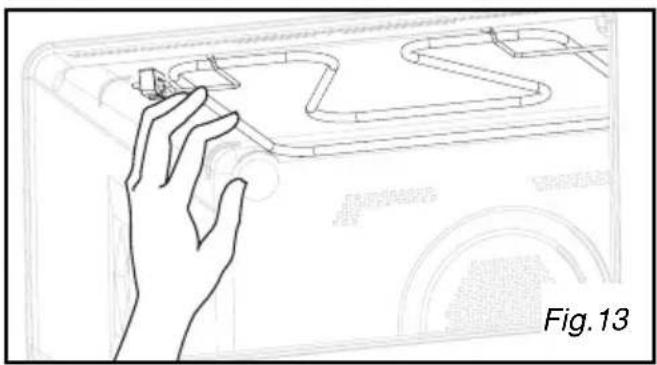
natural_image
Line drawing of a hand interacting with a small object on a curved surface, labeled Fig. 13 (no text or symbols on the diagram itself)KOOK AANWIJZINGEN
ONTDOOIEN:
natural_image
Diagram of a chicken on a tray with directional arrows indicating movement or force, labeled Fig.01 (no text or symbols on the diagram itself)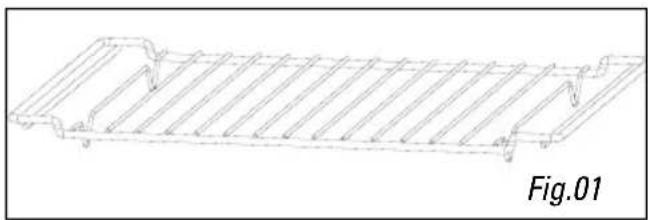
natural_image
Technical line drawing of a rectangular structural component with hatched fill (no text or symbols)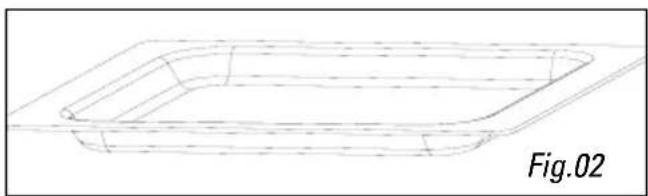
natural_image
Line drawing of a rectangular container with dashed internal lines, labeled Fig.02 (no text or symbols on the diagram itself)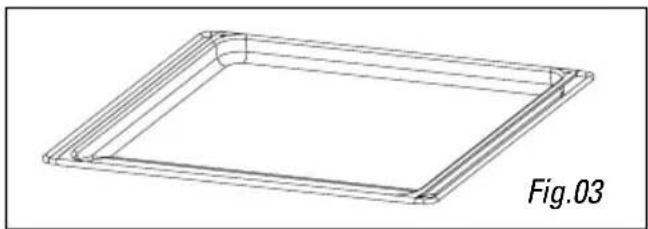
natural_image
Technical line drawing of a square frame with internal parallel lines, labeled Fig.03 (no text or symbols on the diagram itself)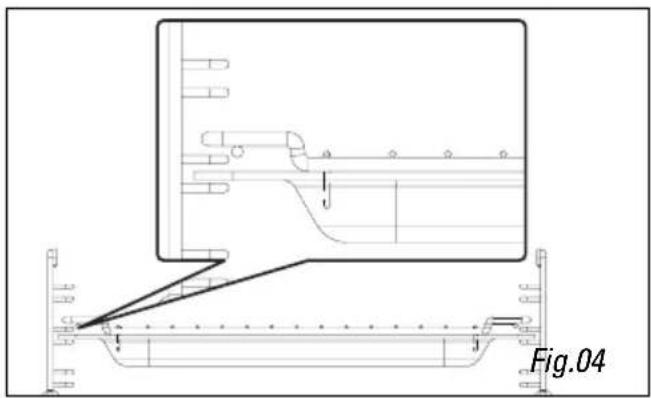
natural_image
Technical line drawing of a mechanical assembly with no visible text or symbolsProgrammation express
Affichage
natural_image
Technical line drawing of a mechanical component with internal components and a diagonal tool, labeled Fig.12 (no text or symbols on the diagram itself)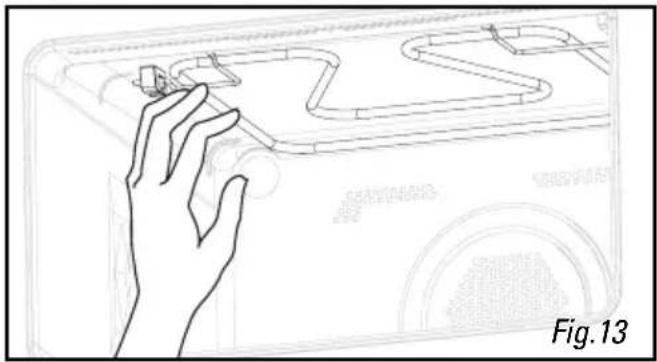
natural_image
Line drawing of a hand interacting with a small object on a device, labeled 'Fig. 13' (no text or symbols on the diagram itself)GUIDE DE CUISSON
DECONGELATION:
natural_image
Technical line drawing of a rectangular structural component with hatched fill and mounting holes (no text or symbols)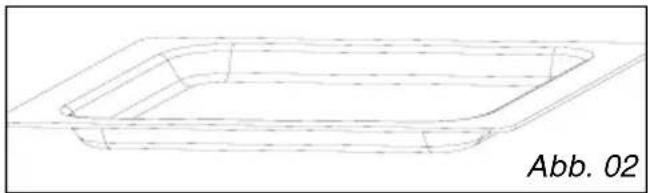
natural_image
Line drawing of a rectangular container with dashed internal lines, labeled Abb. 02 (no text or symbols on the diagram itself)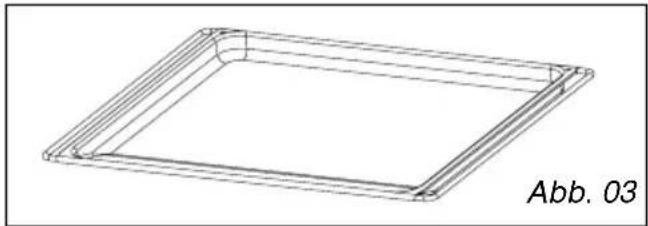
natural_image
Technical line drawing of a square frame with rounded corners, labeled Abb. 03 (no other text or symbols)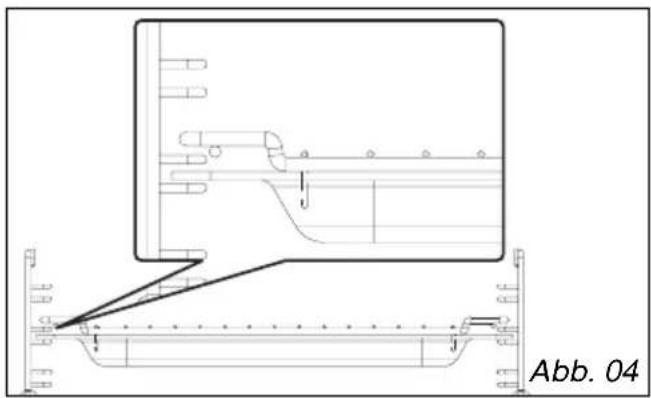
natural_image
Technical line drawing of a mechanical assembly with a magnified inset showing internal components (no text or symbols)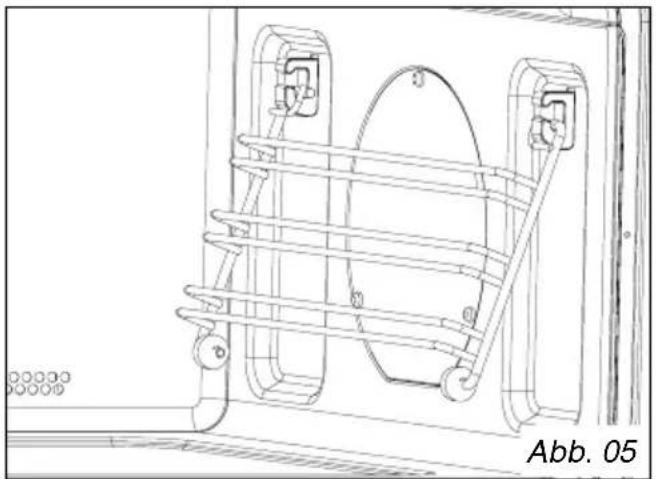
natural_image
Technical line drawing of a mechanical assembly with no visible text or symbolsBedienbereich


natural_image
Technical line drawing of a mechanical component with circular features and a diagonal tool, labeled Abb. 12 (no readable text or symbols)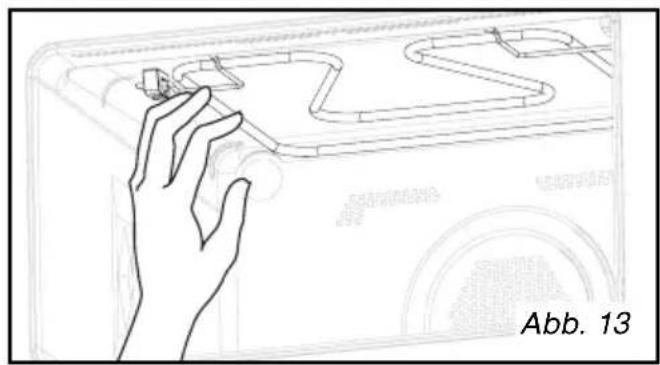
natural_image
Line drawing of a hand interacting with a vehicle's ramp (no text or symbols)KOCHLEITFADEN
AUFTAUEN:
Safety recommendations 3
Operating principle 4
Protecting the environment 4
INSTALLATION
Before making hook-ups 5
Electrical hook-ups 5
Build-in 6
DESCRIPTION
Appliance 7
Accessories 8
Control panel 9
Function selector button 10
Display 10
USE
Setting/changing the time 11
Immediate cooking 12
Quick preheat function 12
Micro-wave function 13
Express programme 14
Heat and hold 14
Reheating on two levels 14
Automatic cooking functions 15
Guide to automatic functions ..... 16
Defrosting 18
Automatic defrosting function 19
Circulating heat + micro-wave cooking function 20
Grill + micro-wave function 21
Traditional + micro-wave function 22
Cooking with circulating heat function 23
Traditional pulsed function 24
Grill function 25
Pulsed grill function 26
Bottom heating function 27
Child safety lock 28
Timer 28
MAINTENANCE AND CLEANING 29
COOKING GUIDE 30
EFFECTIVENESS TEST 34
TROUBLESHOOTING 35
Important: Keep this user guide with your appliance. If the appliance is ever sold or transferred to another person, ensure that the new owner receives the user guide. Please become familiar with these recommendations before installing and using your appliance. They were written for your safety and the safety of others.
Safety recommendations
Your appliance is designed for standard household use for cooking, reheating and defrosting foods. The manufacturer declines any responsibility in the case of inappropriate use.
This appliance is not intended for use by persons (including children) with impaired physical, sensory or mental capacities, or by inexperienced or untrained persons, except if they have been instructed in its operation by a person responsible for their safety or are being supervised.
Ensure that the cookware is suitable for use in a micro-wave oven. Do not leave any accessories in your oven when it is off. To avoid damaging your appliance, never operate it while empty or without the turntable.
Do not interfere with the orifices on the lock on the front of the appliance; this could cause damage to your appliance that would require a service call. The seal and frame of the door must be regularly examined to ensure that they have not deteriorated. If these areas are damaged, discontinue use of the appliance and have a specialised technician check it.
While heating food items in plastic or paper containers, monitor the micro-wave's contents for there is a risk of spontaneous combustion.
For the micro-wave and micro-wave + circular heating functions, the use of metallic cookware, forks, spoons, knives or metal staples or fasteners for frozen foods is not recommended.
The contents of baby bottles and baby food jars should be shaken or stirred and their temperature checked before consumption to avoid burns. Never heat a baby bottle with the nipple on (risk of explosion).
Children should be watched to ensure that they do not play with the appliance. Do not allow children to use the micro-wave oven without supervision, unless appropriate instructions have been given so that the child can use the oven safely and understands the dangers of incorrect operation.
Always use oven mitts to remove dishes from the oven. Some dishes absorb the heat of foods and, therefore, are very hot.
Liquids and other foods should not be heated in sealed containers because they may explode. It is recommended that you avoid heating eggs in their shells and whole hard-boiled eggs in the micro-wave oven because they run the risk of explosion, even after cooking is complete.
Heating beverages in the micro-wave oven can cause sudden and/or delayed splattering of boiling liquid, so precautions must be taken when handling their containers.
In the case of small quantities (a sausage, a croissant, etc.), place a glass of water next to the food. Excessive cooking times may dry out foods and carbonise them. To avoid such incidents, never use the same times recommended for cooking in a traditional oven.
If smoke appears, stop or unplug the oven and leave the door closed to smother any flames that may appear.
Operating principle Protecting the environment
The micro-waves used for cooking are electromagnetic waves. They are commonly found in our environment in the form of radio-electric waves, light or infrared rays.
Their frequency is in the 2450 MHz range.
Their behaviour:
· They are reflected by metals.
· They travel through all other materials.
- They are absorbed by water, fat and sugar molecules.
When food is exposed to micro-waves, its molecules begin moving rapidly, which causes heating.
The penetration depth of waves into the food is approximately 2.5 cm; if the food is thicker, the core of the food will be cooked by conduction, as in traditional cooking.
It is valuable to note that the micro-waves trigger within the food a simple thermal phenomenon and that they are not harmful to one's health.
This appliance's packing materials are recyclable. Recycle them and play a role in protecting the environment by depositing them in municipal containers provided for this purpose.
Your appliance also contains many recyclable materials. It is therefore marked with this logo to indicate that used appliances must not be mixed with other waste. Recycling of the appliances organised by your manufacturer will thus be undertaken in optimum conditions, in accordance with European directive EC/2002/96 relating to electrical and electronic equipment waste. Consult your city hall or your retailer to find the drop-off points for used appliances that is nearest to your home. We thank you for your help in protecting the environment.
natural_image
Diagram of a chicken inside a bowl with dotted lines indicating motion or force vectors (no text or symbols)Before making hook-ups

Warning:
Ensure that your appliance has not suffered any damage during transport (deformed seal or door, etc.). If you see any kind of damage, before doing anything else, contact your retailer.
In order to easily locate the reference information for your appliance, we recommend that you note these data on the "After-Sales Service Department and Customer Relations" page.
Electrical hook-ups
Ensure that:
- The electrical installation has sufficient voltage.
- The electrical wires are in good condition.
- The diameter of the wires complies with the installation requirements.
- Your electrical installation is equipped with 16-ampere thermal-sensitive protection.
In case of doubt, consult your electrician-installer.
The electrical connections are made before the appliance is installed in its housing.
Electrical safety must be provided by a correct build-in. During installation and maintenance operations, the appliance must be unplugged from the electrical grid; fuses must be cut off or removed.
The oven must be connected with a power cable (standardized) with three 1.5 mm ^2 conductors (1 ph + 1 N + ground) that must be connected to a monophase 220-240 V \~ network via a CEI 60083 standardised receptacle (1 ph + 1 N + ground lead) or in accordance with installation rules. The safety wire (green-yellow) is connected to the appliance's O terminal and must be connected to the ground lead of the electrical set-up.
In the case of connections with an electric receptacle, it must remain accessible after installation of the appliance.
The oven's neutral conductor (blue wire) must be connected to the network's neutral conductor.
In the electrical hook-up, ensure there is a means available to the user, who must be able to disconnect the appliance from the outlet, either by pulling the plug from the outlet or by turning off a switch, in compliance with installation rules.
If the power cable is damaged, it should be replaced by the manufacturer, its after-sales service department or by a qualified person to avoid danger.

Warning:
We cannot be held responsible for any accident resulting from a non-existent, defective or incorrect ground lead.
If the oven malfunctions in any way, unplug the appliance or remove the fuse corresponding to the electrical outlet where the oven is hooked up.
It is dangerous for anyone other than a qualified person to perform maintenance operations or repairs requiring the removal of the cover that protects against exposure to microwave power.
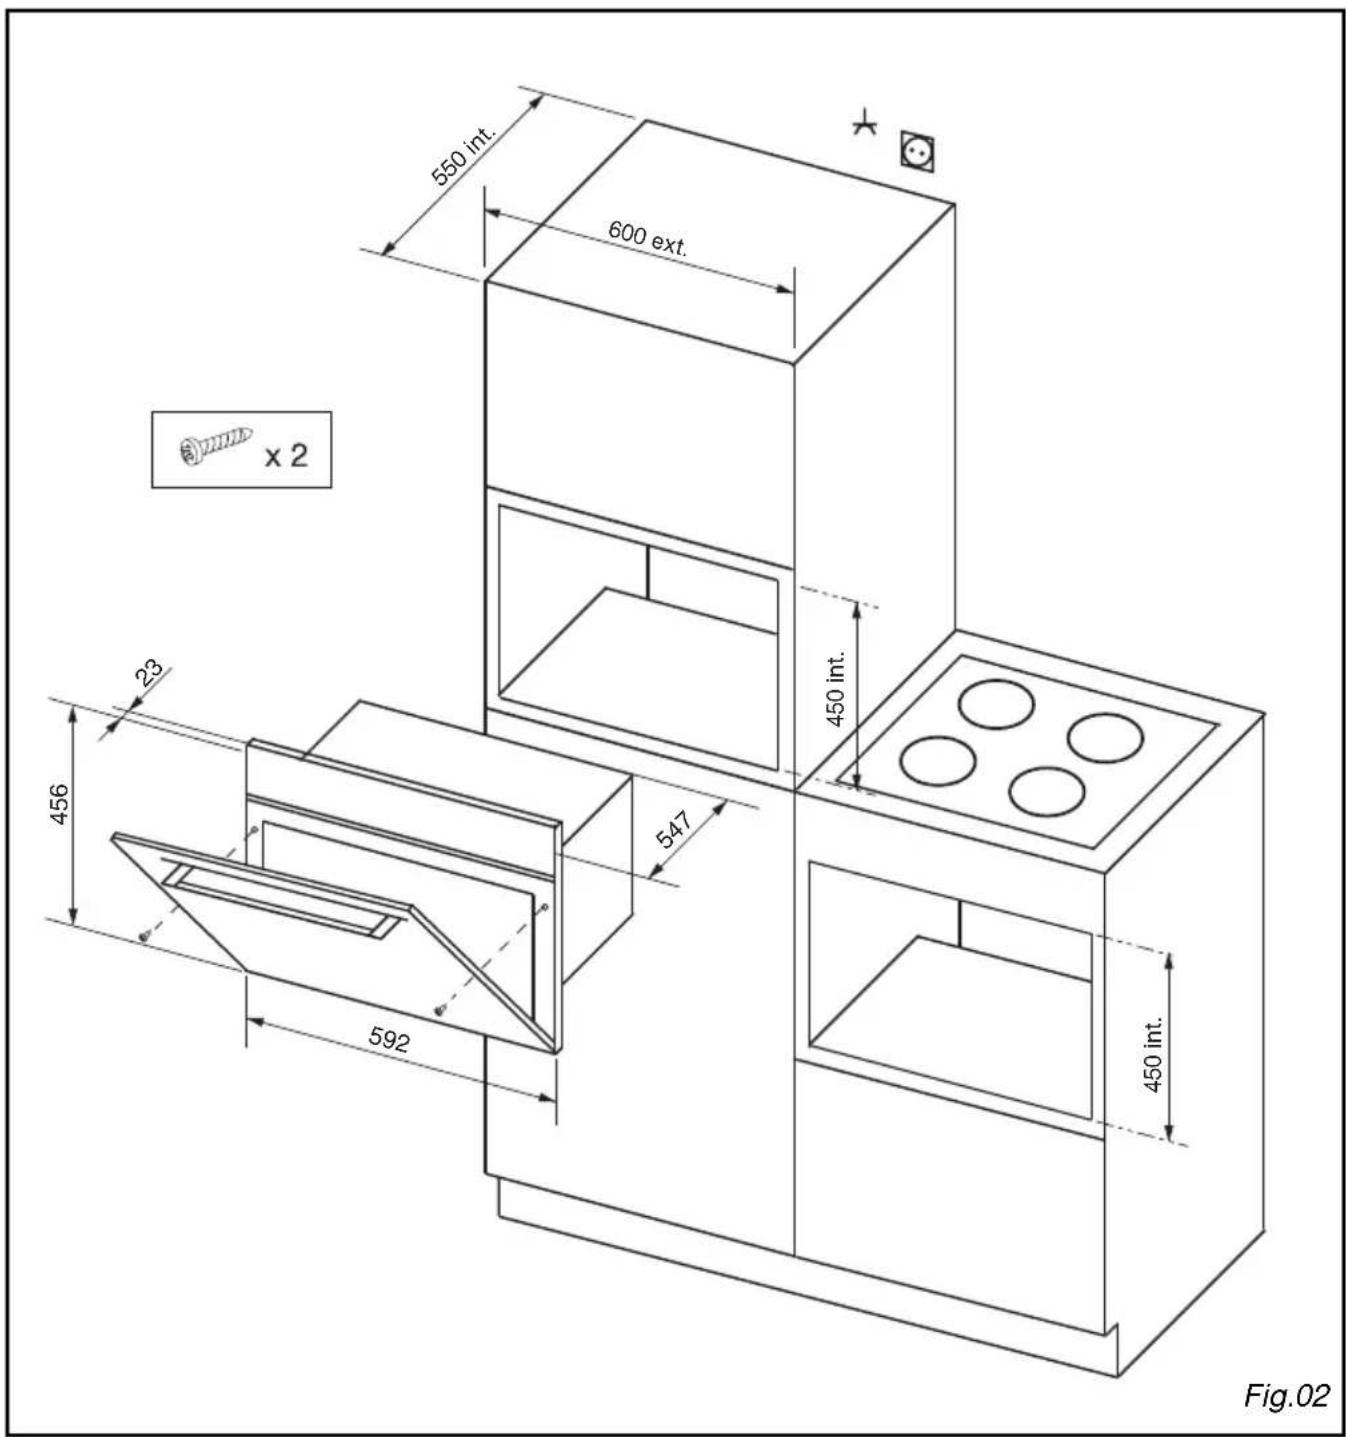
Build-in
The appliance may be installed under a worktop or in a column of cabinetry (open or closed) that has the appropriate dimensions for built-in installation (Fig.02).

Never use the appliance immediately (wait 1 to 2 hours) after having moved it from a cold place to a warm place because the condensation could cause poor operation.
Appliance
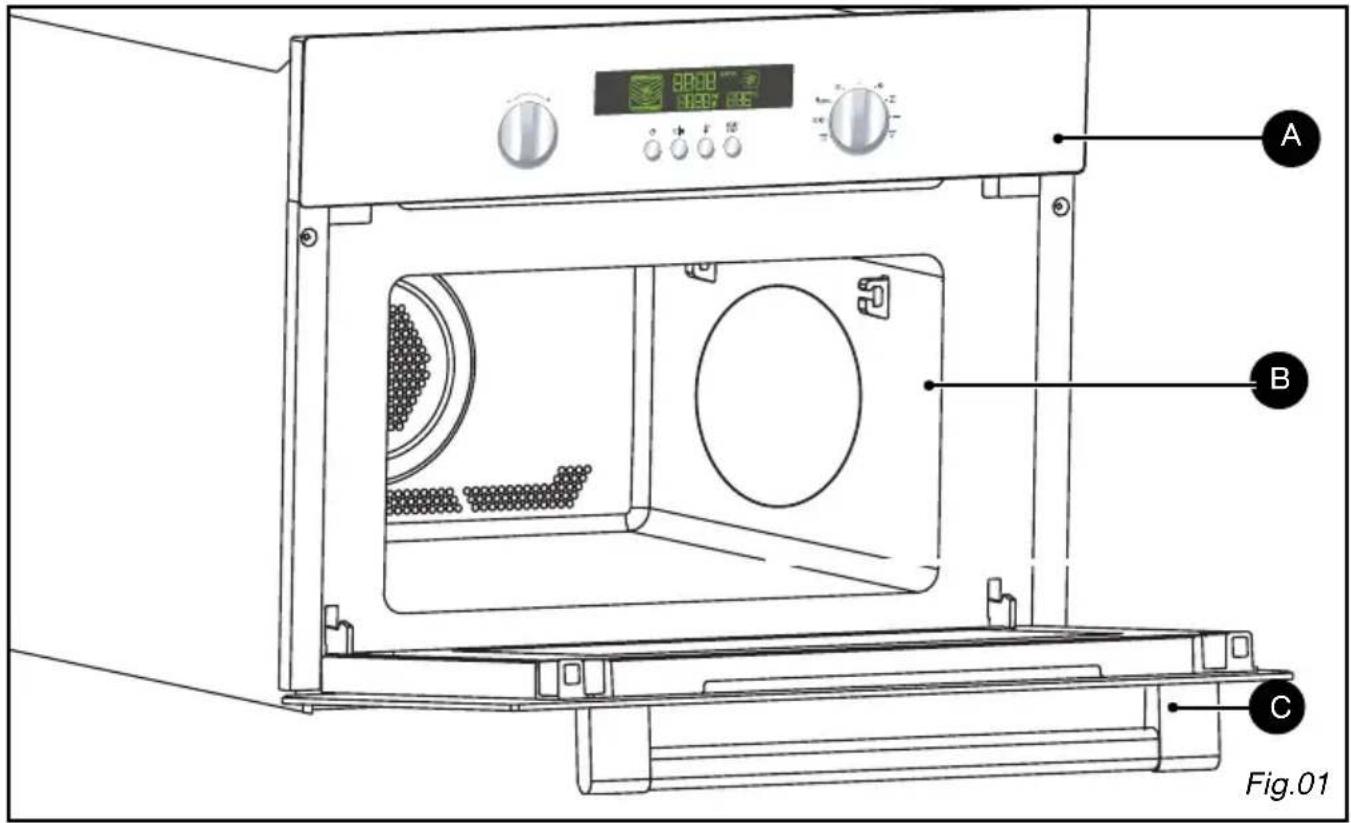
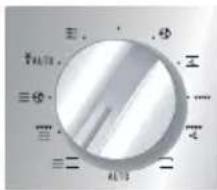
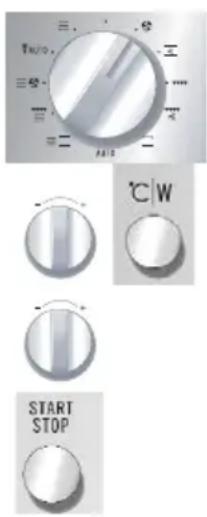
A Control panel
B Cavity
C Door handle
Accessories
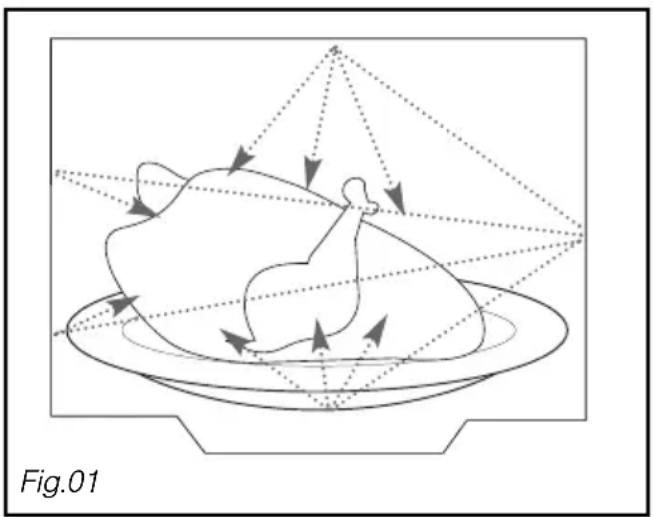
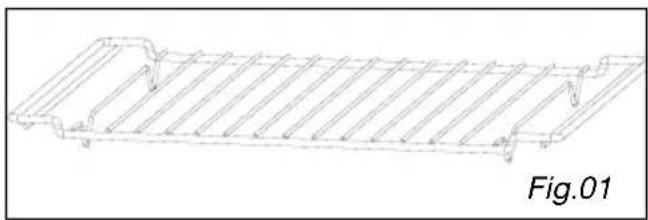
The grid (Fig.01): it allows you to brown or grill foods. The grid should not under any circumstances be used with other metal cookware on the micro-wave, grill + micro-wave or circulating heat + micro-wave settings. However, you can reheat food in an aluminium tray if you insulate it from the grid using a plate.
Ensure that the dishes are centred properly with respect to the sides of the grid to allow air to circulate freely.
■ Glass dish (Fig.02): It is used as a cooking dish.
Enamel dish (Fig.03): It can be used for double-boiler procedures when filled with water to mid-height. It can also be used as a cooking dish.

Comments:
Be careful never to use the enamel dish with the micro-wave function. You could damage your oven.
Grid + Glass dish: to roast and recover the cooking juices, place the grid in the glass dish (Fig.04).
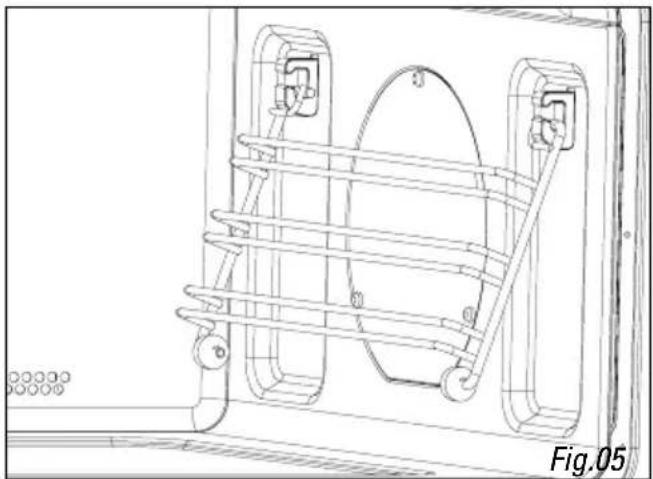
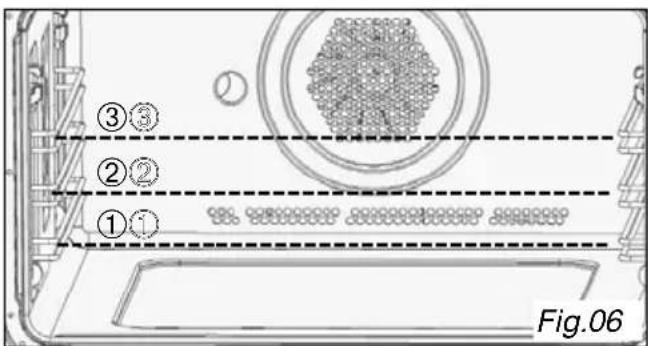
The side grids (Fig.05/06): 2 racks fitted with hooks allow you to use the accessories on three levels.
Three insertion levels are available based on the cooking method and type of food.
With the Grill or Grill + Micro-wave settings, the accessories (grid or glass dish) are placed on the first level for thick foods like roasts and on the third level for thinner foods like chops and sausages).
In the cooking with or without micro-wave settings, you can insert the grid or the glass dish on the first or second levels based on the item being cooked.
natural_image
Technical line drawing of a structural component with ribbed top and flanged side (no text or symbols)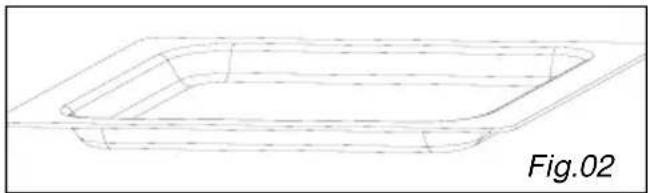
natural_image
Line drawing of a rectangular container with dashed internal lines, labeled Fig.02 (no text or symbols on the diagram itself)
natural_image
3D wireframe diagram of a square frame with rounded corners, labeled Fig.03 (no text or symbols on the diagram itself)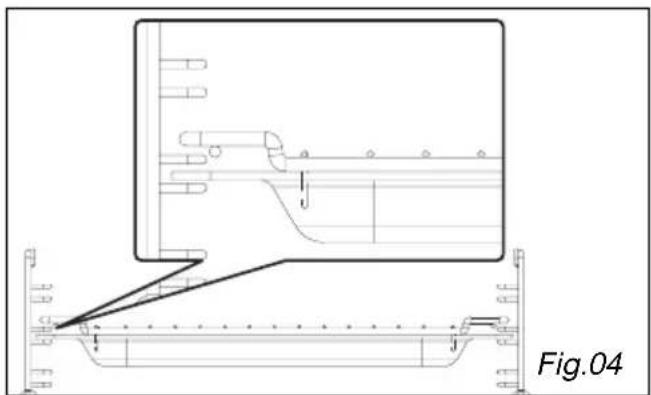
natural_image
Technical line drawing of a mechanical assembly with no visible text or symbols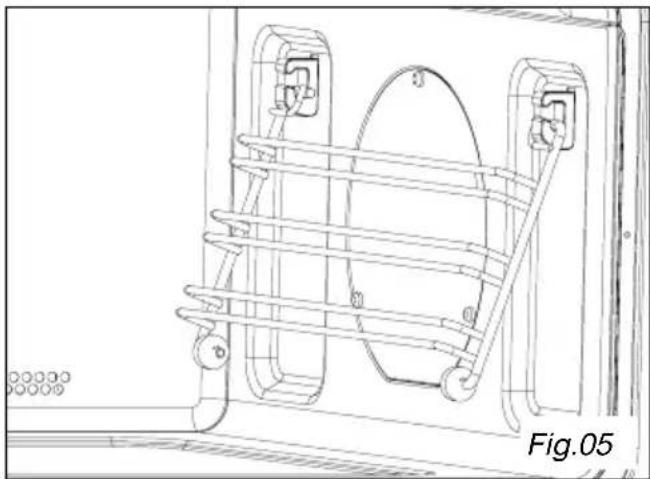
natural_image
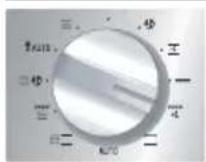
Technical line drawing of a mechanical assembly with no visible text or symbolsControl panel
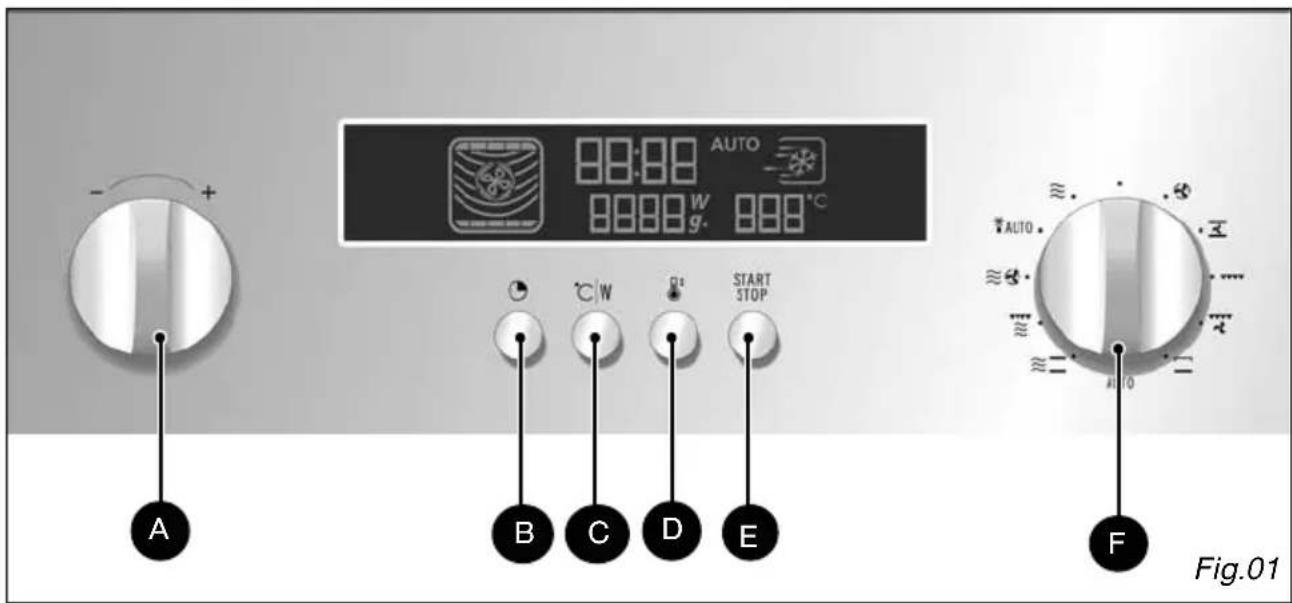


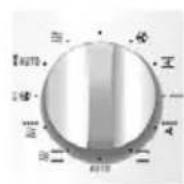
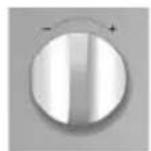
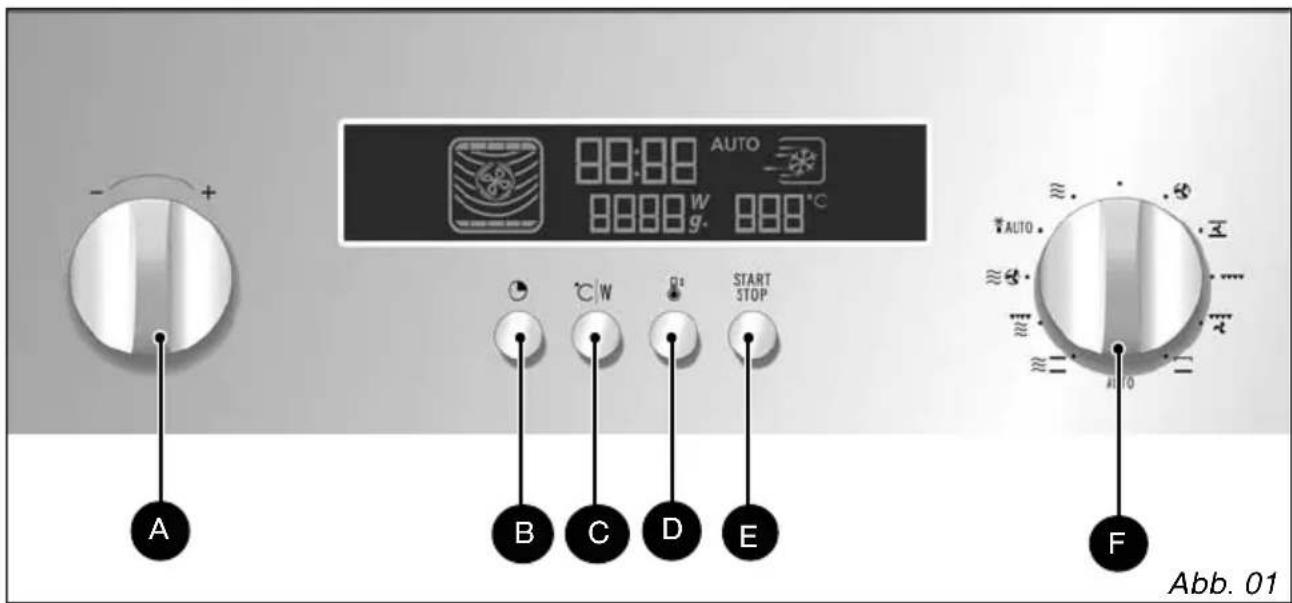
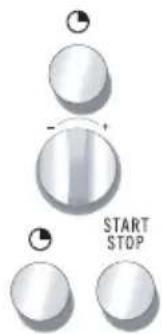
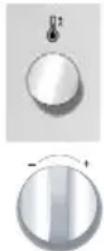
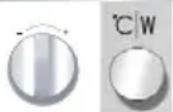
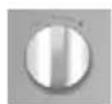
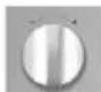
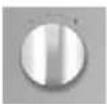
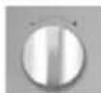
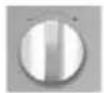
The “- / +” selector button allows you to set the time, programme duration, power level, food type, food weight and temperature.
B The CLOCK button allows you to set the time.
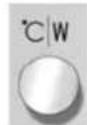
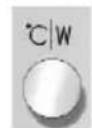
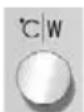
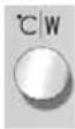
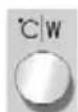
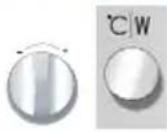
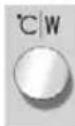
C The °C/W button allows you to confirm your selections.
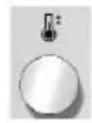
D The PREHEAT button allows you to rapidly heat the oven to 170^ C.
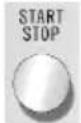
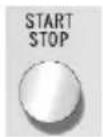
E The START/STOP button allows you to start a programme, and suspend or stop a programme underway.
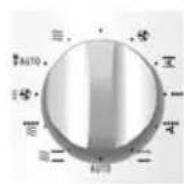
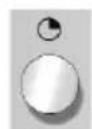
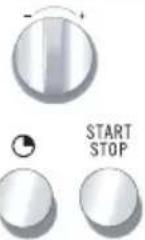
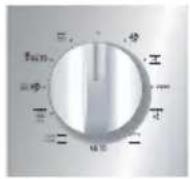
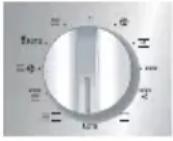
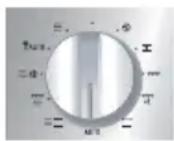
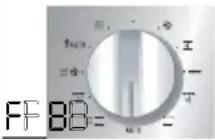
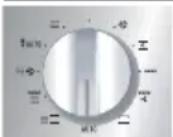
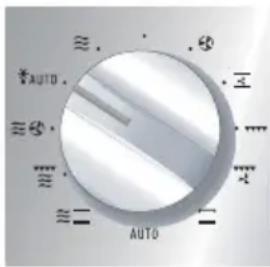
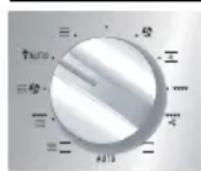
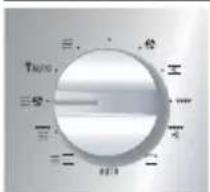
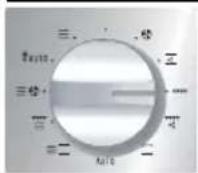
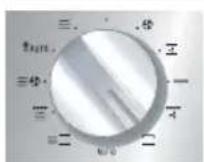
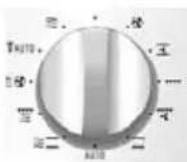
F The FUNCTION/AUTO PROGRAMME selector button allows you to choose the programme type and the automatic function.
Function selector button

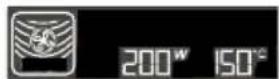
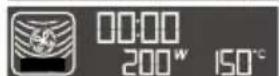
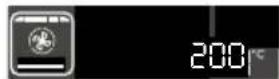
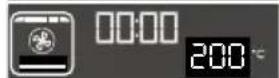
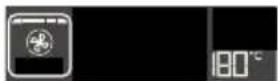
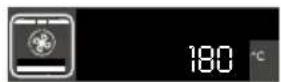
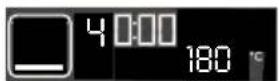
Display
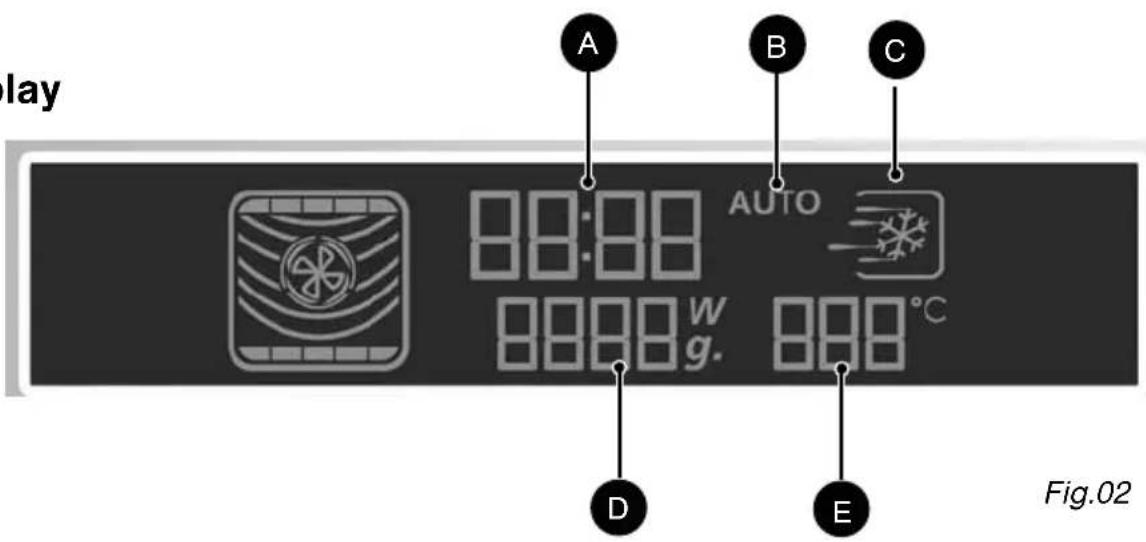
The display guides you through programming the various settings:

Time
Programme duration

Automatic programmes

Automatic defrosting

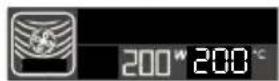
Micro-wave power level (Watts)

Food weight (Grammes)
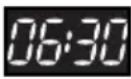
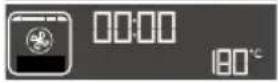
Setting/changing the time
After connecting your appliance or after an extended power outage, 00:00 flashes in the display.
To set the time Display
Turn the button to set the time, e.g. 6:30.
Confirm by pressing CLOCK button or START.
There is a beep to confirm that the time has been set.
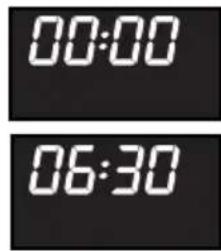
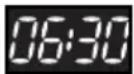
To change the time Display
Press the clock button. The time display flashes.
Enter the new time (e.g. 7:30) by turning the selector button.
Confirm by pressing the CLOCK button or START. There is a beep to confirm that the new time has been set.


Comments:
If you do not press the clock button, the time displayed is automatically saved after one minute.
Your appliance is equipped with a save function so that the time will continue to be displayed for one day in the event of a power outage.
To lower the brightness of the display, press and hold the clock button for five seconds. Only the backlighting remains activated.
Press again for five seconds to restore the full brightness of the display.

Immediate cooking
Your appliance is now hooked up and the correct time is set.
Use the handle to open the door. Put the food in the appliance and close the door.
If the door is not closed properly, the appliance will not function.

If the door is opened during a programme, it is not cancelled, but rather interrupted. To restart the oven, close the door and press the START button.
If programming is not followed by any action for one minute, the settings are cancelled and you must reprogram.

Press the START/STOP button when the door is closed to interrupt the programme.
Press and hold the START/STOP button for two seconds to cancel a programme or turn the selector button to OFF.
Three beeps are sounded to indicate the end of each programme and the time is again displayed in the display panel.
If the door is left open, the light turns off after 3 minutes.

To eliminate moisture, your appliance is equipped with a delayed ventilation function. Depending on the cooking method chosen (Solo/Grill/Combined), the oven fan may continue to run after the programme ends. It will stop automatically.

Comments:
During cooking, neither the temperature nor the power level may be changed.
To change these, a new cooking programme must be entered.
If the door is not opened after the cooking programme, three rapid beeps are repeated each minute for 10 minutes.
Quick preheat function

To preheat your oven before cooking, select the quick preheat function
To activate this option:
Press the QUICK PREHEAT button ; the clock display flashes, showing 10 minutes. You may use the selector button to decrease this time.
Confirm by pressing the START button; the temperature is displayed (170°C, fixed temperature).
To cancel:
Press and hold the STOP button for a few seconds
Using the power levels
| Power level Use | |
| 1000 W/900 W | Quickly reheating beverages, water and dishes containing a large volume of liquid.Cooking dishes containing lots of water (soups, sauces, tomatoes, etc.). |
| 800 W/700 W | Cooking fresh or frozen vegetables. |
| 600 W | Melting chocolate. |
| 500 W | Cooking fish and crustaceans. Reheating on two levels.Cooking dried beans at low heat. Reheating or cooking fragile, egg-based dishes. |
| 400 W/300 W | Low-heat cooking of dairy products, jams. |
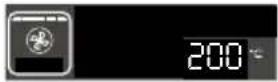
| 200 W | Manual defrosting. Softening butter, ice cream. |
| 100 W | Defrosting pastries containing cream. |
REAL POWER OF MICRO-WAVE OVEN: 1000 W
Programming by power level Display
| Turn the selector button to choose the micro-wave function. The maximum power level, 1000 W, flashes in the display. | ||
| Turn the “-/+” selector button if you wish to reduce the micro-wave power, e.g. to 500 W.Confirm the power level by pressing the °C/W button; there is a beep to confirm your selection.The clock’s digits start flashing in the display. | ||
| Turn the “-/+” selector button to define the required duration of the programme, e.g. 10 minutes. | ||
| Confirm by pressing START/STOP. The oven turns on and the programme begins. |

Comments:
If the door is opened during cooking, the oven stops and the remaining time flashes in the display. To end the programme, simply close the door and press START.
Warning: this function must be used with the glass dish inserted on the racks to optimise cooking and ensure the durability of your product.

The duration can be adjusted at any time by simply turning the “- / + ” selector button.
Express programme
Express programming Display
Turn the selector button to OFF, then press the START button for one second to define a 30-second express programme. The micro-wave operates at its maximum power level (1000 W).
The oven turns on and the programme begins.

You can enter an express programme ranging up to 2 min, 30 sec. Each time you press START, 30 additional seconds are added to the programme duration. Press the button five times to enter the maximum duration of 2 min, 30 sec.
After starting the programme, you can modify its duration by turning the "+ / -" selector button to as much as


Heat & hold
Heat & hold Display
If you leave your dish in the oven without opening the door at the end of a micro-wave programme, a “heat and hold” function starts after two minutes to maintain the temperature of your dish. Two long beeps indicate the start of the heat and hold function and the light in your oven turns off. Three beeps are sounded after 15 minutes to indicate the end of the “Heat & Hold” programme.

Reheating on two levels see page 30
For the best results heating two dishes at the same time, program the micro-wave function for 500 watts.

Recommendations:
Cover the plates with plastic food wrap for micro-wave use or with another inverted plate. The programme times indicated below are given for reheating refrigerated foods or preserved goods at room temperature.
Automatic cooking functions

Thanks to the automatic cooking function, the cooking mode and duration are automatically programmed based on the food type and weight. The automatic cooking setting can be obtained via the selector button.
Guide to automatic functions
 VegetablesFresh U1U22FrozenU33 VegetablesFresh U1U22FrozenU33 | This function is used to cook vegetables that weigh 100 g to 1000 g.The vegetables are cooked on the micro-wave setting.Choose fresh vegetables and before cooking add:- up to 200 g: 2 tablespoons water- up to 500 g: 0.5 dl water- up to 1000 g: 1 dl waterUse an appropriate dish for the volume of vegetables and cover it (except when you are cooking mushrooms).Mid-way through cooking, a beep is sounded to remind you to stir the vegetables and “carrots in the display. Add fats and season if desired.After cooking, wait a few minutes before serving the vegetables.Choose category U1to cook firmer vegetables that contain more fibre: Brussels sprouts, shredded white cabbage, sliced carrots, diced celery root, etc.Choose category U2to cook more tender vegetables that contain more water:Sliced or diced courgette, leeks in thin strips, whole potatoes sliced into evenly sized rounds, whole leaf spinach, fennel, cauliflower and broccoli florets, etc.Choose category U3to cook frozen vegetables:sliced carrots, cauliflower and broccoli florets, Brussels sprouts, leeks in thin strips, sliced or diced courgette, whole leaf spinach.This function (C) allows you to reheat refrigerated ready-made dishes (lasagna, potatoes au gratin, shepherd’s pie, fish gratin, etc.) weighing 100 g to 1000 g.The dishes are reheated on the micro-wave setting.Remove the product from its packaging and place in an appropriately sized, micro-wave safe dish that is heat-resistant. For better results, cover the micro-wave-safe dish with plastic food wrap for micro-wave use or with another inverted plate. Wait two minutes before serving to allow for even heat distribution. |
| FishFF | This function (F) is used to cook vegetables that weigh 100 g to 1000 g.All fish types can be cooked in the micro-wave oven. Just make sure that the fish is fresh.The food is cooked on the microwave setting.You can cook the fish whole, in slices or in filets. If you would like to cook a whole fish, cut notches into the thickest part to obtain best results.Place the fish in a round or oval dish for micro-wave use, add two to three tablespoons water, lemon juice or white wine and cover with the dish’s lid or plastic food wrap; season after cooking.Midway through cooking, a beep is sounded and “bushes in the display to remind you that it is time to rotate the fish in order to achieve the best results. |
Guide to automatic functions
  | This function (FF) is used to cook and brown whole birds or pieces of chicken (thighs) that weigh 500 g to 2000 g.The chicken is cooked on the micro-wave oven + circular heating setting.Use a dish suitable for micro-wave ovens that resists high temperatures, preferably in terra cotta (less splattering than in a glass dish). Chicken thighs can be placed directly on the glass drip tray.Before cooking pierce the skin to avoid splattering.Add a bit of oil to the chicken, salt and pepper and add additional seasoning if desired.Whole chicken: Place the dish on the grid at the level 1.Chicken thighs: up to 900 g, place the dish on the grid at level 2.Once cooked, leave the chicken in the oven for five minutes before serving. |
 Beef I^ Beef I^ | This function is used to cook roasts that weigh 500 g to 2000 g.Choose category FPP to cook and brown roasts of beef.Choose category FPP to cook and brown roasts of pork.Cooking is carried out through a combination of the micro-wave + circular heating and microwave + grill functions.Use a dish suitable for micro-wave ovens that resists high temperatures, preferably in terra cotta (less splattering than in a glass dish).When possible, cook roasts without fatty exterior layers to avoid smoke and grease splattering. You will achieve better results with thinner roasts.Remove the meat from the refrigerator and let it come to room temperature one hour before placing it in the oven.Place the dish on the grid at the second shelf level. After cooking, wrap the roast in aluminium paper and let it stand for 10 minutes. This will help relax the meat fibres and the roast will be more tender and juicy. |
Guide to automatic functions
 Refrigerated Refrigerated | This function (C) allows you to reheat refrigerated ready-made dishes (lasagna, potatoes au gratin, shepherd's pie, fish gratin, etc.) weighing 100 g to 1000 g.The dishes are reheated on the micro-wave setting.Remove the product from its packaging if necessary (see instructions on package) and place in an appropriately sized, micro-wave safe dish that is heat-resistant. For better results, cover the microwave-safe dish with plastic food wrap for micro-wave use or with another inverted plate.Wait two minutes before serving to allow for even heat distribution. |
 Verse pizzaPP11DiepvriespizzaPP22 Verse pizzaPP11DiepvriespizzaPP22 | This function is used to cook and brown pizzas in your oven.Choose category PP to cook and brown fresh pizzas in the pizza dish.The display shows 12 min; adjust the duration of cooking if necessary.The pizza is cooked on the micro-wave + grill setting.Choose category PP to cook and brown frozen pizzas that weigh between 125 g and 650 g. Use with the special pizza dish, entering the weight.Always place the pizza dish on the glass dish at the 1st level. |

Warning: this function must be used with the glass dish inserted on the racks to optimise cooking and ensure the durability of your product.
Programming automatic cooking time based on food weight Display


Turn the selector button to choose the food type you wish to cook, e.g. fish.
Turn the “- / +” selector button until the letter F is displayed.
Confirm your programme choice by pressing the °C/W button. The minimum weight (100 g for fish) appears in the display.
Turn the "- /+" selector button to adjust the weight, e.g. 150 g. Confirm by pressing START.
The required programme duration is automatically calculated. This duration appears in the display and the programme starts.


Defrosting
Using your micro-wave oven to defrost frozen vegetables enables you to save a lot of time. To defrost food, use the AUTOMATIC DEFROST function or the MICRO-WAVE function set to power level 200 W.
Note:
Small cuts of meat or fish can be cooked immediately after defrosting. Larger cuts such as meat roasts or whole fish will still be slightly frozen at the end of the defrost programme.
We recommend that you let them sit for at least as long as the time they spent in the defrosting programme so that they reach an even temperature.
Foods covered with ice crystals will take longer to defrost. In this case, you can increase the defrost time.
Recommendations:
The defrost time depends on the appliance type. It also depends on the shape, size, initial temperature and quality of the food.
In most cases, food should be removed from its packaging. Remember to remove the metal staples from packaging.
Halfway through the defrost time, the pieces should be turned over, mixed and separated if they were frozen together.
Defrost the meat and fish by placing it on an upside-down saucer positioned on a plate; this allows juices to flow out. If it stays in contact with the food, it will overheat.
Never refreeze food unless it has been cooked.
Length of defrost programmes:
The durations of defrost programmes were calculated based on food frozen at -18^ . This gives you an indication of the required defrosting time, but the actual duration may vary based on the thickness, shape, size and packaging of the food.
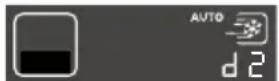
Automatic defrosting function


Choosing a programme:
The following automatic defrosting programmes are available:
Programme based on defrost time
d 1 Corresponds to 200 W (power level for defrosting) No weight suggested: you must enter a defrosting time.
You can refer to the table (page 30) to see the suggested defrosting times.
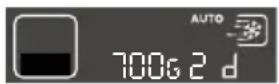
Programme based on weight
d 2 Defrosting meat, poultry, fish and vegetables (100 g to 2000 g).
d 3 Defrosting bread (100 g to 500 g).
d 4 Defrosting ready-made dishes (100 g to 2000 g).
Automatic defrosting Display
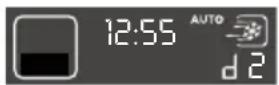
Turn the selector button to "Automatic defrosting" and "d1" appears in the display.
Turn the “- / +” selector button to choose d2 /d3 / d4 (example: d2). Confirm the selection by pressing °C/W.
For the d1 defrosting programme, the clock numbers flash in the display.
For the d2 / d3 / d4 defrosting programs, 100 g (minimum defrost weight) appears in the display.


Turn the " - / + " selector button to choose the duration (D1) or weight (d2/d3/d4), e.g. 700 g. Confirm by pressing START.
The required duration is automatically calculated. The program duration appears in the display and the defrosting programme starts.


Comments:
The defrost time is automatically calculated based on the weight of the food. This may depend on the initial temperature of the food (the times are calculated for food frozen at -18^ ).
Midway through the automatic defrosting programme for food weighing more than 350 g (except bread), a beep is sounded to remind you that it is time to rotate the food to obtain the best results;
"This is also displayed. After turning the food, close the door and press START to continue the defrosting programme.
With the automatic defrost function, the defrost time cannot be modified.
As for foods that do not appear in the food category recommendations, use the 200 W/MICRO-WAVE function or d1.
Circulating heat + micro-wave cooking function

The circulating heat + micro-wave cooking mode combines micro-wave cooking with circular heat cooking, which allows you to save considerable time. The following micro-wave power levels are available: 100-200-300-400-500 W. The cooking temperature can be adjusted in increments of 10^ C, from 50^ C to 250^ C.
The cooking time can be set between 0 and 60 minutes.
Programming the CIRCULATING HEAT cooking mode Display + micro-wave
Turn the selector button to choose the CIRCULATING HEAT + MW setting. "500 W" flashes in the display to ask you to choose the micro-wave power level desired.
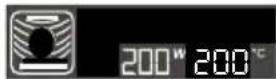
Turn the “- / +” selector button to adjust to the desired micro-wave power level, e.g. 200 W (the maximum power for combined cooking is 500 W). Confirm the selection by pressing °C/W.; “200°” flashes to ask you to choose the desired cooking temperature.

Turn the “- / +” selector button to set the desired cooking temperature, e.g. 150°.
Confirm the selection by pressing °C/W; the clock numbers flash in the display.
Turn the “- / +” selector button to set the required cooking time, e.g. 30 minutes.
Confirm the selection by pressing START; the oven turns on and the programme begins.


Comments:
The cooking time can be adjusted at any time by simply turning the selector button.

Recommendations:
When using the oven in the combined circulating heat + micro-wave mode, do not use metal cookware.

Warning:
Never preheat your oven in the Circulating Heat + Micro-wave mode because this could damage the appliance.

Warning: this function must be used with the glass dish inserted on the racks to optimise cooking and ensure the durability of your product.
Grill + Micro-wave function

This setting allows you to use the grill + micro-wave function at the same time, which enables fast cooking. You can use any of the grid levels with any micro-wave power level settings up to 700 W.
Programming the GRILL + MICRO-WAVE function Display

Turn the selector button to choose the GRILL + MICRO-WAVE function. The "500 W" power level flashes in the display to ask you to choose the desired micro-wave power level.
Turn the “- / +” selector button to reduce the microwave power level, e.g. 300 W. Confirm the selection by pressing °C/W; GP3 flashes to ask you to choose the desired grill level.

Turn the “- / +” selector button to reduce the grill power level, e.g. GP2. Confirm the selection by pressing °C/W; the clock numbers begin to flash.

Turn the “- / +” selector button to enter the required cooking time on the combined micro-wave + grill setting, e.g. 20 minutes.

Confirm the selection by pressing START; the oven turns on and the programme begins.


Comments:
The programme duration can be adjusted at any time by simply turning the “- / +” selector button “- / +”.

Warning: this function must be used with the glass dish inserted on the racks to optimise cooking and ensure the durability of your product.
Traditional + Micro-wave function

Programming the TRADITIONAL + micro-wave cooking mode Display
Turn the selector button to choose the TRADITIONAL + MW setting. "700 W" flashes in the display to ask you to choose the micro-wave power level desired.
Turn the “- / +” selector button to adjust to the desired micro-wave power level, e.g. 200 W (the maximum power for combined cooking is 500 W). Confirm the selection by pressing °C/W.; “200°” flashes to ask you to choose the desired cooking temperature.

Turn the “- / +” selector button to set the desired cooking temperature, e.g. 150°.
Confirm the selection by pressing °C/W; the clock numbers flash in the display.
Turn the “- / +” selector button to set the required cooking time, e.g. 30 minutes.
Confirm the selection by pressing START; the oven turns on and the programme begins.


Comments:
The cooking time can be adjusted at any time by simply turning the selector button.

Recommendations:
When using the oven in the combined traditional + micro-wave mode, do not use metal cookware.

Warning:
Do not preheat your oven on the traditional + micro-wave setting; this could damage the appliance.

Warning: this function must be used with the glass dish inserted on the racks to optimise cooking and ensure the durability of your product.
Cooking with circulating heat function

The circulating heat cooking mode allows you to cook and brown foods on one, two or three levels.
Programming the CIRCULATING HEAT cooking mode Display
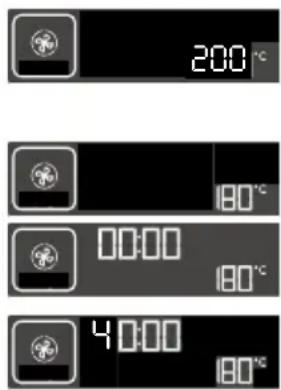
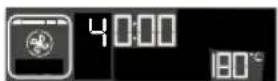
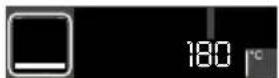
Turn the selector button to choose the CIRCULATING HEAT setting. "200°" flashes in the display to ask you to choose the desired cooking temperature.
Turn the “- / +” selector button to set the desired cooking temperature, e.g. 180°. Confirm the selection by pressing °C/W; the clock numbers begin to flash.
Turn the “- / +” selector button to set the required cooking time, e.g. 40 minutes.
Confirm the selection by pressing START; the oven turns on and the programme begins.

Comments:
The cooking time can be adjusted at any time by simply turning the “- / +” selector button.
You can preheat your oven with circulating heat or by pressing the quick preheat button, then return to this sequence.
A beep is sounded to indicate that the programmed temperature has been reached.

Recommendations:
The cooking temperature can be adjusted in increments of 10^ C, from 50^ C to 250^ C.
The cooking time can be set between 0 and 90 minutes.
It is preferable to program the minimum duration, then prolong it if necessary; check the appearance of the food before continuing.
Always position the accessories (grid, enamel dish or drip tray) on the first or second rack levels; this will optimise heat distribution and the quality of cooking.
Use heat-resistant vessels.
Protect your hands when removing dishes from the oven because they can become very hot.
If you want to defrost food after using the circulating heat function, we recommend that you let your oven cool down for 10 minutes; this will give you better results.
Traditional pulsed function
The traditional pulsed function allows you to cook and brown food.
The cooking temperature can be adjusted in increments of 10^ C, from 50^ C to 250^ C.
Programming the traditional pulsed function Display


Turn the selector button to choose the TRADITIONAL PULSED setting. "200°" flashes to ask you to choose the desired cooking temperature.
Turn the “- / +” selector button to set the desired cooking temperature, e.g. 180°. Confirm the selection by pressing °C/W; the clock numbers flash in the display.
If you wish, turn the “- / +” selector button to set the required cooking time, e.g. 40 minutes.
Confirm the selection by pressing START; the oven turns on and the programme begins


You can preheat your oven with circulating heat or by pressing the quick preheat button, then return to this sequence.
Grill function

This setting is used to cook and brown food like au gratin dishes or meats.
It can be used before or after cooking, depending on the recipe.

Warning:
The accessible areas of the oven may become very hot when the grill is used. Children should be kept away from the appliance.
When the appliance is operating in combined mode, we recommend that adults monitor children using the oven because the temperatures are very high.
When using the grill, you must protect your hands when removing dishes and use cookware that resists high temperatures, such as Pyrex glass or ceramic.
There are three grill settings:
GRILL POWER
Low (GP 1) for au gratin dishes or to brown more delicate dishes.
Medium (GP 2) for au gratin dishes or to brown more delicate dishes.
High (GP 3) to grill meats and fish
Insert the grid based on the height of the cookware or the food.
Position the drip tray on the first level if necessary.
Programming the GRILL function Display
Turn the selector button to choose the grill function. "GP3" flashes to ask you to choose the desired grill level.

Turn the “- / +” selector button to reduce the grill power level, e.g. GP2.
Confirm the selection by pressing °C/W; the clock numbers begin flashing in the display.

Turn the “- / +” selector button to enter the grilling time needed, e.g. 20 minutes.

Confirm by pressing START; the oven turns on and the programme begins.


Comments:
The grilling time can be adjusted at any time by simply turning the “- / +” selector button.
See Cooking Guide, page 30.
Pulsed grill function

See Cooking Guide, page 30
This setting allows you to use the grill + fan mode at the same time, which yields even cooking for dense foods.
The cooking temperature can be adjusted in increments of 10^ C, from 50^ C to 200^ C.
Programming the Pulsed grill function Display


Turn the selector button to choose the PULSED GRILL setting. "200°" flashes to ask you to choose the desired cooking temperature.
Turn the “- / +” selector button to set the desired cooking temperature, e.g. 180°. Confirm the selection by pressing °C/W; the clock numbers flash in the display.
If you wish, turn the “- / +” selector button to set the required cooking time, e.g. 40 minutes.
Confirm the selection by pressing START; the oven turns on and the programme begins.

Comments:
The cooking time can be adjusted at any time by simply turning the “- / +” selector button.
You can preheat your micro-wave oven in the same way as for a circulating heat cooking programme.
A beep is sounded to indicate that the programmed temperature has been reached.
See Cooking guide, p. 30.
Bottom heating function

This cooking setting uses the bottom heating element. It is recommended for cooking moist dishes (quiche, etc.) and rising dough dishes (cake, brioche, etc.).
The cooking temperature can be adjusted in increments of 10^ C, from 50^ C to 250^ C.
Programming the bottom heating function Display

Turn the selector button to choose the BOTTOM HEATING function. "180°" flashes to ask you to choose the desired cooking temperature.
Turn the “- / +” selector button to set the desired cooking temperature, e.g. 180°. Confirm the selection by pressing °C/W; the clock numbers flash in the display.

Turn the “- / +” selector button to set the required cooking time, e.g. 40 minutes.
Confirm the selection by pressing START; the oven turns on and the programme begins.


Comments:
The cooking time can be adjusted at any time by simply turning the “- / +” selector button.
You can preheat your micro-wave oven in the same way as for a circulating heat cooking programme.
A beep is sounded to indicate that the programmed temperature has been reached. See table, page 30.
Child safety lock
You can program the "CHILD SAFETY LOCK" to prevent use of your micro-wave oven.
To activate this option:
Open the door and press the START/STOP button for five seconds, until the key symbol appears in the display. Two beeps are sounded to confirm that your micro-wave oven is temporarily locked. No programmes are available.

To cancel:

Follow the same procedure: Press the START/STOP button for five seconds with the door open. The key symbol disappears and the clock is displayed. Two beeps are sounded to confirm the procedure.
Timer

You can also program the "TIMER" function on your micro-wave oven.
To set the timer:
Turn the selector button to OFF.
Turn the “- / +” selector button to enter the desired duration.
Confirm by pressing Start.
The countdown for the programmed duration begins
Three beeps are sounded to indicate the end of the programmed duration.

To cancel, open the door and press STOP.
We recommend that you clean your oven regularly and remove all food deposits from the inside and outside of the appliance. Use a damp sponge with a little soap. If the appliance is not kept clean, its surface can deteriorate, which will considerably shorten its service life and create danger. If the door or seal are damaged, the oven should not be used before being repaired by a qualified professional.
Do not clean the appliance with a steam cleaner.
Do not use abrasive cleaning products or hard metallic scrapers for cleaning the oven's glass door, which could scuff the surface and cause the glass to shatter.
If the oven has an unpleasant smell or if it is soiled, boil a cup of water with the juice of one lemon for two minutes and clean the oven interior with a bit of dish soap.
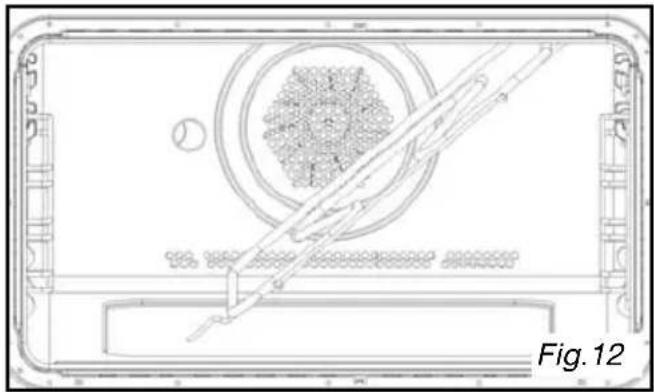
To clean the upper part of the cavity, fold down the grill heating element (Fig. 12).
Remove the grill heating element by pressing on the rod located in the upper left (Fig. 13).
natural_image
Technical line drawing of a device casing with internal components and a diagonal line, labeled Fig. 12 (no text or symbols on the diagram itself)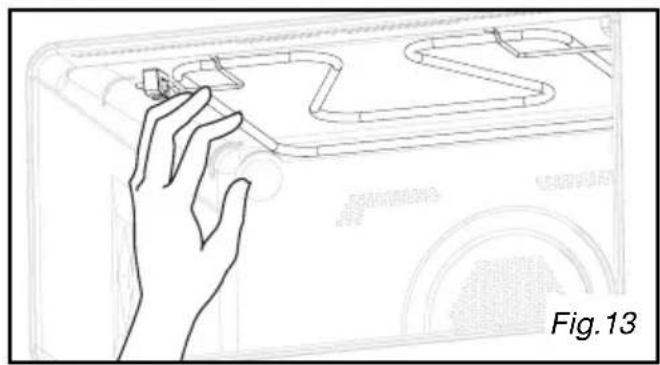
natural_image
Line drawing of a hand interacting with a mechanical component, labeled Fig. 13 (no text or symbols on the diagram itself)COOKING GUIDE
DEFROSTING:
| Food Quantity Duration | Recommendations | ||
| Flaky or short crust 400 | g 1 - 3 min | Place on paper towels; turn midway through programme | |
| Sea scallops 500 g 5 - 7 | min | Place on a plate; stir midway through programme | |
| Peeled pink shrimp 100 g | g 1 - 2 min | “ “ | |
| Whole pink shrimp 200 g | 2 - 4 min | “ | |
| Rock lobster/prawns (10) | 500 g 6 - 8 | mi “ “ | |
| StrawberriesRaspberries/cherriesGooseberries/blueberries/black currants | 250 g 7 | -9 min6 - 8 min5 - 7 min | |
Reheating: Use the automatic "C" sequence according to weight or choose your own reheating time.
| Food Quantity | Duration | Power | |
| Milk, Bouillon | 1 bowl, 300 g | 1.5 to 2.5 min | 700 WDo not cover and stir during reheating |
| Soup | 1 bowl, 300 g4 bowls, 330 g x 4 | 2 to 3 min9 to 10 min | 700 WDo not cover and stir during reheating |
| Prepared food dish | 1 pers (300 g) | 3 to 4 min | 700 WCover and stir during reheating |
| Meats cooked in sauce | 4 slices | 6 to 8 min | 700 WCover and stir during reheating |
Re-heating on two levels:
Position the glass dish on level 1 and the grill on level 3.
When you reheat pre-cooked dishes, take care to always cover your dish
| Homogenous foods (purée, peas, celery, etc.) | Two 200-g plates | 4 to 6min |
| Heterogenous food (cassoulet, Beef Burgundy, ravioli, etc.) | Two 300-g plates | 6 to 8 min |
Cooking guide in circulating heat + micro-wave mode

Use a dish suitable for micro-wave ovens that resists high temperatures, preferably in terra cotta (less splattering than in a glass dish).
When possible, cook roasts without fatty exterior layers to avoid smoke and grease splattering.
After cooking, season the roast, wrap it in aluminium paper and let it sit for 10 minutes. This will help relax the meat fibres and the roast will be more tender and juicy.
| Food Qty | Programme MICRO-WAVE + CIRCULAR HEATING | Duration (min) | Recommendations Insert on level 2 | |
| Lamb shoulder on the bone | 1,300 g | 200 W + 200°C 32 - 37 | In the drip | tray |
| Boneless rib steak | 800 g | 200 W + 200°C | 23 - 28 | In a dish, on the grid |
| Chicken, guinea fowl | 1,200 g | 200 W + 200°C | 35 - 40 | In a dish, on the grid, level 1 |
| Roast turkey | 800 g | 300 W + 300°C | 32 - 37 | In a dish, on the grid |
| Pork roast | 1,200 g | 300 W + 300°C | 47 - 52 | In a dish, on the grid |
| Veal - roast | 1,000 g | 300 W + 300°C | 37 - 42 | In a dish, on the grid |
| Quiche 200 W + 200°C | 30 - 35 In | a dish, on the grid | ||
| Whole grain bread 200 | W + 250°C | 20 - 25 Cake mould, level 1 |
Cooking on two levels: (for pastry, choose the option without microwave)
To simultaneously cook an 800 g roast veal and 800 g of potatoes au gratin, set the appliance as follows:
55 min. at 170^ C + 300 W.
Put the au gratin in the glass dish at level 1 and the roast in a separate dish on level 3.
Cooking guide for Micro-wave + Grill function

This setting allows you to reheat ready-made frozen dishes: remove the product from its packaging (if it is not micro-wave safe) and place it in the glass dish on level 1. Do not cover.
Use a dish suitable for micro-wave ovens that resists high temperatures, preferably in terra cotta (less splattering than in a glass dish).
Place the food in a dish and place it on the grid inserted at level 1. Turn the food over midway through the programme.
When possible, cook roasts without fatty exterior layers to avoid smoke and grease splattering.
After cooking, season the roast, wrap it in aluminium paper and let it set for 10 minutes. This will help relax the meat fibres and the roast will be more tender and juicy.
| Food Quantity Programme Duration | |||
| Lamb shoulder (boned and tied) 1,300 g 200 W + GL 3 | 40 - 45 min | ||
| Boneless rib steak 800 g 200 W + GL 3 | 18 - 23 min | ||
| Chicken, Guinea fowl 1,200 g 500 W + GL 3 | 25 - 27 min | ||
| Roast turkey 800 g 300 W + GL 3 | 27 - 32 min | ||
| Pork roast 1,000 g 300 W + GL 3 | 35 - 40 min | ||
| Roast veal 1,200 g 300 W + GL 2 | 50 - 55 min | ||
| Potatoes au gratin 1,100 g 700 W + GL 1 | 20 - 25 min | ||
| Frozen ready-made dishes (shep-herd's pie, moussaka, lasagna) | 500 g 700 W + GL1 | 12 - 14 min |
Cooking guide, Traditional + Micro-wave

Use heat-resistant, microwave-safe cookware.
* Before inserting the dish, preheat the oven using the “Quick preheat” option, then choose the traditional + micro-wave cook setting.
| Food | Programme | Duration | Level |
| Cheesecake* | 100 W+200°C | 42-45 minutes | 2nd |
| Pudding | 200 W+200°C | 20 min | 2nd |
| Quiche* | 200 W+200°C | 30 min | 2nd |
| Potato gratin | 300 W+200°C | 30-35 minutes | 1st |
| Rising cake | 200 W+200°C | 45 min | 2nd |
Cooking guide for cooking without micro-wave power
| DISHES LEVEL LEVEL COOKING TIME | |||||||||||
| MEATS: | |||||||||||
| Pork roast (1 kg) | 160°C | 2 | 90 min dish on grid | ||||||||
| Roast veal (1 kg) | 180°C | 2 | 70-75 min dish on grid | ||||||||
| Roast beef (1 kg) | 220°C* | 2 | 190°C* | 1 | 35-40 dish on grid | ||||||
| Lamb (1.5 kg) | 180°C | 2 | 70-75 min dish on grid | ||||||||
| Poultry (1.2 kg) | 180°C | 1 | 180°C | 1 | 90-120 min dish on grid | ||||||
| Large poultry | 220°C | 1 | |||||||||
| Rabbit | 230°C | 2 | 40-45 min | ||||||||
| Pork chops | P3 | 3 | 25-30 min | ||||||||
| Lamb chops | P3* | 3 | 15-17 min | ||||||||
| Beef ribs | P3 | 2 | 20-25 min | ||||||||
| Slices of lard | P3* | 3 | 15-20 min | ||||||||
| FISH: | |||||||||||
| Whole (1.2 kg) | 180°C 2 P3 | * | 35-45 min dish on grid | ||||||||
| Grilled | 15-20 min | ||||||||||
| VEGETABLES: | |||||||||||
| Potatoes au gratin | 200°C | 2 | 50-55 min dish on grid | ||||||||
| Lasagna | 180°C | 2 | 40-45 min dish on grid | ||||||||
| Stuffed tomatoes | 200°C | 2 | 180°C | 2 | 45-55 min dish on grid | ||||||
| PASTRY: | |||||||||||
| Génoise | 150°C | 2 | 160°C | 1 | 35-45 min | ||||||
| Jelly roll | 220°C* | 2 | 6-8 min glass dish | ||||||||
| Pound cake | 170°C | 1 | 40-50 min mould on grid | ||||||||
| Cookies | 160°C | 2 | 20-25 min pastry dish | ||||||||
| Cream | 160°C | 2 | 35-45 min in a double-boiler | ||||||||
| Puff pastry dough | 180°C | 2 | 35-40 min pastry dish | ||||||||
| Flaky crust | 220°C* | 2 | 15-25 min pastry dish | ||||||||
| Tarts | 200°C | 1 | 35-40 min mould on grid | ||||||||
| Quiches | 200°C | 1 | 35-45 min mould on grid | ||||||||
| Soufflée | 200°C | 1 | 50-55 min on grid | ||||||||
| Toast | P3 | 3 | 3-4 min on grid | ||||||||
* Preheat the oven to the temperature indicated.
For grilling, preheat the oven using the "Grill" sequence
For “Grill” cooking with food placed on the grid, place the enamel dish on the first level to collect the cooking juices.
A bain-marie (double boiling technique) should always begin with hot water: do not overfill the dish.
Cooking on two levels: with circulating heat
Examples of cooking dishes of the same type: 2 tarts, 2 cakes, 2 pizzas, etc.
or of different types: fish + roast, etc.
Use the 1st and 3rd levels.
The dishes are not necessarily removed from the oven at the same time.
Methods of measuring suitability for use that are compliant with IEC/EN/NF EN 60705;
The International Electrotechnical Commission, SC.59K, has established a standard on comparative performance measures conducted on different micro-wave ovens.
We recommend the following for this appliance:
| Test Load | Approx. duration | Power level | Cookware/ Recommendations | |
| Egg cream (12.3.1) | 1,000 g | 8 min 500 W | Pyrex 227Glass dish, level 1 | |
| Savoie cake (12.3.2) | 475 g 7 | min 700 W | Pyrex 254BGlass dish, level 1 | |
| Meat loaf (12.3.3) | 900 g 1 | 4 min 700 W | Pyrex 838Glass dish, level 1 | |
| Defrosting meat (13.3) | 500 g 1 | 1 min 200 W | Glass dish | |
| Defrosting raspberries (B.2.1) | 250 g 6 | min 200 W | On a flat plateGrid, level 1 | |
| Potatoes au gratin (12.3.4) | 1,100 g | 25 min | Grill, low power + 700 W | Pyrex 827On glass dish, level 1 |
| Chicken (12.3.6) | 1,200 g | 26 min | Grill, high power + 500 W | Place on grid + drip trayInsert on first level from bottomTurn over midway through cooking |
| 40 min | Cooking with circulating heat 200°C + 200 W | Use an earthenware dishPlace on the grid inserted at the first level from the bottom | ||
| Cake (12.3.5) | 700 g 20 | min | Cooking with circulating heat 220°C + 200 W | Pyrex 828Place on the grid at level 1 |
If you have doubts about the proper functioning of your appliance, this does not necessarily mean it is broken. In any event, check the following items:
| You observe that Solution | |
| The countdown starts, but the appliance does not function (food is not heated) and “DEMO” flashes in the display. | The “Demonstration” mode is enabled. To switch to “Operational” mode, simultaneously press the following three buttons:  |
| The appliance does not turn on. | Ensure that your appliance is properly connected.Ensure that the oven door is properly closed.Ensure that the “Child safety lock” is not enabled. |
| The appliance continues to make noise after the end of the programme. | To eliminate residual steam, your appliance is equipped with a delayed ventilation function. Depending on the cooking method chosen (Solo/Grill/Combined), the oven fan may continue to run after the programme ends. |
| You notice the presence of steam on the glass. | Wipe the condensation with a cloth. |
| Food is not heated in the micro-wave position. | Ensure that the cookware is suitable for microwave ovens and that the power level is appropriate. |
| Smoke escapes from the grill at the start of the programme. | Remove all food residue from the heating element before each use. |
| The appliance is creating sparks. | Deep clean the appliance:remove all traces of grease, food particles, etc.Ensure that no metal object is located close to the oven’s inner surfaces.Never use metal objects with the grill.Never run your oven when it is empty. |


- MEDEDELING VOOR DE GEBRUIKER
- de bedieningen
- KOOK AANWIJZINGEN
- Programmation express
- GUIDE DE CUISSON
- Bedienbereich
- KOCHLEITFADEN
- INSTALLATION
- DESCRIPTION
- USE
- MAINTENANCE AND CLEANING 29
- COOKING GUIDE 30
- EFFECTIVENESS TEST 34
- TROUBLESHOOTING 35
- Safety recommendations
- Operating principle Protecting the environment
- Before making hook-ups
- Electrical hook-ups
- Build-in
- Appliance
- Accessories
- Comments:
- Control panel
- Function selector button
- Setting/changing the time
- Immediate cooking
- Quick preheat function
- REAL POWER OF MICRO-WAVE OVEN: 1000 W
- Express programme
- Express programming Display
- Heat & hold
- Heat & hold Display
- Reheating on two levels see page 30
- Recommendations:
- Automatic cooking functions
- Guide to automatic functions
- Programming automatic cooking time based on food weight Display
- Defrosting
- Note:
- Length of defrost programmes:
- Automatic defrosting function
- Programme based on defrost time
- Programme based on weight
- Automatic defrosting Display
- Circulating heat + micro-wave cooking function
- Programming the CIRCULATING HEAT cooking mode Display + micro-wave
- Warning:
- Grill + Micro-wave function
- Programming the GRILL + MICRO-WAVE function Display
- Traditional + Micro-wave function
- Programming the TRADITIONAL + micro-wave cooking mode Display
- Cooking with circulating heat function
- Programming the CIRCULATING HEAT cooking mode Display
- Traditional pulsed function
- Programming the traditional pulsed function Display
- Grill function
- Programming the GRILL function Display
- Pulsed grill function
- Programming the Pulsed grill function Display
- Bottom heating function
- Programming the bottom heating function Display
- Child safety lock
- Timer
- COOKING GUIDE
- Re-heating on two levels:
- Cooking guide in circulating heat + micro-wave mode
- Cooking on two levels: (for pastry, choose the option without microwave)
- Cooking guide for Micro-wave + Grill function
- Cooking guide, Traditional + Micro-wave
- Cooking guide for cooking without micro-wave power
Brand : Pelgrim
Model : MAG592
Category : Microwave Oven