F451 - Mobile Phone ZTE - Free user manual and instructions
Find the device manual for free F451 ZTE in PDF.
User questions about F451 ZTE
0 question about this device. Answer the ones you know or ask your own.
Ask a new question about this device
Download the instructions for your Mobile Phone in PDF format for free! Find your manual F451 - ZTE and take your electronic device back in hand. On this page are published all the documents necessary for the use of your device. F451 by ZTE.
USER MANUAL F451 ZTE
ZTE Canada Inc, 4711 Yonge Street, North York, Ontario M2N 6K8
ZTE F451
User Guide
LEGAL INFORMATION
Copyright © 2011 ZTE CORPORATION.
All rights reserved.
No part of this publication may be quoted, reproduced, translated or used in any form or by any means, electronic or mechanical, including photocopying and microfilm, without the prior written permission of ZTE Corporation.
ZTE Corporation reserves the right to make modifications on print errors or update specifications in this guide without prior notice.
Version No.: V1.0
Edition Time : 09-2011
Manual No. : 079584503708
Contents
Welcome 8
Your F451 8
Phone Overview 8
Specifications 11
Getting Started ....12
Installing the Battery 12
Installing the microSD Card ....13
Charging the Battery 13
Powering On/Off Your Phone 14
Home screen 15
Main Display Icons ....15
Basic Operation ....17
Menu Navigation ....17
Locking/Unlocking Your Phone 17
Locking Your Phone 17
Unlocking Your Phone 18
Locking/Unlocking the Keypad 18
Easy Set-up 18
Entering Text 19
Calling 21
Making a Call 21
Using the Keypad 21
Using the Contacts 21
Using the Call History ......21
Making an International Call ....21
Answering a Call 22
Speed Dialing 22
Assigning a Speed Dial 22
Removing a Speed Dial 23
Wait/Pause 23
Wait (W) 23
2-Sec Pause (P) ......23
In-Call Options 24
Recent Calls ......25
Contacts 26
Adding a New Contact 26
Editing a Contact 26
Updating a Contact ....26
Changing the Default Number 26
Searching a Contact 27
Managing Contacts 27
Deleting Contacts ....27
Locking/Unlocking Contacts 27
Copying Contacts to the microSD Card 28
Sending Contacts via Bluetooth 28
Grouping Contacts ....29
Adding Contacts to a Group 29
Adding a New Group 29
Sending a Message to Group Members 29
My Name Card 29
Editing My Name Card 29
Sending My Name Card via Message 30
Sending My Name Card via Bluetooth ....30
Messaging 31
Using the Message Key ....31
Creating and Sending a Text Message ....31
Creating and Sending a Multimedia Message ....32
Erasing Messages 32
Voicemail 33
Email & IM 33
Messaging Settings ....33
Browser 35
Opening Web Pages 35
Opening a New Browser Tab....35
Setting a Speed Dial ....36
Browser Settings 36
Downloading Suggestion ....36
Deleting the Downloaded File ....36
Multimedia ....37
Browser 37
My Music ....37
Playing Music 37
Creating a Playlist ....38
Adding Songs to a Playlist 38
Managing My Music 39
My Ringtones 39
My Sounds 39
Playing and Using a Sound 40
My Pictures ....41
Recorder 42
Camera 42
Bluetooth ^® 44
Turning Bluetooth On or Off 44
Pairing With a Bluetooth Device ....44
Bluetooth Settings 45
Tools 47
Calculator 47
Tip Calculator ....47
Calendar 47
Adding a New Event 47
Viewing an Event 48
Calendar Options 48
Alarm Clock 48
Adding a New Alarm 48
Alarm Options 49
Stop Watch 49
World Clock 49
Notepad ....50
USB Mass Storage ....50
Settings 51
Master Volume ....51
Keyguard Settings ....51
Sounds Settings ....51
Call Sounds ....51
Alert Sounds ....51
Keypad Volume 52
Digit Dial Readout 52
Service Alerts 53
Power On/Off 53
Display Settings ....53
Personal Banner 53
Backlight 54
Wallpaper 54
Display Themes 54
Dial Fonts 55
Menu Font Size 55
Clock Format ....55
Phone Settings ....55
Airplane Mode 55
Setting Shortcuts ....56
Language 57
Location 57
Phone Security ....57
Global Data Settings 59
System Select 59
Call Settings 59
Answer Options ....59
Auto Retry 60
TTY Mode ....60
One Touch Dial 61
DTMF Tones 61
Hearing Aid Mode 61
Memory 61
Save Options ....61
Phone Memory 62
Card Memory 62
Card Lock 63
Phone Info 64
For Your Safety 65
General Care 65
Aircraft Safety 67
Hospital Safety 68
General Guidelines ....68
Road Safety 69
Vehicles Equipped With an Airbag 70
Third Party Equipment 70
Efficient Use 70
Radio Frequency (RF) Energy 70
Emergency Services 72
FCC Compliance ....72
IC Notice ....73
Copyright Notice 74
Welcome
Your F451
Thank you for choosing F451 digital mobile phone. It works in CDMA network, you can make calls and send messages or emails while traveling or roaming.
To guarantee this mobile phone is always in its best condition, please read this manual carefully and keep it for future reference. To ensure your safety, read the section: For Your Safety thoroughly before using this phone for the first time.
Note: The pictures and icons presented in this manual are meant for illustrative purposes only and may not accurately represent the actual pictures and icons found on the phone. Your phone contains the most up to date information.
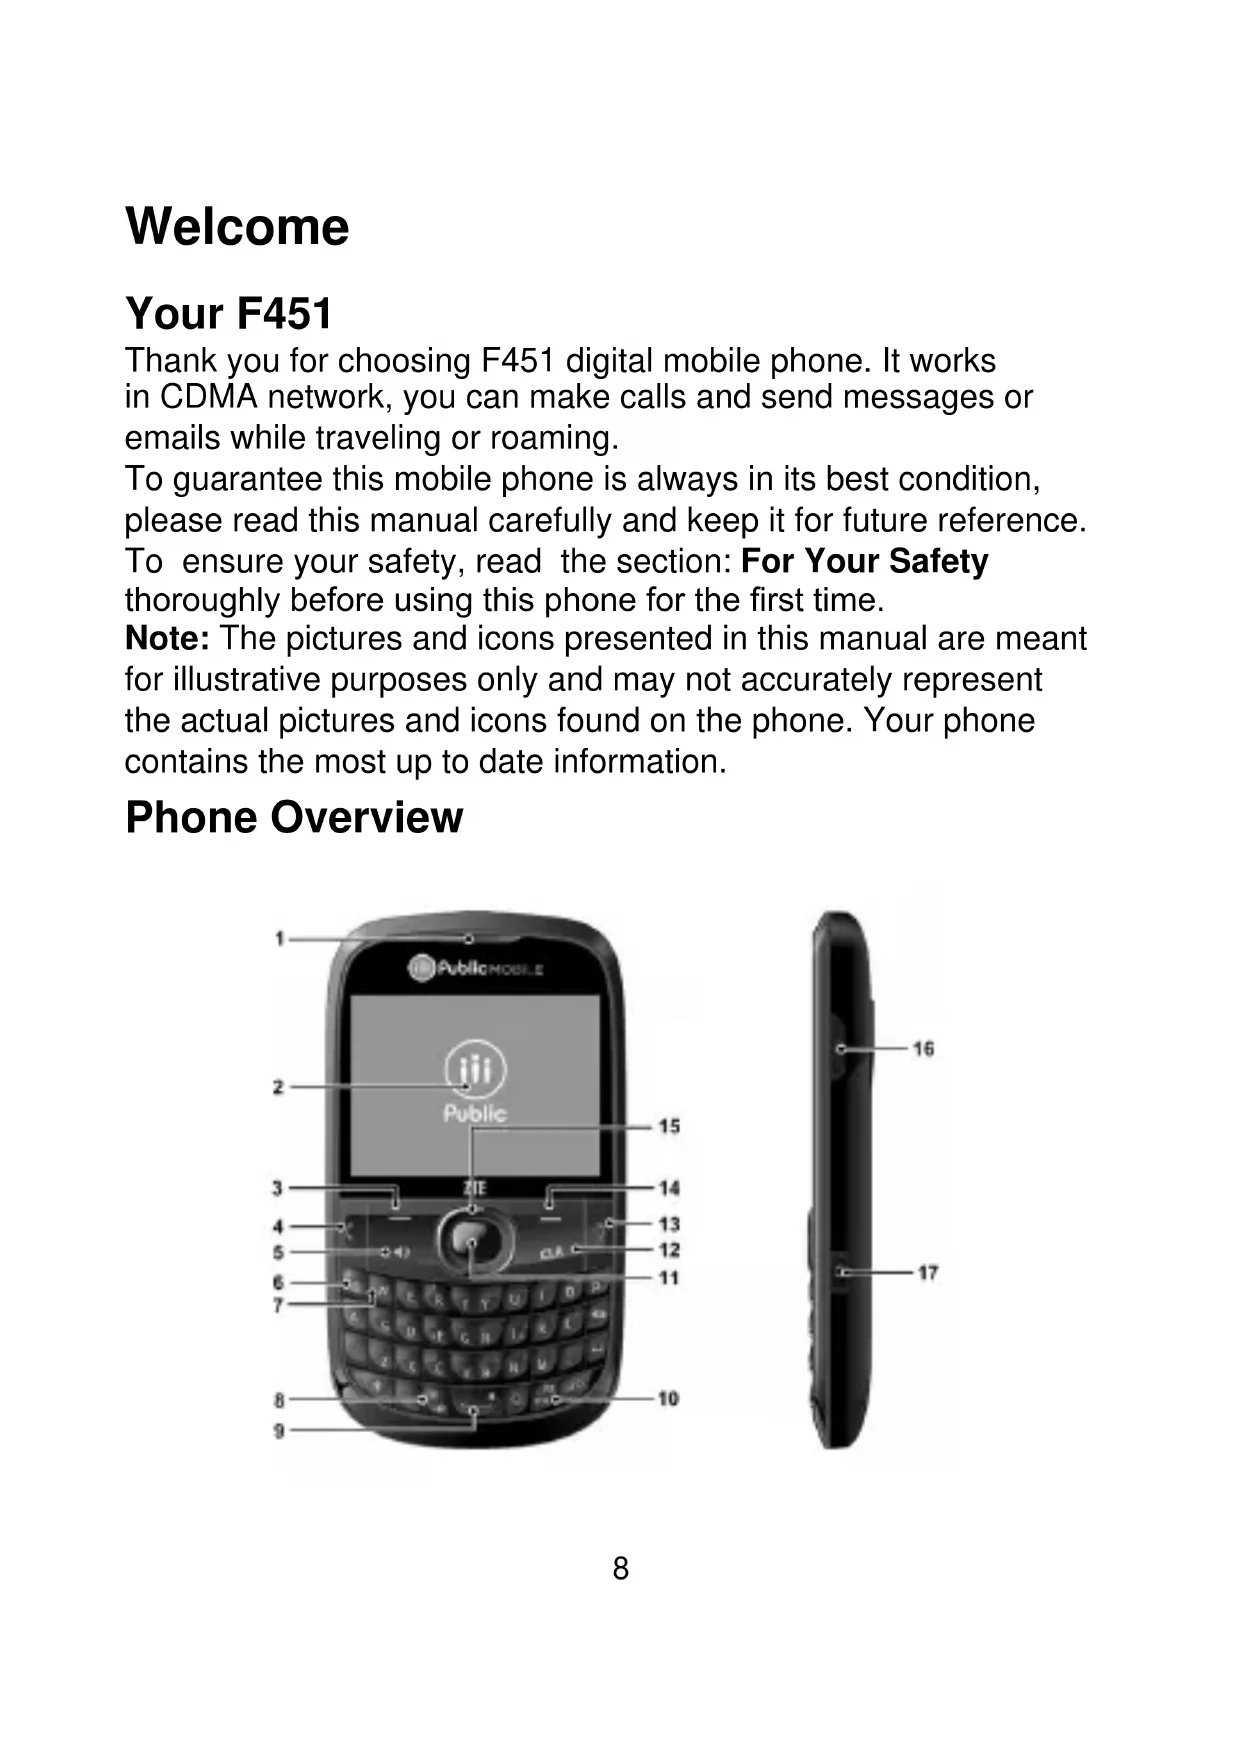
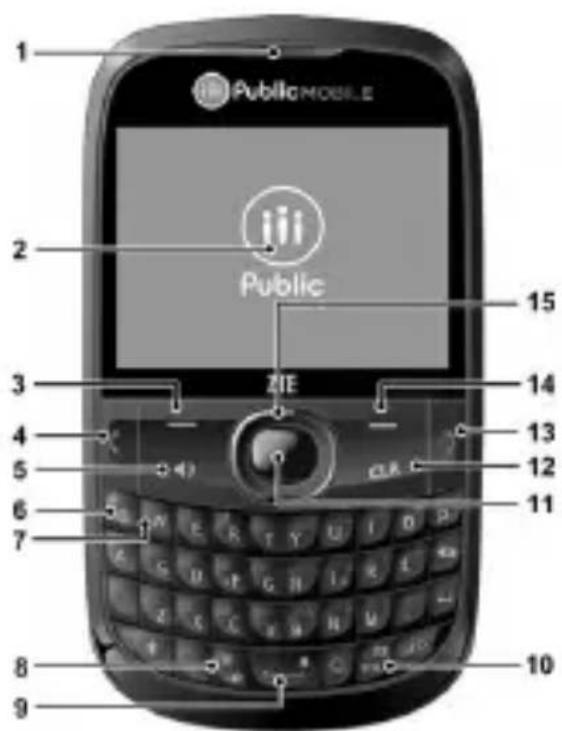
Phone Overview
text_image
1 PublicMOBILE 2 Public 3 ZIE 4 5 6 7 8 9 10 11 12 13 14 15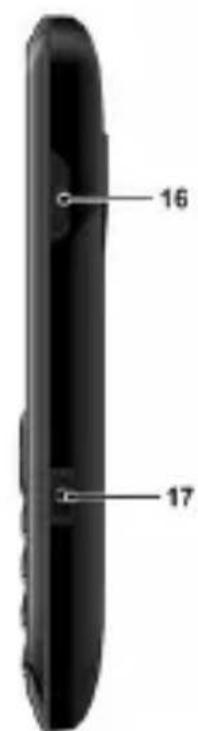
text_image
16 17- Earpiece: Allows you to hear the caller.
- LCD Screen: Displays all the information needed to operate your phone.
- Left Soft Key: Press to display the Contacts List or access the function listed above the key.
- Send Key: Press to make or receive a call. From the home screen, press to access the All Calls list.
- Speakerphone Key: Press to activate or deactivate the speakerphone.
- Music Key: Press to display the My Music menu from the home screen.
- Voicemail Key: Press and hold to dial your voicemail from home screen.
- Vibration Mode Key: Press and hold to turn the vibration mode on or off from the home screen.
- Lock Key: Press and hold to lock the keypad from the home screen.
- Message Key: Press to open a new text message from the home screen.
- Center Select Key: Allows you to access the menu screen. It also allows you to accept choices when navigating through a menu.
- CLR Key: Delete characters or entire words during text entry mode. Press to return to the previous menu or screen.
- End/Power Key: Press to end calls or close applications. Press and hold to power your phone on/off.
- Right Soft Key: Press to enter the message box or access the function listed above the key.
-
Directional Key: Allows you to scroll through phone menu options and provides a shortcut to phone functions from home screen.
-
Accessory/Charger Port: Connects the phone to the wall charger, or other compatible accessories.
- Camera Key: Press and hold to access the camera screen from the home screen.
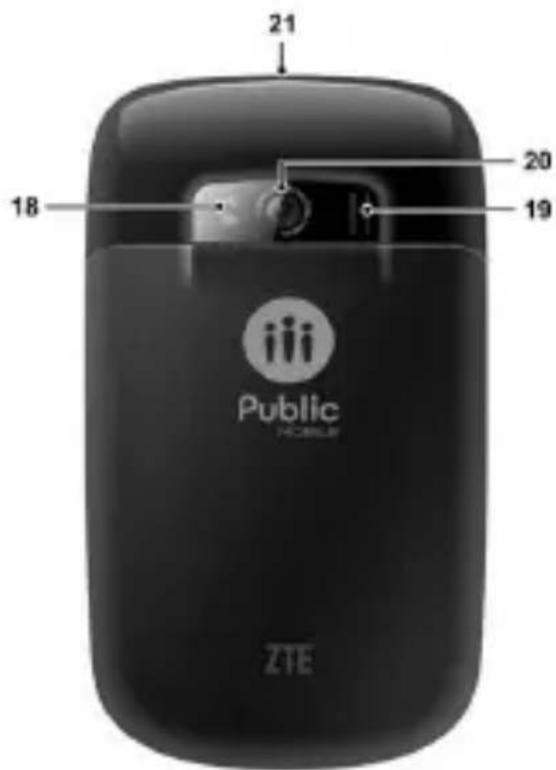
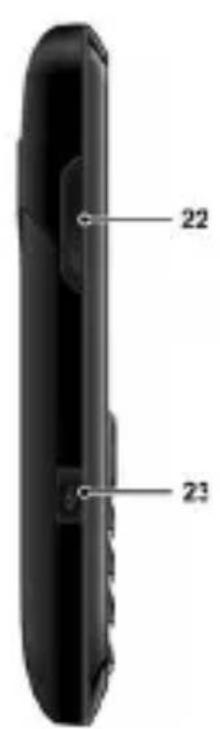
text_image
21 18 20 19 Public HEALTHS ZTE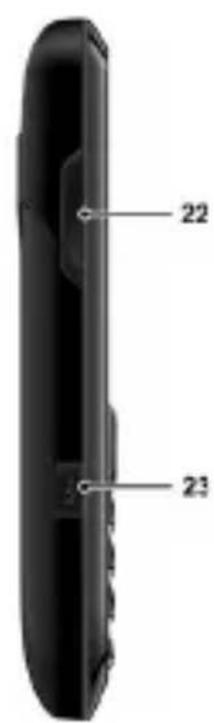
text_image
22 23- Camera Flash: Camera flash used for taking pictures.
- External Speaker: Allows you to listen to music, sounds or ringtones.
- Camera: Built-in camera.
- Headset Jack: Plug in an optional headset for convenient and hands-free conversations or music playback.
- Volume Keys: Allows you to adjust the master volume or the earpiece volume during a call.
- Voice Recorder Key: Press to launch Voice Recorder from the home screen.
Specifications
| Model F451 | |
| Dimensions (L x W x H) | 110 × 61 × 12.5 mm |
| Weight approximately 100 g including battery | |
| Continuous Standby Time | about 220 hours |
| Continuous Talk Time about 240 minutes | |
Note: The phone's talk and standby times are based on ideal working environments. Network conditions or, for example, use of the extended backlight or browser, can use more battery power and reduce talk/standby time.
Getting Started
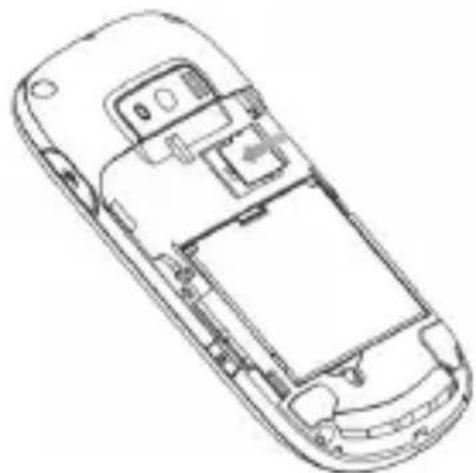
Installing the Battery
- Remove the battery cover by pressing downward and sliding it off.
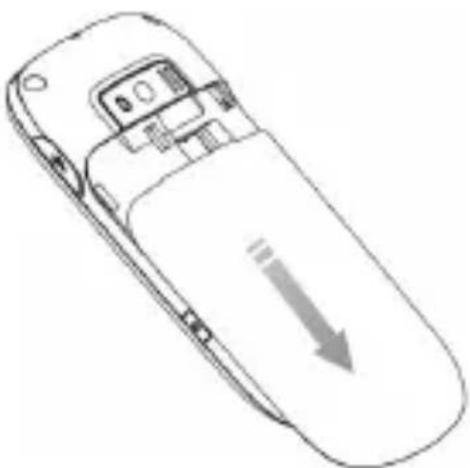
natural_image
Line drawing of a mobile phone with an arrow pointing downward (no text or symbols)- Align the battery contacts with the phone terminal and press until you hear a "click".
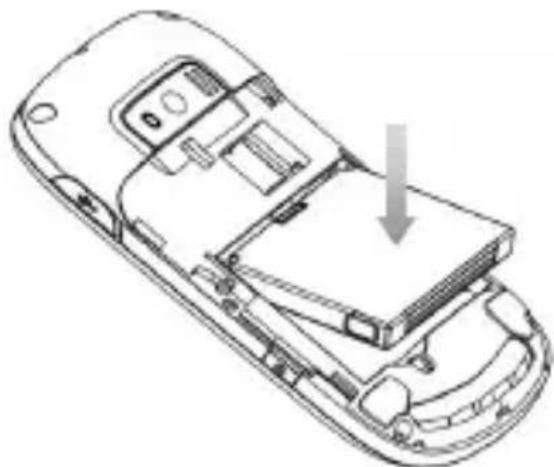
natural_image
Line drawing of a mobile phone car interior showing the rear panel and front compartment with a downward arrow indicating a component (no text or symbols present)Align the battery cover over the battery compartment and slide it upward until it clicks into place.
Installing the microSD Card
Your phone supports microSD card up to 16 GB. You can store music, pictures, and other files on the microSD card.
Note:
microSD logo micro is a trademark of the SD Card Association.
- Position the microSD card with the metal contacts facing down and slide it into place until it is fully inserted and locked in place.
natural_image
Line drawing of a mobile phone car interior showing front, rear, and side views (no text or symbols)- Replace the battery cover.
Charging the Battery
Your device comes with a wall adapter and a USB cable which connect together to charge your phone. To charge your phone:
- Connect the USB cable into the wall adapter.
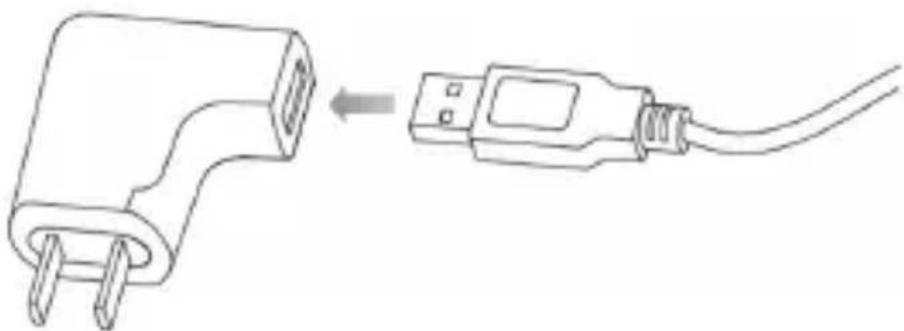
natural_image
Line drawing of a plug and USB cable being inserted into a socket (no text or symbols)- Plug the USB cable (as shown below) into the phone's Charger/Accessory Port.
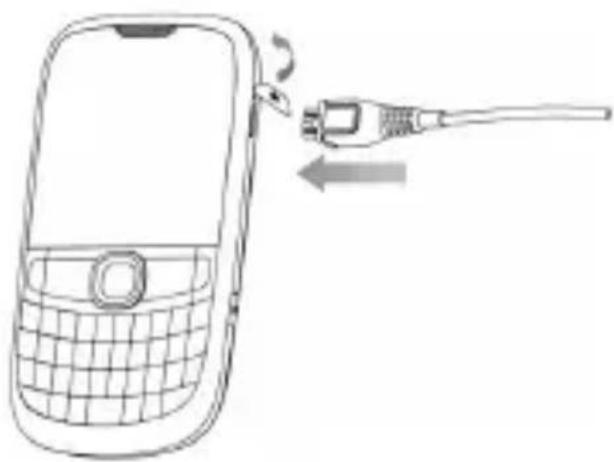
natural_image
Line drawing of a mobile phone with an attached cable showing signal change (no text or symbols)- Plug the wall adapter into a power outlet.
Warning: Please use only an approved charging accessory to charge your device. Improper handling of the charging port, as well as the use of an incompatible charger, may cause damage to your device and void the warranty.
When not using the battery for a long time, remove it from the phone and store in a cool dry place.
Powering On/Off Your Phone
It's important to fully charge the battery before turning on your phone.
- To power on the phone, press and hold the until the LCD screen lights up. End/Power Key
Note: If the phone lock code has been activated, you need to enter the code to unlock the phone. The default lock code is the last 4 digits of your phone number.
- To power off the phone, press and hold the End/Power Key until the display turns off.
Home screen
The start screen indicates that your device is in the home screen.
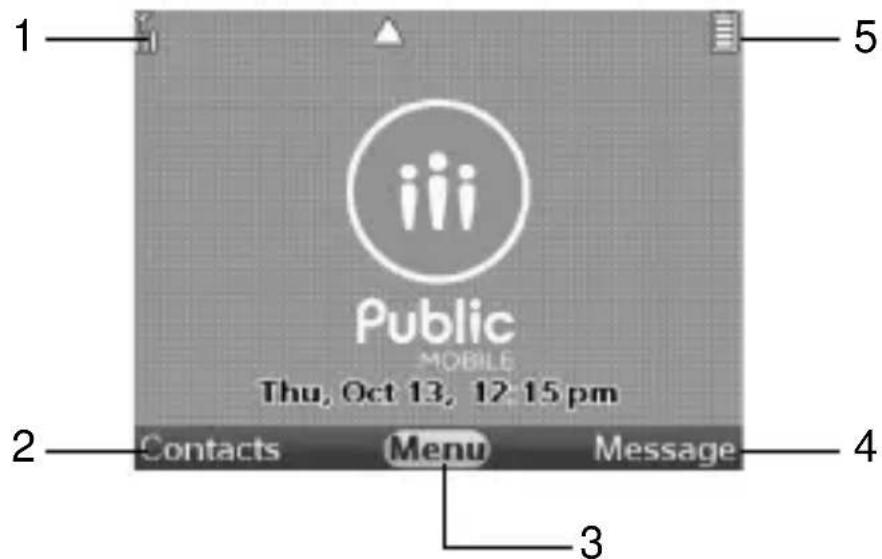
text_image
1 Public MOBILE Thu, Oct 13, 12:15 pm 2 Contacts Menu Message 3- Signal strength: The strength of the signal received by the device is indicated by the number of bars displayed.
- Contacts: Press the Left Soft Key to select this option.
- Menu: Press the Center Select Key to select this option.
- Message: Press the Right Soft Key to select this option.
- Battery strength: Four bars indicate a fully charged battery.
Note: The start screen may vary if you change the default display settings.
Main Display Icons
 | Signal Strength Airplan |  ode ode | |
 | No Service Battery Lev |  | |
 | All Sounds Off Alarm C |  | |
 | Vibrate On Missed Cal |  | |
 | Message |  | Alarm On |
 | Roaming Data Transfer |  | |
 | Dormant Secure Socke |  ayer ayer | |
 | Voice Call Keypad Loc |  | |
 | Bluetooth On Calendar |  pointment pointment |
Tip: Press Center Select Key [Menu] > Settings & Tools > Phone Info > Icon Glossary for more information.
Basic Operation
Menu Navigation
Your phone can be customized via the menu. Each function can be accessed by scrolling with the Directional Key or by pressing the number that corresponds with the menu item.
- To access the menu, press the Center Select Key [Menu].
- To scroll through the menu, press the Directional Key up, down, left or right, or press the number key that corresponds to the desired menu item.
-
To return to the previous page, press the CLR Key. To exit the current menu and return to home screen, press the End/Power Key.
-
To access the message box, press the Right Soft Key [Message]. To access the contact List, press the Left Soft Key [Contacts].
In this manual, the steps needed to access a function or menu, are shown in a straightforward condensed form. For example, press the Center Select Key [Menu] > Settings & Tools > Tools > Calendar.
Locking/Unlocking Your Phone
To keep your phone from unauthorized use, you can lock the phone. The use of your phone is restricted once the phone is locked. You can still make emergency calls when the phone is locked.
Locking Your Phone
-
Press the Center Select Key [Menu] > Settings & Tools > Phone Settings > Phone Security.
-
Enter the phone lock code and press the Center Select Key. The default lock code is the last 4 digits of your phone number.
-
Select Lock Phone Now and press the Center Select Key. Tip: You can choose to make the phone locked automatically when you power it on. For detailed information, see “Phone Lock Setting”.
Unlocking Your Phone
- Press the Right Soft Key [Unlock] from the home screen.
- Enter the phone lock code and press the Center Select Key.
Locking/Unlocking the Keypad
- To lock the keypad, press and hold the Lock Key from the home screen.
- To unlock the keypad, press the Center Select Key, or press the Left or Right Soft Key and Center Select Key sequentially depending on the current unlock options.
Note: To change the unlock options, press the Center Select Key [Menu] > Settings & Tools > Keyguard Settings > Unlock Options and select Press Once or Press Twice.
Tip: You can choose to make the keypad locked automatically. Just press the Center Select Key [Menu] > Settings & Tools > Keyguard Settings > Auto lock, and select On.
Easy Set-up
Easy Set-up will guide you to set the common sound or display setting options.
-
Press the Center Select Key [Menu] > Settings & Tools > Sounds Settings/Display Settings > Easy Set-up.
-
Follow the prompts on the screen, and press the Center Select Key to set each sound or display option or press the Right Soft Key to skip setting the option.
Note: Press the CLR Key to go to the previous options and change the settings. Press the Left Soft Key [Preview] or [Play] to view or play the option before setting it.
Entering Text
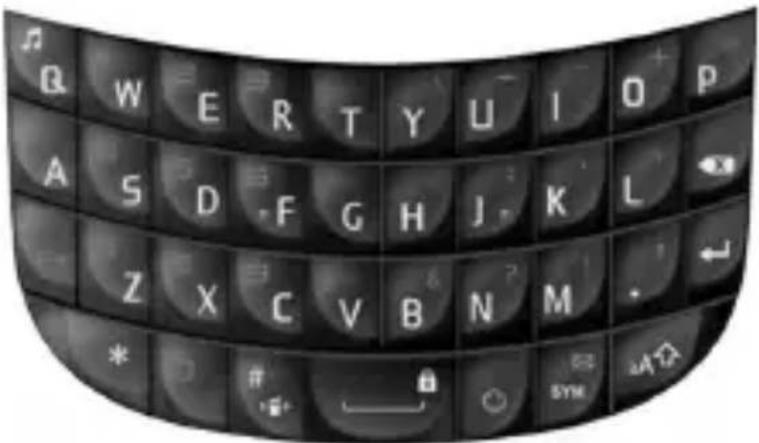
text_image
Q W E R T Y U I O P A S D F G H J K L Z X C V B N M * # 8 SYM A☆Your phone has a QWERTY keypad – a compact version of standard computer keyboard. Here's how it works.
- Press to switch lowercase and uppercase letters.
- To type a number or symbol, press and then press the corresponding keys. Press twice to enter all numbers or symbols.
- Press the Left Soft Key to change the input mode: predictive text, alphabetic and numeric.
- To open the symbols, press or press the Left Soft Key and select Symbols. Use the Directional Key and the Center Select Key to enter a symbol. You can press the Left/Right Soft Key [Prev/Next] to view more symbols.
- To open the smileys, press or press the Left Soft Key and select Smileys. Use the Directional Key and the Center Select Key to enter a smiley.
- To add a quick text, press the Right Soft Key [Options] and select Insert Quick Text, choose an entry and press the Center Select Key.
• To move the cursor, use the Directional Key.
- To delete the character before the cursor, press or the CLR Key. In predictive text input mode, hold or the CLR Key to delete the word before the cursor. In alphabetic or numeric input mode, hold or the CLR Key to delete all characters before the cursor.
- To start a new line, press ←.
• To enter a space, press
Calling
Making a Call
Using the Keypad
- Enter the destination phone number.
- Press the Send Key.
Note: To make an emergency call, enter the emergency number and press the Send Key. If possible, remain stationary and keep the line connected.
Using the Contacts
- Press the Center Select Key [Menu] > Contacts > Contact List.
- Select a contact you want to call. If the contact has multiple numbers, you can open the contact and select a phone number.
- Press the Send Key.
Note: Selecting a contact and then pressing the Send Key will dial the default number of the contact automatically.
Using the Call History
- Press the Center Select Key [Menu] > Recent Calls.
- Navigate through the menu and press the Center Select Key to view the missed, received, dialed or all calls.
- Select a number or contact you want to call and press the Send Key.
Shortcut: Press the Send Key in home screen to view all calls list.
Making an International Call
-
Press on the keypad to display the ‘+’ required for international calls.
-
Enter the country code, area code, and phone number.
- Press the Send Key.
Answering a Call
When the phone rings or vibrates, press the Send Key to answer the call.
If you don't want to answer, just press the End/Power Key.
Note: You can change the default call answering options by pressing the Center Select Key [Menu] > Settings & Tools > Call Settings > Answer Options.
Speed Dialing
This feature is ideal for frequently dialed numbers and allows contact entries to be dialed via the keypad with only one, two, or three key presses.
One-Touch Dialing:
1-9: Press and hold the number you wish to connect to for more than 1 second.
1: Speed Dial entry 1 (Voicemail) is already assigned.
Two-Touch Dialing:
10-99: Press the first digit then press and hold the second digit of the number to dial.
Three-Touch Dialing:
100-999: Press the first and second digits, then press and hold the third digit of the number to dial.
Assigning a Speed Dial
- Press the Center Select Key [Menu] > Contacts > Speed Dials.
- Select a speed dial entry, or enter the speed dial digits in the Go to field, then press the Center Select Key [Set].
-
Select a contact in the contact list and press the Center Select Key. If the contact has multiple phone numbers, you need to choose a number.
-
Select Yes and press the Center Select Key.
Removing a Speed Dial
- Press the Center Select Key [Menu] > Contacts > Speed Dials.
- Select a speed dial entry, or enter the speed dial digits in the Go to field.
- Press the Right Soft Key [Remove].
- Select Yes and press the Center Select Key.
Wait/Pause
Pauses are used for automated systems (i.e., voicemail or calling cards). The numbers entered after the pause will automatically be dialed after the pause. This feature is useful for dialing into systems that require a code.
Wait (W)
The phone stops dialing until you press the Send Key to dial the next number.
- Enter the phone number.
- Press the Right Soft Key [Options].
- Select Add Wait and press the Center Select Key.
- Enter additional number(s).
- Press the Send Key to dial.
2-Sec Pause (P)
The phone waits 2 seconds before sending the next string of digits automatically.
- Enter the phone number.
- Press the Right Soft Key [Options].
- Select Add 2-sec Pause and press the Center Select Key.
- Enter additional number(s) (pin number or credit card number).
- Press the Send Key to dial.
In-Call Options
The following features and options are available during a call.
- To adjust the volume, press the Volume Keys.
- To mute or unmute your voice, press the Left Soft Key [Mute/Unmute].
- To activate or deactivate the speakerphone, press the Speakerphone Key.
- Press the Right Soft Key [Options] for more options.
New Txt Message: Create a new text message.
Contact List: View the contact list.
Recent Calls: View the call history.
Bluetooth Menu: Open the Bluetooth menu.
▶ Main Menu: Open the main menu.
Notepad: Open the notepad.
➢ Voice Privacy: Turn the voice privacy feature on or off.
Recent Calls
Press the Center Select Key [Menu] > Recent Calls to view the call history.
- Missed: View the calls you did not answered.
• Received: View the calls you answered.
- Dialed: View the calls made from your phone.
- All: View the missed, received and dialed calls.
• View Timers: View the information of Last Call, All Calls, Received Calls, Dialed Calls, Roaming Calls, Transmit Data, Received Data, Total Data, Last Reset, Lifetime Calls and Lifetime Data Counter. And you can also reset them separately or together.
Contacts
Adding a New Contact
- Press the Center Select Key [Menu] > Contacts > New Contact.
- Enter the contact information you need and press the Center Select Key [Save].
Editing a Contact
- Press the Left Soft Key [Contacts] in the home screen or press the Center Select Key [Menu] > Contacts > Contact List.
- Select a contact and press the Left Soft Key [Edit].
- Edit or add the contact information and press the Center Select Key [Save].
Updating a Contact
- Enter the phone number you want to save in the home screen.
- Press the Left Soft Key [Save].
- Select Update Existing and press the Center Select Key.
- Select the contact you would like to update and press the Center Select Key.
- Select the desired number type and press the Center Select Key to update the contact.
Changing the Default Number
- Press the Left Soft Key [Contacts] in the home screen.
- Select a contact and press the Left Soft Key [Edit].
- Highlight the number you would like to set as the default and press the Right Soft Key [Options].
- Select Set as Default and press the Center Select Key.
-
Select Yes and press the Center Select Key.
-
Press the Center Select Key [Save] to update the contact's information.
Searching a Contact
- Press the Left Soft Key [Contacts] in the home screen to view the contact list.
- Enter the contact name in the Go to field and the contacts matching the name will be highlighted.
Managing Contacts
Deleting Contacts
- Press the Left Soft Key [Contacts] in the home screen.
- Press the Right Soft Key [Options], select Manage Contacts > Erase and press the Center Select Key.
-
Press the Center Select Key [Mark] to select the contacts, or press the Right Soft Key [Mark All] to mark all contacts and then press the Left Soft Key [Done].
-
Select Yes and press the Center Select Key to confirm. Note: You can also select a contact in the contact list, press the Right Soft Key [Options] > Erase, select Yes and press the Center Select Key to delete it.
Locking/Unlocking Contacts
You can lock or unlock the phone contacts in the contact list and the locked contacts cannot be deleted.
- Press the Left Soft Key [Contacts] in the home screen.
- Press the Right Soft Key [Options], select Manage Contacts > Lock/Unlock and press the Center Select Key.
- Press the Center Select Key [Mark] to mark the contacts you want to lock or unlock, or press the Right Soft Key [Mark All] to mark all contacts and then press the Left Soft Key [Done].
Copying Contacts to the microSD Card
You can copy contacts to a microSD card when it is inserted into the phone. The contact files are saved in synched\contact on the microSD card.
- Press the Left Soft Key [Contacts] in the home screen.
- Press the Right Soft Key [Options], select Manage Contacts > Copy to Memory Card and press the Center Select Key.
- Press the Center Select Key [Mark] to mark the contacts, or press the Right Soft Key [Mark All] to mark all contacts and then press the Left Soft Key [Done].
- Select Yes and press the Center Select Key.
Note: You can also copy or move the contacts in the microSD card to your phone.
Sending Contacts via Bluetooth
You can send the contacts (V-card) to the Bluetooth devices that support V-card.
- Press the Left Soft Key [Contacts] in the home screen.
- Select a contact and press the Right Soft Key [Options].
- Select Send via Bluetooth and press the Center Select Key.
- Press the Center Select Key [Mark] to mark more contacts, or press the Right Soft Key [Mark All] to mark all contacts and then press the Left Soft Key [Done].
- Follow the on-screen prompts and pair with a new Bluetooth device or select a previously-paired Bluetooth device to send the V-card.
Note: Not all Bluetooth devices can receive V-card. Not all contact information is contained in a V-card.
Grouping Contacts
It's easier to manage your contacts by grouping them. You can add, rename, delete the groups or send a message to all contacts in a group.
Adding Contacts to a Group
- Press the Center Select Key [Menu] > Contacts > Groups.
- Select a group and press the Right Soft Key [Options].
- Select Add and press the Center Select Key.
- Press the Center Select Key [Mark] to mark your desired contacts and press the Left Soft Key [Done].
Adding a New Group
- Press the Center Select Key [Menu] > Contacts > Groups.
- Press the Left Soft Key [New].
- Enter the new group name and press the Center Select Key [Save].
Sending a Message to Group Members
- Press the Center Select Key [Menu] > Contacts > Groups.
- Select a group you want to send a message to and press the Right Soft Key [Options].
- Select New Txt Message or New Multimedia Message and press the Center Select Key.
- Write the message and press the Center Select Key [Send].
My Name Card
My Name Card is your personal contact, which you can send as a V-card via a message or Bluetooth.
Editing My Name Card
- Press the Center Select Key [Menu] > Contacts > My Name Card.
-
Press the Center Select Key [Edit].
-
Enter your contact information and press the Center Select Key [Save].
Sending My Name Card via Message
- Press the Center Select Key [Menu] > Contacts > My Name Card.
- Press the Right Soft Key [Options], then select Send via Multimedia Message and press the Center Select Key.
- Create a multimedia message with My Name Card as an attachment, and then press the Center Select Key [Send].
Sending My Name Card via Bluetooth
You can send My Name Card to the Bluetooth devices that support V-card.
-
Press the Center Select Key [Menu] > Contacts > My Name Card.
-
Press the Right Soft Key [Options], then select Send via Bluetooth and press the Center Select Key.
-
Follow the on-screen prompts and pair with a new Bluetooth device or select a previously-paired Bluetooth device to send My Name Card.
Messaging
Your phone is able to send text, picture and voice messages.
To access Messaging, press the Center Select Key [Menu] > Messaging.
Shortcut: To quickly access the message box, press the Right Soft Key [Message] in the home screen.
Using the Message Key
You can press the Message Key on the keypad to create a new message.
- From the home screen, press the Message Key to create a new text message.
- From the contact list, press the Message Key to create a new text message addressed to the highlighted contact's default number.
- From Recent Calls, press the Message Key to create a new text message addressed to the highlighted phone number or contact.
- From My Pictures, press the Message Key to create a new multimedia message with the highlighted picture as an attachment.
- From My Sounds, press the Message Key to create a new multimedia message with the highlighted sound as an attachment.
Creating and Sending a Text Message
-
Press the Center Select Key [Menu] > Messaging > New Message > Txt Message.
-
In the To field, enter the phone number and press the Center Select Key. Or press the Right Soft Key [Add] to access more operations.
-
Enter the message in the Text field. Press the Right Soft
Key [Options] to access more operations.
- Press the Centre Select Key [Send] or the Send Key to send the message.
Creating and Sending a Multimedia Message
- Press the Center Select Key [Menu] > Messaging > New Message > Multimedia Message.
- In the To field, enter the phone number and press the Center Select Key. Or press the Right Soft Key [Add] to access more operations.
- Enter the message in the Text field.
- Select the Picture field and press the Left Soft Key [Add] to insert the picture.
- Select the Sound field and press the Left Soft Key [Add] to add the sound file.
- Select the Name Card field and press the Left Soft Key [Add] to add the name cards.
- Select the Subject field and enter the subject.
- Press the Right Soft Key [Options] to access more operations.
- Press the Center Select Key [Send] or the Send Key to send the message.
Erasing Messages
You can delete the sent, received messages or messages in Drafts. The locked messages cannot be erased.
- Press the Center Select Key [Menu] > Messaging and press the Right Soft Key [Options] for the following options.
- Erase Sent/received: Erase sent and received messages.
- Erase Drafts: Erase all messages in the Drafts folder.
-
Erase All: Erase all messages or all except unread messages in all message folders.
-
Press the Directional Key to select and press the Center Select Key to confirm.
Voicemail
All unanswered calls to your phone can be transferred to voicemail, even if your phone is powered off. It's recommended to set up your voicemail and personal greeting as soon as you activate your phone. For more information, contact your service provider.
-
To dial your voicemail directly, enter your voicemail number in the home screen and press the Send Key. Or press the Center Select Key [Menu] > Messaging > Voicemail and press the Center Select Key [Call] to dial.
-
Follow the prompts to enter your password and listen to your messages.
Shortcut: In the home screen, press and hold 1 to dial voicemail.
Email & IM
- Press the Center Select Key [Menu] > Messaging > Email & IM or press the Center Select Key [Menu] > Email & IM.
- Read the introduction and click Next.
- Follow the on-screen prompts to finish the procedure.
Messaging Settings
- Press the Center Select Key [Menu] > Messaging and then press the Left Soft Key [Settings].
- Select one of the following options and press the Center Select Key.
- Inbox View: Set the Inbox View. If the Inbox View by Time is set, the received and sent messages are separated in the Inbox and Sent folders. If the Inbox View by Contact is set, the received and sent messages are saved in the combined Messages folder.
- Entry Mode: Choose one as the default text entry mode.
- Auto Save Sent: Set the default save mode for the messages you send. Choose On to save all sent messages in the Sent folder. Choose Off to discard all sent messages. Choose Prompt to have the prompt after a message is sent.
- Auto Erase Inbox: Choose On to erase the oldest read message automatically from the Inbox when the Inbox is full and a new message arrives. Choose Off to disable this feature and you can delete the messages manually when the Inbox is full.
- Messaging Font Size: Set the message font size to Normal or Large.
- Txt Auto View: Choose On to display text messages automatically when they arrive. Choose Off to disable this feature and have the phone prompt you.
- Multimedia Auto Receive: Choose On to download the picture/voice messages automatically. Choose Off to have the phone prompt you to download the picture/voice messages.
- Quick Text: Create or edit the quick text which you can add to a message. Press the Center Select Key [Edit] to edit a quick text. Press the Left Soft Key [Erase] to delete one entry. Select Options > New/Move to add a new quick text or move a saved one.
- Callback #: Add a default callback number so that the recipient can call back or reply. Choose On and enter the callback number, then press the Center Select Key.
- Signature: Choose Custom to add a signature that can be inserted at the end of a text, picture or voice message. Choose None to disable the signature.
- Delivery Receipt: Choose On to be notified when the message you send is delivered. Choose Off to disable notification.
Browser
The web browser is preinstalled in your phone, which allows you to access the Internet with ease. This browser compresses the data of the web pages you visit and speeds up the browsing experience while saving your data airtime.
Press the Center Select Key [Menu] > Browser or Center Select Key [Menu] > Media Center > Browser to launch the browser.
Opening Web Pages
In the browser, you can open a web page in the following ways.
- Use the Directional Key to highlight the address bar on the top of screen and press the Center Select Key [Edit] to enter the website address you want to browse, and then press the Center Select Key [Go].
- Use the Directional Key to highlight the search bar behind the address bar and press the Center Select Key [Edit] to enter the information you want to search, and then press the Center Select Key [Search].
- Use the Directional Key to select a preset website thumbnail (Speed Dial) and press the Center Select Key [Open].
- Press the Left Soft Key [Menu] in the browser screen and highlight and then press the Center Select Key [Tools], select Bookmarks/History/Saved Pages and press Center Select Key to open the related web page.
Opening a New Browser Tab
The Opera Mini browser supports multi-tab browsing. You can open a different web page in each tab.
-
Press Left Soft Key [Menu] and use the Directional Key to highlight on the upper right of the browser screen.
-
Press the Center Select Key.
-
Press the Center Select Key [Edit] to enter the website address, and then press the Center Select Key [Go]. To close a tab, select the tab you want to close and press the Right Soft Key [Close Tab].
Setting a Speed Dial
The website thumbnails in the main screen of the browser are for speed dial, which enables quick access of certain web pages.
-
Use the Directional Key to highlight an unassigned speed dial in the browser screen and press the Center Select Key [Add].
-
Enter the website address and press the Center Select Key [Add].
Browser Settings
-
Press the Left Soft Key [Menu] in the browser screen and highlight and then press the Center Select Key [Tools].
-
Select Settings and press the Center Select Key. You can set the options about the browser, please consult Opera Software ASA for the detailed information.
Downloading Suggestion
Your mobile phone only supports you to open two kinds of downloaded files(pictures and audios), and you SHOULD save the files into the default folder: pictures or sounds. If the default folder is Other, it means the file to be downloaded is not compatible with your phone.
Deleting the Downloaded File
Press the Left Soft Key [Menu] in the browser screen and highlight and then press the Center Select Key [Tools] > Downloads, choose an item you want to delete, press the Left Soft Key [Manage] > Delete File to erase the select file.
Multimedia
Browser
Refer to the Browser chapter please.
My Music
You can use My Music to play and manage music files stored on your phone and micro SD card. Press the Center Select Key [Menu] > Multimedia > My Music to access My Music.
IMPORTANT: To play music files on the microSD card, please store your music files in synched\music on the microSD card. The phone will load the music files in this directory.
Playing Music
- Press the Music Key in the home screen to access My Music. The phone will check your phone memory and the microSD card (if inserted) for music files.
- Select All Songs, Playlists, Artists, Genres or Albums and press the Center Select Key to view the songs or playlists.
- Choose a song or playlist and press the Center Select Key [Play].
-
In the music player, you can:
-
Press the Center Select Key to pause or continue the playing.
- Press the Directional Key left or right to skip to the previous or next song.
- Press and hold the Directional Key left or right to rewind or fast forward.
- Press the Directional Key up or down to display the current playlist.
- Press the Volume Keys to adjust the volume. Or press the Left Soft Key [Mute/Unmute] to mute or unmute the playing.
- Press the Right Soft Key [Options] for more options:
➢ Exit Player: Stop the playing and close the music player.
➢ Music Only Mode: Turning this option on will disable all wireless communications.
➢ Song Info: View detailed song information.
Home Screen: Return to home screen and the music is still playing.
Repeat: Set the repeat mode (Repeat All, Repeat One or Off).
▶ Shuffle: Turn on/off the shuffle.
- Press the End/Power Key to go back to home screen and the music is still playing. You can check the playing information on the screen.
Tip: When the music is playing in the background, press the Music Key in home screen to open the player, or press the End/Power Key in home screen to stop the playing.
Creating a Playlist
- Press the Music Key in home screen. Select Playlists and press the Center Select Key.
- Select Yes and press the Center Select Key if there're no playlists available. Or press the Right Soft Key [Options] and select Create New then press the Center Select Key if you have created a playlist.
- Mark your desired songs and press the Left Soft Key [Done].
- Edit the playlist name and press the Center Select Key [Save].
Adding Songs to a Playlist
- Press the Music Key in the home screen. Select Playlists and press the Center Select Key.
- Select a playlist and press the Left Soft Key [View].
-
Press the Right Soft Key [Options] and select Add Songs then press the Center Select Key.
-
Mark the songs you want to add and press the Left Soft Key [Done].
Managing My Music
-
Press the Music Key in the home screen. Select Manage My Music and press the Center Select Key.
-
The following options are available:
-
Erase: Mark the songs and press the Left Soft Key [Done] to delete them. The locked songs cannot be deleted.
- Lock/Unlock: Mark the songs and press the Left Soft Key [Done] to lock or unlock them. Only the songs in the phone memory can be locked.
- Move To Memory Card/Move To Phone: Mark the songs and press the Left Soft Key [Done] to move them to the microSD card or phone memory. The locked songs cannot be moved.
Note: Please insert the microSD card before moving the songs. The songs moved to the microSD card are saved in synched\ music.
My Ringtones
You can play and use the ringtones.
- Press the Center Select Key [Menu] > Multimedia > My Tones > My Ringtones.
- Select a ringtone and press the Center Select Key [Play] to play it.
- Press the Left Soft Key [Set as] to set a preloaded ringtone as default Ringtone, Contact ID or Alert Sounds by pressing the Center Select Key.
My Sounds
In My Sounds, you can play and use the sound files stored on your phone and micro SD card.
IMPORTANT: To use the sound files on the microSD card, please store them in synched\sounds on the microSD card. The phone will load the sound files in this directory.
Playing and Using a Sound
- Press the Center Select Key [Menu] > Multimedia > My Tones > My Sounds.
- Select a sound and press the Center Select Key [Play] to play it.
- Press the Left Soft Key [Set as] to set the ringtone as default Ringtone, Contact ID or Alert Sounds by pressing the Center Select Key.
-
Press the Right Soft Key [Options] for more options:
-
Send: Send the sound.
- Rename: Rename the sound. (Not available for preloaded sounds.)
- Move To Memory Card/Move To Phone: Move the sound to the microSD card or phone memory. The locked sound cannot be moved. (Not available for preloaded sounds.)
- Lock/Unlock: Lock or unlock the sound. Only the sounds in the phone memory can be locked. (Not available for preloaded sounds.)
- Erase: Delete the sound. The locked sounds cannot be deleted. (Not available for preloaded sounds.)
- Erase All: Delete all sounds in the microSD card or phone. (Not available for preloaded sounds.)
- File Info: View detailed sound information.
Note: Please insert the microSD card before moving the sounds. The sounds moved to the microSD card are saved in synched\ sounds.
My Pictures
In My Pictures, you can view and manage all taken or downloaded pictures, and the pictures stored on your phone and micro SD card.
IMPORTANT: To view the pictures on the microSD card, please store them in synched\pics on the microSD card. The phone will load the pictures in this directory.
- Press the Center Select Key [Memu] > Multimedia > My Pictures.
- Select a picture and press the Center Select Key [View] to view it.
- Select a picture and press the Left Soft Key [Erase] to delete it. The preloaded and locked pictures cannot be deleted.
-
Select a picture and press the Right Soft Key [Options] for more options:
-
Send: Send the picture. Not all pictures can be sent.
- Set as: Set the picture as Wallpaper or a Picture ID.
- Manage Pictures: Manage the pictures stored on your phone and microSD card. (Not available for preloaded pictures.)
➢ Erase: Mark the pictures and delete them. The locked pictures cannot be deleted.
Lock/Unlock: Mark the pictures and lock/unlock them. Only the pictures in the phone memory can be locked.
Move To Phone/Move To Memory Card: Mark the pictures and move them to the phone memory or microSD card. The locked pictures cannot be moved.
- Rename: Rename the picture. (Not available for preloaded pictures.)
- File Info: View detailed picture information.
Note: Please insert the microSD card before moving the pictures. The pictures moved to the microSD card are saved in synched\pics.
Recorder
- Press the Center Select Key [Menu] > Multimedia > Recorder.
- Press the Center Select Key to start recording and press the Center Select Key [STOP] to stop recording.
- Select and open a recording memo by pressing Center Select Key [Menu] > Multimedia > My Tones > My Sounds.
Camera
- Press the Center Select Key [Menu] > Multimedia > Camera.
Shortcut: Press and hold the Camera Key in the home screen to turn on the camera.
-
Press the Directional Key up or down to adjust the brightness. Press the Directional Key left or right to zoom out or in (except for the 1600X1200 resolution mode).
-
Press the Right Soft Key [Options] to access the camera options. Then press the Directional Key up or down to set each option.
-
Flash Lamp: Choose the flash mode from Auto Flash, Only This Shot, Off and On.
- White Balance: Choose from Auto, Darkness, Fluorescent, Tungsten, Cloudy and Sunny. You can select Darkness to take better pictures in low light levels.
• Color Effects: Choose from Normal, Negative, Black & White and Antique. -
Self Timer: Choose from Off, 10 Seconds, 5 Seconds and 3 Seconds.
-
Shutter Sound: Choose from Shutter, Ready! 1 2 3 and Say “Cheez”.
- Resolution: Choose from 1600x1200, 1280x960, 800x600, 640x480 and 320x240.
-
Save Option: Choose Phone to save the new pictures in the phone or choose Card to save them in the microSD card.
-
Press the Center Select Key [Take] or the Camera Key to take a picture.
-
Press the Left Soft Key [Save] to save the picture in My Pictures or press the Right Soft Key [Erase] to delete it. You can also press the Center Select Key [Send] to send it via a multimedia message.
Warning: Keep a safe distance when using the flash. Do not point the flash toward people or animals' eyes.
Bluetooth®
Your phone is capable of connecting to a variety of Bluetooth wireless accessories. It allows you to transfer data between Bluetooth devices, talk with a Bluetooth wireless earphone, etc. The approximate range for Bluetooth wireless technology is up to 30 feet (10 meters).
This device is compliant with Bluetooth specifications, supporting the following profiles: Headset, Handsfree, Stereo, Phonebook Access and Object Push.
Turning Bluetooth On or Off
- Press the Center Select Key [Menu] > Settings & Tools > Bluetooth Menu.
- Press the Left Soft Key [Turn on/Turn off] to turn Bluetooth on or off.
Pairing With a Bluetooth Device
To pair with another Bluetooth device, you need to turn the Bluetooth of both devices on and enable the other device's Bluetooth discoverable mode.
-
Press the Center Select Key [Menu] > Settings & Tools > Bluetooth Menu > Add New Device.
-
The phone will prompt you to place the device you are connecting to in discoverable mode. Press the Center Select Key to continue.
-
A list of visible Bluetooth devices in range will be shown. Select the Bluetooth device to be paired to and press the Center Select Key [Pair].
-
Enter the password and press the Center Select Key [Set]. Note: The password could be alphanumeric.
-
After the selected device pairing the password, select
Always Ask or Always Connect and press the Center
Select Key to set the incoming security for the device.
-
Once paired, you will see the device in the Bluetooth menu.
-
Select a paired device and press the Right Soft Key
[Options] to access the following options.
- Remove Device: Remove the paired device from the list.
- Remove All Devices: Remove all paired devices.
- Rename Device: Rename the paired device.
- Incoming Security: Set the incoming security (Always Ask or Always connect) for the paired device.
- Service Discovery: View the Bluetooth services supported by the paired device.
- Device Info: View the information of the paired device.
- Send Name Card via Bluetooth: Send contact information (vCard) to the paired device.
- Send V-calendar via Bluetooth: Send calendar events (vCalendar) to the paired device.
- Send Pictures via Bluetooth: Send pictures in My Pictures to the paired device.
- Send Sounds via Bluetooth: Send sounds in My Sounds to the paired device.
Bluetooth Settings
In the Bluetooth menu, highlight Add New Device and press the Right Soft Key [Options] to access the following options.
- My Phone Name: Edit your phone name which appears on other Bluetooth devices when your phone is located.
- Discovery Mode: Select On to allow other Bluetooth devices to find your phone, or select Off to disable the discovery mode.
Note: After selecting On, other users have one minute to see your accessibility, after which the discovery mode will automatically turn off.
- Supported Profiles: View the profiles that your phone can support. Highlight a profile and press the Center Select Key to view the description.
Tools
Calculator
Your phone has a basic calculator for addition, subtraction, multiplication and division.
Press the Center Select Key [Menu] > Settings & Tools > Tools > Calculator and use the keypad to operate.
- Press the Directional Key to select a mathematical function (add, subtract, multiply or divide).
- Press the Center Select Key to perform the calculation.
- Press the * Key to insert a decimal point.
- Press the # Key to change the sign.
- Press the Left Soft Key [Clear] to clear the inputs and result.
- Press the Right Soft Key [Operators] to insert ( , ), or Exponent.
Tip Calculator
- Press the Center Select Key [Menu] > Settings & Tools > Tools > Tip Calculator.
- Enter the Total bill amount, adjust the Tip percentage, and set the Split for the number of people paying.
- The calculator automatically displays the tip and the share of the bill for each person.
Calendar
You can use the function to arrange and remind you of your upcoming events.
Adding a New Event
- Press the Center Select Key [Menu] > Settings & Tools > Tools > Calendar.
-
Press the Directional Key to highlight a date.
-
Press the Left Soft Key [Add] to add a new event.
- Enter the subject, scroll down and press the Center Select Key [Set] to set other event settings including Start Time, End Time, Start Date, End Date, Recurrence, Alert Time, Reminder, Alert Tone and Vibrate.
- Press the Right Soft Key [Done].
Viewing an Event
- Press the Center Select Key [Menu] > Settings & Tools > Tools > Calendar.
- Press the Directional Key to highlight a scheduled day.
- Press the Center Select Key [View] to view the event of the highlighted day.
- Press the Center Select Key [View] again to see detailed information about the event.
Calendar Options
From the calendar view, press the Right Soft Key [Options] to access the calendar options.
• Weekly View/Monthly View: Choose to display the calendar in weekly view or monthly view.
- Go to Date: Specify a date to view.
- Erase All: Delete all events.
- Erase All Old: Delete all past events.
- Search: Enter the subject in the Go to field to search for the matched events.
Alarm Clock
Adding a New Alarm
- Press the Center Select Key [Menu] > Settings & Tools > Tools > Alarm Clock.
-
Select an alarm entry and press the Center Select Key.
-
From the Turn On/Off field press the Center Select Key [Set] to turn the alarm On or Off. Scroll down to adjust the remaining settings, including Set Time, Repeat and Ringtone.
-
Press the Right Soft Key [Done].
Alarm Options
From the Alarm Clock menu, highlight an existing alarm and press the Right Soft Key [Options] to access the following options.
• Turn off/on: Turn off or turn on the alarm.
- Reset: Delete the alarm.
- Reset All: Delete all alarms.
Stop Watch
- Press the Center Select Key [Menu] > Settings & Tools > Tools > Stop Watch.
- Press the Center Select Key [Start] to start timing.
- Press the Left Soft Key [Lap] to record lap times.
- Press the Center Select Key [Stop] to stop timing.
- Press the Right Soft Key [Reset] to clear the records.
World Clock
View the local time and the time of other cities around the world.
- Press the Center Select Key [Menu] > Settings & Tools > Tools > World Clock.
- Press the Directional Key left or right to display different cities and time zones.
Note: Press the Left Soft Key [DST] to enable or disable daylight savings time. Press the Right Soft Key [Cities] to open the city list and set a desired city as the local city.
Notepad
You can create, edit or erase notes on your phone.
- Press the Center Select Key [Menu] > Settings & Tools > Tools > Notepad.
- Press the Left Soft Key [Add] to add a new note.
- Enter the note and press the Center Select Key [Save] to save it.
- Highlight a note in the notepad list and press the Right Soft Key [Options] > Erase/Erase All to delete the highlighted note or all notes.
USB Mass Storage
You can use the USB mass storage feature to transfer data between the microSD card and PC.
- Insert the microSD card into your phone.
- Connect your phone to the PC with a USB cable.
- Press the Center Select Key [Menu] > Settings & Tools > Tools > USB Mass Storage.
- The phone will be in USB mode and you can transfer data between the microSD card and PC.
- If you want to exit from the USB mode, press the Center Select Key [Exit].
Tip: You can also press the End/Power Key to go back to idle screen and then connect your phone to the PC with a USB cable. Your phone will prompt you to connect the phone to PC, select Yes and press the Center Select Key to enable the USB mode.
Note: If the microSD card is locked, the phone will prompt you to unlock it.
Settings
Master Volume
Set the master volume of the phone.
- Press the Center Select Key [Menu] > Settings & Tools > Master Volume.
- Adjust the volume by pressing the Directional Key left or right.
- Press the Center Select Key [Set] to save. To check the volume, press the Left Soft Key [Play].
Tip: You can also press the Volume Keys in home screen to adjust the master volume.
Keyguard Settings
Set the keypad auto lock and unlock options. Please see the "Locking/Unlocking the Keypad" chapter for detailed information.
Sounds Settings
Call Sounds
- Press the Center Select Key [Menu] > Settings & Tools > Sounds Settings > Call Sounds.
- You can set the following options.
- Call Ringtone: Choose a ringtone from the list for incoming calls.
- Call Vibrate: Select On/Off to enable or disable the vibration for incoming calls.
Alert Sounds
-
Press the Center Select Key [Menu] > Settings & Tools > Sounds Settings > Alert Sounds.
-
You can set the following options.
-
TXT Message: Choose Tone, Vibrate, or Reminder for incoming text message alerts.
• Multimedia Message: Choose Tone, Vibrate, or Reminder for incoming multimedia message alerts.
• Voicemail: Choose Tone, Vibrate, or Reminder for incoming voicemail alerts.
- Emergency Tone:
Alert: The phone will play the emergency tone for emergency dialing, except when the master volume is set to Vibrate Only or Off.
➢ Vibrate: The phone will vibrate for emergency dialing instead of playing the emergency tone.
➢ Off: Disable the emergency tone and vibration.
- Missed Call: Choose Tone, Vibrate, or Reminder for missed call alerts.
Note: If Emergency Tone is set to Alert and the master volume is set to Vibrate Only, the phone will vibrate for emergency dialing. If the master volume is set to Off, the phone will not sound or vibrate for emergency dialing.
Keypad Volume
Adjust the volume played for keypad presses.
- Press the Center Select Key [Menu] > Settings & Tools > Sounds Settings > Keypad Volume.
- Press the Directional Key left or right to adjust the volume and press the Center Select Key [Set].
Digit Dial Readout
Choose whether the numbers are read out when you dial.
- Press the Center Select Key [Menu] > Settings & Tools > Sounds Settings > Digit Dial Readout.
- Select On or Off, and press the Center Select Key [Set].
Service Alerts
- Press the Center Select Key [Menu] > Settings & Tools > Sounds Settings > Service Alerts.
-
Select one of the following options and press the Center Select Key.
-
Minute Beep: The phone will beep every minute during a call.
- Call Connect: The phone will alert you when a call is connected.
-
Roam Alert: The phone will alert you when your phone is roaming.
-
Select On or Off, and press the Center Select Key [Set].
Power On/Off
Enable or disable the sound played when you power on or off the phone.
- Press the Center Select Key [Menu] > Settings & Tools > Sounds Settings > Power on/off.
- Select Power on or Power off, and press the Center Select Key.
- Select On or Off, and press the Center Select Key [Set].
Display Settings
Personal Banner
Add your own personalized greeting or network status banner that displays on the idle screen.
- Press the Center Select Key [Menu] > Settings & Tools > Display Settings > Personal Banner.
- Enter the text and choose the text color for the personal banner displayed in home screen, then press the Center Select Key [Save].
Backlight
Set the backlight duration for the display screen and keypad.
-
Press the Center Select Key [Menu] > Settings & Tools > Display Settings > Backlight.
-
Select one of the following options and press the Center Select Key.
-
Display: Select 3 Seconds, 10 Seconds, 20 Seconds, 30 Seconds, Always On or Power Save Mode as the backlight duration of display screen, and then press the Center Select Key [Save].
- Keypad: Select 3 Seconds, 10 Seconds, 20 Seconds, 30 Seconds, Always On or Always Off as the backlight duration of keypad, and then press the Center Select Key [Save].
Note: Setting the backlight to Always On may drain the battery life.
Wallpaper
Choose wallpaper for the idle screen.
- Press the Center Select Key [Menu] > Settings & Tools > Display Settings > Wallpaper.
- Select My Pictures or Fun Animations and press the Center Select Key.
- Select a picture and press the Left Soft Key [Preview] to view it. Press the Center Select Key to set it as wallpaper.
Display Themes
Choose different themes for the phone's menus.
- Press the Center Select Key [Menu] > Settings & Tools > Display Settings > Display Themes.
- Select Neon or Rebirth and press Left Soft Key [Preview] to preview the display theme. Press the Center Select Key [Save] to set the theme.
Note: The default display theme is Neon. Press the Right Soft Key [Help] to view the help information.
Dial Fonts
Set the font size in the dialer.
- Press the Center Select Key [Menu] > Settings & Tools > Display Settings > Dial Fonts.
- Select Normal or Large Only and press the Center Select Key [Save].
Menu Font Size
Set the menu font size.
- Press the Center Select Key [Menu] > Settings & Tools > Display Settings > Menu Font Size.
- Select Normal or Large and press the Center Select Key [Save].
Clock Format
Choose the clock type displayed in home screen.
- Press the Center Select Key [Menu] > Settings & Tools > Display Settings > Clock Format.
- Choose from the following options: Digital 12, Digital 24, or Off.
- Press the Left Soft Key [Preview] to view the clock format. Press the Center Select Key [Save] to confirm the setting.
Phone Settings
Airplane Mode
When Airplane Mode is enabled, all wireless communications are disabled. You cannot use your phone to place or receive calls. But when you make an emergency call: 911, the phone will turn off Airplane Mode automatically and the outgoing call screen will display.
- Press the Center Select Key [Menu] > Settings & Tools > Phone Settings > Airplane Mode.
- Select On or Off and press the Center Select Key [Save].
Setting Shortcuts
Setting My Shortcuts
- Press the Center Select Key [Menu] > Settings & Tools > Phone Settings > Set Shortcuts > Set My Shortcuts.
- Select the shortcut you want to change and press the Center Select Key [Set].
- Select an application in the list for replacement and press the Center Select Key.
- To reset shortcut(s), select a shortcut and press the Right Soft Key [Options] for the reset options.
- Reset Shortcut 1, 2, 3 or 4: Reset the selected shortcut.
- Reset My Shortcuts: Reset all shortcuts to default.
Using My Shortcuts
- Press the Directional Key right in the home screen to open the My Shortcuts menu.
- Select a shortcut and press the Center Select Key to access the function quickly.
- To relocation a shortcut, press the Right Soft Key [Move] and use the Directional Key to move the shortcut. Press the Center Select Key [Save] to confirm. Press the Left Soft Key [Settings] to Set My Shortcuts or Set Directional Keys.
Setting Directional Keys
Assign a shortcut key (Directional Key left, up and down) to a favorite or often-used function.
- Press the Center Select Key [Menu] > Settings & Tools > Phone Settings > Set Shortcuts > Set Directional Keys.
-
Highlight a directional key and press the Center Select Key [Set].
-
Select a function in the list for replacement and press the Center Select Key.
- To reset directional key shortcut(s), press the Right Soft Key [Options] for the reset options.
- Reset up, Left or down Key: Reset the selected directional key.
- Reset Directional Keys: Reset all directional keys to default.
Language
Choose a phone language.
- Press the Center Select Key [Menu] > Settings & Tools > Phone Settings > Language.
- Select a language and press the Center Select Key [Save].
Location
This Global Positioning Service (GPS) location feature can identify your location to the network. You can set GPS to work only when you dial 911 from your phone.
- Press the Center Select Key [Menu] > Settings & Tools > Phone Settings > Location.
- GPS location is on only when you dial 911. Press the Center Select Key [OK].
Phone Security
Lock your phone, set restrictions and other security options Note: You will need to enter the phone lock code to enter this menu. The default lock code is the last 4 digits of your phone number.
Edit Phone Code
- Press the Center Select Key [Menu] > Settings & Tools > Phone Settings > Phone Security.
- Enter the phone lock code and press the Center Select Key.
-
Select Edit Phone Code and press the Center Select Key.
-
Enter the new code and press the Center Select Key.
- Re-enter the new code for confirmation and press the Center Select Key.
Phone Lock Setting
Phone locking keeps your phone from unauthorized use. The use of your phone is restricted once the phone is locked, but you can still make emergency calls.
- Press the Center Select Key [Menu] > Settings & Tools > Phone Settings > Phone Security.
- Enter the phone lock code and press the Center Select Key.
- Select Phone Lock Setting and press the Center Select Key.
-
Select one of the following options and press the Center Select Key [Save].
-
Unlocked: The phone is not locked whenever you power up the phone.
- on Power up: You need to enter the phone lock code whenever you power up your phone.
Lock Phone Now
Lock your phone manually. For detailed information, see the "Locking Your Phone" chapter.
Restore Phone
Erase all user data permanently and reset all settings to factory defaults.
- Press the Center Select Key [Menu] > Settings & Tools > Phone Settings > Phone Security.
- Enter the phone lock code and press the Center Select Key.
- Select Restore Phone and press the Center Select Key.
- Select Yes and press the Center Select Key.
- Follow the on-screen prompts and press the Center Select Key to restore the phone.
Global Data Settings
Enable or disable the data access for global roaming.
- Press the Center Select Key [Menu] > Settings & Tools > Phone Settings > Global Data Settings.
- Select Allow Access For All Trips, Allow Access Only For This Trip or Deny Data Roaming Access and press the Center Select Key.
System Select
You don't need to set this option unless you want to change the system selection. Please contact your service provider for details.
-
Press the Center Select Key [Menu] > Settings & Tools > Phone Settings > System Select.
-
Select one of the following options and press the Center Select Key [Save].
- Home Only: Your phone is available for normal operation only in the home network.
• Automatic: You can use your phone in the home or roaming network.
Call Settings
Answer Options
Select the method for answering incoming calls.
-
Press the Center Select Key [Menu] > Settings & Tools > Call Settings > Answer Options.
-
Select from the following options and press the Center Select Key [Mark].
- Any Key: Calls are answered when any key is pressed except the End/Power Key, Left and Right Soft Keys and Volume Keys.
• Auto with Handsfree: Calls are answered automatically with 5 seconds delay.
3. Press the Left Soft Key [Done].
Note: Auto with Handsfree is available when a headset is inserted into your phone.
Auto Retry
Set the length of time the phone waits before automatically redialing a number when the attempted call fails.
- Press the Center Select Key [Menu] > Settings & Tools > Call Settings > Auto Retry.
- Select 10, 30, 60 Seconds or Off and press the Center Select Key [Set].
TTY Mode
Your phone is a TTY compatible device. Simply connect the TTY device to the phone's headset jack.
- Press the Center Select Key [Menu] > Settings & Tools > Call Settings > TTY Mode.
-
Select one of the following options and press the Center Select Key [Set].
-
TTY Full: Users who cannot talk or hear may use this mode to send and receive text messages through TTY device.
- TTY + Talk: Users who can talk, but cannot hear, may use this mode to talk through the phone and receive responses via text messages.
- TTY + Hear: Users who can hear, but cannot talk, may use this mode to listen to conversation of the other party, and respond via text messages.
- TTY off: Users who can hear and talk can disable TTY support.
One Touch Dial
Enable or disable the speed dial feature.
-
Press the Center Select Key [Menu] > Settings & Tools > Call Settings > One Touch Dial.
-
Select On or Off and press the Center Select Key [Set].
DTMF Tones
Set the DTMF tones length.
-
Press the Center Select Key [Menu] > Settings & Tools > Call Settings > DTMF Tones.
-
Select Normal or Long and press the Center Select Key [Set].
Hearing Aid Mode
Your phone supports HAC (Hearing Aid Compatibility) function. When you turn on the Hearing Aid Mode and use a hearing aid to answer the phone, it will help you hear more clearly during the phone call.
-
Press the Center Select Key [Menu] > Settings & Tools > Call Settings > Hearing Aid Mode.
-
Select On or Off and press the Center Select Key [Set].
Memory
Save Options
Choose the default save location for pictures and sounds.
-
Press the Center Select Key [Menu] > Settings & Tools > Memory > Save Options.
-
Select Pictures or Sounds and press the Center Select Key.
-
Select Phone Memory or Card Memory and press the Center Select Key [Set].
Phone Memory
View the phone memory usage information and manage the files stored in the phone. To move files to the microSD card, you need to insert the card to your phone first.
Note: The preloaded pictures, ringtones and sounds in your phone are not available for Phone Memory.
- Press the Center Select Key [Menu] > Settings & Tools > Memory > Phone Memory.
-
Select one of the following menus and press the Center Select Key.
-
Phone Memory Usage: View the available, used or total phone memory and the phone memory usage for My Music, My ringtones, My sounds and My pictures.
- My Pictures: View the pictures saved on your phone in My Pictures.
- My Ringtones: View the ringtones saved on your phone in My Ringtones.
- My Music: View the music files saved on your phone in My Music.
- My Sounds: View the sounds saved on your phone in My Sounds.
- My Contacts: View the contacts saved on your phone.
-
Move All To Card: Move all movable files on your phone to the microSD card.
-
Press the Right Soft Key [Options] to access more options.
Card Memory
View the microSD card memory usage information and manage the files stored in the card. Please insert the card to your phone first.
-
Press the Center Select Key [Menu] > Settings & Tools > Memory > Card Memory.
-
Select one of the following menus and press the Center Select Key.
-
Card Memory Usage: View the available, used or total card memory and the card memory usage for My Music, My sounds and My pictures.
- My Pictures: View the pictures saved on the microSD card in My Pictures.
- My Music: View the music files saved on the microSD card in My Music.
- My Sounds: View the sounds saved on the microSD card in My Sounds.
• My Contacts: View the contacts saved on the microSD card. - Move All To Phone: Move all movable files on the microSD card to your phone.
-
Format: Format the microSD card. All data in the card will be erased.
-
Press the Right Soft Key [Options] to access more options.
Card Lock
You can choose to lock or unlock the microSD card when it is inserted into your phone.
- Press the Center Select Key [Menu] > Settings & Tools > Memory > Card Lock.
- Select On or Off and press the Center Select Key [Set].
Note: When the microSD card is locked, you cannot copy or move files to the microSD card.
Phone Info
-
Press the Center Select Key [Menu] > Settings & Tools > Phone Info.
-
Select one of the following menus and press the Select Key.
Center
• My Number: View the MDN and MIN information.
- SW/HW Version: View Software version, PRL version, Browser version, HW version, MEID and Warranty date code.
- Icon Glossary: View the list of icons with a brief description.
- Operating System: View the information of the operating system.
For Your Safety
General Care
Your handset contains delicate electronic circuitry, magnets and battery systems. You should treat it with care and give particular attention to the following points:
- Do not allow the handset, battery or accessories to come into contact with liquids or moisture at any time. Do not immerse it in any liquid.
- Do not place the handset alongside computer disks, credit cards, travel cards or other magnetic media. The information contained on the disks or cards may be affected by the handset.
- Do not paint the handset.
- Do not leave the handset or battery in places where the temperature could exceed 140 °F, e.g. on a car dashboard or a windowsill, behind glass in direct sunlight, etc.
- Do not remove the handset battery while the handset is switched on.
• Take care not to allow metal objects, such as coins or key rings, to contact or short-circuit the battery terminals.
- Do not dispose of batteries in fire. The handset's Li-ION batteries may be safely disposed of at a Li-ION recycling point. Follow local requirements for recycling.
- Do not put the handset's battery in your mouth, as battery electrolytes may be toxic if swallowed.
- Do not disassemble or crush, bend or deform, puncture, or shred.
- Do not modify or remanufacture, attempt to insert foreign objects into the battery, immerse or expose to water or other liquids, expose to fire, explosion or other hazard.
- Only use the battery for the system for which it is specified.
- Only use the battery with a charging system that has been qualified by ZTE. Use of an unqualified battery or charger may present a risk of fire, explosion, leakage, or other hazard.
- Do not short-circuit a battery or allow metallic conductive objects to contact battery terminals.
- Replace the battery only with another battery that has been qualified with the system per this standard, IEEE-Std-1725. Use of an unqualified battery may present a risk of fire, explosion, leakage or other hazard.
- Promptly dispose of used batteries in accordance with local regulations.
- Battery usage by children should be supervised.
- Avoid dropping the phone or battery. If the phone or battery is dropped, especially on a hard surface, and the user suspects damage, take it to a service center for inspection.
- Improper battery use may result in a fire, explosion, or other hazard.
- The phone shall only be connected to products that bear the USB-IF logo or have completed the USB-IF compliance program.
- Do not put a battery into a microwave oven, dryer or high-pressure container.
- Use only authorized chargers.
- Do not puncture the battery with a sharp object such as a needle.
- When the battery is disposed, be sure it is non-conducting by applying vinyl tape to the (+) and (-) terminals.
- Do not drop, throw, or subject the handset to rough treatment.
- Stop using the battery if abnormal heat, odor, discoloration, deformation, or abnormal condition is detected during use, charge or storage.
- Do not use your handset with a damaged or deformed battery.
- Do not solder the battery directly.
- Remove the battery whose life cycle has expired from equipment immediately.
- The earpiece may become warm during normal use. Also, the handset itself may become warm while the battery is being charged.
- When a handset is in vibration mode, the vibration may cause the handset to move.
- Be careful not to place the handset near heat sources (such as a heater).
- Use a damp or anti-static cloth to clean the handset. Do not use an ordinary dry cloth or electrostatic cloth. Do not use chemical or abrasive cleaners as these could damage the casing.
- Third party equipment: The use of third party equipment, cables, or accessories, not made or authorized by ZTE, may invalidate the warranty of your phone and also adversely affect the phone's safety and operation.
- Remember to make backup copies of all important data on your handset.
- Remember to recycle: The cardboard packing supplied with this handset is ideal for recycling.
Warning: In the unlikely event of a battery leak, take care to keep the battery discharge away from your eyes and skin. If the leakage does come into contact with the eyes or skin, flush thoroughly with clean water and consult with a doctor.
Aircraft Safety
- Switch off your phone or activate the airplane mode when inside or near an aircraft. Use of handsets in an aircraft may be dangerous to the operation of the aircraft and may disrupt
the cellular network. Failure to observe this instruction may lead to suspension or denial of phone service to the offender, or legal action, or both.
- Airplane mode allows you to use many of your phone's features, such as calculator, voice memos, and many others when you are in an airplane or other area where wireless signals may cause interference. In the airplane mode, you are prohibited from making or receiving calls.
Hospital Safety
- Switch off your phone and remove its battery in areas where handset use is prohibited.
- Follow the instructions given by any respective medical facility regarding the use of cellular handsets on their premises.
General Guidelines
- Many jurisdictions have laws and regulations about taking pictures in public or private areas regarding the processing and further use of such pictures. ZTE encourages its customers to obey all laws and to honor the personal rights of others.
- Check the roaming agreement availability with your network operator.
- The use of mobile phones is not allowed in some radiation sensitive areas, such as hospitals, research centers, and airplanes. The user is responsible for powering off the device. If there is any uncertainty, the battery should be removed.
- Observe any signs that indicate powering off your handset, such as those near gas stations or explosives.
- If you have a heart condition, be careful with the setting of call vibration or tone volume. This phone is capable of producing loud noises which may damage your hearing. Turn
down the volume before using headphones, Bluetooth stereo headsets or other audio devices.
- Do not allow children to play with the handset, charger or batteries.
- The operation of some medical electronic devices, such as hearing aids and pacemakers, may be affected if a handset is used next to them. Observe any caution signs and the manufacturer's recommendations.
- Take care not to put your phone in the back pocket of your pants and then sit on the phone. Also, do not put your phone at the bottom of a bag where it may be subject to excessive weight or pressure as this may damage the LCD and cause them to malfunction.
- The phone contains metal and may cause a reaction for overly sensitive skin types.
- Do not leave the phone discharged or without a battery for a long period of time. Otherwise some data may be erased.
Road Safety
- You must exercise proper control of your vehicle at all times. Give your full attention to driving.
- Observe all of the recommendations contained in your local traffic safety documentation.
- Pull off the road and park before making or answering a call, if driving conditions require so. Check if local laws and/or regulations restrict the use of cellular phones while driving.
- You must not stop on the hard shoulder of a motorway to answer or make a call, except in emergency situations.
- Switch off your handset at a refueling point, such as a gas station, even if you are not refueling your own car.
- Do not store or carry flammable or explosive materials in the same compartment as the handset.
• Electronic systems in a vehicle, such as anti-lock brakes,
speed control and fuel injection systems are not normally affected by radio transmissions. The manufacturer of such equipment may advise if it is adequately shielded from radio transmissions. If you suspect vehicle problems caused by the radio transmitter in the handset, consult your dealer and do not switch on the handset until your handset has been checked by a qualified technician.
Vehicles Equipped With an Airbag
An airbag inflates with great force. Do not place objects, including either installed or portable wireless equipment, in the area over the airbag or in the airbag deployment area. If in-vehicle wireless equipment is improperly installed and the airbag inflates, serious injury could result.
Third Party Equipment
The use of third party equipment, cables or accessories, not made or authorized by ZTE, may invalidate the warranty of the handset and also adversely affect the handset's operation. For example, use only the ZTE charger supplied with the handset.
Efficient Use
For optimum performance with minimum power consumption, do not cover the antenna area (It's on the bottom of your phone when you are holding it) with your hand. Covering the antenna affects the call quality, may cause the handset to operate at higher power levels than needed, and may shorten talk and standby times.
Radio Frequency (RF) Energy
This model phone meets the government's requirements for exposure to radio waves.
This phone is designed and manufactured not to exceed the emission limits for exposure to radio frequency (RF) energy
set by the Federal Communications Commission of the U.S. Government:
The exposure standard for wireless mobile phones employs a unit of measurement known as the Specific Absorption Rate, or SAR. The SAR limit set by the FCC is 1.6 W/kg. Tests for SAR are conducted using standard operating positions accepted by the FCC with the phone transmitting at its highest certified power level in all tested frequency bands. Although the SAR is determined at the highest certified power level, the actual SAR level of the phone while operating can be well below the maximum value. This is because the phone is designed to operate at multiple power levels so as to use only the power required to reach the network. In general, the closer you are to a wireless base station antenna, the lower the power output.
The highest SAR value for this model phone as reported to the FCC when tested for use at the ear is 1.230 W/kg and when worn on the body, as described in this user guide, is 1.000 W/kg (Body-worn measurements differ among phone models, depending upon available enhancements and FCC requirements.)
While there may be differences between the SAR levels of individual phones and at various positions, they all meet the government requirement.
The FCC has granted an Equipment Authorization for this model phone with all reported SAR levels evaluated as in compliance with the FCC RF exposure guidelines. SAR information on this model phone is on file with the FCC and can be found under the Display Grant section of http://www.fcc.gov/oet/ea/fccid after searching on
FCC ID: Q78-ZTECF451
For body worn operation, this phone has been tested and meets the FCC RF exposure guidelines for use with an accessory that contains no metal and that positions the handset a minimum of 1.5
cm from the body. Use of other enhancements may not ensure compliance with FCC RF exposure guidelines. If you do not use a body-worn accessory and are not holding the phone at the ear, position the handset a minimum of 1.5 cm from your body when the phone is switched on.
Emergency Services
To make an emergency call in any country:
- Ensure your phone is ON and in service. Press the Center Select Key to unlock the phone.
- Press the End/Power Key as many times as needed to clear the display and ready the device for calls.
- Enter a local emergency number, i.e., 911.
- Press the Send Key to dial the number. Follow instructions received and do not end the call until told to do so.
IMPORTANT: Tell the operator which service you require: Police, Ambulance, Fire Engine, Coastguard or Mountain Rescue Service. Give your position, and if possible, remain stationary and maintain contact. Due to the nature of the cellular system, the connection of emergency calls cannot be guaranteed.
You should never rely on any wireless device for essential communication such as medical emergencies.
FCC Compliance
This device complies with part 15 of the FCC Rules. Operation is subject to the following two conditions: (1) This device may not cause harmful interference, and (2) this device must accept any interference received, including interference that may cause undesired operation.
Caution: Changes or modifications not expressly approved by the manufacturer could void the user's authority to operate the equipment.
NOTE: This equipment has been tested and found to comply
with the limits for a Class B digital device, pursuant to part 15 of the FCC Rules. These limits are designed to provide reasonable protection against harmful interference in a residential installation. This equipment generates, uses and can radiate radio frequency energy and, if not installed and used in accordance with the instructions, may cause harmful interference to radio communications. However, there is no guarantee that interference will not occur in a particular installation. If this equipment does cause harmful interference to radio or television reception, which can be determined by turning the equipment off and on, the user is encouraged to try to correct the interference by one or more of the following measures:
- Reorient or relocate the receiving antenna.
- Increase the separation between the equipment and receiver.
- Connect the equipment into an outlet on a circuit different from that to which the receiver is connected.
- Consult the dealer or an experienced radio/TV technician for help.
IC Notice
Operation is subject to the following two conditions: (1) this device may not cause interference, and (2) this device must accept any interference, including interference that may cause undesired operation of the device. This Class B digital apparatus complies with Canadian ICES-003. Cet appareil numérique de la classe Best conforme à la norme NMB-003 du
Canada. This device and its antenna(s) must not be co-located or operating in
conjunction with any other antenna or transmitter. The County Code Selection feature is disabled for products marketed in the US/Canada.
IC: 5200A-ZTECF451
Copyright Notice
The video/audio recordings you download are protected by copyright laws. They are for your personal use only and must not be otherwise used without the permission of the copyright owner.
ZTE F451
Guide d'utilisation
INFORMATION JURIDIQUE
Copyright © 2011 ZTE CORPORATION.
Volume principal ....132
text_image
21 18 20 19 Public ZTE