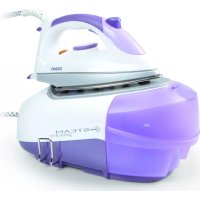
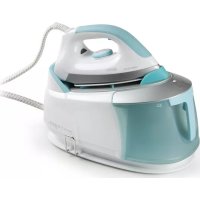
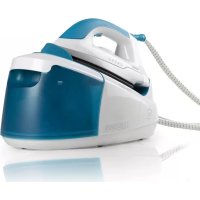
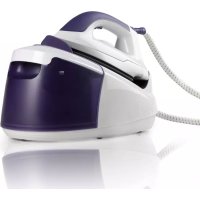
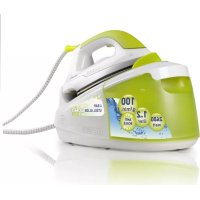
DO7081S - Generator DOMO - Free user manual and instructions
Find the device manual for free DO7081S DOMO in PDF.


| Product type | Steam station |
| Brand | DOMO |
| Model | DO7081S |
| Power supply | 220-240 V ~ 50/60 Hz |
| Power | 2200 W (estimation) |
| Water tank capacity | Approximately 1.5 L |
| Steam pressure | High pressure (up to 5 bar) |
| Temperature settings | 3 positions (1, 2, 3 dots) |
| Steam levels | Low, medium, max |
| Water hardness setting | LO (soft), MI (medium), HI (hard) |
| Functions | Steam ironing, dry ironing, vertical steam, spray, auto shut-off (10 min) |
| Display | LCD screen with indicators |
| Safety | Auto shut-off, overheating protection, pressure cap lock |
| Maintenance and cleaning | Rinse steam generator with clean water, clean soleplate with damp cloth |
| Spare parts and repairability | Contact DOMO after-sales service |
| Warranty | 2 years |
| Dimensions (approx.) | 40 x 25 x 30 cm |
| Weight (approx.) | 5 kg |
Frequently Asked Questions - DO7081S DOMO
User questions about DO7081S DOMO
0 question about this device. Answer the ones you know or ask your own.
Ask a new question about this device
Download the instructions for your Generator in PDF format for free! Find your manual DO7081S - DOMO and take your electronic device back in hand. On this page are published all the documents necessary for the use of your device. DO7081S by DOMO.
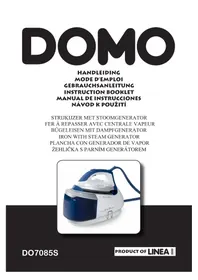
USER MANUAL DO7081S DOMO
CONDITIONS DE GARANTIE
This appliance has a two year warranty period. During this period the manufacturer is responsible for any failures which are the direct result of construction failure. When these failures occur the appliance will be repaired or replaced if necessary. The warranty will not be valid when the damage to the appliance is caused by wrong use, not following the instructions or repairs executed by a third party. The warranty will only be valid if the warranty application has been completed by the dealer at the time of purchase. All parts, which are subject to wear, are excluded from the warranty.
www.domo-electro.be DO7081S
Type nr. Apparaat
N^ de modulo de l'appareil DO7081S
Type nr des Gerätes
Type nr. of appliance
Naam
Nom
Name
Adres
Adresse
Address
Aankoopdatum
Date d'achat
Kaufdatum
Date of purchase
Tel :
RECYCLAGE INFORMATIE
RECYCLING INFORMATIONEN
RECYCLING INFORMATION
The symbol on the product or on its packaging indicates that this product may not be treated as household waste. Instead it shall be brought to the applicable collection point for recycling of electrical and electronic equipment. By ensuring this product is disposed of correctly, you will help prevent potential negative consequences for the environment and human health, which could otherwise be caused by inappropriate waste handling of this product. For more detailed information about recycling of this product, please contact your local city office, your household waste disposal service or the shop where you purchased the product.
INFORMACE O RECYKLACI ODPADU
If the supply cord is damaged, it must be replaced by manufacturer of its service agent or a similarly qualified person in order to avoid a hazard.
BELANGRIJK
For safety purpose you should read the instructions carefully before using the appliance for the first time. Save the instructions for future reference.
The appliance is designed for domestic use and may only be operated in accordance with these instructions for use.
The appliance generates high temperature steam. Always handle with care and warn other users of potential danger.
DO'S
Check the mains voltage state don the rating plate corresponds to the local electricity supply.
Unwind and straighten the power cord an supply cord before use.
Place the appliance on firm and steady surface.
The appliance must be used and rested on a stable surface.
Avoid power cord or supply cord touches the soleplate.
The plug of the supply cord must be removed from the socket-outlet before the water reservoir is filled with water.
Keep electrical appliances out of reach from children or infirm persons. Do not let them use the appliances without supervision.
When placing the iron on its stand, ensure that the surface on which the stand is placed is stable.
If the power cord or supply cord is dapaged, te manufacturer or its service agent or similarly qualified person must replace it in order to avoid a hazard.
Empty the water tank after use.
This appliance is not intended for use by persons (including children) with reduced pysical, sensory or mental capabilities, or lack of experience and knowledge, unless they have been given supervision or instruction concerning use of the appliance by a person responsible for their safety.
Children should be supervised to ensure that htey do not play with the appliance.
DO NOT'S
Do not allow children touch the appliance when ironing.
Do not leave the appliance unattended when it is connected to a mains supply outlet.
Do not use an extension power cord set unless competent authority has approved it.
Do not add perfumed, vinegar or other chemical liquids in the water tank; they can damage the appliance seriously.
Do not immerse the appliance in water or any other liquid.
Do not use the appliance when it is damaged or performs abnormally.
The appliance is not to be used i fit has been dropped, if there are visible signs of damage or if it is leaking.
Do not touch the iron rest during or jsut after ironing. It is hot!
Do not roll the power cord or supply cord around the iron unit or base console for storage until it has cooled down completely.
Do not attempt to open the cabine tor dismantle any parts from the appliance, there is no serviceable part inside.
The filling aperture must not be opened during use. Instruction for the safe refilling of the water reservoir shall be given.
When cleaning, never unscrew the boiler cap whilst the unit is pressurised. Steam will shoot out and burn you. Always switch off, unplug and leave overnight before commencing to clean the boiler.
Don't use distilled water in the iron.
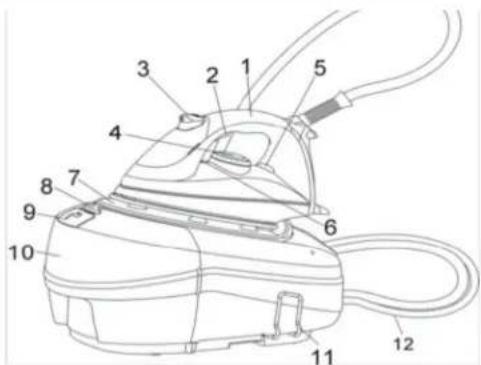
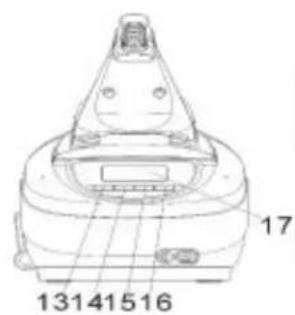
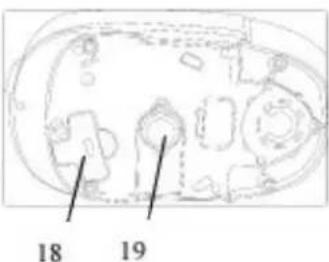
GET TO KNOW YOUR STEAM GENERATOR
| 1. Soft Grip Handle 11. Cord Storage | |
| 2. Steam Button 12. Cord | |
| 3. Spray Button 13. Power On/Off button | |
| 4. Temperature Dial 14. Water | Hardness Setting Button |
| 5. Pilot Light 15. “-” LCD Control Button | |
| 6. Temperature Indicator 16. “+” LCD Control Button | |
| 7. Iron Rest 17. LCD | |
| 8. Water Tank Release Button | 18. Boiler Key |
| 9. Water Inlet Cover 19. Boiler Cap Cover | |
| 10. Water Tank | |
D
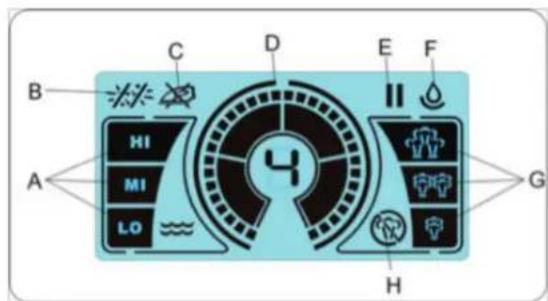
A. Water Hardness Level Indicators
B. Boiler Clean Indicator
C. Base Unit Temperature Indicator
D. Pressure Level Indicator
E. Auto Shut off indicator
F. Water Refill Indicator
G. Steam Level Indicators
H. Steam Off Mode Indicator
HINT FOR IRONING
Sort out the articles to be ironed according to the type of fabric. This will minimize the frequency of temperature adjustment for different garment.
Test ironing a small area on the backside or inside the garment if you are unsure about the type of fabric. Start with a low temperature and increase gradually.
Wait for 2 minutes before ironing heat sensitive fabrics. Temperature adjustment needs certain time to reach the required level no matter it is higher or lower.
Delicate fabrics such as silk, wool, velour, etc. are best ironed with an ironing cloth to prevent shine marks
The appliance has a high technology steam chamber, water is converted to steam vapor in the chamber and transported to the iron unit through the supply cord.
HOW TO FILL WATER
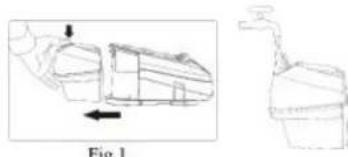
The appliance has an electronic system to monitoring the water level. When the water level is lower than the pre-set value, the icon will blink with beep sound until the water is re-filled.
Disconnect the power cord from mains supply outlet.
Press the water tank release button and pull out the water tank.
Open the water inlet cover.
Fill water through the water inlet hole up to MAX level marked on the side of water
tank.
Close the water inlet cover Replace the water tank in its place.
FIRSTTIME IRONING
Remove any protective films or sticker from the soleplate and the cabinet, if any.
Unwind and straighten the power cord and supply cord.
Fill the water tank with tap water.
Connect the appliance to a suitable mains supply outlet.
"Beep" sound would be heard and the LCD would display all logos for a Second then turn off.
Press the power On/Off button
The medium steam level ( ) and medium hard water level (一) indicators will display in the LCD with a beep sound.
The will blink to indicate; the steam generator is heating up or cooling down for the steam ironing.
Select the Max steam level ( ) indicator by press the “+” LCD control button, a beep sound would be heard.
Turn the Temperature Dial on the Iron unit in clockwise direction to Maximum position, the Pilot Light will glow.
The steam generator pressure will increase step by step as
The will disappear from the LCD, when the steam generator reached the appropriate heat
Wait until the LCD display the icon, its mean the steam generator reached the high pressure.
Pilot Light goes off when the required temperature for the iron unit is reached.
The appliance is ready to use.
Depress the Steam Button for 1 minute to clean the steam generating system.
Begin first time ironing with an old towel
Note:
The steam never come out until the steam generator reached the required temperature. It takes about one minutes to reach its required temperature.
STEAM IRONING
Unwind and straighten the power cord and supply cord.
Fill the water tank with tap water. (See HOW TO FILL WATER)
Connect the appliance to a suitable mains supply outlet.
"Beep" sound would be heard and the LCD would display all logos for a Second then turn off.
Press the power On/Off button,
The medium steam level and hard water level indicator will display in the LCD with a beep sound.
The will blink to indicate; the steam generator is heating up or cooling down for the steam ironing.
Turn the Temperature Dial in clockwise direction; select ‘’ (1 dot), ‘’ (2 dots) or ‘’
(3 dots) according to the recommendation of garment label.
Pilot Light glow until the required temperature for the iron unit is reached.
Select your required steam level by press the "+" -" LCD control buttons, Max steam level, medium steam level and Low steam level, a beep sound would be heard for each LCD control button pressing.
The steam generator pressure will increase step by step.
The will disappear in the LCD, when the steam generator reached the appropriate heat
Pilot Light goes off when the required temperature for the iron unit is reached.
The appliance is ready to use.
Press the Steam Button for steam ironing.
Turn the Temperature Dial on the iron unit in anti-clockwise direction to "Min" and the iron is switched off.
Press the Power On/Off switch, the base console will switch to "Standby mode" with a beep sound.
Disconnect the power cord from mains supply outlet.
When the appliance gets cool completely, store it in a safe place. For the power cord & steam supply cord storage
VERTICAL STEAMING
This function provides steam to remove wrinkles on delicate garments in hanging position, hanging curtains or other hanging fabric
Note:
Do not apply steam on any clothes or fabrics that are being worn by human or pets.
Temperature of steam is very high.
Maintain a distance of a few centimeters from delicate fabric (Synthetics, silk, velvet, etc.), otherwise the fabric could be damaged.
DRY IRONING
Unwind and straighten the power cord and supply cord.
Connect the appliance to a suitable mains supply outlet.
"Beep" sound would be heard and the LCD would display all logos for a Second then turn off.
Press the power On/Off button
The medium steam level and medium hard water level indicator will display in the LCD with a beep sound.
The will blink to indicate; the base unit is heating up or cooling down.
Turn the Temperature Dial on the iron in clockwise direction; select ·s (1 dot), ·s (2 dots) or ·s (3 dots) according to the recommendation of garment label.
Pilot Light glow until the required temperature for the iron unit is reached.
Select the dry iron indicator ( ) by press the “-LCD control button, a beep sound would be heard for each LCD control button pressing.
If the steam generator has the steam pressure, the pressure indicator will display in the LCD.
Pilot Light goes off when the required temperature for the iron unit is reached.
The appliance is ready to use.
Turn the temperature dial on the iron unit in anti-clockwise direction to "Min" and the iron is switched off.
Press the Power On/Off switch, the base console will switch to "Standby mode" with a beep sound.
Disconnect the power cord from mains supply outlet.
When the appliance gets cool completely, store it in a safe place.
AUTO SHUT-OFF
The auto shut off mode will activate if the steam button not press over 10 minutes whether you are using the appliance. The LCD display back light goes off with a beep sound and the pause icon will blink. When this occurs, press the Power ON/OFF button or steam knob once, the appliance will switch ON immediately. Wait about one and half minutes for the appliance to heat up to the temperature set before.
WATER HARDNESS SETTING
Unwind and straighten the power cord and supply cord.
Connect the appliance to a suitable mains supply outlet.
"Beep" sound would be heard and the LCD would display all logos for a Second then turn off.
Press the power On/Off button
The medium steam level and hard water level indicators will display in the LCD with a beep sound.
The icon will blink to indicate; the steam generator is heating up or cooling down for the steam ironing.
Press once the water hardness setting button, the icon will display in the LCD with a beep sound.
Select your usage water hardness by press the “-, +” LCD control buttons; Soft water (LO) or Hard water (MI) or Very Hard water (HI), a beep sound would be heard for each pressing.
For the memory setting simply once press the water hardness setting button, the icon will disappear from the LCD with a beep sound.
SPRAYING
This function can be used any time and is not affect any setting.
Remove the spray button -.
Fill the water tank.
Replace the water tank in its place.
Aim the nozzle to the garment.
Press the Spray Button.
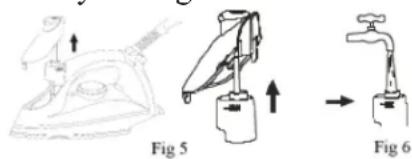
Note: It may be necessary to press the spray button a few times to start this function.
HOW TO CLEAN THE STEAM GENERATOR
To extend the life of your steam station and to avoid a build up of scale, it is essential that you rinse out the boiler, after the icon start the flashing in the LCD.
- The icon will blink to indicate you to clean the boiler.
-
Press the Power On/ off switch, the base console will switch to "Standby mode" with a beep sound.
-
Disconnect the power cord from mains supply outlet.
- Allow the appliance cool down fully.
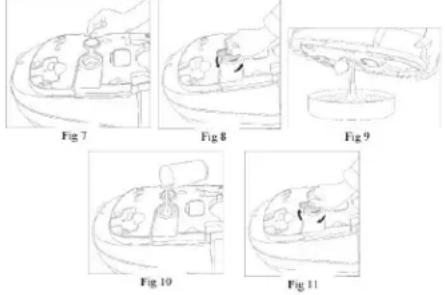
- Turn the steam station upside down and pull back the boiler cap cover.
- Unscrew the boiler cap by using the provided key at the bottom of the generator and empty out any water.
- Pour one cup of tap or filtered water through the boiler underneath hole.
- Shake the appliance gently then empty out all the water.
- Repeat this operation until the water from the boiler comes out clear and clean.
- Pour 100ml of water in the boiler. Leave the water in the boiler, to prevent the boiler from getting damaged.
11 Screw the boiler cap back on again without using excessive force. - Replace the cover.
- The unit is now ready to use.
Important:
When cleaning, never unscrew the boiler cap whilst the unit is pressurized. Steam will shoot out and burn you. Always switch off, unplug and leave overnight before commencing to clean the boiler.
Do not use chemical descending agents or vinegar as they may damage your appliance.
DRAINING THE WATER
Disconnect the power cord from mains supply outlet.
Press the water tank release button and pull out the water tank.
Open the water inlet cover
Empty the water in the tank holding on it upside down as.
Close the water inlet cover
Replace the water tank in its place.
CLEANING AND MAINTENANCE
- Disconnect the power cord from the mains supply outlet.
- Use a damped cloth or non-scratching cleaner to remove any deposits on the soleplate or the cabinets.
- Never use sharp or rough objects to remove the deposit on the soleplate.
- Never use any abrasive, vinegar or descending agents to clean the iron.
- CONDITIONS DE GARANTIE
- RECYCLAGE INFORMATIE
- RECYCLING INFORMATIONEN
- RECYCLING INFORMATION
- INFORMACE O RECYKLACI ODPADU
- BELANGRIJK
- DO'S
- DO NOT'S
- GET TO KNOW YOUR STEAM GENERATOR
- D
- HINT FOR IRONING
- HOW TO FILL WATER
- FIRSTTIME IRONING
- STEAM IRONING
- VERTICAL STEAMING
- DRY IRONING
- AUTO SHUT-OFF
- WATER HARDNESS SETTING
- SPRAYING
- HOW TO CLEAN THE STEAM GENERATOR
- Important:
- DRAINING THE WATER
- CLEANING AND MAINTENANCE
Brand : DOMO
Model : DO7081S
Category : Generator