PDP433HDE - Téléviseur PIONEER - Free user manual and instructions
Find the device manual for free PDP433HDE PIONEER in PDF.
Download the instructions for your Téléviseur in PDF format for free! Find your manual PDP433HDE - PIONEER and take your electronic device back in hand. On this page are published all the documents necessary for the use of your device. PDP433HDE by PIONEER.
USER MANUAL PDP433HDE PIONEER
Operating Instructions
PLASMA DISPLAY SYSTEM SYSTEME D'ÉCRAN PLASMA PLASMA DISPLAY-SYSTEM PDP-503HDE PDP-433HDE PDP-503HDE/(HYO1) 9/3/02, 1:30 PM1Thank you for buying this Pioneer product.
Please read through these operating instructions so you will know
how to operate your model properly. After you have finished read-
ing the instructions, put them away in a safe place for future
In some countries or regions, the shape of the power plug and
power outlet may sometimes differ from that shown in the ex-
planatory drawings. However the method of connecting and op-
erating the unit is the same.
WARNING: BEFORE PLUGGING IN THE UNIT FOR THE FIRST TIME, READ THE FOLLOWING SECTION CAREFULLY.
(GROUNDING, EARTHLING) PIN, IT WILL ONLY FIT INTO A GROUNDING (EARTHLING) TYPE POWER OUTLET. THIS IS A SAFETY FEATURE. IF YOU ARE UNABLE TO INSERT THE PLUG INTO THE OUTLET, CONTACT YOUR ELECTRICIAN TO REPLACE YOUR OBSOLETE OUTLET. DO NOT DEFEAT THE SAFETY PURPOSE OF THE GROUNDING (EARTHLING) TYPE PLUG.
The following symbols are found on labels
attached to the product. They alert the operators
and service personnel of this equipment to any
potentially dangerous conditions.
WARNING This symbol refers to a hazard or unsafe
practice which can result in personal injury or
CAUTION This symbol refers to a hazard or unsafe
practice which can result in severe personal
OR FABRIC. HAVING A THICK PILE.
PDP-503HDE/(WARNING) 8/31/02, 5:06 PM11
Thank you for your purchase of the PIONEER product. To ensure safety and many years of trouble-free operation
of your product, please read the Safety Precautions carefully before using this product.
Connecting to the power cord ………………… 12
Turning off the power ………………………………… 13
Initial auto installation ………………………………… 14
Simple button operations for changing channels … 16
Simple button operation for changing
volume/sound …………………………………… 17
Additional channels entry ………………… 27
Connecting a DVD player ……………………… 42
Displaying a DVD image ………………………… 42
Enjoying a game console and viewing camcorder
images …………………………………………… 43
Connecting a game console or camcorder …… 43
Displaying an image of the game player
and camcorder ……………………………… 43
Viewing an image from a computer ………………… 44
Connecting a computer ………………………… 44
Displaying an image from a computer ………… 44
Password setting for Child lock (AV mode only) …… 54
Connecting pin assignments for SCART …………… 61
PDP-503HDE/(E)-a 8/31/02, 5:08 PM12
Important User Guidance Information
In order to obtain maximum enjoyment from this Pioneer PureVision PDP-503HDE/PDP-433HDE Plasma Display System,
please first read this information carefully.
With the Pioneer PureVision PDP-503HDE/PDP-433HDE, you can be assured of a high quality Plasma Display System with
long-life and high reliability. To achieve images of exceptional quality, this Pioneer Plasma Display System incorporates
state-of-the-art design and construction, as well as very precise and highly advanced technology. On a total of nearly 3
million light cells, more than 99.999 percent of the cells remain active.
Over the course of its lifetime, the luminosity of the Pioneer PDP-503HDE/PDP-433HDE Plasma Display System will diminish
very slowly, such as with all phosphor-based screens (for example, a traditional tube-type television). To enjoy beautiful
and bright images on your Pioneer Plasma Display System for a long time, please carefully read and follow the usage
All phosphor-based screens (including conventional tube-type televisions) can be affected by displaying static images for
a prolonged period. Plasma Display System’s are no exception to this rule. After-image and permanent effects on the
screen can be avoided by taking some basic precautions. By following the recommendations listed below, you can ensure
longer and satisfactory results from your plasma:
• Whenever possible, avoid frequently displaying the same image or virtually still moving pictures (e.g. closed-captioned
images or video game images which have static portions).
• Do not display Teletext for a prolonged period of time.
• Avoid viewing the On Screen Display for extended periods, from a decoder, DVD player, VCR and all other components.
• Do not leave the same picture freeze-framed or paused continuously over a long period of time, when using the still
picture mode from a TV, VCR, DVD player or any other component.
• Images which have both very bright areas and very dark areas side by side should not be displayed for a prolonged
• When playing a game, the “GAME” mode setting within “AV SELECTION” is strongly recommended. However, please
limit its use to less than 2 hours at a time.
• After playing a game, or displaying a PC image or any still image, it is best to view a normal moving picture in
the “WIDE” or “FULL” screen setting for more than 3 times the length of the previous still moving image.
• After using the Plasma Display System, always switch the display to “STAND BY” mode.
Installation guidelines
The Pioneer PureVision PDP-503HDE/PDP-433HDE Plasma Display System incorporates a very thin design. To ensure
safety, please take the proper measures to mount or install the Plasma Display, in order to prevent the unit from tipping over
in the event of vibration or accidental movement.
This product should be installed by using only parts and accessories designed by PIONEER. Use of accessories other than
the PIONEER stand or installation bracket may result in instability, and could cause injury. For custom installation, please
consult the dealer where the unit was purchased. To ensure correct installation, experienced and qualified experts must
install the unit. PIONEER will not be held responsible for accident or damage caused by the use of parts and accessories
manufactured by other companies.
To avoid malfunction and overheating, make sure that the vents on the main unit are not blocked when installing to ensure
proper heat emission:
• Distance the unit slightly from other equipment, walls, etc. (more than 10 cm)
• Do not fit the unit inside narrow spaces where ventilation is poor.
• Do not cover with a cloth, etc.
• Clean the vents on the sides and rear of the unit to remove dust build-up, by using a vacuum cleaner set to its lowest
Using the unit without proper ventilation may cause the internal temperature to rise, and could result in possible malfunction.
When the surrounding or internal temperature exceeds a certain degree, the display will automatically power off in order to
cool the internal electronics and prevent hazardous occurrences.
Any malfunction may occur due to: an inappropriate installation site, improper assembly, installation, mounting, or operation
of this product, modifications made to the product. However, PIONEER cannot be held responsible for such accidents or
A Typical effects and characteristics of a phosphor-based matrix display, e.g. permanent residual images upon the phosphor
of the panel, and the existence of a minute number of inactive light cells in the screen, are not covered by local warranties.
PDP-503HDE/(E)-a 8/31/02, 5:08 PM23
Electricity is used to perform many useful functions, but it can also cause personal injuries and property damage
if improperly handled. This product has been engineered and manufactured with the highest priority on safety.
However, improper use can result in electric shock and/or fire. In order to prevent potential danger, please
observe the following instructions when installing, operating and cleaning the product. To ensure your safety
and prolong the service life of your product, please read the following precautions carefully before using the
1. Read instructions—All operating instructions must be read and understood before the product is operated.
2. Keep this manual in a safe place—These safety and operating instructions must be kept in a safe place for future
3. Observe warnings—All warnings on the product and in the instructions must be observed closely.
4. Follow instructions—All operating instructions must be followed.
5. Cleaning—Unplug the power cord from the AC outlet before cleaning the product. Use a damp cloth to clean the
product. Do not use liquid cleaners or aerosol cleaners.
6. Attachments—Do not use attachments not recommended by the manufacturer. Use of inadequate attachments can
result in accidents.
7. Water and moisture—Do not use the product near water, such as bathtub, washbasin, kitchen sink and laundry tub,
swimming pool and in a wet basement.
8. Stand—Do not place the product on an unstable cart, stand, tripod or table. Placing the product on an unstable
base can cause the product to fall, resulting in serious personal injuries as well as damage to the product. Use only
a cart, stand, tripod, bracket or table recommended by the manufacturer or sold with the product. When mounting
the product on a wall, be sure to follow the manufacturer’s instructions. Use only the mounting hardware recommended
by the manufacturer.
9. When relocating the product placed on a cart, it must be moved with utmost care. Sudden
stops, excessive force and nueven floor surface can cause the product to fall from the cart.
10. Ventilation—The vents and other openings in the cabinet are designed for ventilation. Do not
cover or block these vents and openings since insufficient ventilation can cause overheating
and/or shorten the life of the product. Do not place the product on a bed, sofa, rug or other
similar surface, since they can block ventilation openings. This product is not designed for built-
in installation; do not place the product in an enclosed place such as a bookcase or rack,
unless proper ventilation is provided or the manufacturer’s instructions are followed.
11. Power source—This product must operate on a power source specified on the specification label. If you are not sure
of the type of power supply used in your home, consult your dealer or local power company.
12. Power cord protection—The power cords must be routed properly to prevent people from stepping on them or
objects from resting on them. Check the cords at the plugs and product.
13. The plasma Display used in this product is made of glass. Therefore, it can break when the product is dropped or
applied with impact. Be careful not to be injured by broken glass pieces in case the plasma Display breaks.
14. Overloading—Do not overload AC outlets or extension cords. Overloading can cause fire or electric shock.
15. Entering of objects and liquids—Never insert an object into the product through vents or openings. High voltage
flows in the product, and inserting an object can cause electric shock and/or short internal parts. For the same
reason, do not spill water or liquid on the product.
16. Servicing—Do not attempt to service the product yourself. Removing covers can expose you to high voltage and
other dangerous conditions. Request a qualified service person to perform servicing.
17. Repair—If any of the following conditions occurs, unplug the power cord from the AC outlet, and request a qualified
service person to perform repairs.
a. When the power cord or plug is damaged.
b. When a liquid was spilled on the product or when objects have fallen into the product.
c. When the product has been exposed to rain or water.
d. When the product does not operate properly as described in the operating instructions.
Do not touch the controls other than those described in the operating instructions. Improper adjustment of
controls not described in the instructions can cause damage, which often requires extensive adjustment work
by a qualified technician.
e. When the product has been dropped or damaged.
f. When the product displays an abnormal condition. Any noticeable abnormality in the product indicates that
the product needs servicing.
18. Replacement parts—In case the product needs replacement parts, make sure that the service person uses
replacement parts specified by the manufacturer, or those with the same characteristics and performance as the
original parts. Use of unauthorized parts can result in fire, electric shock and/or other danger.
19. Safety checks—Upon completion of service or repair work, request the service technician to perform safety checks
to ensure that the product is in proper operating condition.
20. Wall or ceiling mounting—When mounting the product on a wall or ceiling, be sure to install the product according
to the method recommended by the manufacturer.
21. Heat sources—Keep the product away from heat sources such as radiators, heaters, stoves and other heat- generating
products (including amplifiers).
22. Unplug the power cord from the AC outlet before installing the speakers.
PDP-503HDE/(E)-a 8/31/02, 5:08 PM34
• Newly developed WIDE XGA Plasma Panel (H:1280 m V:768 pixels)
• Picture and Picture. Still Image function.
• 12-Language On Screen Display
• 4 Video Input with 3 SCART terminals and PC (XGA) Input
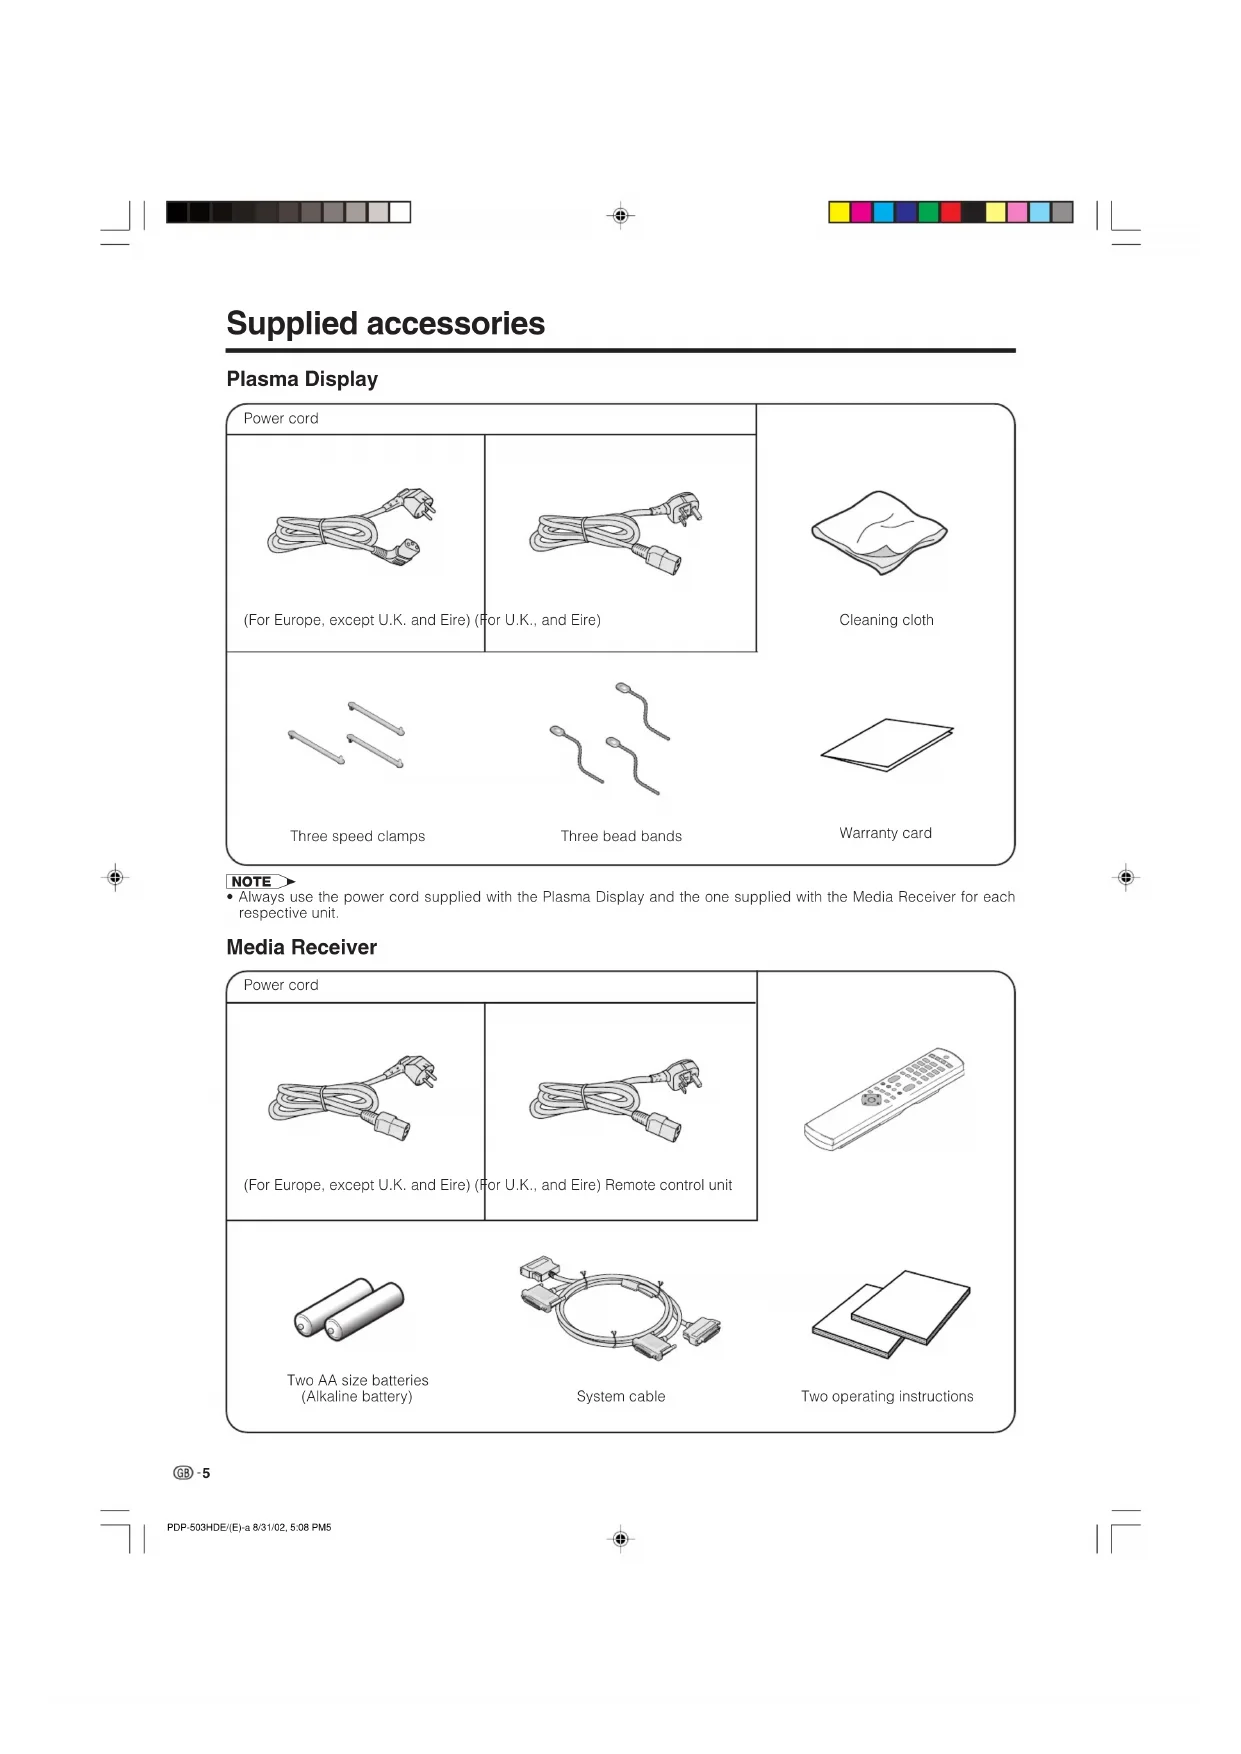
Supplied accessories
Two AA size batteries
Two operating instructions
• Always use the power cord supplied with the Plasma Display and the one supplied with the Media Receiver for each
• Avoid the direct sunlight. Keep enough ventilation.
• The length of the system cable used to connect the
Plasma Display and the Media Receiver is about 3
• Because the Plasma Display is heavy, be sure to
move it by more than two persons.
• Do not place anything on the Media Receiver. Otherwise,
the Media Receiver does not receive enough ventilation,
and does not operate properly.
• When installing, keep enough space around the upper
part and the back part, in order that ventilation around
back part is secured.
Using the optional PIONEER stand
• For details concerning installation, please refer to
the instruction manual provided with the stand.
Using the optional PIONEER speakers
• For details concerning installation, please refer to
the instruction manual provided with the speaker.
L Operating Environment
Operating environment temperature and humidity: e0°C–
e40°C (e32F–e104F); less than 20–80%RH (cooling vents
Avoid installing in the following locations:
• Under direct exposure to sunlight,
• Under strong artificial light,
• Poorly ventilated.
Media Receiver (rear view)
For details concerning
optional PIONEER speaker
installation, please refer to
the speaker instruction
1. Connecting the system cable and the power cord to the Plasma Display
2. Connecting the system cable and the power cord to the Media Receiver
Using the remote control unit
Use the remote control unit by pointing it towards the remote sensor window.
Objects between the remote control unit and sensor window may prevent proper
Cautions regarding remote control unit
• Do not expose the remote control unit to shock. In addition, do not expose the
remote control unit to liquids, and do not place in an area with high humidity.
• Do not install or place the remote control unit under direct sunlight. The heat
may cause deformation of the unit.
• The remote control unit may not work properly if the remote sensor window of
the Plasma Display is under direct sunlight or strong lighting. In such case,
change the angle of the lighting or Plasma Display set, or operate the remote
control unit closer to the remote sensor window.
Inserting the batteries
If the remote control unit fails to operate Plasma Display System functions,
replace the batteries in the remote control unit.
1 Open the battery cover. 2 Insert batteries (two AA size
batteries, supplied with product).
• Place batteries with their terminals
corresponding to the (e) and (f)
indicators in the battery compartment.
3 Close the battery cover.
Cautions regarding batteries
Improper use of batteries can result in chemical leakage or explosion. Be sure to follow the instructions below.
• Do not use manganese batteries. When you replace the batteries, use alkaline ones.
• Place the batteries with their terminals corresponding to the (e) and (f) indicators.
• Do not mix batteries of different types. Different types of batteries have different characteristics.
• Do not mix old and new batteries. Mixing old and new batteries can shorten the life of new batteries or cause
chemical leakage in old batteries.
• Remove batteries as soon as they have worn out. Chemicals that leak from batteries can cause a rash. If you
find any chemical leakage, wipe thoroughly with a cloth.
• The batteries supplied with this product may have a shorter life expectancy due to storage conditions.
• If you used the remote control unit for an extended period of time, remove the batteries from it.
(used in the factory setup)
* If you’re having problems operating the Media Receiver and want to return to normal screen, even when it
stays on (the indicator lights green), press CLEAR on the Media Receiver. Pressing CLEAR resets the System
• AV SELECTION resets to STANDARD
• TV channel resets to channel 1
• Multiscreen resets to normal
• Audio setting initialises
• SRS resets to Off.
• Image position is initialises
• Pressing CLEAR will not work if the System is in standby mode but the indicator lights red.
• Pressing CLEAR will not delete channel preset or password. See Page 54 for initialising factory preset settings when you
know your password. See Page 63 for initialising factory preset values when you have forgotten your password.
Switch off the power.
TV/External input mode: Change the still image mode.
TELETEXT mode: Freeze a multi-page on screen while other
pages are automatically updated. Press d again to return to the
Set the dual picture mode. Press c again to return to normal view.
Switch on the power.
TV/External input mode: Set the channel.
TELETEXT mode: Set the page.
TV/External input mode: Select the channel.
TELETEXT mode: Select a page.
TELETEXT mode: Change the picture mode for sub-page selecting.
TELETEXT mode: Display hidden characters.
13 MENU Display the Menu screen.
TV/External input mode: Change the wide image mode.
TELETEXT mode: Set the area of magnification. (full/upper half/
Select an input source. (TV, INPUT 1, INPUT 2, INPUT 3, INPUT 4,
Display the channel information.
TELETEXT mode: Display an index page for CEEFAX/FLOF
information. TOP OVER VIEW for TOP programme.
MENU mode: Return to the previous menu screen.
Select a desired item on the setting screen.
Move the picture on the screen.
point it at the Plasma Display.
Simple operations for watching a TV programme
Connecting to an antenna
To enjoy a clearer picture, use an outdoor antenna. The following is a brief explanation of the types of connections
that are used for coaxial cable.
Antenna cables-commercially available
If your outdoor antenna uses a 75-ohm coaxial cable with a standard DIN45325
plug (IEC 169-2), plug it into the antenna terminal at the rear of the Media
Connecting to the power cord
Plasma Display (bottom view)
Media Receiver (rear view)
• Always turn off the main power of Plasma Display and Media Receiver when connecting the power cords.
• Disconnect the power cord from the power outlet, Plasma Display and Media Receiver when the System is not going to
be used long period of time.
PDP-503HDE/(E)-b 8/31/02, 5:08 PM1213
Media Receiver does not turn on or its power cord is disconnected.
The Plasma Display System is in standby mode.
The Plasma Display System turns the power on.
Media Receiver status indicators
Only the Media Receiver is in standby mode or the Plasma Display System is in standby mode.
The Plasma Display System turns the power on.
STANDBY/ON MAIN POWER STANDBY/ON INPUTSTANDBY/ON VOLUMECHANNEL Power indicator
POWERSTANDBY/ONMEDIA RECEIVER PDP-R03E PUSH PLASMA DISPLAY SYSTEM POWER Power indicator
Turning on the power
1 Press MAIN POWER on the Plasma Display.
• The power indicator on the Plasma Display flashes red.
2 Press POWER on the Media Receiver.
• The System turns the power on.
• The power indicator on the Plasma Display lights up
green and the one on the Media Receiver lights up in
• If the power indicators still light up red, press any
button from 0 to 9 on the remote control unit or
STANDBY/ON on the Plasma Display to turn the
When turning the Media Receiver on first
1 Press POWER on the Media Receiver.
• The power indicator on the Media Receiver lights up
2 Press MAIN POWER on the Plasma Display.
• The System turns the power on.
• The power indicator on the Plasma Display lights up
green and the one on the Media Receiver lights up in
• If the power indicators still light up red, press any
button from 0 to 9 on the remote control unit or
STANDBY/ON on the Plasma Display to turn the
•“Plasma Display System” and “System” above mean the Plasma
Display Panel and Media Receiver.
• The initial auto installation starts when the System powers on for
the first time. If the System has been turned on before, the initial
auto installation will not be invoked. See page 23 to try auto
installation from the Setup menu.
Turning off the power
1 Press a on the remote control unit or STANDBY/
ON on the Plasma Display.
• The System enters standby mode and the image on
the screen disappears.
• Both power indicators change from green to red.
2 Press MAIN POWER on the Media Receiver.
• The power indicator on the Media Receiver turns off
and the one on the Plasma Display flashes red.
3 Press MAIN POWER on the Plasma Display.
• The power indicator on the Plasma Display turns off
after approximately 5 seconds.
• If you are not going to use this System for a long time, be sure to
remove the AC cord from the power outlet.
PDP-503HDE/(E)-b 8/31/02, 5:08 PM1314
1 Press / to select the desired language listed on
2 Press ENTER to enter the setting.
2. Setting the country or area
1 Press / to select your country or area listed on
2 Press ENTER to enter the setting. • The programme auto search starts at the same time. A
• Return to the Language menu by pressing n.
Searching TV channels
11 142.25148.25 Initial auto installation
When the Plasma Display System power on for the first time after purchase, the initial auto installation is invoked.
You can automatically set language, country and channels in successive operations.
A • See page 23 to try Auto installation from the setup menu. 3. Automatic channel searching
Channel auto search makes the Plasma Display System
look for all channels viewable in the set country or area.
• If no channel is found, “No programme found. Is antenna connected properly?” displays. And the auto installationis finished.• If you want to try Auto installation again, see page 23. PDP-503HDE/(E)-b 8/31/02, 5:09 PM1415
Labelling TV channels
Auto Installation - Setup “Auto”
Preset download Sending programme 10 settings.Programme data sent successfully.Auto Installation completed.Error in sending programme data. Watching TV
4. Automatic channel labelling
After finding TV channels, the Plasma Display System
starts naming each TV channel found.
• The System can only name channels labelling information.
If no information is available, the System displays “-----”.
• Cancel the setting by pressing n and the System
Display System starts sorting the labelled channels.
• Cancel the setting by pressing n. The system
automatically downloads and stores each sorted
• Each time a channel preset download finishes, “Sending
programme 10 settings.” displays. Once all presets have
downloaded, “Programme data sent successfully.”
• When a VCR is connected via INPUT 2, the System sends
all preset channel information to the VCR. See pages 25,
• If a channel preset download is not successful, “Error in
sending programme data.” displays. And preset
downloading will stop at that moment. PDP-503HDE/(E)-b 8/31/02, 5:09 PM1516
Watching TV Simple button operations for changing
lon the remote control unit
k to increase channel number.
l to decrease channel number. When viewing the Teletext information • Press P
k to increase the page number.
l to decrease the page number.
• CHANNEL r/s on the Plasma Display operates the same as P kk
MENU When preset download finishes, your initial auto
installation is completed.
•“Auto Installation completed.” displays. After that, the screen changes to the auto installation menu.
7. Watching TV The setup menu disappears and you can watch the
programmes on channel 1.
B/G PAL Using 0 – 9 on the remote control unit
Select the channels directly by pressing buttons 0 to
• To select channel 2, a 1-digit channel, press 2.
• To select channel 12, a 2-digit channel, press o to
select 2-digit input. Then press 1, followed by 2. When viewing Teletext information View a page directly which is 3-digit page number from
100 to 899 by pressing buttons 0 to 9. With Teletext,
you do not use o. See page 57.
• The selected channel such as “12” has been displayed. With Teletext, the page number displays continuously. • In the standby mode, when you press 0, the power turns on and the on-screen image comes from the INPUT 1 source. Or, when you press any button from 1 to 9, a TV image displays.PDP-503HDE/(E)-b 8/31/02, 5:09 PM1617
Watching TV Plasma DisplayVolume adjustment Mute
* When “Audio Out” is set to “Variable”, the indicator on the screen changes as shown below.Output deviceVariable soundAudio outVariableFixedVariable soundConstant asspecified Mute
Using e on the remote control unit e mutes the current sound output. 1 Press e.
•“e” has been displayed on the screen for 8 minutes, and the sound is silenced.• The System does not suddenly output loud sound asthe volume level is set to 0. 2 Press e again to cancel the mute. • Pressing i kk
l and g can also cancel the mute. A • See page 53 for details on the audio out function.STANDBY/ONINPUTSTANDBY/ON VOLUMECHANNELVOLUME 20
• VOLUME r/s on the Plasma display operates the same as i kk
h produces SRS, FOCUS effect from the speakers.
Each time you press h, the mode changes among
SRS, FOCUS, FOCUS e SRS and Off.
• SRS (Sound Retrieval System): Creates more a
natural sound retrieving the spatial information from
any stereo recording and restoring the original three-
dimensional sound field.
• FOCUS: Repositions a sound image from two
speakers to a more optimal listening position or
height without moving them.
• FOCUS e SRS: Produces both SRS and FOCUS
• Off: Outputs the normal sound.
Using g on the remote control unit
When receiving a stereo signal
Each time you press g, the mode switches between
NICAM STEREO and MONO.
When receiving a bilingual signal
Each time you press g, the mode switches among
NICAM p, NICAM pp, NICAM p/pp and MONO.
When receiving a monaural signal
Each time you press g, the mode switches between
NICAM MONO and MONO.
In the TV mode of A2 broadcasts
When receiving a stereo signal
Each time you press g, the mode switches between
When receiving a bilingual signal
Each time you press g, the mode switches among
DUAL p, DUAL pp, DUAL p/pp and MONO.
When receiving a monaural signal
When you press g, “MONO” displays.
• No channel and sound mode display.
•“BBC2” and “99” are tentative network name and channel. PDP-503HDE/(E)-b 8/31/02, 5:09 PM1920
MENU ContrastBrightColour Tint SharpAdvancedReset Basic adjustment settings
MENU Energy SaveNo signal offNo operation offDescriptionSave power by decreasing picturebrightness.System automatically shuts down ifno video signal inputs for 15 minutes.System automatically shuts down ifyou do not operate the System for 3hours.DescriptionAdjusts the picture between light andshade.Adjusts picture brightness.Adjusts colour intensity.Adjusts skin colour to a more naturaltone for all colour system.Adjusts picture sharpness.Adjusts colour temperature, purecinema, black and black & white.All image adjustment settings returnto the factory preset values. MENU Treble Bass BalanceResetDescriptionAdjusts the treble weaker or stronger.Adjusts the bass weaker or stronger.Adjusts audio output between leftand right speakers.All audio adjustment settings returnthe factory preset values. MENU Auto InstallationProgrammeSetupChild LockDescriptionRuns auto installation again the sameas when the System powers on forthe first time after purchase.Sets the channel preset.Sets a password to restrictoperations. MENU Input Select WSS 4:3 ModePositionAudio Out Demo Colour Sys.Language NR DescriptionSelect the kind of input signal of each inputsource.When wide screen signal bits are present in theTELETEXT data, you can view information inwide screen mode.When you receive a 4:3 or 14:9 mode signal,select 4:3 or WIDE display.Adjusts the horizontal/vertical position of theimage displayed.Select the type of monitor output. You canadjust volume for the main speaker or monitoroutput.Demonstration setting for storefront displays.Select the colour system of an image currentinput.Select the on screen display language.Reduces the noise of the picture.
List of AV menu items to help you with operations.
Page 31, 47, 49, 50, 52, 53
PDP-503HDE/(E)-c 8/31/02, 5:47 PM2021
Basic adjustment settings
List of PC menu items to help you with operations.
PDP-503HDE/(E)-c 8/31/02, 5:47 PM2122
Basic adjustment settings
Moving the picture on the screen
You can move the picture around on the screen.
Press / / / to move an image on the screen to the
/ / / , an on-screen image, “Adjusting
Position” displays to the desired position.
• This setting cannot be stored. Once the System shuts
down or enters standby mode, the setting is erased. To
move the picture around the screen again, you must
perform the above procedure again.
• An on-screen image from a PC source cannot be moved
• Initialise the image position by pressing ENTER. PDP-503HDE/(E)-c 8/31/02, 5:47 PM2223
Basic adjustment settings
Auto Installation - Language EnglishDeutschFrançaisItalianoEspañolNederlandsSvenskaPortuguêsTürkçeSuomi Auto Installation - Country AustriaBelgiumDenmark
You can run auto installation again, even after setting up the preset channels.
Select from among 12 languages: English, German,
French, Italian, Spanish, Dutch, Swedish, Portuguese,
Greek, Finnish, Russian and Turkish.
2 Press / to select “Setup”, and then press
ENTER. • Password setting menu displays only when child lockis set. See page 54.• Setup menu displays when the child lock is not set.Skip the step 3. 3 Enter your 4-digit password with 0 – 9 to cancel
the child lock when you set it. • See page 54 for details of cancelling the child lock. 4 Press / to select “Auto Installation”, and then
press ENTER. • Language menu displays. 5 Press / to select the desired language listed on
the screen, and then press ENTER. • Country menu displays. Country setting
After setting the language, to use the Plasma Display
System you have to select the country, which sets the
colour system for viewable TV channels.
Setting screen displays.
1 Press / to select your country or area listed on
2 Press ENTER. • The country is set and the programme auto searchstarts at the same times. A
• Return to the language menu by pressing n.
PDP-503HDE/(E)-c 8/31/02, 5:47 PM2324
Basic adjustment settings
09 Reading broadcasting station names.10 ----- Searching TV programmes
Labelling TV channels
Programme auto search
After setting the country, perform the procedure below
to search TV channels.
• Cancel the setting by pressing n and the System
automatically returns the status before programme auto
• If no channels were found, you should check your
antenna connection, and try auto installation again
because it is finished. (See page 12)
After finding new TV channels, each network name
are searched and displays.
• Cancel the setting by pressing n and the System
09 Sorting channels.10 ----- Basic adjustment settings
Sorting TV channels Sending programme 10 settings.Programme data sent successfully.Auto Installation completed. Error in sending programme data.
Automatically sorts TV channels.
• Cancel the setting by pressing n and the System
automatically returns to the status before programme auto
• Don’t shut down the System until “Sorting channels.”
When auto sorting finishes, the channels are
automatically stored in memory.
•“Sending programme 10 settings.” displays during each
channel preset download. Once all presets have
downloaded, “Programme data sent successfully.”
• The System can only send preset channel information to
a VCR when that device is connected via the INPUT 2
• If a channel preset download is not successful, “Error in
sending programme data.” displays. And preset
downloading will stop at that moment. PDP-503HDE/(E)-c 8/31/02, 5:47 PM2526
You can also automatically search and download TV
channels by performing the procedure below. This is
the same function as from programme auto search to
preset download in auto installation on pages 24 to
2 Press / to select “Setup”, and then press
3 Press / to select “Programme Setup”, and then
4 Press / to select “Auto Search”, and then press
ENTER. • Programme auto search starts as shown below.1 Programme auto search2 Auto labelling3 Auto sorting4 Preset download A
• Return to the previous menu by pressing n before programme auto search starts.• See pages 24 to 25 for the details on the programme autosearch. Programme setup
After completing channel preset download, you can try again with the Programme Setup menu from programme
auto search to preset download, or run manual adjust to set channel items individually.
Manual setting for each channel
You can set some channel items manually. They are
Fine (TV frequency), Colour sys, Sound sys, Label
(Network name), Skip, Decoder and Lock (Child Lock).
2 Press / to select “Setup”, and then press
3 Press / to select “Programme Setup”, and then
4 Press / to select “Manual Adjust”, and then press
• Programme Setup “Manual” menu displays.
• Return to the previous menu by pressing n.
• Exit the menu by pressing MENU.
• When you exit Programme Setup “Manual” menu, preset download automatically runs if you change informationon that menu. PDP-503HDE/(E)-c 8/31/02, 5:48 PM2627 Programme Setup “Manual” 01
1 Press / / / to select the channel you want to
edit, and then press ENTER.
• The selected channel information displays.
2 Press / to select “Fine”, and then press ENTER.
• Fine tuning bar displays.
3 Press / to adjust the frequency, and then press
• Adjust with checking the back image as a reference.
• Instead of the above, you can also set by directly
entering the frequency number of the channel with 0 –
• Return to the previous menu by pressing n.
• Exit the menu by pressing MENU.
1 Press / / / to select the channel you want to
edit, and then press ENTER.
• The selected channel information displays.
2 Press / to select “Colour sys.”, and then press
• Receivable colour systems are listed.
3 Press / to select your colour system, and then
• Return to the previous menu by pressing n.
• Exit the menu by pressing MENU.
Colour system menu Programme Setup “Manual” 01
Fine 196.25MHzSAT.1 PRO7 03 KABEL Additional channels entry
On Programme Setup “Manual” menu
1 Press / / / to select a channel number with
blue, and then press ENTER.
• Listed channels are black for “Skip” set to “Off” or blue
for “Skip” set to “On” or no channel.
• The selected channel information displays.
2 Press / to select “Skip”, and then press ENTER.
• Skip menu displays.
3 Press / to set “Skip” to “Off”, and then press
• Channels set “Skip” to “On” are skipped even if you
select them by using Pk/Pl.
• Return to the previous menu by pressing n.
• Exit the menu by pressing MENU. PDP-503HDE/(E)-c 8/31/02, 5:48 PM2728
Sound menu Programme Setup “Manual” 01
Basic adjustment settings
Auto installation automatically assigns names to all
viewable networks. However, you can change
individual channel names.
On Programme Setup “Manual” menu
1 Press / / / to select the channel you want to
edit, and then press ENTER.
• The selected channel information displays.
2 Press / to select “Label”, and then press
• Alphabet and numbers are listed.
3 Press / / / to select each character of the new
name for the channel, and then press ENTER.
4 Repeat the above until the name is fully spelt out.
• The name can be 5 characters or less.
• Return to the previous menu by pressing n.
• Exit the menu by pressing MENU.
Channels with “Skip” set to “On” with Pk/Pl are
passed over even if you select them.
On Programme Setup “Manual” menu
1 Press / / / to select the channel you want to
edit, and then press ENTER.
• The selected channel information displays.
2 Press / to select “Skip”, and then press ENTER.
• Skip menu displays.
3 Press / to set “Skip” to “On”, and then press
• Return to the previous menu by pressing n.
• Exit the menu by pressing MENU.
On Programme Setup “Manual” menu
1 Press / / / to select the channel you want to
edit, and then press ENTER.
• The selected channel information displays.
2 Press / to select “Sound sys.”, and then press
• Receivable sound systems (Broadcasting systems) are
3 Press / to select your sound system, and then
• If you adjust this setting, please check the colour system
information on page 27.
• Return to the previous menu by pressing n.
• Exit the menu by pressing MENU. PDP-503HDE/(E)-c 8/31/02, 5:48 PM2829 Programme Setup “Manual” 01
Lock OffSAT.1 PRO7 03 KABEL On Programme Setup “Manual” 01
02 Decoder Off INPUT2INPUT3SAT.1 PRO7 03 KABELINPUT1 Basic adjustment settings
Setting the child lock
You can block the viewing of any channel.
On Programme Setup “Manual” menu
1 Press / / / to select the channel you want to
edit, and then press ENTER.
• The selected channel information displays.
2 Press / to select “Lock”, and then press ENTER.
• Child lock menu displays.
3 Press / to set “Lock” to “On”, and then press
• Even if set to “On”, this function never works if not setting
password, See page 54 for the details on password
• Return to the previous menu by pressing n.
• Exit the menu by pressing MENU.
When connecting a decoder to, you need assign the
On Programme Setup “Manual” menu
1 Press / / / to select the channel you want to
edit, and then press ENTER.
• The selected channel information displays.
2 Press / to select “Decoder”, and then press
• Terminal inputs are displays.
3 Press / to select an INPUT terminal, and then
•“Off” is factory preset value. When set to “Off”, you cannot
watch any image from decoders.
• Return to the previous menu by pressing n.
• Exit the menu by pressing MENU. PDP-503HDE/(E)-c 8/31/02, 5:48 PM2930
Basic adjustment settings Programme Setup “Sort” 01
Channel positions can be sorted freely.
2 Press / to select “Setup”, and then press
3 Press / to select “Programme Setup”, and then
4 Press / to select “Sort”, and then press ENTER.
• The channels are listed. Black ones are set “Skip” to
“Off” and blue are set “Skip” to “On”.
5 Press / / / to select the channel you want to
move, and then press ENTER.
6 Move it to the desired position by pressing / / /
, and then press ENTER.
7 Repeat the steps 5 and 6 until all desired channels
• Return to the previous menu by pressing n.
• Exit the menu by pressing MENU.
MENU Language setting
You can also select a language from option menu. Select from among 12 languages: English, German, French,
Italian, Spanish, Dutch, Swedish, Portuguese, Greek, Finnish, Russian and Turkish. ENTER MENU
2 Press / to select “Option”, and then press
ENTER. • Option menu displays. 3 Press / to select “Language”, and then press
ENTER. • Language menu displays. 4 Press / to select the desired language listed on
5 Press MENU to exit the menu.
• Return to the previous menu by pressing n. PDP-503HDE/(E)-c 8/31/02, 5:48 PM3132
Adjustments items for PC source
Basic adjustment settings buttonFor less contrastFor less brightnessFor less colourintensitySkin tones becomepurplishFor less sharpnessSelected itemContrastBrightColour Tint Sharp Adjustments items for AV source
MENU Picture USER ContrastBright Red Green Blue ResetRETURN[+30] [0]
• Select “Advanced” and then press ENTER to set “Colour
Temp”, “Black”, “Black & White” or “PureCinema” settings. See pages 33 and 34.buttonFor more contrastFor more brightnessFor more colourintensitySkin tones becomegreenishFor more sharpnessbuttonFor less contrastFor less brightnessFor weaker redFor weaker greenFor weaker blueSelected itemContrastBright Red Green Blue buttonFor more contrastFor more brightnessFor stronger redFor stronger greenFor stronger blue Picture adjustments
Adjust the picture to your preference with the following picture settings.
2 Press / to select “Picture”, and then press
ENTER. • Picture menu displays. 3 Press / to select a specific adjustment item.
4 Press / to adjust the item to your desired
5 Press MENU to exit the menu.
A • When all adjustments set to factory preset values,1 Press / to select “Reset”, and then press ENTER. 2 Press / to select “Yes”, and then press ENTER.
• Return to the previous menu by pressing n.
• If you select “STANDARD” with AV SELECTION on the remote control unit, these items will display in grayand not be selectable. See page 50.AV selection modeAV selection mode
ENTER MENU AV SELECTION
Basic adjustment settings
Allows you to select a level for automatically adjusting
blackish tone to suit viewing conditions.
2 Press / to select “Picture”, and then press
3 Press / to select “Advanced”, and then press
4 Press / to select “Black”, and then press
5 Press / to select the desired level, and then
6 Press MENU to exit the menu.
• Return to the previous menu by pressing n.
• If you select “STANDARD” with AV SELECTION on the remote control unit, this item will display in gray andnot be selectable. See page 50. Description White with Bluish toneWhite with Reddish toneSelected item High Mid-High Mid Mid-Low Low
MENU Picture DYNAMIC AdvancedColour Temp [High] High Mid-High Mid Mid-Low Low
Adjust the colour temperature to suit whitish tone.
2 Press / to select “Picture”, and then press
3 Press / to select “Advanced”, and then press
4 Press / to select “Colour Temp”, and then press
5 Press / to select the desired level, and then
6 Press MENU to exit the menu.
• Return to the previous menu by pressing n.
Basic adjustment settings
Automatically detects a film-based source (originally
encoded at 24 frames/second), analyses it then
recreates each still film frame for high-definition picture
2 Press / to select “Picture”, and then press
3 Press / to select “Advanced”, and then press
4 Press / to select “PureCinema”, and then press
5 Press / to select “On”, and then press ENTER.
6 Press MENU to exit the menu.
• Return to the previous menu by pressing n.
• If you select “STANDARD” with AV SELECTION on the remote control unit, or input sources with verticalfrequency 50 Hz (e.g. PAL, SECAM etc.), this item willdisplay in gray and not be selectable. See page 50. Black & White
For viewing a video in monochrome.
2 Press / to select “Picture”, and then press
3 Press / to select “Advanced”, and then press
4 Press / to select “Black & White”, and then press
5 Press / to select “On”, and then press ENTER.
6 Press MENU to exit the menu.
• Return to the previous menu by pressing n.
• If you select “STANDARD” with AV SELECTION on the remote control unit, this item will display in gray andnot be selectable. See page 50.PDP-503HDE/(E)-c 8/31/02, 5:48 PM3435
Basic adjustment settings
Sound adjustment You can adjust the sound quality to your preference with the following settings.Adjustments items for AV sourcebuttonFor weaker trebleFor weaker bassDecrease audio fromthe right speakerSelected itemTreble Bass BalancebuttonFor stronger trebleFor stronger bassDecrease audio fromthe left speaker
ENTER MENU AV SELECTION
+15 Right 1 Press MENU.
2 Press / to select “Audio”, and then press ENTER.• Audio menu displays. 3 Press / to select a specific adjustment item.
4 Press / to adjust the item to your desired position. 5 Press MENU to exit the menu.
A • When all adjustments set to factory preset values,1 Press / to select “Reset”, and then press ENTER. 2 Press / to select “Yes”, and then press ENTER.
• Return to the previous menu by pressing n.
• If you select “STANDARD” with AV SELECTION on the remote control unit, these items will display in grayand not be selectable. See page 50.PDP-503HDE/(E)-c 8/31/02, 5:48 PM3536
Basic adjustment settings
MENU Power ControlNo signal off [Enable]DisableEnable MENU Power ControlNo operation off [Enable]DisableEnable Power control Power Control setting allows you to reduce the display brightness to save energy.No signal off When set to “Enable”, the power will automatically shut down if no signal inputs for 15 minutes. 1 Press MENU.
2 Press / to select “Power Control”, and then press ENTER. 3 Press / to select “No signal off”, and then press ENTER. 4 Press / to select “Enable”, and then press ENTER. 5 Press MENU to exit the menu. • Five minutes before the power shuts down, hazardwarning displays every minute. A •“Disable” is factory preset value. • Return to the previous menu by pressing n . • When a TV programme finishes, and the Media Receiverreceives signal input, this function may not operate.No operation off When set to “Enable”, the power will automatically shut down if the signal stays inactive for 3 hours. 1 Press MENU.
2 Press / to select “Power Control”, and then press ENTER. 3 Press / to select “No operation off”, and then press ENTER. 4 Press / to select “Enable”, and then press ENTER. 5 Press MENU to exit the menu. • Five minutes before the power shuts down, hazardwarning displays every minute. A •“Disable” is factory preset value. • Return to the previous menu by pressing n .
MENU Power ControlEnergy Save [Save]Standard Save
Power control for AV source Energy save When set to “Save”, the power consumption is saved by degrading picture brightness. 1 Press MENU.
2 Press / to select “Power Control”, and then press ENTER. 3 Press / to select “Energy Save”, and then press ENTER. 4 Press / to select “Save”, and then press ENTER.
5 Press MENU to exit the menu.
A •“Standard” is factory preset value. • Return to the previous menu by pressing n. PDP-503HDE/(E)-c 8/31/02, 5:48 PM3637
MENU Power ControlPower Management [Off] Off Mode2Mode1 MENU Power ControlEnergy Save [Save]Standard Save
Basic adjustment settings Power managementWhen set, the power will automatically shut down. 1 Press MENU.
2 Press / to select “Power Control”, and then press ENTER. 3 Press / to select “Power Management”, and then press ENTER. 4 Press / to select “Mode1” or “Mode2”, and then press ENTER. 5 Press MENU to exit the menu.
• Return to the previous menu by pressing n. Description• No power management• Factory preset value.• If no signal inputs for 8 minutes, the powershuts down.• Even if you start using the computer andthe signal inputs again, the System stays off. • The System turns on again by pressingSTANDBY/ON on the Plasma Display or 0 – 9 on the remote control unit. The System is out of PC mode. (See page 13.)• If no signal inputs for 8 seconds, the powershuts down.• When you start using the computer and thesignal inputs again, the System turns on.Selected item Off Mode1Mode2
Power control for PC source Power control allows you to reduce display brightnessand save energy.Energy save 1 Press MENU.
2 Press / to select “Power Control”, and then press ENTER. 3 Press / to select “Energy Save”, and then press ENTER. 4 Press / to select “Save”, and then press ENTER.
5 Press MENU to exit the menu.
A •“Standard” is factory preset value. • Return to the previous menu by pressing n.
PDP-503HDE/(E)-c 8/31/02, 5:48 PM3738
Using external equipment
MONITOR OUTPUTS-VIDEOVIDEOR–AUDIO–L(GRAY)RS-232C IN OUT CONTROLINPUT 3INPUT 2
You can connect many types of external equipment to your Plasma Display System, like a decoder, VCR, DVD
player, computer, game console and camcorder. To view external source images, select the input source from
b on the remote control unit or INPUT on the Plasma Display.
• To protect all equipment, always turn off the Media Receiver before connecting to a decoder, VCR, DVD player, computer,
game console, camcorder or other external equipment.
• Please refer to the relevant operation manual (DVD player, computer, etc.) carefully before making connections.
Y P B PRCOMPONENTAC INLETSYSTEMCABLE(WHITE)INPUT 1 Media Receiver (rear view)
(commercially available)
Watching a decoder image
Connecting a decoder
You can use the INPUT 1 terminal when connecting a decoder and other audiovisual equipment.
Displaying a programme
When connecting to the INPUT 1 terminal, select
“INPUT1” and set the correct input signal type on “Input
Select” in the menu. (See page 49.)
The setting is stored and can be selected on the
“INPUT SOURCE” menu.
To watch a decoder image, select “INPUT1” from the
“INPUT SOURCE” menu using b on the remote
control unit or INPUT on the Plasma Display. (See page
• Each time b is pressed, the input source toggles.
• If the decoder image does not come in clearly, you may
need to change the input signal type setting on the “Input
• It is recommended to connect to the INPUT 1 terminal
when using a decoder for ground wave signal input. If
INPUT 1 signals preset in auto installation or programme
setup, make sure to set “Decoder” to “INPUT1” in the
Programme Setup “Manual” menu. (See page 29.)
• Refer to your decoder operation manual for the signal type. PDP-503HDE/(E)-d 9/2/02, 9:39 AM3940
Using external equipment Option MENU Input SelectINPUT2 [AV]
Y/C AV MONITOR OUTPUTS-VIDEOVIDEOR–AUDIO–L(GRAY)RS-232C IN OUT CONTROLINPUT 3INPUT 2
Y P B PRCOMPONENTAC INLETSYSTEMCABLE(WHITE)INPUT 1 Media Receiver (rear view)
VCR INPUT SOURCE TV INPUT1
(commercially available)
Watching a VCR image
Connecting a VCR You can use the INPUT 2 terminal when connecting a VCR and other audiovisual equipment.
If your VCR supports TV-VCR advanced “AV Link” systems (see page 41), you can connect the VCR to the
INPUT 2 terminal on the Media Receiver using the fully-wired 21-pin SCART cable.
AV Link advanced system
• Download tuning information directly from TV to VCR (Preset download).
• While watching TV, you can record a programme with a one-touch press of the VCR recording button. (WYSIWYR*)
* Refer to your VCR operation manual as some VCRs have an exclusive key for WYSIWYR.
• When you press the play button on the VCR, the TV automatically turns on from standby and displays a VCR image.
• When you press the system standby button on the VCR, the TV also enters standby mode.
• TV-VCR advanced “AV Link” systems may not compatible with some external sources.
• It is recommended to connect to the INPUT 2 terminal when using a decoder for ground wave signal input with a VCR. If
INPUT 2 signals preset in auto installation or programme setup, make sure to set “Decoder” to “INPUT2” in the Programme
Setup “Manual” menu. (See page 29.)
Displaying a VCR image
When connecting to the INPUT 2 terminal, select
“INPUT2” and set the correct input signal type on “Input
Select” in the menu. (See page 49.)
The setting is stored and can be selected on the
“INPUT SOURCE” menu.
To watch a VCR image, select “INPUT2” from the
“INPUT SOURCE” menu using b on the remote
control unit or INPUT on the Plasma Display. (See page
• Each time b is pressed, the input source toggles.
• If the VCR image does not come in clearly, you may need
to change the input signal type setting on the “Input Select”
• Refer to your VCR operation manual for the signal type.
Decoder PDP-503HDE/(E)-d 9/2/02, 9:39 AM4041
Using external equipment
MONITOR OUTPUTS-VIDEOVIDEOR–AUDIO–L(GRAY)RS-232C IN OUT CONTROLINPUT 3INPUT 2
Y P B PRCOMPONENTAC INLETSYSTEMCABLE(WHITE)INPUT 1 SCART cable
(commercially available)
Media Receiver (rear view)
VCR Using i/o Link.A This System incorporates four typical i/o Link.A functions for smooth connections between Media Receiver and
other audiovisual equipment.
• Only works when the audiovisual equipment is connected to the INPUT 2 terminal on the Media Receiver with i/o Link.A
via a fully wired 21-pin SCART.
While the Plasma Display System is in standby mode,
it automatically turns on and plays back the image
from the audiovisual source (e.g. VCR, DVD).
When the connected audiovisual equipment (e.g. VCR,
DVD) enters standby mode, so does the Plasma
WYSIWYR (What You See Is What You
When the remote control unit of the connected VCR
has the WYSIWYR button, you can automatically start
recording by pressing the WYSIWYR button.
Automatically transfer the channel preset information
from the tuner on the Plasma Display System to the
one on the connected audiovisual equipment (e.g.
VCR) via the INPUT 2 terminal.
• Refer to operation manuals of each external equipment
PDP-503HDE/(E)-d 9/2/02, 9:39 AM4142
Using external equipment
Y P B PRCOMPONENTAC INLETSYSTEMCABLE(WHITE)INPUT 1 Media Receiver (rear view)
Component cable (commercially available)
(commercially available)
select “COMPONENT” for “Input
Select” in the menu.
Watching a DVD image
Connecting a DVD player
You can use the INPUT 3 terminal when connecting to a DVD player and other audiovisual equipment.
Displaying a DVD image
When connecting to the INPUT 3 terminal, select
“INPUT3” and set the correct input signal type on “Input
Select” in the menu. (See page 49.)
The setting is stored and can be selected on the
“INPUT SOURCE” menu.
To watch a DVD image, select “INPUT3” from “INPUT SOURCE” menu using b on the remote control unit
or INPUT on the Plasma Display. (See page 49.)
• Each time b is pressed, the input source toggles.
• If the DVD image does not come in clearly, you may need
to change the input signal type setting on the “Input Select”
• Refer to your DVD player operation manual for the signal
type. PDP-503HDE/(E)-d 9/2/02, 9:39 AM4243
Using external equipment POWERSTANDBY/ONMEDIA RECEIVER PDP-R03E Media Receiver (front view)
Game console/Camcorder
Composite video cables
(commercially available)
(commercially available)
PC Enjoying a game console and viewing camcorder images
Connecting a game console or camcorder
A game console, camcorder and some other audiovisual equipment are conveniently connected using the
• The S-video terminal has priority over the video terminals.
Displaying an image of the game player and
When connecting to the INPUT 4 terminals, select
You only need to select the input source on the “INPUT SOURCE” menu.
To connect a game console or view a camcorder, select
“INPUT4” from the “INPUT SOURCE” menu using b
on the remote control unit or INPUT on the Plasma
Display. (See page 49.)
• Each time b is pressed, the input source toggles.
PDP-503HDE/(E)-d 9/2/02, 9:39 AM4344
Using external equipment POWERSTANDBY/ONMEDIA RECEIVER PDP-R03E RGB cable
(commercially available)
Media Receiver (front view)
ø 3.5 mm stereo minijack cable
(commercially available)
PC Pin No. Signal name Pin No. Signal name Pin No. Signal name
1 R 6 GND (Ground) q Not connected
2 G 7 GND (Ground) w SDA
3 B 8 GND (Ground) e HD
4 Not connected 9 Ⳮ5V r VD
5 CSYNC 0 GND (Ground) t SCL Viewing an image from a computer
Connecting a computer
Use the PC terminals to connect a computer.
• The PC input terminals are DDC1/2B-compatible.
• Refer to page 60 for a list of computer signals compatible with the Plasma Display System.
Signal names for 15-pin mini D-sub connecter
• Macintosh adaptor may be required for use for some Macintosh computers.
Displaying an image from a computer
When connecting to a computer, the correct input
signal type is automatically detected. (See page 49.)
If the computer image does not come in clearly, you
may need to set the Auto Sync. adjustment on the “Auto
Sync.” in the menu. (See page 48.)
You only need to select the input source on the “INPUT SOURCE” menu.
To view an image from a computer, select “PC” from
the “INPUT SOURCE” menu using b on the remote
control unit or INPUT on the Plasma Display. (See page
Using external equipment
RS-232C IN OUT CONTROL SYSTEM CABLE CONTROL IN OUT CONTROL IN OUT CONTROL IN OUT Media Receiver (rear view)
Control cord connection
When connecting control cords to the Media Receiver form other remote controlled PIONEER components
bearing the t logo, remote control operations are performed through the sensor on the System side.
After connecting to a CONTROL IN jack on another component, its sensor will no longer receive signals. To
operate a component remotely, point the remote control unit of the connected component at the remote control
sensor on the System.
• Make sure the power is turned off when making connections.
• Please complete all component connections before making control cord connections.
The control cables (not supplied) are monaural cables
with mini plugs (no resistance). PDP-503HDE/(E)-d 9/2/02, 9:39 AM4546
Bunch cables using provided speed clamps
Attaching speed clamps to the main unit
Connect the speed clamps using the 4 holes marked with • below, depending on your routing system.
Attaching and Removing speed clamps
Insert 1 into an appropriate hole on the rear of the Plasma Display and snap 2 into the back of 1 to fix the
Speed clamps are designed to be difficult to undo once in place. Please attach carefully.
Use pliers to twist the clamp 90°, pulling outward. The clamp may deteriorate over time and become damaged
Gather cables into a bunch, secure with provided bead bands
• Cables can be routed to the right or left.
Using external equipment
Speed clamps and bead bands are included with this System for bunching cables. Once properly bunched,
follow the steps below to route the cables. As viewed from the rear of the display. 1
Useful adjustment settings
/// DescriptionCentres the image by moving it to the left orright.Centres the image by moving it up or down.Selected itemH-Pos.V-Pos. Image position (AV mode only) For adjusting a picture’s horizontal and verticalposition. 1 Press MENU.
2 Press / to select “Option”, and then press ENTER. 3 Press / to select “Position”, and then press ENTER. 4 Press / to select “H-Pos.” or “V-Pos.”.
5 Press / to adjust the item to your desired position. 6 Press MENU to exit the menu.
A • For resetting all adjustment items set to the factory presetvalues,1 Press / to select “Reset”, and then press ENTER.2 Press / to select “Yes”, and then press ENTER. • Return to the previous menu by pressing n.• Adjustments are stored separately according to inputsource.• Image position returns to the factory preset value when“H-Pos.” or “V-Pos.” value is adjusted. (See page 22.) Noise reduction (NR) (AV mode only) The noise of the picture can be reduced by the NRfunction. 1 Press MENU.
2 Press / to select “Option”, and then press ENTER. 3 Press / to select “NR”, and then press ENTER.
4 Press / to select the desired level, and then press ENTER. 5 Press MENU to exit the menu.
A • Return to the previous menu by pressing n.• The NR setting functions during 480i, 580i, and 480p input.It cannot be selected during 1080i and 720p input.• The NR setting is recorded for each INPUT SOURCE (TV,INPUT1 to 4).Option MENU NR [High] High
[0] –90–60–90–20 +90
Fine Sync. adjustment (PC mode only) Ordinarily you can easily adjust the picture asnecessary to change image position using Auto Sync.In some cases, however, manual adjustment is neededto optimise the image. 1 Press MENU.
2 Press / to select “Option”, and then press ENTER. 3 Press / to select “Fine Sync.”, and then press ENTER. 4 Press / to select the specific adjustment item.
5 Press / to adjust the item to your desired position. 6 Press MENU to exit the menu.
A • When all adjustments set to factory preset values,1 Press / to select “Reset”, and then press ENTER. 2 Press / to select “Yes”, and then press ENTER. • Return to the previous menu by pressing n.
/// Description Centres the image by moving it to the left or
Centres the image by moving it to the up or
Adjusts the clock frequency.
Adjusts the clock phase. Selected itemH-Pos.V-Pos.ClockPhase Auto Sync. adjustment (PC mode only) For automatically adjusting the computer image. 1 Press MENU.
2 Press / to select “Option”, and then press ENTER. 3 Press / to select “Auto Sync.”, and then press ENTER. • Auto Sync. starts and “Adjusting the image.” displays.
• Return to the previous menu by pressing n.
• When Auto Sync. is successful, “Auto Sync completed successfully” displays. If not, Auto Sync. failed.• Auto Sync. may fail even if “Auto Sync completedsuccessfully” displays.• Auto Sync. may fail with a PC image composed of similarpatterns or monochrome. If not successful, change thePC image and try again.• Be sure to connect the computer to the Media Receiverand switch it on before starting Auto Sync. PDP-503HDE/(E)-e 8/31/02, 5:40 PM4849
INPUT SOURCE TV INPUT1
/ INPUT 1 signal menuINPUT 2 signal menuINPUT 3 signal menu Input selection Can use for selecting the input source. 1 Press b on the remote control unit or INPUT on the Plasma Display.• INPUT SOURCE menu displays. 2 Hold down b on the remote control unit or INPUT on the Plasma Display to select the input source.• An image from the selected source automaticallydisplays.• You can also select the input source by pressing /
A • When there are no external sources connected to those terminals, “INPUT3” (COMPONENT) or “INPUT4” will display in gray and not be selectable. • Return to the previous menu by pressing n.
Input signal setting For setting the signal type of external equipment. 1 Press MENU.
2 Press / to select “Option”, and then press ENTER. 3 Press / to select “Input Select”, and then press ENTER. 4 Press / to select an input source you want to set, and then press ENTER. 5 Press / to select a signal type, and then press ENTER.• If the selected signal type is incorrect, an image doesnot display or no colour image displays. 6 Press MENU to exit the menu.
• Return to the previous menu by pressing n.
• The System automatically sets input signals from “INPUT4” and “PC”.• If no (colour) image displays, try to change the signaltype.• Check the operation manual of the external equipmentfor the signal type. PDP-503HDE/(E)-e 8/31/02, 5:40 PM4950 Option MENU Colour Sys. [PAL] PAL PAL-60SECAMNTSC 3.58NTSC 4.43
AUTO Useful adjustment settings AV SELECTION: STANDARDAV SELECTION: DYNAMICAV SELECTION: MOVIEAV SELECTION: GAMEAV SELECTION: USERAV SELECTION: STANDARDAV SELECTION: USER Mode selection for the INPUT 1 to 4 terminal
Mode selection for the PC terminal
For a highly defined image in a normallybright roomFor a clear-cut image emphasising highcontrast for sports viewing.For a movieLowers image brightness for easier viewingAllows the user to customise settings asdesired. You can set the mode for eachinput source.Selected itemSTANDARDDYNAMICMOVIE GAME USER Colour system setting (AV mode only)
You can change the colour system to one that is
compatible with the image on the screen.
2 Press / to select “Option”, and then press
3 Press / to select “Colour Sys.”, and then press
4 Press / to select a compatible video signal
system of your equipment, and then press ENTER.
5 Press MENU to exit the menu.
• If “AUTO” is selected, colour systems for each channel are automatically set. If an image does not display clearly,select another colour system (e.g. PAL, NTSC 4.43). • Return to the previous menu by pressing n.
AV selection gives you five viewing options to choose
from to best match the Plasma Display System
environment, which can vary due to factors like room-
brightness, type of programme watched or the type of
image input from external equipment.
1 Press AV SELECTION. • Present AV selection mode displays. 2 Press AV SELECTION again before the mode
displayed on the screen disappears. • The mode changes as shown left.
Useful adjustment settings
1 Press f. • The WIDE MODE menu displays.• The menu lists the wide mode options selectable forthe type of video signal currently received. 2 Press f or / while the WIDE MODE menu is
still on the screen. • You can sequentially select a wide mode that has itsown aspect ratio. Auto Selection
If you set “WSS” and “4:3 Mode” in the Option menu
on page 52, the optimum screen mode is automatically
chosen for every broadcast containing the WSS
To enable Auto Selection, set “WSS” in the Option menu
to “On”. (See page 52.)
To set the type of the wide screen, select “4:3” or
“WIDE” in the 4:3 Mode menu. (See page 52.)
A • If the broadcast signal contains no WSS information, AutoSelection will not function even when the WSS option isenabled. 4:3 Mode set to “4:3” 4:3 Mode set to “WIDE”
For 4:3 “standard” pictures. A side bar appears on each side. For 14:9 squeeze pictures. A thin side bar appears on each side.For 14:9 letterbox pictures. A thin side bar appears on each side, and you may also see bars onthe top and bottom with some programs.In this mode the picture is progressively stretched toward each side of the screen.For 16:9 squeeze pictures.For 16:9 letterbox pictures. Bars may appear on the top and bottom with some programs.For 14:9 letterbox pictures. Bars may appear on the top and bottom on some programs.PDP-503HDE/(E)-e 8/31/02, 5:40 PM51