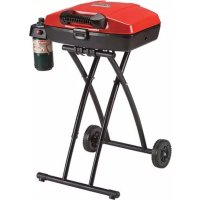
RoadTrip - Barbecue COLEMAN - Free user manual and instructions
Find the device manual for free RoadTrip COLEMAN in PDF.


| Product Type | Portable gas barbecue |
| Brand | Coleman |
| Model | RoadTrip (series 9955) |
| Input Power | 11,000 Btu/h (1 burner) |
| Fuel | Regulated pressure propane - 465 g (16.4 oz) disposable cylinders |
| Ignition | Electronic InstaStart™ + match ignition |
| Dimensions (unfolded) | Approximately 120 x 60 x 90 cm (estimated) |
| Weight | Approximately 12 kg (estimated) |
| Materials | Steel, metal cooking grate |
| Cooking Surface | Removable grate (1 piece) |
| Cooking Method | Direct and indirect (single burner) |
| Additional Features | Tow handle, legs with wheels, removable drip tray, clamshell carrier for transport |
| Care and Cleaning | Clean grate after each use; accessible burner for unclogging; regular emptying of grease tray |
| Safety | Outdoor use only; gas shut-off via control knob; leak detection with soapy water; do not use in rainy weather |
| Spare Parts | Coleman spare parts available: burner, grate, tray, wheels, handle |
| Warranty | 3-year limited (material and workmanship defects) |
| Approvals | Complies with ANSI Z223.1/NFPA 54 and CSA B149.1 standards |
Frequently Asked Questions - RoadTrip COLEMAN
User questions about RoadTrip COLEMAN
0 question about this device. Answer the ones you know or ask your own.
Ask a new question about this device
Download the instructions for your Barbecue in PDF format for free! Find your manual RoadTrip - COLEMAN and take your electronic device back in hand. On this page are published all the documents necessary for the use of your device. RoadTrip by COLEMAN.
USER MANUAL RoadTrip COLEMAN
Use, Care & Assembly Manual
With Grill Lighting Instructions
Model 9955 Series (LP Gas)
ASSEMBLER/INSTALLER:
Leave these instructions with the consumer.
CONSUMER/USER:
Read all instructions and keep in a safe place for future reference.
natural_image
Technical line drawing of a portable electric motor with cooling fan and side-mounted wheels (no text or symbols)www.coleman.com
NOTE:
Propane cylinder is not included.
IMPORTANT
Read this manual carefully before assembling using or servicing this grill. Keep this manual for future reference. If you have questions about assembly, operation, servicing or repair of this grill, please call Coleman at 1-800-835-3278 or TDD: 1-316-832-8707. In Canada call 1-800-387-6161.
For Outdoor Use Only
Contents
Contents....2
Technical Characteristics 2
General Safety Information.... 2
General Installation.... 3
Portable L.P. Gas Barbecue Cylinders 3
Grill Features 4
Assemble Grill 5
Installing 1 lb. Propane Cylinder 6
Burner and Orifice 6
Leak Testing - Disposable LP Gas Cylinders 7
How to Check for Leaks....7
Fixing A Fuel Leak 7
Start-Up Check List....7
Lighting Instructions....8
Lighting The Burner 8
Shutting Off the Grill 9
General Use and Correct Burner Flames 9
Grilling Tips and Hints 9
In Case of Grease Fire.... 10
Cooking Methods....10
Care, Maintenance and Cleaning 10
Cleaning the Venturi 11
Moving and Storage.... 12
Troubleshooting.... 12
Replacement Parts List — 9955 Series .... 15
Warranty 16
Technical Characteristics
Input Rating: 1 burner tube @ 11,000 BTU/H
Category: Pressure regulated propane
Fuel: 16.4 oz. disposable propane cylinders
Regulator: 9955 must be used
General Safety Information
This manual contains important information about the assembly, operation and maintenance of this outdoor propane appliance. General safety information is presented on this page and is also located throughout these instructions. Particular attention should be paid to information accompanied by the safety alert symbol:
“⚠️ DANGER”, “⚠️ WARNING”, “⚠️ UITION”.
Keep this manual for future reference and to educate new users of this product. This manual should be read in conjunction with the labeling on the product.
Safety precautions are essential when any mechanical or propane fueled equipment is involved. These precautions are necessary when using, storing, and servicing. Using this equipment with the respect and caution demanded will reduce the possibilities of personal injury or property damage.
The following symbols shown below are used extensively throughout these instructions. Always heed these precautions, as they are essential when using any mechanical or propane fueled equipment.

DANGER
DANGER indicates an imminently hazardous situation which, if not avoided, will result in death or serious injury.

WARNING
WARNING indicates a potentially hazardous situation which, if not avoided, could result in death or serious injury.

CAUTION
CAUTION indicates a potentially hazardous situation which, if not avoided, may result in minor or moderate personal injury, or property damage.

DANGER
If you smell gas:
- Shut off gas to the appliance.
- Extinguish any open flame.
- Open lid.
- If odor continues, keep away from the appliance and immediately call your gas supplier or your fire department.

WARNING
- Do not store or use gasoline or other flammable liquids or vapors in the vicinity of this or any other appliance.
- An LP cylinder not connected for use shall not be stored in the vicinity of this or any other appliance.
CALIFORNIA PROPOSITION 65:
WARNING: This fuel, and by products of combustion of this fuel, contain chemicals known to the state of California to cause cancer, birth defects, or other reproductive harm.

DANGER
- FOR OUTDOOR USE ONLY. NEVER operate grill in enclosed areas, as this could lead to gas accumulating from a leak, causing an explosion or a carbon monoxide buildup which could result in injury or death. DO NOT use in garages, breezeways, sheds or any enclosed area.
• NOT FOR USE BY CHILDREN. - If these instructions are ignored, a hazardous fire or explosion could result in physical injury, death or property damage!

WARNING
• DO NOT move grill while it is lit.
- Keep outdoor cooking gas appliance area clear and free from combustible materials, gasoline and other flammable vapors and liquids.
WARNING
- NEVER use charcoal briquettes or lighter fluid in a gas grill.
- Grill is hot when in use; to avoid burns, DO NOT touch any hot grill surface. Keep children and pets away from hot grill.
• NEVER leave the grill unattended while it is in use. - It is your responsibility to assemble, install, operate and care for your gas grill properly.
• DO NOT use gas grill indoors. - Under some circumstances, propane may lose the distinctive odor that was added. Other strong odors may hide or mask the odor of propane. Colds, allergies, sinus congestion, and the use of tobacco, alcohol or drugs may impair your ability to detect the odor of propane.
General Installation
- Installation must conform with local codes or, in the absence of local codes, with either the National Fuel Gas Code, ANSI Z223.1/NFPA 54, Natural Gas and Propane Installation Code, CSA B149.1, or Propane Storage and Handling Code, CSA B149.2, as applicable.
- To check local codes, see your local L.P. gas dealer or natural gas company listed in the Yellow Pages for recommended installation procedures and regulations.
WARNING
This appliance is not to be installed in or on a recreational vehicle and/or boat.
Follow these safety rules before each use:
- A minimum clearance of 24 inches from the left, right and back sides of the grill must be maintained between the grill and any combustible construction such as wood siding of a building.
- Never locate the grill under an unprotected combustible material or overhang.
- Do not obstruct the flow of combustion and ventilation air.
- The grill should be level and not facing directly into the wind.
WARNING
A liquid propane tank, not connected for use with this gas barbecue, shall not be stored in the vicinity of this or any other appliance.
Connections must comply with local requirements and are the sole responsibility of the person performing the work.
WARNING
- DO NOT attempt to adjust the regulator as this could create a situation causing personal injury or property damage.
Portable L.P. Gas Barbecue Cylinders
Liquefied Petroleum gas (abbreviated L.P. gas or propane), is highly flammable. It becomes liquid when stored under high pressure inside a cylinder and vaporizes when released. L.P. gas is heavier than air and tends to collect in low areas. It is important that there are no leaking connections on your gas grill that could cause a fire or explosion (see the section titled “LEAK TESTING”).
Portable LP gas grills require a fuel delivery system which is comprised of an adjustable regulator [A] and an L.P. gas supply cylinder [B]. (Fig. 1) Illustration in Fig. 1 is for description purposes only.
Cylinder Specifications
- All L.P. gas cylinders used with this appliance shall be constructed and marked in accordance with the Specifications for L.P. Gas Cylinders of the U.S.
Department of Transportation (DOT) or the National Standard of Canada, CAN/CSA-B339, Cylinders, Spheres and Tubes for Transportation of Dangerous Goods; and Commission, as applicable; and a cylinder connection device compatible with the connection for outdoor cooking appliances. - Read labels on the L.P. Gas Supply Cylinder.
WARNING
Your new barbecue grill is equipped with a CGA # 600 regulator [A]. DO NOT attempt to connect this regulator to any other disposable L.P. cylinder not equipped with a mating CGA # 600 fitting [C]. This grill may only be used with the pressure regulator supplied with this unit, or pressure regulators specified by Coleman for use with this unit. Replacement regulators must only be those specified by Coleman. (Fig. 1)
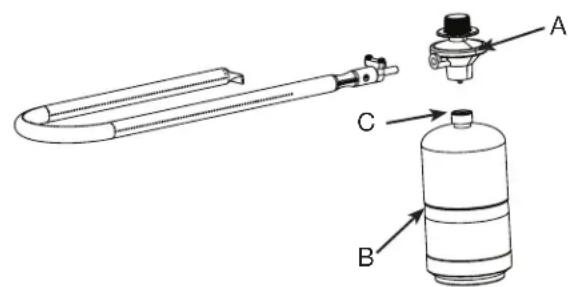
Fig. 1

DANGER
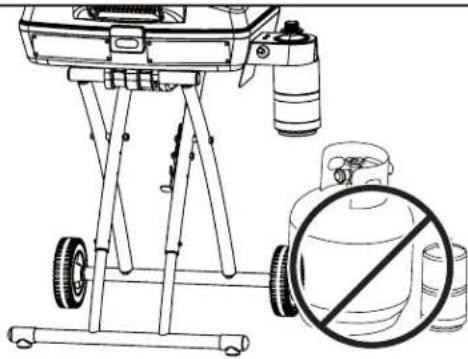
- NEVER store a spare L.P. gas supply cylinder under the grill body or in the vicinity of any heat producing appliance. (Fig. 2)
Failure to follow this information exactly could result in an explosion and/or fire causing death or serious injury.
natural_image
Line drawing of a portable gas cylinder with a stopper and a stopper, no text or symbols presentREPRESENTATIVE ILLUSTRATION
Fig. 2
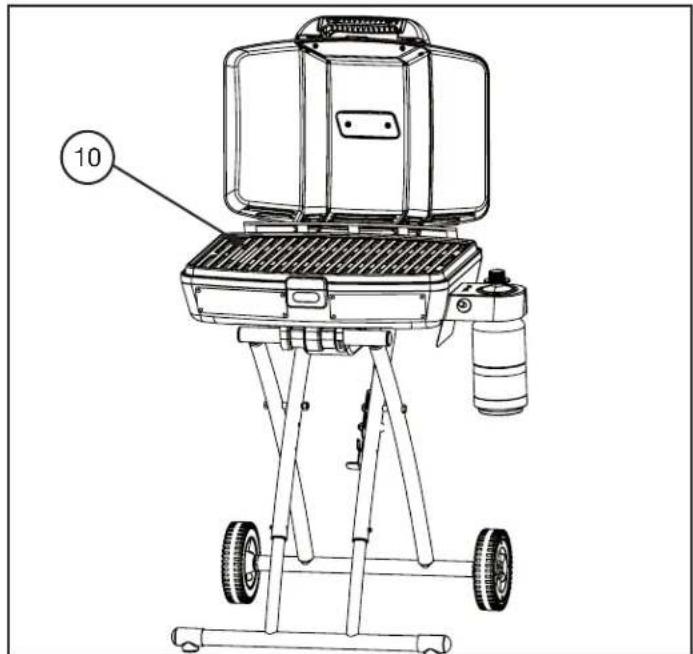
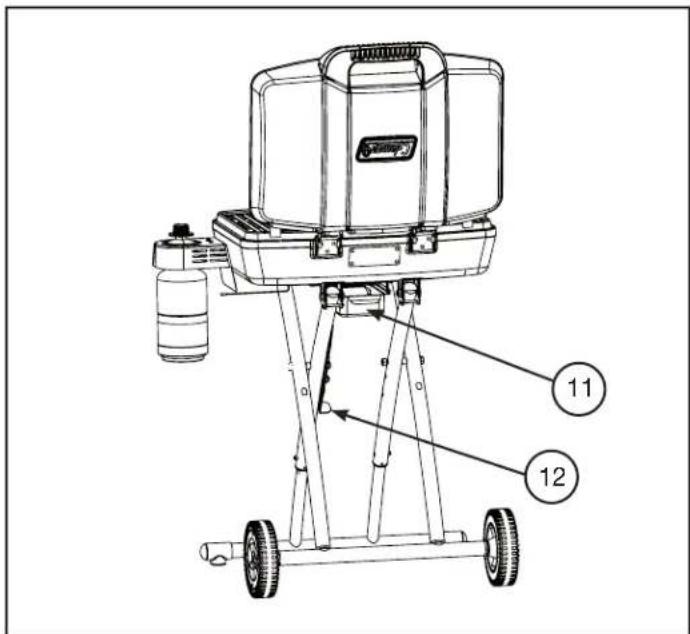
Grill Features
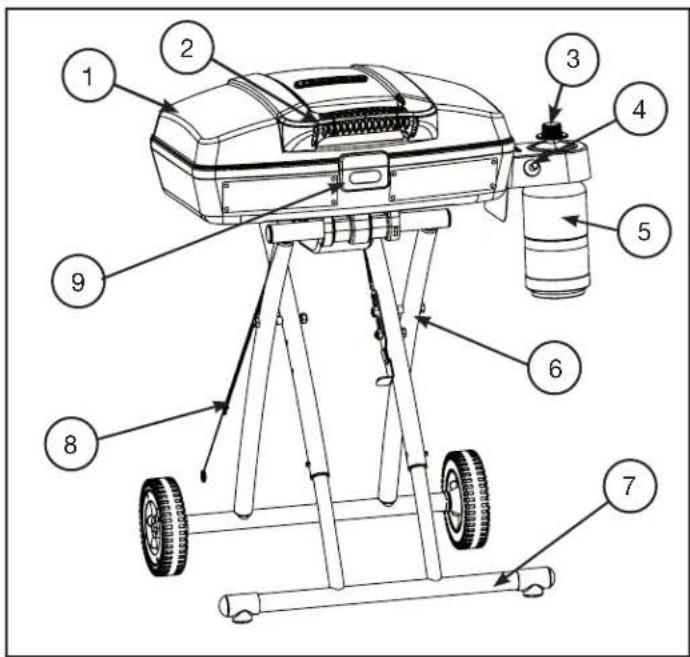
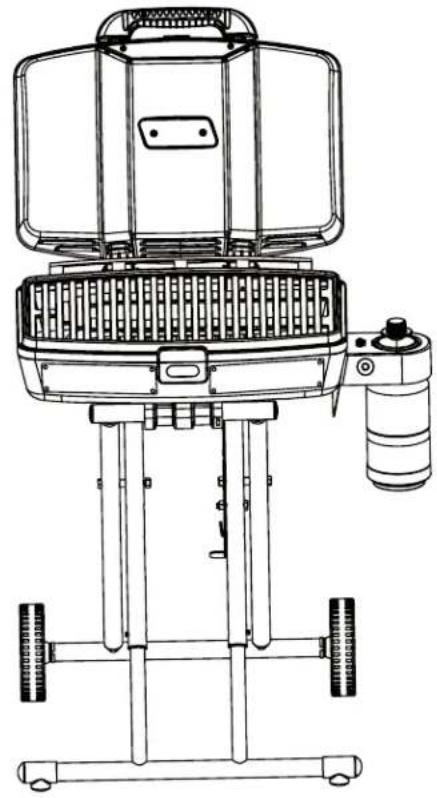
- Grill Lid
- Lid Handle
- Regulator w/ Control Knob
- Electronic Igniter
- Disposable Cylinder (Not Included)
- Legs w/ Wheels
- Towing Handle
- Match Extension (Store on leg)
- Lid Release Latch
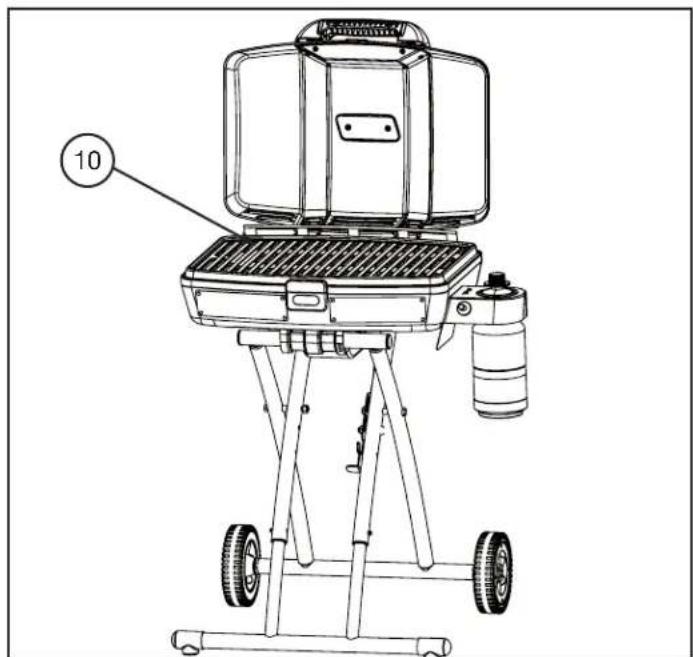
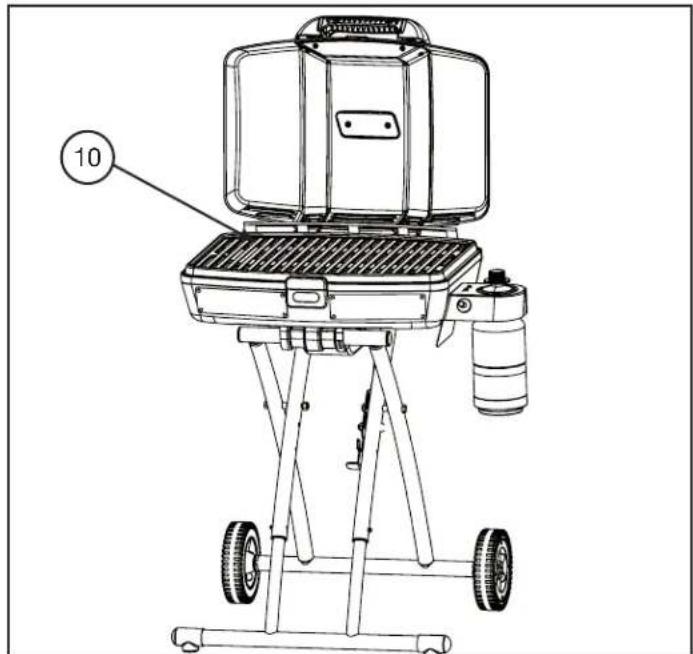
- Grilling/Cooking Surface
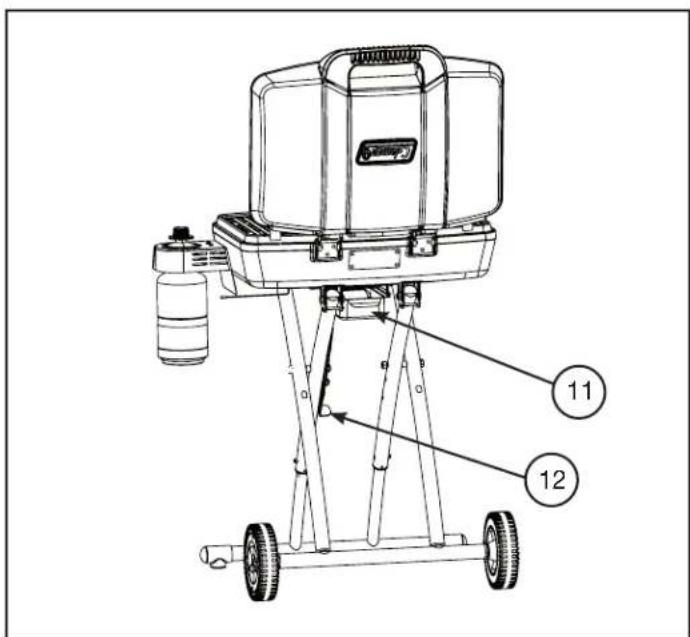
- Drip Tray
- Latch Bracket
Assemble Grill
IMPORTANT: Remove all packing material prior to assembly/use.
Assemble Wheels and Towing Handle
■Remove grill, wheels, legs and handle from packaging.
■Inspect all packing and remove all parts.
■See carton for parts included with your unit.
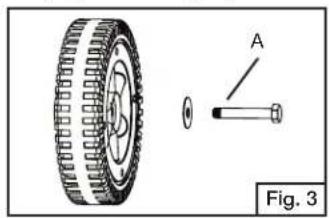
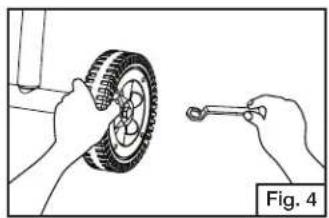
■Assemble wheels to grill base. Attach each wheel to axle using one bolt and one washer. (Fig. 3 and Fig. 4)
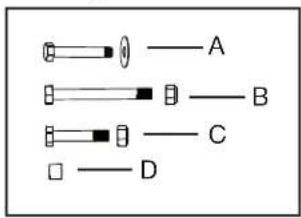
natural_image
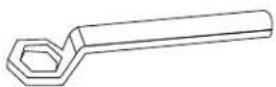
Technical illustration of a tire assembly with labeled component A, shown in two views (no text or symbols on the diagram itself)NOTE: Wrench not provided.
natural_image
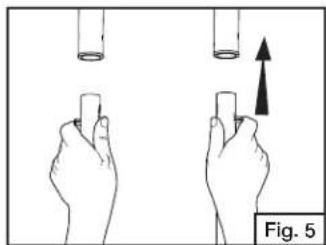
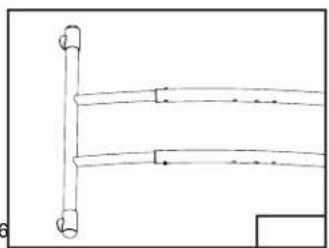
Illustration of hands adjusting a tire with a wrench, labeled Fig. 4 (no text or symbols on the diagram itself)■Telescope the extending tubes to the towing handle. Press buttons on towing handle and push in until they lock into place. (Fig. 5 and Fig. 6)
natural_image
Illustration of two hands holding test tubes with a magnified view showing upward motion (no text or symbols)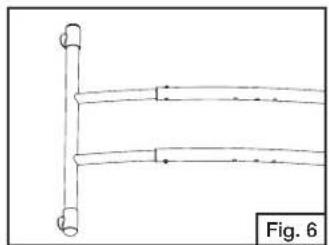
natural_image
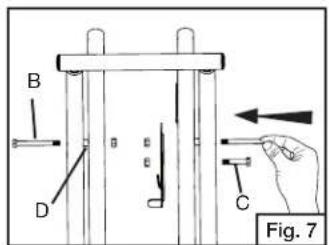
Simple line drawing of a three parallel pipe or tube structure with no text or symbols■Interlock the towing handle and the grill stand with pivot bolts, spacers, latch bracket and nuts. (Fig. 7)
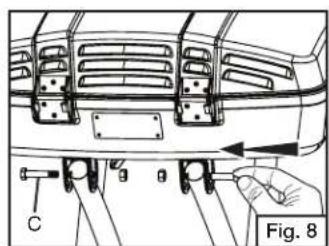
■Attach ends of towing handle to grill with pivot bolts & nuts. (Fig. 8)
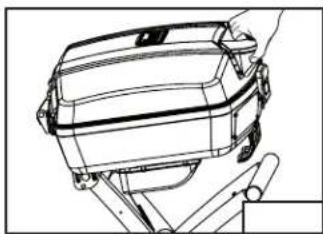
■Once handle is locked in position, the grill can easily be moved to any location in your campsite or backyard. (Fig. 9)
■NOTE: While towing the grill, make sure the latch bracket was securely inserted into slot on the front bracket. (Fig. 10)
Set up the Grill
■Pull the latch bracket out of the slot. (Fig. 11)
■Place foot on towing handle, grasp lid handle and lift until stand is fully extended. (Fig. 12)
■Continue to pull lid handle toward you until stand is fully extended. (Fig. 13)
■Lower grill and slide grill back until leg extensions lock into brackets on bottom of grill stand. (Fig. 14, Fig. 15 and Fig. 16)
natural_image
Line drawing of a vehicle chassis with a hand holding the top frame (no text or symbols)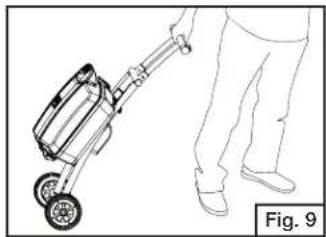
natural_image
Line drawing of a person pushing a small wheeled cart (no text or symbols)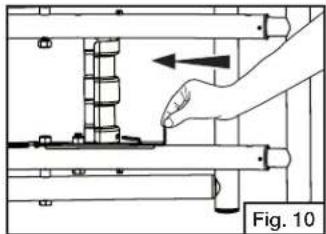
natural_image
Mechanical assembly diagram showing a hand operating a shaft with a spring-loaded component, labeled Fig. 10 (no text or symbols on the diagram itself)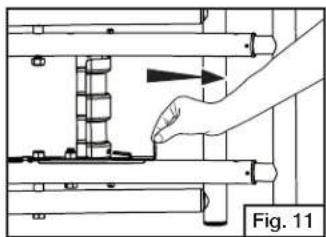
natural_image
Technical diagram showing a hand operating a mechanical assembly with no visible text or symbols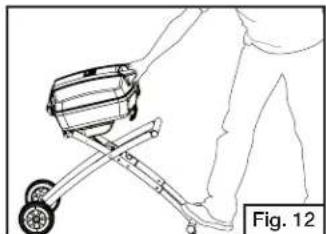
natural_image
Line drawing of a person using a cart-mounted device (no text or symbols)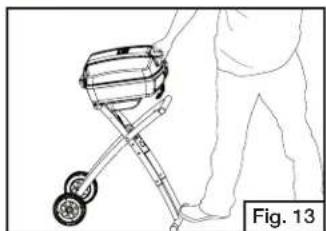
natural_image
Line drawing of a person using a portable tool with wheels, labeled as Fig. 13 (no text or symbols on the diagram itself)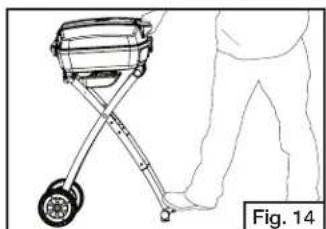
natural_image
Line drawing of a person using a portable grill with wheels, no text or symbols present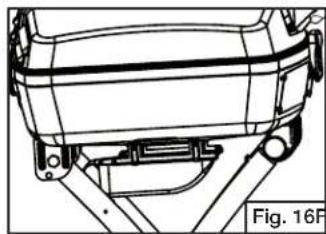
natural_image
Technical line drawing of a vehicle chassis frame with mounting bracket (no text or symbols)g. 1!
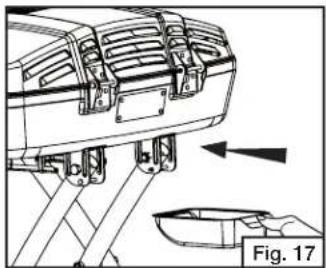
Install the Drip Tray
■Install drip tray below rear of grill. (Fig. 17)
natural_image
Technical line drawing of a vehicle chassis with structural components and a boat, labeled Fig. 17 (no text or symbols on the diagram itself)Installing 1 lb. Propane Cylinder
NOTE: Your 9955 Series grill is set up from the factory to use a 1 lb. disposable propane cylinder.
WARNING
Only cylinders marked "Propane" must be used.
WARNING
This procedure MUST be performed OUTDOORS only! Read and follow the directions on the cylinder.
DANGER
- NEVER store a spare L.P. gas supply cylinder under the grill body or inside the grill enclosure or in the vicinity of any heat producing appliance.
Failure to follow this information exactly could result in an explosion and/or fire causing death or serious injury.
CAUTION
Tighten by hand only. DO NOT use tools.
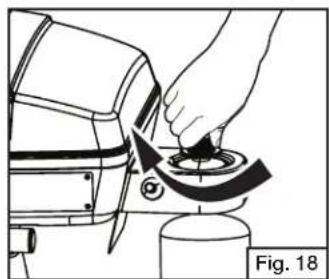
■Before attaching propane cylinder make sure burner knob is in the OFF position. (Fig. 18)
natural_image
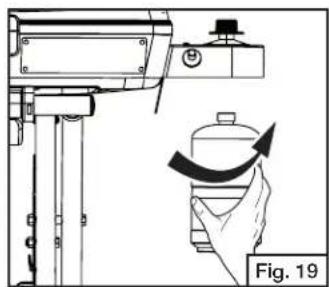
Illustration of a hand using a tool to adjust or install a mechanical component, labeled Fig. 18 (no text or symbols on the diagram itself)■Remove plastic cap from top of propane cylinder and screw cylinder into regulator hand tight. (Fig. 19)
natural_image
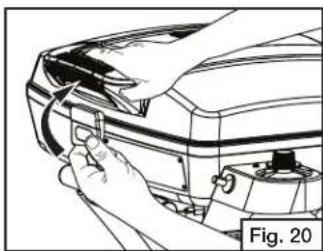
Technical diagram showing a mechanical assembly with a hand holding a component, no visible text or symbols■To open lid, unlatch handle cover and lift up. (Fig. 20)
natural_image
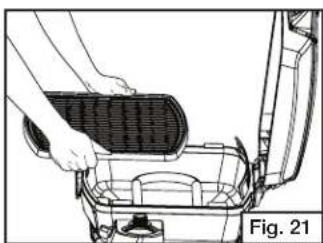
Line drawing of a hand adjusting a component on a vehicle head (no text or symbols)■Place grill grate over the burner. (Fig. 21)
natural_image
Person installing or removing a device into a container (no text or symbols visible)Burner and Orifice
■Proper location of the burner with respect to the orifice is important. To verify the proper installation of the burner tube, view under the regulator assembly cover. The burner tube must be located over the orifice fitting. See Fig. 22 (grill top not shown).
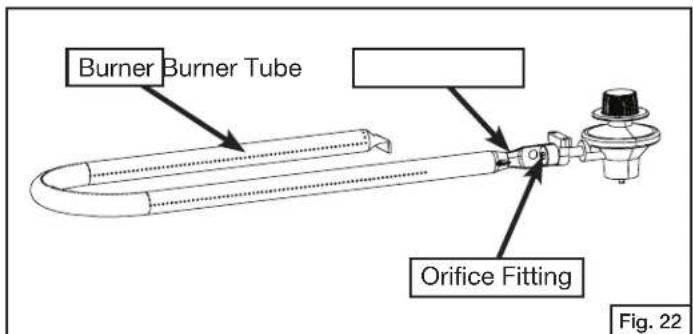
■Check and clean the burner/venturi tubes for insects and insect nests. A clogged tube can lead to a fire beneath the appliance.
Leak Testing - Disposable LP Gas Cylinders

DANGER
To Prevent Fire or Explosion Hazard:
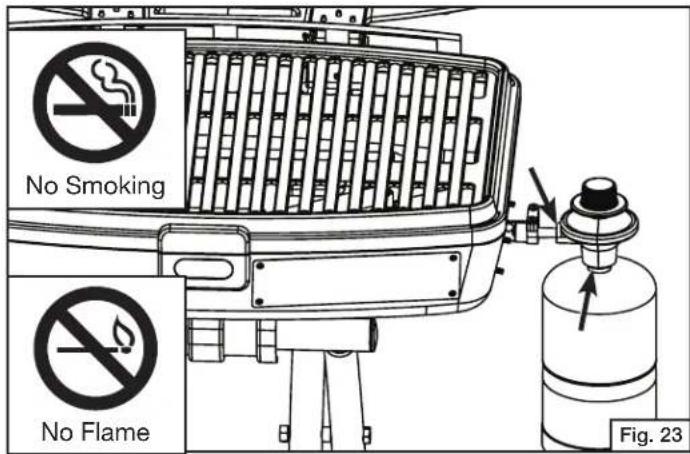
- NO SMOKING. DO NOT use or permit sources of ignition in the area while doing a leak test.
• Perform leak tests outdoors only.
• NEVER perform a leak test with fire or flame.
How to Check for Leaks
- Make a soapy solution of equal parts mild liquid dishwashing detergent and water.
- Turn off the burner control knob.
- Apply a soap solution to the connections indicated with the arrows. (Fig. 23) If bubbles appear at these areas, a leak is indicated.
Fixing A Fuel Leak
If you detect a leak:
- Stop a leak by tightening the loose joint, or by replacing the faulty part with a replacement part recommended by Coleman. DO NOT attempt to repair the cylinder if it should become damaged; the cylinder MUST be replaced.
- If you are unable to stop a leak, remove the cylinder from the grill. DO NOT use the grill until the leak is corrected.
When to test for leaks:
- Perform a leak test each time the gas supply cylinder is connected to the regulator. Leak test anytime a part of the gas system is replaced.
Start-Up Check List

WARNING
Failure to follow these safety steps before using the grill each time could result in a fire that could be hazardous to you, your appliance or property. It is especially important to observe these steps after the grill has been stored, moved or cleaned.
- Regularly check the burner venturi tube for blockage from an insect nest. Read "Cleaning the Venturi" in the section titled "Care, Maintenance, and Cleaning", and also the section titled "Troubleshooting".
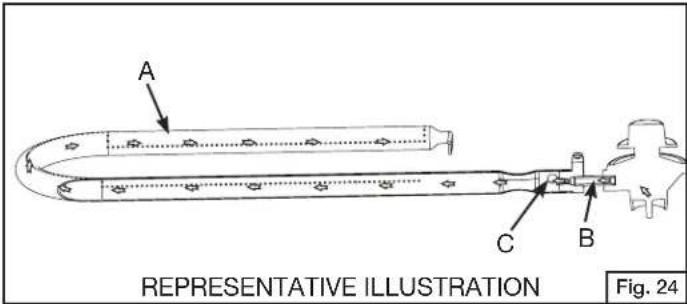
- Check that the burner tube [A] is set over the regulator outlet [B] correctly. The orifice [C] must be inside the venturi. (Fig. 24)
- Use only the gas specified.
- Keep the grill on a level surface.
- Keep the grease pan empty at start up.

CAUTION
DO NOT add charcoal or lighting fluid!
Lighting Instructions
WARNING
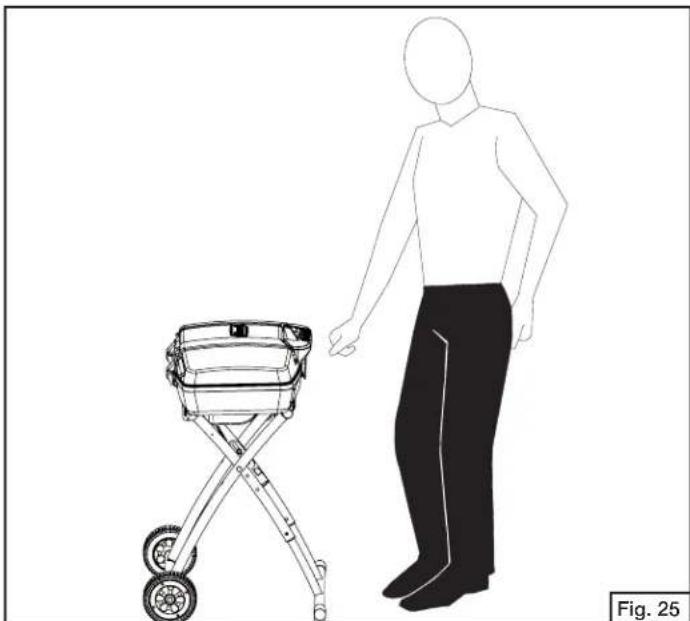
THE FOLLOWING RULES MUST ALWAYS BE FOLLOWED IN THIS ORDER (FIG. 25):
- OPEN THE GRILL LID! Any attempt to light the grill with the lid down could cause an explosion.
- Check that the burner control knob is turned to "OFF".
- DO NOT stand with your head or arms over the grill.
natural_image
Line drawing of a person standing beside a small cart with wheels, no text or symbols present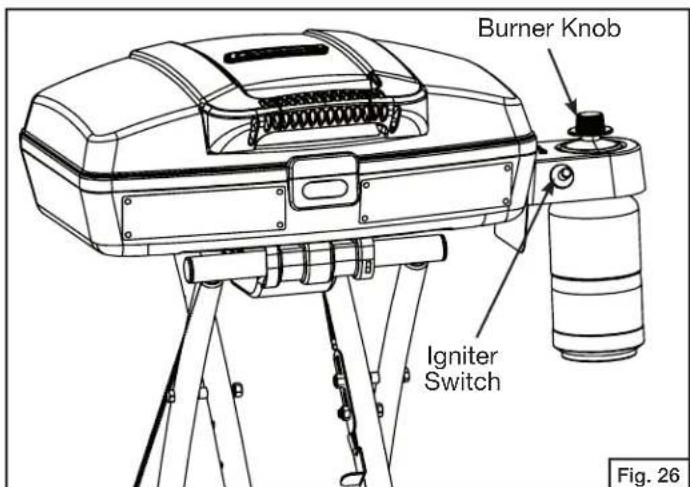
Lighting The Burner
INSTASTART™ Electronic Ignition
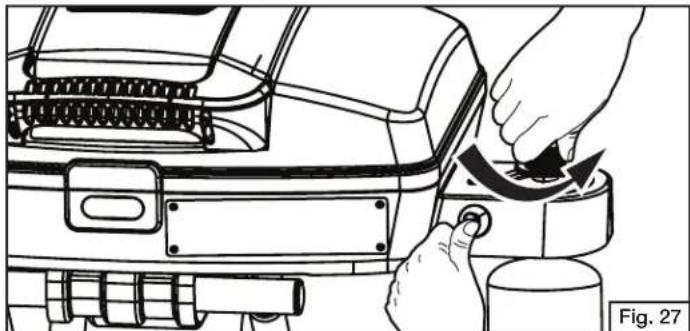
- Open regulator valve and push igniter button repeatedly until burner lights.
Note: If igniter fails to light grill, use match to light burner. See match light instructions. If the grill is wet, the igniter may not spark. - Adjust flame with regulator valve. (Fig. 26 and Fig. 27)
natural_image
Line drawing of hands adjusting a car engine compartment with a valve, no text or symbols presentMatch Lighting
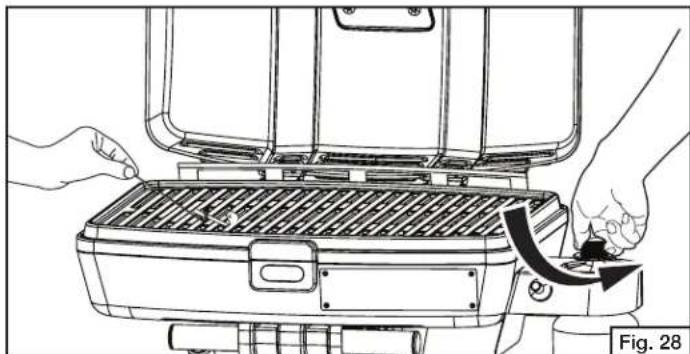
- Strike and place the burning long wooden match (or use the match extension or a butane lighter with extension) through the spaces in the grill grate near the ports of the burner.
- Push and turn the control knob counterclockwise to the "HIGH" position. (Fig. 28)
CAUTION
Use a LONG wooden match or a butane lighter with an extension. If a long-reach match or lighter is not accessible, use the match extension. Insert a match in the holder end of the extension, strike and place the burning match near the BURNER being operated.
natural_image
Line drawing of a mechanical device with hands operating a lid and a curved arrow indicating rotation (no text or symbols)Shutting Off the Grill

CAUTION
DO NOT touch hot grill parts with your bare hands! You MUST use protective gloves.
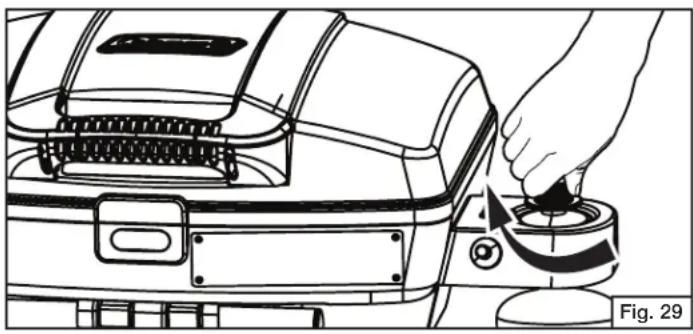
■Turn the burner control knob to off. (Fig. 29)
natural_image
Line drawing of a hand turning a knob on a car engine component (no text or symbols)
CAUTION
Be certain the disposable cylinder is disconnected when the grill is not in use.
General Use and Correct Burner Flames

WARNING
- Keep the grill area clean and free from combustible materials, gasoline and other flammable vapors, liquids, and spare L.P. cylinders.
- DO NOT obstruct the flow of combustion and ventilation air.
- Keep the ventilation opening(s) of the L.P. cylinder enclosure free and clear of debris.
- A barbecue grill becomes hot during use. DO NOT touch grate.
- Be sure to tighten all hardware (screws, nuts, bolts, etc.) at least once a year or before each grilling season.
Condition The Grill
- Before using the grill for the first time, or after storage, operate the grill 15 minutes on the high setting with the lid closed, to burn away oil.
- Once the oil has burned away, check the burner flame per the next step.
The Burner Flame
- Open the grill lid. The cooking grate should be in place.
- Keep your arms and face away from being directly above the cooking area. Look through the cooking grate and observe the burner's flame below.
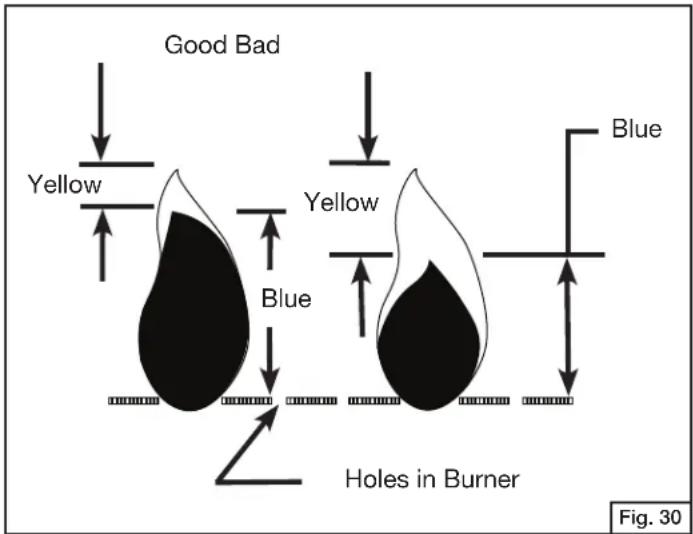
- Flames should appear similar to the good flame shown in Fig. 30 and as follows:
• A good flame should be blue with a yellow tip. -
Some yellow tips on flames up to 1 inch in length are acceptable as long as no carbon or soot deposits appear.
-
If flames are excessively yellow and irregular, the oil residue may not be completely burned off, or the venturi may be clogged or may not be properly positioned over the orifices. Allow the grill to cool before repositioning the venturi over the valve and orifices.
- Grills that have been in use for a while sometimes begin to show more yellow flame. A build-up of food deposits, fats or cooking seasonings can cause yellowing flames. Clean the burner to remove residue and check for clogged burner holes or a blocked venturi. Refer to the section titled “Cleaning the Venturi”.
- Regular use of your grill will actually help keep it operating more smoothly.
- Each grill may heat differently. Some units will heat somewhat more to the center and back of the grill. The flavor of grilled food will improve the more you use the grill and as you become familiar with it.
Grilling Tips and Hints
Burner Control Setting Tips
- The high flame setting is too hot for direct cooking. The high flame setting is good for quick searing of meat, then finish cooking on medium or low flame settings.
- Use the high flame setting with the lid closed to preheat the grill for 5 minutes before cooking and with the lid closed for a maximum of 5 minutes after cooking to burn off grease drippings.
- Use a medium flame setting for direct cooking of steaks, pork chops, chicken and hamburgers.
• Use a low flame setting for roasts. - Thick steaks will finish with a better texture and more juice if first seared on high flame setting and then cooked on a low flame setting.
Safe Grill Operation
- NEVER leave cooking food unattended. Continually observing the food will help in maintaining an even temperature, conserve fuel, improve the food's flavor and lessen flare-ups.
- To open the grill lid, slowly lift the handle to avoid burning in case of a grease fire flare-up.
- DO NOT expose any part of your body directly above the cooking area.
Food Preparation Hints
Your grill can cook a variety of foods. For best results, follow these instructions:
- Trim excess fat from meat and poultry. Slash any remaining fat to stop curling, but take care not to cut the meat.
- Frozen meat and poultry should be thawed prior to cooking.
- Frozen fish and vegetables will cook without thawing.
- Salt food after cooking to help prevent drying out the food.
• Brush naturally lean meats with cooking oil or margarine. - Cook small pieces of tender foods in foil or on special delicate-food cooking grate (see the section titled "Cooking Methods").
- Apply barbecue, tomato or sugar-based sauces no sooner than the last 10 m inutes of cooking.
- Turn food with tongs or a spatula; piercing food (especially meat), tends to dry it out.
In Case of Grease Fire
Follow These Steps
- Shut off the gas at the burner valve(s) and stay away!
- Allow the fire to burn itself out.
- Once the fire is out and the appliance has cooled, remove the disposable cylinder.
- Clean all parts and inspect for damage. Parts to check for damage are the L.P. cylinder, regulator, burner valve(s) and burner(s).
- If any of the above mentioned components are damaged, seek replacement from Coleman before operating the grill again. Locate your nearest service center by calling 1-800-835-3278.
Note:
- Some flare-up adds a smoky flavor and sears food. Excessive grease fires can cause a potentially hazardous situation and damage the grill.
- Avoid excessive flare-ups by preheating the grill with the lid closed for 5 minutes on the high setting to burn off grease from previous cooking.
- Cook with the lid down and continually monitor cooking food to avoid grease fires and flare-ups.
- Trimming excess fat from meat will reduce grease fires and flare-ups. Cook fatty meat in smaller amounts over indirect heat on a low setting.
- Be sure to follow the instructions in the section titled "Care, Maintenance, and Cleaning".
Cooking Methods
Direct method:
• The heat source is directly below the food.
- Use for browning meat or cooking hot dogs and hamburgers, but check food frequently.
- Use for skillet and stir-fry cooking, but limit the amount of oil and heat to be used.
- Cook roasts, turkey or duck on low heat. Place meat with water in a foil pan with a corrugated bottom. Replenish water as needed.
Indirect method:
- Light only one side of the burner and place food on the opposite side for cooking.
- Allow food to cook at a lower temperature which increases tenderness and reduces grease flare-ups.
- It is a good method for cooking foods that burn easily (vegetables, fish, etc.).
- Cook casseroles in ovenware or foil pans much like cooking in a conventional oven.
- Also try placing a pan of water above the lit burner side to help meat retain its juices. Replenish the water as needed.
Care, Maintenance and Cleaning
DRIP TRAY
The drip tray is located below the grill and should be cleaned periodically to prevent heavy buildup of debris. (Fig. 31)
Note: Allow the drip tray to cool before attempting to clean.
Important: Do not leave the grill outside during inclement weather unless it is covered (cover sold separately). Rain water can collect inside of the grill, or in the drip tray if left uncovered. If the drip tray is not cleaned after use and the grill is left uncovered, the drip tray will fill with water causing grease and water to spill. We recommend cleaning and storing the drip tray after every use.

natural_image
Line drawing of a vehicle chassis with a hand holding a small device, labeled Fig. 31 (no text or symbols on the diagram itself)COOKING GRATE
The cooking grate can be cleaned immediately after cooking is completed and after turning off the grill. Wear a barbecue mitt and scrub the cooking grate with a damp cloth. If the grill is allowed to cool down, cleaning the grate will be easier if removed from the grill and cleaned with a mild detergent.
CAUTION
All cleaning and maintenance should be done only when the grill is cool & with the fuel supply turned off at the cylinder. Disposable propane cylinders should be detached from the grill during cleaning.
Suggested Cleaning Materials:
- Mild dishwashing liquid detergent
- Hot water
- Wire brush
- Paper clip
- Nylon cleaning pad
- Soft brass-bristled brush • Putty knife • Scraper
Component Cleaning:
- BURNER: Wire-brush loose corrosion from the burner exterior. Clean clogged gas port holes with an opened paper clip. Replace corroded or damaged burner that would emit excess gas.
- COOKING GRATE: Clean cooking grate with mild soap and hot water. Remove stubborn residue with a mild cleanser or scrub brush. DO NOT use a commercial oven cleaner.
- GRILL INTERIOR: Remove grate. Scrape side with tools and remove excess grease and cooking residue.
Cleaning the Venturi
WARNING
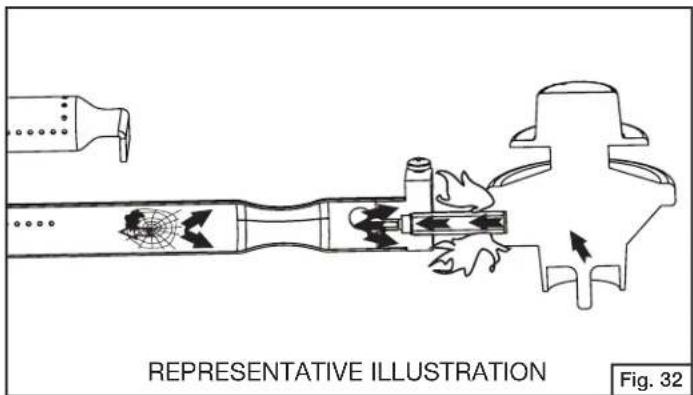
Spider's nests or wasp's mud inside the venturi may cause fire at the valve. If a fire occurs, immediately turn off the gas supply at the control valve (see representative illustration in Fig. 32).
Note:
Spiders and small insects can spin webs and build nests inside the venturi tubes. This especially occurs in late summer and fall before frost when spiders are most active. These nests can obstruct gas flow and cause a fire in and around the burner knob. Such a fire can cause operator injury and serious damage to the grill. To help prevent a blockage and ensure full heat output, clean and inspect the venturi tubes often (once or twice a month). NOTE: Water or air pressure will not normally clear a spider web.
Steps For Cleaning Venturi:
- To remove the above obstructions, use an accessory flexible venturi brush or bend a small hook on one end of a 20-inch long flexible wire such as the one shown in Fig. 33.

natural_image
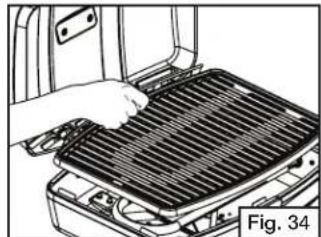
Simple line drawing of a U-shaped object with no text or symbols, labeled 'Fig. 33' (no other text or symbols)- Remove the cooking grate set aside. (Fig. 34)
natural_image
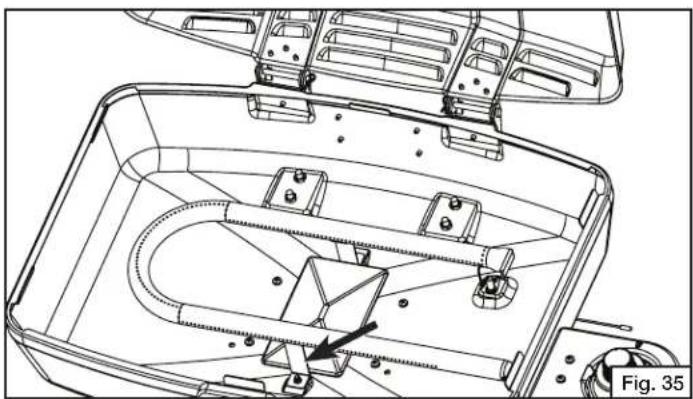
Line drawing of a hand pressing down on a grating device inside a vehicle (no text or symbols visible)- Using a screwdriver, remove the self-tapping screws holding the burner clamps beneath the case and remove the burner. (Fig. 35)
natural_image
Technical line drawing of a mechanical assembly with internal components and mounting holes (no text or symbols)- Look inside lower end of venturi tube for nests, webs or mud. If present, clean as noted in Step 1, Fig. 33.
-
Inspect and clean the burner if needed.
-
Replace the burner and burner clamps, and position the burner in the operating position.
-
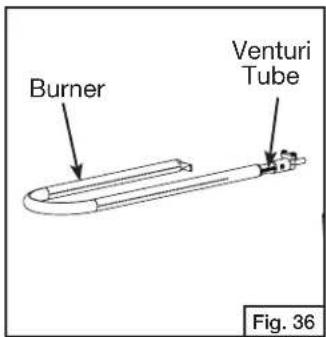
Make sure the orifice fittings are inside the venturi tube, then tighten all self tapping screws. (Fig. 36)
Moving and Storage

CAUTION
A collision with the grill, as with any metal object, could cause injury. Use care when moving a portable gas grill.
Moving the grill:
- DO NOT move the grill while it is lit or hot, or with objects on the cooking surface.
- Clean the grease tray before moving the grill to prevent spills.
• Collapse the grill before moving. - Move the grill slowly. DO NOT run with the grill behind you; it could hit you from behind causing injury.
After moving the grill:
- Check all gas connections for leaks that could occur from the movement.
- Check the venturi tubes to be sure they are still over the orifices.
Steps to follow before storing grill:
- Clean the grill, including the grease tray.
- Coat the burner lightly with cooking oil to retard rusting.
- For outdoor use only. If the grill is stored indoors, detach the cylinder outdoors. If left outdoors, remove the cylinder and cover the grill for protection from the weather. Grill covers may be purchased from a grill dealer or manufacturer.
Troubleshooting
Problem: Grill will not light when the igniter button is pushed or has incomplete burner flame.
Possible Causes and Solutions:
- Lack of fuel. Check to see that the cylinder has fuel.
- Make sure the burner is turned on. Allow up to four seconds for gas flow to ignite.
- If burner lights with match but not igniter, check the ceramic electrode position near the burner, the condition of the igniter wire and its connections. Perform igniter test and replace any damaged parts.
- Check for spider webs or insect nest in venturi and clean venturi.
- Check for misalignment of venturi on orifices. Position venturi over orifices.
- Burner ports, orifices or knob have blockage. Clean the components.
- Regulator failure; regulator needs to be replaced by an authorized service dealer.
- Make sure the regulator and cylinder are properly assembled. See the section titled "Installing 1 lb. Propane Cylinders".
Problem: Yellow flame.
Possible Causes and Solutions:
- Check for spider webs or insect nest in the venturi and clean the venturi.
- New burner may have residual oil which will burn off.
- Clean off any food residue, grease or seasoning salts on the burner.
- The venturi may be misaligned and needs to be lined up over the orifice.
Problem: Flame blows out on low setting or has uneven heat distribution.
Possible Causes and Solutions:
- Check for spider webs or insect nests in the venturi and clean the venturi.
- Cold grill needs to be preheated for 5 minutes on high setting.
- The venturi may be misaligned and needs to be lined up over the orifices.
- Cold and windy weather will require you to move the grill away from the wind.
- Lack of fuel. Check to see that the cylinder has fuel.
Problem: Grill too hot.
Possible Causes and Solutions:
- Excessive flareups which require the maintenance described in the section titled "IN CASE OF GREASE FIRE".
- A damaged orifice or regulator which requires replacement with factory authorized parts.
- Buildup of grease inside the grill will require cleaning and emptying the grease tray.
- Choose a lower cooking temperature if using excessively high settings.
Problem: Fire at any connection.
Possible Causes and Solutions:
IMMEDIATELY shut off control knob and allow grill to cool.
- Gas is leaking from a faulty connection. Tighten connections with an adjustable wrench and replace damaged parts. Perform a leak test on all connections before cooking on the grill again.
Problem: Flame behind control panel or control knob area.
Possible Causes and Solutions:
IMMEDIATELY shut off control knob and allow grill to cool.
- Check for spider webs or insect nest in the venturi and clean the venturi.
- Gas is leaking from a faulty connection. Hand tighten connections and replace damaged parts. Perform a leak test on all connections before cooking on the grill again.
- The venturi may be misaligned and needs to be lined up over the orifices.
ATTN: DEPT 586
WICHITA, KS 67219
PO BOX 2931
PRODUCT REGISTRATION DEPARTMENT

Here
Stamp
First-Classes
Place
Please
correspondence to the address below.
Please do not send other
Please hold and sell with tape to not startle
Coleman® Grill
Registration Card

IMPORTANT!
COMPLETE THE ATTACHED REGISTRATION CARD AND RETURN WITHIN 10 DAYS TO RECEIVE THESE IMPORTANT BENEFITS:
▶ PROTECT YOUR PRODUCT:
We will keep the model number and date of purchase of your new Coleman ^® product on file to help you refer to this information in the event of an insurance claim such as fire or theft.
▶ PROMOTE BETTER PRODUCTS:
We value your input. Your responses will help us develop products designed to best meet your needs.
CONGRATULATIONS ON YOUR NEW COLEMAN® GRILL PURCHASE!
If you have any questions about your product, please call Coleman customer service at 1-800-835-3278. For easier/faster registration, please go to the product registration section of our Coleman Web site at www.coleman.com.
① 1. □ Mr. 2. □ Mrs. 3. Ms. 4. Miss□
First Name: Last Name: Initial:

Address (Number and Street): Apt #:

City: Zip:State:

Phone #:

② Date of Purchase: __________________________________________________ YearDayMonth ③ Purchase Price: \$.00 (Excluding Tax) 1. □ Regular Price 2. Sale Price 3. Don't Know
④ Store where purchased:
⑤ Product Model Number:
⑥ Can Coleman contact you with promotional information or updates about Coleman® products?
- □ Yes, Please contact me. 2. □ No, Thanks
⑦ E-mail Address:
The following questions are not required to register your product, but will greatly assist us in understanding your needs and building better performing products.
8 Which factors most influenced your purchase? (Please check all that apply.)
1) □ Received as a gift
8) □ Magazine
2) □ Brand
9) □ In Store Display/Sign
3) □ Price
10) □ Packaging
4) □ Style
11) □Size
5) □ Recommendation from Store Salesperson
12) □ Weight
6) □ Recommendation from Friend
13) □ Ease of Use
7) □ Television
14) □ Other Features
15) □Other
9 Which of these best describes this purchase? (Please check all that apply.)
1) □ Received as a gift
2) First of this type of product owned
3) □ Addition to Coleman® products
4) Replaced old Coleman ^8 product
5) □ Replaced another brand product
6) □ Purchase in addition to another brand
10 Do you participate in any of the following activities? (Please check all that apply.)
⑪ What other brands did you consider?:
⑫ Date of Your Birth: YearDayMonth
13 For your primary residence, do you:
- □ Own 2. □ Rent
14 Education: (Check only one.)
1) □ High school diploma
2) Some college
3) □ College degree
4) Some graduate school
5) □ Graduate degree
15 Marital Status:
- □ Single 2. □ Married
16 Number of people in household: ____
17 Number of kids in household under 18 years of age: ____
18 Which best describes your family income?
1) □ Under \$15,000
2) \15,000 - \24,999
3) □ \25,000 - \34,999
4) \35,000 - \49,999
5) □ \50,000 - \74,999
6) \75,000 - \99,999
7) \100,000 - \149,999
8) Over \$150,000
19 What grill feature influenced the purchase of your Coleman®grill? (Please check all that apply.)
1) □ Amount of BTU's for cooking
7) Side burner (if applies)
13) Size of the grill (available cooking square inches)
2) □ Cart design
8) Steamer/Fryer/Warmer (if applies)
14) Integrated storage cabinet
3) □ Flame control cooking system
9) Side table design
15) Brice
4) □ Power burner
10) Color of the grill (not including stainless steel)
16) Botisserie (if applies)
5) □ Stainless steel material (if applies)
11) Warning racks
17) Other
6) □ Porcelain or stainless steel cooking grates
12) Dependable igniter
Thank you for filling out this questionnaire. Your answers are important to us. Please check here [ ] if you prefer not to learn more about Coleman® Outdoor Cooking Products or obtain information on new interesting opportunities from other companies.
Replacement Parts List — 9955 Series
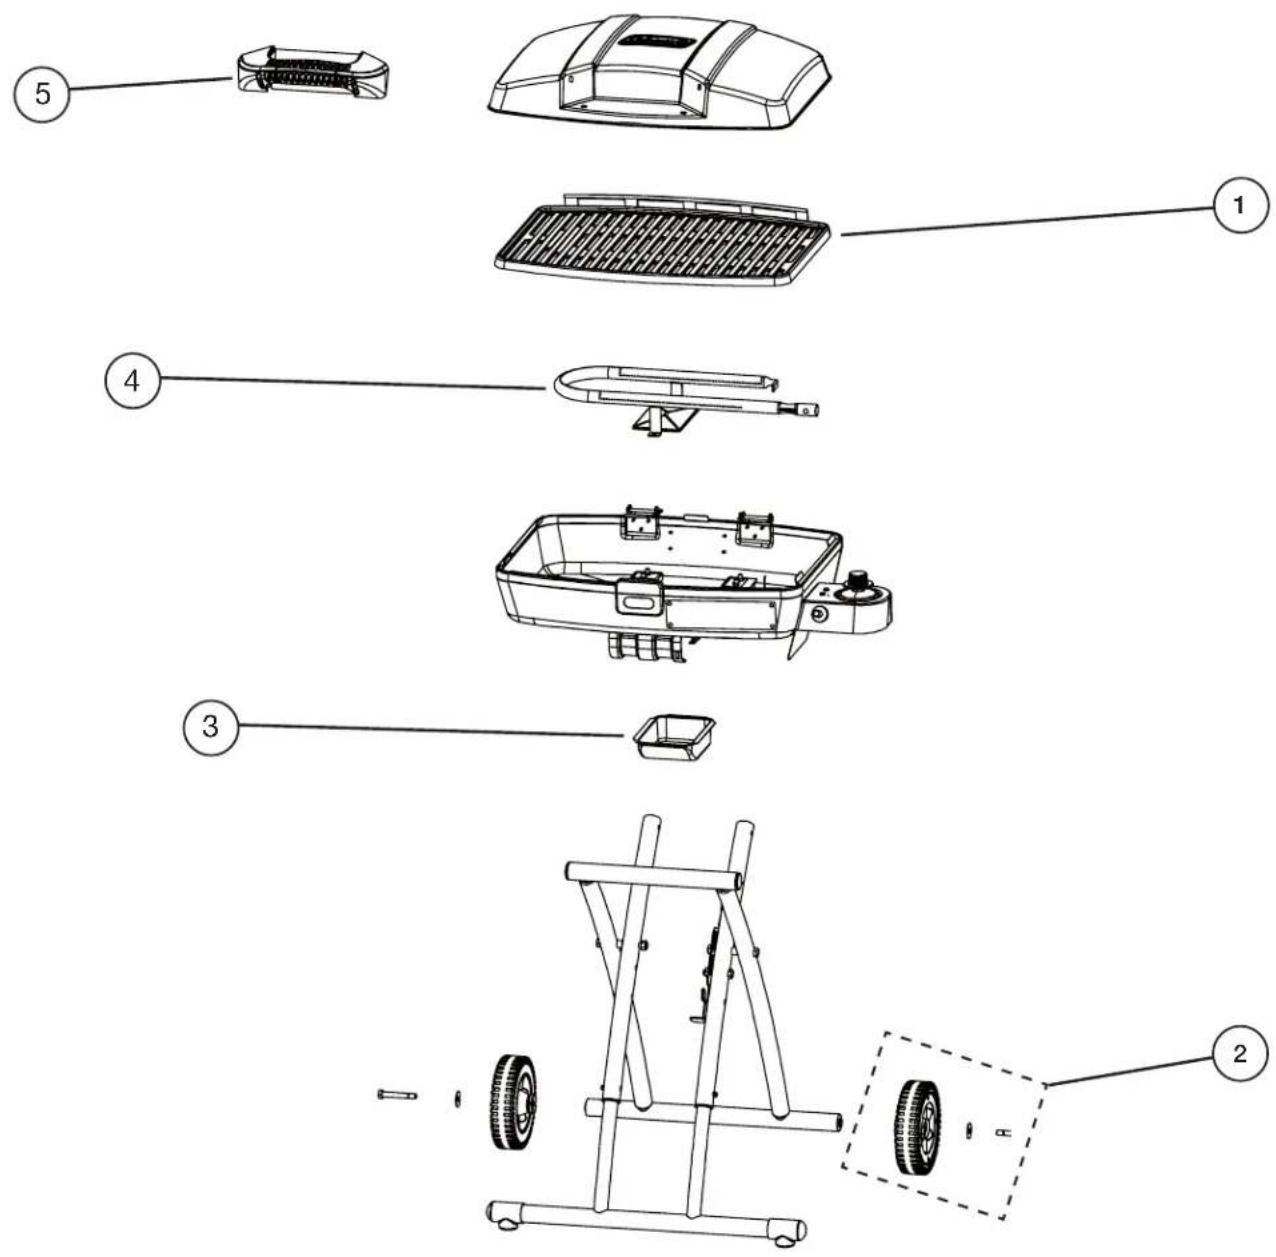
1 2000007426 Grate
2 9949-2401 Wheel Assy
3 5010000823 Drip Tray
4 5010000822 Burner/Flame tamer
5 5010000824 Lid Handle Assy
Limited Three Year Warranty
The Coleman Company, Inc. (“Coleman”) warrants that for a period of three (3) years from the date of original retail purchase, this product will be free from defects in material and workmanship. Coleman, at its option, will repair or replace this product or any component of the product found to be defective during the warranty period. Replacement will be made with a new or remanufactured product or component. If the product is no longer available, replacement may be made with a similar product of equal or greater value. This is your exclusive warranty.
This warranty is valid for the original retail purchaser from the date of initial retail purchase and is not transferable. Keep the original sales receipt. Proof of purchase is required to obtain warranty performance. Coleman dealers, service centers, or retail stores selling Coleman ^® products do not have the right to alter, modify or in any way change the terms and conditions of this warranty.
What This Warranty Does Not Cover
This warranty does not cover normal wear of parts, parts that are not genuine Coleman ^® parts, or damage resulting from any of the following: negligent use or misuse of the product; commercial use of the product; use contrary to the operating instructions; disassembly, repair or alteration by anyone other than Coleman or an authorized service center. Further, the warranty does not cover Acts of God, such as fire, flood, hurricanes and tornadoes. Warranty void if damage to the product results from the use of a part other than a genuine Coleman ^® part.
COLEMAN SHALL NOT BE LIABLE FOR DEFECTS THAT ARE CAUSED BY THE USE OF UNAUTHORIZED PARTS OR SERVICE. COLEMAN SHALL NOT BE LIABLE FOR ANY INCIDENTAL OR CONSEQUENTIAL DAMAGES CAUSED BY THE BREACH OF ANY EXPRESS OR IMPLIED WARRANTY OR CONDITIONS. EXCEPT TO THE EXTENT PROHIBITED BY APPLICABLE LAW, ANY IMPLIED WARRANTY OF MERCHANTABILITY OR FITNESS FOR A PARTICULAR PURPOSE IS LIMITED IN DURATION TO THE DURATION OF THE ABOVE WARRANTY OR CONDITIONS. SOME STATES, PROVINCES, OR JURISDICTIONS DO NOT ALLOW THE EXCLUSION OR LIMITATION OF INCIDENTAL OR CONSEQUENTIAL DAMAGES OR LIMITATIONS ON HOW LONG AN IMPLIED WARRANTY LASTS, SO THE ABOVE LIMITATIONS OR EXCLUSION MAY NOT APPLY TO YOU. THIS WARRANTY GIVES YOU SPECIFIC LEGAL RIGHTS, AND YOU MAY ALSO HAVE OTHER RIGHTS THAT VARY FROM STATE TO STATE OR PROVINCE TO PROVINCE.
How to Obtain Warranty Service
Your product must be under warranty in order to obtain warranty service. If your product is defective and is within your warranty period, contact us at 1-800-835-3278 (TDD 1-316-832-8707) in order to receive a return authorization. Do not return product to Coleman without authorization. You will be directed to attach a tag to the product that includes your name, address, daytime telephone number and description of the problem. Include a copy of the original sales receipt. Carefully package the product and send insured by UPS, FedEx Ground or Parcel Post with shipping and insurance prepaid to:
For products purchased in the United States:
The Coleman Company, Inc.
3600 North Hydraulic
Wichita, KS 67219 U.S.A.
For products purchased in Canada:
Sunbeam Corporation (Canada) Limited
DBA Jarden Consumer Solutions
20B Hereford Street
Brampton, ON L6Y 0M1
The cost of transporting the product to Coleman for warranty service is the responsibility of the purchaser.
Do not mail products with fuel in tanks, or with disposable propane cylinders.
DO NOT RETURN THIS PRODUCT TO THE PLACE OF PURCHASE.
If you have any questions regarding this warranty please call 1-800-835-3278 or TDD 1-316-832-8707 in the United States or 1-800-387-6161 in Canada.
For Warranty, Service and Parts: Locate your model number and serial number on the label found on the grill.

The Coleman Company, Inc. • 3600 North Hydraulic • Wichita, KS 67219 U.S.A.
1-800-835-3278 • TDD: 1-316-832-8707
© 2012 The Coleman Company, Inc. All rights reserved. Coleman®, Colenra RoadTrip are registered trademarks and InstaStart™ is a trademark of The Coleman Company, Inc.
Barbecue à gaz
natural_image
Technical line drawing of a portable electric motor with control panel and side-mounted base (no text or symbols)www.coleman.com
REMARQUE:
Fig. 1

DANGER

natural_image
Technical illustration of a tire and a mechanical component labeled A, shown with no text or symbols beyond labels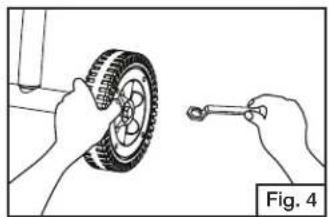
natural_image
Illustration of hands using a wrench to adjust a tire wheel (no text or symbols present)natural_image
Illustration of two hands holding test tubes with a magnified view showing upward motion (no text or symbols)Fig. 6
natural_image
Pure technical line drawing of a mechanical component with no text or symbolsnatural_image
Line drawing of a person pushing a wheeled cart with wheels, no text or symbols present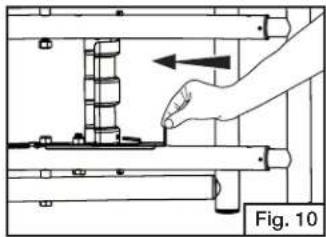
natural_image
Mechanical assembly diagram showing a hand operating a shaft with a spring mechanism (no text or symbols)natural_image
Mechanical assembly diagram showing a hand pressing a component on a mechanical assembly (no text or symbols)natural_image
Line drawing of a person pushing a cart with a handle, labeled as Fig. 12 (no text or symbols on the diagram itself)natural_image
Line drawing of a person using a portable tool with wheels, labeled as Fig. 13 (no text or symbols on the diagram itself)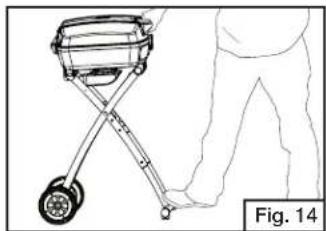
natural_image
Line drawing of a person using a portable cart with wheels, labeled as Fig. 14 (no text or symbols on the diagram itself)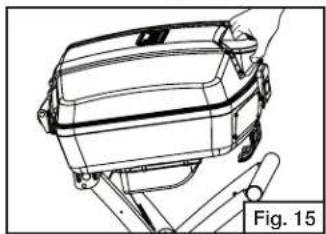
natural_image
Technical line drawing of a mechanical component with no visible text or symbols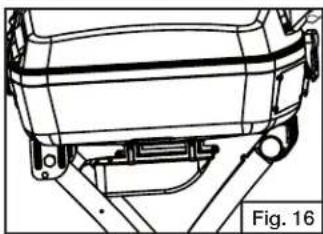
natural_image
Technical line drawing of a vehicle chassis frame with mounting brackets and structural supports (no text or symbols)natural_image
Technical line drawing of a mechanical assembly with a hand holding a tool, labeled Fig. 17 (no text or symbols on the diagram itself)natural_image
Illustration of a hand using a tool to adjust or install a component, with no visible text or symbols.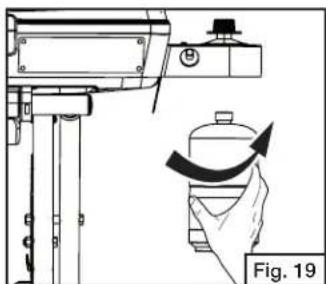
natural_image
Technical line drawing of a mechanical device with a hand holding a component, showing a curved arrow indicating rotation (no text or symbols present)natural_image
Line drawing of a hand adjusting a car engine compartment, labeled Fig. 20 (no text or symbols on the diagram itself)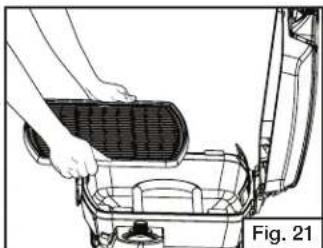
natural_image
Line drawing of a person installing or removing a device into a container (no text or symbols visible)Brûleur et orifice
natural_image
Line drawing of a person standing beside a small cart with wheels, labeled Fig. 25 (no text or symbols on the diagram itself)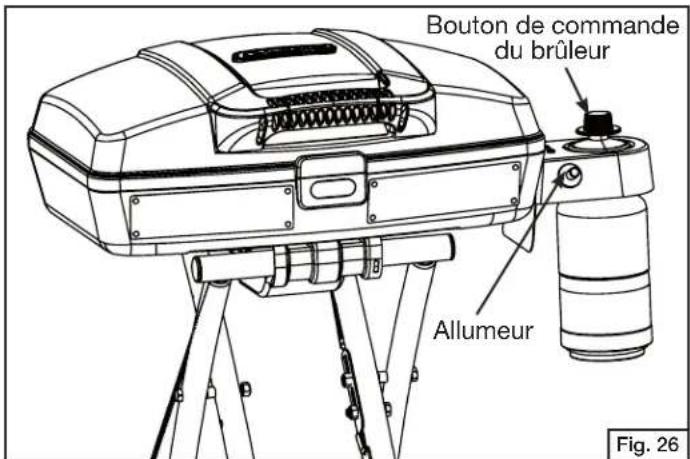
natural_image
Line drawing of hands installing a component on a vehicle hood, showing tool and assembly (no text or symbols)natural_image
Line drawing of a device with hands operating a gridded tray and a switch, labeled Fig. 28 (no text or symbols on the diagram itself)Extinction du gril
ATTENTION
natural_image
Line drawing of a hand turning a button into a car engine compartment, labeled Fig. 29 (no text or symbols on the diagram itself)ATTENTION
natural_image
Line drawing of a mechanical device with a hand holding a small object, labeled Fig. 31 (no text or symbols on the device itself)GRILLE DE CUISSON
natural_image
Simple line drawing of a U-shaped object with no text or symbols, labeled 'Fig. 33' (no other text or symbols)natural_image
Diagram of a hand installing or removing a grid-like object into a vehicle chassis (no text or symbols visible)natural_image
Technical line drawing of a mechanical assembly with no visible text or symbolsThe Coleman Company, Inc.
3600 North Hydraulic
Wichita, KS 67219 U.S.A.
Sunbeam Corporation (Canada) Limited
DBA Jarden Consumer Solutions
20B Hereford Street
Brampton, ON L6Y 0M1
NE RETOURNEZ PAS CE PRODUIT AU LIEU D'ACHAT.
natural_image
Technical line drawing of a portable oil lamp with control panel and base mount (no text or symbols)www.coleman.com
IMPORTANTE
Solamente Para Uso Al Aire Libre
NOTA:
Fig. 1

PELIGRO
natural_image
Line drawing of a portable gas pump with wheels and a bottle, accompanied by a prohibition symbol (no text or labels)ILUSTRACION REPRESENTATIVA
Fig. 2
natural_image
Technical illustration of a tire assembly with labeled component A, shown in two views (no text or symbols beyond label)NOTA:
natural_image
Illustration of hands installing a tire on a car wheel (no text or symbols)natural_image
Illustration of two hands holding test tubes with a magnified view showing upward motion (no text or symbols)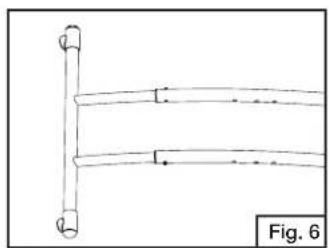
natural_image
Simple line drawing of a vertical pipe with horizontal segments and arrows indicating direction (no text or symbols)natural_image
Line drawing of a person pushing a suitcase with wheels, no text or symbols presentnatural_image
Mechanical assembly diagram showing a hand operating a shaft with a spring mechanism, labeled Fig. 10 (no text or symbols on the diagram itself)natural_image
Mechanical assembly diagram showing a hand pressing a component on a mechanical assembly (no text or symbols visible)natural_image
Line drawing of a person using a cart-mounted device with wheels, labeled as Fig. 12 (no text or symbols on the diagram itself)natural_image
Line drawing of a person using a portable tool with wheels, labeled as Fig. 13 (no text or symbols on the diagram itself)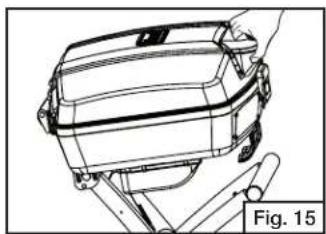
natural_image
Technical line drawing of a vehicle chassis with no visible text or symbols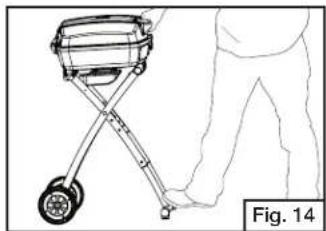
natural_image
Line drawing of a person using a portable grill with wheels, no text or symbols presentnatural_image
Technical line drawing of a vehicle chassis frame with no visible text or symbols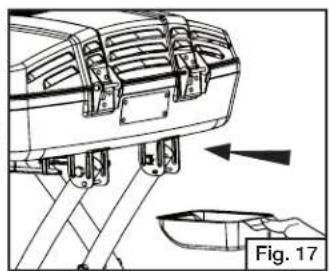
natural_image
Technical line drawing of a vehicle chassis with ladder and frame components, no visible text or symbolsnatural_image
Illustration of a hand using a tool to adjust or install a mechanical component, labeled Fig. 18 (no text or symbols on the diagram itself)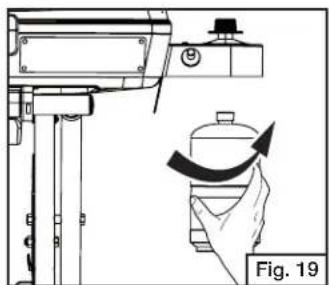
natural_image
Technical line drawing of a mechanical device with a hand holding a cylindrical component, showing motion direction (no text or symbols)natural_image
Line drawing of a hand adjusting a component on a car hood, labeled Fig. 20 (no text or symbols on the diagram itself)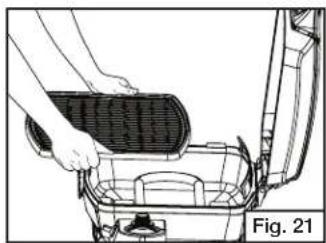
natural_image
Line drawing of a person opening a trash bin with a bag partially inserted (no text or symbols)Quemador y Orificio
natural_image
Line drawing of a person standing beside a small wheeled cart (no text or symbols)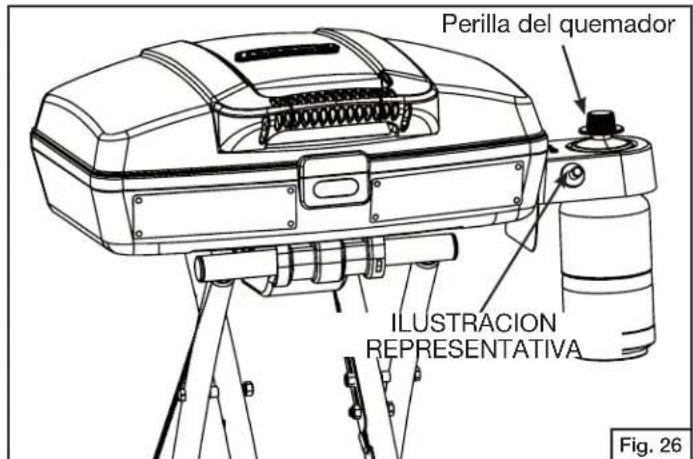
natural_image
Line drawing of hands installing or adjusting a car engine component, no text or symbols presentnatural_image
Line drawing of a device with hands operating a gridded tray and a switch, labeled Fig. 28 (no text or symbols on the diagram itself)Apagando la Parrilla
PRECAUCIÓN
natural_image
Line drawing of a hand turning a button into a car engine compartment (no text or symbols)PRECAUCIÓN
natural_image
Line drawing of a mechanical device with a hand holding a small component, labeled Fig. 31 (no text or symbols on the device itself)PARRILLA DE COCCIÓN

- Use, Care & Assembly Manual
- With Grill Lighting Instructions
- Model 9955 Series (LP Gas)
- IMPORTANT
- Contents
- Technical Characteristics
- General Safety Information
- DANGER
- WARNING
- CAUTION
- If you smell gas:
- CALIFORNIA PROPOSITION 65:
- General Installation
- Follow these safety rules before each use:
- Portable L.P. Gas Barbecue Cylinders
- Cylinder Specifications
- Grill Features
- Assemble Grill
- Assemble Wheels and Towing Handle
- Set up the Grill
- Install the Drip Tray
- Installing 1 lb. Propane Cylinder
- Burner and Orifice
- Leak Testing - Disposable LP Gas Cylinders
- How to Check for Leaks
- Fixing A Fuel Leak
- If you detect a leak:
- When to test for leaks:
- Start-Up Check List
- Lighting Instructions
- THE FOLLOWING RULES MUST ALWAYS BE FOLLOWED IN THIS ORDER (FIG. 25):
- Lighting The Burner
- INSTASTART™ Electronic Ignition
- Match Lighting
- Shutting Off the Grill
- General Use and Correct Burner Flames
- Condition The Grill
- The Burner Flame
- Grilling Tips and Hints
- Burner Control Setting Tips
- Safe Grill Operation
- Food Preparation Hints
- In Case of Grease Fire
- Follow These Steps
- Note:
- Cooking Methods
- Direct method:
- Indirect method:
- Care, Maintenance and Cleaning
- DRIP TRAY
- COOKING GRATE
- Suggested Cleaning Materials:
- Component Cleaning:
- Cleaning the Venturi
- Steps For Cleaning Venturi:
- Moving and Storage
- Moving the grill:
- After moving the grill:
- Steps to follow before storing grill:
- Troubleshooting
- Problem: Grill will not light when the igniter button is pushed or has incomplete burner flame.
- Possible Causes and Solutions:
- Problem: Yellow flame.
- Problem: Flame blows out on low setting or has uneven heat distribution.
- Problem: Grill too hot.
- Problem: Fire at any connection.
- IMMEDIATELY shut off control knob and allow grill to cool.
- Problem: Flame behind control panel or control knob area.
- Coleman® Grill
- Registration Card
- IMPORTANT!
- CONGRATULATIONS ON YOUR NEW COLEMAN® GRILL PURCHASE!
- Replacement Parts List — 9955 Series
- Limited Three Year Warranty
- What This Warranty Does Not Cover
- How to Obtain Warranty Service
- For products purchased in the United States:
- For products purchased in Canada:
- Barbecue à gaz
- Brûleur et orifice
- Extinction du gril
- ATTENTION
- GRILLE DE CUISSON
- IMPORTANTE
- PELIGRO
- NOTA:
- Quemador y Orificio
- Apagando la Parrilla
- PRECAUCIÓN
- PARRILLA DE COCCIÓN
Brand : COLEMAN
Model : RoadTrip
Category : Barbecue