
PFD7T12S3 - Surveillance Camera Moog Videolarm - Free user manual and instructions
Find the device manual for free PFD7T12S3 Moog Videolarm in PDF.
User questions about PFD7T12S3 Moog Videolarm
0 question about this device. Answer the ones you know or ask your own.
Ask a new question about this device
Download the instructions for your Surveillance Camera in PDF format for free! Find your manual PFD7T12S3 - Moog Videolarm and take your electronic device back in hand. On this page are published all the documents necessary for the use of your device. PFD7T12S3 by Moog Videolarm.
USER MANUAL PFD7T12S3 Moog Videolarm
2009-2010, Moog Videolarm, Inc. All Rights Reserved
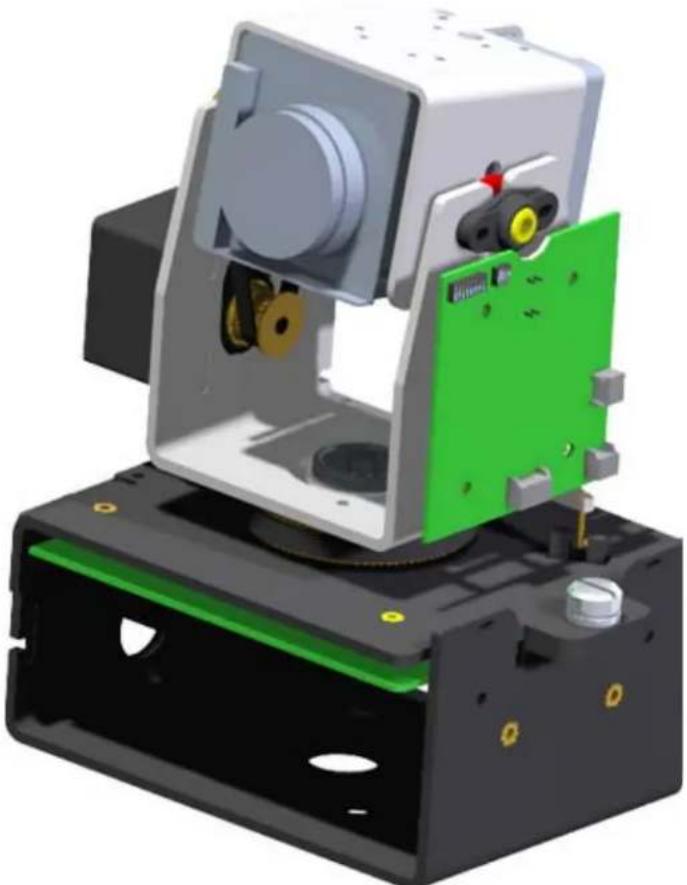
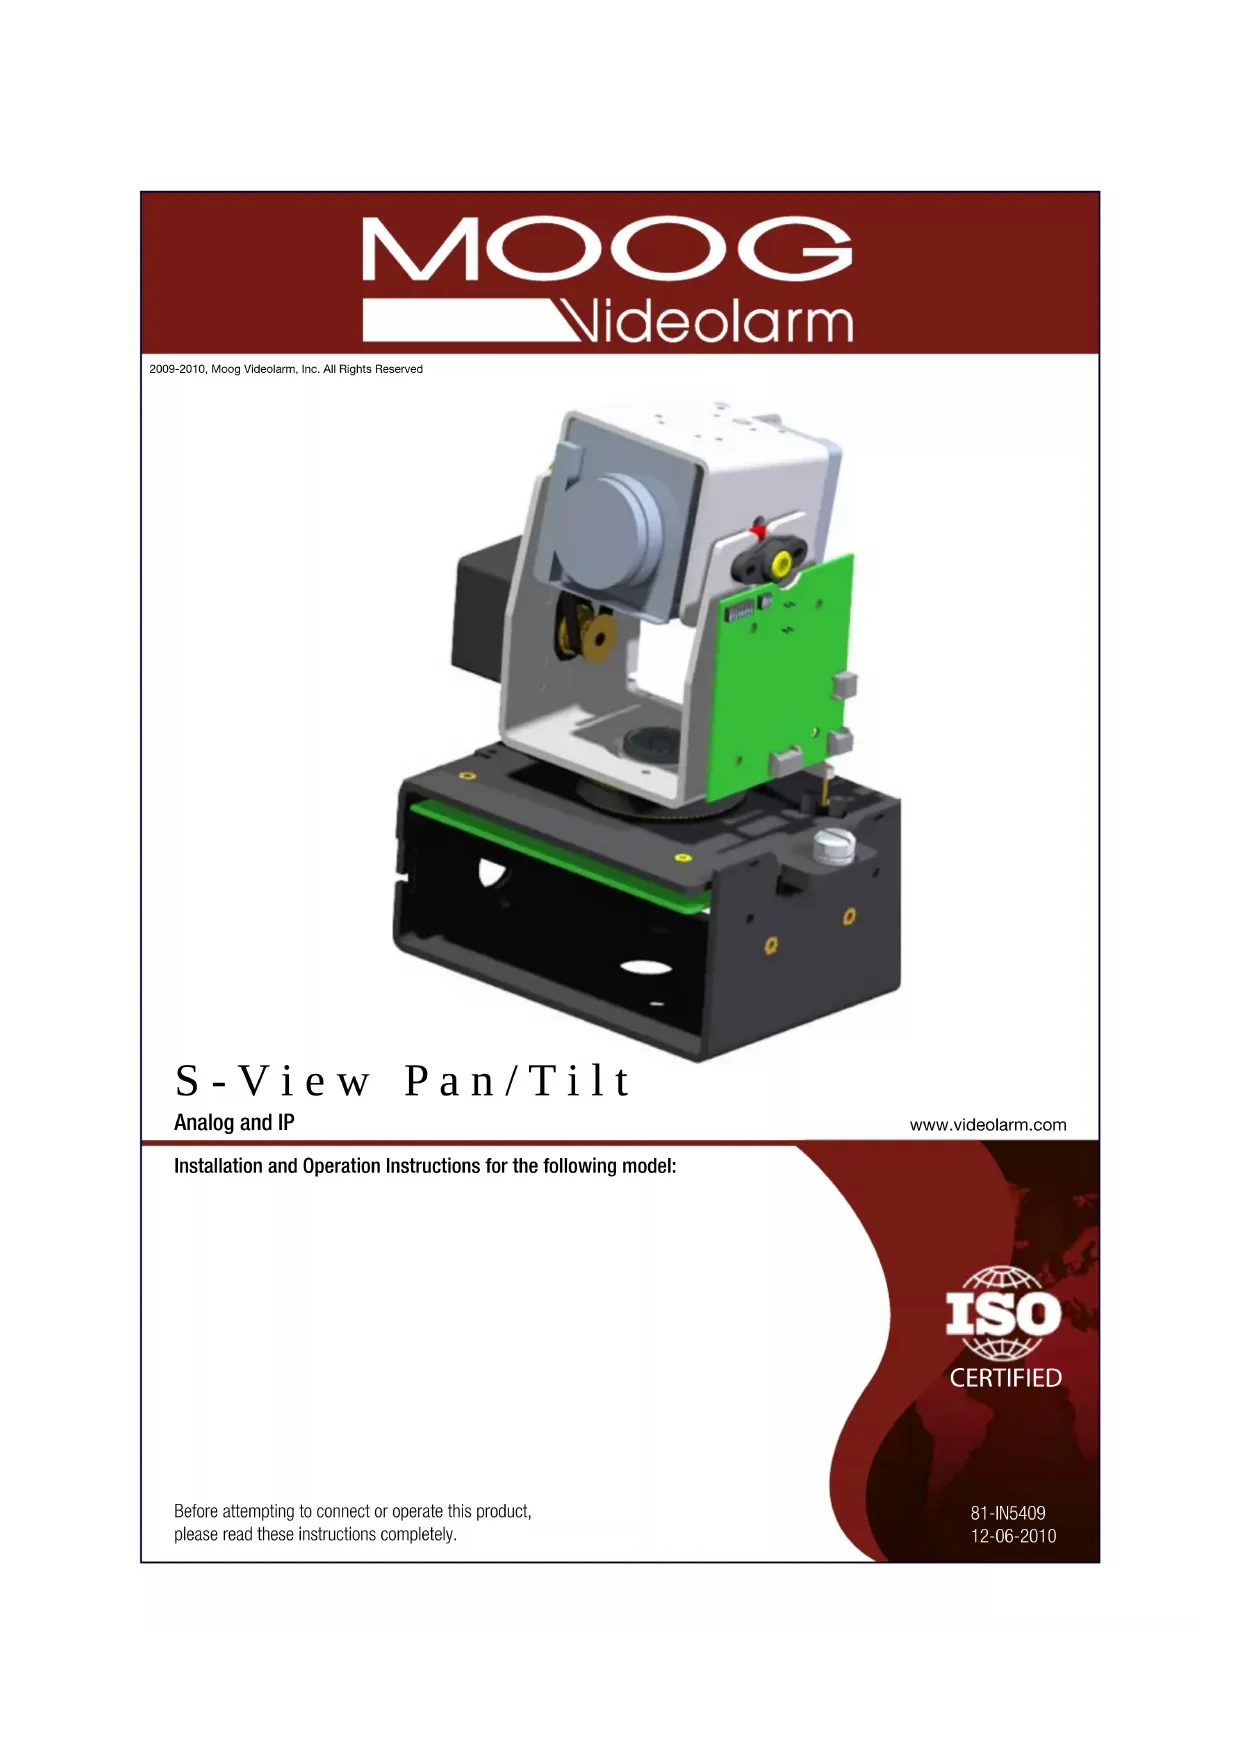
S-View Pan/Tilt
Analog and IP
www.videolarm.com
Installation and Operation Instructions for the following model:
Before attempting to connect or operate this product, please read these instructions completely.

CERTIFIED
81-IN5409
12-06-2010
IMPORTANT SAFEGUARDS SAFETY PRECAUTI
1 Read these instructions.
2 Keep these instructions.
3 Heed all warnings
4 Follow all instructions.
5 Do not use this apparatus near water.
6 Clean only with damp cloth.
7 Do not block any of the ventilation openings. Install in accordance with the manufacturers instructions.
8 Cable Runs- All cable runs must be within permissible distance.
9 Mounting - This unit must be properly and securely mounted to a supporting structure capable of sustaining the weight of the unit.
Accordingly:
a. The installation should be made by a qualified installer.
b. The installation should be in compliance with local codes.
c. Care should be exercised to select suitable hardware to install the unit, taking into account both the composition of the mounting surface and the weight of the unit.
10 Do not install near any heat sources such as radiators, heat registers, stoves, or other apparatus (including amplifiers) that produce heat.
11 Do not defeat the safety purpose of the polarized or grounding-type plug. A polarized plug has two blades with one wider than the other. A grounding type plug has two blades and a third grounding prong. The wide blade or the third prong are provided for your safety. When the provided plug does not fit into your outlet, consult an electrician for replacement of the obsolete outlet.
12 Protect the power cord from being walked on or pinched particularly at plugs, convenience receptacles, and the point where they exit from the apparatus.
13 Only use attachment/ accessories specified by the manufacturer.
14 Use only with a cart, stand, tripod, bracket, or table specified by the manufacturer, or sold with the apparatus. When a cart is used, use caution when moving the cart/ apparatus combination to avoid injury from tip-over.
15 Unplug this apparatus during lighting storms or when unused for long periods of time.
16 Refer all servicing to qualified service personnel. Servicing is required when the apparatus has been damaged in any way, such as power-supply cord or plug is damaged, liquid has been spilled of objects have fallen into the apparatus, the apparatus has been exposed to rain or moisture, does not operate normally, or has been dropped.
Be sure to periodically examine the unit and the supporting structure to make sure that the integrity of the installation is intact. Failure to comply with the foregoing could result in the unit separating from the support structure and falling, with resultant damages or injury to anyone or anything struck by the falling unit.
UNPACKING
Unpack carefully. Electronic components can be damaged if improperly handled or dropped. If an item appears to have been damaged in shipment, replace it properly in its carton and notify the shipper.
Be sure to save:
1 The shipping carton and packaging material. They are the safest material in which to make future shipments of the equipment.
2 These Installation and Operating Instructions.
SERVICE
If technical support or service is needed, contact us at the following number:
TECHNICAL SUPPORT
AVAILABLE 24 HOURS
1-800-554-1124

CAUTION
RISK OF ELECTRIC SHOCK DO NOT OPEN

CAUTION: TO REDUCE THE RISK OF ELECTRIC SHOCK,DO NOT REMOVE COVER (OR BACK).NO USER- SERVICEABLE PARTS INSIDE.REFER SEVICING TO QUALIFIED SERVICE PERSONNEL.

The lightning flash with an arrowhead symbol, within an equilateral triangle, is intended to alert the user to the presence of non-insulated "dangerous voltage" within the product's enclosure that may be of sufficient magnitude to constitute a risk to persons.
The exclamation point within an equilateral triangle is intended to alert the user to presence of important operating and maintenance (servicing) instructions in the literature accompanying the appliance.
PRODUCTCATEGORY PARTS LABOR
All Enclosuresand Electronics
Pan/Tilts
Poles/PoleEvators
Warrior/Q-View/I.RJluminators
View Series
Controllers
PowerSupplies
AccessoryBrackets
Five (5) Years
Three (3) Years **6 months if used in autoscan
Three (3) Years /tour operation
Five (5) Years
Five (5) Years 6 months if used in autoscan
Five (5) Years /tour operation
Five (5) Years
Five (5) Years
Five (5) Years
Three (3) Years 6 months if used in autoscan
Three (3) Years /tour operation
Five (5) Years
Five (5) Years
Five (5) Years /month if used in oscans
Five (5) Years
Five (5) Years
During the labor warranty period, to repair the Product, Purchaser will either return the defective product, freight prepaid, or deliver it to Videolarm Inc. DecaturGA.The Product to be repaired is to be returned in either its original carton or a similar package affording an equal degree of protection with a RMA# (Return Materials Authorization number) displayed on the outer box or packing slip. To obtain a RMA#you must contact our Technical Support Team at 800.554.1124extension 101.Videolarm will return the repaired Product freight prepaid to PurchaserVideolarm is not obligated to provide Purchaser with a substitute unit during the warranty period or at any time. After the applicable warranty period, Purchas must pay all labor and/or parts charges.
The limited warranty stated in these product instructions is subject to all of the following terms and conditions:
TERMS AND CONDITIONS
- NOTIFICATION OF CLAIMS: WARRANTY SERVICE: If Purchaser believes that the Product is defective in material or workmanship, then written notice with an explanation of the claim shall be given promptly by Purchaser to Videolarm but all claims for warranty service must be made within the warranty period. If after investigation Videolarm determines that the reported problem was not covered by the warranty, Purchaser shall pay Videolarm for the cost of investigating the problem at its then prevailing per incident billable rate. No repair or replacement of any Product or part thereof shall extend the warranty period as to the entire Product. The specific warranty on the repaired part only shall be in effect for a period of ninety (90) days following the repair or replacement of that part or the remaining period of the Product parts warranty, whichever is greater.
2.EXCLUSIVE REMEDY: ACCEPTANCE: Purchaser's exclusive remedy and Videolarm's sole obligation is to supply (or pay for) all labor necessary to repair any Product found to be defective within the warranty period and to supply, at no extra charge, new or rebuilt replacements for defective parts.
-
EXCEPTIONS TO LIMITED WARRANTY: Videolarm shall have no liability or obligation to Purchaser with respect to any Product requiring service during the warranty period which is subjected to any of the following: abuse, improper use: negligence, accident, lightning damage or other acts of God (i.e., hurricanes, earthquakes), modification, failure of the end-user to follow the directions outlined in the product instructions, failure of the end-user to follow the maintenance procedures recommended by the International Security Industry Organization, written in product instructions, or recommended in the service manual for the Product. Furthermore, Videolarm shall have no liability where a schedule is specified for regular replacement or maintenance or cleaning of certain parts (based on usage) and the end-user has failed to follow such schedule; attempted repair by non-qualified personnel; operation of the Product outside of the published environmental and electrical parameters, or if such Product's original identification (trademark, serial number) markings have been defaced, altered, or removed. Videolarm excludes from warranty coverage Products sold AS IS and/or WITH ALL FAULTS and excludes used Products which have not been sold by Videolarm to the Purchaser. All software and accompanying documentation furnished with, or as part of the Product is furnished "AS IS" (i.e., without any warranty of any kind), except where expressly provided otherwise in any documentation or license agreement furnished with the Product.
-
PROOF OF PURCHASE:The Purchaser's dated bill of sale must be retained as evidence of the date of purchase and to establish warranty eligibility.
DISCLAIMEROF WARRANTY
EXCEPT FOR THE FOREGOING WARRANTY, VIDEOLARM HEREBY DISCLAIMS AND EXCULES ALL OTHER WARRANTIES, EXPRESS OR IMPLIED
INCLUDING, BUT NOT LIMITED TO ANY AND/OR ALL IMPLIED WARRANTYES OF MERCHANTABILITY, FITNESS FOR A PARTICULAR PURPOSE AND/OR ANY WARRANTY WITH
REGARD TO ANY CLAIM OF INFRINGEMENT THAT MAY BE PROVIDED IN SECTION 2-312(3) OF THE UNIFORM COMMERCIAL CODE AND/OR IN ANY OTHER COMPARABLE
STATE STATUTE. VIDEOLARM HEREBY DISCLAIMS ANY REPRESENTATIONS OR WARRANTY THAT THE PRODUCT IS COMPATIBLE WITH ANY COMBINATION OF NON-VIDEOSLARM
PRODUCTS OR NON-VIDEOLARM RECOMMENDED PRODUCTS PURCHASER CHOoses TO CONNECTTO PRODUCT.
LIMITATION OF LIABILITY
THE LIABILITY OF VIDEOLARM, IF ANY, AND PURCHASER'S SOLE AND EXCLUSIVE REMEDY FOR DAMAGES FOR ANY CLAIM OF ANY KIND
WHATSOEVER, REGARDLESS OF THE LEGAL THEORY AND WHETHER ARISING IN TORT OR CONTRACT, SHALL NOT BE GREATER THAN THE ACTUAL PURCHASE PRICE OF THE
PRODUCT WITH RESPECT TO WHICH SUCHCLAIM IS MADE. IN NO EVENT SHALL VIDEOLARM BE LIABLE TO PURCHASER FOR ANY SPECIAL, INDIRECT, INCIDENTAL, OR

Electrical Specifications
S-VIEW PAN/TILT
Content of Box

Class 2 Power Supply Only
MODELS:24VAC
Analog 13 WATTS
IP 28WATTS
MODELS:12VDC
View: Analog 13 WATTS
S-view:IP 20WATTS

Remove Pan/Tilt from shipping carton. Install in base bracket in housing.
- Quite Pan/Tilt del carton del envío. Instale en soporte bajo en la cubierta.
- Enlevez Pan/Tilt du carton d'expédition. Installez dans la parenthèseasse dans le logement.
- Entfernen Sie Pan/Tilt vom Verschiffenkarton. Bringen Sie in niedrigen Haltewinkel im Gehäuse an.
- Remova Pan/Tilt da caixa do transporte. Instale no suporte baixo na carcaça.
- Rimuova Pan/Tilt alla scatola di trasporto. Installi in staffa bassa in alloggiamento.
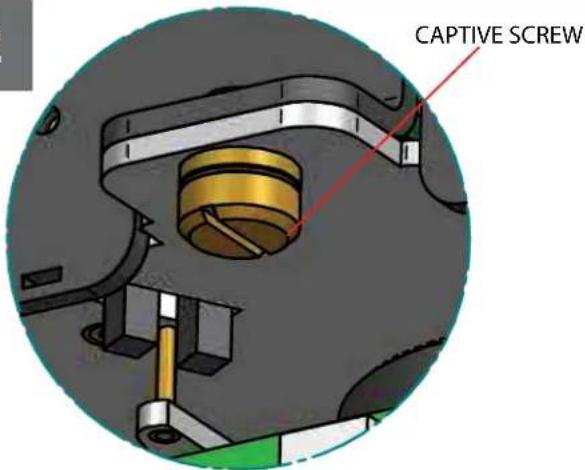
2
To secure in place, fighten captive screw.
- Para asegurar en lugar, apriete el tornillo prisionero.
- Pour fixer en place, serrez la vis captive.
- Um im Platz zu sichern, ziehen Sie Sicherheitsschraube fest.
- Para fixar-se no lugar, aparez o parafuso prisioneiro.
Per fissare sul posto, stringa la vite prigioniera.
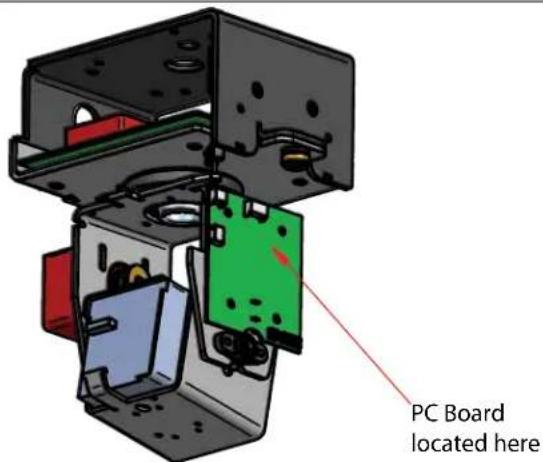
3
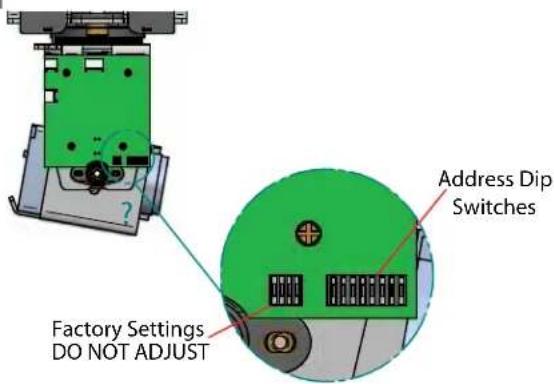
To set camera address locate PC board on the side of Pan/Tilt unit. (Analog)
- Para fjjar la direccion de la CAMERA fotografica localice el tablero de PC en el lado de la unidad de Pan/Tilt.
- Pour placer l'adresse d'appareil-photo localisez le panneau de PC du cote de l'unité de Pan/Tilt.
- Um Kameraadresse einzustellen lokalisieren Sie PC Brett auf der Seite der Pan/Tilt MaBeinheit.
- Paraaabstar o endereco da camera enoentre a placadepcno lado da unidade de Pan/Tilt.
Per regolare l'indirizzo della macchina fotografica individui il bordo del pc dal lato dell'unità di Pan/Tilt.
4
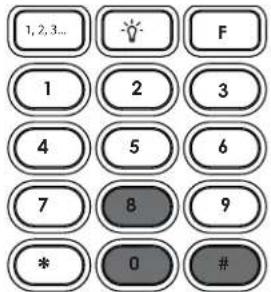
Use the 8 position Dip switch to set address lower corner. (Analog)
- Utilice el interruptor dip de 8 posiciones para fjjar una esquina más baja de la direccion.
Utilisez le contact DIP de 8 positions pour placer le coin inférieur d'adresse. - Benutzen Sie den 8 Position DIP-Schalter, um Adresse unterere Ecke einzustellen.
- Use o interruptor de vergulho de 8 posicaoes ajustar um canto mais boa do endereco.
Utilizzi l'interruttore di tutte di 8 positioni per regolare il angolo più basso di indirizzo.
5
(Analog)
6
PROTOCOLS
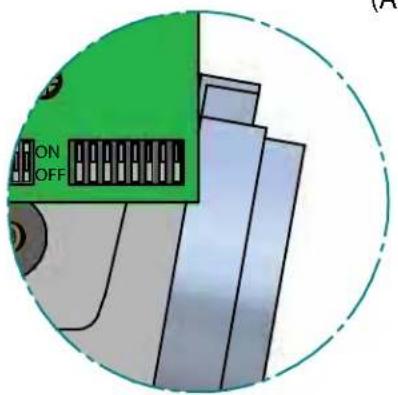
To set the address at "0" side the all switches off as shown. See table in back for address 0-255
- Para fazer la direccion en "0" todos todos los interruptores apagado según lo demostrado. Vea la tabla adentro detrás para la direccion 0-255
Pour placer I'adresse sur "0" cotés les tous les commutateurs au loin comme montré. Voir le tableau dedans en arrêt pour I'adresse 0-255
Die Adresse an "0" Seite weg einstellen die alle Schalter, wie gezeigt. Sehen Sie Tabelleinnen zurück für Adresse 0-255 - Paraaabstara o endereco em "0"lados todos os interruptores como mostrado. Veja a tabela dentro para tras para oendereco 0-255
Per regolare l'indirizzo "su 0" lati tutti gli interrupturi fuori come indicato. Veda la tabella dentro indietro per l'indirizzo 0-255
1 VL422
2PELCO P4800/9600
3PELCO D 4800/9600
The S-View Pan/Tilt support the above protocols. This is done automatically no settings are required.
- La ayud de la S-Vista Pan/Tilt los protocolos antedichos. Se requireso este se hace automatamente ningunos ajustes.
L'appui de la S-Vue Pan/Tilt les protocoles ci-dessus. Ceci est fait automatiquement aucuns arrangements sont exigés.
Die S-Ansicht Pan/Tilt Unterstützung die oben genannten Protokolle. Thisem wird automatisch keine Einstellungen werden angefordert getan. - A sustentarao da S-Vista Pan/Tilt os protocolos acima. Isto e feito automaticamente nenhuns ajustes erequiredo.
- Il supporto di S-Vista Pan/Tilt i suddetti protocolli. Cio è fattà automaticamente nessun regolazioni è richiesta.
7
MENUDRIVEN SETTINGS(Analog)
Camera
When using Videolarm controller; to enter the menu; select the camera you wish to control.
- Al usar el regulator de Videolarm; para incorporar el menu; selección la CAMERA fotografia que ugsted desea controlar.
- En utilisant le contrôle de Videolarm; pour écrire le menu;CHOISSEZ l'appareil-photo que vous souhaitez commander.
- Wenn Videolarm Steuerpull verwendet wird: das Menu eintragen; wahlen Sie die Kamera vor, die Sie steuern möchten.
- Ao uso o controlador de Videolarm; para incorporar o menu; selección a CAMERA que você deseja controlar.
- Nel usoando il regolatore di Videolarm; per entrare nel menu; selezioni la macchina fotografica che desiderate controllare.
8
MENUDRIVEN SETTINGS(Analog)
Presets
Then press 95 followed by the Preset button (品)
- Entoces la prensa 95 siguió por preestablecio el botón (Y).
- Alors la pression 95 a suivi de a préprégle le bouton (艹)
Dann folgte Presse 95 von einstelle Taste (Y). - Então a imprensa 95 seguiuengo pré-ajustou a tecla ( ).
- Allora la pressa 95 è seguito dal ha prestabilito il tasto (3).
9
(IP)
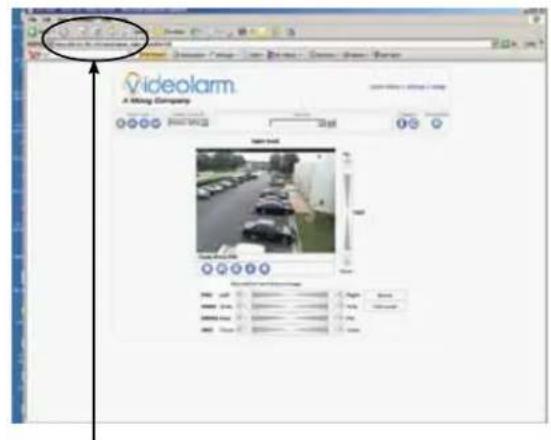
IP INSTRUCTIONS: The factory default IP address is : 192.168.0.90.
INSTRUCCIONES DEL IP: EI IP address del defejo de la fabricula es: 192.168.0.90.
- INSTRUCTIONS D'IP: Le IP address de début d'usine est : 192.168.0.90.
IP ANWEISUNGEN: Das Fabrikrückstellung IP address ist: 192.168.0.90.
- INSTRUÇOES DO IP: O IP address do defeito da fabrica é: 192.168.0.90.
- ISTRUZIONI DEL IP: Il IP address di difetto della fabbrica e: 192.168.0.90.
10
(IP)
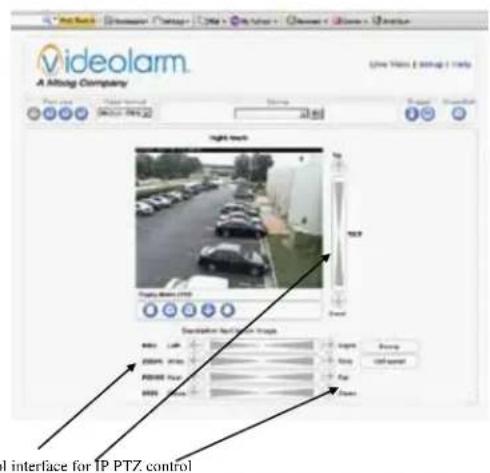
Control interface for IP PTZ control.
- Controle el interfaz para el control del IP PTZ.
Commandez l'interface pour la commande d'IP PTZ. - Steuern Sie Schnittstelle IP PTZ zur Steuerung.
- Controle a relação para o controle do IP PTZ.
- Controlli l'interfaccia per controlo del IP PTZ.
11
(IP)
For Pan Tilt control click on the PTZ control icon in top right corner.
- Para el control de la inclinacion de la cacerola trasque encendido el icono del control de PTZ en equna derecha superior.
Pour le clic de commande d'inclinaison de casserole sur I'icone de commande de PTZ dans le bon coin supérieur. - Zur Wanne Neigungsteuerung klichen Sie an die PTZ Steuerikone in der Rechteecke.
- Para o controle da inclinação da bandeja está sobre o icone do controle de PTZ no canto direito superior.
Per controlo di ribaltamento della vaschetta scatti sopra licona di controlo di PTZ nel giusto angolo superiore.

12
(IP)
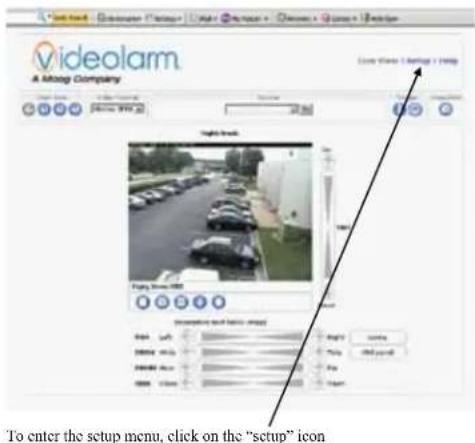
See IP Camera instruction CD for operation details.
- Vea el CD de la instruccion de la webcam fotografica del IP para los detalles de la operation.
- Voir le CD d'instruction d'appareil-photo d'IP pour des détails d'opération.
- Sehen Sie IP Kamera-Anweisung CD für Betrieb Details.
- Veja o CD da instrucao da camera do IP para detalhes da operacao.
- Veda il CD di struzione della macchina fotografica del IP per i particolari di funzionamento.
13
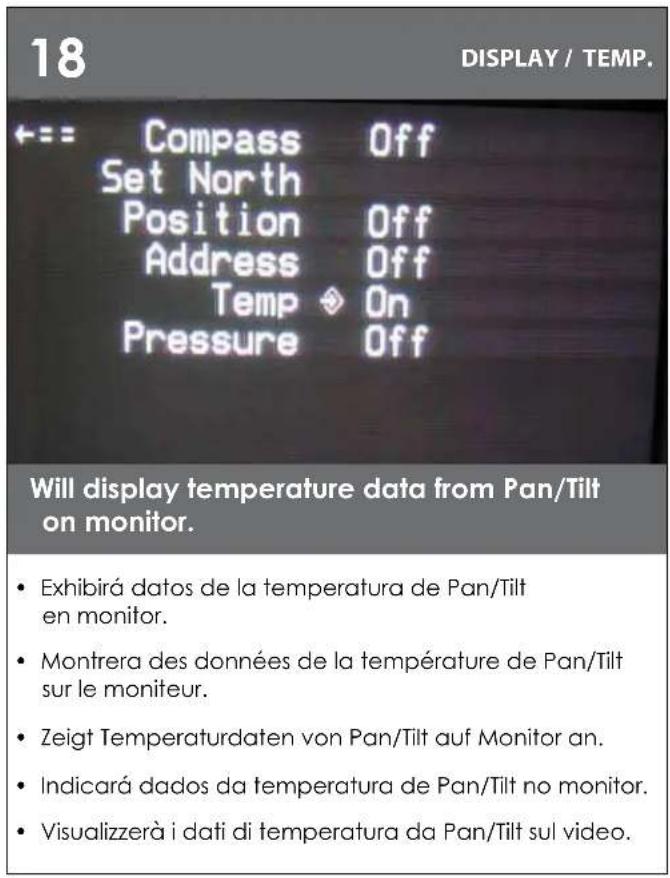
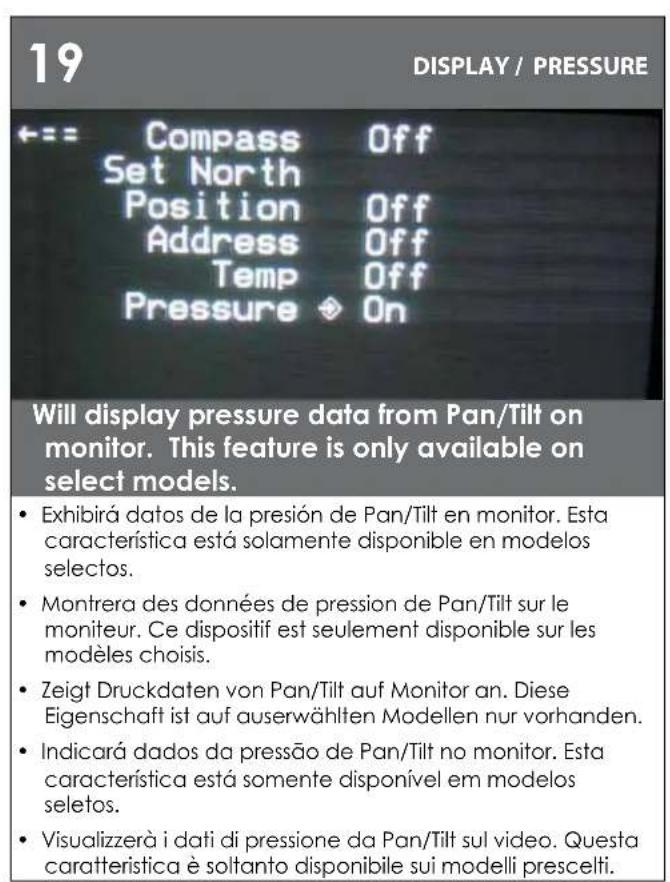
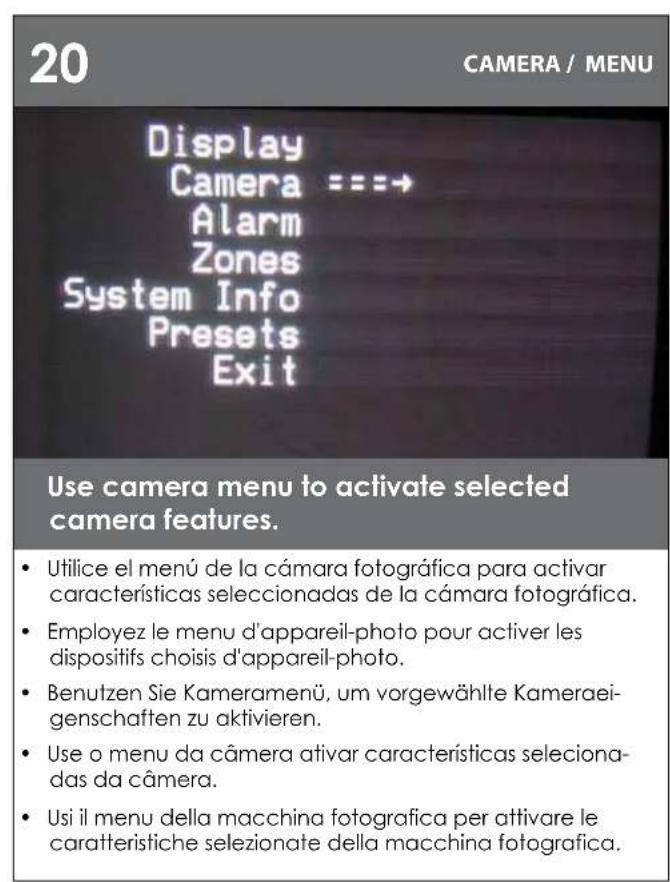
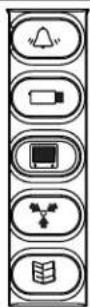
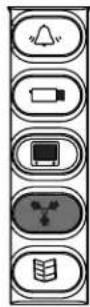
DISPLAY/MENU
DISPLAY/COMPASS
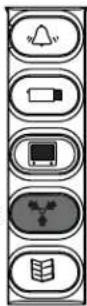
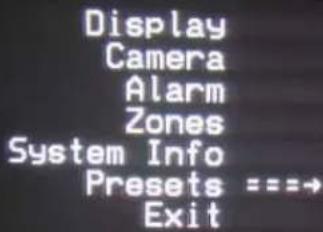
Display = = = Camera Alarm Zones System Info Presets Exit
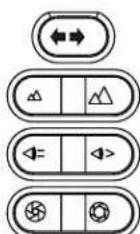
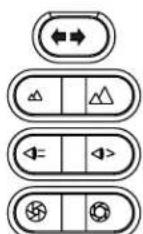
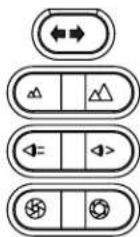
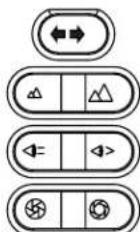
Use Up & Down control on the controller to navigate through the menu. Pan left and right are used to enter sub menus.
- Utilice para irriba y abajo controle en el regulador para navegar a través del menú. La cacerola a la izquierda e a la derecha se realiza para incorpurar menús secundarios.
- Épuisez et commandez vers le bas sur le contrôleur pour diriger par le menu. La casserole à gauche et à droite sont utilisées pour écrire les menus secondaires.
- Verwenden Sie oben u. steuem Sie unter auf dem Steuerpult, um durch das Monu zu steuern. Verschieben Sie links undrecht werden verwendel, Vormenu einzutragen.
- Use acima & controle para boa no controlador para navigate atraves do menu. Garimpe esquerdo e direito são usados incorpolar menus secundários.
- Consumi & giu controlli sul regolatore per traversare attraverso il menu. La vaschetta a destra e a sinistra è utilizzata per entrare nei menu secondari.
14
中
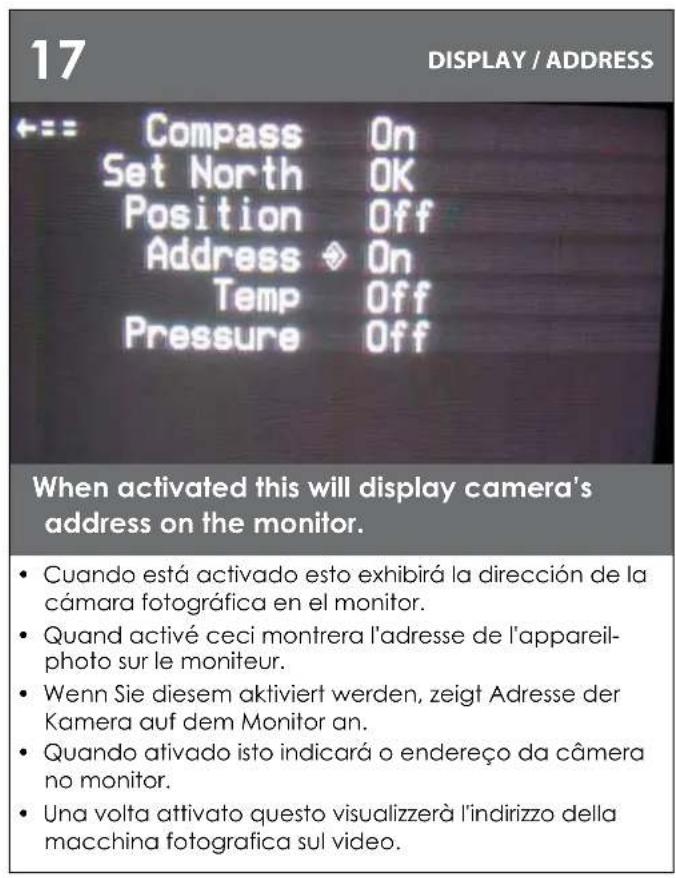
Compass Set North Position Address Temp Pressure

On
Off Off Off
Use this submenu to activate compass heading. Press zoom in to turn on, zoom out to turn off, Pan Left to exit.
- Utilice este submenu para activar el titULO de compás. Presione el zumbido adentro para girarse, zumbido hacía fueira a dan vuelta apagado, cacero la izquierda a la salida.
- Employez ce submenu pour activer le titre de boussole. Serrez le bourdonnement dedans pour se tourner dessus, bourdonnement dehors vers se tourment au loin, casserole gauche vers la sortie.
- Verwenden Sie diese submenu, um Kompalßsteuerkurs zu aktivieren. Betätigten Sie Zoom innen, um, Zoom heraus an an zu wenden wenden weg, die Wonne, die an Ausgang link ist.
- Use este submenu ativar a titulo de compasso. Pressione o zumbido dentro para girar sobre, zumbido para fora para desigam, bandeja esquerda para a saida.
- Usi quello submenu per allivare l'intestazione di bussola. Premi lo zoom辖区内 per girarsi sopra, zoom fuori verso si girano fuori, vaschetta di sinistra verso Fuscita.
15
DISPLAY/SET NORTH
中
Compass On Set North OK Position Off Address Off Temp Off Pressure Off
Use the "Zoom In" button to set calibration. Display will show OK.
- Uflice el "zumbido en" botton para fjjar la calibracion. La exhibicion demostrará MUY BIEN.
Employez "bourdonnement dans" le botton pour placer le calibrage. L'affichage montrera BIEN.
Benutzen Sie den "Zoom" im botton, um Kalibrierung einzustellen. Anzeige stellt O.K. dar. - Use o "zumbido" no botton ajustar a calibracao. A exposicao月至ra ESTA BEM.
- Usi "lo zoom" nel botton per regolare la calibratura. L'esposizione mostrera BENE.
16
DISPLAY/POSITION
Compass Off Set North Position On Address Off Temp Off Pressure Off
A numeric camera position is shown on monitor. With "Position" activated,
- Una posicón número de la-camera fotografica se demuestra bajo a monitor. Con la "Posición" activó.
- Une position numérique d'appareil-photo est montré sur le moniteur. Avec l"Position" a créé.
- Eine numerische Kameraposition wird auf Monitor gezeigt. Wenn "Position" aktiviert ist.
- Uma posicao numérica da camera é muito boa monitor. Com "Posicao" atrivou.
- Una posizione numerica della macchina fotografica è indicata sul video. Con "Posizione" ha attivato.
21
CAMERA / STABILIZATION
ALARM/MENU
中83
Stabilize Day/Night Shutter Backlight AGC Digi Zoom
Off Auto Auto Off On Off
Camera sub menu includes, image stabilization, day/night mode, shutter, backlight, AGC and digital zoom. Image stabilization is not a feature of all cameras
El menu secundario de la CAMERA fotografica incluye, estabilacion de la imagen, modo de ayay/night, obturador, contraluz, AGC y zumbido digital. La estabilacion de la imagen no es una caracteristica de todas los camaras fotograficas.
Le menu secondaire d'appareil-photo inclut, stabilisation d'image, mode de day/night, obturator, contre-jour, AGC et bourdonnement numérique. La stabilisation d'image n'est pas un dispositif de tous les apparcellis-photo.
Kameravormenu schieBt, Bildausgleichung, day/night Modus, Blendenverschluß. Hintergrundbeleuchtung, AGC und digitaler Zoom ein. Bildausgleichung ist nicht eine Eigenschaft aller Kameras.
- O menu secundario da camera inclui, establização da imagem, modalidade de day/night, obturador, luminoso, AGC e zumbido digital. A establização da imagem não é uma caractéristica de todas as cameras.
- Il menu secondario della macchina fotografica include, stabilizzazione di immagine, modo di day/night, olfactory, lampadina, AGC e zoom digitale. La stabilizzazione di immagine non è una caratteristica di tutte le macchine fotografiche.
Display
Camera
Alarm = = =
Zones
System Info
Presents Exit
Use sub menu to activate alarm. When enabled camera will go to preset "1" when alarm input is closed.
- Ufilice el menu secundario para activar alalarmar. Cuando está permitida la CAMERA fotografica irá a preestablecer "1" cuando la entrada del alarmar es cerrada.
- Employez le menu secondaire pour activer l'alarme. Quand permet l'appareil-photo ira prerégler "1" quand l'entrée d'alarme est fermée.
Benutzen Sie Vomenü, um Warnung zu aktivieren. Wenn sie ermöglich wird, gehen Kamera, "1" einzustellen, wenn Warnung Eingang geschlossen ist. - Use o menu secundario ativar o alarme. Quando permitted a camera irá pré-ajustar "1" quando a entrada do alarmé é closed.
- Us il menu secondario per allivare l'allarme. Una volta permessa la macchina fotografica andra prestabilitire "1" quando l'input dell'allarme è chiuso.
23
ZONE/SHOW
ZONE/PRIV.
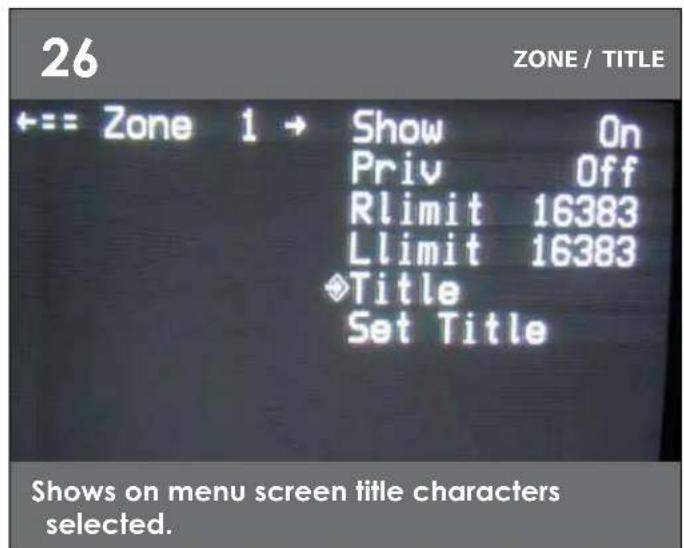
Zone 1 Show On Priv Off Rlimit 16383 Llimit 16383 Title Set Title
Will show title of the zone on monitor when activated.
- Demostraré el titulo de la zona en monitor cuando está activado.
- Montrera le titre de la zone sur le moniteur quand activé.
- Zeigt Titel der Zone auf Monitor, wenn Sie aktiviert werden.
- Mostraró o titulo da zona no monitor quando ativado.
- Mostrera il titolo della zona sul video una volta atlivato.
24
Zone 1 Show On Priv Off Rlimit 16383 Limit 16383 Title Set Title
Turn on "PRIV" to activate; Rlimit will turn off menu, to allow you to position right limit for zone.
- Gire "PRIV" para activar; el rimit dará vuelta apagado al menu, para permitir que usted coloque el limite correcho para la zona.
- Allumez "PRIV" pour activer; le rylimarétera le menu, pour vous permettre de placer la bonne limite pour la zone.
- Schalten Sie "PRIV" ein, um zu aktivieren; rimit stellt Menu ab, um Ihnen zu erlauben, rechte Begrenzung für Zone in Position zu bringen.
- Gire sobre "PRIV" para atívar; o rimit desligará o menu, para permitir que você posicao o limite direito para a zona.
- Accenda "PRIV" per attivare; il rimit spegnerà il menu, per permettere che posizioniate il giusto limite per la zona.
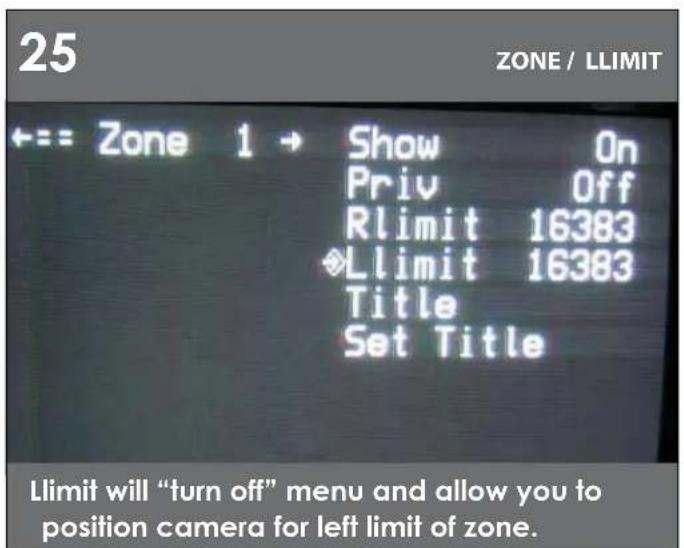
Voluntad de Llimit "dar vuelta apagado" al menu y permitir que ested colque la camarafotografica para el limite izquierdo de la zona.
- Volonté de Limit "arreter" le menu et vous permettre de placer l'appareil-photo pour la limite gauche de la zone.
- Limit Wille Menu abstellen und ihren erlauben, Kamera für linke Begrenzung auf Zone in Position zu bringen.
- Vontade de Llimit "para desligar" o menu e para permitir que você posicaoe a camera para o limite esquerdo da zona.
- Volontà di Llimit "spagnere" menu e permettere che posizioniate macchina fotografica per il limite di sinistra della zona.
- Demostraciones en los caracteres del tíolo de la pantalla de menú seleccióndos.
- Expositions sur des caractères de titre d'écran menu choisis.
- Erscheinen auf den Menüschirm-Tifelbuchstaben vorgewählt.
- As mostras em caroleres do tilio da lela de menu selecionaram.
Le esposizioni sui caratteri di titolo dello schermo di menu hanno selezionato.
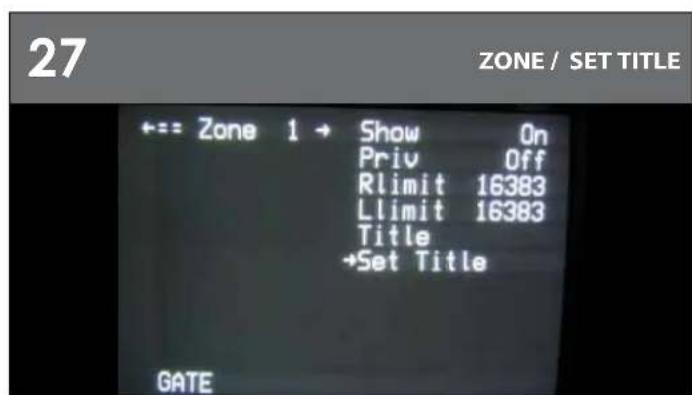
Allow you to select title characters. Pan left or right to change character position. Use tilt up/down to show characters. Press zoom in to set title-exit menu zoom out will restore to original title.
- Permitte usede selecione caracteres del tulo. Filtre izquierdo o derecho camblar la posiclon de caracter. Ullice la incinacion up/down para demostrar caracteres. El zumbido de la prensa adentro para filar el zumbido del menu de la tulo-salida hacia fuea restuarao al tulo original.
- Permettevez-vous de désir des caractères de titre. Filtrée gauche ou droit de changer la position d'impression. Employez l'inclination haut/bas pour montré des caractères. Le bourdonnement de pression cédans pour placer le bourdonnement de menu de titre-sortie dehors reconstituyaure au titre original.
Erlauben Sie Innen, Titelbuchstaben vorzubwahlen, Verschleben Sie Ilnks oder recht. Zeichenslste zu onder. Verwendten sie Die Neigung, die, um Buchstaben zu zeigen Auf-/Ab ist. Der Presse Zoom innen, zum von Titel-Ausgang Menu Zoom hersaus einzelstellen stellt zumurspranglichen Titel wieder her. - Permila que você selecione caráleres do发展目标. Garimpe esqueço ou direito para fazer a posicao de carator. Use a inclinação up/downulararcarateres. O zumbido da impressaclistro paraaabustar o zumbido do menu da发展目标a para fora restauraraoftitulaooriginal.
Permette che selezioniate i caratteri di filolo, Filtri di sinistro o di destrato per camiare la posizione del carattere. Usil l'incinazione up/down per lostrare i caratteri. Lo zoom della pressa除去 per regolare lo zoom del menu dell'filolo-uscita fuori ristabilità al filto originale.
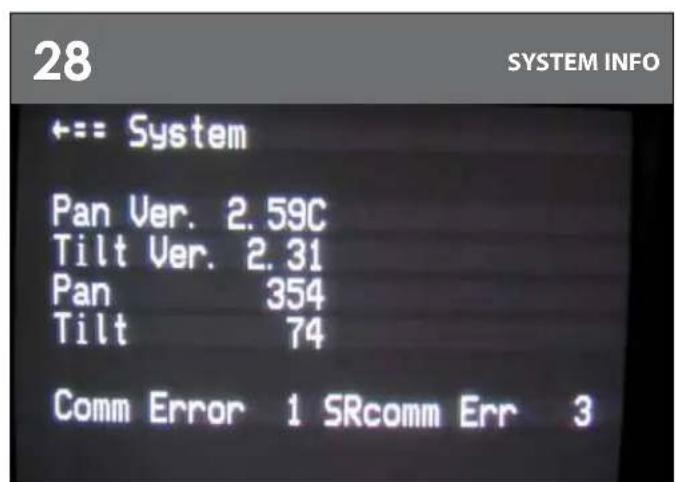
Displays Pan version, Tilt version, current Pan position, and current Tilt position.
- Version de la cacerola de las exhibiciones, version de la inclinación, posición actual de la cacerola, y posición actual de la inclínación.
- Version de casserole d'affichages, version d'inclinaison, position actuelle de casserole, et position actuelle d'inclinaison.
Anzeigen Wanne Version, Neigungversion, gegenwärftige Wanne Position und gegenüber Neigungposition. - Versão da bandeja das expositões, versão da inclinação, posicao atual da bandeja, e posicao atual da inclinação.
- Versione della vaschetta delle esposizioni, versione di inclinazione, attuale posizione della vaschetta ed attuale posizione di inclinazione.
29
PRESETS
Allow user to set dwell time for each stored preset. If presets have not been saved the dwell time for that preset will be displayed as ".".
- Permita que el usuario fije el tiempo de detencion para cada uno almacenada preestablecen. Si las precolocaciones no se han ahorrado la epoca de detencion para ese preestablezca sera exhibido como ""
- Permettez à l'utilisateur de placer le temps d'angle de saturation pour chaque stocke préréglient. Si des prérégliages que le demuni economisé le moment d'angle de saturation pour le ce a prérégliés seront montrés comme."
Erauben Sie Benutzer, Verweilzeit für gespeichertes{jedes einzustellen einstehen. Wenn Voreinstellungen nicht die Verweilzeit für diese gespeichert worden sind, stellen Sie wird angezeigt wie" ein. - Permitta que o uso éajuste o tempo de interrupção para cada um armazenado pré-ajustam. Se os pré-ajustes não foram conservados o quando de interrupção para o esse pré-ajuste está indicado como
Permetta che l'utente regoli il tempo di abitazione per ciascuno immagazzinato prestabiliscono. Se i preregolamenti non sono stati conservati il momento di abitazione per ilquel prestabilisca sare visualizzato come".
30
PRESETS
= 2
95125 55.
…
Allows user to set dwell time for each existing stored preset. The above screen show (6) stored presets, with dwell times of, 9,5,12,5,5,5 seconds.
- Permite que el usuario fije el tiempo de detencion para que cada uno el existir almagenado preestablecio. Las precocaciones aimacadas (6) antedicho de la demostracion de la pantalla, con tiempos de detencion de, 9.5.12.5.5 segundos.
- Permet à l'utilisateur de placer le temps d'angle de saturation pour que chaque exister stocké à préreglié. Les préregliages stockés par (6) ci-dessus d'exposition d'écran, avec des temps d'angle de saturation de, 9.5.12.5.5.5 secondes.
- Erlaubt Benutzer, Verweilzeit für jeder einzustellen, stille das Bestehen gespeichert ein. Die已经有 eigenen gespeicherlen Voreinstellungen des Schrimmerscheinens (6), mit Verweilzeiten von, 9.5.12.5.5.5 Sekunden.
- Permile que o uso éajuste o tempo de interrupção para que cada um existir armazenado pré-ajustou. Os pré-ajustes armazenados da minha dela tela (6) acima, com tempos de interrupção de, 9.5.12.5.5.5 segundos.
- Permette che l'ultente regoli il tempo di abitazione per ciascuno esistere memorizzato ha prestabilito. Suddetto i preregolamenti che immagazzinati di esposizione dello schermo (6), con i tempi di abitazione di. 9.5.12.5.5.5 secondi.
31
MENUDRIVEN SETTINGS
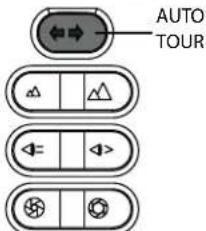
To activate a Tour of Preset press Auto Tour Button (一 - 一) on controller after exiting menu.
- Para activar un viaje de preestablezca el viaje auto Button (de la prensa en regulator afterwards del menu.
Pour activer une excursion de prereglez l'excursion automatique Button on d'exercusion de pression après avoir sorti le menu. - Um eine Tour von zu aktivieren stellen Sie Presse Selftour Button on Steuerpult ein nach dem Sie Menu heraus-genommen haben.
- Para ativar uma excursao de pre-ajuste a auto excursao Button on da excursao da imprensa o auto antes ter retirado o menu.
- Per attivare un giro di prestabilitisca il giro auto Button (▶) on di giro della pressa dopo avere rimioso il menu.
32
EXIT
Display
Camera
Alarm
Zones
System Info
Presets
Exit = =
Select exit to leave menu options.
- Selecciona la calidad para partir ooptiones del menu.
- Choisissez la sortie pour laisser des options de menu.
Wahlen Sie Ausgang vor, um Menüwahlen zu halten. - Seleciona saida para deleivar opções do menu.
- Selezioni l'uscita per lasciare le opzioni del menu.
33
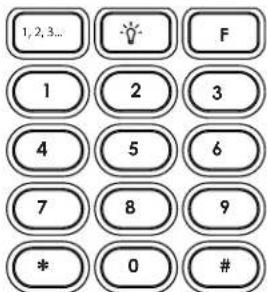
To set a manually controlled pattern by joystick set Preset 80 (80,#, #).
- Para fazer un patrónmanualmente controlado por el Sistema de la palanca de mando preestablezca 80 (80, #).
Pour placer un mode manuellement commande par l'ensemble de manche prereglez 80 (80, #).
Um ein manuell gesteuertes Muster durch Steuerknuppelsatz einzustellen stellen Sie 80 ein (80, #, ). - Para ajustar um teste padrãomanualmente controdo peso jogo do manche pré-ajuste 80 (80, #).
Per determinare un modello manualmente controllato dall'insieme della barra di lavoro prestabilisca 80 (80, #).
34

Using the joystick move Pan/Tilt to desired positions where you can record up to 128 seconds of movement.
- Con la palanca de mando nuevo Pan/Till a las posiciones deseadas donde usted coulda registrar hasta 128 segundodes movimiento.
- En utilisant le manche déplacez Pan/Tilt aux positions désirées où vous pouvez enregistrer jusqu'à 128 secondes de mouvement.
Mit dem Steuerknuppel verschiben Sie Pan/Till auf gewüchsle Positionen, in denen Sie bis 128 Sekunden Bewegung notieren können. - Usando o manche mova Pan/Tilt para as posições desejadas onde você pade gravar até 128 segundos do movimento.
Per mezzo della barra di lavoro sposti Pan/Tilt verso le posizioni valute dove potete registrate fina a 128 secondi di movimento.
35
Presets
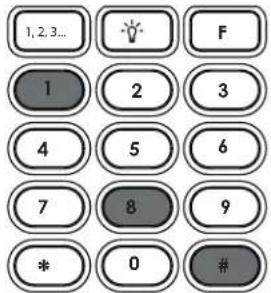
Press Preset 81 to stop recording (81,#,Y). Preset 80, Y to start pattern.
Presione preestablecen 81 para parar el registrar (81, #, ). Preestablezca 80, para comenzar el patron.
- Serrez préreglen 81 pour cesser d'enregistrer (81, #, y).
- Préreglez 80, pour commencer le modele.
- Betätigen Sie sich einstellen 81. um zu notieren zu stoppen (81, #, ). Stellen Sie 80 ein, um Muster zu beginnen.
- Pressione pré-ajustam 81 para parar de gravar (81, #, ).
Pre-ajuste 80, para comear o teste padão.
- Premi prestabiliscono 81 per smettere di registrale (81, #, Y).
- Prestabilisca 80. Per iniziare il modello.
36
OTHER FEATURES:
Home Preset
Preset 1 is the "home preset". If this preset has been defined, then the VLTP385 will always go to this preset when the unit is powered up.
Remote Address
The Address of the unit can be set by a remote command. This "soft" address will be saved even if the unit loses power and will override the dip switch set address. The "soft" address can be cleared by a remote command and the address will be determined by the dip switch setting.
Program Download
There are two software programs in the standard unit. Each program can be updated via the command communication channel with a laptop or other computer system.
Error Messages
The "COMM ERROR" message will be displayed at the top of the screen whenever the MR7CS-9TM detects frame errors in the receive data, such as when the RXA and RXB wires are reversed when using RS485/422 or when the baud rate is incorrect.
The CAMERA ERROR" message will be displayed at the top of the screen whenever there is an error in communication with the camera.
Table 1: Pan/Tilt Address Dip Switch Settings
Part No. Description
| 1 RP 6039mm1.8 Motor (2) | |
| 2 RP VL2314 Hub Bracket | |
| 3 RP 40CASL385 Slip Ring Assembly (2) | |
| 5 RP VL2315 20T 80 Pitch Pulley (2) | |
| 6 RP 605007 Bearing | |
| 7 RP VL2316 90T Pan Pulley | |
| 8 RP VL2318 60T Tilt Pulley | |
| 9 RP VL2320 Tilt Bearing Hub | |
| 10 RP 605011 Bearing | |
| 14 RP 73CAVKS454 23 X Zoom Camera | |
| 15 RP 92WSFN11 Nylon Washer (2) | |
| 16 RP 605009 Tilt Belt | |
| 17 RP 605008 Pan belt | |
| 18 RP 95FSSR06 Retaining ring (large) | |
| 19 RP 95FSSR07 Retaining ring | |
| 21 RP 605010 Tilt Bearing | |
| 22 RP VL2312R1 Quick Release Bracket | |
| 23 RP 76V385T Tilt PCB | |
| 24 RP 76V385P Main PCB | |
| 25* RPVL2317 Tilt Bracket | |
| 26* RPVL2321 Camera Bracket |
Product Registration/Warranty
Thank you for choosing Videolarm. We value your patronage and are solely committed to providing you with only the highest quality products available with unmatched customer service levels that are second-to-none in the security industry.
Should a problem arise, rest assure that Videolarm stands behind its products by offering some of the most impressive warranty plans available: 3 Years on all Housings, Poles, Power Supplies, and Accessories and 5 Years on all camera systems (SView, QView, Warriors), and InfraRed Illuminators.
3
VRRANT
5
Register Your Products
Option 1: Online Option 2: Mail-In
Take a few moments and validate your purchase with our Online Product Registration Form at www.videolarm.com/productregistration.jsp
or complete and mail-in the bottom portion of this flyer.
Register your recent Videolarm purchases and benefit from the following:
Simple and Trouble-Free RMA process
- Added into customer database to receive product updates / news
- Eliminate the need to archive original purchase documents:
Receits, Purchase Orders, etc...
Cut at the dotted Line
Place in envelope, affix stamp and mail to:
Videolarm ATTN: Warranty
2525 Park Central Ave.
Decatur, GA 30035
Main Contact Info
First Name: Last Name:
Professional Title: Company:
Address 1: Address 2:
City: State / Province/Country:
Zip / Postal Code: Phone Number: E-mail Address:
Product Information
Please Circle One: Business
Personal
Name & Location of Company / Store where Purchased:
(City, State, Country)
Videolarm Product ID Product Description
Serial #
(Available only for Camera Systems, IR Illuminators, Wireless Devices)
PO#