 — Washing machine — Mode d'emploi PDF")
ARTXF 149 (EU) - Washing machine HOTPOINT - Free user manual and instructions
Find the device manual for free ARTXF 149 (EU) HOTPOINT in PDF.
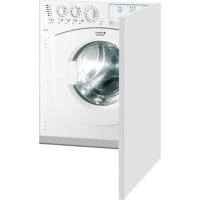
| Product type | Front-loading washing machine |
| Brand | Hotpoint |
| Model | ARTXF 149 (EU) |
| Dimensions (W x H x D) | 40 x 85 x 60 cm |
| Wash capacity | 1 to 6 kg (depending on program) |
| Maximum spin speed | 1400 rpm |
| Wash programs | 12 programs including Cotton, Synthetic, Wool, Silk, Baby, Good Night, Mix 30' and 15' |
| Special functions | Delayed start (1-24h), Intensive, Extra rinse, Easy iron, Key lock |
| Display | Display of remaining time and delayed start |
| Detergent drawer | 4 compartments: prewash, main wash (powder/liquid), additives, bleach |
| Load balancing system | Yes, automatic laundry distribution before spin |
| Water pressure | Min: 0.05 MPa (0.5 bar) - Max: 1 MPa (10 bar) |
| Power supply | 220-240 V, 50 Hz (see rating plate) |
| Energy consumption | Compliant with EC directives (2006/95/EC, 89/336/EEC) |
| Safety | Door lock, child safety (key lock), automatic standby |
| Pump cleaning | Self-cleaning pump with accessible pre-chamber |
| Drum maintenance | Leave the door ajar after use to prevent odors |
| Noise level | Not specified (Good Night program for nighttime use) |
| Weight | Approximately 65 kg (estimate) |
| Included accessories | Transport bolts, plastic caps, drain hose support |
Frequently Asked Questions - ARTXF 149 (EU) HOTPOINT
User questions about ARTXF 149 (EU) HOTPOINT
0 question about this device. Answer the ones you know or ask your own.
Ask a new question about this device
Download the instructions for your Washing machine in PDF format for free! Find your manual ARTXF 149 (EU) - HOTPOINT and take your electronic device back in hand. On this page are published all the documents necessary for the use of your device. ARTXF 149 (EU) by HOTPOINT.
USER MANUAL ARTXF 149 (EU) HOTPOINT
Unpacking and levelling
Connecting the electricity and water supplies
The first wash cycle
Technical data
Description of the washing machine and starting a wash cycle, 4-5
Control panel
Indicator lights
How to open and shut the drum
Starting a wash cycle
Wash cycles, 6
Table of wash cycles
Personalisation, 7
Setting the temperature
Setting the spin speed
Functions
Detergents and laundry, 8
Detergent dispenser drawer
Bleach cycle
Preparing the laundry
Garments requiring special care
Load balancing system
Precautions and tips, 9
General safety
Disposal
Saving energy and respecting the environment
Care and maintenance, 10
Cutting off the water or electricity supply
Cleaning the washing machine
Caring for your appliance door and drum
Cleaning the pump
Checking the water inlet hose
How to clean the detergent dispenser
Troubleshooting, 11
Service, 12
!Keep this instruction manual in a safe place for future reference. Should the appliance be sold, transferred or moved, make sure the instruction manual accompanies the washing machine to inform the new owner as to its operation and features.
!Read these instructions carefully: they contain vital information on installation, use and safety.
Unpacking and levelling
Unpacking
- Unpack the washing machine.
- Check whether the washing machine has been damaged during transport. If this is the case, do not install it and contact your retailer.
-
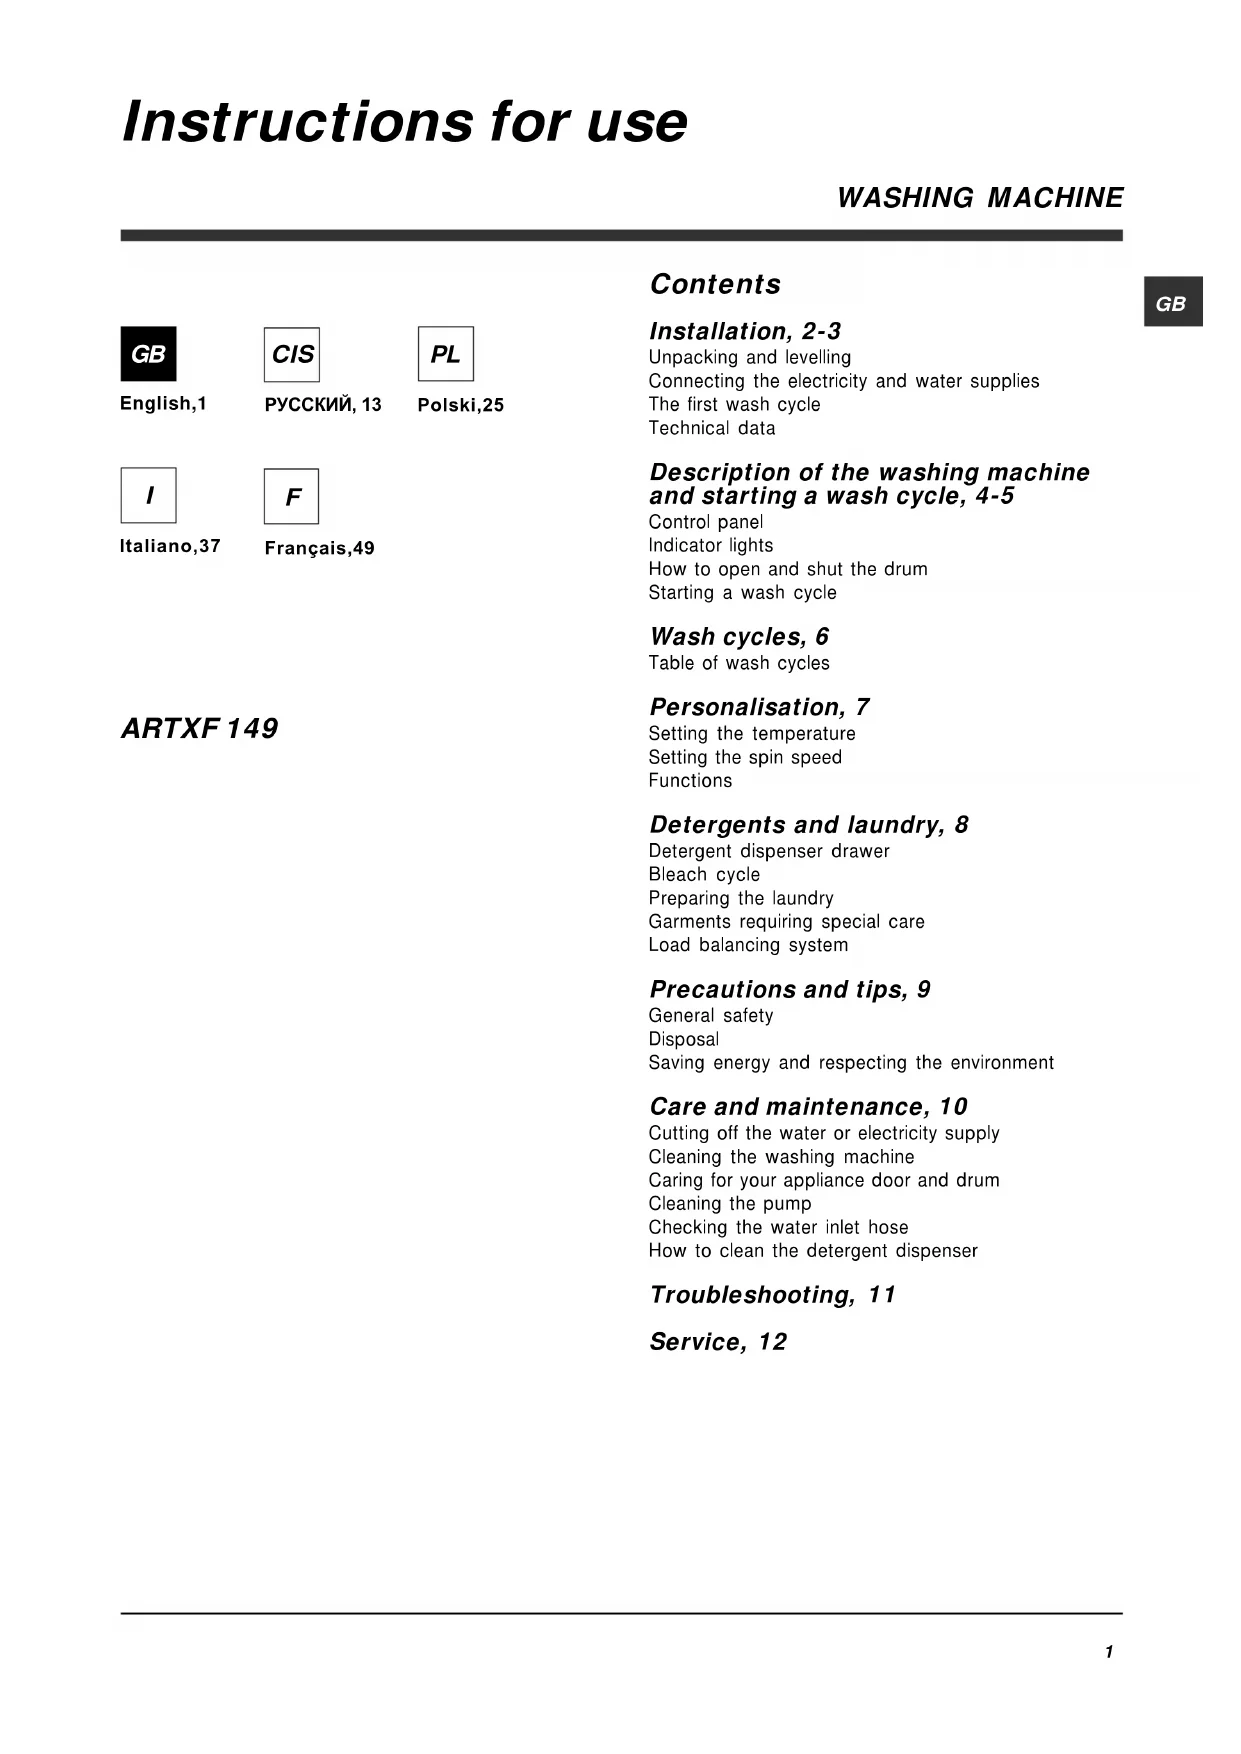
Remove the four protective screws and the rubber washer with the respective spacer, situated on the rear of the appliance (see figure).
-
Seal the gaps using the plastic plugs provided.
- Keep all the parts: you will need them again if the washing machine needs to be moved to another location.
Warning: Whaldgthe screws be re-used, make sure you fasten the shorter ones at the top.
!Packaging materials are not children's toys.
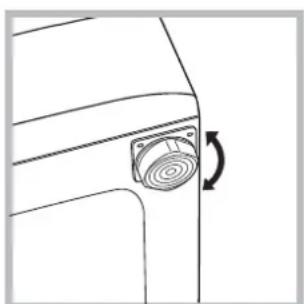
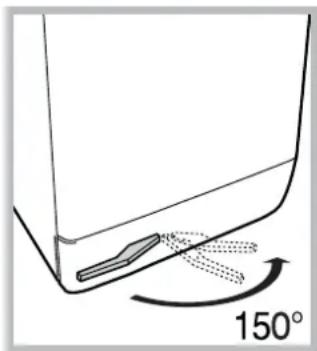
Levelling
Your machine may make a considerable amount of noise if the two front feet have not been adjusted correctly.

- Install the washing machine on a flat sturdy floor, without resting it up against walls, furniture cabinets or other.
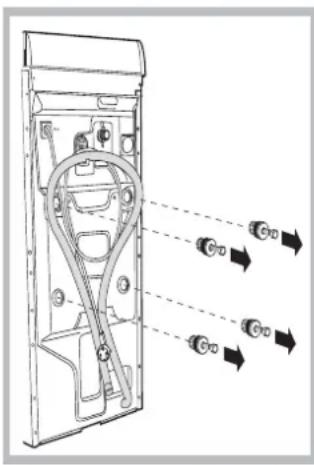
- If the floor is not perfectly level, compensate for any unevenness by tightening or loosening
the adjustable front feet (see figure); the angle of inclination, measured according to the worktop, must not exceed 2^ .
Levelling your appliance correctly will provide it with stability and avoid any vibrations, noise and shifting during operation. If it is placed on a fitted or loose carpet, adjust the feet in such a way as to allow enough room for ventilation beneath the washing machine.
Putting your appliance in place and moving it.
If your washing machine is equipped with a special set of retractable wheels you can easy move it. To lower the wheels and thus move the appliance effortlessly, just pull the lever, situated on the left-hand side beneath the base. Once the
appliance is in the required position, put the lever back in place. The washing machine is now firmly in place (see figure).
Electric and water connections
Connecting the water inlet hose
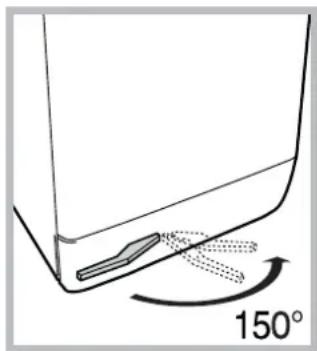
- Connect the supply pipe by screwing it to a cold water tab using a 3/4 gas threaded connection (see figure). Before performing the connection, allow the water to run freely until it is perfectly clear.
-
Connect the other end of the water inlet hose to the washing machine, screwing it onto the appliance's cold water inlet, situated on the top right-hand side on the rear of the appliance (see figure).
-
Make sure there are no kinks or bends in the hose.
!The water pressure at the tap must be within the values indicated in the Technical details table (on the next page).
If the water inlet hose is not long enough, contact a specialist store or an authorised serviceman.
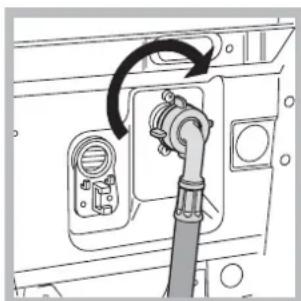
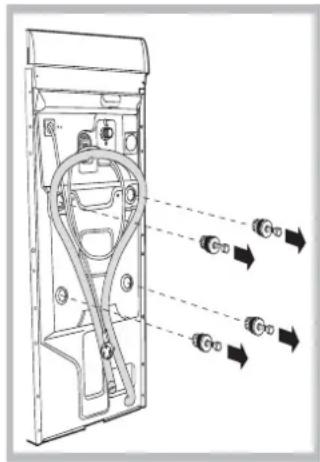
Connecting the drain hose
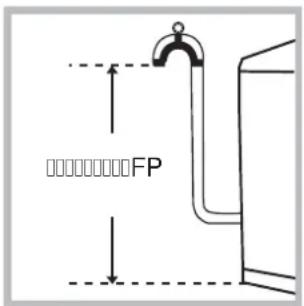
Connect the drain hose, without bending it, to a drainage duct or a wall drain located at a height between 65 and 100cm from the floor;

alternatively, rest it on the side of a washbasin or bathtub, fastening the duct supplied to the tap (see figure). The free end of the hose should not be underwater.
! We advise against the use of hose extensions; if it is absolutely necessary, the extension must have the same diameter as the original hose and must not exceed 150~cm in length.
Electrical connections
Before plugging the appliance into the electricity socket, make sure that:
- the socket is earthed and complies with all applicable laws;
- the socket is able to withstand the maximum power load of the appliance as indicated in the Technical data table (see opposite);
- the power supply voltage falls within the values indicated in the Technical data table (see opposite);
- the socket is compatible with the plug of the washing machine. If this is not the case, replace the socket or the plug.
! The washing machine must not be installed outdoors, even in covered areas. It is extremely dangerous to leave the appliance exposed to rain, storms and other weather conditions.
! When the washing machine has been installed, the electricity socket must be within easy reach.
! Do not use extension cords or multiple sockets.
! The cable should not be bent or compressed.
! The power supply cable must only be replaced by authorised technicians.
Warning! The company shall not be held responsible in the event that these regulations are not respected.
The first wash cycle
Once the appliance has been installed, and before you use it for the first time, run a wash cycle with detergent and no laundry, using the wash cycle 2.
| Technical data | |
| Model | ARTXF 149 |
| Dimensions | width 40 cm height 85 cm depth 60 cm |
| Capacity | from 1 to 6 kg |
| Electrical connections | please refer to the technical data plate fixed to the machine |
| Water connections | maximum pressure 1 MPa (10 bar) minimum pressure 0.05 MPa (0.5 bar) drum capacity 42 litres |
| Spin speed | up to 1400 rotations per minute |
| Energy rated programmes according to regulation EN 60456 | programme 7; temperature 60°C; using a load of 6 kg. |
| CE | This appliance conforms to the following EC Directives: - 89/336/EEC dated 03/05/89 (Electromagnetic Compatibility) and subsequent modifications - 2002/96/EC - 2006/95/EC (Low Voltage) |
Description of the washing machine and starting a wash cycle
Control panel
WASH CYCLE PROGRESS
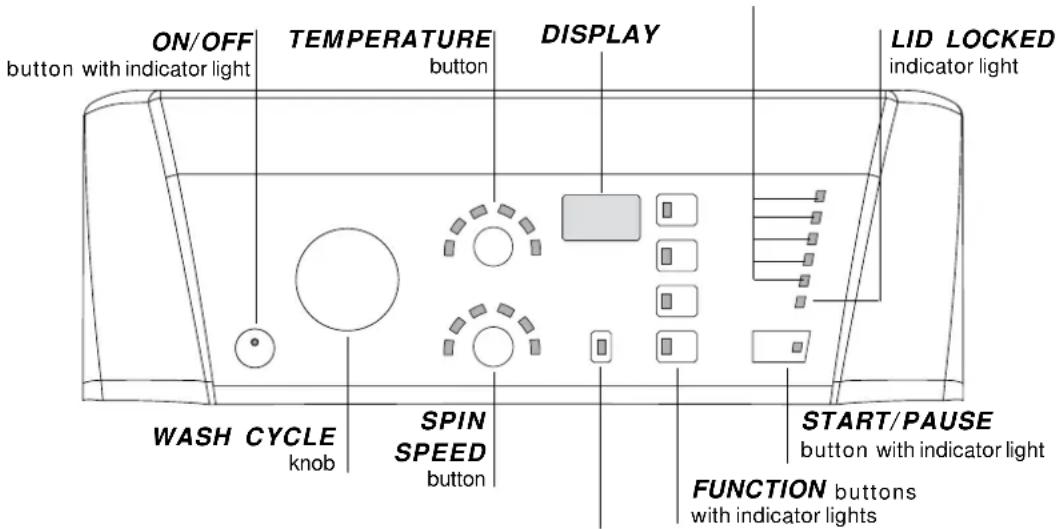
CONTROL PANEL LOCK button with indicator light
ON/OFF button with indicator light: switches the machine on and off. If the indicator light is illuminated, this indicates that the machine is switched on.
WASH CYCLE knob: programmes the wash cycles. During the wash cycle, the knob does not move.
SPIN SPEED button: sets the spin speed or exclude the spin cycle completely (see "Personalisation").
TEMPERATURE button: sets the temperature or the cold wash cycle (see "Personalisation").
DISPLAY: indicates the time remaining for the selected wash cycle and, if a delayed start has been programmed, the time remaining until the start of the wash cycle.
CONTROL PANEL LOCK button with indicator light: activates or deactivates the control panel lock.
FUNCTION buttons with indicator light: used to select the available functions. The indicator light corresponding to the selected function will remain lit.
WASH CYCLE PROGRESS indicator lights: used to monitor the progress of the wash cycle. The illuminated indicator light shows which phase is in progress.
DOOR LOCKED indicator light: indicates whether the door may be opened or not (see next page).
START/PAUSE button with indicator light: starts or temporarily interrupts the wash cycles.
N.B. To pause the wash cycle in progress, press this button; the corresponding indicator light will flash orange, while the indicator light for the current wash cycle phase will remain lit in a fixed manner. If the DOOR LOCKED indicator light is switched off, the door may be opened. To start the wash cycle from the point at which it was interrupted, press this button again.
Standby mode
This washing machine, in compliance with new energy saving regulations, is fitted with an automatic standby system which is enabled after about 30 minutes if no activity is detected. Press the ON-OFF button briefly and wait for the machine to start up again.
Indicator lights
The indicator lights provide important information. This is what they can tell you:
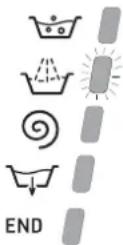
Wash cycle phase indicator lights
As the WASH CYCLE knob is rotated, the indicator lights illuminate, indicating the stages which will be performed by the machine in accordance with the selected wash cycle.
Once the desired wash cycle has been selected and has begun, the indicator lights switch on one by one to indicate which phase of the cycle is currently in progress.
Wash
Rinse
Spin
Drain
End of wash cycle
Function buttons and corresponding indicator lights
When a function is selected, the corresponding indicator light will illuminate. If the selected function is not compatible with the programmed wash cycle, the corresponding indicator light will flash, a sound signal will be emitted and the function will not be activated. If a function which is incompatible with another function selected previously, only the most recent selection will remain active.
Temperature indicator light
When a temperature value is selected, the corresponding indicator light will illuminate.

Spin indicator light
When a spin value is selected, the corresponding indicator light will illuminate.


Control panel lock indicator light
To activate the control panel lock, press and hold the button for approximately 2 seconds. When the indicator light is illuminated, the control panel is locked. This means it is possible to prevent wash cycles from being modified accidentally, especially where there are children in the home. To deactivate the control panel lock, press and hold the button for approximately 2 seconds.

Lid locked indicator light
If this indicator light is on, the appliance door is locked to prevent it from being opened accidentally; to avoid any damage, wait for the indicator light to switch off (it will take about three minutes) before you open the appliance door. N.B. If the DELAY TIMER function is activated, the door cannot be opened; pause the machine by pressing the START/PAUSE button if you wish to open it. If the START/PAUSE indicator light (orange) flashes rapidly at the same time as the function indicator light, this indicates a problem has occurred (see "Troubleshooting").
How to open and to close the drum

Fig.1

Fig. 2
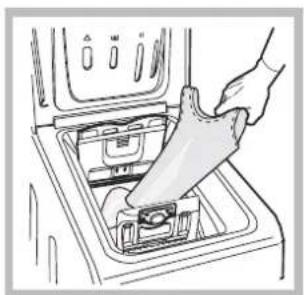
Fig. 3
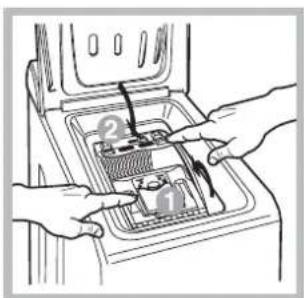
Fig. 4
Lift the external lid and open it completely.
B) Opening the drum (Soft opening):
With one finger, push the button indicated in fig. 2 and the drum will open delicately.
C) Loading the washing machine (Fig. 3).
- close the drum fully by first shutting the front door followed by the rear one;
- then ensure the hooks on the front door are perfectly housed within the seat of the rear door;
- after the hooks have clicked into position, press both doors lightly downwards to make sure they do not come loose;
- finally shut the external lid.
E) Drum End Stop (Fig. 2):
Once the wash cycle has been completed, the drum will position itself with doors facing upward for ease pf opening.
Starting a wash cycle
- Turn the washing machine on by pressing the ON/OFF button. All the indicator lights will turn on for a few seconds, then only the indicator lights relative to the selected programme settings will remain lit and the START/PAUSE indicator light will flash.
- Load the laundry, close the door and the lid.
- Set the WASH CYCLE knob to the desired programme.
- Set the washing temperature (see "Personalisation").
- Set the spin speed (see "Personalisation").
- Measure out the detergent and washing additives (see "Detergents and laundry").
- Select the desired functions.
- Start the wash cycle by pressing the START/ PAUSE button and the corresponding indicator light will remain lit in a fixed manner, in green.
To cancel the set wash cycle, pause the machine by pressing the START/PAUSE button and select a new cycle. - At the end of the wash cycle the END indicator light will switch on. The LID LOCKED indicator light will switch off, indicating that the door may be opened. Take out your laundry and leave the appliance door ajar to make sure the drum dries completely.
Switch the washing machine off by pressing the ON/OFF button.
Table of wash cycles
| Washes | Description of the wash cycle | Max.temp.(°C) | Max.speed(rpm) | Detergents | Max.load(kg) | Cycleduration | ||
| Bleach | Wash | Fabricsoftener | ||||||
| Special cycles | The duration of the wash cycles can be checked on the display. | |||||||
| 7 | Sanitizing cycle 90°: Extremely soiled whites. | 90° 1400 | ● | ● | ● | 6 | ||
| 7 | Sanitizing cycle 90° (1): Heavily soiled whites and resistant colours. | 60° 1400 - | ● | ● | 6 | |||
| 8 | Goodnigt cycle: Lightly soiled delicate colours. | 40° 800 - | ● | ● | 4 | |||
| 9 | Baby cycle: Heavily soiled delicate colours. | 40° 800 - | ● | ● | 2 | |||
| 10 | Shirts | 40° 600 - | ● | ● | 2 | |||
| 11 | Silk/Curtains: For garments in silk and viscose, lingerie. | 30° 0 - | ● | ● | 1 | |||
| 12 | Wool: For wool, cashmere, etc. | 40° 600 - | ● | ● | 1 | |||
| Everyday wash cycles (Daily) | ||||||||
| 1 | Cotton + Prewash 90°: Extremely soiled whites. | 90° 1400 - | ● | ● | 6 | |||
| 2 | Cotton: Heavily soiled whites and resistant colours. | 60° 1400 | ● | ● | ● | 6 | ||
| 2 | Cotton (2): Heavily soiled whites and delicate colours. | 40° 1400 | ● | ● | ● | 6 | ||
| 3 | Coloured Cottons (3): Lightly soiled whites and delicate colours. | 40° 1400 | ● | ● | ● | 6 | ||
| 4 | Synthetics resists: Heavily soiled resistant colours. | 60° 800 - | ● | ● | 2,5 | |||
| 4 | Synthetics delicates: Lightly soiled resistant colours. | 40° 800 - | ● | ● | 2,5 | |||
| 5 | Mix 30°: To refresh lightly soiled garments quickly (not suitable for wool, silk and clothes which require washing by hand). | 30° 800 - | ● | ● | 3 | |||
| 6 | Mix 15°: To refresh lightly soiled garments quickly (not suitable for wool, silk and clothes which require washing by hand). | 30° 800 - | ● | ● | 1,5 | |||
| Partials wash cycles | ||||||||
| Rinse - 1400 | ● | - | ● | 6 | ||||
| Spin | - | 1400 | - | - | - | 6 | ||
| Light spin | - | 800 | - | - | - | 2,5 | ||
| Drain no spin | - | 0 | - | - | - | 6 | ||
The information contained in the table is intended as a guide only.
For all Test Institutes:
1) Test wash cycle in compliance with regulation EN 60456: set wash cycle 7 with a temperature of 60^ .
2) Long wash cycle for cottons: set wash cycle 2 with a temperature of 40^ .
3) Short wash cycle for cottons: set wash cycle 3 with a temperature of 40^ .
Specials wash cycles
Sanitizing cycle (wash cycle 7). A high-temperature hygienic wash cycle (over 60^ ) which requires the use of bleach. Pour the bleach, the detergent and the additives into the relevant compartments (see paragraph entitled "Detergent dispenser drawer").
Goodnigt cycle (wash cycle 8). This is a silent cycle which can be run at night, when the electricity prices are lower. The wash cycle is designed for cottons and synthetics. At the end of the cycle the machine stops while there is still water in the drum; to spin and drain the laundry press the START/PAUSE button; alternatively the machine will perform the spin cycle and drain the water automatically after 8 hours.
Baby cycle (wash cycle 9). This wash cycle can be used to remove the soiling typically caused by babies, while ensuring that all detergent is removed from nappies in order to prevent the delicate skin of babies from suffering allergies. The cycle has been designed to reduce the amount of bacteria by using a greater quantity of water and optimising the effect of special disinfecting additives added to the detergent.
Mix 30^ (wash cycle 5) this wash cycle was designed to wash lightly soiled garments quickly: it lasts just 30 minutes and therefore saves both energy and time. By selecting this wash cycle (5 at 30^ ), it is possible to wash different fabrics together (except for wool and silk items), with a maximum load of 3 kg.
Mix 15(wash cycle 6) this wash cycle was designed to wash lightly soiled garments quickly: it lasts just 15 minutes and therefore saves both energy and time. By selecting this wash cycle (6 at 30^ ), it is possible to wash different fabrics together (except for wool and silk items), with a maximum load of 1.5kg .
Setting the temperature
By pressing the TEMPERATURE button to set the wash temperature (see Table of wash cycles).
The temperature may be lowered, or even set to a cold wash (B).
The washing machine will automatically prevent you from selecting a temperature which is higher than the maximum value set for each wash cycle.
Setting the spin speed
By pressing the SPIN SPEED button to set the spin speed for the selected wash cycle.
The maximum spin speeds available for each wash cycle are as follows:
Wash cycles Maximum spin speed
Cottons 1400 rpm
Synthetics 800 rpm
Wool 600 rpm
Silk drain only
The spin speed may be lowered, or the spin cycle can be excluded altogether by selecting the symbol
The washing machine will automatically prevent you from selecting a spin speed which is higher than the
maximum speed set for each wash cycle.
Functions
The various wash functions available with this washing machine will help to achieve the desired results, every time.
To activate the functions:
- Press the button corresponding to the desired function;
- the function is enabled when the corresponding indicator light is illuminated.
Note: If the indicator light flashes rapidly, this signals that this particular function may not be selected in
conjunction with the selected wash cycle.

Delay timer
To set a delayed start for the selected wash cycle, press the button repeatedly until the desired delay time is displayed (this may be between 1 hour and 24 hours).
To disable the function press the button until the text OFF is displayed.
N.B. Once you have pressed the START/PAUSE button, the delay time may only be decreased if you wish to modify it.
!This option is enabled with all programmes.

Super Wash
Because a greater quantity of water is used in the initial phase of the cycle, and because of the increased cycle duration, this function offers a high-performance wash.
! This function may not be used in conjunction with wash cycles 5, 6, 7, 11, 12, , ,

Extra rinse
By selecting this function, the efficiency of the rinse is increased and optimal detergent removal is guaranteed. It is particularly useful for sensitive skin.
! This function may not be used in conjunction with wash cycles 5, 6, ⑨ , Q .

Easy iron
By selecting this function, the wash and spin cycles will be modified in order to reduce the formation of creases. At the end of the cycle the washing machine will perform slow rotations of the drum.
For the 11 wash cycle, the machine will end the cycle while the laundry is soaking, the EASY IRON and START/
PAUSE indicator lights will flash (orange) and the RINSE phase will remain lit in a fixed manner. To drain the water so that the laundry may be removed, press the START/PAUSE button or the EASY IRON button.
! This function may not be used in conjunction with wash cycles 5, 6, 7, 8, 9, 12, ⑨ , ① , ④ .
Detergents and laundry
Detergent dispenser drawer
Good washing results also depend on the correct dose of detergent: adding too much detergent won't necessarily make for a more efficient wash, and may in fact cause build up on the interior of your appliance and even pollute the environment.

Open up the detergent dispenser and pour in the detergent and fabric softener, as follows.
compartment 1: Detergent for pre-wash
compartment 2: Detergent for the wash cycle (powder or liquid)
It is recommended that you place liquid detergent directly into the compartment using the appropriate dosing cup.
compartment 3:Additives (softener,etc.)
When pouring the softener in compartment 3, avoid exceeding the "max" level indicated. The softener is added automatically into the machine during the last wash. At the end of the wash programme, some water will be left in compartment 3. This is used for the inlet of denser fabric softeners into the machine, i.e. to dilute the more concentrated softeners. Should more than a normal amount of water remain in compartment 3, this means the emptying device is blocked. For cleaning instructions, see "Care and maintenance".
compartment 4: Bleach
Bleach cycle
Bleaching may only be performed in conjunction with wash cycles 2, 3, 7.
Pour the bleach into compartment 4; pour the detergent and softener into the corresponding compartments, then select one of the abovementioned wash cycles.
This option is recommended only for very soiled cotton garments.
Preparing the laundry
- Divide the laundry according to:
- the type of fabric/the symbol on the label
- the colours: separate coloured garments from whites.
- Empty all garment pockets and check the buttons.
- Do not exceed the listed values, which refer to the weight of the laundry when dry:
Durable fabrics: max. 6 kg
Synthetic fabrics: max. 2,5 kg
Delicate fabrics: max. 2 kg
Wool: max. 1 kg
How much does your laundry weigh?
1 sheet 400-500 g
1 pillow case 150-200 g
1 tablecloth 400-500 g
1 bathrobe 900-1200 g
1 towel 150-250 g
Garments requiring special care
Shirts: use special wash cycle 10 to wash shirts in various fabrics and colours.
It guarantees maximum care is taken of the garments and minimises the formation of creases.
Silk: use special wash cycle 11 to wash all silk garments. We recommend the use of special detergent which has been designed to wash delicate clothes.
Curtains: fold curtains and place them in a pillow case or mesh bag. Use wash cycle 11.
Wool: is the only washing machine manufacturer to have been awarded the prestigious Woolmark Platinum Care endorsement (M.0508) by the Woolmark Company, which means that all woollen garments may be washed in the washing machine, even those which state "hand wash only" on the label. Wash cycle 12 therefore offers complete peace of mind when washing woollen garments in the washing machine (max. load 1 kg) and guarantees optimal performance.
Load balancing system
Before every spin cycle, to avoid excessive vibrations and to distribute the load in a uniform manner, the drum rotates continuously at a speed which is slightly greater than the washing rotation speed. If, after several attempts, the load is not balanced correctly, the machine spins at a reduced spin speed. If the load is excessively unbalanced, the washing machine performs the distribution process instead of spinning. To encourage improved load distribution and balance, we recommend small and large garments are mixed in the load.
! This washing machine was designed and constructed in accordance with international safety regulations. The following information is provided for safety reasons and must therefore be read carefully.
General safety
- This appliance was designed for domestic use only.
- This appliance is not intended for use by persons (including children) with reduced physical, sensory or mental capabilities, or lack of experience and knowledge, unless they have been given supervision or instruction concerning use of the appliance by a person responsible for their safety. Children should be supervised to ensure that they do not play with the appliance.
- The washing machine must only be used by adults, in accordance with the instructions provided in this manual.
- Do not touch the machine when barefoot or with wet or damp hands or feet.
- Do not pull on the power supply cable when unplugging the appliance from the electricity socket. Hold the plug and pull.
- Do not touch the drained water as it may reach extremely high temperatures.
- Never force the porthole door. This could damage the safety lock mechanism designed to prevent accidental opening.
- If the appliance breaks down, do not under any circumstances access the internal mechanisms in an attempt to repair it yourself.
- Always keep children well away from the appliance while it is operating.
- If the appliance has to be moved, work in a group of two or three people and handle it with the utmost care. Never try to do this alone, because the appliance is very heavy.
- Before loading laundry into the washing machine, make sure the drum is empty.
Disposal
- Disposing of the packaging materials: observe local regulations so that the packaging may be re-used.
- The European Directive 2002/96/EC on Waste Electrical and Electronic Equipment, requires that old household electrical appliances must not be disposed of in the normal unsorted municipal waste stream. Old appliances must be collected separately in order to optimise the recovery and recycling of the materials they contain and reduce the impact on human health and the environment.
The crossed out "wheeled bin" symbol on the product reminds you of your obligation, that when you dispose of the appliance it must be separately collected. Consumers should contact their local authority or retailer for information concerning the correct disposal of their old appliance.
Saving energy and respecting the environment
Saving on detergent, water, energy and time
- To avoid wasting resources, the washing machine should be used with a full load. A full load instead of two half loads allows you to save up to 50% on energy.
- The pre-wash cycle is only necessary on extremely soiled garments. Avoiding it will save on detergent, time, water and between 5 and 15% energy.
- Treating stains with a stain remover or leaving them to soak before washing will cut down the need to wash them at high temperatures. A programme at 60^ instead of 90^ or one at 40^ instead of 60^ will save up to 50% on energy.
- Use the correct quantity of detergent depending on the water hardness, how soiled the garments are and the amount of laundry you have, to avoid wastage and to protect the environment: despite being biodegradable, detergents do contain ingredients that alter the natural balance of the environment. In addition, avoid using fabric softener as much as possible.
- If you use your washing machine from late in the afternoon until the early hours of the morning, you will help reduce the electricity board's peak load. The "Delay Timer" option helps to organise your wash cycles accordingly.
- If your laundry has to be dried in a tumble dryer, select a high spin speed. Having the least water possible in your laundry will save you time and energy in the drying process.
Cutting off the water or electricity supply
- Turn off the water tap after every wash. This will limit the wear of your appliance's water system and also prevent leaks.
- Unplug your appliance when cleaning it and during all maintenance operations.
Cleaning your appliance
The exterior and rubber parts of your appliance can be cleaned with a soft cloth soaked in lukewarm soapy water. Do not use solvents or abrasives.
Caring for your appliance door and drum
Always leave the appliance door ajar to prevent unpleasant odours from forming.
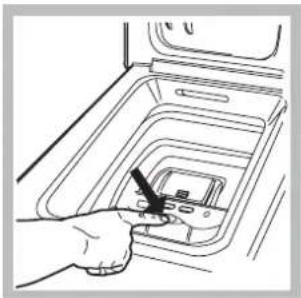
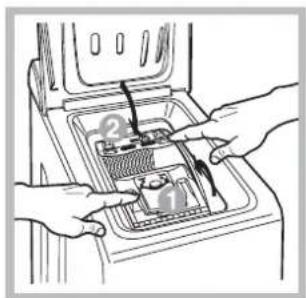
Cleaning the pump
The washing machine is fitted with a self-cleaning pump that does not require any maintenance. Sometimes, small items (such as coins or buttons) may fall into the pre-chamber that protects the pump, situated in the lower part of the same.
! Make sure the wash cycle has ended and unplug the appliance.
To recover any objects that have fallen into the pre-chamber:
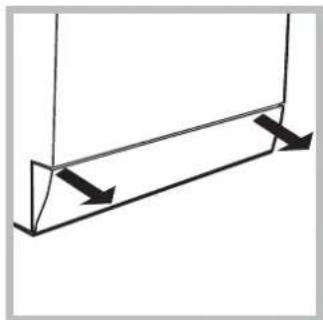
-
remove the plinth at the bottom on the front side of the washing machine by pulling from the side with your hands (see figure);
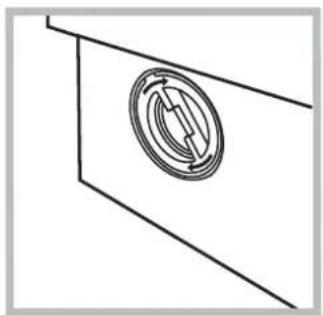
-
unscrew the lid rotating it anticlockwise (see figure): a little water may trickle out.
This is perfectly normal; 3. clean the interior thoroughly;
-
screw the lid back on;
-
reposition the panel, making sure the hooks are securely in place before you push it onto the appliance.
Checking the water inlet hose
Check the water inlet hose at least once a year. If you see any cracks, replace it immediately: during the wash cycles, water pressure is very strong and a cracked hose could easily split open.
I Never use hoses that have already been used.
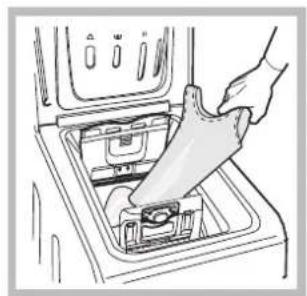
How to clean the detergent dispenser
Disassembly:
Press lightly on the large button on the front of the detergent dispenser and pull it upwards (fig. 1, 2).
Cleaning:
Then clean the dispenser under a tap (fig. 3) using an old toothbrush and, once the pair of siphons inserted in the top of compartments 1 and 2 (fig. 4) have been pulled out, check whether the same are not clogged and then rinse them.
Reassembly:
Do not forget to reinsert the pair of siphons into the special housings and then to replace the dispenser into its seat, clicking it into place (fig. 4, 2 and 1).
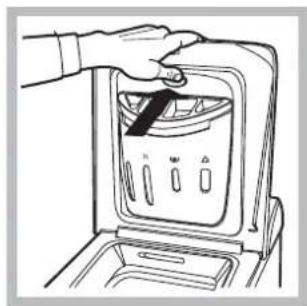
Fig.1 Fig.2


Fig. 3
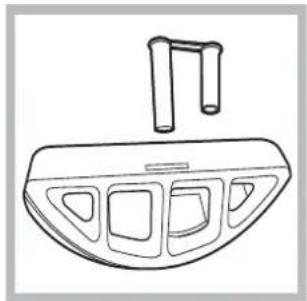
Fig. 4
Your washing machine could fail to work. Before contacting the Technical Assistance Centre (see "Assistance"), make sure that the problem cannot be not solved easily using the following list.
Problem:
The washing machine does not switch on.
The wash cycle does not start.
The washing machine does not take in water (the indicator light for the first wash cycle stage flashes rapidly).
The washing machine continuously takes in and drains water.
The washing machine does not drain or spin.
The washing machine vibrates a lot during the spin cycle.
The washing machine leaks.
The START/PAUSE indicator light (orange) and the function indicator lights flash rapidly.
There is too much foam.
Possible causes / Solutions:
- The appliance is not plugged into the socket fully, or is not making contact.
-
There is no power in the house.
-
The appliance Lid is not shut properly.
- The ON/OFF button has not been pressed.
- The START/PAUSE button has not been pressed.
- The water tap has not been opened.
-
A delayed start has been set (see "Personalisation").
-
The water inlet hose is not connected to the tap.
The hose is bent. - The water tap has not been opened.
- There is no water supply in the house.
- The pressure is too low.
-
The START/PAUSE button has not been pressed.
-
The drain hose is not fitted at a height between 65 and 100cm from the floor (see "Installation").
- The free end of the hose is under water (see "Installation").
- The wall drainage system is not fitted with a breather pipe.
If the problem persists even after these checks, turn off the water tap, switch the appliance off and contact the Assistance Service. If the dwelling is on one of the upper floors of a building, there may be problems relating to water drainage, causing the washing machine to fill with water and drain continuously. Special anti-draining valves are available in shops and help to avoid this inconvenience.
- The wash cycle does not include draining: some wash cycles require the drain phase to be started manually.
- The EASY IRON function has been activated: To complete the wash cycle, press the START/PAUSE button ("Personalisation").
- The drain hose is bent (see "Installation").
-
The drainage duct is clogged.
-
The drum was not unlocked correctly during installation (see "Installation").
- The washing machine is not level (see "Installation").
-
The washing machine is trapped between cabinets and walls (see "Installation").
-
The water inlet hose is not screwed on properly (see "Installation").
- The detergent dispenser drawer is blocked (for cleaning instructions, see "Care and maintenance").
-
The drain hose is not fixed properly (see "Installation").
-
Switch off the machine and unplug it, wait for approximately 1 minute and then switch it back on again.
If the problem persists, contact the Technical Assistance Service.
- The detergent is not suitable for machine washing (it should display the text "for washing machines" or "hand and machine wash", or the like).
- Too much detergent was used.
Before calling for Assistance:
- Check whether you can solve the problem alone (see "Troubleshooting");
- Restart the programme to check whether the problem has been solved;
- If this is not the case, contact an authorised Technical Assistance Centre using the telephone number provided on the guarantee certificate.
!Always request the assistance of authorised technicians.
Have the following information to hand:
- the type of problem;
- the appliance model (Mod.);
the serial number (S/N).
This information can be found on the data plate situated on the rear of the washing machine.

Pycckn
CopepkHne
YctaHOBka, 14-15
PacnaKOBKa n HnBeJIInpoBka
IopKIOUeHKeBOOPOBOyN3JeKTPnueCTBy
PepBbI ZnKJ CTnPK
CIS
Onncahne cTnpaIbHoi MaunHbI n nopraKa 3anycka nporpaMMbl, 16-17
Panaelb ynpabNeHnA
HdkaTopbi
KakOTKpbTb 3aKpbTb 6apa6aH
Popraok 3anycka nporpammbi
ARTXF 149
PporpaMbl, 18
Tabniua nporpamM
PepcoHaJIIn3npoBaHHbIe HacTpoJKn, 19
PerynipoBka TempepaTpybI
Bb6opckopoctnOTKIMa
Ponck HencnpaBHOCTeN MeToDbI INx yctpaHHeHn, 23
CepBnchoe 6cbnyxmbaHne,24
TexHnueckne xapaKTepeNCTNKn

AIO 77

!CoxpaHNTe daHHOe pyKOBODCTBO.OHO dONJHO 6bITb B KOMNKeTe CO CTnpaJIbHOI MaUNHOB CnUyae npOdaXNIpePaunObOpYIOBaHNrIINpNi nepee3de Ha HObyo KBapTnpy, YTObI HObBI BnaJeNEc ObOpYIOBaHNrMOrO3HaKOMNTbcrC npabINammerofychNKIOHOIpOBAHnriO6CnykBaHNr.
!BnmaTeIbHo npouHTaIte pykoBoDCTBO:B HEM coedePkaTcBaXHbIe CBeDeHnNo yCTaHOBKe n 6e3oNaCHO kCNpyatauIN CTnpaNbHO MaunHbl.
PacnaKOBka N BbipaBHBaHne PacnaKOBka
1.PacnayTe CTnpaIbHyo MaLInHy.
2.Y6eIntecb,yTO
obopyoBaaHne He 6blno
NoBpeKdeHO BO Bpemr
TpaHCnOpTnpOBKn. Pn
ObHapyKeHH NOBpeKdeHn -He NoDKnIOaHNe
MaunHy-CBraXtecb C
NocTabuNKOM
HEmeJenHNO.
3.YdaIte YeIbpe TpaHCnOpTnpoBOuHbIX BnHTa n pe3nHOBbie npo6Kn C npOKJaKaMn,
pacnoIoxKeHHbIe B 3aJHne YacTn CTnpaIbHO MaunHb (CM. puc.).
4.3akpoTe OTBepCTn npnilaraIOUIMMNCI pnaCTNKOBbIMN 3aIpyuKaAMN.
5. CoxpanyIe BCE deTann: OHN Bam noHaio6raTc npn nocJeDyoUe TpaHcnpTnpOBKe CTnpaJIbHOJ MaunHbl.
6oNTbI,pe3nHOBBie 7aH6bI N 6oJbWyIO MeTaJINuEcKyo nOnepeuHyIO nnAHy.3akpoTe o6pa3OBaBWeecr OTBepCTNIIaCTMaCCOBbIMN 3aIpykamn.
! He pa3pewaIte DeTm IrpaTb c ynaKOBouHbIMMaTePnAJaMn.
BbipabHbBaHne
1.YctaHOBtte CTnpaIbHyMaunHy Ha POBHOM INpOCHOM NOy, TaK YTO6bIOHa He KacaIacb CTeHMe6eIN IPOuHXnpEdMETOB.
2. Nocne yctaHOBKn MaunHbHa MeCTO oTpeynpuYte ee ycToOnBOe noJoxHeNe
nytem BpaueHnnepeDnHex HOKe (cm. puc.).ДЯ 3TORO CHaHaIa Ocna6bTe KOHTpraIky, NOcIe 3aBep- WENr peYunpOBKn KOHTprAky 3aTAHnte. NocIe yCTaHOBKn MaUNHb Ha MeCTo npOBepbTe no yPOBHI
roH3OHTaIbHOCtB BepxHe KpbIshKn Kopnyca, OTKnIOHeHne roH3OHTaII DoJIxHO 6bITb He 6oJee 2^ . IpaBnIbHoe BbIpaBHNBaHne O6OpyDoBaHnI NOMoKet N36ExaTb Wyma, B6pauN IN CMeUeHn BO BpeMra pa60tbl MaunHbl.
Ecnn CTnpaBnHa MaunHa CTOnT Ha NoNy, NOKpbITOM KOBpOM, y6eINTecb, yTO ee OCHOBaHne BO3BbIwaetc HnKDobpOM. B npOTNBom Cnyae BEHTNJIaCn 6yET 3atpydHeHa nn BOBce HeBO3MOxHa.
YctaHObKa MaunHbHa MeCTO n NepemueHne
BaHa cTnpaBna
Maunha MoKet 6bItb
OchaueHa CneuaHbHbIMn y6paioumncs KoJecamnIOnyobJeHEne ee nepemueehn.
YTo6bl Onyctntb KoJeca
NpepeDbHyt obopydOBaHne, npocTo notaHnte 3a pbUar,
pacnoNoKeHHbI cNeBa
NoD oChOBaHmMaUNHb.IocNe yCTaHOBKn
obopyoBaHnB Tpe6yeMoE noJoxKeHne BepHnte pbHaB NxCOdHoe NoNo.
IopKJIoueHne K BODOpPOBOHOH N 3JIeKTPnueCKoCetN IopCoeINHeHne 3aJIbBHorO 7JHaHra

HndkaTopb coo6aOT noIb30BaTeJIIO BaXhIe CBeDeHn. 3HaueHne HndkaTopoB:
HdkaTOpbI TeKuεe Φa3blcNKla:
NobepHnTe pyKoTky NPOPGAMMbI, n 3aoropTcRnHNkATOpbI, NOKa3bIBaRgPbE MaunHa6yDet BbINONrB cOrnacHO 3aDaHHoN pORpAmMe.1ocne BbIbopa n 3anycka Unkna CTnPKn HdNKATOpbI 6yDyT3aRopA bC R OINH 3a DpyrM, NOKa3bIBaRnOcJeOBaTeNbHOCT BblONHeHr NpORpaMMbl:
CTnnpka
Плоскане
OTXMM
CINB
KoHeu znkna

KhONKN DOnONHnTeIbHbIX FyHKnN COOTBeTCTByIOUne HNDkATOpbl
PnBbIope fynKcun 3aropaeTc COOTBeTCTByIOUaJ KhONka.EcNn BbIbpaHHa fynKcua HecOBMeCTUMa C 3aHaHNo nporpammo,6yDet MuraTb COOTBeTCTByIOUm INDnKATOp,BKNIOHTC3ByKOBo CNrHaN, n 3Ta fynKcua BKnIOUeHa He 6yDet. EcnN bYdET BbIbpaHa fynKcua, HecOBMeCTUMa C dpyToi, paHee BblbpaHHo fynKcuae, OCTaHcTc BKnIOUeHHo TOnbko NocJeHra BblpaHHa fynKcua.
HdkaTop tempeatpybI
PnBbIbope TemnepaTyphoro 3HaueHn 3aropaeTc COOTBeTCTByIOuIN INHdNKATOp.
HdkaTop oTkMa
PpN BbIbope cKOpOCTn OTXkMa 3aropaETc COOTBETCTBYIOUHINDKaTOP.


Hdkatop 6noknpOBkn KhoNOK
ДяВКLOЧЕнг6LOKUPOBn NaHeNурвлесь dePKeNTe KONky HaxaToI npMepHO 2 ceKyHdbI. BKNIOUChEHHb INDnKaTOP O3Haayet, YTO NaHeIb ynpabJIeHn3a6JIOKupOBaHa. TAKIM o6pa3oM nporpamMa He MoXET 6bITb CnyaHNo N3MeHeHa, ocOBeHNO ecIn B DOME detN.
Дя OTKLOHEN6IOKNPOBn NaHeJy npaBneHnAdePKeTe KONky HkaToI npMepHo 2 ceKyHdbI.
O INdkaTop 6JIOKnpOBKn IIOka:
BkHouHHbInHdkaTOp 03Haayet,HTO JHK 3a6nKIpOBaH BO n36exKaHHe eTo cTuayHoro OTkpBbAHn.Bo n36exKaHne ero NOBpeXeHHe HEO6xOdmo DoKdaTbcra, KOrda INdkaTOp norachET, Nepe TEm KaK OTkpblb JIOK.ObbHuHO INdkaTOp racet Hepe3 3 MmHytbl Nocle OKOHauHnCTnPKI. IPNIMEAHHE: ecN BkHouHeA cyHKuJa "TaImeP oTCpOKn", JIOK OTkpblb HeNb3a.ДЯ 3TOrO Heo6xOdmo nepeKNoCHbMaunHy B pExM Nay3bl Prn NOMOnu KNonkn PYNCK/PAY3A.
!5bictpeMiraHneMHnKaTopaNYCK/AY3A (opahKebbl)OHOBPeMeHHoC INHnKaTOpOMyHKmO3HaayetHeuCnpaBHOCTb(cm.《Heucnpaehocmu MeMoobuxycmpaHeura》)
Kak otkpblb n 3aKpbItb 6apa6aH

pnc.1
pnc.2
pnc.3
PNC.4
A)OTKpbIBAHNE(pnc.1):
IOnHIMMTE BHeUHIO KpbIuKy I NIOJIHOCTbIO ee OTKpOHTe.
B) OTKpbIbAHne 6apa6aHa (Soft opening - PnaBHOe OTKpbIbAHne):
Haxmnte KhoNky, noKa3aHHyIO ha puc. 2, KpbIwka 6apa6aHa nnabHO OTKpoETcR.
C) 3AΓPY3KA CTNPAJIbHOI MAUINHBI (pnc. 3).
PpeDyCMToPeHHoe JnKaKdoi npopamMbI.
BbI6op ckopoCTn OTXIMa
Bb6op ckopocn OTXmMa Bb6paHno nporpMMbl npon3BOIDTC npn nomOu nperyJrTopa ckopoctn OTXIM.
Ipa3HbIX nporpamM npedymCatpnaeTc pa3HaMaKmMaJbHa CKoPoCTb OTkMa:
PporpaMbl MaKcHMaJIbHaN cKOpOCTb OTXHMa
Xnnonok 1400 o6oPoTOB MmHyTu
CHTETNueckneTKAHN 800o6OpOTOB MmHyTy
Uepcb600o6opotOB MmHyTy
UeK63OTXUMa
CKopocTb OTKIMa MOXET 6bITb yMeHbUeHa, INI Xe OTKIM MOXET 6bITb COBcEM NCKIOueH, NOBepHyB peYnTOp B IIOJoxHe.
MaunHa aBToMaTnueckn He donyckaet BbIbOp ckopocn OTKIMa, npeBbIaHoum MaKcImaJIbHyIO ckopocTB, npedymoTeHHyO dIg KaKdoi npopamMbI.
DOnoJIHnTeJbHbIe FyHKUIN
Pa3HbIe yHKun CTnPK MaunHbIO3BOJIoT DOCTuK JeaemO uNCToB I 6JIIN3HbBaUero 6JIbA.
Popraok BbIbopa yHKnui:
- Haxmte KhoNky HxKHOB Bam cyHKUIN;
2.BKJIIOUeHHe COOTBeCTCTByIOUeIro INHnKaTopa O3HaayaeT, YTO cyHKmB KJIIOUeHa.
PnmeaHne: Yactoe mHaHne HndkaTopa 03haaet, yTo daHHa fynkun He moKet 6bItb BbIbpaHa dna 3aHaHO nporpaMMbl.

Taimep oTcpoKn
Ipy nporpaMMPOBAHn 3aepKKn 3anycka Bb6paHHo nporpAMMb HxKMnTe HeckoNko pa3 KhoNky noka He Otpa3ntcH yxHoe BpeM 3aepKKn (ot 1 do 24 vacob).
Дя OTKIQUeHnA ToI ΦyHKUIN HAKMTE KHOKNY NOKa He NOBNTcCoO6uEHe DFF.
Jaeyka 3: O6abKn (ononackBaTeJIb n T.d.)
Korda Bbl haJIbBaTe OONACKBATEB B yYeKy 3,
O6paaTe BHNMaHHe, YTO6bl He npeBbICNTb
MaKcIMaJIbHbI yPoBeHb, yKa3aHbHb OTMeTkoi max . OOnLACKBATEb ABToMaTHueCKn NOaETcB
6apa6aH B npOceCe NocJeHrero ONoLACKBAHn.
Io 3aBepWeHH npOrpAMMb CTnPKn B yYeKe 3
OCTaETcB ODa. OHa Heo6xOdIma DnA NOaH N
6apa6aH oYeH b rCyTBx OOnLACKBATEeN, T.e. dJa
pa36abHeHH KOnUeHTpnpOBaHHbx
OOnLACKBATEeE. Ecnn B yYeKe 3 OCTaHETCra BObl
60nbIe HopMaJIbHOro, 3TO 3NaHT, YTO KaHaJI CnIBa
ONLACKBATEJ B 6apa6aH 3acOpuNCr. CMOTPnte
ONncAHne YnCTKn yyeek Ha cmp. "TexHuueckoe
OcbNyXuBaHue u yxoD".
yueKa4: Lnk ot6ennBaHn
OT6eJnBaHne
OT6eINBaHHe npoIN3BOIDITcTc TOnbKO c nporpaMMaM2,3,7,
Iobabte OTbeBnBaTeB 4,MOUooe CpeCTBO IN OONaACKBaTeJB COOTBeTCTBYIOJIne OTDeJeHn3aTeM Bbl6epnte OndHy n3 BblIeYka3aHHbIX nporpaMM.
PekomeHdyetca TOnIbKO dIra ouHeb Ipr3Horo x/6 6eJIb.
Iodrotobka 6enb
- Pa3dJIte 6eIbe no cIeDyIOUzIM npu3HaKaM:
-TINTKaHn/06o3HaueHnaHa 3TKeTke. - CBET:OTDeIInTe UBeTHoe 6eJIbe OT 6enoro.
- BbHbTe n3 KapMaHOB BOe npedMeTbI npOBepbTe nyROBnbl.
- He npeBbIaIe MaKcImaIbHyIO 3arpy3ky 6apa6aHa, yKa3aHHyIO dIra cyXoro 6enby:
N3dJIy, Tpe6yUoJne DeJnKaTHoH CTnRKn
Py6a#Kn: nCnoB3yIe cneuaJIbHyIO nporpaMMy 10 dIra CTnPK py6aWeK I3 pa3HbIX TkaHeN pa3HbIX UBeTOB.
3TOO6eCneuHTMAKcIMMaJIbHyIO COxpaHHOCTb Beuei N CdeJaet INX MeHee MRTbIMN.
WeJk: nCnoJIb3yIte CneuNaJIbHyIO nporpamMy 11 dJa CTnPKI BCex WeKOBbIX Beuei. PeKOMeHdyetcN CNOJIb3OBAtB CneuaJIbHOe CTnpaJIbHOe BEueCTBO DnA DeNIKAthbIX TKAHei.
3aHaBeckn: CBepHNTe INIIOXHTe B HABOJIouky NIN B CeTtay MeUoYek. IcNoJb3yNe nporpaMMy 11.
Wepctb:CTnpaIbHaMaunHaMapKn eINHCTBeHHa
nonyHnna npeTnxHb3nK Woolmark Platinum Care
(M.0508)OT KomnAHn The Woolmark Company,
KOTopbI cepTnHnpyET MaunHHyO CTnPKy Bcex
WepCTraHbIX n3deJIn, DaXeTex, Ha 3TNKeTKax KOtOpbIX
yKa3aHO TOnbKO pyHnA CTnPKa》PnBbIbope
nporpaMmb12 Bbl MoKeTe HAdEJKHO n 3ΦΦeKTHBHO
CTnpaTb IIO6bIe WepCTraHbIe n3deJInn (MaKc.1Kr) C
rapaHTnpoBaHHbIM JyUHMn pe3yJbTaTaMn.
Cnctema 6aJaHcnpOBKn 6eJbA
IpeE Kaxdbim OTKIMOM BO n36eKaHne Upe3MepHBx Bbpaunn I dnn paBHomepHoro pacnpedeJeHn8 6JIbB B 6apabane MaunHa npOn3BOJNT BpaueHnco CKOpocTbIO, Cnerka npBeBbIaHOUeckOpocTb CTnPKN. Ecnn nocle HeckoJIbKnX NOnbITOK 6JIbe He 6ydet npaBnIbHO c6anaHCnpoBaHo, MaunHa npOn3BeTeOTKIM Ha MehSeickOpocTn NO cpabHeHIO C npedycmOTpeHHo.
!CtnpaBnHa MaunHa CnpoekTnpoBaHa n N3ROTOBJeHa B COOTBeCTBm C MekdyHapOdHbIMN HOPMaTHBaMn NO 6e30NaChOCTn. Heo6xOIMMO BHIMATEJbHO npOHTaTb HactoIuIne PpeDynpexKDeHnA, COCTaJIeHHbE B CEJIAX BaWei 6e30NaChOCTn.
CTnpaJIbHaMaunHa He BKNIOUOaETc.
- UTeNceIbHaB BnIka He CoeINHeHa C 3JIeKTpO p03eTko IIN OTXoJNT H He oBeCneuBaet KOHTaTa.
B DOME OTKIHOHeO 3JIeKTPnueCTBO.
Lukn ctnpkn He 3anyckaetc.
JIIOK nIoxo 3aKpbT.
He 6bina Haxa Ta Khonka BKJ/BblKJI.
-He6binaHaxkataKHonkaIYCK/IAV3A.
-ПepeкьтВОДОПROВОДнБИКраH.
- 5blya 3anporpammmipoBaHa 3aepkka 3anycka LmKn (TaMep oTcpoKn, (cm. «IpecoHaun3upoBaHbIe HacmpouKu»).
CTnpaJIbHnMaunHa He 3aJnBaET BDOy (Yacto Mmraet INHdNkATOp nepBOBΦa3bl CTnpKn).
BodonpoBoDnHbI uHaHr He noDcoeUHeN K KpaHy.
- UJnahr corHyT.
-ПepeкрытВоДОПРОВОДнБИКраН.
B Dome HET BOJI.
- HeioctaToUHoe BOOnpOBOHoe DaBJIeHHe.
- He 6bila Na Haxkata KhoNka NYCK/NAY3A.
MaunHa HenpepbIBHO 3aINBaET n CnNBaet Body.
CINBHOI UHaHr He HaxoITcHbYbcOte 65-100cm.OTnna (CM.《UcmaHo8ka》).
- Koheu cnBHO OJHaHra norpyKeH B BOy (CM. «YcmaHoEka»).
- HacteHHoe cInBHOe OTBepCTne He OCHaUeHO BaHTy3OM IIN BbIyCKa BO3dyxa.
Ecni nocne BbiuenepeueHcIeHHbIX npOBepOK HeNCpabHOCTb He 6yTeT yCtpaHeHa, CJeDyeT nepeKpbITb BOIOnpoBOHbIK PkaH, BbIKIOHTb CTnpaBHyO MaunHy N o6paTntbcra B LHeTp CepBncHoro OcbJyKbAHna.
Ecnn Ba7a Kbaptnpa HaxoDntcHa NocnEHNx 3TaXkax 3DaHn, MoryT NaBIOdaTcBraIeHnna CnOHa, NoTOMy CTnpaNbHn MaunHa nPON3BOiN HnpepbHBn 3aINb IN CnIN B Odb. Ipy yCTpaHnne 3ToA hOMaINB npodaKe IMeIoTcCneuNaHbIe KlaNaHbI pOTNB RAJIeHncaOHa.
CTnpaJIbHaMaunHa He cJnBaet BDOy n He OTXnMaET 6eJIbe.
- Bb6paHna nporpamma He npedymaTpmbaeT cNIB BObl:ДЯ HeKOTopbIX nporpamm Heo6xoDnMo BKHouHTb CINB BpyHyIO.
BkHoueHa cyHKUJI EKAKI JAAKKA: n3aBepueHn nporpaMbHakMnte KONky NCKIAY3A (cM. «IepcoHaUN3upoeaHHbIe Hacmpouku)
CJINBHOI JIANHr COHT (CM. «YcmaHO8ka»). - 3acopen cInBnTpy6oPBOD.
CtnpaJIbHna MaunHa cnIbHo Bn6pnpyET B npocce OTXnMa.
B MOMENT yCTaHOBKn CTnpaIbHOI MaUNHbI 6apa6aH 6bl pa36nOKIpOBAH HENpaBUNbHO (CM. «YcmaHO8Ka»).
- CtnpaBnaMaunHa yCTaHOBJeHa HEPOBHO (CM. «YcmaHOBaKa»).
MaunHa 3aKaTa MeKdy CTeHbI Me6eBbO (CM. «YcmaHo8ka»).
YTeUKNBODbI N3 CTnpaJIbHOJ MaunHbl.
-Плнох ппкруен ВОДОПВОДнБИ 小нг (СM. «УсmaHoEka»).
- 3acopen pacnpedeHnteMb MOUoIero cpeIcTbA (nopraok erO YIcTKM. e npapaapae《TexHuueckoe o6cnyKueaHue u yxoD》).
CnBHOJIJIHrIIOX3aKpePHeH (CM. YcmaHoEka)
HnDnKaTOp NYCK/NAY3A (opaHKeBbI) n HnDnKaTOpbl fynKcuiyacto MmraIoT.
- BbIKIOHnTe MaunHy n BblbTe lTeNCeIbHyIO BuNKy n3 ceTeBOJ po3eTKN, NOOXDNTe 1 MNHyTu N BHOBB BKIOHnTe MaunHy. Ecnn HeNCnpaBHOCTb He yctpaHReTc, o6paTntecb BCepBnCHyO Cnyk6y.
B npoecce ctnpkn 6pa3yetc cnwhkom 6nhna neha.
- MoHooee cpeCTBO HENpIroDHO DnA CTHPKB CTnpaJIbHO MaUNHe (Ha
yNApKBe DOJIKHO 6bITb YKa3aHO «ДЯ CTHPKB CTnpaJIbHO MaUNHe», «ДЯpyHOB N MaUNHHO B CTHPKN» UNI NOIO6Hoe).
BpacpepeJIeIeIb 6blIO nOmeHcHo Upe3MepHoe KOINHeCTBO MOIOeero cpeIcTBA.
IpepeTem kak o6paNTbCBA Cnyx6y CepBnca:
- Поберпг, Heьзя Лу усразиь Heucрвocьcamoctorьho (cM. «Heucрбогсma u Meodby ux ycmpaHua});
BHOb3anyctnTe nporpamMy dIy npoBepKINcnpaBHOCTMaunHbI;
B npoTBHom cnyae obaTbCBA B AToPn3OaHHbI CepBnchbI UeHTp no TeNefoHaM, yKa3aHHbIM B rapaHTnHOM TaJIHOHe.
!HnKorda He o6paaTecb K HeaBtOp3oBaHHbIM CepBnChbIM ueHTpaM.
Pn o6paueHnn B CepBnchHy Cnyk6y Heo6xoJIMO coo6uNTb:
TNHEnCnPaBHOCTN;
Homep rapaHTnHoro DOkymeHTa (cePBnCHoN KHNKn, cepBnCHOrO ceTnΦnKaTa n T.n.);
- MoDJIb MaUNHbI (MoJ.) n cepuHbI HOMep (S/N), yka3aHHbIe B INHΦopMaUHOHHO Ta6NJUKe, paCIOJOXeHHoHa 3aDHe N aHEI cTupaJIbHO MauINHbI.
Pon3BOnTeNb: Indesit Company
Bnane A. MepnoH 47, 60044, Fa6pnaHo (AH), Iraia
ImmopTeP: OOO "INHe3nT Pyc"
C BOpocamn (B Poccn) 01.01.2011: Poccn, 129223, MockBa, IpocneKT Mnpa, BBU, naB. 46
obpaatbcno aDpecy: c 01.01.2011: Pocn, 127018, MockBa, yI. DvinueB, dom 12, Kopn. 1

Polski
Spis tresci
Instalacja, 26-27
Coton 1400 tours/minute
Causes / Solutions possibles:
- Description of the washing machine and starting a wash cycle, 4-5
- Wash cycles, 6
- Personalisation, 7
- Detergents and laundry, 8
- Precautions and tips, 9
- Care and maintenance, 10
- Troubleshooting, 11
- Unpacking and levelling
- Unpacking
- Levelling
- Putting your appliance in place and moving it.
- Electric and water connections
- Connecting the water inlet hose
- Connecting the drain hose
- Electrical connections
- The first wash cycle
- Description of the washing machine and starting a wash cycle
- Control panel
- WASH CYCLE PROGRESS
- Standby mode
- Indicator lights
- Wash cycle phase indicator lights
- Function buttons and corresponding indicator lights
- Temperature indicator light
- Spin indicator light
- Control panel lock indicator light
- Lid locked indicator light
- How to open and to close the drum
- B) Opening the drum (Soft opening):
- C) Loading the washing machine (Fig. 3).
- E) Drum End Stop (Fig. 2):
- Starting a wash cycle
- Specials wash cycles
- Setting the temperature
- Setting the spin speed
- Functions
- Delay timer
- Super Wash
- Extra rinse
- Easy iron
- Detergents and laundry
- Detergent dispenser drawer
- compartment 1: Detergent for pre-wash
- compartment 2: Detergent for the wash cycle (powder or liquid)
- compartment 3:Additives (softener,etc.)
- compartment 4: Bleach
- Bleach cycle
- Preparing the laundry
- How much does your laundry weigh?
- Garments requiring special care
- Load balancing system
- General safety
- Disposal
- Saving energy and respecting the environment
- Saving on detergent, water, energy and time
- Cutting off the water or electricity supply
- Cleaning your appliance
- Caring for your appliance door and drum
- Cleaning the pump
- Checking the water inlet hose
- How to clean the detergent dispenser
- Disassembly:
- Cleaning:
- Reassembly:
- Problem:
- Possible causes / Solutions:
- Before calling for Assistance:
- Have the following information to hand:
- CopepkHne
- Onncahne cTnpaIbHoi MaunHbI n nopraKa 3anycka nporpaMMbl, 16-17
- ARTXF 149
- Ponck HencnpaBHOCTeN MeToDbI INx yctpaHHeHn, 23
- PacnaKOBka N BbipaBHBaHne PacnaKOBka
- BbipabHbBaHne
- YctaHObKa MaunHbHa MeCTO n NepemueHne
- IopKJIoueHne K BODOpPOBOHOH N 3JIeKTPnueCKoCetN IopCoeINHeHne 3aJIbBHorO 7JHaHra
- HdkaTOpbI TeKuεe Φa3blcNKla:
- KhONKN DOnONHnTeIbHbIX FyHKnN COOTBeTCTByIOUne HNDkATOpbl
- HdkaTop tempeatpybI
- HdkaTop oTkMa
- Hdkatop 6noknpOBkn KhoNOK
- O INdkaTop 6JIOKnpOBKn IIOka:
- Kak otkpblb n 3aKpbItb 6apa6aH
- A)OTKpbIBAHNE(pnc.1):
- B) OTKpbIbAHne 6apa6aHa (Soft opening - PnaBHOe OTKpbIbAHne):
- C) 3AΓPY3KA CTNPAJIbHOI MAUINHBI (pnc. 3).
- BbI6op ckopoCTn OTXIMa
- PporpaMbl MaKcHMaJIbHaN cKOpOCTb OTXHMa
- DOnoJIHnTeJbHbIe FyHKUIN
- Taimep oTcpoKn
- OT6eJnBaHne
- Iodrotobka 6enb
- N3dJIy, Tpe6yUoJne DeJnKaTHoH CTnRKn
- Cnctema 6aJaHcnpOBKn 6eJbA
- Pn o6paueHnn B CepBnchHy Cnyk6y Heo6xoJIMO coo6uNTb:
- Spis tresci
- Instalacja, 26-27
- Causes / Solutions possibles:
Brand : HOTPOINT
Model : ARTXF 149 (EU)
Category : Washing machine