
Tedi 200 P - Digital decoder FAGOR - Free user manual and instructions
Find the device manual for free Tedi 200 P FAGOR in PDF.
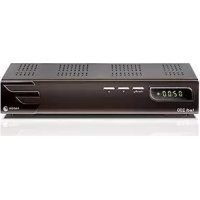


| Brand | Fagor |
| Model | Tedi 200 P |
| Product type | Digital terrestrial decoder (DTT) |
| Dimensions (approx.) | 200 x 150 x 40 mm |
| Weight (approx.) | 0.5 kg |
| Power supply | AC 175~240 V, 50/60 Hz, 5 W max |
| Video resolution | 720 x 576 (PAL), 720 x 480 (NTSC) |
| Video format | 4:3, 16:9 |
| Audio format | MPEG-1, MPEG-2, stereo, mono |
| Modulation | QPSK, 16QAM, 64QAM |
| Main functions | DTT reception, EPG guide, teletext, favorite lists, mosaic, image pause, parental control |
| Connectors | 2x SCART, RCA outputs (CVBS, audio L/R, S/PDIF), antenna input/output, RS-232 |
| Cleaning | Unplug before cleaning, slightly damp cloth, no solvents |
| Safety | Do not open the casing, avoid moisture, do not block ventilation, disconnect during thunderstorms |
| Included accessories | Remote control, AAA batteries, SCART cable, antenna cable, manual |
| Repairability | Repair only by qualified personnel; warranty valid with original packaging and accessories |
| Reception countries | France, Spain, etc. (depending on adjustable region) |
Frequently Asked Questions - Tedi 200 P FAGOR
User questions about Tedi 200 P FAGOR
0 question about this device. Answer the ones you know or ask your own.
Ask a new question about this device
Download the instructions for your Digital decoder in PDF format for free! Find your manual Tedi 200 P - FAGOR and take your electronic device back in hand. On this page are published all the documents necessary for the use of your device. Tedi 200 P by FAGOR.
USER MANUAL Tedi 200 P FAGOR
2.2.1.-Front panel 25 2.2.2.-Rear panel 25 2.2.3 - Remote control 25
- Connecting
3.1.- Antenna diagram + TDT + TV 26 3.2.- Antenna diagram + TDT + VCR + HIFI + TV 26
4.-First installation 27 5.-Operation
5.1.-Quick access keys 27 5.2.-Main menu 28
5.2.1.-Channel menu 28 5.2.2.- Installation menu 29 5.2.3.-Setup menu 29 5.2.4.-Tools menu 30
6.-Troubleshooting 31 7. - Technical Features 32
1.- SAFETY INSTRUCTIONS
- Before installing or using the appliance, carefully read the Safety Instructions and User Manual.
- Any damage or injury resulting from misuse of the appliance or failure to comply with the instructions in this manual shall exonerate the manufacturer from all liability and render the guarantee invalid. In order for the unit to be repaired under warranty, it must be received by Fagor Electrónica in perfect condition, in the original packaging and with all the accessories.
| POWER 175-240v AC; 50/60 Hz | |
| CAUTION RISK OF ELECTRIC SHOCK DO NOT OPEN | Opening the covers on the appliance can cause exposure to dangerous voltages and other risks. These operations must be carried out by qualified technicians only. |
| OVERLOADS Do not overload power sockets. This may cause fire or electrical discharge. | |
| LIQUIDS Do not allow the appliance to come into contact with water or any other liquids. | |
| CLEANING Unplug the receiver from the power supply | before cleaning. Clean the outside with a slightly damp cloth. Do not use any type of detergent. |
| VENTILATION Do not block any of the ventilation openings. Leave at least 1 cm above and 5 cm around the receiver to allow ventilation and prevent overheating. Avoid exposure to the sun or other sources of heat. | |
| CONNECTIONS Connect all the appliance components | before connecting to the power supply. Shut down the receiver and all the equipment connected to it before connecting or disconnecting any cables. Unplug the appliance from the power supply and disconnect the antenna and television system cables during storms or when the receiver is not in use for long periods of time. |
2.- INTRODUCTION
2.1.- Package contents
The package should contain the following items:
- Receiver
- Remote control
- Two 1.5V AAA batteries.
- Instruction Manual -1 SCART-SCART cable
- 1 Antenna cable
2.2.- Description
2.2.1.- Front Panel
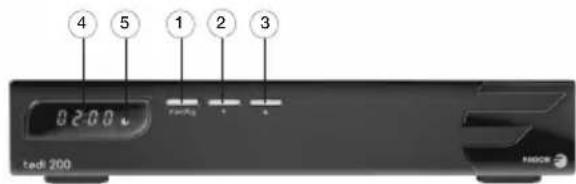
- On/Off button
- Channel down
- Channel up
- Display
- On/Stand by light
2.2.2.- Rear Panel
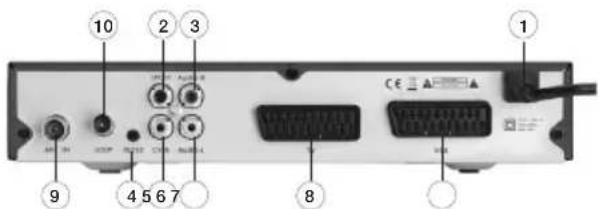
- 230 V power supply
- RCA jack for audio digital output (S/P DIF)
- RCA jack for right audio channel output
- RS 232 series
- RCA jack for video compound output (CVBS)
- RCA jack for left audio channel output
- VCR SCART: Euroconnector for video recorder
- TV SCART: Euroconnector for television
- Input for terrestrial antenna
- Output for terrestrial antenna
- STANDBY: Switch between on and standby modes
- MUTE: Mute the sound
- Numeric entry
- TV/RADIO: Switch between TV and Radio
- Return to the previously selected channel
- EPG: Electronic Programme Guide
- MENU: Show main menu on the screen
- Adjust volume, or left/right selection in the menu
- OK/LIST: List of TV channels, or confirm change in the menu
- PR-, PR+: Change channel, or select previous/next option in the menu.
- INFO: Channel information
- EXIT: Return to the previous menu or exit menu completely
- AUDIO: Available audio selection
- / switch between groups of channels
- SUBTITLE: Subtitle selection: None / Standard / TTX
- TXT: Show teletext
- PAUSE: Pause the image
- Available audio selection
- MOSAIC: Enter MOSAIC mode
- FAV: Select favourites group
- No function
- PAL/NTSC: Switch between PAL and NTSC
- TV/AV: Switch between TV SCART and VCR SCART (EUROCONNECTOR)
3.- CONNECTING
- When connecting the receiver for the first time, the First Installation Screen appears.
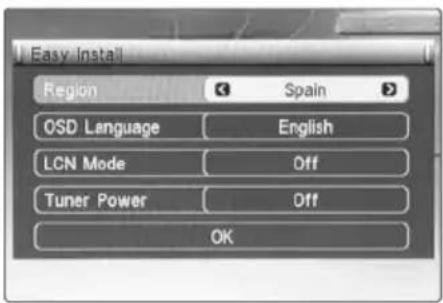
Using the keys, select the desired setting for each of the following options. Using the PR-, PR+ keys, move through the options.
- Region: Select the country.
- OSD Language: Select the menu language.
- LCN Mode: Turn on the LCN Mode only if your country broadcasts with Logical Channel Numbering (LCN) function.
- Tuner Power: Switch on the tuner power supply only if you need to use an indoor antenna. Power supply +5V.
- OK: Push OK on the remote control and the receiver will begin an automatic search.
5.- OPERATION
5.1.- Hot keys
- "STANDBY" key: Switch between On and Standby modes. The receiver goes into energy saving mode, the signal is suspended, the Standby indicator is illuminated and digital clock is displayed. If the key is pushed again, the receiver is reactivated and the last channel viewed is displayed.
- "MUTE" key: Mute the sound, maintaining the active image. Push the mute key again to reactivate and use.
- "TV/RADIO" key: Switches between television and Radio.
- key: Return to the previously selected channel.
- "EPG" key: Electronic Programme Guide. Shows information about the programme highlighted on the screen in yellow. The information depends on the operator and is not always available.
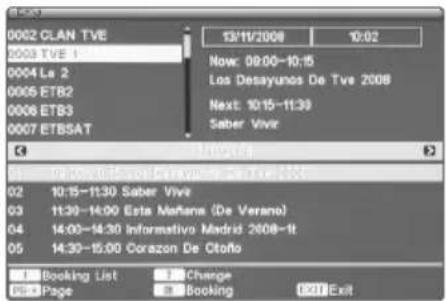
Key "2": Used to enter the daily programme schedule that shows on the bottom half of the screen. Use the keys to change the date. - Use the PR-, PR+ keys to move the cursor through the programming schedule. Key "3" accesses detailed information about the selected program. Key "1" shows additional information and returns to reduced information. The information provided depends on the operator. - "OK/LIST" key: Enter into the list of television channels. It is also used to confirm changes in the menu. - "INFO" key: Shows information on the screen about programme tuning. Push the "INFO" key once to see the following display:
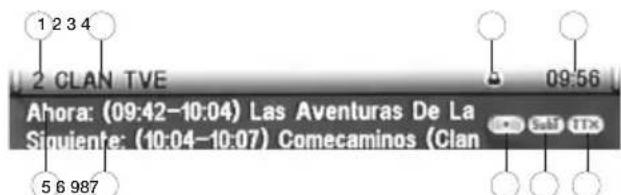
- Programme number
- Programme name
- Restricted programme
- Time
- Current programme
- Next programme
- Sound available
- Subtitles available
- Teletext available
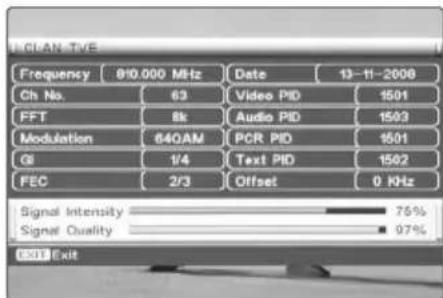
- Pushing the "INFO" key a second time will show information about the current channel. The level and quality options are for guidance only.
- "AUDIO" key: Changes the language of the current programme and selects the type of audio: left, right, stereo.
- "SUBTITLE" key: Subtitle selection. "Standard": Subtitles over video. "Teletext": Subtitles over teletext.
- "TXT" key: Show teletext.
- "PAUSE" key: Freeze the image, maintaining the active sound. Press the pause key again to reactivate and update.
- "MOSAIC" key: Activate mosaic mode. In this mode, nine programmes can be viewed on the screen. The one highlighted in yellow is the active one.
- "FAV" key: Displays the list of favourites. The PR-, PR+ keys can be used to select another group of favourites.
- "TV/VCR" key: Switch between TV SCART and VCR SCART (EUROCONNECTOR).
5.2.- Main menu
- Press the "MENU" key to access the receiver's main menu.
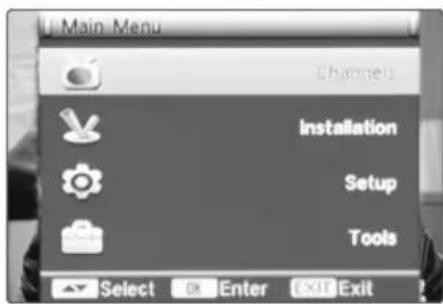
- The receiver's main menu is divided into four sub-menus: Channels, Installation, Setup and Tools.
- Using the PR-, PR+ keys, select the required menu and press "OK" to confirm.
5.2.1.- Channel menu
- Activates all of the functions relating to the Channels List.
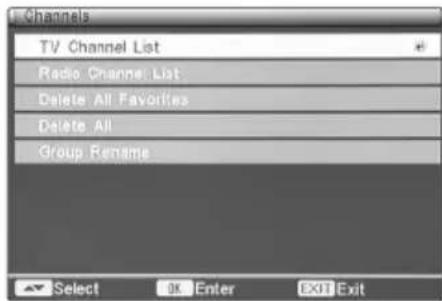
5.2.1.1.- TV channel list
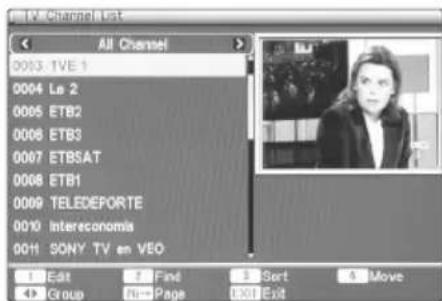
Key "1" Edit. Enter the programme editing menu:
- "OK" key selection. Select or deselect the programmes to edit.
- Key "0" All. Select/deselect all of the programmes on the list. Key "1" Favourite. Save the selected programmes in the desired favourites list. Key "2" Lock. Block the selected programs. Function "Channel Lock" must be On (see section 5.2.3.6). To access blocked programmes, the Access Password will be requested. The default Access Password is "0000". Key "3": Skip. Go up to the next selected programme. Key "4": Delete. Erase the selected list of programmes. Key "5": Rename. Rename the last program selected.
Key "2" Find. Locate programmes with names that begin with the first letter selected.

Key "3" Sort. Order the channels by the selected criteria.
Default: Initial order
Name (A-Z): Ascending alphanumeric order
Name (Z-A): Descending alphanumeric order
FTA: Free channels are at the beginning
of the list followed by subscription channels.
Lock: Blocked channels go to the end of the list
IMPORTANT: Changes in the order of the channels won't be effective when the LCN Mode is On (see section 5.2.3.2)
Key "4" Move. To change the order of channels list. Key Switch between groups of favourites.
5.2.1.2.- Radio Channel list
The functions for the list of radio stations are the same as those for the television channels.
5.2.1.3.- Delete all favourites
- Erases all lists of favourites.
5.2.1.4.- Delete All
After entering the Access Password, all TV channels will be erased. The default Access Password is "0000". See section 5.2.3.6
5.2.1.5.- Group Rename
- Rename the groups of favourites.
5.2.2.- Installation menu
- For all functions relating to Programme Search and antenna adjustment.
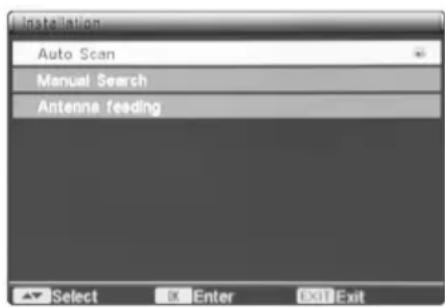
5.2.2.1.Auto Scan:
Search for digital programmes on the entire band.
5.2.2.2. Manual search:
- Search for digital programmes in the channel selected.
5.2.2.3.Antenna feeding:
- Only switch on the antenna power supply if there is an indoor antenna. Power supply +5V.
5.2.3.- Setup menu
- Access all the functions relating to the configuration of the receiver (timer OSD configuration, TV system, etc).
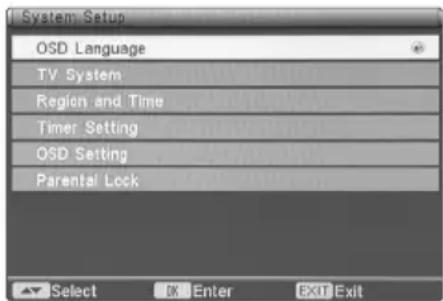
5.2.3.1. OSD Language:
- Select the OSD language (On Screen Display).
5.2.3.2. TV System
- Display Mode: Allows selection from the options AUTO (Automatic), PAL and NTSC.
- Aspect Ratio: 4:3 PS, 4:3 LB and 16:9 Video Output: CVBS (video compound), RGB (red, green, blue)
- LCN Mode:
- On: activates Automatic Channel Order (Logical Channel Number) provided the operator broadcasts the service.
- Off: deactivates Automatic Channel Order and allows the user to reorder channels as preferred.

5.2.3.3. Region and time
Region: Select the country. (SPAIN, France, etc). - GMT Usage: By region, User Define and Off. - GMT Offset: GMT + 00:00. Can be modified when GMT Type has been selected "User Define". - Date. Can be modified when GMT Type is "Off". - Time. Can be modified when GMT Type is "Off". - Summer time. Off. On. - Time Display: Show Time on the screen. Off. On.
5.2.3.4. Time Setting
5.2.3.4.1. Program Timer
- Timer number: Eight timers are available.
- Timer Mode: Off, Once, Daily, Weekly and Monthly.
- Timer Service: TV and Radio.
- Wakeup channel Date: Day of month Month: Month number Day: Day of week Time: Start time
IMPORTANT: Verify that the time and date are correct before programming.
5.2.3.4.2. Sleep Timer:
- Off (Switched off), 10, 30, 60, 90 and 120 minutes.
5.2.3.5. OSD settings
- Subtitle Display: Off, Standard and Teletext.
- OSD transparency: Select from Off, 10%, 20%, 30%, 40% and 50%.
- OSD style: Select style one or two.
- Load Default OSD Setting: Restores default settings.
5.2.3.6. Parental lock
The default access password is "0000". - Menu Lock: Off, On. Blocks the Installation menu functions. Access Password is asked. - Channel Lock: Off, Manual (see section 5.2.1.1) - New Password: Enter the new password. - Confirm Password: Confirm the new password.
5.2.4. Tools Menu
- In this menu, several functions are grouped to enable access to: Information about the remote control, games available, general configuration, etc.
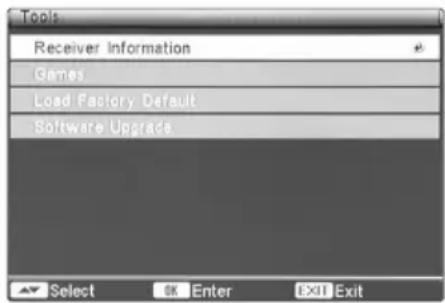
- Receiver information: Shows information about the receiver hardware, software and firmware. Games: Tetris, Snake and Othello.
- Load Factory Default: Restores the default factory settings. Requires password. You can find the factory default values in bold letter at each section of this user manual.
- Software Upgrade: Go to web site www.fagorelectronica.es
6.-TROUBLESHOOTING
| Problem | Possible cause | Solution |
| No signal or bad signal. | - Connection fault. - A cable is not connected correctly. | - Check all the connections cables. |
| - The antenna is disconnected. - The antenna is in the wrong position. - The antenna is damaged. - There is no digital signal. | - Plug in the antenna (if it is a DVB-T indoor antenna). - Adjust the position of the antenna. - Replace the antennal. - Check if there is a signal. | |
| The receiver does not respond to the remote control. | The batteries are flat. | Replace the batteries. |
| There is an obstruction between the receiver and the remote control. | Point the remote control at the receiver and make sure there are no obstructions between them. | |
| There is no signal when the receiver is moved to another room. | The new location does not have sufficient signal. | Try connecting a cable directly from the antenna to the receiver. |
| The message “No FAV Channel” appears when the favourites button is pushed. | No favourite channels have been stored . | Select favourite channels in the channels list. |
7. - TECHNICAL SPECIFICATIONS
| GB | |
| POWER SUPPLY | |
| Power supply voltage AC 175~240V; 50/60Hz | |
| Consumption 5 W MAX. | |
| Max. current at +5Vdc 50 mA | |
| HARDWARE | |
| Tunner | |
| Input impedance 75 Ohm | |
| RF input connector IEC female, 9.5 mm | |
| RF output connector IEC male, 9.5mm | |
| Input frequency | 177,5 ~ 227,5 MHz |
| 474 ~ 858 MHz | |
| Input levels -8,75 dBm a -78,5 dBm | |
| Connector | |
| TV Scart CVBS, RGB, Audio L/R | |
| VCR Scart CVBS in-out, Audio L/R in-out | |
| RCA outputs Video (CVBS) x 1, Audio L x 1 | Audio R x 1, Audio S/P DIF x 1 |
| 3,8 m/m JACK RS 232 | |
| SYSTEM | |
| Constellation QPSK, 16QAM, 64QAM | |
| Transmission mode 2K / 8K FFT | |
| FEC 1/2, 2/3, 3/4, 5/6, 7/8 | |
| Guard interval 1/4, 1/8, 1/16, 1/32 | |
| Transport Stream MPEG-2 ISO/IEC 13818 | |
| Video resolution | 720 x 576 (PAL) |
| 720 x 480 (NTSC) | |
| Video format | 4:3, 16:9, Letter box |
| MPEG Audio Decoder | MPEG-1, MPEG-2 ISO/IEC 13818-3 LayerII&II |
| Audio mode | Left / Right / Stereo |
| Video output impedance | 75 Ohm |
| Video output level | 1Vpp |
| Audio output impedance 600 Ohm | |
| Audio output level | 2 Vrms (5,6 Vpp) |

- This symbol means that the product complies with the requirements of Directive 2003/92/EC on waste electrical and electronic equipment.
- All electrical and electronic appliances must be disposed of separately from municipal waste collection, through collection points designated by the government or local authorities.
- Proper collection and treatment of unusable appliances helps to avoid potential risks to the environment and public health.
- For more information on how to dispose of your old electrical and electronic appliances, please contact your local council, the waste collection service, or the establishment where you purchased the product.
- This symbol means that the product complies with the requirements of Directive 2003/92/EC on waste electrical and electronic equipment.
- All electrical and electronic appliances must be collected and disposed of selectively through specific services designated by the government or local authorities, different from those of regular household waste collection.
- Proper collection and treatment procedures for unusable appliances help to eliminate potential risks to the environment and public health.
- For more information on the disposal procedure for your unusable electrical or electronic appliances, please contact the municipal service responsible for household waste collection or the establishment where you purchased this appliance.
- This symbol means that the product complies with the 2003/92/CE Directive on Waste Electrical and Electronic Equipment.
- Electrical and electronic equipment should not be discarded with normal household waste, but through collection points appointed by the government or local authorities.
- Proper collection and treatment of end-of-life products helps to avoid potential risks to the environment and public health.
- To get more information about how to discard old electrical and electronic equipment, please contact your town council, the refuse collection service, or the shop where the equipment was purchased.
| FAGOR | DECLARATION DE CONFORMIDAD DECLARATION DE CONFORMITÉ DECLARATION OF CONFORMITY DECLARATION DE CONFORMIDADE |
| Fabricante/ Fabricant/ Manufacturer/ Fabricante : | FAGOR ELECTRONICA, S.COOP. |
| Dirección/ Adress/ Address/ Direção : | B° San Andrés s/n - P.O. Box 33 20500 MONDRAGON (Guipuzcoa) Spain |
| NIF / VAT : | F-20 027975 |
| Declara bajo su exclusiva responsabilitad la conformidad del producto : Declare, sous notre responsabilité, la conformité du produit : Declare under our own responsibility the conformity of the product : Declara exclusiva responsabilitad a conformidade do producto : | |
| TEDI 200 | |
| Según los requerimientos de las Directivas del Parlamento Europeo: Selon les specifications des Directives du Parlament Européen : According to the specifications of directives of the European Parliament: Com as espécificações da Directivas do Parlamento Europeu: | |
| 73/23/CEE 89/336/EEC - 93/68/CEE | |
| Para su evaluación se han aplicado las Normas: Pour l'évaluation ont étéis appliqués les Normes: For the evaluation, the following Standards were applied: Para a avaliación, os seguiñes Normas foram aplicados : | |
| EN 55013:2001+A1:2003 EN 55020:2002+A1:2003 EN 61000-3-2:2000 EN 61000-3-3:1995+A1:2001 EN 650065:2002 | |
| Fecha: NOV. 2008 | Firma: J.M. Saiz |
| Date: | Signature: Jefe Calidad Tratamente de Señal Head of Quality Dept., Signal Processing |
- SAFETY INSTRUCTIONS
- INTRODUCTION
- PACKAGE CONTENTS
- DESCRIPTION
- FRONT PANEL
- REAR PANEL
- CONNECTING
- OPERATION
- HOT KEYS
- MAIN MENU
- CHANNEL MENU
- TV CHANNEL LIST
- RADIO CHANNEL LIST
- DELETE ALL FAVOURITES
- DELETE ALL
- GROUP RENAME
- INSTALLATION MENU
- AUTO SCAN
- MANUAL SEARCH
- ANTENNA FEEDING
- SETUP MENU
- OSD LANGUAGE
- TV SYSTEM
- REGION AND TIME
- TIME SETTING
- PROGRAM TIMER
- SLEEP TIMER
- OSD SETTINGS
- PARENTAL LOCK
- TOOLS MENU
- TROUBLESHOOTING
- TECHNICAL SPECIFICATIONS
Brand : FAGOR
Model : Tedi 200 P
Category : Digital decoder