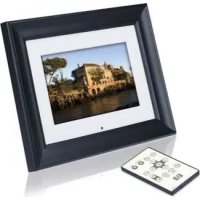
df1000 - Digital photo frame HP - Free user manual and instructions
Find the device manual for free df1000 HP in PDF.
| Product Type | Digital Photo Frame |
| Brand | HP |
| Model | df1000 |
| Screen Size | 10.4 inches (diagonal) |
| Aspect Ratio | 4:3 |
| Resolution | 800 x 600 pixels |
| Power | External AC adapter 12V, 1.5A |
| Internal Memory | 512 MB |
| External Memory Support | Slot 1: Memory Stick Pro, SD, XD, MMC; Slot 2: CompactFlash, Microdrive |
| Connectivity | 1 USB 2.0 Host port, 1 Mini USB 2.0 (device) port |
| Supported Image Formats | JPEG (baseline) |
| Supported Audio Formats | MP3 |
| Supported Video Formats | MPEG-1, MP4, Motion JPEG |
| Speakers | 2 x 1.0 W |
| On-Screen Display Languages | English, French, Spanish, Italian, German, Dutch, Portuguese |
| Main Functions | Auto-rotation, slideshow with music, 5x zoom, manual rotation, 4-quadrant display, PictBridge printing, photo copy/delete, clock and calendar, on/off timer |
| Remote Control | Yes, with CR2025 battery |
| Approx. Dimensions | 280 x 200 x 32 mm |
| Approx. Weight | 0.8 kg |
| Care and Cleaning | Use a soft, lint-free cloth; avoid abrasive products, ammonia, alcohol; do not press hard on the screen |
| Safety | Use only the provided adapter; do not expose to moisture |
| Spare Parts / Repairability | Adapter and remote control available via HP support; warranty repair by authorized dealer |
Frequently Asked Questions - df1000 HP
User questions about df1000 HP
0 question about this device. Answer the ones you know or ask your own.
Ask a new question about this device
Download the instructions for your Digital photo frame in PDF format for free! Find your manual df1000 - HP and take your electronic device back in hand. On this page are published all the documents necessary for the use of your device. df1000 by HP.
USER MANUAL df1000 HP
HP df720, df780, df820, df1000 Series
Digital Picture Frame Cadre Photo Numérique
FCC Compliance Statement
Note: This equipment has been tested and found to comply with the limits for a Class B digital device, pursuant to Part 15 of the FCC Rules. These limits are designed to provide reasonable protection against harmful interference in a residential installation. This equipment generates, uses, and can radiate radio frequency energy and, if not installed and used in accordance with the instructions, may cause harmful interference to radio communications. However, there is no guarantee that interference will not occur in a particular installation. If this equipment does cause harmful interference to radio or television reception, which can be determined by turning the equipment off and on, the user is encouraged to try to correct the interference by one of the following measures:
- Reorient or relocate the receiving antenna.
- Increase the separation between the equipment and receiver.
- Connect the equipment into an outlet on a circuit different from that to which the receiver is connected.
- Consult the dealer or an experienced radio/TV technician for help.
FCC Caution: To assure continued compliance, only use shielded interface cables when connecting to computer or peripheral devices. Any changes or modifications not expressly approved by the party responsible for compliance could void the user's authority to operate this equipment.
This device complies with Part 15 of the FCC Rules. Operation is subject to the following two conditions: (1) this device may not cause harmful interference, and (2) this device must accept any interference received, including interference that may cause undesired operation.
Table of Contents
FCC Compliance Statement 1
What's in the Box? 3
Getting Started 4
Remote Control 7
Initial Setup 8
Setup Menu 10
Key Features 12
Selecting a Memory Source 13
Picture Options 14
Picture Rotate and Zoom 15
Copying and Deleting Pictures 16
Printing with PictBridgeTM 20
MusicPlayback 22
Video Playback 23
Four-Quadrant Display 25
Clock & Calendar Display 26
Specifications 30
Frequently Asked Questions 34
Cleaning and Care Tips 36
Getting Help 37
What's in the Box
| Qty Item Image | |
| 1 Digital Picture Frame | |
| 1 Remote Control Replacement Battery = CR2025 | |
| 1 Universal Power Adapter (df720, df780, & df820 - 9V, 2A) (df1000 - 12V, 1.5A) | |
| 1 USB 2.0 Cable | |
| 1 User Manual | |
| 1 Quick Start Guide | |
| 1 Warranty Document | |
| 1 Declaration of Conformity | |
| Certain models may have inter-changeable Mattes |
Getting Started
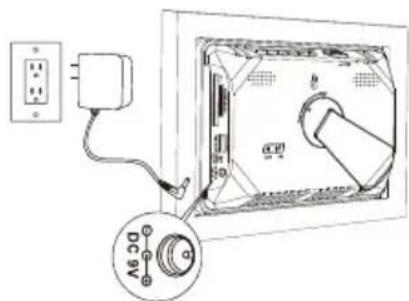
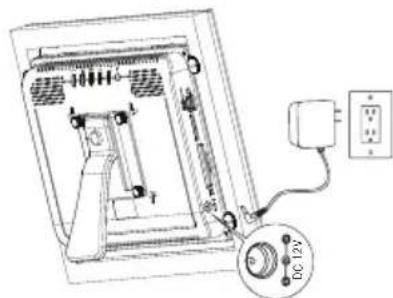
- Connect the power cord into the DC input of the digital picture frame and plug the adapter into a power outlet as illustrated below.
HP df720, df780, & df820
HP df1000
- The HP Digital Picture Frame is preloaded with pictures that illustrate the basic features of this product. If you want to view these pictures, turn the frame on as illustrated in step 4. The slideshow will begin in a few seconds. However, if you wish to immediately view your own pictures, go to the next step (step 3).
- Insert a memory card or USB storage device (external memory) containing desired pictures, music, and/or video into the appropriate card slot or USB port as illustrated below. Note: Memory cards and USB storage devices must be orientated correctly.
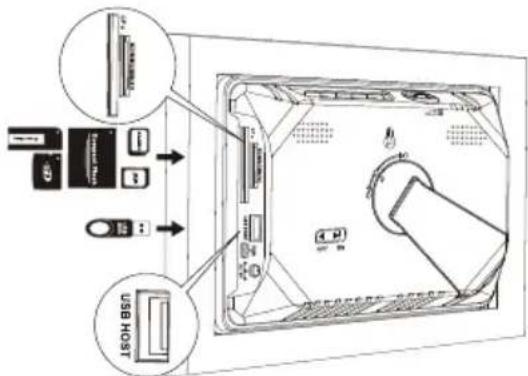
HP df720, df780, & df820
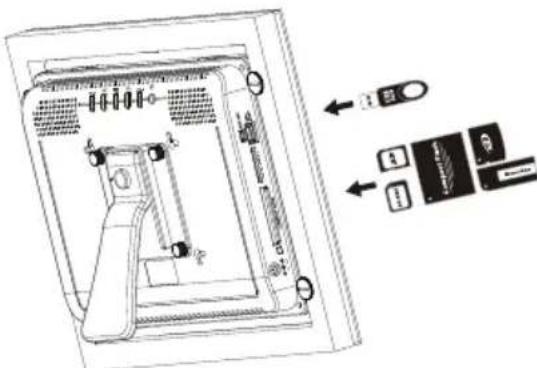
HP df1000
- Power on the digital picture frame.
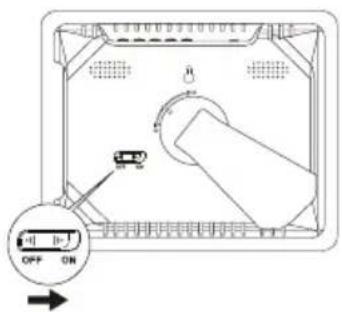
Move the POWER switch to the ON position HP df720, df780, & df820

Push the POWER bottom
HP df1000
A slideshow of your pictures will begin automatically in a few seconds. If music tracks are available on the same external memory device, the slideshow will be displayed with background music unless disabled in the SETUP MENU. Enjoy it and have fun!
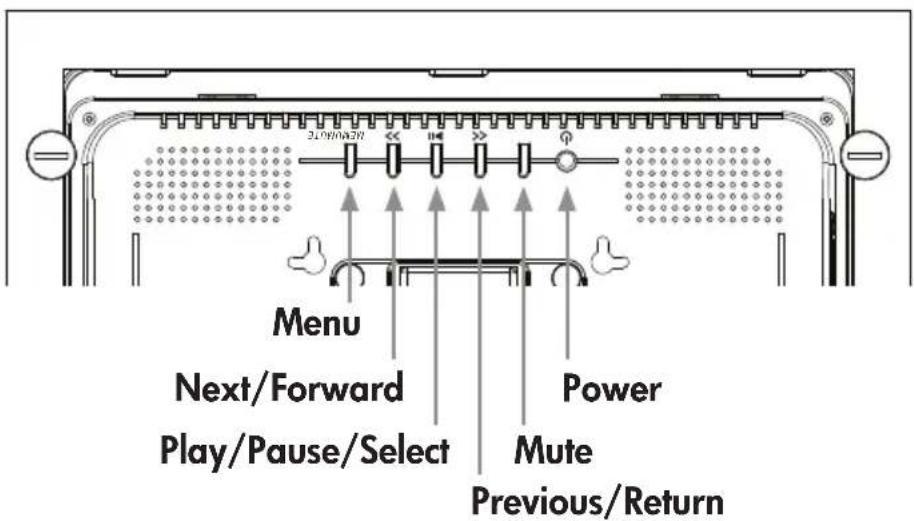
- In addition to the remote control, the digital picture frame has basic control buttons and LCD backlighting controls on the top of the frame as illustrated below.
HP df720, df780, & df820
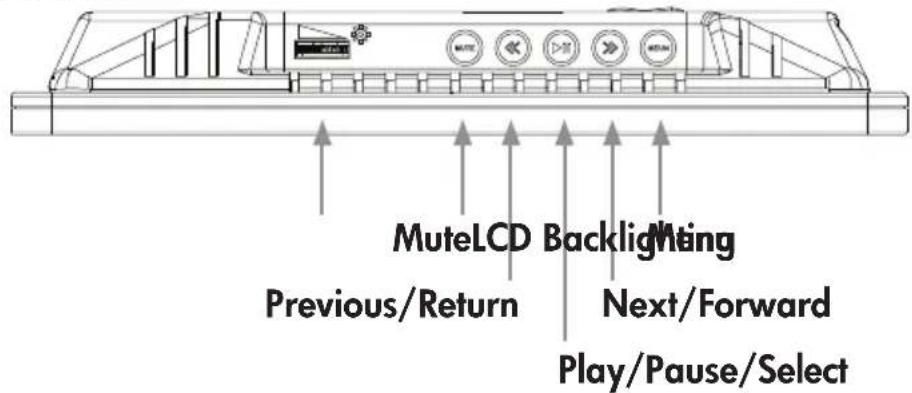
HP df1000
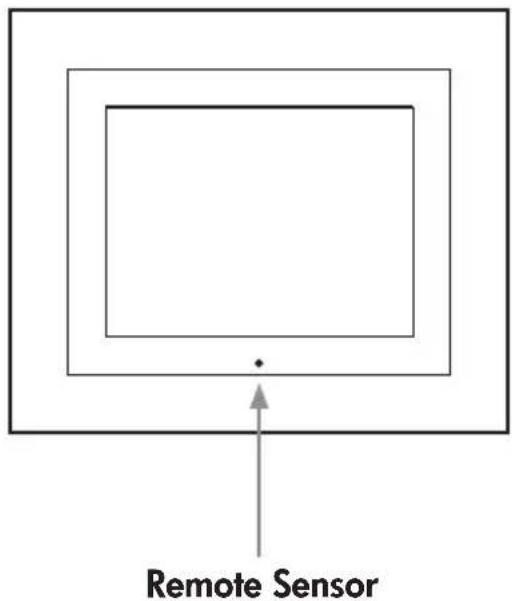
- When using the remote control, point it at front remote sensor as illustrated below.
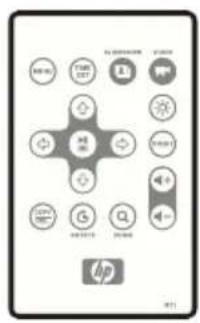
Remote Control
| MENUE | MENU: Press to access main menu mode or card selection mode |
| TIMESET | TIME SET: Press this button in the time mode to set up the date and time |
| SLIDESHOW: Press this button to begin a picture slideshow. | |
| VIDEO PLAYBACK: Press this button to playback video files. | |
| UP: Press to move up in thumbnail mode or when setting options. | |
| NEXT or FORWARD: Press to move right in browse, thumbnail or menu mode. | |
| PLAY/PAUSE or SELECT: Press to change display mode (slide show, browse, or thumbnail). Press to play or pause music or video files. Press to make selections in menu or settings mode. | |
| PREV or RETURN: Press to move left in browse, thumbnail or menu mode, or return to previous screen in slide show mode. | |
| DOWN: Press to move down in thumbnail mode or when setting options. | |
| COPY/DEL | COPY/DEL: Press this button in Photo Browse mode or MUSIC mode to initiate the copy or delete process. |
| ROTATE: Press to rotate the picture. | |
| ZOOM: Press to enlarge picture in photo browse mode. | |
| VOL + / -: Press the + button to increase and the - button to decrease audible playback volume. | |
| Print: Press this button in the Browse mode to print photo from a PictBridge™ photo printer. | |
| BRIGHTNESS/CONTRAST/TINT/COLOR: Press this button during picture browse mode to adjust basic appearance controls. |
Initial Setup
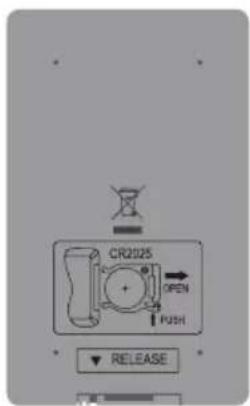
- Pull tab from remote control to activate.
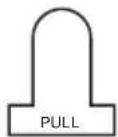
Should your remote control require a new battery, please purchase a 3 volt lithium CR2025 model for replacement. The remote control has battery replacement instructions stamped into the back side as illustrated below.
- Power on the picture frame and allow the picture slideshow to begin.
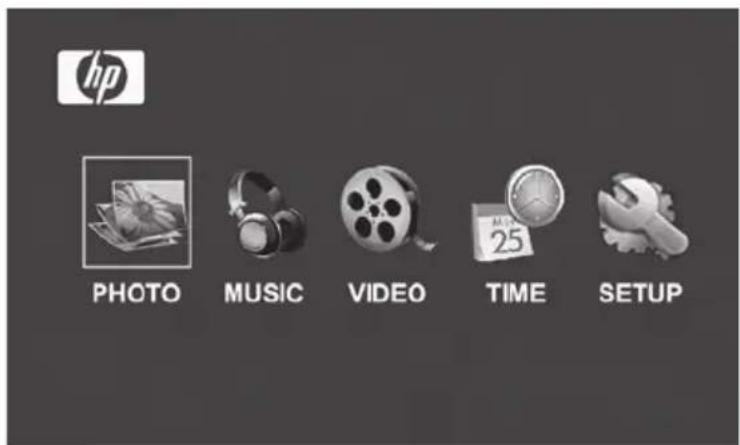
Press below.
button once to view the MAIN MENU as illustrated
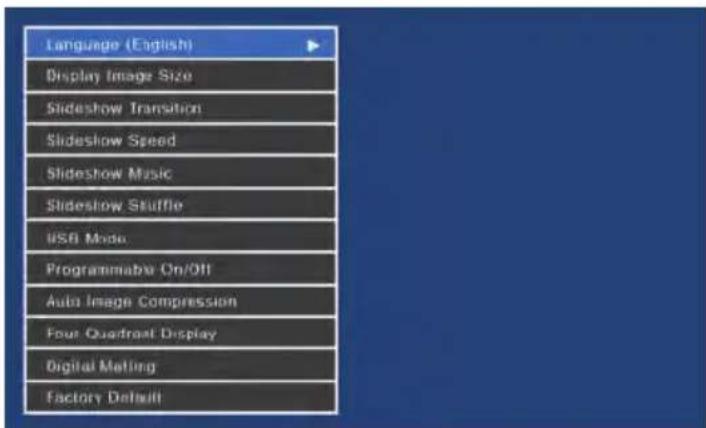
- Press or to highlight the icon. Press the open the SETUP MENU as illustrated below


-
LANGUAGE setting will be highlighted in blue. Press the button to display additional language selections. Note: If desired language is already selected, go to step 6.
-
Use or to highlight the desired On-Screen-Display
language (OSD) and press to return to the setup menu.

to select the language. Press

- Press or to highlight other options and press to
select. Continue to use or to highlight and to select the desired settings. Read the next section titled SETUP MENU for details of these options.
Setup Menu
| Option Description | |
| Language | Choose from 7 On Screen Display languages. Options are: English, German, French, Spanish, Portuguese, Italian, and Dutch. The factory default is "English". |
| Display Image Size | Select "ORIGINAL" to display pictures with their original properties. Display picture in full height in normal aspect ratios. Many pictures may not fill the screen, and leave space on both sides. Select "OPTIMAL" to allow the frame to display pictures with optimized properties. Picture(s) will enlarge to fit the full width of the screen. The factory default option is "ORIGINAL". |
| Slideshow Transition | Choose from 6 options and select the preferred transition. Options are: Normal, Random, Fade, Curtain, Open_Door, and Cross_Comb. The default option is set to "RANDOM". |
| Slideshow Speed | Select the desired picture display duration. Options are: 5, 10, 30, 60 Seconds, 1 Hour, and 24 Hours. The default option is "5" Seconds. |
| Slideshow Music | Select ON to allow playback of mp3 music during the picture slideshow. Note: you must have mp3 file(s) on the memory source. The factory default is set to "ON". |
| Slideshow Shuffle | Select ON to display pictures in a random order. Pictures will not repeat until all have been displayed. Select OFF to display pictures in sequential order. The factory default is set to "OFF". |
| Programmable On/Off | This feature will automatically turn the LCD on/off to save energy. Select Power On Time or Power Off Time to set the on/off time respectively. Use or to switch between the Hour/Minute/AM PM fields, and or to change the values. Select ""-:--:" to disable the feature. If you want to turn the LCD back on, press any button on the picture frame or remote control. The factory default is set to "... ...". |
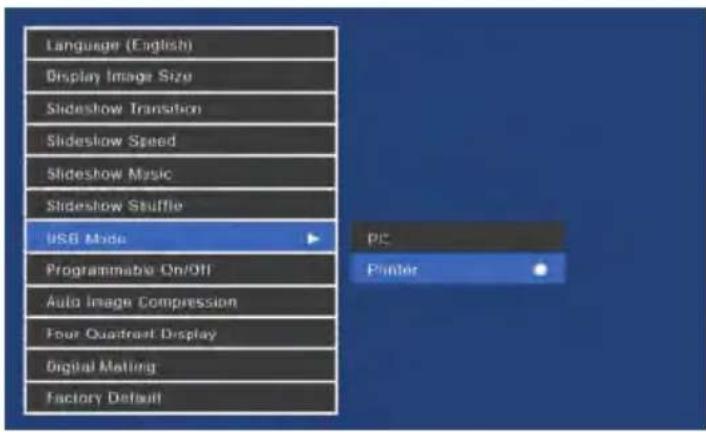
| USB Mode | This option configures the mini-USB port to either connect to a PC or PictBridge™ Printer. The factory default is set to "PC". |
| Auto Image Compression | When enabled, this feature will reduce the size of pictures copied from memory cards and USB thumb drives by rescaling their resolutions to the resolution of the picture frame's LCD screen. Note that pictures which are copied from a PC via USB connection will not be compressed. The factory default is set to “Enable”. |
| Four-Quadrant Display | The four-quadrant display feature allows you to choose from 6 available options of various clock, calendar and slideshow compositions. Please refer to page 24 for details. |
| Digital Matting | Digital matting puts a digital border around the LCD screen. Choose from 6 different designs, or select OFF to disable this feature. The factory default is set to “OFF”. |
| Factory Default | If you wish to restore ALL the settings to the factory default, use or to highlight YES and then press the button. |
Key Features
| Features |
| Automatic picture rotation to match frame orientation. |
| Picture slideshow with or without music. • 6 different picture transition options • Shuffle mode option |
| Multiple picture viewing options. • View individual pictures in Browse mode (see later section) • View Pictures in thumbnail mode • Zoom and rotate individual pictures |
| Playback music/audio tracks • Music tracks must be in an mp3 file format |
| Playback video clips • Video clips must be in an MPEG-1, MP4, & Motion JPEG (AVI and MOV) file formats |
| Four-Quadrant Display • Customizable layout for different alarm clock, calendar and photo display. • Note: ONLY pictures from the internal memory will be displayed. |
| PictBridge Photo Printing • Print photos directly to any PictBridge-capable printer. |
| Digital Matting • Adds an elegant border around the LCD screen to complement your photos. |
| Auto Image Compression • Automatically compresses photos copied from memory cards without compromising their display quality. |
| Brightness, contrast, tint, and color adjustments in photo browse mode. |
| PC connection allows for adding pictures (as well as music and video files) to internal or external memory. (see section titled Picture Options for details) |
| Add or delete pictures from external memory devices and internal memory |
| 7 on screen display languages • English, French, Spanish, Italian, German, Dutch, & Portuguese |
Selecting a Memory Source
The HP Digital Picture Frame can play back content from internal and external memory devices such as USB flash drives and memory cards typically used with digital cameras. More than one external memory device can be inserted at any given time. However, content from only one memory source can be selected for playback.
To select the desired picture source, there are many methods to get to the memory source selection menu.
-
In slideshow or browse mode: Press button twice.
-
In MAIN MENU mode: Press button Once.
This will display the memory source screen as illustrated below. Note: The screen may differ depending on type and number of external memory devices that are inserted.
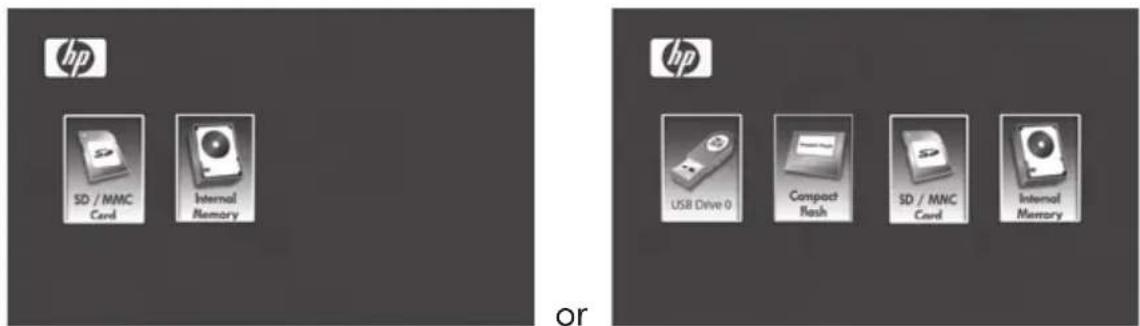
SD/MMC Card only SD/MMC card, Compact Flash, and USB Flash Drive inserted.
- Use or to highlight the desired memory source
icon. Press to select. This will bring up the MAIN MENU for the memory source just selected.
Picture Options
Slideshow modes
Slideshow mode will begin automatically a few seconds after the frame is powered on or when an external memory card/USB Flash drive is inserted. There are two slideshow modes, one with background music and the other without. Review the Initial Setup and Setup Menu sections of this document for details on how to change desired settings.
Browse mode
To exit slideshow mode, press once. "Browse mode" will be displayed on the lower right of the screen for a few seconds. This allows forward and previous picture viewing.

to return to slideshow mode.
Thamburger mode
To view pictures in a thumbnail mode, press TWICE when in slideshow or ONCE when in browse mode as illustrated below.
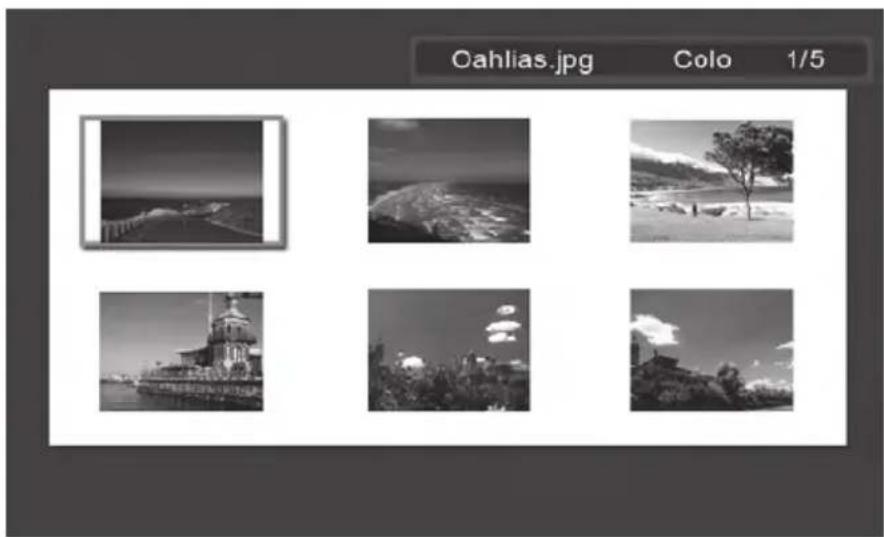
Use the arrow buttons to navigate to a picture. Press to view the selected picture.
Picture Rotate and Zoom
Picture Rotation
Pictures will be automatically rotated based on the frame orientation.
Pictures can be manually rotated by pressing the button in slideshow or browse mode. Note: if a picture is rotated while in slideshow mode, the frame will automatically enter into photo browse mode. Each press of this button will rotate the picture by 90 degrees to the right.
Press

to resume slideshow mode
Picture Zoom
Pictures can be zoomed to 5X by pressing the button in slideshow or browse mode. Each press of this button will increase the zoom by 1X until 5X. At 5X, press this button ONCE to return to the original view. Note: if a picture is zoomed while in slideshow mode, the frame will automatically enter into photo browse mode.
Once in zoom mode, use the arrow buttons to position the picture for desired viewing.
Press

to resume slideshow mode.
Copying and Deleting Pictures
Copying pictures onto frame internal memory
From an external memory device: With the picture frame powered off, insert an external memory device with the preferred pictures into the appropriate connector. Turn the picture frame power ON and a slideshow from the external memory will automatically
begin in a few seconds. Press button once to enter picture
browse mode or press button twice to enter thumbnail
mode. At the desired picture, press the COPY DEL button to display the copy/delete menu as shown below.
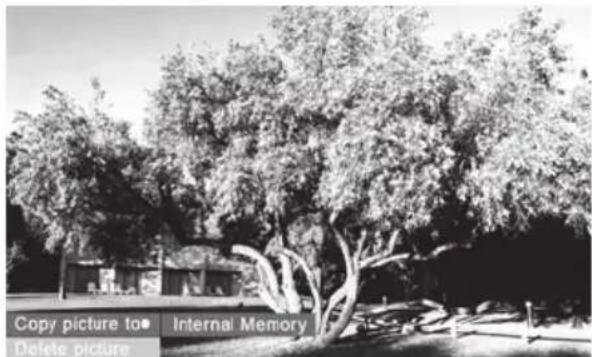
'Copy picture to' will be highlighted in blue. Press

display Internal Memory. Press again to copy the desired picture onto the frame's internal memory. A Finished text box will be displayed indicating the picture is now in the internal memory as illustrated below.
Finished
Press to return to photo browse mode. Use or to select another picture and repeat above step to copy to internal memory.
Press to resume slideshow.
Copying pictures onto frame internal memory
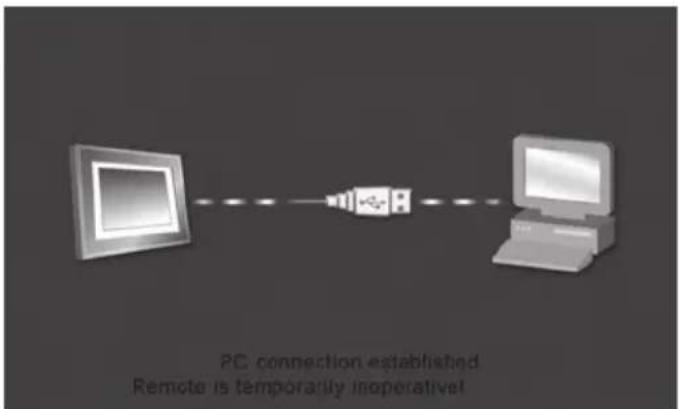
From a PC/laptop: For the first connection, it is recommended to remove all external memory sources.
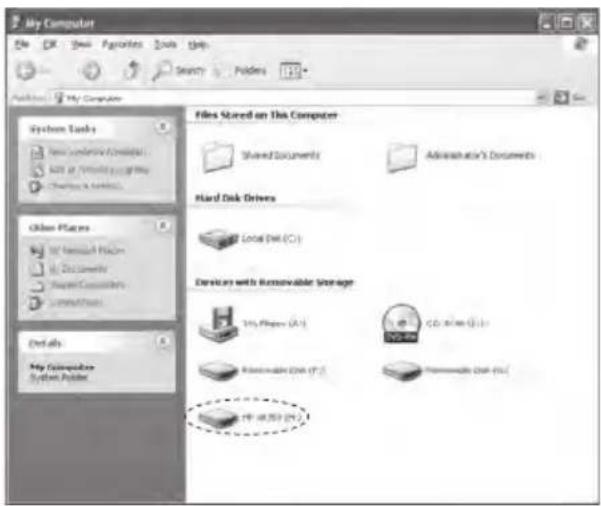
Power on the HP Digital Picture Frame. Go to the SETUP MENU (see Initial Setup) and set the USB Mode to PC. Connect the HP Digital Picture Frame to your Windows™ 2000 (with service pack 4 or greater), Windows™ XP (with Service Pack 2 or greater), or Windows™ Vista PC/notebook by using the USB cable provided with the product. 3 new drive letters should appear in Windows Explorer. These new drive letters represent the Digital Picture Frame's internal memory, memory card slot 1, and memory card slot 2. (see illustration below):
The digital picture frame will display the graphic below:
1 of the 3 new drive letters is the HP Digital Picture Frame's internal memory and labeled HP df720, df780, df820 or df1000 (depending on your photo frame model). Drive letter assignment MAY vary from PC to PC.
Use standard WindowsTM explorer file copy and paste procedures to move content onto the frame's internal memory.
To check the picture frame's available memory, right click on the HP df720, df780, df820 or df1000 drive letter and select Properties. A properties menu will appear displaying the available/free space (in Mega Bytes [MB]).
When finished copying pictures, disconnect the PC/laptop by

double-clicking on the Safely Remove Hardware icon in the lower right on the screen of the PC/Laptop. This will display the menu as illustrated below.
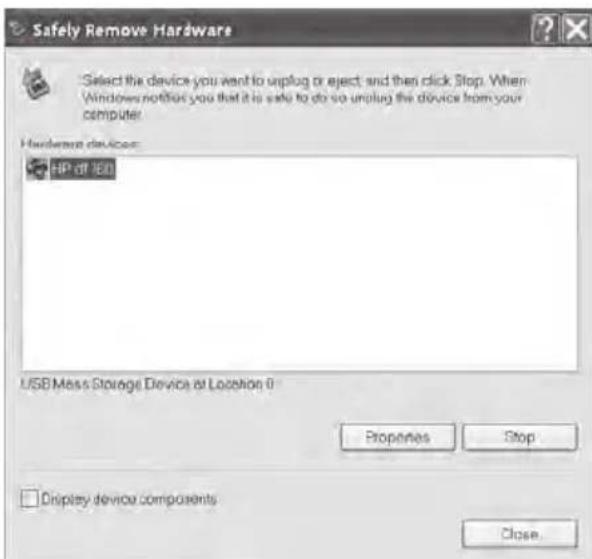
Highlight the HP df720, df780, df820 or df1000 drive and then click on the Stop button. After notification, unplug the USB 2.0 cable from both the PC/Laptop and the picture frame.
Deleting pictures from internal or external memory
Pictures can be deleted from internal and external memory sources in the same manner as it was added. Before deleting a picture or pictures, it is important to select the desired memory source (see Selecting a Memory Source section for details).
Select the desired picture to be deleted and press the COPY DEL.
button to display the copy/delete menu. Press to highlight 'Delete picture' text. Press to display the YES and NO text.
Use to highlight the desired action. If YES is highlighted,
press to delete the desired picture from memory. The picture will disappear and the next picture (if additional pictures are available) will be displayed.
Press twice to delete this image or press to return to photo browse mode.
If the frame is connected to a PC or laptop as previously described in Copying pictures - From a PC/laptop section, pictures can be deleted using standard Windows™ explorer file delete procedures.
Printing with PictBridge™
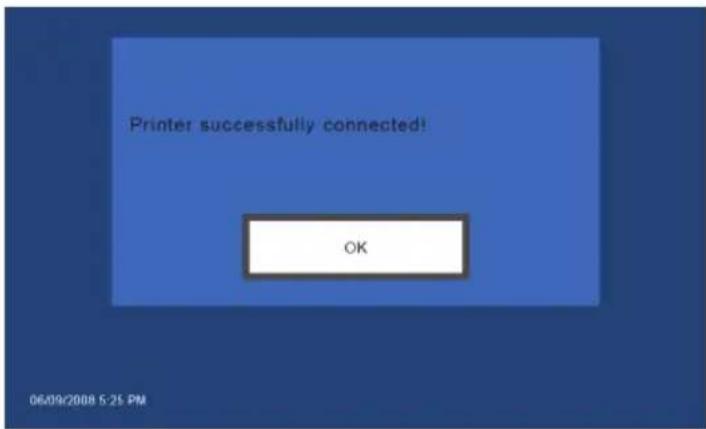
The PictBridge™ function allows you to connect the digital picture frame to a PictBridge™ photo printer via USB for quality photo printing.
Go to the SETUP MENU (see Initial Setup) and set the USB Mode to Printer.
Connect the HP Digital Picture Frame to your PictBridge™ photo printer by using the USB cable provided with the product. A message will appear on the screen to indicate that the printer connection is detected.
In the browse mode, Use or to access the desired photo. Press PRINT, select OK and press to start printing.
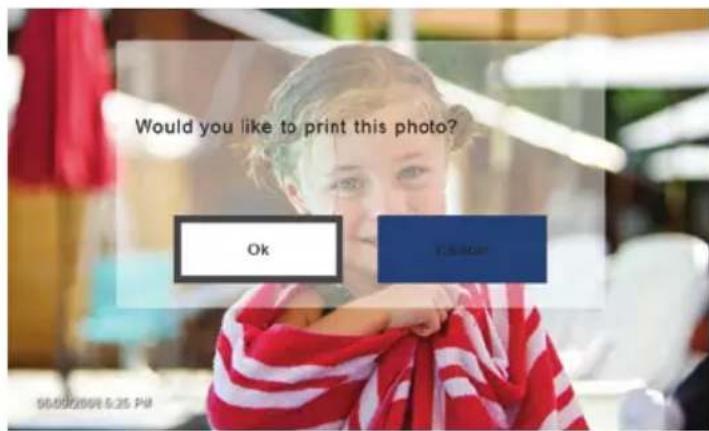
Once the printing is finished, press mode.

Music Playback
Go to the MAIN MENU (see Initial Setup section). Note: make sure the desired memory source is selected (see Selecting a Memory Source section for details).

The frame will display a list of music/audio files found on the selected memory source as illustrated below.
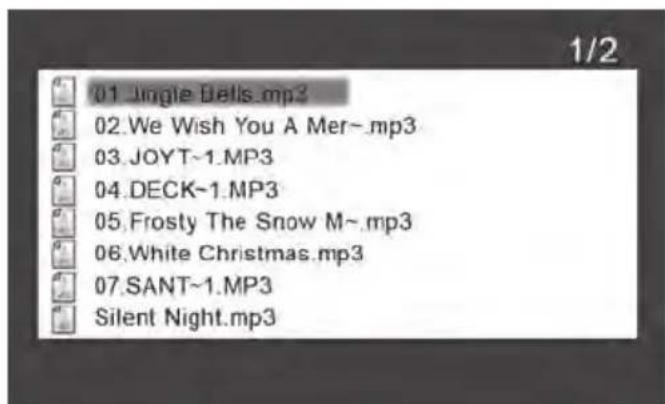
The first music track in the list will be highlighted. Press to begin playback.
- The default playback mode is to play from first to last track then repeat from the first track.
- Press to adjust volume.
- Press or to playback other tracks (if available).
Copying and Deleting Music
The process for copying or deleting music onto or from the frame internal and external memory sources is the same as described in the previous section titled Copying and Deleting Pictures. Please refer to this section for details
Supported audio format: .mp3
Video Playback
There are two methods to playback video files on a memory source. Note: make sure the desired memory source is selected (see Selecting a Memory Source section for details).
- Go to the MAIN MENU (see Initial Setup section) and press the

button. If compatible video files are available, playback first (if more than one file) will begin.
- The default playback mode is to play from first to last clip then repeat until stopped.

- Press to adjust volume.


- Press or to select other clips, and use to play the selected clip.

to pause playback.

-
Press to return to the MAIN MENU screen.
-
Go to the MAIN MENU (see Initial Setup section).

The frame will display a list of supported video clips/files found on the selected memory source as illustrated below.
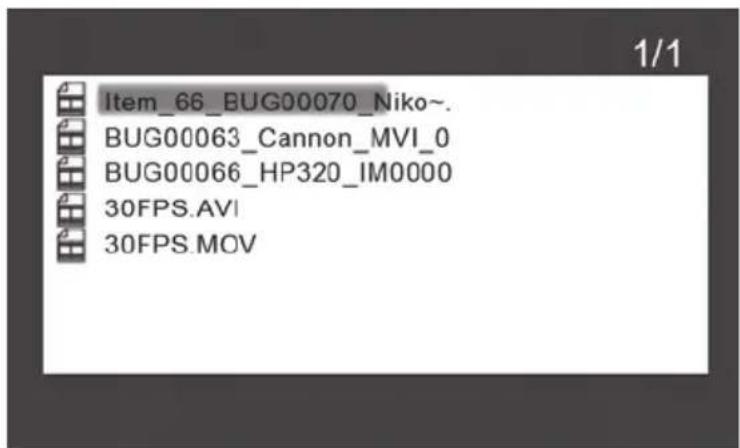
Use the or to highlight a desired video clip. Press to start playback.
- The default playback mode is to play from first to last clip then repeat until stopped.
- Press to adjust volume.
Press to pause playback. - Press to return to the list of video files.
Copying and Deleting Videos
Video clips CANNOT be copied or deleted using the COPY DEL feature.
However, if connected to a PC or Laptop, video clips can be managed using the same procedures as described in the Copying pictures – From a PC/laptop section.
Supported Video format: MPEG-1, MP4, and Motion JPEG
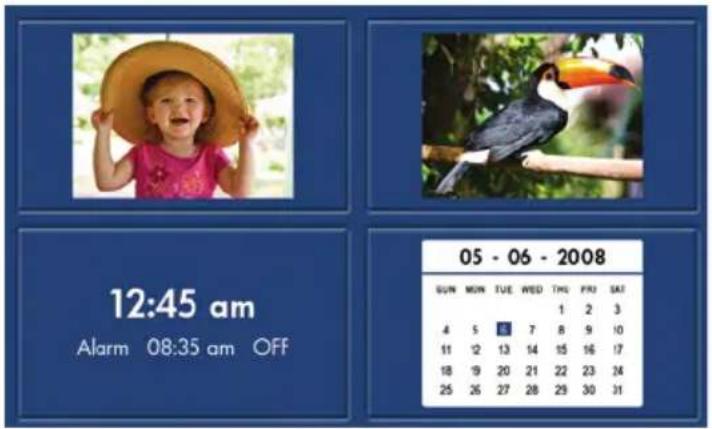
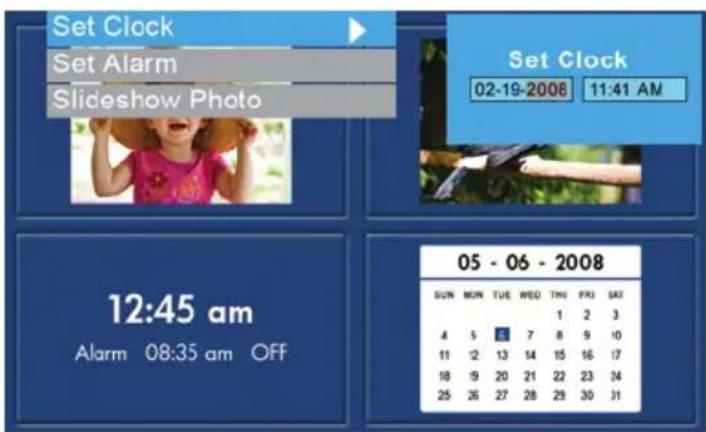
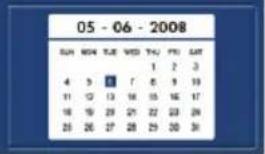
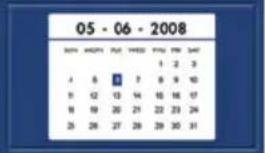
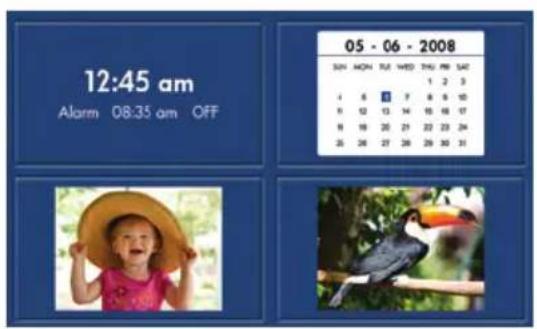
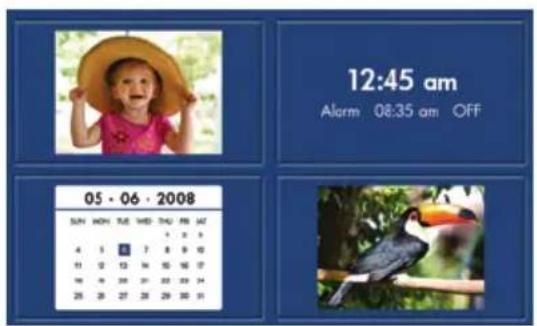
Four-Quadrant Display
In the four-quadrant display, the screen is divided into four sections that can be used to display slideshow (or images), calendar, and time/alarm setting in various combinations.
Go to the MAIN MENU (see Initial Setup section).

The frame will display the four-quadrant screen similar to the illustration below.
Initially, the calendar and clock will display an incorrect date and time until they are properly set up. To adjust the date and time, press the

button to display the TIME SET menu as shown below.
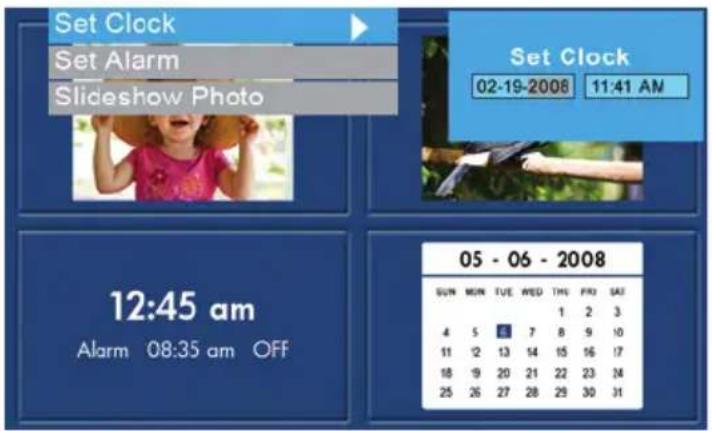
Setting the Calendar and Clock:


- The Set Clock option will be highlighted. Press the button to open the Set Clock screen as shown below.

Use the & buttons to clock values.
Use the & buttons to change the date and time values.
- Press when desired date and time are selected. This will return to the TIME SET menu.
Use & to highlight the Set Alarm or Slideshow Photo options. Press to select the desired option.
Setting the Alarm:
- Highlight the Set Alarm option. Press the or button to open the Set Alarm screen.
Use the & buttons to move between the calendar, clock, and On/OFF values.
Use the

buttons to change these values.
Press

when desired settings are selected. This will return to the
TIME SET menu.
Use

& to highlight the Set Clock or Slideshow Photo
options. Press

to select the desired option.
Setting the Slideshow Photo feature:
- Highlight the Slideshow Photo option. Press the


button to open the Slideshow Photo screen.
Use the


None(Clock Display) option.
- Internal Memory will display pictures from the frame's internal memory in a slideshow mode while in Calendar mode as shown below:
Note: ONLY pictures from the internal memory will be displayed.
- Press to select desired option. This will return to the TIME SET menu and display the selected feature.
- Press the button to remove the TIME SET menu. Press again to display the MAIN MENU screen.
Customizing the Four-Quadrant Display:
-
Go to SETUP MENU (see INITIAL SETUP section).
-
Use the buttons to highlight the Four-Quadrant Display option. Press the button to display additional four-quadrant selections.
Use to highlight the desired four-quadrant display mode and press to select it. Press to return to the setup menu. - Press button to return to the MAIN MENU.
Mode 1


Mode 2


Mode 3

Mode 4

Mode 5
Mode 6
Specifications - df720
| Panel Specification | |
| Size | 7" |
| Aspect ratio 16:9 | |
| Resolution 480 x 234 pixels | |
| Power | |
| External AC Power Adapter +9V, 2.0A | |
| Audio | |
| Internal speakers 1.0 W x2 | |
| Connectivity | |
| USB Ports | 1 - USB 2.0 (Host, for thumb drive) 1 - Mini USB 2.0 (Device, for link to PC for manage internal memory, and printing images via PictBridge™ enabled printer) |
| Storage/Media | |
| Internal memory 512MB | |
| Supported Memory cards | |
| Memory cards slot 1 | Memory Stick Pro (MS Pro), Secure Digital (SD 2.0), XD Picture Card, & Multi Media Card (MMC) |
| Memory cards slot 2 C | compact Flash (CF I), Microdrive (CF II) |
| Media Files Supported: | |
| Video file formats MP | EG-1, MP4, & Motion JPEG |
| Picture file formats JPEG - (Base line only) | |
| Audio file formats | MP3 |
| Supported Languages | |
| On-Screen Display | English, French, Spanish, Italian, German, Dutch, & Portuguese |
Specifications - df780
| Panel Specification | |
| Size | 7" |
| Aspect ratio 16:9 | |
| Resolution 800 x 480 pixels | |
| Power | |
| External AC Power Adapter +9V, 2.0A | |
| Audio | |
| Internal speakers 1.0 W x2 | |
| Connectivity | |
| USB Ports | 1 - USB 2.0 (Host, for thumb drive) 1 - Mini USB 2.0 (Device, for link to PC for manage internal memory, and printing images via PictBridge™ enabled printer) |
| Storage/Media | |
| Internal memory 512MB | |
| Supported Memory cards | |
| Memory cards slot 1 | Memory Stick Pro (MS Pro), Secure Digital (SD 2.0), XD Picture Card, & Multi Media Card (MMC) |
| Memory cards slot 2 C | compact Flash (CF I), Microdrive (CF II) |
| Media Files Supported: | |
| Video file formats MP | EG-1, MP4, & Motion JPEG |
| Picture file formats JPEG - (Base line only) | |
| Audio file formats | MP3 |
| Supported Languages | |
| On-Screen Display | English, French, Spanish, Italian, German, Dutch, & Portuguese |
Specifications - df820
| Panel Specification | |
| Size | 8" |
| Aspect ratio 4:3 | |
| Resolution 800 x 600 pixels | |
| Power | |
| External AC Power Adapter +9V, 2.0A | |
| Audio | |
| Internal speakers 1.0 W x2 | |
| Connectivity | |
| USB Ports | 1 - USB 2.0 (Host, for thumb drive) 1 - Mini USB 2.0 (Device, for link to PC for manage internal memory, and printing images via PictBridge™ enabled printer) |
| Storage/Media | |
| Internal memory 512MB | |
| Supported Memory cards | |
| Memory cards slot 1 | Memory Stick Pro (MS Pro), Secure Digital (SD 2.0), XD Picture Card, & Multi Media Card (MMC) |
| Memory cards slot 2 C | compact Flash (CF I), Microdrive (CF II) |
| Media Files Supported: | |
| Video file formats MP | EG-1, MP4, & Motion JPEG |
| Picture file formats JPEG - (Base line only) | |
| Audio file formats | MP3 |
| Supported Languages | |
| On-Screen Display | English, French, Spanish, Italian, German, Dutch, & Portuguese |
Specifications - df1000
| Panel Specification | |
| Size | 10.4" |
| Aspect ratio 4:3 | |
| Resolution 800 x 600 pixels | |
| Power | |
| External AC Power Adapter +12V, | .5A |
| Audio | |
| Internal speakers 1.0 W x2 | |
| Connectivity | |
| USB Ports | 1 - USB 2.0 (Host, for thumb drive) 1 - Mini USB 2.0 (Device, for link to PC for manage internal memory, and printing images via PictBridge™ enabled printer) |
| Storage/Media | |
| Internal memory 512MB | |
| Supported Memory cards | |
| Memory cards slot 1 | Memory Stick Pro (MS Pro), Secure Digital (SD 2.0), XD Picture Card, & Multi Media Card (MMC) |
| Memory cards slot 2 C | compact Flash (CF I), Microdrive (CF II) |
| Media Files Supported: | |
| Video file formats MP | EG-1, MP4, & Motion JPEG |
| Picture file formats JPEG - (Base line only) | |
| Audio file formats | MP3 |
| Supported Languages | |
| On-Screen Display | English, French, Spanish, Italian, German, Dutch, & Portuguese |
Frequently Asked Questions
| Question Answer | |
| Why can't I power on/off HP Digital Picture Frame (df1000)? | Please press the power button for about 2-3 seconds. |
| How far away can I use the remote control? | Around 100cm. |
| My remote control doesn't work? | You may need to change the battery. Please use a lithium 3V-model number CR2025 only. |
| Why can't I display some of my Pictures? | Some picture/image file formats are not supported. Please refer to the specifications. |
| Why can't I play some of my music tracks? | Some music file formats are not supported. Please refer to the specifications. |
| Why can't I play some of my video clips? | Some video file formats are not supported. Please refer to the specifications. |
| Can I delete pictures from external memory cards or flash drives? | Yes, refer to the Picture Options section of this document. |
| Can I delete pictures from internal memory? | Yes, refer to the Picture Options section of this document. |
| How can I switch to the internal memory? | Remove all external memory sources.Or press the MENU button until the memory source selection screen is displayed.Use & to highlight internal memory icon and press |
| Why can’t I use my WindowsTM 98 or Me system to copy content onto the frame? | The appropriate USB drivers are not supplied for this product and are NOT native to these operating systems |
| I have lost or damaged my remote and/or power adapter. Can I order replacements? | Yes. Visit www.hp.com/support for more details. |
| How can I find the latest information/FAQs about my HP Digital Picture Frame? | Visit www.hp.com/support for more details and the latest information. |
Cleaning and Care Tips
Please power off the HP Digital Picture Frame before cleaning.
DO NOT push on the screen too firmly.
√ DO NOT spray or pour liquid cleaning agents directly on the screen or frame.
√ DO NOT use ammonia, alcohol, or abrasive detergent cleaning agents.
Cleaning the Screen:
- Wipe screen with a clean, soft, lint-free cloth to remove dust and loose particles.
- If further cleaning is required, apply an appropriate cleaning agent (approved for LCD displays) to a clean, soft, lint-free cloth and wipe the screen.
NOTE: do not apply too much pressure on the screen to avoid damaging it.
Cleaning the Frame and Backing:
- Use a clean, soft, lint-free cloth to remove dust and loose particles.
- If desired, apply an appropriate cleaning agent to a clean, soft, lint-free cloth and wipe the appropriate surfaces.
Getting Help
Should you have a technical support question or your HP Digital Picture frame requires service within the warranty period, please contact the original point of purchase or an authorized HP reseller in your country. If service is not available at those locations, please contact an HP Branded Product warranty agent from the support contact list provided below. A service agent will work with you to troubleshoot your issue and if necessary, issue a Return Material Authorization (RMA) number in order to replace your HP Branded Product. For warranty claims, you will be required to provide a copy of your original dated sales receipt as proof of purchase and the issued RMA number. You will be responsible for shipping charges when shipping the product to the service center. The service agent will provide you with an address and you will also be responsible for any shipping charges to the warranty service center. Once your product is received by this service center, a replacement unit will be shipped back to you typically within 5 business days.
| Email Support: | |
| Language Email Address | |
| Dutch holland@hpodd.com | |
| Chinese | simp.chinese@hpodd.com |
| trad.chinese@hpodd.com | |
| English english@hpodd.com | |
| François français@hpodd.com | |
| Deutsch deutsch@hpodd.com | |
| Italiano italiano@hpodd.com | |
| Japanese nippon@hpodd.com | |
| Korean korean@hpodd.com | |
| Portuguese portugues@hpodd.com | |
| Espanol espanol@hpodd.com | |
| Svenska sk@hpodd.com | |
| Contact/Phone Support: | ||
| Country Language | Number | |
| Europe Region (EMEA) | ||
| België D | utch and German + 32 | 2700 1724 |
| FRANCE French + | 33 171230454 | |
| DEUTSCHLAND German + | 49 6950073896 | |
| IRELAND English + | 353 1850882016 | |
| ITALIA Italian + 39 | 269682189 | |
| NETHERLANDS Dutch + | 31 202015093 | |
| ESPANÁ | Spanish | + 34 914533458 |
| SWITZERLAND German/French/Italian + | 41 18009686 | |
| UK | English + 44 2073652400 | |
| North America | ||
| United States | English 1.866.694.7633 | |
| Canada | English & French | 1.866.694.7633 |
pourmettrelalectureenpause.
- Appuyez sur

Specifications - df720
Specifications - df780
Specifications - df820
Specifications - df1000