
A380 - Phone GIGASET - Free user manual and instructions
Find the device manual for free A380 GIGASET in PDF.
| Product type | Induction hob |
| Brand | Gigaset |
| Model | A380ZT |
| Dimensions (W x D x H) | 770 x 510 x 51-64 mm |
| Weight | Approx. 12 kg |
| Power supply | 230 V ~, 50/60 Hz, fuse 16 A (depending on connection configuration) |
| Number of cooking zones | 4 zones (2 x ø160 mm, 1 x ø180 mm, 1 x ø210 mm) |
| Maximum power per zone | 2000 W (ø160 mm), 2800 W (ø180 mm), 3100 W (ø210 mm) |
| Power levels | 9 positions + Boost (b) |
| Main functions | Induction, timer automatic cut-off (0-99 min), child lock, pan detection, overheating protection, residual heat indicator, overflow protection |
| Care and cleaning | Daily cleaning with soft cloth and mild detergent; for stubborn stains, use special glass scraper and cleaning vinegar; do not use abrasives |
| Safety | Child lock, overheating protection, automatic shut-off in case of overflow, small pan detection, residual heat indicator |
| Spare parts and repairability | Contact after-sales service (numbers on warranty); power cable replacement reserved for manufacturer or qualified professional |
| General information | Use only pans suitable for induction (magnetic base, min. diameter 12 cm except zone 16 cm min. 10 cm); warranty does not cover damage from improper use |
Frequently Asked Questions - A380 GIGASET
User questions about A380 GIGASET
0 question about this device. Answer the ones you know or ask your own.
Ask a new question about this device
Download the instructions for your Phone in PDF format for free! Find your manual A380 - GIGASET and take your electronic device back in hand. On this page are published all the documents necessary for the use of your device. A380 by GIGASET.
USER MANUAL A380 GIGASET
Instructions for use 81 - 98
Installation guide 99 - 106
important information

tip
conseil
Tipp
tip
Inhoud
text_image
Diagram of a cooking pot with labeled parts, showing liquid level, heating element, and numbered components.natural_image
Illustration of two cooking pots on a black induction cooktop (no text or symbols)Maximale combinaties
natural_image
Pure mechanical diagram showing a lever system with dashed arrows indicating motion (no text or symbols)text_image
Technical diagram showing a corner joint with labeled section A and an arrow indicating direction or force.text_image
Diagram of a cooking pot with labeled parts, showing liquid level and granular material in a container.natural_image
Pure technical diagram of a mechanical assembly without any text, numbers, or symbolstext_image
Technical diagram showing a mechanical or structural component with an arrow indicating direction and label A, likely from an engineering or CAD context.text_image
Diagram of a cooking pot with labeled parts, showing a lid, pan, and base with numbered components.natural_image
Illustration of two cooking pots on a black induction cooktop (no text or symbols)natural_image
Pure mechanical diagram showing a lever system with no text, numbers, or symbolstext_image
Technical diagram showing a corner joint with an inset detail and labeled section A■ Your induction hob 82
Description 82
Introduction 83
Operation induction 84
Safety 85
What you should pay attention to ..... 85
■ Use 87
Setting 87
Extra safety 91
Pans 92
Optimal use of the hob 92
Comfortable cooking 94
Cooking table 94
■ Maintenance 95
General 95
■ Faults 96
Table 96
General 97
■ Environmental aspects ..... 98
Disposal of packaging and appliance .. 98
■ Installation 99
General 99
Electrical connection ..... 100
Building in 103
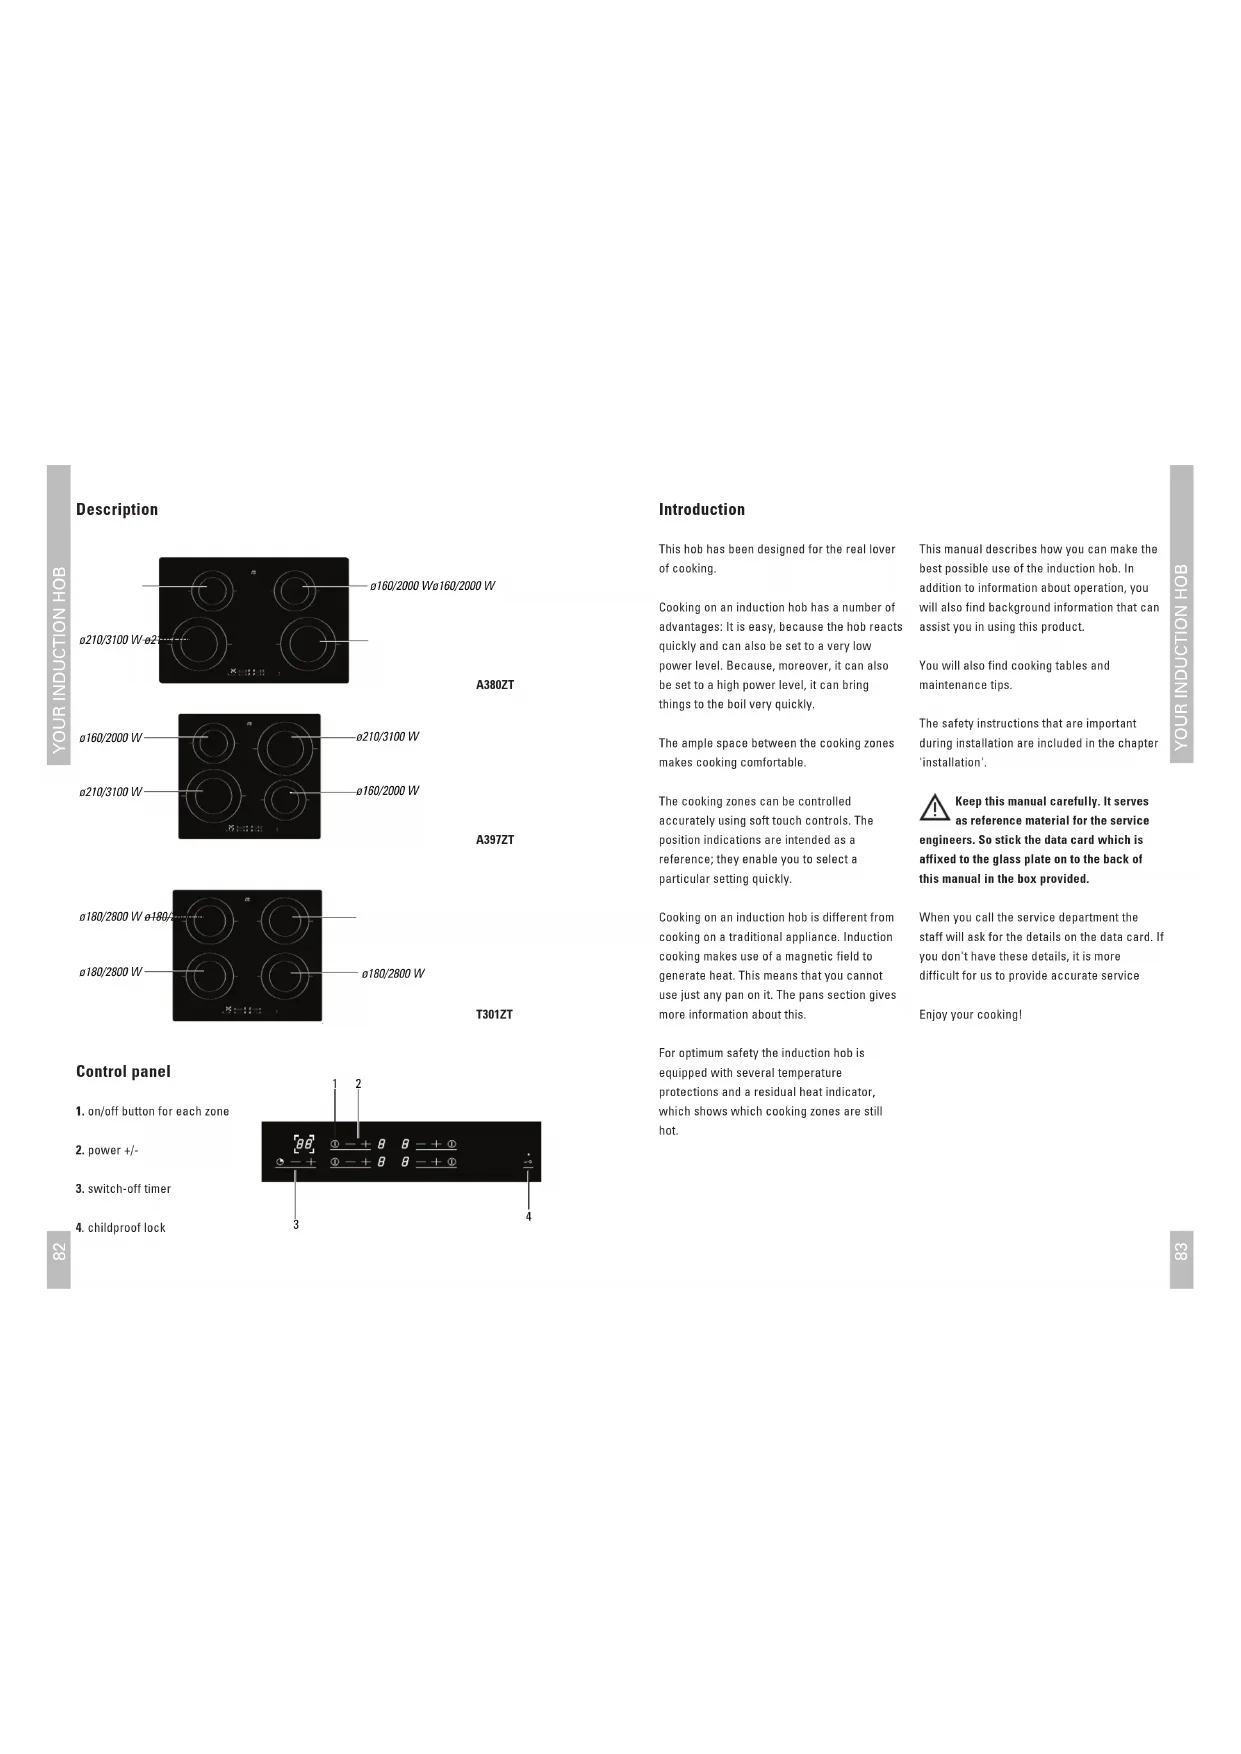
Description

text_image
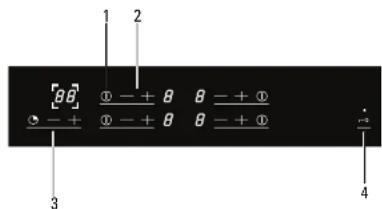
ø160/2000 Wø160/2000 W ø210/3100 Wø2 A380ZT ø160/2000 W ø210/3100 W ø160/2000 W A397ZT ø180/2800 Wø180/ ø180/2800 W ø180/2800 W T301ZTControl panel
- on/off button for each zone
- power +/-
- switch-off timer
- childproof lock
This hob has been designed for the real lover of cooking.
Cooking on an induction hob has a number of advantages: It is easy, because the hob reacts quickly and can also be set to a very low power level. Because, moreover, it can also be set to a high power level, it can bring things to the boil very quickly.
The ample space between the cooking zones makes cooking comfortable.
The cooking zones can be controlled accurately using soft touch controls. The position indications are intended as a reference; they enable you to select a particular setting quickly.
Cooking on an induction hob is different from cooking on a traditional appliance. Induction cooking makes use of a magnetic field to generate heat. This means that you cannot use just any pan on it. The pans section gives more information about this.
For optimum safety the induction hob is equipped with several temperature protections and a residual heat indicator, which shows which cooking zones are still hot.
This manual describes how you can make the best possible use of the induction hob. In addition to information about operation, you will also find background information that can assist you in using this product.
You will also find cooking tables and maintenance tips.
The safety instructions that are important during installation are included in the chapter 'installation'.
Keep this manual carefully. It serves as reference material for the service engineers. So stick the data card which is affixed to the glass plate on to the back of this manual in the box provided.
When you call the service department the staff will ask for the details on the data card. If you don't have these details, it is more difficult for us to provide accurate service
Enjoy your cooking!
Operation induction
A magnetic field is generated in the appliance. By placing a pan with an iron base on a cooking zone, a current is induced in the pan base. This induced current generates heat in the base of the pan.
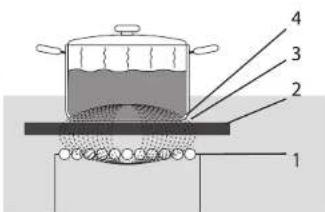
text_image
Diagram of a cooking process showing a pot with liquid and a heated dish, labeled with numbered components.The coil (1) in the hob (2) generates a magnetic field (3). By placing a pan with an iron base (4) on the coil, a current is induced in the base of the pan.
Easy
The electronic controls are accurate and easy to set. On the lowest setting, you can melt chocolate directly in the pan, for example, or cook ingredients that you would normally heat in a bain-marie.
Fast
Thanks to the induction hob's high power levels, bringing food to the boil is very quick. Cooking food through takes just as long as for other types of cooking.
Clean
The hob is easy to clean. Because the cooking zones do not get any hotter than the pans themselves, food spills cannot burn on.
Safe
The heat is generated in the pan itself. The glass top does not get any warmer than the pan. This means that the cooking zone is considerable cooler compared to that from a Ceramic hob or a gasburner. Once a pan has been taken away, the cooking zone cools down quickly.
Safety
What you should pay attention to
Induction cooking is extremely safe. Because the heat is generated in the pan and the ceramic plate will not get hotter than the contents of the pan, the chance that you will burn yourself on the hob is very slight. However, there are, as with any other hob, a number of matters of which you should be aware.
Connecting and repair
This appliance should only be connected to the mains supply by a qualified electrician.
Never open the casing of the appliance. Only authorised personnel may open the appliance or carry out work on the mains power supply. The power supply must be disconnected before the appliance is cleaned or repaired. Preferably, by removing the plug from the socket, switching off the (automatic) fuse(s) or setting the switch in the supply cable to zero in the case of a fixed connection.
Do not continue to use an appliance whose cooking surface is showing a break or cracks. Switch the appliance off immediately. Disconnect it from the power supply to avoid electric shocks and contact your service agent.
First use
When you use the hob for the first time, you will notice that it smells 'new'. It is perfectly normal. Generally this smell will disappear once you have used the appliance four or five times. It occurs because protective layers on the
electronics in the appliance have warmed up and evaporated. The odour will disappear of its own accord as a result of ventilation.
Ensure that there is adequate ventilation during use
- Keep the natural ventilation openings on the front and the underside of the appliance open.
If there is a drawer under the hob
■ Ensure that there is a sufficient gap between the hob and the contents of the drawer.
■Do not place any flammable objects in the drawer.
The cooking zones get hot during use and also remain hot for some time after use (see also 'residual heat indication')
Do not allow small children in the vicinity of the hob during and directly after cooking.
Use of fat and oil
■Grease and oil are flammable when overheated.
Do not stand to close to the pan.
If the oil catches fire, never extinguish the fire with water.
- Put the lid on the pan and switch off the cooking zone.
Use of other equipment near the hob
■Make sure that cables of electrical machines (such as a mixer) do not end up on hot cooking zones.
Never flambé under an extractor hood
■The high flames can cause fire. Even if the ventilator is switched off.
Pressure cleaner or steamcleaners
■Never use a high pressure cleaner or steam cleaner to clean the hob.
Glassceramic cooking surface
This cooking appliance is designed for domestic use. Do not use the appliance for any purpose other than food preparation.
Take care that the pan does not boil dry Damage caused by pans boiling dry is excluded from the warranty.
The glass-ceramic cooking surface is very strong but not unbreakable. A breakage may occur if a sharp object falls on it.
■The cooking surface must not be used for storage.
■Do not place any metal objects such as knives and forks on the cooking area. They could become hot.
During usage
Remember the very short heating up time at the higher settings. Always stay close to the hob if you have a cooking zone on a high setting.
■Never let an empty pan stand on a hotplate that is switched on. While the hotplate is protected and will switch itself off, the pan will be extremely hot. The pan could be damaged.
When the induction hob is in use keep objects that can be affected by magnetic fields (credit cards, bank cards, diskettes, watches and similar items) away from its vicinity. We advise those who have pacemakers to consult a heart specialist first.
■Do not use the appliance below 5 °C.
Setting
The induction hob is fitted with a residual heat indicator, switch-off timer, automatic cooking-time limiter and a childproof lock. On this page and the following ones, you can read how to use these facilities.
Switching on

- Put a pan on a cooking zone.
- Press the on/off button.
A zero appears in the display. You can set the desired setting. If no cooking setting is selected the cooking zone will switch off automatically after a few seconds.
Power setting
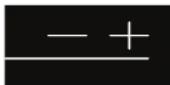
- Press the + button.
- Select a higher or lower setting by pressing the + or - buttons.
The cooking zones have 9 settings + a boost setting.
Switching off
Switch off the cooking zone immediately with the on/off button, or hold the - button until zero appears in the display.
Power
The power, depending on the diameter of the zone, is adjustable between 50 and 3100 Watts. See the table below.
| Diameter Power setting |
| ø 160 mm 50 - 2000 W |
| ø 180 mm 50 - 2800 W |
| ø 210 mm 50 - 3100 W |
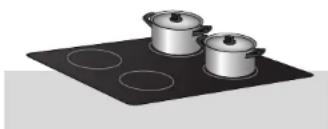
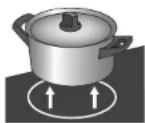
Two cooking zones one in front of the other are operated by one generator. The advantage of this is that a high power level can be realised for a cooking zone. This is ideal for bringing food and liquids to the boil very quickly, for frying and for searing large quantities.
The generator divides the power between both zones. Up until setting 5, this has no consequences. However, if a higher setting is used then the other cooking zone will automatically be restricted.
If you set one of the zones to a higher level then you must first switch the other zone to a lower setting.
natural_image
Illustration of two cooking pots on a black induction cooktop (no text or symbols)Maximum combinations
| 1st zone 5 | 6 | 7 | 8 9 | b(obst) | |
| 2nd zone | b(obst) | 9 8 7 | 6 5 |
Two cooking zones one in front of the other influence each other. Zones alongside each other can both be set to a high setting at the same time.
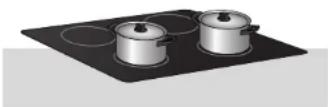
Two zones next to each other will not influence each other. Thus you can switch them both to a high setting at the same time.
Getting used to it...
To start with, you will be surprised by the speed of the appliance. In particular, bringing things to the boil on the higher setting is very fast. To prevent a dish boiling over or boiling dry, the best thing is to always stay beside the hob. In the case of induction cooking, it is only the part of the zone on which the pan stands that is used. If you use a small pan on a large zone, the power will be adjusted to the diameter of the pan.
The power will thus be lower and it will take longer before the food in the pan comes to the boil. You will achieve the best result by using a pan that has the same dimensions as the cooking zone. If you use a pan with a base that is too small, the cooking zone will not switch on. The minimum pan base diameter is 12 cm with the exception of the 16 cm zone where a pan with a 10 cm diameter can be used.
Setting b (boost)
Only switch the hob on at setting b if you want to boil water. This setting is too high for heating butter or milk and much too high for defrosting.
Consult the cooking tables on page 94 to help you learn the techniques.
Setting 9
Setting 9 is the grill setting. This setting is suitable for grilling meat. Setting b is far too fast for this; the milk constituents in the margarine burn before the margarine has melted.
Residual heat indicator
The indicator shows that the cooking zone is still hot and goes out as soon as the glass top reaches a safe temperature.
Residual heat is shown in the display with a H.

Switch-off timer
You can use the switch-off timer to switch off one of the cooking zones automatically.
You can use the timer to choose the cooking zone that must be switched off. The square brackets indicate the cooking zone to which the timer is or can be linked.
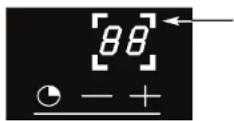
Press the timer button repeatedly to select the correct zone.
The timer can be linked to an arbitrary cooking zone. You can also use the timer as a standard kitchen timer without having to use the hob.
Using the switch-off timer
- Put a pan on the cooking zone.
- Use the on/off button to switch on the cooking zone (that you want to switch off automatically).
- Press the timer button repeatedly until the cooking zone required is selected.
- Set a time (0-99 minutes) with the + and - buttons of the timer. The indicator on the display lights up.
You can change the remaining cooking time at any moment during preparation by using the + and - buttons of the timer. When the time you have set is up, the zone switches off and you
will hear a beep signal. You can switch the beep off at the end of the cooking time by the + or - button of the timer. The last minute of the set time is given in seconds.
To turn off the switch-off timer:
Press the timer button ① turn off the timer.
Protecting against boiling over
The appliance has a protection against boiling over. You will hear a beep signal and the symbol appears on the display.
The appliance automatically switches off. This can be for one of the following reasons: ■Boiling over where the operating buttons are covered.
■Damp cloth on the buttons.
■Metallic object on the operating buttons. Clean the appliance or remove the metallic object.
Cooking-time limiter
The cooking-time limiter is a safety function of your hob. It switches the cooking zones off automatically after a certain time in case you forget to switch off the hob. The switch off time (between 1 and 10 hours) depends on the setting used.
In case of a cooking zone automatically switched off, the display of that cooking zone returns an "A". You hear a beep signal for 2 minutes. "A" remains on the display until a random button is pressed.
Cooking-time limiter table
| Setting Time (hours) | |
| 1 10 | |
| 2 | 5 |
| 3 | 5 |
| 4 | 4 |
| 5 | 4 |
| 6 | 3 |
| 7 | 3 |
| 8 | 2 |
| 9 | 2 |
| P | 1 |
Childproof lock
Your induction hob is equipped with a childproof lock that lets you lock the appliance:
■When the hob is switched off (for cleaning the appliance or to prevent unintended switching on by children);
■or during cooking (the zones stay in operation and the level you have set in the displays will not change).
If the childproof lock is switched on during cooking, the on/off keys still work for safety reasons. Don't forget to unlock the keypad before using it again.
Switch on childproof lock
Press on the lock button (47.5 seconds) until the lamp above the button lights up and you hear a beep signal.
Locked cooking zone in operation
On the display the symbol and the capacity being used by the cooking zone concerned are shown alternately. When you use a button from the cooking zone that is switched on, the lamp above the lock button will burn for a few seconds. For safety reasons you can still turn off the cooking zone using the on/off button ①
When you use a button for a cooking zone that is not switched on, the symbol 📋 displayed and the lamp above the lock key will come on for a few seconds.
Switch off childproof lock
Press the lock button (+0.5 seconds) until the lamp above the button goes out. You hear a double beep signal
Clean Lock function
By pressing the child lock during use, all buttons are blocked for 1 minute. This is useful when cleaning up something which has boiled over, for example. The original settings remain.
Beep signal
You can switch the beep signal for the "+" and "-" buttons on and off. Switch the beep signal off by setting the front left hand zone on and off and then pressing both "-" buttons of the left zones within 3 seconds. To confirm that the change has been accepted, the code .. appears on the display. The beep signal can be switched on again by repeating this process.
Extra safety
Safety hob
A sensor continuously measures the temperature of certain parts of the hob. In case of temperatures rising too high, the power is reduced automatically.
As soon as you remove the pan from the hob, the cooking zone automatically stops Accustom yourself to stop the cooking zone or hob manually to avoid unintended switching on of the induction hob.
Safety pans
Every cooking zone is equipped with a sensor that measures the temperature of the bottom of the pan to avoid any risk of overheating when a pan boils dry.
Safety metal parts
Small objects such as very small pans (less than 12 cm or less than 10 cm in the 16 cm zone), forks or spoons are not detected as pans by the hob. The display of the cooking setting continues to flash and the zone will not switch on.
Overheating protection
The appliance may become overheated if:
■ the pan does not conduct the heat adequately;
■ fat or oil is heated at a high setting;
■ there is insufficient circulation of air (see also ventilation protection in the installation part of this manual).
In the event of overheating the result will be that the cooking zone in question or all the cooking zones will display one of the following reactions:
■the hob will reduce the power supplied slightly (this is not visible in the cooking settings in the displays);
■if this does not help, the hob switch off and a series of dashes will appear in the displays.
As soon as the cooking zone(s) has/have cooled down sufficiently, the dashes disappear and the cooking zones remain switched off.
Prevent the overheating protection becoming activated by:
■ using pans that are good conductors of heat;
■ heating up fat or oil at a lower setting;
■ making sure there is sufficient ventilation.
If, despite the above-mentioned measures having been taken, the overheating protection becomes activated again, contact the service department or a professionally qualified specialist.
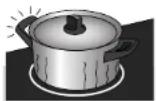
Optimal use of the hob
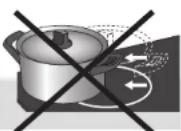
Heat losses are minimal, because the heat is generated in the pan itself.
For smaller pans, only that part of the zone that is in contact with the base of the pan is activated. An associated advantage is that the handles of the pan do not get hot due to radiant heat around the pan.
1
2
- Heat loss and hot handles with a conventional hob.
- No heat loss and cold handles with induction cooking.
Grains of sand may cause scratches which cannot be removed.
■ Only put pans with a clean base on the cooking surface.
■Always pick pans up to move them.
■Do not use the hob as a worktop.

Slide the bottom of the pan across a damp cloth, before you put the pan on
the cooking surface. This will prevent grains of sand or the like being transferred to the hob surface.
Always pick pans up; never slide them.

Always keep the lid on the pan when cooking, in order to avoid energy loss.
Induction cooking makes use of a magnetic field to generate heat. This is why the bases of the pans have to contain iron and therefore be magnetic.
The diameter of the cooking zones is 16, 18 or 21cm . The induction hob adopts to the diameter of the pan automatically. With smaller pans, there is no loss of energy, but the power is less compared to larger pans. The pan bottom must always be bigger than 12cm (or 10cm for the 16cm zone).
You can check for yourself whether your pans are suitable using a magnet.
A pan is suitable if:
■ the base of the pan is attracted by the magnet;
■ the pan is suitable for electric cooking.
You should only use pans with a thick (minimum 2.25 mm), flat base which are suitable for induction cooking. The best are pans with the "Class Induction" quality mark.
Pans with a base which is not magnetic or is not suitable for electric cooking are unsuitable for use on the induction hob.
Suitable:
■Special stainlesssteel pans for induction cooking;
Solid enamelled pans;
Enamelled cast-iron pans.
Unsuitable:
Earthenware;
aluminium;
plastic;
copper;
china;
■stainless steel.
Be careful with enamelled sheet-steel pans. These can be damaged if they are used for induction cooking, particularly if their bases are too thin.
With enamelled sheet-steel pans:
the enamel may chip (the enamel comes loose from the steel), if you switch the hob on at a high setting when the pan is (too) dry;
■ the base of the pan may warp - due, for example, to overheating or to the use of too high a power level.
Never use pans with a misshapen base. A hollow or rounded base can interfere with the operation of the overheating protection, so that the appliance becomes too hot.
This may lead to the glass top cracking and the pan base melting. Damage arising from the use of unsuitable pans or from boiling dry is excluded from the guarantee.
Noise in the base of the pan
While cooking, you might hear a rattling noise in the base of the pan. This is harmless. The noise is due to the high power of the cooking zone having an effect on the base of the pan. Reduce the rattling noise by selecting a lower setting.
Pressure cookers
Induction cooking is very suitable for cooking in pressure cookers. The cooking zone reacts very quickly, and so the pressure cooker is quickly up to pressure. As soon as you switch a cooking zone off, the cooking process stops immediately.
Used pans
■Pans that have already been used for cooking on a gas hob are no longer suitable for use on an induction hob.
Cooking table
The table below is intended solely as a guide, because the heat setting depends on the quantity of food and the composition of the pan.
Use the highest setting for:
■bringing to the boil quickly;
■shrinking down leaf vegetables;
blanching vegetables;
■ heating oil and fat;
■ frying steak {rare, red};
■ pressurising a pressure cooker.
Use a slightly lower setting for:
■searing meat;
■ frying flatfish, slices or fillet;
■ frying cooked potatoes;
■ cooking smooth, thickened soups and
sauces;
■ frying omelettes;
■ frying beef steak (medium, pink-red);
■ deep frying (depending on the temperature and the quantity).
Use a setting slightly above the average setting for:
■ cooking of thick pancakes;
■ frying thick pieces of meat in breadcrumbs;
■ cooking through thin pieces of meat;
■broiling large pieces of meat;
■ frying blocks of ham or bacon;
■ frying raw potatoes;
■ frying fish coated with breadcrumbs;
General
Daily cleaning
Although food that has boiled over cannot burn on, it is still recommended that you clean the hob immediately after use. For daily cleaning, you can best use a mild cleaning agent and a damp cloth.
Dry the hob with kitchen paper or a dry cloth.
Stubborn stains
Stubborn stains can also be removed with a mild cleaning agent - for example, washing-up liquid.
Remove water marks and lime stains with vinegar.
Traces of metals (due to sliding pans) can be difficult to remove. Special products are available on the market to deal with this. Remains of food that has boiled over are best removed with a glass scraper. Melted plastic and sugar can also be removed with a glass scraper.
Never use
You should never use scouring agents. These cause scratches in which lime deposits and dirt can accumulate. Never use sharp objects such as steel wool and scourers. Before you start to clean, turn the childproof lock on.
Table
| TYPE OF GRIME | USE | CLEANING METHOD |
| Light stains. | Household sponges. | Wet the area to be cleaned with warm water and then wipe off. |
| Deep-seated stains.Boiled over sugary dishes, melted plastic. | Household sponges.Special glass scraper. | Wet the area to be cleaned with warm water, use a special glass scraper to remove the most difficult grime, then use the scourer side of a household sponge to remove the rest and finally wipe off. |
| Rings and scale. | Cleansing vinegar. | Apply warm cleansing vinegar to the stains, work in and wipe off with a soft cloth. |
| Shiny metallic stains.Weekly maintenance. | Special product for vitroceramic glass. | Apply a special product for vitroceramic glass to the glass plate, preferably a product with silicone (protective effect). |
household sponge for delicate kitchenware
scouring sponge
Table
If the appliance does not work properly, this does not always mean that it is defective. Try to deal with the problem yourself first by checking the points mentioned below:
| You have observed the following: Possible causes: Solutions: | ||
| The display lights up. Normal operation. Do nothing, the display disappears after 30 seconds. | ||
| Only works on one side.The fuse in the meter cupboard is defective.Continuous beep. | The appliance is incorrectly connected. | Check the electrical connection.See electrical connection (page 100). |
| When first used a strange smell comes from the hob. | New appliance. Warm a pan full of water for 30 minutes on each zone. | |
| The hob does not work and the displays on the operating panel remain out. | The appliance is receiving no power. Defective power supply or incorrect connection. | Check the fuses and the electrical master switch. |
| The hob does not work and an error code F1, F2, F3 or F4 is displayed. | The electrical circuit works poorly. Contact the Service Department. | |
| The hob does not work, the information 07 or 0 is displayed. | The hob is locked. See chapter on use of child protection. | |
| The hob switches off during use, 4 dashes are displayed. | Something has boiled over or there is an object on the operating panel. | Clean the hob or remove the object and then continue cooking. |
| A series of small 07F0 is displayed. | The electronic circuits are warm. See chapter on installation. | |
| Error code F0 Pan is boiled dry or to hot. Let appliance cool down or continuing cooking on a lower setting. | ||
| After switching on a cooking zone, the operating panel display continues to flicker. | The pan you are using is not suitable for induction cooking or has a diameter of less than 12 cm (10 cm for the 16 cm cooking zone). | See chapter on pans for induction cooking. |
| Error code F5 or F6 Appliance overheated due to insufficient ventilation. | Check the building-in situation or contact the Service Department. | |
| The pans are noisy during cooking.Your cooking pan makes a ticking sound during cooking. | Normal for certain types of pan. It is caused by the energy being transmitted from the hob to the pan | Do nothing. There is no danger for the hob or for your pan. |
| The ventilator continues to work for several minutes after the hob has been switched off. | The electronics are cooling off.Normal operation. | Nothing. |
General
In case of faults phone the service department. See the guarantee certificate or consult the internet site www.hps.nl.
If you notice a crack on the cooking surface (no matter how little), switch off the appliance immediately. Remove the plug from the socket or set the switch of the power supply cable (in the case of a fixed connection) to zero or turn off the fuse switch(es) in the meter cupboard.
Phone the service department.
This appliance should only be connected up by a registered electrical installer! The electrical connection must comply with national and local regulations.
Damage caused by incorrect connection, incorrect use or incorrect building in is not covered by the guarantee.
Disposal of packaging and appliance
The appliance packaging is recyclable. The following may have been used:
■cardboard;
■polythene film (PE);
■CFC-free polystyrene (PS hard foam).
Dispose of these materials responsibly and in accordance with government regulations.
On the data plate is put the symbol of a crossed-out wheeled dustbin:
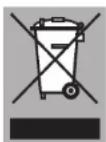
This means that at the end of its working life, the product must not be disposed of as urban waste. It must be taken to a special local authority differentiated waste collection centre or to a dealer providing this service.
Disposing of a household appliance separately avoids possible negative consequences for the environment and health deriving from inappropriate disposal and enables the constituent materials to be recovered to obtain significant savings in energy and resources.
As a reminder of the need to dispose of household appliances separately, the product is marked with a crossed-out wheeled dustbin.
General
This appliance meets all relevant CE guidelines.
The data plate on the underside of the appliance indicates the total nominal load, the required voltage and the frequency.
Safety
This appliance should only be connected up by a registered electrical installer! The electrical connection must comply with national and local regulations.

The appliance should always be earthed.
Damage caused by incorrect connection, incorrect use or incorrect building in is not covered by the guarantee.
For correct operation of the appliance it is important that: ■the power cable hangs freely and is not struck by a drawer; ■the worktop is level.
The walls and the worktop around the appliance must be made of heatresistant (>85°C) material. Even if the appliance itself does not get hot, the heat from a hot frying pan, for instance, could cause discolouring or damage to the wall or worktop.
Electrical connection
The model number, power supply and connected load are specified on the data plate.
The data plate is attached to the base of the appliance.
The connection cable is of the type Y.
This means that the connection cable may only be replaced by the manufacturer, the service organisation or similarly qualified persons, in order to prevent dangerous situations.
If you want to make a fixed connection, make sure that a multi-polar switch with a contact separation of at least 3 mm is fitted in the supply line.
Electrical connection
The appliance is delivered with a connection cable. As standard, the connection cable has a connection between the brown and blue wires and between the gray and black wires. In most cases you should remove these connections.
text_image
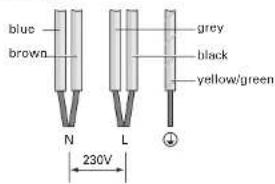
blue brown grey black yellow/green N L 230V2 phase connection
2 positive + 2 negative 2 2N a.c. 230 V Remove the connections.
The fuse box in your home must be fitted with a 16 A fuse.
text_image
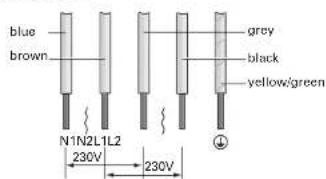
blue brown grey black yellow/green N1N2L1L2 230V 230Vnegative connection N1 (blue) negative connection N2 (brown) positive connection L1 (grey) positive connection L2 (black)
2 positive + 1 negative 2 2N a.c. 400 V
Remove the connection between the grey and the black wire.
The fuse box in your home must be fitted with a 16 A fuse.
text_image
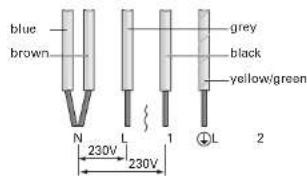
blue brown grey black yellow/green N L 1 L 2 230V 230Vnegative connection N (blue and brown) positive connection L1 (grey) positive connection L2 (black)

Do not connect the 3rd phase
The next deviant connections are possible too:
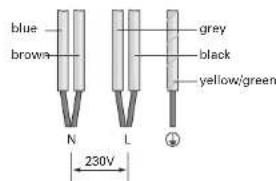
1 phase connection
1 positive + 1 negative 1N a.c. 230 V
The fuse box in your home must be fitted with a 32 A fuse.
text_image
blue brown grey black yellow/green N L 230Vnegative connection N (blue and brown) positive connection L (grey and black)
3 phase connection
3 positive without negative 3 a.c. 230 V
Remove the connection between the grey and the black wire.
The fuse box in your home must be fitted with a 16 A fuse.
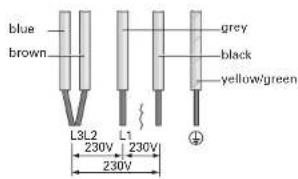
text_image
blue brown grey black yellow/green L3L2 L1 230V 230V 230Vpositive connection L1 (grey)
positive connection L2 (black)
positive connection L3 (blue and brown)
Safety prescriptions
For the appliance to work well, it is important:
That there is sufficient ventilation to allow the hob to cool down, in accordance with the possibilities specified in this chapter.
■The ventilation air drawn in by the hob must not be warmer than 65 °C. Bear this in mind if the oven is to be built in under the hob.
- That the connecting cable hangs freely and is not caught by a drawer.
■The worktop is flat.
Building in
Cut opening in worktop
Saw the opening in the worktop. This should be done very accurately (see table).
Also saw out any partitions that may be present.
The distance from the saw line to the rear wall and/or side wall is indicated in the table.
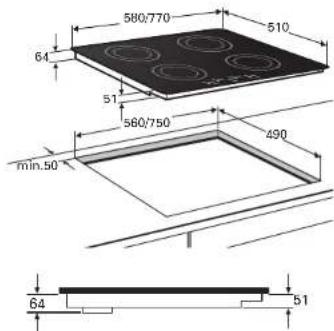
text_image
580/770 64 510 580/750 min.50 490 64 51Table:
| Type of hob T301ZT A397ZT A380ZT | |||
| Appliance width x depth 580 x 510 mm 580 x 510 mm 770 x 510 mm | |||
| Installation height from top of worktop 51 / 64 mm 51 / 64 mm 51 / 64 mm | |||
| Cut out dimensions width x depth 560 x 490 mm 560 x 490 mm 750 x 490 mm | |||
| Distance from saw line to rear wall 50 mm minimum 50 mm minimum 50 mm minimum | |||
| Distance from appliance to side wall 40 mm minimum 40 mm minimum 40 mm minimum |
Space to be left free around the appliance:
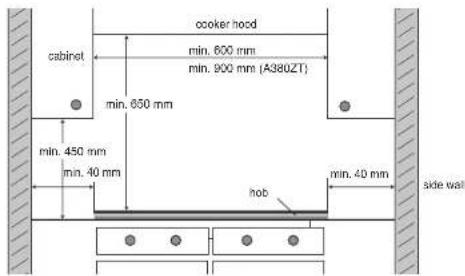
text_image
cooker hood min. 600 mm min. 900 mm (A380ZT) cabinet min. 650 mm min. 450 mm min. 40 mm hob min. 40 mm side wallVentilation

The electronics in the appliance require cooling. The ventilation openings are located on the underside of the appliance. It must be possible for cool air to be drawn in through these openings. The appliance is fitted with outlet openings at the front and bottom. The kitchen unit will require a few modifications to allow optimum cooling of the hob.
Above drawer or fixed panel
Saw out the ventilation openings (min. 100 cm ^4 ).
Ventilation is via plinth and rear of cupboard.

Do not allow the ventilation openings on the underside of the appliance to be blocked by a drawer.
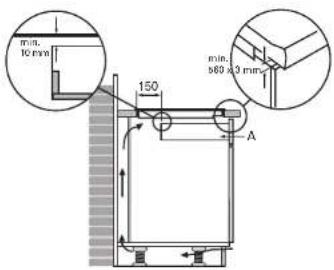
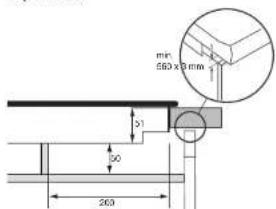
Where there is a drawer, a gap of at least 560 x 3 mm should be made at the front.
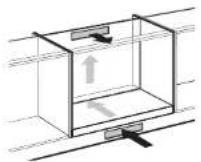
text_image
min. 10 mm 150 min. 800 x 3 mm AThe distance between drawer A and the hob should be a minimum of 10 mm.
No extra modifications for ventilation need be made where there is a fixed panel.
Ventilationprotection
The electronics in the appliance require cooling. The cool air is sucked from behind the cupboard and blown out at the front and at the bottom in the front of the appliance. The hob can only operate if there is sufficient circulation of fresh air.

The appliance will switch off after a short time if there is not enough circulation.
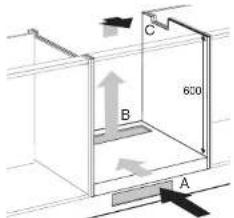
Above a 60 cm oven of the Etna brand
text_image
C 600 B ARecess height minimum 600 mm. Ventilation is via plinth and rear of oven.
Where there is a oven, a gap of at least 560 x 3 mm should be made at the front. Cut out ventilation openings 'A' + 'B' (100 cm²). Make an opening in the side wall "C" of the kitchen cupboard for leading the connection cable through.
Ensure that the connection cables hang freely. If there is a drawer underneath the hob, make sure that the contents do not project above the edge of the drawer and interfere with the ventilation.
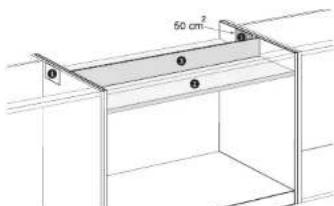
Installation of the induction hob above a combimicrowave oven, a 90 cm Etna oven or an oven of a different brand
Saw out the ventilation opening(s), making sure that the total surface of the holes is a minimum of 100 cm ^2 . See the drawing, for example, showing 2 holes (1).
text_image
50 cm²Fit a protective plate (2) between the oven and the hob. The plate should be at least 10 mm thick and heat-resistant (85 °C). The space between the underside of the hob and the protective plate must be at least 50 mm.
natural_image
Pure mechanical diagram showing a lever system with dashed arrows indicating motion (no text or symbols)To protect the air flow, fit a protective panel (3) - of the same material as the protective plate - between the protective plate and the hob. Ventilation is via the adjoining cupboards.
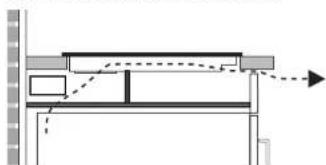
text_image
min 560 x 3 mm 51 50 260
Install the appliance in such a way that the power plug remains accessible always.
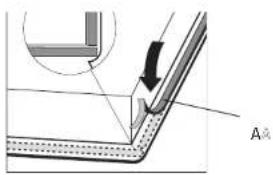
text_image
Technical diagram showing a mechanical or structural component with an arrow indicating direction, labeled 'A' and 'A'- Check if the kitchen cabinet and the cut out are in accordance with the instructions (see 'safety' and 'building in dimensions').
- Remove the protective foil from the sealing strip and affix the strip (A) in the groove of the aluminium profiles or on the edge of the glass plate. Do not affix the sealing strip round the corner but instead cut 4 pieces that fit tightly together in the corner.
- If the woodtop is made of treated wood, then coat the sawn surfaces of the top with sealing varnish, to prevent moisture causing the top to swell.
- Turn the appliance over and put it in the cutout.
- Connect the appliance to the mains supply. The displays light up for approximately 30 seconds. This is normal!
- Check its operation. If the appliance has been connected incorrectly, it will emit a beep signal or the displays will not illuminate.
- Hand over the instructions to your customer.