
VS3251 - Loudspeaker ALTEC LANSING - Free user manual and instructions
Find the device manual for free VS3251 ALTEC LANSING in PDF.
| Product Type | 5.1-channel amplified audio system |
| Total Continuous Power (RMS) | 70 watts |
| Power per front/rear/center satellite | 9 watts per channel (4 ohms) |
| Subwoofer Power | 25 watts (4 ohms) |
| Frequency Response | 40 Hz - 17 kHz (-10 dB) |
| Maximum Sound Pressure Level (SPL) | 101 dB |
| Signal-to-Noise Ratio | > 70 dB (1 kHz input) |
| Satellite Speakers | 5 speakers with 2.5" full-range driver |
| Subwoofer | 5" long-throw woofer |
| Magnetic Shielding (Satellites) | Yes (except subwoofer) |
| Power Supply | AC power cord (wall outlet) |
| Remote Control | Yes, wireless with included AAA (LR03) batteries |
| Audio Inputs | 3.5 mm stereo (Front, Rear, Center/Sub, AUX) |
| Headphone Output | Yes, 3.5 mm jack on subwoofer |
| Maximum Infrared Distance | 8 m |
| Audio Modes | Stereo (2 channels) and Surround (5.1) |
| Remote Control Functions | Master volume, rear volume, center volume, subwoofer volume, mute, stereo/surround mode |
| Safety Instructions | Do not expose to water or humidity; do not block ventilation openings; disconnect during storms |
| Care and Cleaning | Clean with a dry cloth only |
| Repairability | No user-serviceable parts; contact qualified personnel |
| Warranty (EU/Asia) | 2 years (outside EU: 1 year) |
Frequently Asked Questions - VS3251 ALTEC LANSING
User questions about VS3251 ALTEC LANSING
0 question about this device. Answer the ones you know or ask your own.
Ask a new question about this device
Download the instructions for your Loudspeaker in PDF format for free! Find your manual VS3251 - ALTEC LANSING and take your electronic device back in hand. On this page are published all the documents necessary for the use of your device. VS3251 by ALTEC LANSING.
USER MANUAL VS3251 ALTEC LANSING
natural_image
Exterior view of a black Altec Lansing audio speaker module with multiple speakers and control devices (no visible text or symbols)VS3251
User's guide Guia do Usuário Mode d'emploi Guía del usuario

The lightning flash with arrowhead, within an equilateral triangle, is intended to alert the user to the presence of uninsulated “dangerous voltage” within the product’s enclosure that may be of sufficient magnitude to constitute a risk of electric shock to persons.
CAUTION
RISK OF ELECTRIC SHOCK DO NOT OPEN
Caution: To prevent the risk of electric shock, do not remove cover (or back). No user-serviceable parts inside. Refer servicing to qualified service personnel.

The exclamation point within an equilateral triangle is intended to alert the user to the presence of important operating and maintenance (servicing) instructions in the literature accompanying the appliance.
CAUTION
To prevent electric shock do not use this (polarized) plug with an extension cord, receptacle or other outlet unless the blades can be fully inserted to prevent blade exposure.
WARNING
TO REDUCE THE RISK OF FIRE OR ELECTRIC SHOCK, DO NOT EXPOSE THIS APPLIANCE TO RAIN OR MOISTURE.
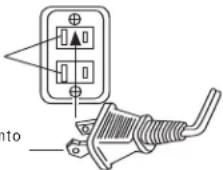
CONNECTING THE POWER CORD (AC WALL SOCKET)
Long slot is neutral (ground) side.
Insert the wide blade into the ground side slot.
IMPORTANT SAFETY INSTRUCTIONS
- Read these instructions.
- Keep these instructions.
- Heed all warnings.
- Follow all instructions.
- Do not use this apparatus near water — This apparatus shall not be exposed to dripping or splashing, and no objects filled with liquids, such as vases, shall be placed on the apparatus.
-
Clean only with dry cloth.
-
Do not block any ventilation openings. Install in accordance with the manufacturer's instructions. The apparatus should not be situated on a bed, sofa, rug or similar surface that may block the ventilation openings. The apparatus must not be placed in a built-in installation, such as a closed bookcase or cabinet that may impede the flow of air through the ventilation openings. Ventilation should not be impeded by covering the openings with items such as newspapers, tablecloths, curtains, etc.
-
Do not install near any heat sources such as radiators, heat registers, stoves, or other apparatus (including amplifiers) that produce heat.
-
No naked flame sources, such as lighted candles, should be placed on the apparatus.
-
Do not defeat the safety purpose of the polarized or grounding-type plug. A polarized plug has two blades with one wider than the other. A grounding type plug has two blades and a third grounding prong. The wide blade or the third prong are provided for your safety. If the provided plug does not fit into your outlet, consult an electrician for the replacement of the obsolete outlet.
-
Protect the power cord from being walked on or pinched — particularly at plugs, convenience receptacles, and the point where they exit from the apparatus.
-
Do not install in an area which impedes the access to the power plug. Disconnecting the power plug is the only way to completely remove power to the product and must be readily accessible at all times.
-
Power source — Use only power supplies of the type specified in the operating instructions or as marked on the appliance. If a separate power supply is included with this apparatus, do not substitute with any other power supply — use only manufacturer-provided power supplies.
-
Unplug this apparatus during lightning storms or when unused for long periods of time.
-
Refer all servicing to qualified service personnel. Servicing is required when the apparatus has been damaged in any way, such as power-supply cord or plug is damaged, liquid has been spilled or objects have fallen into the apparatus, the apparatus has been exposed to rain or moisture, does not operate normally, or has been dropped. For service, refer to qualified service personnel, return to the dealer, or call the Altec Lansing service line for assistance.
-
For products which incorporate batteries, please refer to local regulations for proper battery disposal.
-
Only use attachments/accessories specified by the manufacturer.
-
Use only with the cart, stand, tripod, bracket, or table specified by the manufacturer or sold with the apparatus. When a cart is used, use caution when moving the cart/apparatus combination to avoid injury from tip-over.

ALTEC LANSING TECHNOLOGIES, INC. ONE YEAR LIMITED WARRANTY (TWO-YEAR LIMITED WARRANTY IN THE EUROPEAN UNION AND ASIA)
What Does The Warranty Cover?: Altec Lansing warrants that its products shall be free from defects in materials or workmanship, with the exceptions stated below.
What Is The Period Of Coverage?: For units purchased in European Union or Asia, this warranty runs for two years from the date of purchase. For units not purchased in Europe or Asia, this warranty runs for one year from the date of purchase. The term of any warranties implied by law shall expire when your limited warranty expires. Some states and/or Member States in the European Union do not allow limitations on how long an implied warranty lasts, so the above limitation may not apply to you.
What Does The Warranty Not Cover?: This warranty does not cover any defect, malfunction or failure that occurs as a result of: improper installation; misuse or failure to follow the product directions; abuse; or use with improper, unintended or faulty equipment. (For information on proper installation, operation and use consult the manual supplied with the product. If you require a replacement manual, you may download a manual from www.alteclansing.com.) Also, consequential and incidental damages are not recoverable under this warranty. Some states do not allow the exclusion or limitation of incidental or consequential damages, so the above limitation or exclusion may not apply to you.
What Will Altec Lansing Do To Correct The Problem?: Altec Lansing will, at its option, repair or replace any product that proves to be defective in material or workmanship. If your product is no longer being manufactured, or is out of stock, at its option, Altec Lansing may replace your product with a similar or better Altec Lansing product.
How To Get Warranty Service: To get a covered product repaired or replaced, you must contact Altec Lansing during the warranty period by email (csupport@alteclansing.com). You must Include in your email, your name, address, email address, telephone number, date of purchase and a complete description of the problem you are experiencing. In the United States, you may alternatively contact Altec Lansing by telephone at 1-800-ALTEC88 — please be prepared to provide the same information. If the problem appears to be related to a defect in material or workmanship, Altec Lansing will provide you a return authorization and instructions for return shipment. Return shipments shall be at the customer's expense, and the return must be accompanied by the original proof of purchase. You should insure the shipment as appropriate because you are responsible for the product until it arrives at Altec Lansing.
How Will State Law Affect Your Rights?: This warranty gives you specific legal rights, and you may also have other rights which vary from state to state. Please note that in the European Union, you as a consumer might have other legal rights under national legislation of European Union Member States governing the sale of Altec Lansing's goods. Those rights are not affected by this guarantee.
The above limited warranties and remedies are sole warranties and remedies available to purchaser, if, and to the extent, valid and enforceable under the applicable law.
CUSTOMER SERVICE
The answers to most setup and performance questions can be found in the Troubleshooting guide. You can also consult the FAQs in the customer support section of our Web site at www.alteclansing.com. If you live in North America and still can't find the information you need, please call our customer service team for assistance before returning the speakers to your retailer under their return policy.
Tel: 800-258-3288
Email: csupport@alteclansing.com
If you live outside of North America, please visit our website at www.alteclansing.com and select your region to locate your country's distributor.
For the most up-to-date information, be sure to check our Web site at www.alteclansing.com.
INTERNATIONAL DISTRIBUTION
International customers: For Information regarding the distribution of Altec Lansing products in your country, please visit www.alteclansing.com and click on your region.
DISPOSAL OF OLD ELECTRICAL & ELECTRONIC EQUIPMENT

This symbol on the product or on its packaging indicates that this product shall not be treated as household waste. Instead it shall be handed over to the applicable collection point for the recycling of electrical and electronic equipment. By ensuring this product is disposed of correctly, you will help prevent potential negative consequences for the environment and human health, which could otherwise be
caused by inappropriate waste handling of this product. The recycling of materials will help to conserve natural resources. For more detailed information about recycling of this product, please contact your local city office or your household waste disposal service.
VS3251 six-Piece Powered Audio System
Thank you for purchasing this Altec Lansing product. For generations, Altec Lansing has been first in audio innovation. Today, our line of powered speakers has received more performance awards than any other brand. In all kinds of environments, in every price range, Altec Lansing offers sound of distinction — giving even the most demanding customers the audio enjoyment they seek. Just listen to this!
Box Contents
- Five speakers with removable stands
- One subwoofer
- Infrared pod
- Wireless remote
• 2 AAA (LR 03) batteries
• Color-coded 3.5mm stereo cables
• User's guide and quick connect card
Placing Speakers
Subwoofer
All stereo-encoded information is heard through the satellite speakers. The subwoofer contains no stereo imaging, and its sound is non-directional. As a result, the subwoofer doesn't have to be placed in any particular relationship to the satellites. However, placing the subwoofer on the floor close to a wall or room corner provides better bass efficiency and optimum sound.
Warning: The subwoofer is not magnetically shielded. As such, it SHOULD be placed at least 2 feet (0.6m) from TVs, computer monitors, computer hard drives or any other magnetic media (e.g., floppy disks, Zip disks, computer or audio tapes, etc.).
Front Satellite Speakers
Arrange the front satellite speakers to suit your listening tastes — from right next to the monitor to as far apart as the speaker cords allow. Use the key hole on the back of each speaker if you choose to mount them on the wall.
Center Speaker
Place the center speaker either on top or below the center of the monitor. Use the key holes on the back of the center speaker if you choose to mount it on the wall.
Rear Satellite Speakers
The rear satellite speakers should be placed slightly behind you, or as far back as the cords allow. Use the key hole on the back of each speaker if you choose to mount them on the wall.
For optimum sound, all satellites should be placed at or slightly above ear level, and in an arrangement that offers the most satisfying results.
Note: The satellite speakers ARE magnetically shielded and can be placed close to video displays such as TVs and computer monitors without distorting the image.
Infrared Eye
The infrared "eye" can be placed anywhere on your desktop where it will be able to "see" the wireless remote. The "eye" will recognize commands from the wireless remote from up to 26' (8 m) away.
Making Connections
Warning: Do not insert the speaker system's power plug into a wall outlet until all connections are made. Also, turn off audio source (i.e., your PC, MP3 player, Sony PlayStation, etc.) before connecting the outputs to the speaker system's inputs.
To ensure first-time operation as expected, please carefully follow the connection sequences described below in the order indicated.
Speaker System
To connect each satellite to the subwoofer, use the FRONT LEFT (front left), FRONT RIGHT (front right), REAR LEFT (rear left), REAR RIGHT (rear right) and CENTER (center) identifiers on the back of each satellite to connect them to the appropriate output on the back of the subwoofer. To make the connection, depress the color-coded spring-clip on the back of the subwoofer and insert the color-coded wire, and depress the black spring clip and insert black wire.
Inputs
Various connection schemes between your audio source and the speaker system are available. Determine if you'll be setting up the speaker system for PC audio/PC gaming, DVD playback, console gaming or with portable audio devices (such as MP3 or portable CD players), then skip to the appropriate section.
PC Audio / PC Gaming / DVD Playback
Sound cards designed for PC gaming or DVD playback have unique audio outputs. Typically, the outputs will be marked as "front output," "rear output" and "LFE/center output." In some cases, slightly different terminology may be used. The sound card's documentation should help you determine which outputs to use with your speaker system.
6-Channel/5.1 Sound Card with analog outputs
- Locate the green, black, and orange cables.
- Insert one end of the green, black, and orange cables into the computer soundcard's green, black, and orange outputs. Plug the other end of the green, black, and orange cables into the back of the subwoofer, as follows:
- Plug the green cable into the input marked "Front Right/Left"
- Plug the black cable into the input marked "Rear Right/Left"
- Plug the orange cable into the input marked "Subwoofer/Center."
2-Channel/Stereo Sound Cards
- Locate the green cable.
- Insert one end of the green cable into the computer's stereo (green) output, and the other end into the input marked AUX on the subwoofer.
Console Gaming
(Requires the use of the Console Gaming Y-Adapter, which is not included. This adapter can be purchased at www.alteclansing.com.)
Most console game systems feature dual-RCA outputs. To connect your speakers, follow the steps below:
- Locate or purchase a Console Gaming Y-Adapter with a lime green 3.5 mm stereo jack on one end and two RCA jacks on the other — one red and one white.
- Locate the red and white RCA plugs on the end of the cable connected to the back of your console gaming system. Connect them to the matching red and white RCA jacks on the Console Gaming Y-Adapter.
- Locate the green cable included with this system.
- Insert one end of the green cable into the Console Gaming Y-adapter lime green 3.5mm stereo jack, and the other end into the input marked AUX on the subwoofer.
Portable Audio Devices (MP3, Portable CD Players, etc.)
- Locate the green cable.
- Insert one end of the green cable into the headphone or line-out jack of the portable audio device, and the other end into the input marked AUX on the subwoofer.
POWERING ON
- After all other connections are made, plug the AC power cord (on the back of subwoofer) into a wall outlet.
- Turn the system on by pushing the power switch on the back of the subwoofer. The LED on the subwoofer will blink slowly when the unit is in stand-by mode.
- Turn on the audio source.
- Insert 2 AAA (LR 03) batteries in the battery compartment of the wireless remote.
- Activate the system by pushing the 🔊 located on the wireless remote. The LED on the subwoofer will stop blinking when the unit is on.
Note: While in stand-by or mute mode, the system continues to receive power. To completely shut down the unit push the power switch on the back of the subwoofer and make sure the LED on the subwoofer is off.
Note: To avoid hearing a popping sound when you turn on your Altec Lansing speaker system, always turn on your audio source first.
Stereo and Surround Sound
- Push the STER/SURR button on the wireless remote to alternate between six-speaker surround sound and two-speaker stereo sound.
Note: The system will power on the surround mode (SURR), with all five speakers activated.
Master Volume
The MASTER VOLUME knob on the subwoofer and the "+" and "-" buttons marked with the word "MASTER VOLUME" on the wireless remote control the master volume. On the subwoofer, turn the knob clockwise to increase the volume and counterclockwise to decrease the volume. On the wireless remote, push the "+" button to increase the volume, and the "-" button to decrease it.
Surround Volume
The "+" and "-" buttons marked with the word "REAR" on the wireless remote control the volume of the rear speakers. Push the "+" button to increase the volume, and the "-" button to decrease it.
Center Volume
The "+" and "-" buttons marked with the word "CENTER" on the wireless remote control the volume of the center speaker. Push the "+" button to increase the volume, and the "-" button to decrease it.
Subwoofer Volume
The "+" and "-" buttons marked with the word "SUBWOOFER" on the wireless remote control the volume of the subwoofer. Push the "+" button to increase the volume, and the "-" button to decrease it.
Mute
To mute the speaker system, press the MUTE button located on the wireless remote. The LED on the subwoofer will blink fast when the unit is in mute mode.
Headphones
To use headphones with the system, plug them into the labeled jack on the subwoofer. When headphones are connected, the speaker system is muted.
System Specifications\*
Altec Lansing's superior sound comes from our patented Dynamic EQ technology, which utilizes custom-built, high-fidelity drivers, state-of-the-art equalization circuitry, and a harmonious mix of the following specifications:
Sound Pressure Level (SPL): 101 dB
Total Continuous Power: 70 Watts RMS
• Front Speakers: 9 Watts/channel @ 4 ohms
@ 10% THD @ 120 Hz - 17 kHz
2 Channels Loaded
• Rear Speakers: 9 Watts/channel @ 4 ohms
@ 10% THD @ 120 Hz — 17 kHz
2 Channels Loaded
• Center Speaker: 9 Watts @ 4 ohms
@ 10% THD @ 120 Hz - 17 kHz
Single Channel Loaded
- Subwoofer: 25 Watts @ 4 ohms
@ 10% THD @ 40 - 170 Hz
Single Channel Loaded
Frequency Response: 40 Hz - 17 kHz (-10 dB)
Signal to Noise Ratio
@ 1 kHz input: > 70 dB
Drivers (per satellite): One full-range 2.5" driver per speaker
Subwoofer: One 5" long-throw woofer
Troubleshooting
| Symptom Possible Problem Solution | ||
| LED is not lit. | Power isn't turned on. | Turn on the speaker system by (1) making sure the AC power cord is connected to a wall outlet, (2) pushing the On/Off button located on the back of the subwoofer, and (3) activating the system by pushing the button on the wireless remote. An LED will light on the subwoofer when the power is ON. |
| Wireless remote batteries are dead. | Insert 2 AAA (LR 03) batteries in the battery compartment of the wireless remote. | |
| AC power cord isn't connected to the wall outlet. | Connect the AC power cord to a wall outlet. | |
| Surge protector (if used) isn't powered on. | If the AC power cord is plugged into a surge protector, make sure the surge protector is switched on. | |
| Wall outlet not functioning. | Plug another device into the wall outlet (same jack) to verify the wall outlet is working. | |
| No sound from one or more speakers. | Volume is set too low. | On the subwoofer, turn the knob clockwise to increase the volume. On the wireless remote, push the "+" button to increase the volume. |
| Check volume level on the computer sound card or alternate audio source device, and set at mid-level. | ||
| Speaker system isn't connected to audio source. | Check plug connections on the audio source. Make sure the signal cable(s) is/are inserted firmly into the correct jacks. | |
| Speaker system is connected to wrong output on audio source. | Make sure the lime green 3.5mm stereo cable is connected and fully inserted into the "line-out," "audio-out," or the headphone jack of the audio source. | |
| Problem with audio source device. | Test the speakers on another audio device. Remove the lime green 3.5mm stereo cable from the audio source device and connect it to the "line-out," "audio-out," or the headphone jack of another audio source. | |
| No sound from center or rear satellites. | The system is set to the STER (stereo) mode. | Push the STER/SURR button on the wireless remote to enjoy six-speaker sound. |
| Rear or center level is set too low. | Increase the rear or center speaker volume level. | |
| Crackling sound from speakers. | Bad connection. | Check all cables. Make sure they are connected to the "line-out" or "audio-out" jack on your sound card or other audio source — 7 NOT "speaker-out." |
| Volume level in computer operating system is set too high. | Check the computer operating system volume level and decrease it if necessary. | |
| A problem with your audio source device. | Unplug the stereo cable from the audio source. Then plug it into the headphone jack of an alternate audio source (e.g., Walkman, Discman or FM radio). | |
| Sound is distorted. | Volume level set too high. | On the subwoofer, turn the knob counterclockwise to decrease the volume. On the wireless remote, push the "-" button to decrease the volume. |
| Computer operating system volume level is set too high. | Adjust the computer operating system volume and balance levels to the center as a starting point, then adjust the level on the speaker using the volume control. | |
| Sound source is distorted. | WAV files are often of poor quality. So distortion and noise are easily noticed with high-powered speakers. Try a different sound source such as a music CD. | |
| Radio interference. | Too close to a radio tower. | Move your speakers until the interference goes away. |
| No sound from subwoofer. | Subwoofer volume is too low. | Increase the subwoofer volume on the wireless remote. |
| Bad connection. | Check to make sure that all cables are connected properly and are making a clear connection. | |
| Low hum from subwoofer. | The AC in your house is at 60 cycles per second, which is within the audio frequency of the subwoofer. | Some low hum may be detected when your speaker system is powered on without an audio source playing, or when the volume is set at an extremely low level. |
| Loud hum from subwoofer. | Bad connection. | Unplug the AC power cord from the surge protector (if used), and plug directly into an AC wall outlet. |
| Move your cables. Check to ensure they are making a clear connection. | ||
| Volume on your audio source device is set too high. | Disconnect your 3.5mm stereo cable from the audio source. If the loud hum goes away, lower the volume on the audio source. | |
| Lower the master volume or subwoofer volume on your computer, portable device, etc. | ||
| Too much bass from subwoofer. | Subwoofer volume is too high. | Decrease the subwoofer volume on the wireless remote. |
| Distorted monitor. | Subwoofer too close to monitor. | Because the subwoofer is not magnetically shielded, it can cause distortion if it's too close to your monitor. Move the subwoofer so it's at least 2 feet from your monitor. |

@ 10% THD @ 120 Hz - 17 kHz
2 canales cargados
• Parlantes posteriores: 9 Vatios/canal @ 4 ohmios
@ 10% THD @ 120 Hz - 17 kHz
2 canales cargados
• Parlante central: 9 Vatios @ 4 ohmios
@10% THD @ 120 Hz - 17 Hz
Un canal cargado
• Parlante secundario 25 Vatios, 4 ohmios
para graves: @ 10% THD @ 40 - 170 Hz
Un canal cargado
- Alto-Falantes Frontais: 9 Watts/canal @ 4 ohms
@ 10% THD @ 120 Hz - 17 kHz
2 Canais Carregados
- Alto-falantes traseiros: 9 Watts/canal @ 4 ohms
@ 10% THD @ 120 Hz - 17 kHz
@ 10% THD @ 120 Hz - 17 kHz
@ 10% THD @ 40 - 170 Hz

- CAUTION
- RISK OF ELECTRIC SHOCK DO NOT OPEN
- WARNING
- CONNECTING THE POWER CORD (AC WALL SOCKET)
- IMPORTANT SAFETY INSTRUCTIONS
- ALTEC LANSING TECHNOLOGIES, INC. ONE YEAR LIMITED WARRANTY (TWO-YEAR LIMITED WARRANTY IN THE EUROPEAN UNION AND ASIA)
- CUSTOMER SERVICE
- INTERNATIONAL DISTRIBUTION
- DISPOSAL OF OLD ELECTRICAL & ELECTRONIC EQUIPMENT
- VS3251 six-Piece Powered Audio System
- Box Contents
- Placing Speakers
- Subwoofer
- Front Satellite Speakers
- Center Speaker
- Rear Satellite Speakers
- Infrared Eye
- Making Connections
- Speaker System
- Inputs
- PC Audio / PC Gaming / DVD Playback
- 6-Channel/5.1 Sound Card with analog outputs
- 2-Channel/Stereo Sound Cards
- Console Gaming
- Portable Audio Devices (MP3, Portable CD Players, etc.)
- POWERING ON
- Stereo and Surround Sound
- Master Volume
- Surround Volume
- Center Volume
- Subwoofer Volume
- Mute
- Headphones
- System Specifications\*
- Troubleshooting
Brand : ALTEC LANSING
Model : VS3251
Category : Loudspeaker