
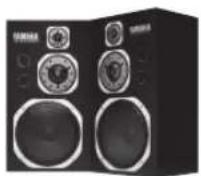
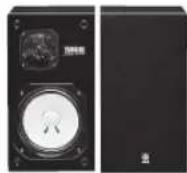
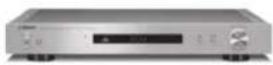
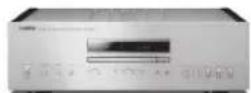
CDS2100 - Cd player/recorder YAMAHA - Free user manual and instructions
Find the device manual for free CDS2100 YAMAHA in PDF.

| Product Type | Super Audio CD Player/Recorder |
| Brand and Model | YAMAHA CD-S2100 |
| Dimensions (W × H × D) | 435 × 137 × 438 mm |
| Weight | 15.6 kg |
| Power Supply | 220-240 V AC, 50/60 Hz (Europe model) or 110-120 V AC, 60 Hz (USA/Canada model) |
| Power Consumption | 30 W (standby: 0.3 W or 0.4 W depending on model) |
| Frequency Response | SA-CD: 2 Hz to 50 kHz (-3 dB); CD: 2 Hz to 20 kHz |
| Signal-to-Noise Ratio | ≥ 116 dB (SA-CD/CD) |
| Dynamic Range | SA-CD: ≥ 110 dB; CD: ≥ 100 dB |
| Output Level | 2.0 ± 0.3 V (SA-CD/CD) |
| Audio Outputs | Unbalanced analog (RCA) × 2 channels; balanced XLR × 2 channels; optical and coaxial digital |
| Digital Inputs | USB Type B, optical, coaxial (up to 192 kHz / 24 bits) |
| Compatible Disc Formats | SA-CD, audio CD, CD-R, CD-RW, CD-TEXT, MP3, WMA |
| Special Features | Pure Direct mode, DSD playback via USB, programmed playback, repeat, shuffle |
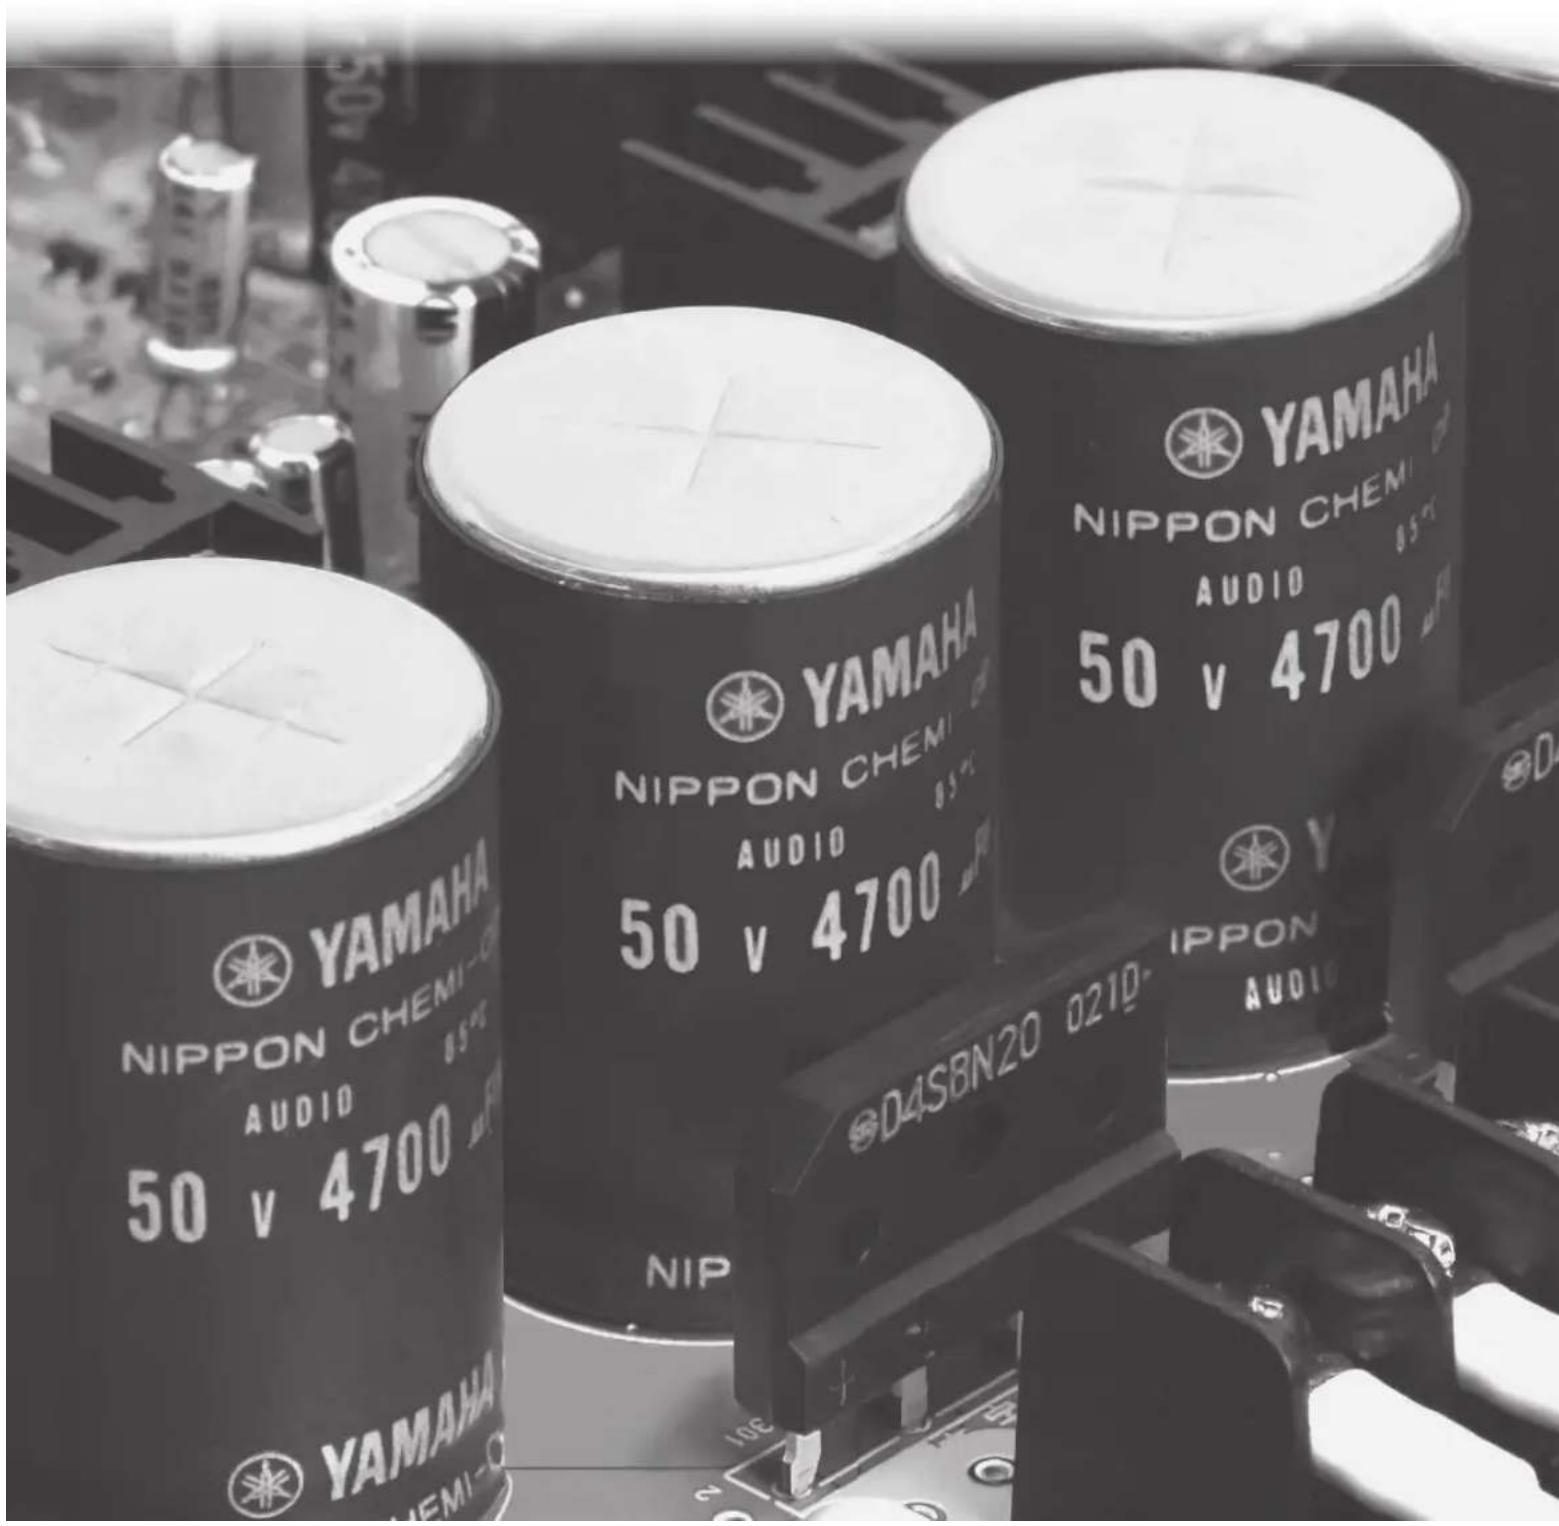
| D/A Converter | ES9016 with adjustable DPLL |
| Connectivity | USB port (for PC), infrared remote control, external remote control input/output |
| Supplied Accessories | Power cable, remote control, batteries, RCA stereo cable, safety brochure |
| Maintenance and Cleaning | Use a dry, clean cloth; for glossy finishes, use the Yamaha Unicon cloth |
| Safety | Automatic standby after 30 min without signal; anti-vibration feet with metal spikes |
| Repairability | Yamaha authorized after-sales service; spare parts available through dealer |
Frequently Asked Questions - CDS2100 YAMAHA
User questions about CDS2100 YAMAHA
0 question about this device. Answer the ones you know or ask your own.
Ask a new question about this device
Download the instructions for your Cd player/recorder in PDF format for free! Find your manual CDS2100 - YAMAHA and take your electronic device back in hand. On this page are published all the documents necessary for the use of your device. CDS2100 by YAMAHA.
USER MANUAL CDS2100 YAMAHA
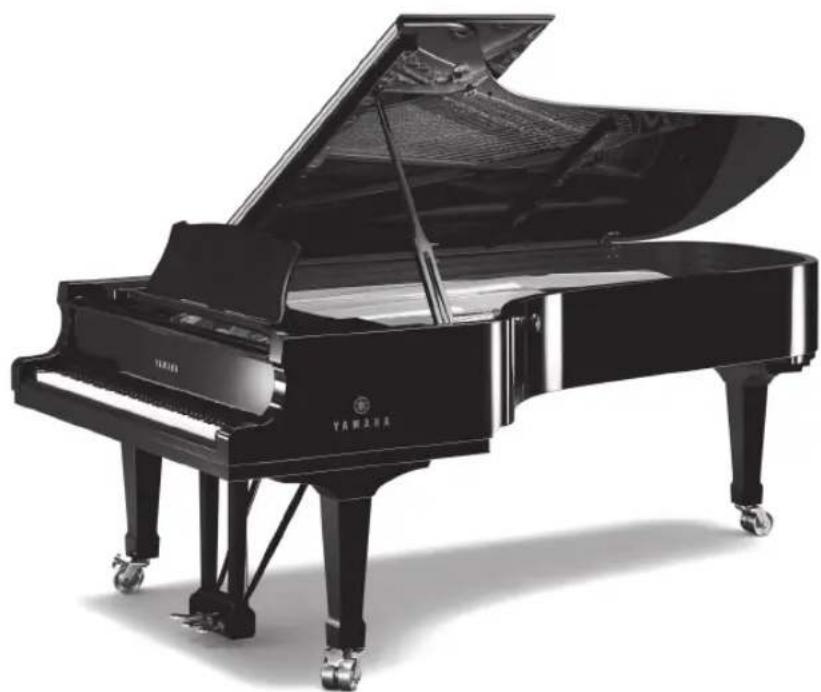
A Living Tradition in Sound
A piano comes into this world through the perfect synergy of advanced technical skill and artistry. Such a piano can create sound that truly reflects the player's feelings.
The final stage in piano production is called "voicing". It is here that the instrument is given its soul.
A highly skilled expert concentrates his mind and sensitivity on the sound of each key, finely adjusting the dynamic feel of the hammers, bringing the tone and vibrancy of all 88 keys together perfectly; a truly stunning achievement.
It is a quality of sound that can only be determined by an astute, sensitive ear. We apply this very same concept to the manufacture of our audio products. The technician performs exhaustive listening tests and every component is considered, in order to finally achieve the ideal sound.
Yamaha's tradition of audio quality stretches back over 125 years, and continues to live on in all Yamaha products today.
Excellence in Audio Achievement
1920- 1960s
1970s
1980s
1990s
2000s
2010s
First HiFi System introduced in 1920
We introduced numerous HiFi components (turntables, FM/AM tuners, integrated amplifiers, precamplifiers, power amplifiers and speakers) in 1955 - 1965.
Natural Sound Speaker Series introduced in 1967
NS-20 Monitor Speaker
CA-1000 Integrated Amplifier
Featuring A-Class operation, the CA-1000 set the standard for integrated amplifiers.
NS-690 Natural Sound Speaker
NS-1000M Monitor Speaker
A truly legendary speaker still revered by HiFi enthusiasts.
B-1 Power Amplifier
An innovative power amp that used vertical FETs in all stages.
C-2 Control Amplifier
Received top prize at the Milan International Music and HiFi Show.
NS-10M Studio Monitor Speaker
Became of the most popular studio monitors in the world.
A-1 Integrated Amplifier
PX-2 Turntable
Yamaha's first straight arm turntable.
B-6 Power Amplifier
Pyramid-shaped power amplifier.
GT-2000/L Turntable
First CD Player (CD-1) introduced in 1983
B-2x Power Amplifier
MX-10000 Power Amplifier and
CX-10000 Control Amplifier
Redefined the capabilities of separate components.
AX-1 Integrated Amplifier
GT-CD1 CD Player
MX-1 Power Amplifier and
CX-1 Preamplifier
Soavo-1 and Soavo-2 Natural Sound Speaker Systems
A-S2000 Integrated Amplifier and CD-S2000 CD Player
NP-S2000 Network Player
A-S3000 Integrated Amplifier and CD-S3000 CD Player
NS-20
CA-1000

NS-690
NS-1000M
B-1

C-2
NS-10M

B-6
A-1
B-2x
MX-10000
CX-10000

Scavo-1
NP-S2000
A-S3000
CD S3000
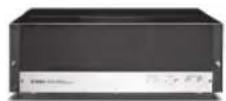
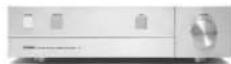
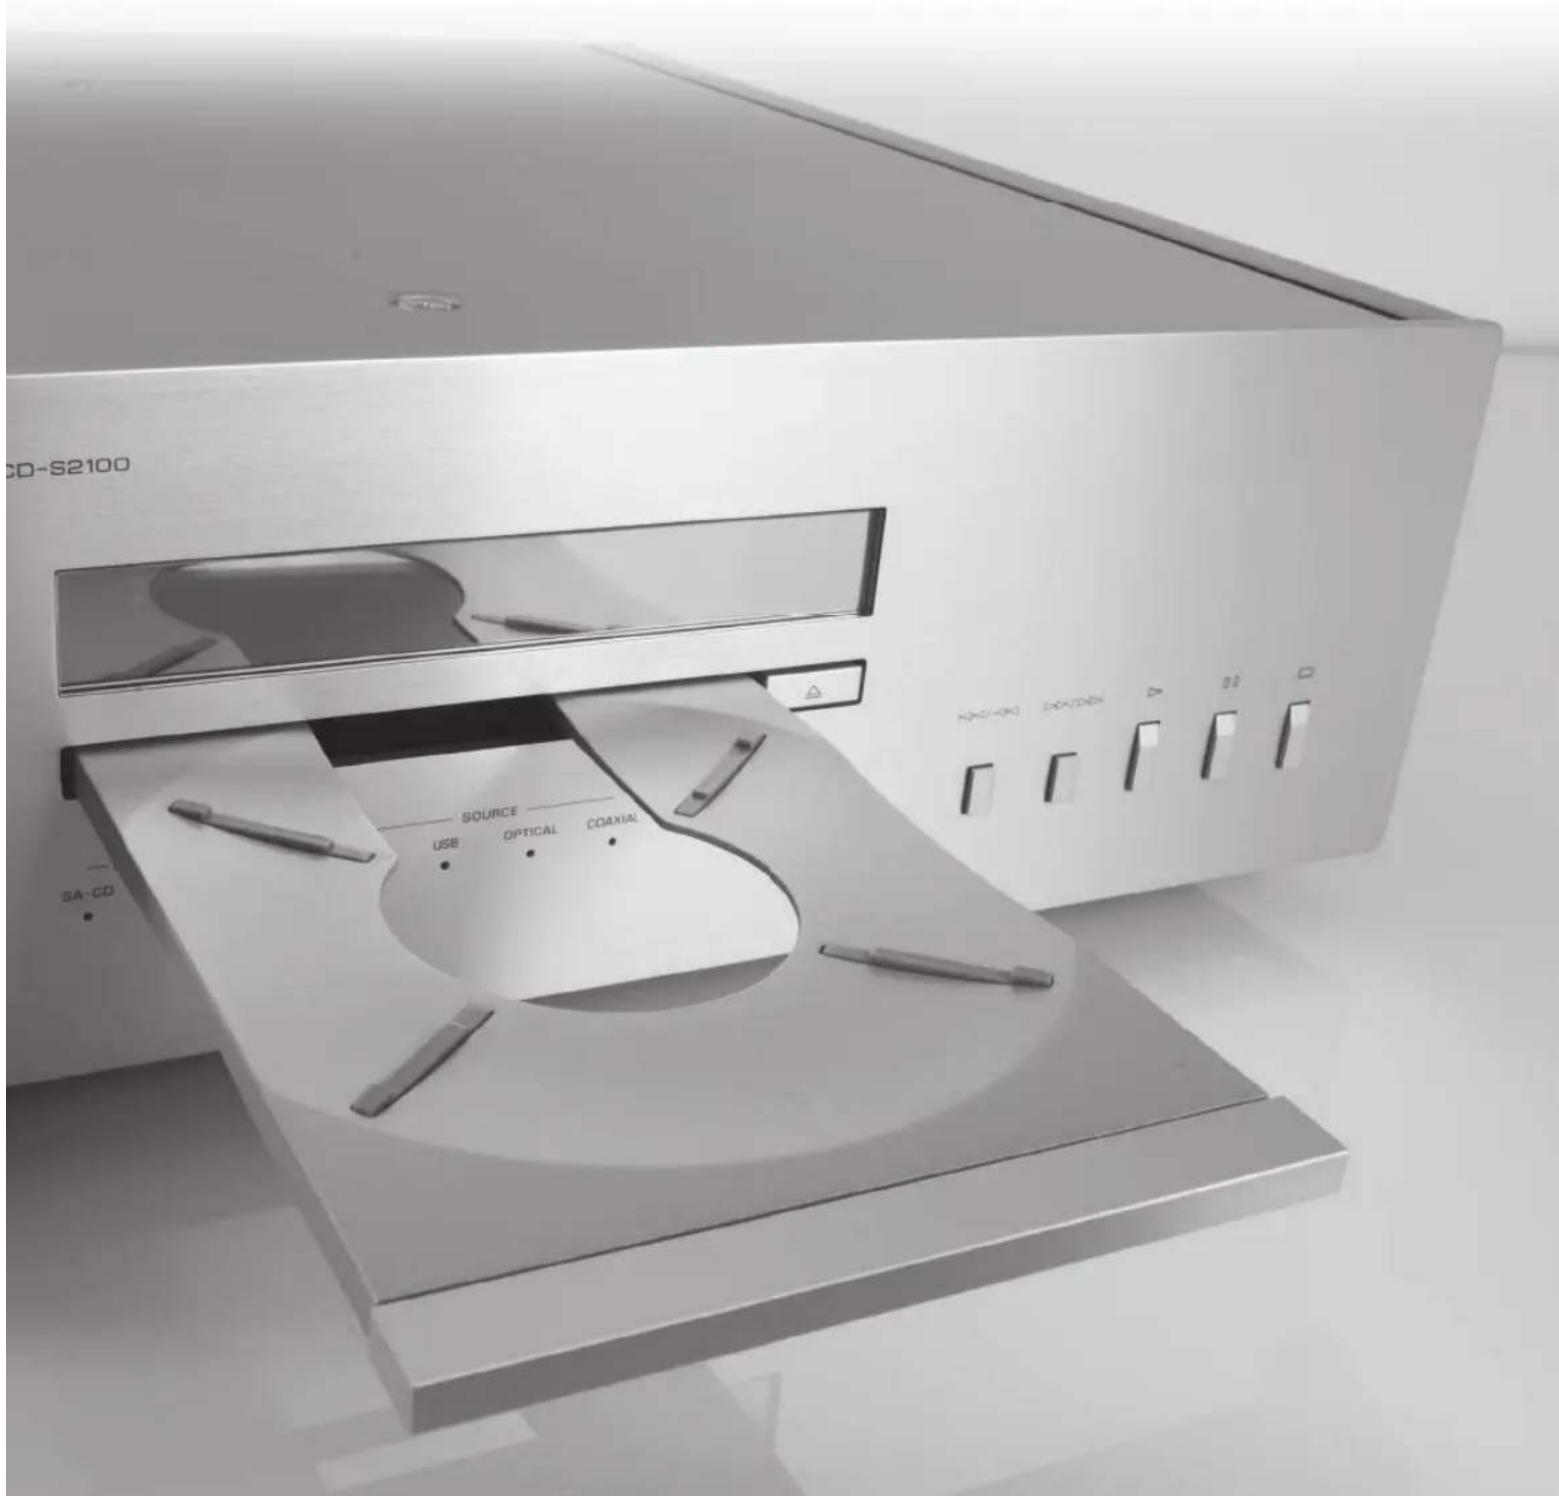
CD-S2100
Full-stage balanced signal transmission beginning with the DAC achieves the ultimate in CD reproduction
Independent power supplies with digital and analog completely separated
Exclusive Yamaha loading mechanism and high precision CD drive
Left-right symmetrical design with rigid, stable construction
Pure Direct
Super sound from Super Audio CDs
Heavy feet with newly-developed antivibration spikes
DSD playback via 192 kHz, 24-bit USB DAC
Supplied accessories
Please check that you have received all of the following parts.
Power cable
- Remote control
- Batteries (AAA, R03, UM-4) (× 2)
- Stereo pin cable
SAFETY BROCHURE
Contents
Controls and functions 6
Connections 18
Playback of music files stored on a PC 22
Specifications 26
Playable disc format. 27
Troubleshooting 29
■About this manual
indicates a tip for your operation.
- Photographs and illustrations are for explanatory purposes, and may differ from the actual unit.
- Read the "SAFETY BROCHURE" before using this unit.
Controls and functions
In this chapter, you will learn the controls and functions of CD-S2100.
Controls and functions
■Front panel (pages 6 to 9)
①STANDBY/ON, OFF switch
Turns on or off this unit.
STANDBY/ON (upper position): In this position, you can select STANDBY or ON, using the CD key on the remote control.
OFF (lower position): The power of this unit is turned off.
Notes
- When you turn on this unit, it will take a few seconds before this unit can reproduce sound.
If this unit is not operated for 30 minutes with no audio signal detected, it goes to STANDBY mode (page 14). - If you disconnect the power cable from the AC outlet and connect it again when this unit is in STANDBY mode, the power of the unit is turned on (page 20). If the unit is not to be operated for a long time, set the STANDBY/ON, OFF switch to OFF.
②STANDBY/ON indicator
Lit brightly: Shows that the power of the unit is ON. In this condition, you can switch the unit to STANDBY mode by pressing the CD key on the remote control.
Lit dimly: Shows that the unit is in STANDBY mode. In this condition, you can switch the unit on by pressing the CD key on the remote control.
Off: Shows that the power of the unit is OFF. In this condition, you can turn the power on only by pressing the STANDBY/ON, OFF switch on the front panel.
PURE DIRECT key
Allows you to enjoy high audio quality.
- Press this key again to turn off the PURE DIRECT mode.
- This setting is retained even if you turn off this unit.
Notes
When PURE DIRECT is on:
- The audio signals are output only from the BALANCED OUT jacks and the ANALOG OUT jacks.
The front panel display will show only the minimum indicators and messages.
4PURE DIRECT indicator
Lights when the PURE DIRECT mode is turned on.
⑤SOURCE key
Selects the audio source to be played back. Each time you press this key, the audio source is switched.

The audio source setting is retained even if you turn off this unit.
⑥ LAYER key
Switches the playback layer of a hybrid Super Audio CD between SA-CD and CD while playback is stopped (page 27).

This setting is retained even if you turn off this unit.
Note
When SA-CD layer is selected, audio signals are output only from the BALANCED OUT and ANALOG OUT jacks.
⑦ LAYER indicators
The indicator of the layer selected with the LAYER key lights.
⑥SOURCE indicators
The indicator of the audio source selected with the SOURCE key lights.
■Front panel (pages 6 to 9)
Remote control sensor
Receives signals from the remote control.
⑩Display
The brightness can be adjusted with the DIMMER key on the remote control (page 12).
(1) (playback) / (pause) indicator
Lights in the playback/pause mode.
② Disc type indicator
Indicates the type (SA-CD/CD/HYBRID) of the disc in the disc tray.
③Time display mode indicator
Indicates the time display mode of the display. Change the mode by pressing the DISPLAY key on the remote control (page 13).
TRACK: Elapsed time of the current track
TRACK REMAIN: Remaining time of the current track
TOTAL REMAIN: Total remaining time of the disc
⑭Playback mode indicator
Indicates the current playback mode.
PROG: Program playback (page 14)
SHUFFLE: Shuffle playback (page 13)
REP OFF: Repeat playback off (page 12)
REP S: Single repeat playback (page 12)
REP ALL: All repeat playback (page 12)
Information display
16Disc tray
Loads a disc.
(Open/Close) key
Opens or closes the disc tray.
The disc tray also closes automatically when you press:
- the Play) key on the front panel or on the remote control.
- the front edge of the disc tray gently.
- a numeric button on the remote control.
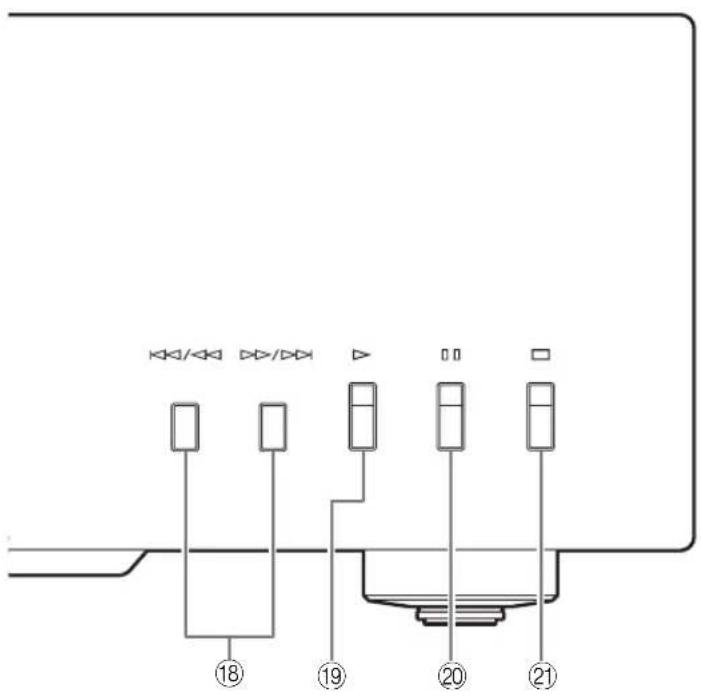
(Skip/Search backward) key
Press the key once to skip back to the beginning of the current track.
Press it twice to skip to the beginning of the previous track.
Press and hold it to search backward.
(Dep/Dep) (Skip/Search forward) key
Press the key once to skip to the next track.
Press and hold it to search forward.
19 (Play) key
Starts playback.
(Pause) key
Pauses playback. Press the key to resume playback.
② (Stop) key
Stops playback.
See page 28 for more information on MP3/WMA playback.

Rear panel
See page 18 for connection information.
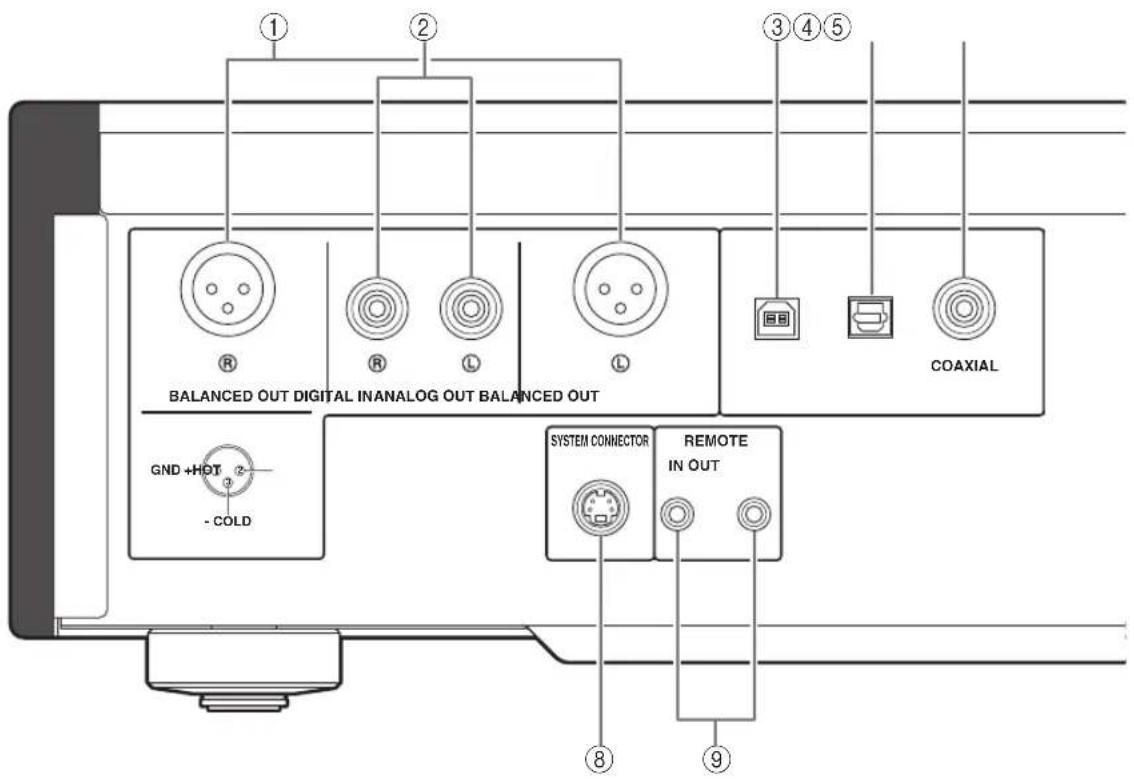
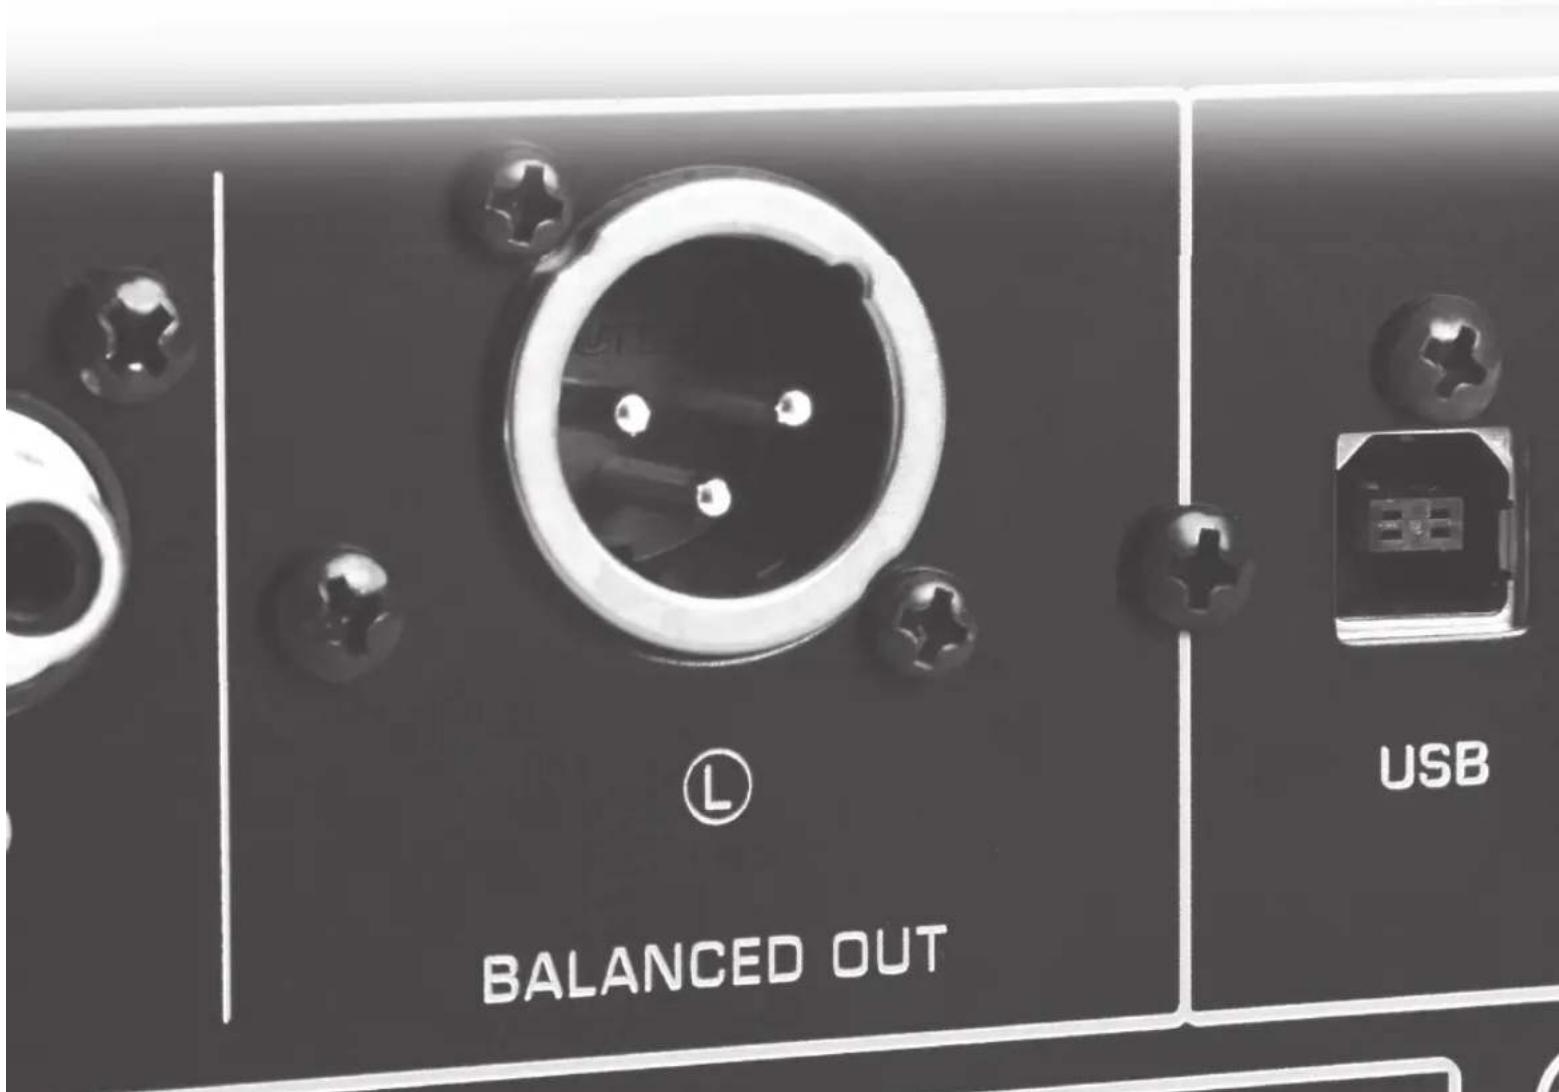
①BALANCED OUT jacks (male)
②ANALOG OUT jacks
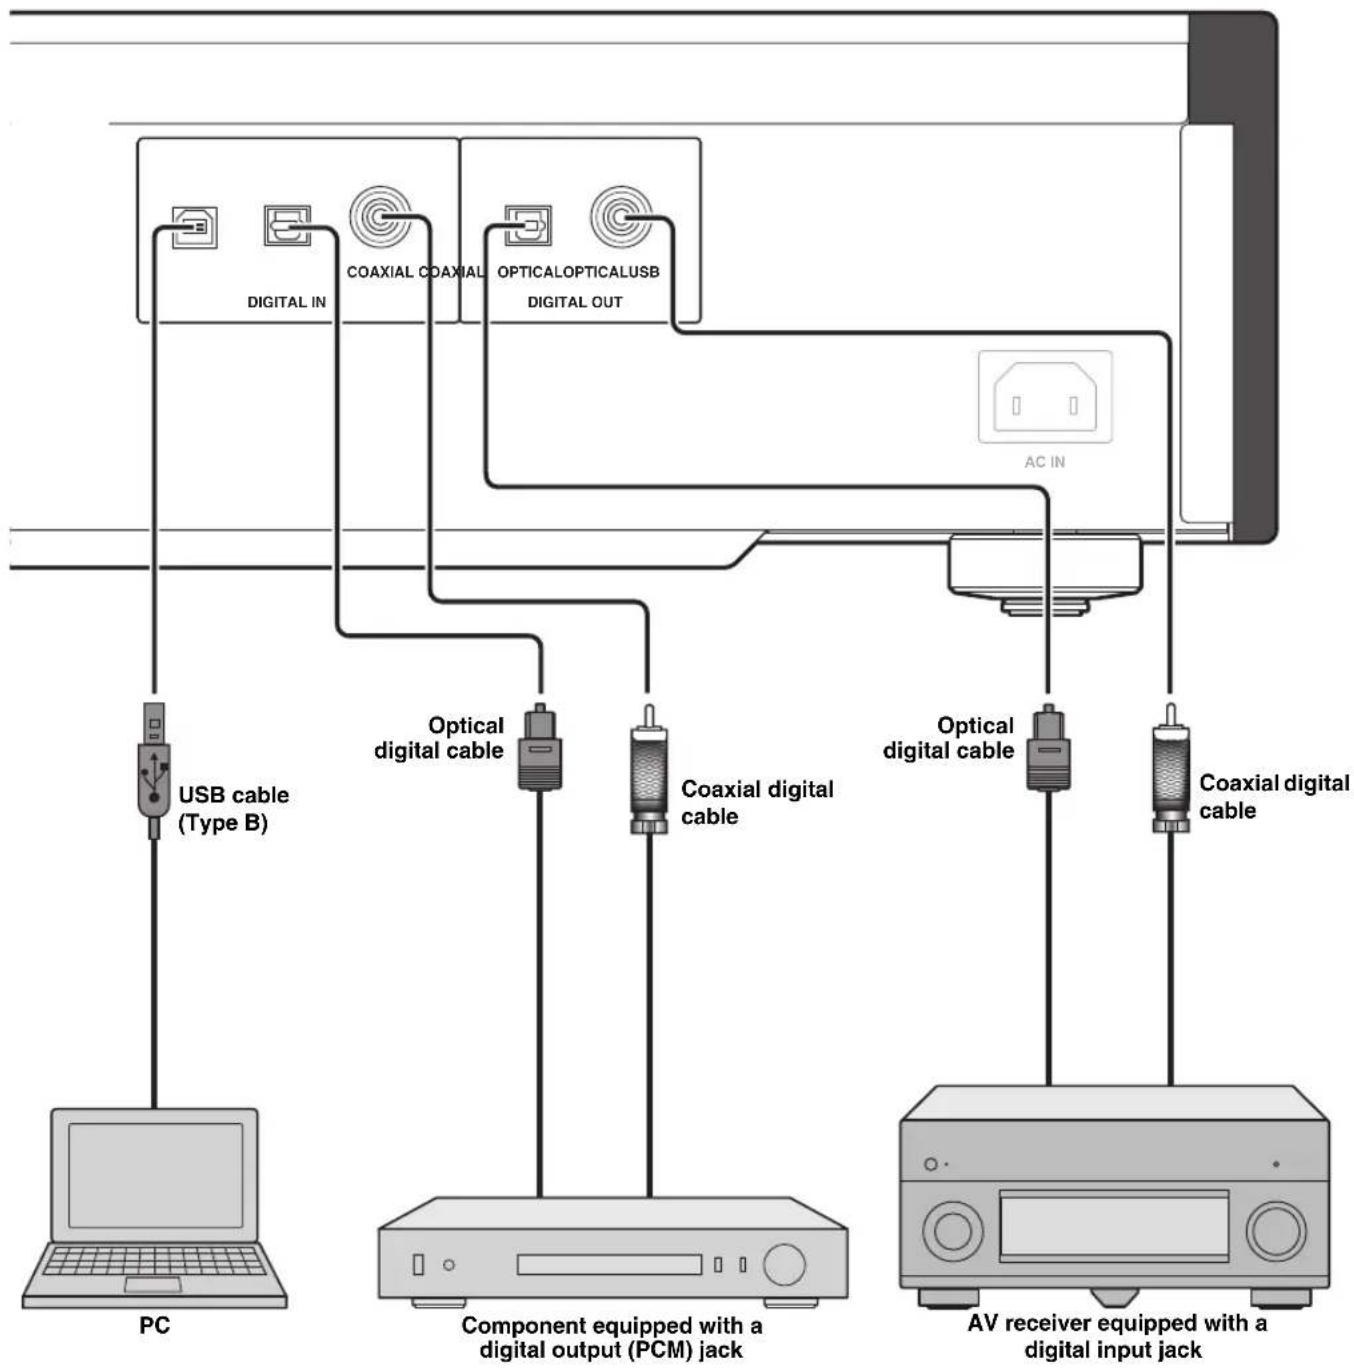
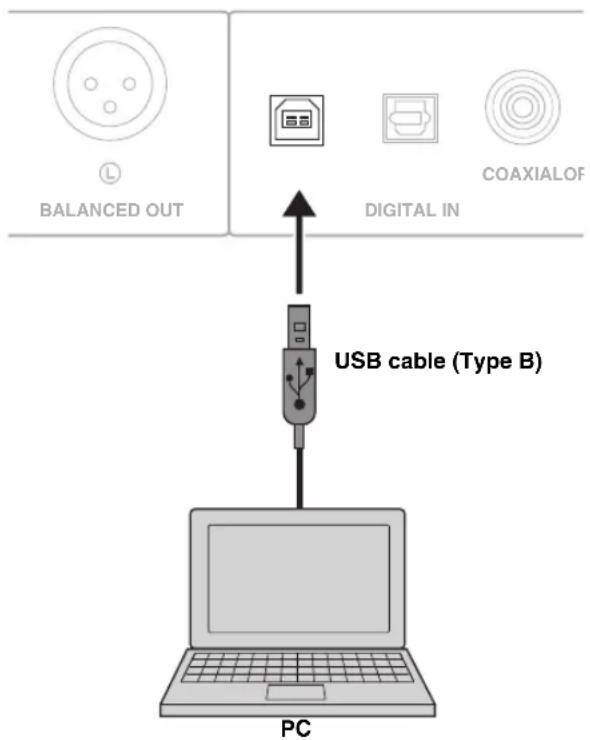
③ DIGITAL IN USB jack (Type B)
④ DIGITAL IN OPTICAL jack
⑤ DIGITAL IN COAXIAL jack
⑥ DIGITAL OUT OPTICAL jack
⑦DIGITAL OUT COAXIAL jack
Note
While playing the SA-CD layer, the audio signals are output only from the BALANCED OUT and ANALOG OUT jacks.
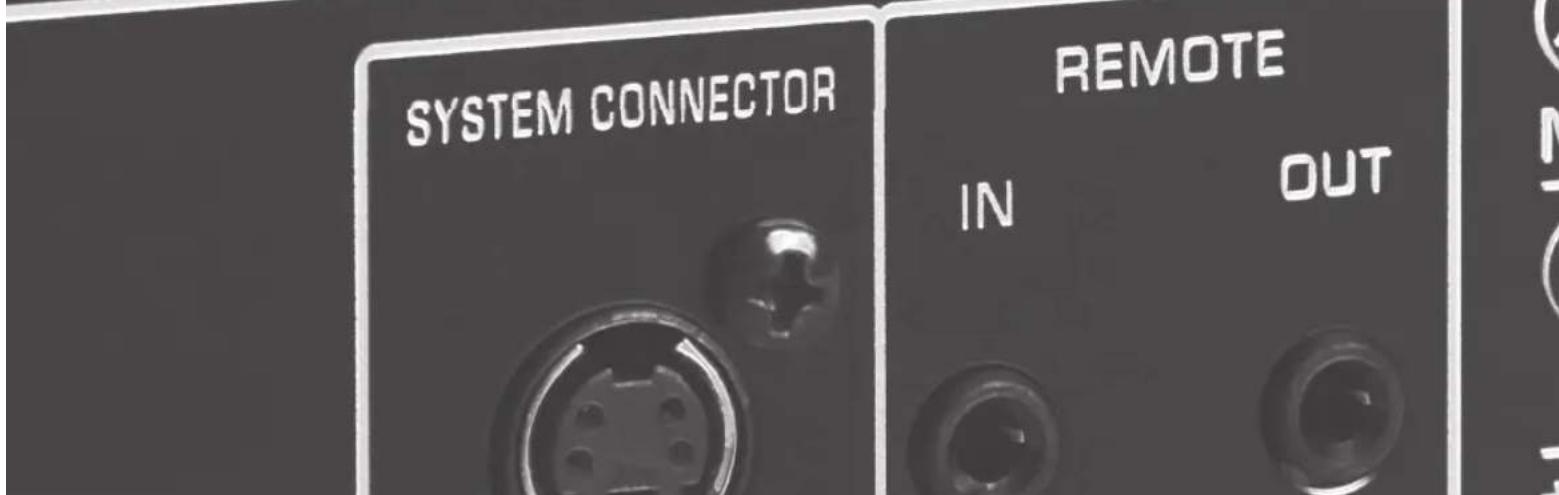
SYSTEM CONNECTOR
Use this connector to connect a product testing device for servicing.
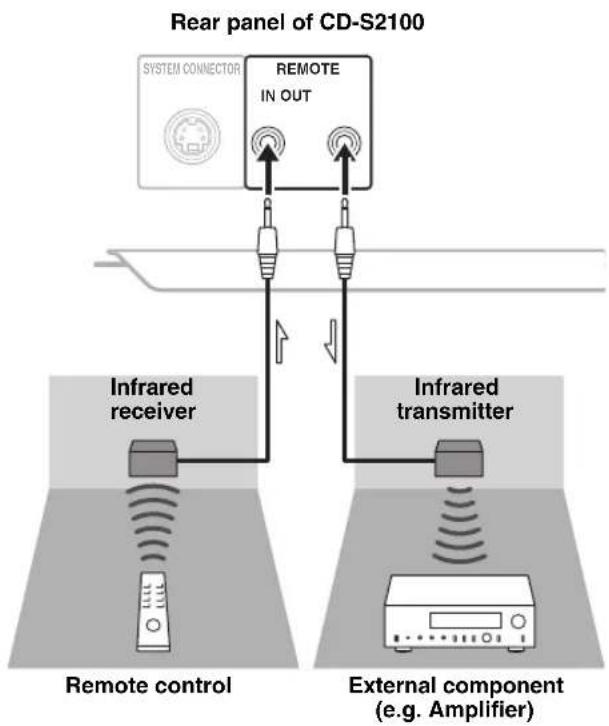
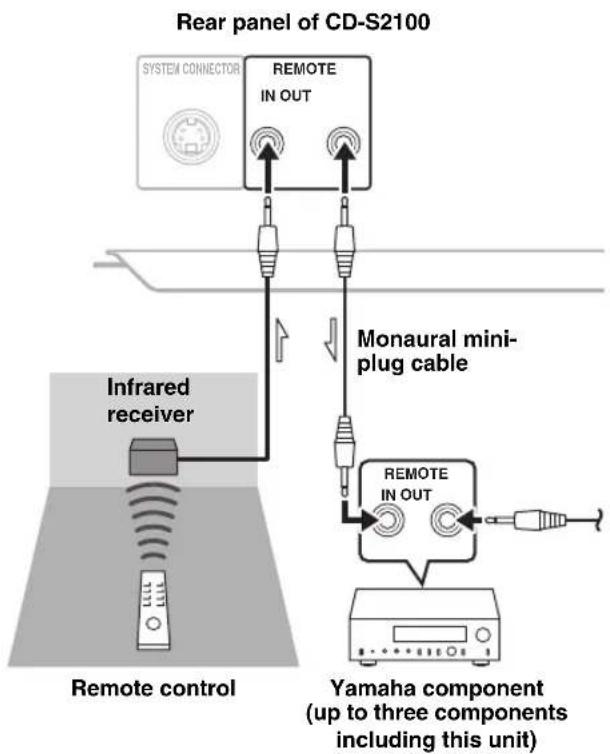
⑨REMOTE IN/OUT jacks
Use these jacks to connect an external component for remote operation.
For details on the connection, see page 21.
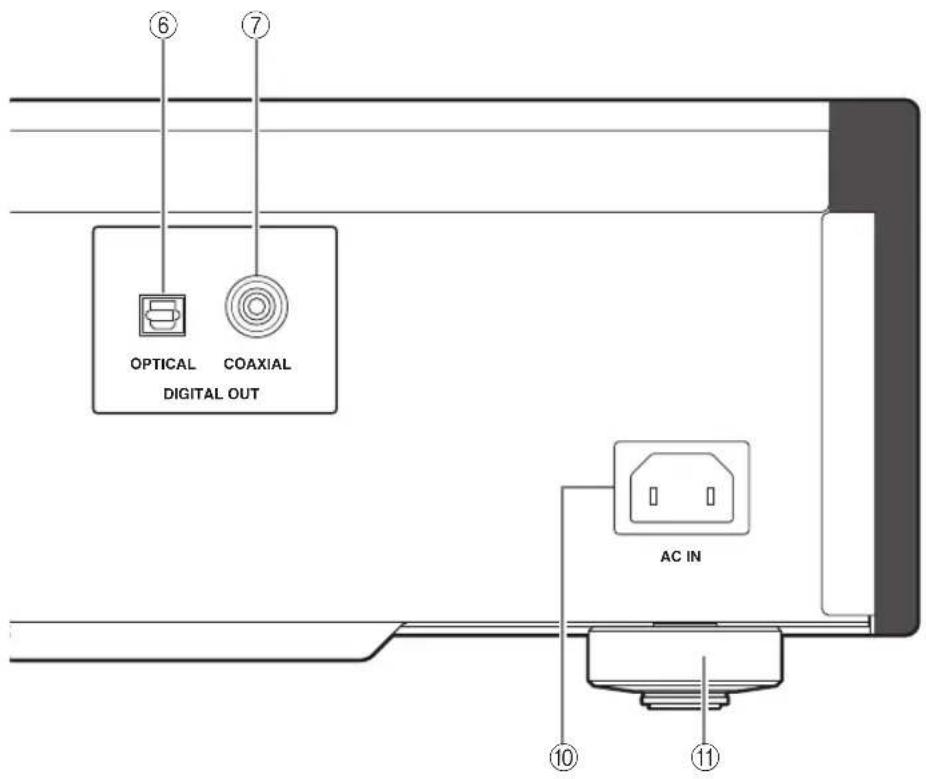
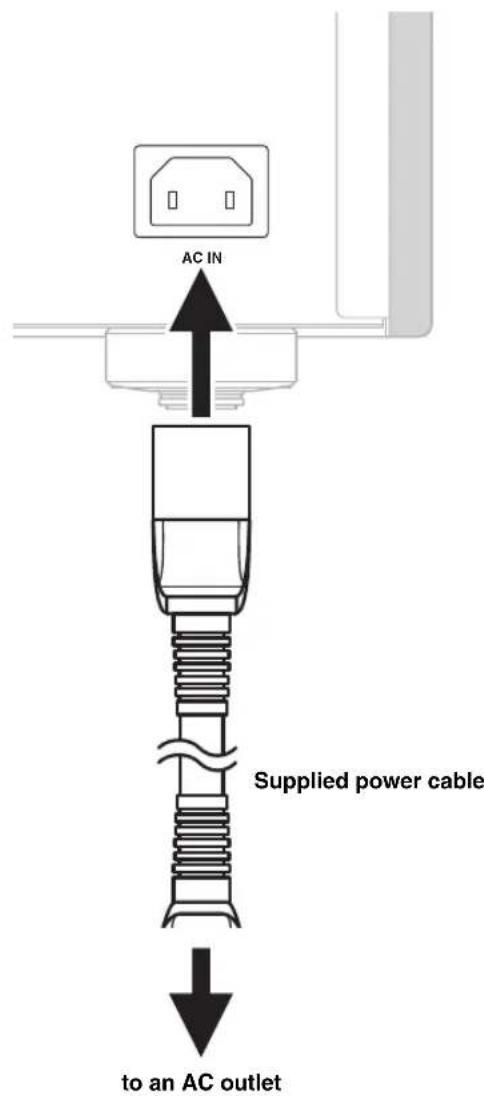
⑩ AC IN inlet
Use this inlet to plug in the supplied power cable. See page 20 for connection information.
⑪Foot
The feet of this unit include built-in spikes. Using the spikes can reduce the effect of vibrations on the set. When using the spikes, remove the transport tape, then remove the magnet foot by pulling it.
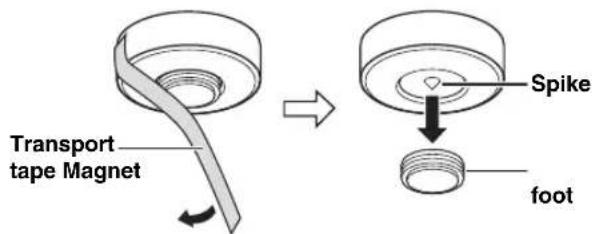
Caution
Take care that the magnet foot is not accidentally swallowed by small children.
- When using the feet's built-in spikes, the spikes may scratch the shelf or floor on which this unit is installed. Use the magnet feet or appropriate supports when placing this unit on expensive furniture, etc.
#
If this unit is unstable, you can adjust the foot height by rotating it.
Remote control
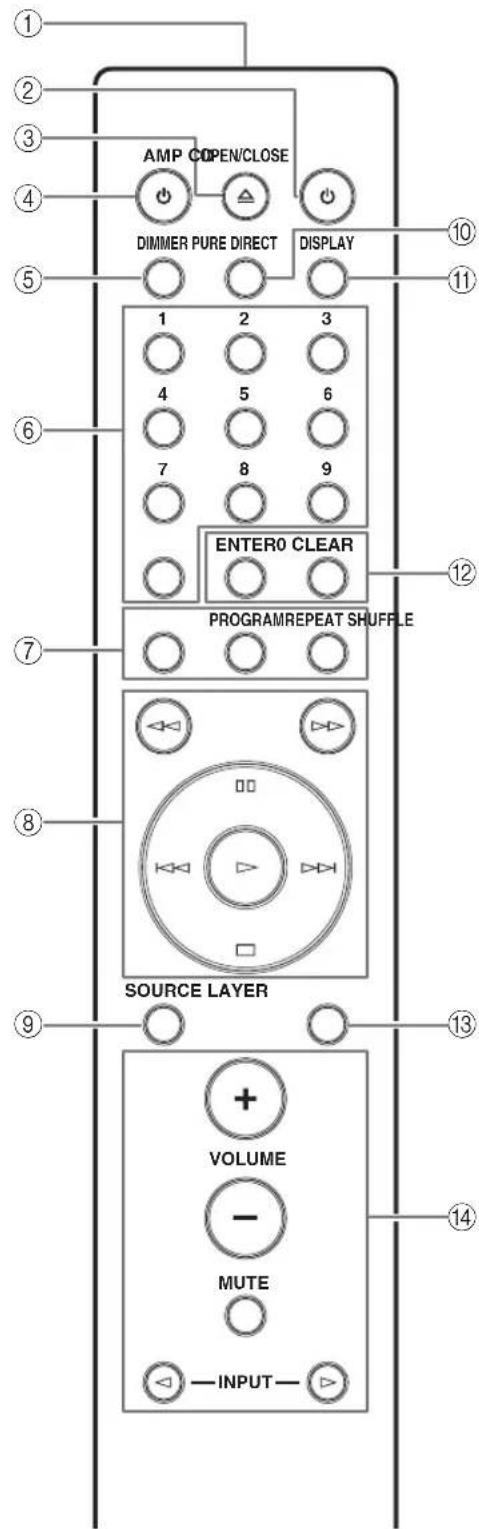
① Infrared signal transmitter
Sends infrared signals to this unit.
CD key
Turns this unit ON or switches it to STANDBY mode. For details on STANDBY, see "Front panel" (page 6).
③ OPEN/CLOSE key
Opens or closes the disc tray.
④ AMP key
Turns the Yamaha amplifier ON or switches it to STANDBY mode.
Note
Some Yamaha amplifiers cannot be controlled with the AMP key of this remote control.
⑤ DIMMER key
Selects the brightness level for the front panel display. Each time you press the DIMMER key, the brightness level changes in the following order:


This setting is retained even if you turn off this unit.
⑥Numeric buttons
Use to select a track directly.
Note
This operation is ineffective for MP3 or WMA discs.
⑦REPEAT key
Repeats playback of a single track or all tracks. Each time you press the REPEAT key during playback, the repeat playback mode changes as follows:
REP OFF (repeat playback off):
Repeat playback is cancelled.
REP S (single repeat playback):
On reaching the end of the current track, playback repeats from the beginning of the current track.
REP ALL (all repeat playback):
On reaching the end of the last track, playback repeats from the beginning of the first track.
Note
This operation is ineffective for MP3 or WMA discs.
PROGRAM key
Turns on or off the program playback mode. See "Program playback" (page 14).
SHUFFLE key
Performs shuffle playback.
Notes
- This operation is ineffective for MP3 or WMA discs.
- The shuffle playback mode is cancelled when playback is stopped or the disc is ejected.
(8) (Search backward) key
(Search forward) key
Searches tracks backward/forward.
(Pause) key
Pauses playback. Press the key to resume playback.
(Play) key
Starts playback.
_u^u (Skip backward) key
Press the key once to skip back to the beginning of the current track.
Press it twice to skip to the beginning of the previous track.
( > (Skip forward) key
Press the key once to skip to the next track.
(Stop) key
Stops playback.
SOURCEkey
Selects the audio source to be played back. Each time you press this key, the audio source is switched as shown below.
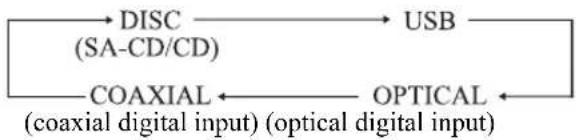
中
The audio source setting is retained even if you turn off this unit.
PURE DIRECT key
Allows you to enjoy high audio quality.
中
- Press this key again to turn off the PURE DIRECT mode.
- This setting is retained even if you turn off this unit.
Notes
When PURE DIRECT is on:
The audio signals are output only from the BALANCED OUT jacks and the ANALOG OUT jacks.
The front panel display will show only the minimum indicators and messages.
⑪DISPLAYkey
Switches the time display. Each time you press the DISPLAY key during playback, the time display changes as follows:
TRACK: Elapsed time of the current track
TRACK REMAIN: Remaining time of the current track
TOTAL REMAIN: Total remaining time of the disc
⑫ENTER key
Confirms a track number entered when you are programming tracks.
CLEAR key
Erases the last programmed track when this unit is in the program editing mode. See "Program playback" (page 14).
#
To erase all programmed tracks, press the CLEAR key while programmed playback is stopped.
⑬ LAYER key
Switches the playback layer of a hybrid Super Audio CD between SA-CD and CD while playback is stopped (page 27).
中
This setting is retained even if you turn off this unit.
Note
When SA-CD layer is selected, audio signals are output only from the BALANCED OUT and ANALOG OUT jacks.
④ Yamaha amplifier operation keys
Operates the Yamaha amplifier.
Refer to the owner's manual of your amplifier for details.
Note
Some Yamaha amplifiers cannot be controlled with the keys of this remote control.
See page 28 for more information on MP3/WMA playback.
■Program playback
In the program playback mode, you can play back tracks in a programmed sequence.
1Press PROGRAM while playback is stopped.
This unit is set to the program editing mode.
2Select a track by using the numeric buttons and press ENTER.
3Repeat step 2 to program the next track.
You can program up to 24 tracks.
4 Press the (Play) key.
Playback starts from the beginning of the programmed sequence.
Notes
- This operation is ineffective for MP3 or WMA discs.
-
The programmed tracks are erased in the following cases:
-
when the disc is ejected
- when this unit is turned off or goes to STANDBY mode
- when an audio source other than the disc is selected
- when the playback layer of a hybrid Super Audio CD is switched between SA-CD and CD
Setting the AUTO POWER STANDBY function
The AUTO POWER STANDBY function can be set to ON or OFF. When set to ON, if the unit is not operated for 30 minutes with no audio signal detected, it automatically goes to STANDBY mode. When set to OFF, the unit does not go to STANDBY mode automatically.
1Open the disc tray and remove any currently-loaded disc from the unit.
Skip step 1 to 3 if "NO DISC" appears on the information display.
2Close the disc tray.
3Press SOURCE to select "DISC" as the audio source.
"NO DISC" appears on the information display.
4Press and hold the (Stop) key or (Play) key on the front panel for about 2 seconds to switch the setting.
(Stop) key: The AUTO POWER STANDBY function switches to ON, and "AutoSTBY ON" appears on the information display.
(Play) key: The AUTO POWER STANDBY function switches to OFF, and "AutoSTBY OFF" appears on the information display.
Notes
- The default setting for the AUTO POWER STANDBY function is ON.
- This setting is retained even if you turn off this unit.
Setting the DPLL (Digital Phased Lock Loop) bandwidth
The audio DAC (ES9016) of this unit employs DPLL to generate accurate clock signals synchronized with the clock of the input digital audio signal. The 7-step DPLL bandwidth setting gives the unit tolerance for fluctuation of the clock of the input digital signal and adjustment of the accuracy of the operating clock in the DAC.
1Press SOURCE to select the audio source to be played back.
The DPLL bandwidth can be set for each audio source, respectively.
2Within 5 seconds after selecting the audio source, press ENTER.
The unit enters the setting mode, and the DPLL bandwidth currently set appears on the information display.
3Select the DPLL bandwidth using the (pause) key and the stop) key.
Each time the pause) key is pressed, the bandwidth changes in the following order. If you press the stop) key, it changes in reverse order.
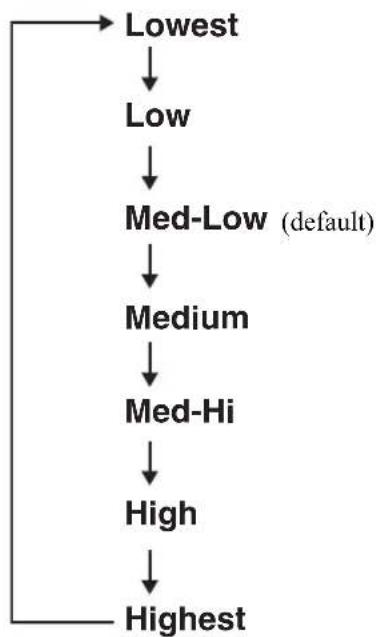
4Press ENTER.
The setting value flashes for 3 seconds, then the unit resumes to normal mode.
To cancel the setting, press CLEAR.
Notes
- As the DPLL bandwidth setting value approaches "Lowest," the accuracy of the operating clock in the DAC improves, but the unit may be susceptible to a change in the clock of the external component. The sound from such a component may more easily skip.
- As the DPLL bandwidth setting value approaches "Highest," the accuracy of the operating clock in the DAC deteriorates, but the unit is far less susceptible to a change in the clock of the external component, and the sound from such a component hardly skips.
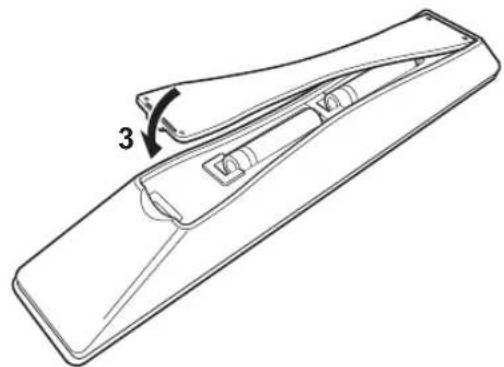
■Installing batteries in the remote control
1Remove the battery compartment cover.
2Insert the two batteries (AAA, R03, UM-4) according to the polarity markings (+ and -) on the inside of the battery compartment.
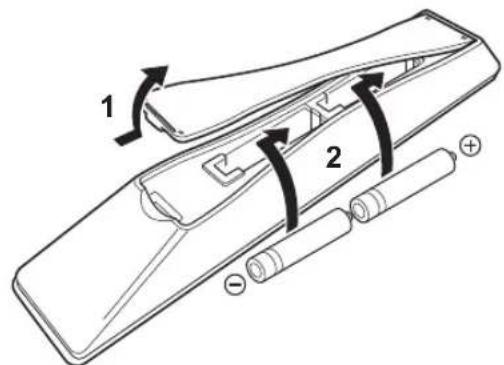
3Reinstall the battery compartment cover.
Operating range of the remote control
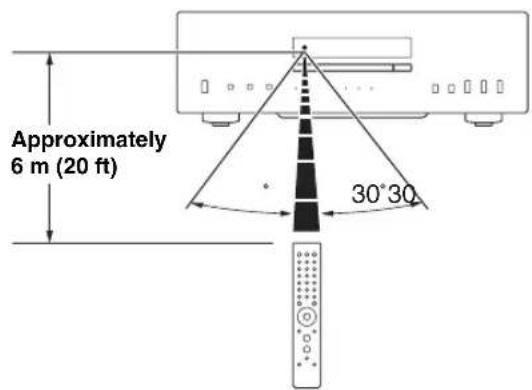

The remote control transmits a directional infrared beam. Be sure to aim the remote control directly at the remote control sensor on the front panel of this unit during operation.
Connections
In this section, you will make connections between CD-S2100 and your amplifier.
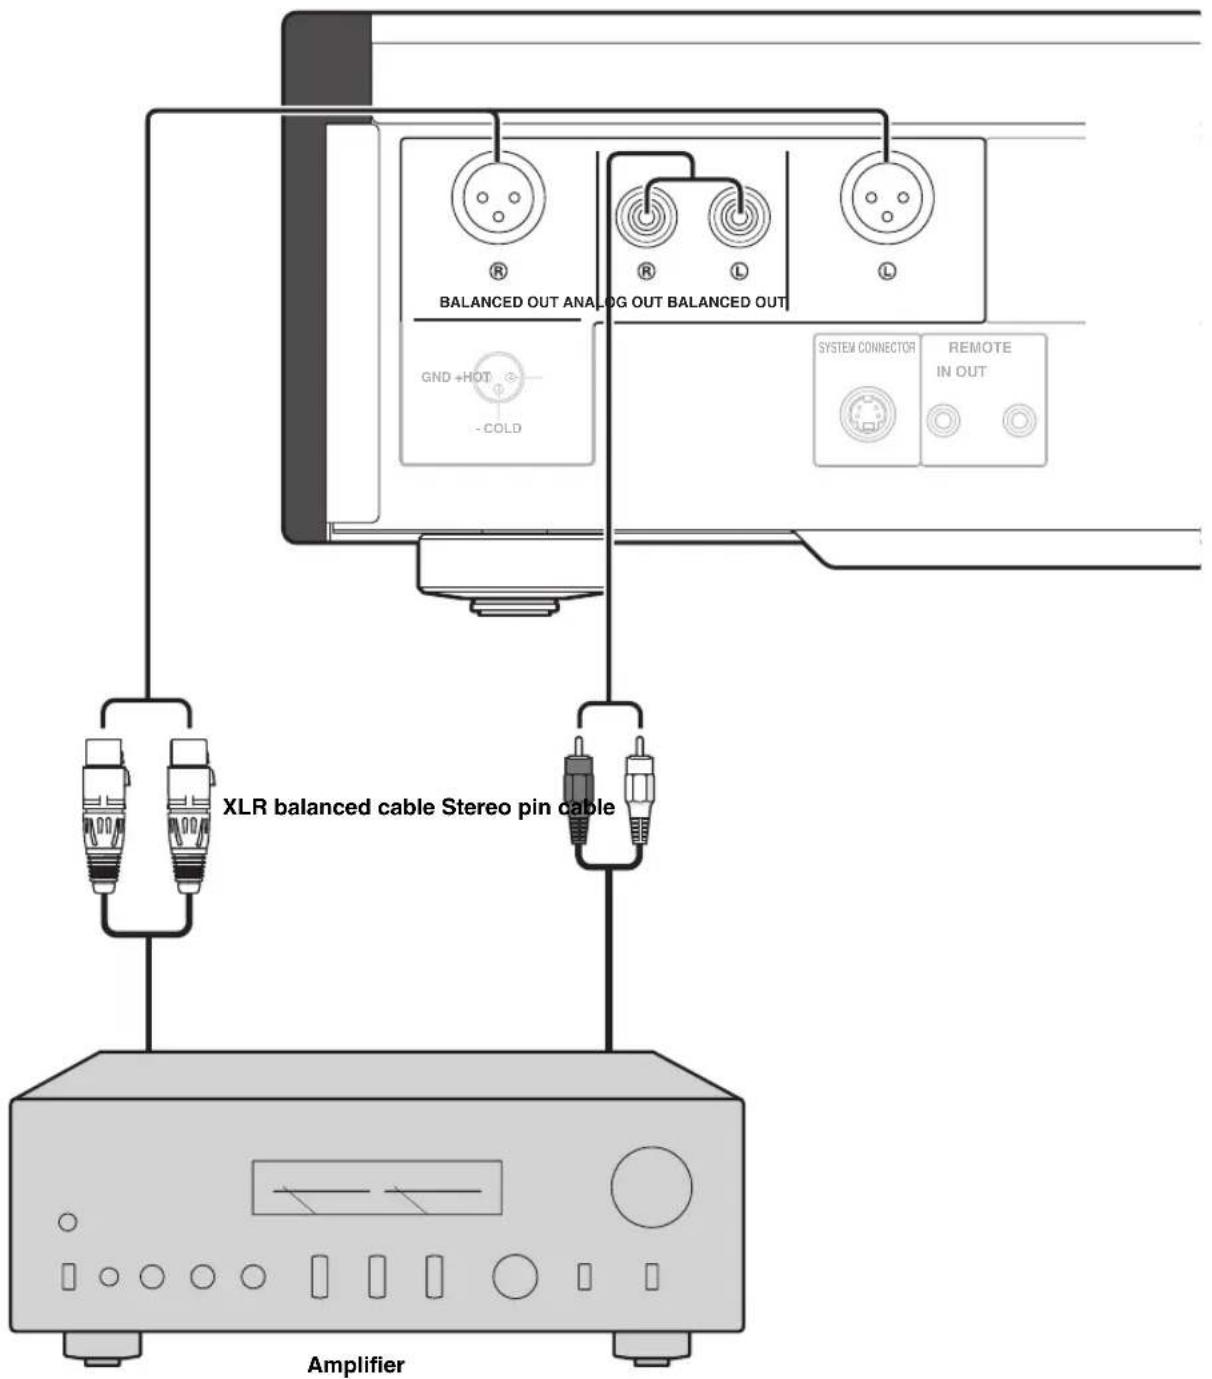
If your amplifier is equipped with XLR balanced input jacks, we recommend balanced connection for optimum audio performance.
When the SA-CD layer is played, the audio signals are output only from the BALANCED OUT and ANALOG OUT jacks.
Note
Only PCM signals can be input to the DIGITAL IN (OPTICAL/COAXIAL) jacks of this unit. For details on the supported PCM signals, see page 26.
Connecting to the BALANCED OUT jacks
Connect your amplifier with the XLR balanced input.
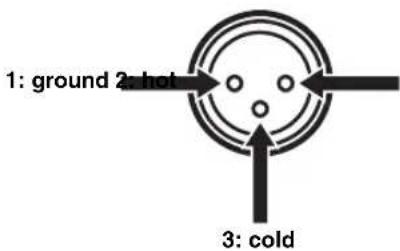
jacks. The pin assignments for these jacks are shown below. Refer to the owner's manual supplied with your amplifier and verify that its XLR balanced input jacks are compatible with the pin assignments.
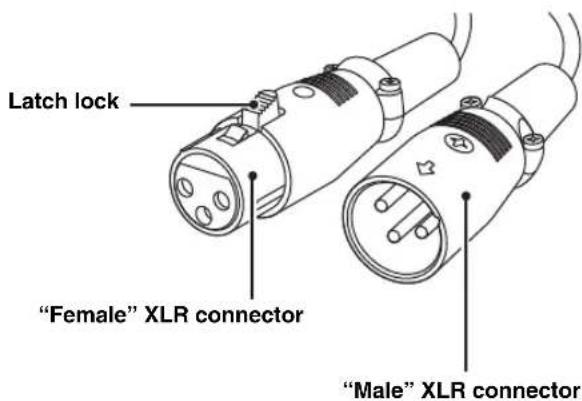
When connecting, be sure to match the pins and insert the connector of the "female" XLR balanced cable. When disconnecting, pull out the "female" XLR balanced cable while pressing down the latch lock on the plug.
Connecting the power cable
Plug the power cable into the AC IN inlet when all connections are complete, and then plug in the power cable to the AC outlet.
Rear panel of CD-S2100
■Operating this unit from another room
If you connect an infrared receiver and transmitter to the REMOTE IN/OUT jacks of this unit, you can operate the unit and/or external component using the supplied remote control located in another room.
Remote connection between Yamaha components
When you have another Yamaha component supporting remote connection, as this unit does, an infrared transmitter is not necessary. You can transmit remote signals by connecting an infrared receiver and the REMOTE IN jack of the other component to the REMOTE IN/OUT jacks of this unit, using cables with monaural miniplugs.
Up to three Yamaha components (including this unit) can be connected.

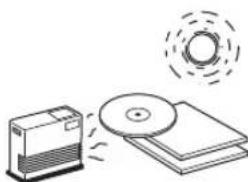
When a PC is connected to the USB jack of this unit, the unit functions as a USB DAC, enabling music files stored on the PC to be played via an amplifier connected to the unit.
Rear panel of CD-S2100
Supported operating systems
The USB connection with this unit is for PCs with the following operating systems:
Windows: Windows Vista (SP2, 32bit/64bit)/
Windows 7 (32bit/64bit)/
Windows 8 (32bit/64bit)
Mac: OS X 10.5.8/10.6.8/10.7.x/10.8.x
Notes
- Operations with other operating systems are not guaranteed.
- Operations may be disabled even with the above-mentioned operating systems, depending on the configuration or environment of the PC.
- Operations may not be executed correctly if the PC is connected to this unit before the driver is installed.
■Installing the dedicated driver
Before connecting a PC to this unit, install the dedicated driver on the PC.
1Access the following URL, download the dedicated "Yamaha Steinberg USB Driver," then extract and execute the file.
Website for downloading the exclusive driver URL: http://download.yamaha.com/
2Install the downloaded "Yamaha Steinberg USB Driver" on the PC.
For details, refer to the Installation Guide supplied with the downloaded driver.
3When installation is complete, quit all running applications.
4Set the audio output destination of the computer to "Yamaha CD Player."
With Windows OS:
Control Panel Sound [Playback] tab With Mac OS:
System Preferences Sound [Output] tab
The setting may vary, depending on the operating system. For details, consult the manufacturer of your PC.

Transmittable sampling frequencies are as follows:
44.1 kHz/48 kHz/88.2 kHz/96 kHz/176.4 kHz/192 kHz
Notes
- Operations may not be executed correctly if the PC is connected to this unit before the driver is installed.
- When the driver is installed on a Windows XP computer, the operation speed of the computer may be reduced. In such a case, restart the computer.
- The "Yamaha Steinberg USB Driver" is subject to change without prior notice. For details and the latest information, refer to the download page for the driver.
■Playing back music files stored on the PC
1Connect the PC to this unit, using a USB cable.
2Turn on the PC.
3Turn this unit on by pressing the STANDBY/ON, OFF switch on the front panel.
4Select "USB," using the SOURCE key.
5Set the audio output destination of the PC to "Yamaha CD Player."
With Windows OS:
Control Panel Sound [Playback] tab
With Mac OS:
System Preferences Sound [Output] tab
The setting may vary, depending on the operating system. For details, consult the manufacturer of your PC.
6Operate the PC to start playback of music files.
When the music signal is fed from the PC to the unit, the sampling frequency of the file being played is indicated on the display of the unit.
Adjusting the sound volume
To obtain higher sound quality, set the sound volume at the PC to the maximum, and gradually increase the volume at the amplifier from the minimum to your desired level.
Notes
- Do not disconnect the USB cable, turn off the unit, or change the input with the SOURCE key while playback on a PC connected via the USB cable is in progress. Doing so may cause a malfunction.
- To mute operation sounds of the PC during music playback, change the setting on the PC.
- If music files cannot be played correctly, restart the computer and perform the mentioned procedure again.
- The music files stored on a PC cannot be controlled from this unit or the remote control of this unit. Operate them on the PC.
Specifications
In this section, you will find technical specifications for CD-S2100.
AUDIO SECTION
- Frequency Response (1 kHz, 0 dB)
SA-CD 2 Hz to 50 kHz (-3 dB)
CD 2 Hz to 20 kHz - Playback Frequency Range. 2 Hz to 96 kHz
Harmonic Distortion (1 kHz, 0 dB)
SA-CD 0.002% or less
CD 0.002% or less - Signal to Noise Ratio (IIIF-A Network) (1 kHz, 0 dB)
SA-CD/CD 116 dB or more - Dynamic Range (1 kHz, 0 dB)
SA-CD 110 dB or more
CD 100 dB or more - Output Level (1 kHz, 0 dB)
SA-CD/CD 2.0 ± 0.3 V
LASER DIODE PROPERTIES
Wavelength SA-CD 655 nm CD 790 nm
Output Power SA-CD 1.89 mW (max) CD 1.36 mW (max)
INPUT/OUTPUT SECTION
- Digital Input (DIGITAL IN)
USB (Type B) × 1 USB 2.0 compliant OPTICAL × 1 COAXIAL × 1 Support audio sample rate 44.1/48/88.2/96/176.4/192 kHz Word depths 16 bit/24 bit - Digital Output (DIGITAL OUT)
OPTICAL × 1
COAXIAL × 1
Support audio sample rate 44.1/48/88.2/96/176.4/192 kHz
Word depths 16 bit/24 bit - Audio Output
ANALOG OUT Unbalanced × 2 ch (L/R)
BALANCED OUT Balanced × 2 ch (L/R)
Remote Input/Output REMOTE IN REMOTE OUT - System Connector SYSTEM CONNECTOR
GENERAL
- Power Supply [China, Korea, Asia, Australia, U.K. and Europe models] AC 220 - 240 V, 50/60 Hz [U.S.A, Canada and Taiwan models] AC 110 - 120 V, 60 IIz
Power Consumption 30 W - Standby Power Consumption (reference data)
[U.S.A, Canada, Taiwan, China, Korea, Asia and Europe models]. 0.3 W
[Australia and U.K. models]. 0.4 W - Dimensions (W × H × D) 435 × 137 × 438 mm (17-1/8" × 5-3/8" × 17-1/4")
Weight 15.6 kg (34.4 lbs) - Specifications are subject to change without notice.
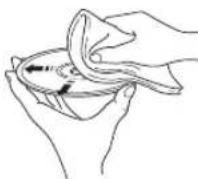
Taking care of this unit
Polish finish on the side panels
Use of Yamaha Unicon cloth (sold separately) is recommended. For heavy dirt, use Yamaha Piano Unicon (sold separately). For pusing, contact your nearest authorized Yamaha dealer or service center.
Other finish
When you wipe this unit, do not use chemical solvents (alcohol, thinner, etc.), which might damage the finish. Use a clean, dry cloth. For heavy dirt, dampen a soft cloth in detergent diluted with water, wring it out, and clean this unit with the cloth.
Supported disc types
This unit is designed to play back compact discs bearing the marks shown below. Never attempt to load any other types of discs into this unit. This unit can also play back 8-cm (3-inch) compact discs.
Super Audio CD

SUPER AUDIO CD
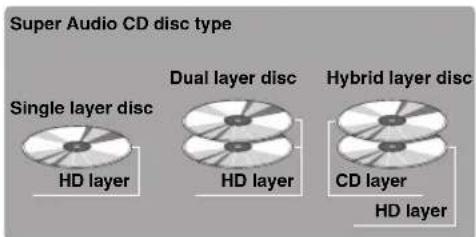
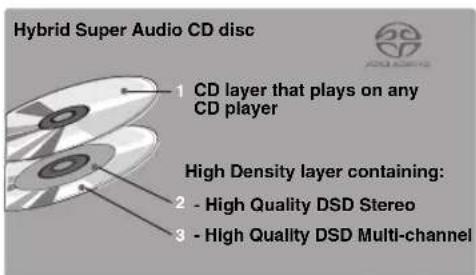
Audio format based upon the current CD standards but includes a greater amount of information that provides higher quality sound. There are three types of discs: single layer, dual layer and hybrid discs. The hybrid disc can be played on existing CD players as well as Super Audio CD players since it contains both standard audio CD and Super Audio CD information.
Note
This unit does not show text data on the front panel display.
Compact discs (digital audio)

The most popular discs for commercially available audio CDs.
CD-R, CD-RW digital audio discs


Music CDs made by copying onto a CD-R or CD-RW (including MP3 or WMA format files).
Notes
- Be sure to use a CD-R or CD-RW disc made by a reliable manufacturer.
- Be sure to use a CD-R or CD-RW disc which has at least one of the following phrases on the disc or disc case.
FOR CONSUMER
FOR CONSUMER USE
FOR MUSIC USE ONLY
- Be sure to use a finalized CD-R or CD-RW disc.
CD-TEXT discs

The discs recorded with text data such as album titles, track titles, and artist names. These discs can be played back with ordinary CD players.
Note
This unit does not show text data on the front panel display.
NOTE:
This unit may not be able to play back some CD-RW discs or discs on which recording was not made correctly.
To prevent a malfunction of this unit:
- Do not use any nonstandard shaped disc (heart, etc.) available in the market as it might damage this unit.
- Do not use a disc with tape, seals, or paste on it. Such a disc may get stuck in this unit or cause damage to this unit.

About MP3 and WMA discs
You can play back MP3 and WMA files recorded on a CD-R or CD-RW with similar uses as a music CD.
MP3
MP3 (MPEG-1 Audio Layer-3) is a standard technology and format for compressing an audio sequence into a small-sized file. However, the original level of sound quality is preserved during playback.
Notes
- This unit plays back MP3 files in alphanumeric order.
- Up to 648 folders and files (combined) and up to 299 folders are recognized; however, some folders and files may not be recognized depending on their directory structure.
- Depending on recording conditions such as recording software settings, this unit may not be able to play back the disc or files in the order they were recorded.
- This unit is compatible with a sampling frequency of 44.1kHz .
- This unit is compatible with a bitrate of 32, 40, 48, 56, 64, 80, 96, 112, 128, 160, 192, 224, 256, or 320 kbps. Variable bitrate is not supported.
- The disc must be ISO9660 compatible.
The text data contained in the files are not displayed on this unit.
WMA
WMA (Windows Media Audio) is a Microsoft file format for encoding digital audio files similar to MP3 although WMA can compress files at a higher rate than MP3.
Notes
- This unit plays back WMA files in alphanumeric order.
- Up to 648 folders and files (combined) and up to 299 folders are recognized; however, some folders and files may not be recognized depending on their directory structure.
- This unit is compatible with a sampling frequency of 44.1kHz .
- This unit is compatible with a bitrate of 48, 64, 80, 96, 128, 160, or 192 kbps. Variable bitrate is not supported.
- The disc must be ISO9660 compatible.
Copyright-protected WMA files cannot be played back with this unit. - The text data contained in the files are not displayed on this unit.
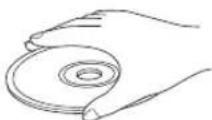
■Handling compact discs
- Always handle a disc with care so that its surface is not scratched.
- Compact discs are rarely worn out during playback, but damage to the disc surface when the disc is being handled can adversely affect the disc playback.
- Be sure to use a felt-tip pen or similar writing tool when writing on the label side of a disc. Do not use a ball-point pen, pencil, or other hard-tipped writing tools as these may damage the disc and may adversely affect the disc playback.
- Do not warp discs.
- When a disc is not currently being used, remove it from this unit and store it in an appropriate case.
- When removing or storing a disc, be careful not to scratch the playing surface.
- Compact discs are not affected by small particles of dust or fingerprints on their playing surface, but even so they must be kept clean. Wipe the disc surface with a clean, cry cloth. Do not wipe the disc surface with a circular motion; wipe it straight outward from the center.
- Do not try to clean the disc surface with any type of disc cleaner, record spray, anti-static spray or liquid, or any other chemical-based liquid as such substances may irreparably damage the disc surface.
- Do not expose discs to direct sunlight, high temperature, or high humidity for a long period of time as these conditions may warp or otherwise damage the disc.
- To play back an 8-cm (3-inch) compact disc, place it in the inner recessed area of the disc tray. Do not put a normal 12-cm CD on top of an 8-cm CD.
Refer to the chart below if this unit does not function properly. If the problem you are experiencing is not listed below or if the instructions below do not help, turn off this unit, disconnect the power cable, and contact the nearest authorized Yamaha dealer or service center.
| Problem Cause | Remedy | See page | |
| This unit fails to turn on. | The power cable is not connected nor completely connected. | Securely connect the power cable. | 20 |
| This unit automatically goes to STANDBY mode. | The automatic standby function is activated. If the automatic standby function is activated. If the automatic standby function is activated. If the automatic standby function is activated. If the automatic standby function is activated. If the automatic standby function is activated. If the automatic standby function is activated. If the automatic standby function is activated. If the automatic standby function is activated. If the automatic standby function is activated. If the automatic standby function is activated. If the automatic standby function is activated. If the automatic standby function is activated. If the automatic standby function in the digital input Jacks. | unit is not operated for 30 minutes with no audio signal detected, it automatically goes to STANDBY mode. | 6 |
| The disc tray does not close completely. | A foreign object is obstructing the tray. Carefully check the disc tray and remove the foreign object. | - | - |
| Playback does not start. | The disc is damaged. Check the disc carefully; replace it if necessary. | - | - |
| There is moisture on the laser pickup. Wait 20 to 30 minutes after switching the unit ON before trying to play back a disc. | - | - | |
| The disc is loaded upside down. Reload the disc with the label side up. | - | - | |
| The disc is dirty. Clean the disc. | 28 | 28 | |
| The MP3 or WMA formats are not compatible with this unit. | Replace the disc with a correctly recorded disc playable with this unit. | 28 | |
| The CD-RW (ReWritable) disc is not recorded correctly. | Replace the disc with a correctly recorded disc playable with this unit. | 27 | |
| The disc is a non-standard disc not playable with this unit. | Replace the disc with a correctly recorded disc playable with this unit. | 27 | |
| Playback is delayed, or begins at the wrong place. | The disc may be scratched or damaged. Check the disc carefully; replace it if necessary. | 28 | 28 |
| No sound. | Improper output cable connections. | Connect the cables properly. If the problem persists, the cables may be defective. | 18 |
| Improper amplifier operation. Set the amplifier controls to the correct input selection. | - | - | |
| No playback sound from the component connected to the digital input Jacks. | The unit is in PURE DIRECT mode. | Turn off PURE DIRECT mode. | 7 |
| The Super Audio CD layer is being played. | Change the layer for playback. | 7 | |
| Sound "skips." | This unit is being subjected to vibrations or impacts. | Relocate this unit. | - |
| The disc is dirty. Clean the disc. | 28 | 28 | |
| The clock of the playback audio signal is fluctuated. | Change the DPLL bandwidth of the audio DAC (ES9016). | 15 | |
| Sound "hums." | Improper cable connections. | Securely connect the audio cables. If the problem persists, the cables may be defective. | 18 |
| Noise from a nearbytuner. | The tuner is too close to this unit. Move the tunerand this unit farther apart. | — | |
| Noise from inside ofthe disc tray. | The disc may be warped. Replace the disc. | 28 | |
| No sound from thecomponentconnected to theDIGITAL IN (OPTICALor COAXIAL) jack. | The output audio source setting on the connectedcomponent is not “PCM.” | Only PCM audio sources can be played via theDIGITAL IN (OPTICAL/COAXIAL) jacks ofthis unit.Set the output audio source of the connectedcomponent to “PCM.” | — |
| The remote controldoes not work. | The batteries of the remote control are too weak. Replace the batteries with new ones. | 16 | |
| Remote control is too far away or tilted toomuch. | Use within 6 m and 60° radius. | 16 | |
| Direct sunlight or lighting (of an inverter typefluorescent lamp etc.) is striking the remotecontrol sensor of this unit. | Reposition this unit. | 8 |
■On USB connection
| Problem Cause | Remedy | See page | |
| The connected PC does not recognize this unit. | The operating system of the PC is not supported. | Use a PC with an operation-guaranteed operating system. | 22 |
| Improper USB cable connection Connect the USB cable properly. | 19, 22 | ||
| The output of the PC or application is muted. | Cancel the sound muted of the PC or application. | — | |
| Noisy playback. Another | application is launched on the PC while a music file is being played. | If another application is launched while a music file is being played, sound may be momentarily lost or noise may be generated. Do not launch other applications during playback. | — |
| Music files cannot be played. | The music data are not properly reproduced, because this unit is connected to the PC or the input of this unit is switched to “USB” while the music application is running on the PC. | Connect this unit to the PC and set the input of the unit to “USB” in advance. Then launch the music application and start playback. | 22, 23 |
| The dedicated “Yamaha Steinberg USB Driver” has not been installed correctly. | Install the “Yamaha Steinberg USB Driver” again, following the correct procedure. | 22 | |
■Messages on the information display
| Message Status | |
| NO DISC No disc is set on the disc tray. | |
| Check Cable | The dedicated “Yamaha Steinberg USB Driver” has not been installed correctly. Or, the audio output of the computer has not been set to “Yamaha CD Player.” |
| Check PC The audio signal from the computer cannot be recognized. | |
| Fs: ---kHz No audio signal is recognized. |