
YSP1400 - Soundbar YAMAHA - Free user manual and instructions
Find the device manual for free YSP1400 YAMAHA in PDF.
| Product Type | Digital Sound Projector (Soundbar) |
| Brand | YAMAHA |
| Model | YSP-1400 |
| Dimensions (W x H x D) | 1000 x 96 x 133 mm (without stand); 1000 x 96 x 141 mm (with stand) |
| Weight | 4.3 kg |
| Power Supply | 120 V AC 60 Hz (USA/Canada) or 220-240 V AC 50/60 Hz (other models) |
| Power Consumption | 24 W (standby < 0.5 W) |
| Amplifier | Tweeter: 2 W x 8; Subwoofer: 30 W x 2 |
| Speakers | 8 tweeters (2.8 cm cone) + 2 built-in subwoofers (8.5 cm cone, bass-reflex type) |
| Frequency Response | Tweeter: 500 Hz - 22 kHz; Subwoofer: 45 Hz - 500 Hz |
| Supported Audio Formats | PCM (2 channels), Dolby Digital, DTS Digital Surround |
| Inputs | 1 optical (TV), 1 coaxial (BD/DVD), 1 analog RCA (ANALOG), 1 3.5 mm mini-jack (PORTABLE) |
| Output | 1 subwoofer output (RCA) |
| Bluetooth | Version 2.1 + EDR, profiles A2DP, codecs SBC, AAC, max. range 10 m |
| Main Functions | Surround modes (Cinema, Music, Sports, Game, TV), Clear Voice, UniVolume, YSP position (L/C/R), Bluetooth standby mode, TV remote repeater |
| Care and Cleaning | Clean with a dry, clean cloth. Do not use chemical solvents. Do not expose to moisture or heat sources. |
| Safety | Do not open the device. Unplug during storms. Maintain at least 10 cm ventilation around the device. Do not place objects containing liquid on the device. |
| Spare Parts and Repairability | Repairs must be carried out by qualified personnel. Contact an authorized Yamaha center for any spare parts. Optional YRB-100 acoustic reflection panels available. |
Frequently Asked Questions - YSP1400 YAMAHA
User questions about YSP1400 YAMAHA
0 question about this device. Answer the ones you know or ask your own.
Ask a new question about this device
Download the instructions for your Soundbar in PDF format for free! Find your manual YSP1400 - YAMAHA and take your electronic device back in hand. On this page are published all the documents necessary for the use of your device. YSP1400 by YAMAHA.
USER MANUAL YSP1400 YAMAHA
IMPORTANT SAFETY INSTRUCTIONS
CAUTION: TO REDUCE THE RISK OF ELECTRIC SHOCK, DO NOT REMOVE COVER (OR BACK). NO USER-SERVICEABLE PARTS INSIDE. REFER SERVICING TO QUALIFIED SERVICE PERSONNEL.
Explanation of Graphical Symbols

The lightning flash with arrowhead symbol, within an equilateral triangle, is intended to alert you to the presence of uninsulated "dangerous voltage" within the product's enclosure that may be of sufficient magnitude to constitute a risk of electric shock to persons.

The exclamation point within an equilateral triangle is intended to alert you to the presence of important operating and maintenance (servicing) instructions in the literature accompanying the appliance.
IMPORTANT
Please record the serial number of this unit in the
space below.
MODEL:
Serial No.:
The serial number is located on the bottom of the unit. Retain this Owner's Manual in a safe place for future reference.
FOR CANADIAN CUSTOMERS
To prevent electric shock, match wide blade of plug to
wide slot and fully insert.
CAN ICES-3 (B)NMB-3 (B)
I Read these instructions.
2 Keep these instructions.
3 Heed all warnings
4 Follow all instructions.
5 Do not use this apparatus near water.
6 Clean only with dry cloth
? Do not block any ventilation openings. Install in
accordance with the manufacturer's instructions.
8 Do not install near any heat sources such as
radiators, heat registers, stoves, or other apparatus
(including amplifiers) that produce heat.
9 Do not defeat the safety purpose of the polarized or grounding-type plug. A polarized plug has two blades with one wider than the other. A grounding type plug has two blades and a third grounding prong. The wide blade or the third prong are provided for your safety. If the provided plug does not fit into your outlet, consult an electrician for replacement of the obsolete outlet.
10 Protect the power cord front being walked on or pinched particularly at plugs, convenience receptacles, and the point where they exit from the apparatus.
11 Only use attachments?
accessories specified by the
manufacturer.
12 Use only with the cart, stand, tripod, bracket, or table specified by the manufacturer, or sold with the apparatus. When a cart is used, use caution when moving the cart
apparatus combination to avoid injury from tip-over.
13 Unplug this apparatus during lightning storms or when unused for long periods of time.
14 Refer all servicing to qualified service personnel. Servicing is required when the apparatus has been damaged in any way, such as power-supply cord or plug is damaged, liquid has been spilled or objects have fallen into the apparatus, the apparatus has been exposed to rain or moisture, does not operate normally, or has been dropped.
We Want You Listening For A Lifetime

LISTNING
LISTENING
The A Lifetimes
Yamaha and the Electronic Industries Association's Consumer Electronics Group want you to get the most out of your equipment by playing it at a safe level. One that lets the sound come through loud and clear without
annoying blaring or distortion – and.
most importantly, without affecting
your sensitive hearing. Since hearing damage from loud sounds is often undetectable until it is too late, Yamaha and the Electronic Industries Association's Consumer Electronics Group recommend you to avoid prolonged exposure from excessive volume levels.
FCC INFORMATION (for US customers)
IMPORTANT NOTICE: DO NOT MODIFY
THIS UNIT!: This product, when installed as indicated in the instructions contained in this manual, meets FCC requirements. Modifications not expressly approved by Yamaha may void your authority, granted by the FCC, to use the product.
2 IMPORTANT: When connecting this product to accessories and/or another product use only high quality shielded cables. Cable/s supplied with this product MUST be used. Follow all installation instructions. Failure to follow instructions could void your FCC authorization to use this product in the USA.
3 NOTE: This product has been tested and found to comply with the requirements listed in FCC Regulations, Part 15 for Class "B" digital devices. Compliance with these requirements provides a reasonable level of assurance that your use of this product in a residential environment will not result in harmful interference with other electronic devices. This equipment generates/uses radio frequencies and, if not installed and used according to the instructions found in the users manual, may cause interference harmful to the operation of other electronic devices.
4 Compliance with FCC regulations does not guarantee that interference will not occur in all installations. If this product is found to be the source of interference, which can be determined by turning the unit "OFF" and "ON", please try to eliminate the problem by using one of the following measures:
5 Relocate either this product or the device that is being affected by the interference.
6 Utilize power outlets that are on different branch (circuit breaker or fuse) circuits or install AC line filter/s.
7 In the case of radio or TV interference, relocate/reorient the antenna. If the antenna lead-in is 300 ohm ribbon lead, change the lead-in to coaxial type cable.
8 If these corrective measures do not produce satisfactory results, please contact the local retailer authorized to distribute this type of product. If you can not locate the appropriate retailer, please contact Yamaha Corporation of America A/V Division 6600 Orangethorpe Ave., Buena Park, CA 90620.
9 The above statements apply ONLY to those products distributed by Yamaha Corporation of America or its subsidiaries.
• This device complies with Part 15 of the FCC Rules and RSSGen of IC Rules.
• Operation is subject to the following two conditions: 1) this device may not cause harmful interference, and 2) this
device must accept any interference received including interference that may cause undesired operation.
See the Troubleshooting Section at the end of this manual if interference to radio reception is suspected.
FCC WARNING
Change or modifications not expressly approved by the party responsible for compliance could void the user's authority to operate the equipment.
NOTICE
This equipment has been tested and found to comply with the limits for a Class B digital device, pursuant to part 15 of the FCC Rules. These limits are designed to provide reasonable protection against harmful interference in residential installation. This equipment generates, uses and can radiate radio frequency energy and, if not installed and used in accordance with the instructions, may cause harmful interference to radio communications. However, there is no guarantee that interference will not occur in a particular installation. If this equipment does cause harmful interference to radio or television reception, which can be determined by turning the equipment off and on, the user is encouraged to try to correct the interference by one or more of the following measures:
- Reorient or relocate the receiving antenna.
Increase the separation between the equipment and receiver.
Connect the equipment into an outlet on a circuit different from that to which the receiver is connected.
Consult the dealer or an experienced radio/TV technician for help.
This equipment complies with FCC/IC radiation exposure limits set forth for uncontrolled equipment and meets the FCC radio frequency (RF) Exposure Guidelines in Supplement C to OE165 and RSS-102 of the IC radio frequency (RF) Exposure rules. This equipment has very low levels of RF energy that it deemed to comply without maximum permissive exposure evaluation (MPF). But it is desirable that it should be installed and operated with at least 20 cm and more between the radiator and person's body (excluding extremities: hands, wrists, feet and ankles).
This transmitter must not be co-located or operated in conjunction with any other antenna or transmitter.
PRÉCAUTIONS CONCERNANT LA SÉCURITÉ
ATTENTION RISQUE DE CHOC ÉLECTRIQUE NE PAS OUVRIR
ATTENTION : POUR RÉDUIRE LES RISQUES D'INCENDIE ET DE DÉCHARGE ELECTRIQUE, NE PAS RETIRER LE COUVERCLE (OU LE PANNEAU ARRIÈRE). AUCUNE PIÈCE INTERNE NE PEUT ÊTRE CHANGÉE PAR L'UTILISATEUR. POUR L'ENTRETIEN, S'ADRESSER À UN PERSONNEL QUALIFIÉ.
• To assure the finest performance, please read this manual carefully. Keep it in a safe place for future reference.
• Install this unit in a well ventilated, cool, dry, clean place - away from direct sunlight, heat sources, vibration, dust, moisture, and/or cold. For proper ventilation, allow the following minimum clearances. Top: 10 cm (4 in). Rear: 10 cm (4 in). Sides: 10 cm (4 in)
- Locate this unit away from other electrical appliances, motors, or transformers to avoid humming sounds.
- Do not expose this unit to sudden temperature changes from cold to hot, and do not locate this unit in an environment with high humidity (i.e. a room with a humidifier) to prevent condensation inside this unit, which may cause an electrical shock, fire, damage to this unit, and/or personal injury.
- Avoid installing this unit where foreign objects may fall onto this unit and/or this unit may be exposed to liquid dripping or splashing. On the top of this unit, do not place:
- Other components, as they may cause damage and/or discoloration on the surface of this unit.
- Burning objects (i.e. candles), as they may cause fire, damage to this unit, and/or personal injury.
- Containers with liquid in them, as they may fall and liquid may cause electrical shock to the user and/or damage to this unit.
- Do not cover this unit with a newspaper, tablecloth, curtain, etc. in order not to obstruct heat radiation. If the temperature inside this unit rises, it may cause fire, damage to this unit, and/or personal injury.
- Do not plug in this unit to a wall outlet until all connections are complete.
- Do not operate this unit upside-down. It may overheat, possibly causing damage.
- Do not use force on switches, knobs and/or cords.
- When disconnecting the power cable from the wall outlet, grasp the plug: do not pull the cable.
- Do not clean this unit with chemical solvents; this might damage the finish. Use a clean, dry cloth.
- Only voltage specified on this unit must be used. Using this unit with a higher voltage than specified is dangerous and may cause fire, damage to this unit, and/or personal injury. Yamaha will not be held responsible for any damage resulting from use of this unit with a voltage other than specified.
• To prevent damage by lightning, keep the power cable and outdoor antennas disconnected from a wall outlet or the unit during a lightning storm. - Do not attempt to modify or fix this unit. Contact qualified Yamaha service personnel when any service
is needed. The cabinet should never be opened for any reasons.
- When not planning to use this unit for long periods of time (i.e. vacation), disconnect the AC power plug from the wall outlet.
- Be sure to read the "Troubleshooting" section on common operating errors before concluding that this unit is faulty.
- Before moving this unit, press to set this unit in standby mode, and disconnect the power supply cable from the wall outlet.
- Condensation will form when the surrounding temperature changes suddenly. Disconnect the power supply cable from the outlet, then leave the unit alone.
- Install this unit near the wall outlet and where the AC power plug can be reached easily.
• The batteries shall not be exposed to excessive heat such as sunshine, fire or like. - Secure placement or installation is the owner's responsibility. Yamaha shall not be liable for any accident caused by improper placement or installation of speakers.
Notes on remote controls and batteries
- Do not spill water or other liquids on the remote control.
• Do not drop the remote control.
- Do not leave or store the remote control in the following places:
places of high humidity, such as near a bath
- places of high temperatures, such as near a heater or a stove
- places of extremely low temperatures dusty places
- Do not expose the remote control sensor of this unit to direct sunlight or lighting such as inverted fluorescent lamps.
- If the batteries grow old, the effective operation range of the remote control decreases considerably. If this happens, replace the batteries with two new ones as soon as possible.
- Do not use old batteries together with new ones.
- Do not use different types of batteries (such as alkaline and manganese batteries) together. Read the packaging carefully as these different types of batteries may have the same shape and color.
-
Exhausted batteries may leak. If the batteries have leaked, dispose of them immediately. Avoid touching the leaked material or letting it come into contact with clothing, etc. Clean the battery compartment thoroughly before installing new batteries.
-
Do not throw away batteries with general house waste. Dispose of them correctly in accordance with your local regulations.
- Keep batteries away from children. If a battery is accidentally swallowed, contact your doctor immediately.
- When not planning to use the remote control for long periods of time, remove the batteries from the remote control.
- Do not charge or disassemble the supplied batteries.
WARNING
TO REDUCE THE RISK OF FIRE OR ELECTRIC SHOCK, DO NOT EXPOSE THIS UNIT TO RAIN OR MOISTURE.
As long as this unit is connected to the AC wall outlet, it is not disconnected from the AC power source even if you turn off this unit by In this state, this unit is designed to consume a very small quantity of power.
The name plate is located on the bottom of the unit.
(Power key)
Turns on the power of this unit or sets it to the standby mode.
Do not use this unit within 22 cm (9 inches) of persons with a heart pacemaker implant or defibrillator implant.
Radio waves may affect electro-medical devices. Do not use this unit near medical devices or inside medical facilities.
Contents
Supplied items 2
Features......2
Part names and functions of the unit....3
Installations....4
Connections 6
Operations....8
Enjoy stereoscopic surround effects....10
Listening to the sound from a BLUETOOTH device...... 11
Settings.... 13
Controlling the unit with TV remote control (TV remote control learning function) 13
Controlling the TV via the unit (when the TV's remote control sensor is blocked)....15
Adjusting the volume level of each channel (CH LEVEL).... 15
Using an external subwoofer.... 16
Making sound easy to listen at low volume....17
Initializing the settings of the unit.... 17
Troubleshooting 18
Specifications.... 22
About this manual
- This manual explains operations using the supplied remote control.
- Marks used in this manual
NOTE
This indicates precautions for use of the product and its feature limitations.
HINT
This indicates supplementary explanations for better use.
PDF versions of this manual can be downloaded from the following website. http://download.yamaha.com/
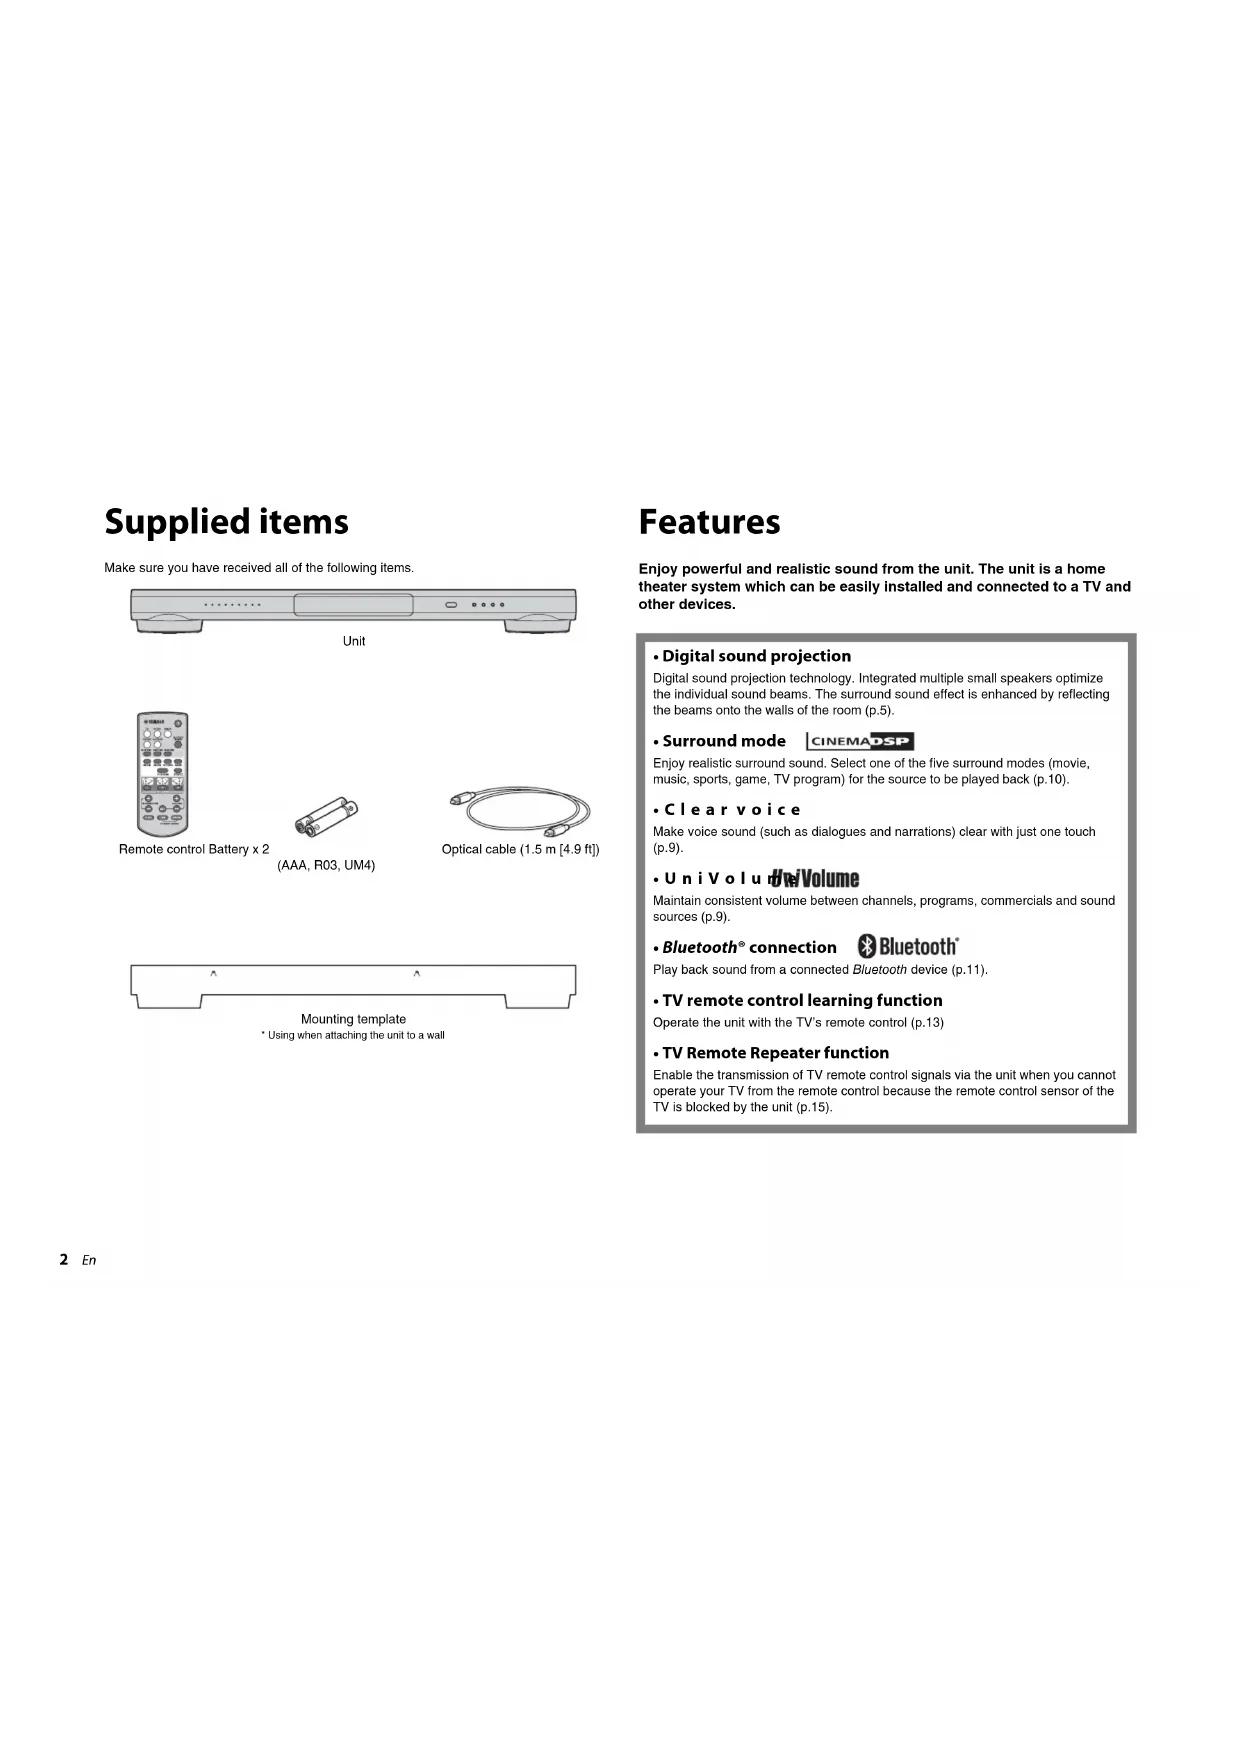
Supplied items
Make sure you have received all of the following items.

natural_image
Front view of a computer monitor unit with buttons and ports (no text or symbols on the device body)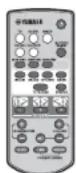
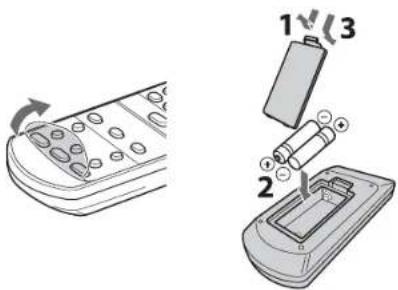
Remote control Battery x 2

(AAA, R03, UM4)

Optical cable (1.5 m [4.9 ft])

natural_image
Simple line drawing of a rectangular object with two horizontal supports and three vertical supports, no text or symbols present.Mounting template
* Using when attaching the unit to a wall
Features
Enjoy powerful and realistic sound from the unit. The unit is a home theater system which can be easily installed and connected to a TV and other devices.
• Digital sound projection
Digital sound projection technology. Integrated multiple small speakers optimize the individual sound beams. The surround sound effect is enhanced by reflecting the beams onto the walls of the room (p.5).
- Surround mode

Enjoy realistic surround sound. Select one of the five surround modes (movie, music, sports, game, TV program) for the source to be played back (p.10).
- Clear voice
Make voice sound (such as dialogues and narrations) clear with just one touch (p.9).
• UniVolume UniVolume
Maintain consistent volume between channels, programs, commercials and sound sources (p.9).
- Bluetooth® connection

Play back sound from a connected Bluetooth device (p.11).
• TV remote control learning function
Operate the unit with the TV's remote control (p.13)
• TV Remote Repeater function
Enable the transmission of TV remote control signals via the unit when you cannot operate your TV from the remote control because the remote control sensor of the TV is blocked by the unit (p.15).
Part names and functions of the unit
Front panel
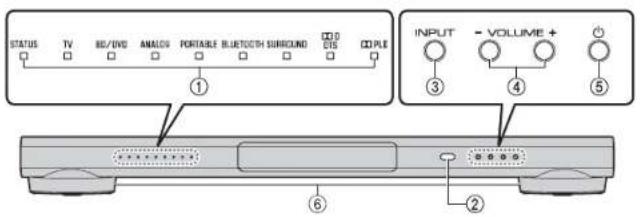
①Indicators
Indicate the status of the unit.
The indicators will dim automatically if no operations are performed for 5 seconds.
②Remote control sensor
Receives infrared signals from the remote control of the unit (p.8).
Receives infrared signals from the TV remote control when the TV Remote Repeater function is enabled (p.15).
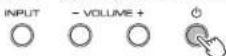
③INPUT key
Selects an input source to be played back (p.8).
④VOLUME (+/-) keys
Adjust the volume (p.8).
⑤ (power) key
Turns on or off (standby) the unit (p.9).
⑥Dual built-in subwoofers
The built-in subwoofers are located in the leg part of the unit.
HINT
- The unit will be automatically turned off when one of the following conditions is met.
- No operations for 8 hours
- No audio input and no operations for 30 minutes
Rear panel
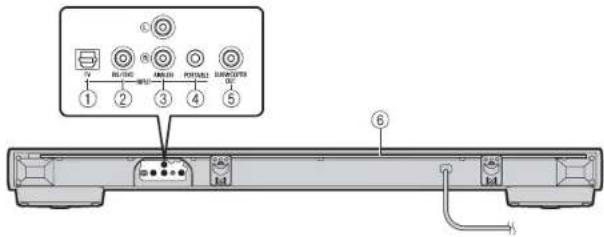
①TV Input Jack
For connecting to a TV with an optical cable.
②BD/DVD input jack
For connecting to a playback device, such as a Blu-ray Disc (BD) player, with a coaxial digital cable.
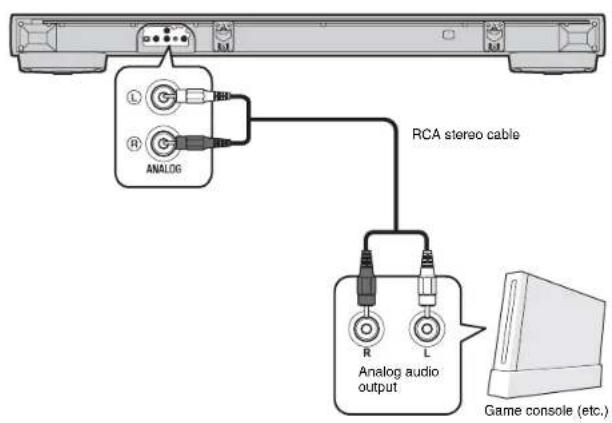
③ANALOG input jacks
For connecting an external device with an RCA stereo cable.
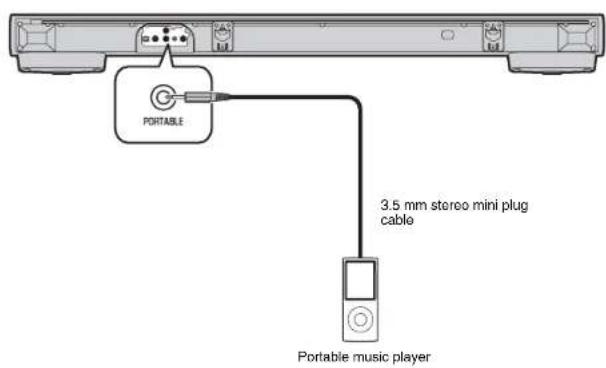
④PORTABLE input jack
For connecting a portable device with a 3.5 mm stereo mini plug cable.
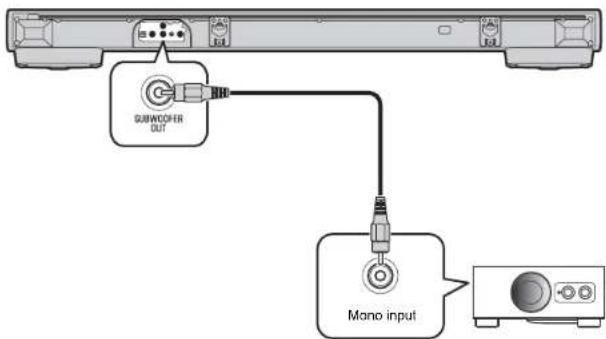
⑤SUBWOOFER OUT jack
For connecting an external subwoofer with a monaural pin cable.
Switch the setting for the external subwoofer (p.16).
⑥TV Remote Repeater
Transmits TV remote control signals received at the TV remote control sensor to the TV (p.15).
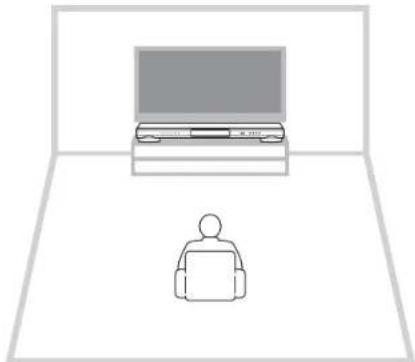
Installations
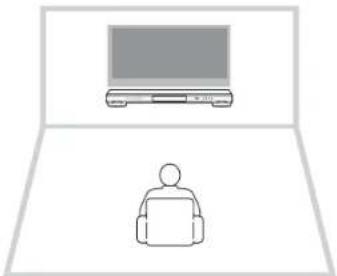
Place the unit on a flat surface such as on top of a TV cabinet.
natural_image
Simple line drawing of a person sitting at a desk with a laptop and monitor (no text or symbols)Cautions
- Do not place the unit on/under any other devices such as BD player in a pile. Doing so may cause a malfunction due to vibrations.
- The unit contains acoustic suspension speakers. Do not place magnetically sensitive items (hard disk drive, etc.) near unit.
- Depending on your installation environment, it may be better to connect the unit and external devices (such as a TV) before installing the unit.
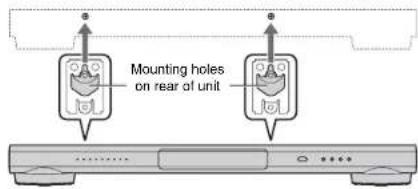
- Do not place the unit within 50 mm (2") of the TV. The wall mount brackets on the rear panel can be removed as necessary.

natural_image
Technical line drawing of a mechanical component with mounting holes and a central body (no text or symbols)Attaching the unit to a wall
natural_image
Simple line drawing of a laptop and a person on a keyboard (no text or symbols)Cautions
- When installing the unit on a wall, all installation work must be performed by a qualified contractor or dealer. The customer must never attempt to perform this installation work. Improper or inadequate installation could cause the unit to fall, resulting in personal injury.
- Do not attach the unit to a wall that is made of weak materials such as plaster or veneered woods. Doing so may cause the unit to fall.
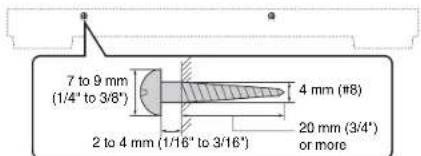
• Make sure you use commercially available screws that can support the weight of the installation (specified in Step 2 on the right). Using clamps other than specified screws, such as short screws, nails, and two-sided tape, may cause the unit to fall.
How to Install on the wall
1 Attach the mounting template on a wall and mark for the screw holes.
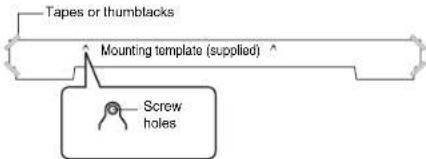
2 Remove the mounting template from the wall and install the commercially available screws at the marks on the wall.
3 Hang the unit on the screws.
Cautions
- Fix the cables in place where they will not become loose. If your foot or hand accidentally gets caught on a loose cable, the unit may fall.
- Check that the unit is fixed securely after the installation. Yamaha will bear no responsibility for any accidents caused by improper installations.
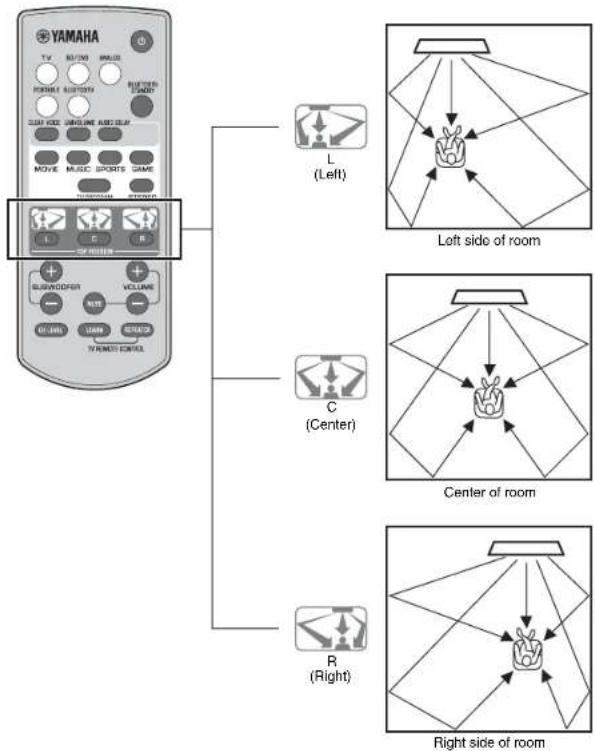
Installation position of the unit and selecting a YSP POSITION key
The surround sound is achieved by reflecting the sound beams off walls as shown in the illustration below. For optimum surround effect, turn on the unit and select the YSP POSITION key according to the installation position of the unit.
Refer to the "WSP POSITION (YSP position) keys" (p.9) in "Operations" to select the key according to the installation position of the unit.
flowchart
graph TD
    A["YAMAHA"] --> B["Left side of room"]
    A --> C["Center of room"]
    A --> D["Right side of room"]
    B --> E["L (Left)"]
    C --> F["C (Center)"]
    D --> G["R (Right)"]
NOTE
- Keep a distance of more than 2 meters (6.6 ft) between the unit and listener.
• Install the unit in front of the listening position. - If the sound beams are blocked by obstacles such as furniture, adjust the position of the unit or the obstacles.
CAUTIONS
Effective surround effect may not be achieved in the following environment.
- Sound beams are blocked by obstacles such as furniture.
• The room size is not within the following dimensions;
Width: 3 meters to 7 meters (9.8 ft to 23 ft)
Depth: 3 meters to 7 meters (9.8 ft to 23 ft)
Height: 2 meters to 3.5 meters (6.6 ft to 11.5 ft)
- Listening position is too close to the unit.
- The unit is installed too close to the left or right wall.
• The unit is installed in the corner of the room.
- There is no wall for reflecting sound beam on the path of the sound beams.

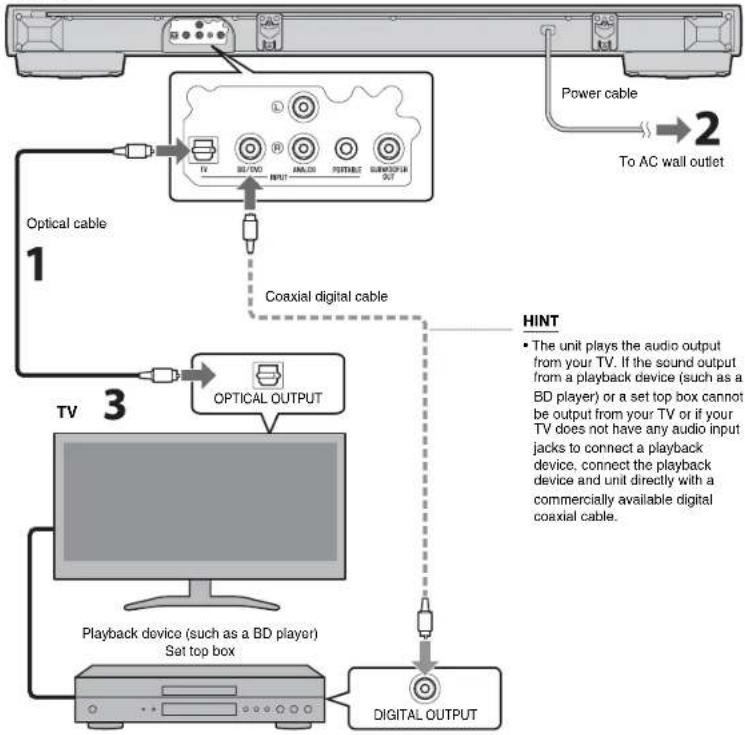
Connections
Connect to a TV (or other peripheral device).
CAUTIONS
- Do not connect the power cable of the unit to the AC wall outlet before making connections.
- Do not use excessive force when inserting the cable plug. Doing so may damage the cable plug or AC wall outlet.
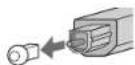
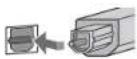
1 Connect the TV and unit with the optical cable (supplied).
Remove the cap of the optical cable and check the direction of the plug.
2 Connect the power cable of the unit to an AC wall outlet.
3 Set the TV as follows.
- Set the TV volume to minimum.
- Disable the TV built-in speaker output (if available).
HINT
-
If a setting to disable the speaker output is not available on your TV, you may disable it by connecting headphones to the headphone jack on the TV. For details, refer to the manuals of the TV.
• The TV and BD/DVD input jacks support the following audio signals. -
PCM (2ch)
- Dolby Digital (up to 5.1 channels)
- DTS Digital Surround (up to 5.1 channels)
Unit (rear)
flowchart
graph TD
    A["TV 3"] --> B["Optical OUTPUT"]
    C["Playback device (such as a BD player) Set top box"] --> B
    D["Digital Output"] --> E["Coaxial digital cable"]
    F["Power cable"] --> G["To AC wall outlet"]
    H["The unit plays the audio output from your TV. If the sound output from a playback device (such as a BD player) or a set top box cannot be output from your TV or if your TV does not have any audio input jacks to connect a playback device, connect the playback device and unit directly with a commercially available digital coaxial cable."] --> B
Analog connection of an external device (game console)
You can connect an external device, such as a game console, to the ANALOG input jacks of the unit with an RCA stereo cable.
Analog connection of a portable device
You can connect a portable device, such as a portable music player, to the PORTABLE input jacks of the unit with a 3.5 mm stereo mini plug cable.
NOTE
- Make sure the left (L) and right (R) channels are connected correctly.
- Select the ANALOG key on the remote control for the input source.
NOTE
- Select the PORTABLE key on the remote control for the input source.
- Adjust the volume level of the portable device as required.
Operations
Preparing the remote control
Peel off the protection sheet before use.
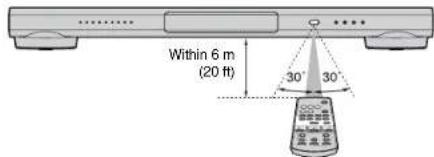
Operating range of the remote control
Remain within the operating range shown below.
Indicators
The indicators on the front panel flash or light up, to indicate the operation and setting status.

Input keys
Select an input source to be played back.
TV ......TV audio
BD/DVD......Audio from a device connected to the BD/DVD input jack
ANALOG ......Audio from a device connected to the ANALOG input jack
PORTABLE.....Audio from a device connected to the PORTABLE input jack
BLUETOOTH ... Audio from a Bluetooth connected device
The indicator for the selected input source lights up. (Example: when TV is selected)

HINT
- To play audio of the playback device connected to the TV or to watch videos of the playback device, set the TV's input source to the playback device.
- For details on Bluetooth connection, refer to "Listening to the sound from a BLUETOOTH device" (p.11).
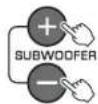
SUBWOOFER keys (+/-)
Adjust the volume of the subwoofer.

VOLUME keys (+/-)
Adjust the volume of the unit.

MUTE key
Mutes the audio output. Press the key again to unmute.

1
Remote control signal transmitter
Transmits infrared signals.
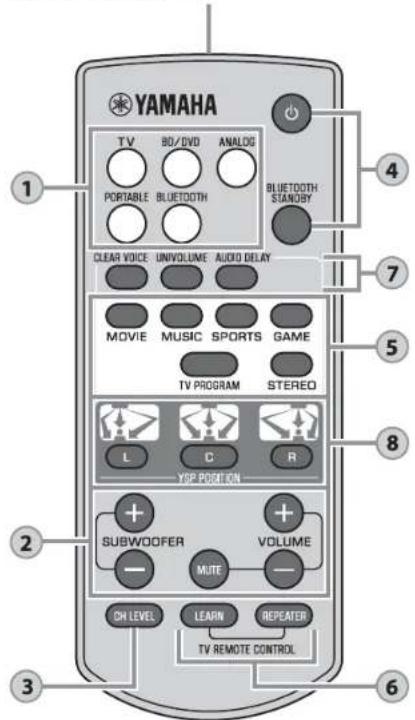
CH LEVEL key
While you listen to the test-tone, you can adjust the volume level of each channel (p.15).
(POWER) key
Turns on or off (standby) the unit.
STATUS Green (turned on)
STATUS Red (Bluetooth standby)
STATUS Off (turned off)
BLUETOOTH STANDBY key
Enables/disables the Bluetooth standby mode (p.12).
4
CLEAR VOICE key
Enables/disables the clear voice function. When this function is enabled, you can enjoy clear voice sounds while watching movies, TV dramas, news programs or sports programs.

UNIVOLUME key
Enables/disables the UniVolume function. When this function is enabled, consistent volume is maintained between channels, programs, commercials and sound sources.

Surround mode / STEREO keys
Choose from five different types of surround playback (surround mode keys), or stereo (2-channel) playback. When the surround playback is selected, the sound field program "CINEMA DSP" provides realistic surround effects (p.10).
MOVIE / MUSIC /
SPORTS/GAME/ Lights up (surround playback) TV PROGRAM
STEREO SURROUND Off (stereo playback)
HINT
- When 2-channel stereo signals are played in surround, the FILL indicator lights up.
■ PLII Lights up (Dolby Pro Logic II)
5
AUDIO DELAY key
Adjusts the audio delay to synchronize the sound with the video when the video image on the TV may seem delayed with respect to the sound. Follow the procedure below to adjust the audio delay.
1 Hold down AUDIO DELAY for more than 3 seconds.
The left most indicator flashes.


Smaller delay (−) Larger delay (+)
3 To finish the adjustment, press AUDIO DELAY.
HINT
- The adjustment will be finished automatically if no operations are performed for 20 seconds.
8
YSP POSITION (YSP position) keys
For optimum surround sound effect, select a preset position mode according to where the unit is installed.
Hold down the selected YSP POSITION key for more than 3 seconds until the respective Indicators on the front panel flash.
L (Left) key.....When the unit is installed on the left side of the room
C (Center) key ....When the unit is installed in the center of the room.
R (Right) key.....When the unit is installed on the right side of the room.
NOTE
- The default setting is for the center. Select the desired setting to match your installation.
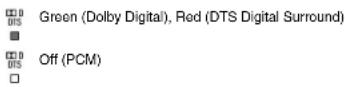
Decoder indication
The unit supports the following audio signals. You can check the type of the input audio signal by the color of the indicator.
Auto-sleep function
The unit will be automatically turned off when one of the following conditions is met.
• No operations for 8 hours
- No audio input and no operations for 30 minutes
Enjoy stereoscopic surround effects
Select the surround mode key to enjoy realistic surround effects that closely resemble a movie theater, the middle of a music concert, or a sports field event, by Yamaha's sound field program, "CINEMA DSP." You can select a surround mode key that best suits the source from MOVIE, MUSIC, SPORTS, GAME, or TV PROGRAM.
1 Play back the source.
2 Press one of the surround mode keys (MOVIE, MUSIC, SPORTS, GAME, or TV PROGRAM).
The SURROUND indicator lights up.


Surround mode
The surround modes are described below.
Select the surround mode that best suits the playback source and your personal taste.
| Sound field program Features | |
| MOVIE Creates a broad | and expansive cinematic space. With Dolby or DTS surround effects, this program enriches your cinematic experience. |
| MUSIC Creates the palp | able excitement, as if you were standing at the front center of a live concert hall event. |
| SPORTS Creates the real | listic atmosphere of a live sports event or talk show. |
| GAME Enjoy three-dimen | sional sound effects with computer or video games. |
| TV PROGRAM Creates | optimum surround sound for TV programs. |
HINT
- When the source are 2-channel stereo signals, the sound is play backed as surround sound by the Dolby Pro Logic II technology.
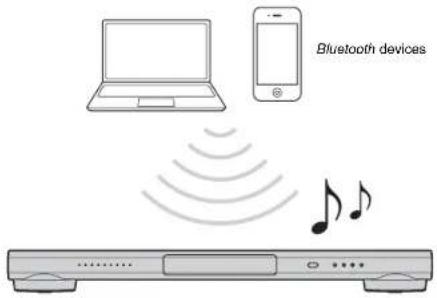
Listening to the sound from a BLUETOOTH device
You can listen to the wireless sound from a Bluetooth device, such as a smartphone or digital music player.
See also the operating manual of the Bluetooth device for more details.
Perform the following steps on the Bluetooth device to be connected.
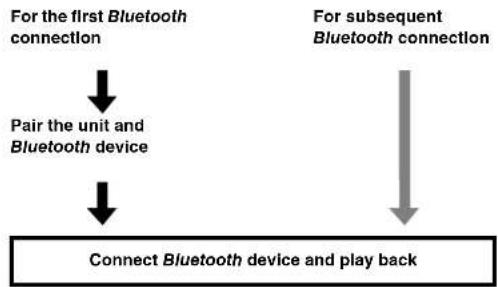
flowchart
graph TD
    A["For the first Bluetooth connection"] --> B["Pair the unit and Bluetooth device"]
    C["For subsequent Bluetooth connection"] --> D["Connect Bluetooth device and play back"]
    B --> D
Pairing a Bluetooth device with the unit
When connecting to a Bluetooth device for the first time, "pairing" between the device and unit is required. Once "pairing" is completed, subsequent connection will be made automatically.
1 Press the BLUETOOTH key on the supplied remote control to select Bluetooth as the input source.
The BLUETOOTH indicator on the front panel lights up in green.


2 Turn on the Bluetooth compatible device to be paired, and perform pairing.
The operation varies depending on the device. Refer to the operation manual of the device.
3 Select "YSP-1400 Yamaha" in the Bluetooth device list on the device.
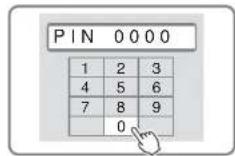
If a passkey (PIN) is required, enter the number "0000".
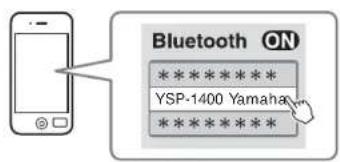
When pairing is completed, or a completion message appears.
NOTE
- Perform pairing with the Bluetooth device and unit within 10 meters (33 ft) of each other.
- Up to eight Bluetooth devices can be pairing with the unit. If a ninth device is paired, the oldest pairing information is deleted.
- If pairing information for a device is deleted, to use that device again, pairing of the device is required again.
- If a Bluetooth device is already connected to the unit, terminate that Bluetooth connection, then perform pairing with the new device.
- Refer to "Troubleshooting" (p.20) for troubleshooting Bluetooth connection.
Playing back audio from a Bluetooth device on the unit
1 Press the BLUETOOTH key on the supplied remote control to select Bluetooth as the input source.
The BLUETOOTH indicator on the front panel lights up in green.


Lights up
2 Turn on the Bluetooth device.
When Bluetooth connection is made correctly, the BLUETOOTH indicator of the unit flashes 3 times.

3 Play back a song on the device.

NOTE
- Perform Bluetooth connection with the device and unit within 10 meters (33 ft) of each other.
- It may be necessary to select "YSP-1400 Yamaha" in the Bluetooth device list again, in the event that a connection problem occurs. You may have to change the output setting to output audio to the unit, depending on the Bluetooth device you are using.
- Adjust the volume level of the Bluetooth device as required.
- If a Bluetooth device is already connected to the unit, terminate that Bluetooth connection, then connect with the new device.
Terminating Bluetooth connection
Bluetooth connection is terminated in the following cases. When the Bluetooth connection is terminated, the BLUETOOTH indicator flashes once.
• The Bluetooth compatible device is turned off.
• The BLUETOOTH key is pressed for more than 3 seconds.
• The unit is turned off.
Using the Bluetooth standby mode
The Bluetooth standby mode allows you to turn on (or off) the unit automatically, that interlocked by the operation of the Bluetooth device.
How to set
With the unit turned on, hold down the BLUETOOTH STANDBY key for more than 3 seconds.
Holding down the BLUETOOTH STANDBY key for 3 seconds each time toggles the mode between enabled and disabled.


When the Bluetooth standby mode is enabled and the unit is turned off, the STATUS indicator lights up in red.
STATUS Lights up (red)
Functions available on Bluetooth devices with Bluetooth standby mode enabled
Power on Interlock function (when the unit is turned off) When Bluetooth connection is made on the device, the unit will turn on and will be ready to play back sound from the device.
Power off Interlock function (when the unit is turned on) The unit will be turned off when Bluetooth connection is terminated on a Bluetooth device. (Only when BLUETOOTH is selected as the input source.)
Using the Home Theater Controller application
By installing the dedicated free application "Home Theater Controller" to a Bluetooth device, such as a smartphone, you can perform various operations easily and conveniently with the Bluetooth device. (Setting items: basic operation, surround mode, sound adjustments)
For details on "Home Theater Controller", see the product information on our website.
Settings
Controlling the unit with TV remote control (TV remote control learning function)
You can use the TV remote control to turn on/off the unit or adjust its volume by having the unit learn the TV remote control signals.
NOTE
- This function is available only when your TV remote control uses infrared signals.
- Depending on the installation conditions or settings of the unit, both the unit and TV will receive the TV remote control signals and operate simultaneously.
1 Turn off the TV and unit.
2 Hold down the LEARN key on the supplied remote control for more than 3 seconds to set the unit to the learning mode.
When the unit is in the learning mode, the indicators on the front panel flash as shown below.


NOTE
- Steps 3 to 6 require only the TV remote control and the keys on the front panel of the unit. The remote control of the unit is not necessary.
3 Make the unit learn the mute operation.
3-1 Press INPUT on the front panel of the unit.

3-2 While pointing your TV remote control at the remote control sensor, hold down the mute key for more than 1 second twice or three times.

Hold down Release Hold down Release (more than 1 second) (more than 1 second)(more than 1 second) (more than 1 second)
| Result Bleep/buzzer Indicators | ||
| Successfully learned | Once | |
| Learning has failed* Repeat from Step 3-1. | Twice | |
4 Make the unit learn the volume (−) operation.
4-1 Press VOLUME (−) on the front panel of the unit.
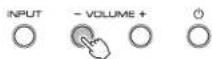
4-2 While pointing your TV remote control at the remote control sensor, hold down the volume (−) key for more than 1 second twice or three times.
| Result Bleep/buzzer Indicators | ||
| Successfully learned | Once | |
| Learning has failed* Repeat from Step 4-1. | Twice | |
Continued →
5 Make the unit learn the volume (+) operation.
5-1 Press VOLUME (+) on the front panel of the unit.
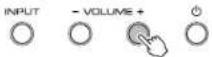
5-2 While pointing your TV remote control at the remote control sensor, hold down the volume (+) key for more than 1 second twice or three times.
| Result Bleep/buzzer Indicators | ||
| Successfully learned | Once | |
| Learning has failed* Repeat from Step 5-1. | Twice | |
6 Make the unit learn the power operation.
6-1 Press (power) on the front panel of the unit.
6-2 While pointing your TV remote control at the remote control sensor, hold down the power key for more than 1 second twice or three times.
| Result Bleep/buzzer Indicators | ||
| Successfully learned | Once | |
| Learning has failed* Repeat from Step 6-1. | Twice | |
7 To finish the learning mode, press the LEARN or (power) key on the supplied remote control.
This completes the necessary settings. Now you can operate the unit with the TV remote control's power key or volume keys.
HINT
- The learning mode will be finished automatically if no operations are performed for 5 minutes. - Set the TV volume to minimum. When you turn up the volume of the unit with the TV remote control, the volume of the TV may be turned up at the same time. In this case, follow Step 3 in "Connections" (p.6) to change the TV setting.
Clearing all learned operations
1 With the unit turned off, hold down the LEARN key on the supplied remote control for more than 3 seconds. (for entering the learning mode)
When the unit is in the learning mode, the indicators on the front panel flash as shown below.


2 Hold down INPUT on the front panel of the unit for more than 3 seconds.

If the clearing is completed, you will hear the bleep sound three times.
3 Press the LEARN or (power) key on the supplied remote control.
Controlling the TV via the unit (when the TV's remote control sensor is blocked)
When the TV Remote Repeater function is enabled, the unit receives TV remote control signals at the TV remote control sensor (on front) and transmits the signals from the TV Remote Repeater (on rear). This function is useful when you cannot operate your TV from the remote control because the remote control sensor of the TV is blocked by the unit.
NOTE
- This function is available only when your TV remote control uses infrared signals.

1 Turn on the unit.
2 Hold down the REPEATER key on the supplied remote control for more than 3 seconds to enable/disable the TV Remote Repeater function.


This completes the necessary settings. When the TV Remote Repeater function is enabled, you can operate your TV from the TV remote control via the unit.
HINT
• The TV Remote Repeater function is disabled by default.
- If the power cable of the unit is connected to an AC wall outlet and when the TV Remote Repeater function is enabled, the function is usable even when the unit is turned off.
- If you have made the unit learn the volume (+) operation (p.14), the volume of the TV may be turned up when you turn up the volume of the unit with the TV remote control. In this case, follow Step 3 in "Connections" (p.6) to change the TV setting.
- You can check the status of the TV Remote Repeater function by the center indicator when turning on the unit.

Adjusting the volume level of each channel (CH LEVEL)
The surround effects is achieved using six channels (audio outputs) of the unit. While listening to a series of test-tones from the unit, you can adjust the volume level of each channel to balance the sound heard from your listening position.
1 Hold down the CH LEVEL key on the remote control for more than 3 seconds.

The STATUS indicator flashes in green during test-tone output. The test-tone cycles through the channels in the order below. The test-tone is output from each channel in turn for two seconds. You can confirm which channel is playing the test-tone by the way the indicators flash.

flowchart
graph TD
    A["Start"] --> B["Front (left)"]
    B --> C["Center"]
    C --> D["Front (right)"]
    D --> E["Surround (right)"]
    E --> F["Surround (left)"]
    F --> G["Subwoofer"]
    style A fill:#f9f,stroke:#333
    style B fill:#ccf,stroke:#333
    style C fill:#cfc,stroke:#333
    style D fill:#fcc,stroke:#333
    style E fill:#cff,stroke:#333
    style F fill:#ffc,stroke:#333
    style G fill:#cfc,stroke:#333
Continued →
2 While the test-tone is output from the channel to be adjusted, press the SUBWOOFER key (+ or -) to balance the volume level with the other channels.
During volume adjustment, the cycle of the test tone stops. When you have finished adjusting the current channel level, release the + or - key and wait a moment for the test-tone cycle to resume. You can check the volume level by the indicator lights.
3 After adjustment is complete, press the CH LEVEL key again.
The test-tone stops.
HINT
- Press the VOLUME key (+ or -) to adjust the overall volume while the test-tone is being played back.
- When the YSP position setting is changed (p.9), the channel level setting will be overwritten.
Using an external subwoofer
The unit has dual built-in subwoofers; however you can connect an external subwoofer when you want to enhance low frequency sound. Perform the following steps to change the setting when using an external subwoofer.
1 Connect the unit to the external subwoofer with a pin cable.
2 With the unit turned off, hold down the SUBWOOFER (-) key on the supplied remote control for more than 5 seconds.

The unit turns on and the external subwoofer is selected.
You can check the status of the subwoofer setting by the indicator when turning on the unit.

To select the built-in subwoofers again, hold down the SUBWOOFER (+) key of the remote control for more than 5 seconds.
NOTE
- The default output setting is for the built-in subwoofers.
- Use an external subwoofer with built-in amplifier.
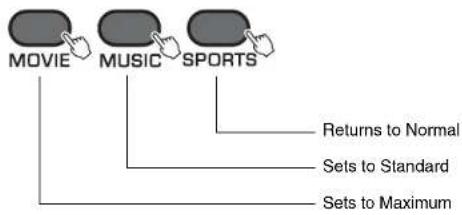
Making sound easy to listen at low volume
You can change the dynamic range to make sounds easy to hear at a low volume.
1 Turn off the unit.
2 Press the key for the desired mode for more than 5 seconds.
flowchart
graph TD
    A["MOVIE"] --> B["Returns to Normal"]
    C["MUSIC"] --> D["Sets to Standard"]
    E["SPORTS"] --> F["Sets to Maximum"]
The unit turns on with the selected setting.
Three settings are available (see below).
You can confirm the setting status by the lights of the indicator, when the unit is turned on.
| Setting Description Indicator | |
| Normal Automatically adjusts the dynamic range based on the volume level of the source. | Lights up in green |
| Standard Compresses the dynamic range to suit a living room environment, etc. | Lights up in orange |
| Maximum Does not compress the dynamic range. | Lights up in red |
NOTE
- Normal is set as default.
Initializing the settings of the unit
Follow the procedure below to initialize the unit. When the unit does not operate properly for any reason, initialization may solve the problem.
1 Turn off the unit.
2 Hold down (power) on the front panel of the unit for more than 3 seconds.

Troubleshooting
Refer to the table below when the unit does not function properly. If the problem you are experiencing is not listed below or if the instructions below do not help, turn off the unit, disconnect the power cable, and contact the nearest authorized Yamaha dealer or service center.
First, check the following:
①The power cables of the unit, TV and playback devices (such as BD players) are connected to AC wall outlets securely.
②The unit, TV and playback devices (such as BD players) are turned on.
③The connectors of each cable are securely inserted in to Jacks on each device.
Power and system
| Problem Cause Remedy | ||
| The power turns off Immediately. | The auto-sleep function worked. The unit will be automatically turned off when one of the following conditions is met.- No operations for 8 hours- No audio input and no operations for 30 minutes | -- |
| The internal microcomputer is frozen, due to an external electric shock (such as lightning or excessive static electricity) or to a drop in the power supply voltage. | Hold down (power) on the front panel of the unit for more than 10 seconds to reboot it. (If the problem persists, disconnect the power cable from the AC wall outlet and plug it again.) | |
| The power cannot be turned on. | The protection circuitry has been activated three times consecutively. (If you try to turn on the power in this condition, the STATUS indicator flashes.) | For product protection, the power cannot be turned on. Unplug the power cable from the AC wall outlet and contact the nearest authorized Yamaha dealer or service center. |
| The unit Is not reacting. | The internal microcomputer is frozen, due to an external electric shock (such as lightning or excessive static electricity) or to a drop in the power supply voltage. | Hold down (power) on the front panel of the unit for more than 10 seconds to reboot it. (If the problem persists, disconnect the power cable from the AC wall outlet and plug it again.) |
| The unit operates by Itself. | Another Bluetooth device is being operated nearby. | Terminate Bluetooth connection of the unit and connect the unit and device again (p.12). |
| TV's 3D glasses do not work. | The unit is blocking the 3D glasses transmitter of your TV. | Check the position of the 3D glasses transmitter of your TV and adjust the position of the unit. |
Audio
| Problem Cause Remedy | ||
| No sound. | Another input source is selected. Select an appropriate input source (p.8). | |
| The mute function is activated. Cancel the mute function (p.8). | ||
| The volume is too low. Turn up the volume (p.8). | ||
| No sound is coming from the subwoofer. | The volume of the subwoofer is too low. | Turn up the volume of the subwoofer (p.8). |
| The playback source does not contain low-frequency signals. | -- | |
| The subwoofer setting is not correct. | With the unit turns off, hold down the SUBWOOFER key (+ or -) on the remote control for more than 5 seconds to switch the subwoofer settling (p.16). | |
| The volume decreases when the unit is turned on. | The automatic volume adjustment function worked.To prevent excessive loudness, the unit automatically controls its volume within a certain level when the unit is turned on. | If necessary, turn up the volume (p.8). |
| No surround effect. | Stereo playback is selected. Select the surround mode key to change for surround playback (p.10). | |
| The volume is too low. Turn up the volume (p.8). | ||
| The volume of the surround left and right channels is low. | Turn up the volume of the surround left and right channels (p.15). | |
| The TV or playback device is set to output 2-channel audio (such as PCM) only. | Change the digital audio output setting on the TV or playback device. | |
| The correct YSP position mode is not selected. | Select a YSP position mode key on the remote control which is best suited for your listening environment. | |
| Sound beams are not reflected effectively off walls because of the shape of the room, etc. | Use of the sound reflection board (sold separately) is recommended (p.21). | |
| Noise is heard. | The unit is too close to another digital or high-frequency device. | Move those devices away from the unit. |
Remote control
| Problem Cause Remedy | ||
| The unit cannot be controlled using the remote control. | The unit is out of the operating range. | Use the remote control within the operating range (p.8). |
| The batteries are weak. Replace with new batteries (p.8). | ||
| The remote control sensor of the unit is exposed to direct sunlight or strong lighting. | Adjust the lighting angle, or reposition the unit. | |
| The TV cannot be controlled using the TV remote control. | The remote control sensor of the TV is blocked by the unit. | Use the TV Remote Repeater function (p.15) so that the TV remote control sensor is not blocked (p.4). |
| There may be any problem with the TV or TV remote control. | Refer to the manuals of the TV. | |
| The TV cannot be controlled by using the TV Remote Repeater function. | The TV Remote Repeater function is disabled. | Enable the TV Remote Repeater function (p.15). |
| The TV remote control does not use infrared signals. (Some remote controls may not work even if it uses infrared signals.) | The TV Remote Repeater function cannot be used in this case. Adjust the position of the unit so that the remote control sensor of the TV is not blocked by the unit and use the TV remote control to operate the TV. | |
| The unit and TV are too close or too far from one another. | Move the unit away from the TV more than 50 mm (2*) (p.4). | |
| There is any obstacle (such as cables) between the unit and TV. | Remove the obstacle between the unit and TV. | |
| The unit does not learn TV remote control operations. | The TV remote control key was not held down long enough. | Hold down the key for more than 1 second twice or three times (p.13). |
| The TV remote control does not use infrared signals. (Some remote controls may not work even if it uses infrared signals.) | The TV remote control learning function cannot be used in this case. Use the supplied remote control to operate the unit. | |
| The position where you operated the TV remote control is not appropriate. | Operate the TV remote control at the appropriate position (p.13). | |
| The batteries of the TV remote control are weak. | Replace with new batteries. | |
| The remote control sensor of the unit is exposed to direct sunlight or strong lighting. | Adjust the lighting angle, or reposition the unit. | |
| The transmission of the remote control signal was disturbed by the TV screen light. | Turn off the TV and perform the learning operation again (p.13). | |
| Sound is coming from the TV when the unit volume is turned up with the TV remote control. (when TV remote control learning function is used) | Audio output is enabled on the TV. | Change the TV setting to disable the TV speaker output. If a setting to disable the speaker output is not available on your TV, try the following methods.- Connect headphones to the headphone jack on the TV.- Set the TV volume to minimum. |
| The power of the unit and of the TV switch in the opposite direction. (For example, the TV is turned off if the unit is turned on.) (when TV remote control learning function is used) | The power of the TV was on when you performed the learning operation. | Press the power key on the TV and (power) on the front panel of the unit to turn on them and then press the power key on the TV remote control to turn off them. |

Bluetooth
| Problem Cause Remedy | ||
| Cannot make the unit paired with the Bluetooth device. | BLUETOOTH is not selected as the input source. | Select BLUETOOTH as the input source. |
| A Bluetooth adaptor, etc. that you want to pair with the unit has a password other than “0000”. | Use a Bluetooth adaptor, etc. whose password is “0000”. | |
| The unit and device are too far apart. | Move the device closer to the unit. | |
| There is a device (microwave oven, wireless LAN, etc.) outputs signals in the 2.4 GHz frequency band nearby. | Move this unit away from the device that is emitting radio frequency signals. | |
| Another Bluetooth device is connected. | Terminate current Bluetooth connection, and perform pairing with the new device. | |
| Cannot make a Bluetooth connection. | Another Bluetooth device is connected. | The unit cannot make multiple Bluetooth connections. Terminate current Bluetooth connection, and make connection for the desired device. |
| More than nine devices are paired and the oldest pairing information is deleted. | Perform pairing again. The unit can retain pairing information for up to eight devices. When pairing a ninth device, the oldest pairing information will be deleted. | |
| No sound is produced or the sound is interrupted during playback. | The Bluetooth connection of the unit with the device is disconnected. | Perform Bluetooth connection operations again (p.12). |
| The unit and device are too far apart. | Move the device closer to the unit. | |
| There is a device (microwave oven, wireless LAN, etc.) outputs signals in the 2.4 GHz frequency band nearby. | Move this unit away from the device that is emitting radio frequency signals. | |
| The device's Bluetooth function is off. | Activate the Bluetooth function of the other device. | |
| The device is not set to send Bluetooth audio signals to the unit. | Check that the Bluetooth function of the device is set properly. | |
| Playback on the device has not been performed. | Perform playback on the device. | |
| The device's volume is set to minimum. | Turn up the volume level. | |
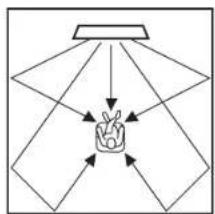
When surround effect is not enough
The unit achieves its surround sound effects by projecting sound beams which reflect off walls. The sound beams are not reflected toward to the listening position caused by furniture, etc., in the path of sound beams, or the room shape. In this case, the sound may become unbalanced.
flowchart
graph TD
    A["Light Lamp"] --> B["Hand gesture"]
    B --> C["Light"]
    B --> D["Light"]
    B --> E["Light"]
    B --> F["Light"]
    B --> G["Light"]
    B --> H["Light"]
    B --> I["Light"]
    B --> J["Light"]
    B --> K["Light"]
    B --> L["Light"]
    B --> M["Light"]
    B --> N["Light"]
    B --> O["Light"]
    B --> P["Light"]
    B --> Q["Light"]
    B --> R["Light"]
    B --> S["Light"]
    B --> T["Light"]
    B --> U["Light"]
    B --> V["Light"]
    B --> W["Light"]
    B --> X["Light"]
    B --> Y["Light"]
    B --> Z["Light"]
Figure 1. Ideal condition
Sound beams are reflected correctly and surround sound effects are balanced.
flowchart
graph TD
    A["Hand gesture"] --> B["Top"]
    A --> C["Left"]
    A --> D["Right"]
    A --> E["Bottom"]
    A --> F["Left"]
    A --> G["Right"]
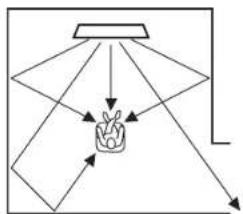
Figure 2. Surround (right) beam is not being reflected because there is no wall.
Surround (right) is quieter than surround (left), or surround (right) is in front of its proper location.
If the sound beams are not reflected toward to the listening position (figure 2), you can adjust for this by installing the optional sound reflection board (YRB-100).

flowchart
graph TD
    A["Top View"] --> B["Hand Icon"]
    B --> C["YRB-100"]
    C --> D["Arrow Right"]
    C --> E["Arrow Left"]
    C --> F["Arrow Up"]
    C --> G["Arrow Down"]
Figure 3. With a sound reflection board installed
The sound beam for surround (right) is reflected correctly, and correct surround sound effect is achieved.
NOTE
- YRB-100 may not be available depending on the country or region.
How to install YRB-100
The unit outputs sound beams according to the "YSP position" settings (p.9) as shown in the following illustrations.
Install the YRB-100 in the path of the sound beam.
shows the recommended install position.
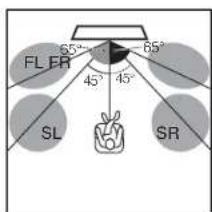
YSP position: Center
FL: Front left
FR: Front right
SL: Surround left
SR: Surround right
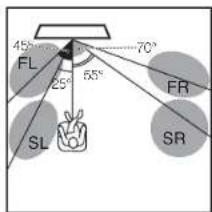
YSP position: Left
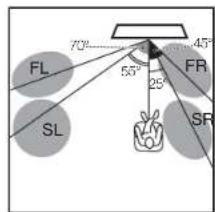
YSP position: Right
- After installing the sound reflection board, refer to the YRB-100 owner's manual to adjust the height and angle. It is recommended to use the test-tone (by holding down the CH LEVEL key) when adjusting the board (p.15).
- By installing the board close to your listening position, you can achieve clear surround sound positioning.
NOTE
This unit does not have the function to automatically adjust sound beam angles. It is not necessary to adjust the sound beam angles, although the procedure is described in the owner's manual.
Specifications
| Item Digital Sound Projector (YSP-1400) | ||
| Amplifier | Maximum Rated Output Power | Tweeter 2 W x 8 |
| Subwoofer 30 W x 2 | ||
| Array Driver | Type | Acoustic suspension type (Magnetic shielding type) |
| Driver 2.8 cm (1-1/8") cone x 8 | ||
| Frequency Response | 500 Hz to 22 kHz | |
| Subwoofer | Type | Bass reflex type (Non-magnetic shielding type) |
| Driver 8.5 cm (3-1/4") cone x 2 | ||
| Frequency Response | 45 Hz to 500 Hz | |
| Decoder | Supported audio signal (TV, BD/DVD) | PCM (2ch) Dolby Digital DTS Digital Surround |
| Input Jacks | Digital (Optical) 1 (TV) | |
| Digital (Coaxial) 1 (BD/DVD) | ||
| Analog (RCA) 1 (ANALOG) | ||
| Analog (Mini-plug) | 1 (PORTABLE) | |
| Output Jack Analog (RCA) 1 (SUBWOOFER OUT) | ||
| Bluetooth | Bluetooth version | Ver. 2.1 +EDR |
| Supported protocols | A2DP | |
| Supported codecs | SBC, AAC | |
| Wireless output Bluetooth Class 2 | ||
| Maximum communication distance | 10 m ([33 ft] without obstructions) | |
| General | Power Supply | U.S.A. and Canada models: AC 120 V, 60HzTaiwan model: AC 110 V, 60HzOther models: AC 220—240 V, 50/60Hz |
| Power Consumption | 24 W | |
| Standby Power Consumption | Less than 0.5 W | |
| Dimensions(W x H x D) | 1000 x 96 x 133 mm(not including brackets)(39-3/8" x 3-3/4" x 5-1/4") | |
| 1000 x 96 x 141 mm(including brackets)(39-3/8" x 3-3/4" x 5-1/2") | ||
| Weight 4.3 kg (9.5 | bs) |
* Specifications are subject to change without notice.
CINEMADSP
The "dogena and Sipoma DSP" are registered trademarks of Yamaha Corporation.
UniVolume
"UniVolume" is a trademark of Yamaha Corporation.
Bluetooth
Bluetooth is a registered trademark of the Bluetooth SIG and is used by Yamaha in accordance with a license agreement.
DOLBY DIGITAL
Manufactured under license from Dolby Laboratories. Dolby, Pro Logic and the double-D symbol are trademarks of Dolby Laboratories.
dts
Manufactured under license under U.S. Patent Nos: 5,956,674; 5,974,380; 6,487,535 & other U.S. and worldwide patents issued & pending. DTS, the Symbol, & DTS and the Symbol together are registered trademarks & DTS Digital Surround and the DTS logos are trademarks of DTS, Inc. Product includes software. © DTS, Inc. All Rights Reserved.
"Blu-ray Disc™", "Blu-ray™", and the logos are trademarks of the Blu-ray Disc Association.
Bluetooth
- Bluetooth is a technology for wireless communication between devices within an area of about 10 meters (33 ft) employing the 2.4 GHz frequency band, a band which can be used without a license.
Handling Bluetooth communications
- The 2.4 GHz band used by Bluetooth compatible devices is a radio band shared by many types of equipment. While Bluetooth compatible devices use a technology minimizing the influence of other components using the same radio band, such influence may reduce the speed or distance of communications and in some cases interrupt communications.
- The speed of signal transfer and the distance at which communications is possible differs according to the distance between the communicating devices, the presence of obstacles, radio wave conditions and type of equipment.
- Yamaha does not guarantee all wireless connections between this unit and devices compatible with Bluetooth function.

ATTENTION : LISEZ CE QUI SUIT AVANT D'UTILISER VOTRE APPAREIL.
natural_image
Front view of a gray electronic device rear panel with buttons and ports (no visible text or symbols)Système
natural_image
Simple line drawing of a rectangular object with two side protrusions and three horizontal lines, no text or symbols present.⑤Touche (alimentation)
⑤Prise SUBWOOFER OUT
natural_image
Simple line drawing of a laptop and a person silhouette on a desk (no text or symbols)Précautions
natural_image
Technical line drawing of a mechanical component with mounting holes and internal features (no text or symbols)natural_image
Simple line drawing of a laptop and a person sitting on a chair, no text or symbols presentPrécautions
Touches mode Surround/STEREO
5
Allumé (lecture surround)
□
STEREO
SURROUND

Guide de dépannage
flowchart
graph TD
    A["Hand gesture"] --> B["Top Shape"]
    A --> C["Left Triangle"]
    A --> D["Right Triangle"]
    A --> E["Bottom Shape"]
    A --> F["Left Triangle"]
    A --> G["Right Triangle"]
Figure 1. Condition idéale

- IMPORTANT SAFETY INSTRUCTIONS
- Explanation of Graphical Symbols
- IMPORTANT
- FOR CANADIAN CUSTOMERS
- We Want You Listening For A Lifetime
- FCC INFORMATION (for US customers)
- IMPORTANT NOTICE: DO NOT MODIFY
- FCC WARNING
- NOTICE
- PRÉCAUTIONS CONCERNANT LA SÉCURITÉ
- Notes on remote controls and batteries
- WARNING
- (Power key)
- Contents
- Supplied items
- Features
- • Digital sound projection
- - Surround mode
- - Clear voice
- • UniVolume UniVolume
- - Bluetooth® connection
- • TV remote control learning function
- • TV Remote Repeater function
- Part names and functions of the unit
- Front panel
- HINT
- Rear panel
- Installations
- Cautions
- How to Install on the wall
- Installation position of the unit and selecting a YSP POSITION key
- NOTE
- Connections
- Connect the TV and unit with the optical cable (supplied).
- Connect the power cable of the unit to an AC wall outlet.
- Set the TV as follows.
- Analog connection of an external device (game console)
- Analog connection of a portable device
- Operations
- Preparing the remote control
- Operating range of the remote control
- Indicators
- Input keys
- SUBWOOFER keys (+/-)
- VOLUME keys (+/-)
- MUTE key
- 1
- CH LEVEL key
- (POWER) key
- BLUETOOTH STANDBY key
- 4
- CLEAR VOICE key
- UNIVOLUME key
- Surround mode / STEREO keys
- 5
- AUDIO DELAY key
- 8
- YSP POSITION (YSP position) keys
- Decoder indication
- Auto-sleep function
- Enjoy stereoscopic surround effects
- Surround mode
- Listening to the sound from a BLUETOOTH device
- Pairing a Bluetooth device with the unit
- Playing back audio from a Bluetooth device on the unit
- Press the BLUETOOTH key on the supplied remote control to select Bluetooth as the input source.
- Turn on the Bluetooth device.
- Play back a song on the device.
- Terminating Bluetooth connection
- Using the Bluetooth standby mode
- How to set
- With the unit turned on, hold down the BLUETOOTH STANDBY key for more than 3 seconds.
- Using the Home Theater Controller application
- Settings
- Controlling the unit with TV remote control (TV remote control learning function)
- Make the unit learn the volume (+) operation.
- Make the unit learn the power operation.
- To finish the learning mode, press the LEARN or (power) key on the supplied remote control.
- Clearing all learned operations
- Controlling the TV via the unit (when the TV's remote control sensor is blocked)
- Turn on the unit.
- Hold down the REPEATER key on the supplied remote control for more than 3 seconds to enable/disable the TV Remote Repeater function.
- Adjusting the volume level of each channel (CH LEVEL)
- Hold down the CH LEVEL key on the remote control for more than 3 seconds.
- Using an external subwoofer
- Making sound easy to listen at low volume
- Initializing the settings of the unit
- Troubleshooting
- When surround effect is not enough
- How to install YRB-100
- CINEMADSP
- UniVolume
- Bluetooth
- DOLBY DIGITAL
- dts
- Handling Bluetooth communications
- ATTENTION : LISEZ CE QUI SUIT AVANT D'UTILISER VOTRE APPAREIL.
- Précautions
- Touches mode Surround/STEREO
- Guide de dépannage
Brand : YAMAHA
Model : YSP1400
Category : Soundbar