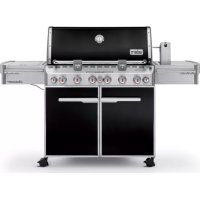
Summit E670 - Barbecue WEBER - Free user manual and instructions
Find the device manual for free Summit E670 WEBER in PDF.



User questions about Summit E670 WEBER
0 question about this device. Answer the ones you know or ask your own.
Ask a new question about this device
Download the instructions for your Barbecue in PDF format for free! Find your manual Summit E670 - WEBER and take your electronic device back in hand. On this page are published all the documents necessary for the use of your device. Summit E670 by WEBER.
USER MANUAL Summit E670 WEBER
LP Gas Grill Owner's Guide
natural_image
Close-up of a pressure gauge with a central needle pointing to approximately 360 degrees (no visible text or symbols)YOU MUST READ THIS OWNER'S GUIDE BEFORE OPERATING YOUR GAS GRILL.
⚠️ DANGER
If you smell gas:
- Shut off gas to the appliance.
- Extinguish any open flames.
- Open lid.
- If odor continues, keep away from the appliance and immediately call your gas supplier or your fire department.
Leaking gas may cause a fire or explosion which can cause serious bodily injury, death, or damage to property.
⚠ WARNING:
- Do not store or use gasoline or other flammable liquids or vapors in the vicinity of this or any other appliance.
- An LP cylinder not connected for use shall not be stored in the vicinity of this or any other appliance.
⚠ WARNING: Follow all leak-check procedures carefully in this manual prior to barbecue operation. Do this even if the barbecue was dealer-assembled.
NOTICE TO INSTALLER: These instructions must be left with the owner and the owner should keep them for future use.
THIS GAS APPLIANCE IS DESIGNED FOR OUTDOOR USE ONLY.
⚠ WARNING: Do not ignite this appliance without first reading the BURNER IGNITION sections of this manual.



WARNINGS
△ DANGER
Failure to follow the Dangers, Warnings and Cautions contained in this Owner's Manual may result in serious bodily injury or death, or in a fire or an explosion causing damage to property.
⚠️ WARNINGS
⚠ Do not store a spare or disconnected liquid propane cylinder under or near this barbecue.
⚠️ Improper assembly may be dangerous. Please follow the assembly instructions carefully.
After a period of storage, and/or nonuse, the Weber ^® gas barbecue should be checked for gas leaks and burner obstructions before use. See instructions in this manual for correct procedures.
Do not operate the Weber® gas barbecue if there is a gas leak present.
⚠ Do not use a flame to check for gas leaks.
Combustible materials should never be within 24 inches (61 cm) of the back or sides of your Weber® gas barbecue.
Do not put a barbecue cover or anything flammable on, or in the storage area under the barbecue.
Your Weber® gas barbecue should never be used by children. Accessible parts of the barbecue may be very hot. Keep young children away while it is in use.
⚠️ You should exercise reasonable care when operating your Weber® gas barbecue. It will be hot during cooking or cleaning and should never be left unattended, or moved while in operation.
Should the burners go out while in operation, turn all gas valves off. Open the lid and wait five minutes before attempting to relight, using the igniting instructions.
Do not use charcoal or lava rock in your Weber® gas barbecue.
⚠️ Never lean over open grill or place hands or fingers on the front edge of the cookbox.
Should a grease fire occur, turn off all burners and leave lid closed until fire is out.
Do not enlarge valve orifices or burner ports when cleaning the valves or burners.
The Weber® gas barbecue should be thoroughly cleaned on a regular basis.
△ Liquid propane gas is not natural gas. The conversion or attempted use of natural gas in a liquid propane unit or liquid propane gas in a natural gas unit is dangerous and will void your warranty.
⚠ Do not attempt to disconnect any gas fitting while your barbecue is in operation.
⚠ Use heat-resistant barbecue mitts or gloves when operating barbecue.
⚠️ Keep any electrical supply cord and the fuel supply hose away from any heated surfaces.
Combustion byproducts produced when using this product contain chemicals known to the state of California to cause cancer, birth defects, or other reproductive harm.
Do not use this barbecue unless all parts are in place. The unit must be properly assembled according to the assembly instructions.
Do not build this model of grill in any built-in or slide-in construction. Ignoring this Warning could cause a fire or an explosion that can damage property and cause serious bodily injury or death.
△ Proposition 65 Warning: Handling the brass material on this product exposes you to lead, a chemical known to the state of California to cause cancer, birth defects or other reproductive harm.
(Wash hands after handling this product.)
⚠ Use the pressure regulator and hose assembly that is supplied with your Weber® gas barbecue.
Do not attempt to disconnect the gas regulator and hose assembly or any gas fitting while your barbecue is in operation.
A dented or rusty liquid propane cylinder may be hazardous and should be checked by your liquid propane supplier. Do not use a liquid propane cylinder with a damaged valve.
Although your liquid propane cylinder may appear to be empty, gas may still be present, and the cylinder should be transported and stored accordingly.
⚠️ If you see, smell or hear the hiss of escaping gas from the liquid propane cylinder:
1. Move away from liquid propane cylinder.
2. Do not attempt to correct the problem yourself.
3. Call your fire department.
TABLE OF ONTENTS
WARNINGS....2
TABLE OF ONTENTS....3
EXPLODED VIEW 4
EXPLODED VIEW LIST 5
WARRANTY 6
GENERAL INSTRUCTIONS....7
CANADIAN INSTALLATION....7
OPERATING....7
STORAGE AND/OR NONUSE....7
LEAK CHECK PREPARATION....9
CHECK FOR GAS LEAKS....11
REFILLING THE LIQUID PROPANE CYLINDER....13
LIGHT FEATURES 13
WEBER® GRILL OUT™ HANDLE LIGHT 13
LIGHTED CONTROL KNOBS 13
BEFORE USING THE GRILL 14
FUEL LEVEL 14
SLIDE OUT GREASE TRAY AND DISPOSABLE DRIP PAN.... 14
HOSE INSPECTION 14
OOKING METHODS....19
DIRECT COOKING 19
INDIRECT COOKING 19
SIDE BURNER IGNITION & USAGE 20
SIDE BURNER IGNITION 20
TO EXTINGUISH 20
IMPORTANT SAFEGUARDS....29
GRILL OUT™ HANDLE LIGHT TROUBLESHOOTING .....32
MAINTENANE 33
CLEANING....33
WEBER® SPIDER/INSECT SCREENS 33
BURNER TUBE CLEANING 33
REPLACING MAIN BURNERS 34
Weber-Stephen Products LLC (Weber) hereby warrants to the ORIGINAL PURCHASER of this Weber® gas grill that it will be free of defects in material and workmanship from the date of purchase as follows:
Aluminum castings: 25 years (2 years on paint; excludes fading)
Stainless steel shroud: 25 years
Porcelain-enameled shroud: 25 years
Stainless steel burner tubes: 10 years
Stainless steel cooking grates: 5 years no rust through or burn through
Stainless steel Flavorizer ^39 bars: 5 years no rust through or burn through
Porcelain-enameled cast-iron cooking grates: 5 years no rust through or burn through
Porcelain-enameled cooking grates: 3 years no rust through or burn through
Porcelain-enameled Flavorizer "bars: 2 years no rust through or burn through
Infrared rolisserie burner: 2 years
All remaining parts: 2 years
when assembled and operated in accordance with the printed instructions accompanying it. Weber may require reasonable proof of your date of purchase. THEREFORE, YOU SHOULD RETAIN YOUR SALES SLIP OR INVOICE.
This Limited Warranty shall be limited to the repair or replacement of parts that prove defective under normal use and service and which on examination shall indicate, to Weber's satisfaction, they are defective. Before returning any parts, contact the Customer Service Representative in your area using the contact information on our website. If Weber confirms the defect and approves the claim, Weber will elect to replace such parts without charge. If you are required to return defective parts, transportation charges must be prepaid. Weber will return parts to the purchaser, freight or postage prepaid.
This Limited Warranty does not cover any failures or operating difficulties due to accident, abuse, misuse, alteration, misapplication, vandalism, improper installation or improper maintenance or service, or failure to perform normal and routine maintenance, including but not limited to damage caused by insects within the burner tubes, as set out in this owner's manual.
Deterioration or damage due to severe weather conditions such as hail, hurricanes, earthquakes or tornadoes, discoloration due to exposure to chemicals either directly or in the atmosphere, is not covered by this Limited Warranty.
There are no other express warrants except as set forth herein and any applicable implied warranties of merchantability and fitness are limited in duration to the period of coverage of this express written Limited Warranty. Some regions do not allow limitation on how long an implied warranty lasts, so this limitation may not apply to you.
Weber is not liable for any special, indirect or consequential damages. Some regions do not allow the exclusion or limitation of incidental or consequential damages, so this limitation or exclusion may not apply to you.
Weber does not authorize any person or company to assume for it any other obligation or liability in connection with the sale, installation, use, removal, return, or replacement of its equipment; and no such representations are binding on Weber.
This Warranty applies only to products sold at retail.
WEBER-STEPHEN PRODUCTS LLC
Customer Service Center
1890 Roselle Road, Suite 308
Schaumburg, IL 60195
USA
For replacement parts call:
1-800-446-1071
Visit www.weber.com ^® , select your country of origin, and register your grill today.
GENERAL INSTRUCTIONS
Your Weber® gas barbecue is a portable outdoor cooking appliance. With the Weber® gas barbecue you can grill, barbecue, roast and bake with results that are difficult to duplicate with indoor kitchen appliances. The closed lid and Flavorize® bars produce that "outdoor" flavor in the food.
The Weber ^® gas barbecue is portable so you can easily change its location in your yard or on your patio. Portability means you can take your Webel ^® gas barbecue with, if you move.
Liquid Propane (LP) gas supply is easy to use and gives you more cooking control than charcoal fuel.
- These instructions will give you the minimum requirements for assembling your Weber ^® gas barbecue. Please read the instructions carefully before using your Weber ^® gas barbecue. Improper assembly can be dangerous.
• Not for use by children. - If there are local codes that apply to portable gas grills, you will have to conform to them. Installation must conform with local codes or, in the absence of local codes, with either the National Fuel Gas Code, ANSI Z223.1/NFPA 54, Natural Gas and Propane Installation Code, CSA B149.1, or Propane Storage and Handling Code, B149.2, or the Standard for Recreational Vehicles, ANSI A 119.2/NFPA 1192, and CSA Z240 RV Series, Recreational Vehicle Code, as applicable.
- The pressure regulator supplied with the Weber® gas barbecue must be used. This regulator is set for 11 inches of water column (pressure).
- This Weber® gas barbecue is designed for use with liquid propane (LP) gas only. Do not use with natural (piped in city) gas. The valves, orifices, hose and regulator are for LP gas only.
- Do not use with charcoal fuel.
- Check that the area under the control panel and the slide out grease tray are free from debris that might obstruct the flow of combustion or ventilation air.
• The areas around the LP cylinder must be free and clear from debris - Replacement pressure regulators and hose assemblies must be those specified by Weber-Stephen Products LLC.
CANADIAN INSTALLATION
These instructions, while generally acceptable, do not necessarily comply with the Canadian Installation codes, particularly with piping above and below ground. In Canada the installation of this appliance must comply with local codes and/or Standard CSA-B149.2 (Propane Storage and Handling Code).
OPERATING
⚠ WARNING: Only use this barbecue outdoors in a well-ventilated area. Do not use in a garage, building, breezeway or any other enclosed area.
⚠ WARNING: Keep ventilation openings for cylinder enclosure free and clear from debris.
⚠ WARNING: Your Weber® gas barbecue shall not be used under overhead combustible construction.
⚠ WARNING: Your Weber® gas barbecue is not intended to be installed in or on recreational vehicles and/or boats.
⚠ WARNING: Do not use the barbecue within 24 inches of combustible materials.
⚠ WARNING: The entire cookbox gets hot when in use. Do not leave unattended.
⚠ WARNING: Keep electrical supply cord and the fuel supply hose away from heated surfaces.
⚠ WARNING: Keep the cooking area clear of flammable vapors and liquids such as gasoline, alcohol, etc., and combustible materials.
⚠ WARNING: Never store an extra (spare) LP cylinder under or near the Weber® gas barbecue.
⚠ WARNING: The LP cylinder used with your barbecue must be with a listed OPD (Overfilling Prevention Device) and a QCC1 or Type 1 (CGA810) cylinder connection. The cylinder connection must be compatible with the barbecue connection.
STORAGE AND/OR NONUSE
- The gas must be turned off at the liquid propane cylinder when the Weber ^® gas barbecue is not in use.
- When the Weber ^ gas barbecue is stored indoors, the gas supply must be DISCONNECTED and the LP cylinder stored outdoors in a well-ventilated space.
- LP cylinder must be stored outdoors in a well -ventilated area out of reach of children. Disconnected LP cylinder must not be stored in a building, garage or any other enclosed area.
- When the LP cylinder is not disconnected from the Weber® gas barbecue, the appliance and LP tank must be kept outdoors in a well-ventilated space.
- The Weber ^® gas barbecue should be checked for gas leaks and any obstructions in the burner tubes before using. (Refer to “MAINTENANCE/ANNUAL MAINTENANCE”).
- Check that the areas under the control panel and the drip tray are free from debris that might obstruct the flow of combustion or ventilation air.
- The Spider/Insect screens should also be checked for any obstructions. (Refer to "MAINTENANCE/ANNUAL MAINTENANCE").
GAS INSTRUCTIONS
SAFE HANDLING TIPS FOR LIQUID PROPANE GAS CYLINDERS
- Liquid Propane (LP) gas is a petroleum product as are gasoline and natural gas. LP gas is a gas at regular temperatures and pressures. Under moderate pressure, inside a cylinder, LP gas is a liquid. As the pressure is released, the liquid readily vaporizes and becomes gas.
- LP gas has an odor similar to natural gas. You should be aware of this odor.
- LP gas is heavier than air. Leaking LP gas may collect in low areas and prevent dispersion.
- To fill, take the LP cylinder to a propane gas dealer, or look up "gas-propane" in the phone book for other sources of LP gas.
⚠ WARNING: We recommend that your LP cylinder be filled at an authorized LP gas dealer, by a qualified attendant, who fills the tank by weight. IMPROPER FILLING IS DANGEROUS.
- Air must be removed from a new LP cylinder before the initial filling. Your LP dealer is equipped to do this.
- The LP cylinder must be installed, transported, and stored in an upright position. LP cylinders should not be dropped or handled roughly.
- Never store or transport the LP cylinder where temperatures can reach 125^ F (too hot to hold by hand). For example: do not leave the LP cylinder in a car on a hot day.
Note: A refill will last about 18–20 hours of cooking time at normal use. The fuel scale, a feature on some of our grills, will indicate the propane supply so you can refill the cylinder before running out. You do not have to run out before you refill.
- Treat "empty" LP cylinders with the same care as when full. Even when the LP tank is empty of liquid, there still may be gas pressure in the cylinder. Always close the cylinder valve before disconnecting.
CAUTION: Place dust cap on cylinder valve outlet whenever the cylinder is not in use. Only install the type of dust cap on the cylinder valve outlet that is provided with the cylinder valve. Other types of caps or plugs may result in leakage of propane.
- Do not use a damaged LP cylinder. A dented or rusty LP cylinder or an LP cylinder with a damaged valve may be hazardous and should be replaced with a new one immediately.
- The joint where the hose connects to the LP cylinder must be leak tested each time the LP cylinder is reconnected. For example, test each time the LP cylinder is refilled.
- Be sure the regulator is mounted with the small vent hole pointed downward so that it will not collect water. This vent should be free of dirt, grease, bugs, etc.
- The gas connections supplied with your Weber ^® gas appliance have been designed and tested to meet 100% CSA and ANSI requirements.
⚠ WARNING: Replacement LP tanks must match the regulator connection supplied with this Weber® gas appliance.
Liquid Propane Cylinder Requirements
- Check to be sure that cylinders have a D.O.T. certification (1), and that they have been date tested (2) is within five years of use. Your LP gas supplier can do this for you.
- All LP tank supply systems must include a collar to protect the cylinder valve.
- The LP cylinder must be a 20-lb. size approximately 18 14 inches high and 12 14 inches in diameter.
- The cylinder must be constructed and marked in accordance with the Specifications for LP - Gas Cylinders of the U.S. Department of Transportation (D.O.T.) or the National Standard of Canada, CAN/CSA-B339, Cylinders, Spheres and Tubes or Transportation of Dangerous Goods; and Commission, as applicable.
Canadian Liquid Propane Cylinder Requirements
Note: Your retailer can help you match a replacement tank to your barbecue.
- The LP cylinder must be constructed and marked in accordance with the specifications for LP gas cylinders, T.C.
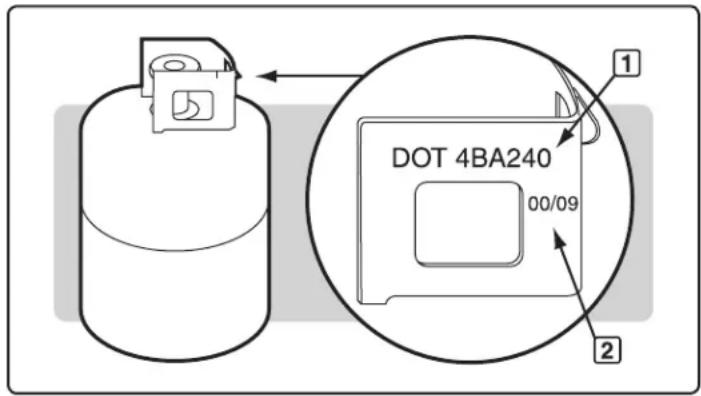
text_image
DOT 4BA240 00/09 1 2GAS INSTRUCTIONS
IMPORTANT LP CYLINDER INFORMATION
⚠️ DANGER
NEVER store a spare LP cylinder under or near Weber ^® gas appliances. NEVER fill the tank beyond 80% full. Failure to follow these statements exactly may result in a fire causing death or serious injury.
Weber ^® gas appliances are equipped for a cylinder supply system designed for vapor withdrawal.
⚠ WARNING: Only use Weber® gas appliances outdoors in a well-ventilated area. Do not use in a garage, building, breezeway or any other enclosed area.
The proper filling methods for the filling of your cylinder are by weight or volume, as described in NFPA 58. Please make sure your filling station fills your LP cylinder by weight or volume. Ask your filling station to read purging and filling instructions on the LP cylinder before attempting to fill.
LEAK CHECK PREPARATION
Check That All Burner Valves Are Off
Valves are shipped in the OFF position, but you should check to be sure that they are turned off. Check by pushing down and turning clockwise. If they do not turn, they are off. If they do turn, continue turning them clockwise until they stop; then they are off.
The Liquid Propane Cylinder
All Weber ^® liquid propane gas grill regulators are equipped with a UL-Listed tank connection as per the latest edition of ANSI Z21.58. This will require a liquid propane tank that is similarly equipped with a Type 1 connection in the tank valve. This Type 1 coupling allows you to make a fast and totally safe hookup between your gas grill and your liquid propane tank. It eliminates the chance of leaks due to a POL fitting that is not properly tightened. Gas will not flow from the tank unless the Type 1 coupling is fully engaged into the coupling.
⚠ WARNING: Make sure that the LP cylinder valve is closed. Close by turning valve clockwise.
△ DANGER
Do not use an open flame to check for gas leaks. Be sure there are no sparks or open flames in the area while you check for leaks. Sparks or flames will result in a fire or explosion which can cause serious bodily injury or death, and damage to property.
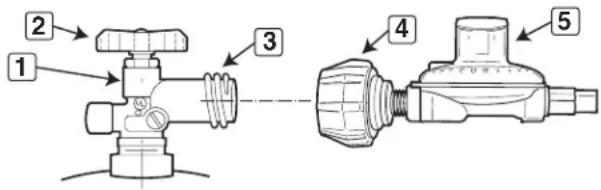
text_image
Technical diagram of a valve assembly with numbered parts for identification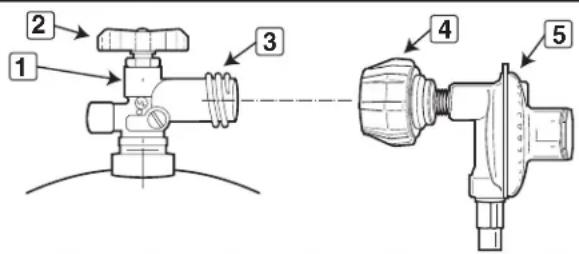
text_image
1 2 3 4 5TYPE 1 ONNETIVE OUPLING
| 1 Type | 1 Valve |
| 2 Hand Wheel | |
| 3 External Thread | |
| 4 Thermally Sensitive Nut | |
| 5 Propane Regulator | |
GAS INSTRUCTIONS
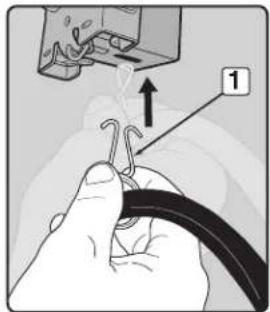
A) Locate hose retention clip (1) on regulator hose. Secure into slot (2) on underside of tank scale.
⚠ WARNING: The hose must be secured to the tank scale with the Hose Retention Clip. Failure to do so could cause damage to the hose resulting in a fire or explosion which can cause serious bodily injury or death, and damage to property.
Some LP tanks have differing top collar assemblies. (The top collar is the metal protective ring around the valve.) One series of tanks mount with the valve facing front (3). The other tanks mount with the valve facing away from the fuel scale (4). Weber recommends the use of cylinder manufacturer's Manchester and Worthington, with a 47.6 lb water capacity. Other cylinders may be acceptable for use with the appliance provided they are compatible with the appliance retention means (see illustrations).
The LP cylinder is installed inside the base cabinet, on the tank scale (right side).
B) Open base cabinet doors.
C) Loosen cylinder lock wing nut. Swing cylinder lock up (5).
D) Turn the LP cylinder so the opening of the valve is either to the front or side of the Weber ^® gas barbecue.
E) Lift tank up into position on the tank scale (6).
F) Swing the cylinder lock down. Tighten the wing nut.
Connect The Hose To The Cylinder
A) Remove the plastic dust cover from the valve.
B) Screw the regulator coupling onto the tank valve, clockwise, or to the right. Hand-tighten only (7).
Note: This connection tightens clockwise and will not allow gas to flow unless the connection is tight. The connection requires tightening by hand only.
⚠ WARNING: Do not use a wrench to tighten the connection. Using a wrench could damage the regulator coupling and could cause a leak.
text_image
Diagram showing a hand holding a cable with an attached component, labeled with number 1 and an arrow indicating direction.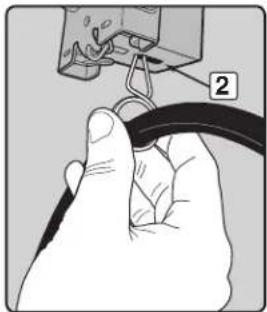
natural_image
Close-up of a hand holding a black cable with a small component above it, no visible text or symbols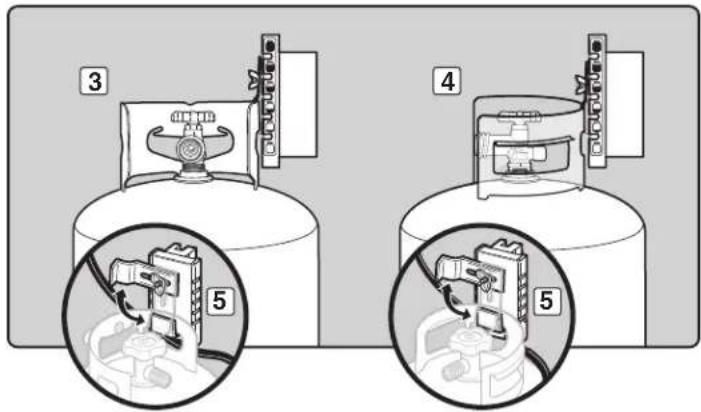
text_image
Diagram showing two configurations of a gas cylinder with labeled parts and zoomed-in insets for electrical or mechanical testing.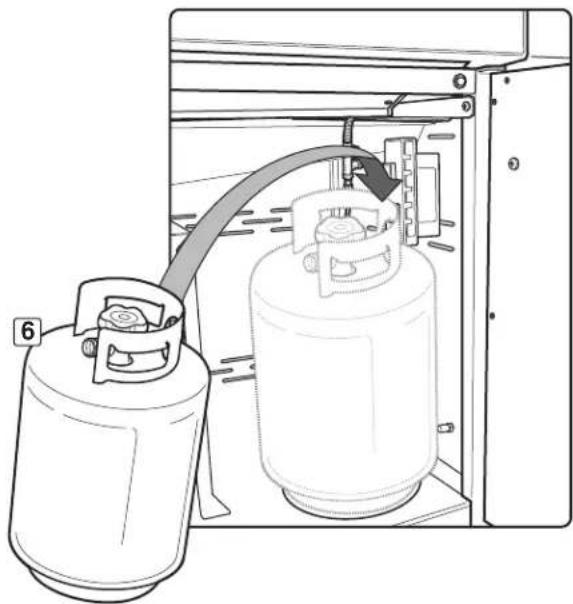
natural_image
Diagram of two gas cylinders inside a control panel, one with a curved pipe and label '6' (no text or symbols on the cylinders themselves)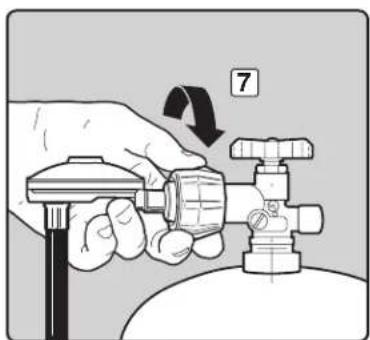
natural_image
Illustration of a hand holding a gas valve with a handle, no text or symbols presentGAS INSTRUCTIONS
⚠ WARNING: The gas connections of your Summit® gas grill have been factory tested. We do however recommend that you leak check all gas connections before operating your Summit® gas grill.
Remove Control Panel
Parts required: Phillips screwdriver and a towel.
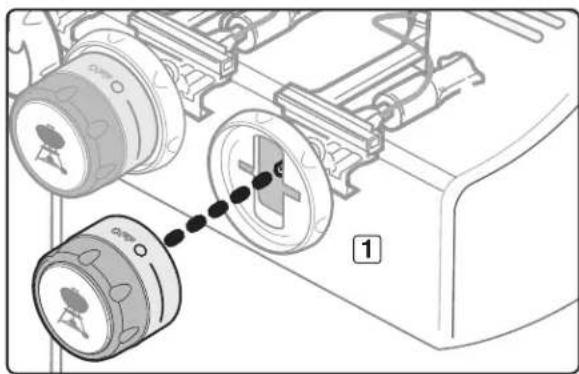
A) Remove the burner control knobs (1).
B) Open both doors and place a towel on top of the doors. This will protect the control panel and tops of the doors from getting scratched on the next step.
C) Remove the screws from the underside of the control panel with a Phillips screwdriver (2).
D) Tilt the control panel forward and lift up and away from the grill (3). (For Summit ^® models with LED features: Be careful not to break or disconnect the wires for the control panel LEDs.)
E) Place the control panel on the towel covering the door assemblies (4).
CHECK FOR GAS LEAKS
△ DANGER
Do not use an open flame to check for gas leaks. Be sure there are no sparks or open flames in the area while you check for leaks. Sparks or open flames will result in a fire or explosion, which can cause serious bodily injury or death and damage to property.
Note: All factory-made connections have been thoroughly checked for gas leaks. The burners have been flame-tested. As a safety precaution, however, you should recheck all fittings for leaks before using your Weber ^2 gas barbecue. Shipping and handling may loosen or damage a gas fitting.
⚠ WARNING: The gas connections of your gas grill have been factory tested. We do however recommend that you leak check all gas connections before operating your gas grill.
⚠ WARNING: Perform these leak checks even if your barbecue was dealer or store assembled.
If your grill has a side burner, make sure the side burner is turned off.
Turn on gas supply at source.
⚠ WARNING: Do not ignite burners when leak checking.
You will need: A soap and water solution and a rag or brush to apply it.
A) Mix soap and water.
B) Turn on gas supply (1).
C) Check for leaks by wetting the fitting with the soap and water solution and watching for bubbles. If bubbles form, or if a bubble grows, there is a leak.
If there is a leak, turn off the gas and tighten the fitting. Turn the gas back on and recheck with the soap and water solution. If leak does not stop, do not use the barbecue. Contact the Customer Service representative in your area using the contact information on our web site. Log onto www.weber.com ^4 .
D) When leak checking is complete, turn gas supply off at the source and rinse connections with water.
Note: Since some leak test solutions, including soap and water, may be slightly corrosive, all connections should be rinsed with water after checking for leaks.
⚠ WARNING: You should check for gas leaks every time you disconnect and reconnect a gas fitting.
natural_image
Diagram of a mechanical device with two circular components connected by dotted lines, no visible text or symbols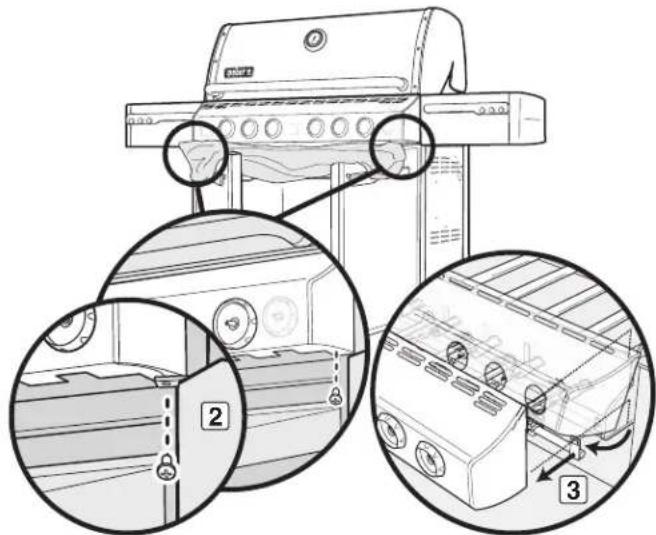
text_image
Technical diagram showing a grill with labeled parts and three circular insets illustrating the exterior and interior views.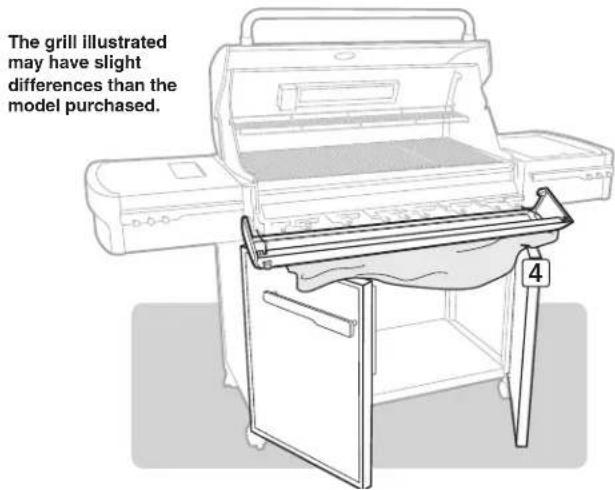
text_image
The grill illustrated may have slight differences than the model purchased. 4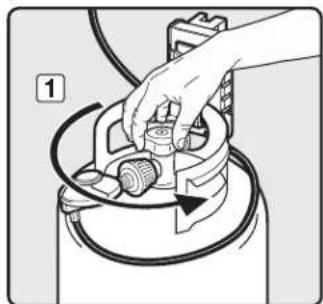
natural_image
Illustration of a hand operating a portable device with a circular component and a scroll wheel (no text or symbols)GAS INSTRUCTIONS
Check
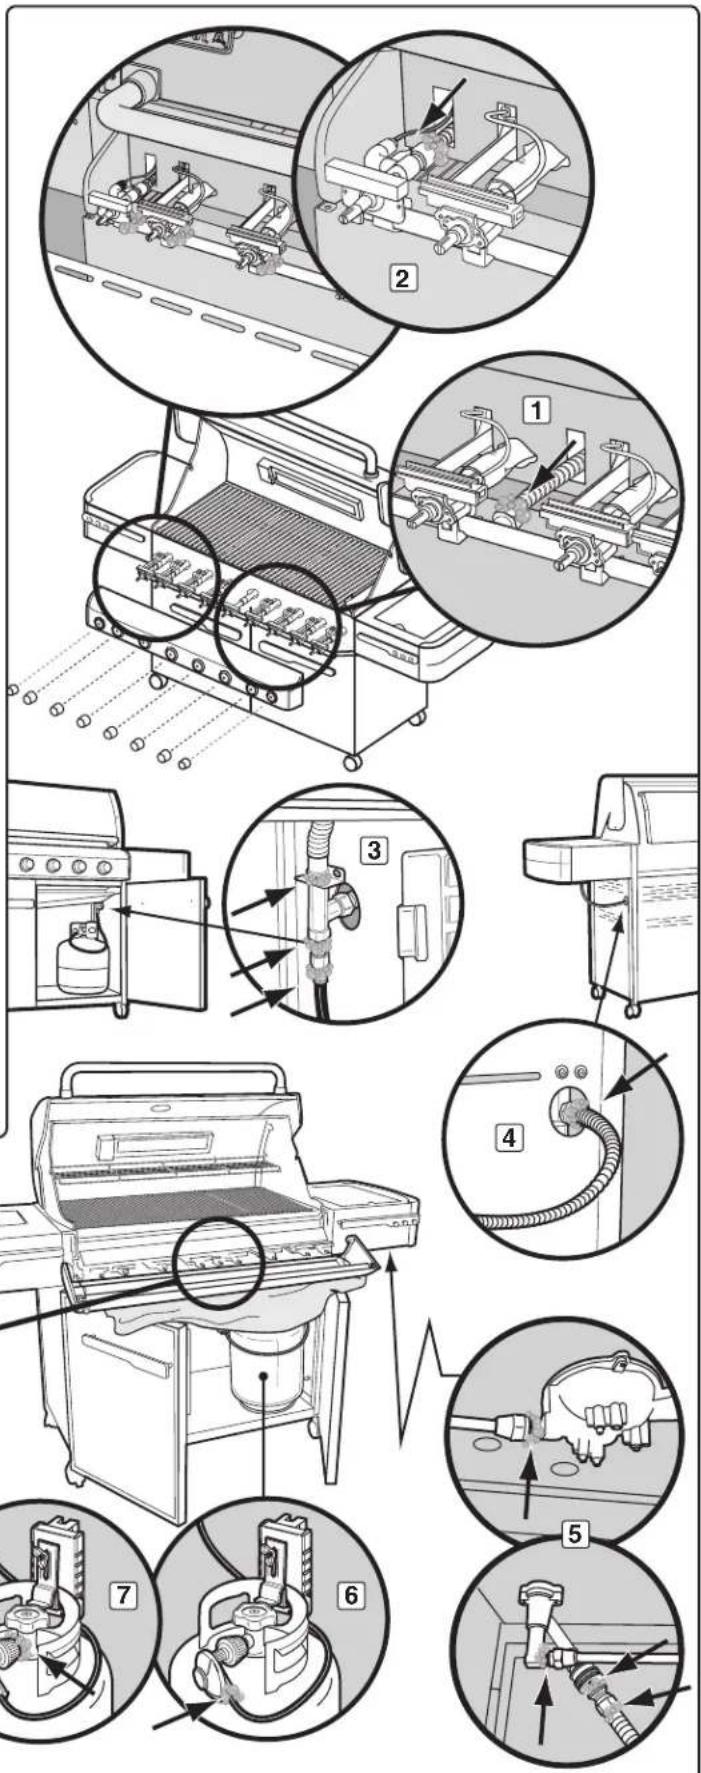
A) Main gas line to manifold connection (1).
B) Rotisserie (I.R. Burner) gas line connection (2).
C) Bulkhead and gas supply hose connection (3).
D) Side burner hose to bulkhead connection (4).
⚠ WARNING: If there is a leak at connection (1, 2, 3, or 4), retighten the fitting with a wrench and recheck for leaks with soap and water solution. If a leak persists after re-tightening the fitting, turn off the gas. DO NOT OPERATE THE GRILL. Contact the Customer Service Representative in your area using the contact information on our web site. Log onto www.weber.com®.
E) Side burner hose to quick disconnect connection, side burner valve and orifice connections (5).
F) Hose to regulator connection (6).
G) Regulator to cylinder connection (7).
H) Valves to manifold connections (8).
⚠ WARNING: If there is a leak at connections (5, 6, 7, or 8), turn off the gas. DO NOT OPERATE THE GRILL. Contact the Customer Service Representative in your area using the contact information on our web site. Log onto www.weber.com®.
When leak checks are complete, turn gas supply off at the source and rinse connections with water.
Reinstall Control Panel
Parts required: control panel, screws and burner control knobs.
A) Hook the top edge of the control panel onto the control panel brackets on either side of the front of the cookbox.
B) Line up screws with screw holes on both the control panel bracket and the frame.
C) Tighten screws.
D) Place corresponding control knobs onto the valve stems.
text_image
Technical diagram illustrating the assembly and maintenance steps of a machine tool, with numbered annotations for each step.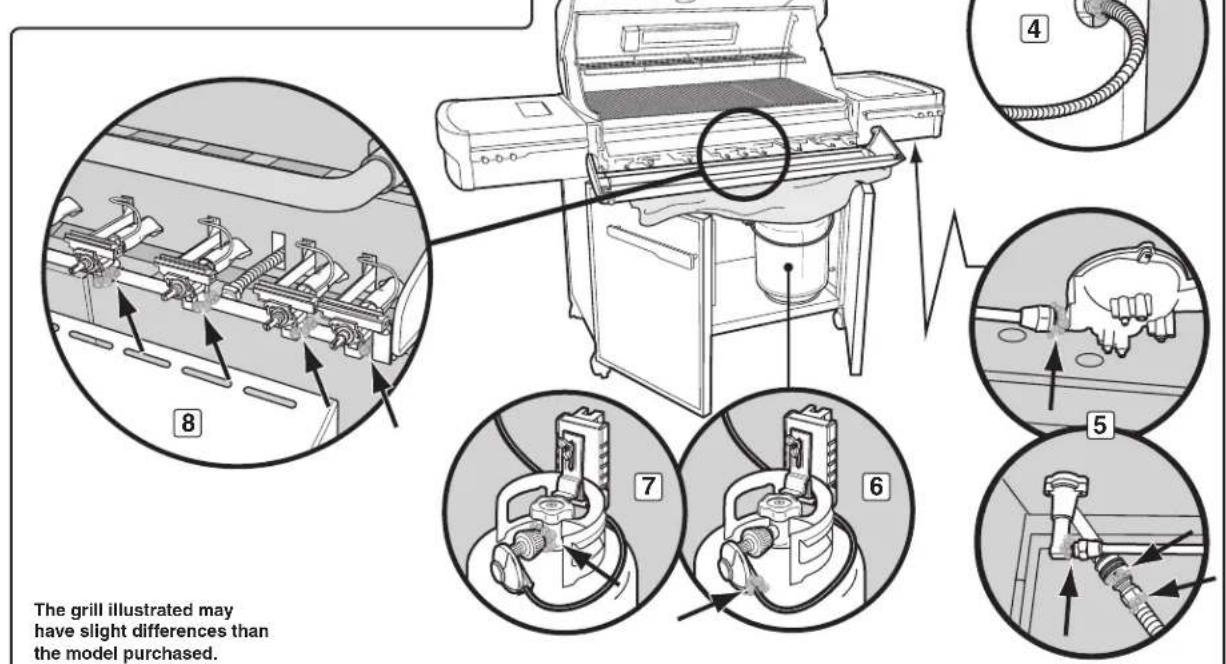
text_image
The grill illustrated may have slight differences than the model purchased.GAS INSTRUCTIONS
REFILLING THE LIQUID PROPANE CYLINDER
We recommend that you refill the LP cylinder before it is completely empty.
Removal of the LP cylinder:
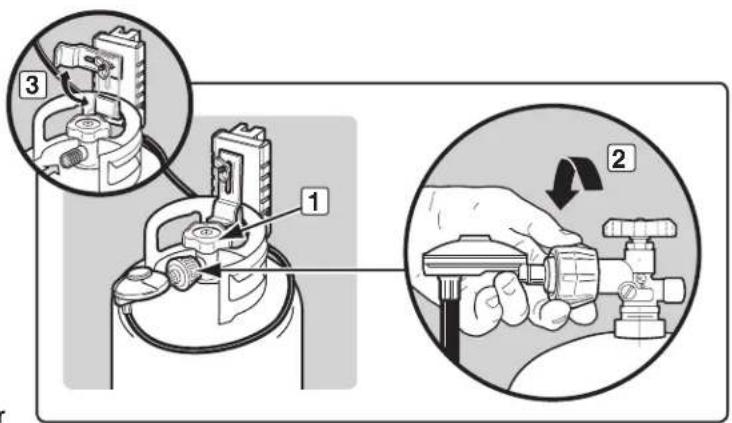
A) Close cylinder valve (turn clockwise) (1).
B) Unscrew regulator coupling by turning counterclockwise, by hand only (2).
C) Loosen cylinder lock wing nut and turn cylinder lock up out of the way (3).
D) Lift cylinder off.
To fill, take the LP cylinder to a gas propane dealer, or look up "gas-propane" in the phone book for other sources of LP gas.
⚠ WARNING: We recommend that your LP cylinder be filled at an authorized LP gas dealer, by a qualified attendant, who fills the cylinder by weight. IMPROPER FILLING IS DANGEROUS.
CAUTION: Place dust cap on cylinder valve outlet whenever the cylinder is not in use. Only install the type of dust cap on the cylinder valve outlet that is provided with the cylinder valve. Other types of caps or plugs may result in leakage of propane.
text_image
Diagram illustrating a mechanical assembly process with labeled parts and directional arrows indicating rotation or adjustment.LIGHT FEATURES
WEBER® GRILL OUT™ HANDLE LIGHT
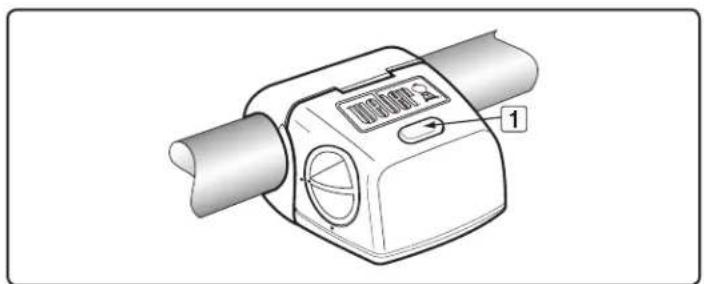
The Weber Grill Out™ Handle Light has a built-in "Tilt Sensor." With the power button (1) activated, the light will come on when the grill lid is open. The light will turn off when the lid is closed. For daytime use, deactivate the sensor by pressing power button (1).
LIGHTED CONTROL KNOBS
Your gas grill comes with control knobs that light up, allowing you to fine tune heat settings, even in low light conditions.
Requires three "D" alkaline batteries. Do not mix old and new batteries or different types of batteries (standard, alkaline, or rechargeable). Battery housing is located inside the cabinet on the left side.
To operate, activate power button.
natural_image
Technical line drawing of a mechanical device with a labeled component (no text or symbols present)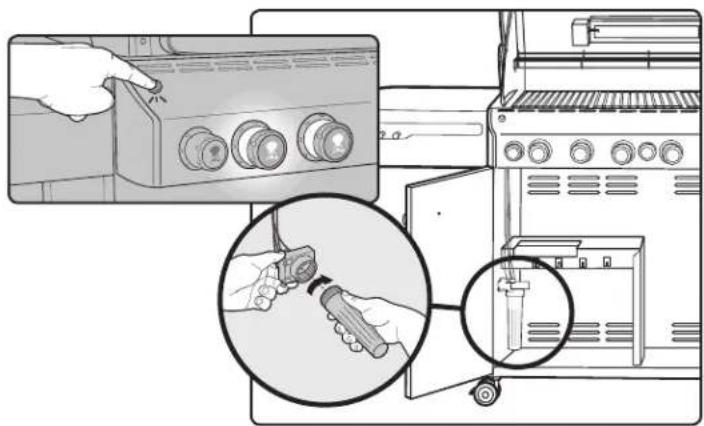
natural_image
Illustration showing a hand operating a heater panel and a close-up of a tool inside a gas stove (no text or symbols present)BEFORE USING THE GRILL
FUEL LEVEL
There are two ways to check the fuel level in your tank: electronically and manually.
To check the level using the electronic tank scale, press the tank scale button, located on the right side of the control panel, for 2–3 seconds. The LED indicates the fuel level in the tank.
To check the level using the manual tank scale, view the color indicator level line, located on the side of the tank scale.
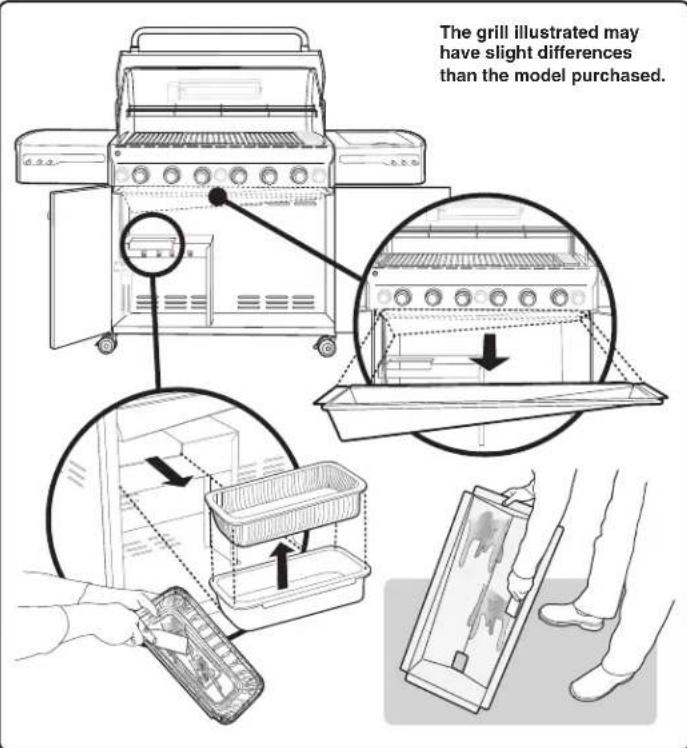
Your grill was built with a grease collection system. Check the slide-out grease tray and disposable drip pan for grease build-up each time you use your grill.
Remove excess grease with a plastic spatula; see illustration. When necessary, wash the grease tray and drip pan with a soap and water solution, then rinse with clean water. Replace the disposable drip pan as needed.
⚠ WARNING: Check the slide-out grease tray and disposable drip pan for grease build-up before each use. Remove excess grease to avoid a grease fire. A grease fire can cause serious bodily injury or damage to property.
⚠️ CAUTION: Do not line the slide-out grease tray with aluminum foil.
text_image
The grill illustrated may have slight differences than the model purchased.HOSE INSPECTION
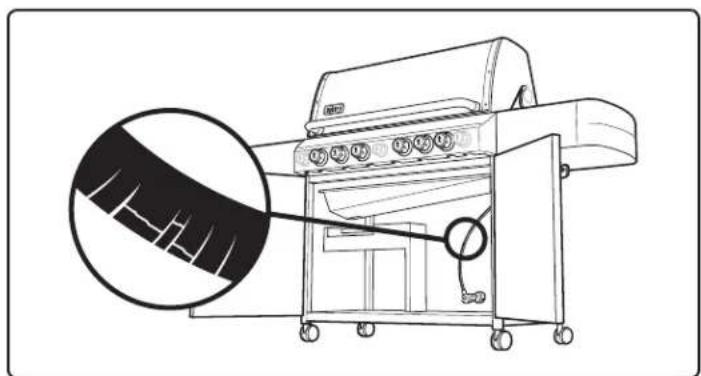
The hose should be inspected for any signs of cracking.
⚠ WARNING: Check hose before each use of barbecue for nicks, cracking, abrasions or cuts. If the hose is found to be damaged in any way, do not use the barbecue. Replace using only Weber® authorized replacement hose. Contact the Customer Service Representative in your area using the contact information on our web site. Log onto www.weber.com®.
natural_image
Line drawing of a portable electric grill with a magnified inset showing blade details (no text or symbols)Always open the lid before igniting the burners.
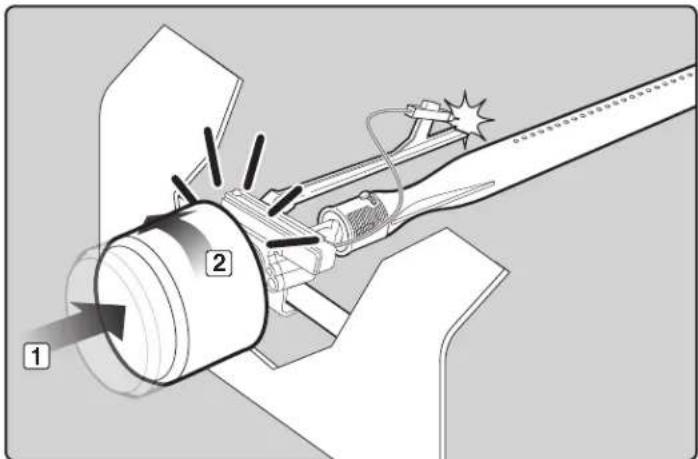
A) Each control knob has its own igniter electrode built in. To create a spark, you must push the control knob in (1) and turn it to START/HI (2).
B) This action will generate gas flow and a spark to the burner lighting tube (3). You will hear a "snap" from the igniter. You will also see a 3" - 5" orange flame coming from the burner lighting tube at the left side of the burner (4).
C) Continue to hold the burner control knob in for two seconds after the "snap." This will allow gas to flow completely down the burner tube (5) and ensure ignition.
D) Check that the burner is lit by looking through the cooking grates. You should see a flame. If burner does not light on first try, push control knob in and turn it to OFF. Repeat lighting procedure a second time.
⚠ WARNING: If the burner still does not light, turn the burner control knob to OFF and wait five minutes to let the gas clear before you try again or try to light with a match.
text_image
Technical diagram of a mechanical device with labeled components and motion indicators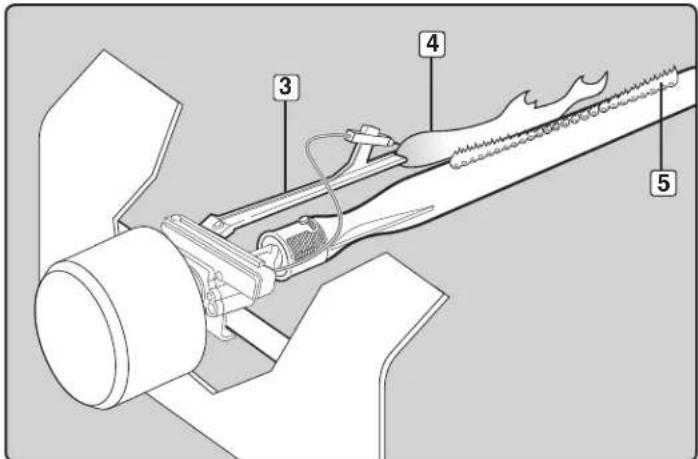
text_image
Technical diagram of a mechanical device with numbered components labeled 3, 4, and 5MAIN BURNER IGNITION & USAGE
MAIN BURNER IGNITION
Summary lighting instructions are inside the left-hand cabinet door.
⚠️ DANGER
Failure to open the lid while igniting the barbecue's burners, or not waiting five minutes to allow the gas to clear if the barbecue does not light, may result in an explosive flare-up which can cause serious bodily injury or death.
Main Burner Snap Ignition
Note: Each control knob snap igniter creates a spark from the igniter electrode to the burner lighting tube. You generate the energy for the spark by pushing in the control knob and turning to START/HI. This will ignite each individual burner.
⚠ WARNING: Check hose before each use of barbecue for nicks, cracking, abrasions or cuts. If the hose is found to be damaged in any way, do not use the barbecue. Replace using only Weber® authorized replacement hose. Contact the Customer Service Representative in your area using the contact information on our web site. Log onto www.weber.com®.
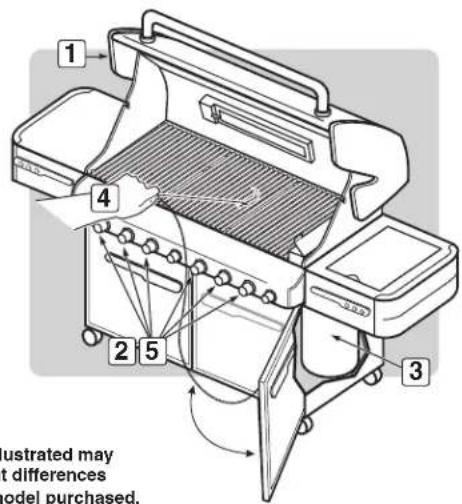
A) Open the lid (1).
B) Make sure all burner control knobs are turned off (2). (Push control knob in and turn clockwise to ensure that it is in the OFF position.)
⚠ WARNING: The burner control knobs must be in the OFF position before turning on the liquid propane cylinder tank valve. If they are not in the OFF position, when you turn on the LP cylinder valve, the “excess gas flow control” feature will activate, limiting the flow of gas from the LP cylinder. If this should occur, turn off the LP cylinder valve and burner control knobs. Start over.
⚠️ DANGER
When the “excess gas flow control” feature is activated, a small amount of gas is still flowing to the burners. After turning off the cylinder and burner control knobs, wait at least five minutes for the gas to clear before attempting to light the grill. Failure to do so may result in an explosive flare-up, which can cause serious bodily injury or death.
C) Turn the cylinder on by turning the cylinder valve counterclockwise (3).
⚠ WARNING: Do not lean over the open barbecue.
D) Push the control knob in and turn to START/HI until you hear the igniter snap (4); continue to hold control knob in for two seconds. This action will spark the igniter, the burner lighting tube, and then main burner.
E) Check that the burner is lit by looking through the cooking grates (5). You should see a flame. If burner does not light on first try, push control knob in and turn it to OFF. Repeat lighting procedure a second time.
⚠ WARNING: If the burner still does not light, turn the burner control knob to OFF and wait five minutes to let the gas clear before you try again or try to light with a match.
TO EXTINGUISH
Push in and turn each burner control knob clockwise to OFF position. Turn gas supply off at the source.
text_image
OFF ○ APAGADO ARRÊTE OFF START/HI MEDIUM LOW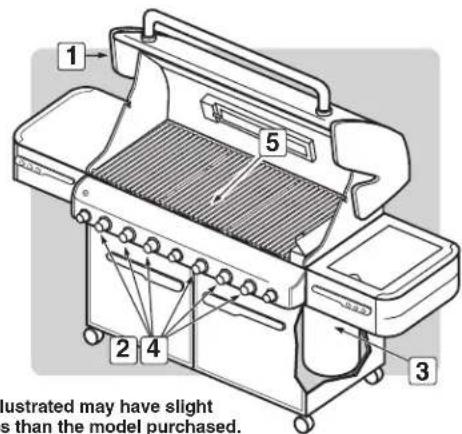
text_image
1 2 4 3 5 Illustrated may have slight s than the model purchased.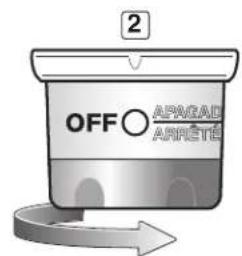
text_image
2 OFF ○ APRAGA ○ ARRETÉ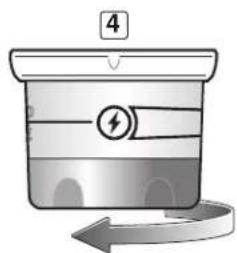
text_image
4MAIN BURNER IGNITION & USAGE
MAIN BURNER MANUAL IGNITION
DANGER
Failure to open the lid while igniting the barbecue's burners, or not waiting five minutes to allow the gas to clear if the barbecue does not light, may result in an explosive flare-up which can cause serious bodily injury or death.
A) Open the lid (1).
B) Make sure all burner control knobs are turned off (2). (Push each knob in and turn it clockwise to ensure it is in the OFF position.)
⚠ WARNING: The burner control knobs must be in the OFF position before turning on the liquid propane cylinder valve. If they are not in the OFF position, when you turn on the LP cylinder valve, the “excess gas flow control” feature will activate, limiting the flow of gas from the LP cylinder. If this should occur, turn off the LP tank valve and burner control knobs. Start over.
DANGER
When the “excess gas flow control” feature is activated, a small amount of gas is still flowing to the burners. After turning off the cylinder and burner control knobs, wait at least five minutes for the gas to clear before attempting to light the barbecue. Failure to do so may result in an explosive flare-up, which can cause serious bodily injury or death.
C) Turn the cylinder on by turning the cylinder valve counterclockwise (3).
D) Put match in the match holder and strike match.
⚠ WARNING: Do not lean over open barbecue.
E) Insert match holder and lit match down through cooking grates and Flavorizer * bars to ignite the selected burner (4).
F) Push the control knob in and turn it to START/HI (5).
⚠ WARNING: If the burner does not light, turn the burner control knob to OFF and wait five minutes to let the gas clear before you try again.
TO EXTINGUISH
Push in and turn each burner control knob clockwise to OFF position. Turn gas supply off at the source.
text_image
1 4 2 5 3 ustrated may t differences model purchased.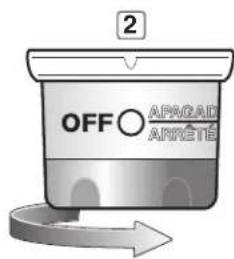
text_image
OFF APROAD ARNETÉ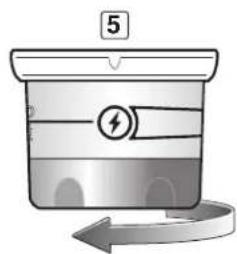
text_image
5GRILLING TIPS & HELPFUL HINTS
- Always preheat the grill before cooking. Set all burners on HI heat and close lid; heat for 10 minutes, or until thermometer registers 500^ - 550^ (260^ - 288^) .
- Sear meats and cook with the lid down for perfectly grilled food every time.
- Grilling times in recipes are based on 70^ F ( 20^ C) weather and little or no wind. Allow more cooking time on cold or windy days, or at higher altitudes. Allow less cooking time in extremely hot weather.
- Grilling times can vary because of the weather, or the amount, size, and shape of the food being grilled.
- The temperature of your gas grill may run hotter than normal for the first few uses.
- Grilling conditions may require adjustment of the burner controls to attain the correct cooking temperatures.
- In general, large pieces of meat will require more cooking time per pound than small pieces of meat. Foods on a crowded cooking grate will require more cooking time than just a few foods. Foods grilled in containers, such as baked beans, will require more time if grilled in a deep casserole rather than a shallow baking pan.
- Trim excess fat from steaks, chops, and roasts, leaving no more than a scant 14 inch (6.4 mm) of fat. Less fat makes cleanup easier, and is a virtual guarantee against unwanted flare-ups.
- Foods placed on the cooking grate directly above burners may require turning or moving to a less hot area.
- Use tongs rather than a fork for turning and handling meats to avoid losing natural juices. Use two spatulas for handling large whole fish.
- If an unwanted flare-up should occur, turn all burners off and move food to another area of the cooking grate. Any flames will quickly subside. After flames subside, relight the grill. NEVER USE WATER TO EXTINGUISH FLAMES ON A GAS GRILL.
- Some foods, such as a casserole or thin fish fillets, will require a container for grilling. Disposable foil pans are very convenient, but any metal pan with ovenproof handles can also be used.
- Always be sure the slide-out grease tray and catch pan are clean and free from debris.
- Do not line the slide-out grease tray with foil. This could prevent the grease from flowing into the catch pan.
- Using a timer will help to alert you when "well-done" is about to become "over-done."
Note: If grill loses heat while cooking, refer to the troubleshooting section of this manual.
⚠ WARNING: Do not move the Weber® gas barbecue when operating or while barbecue is hot.
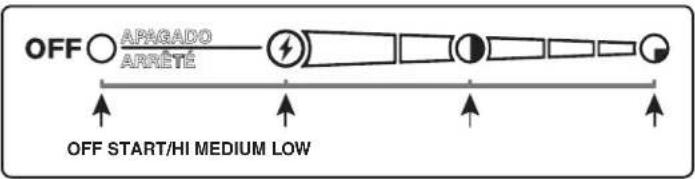
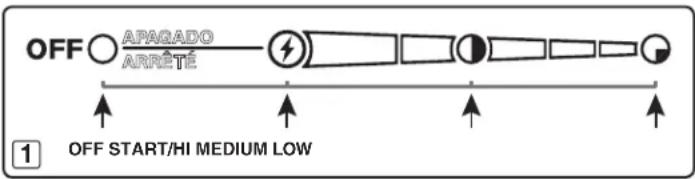
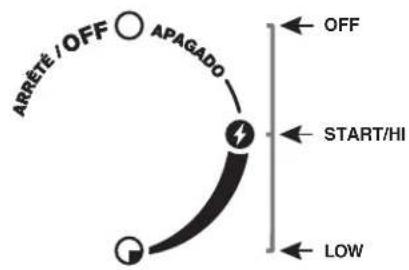
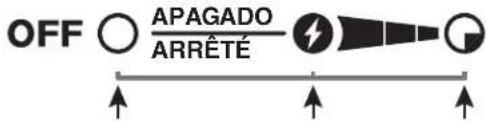
You can adjust the individual burners as desired. The control settings (1) are OFF, START/HI, MEDIUM, or LOW.
text_image
OFF ○ APAGADO ARRÊTE 1 OFF START/HI MEDIUM LOWNote: The temperature inside your cookbox for the first few uses, while surfaces are still very reflective, may be hotter than those shown in your cookbook. Cooking conditions, such as wind and weather, may require adjustment of burner controls to obtain the correct cooking temperatures.
If burners go out during cooking, turn off all burners and wait five minutes before relighting.
PREHEATING
Your Weber ^® gas barbecue is an energy-efficient appliance. It operates at an economical low BTU rate. Preheating the grill before grilling is important. Light your grill according to the instructions in this Owner's Manual. To preheat: After lighting, turn all burners to START/HI, close the lid, and heat until the temperature reaches between 500°F and 550°F (260°C and 290°C), the recommended broiling temperature. This will take 10 to 15 minutes depending on conditions such as air temperature and wind.
COVERED COOKING
All grilling is done with the lid down to provide uniform, evenly circulated heat. With the lid closed, the gas grill cooks much like a convection oven. The thermometer in the lid indicates the cooking temperature inside the grill. All preheating and grilling is done with the lid down. No peeking — heat is lost every time you lift the lid.
DRIPPINGS AND GREASE
The Flavorizer® bars are designed to "smoke" the correct amount of drippings for flavorful cooking. Excess drippings and grease will accumulate in the catch pan under the slide-out grease tray. Disposable foil drip pans are available that fit the catch pan.
⚠ WARNING: Check the slide-out grease tray and catch pan for grease build-up before each use. Remove excess grease to avoid a grease fire in the slide-out grease tray.
FLAVORIZER® SYSTEM
When meat juices drip from the food onto the specially angled Flavorizer® bars, they create smoke that gives foods an irresistible barbecued flavor. Thanks to the unique design of the burners, Flavorizer® bars, and the flexible temperature controls, uncontrolled flare-ups are virtually eliminated, because YOU control the flames. Because of the special design of the Flavorizer® bars and burners, excess fats are directed through the slide-out grease tray into the grease catch pan.
SEAR STATION®
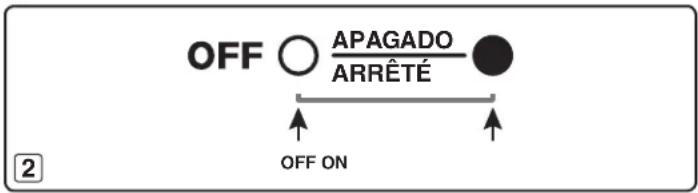
Your Weber ^® gas barbecue may include a sear burner for searing thin meats and fish. The Sear Station ^® burner has an ON or OFF control setting (2) that works with the two adjacent main burners. With the sear and adjacent burners you can effectively sear meats while using other cooking areas for cooking with moderate heat (refer to “SEAR STATION ^® IGNITION & USAGE”).
text_image
OFF ○ APAGADO ARRÊTÉ OFF ONOOKING METHODS
The most important thing to know about grilling is which cooking method to use for a specific food, direct or indirect. The difference is simple: place the food directly over the fire, or arrange the fire on either side of it. Using the right method is the shortest route to great results—and the best way to ensure doneness safety.
direCt CooKinG
The direct method, similar to broiling, means the food is cooked directly over the heat source. For even cooking, food should be turned once halfway through the grilling time. Use the direct method for foods that take less than 25 minutes to cook: steaks, chops, kabobs, sausages, vegetables, and more.
Direct cooking is also necessary to sear meats. Searing creates that wonderful crisp, caramelized texture where the food touches the grate. It also adds great color and flavor to the entire surface. Steaks, chops, chicken breasts, and larger cuts of meat all benefit from searing.
To sear meats, place them over direct high heat for two to five minutes per side. Smaller pieces require less searing time. Usually after searing the food, you finish cooking it at a lower temperature. You can finish cooking fast-cooking foods by the direct method; use the indirect method for longer-cooking foods.
To set up your gas grill for direct cooking, preheat the grill with all burners on HI. Place food on the cooking grate, and then adjust all burners to the temperature noted in the recipe. Close the lid of the grill and lift it only to turn food or to test for doneness at the end of the recommended cooking time.
indireCt CooKinG
The indirect method is similar to roasting, but with the added benefits of that grilled texture, flavor, and appearance you can't get from cooking with an oven. To set up for indirect cooking, light gas burners on either side of the food but not directly beneath it. Heat rises, reflects off the lid and inside surfaces of the grill, and circulates to slowly cook the food evenly on all sides, much like a convection oven, so there's no need to turn the food.
Use the indirect method for foods that require 25 minutes or more of grilling time, or that are so delicate that direct exposure to the flame would dry them out or scorch them. Examples include roasts, ribs, whole chickens, turkeys, and other large cuts of meat, as well as delicate fish fillets.
To set up your gas grill for indirect cooking, preheat the grill with all burners on HI. Then adjust the burners on each side of the food to the temperature noted in the recipe, and turn off the burner(s) directly below the food. For best results, place roasts, poultry, or large cuts of meat on a roasting rack set inside a disposable, heavy-gauge foil pan. For longer cooking times, add water to the foil pan to keep drippings from burning. The drippings can be used to make gravies or sauces.
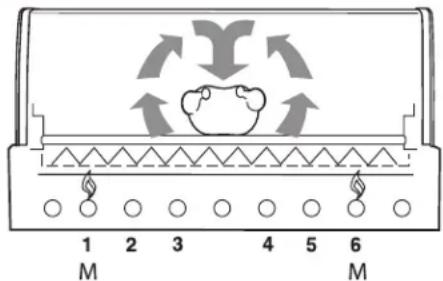
6 BURNER
text_image
1 2 3 4 5 6 H H H H H HDIRET METHOD
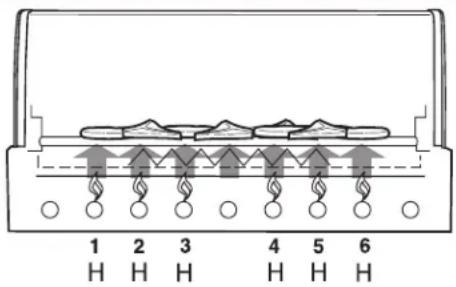
Food is placed on the area of the cooking grates directly over the lit burner.
6 BURNER
text_image
1 2 3 4 5 6 M MINDIRET METHOD
Food is placed on the area of the cooking grates between the lit burners.
SIDE BURNER IGNITION & USAGE
Summary lighting instructions are inside the left hand cabinet door.
DANGER
Failure to open the lid while igniting the side burner, or not waiting five minutes to allow the gas to clear if the side burner does not light, may result in an explosive flare-up which can cause serious bodily injury or death.
⚠ WARNING: Check hose before each use of barbecue for nicks, cracking, abrasions or cuts. If the hose is found to be damaged in any way, do not use the barbecue. Replace using only Weber® authorized replacement hose. Contact the Customer Service Representative in your area using the contact information on our web site. Log onto www.weber.com®.
A) Open the side burner lid (1).
B) Check that the side burner valve is turned off (2) (Push control knob in and turn clockwise to ensure that it is in the OFF position), turn all burners not being used to the OFF position (push in and turn clockwise).
C) Turn the gas supply valve on (3).
D) Push down and turn the side burner control valve to START/HI (4).
E) Press the igniter button several times so it clicks each time until you see a flame (5).
⚠️ CAUTION: Side burner flame may be difficult to see on a bright sunny day.
⚠ WARNING: If the side burner does not light in five seconds:
a) Turn off the side burner control valve, main burners and gas supply at source.
b) Wait five minutes to let the gas clear before you try again, or try lighting with a match (refer to "SIDE BURNER MANUAL IGNITION").
TO EXTINGUISH
Push down and turn side burner control knob to the OFF position. Be sure the burner is off and cool before closing the side burner lid.
text_image
ARRETE/OFF APAGADO OFF START/HI LOW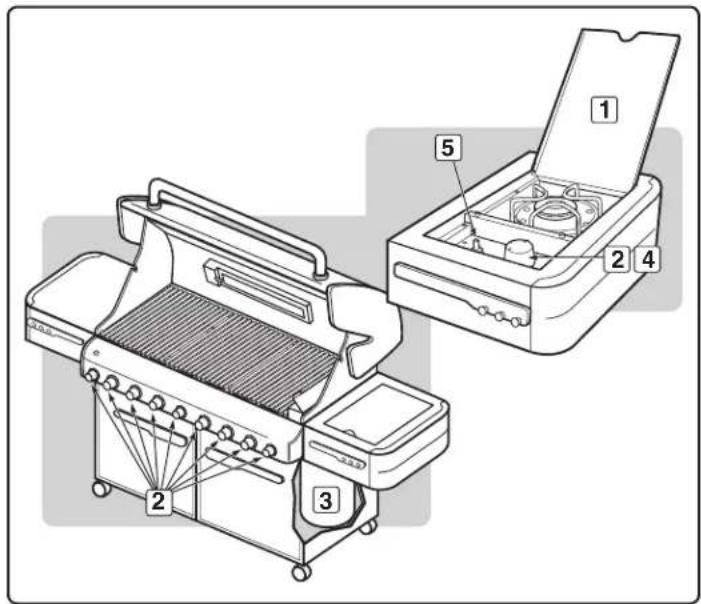
text_image
Technical diagram of a portable stove with labeled components including tray, drawer, and ventSIDE BURNER IGNITION & USAGE
Failure to open the lid while igniting the side burner, or not waiting five minutes to allow the gas to clear if the side burner does not light, may result in an explosive flare-up that can cause serious bodily injury or death.
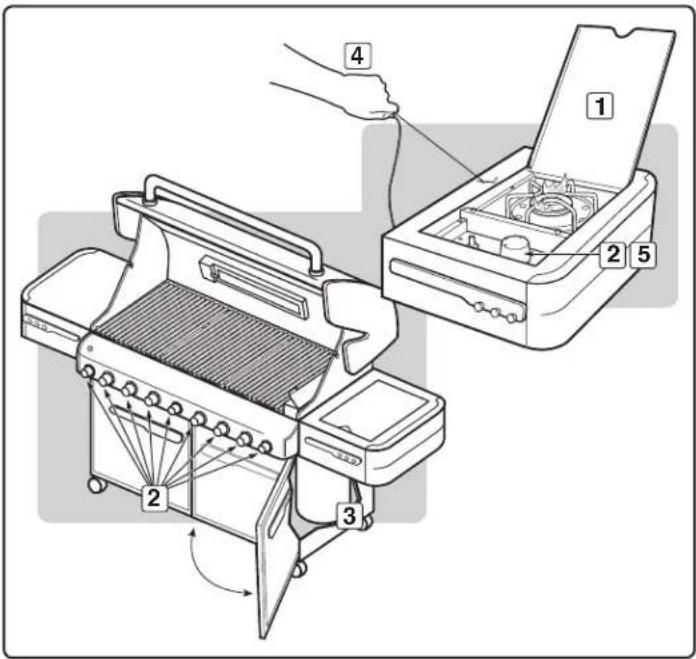
A) Open the side burner lid (1).
B) Check that the side burner valve is turned off (2) (Push control knob in and turn clockwise to ensure that it is in the OFF position), turn all burners not being used to the OFF position (push in and turn clockwise).
C) Turn the gas supply valve on (3).
D) Put match in a match holder and strike match.
E) Hold match holder and lit match by either side of the side burner (4).
F) Push down and turn the side burner control valve to START/HI (5).
⚠ CAUTION: Side burner flame may be difficult to see on a bright sunny day.
⚠ WARNING: If the side burner does not light in five seconds:
a) Turn off the side burner control valve, main burners and gas supply at source.
b) Wait five minutes to let the gas clear before you try again.
TO EXTINGUISH
Push down and turn side burner control knob to the OFF position. Be sure the burner is off and cool before closing the side burner lid.
text_image
Technical diagram of a portable stove with labeled parts including tray, door, and cabinetSEAR STATION® IGNITION & USAGE
SEAR STATION® BURNER IGNITION
Summary lighting instructions are inside the left hand cabinet door.
⚠️ DANGER
Failure to open the lid while igniting the barbecue's burners, or not waiting five minutes to allow the gas to clear if the barbecue does not light, may result in an explosive flare-up which can cause serious bodily injury or death.
The Sear Station® burner has an on or off control setting. To ignite the Sear Station® burner you must first ignite the two adjacent main burners.
Adjacent Main Burner Snap Ignition
Note: Each main burner control knob snap igniter creates a spark from the igniter electrode to the burner lighting tube. You generate the energy for the spark by pushing in the control knob and turning to START/HI. This will ignite each individual burner.
⚠ WARNING: Check hose before each use of barbecue for nicks, cracking, abrasions or cuts. If the hose is found to be damaged in any way, do not use the barbecue. Replace using only Weber® authorized replacement hose. Contact the Customer Service Representative in your area using the contact information on our web site. Log onto www.weber.com®.
A) Open the lid (1).
B) Make sure all burner control knobs are turned off (2). (Push control knob in and turn it clockwise to ensure that it is in the OFF position.)
⚠ WARNING: The burner control knobs must be in the OFF position before turning on the liquid propane cylinder tank valve. If they are not in the OFF position, when you turn on the LP cylinder valve, the “excess gas flow control” feature will activate, limiting the flow of gas from the LP cylinder. If this should occur, turn off the LP cylinder valve and burner control knobs. Start over.
△ DANGER
When the “excess gas flow control” feature is activated, a small amount of gas is still flowing to the burners. After turning off the cylinder and burner control knobs, wait at least five minutes for the gas to clear before attempting to light the grill. Failure to do so may result in an explosive flare-up, which can cause serious bodily injury or death.
C) Turn the cylinder on by turning the cylinder valve counterclockwise (3).
⚠ WARNING: Do not lean over the open barbecue.
D) Ignite each main burner that is adjacent to the Sear Station ^® (4). Push the control knob in and turn it to START/HI until you hear the igniter snap; continue to hold control knob in for two seconds. This action will spark the igniter, the burner lighting tube, and then main burner.
E) Check that the burner is lit by looking through the cooking grates (5). You should see a flame. If burner does not light on first try, push control knob in and turn it to OFF. Repeat lighting procedure a second time.
Sear Station® Burner Lighting: Ignition by an Adjacent Ignited Main Burner
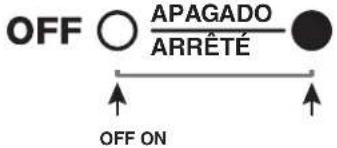
F) Turn Sear Station ^® burner control knob to the ON position (6).
G) Verify burner ignition by visual inspection of a flame (7).
⚠ WARNING: If ignition does not occur in five seconds, turn burner control OFF, wait five minutes, and repeat steps F & G, or see "SEAR STATION® BURNER MANUAL IGNITION" instructions.
⚠ WARNING: If the burner still does not light, turn the burner control knob to OFF and wait five minutes to let the gas clear before you try again or try to light with a match.
Note: See "MAINTENANCE" for burner removal and cleaning procedure.
TO EXTINGUISH
Push in and turn each burner control knob clockwise to OFF position. Turn gas supply off at the source.
text_image
OFF ○ APAGADO ARRÊTÉ ● OFF ON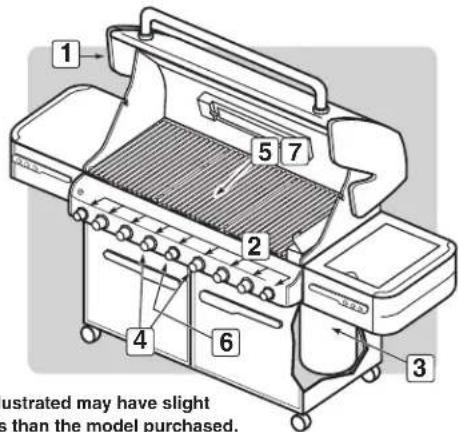
text_image
1 5 7 2 4 6 3 ustrated may have slight s than the model purchased.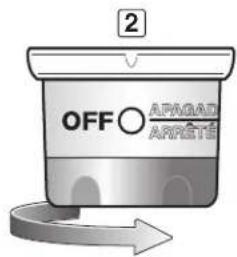
text_image
2 OFF APADAR ARRETIE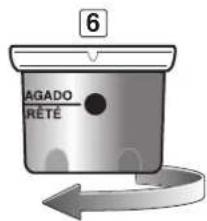
text_image
6 AGADO RÊTÉSEAR STATION® IGNITION & USAGE
SEAR STATION® BURNER MANUAL IGNITION
⚠️ DANGER
Failure to open the lid while igniting the barbecue's burners, or not waiting five minutes to allow the gas to clear if the barbecue does not light, may result in an explosive flare-up which can cause serious bodily injury or death.
The Sear Station® burner, has an on or off control setting. To ignite the Sear Station® burner, you must first ignite the two adjacent main burners.
Adjacent Main Burner Snap Ignition
Note: Each main burner control knob snap igniter creates a spark from the igniter electrode to the burner lighting tube. You generate the energy for the spark by pushing in the control knob and turning it to START/HI. This will ignite each individual burner.
A) Open the lid (1).
B) Verify each main burner that is adjacent to the Sear Station® is lit by visual inspection of a flame (2).
C) Put match in the matchstick holder and strike match.
⚠ WARNING: Do not lean over open barbecue.
D) Insert matchstick holder and lit match down through cooking grates and Flavorizer® bars to ignite the Sear Station® burner (3).
E) Push the Sear Station ^® control knob in and turn it to the ON position (4).
⚠ WARNING: If the burner does not light, turn the burner control knob to OFF and wait five minutes to let the gas clear before you try again.
Note: See "MAINTENANCE" for burner removal and cleaning procedure.
TO EXTINGUISH
Push in and turn each burner control knob clockwise to OFF position. Turn gas supply off at the source.
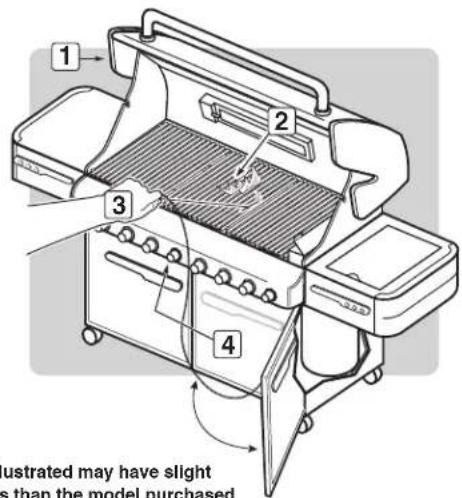
text_image
1 2 3 4 illustrated may have slight s than the model purchased.6 BURNER
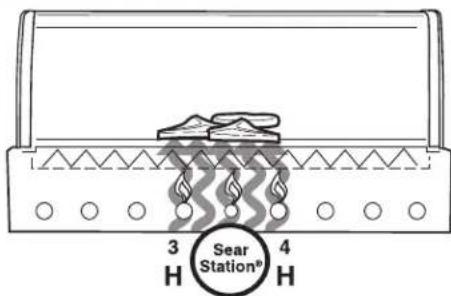
text_image
3 H 4 Sear Station® H HSEAR METHOD
Food is placed in the area of intense heat between the lit burners.
USING THE SEAR STATION®
Your Weber® gas barbecue includes a sear burner for searing meats such as steak, poultry parts, fish, and chops.
Searing is a direct grilling technique which browns the surface of the food at a high temperature. By searing or browning both sides of the meat, you will create a more desirable flavor by caramelizing the food surface. Searing will also enhance appearance of the meat with sear marks from the cooking grates. This, along with the contrast of textures and flavors, can make food more interesting to the palate.
The Sear Station® burner has an on or off control setting that works with the two adjacent main burners. With the sear and adjacent burners, you can effectively sear meats while using other cooking areas for grilling with moderate heat.
Before searing food, you should turn all of the main burners on HI for 15 minutes to preheat the grill. Note: Always grill with the lid closed to allow for maximum heat and to avoid flare-ups.
Once the grill is preheated, turn the outer burners off or down to low. Leave the center two burners on HI and ignite the Sear Station ^95 burner.
Place the meat directly over the Sear Station ^® . You will sear each side anywhere from one to four minutes, depending on the type and thickness of the meat. You may turn the food a quarter turn to make crossing sear marks (1) before you sear the other side in the same manner.
Once you are done searing the meat, you can finish grilling it by moving it to a more moderate heat over the outside burners to achieve the desired doneness.
As you gain experience in using your Sear Station®, we encourage you to experiment with different searing times to find results that work best for your taste.
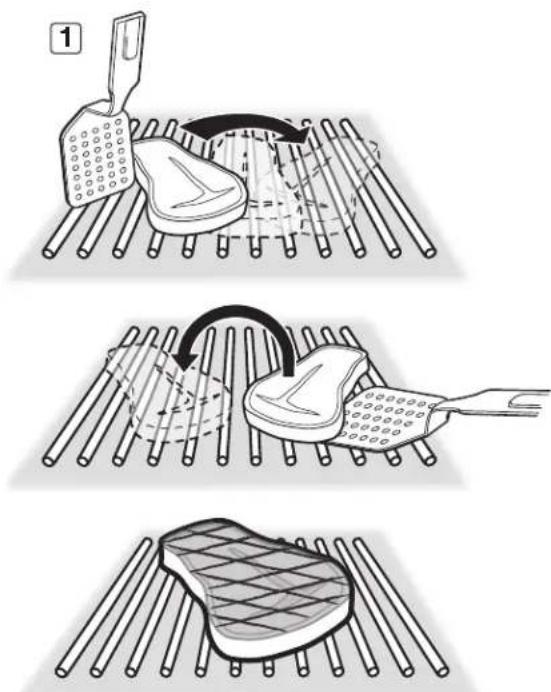
text_image
Illustration showing three-step food preparation steps: slicing meat, pressing a plate with food, and cutting flat shoes.SMOKER BURNER IGNITION & USAGE
SMOKER BURNER IGNITION
⚠️ DANGER
Failure to open the lid while igniting the grill, or not waiting five minutes to allow the gas to clear if the grill does not light, may result in an explosive flare-up which can cause serious bodily injury or death.
Smoker Burner Snap Ignition
Note: The control knob snap igniter creates a spark from the igniter electrode to the burner lighting tube. You generate the energy for the spark by pushing in the control knob and turning to START/HI. This will ignite the smoker burner.
⚠ WARNING: Check hose before each use of grill for nicks, cracking, abrasions or cuts. If the hose is found to be damaged in any way, do not use the grill. Replace using only Weber® authorized replacement hose. Contact the Customer Service Representative in your area using the contact information on our web site. Log onto www.weber.com®.
A) Open the grill lid (1).
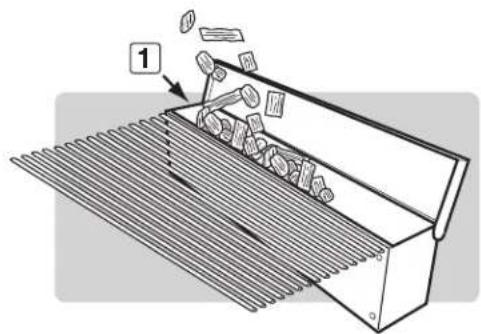
B) Open smoker box lid (2).
C) Fill smoker with water-soaked wood chunks or chips (3).
D) Make sure that all burner control knobs not being used are turned to OFF (4). (Push control knob in and turn it clockwise to ensure that it is in the OFF position.)
⚠ WARNING: The burner control knobs must be in the OFF position before turning on the liquid propane cylinder tank valve. If they are not in the OFF position, when you turn on the LP cylinder valve, the “excess gas flow control” feature will activate, limiting the flow of gas from the LP cylinder. If this should occur, turn off the LP cylinder valve and burner control knobs. Start over.
⚠️ DANGER
When the “excess gas flow control” feature is activated, a small amount of gas is still flowing to the burners. After turning off the cylinder and burner control knobs, wait at least five minutes for the gas to clear before attempting to light the grill. Failure to do so may result in an explosive flare-up, which can cause serious bodily injury or death.
E) Turn the cylinder on by turning the cylinder valve counterclockwise (5).
⚠ WARNING: Do not lean over the open grill while lighting.
F) Push the control knob in and turn it to START/HI until you hear the igniter snap (6); continue to hold control knob in for two seconds. This action will spark the igniter, the burner lighting tube, and then smoker burner.
G) Check that the burner is lit by looking through the cooking grates (7). You should see a flame. If burner does not light on first try, push control knob in and turn it to OFF. Repeat lighting procedure a second time.
⚠️ DANGER
If the smoker burner still does not light, turn the burner control knob to OFF and wait five minutes to let the gas clear before you try again, or try lighting with a match (see "SMOKER BURNER MANUAL IGNITION").
H) Close smoker box lid (8) after wood starts to smolder and turn control knob to LOW.
TO EXTINGUISH
Push in and turn each burner control knob clockwise to OFF position. Turn gas supply off at the source.
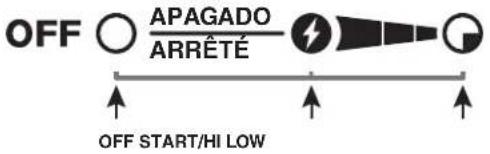
text_image
OFF ○ APAGADO ARRÊTÉ OFF START/HI LOW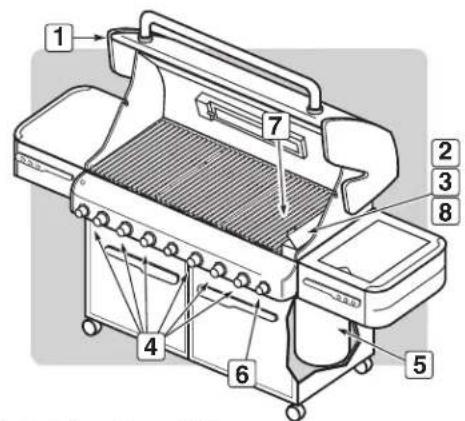
text_image
Technical diagram of a portable device with numbered components for identificationThe grill illustrated may have slight differences than the model purchased.
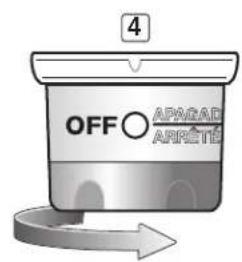
text_image
4 OFF APRAGAR ARRETÉ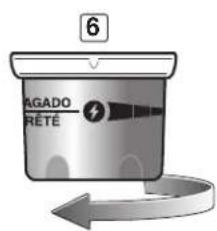
text_image
6 AGADO RÊTÉSMOKER BURNER IGNITION & USAGE
SMOKER BURNER MANUAL IGNITION
⚠ WARNING: Check hose before each use of grill for nicks, cracking, abrasions or cuts. If the hose is found to be damaged in any way, do not use the grill. Replace using only Weber® authorized replacement hose. Contact the Customer Service Representative in your area using the contact information on our web site. Log onto www.weber.com®.
Failure to open the lid while igniting the grill, or not waiting five minutes to allow the gas to clear if the grill does not light, may result in an explosive flare-up which can cause serious bodily injury or death.
B) Open smoker box lid (2). C) Fill smoker with water-soaked wood chunks or chips (3). D) Make sure that all burner control knobs not being used are turned to OFF (4). (Push control knob in and turn it clockwise to ensure that it is in the OFF position.)
⚠ WARNING: The burner control knobs must be in the OFF position before turning on the liquid propane cylinder tank valve. If they are not in the OFF position, when you turn on the LP cylinder valve, the “excess gas flow control” feature will activate, limiting the flow of gas from the LP cylinder. If this should occur, turn off the LP cylinder valve and burner control knobs. Start over.
⚠️ DANGER
When the “excess gas flow control” feature is activated, a small amount of gas is still flowing to the burners. After turning off the cylinder and burner control knobs, wait at least five minutes for the gas to clear before attempting to light the grill. Failure to do so may result in an explosive flare-up, which can cause serious bodily injury or death.
E) Turn the cylinder on by turning the cylinder valve counterclockwise (5).
F) Put a match in the match holder and strike the match.
G) Insert match holder and lit match down through cooking grates and Flavorizer® bars to ignite smoker burner (6).
⚠ WARNING: Do not lean over the open grill while lighting.
H) Push smoker burner control knob in and turn it to START/HI (7). I) Check that the burner is lit by looking down through the cooking grate (8).
△ DANGER
If the smoker burner does not light, turn the burner control knob to OFF and wait five minutes to let the gas clear before you try again.
J) Close smoker box lid (9) after wood starts to smolder and turn control knob to LOW.
TO EXTINGUISH
Push in and turn each burner control knob clockwise to OFF position. Turn gas supply off at the source.
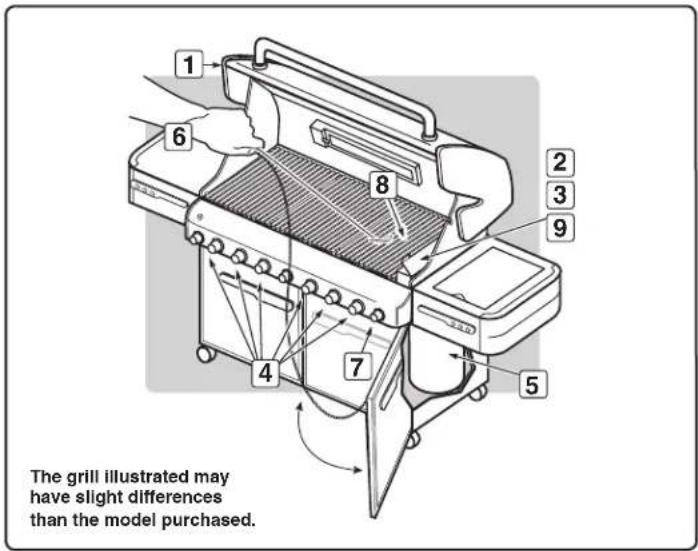
text_image
The grill illustrated may have slight differences than the model purchased.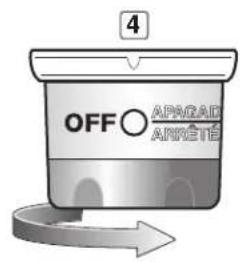
text_image
OFF APRAGAD ANRÉTÉ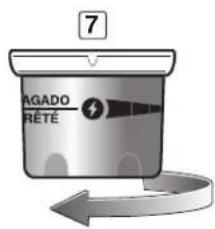
text_image
7 AGADO RÊTESMOKER BURNER IGNITION & USAGE
USING THE SMOKER
The smoker uses presoaked wood chips. For best results with faster cooking foods like steaks, burgers, and chops, etc., we recommend using finer wood chips because they ignite and create smoke faster. For longer cooking foods such as roasts, chicken, and turkeys, etc., we recommend using larger wood chunks because they ignite slowly and provide smoke for a longer period of time. As you gain experience in using your smoker, we encourage you to experiment with different combinations of wood chips and chunks to find the smoke flavor that best suits your taste.
As a starting point, soak wood chips in water for at least 30 minutes before using. (Wet wood will produce more smoke flavor.) Place a handful of wood chips or a few larger chunks in the bottom of the smoker body (1). As you gain experience in smoking, increase or decrease the amount of wood to suit your taste.
Note: Always grill with the lid closed to allow the smoke to fully penetrate the food. Light the smoker burner by following the instructions for "SMOKER BURNER IGNITION." After wood starts to smolder, turn control knob to LOW.
Smoke will start in approximately 10 minutes and last as long as 45 minutes. If you require more smoke flavor, refill the smoker with wood chips and/or chunks. Keep the lid of the grill closed while cooking.
Note: After refilling smoker, smoke will take about 10 to 15 minutes to start again. The smoker may be used to enhance meat, poultry, and fish recipes. Cook with the lid down according to the times indicated in charts or recipes.
⚠️ DANGER
Do not use any flammable fluid in the smoker to ignite the wood. This will cause serious bodily injury.
CLEANING THE SMOKER
Before each use, empty the smoker of ash to allow proper air flow.
Note: Smoking will leave a "smoke" residue on the surface of the smoker. This residue cannot be removed and will not affect the function of the smoker. To a lesser degree, a "smoke" residue will accumulate on the inside of your gas grill. This residue need not be removed and will not adversely affect the function of your gas grill.
text_image
1ROTISSERIE BURNER IGNITION & USAGE
ROTISSERIE BURNER IGNITION
Rotisserie Burner Snap Ignition
Note: Each control knob snap igniter creates a spark from the igniter electrode to the burner lighting tube. You generate the energy for the spark by pushing in the control knob and turning to START/HI. This will ignite each individual burner.
⚠️ ATTENTION: READ BEFORE LIGHTING ROTISSERIE BURNER
After a period of non-use, before lighting the rotisserie burner, a few seconds must pass for the gas supply line to fill. When using the snap igniter you will see a flash of flames moving from left to right across the rotisserie burner surface. The rotisserie burner is not lit until the entire ceramic surface is aflame.
At this point, start a count of twenty seconds before releasing the rotisserie burner control knob.
The rotisserie burner surface will glow red once the burner is fully ignited.
△ DANGER
Failure to open the lid while igniting the grill, or not waiting five minutes to allow the gas to clear if the grill does not light, may result in an explosive flare-up which can cause serious bodily injury or death.
CAUTION: The Rotisserie Burner flame may be difficult to see on a bright sunny day.
⚠ WARNING: Check hose before each use of grill for nicks, cracking, abrasions or cuts. If the hose is found to be damaged in any way, do not use the grill. Replace using only a Weber® authorized replacement hose. Contact the Customer Service Representative in your area using the contact information on our web site.
Log onto www.weber.com®.
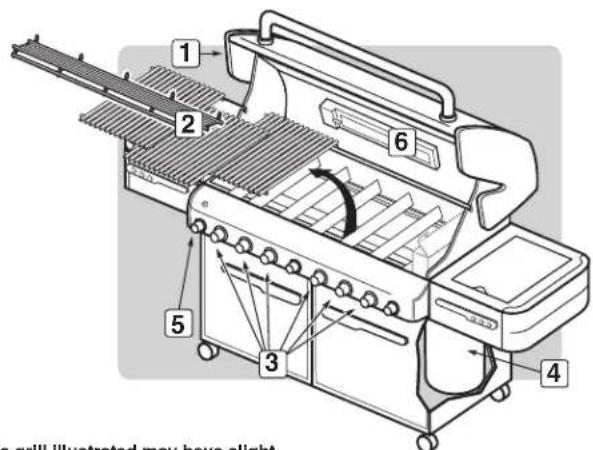
A) Open the lid (1).
B) Remove the warming rack and the cooking grates from the cookbox (2).
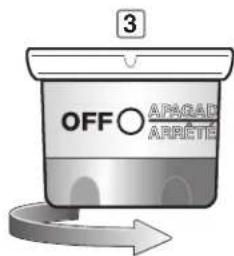
C) Make sure all burner control knobs are turned off (3). (Push control knob in and turn it clockwise to ensure that it is in the OFF position.)
⚠ WARNING: The burner control knobs must be in the OFF position before turning on the liquid propane cylinder tank valve. If they are not in the OFF position, when you turn on the LP cylinder valve, the "excess gas flow control" feature will activate, limiting the flow of gas from the LP cylinder. If this should occur, turn off the LP cylinder valve and burner control knobs. Start over.
△ DANGER
When the “excess gas flow control” feature is activated, a small amount of gas is still flowing to the burners. After turning off the cylinder and burner control knobs, wait at least five minutes for the gas to clear before attempting to light the grill. Failure to do so may result in an explosive flare-up, which can cause serious bodily injury or death.
D) Turn the cylinder on by turning the cylinder valve counterclockwise (4).
⚠ WARNING: Do not lean over the open grill.
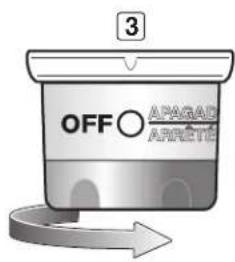
E) Push the control knob in and turn it to START/HI (5). This action will spark the igniter and light the rotisserie burner. Continue to use the snap igniter until the rotisserie burner has ignited. Continue to hold the control knob down until twenty seconds after the burner has ignited. Release the control knob.
text_image
OFF ○ APAGADO ARRÊTÉOFF START/HI LOW
text_image
1 2 6 5 3 4 a grill illustrated may have slightThe grill illustrated may have slight differences than the model purchased.
text_image
3 OFF APRÉTÉ APRÉTÉ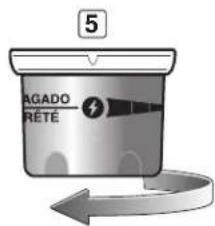
text_image
5 AGADO PRÉTEF) Check that the burner is lit by looking for the rotisserie burner to glow red (6).
⚠ WARNING: If the rotisserie burner does not light, turn the burner control knob to OFF and wait five minutes to let the gas clear before you try again or try to light with a match.
Note: When using the rotisserie with the lid closed, only light two of the main burners on each side of the food (see "GRILLING METHODS—INDIRECT COOKING"). Check your food periodically to prevent it from overcooking on the outside. Turn off the rotisserie burner once the food has browned to the desired color. Finish cooking it on indirect heat.
TO EXTINGUISH
Push in and turn each burner control knob clockwise to OFF position. Turn gas supply off at the source.
ROTISSERIE BURNER IGNITION & USAGE
ROTISSERIE BURNER MANUAL IGNITION
⚠️ ATTENTION: READ BEFORE LIGHTING ROTISSERIE BURNER
After a period of non-use, before lighting the Rotisserie Burner, a few seconds must pass for the gas supply line to fill. When holding a match to the rotisserie burner you will see a flash of flames moving from left to right across the Rotisserie Burner surface, the Rotisserie Burner is not lit until the entire ceramic surface is aflame. At this point, start a count of twenty seconds before releasing the Rotisserie Burner control knob. The Rotisserie Burner surface will glow red once the burner is fully ignited.
△ DANGER
Failure to open the lid while igniting the grill, or not waiting five minutes to allow the gas to clear if the grill does not light, may result in an explosive flare-up which can cause serious bodily injury or death.
⚠️ CAUTION: The Rotisserie Burner flame may be difficult to see on a sunny day.
⚠ WARNING: Check hose before each use of grill for nicks, cracking, abrasions or cuts. If the hose is found to be damaged in any way, do not use the grill. Replace using only a Weber® authorized replacement hose. Contact the Customer Service Representative in your area using the contact information on our web site. Log onto www.weber.com®.
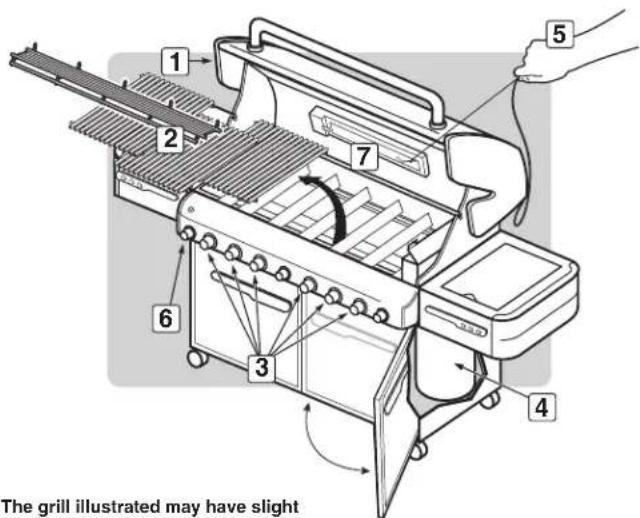
A) Open the lid (1).
B) Remove the warming rack and the cooking grates from the cookbox (2).
C) Make sure all burner control knobs are turned off (3). (Push control knob down and turn it clockwise to ensure that it is in the OFF position.)
⚠ WARNING: The burner control knobs must be in the OFF position before turning on the liquid propane cylinder tank valve. If they are not in the OFF position, when you turn on the LP cylinder valve, the “excess gas flow control” feature will activate, limiting the flow of gas from the LP cylinder. If this should occur, turn off the LP cylinder valve and burner control knobs. Start over.
△ DANGER
When the “excess gas flow control” feature is activated, a small amount of gas is still flowing to the burners. After turning off the cylinder and burner control knobs, wait at least five minutes for the gas to clear before attempting to light the grill. Failure to do so may result in an explosive flare-up, which can cause serious bodily injury or death.
D) Turn the cylinder on by turning the cylinder valve counterclockwise (4).
E) Put a match in the match holder and strike the match.
F) Hold match holder and lit match by right side of rotisserie burner (5).
⚠ WARNING: Do not lean over the open grill.
G) Push rotisserie burner control knob down and turn it to START/HI (6). Continue to hold the control knob down until twenty seconds after the burner has ignited.
H) Check that the burner is lit by looking for the rotisserie burner to glow red (7).
⚠ WARNING: If the rotisserie burner does not light, turn the burner control knob to OFF and wait five minutes to let the gas clear before you try again.
Note: When using the rotisserie with the lid closed, only light two of the main burners under the food (see "GRILLING METHODS—INDIRECT COOKING"). Check your food periodically to prevent it from overcooking on the outside. Turn off the rotisserie burner once the food has browned to the desired color. Finish cooking it on indirect heat.
text_image
The grill illustrated may have slightThe grill illustrated may have slight differences than the model purchased.
text_image
3 OFF APAGAD ARRETE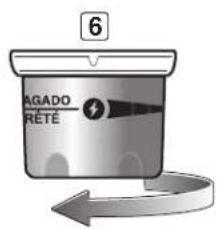
text_image
6 AGADO RÊTÉTO EXTINGUISH
Push in and turn each burner control knob clockwise to OFF position. Turn gas supply off at the source.
ROTISSERIE BURNER IGNITION & USAGE
IMPORTANT SAFEGUARDS
Note: Before using your rotisserie, measure your food at the widest point. If it exceeds 912 " (241.8 mm), it is too large to fit the rotisserie. If it is too large, food can be prepared using a roast holder and the indirect cooking method.
⚠️ WARNINGS
⚠️ Read all instructions before using your rotisserie.
This rotisserie is for outdoor use only.
⚠ Remove motor and store in a dry place when not in use.
Do not touch hot surfaces. Use barbecue mitts.
This rotisserie is not for use by children.
⚠ To protect against electrical hazards do not immerse cord, plugs, or motor in water or other liquids.
⚠️ Unplug the motor from outlet when not in use or before cleaning.
⚠ Do not use rotisserie for other than intended use.
⚠ Make sure motor is off before placing it on the motor bracket.
⚠ Do not operate the rotisserie motor with a damaged cord or plug.
⚠ Do not operate the rotisserie motor if it should malfunction.
The rotisserie motor is equipped with a three prong (grounding) power cord for your protection against shock hazard.
The power cord should be plugged directly into a properly grounded three prong receptacle. If use of an extension cord is required, be sure that it is a minimum 16 AWG (1.3 mm), 3-wire, well insulated cord marked for OUTDOOR USE ONLY and properly grounded.
When using an extension cord, make sure it is not in contact with a hot or sharp surface.
Outdoor extension cords should be marked with the letters "W-A" and a tag stating "Suitable for use with outdoor appliances".
⚠ Do not cut or remove the grounding prong from the rotisserie motor power cord.
Do not let cord hang over any sharp edge or hot surface.
⚠ Do not expose to rain.
⚠️ To reduce the risk of electric shock, keep extension cord connection dry and off the ground.
A short power cord is supplied to reduce the risk of tripping over the cord. Extension cords may be used, but caution must be taken to prevent tripping over the cord.
In absence of local codes the rotisserie motor must be grounded electrically in accordance with the National Electric Code, ANSI / NFPA 70, or Canadian Electrical Code, CSA C22.1.
⚠ WARNING: Set up the rotisserie with food before lighting rotisserie burner.
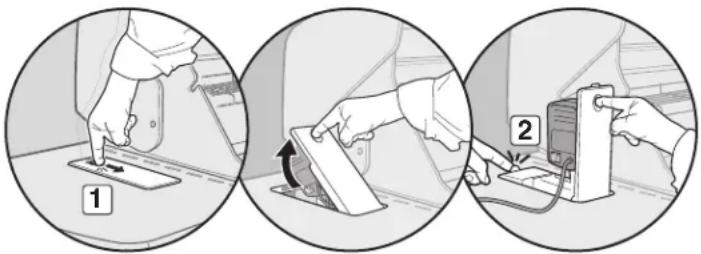
A) To set up rotisserie motor, push the button on the retractable rotisserie panel (1). Pull rotisserie panel upwards. Push locking tab (2) until it snaps into place.
B) Remove power cord and plug into power source.
⚠️ CAUTION: Do not route rotisserie motor power cord through the retractable rotisserie opening in the side table.
CAUTION: Inspect power cord before each use. If cord is damaged, do not use. Contact the Customer Service Representative in your area using the contact information on our web site. Log onto www.weber.com®.
C) Slide one of the spit forks towards the right side of the rotisserie shaft, making sure that the spikes face to the left and the fork screw faces down (3).
D) Push the rotisserie shaft through the center of the food. Insert the tines of both spit forks into the food. The food should be centered on the shaft. Tighten the spit fork screw (4).
E) Slide another spit fork onto the rotisserie shaft, making sure that the spikes face to the right and the fork screw faces up. Insert the tines of both spit forks into the food. Tighten the spit fork screw (5).
text_image
Three-step diagram showing a hand inserting a card into a device, with numbered instructions and arrows indicating the process.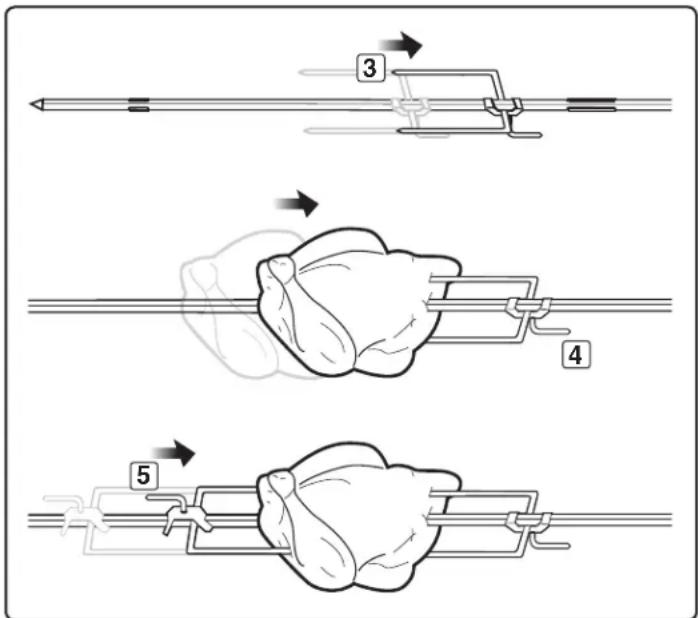
text_image
Diagram illustrating three steps of a biological or mechanical procedure with numbered arrows indicating sequence.ROTISSERIE BURNER IGNITION & USAGE
F) Insert the pointed end of the rotisserie shaft into the motor. Lower the rotisserie spit into the grooves on the cookbox (6).
G) The rotisserie shaft should rotate so that the heavy side of the meat or poultry rotates down to the bottom. Large cuts may require the removal of the cooking grates and warming rack to allow full rotation of the shaft. Remount the food if necessary for better balance.
H) Turn the motor on.
ROTISSERIE COOKING
- Meats (except poultry and ground meat) should be brought to room temperature before cooking. (20 to 30 minutes should be adequate for most foods. If frozen defrost completely before cooking.)
- Tie meat or poultry with a string, if necessary, to make the shape as uniform as possible before putting it on the spit.
- Remove cooking grates and warming rack to allow food to turn freely.
• Follow lighting instructions for rotisserie burner. - Set rotisserie burner on medium-high based on outside air temperatures.
- Place food within area of burner.
- If you wish to save drippings for gravy, place a drip pan directly under the food on top of the Flavorizer® bars.
- Food preparation steps are the same for rotisserie cooking as for regular cooking.
• All cooking is done with the lid closed. - If foods are too heavy or are irregular shapes, they may not rotate well and should be cooked by the Indirect Method without using the rotisserie.
- Smoker can be used in conjunction with rotisserie for more smoke flavor.
Note: When using the rotisserie burner, grill thermometer will not reflect the temperature inside the cooking box.
ROTISSERIE MOTOR STORAGE
A) Before retracting rotisserie back into the side table, unplug the power cord and carefully place plug/power cord into the storage area of the retractable rotisserie assembly (1).
CAUTION: Failure to properly store the rotisserie power cord may result in damage to the power cord when opening and closing the retractable rotisserie panel.
B) Using your index finger, disengage retractable rotisserie panel (2). Push panel down until it snaps securely in place (3).
ROTISSERIE SPIT STORAGE
A) Remove forks from rotisserie spit. Carefully insert spit into cabinet by sliding through hole in right side panel (1).
⚠️ CAUTION: Do not allow rotisserie spit to come into contact with any gas lines.
B) Store rotisserie forks by placing them on the hooks located on the catch pan holder within the grill cabinet (2).
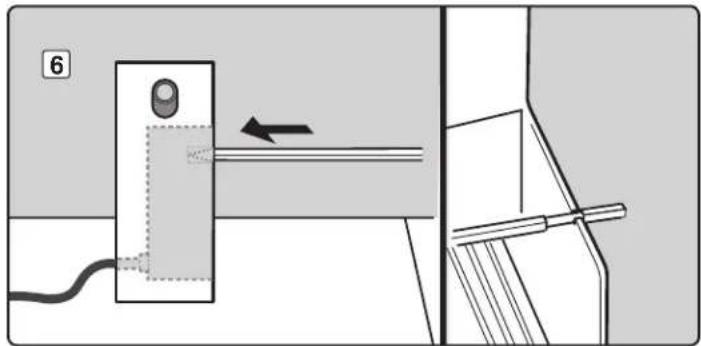
text_image
6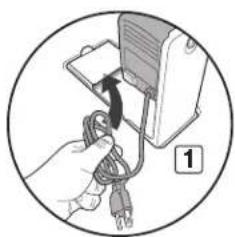
natural_image
Illustration of a hand inserting a plug into a device, no text or symbols present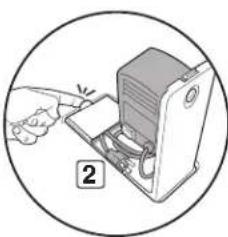
natural_image
Illustration of a hand inserting a card into a computer tower (no text or symbols)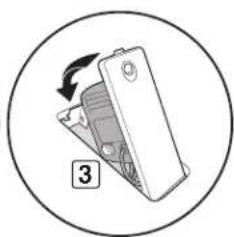
natural_image
Diagram of a refrigerator with a circular arrow indicating rotation, no text or symbols present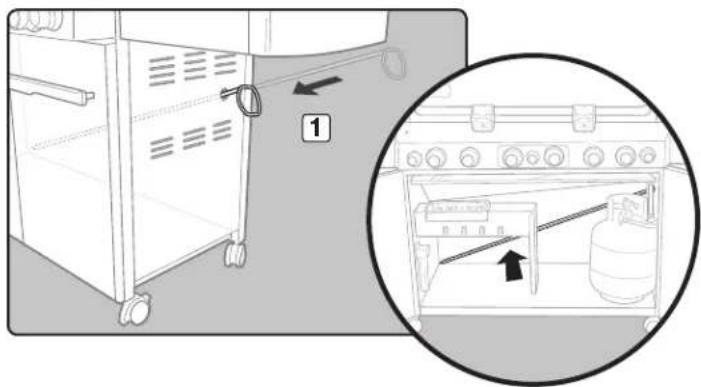
text_image
Diagram showing a gasifier with labeled component '1' and an inset view of the device's internal structure.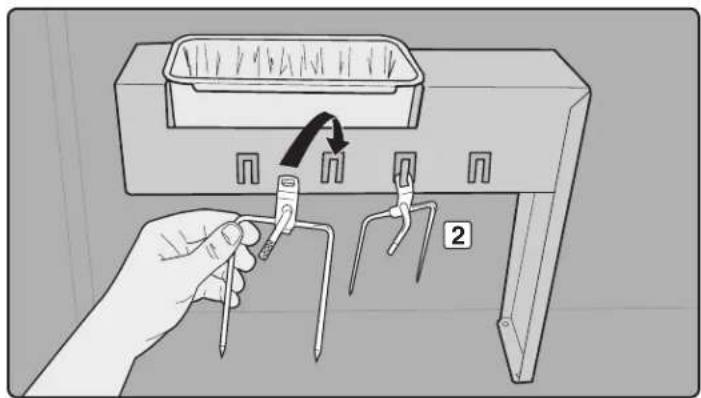
natural_image
Illustration of a hand inserting into a device into a tray with pins, showing a black arrow indicating direction (no text or symbols present)TROUBLESHOOTING
| PROBLEM HEK SOLUTION | ||
| Burners burn with a yellow or orange flame, in conjunction with the smell of gas. (This is normal for the burner lighting tube.) | Inspect Spider/Insect screens for possible obstructions. (Blockage of holes.) | Clean Spider/Insect screens. Refer to “ANNUAL MAINTENANCE”. |
| Symptoms: Burners do not light. -or- Burners have a small flickering flame in the HI position. -or- Barbecue temperature only reaches 250° to 300° in the HI position. | The excess flow safety device, which is part of the barbecue to cylinder connection, may have activated. | To reset the excess flow safety device, turn all burner control knobs and the cylinder valve off. Disconnect the regulator from the cylinder. Turn burner control knobs to HI. Wait at least 1 minute. Turn burner control knobs to OFF. Reconnect the regulator to the cylinder. Turn cylinder valve on slowly. Refer to “MAIN BURNER IGNITION”. |
| Burner does not light, or flame is low in HI position. | Is LP fuel low or empty? | Refill LP cylinder. |
| Is fuel hose bent or kinked? Straighten fuel hose. | ||
| Does burner light with a match? Clean burners. Refer to “MAINTENANCE”. | ||
| Did you use the snap igniter several times until the main burner lit? Refer to “MAIN BURNER IGNITION”. | Make sure to hold the control knob in for two seconds after snapping the igniter and seeing the orange flame from the burner lighting tube. | |
| Does the igniter work? Do you see a spark when you repeatedly use the snap igniter? | Try manually lighting the burner. Refer to “MAIN BURNER MANUAL IGNITION”. Call customer service. | |
| Experiencing flare-ups: ▲ CAUTION: Do not line the slide out grease tray with aluminum foil. | Are you preheating barbecue in the prescribed manner? | All burners on HI for 10 to 15 minutes for preheating. |
| Are the cooking grates and Flavorize® bars heavily coated with burned-on grease? | Clean thoroughly. Refer to “CLEANING”. | |
| Is the bottom tray “dirty” and not allowing grease to flow into catch pan? | Clean bottom tray. | |
| Burner flame pattern is erratic. Flame is low when burner is on HI. Flames do not run the whole length of the burner tube. | Are burners clean? | Clean burners. Refer to “MAINTENANCE”. |
| Inside of lid appears to be “peeling.” (Resembles paint peeling.) | The lid is porcelain enamel or stainless steel, not paint. It cannot “peel”. What you are seeing is baked on grease that has turned to carbon and is flaking off. THIS IS NOT A DEFECT. | Clean thoroughly. Refer to “CLEANING”. |
| Cabinet doors are not aligned. | Check the adjustment pin on the bottom of each door. | Loosen adjustment nut/s. Slide door/s until aligned. Tighten nut. |
| If problems cannot be corrected by using these methods, please contact the Customer Service Representative in your area using the contact information on our web site. Log onto www.weber.com ^ . | ||
SIDE BURNER TROUBLESHOOTING
| PROBLEM HEK SOLUTION | ||
| Side Burner does not light. Is gas supply off? | The excess flow safety device, which is part of the barbecue to cylinder connection, may have activated. | Turn gas supply on.To reset the excess flow safety device turn all burner control knobs and the cylinder valve off.Disconnect the regulator from the cylinder.Turn burner control knobs to START/HI.Wait at least one minute.Turn burner control knobs to OFF.Reconnect the regulator to the cylinder.Turn cylinder valve on slowly.Refer to “SIDE BURNER IGNITION”. |
| Flame is low in HI position.Is the fuel hose bent or kinked? Straighten hose. | ||
| Push button ignition does not work. | Does burner light with a match? | If match lights burner, check igniter.Refer to “SIDE BURNER MAINTENANCE”. |
| If problems cannot be corrected by using these methods,please contact the Customer Service Representative in your area using the contact information on our web site.Log onto www.weber.com". | ||
SEAR STATION® TROUBLESHOOTING
| PROBLEM HEK SOLUTION | ||
| Burners burn with a yellow or orange flame, in conjunction with the smell of gas. (This is normal for the burner lighting tube.)Sear Station® burner does not light. | Inspect spider/insect screens for possible obstructions. (Blockage of holes.) | Clean spider/insect screens.Refer to “ANNUAL MAINTENANCE.” |
| Did you ignite the two adjacent main burners? Refer to “SEAR STATION® IGNITION & USAGE” for safe lighting procedure. | Verify adjacent main burner ignition by visual inspection of a flame.⚠ WARNING: If ignition does not occur in 5 seconds, turn burner control OFF, wait 5 minutes to let the gas clear before you try again. | |
| Does burner light with a match? If you can light burner with | a match, then check the Crossover® Channel on the sear burner.Refer to “MAINTENANCE” for burner removal and cleaning procedure. | |
| Does the igniter work? Do you see a spark when you repeatedly use the snap igniter? | Try manually lighting the burner. Refer to “SEAR STATION® IGNITION & USAGE.” Call Customer Service. | |
| General Symptoms:Burner does not light.ORBurner has a small flickering flame. | The excess flow safety device, which is part of the barbecue to cylinder connection, may have been activated. | To reset the excess flow safety device, turn all burner control knobs and the cylinder valve to OFF. Disconnect the regulator from the cylinder. Turn burner control knobs to START/HI. Wait at least 1 minute. Turn burner control knobs to OFF. Reconnect the regulator to the cylinder. Turn cylinder valve on slowly. Refer to “MAIN BURNER IGNITION.” |
| If problems cannot be corrected by using these methods, please contact the Customer Service Representative in your area using the contact information on our web site. Log onto www.weber.com2. | ||
ROTISSERIE TROUBLESHOOTING
| PROBLEM HEK SOLUTION | ||
| Rotisserie burner does not light. Did you hold the burner | control knob in and hold in for 20 seconds after burner ignited? | Try to relight burner by holding burner control knob in; continue holding in until 20 seconds after burner has ignited. |
| Did you wait to see the entire ceramic surface become alight before counting 20 seconds? | When relighting burner by holding burner control knob in, wait to see the entire ceramic surface become alight before counting 20 seconds. | |
| Did you repeatedly use the snap ignition until the burner ignited? | After waiting five minutes for gas to clear, try using the snap igniter repeatedly until the burner ignites. Refer to "ROTISSERIE BURNER IGNITION & USAGE." | |
| Does the igniter work? Do you see a spark when you repeatedly use the snap igniter? | Try manually lighting the burner. Refer to "ROTISSERIE BURNER MANUAL IGNITION." Call Customer Service. | |
| General Symptoms:Burner does not light.ORBurner has a small, flickering flame. | The excess flow safety device, which is part of the barbecue to cylinder connection, may have been activated. | To reset the excess flow safety device, turn all burner control knobs and the cylinder valve to OFF. Disconnect the regulator from the cylinder. Turn burner control knobs to START/HI. Wait at least 1 minute. Turn burner control knobs to OFF. Reconnect the regulator to the cylinder. Turn cylinder valve on slowly. Refer to "MAIN BURNER IGNITION." |
| If problems cannot be corrected by using these methods, please contact the Customer Service Representative in your area using the contact information on our web site. Log onto www.weber.com ^2 . | ||
GRILL OUT™ HANDLE LIGHT TROUBLESHOOTING
| PROBLEM HEK SOLUTION | |||
| Weber Grill Out^TM Handle Light does not light. Are the batteries old? Replace batteries. | |||
| Are the batteries installed correctly? Refer to assembly illustration. | |||
| Is the lid in the up position with the power button ON? Ligh will activate when lid is open. | |||
| Is the Weber ^® Grill Out^TM Handle Light activated? Press the power button. | |||
| Is the Weber ^® Grill Out^TM Handle Light positioned correctly on the handle? | Adjust position. Refer to assembly illustration. | ||
| If problems cannot be corrected by using these methods, please contact the Customer Service Representative in your area using the contact information on our web site. Log onto www.weber.com ^® . | |||
MAINTENANE
CLEANING
⚠ WARNING: Turn your Weber® gas barbecue off and wait for it to cool before cleaning.
⚠️ CAUTION: Do not clean your Flavorizer® bars or cooking grates in a self-cleaning oven.
Outside surfaces — Use a warm soapy water solution to clean, then rinse with water.
⚠️ CAUTION: Do not use oven cleaner, abrasive cleansers (kitchen cleansers), cleaners that contain citrus products, or abrasive cleaning pads on barbecue or cart surfaces.
Slide-out grease tray — Remove excess grease, wash with warm soapy water, then rinse.
⚠️ CAUTION: Do not line the slide-out grease tray with aluminum foil.
Flavorizer® bars and cooking grates — Clean with a suitable stainless steel bristle brush. As needed, remove from grill and wash with warm soapy water, then rinse with water.
For availability of replacement cooking grates and Flavorizer ^® bars, contact the Customer Service Representative in your area using the contact information on our website. Log onto www.weber.com ^® .
Catch pan — Disposable foil trays are available, or you can line the catch pan with aluminum foil. To clean the catch pan, wash with warm soapy water, then rinse.
Thermometer — Wipe with warm soapy water; clean with plastic scrub ball.
Cookbox — Brush any debris off of burner tubes. DO NOT ENLARGE BURNER PORTS (OPENINGS). Wash inside of cookbox with warm soapy water and a water rinse.
Inside lid — While lid is warm, wipe inside with paper towel to prevent grease build-up. Flaking built-up grease resembles paint flakes.
Stainless steel surfaces — Wash with a soft cloth and a soap and water solution. Be careful to scrub with the grain direction of the stainless steel.
Do not use cleaners that contain acid, mineral spirits, or xylene. Rinse well after cleaning.
Preserve your stainless steel — Your grill or its cabinet, lid, and control panel may be made from stainless steel. Keeping the stainless steel looking its best is a simple matter. Clean it with soap and water, rinse with clear water, and wipe dry. For stubborn particles, a non-metallic brush can be used.
⚠️ IMPORTANT: Do not use a wire brush or abrasive cleaners on the stainless steel surfaces of your grill as this will cause scratches.
⚠️ IMPORTANT: When cleaning surfaces be sure to rub/wipe in the direction of the grain to preserve the look of your stainless steel.
WEBER® SPIDER/INSECT SCREENS
Your Webel ^® gas barbecue, as well as any outdoor gas appliance, is a target for spiders and other insects. They can nest in the venturi section (1) of the burner tubes. This blocks the normal gas flow, and can cause the gas to flow back out of the combustion air opening. This could result in a fire in and around the combustion air openings, under the control panel, causing serious damage to your barbecue.
The burner tube combustion air opening is fitted with a stainless steel screen (2) to prevent spiders and other insects access to the burner tubes through the combustion air openings.
We recommend that you inspect the spider/insect screens at least once a year. (Refer to "ANNUAL MAINTENANCE.") Also inspect and clean the spider/insect screens if any of the following symptoms should ever occur:
A) Gas is smelled in conjunction with burner flames that appear yellow and lazy.
B) Barbecue does not reach temperature.
C) Barbecue heats unevenly.
D) One or more of the burners do not ignite.
DANGER
Failure to correct the above mentioned symptoms may result in a fire, which can cause serious bodily injury or death, and cause damage to property.
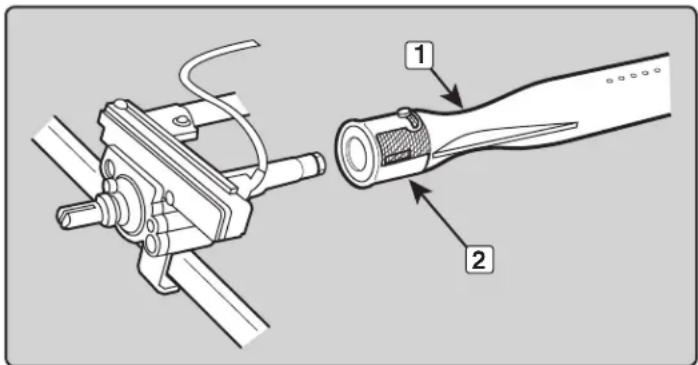
text_image
Technical diagram showing mechanical assembly with labeled parts 1 and 2BURNER TUBE CLEANING
A) Turn off the gas supply.
B) Remove the manifold. (Refer to "REPLACING MAIN BURNERS.")
C) Look inside each burner with a flashlight.
D) Clean the inside of the burners with a wire (a straightened-out coat hanger will also work). Check and clean the air shutter opening at the ends of the burners. Check and clean the valve orifices at the base of the valves. Use a steel bristle brush to clean outside of burners. This is to make sure all the burner ports are fully open.
CAUTION: Do not enlarge the burner ports when cleaning.
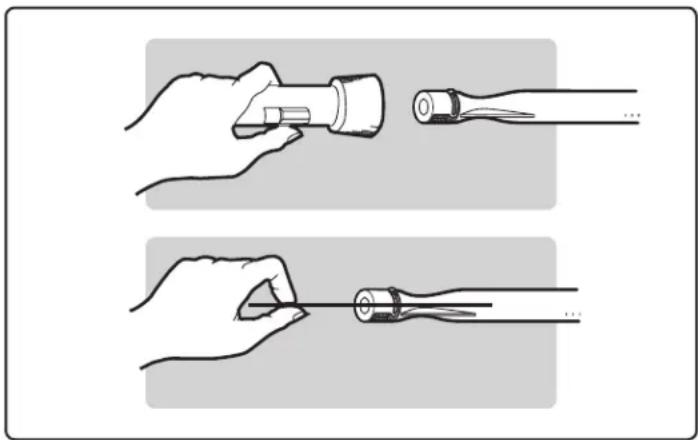
natural_image
Illustration of two hands holding a tool, showing a close-up of the tip and handle (no text or symbols present)MAINTENANE
REPLACING MAIN BURNERS
Note: Your Summit ^® gas grill must be off and cool.
A) Turn gas off at source.
B) Disconnect gas supply.
C) Remove cooking grates.
D) Remove Flavorizer® bars.
E) Remove smoker box (if included in your model).
Removing Control Panel
Parts required: Phillips screwdriver and a towel.
A) Remove the burner control knobs (1).
B) Open both doors and place a towel on top of the doors.
This will protect the control panel and tops of the doors from getting scratched on the next step.
C) Remove the screws from the underside of the control panel with a Phillips screwdriver (2).
D) Tilt the control panel forward and lift up and away from the grill (3). (For Summit® models with LED features: be careful not to break or disconnect the wires for the control panel LEDs.)
E) Place the control panel on the towel covering the door assemblies (4).
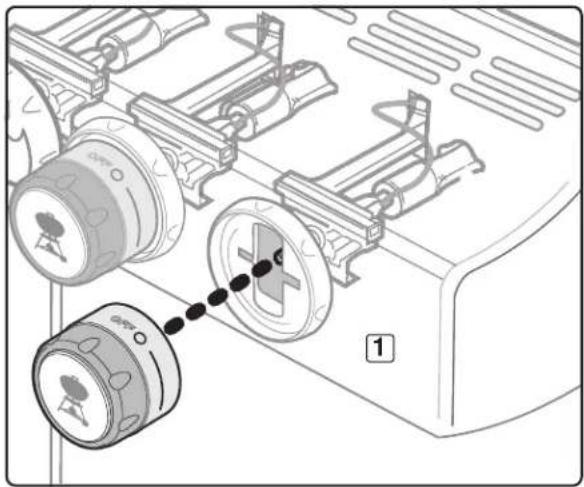
natural_image
Mechanical assembly diagram showing a valve mechanism with a labeled component (no text or symbols present)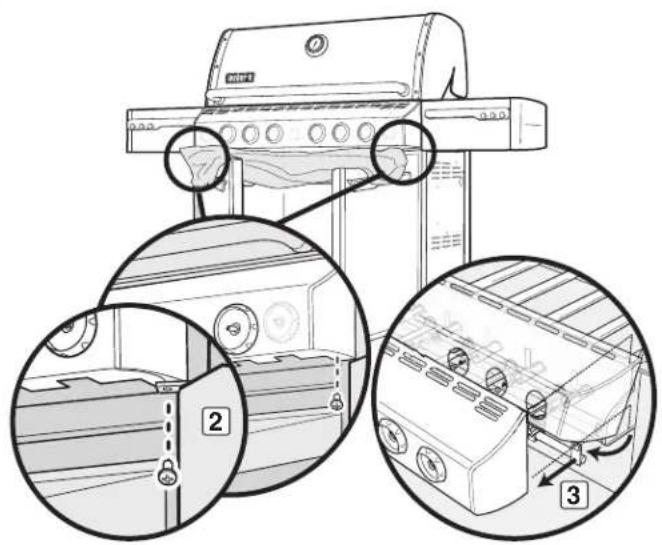
text_image
Diagram showing three views of a grill with labeled parts: top view, front view, and close-up details.The grill illustrated may have slight differences than the model purchased.
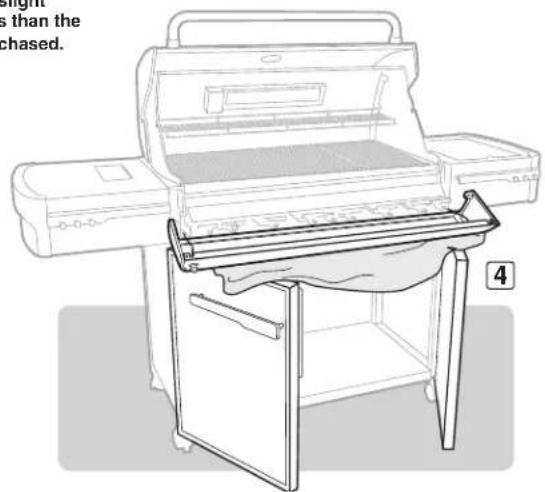
natural_image
Line drawing of a printer with a paper holder placed on top, showing internal components and a cloth cover (no text or symbols)F) Remove the two screws that secure the manifold to the cookbox. Pull manifold assembly out from the manifold frame (5).
G) Pull the selected burner tube(s) from manifold frame and replace with new burner tube(s) (6).
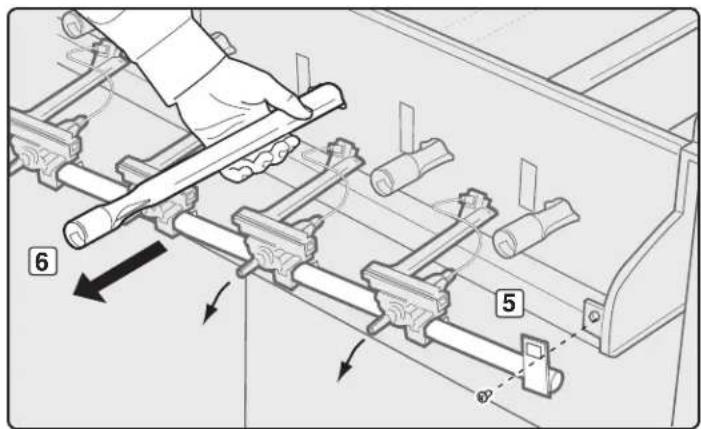
text_image
Technical diagram showing mechanical assembly with numbered components and directional arrows indicating motion or movement.MAINTENANE
Removing The Sear Station® Burner
To remove the Sear Station Burner ^® , pull the burner tube toward you. This removes it from the burner tube notch (7). Then rotate the tube clockwise (8), taking care to rotate it so that the screw at the end of the tube (9) fits through the notch in the heat shield opening (10). When the burner tube is free, remove it from the cookbox (11).
A) To reinstall the manifold assembly, reverse steps for "Removing Control Panel" as previously described.
CAUTION: The burner openings (12) must be positioned properly over the valve orifices (13). Make sure the opposite end of the burner tubes (14) properly align into the slots on the backside of the cookbox. Check proper assembly before fastening manifold in place.
⚠ WARNING: After reinstalling the gas lines, they should be leak checked with a soap and water solution before using the grill. (See “CHECK FOR GAS LEAKS.”)
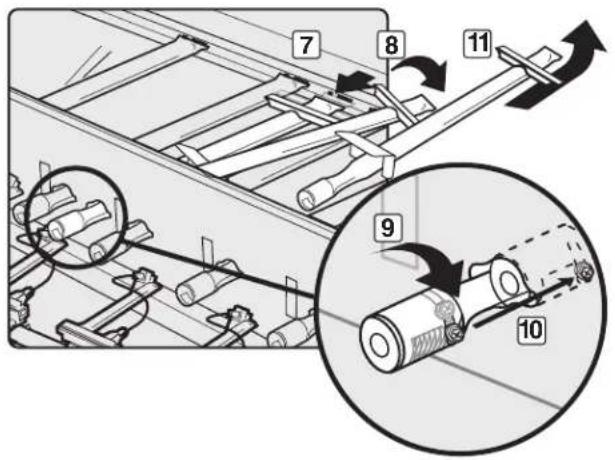
text_image
Technical diagram showing mechanical assembly with numbered components and directional arrows indicating motion or movement.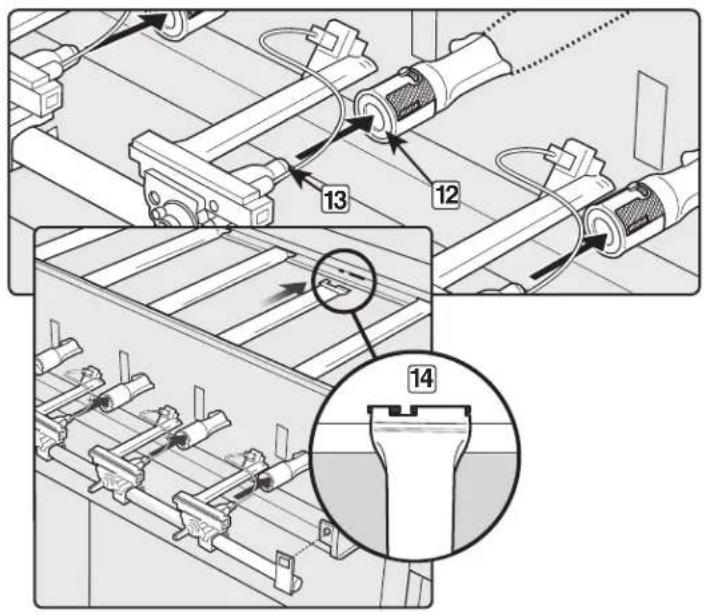
text_image
Technical diagram showing mechanical assembly steps with numbered components and a magnified detail view of a component labeled 14.⚠ WARNING: All gas controls and supply valves should be in the OFF position.
Make sure black wire is connected between the igniter and electrode.
Make sure white wire is connected between the igniter and grounding clip.
Spark should be a white/blue color, not yellow.
A) Igniter wire (1)
B) Ground wire (2)
C) Burner (3)
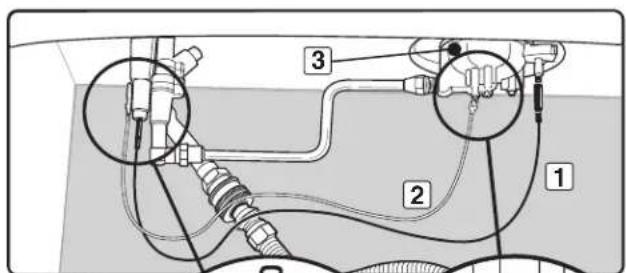
text_image
Technical diagram of a mechanical or fluid system with labeled components 1, 2, and 3, showing tubing and connections.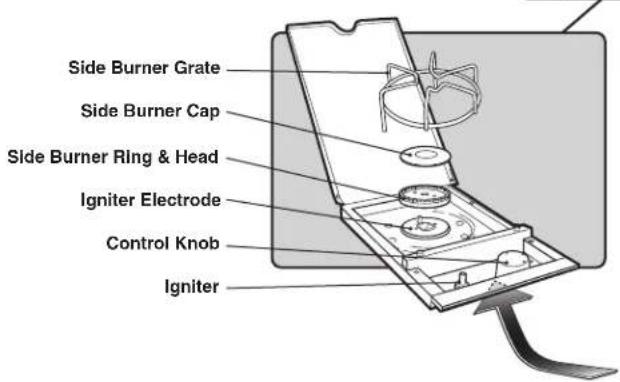
text_image
Side Burner Grate Side Burner Cap Side Burner Ring & Head Igniter Electrode Control Knob Igniter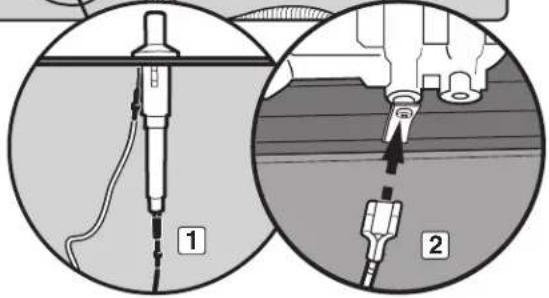
text_image
Technical diagram showing two views of a soldering tool with labeled parts, including a probe and plug assembly.MAINTENANE
ANNUAL MAINTENANCE
Inspection and Cleaning of the Spider/Insect Screens
To inspect the spider/insect screens, remove the control panel. If there is dust or dirt on the screens, remove the burners to clean the screens.
Brush the spider/insect screens lightly with a soft bristle brush (i.e., an old toothbrush).
△ CAUTION: Do not clean the spider/insect screens with hard or sharp tools. Do not dislodge the spider/insect screens or enlarge the screen openings.
Lightly tap the burner to get debris and dirt out of the burner tube. Once the spider/insect screens and burners are clean, replace the burners.
If a spider/insect screen becomes damaged or cannot be cleaned, please contact the Customer Service Representative in your area using the contact information on our web site. Log onto www.weber.com#.
Burner Flame Pattern
The Weber ^® gas barbecue burners have been factory set for the correct air and gas mixture. The correct flame pattern is shown in illustration and described below:
A) Burner tube (1)
B) Tips occasionally flicker yellow (2)
C) Light blue (3)
D) Dark blue (4)
If the flames do not appear to be uniform throughout the burner tube, follow the burner cleaning procedures.
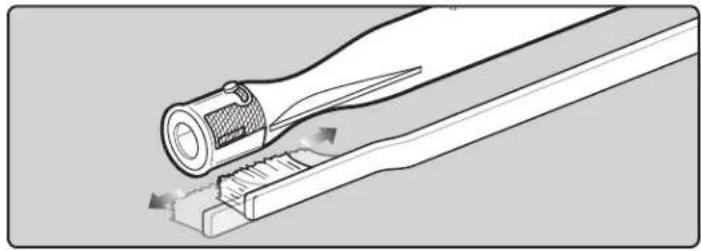
natural_image
Technical illustration of a mechanical assembly with a tool and base, showing internal components and motion arrows (no text or symbols)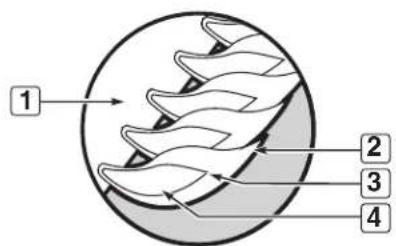
text_image
1 2 3 4Summit®

BARBAOA DE GAS
natural_image
Close-up of a pressure gauge with scale markings (no visible text or symbols beyond measurement labels)DEBE LEER ESTA GUÍA DEL PROPIETARIO ANTES DE PONER A FUNCIONAR LA BARBACOA DE GAS.
⚠️ PELIGRO
Si huele a gas:
WEBER-STEPHEN PRODUCTS LLC
Customer Service Center
1890 Roselle Road, Suite 308
Schaumburg, IL 60195
USA
WEBER-STEPHEN PRODUCTS S.A. de C.V.
Marcella No. 338,
Colonia Americana
44160 México, C.P.
México
text_image
Diagram showing a hand holding a cable with an attached component, labeled with number 1 and an arrow indicating direction.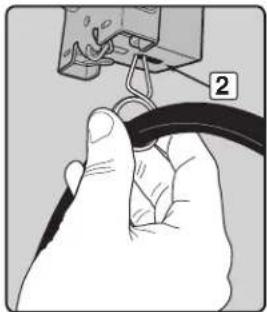
natural_image
Close-up of a hand holding a black cable with a small component above it, no visible text or symbols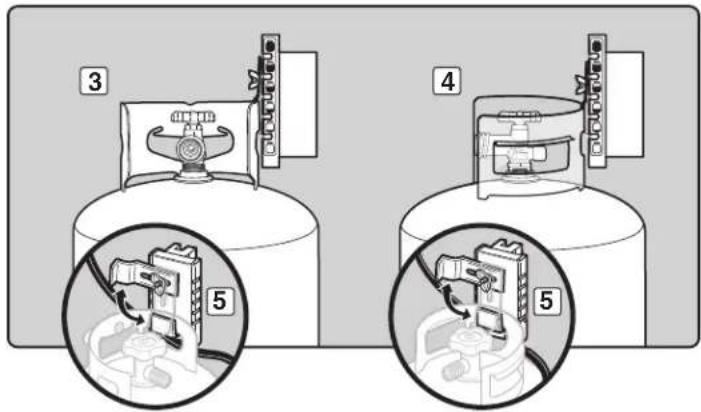
text_image
Diagram showing two configurations of a gas cylinder with labeled parts and zoomed-in insets for electrical or mechanical testing.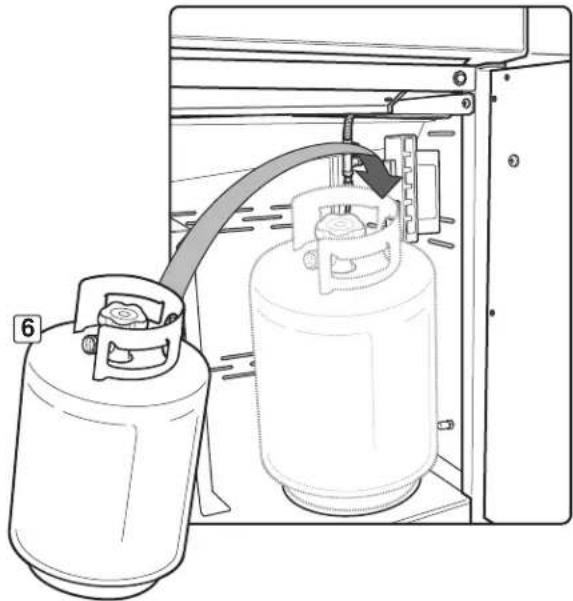
natural_image
Diagram of two gas cylinders inside a storage unit, one with a curved arrow indicating flow or movement (no text or symbols)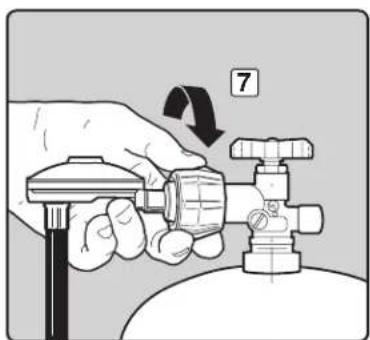
natural_image
Illustration of a hand holding a gas valve with a handle, no text or symbols presentINSTRUIONES SOBRE EL GAS
natural_image
Diagram of a mechanical device with two circular components connected by dotted lines, no visible text or symbols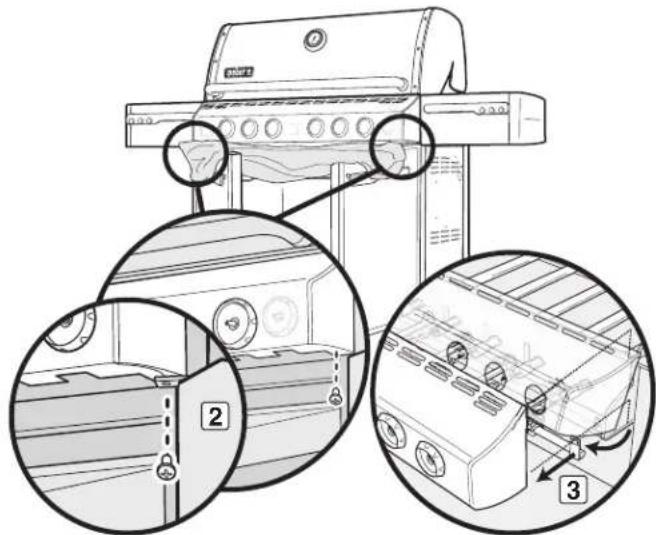
text_image
Technical diagram showing a grill with labeled parts and three circular insets illustrating the exterior and interior views.natural_image
Hand operating a portable air purifier with a hand adjusting the lid (no text or symbols visible)INSTRUIONES SOBRE EL GAS
Verifique
text_image
Technical diagram illustrating the assembly and maintenance steps of a machine tool, labeled with numbered instructions for each step.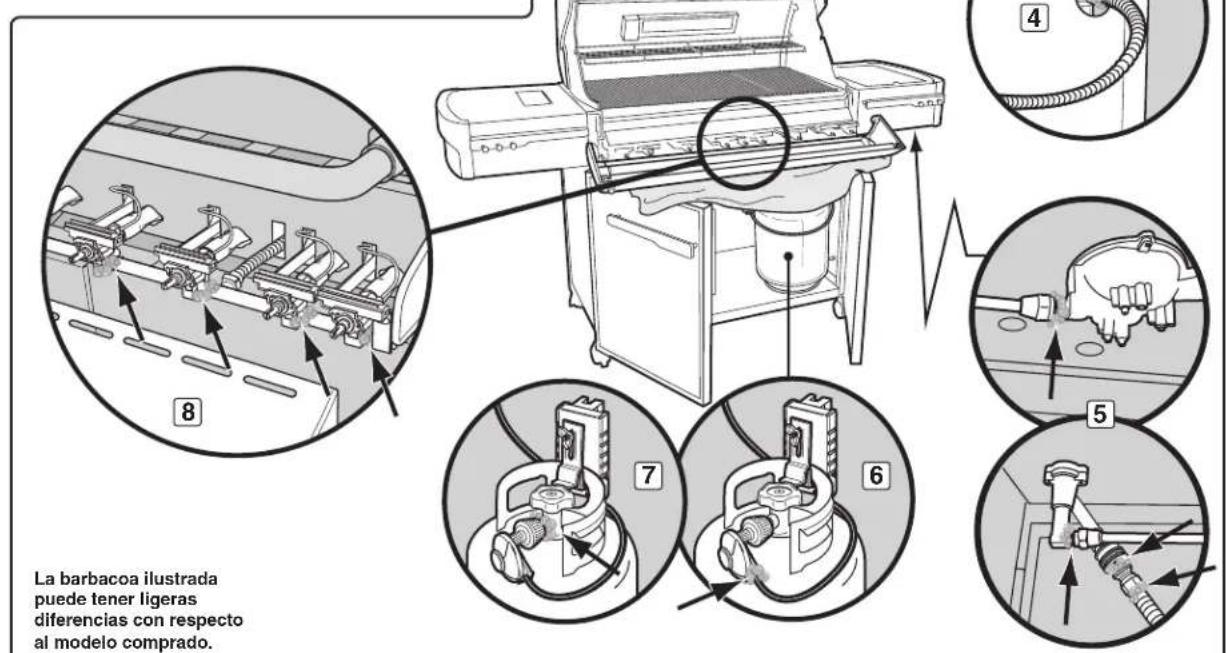
text_image
Diagram illustrating a mechanical assembly process with labeled parts and directional arrows indicating rotation or adjustment.FUNIONES DE LUZ
LÁMPARA DEL ASA WEBER® GRILL OUT™
natural_image
Technical line drawing of a mechanical device with labeled parts (no text or symbols present)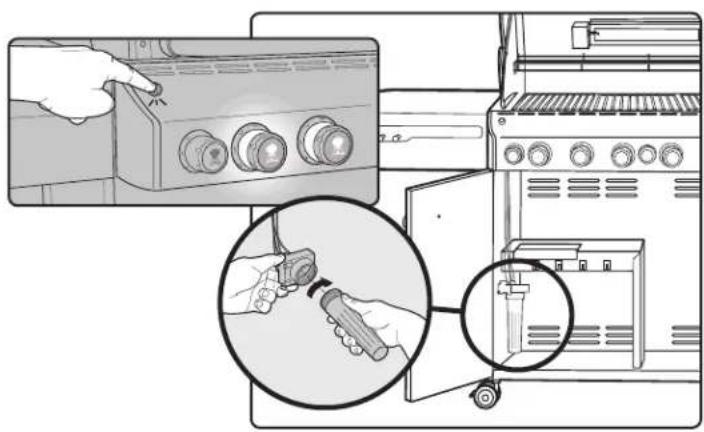
natural_image
Illustration showing a hand operating a kitchen control panel with a magnified close-up of the device's handle (no text or symbols present)ANTES DE UTILIZAR LA BARBAOA
NIVEL DE COMBUSTIBLE
natural_image
Line drawing of a portable electric grill with a magnified inset showing blade details (no text or symbols)text_image
Technical diagram of a mechanical device with labeled components and motion indicators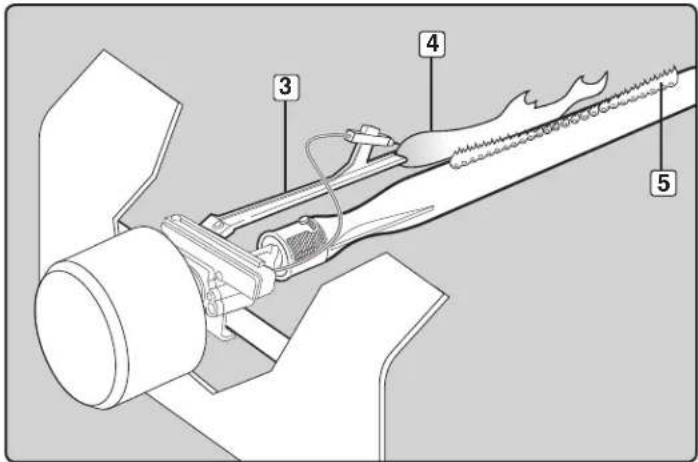
text_image
Technical diagram of a mechanical device with numbered components labeled 3, 4, and 5ENENDIDO Y USO DEL QUEMADOR PRINIPAL
text_image
OFF APROD ARPETE 2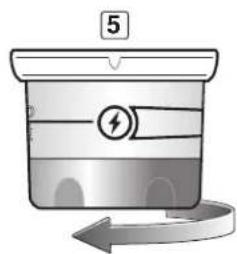
text_image
5ONSEJOS PRÁTIOS PARA ASAR
text_image
1 2 3 4 5 6 M Mtext_image
Technical diagram of a portable stove with labeled components including open lid, internal burner, and fan baseENENDIDO Y USO DEL QUEMADOR LATERAL
ENCENDIDO MANUAL DEL QUEMADOR LATERAL
⚠ PELIGRO
text_image
Technical diagram of a portable stove with labeled parts including tray, door, and drawertext_image
OFF ○ APAGADO ARRÊTÉ ●APAGADO ENCENDIDO
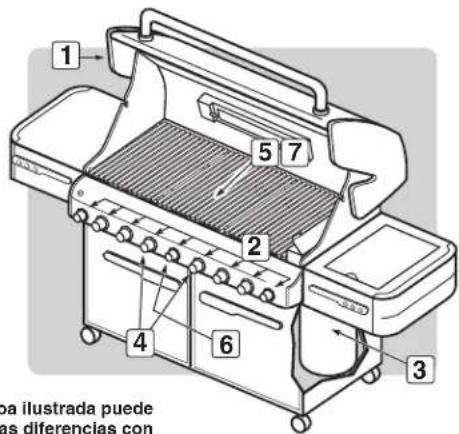
text_image
Illustration showing three-step food preparation steps: grating, slicing, and cutting with a knife.text_image
4 OFF ○ APRAGAR ANNÉTÉ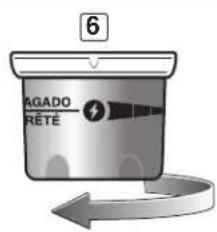
text_image
6 AGADO RÊTÉ⚠️ PELIGRO
text_image
OFF APROAD ARRÊTE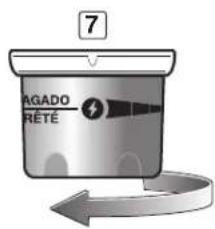
text_image
7 AGADO RÉTÉtext_image
Three-step diagram showing a hand inserting a card into a device, labeled with step 1 and step 2.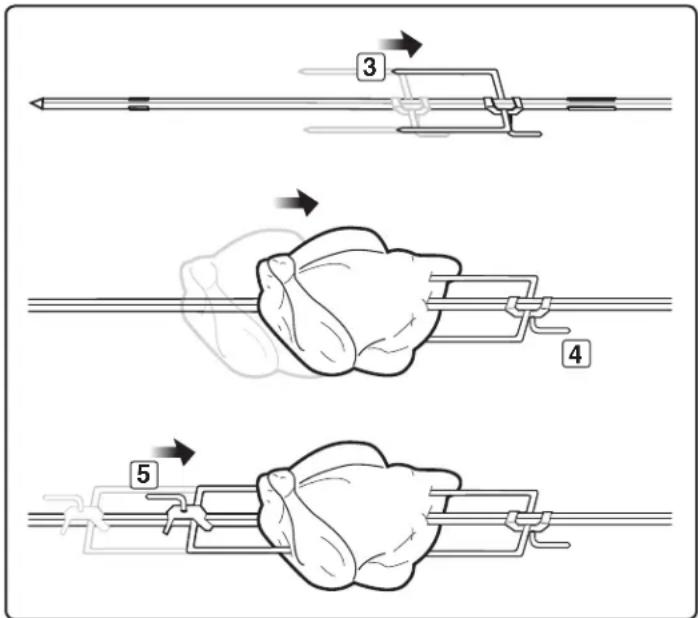
text_image
Diagram illustrating three steps of a biological or mechanical procedure with numbered arrows indicating sequence.text_image
Three-step diagram illustrating a device operation: adding cable, opening a device, and rotating the screen.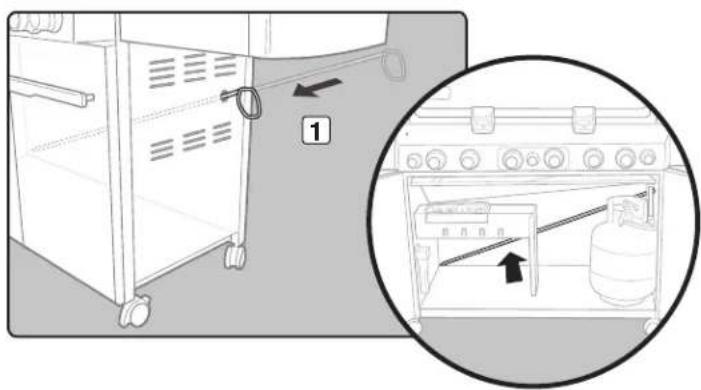
natural_image
Diagram showing a kitchen appliance with a hose and labeled component, alongside an inset view of the oven with a gas cylinder (no text or symbols present)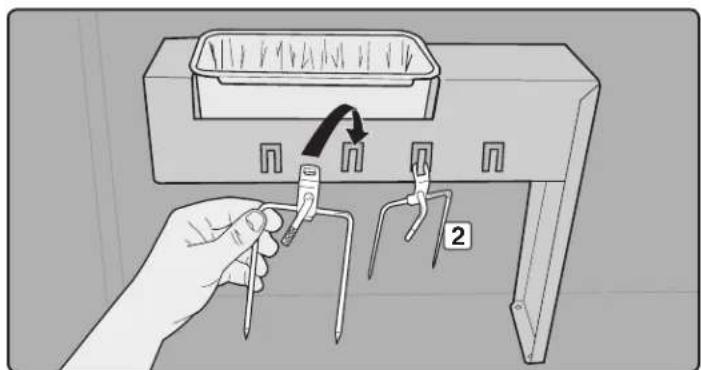
natural_image
Hand inserting a small component into a device with arrows indicating direction (no text or symbols)RESOLUÍN DE PROBLEMAS
text_image
Technical diagram showing mechanical assembly with labeled parts 1 and 2natural_image
Illustration of two hands holding a tool, one with a handle and the other with a pointed tip (no text or symbols)MANTENIMIENTO
REEMPLAZO DE LOS QUEMADORES PRINCIPALES
natural_image
Mechanical assembly diagram showing a valve mechanism with a labeled component (no text or symbols present)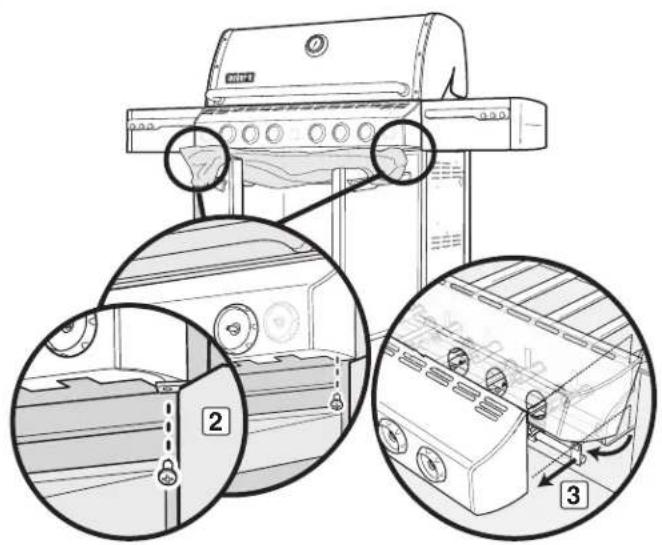
text_image
Diagram showing three views of a grill with labeled parts: top view, front view, and close-up details.text_image
Technical diagram showing mechanical assembly with numbered components and directional arrows indicating motion or movement.MANTENIMIENTO
text_image
Technical diagram showing mechanical assembly with numbered components and directional arrows indicating motion or movement.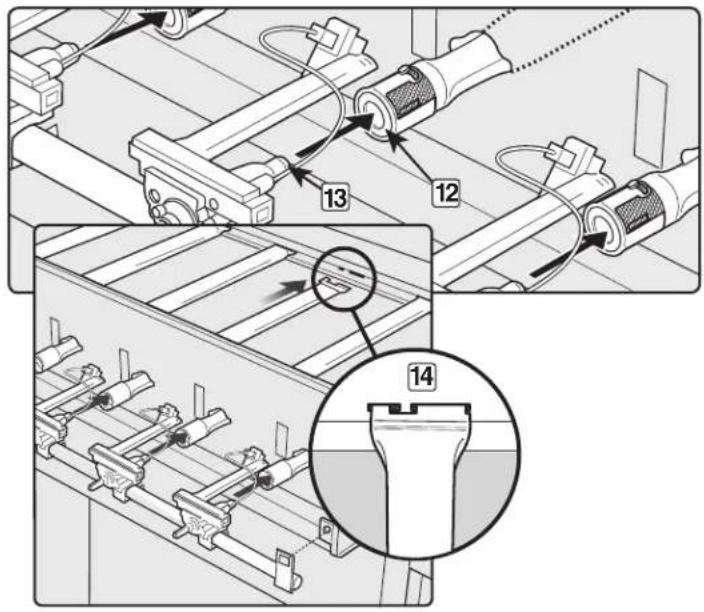
text_image
Technical diagram showing mechanical assembly steps with numbered components and a magnified detail view of a component labeled 14.MANTENIMIENTO DEL QUEMADOR LATERAL
text_image
Technical diagram of a mechanical or fluid system with labeled components 1, 2, and 3, showing hoses, tubing, and connections.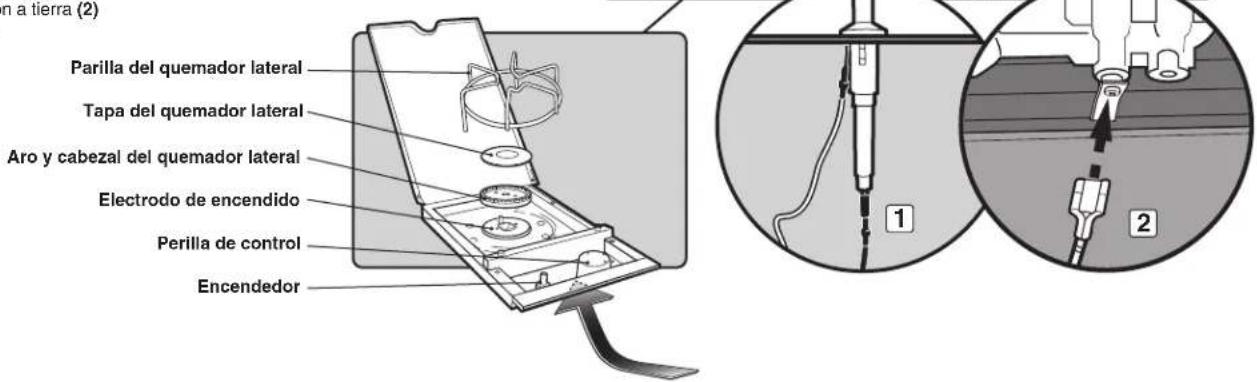
natural_image
Technical illustration of a mechanical assembly with a tool and base, showing internal components (no text or symbols)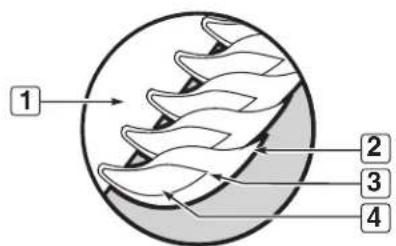
text_image
1 2 3 4Summit®

GRILL A GAZ
natural_image
Close-up of a pressure gauge with scale markings (no visible text or symbols beyond measurement labels)VOUS DEVEZ LIRE CE MODE D'EMPLOI AVANT D'UTILISER VOTRE GRILL A GAZ.
⚠️ DANGER
WEBER-STEPHEN PRODUCTS LLC
Product Registration
P.O. Box 40530
Burlington, ON L7P 4W1
INSTALLATION AU CANADA
text_image
Technical diagram showing a valve assembly with numbered parts and a close-up view of the component.OUPLAGE DE ONNEXION DE TYPE 1
text_image
Diagram showing a hand holding a cable with an attached component, labeled with number 1 and an arrow indicating direction.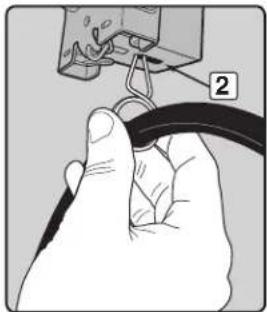
natural_image
Close-up of a hand holding a black cable with a small component above it, no visible text or symbols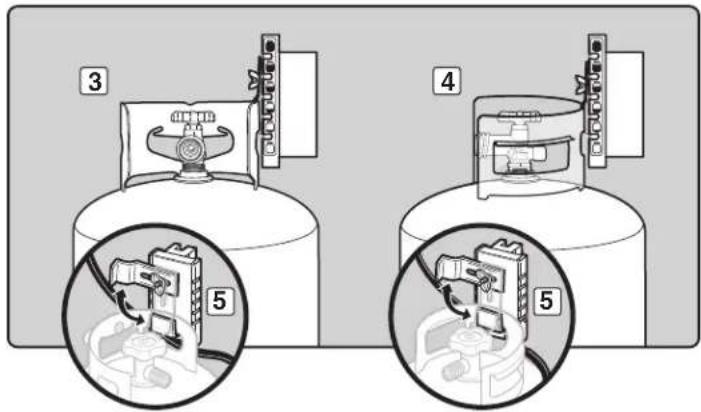
text_image
Diagram showing two configurations of a gas cylinder with labeled parts and zoomed-in insets for mechanical or electrical installation.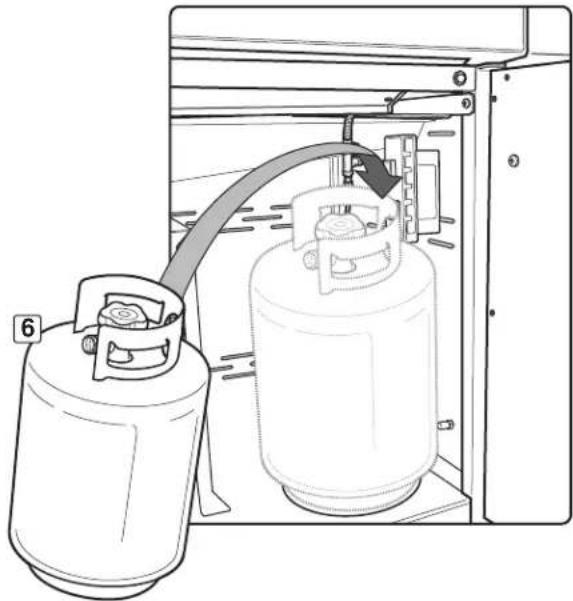
natural_image
Diagram of two gas cylinders inside a storage unit, one with a curved arrow indicating flow or movement (no text or symbols)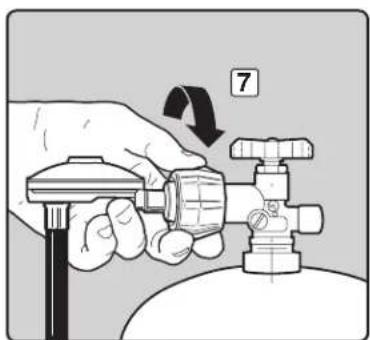
text_image
Diagram showing a hand holding a gas valve with a numbered arrow indicating step 7INSTRUCTIONS ONERNANT LE GAZ
natural_image
Diagram of a mechanical device with two circular components connected by dotted lines, no visible text or symbols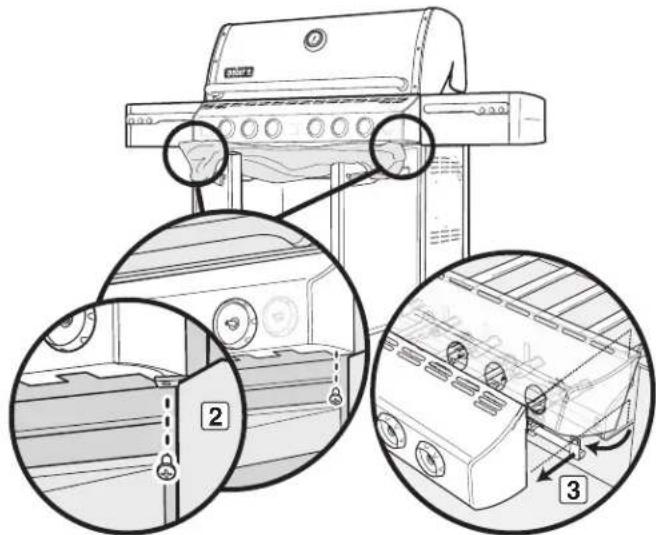
text_image
Technical diagram showing a mounted gas stove with labeled parts and three circular insets illustrating the exterior and interior views.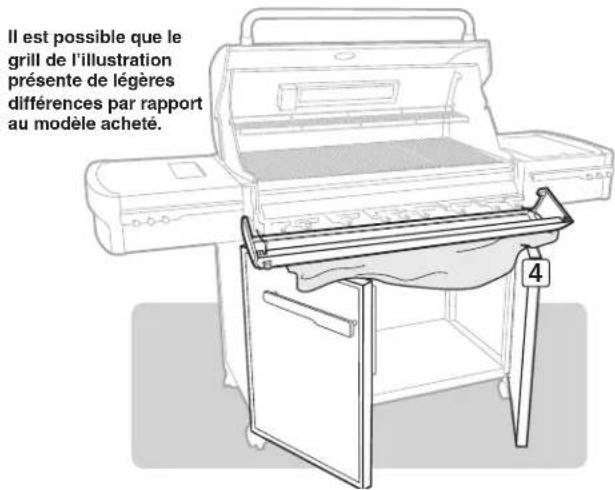
natural_image
Hand operating a portable gas stove with a hand adjusting the lid (no text or symbols visible)INSTRUCTIONS ONERNANT LE GAZ
Vérifiez
text_image
Technical diagram illustrating the assembly and maintenance steps of a machine tool, labeled with numbered instructions for each step.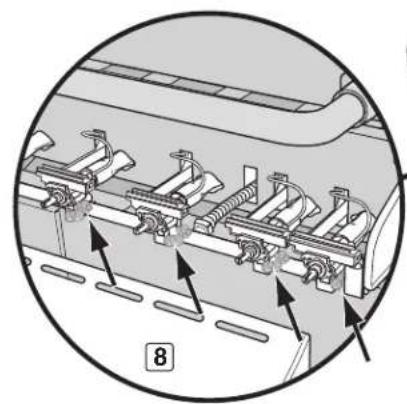
natural_image
Mechanical assembly diagram showing a bracket with bolts and mounting holes, no text or symbols presenttext_image
Technical diagram of a printer with labeled parts and zoomed-in views showing internal components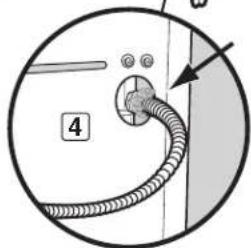
text_image
4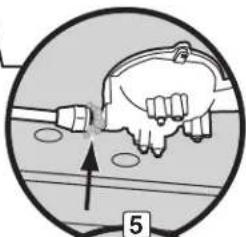
natural_image
Circular diagram showing a hand holding a tool with an arrow pointing to a surface, no text or symbols present.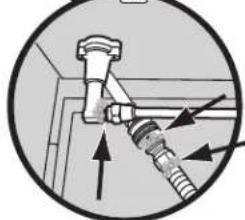
natural_image
Diagram of a pipe connection with arrows indicating flow direction (no text or labels)INSTRUCTIONS ONERNANT LE GAZ
RECHARGEMENT DE LA BOUTEILLE DE PROPANE LIQUIDE
text_image
Diagram illustrating a mechanical assembly process with labeled parts and directional arrows indicating rotation or adjustment.FONTIONNALITES D'ELAIRAGE
LAMPE DE POIGNEE WEBER® GRILL OUT™
natural_image
Technical line drawing of a mechanical device with labeled component (no text or symbols beyond label)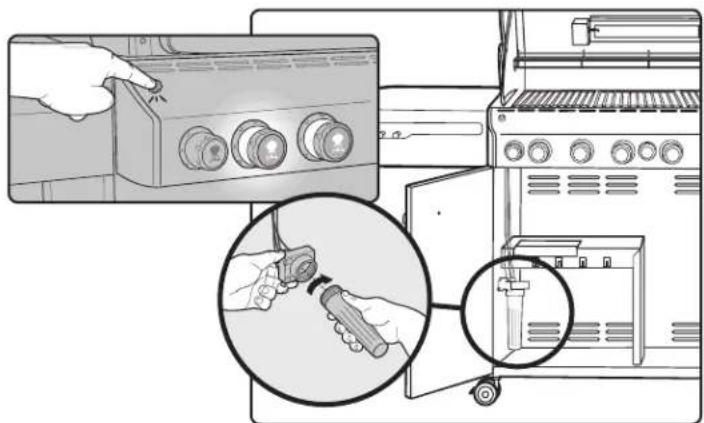
natural_image
Illustration of a kitchen appliance with a hand operating the control panel and a close-up of a tool inserted into a door (no text or symbols visible)AVANT D'UTILISER LE GRILL
NIVEAU DE COMBUSTIBLE
natural_image
Line drawing of a portable electric grill with a magnified inset showing the blade and handle (no text or symbols)UTILISATION DE L'ALLUMAGE A DELI
text_image
Technical diagram of a mechanical device with labeled components and directional arrows indicating motion or flow.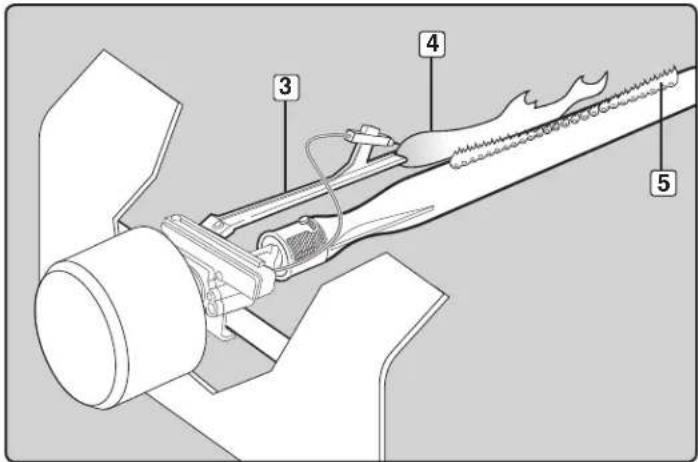
text_image
Technical diagram of a mechanical device with numbered components labeled 3, 4, and 5ALLUMAGE & UTILISATION DU BRULEUR PRINIPAL
ALLUMAGE DU BRULEUR PRINCIPAL
natural_image
Diagram of a battery with a lightning bolt and rotating arrow (no text or symbols)POUR ETEINDRE
text_image
OFF APROAD ARNETE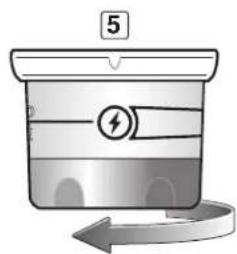
text_image
5ASTUES & ONSEILS UTILES POUR LES GRILLADES
text_image
OFF ○ APAGADO ARRÊTÉ ●ARRÊTÉ MARCHE
METHODES DE UISSON
text_image
1 2 3 4 5 6 M Mtext_image
OFF ○ APAGADO ARRÊTÉ ●ARRÊTÉ MARCHE
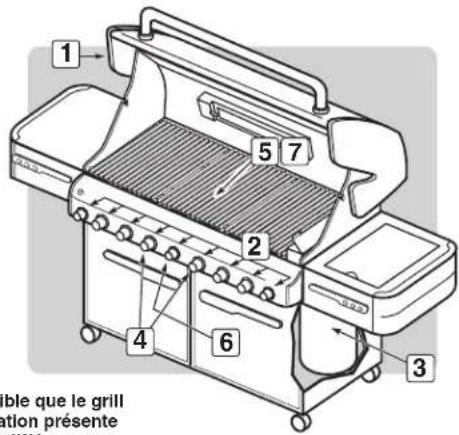
text_image
1 2 3 4 5 6 7 ble que le grill ation présente ###natural_image
Illustration of a shoe being heated by chopsticks, showing the foot and side view (no text or symbols)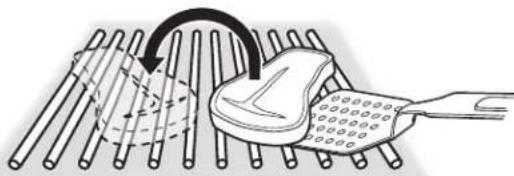
natural_image
Diagram showing a hand holding a tool interacting with a curved mechanical component, surrounded by rods (no text or symbols present)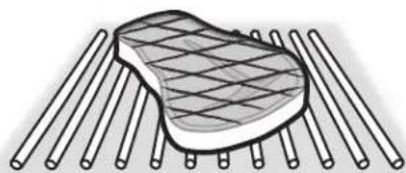
natural_image
Illustration of a flat plate with mesh texture and multiple cylindrical rods extending outward (no text or symbols)ALLUMAGE & UTILISATION DU BRULEUR DU FUMOIR
ALLUMAGE DU BRULEUR DU FUMOIR
⚠️ DANGER
ARRÊTÉ MARCHE/ELEVE FAIBLE
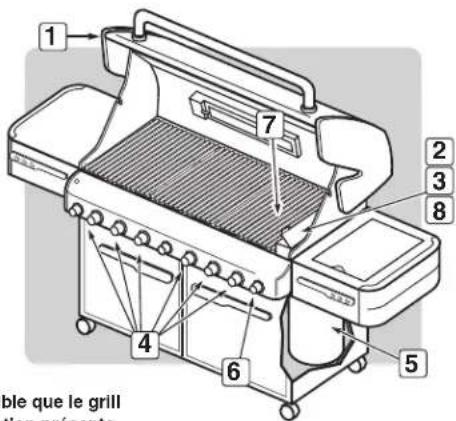
text_image
1 2 3 4 5 6 7 8 ble que le grill tion présentetext_image
OFF APROAD ARRÊTE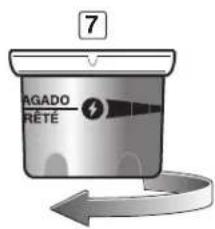
text_image
7 AGADO RÊTEnatural_image
Diagram of a conveyor belt system with rollers and a moving cart, no text or symbols presentALLUMAGE & UTILISATION DU BRULEUR DE LA ROTISSOIRE
ALLUMAGE DU BRULEUR DE LA ROTISSOIRE
ARRÊTÉ MARCHE/ELEVE FAIBLE
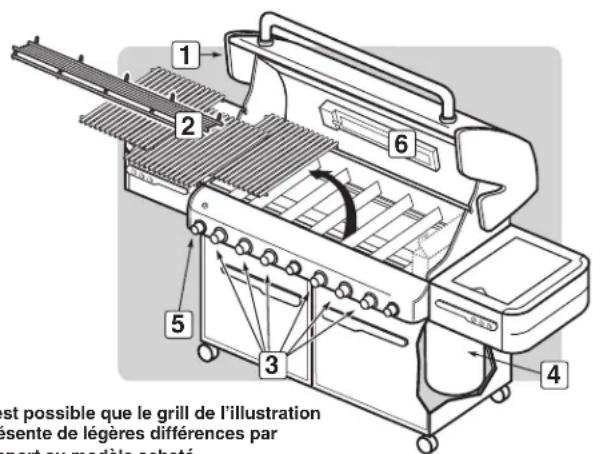
text_image
Three-step diagram showing a hand using a device to interact with a device, labeled with steps 1 and 2.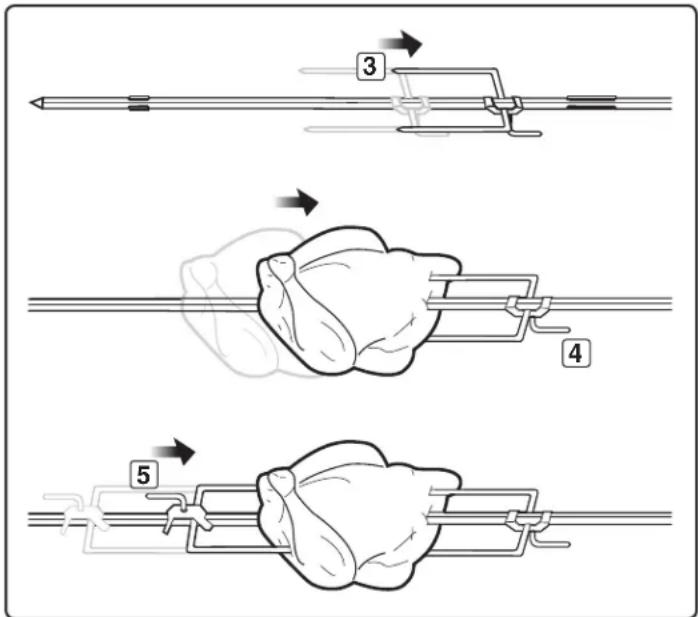
text_image
Diagram illustrating three-step biological or mechanical procedure steps with numbered labels 3, 4, and 5.ALLUMAGE & UTILISATION DU BRULEUR DE LA ROTISSOIRE
text_image
Three-step diagram showing cable installation process: adding cable to a device, adding a switch to a computer, and adding a device with a lock.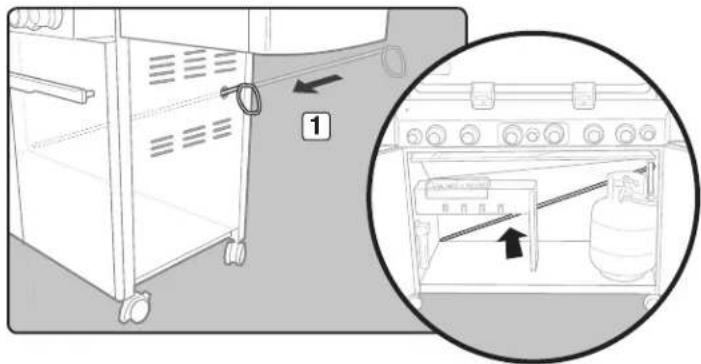
text_image
Diagram showing a kitchen appliance with a labeled component and an inset view of the oven with a gas cylinder.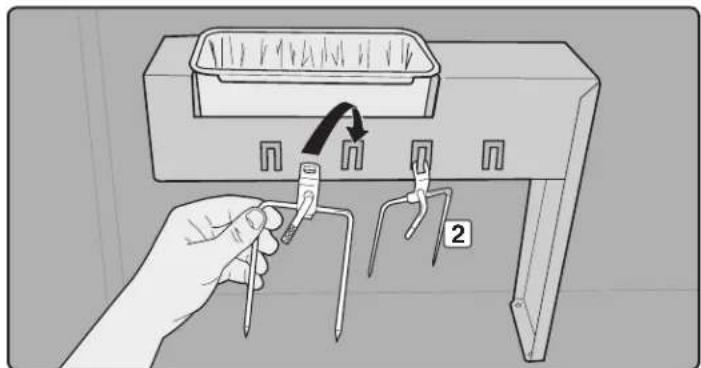
natural_image
Illustration of a hand inserting into a device into a container with arrows indicating the process (no text or symbols present)RESOLUTION DES PROBLEMES
text_image
Technical diagram showing mechanical assembly with labeled parts 1 and 2NETTOYAGE DE TUBE DE BRÛLEUR
natural_image
Illustration of two hands holding a flashlight, showing the process (no text or symbols present)MAINTENANE
REPLACEMENT DES BRULEURS PRINCIPAUX
natural_image
Mechanical assembly diagram showing a valve mechanism with a labeled component (no text or symbols present)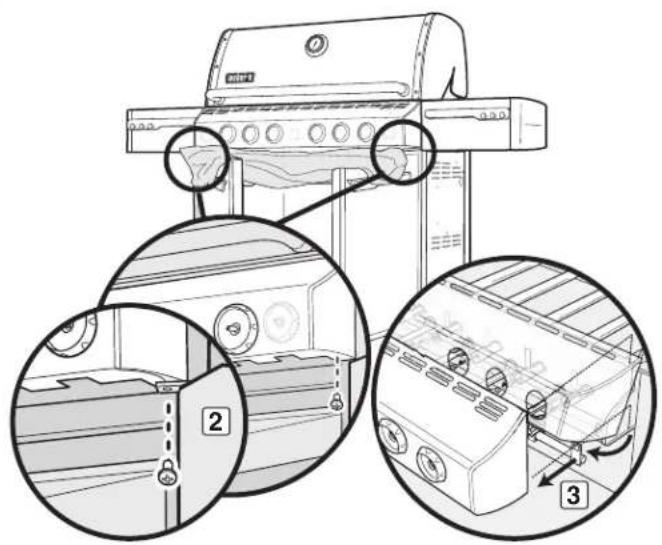
text_image
Diagram showing three views of a grill with labeled parts: top view, front view, and close-up details.text_image
Technical diagram showing mechanical assembly with numbered components and directional arrows indicating motion or movement.MAINTENANE
text_image
Technical diagram showing mechanical assembly with numbered components and directional arrows indicating motion or movement.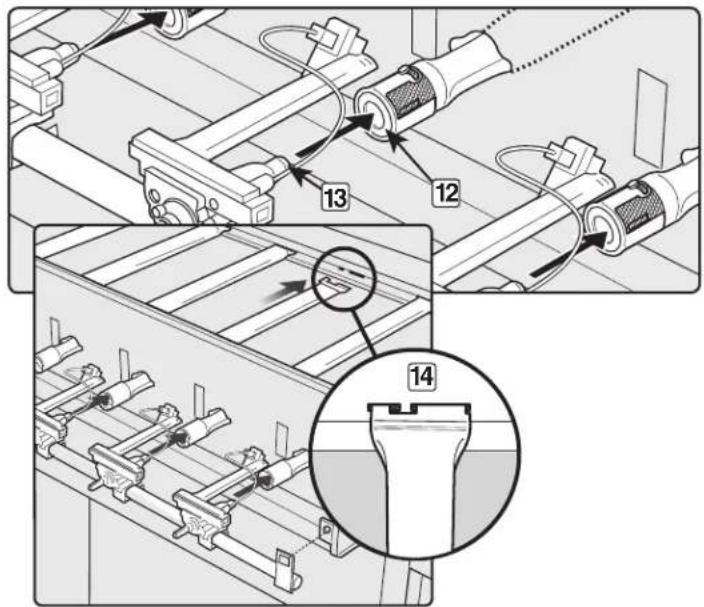
text_image
Technical diagram showing mechanical assembly steps with numbered components and a magnified inset highlighting component 14.MAINTENANCE DU BRULEUR LATERAL
text_image
Technical diagram of a mechanical or fluid system with labeled components 1, 2, and 3, showing hoses, tubing, and connections.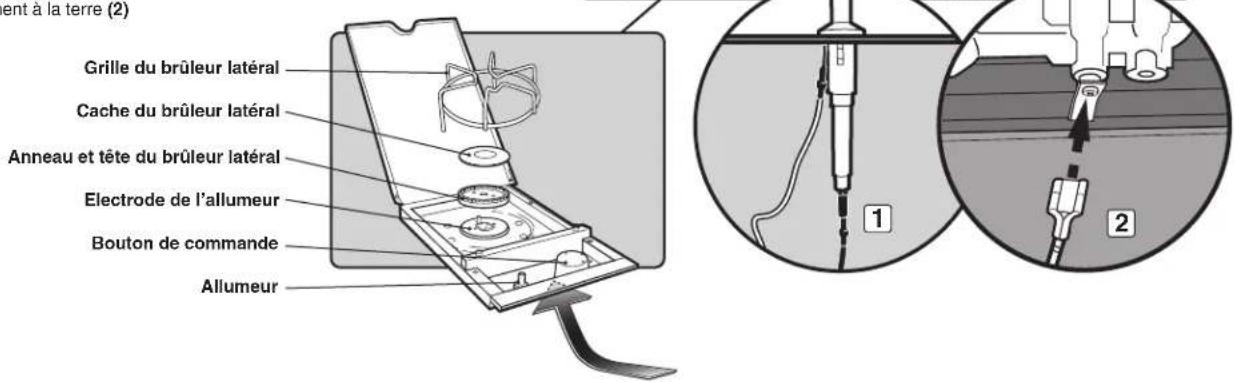
natural_image
Technical illustration of a mechanical assembly with a tool and base, showing internal components (no text or symbols)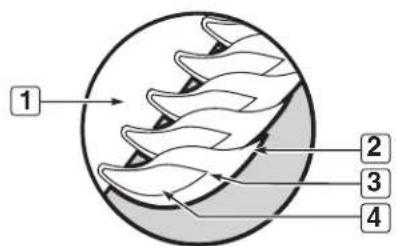
text_image
1 2 3 4MEMO
ATTENTION: This product has been safety tested and is only certified for use in a specific country. Refer to country designation located on outer carton.
These parts may be gas carrying or gas burning components. Please contact Weber-Stephen Products LLC, Customer Service Department for genuine Weber-Stephen Products LLC replacement part(s) information.
⚠ WARNING: Do not attempt to make any repair to gas carrying, gas burning, igniter components or structural components without contacting Weber-Stephen Products LLC, Customer Service Department. Your actions, if you fail to follow this Product Warning, may cause a fire, an explosion, or structural failure resulting in serious personal injury or death as well as damage to property.
WEBER-STEPHEN PRODUCTS LLC
www.weber.com®
© 2011 Designed and engineered by Weber-Stephen Products LLC,
a Delaware limited liability company, located at 200 East Daniels Road, Palatine, Illinois 60067 U.S.A.
Printed in U.S.A.
16 great recipes, 1 great grill
LE LIVRE DE RECETTE, POUR BARBECUE A GAZ WEBER®
natural_image
Steamed fish fillet garnished with asparagus and parsley on a white plate (no text or symbols visible)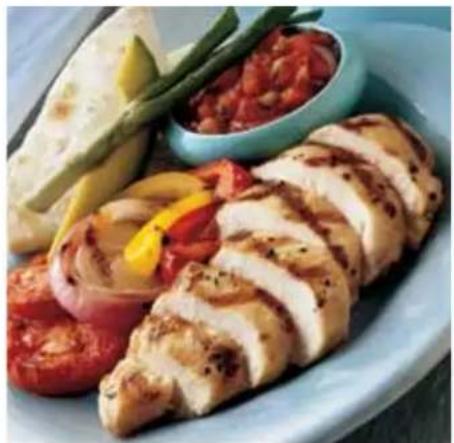
natural_image
Plated dish of grilled chicken with tomatoes, onion, and chili peppers (no text or symbols visible)CONTENTS
Thank you for choosing Weber! We hope you enjoy many years of faithful service from your grill. We're pleased to present you with this cookbook full of Weber's tried-and-true grilling recipes. Each recipe in this book includes the grilling method and heat setting to use on your Weber® gas grill. The charts in this book will be a helpful, easy reference.
If these recipes whet your appetite for more, visit our web site at www.weber.com*. We're always serving up something new. Or call us on our toll-free number, 1-800-446-1071. Our customer service center is open around-the-clock to answer all your questions. Best wishes and happy grilling!
WEBER GRILLING BASICS: WHAT YOU NEED TO KNOW
All good cooks have a few secrets they like to keep to themselves. Not us—we like to share them! We think the keys to our success should be yours as well. Here's the inside scoop to help you get the best results:
To start your gas grill: Open the lid. Check that all burner control knobs are turned to OFF and that your fuel tank is not empty. Turn the gas supply on at the source. Light the grill according to the directions in the owner's manual. Close the lid and preheat the grill until the thermometer reaches
500°F to 550°F. This will take about 10 minutes. To grill, adjust burner controls as the recipe directs.
Grilling temperatures: At the top of each recipe, we indicate the requisite cooking method (direct or indirect) and temperature level (high, medium, or low). Note that a grill set up for indirect cooking can accommodate both methods (just move the food directly over the fire for direct cooking). Where searing is particularly important to the texture or flavor, we note that as well (e.g., Sear: High, Cook: Indirect Medium).
Keep the lid down! Without a doubt, the most important grilling rule. Lifting the lid allows heat to escape, increasing your grilling time. A closed lid also reduces the chance of flare-ups (and closing the lid extinguishes them quickly). Open the grill only to turn foods as indicated in the recipes. More poking and flipping won't make it taste better, trust us.
GRILLING & FOOD SAFETY
» Trim excess fat from steaks, chops and roasts, leaving no more than a scant 1/4 inch of fat. Less fat is a virtual guarantee against unwanted flare-ups.
» If an unwanted flare-up should occur, turn all burners to OFF and move food to another area of the cooking grate. Any flames will quickly subside. After flames
subside, relight the grill. NEVER USE WATER TO EXTINGUISH FLAMES ON A GAS GRILL.
» Do not line the funnel-shaped bottom tray with foil. This could prevent the grease from flowing into the grease catch pan.
» Make sure the bottom tray and grease catch pan are always clean and free from debris.
» Grills radiate a lot of heat, so always keep the grill at least 2 feet from any combustible materials, including the house, garage, deck rails, etc. Never use a grill indoors or under a covered patio.
» When you're finished grilling, turn off the burners and the LP tank or source.
» Wash hands thoroughly with hot, soapy water before starting any meal preparation and after handling fresh meat, fish, and poultry.
» Defrost meat, fish, and poultry only in the refrigerator, never at room temperature.
» Never spray or brush oil on a hot cooking grate. Oil the food instead.
» Never place cooked food on the same platter that the raw food was placed on.
» Vigorously boil marinades that were used for raw meats, fish, or poultry for 10 seconds before using as a baste or sauce.
GRILLING METHODS
The most important thing to know about grilling is which cooking method to use for a specific food, direct or indirect. The difference is simple: place the food directly over the heat, or arrange the heat on either side of it. Using the right method is the shortest route to great results—and the best way to ensure doneness safety.
Direct Method
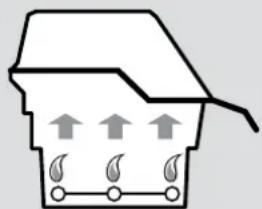
natural_image
Simple line drawing of a roof structure with upward arrows and flame symbols at base (no text or labels)Indirect Method
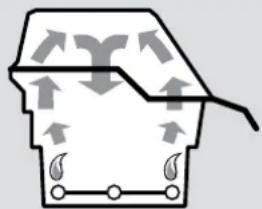
natural_image
Simple line drawing of a house with arrows indicating flow or movement, no text or symbols present.Direct Method
The direct method, similar to broiling, means the food is grilled directly over the heat source. For even grilling, food should be turned once.
The direct method is best for relatively small, tender pieces of food that cook quickly, such as hamburgers, steaks, chops, boneless chicken pieces, fish fillets, shellfish, and sliced vegetables. Direct grilling is also necessary to sear meats. Searing creates that wonderful crisp, caramelized texture where the food hits the grate. It also adds great color and flavor to the entire surface. Steaks, chops, chicken breasts, and larger cuts of meat all benefit from searing.
To sear meats, place them over direct high heat for 2 to 5 minutes per side. Smaller pieces require less searing time. Usually after searing you finish grilling the food at a lower temperature. You can finish grilling fast-cooking foods by the direct method; use the indirect method for longer-cooking foods.
To set up your gas grill for direct grilling, preheat the grill with all burners on high. Place food on the cooking grate, then adjust all burners to the temperature noted in the recipe. Close the lid of the grill and lift it only to turn food or to test for doneness at the end of the recommended cooking time.
Indirect Method
The indirect method is similar to roasting, but with the added benefits of that grilled texture, flavor, and appearance you can't get from an oven. To set up your gas grill for indirect cooking, burners are lit on either side of the food but not directly beneath it. Heat rises, reflects off the lid and inside surfaces of the grill, and circulates to slowly cook the food evenly on all sides, much like a convection oven, so there's no need to turn the food.
The indirect method is best for larger, tougher foods that require longer cooking times, such as roasts, whole chickens, and ribs.
To set up your gas grill for indirect grilling, preheat the grill with all burners on high. Then adjust the burners on each side of the food to the temperature noted in the recipe and turn off the burner(s) directly below the food. For best results, place roasts, poultry, or large cuts of meat on a roasting rack set inside a disposable heavy-gauge foil pan.
For longer cooking times, add water to the drip pan to keep drippings from burning.
The drippings can be used to make gravies or sauces.

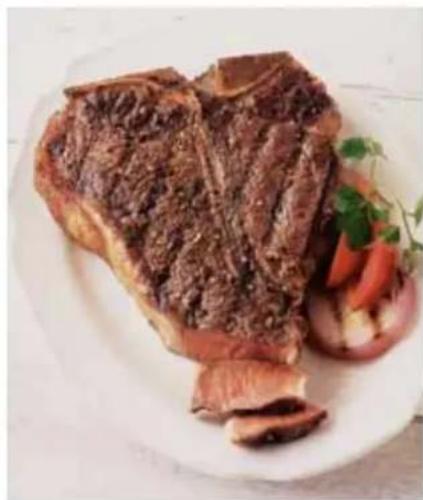
natural_image
Plate of raw steak with garnish, including tomato and onion (no text or symbols visible)Three-Pepper Steak
THREE-PEPPER STEAK
Sear: High, Cook: Indirect High
6 steaks, about 1-1/2" thick
2 teaspoons black peppercorns
2 teaspoons white peppercorns
2 teaspoons Szechwan peppercorns
1/8 teaspoon ground allspice
Trim excess fat from steaks and discard fat. Coarsely crush peppercorns; mix peppercorns and allspice. Rub peppercorn mixture onto both sides of steaks. Refrigerate steaks, covered, 1 to 2 hours. Allow the meat to stand at room temperature for 20 to 30 minutes before grilling. Sear steaks over direct high heat for 4 minutes, turning once. Continue grilling over indirect medium heat for 6 to 8 minutes for medium-rare doneness. Remove from the grill and let rest for 3 to 5 minutes. Serve warm.
Makes 6 servings.
MARINATED FLANK STEAK
Direct Medium-High
For the marinade:
1/2 cup olive oil
1/3 cup soy sauce
1/4 cup red wine vinegar
2 tablespoons lemon juice
1 tablespoon Worcestershire sauce
1 teaspoon dry mustard
1 clove garlic, minced
1/4 teaspoon freshly ground black pepper
1 flank steak, about 1-1/2 pounds and 3/4" thick
To make the marinade: Combine marinade ingredients in a shallow, non-metal container. Place steak in marinade turning to coat completely. Marinate covered in the refrigerator for at least 4 hours or overnight.
Remove steak from marinade and discard the marinade. Allow the steak to stand at room temperature for 20 to 30 minutes before grilling. Grill over direct medium-high heat until medium rare, 8 to 10 minutes, turning once. Remove from the grill and let rest for 3 to 5 minutes. Cut steak diagonally across the grain into thin slices before serving.
Makes 4 servings.

SAVORY HERBED STEAK
Sear: High, Cook: Indirect High
4 steaks, about 1-1/2" thick
Extra-virgin olive oil
1-1/2 teaspoons dried basil leaves
1 teaspoon dried tarragon leaves
1 teaspoon dried chives
4 cloves garlic, minced
Trim excess fat from steaks and discard fat. Brush or spray steaks on both sides with oil. Combine herbs and garlic; mash with fork to form a paste. Rub herb mixture onto both sides of steaks. Refrigerate steaks, covered, 1 to 2 hours. Allow the meat to stand at room temperature for 20 to 30 minutes before grilling. Sear steaks over direct high heat for 4 minutes, turning once. Continue grilling over indirect medium heat for 6 to 8 minutes for medium-rare doneness. Remove from the grill and let rest for 3 to 5 minutes. Serve warm.
Makes 4 servings.

BABY BACK RIBS WITH SPICED APPLE-CIDER MOP
Indirect Low
from Weber's Big Book of Grilling™
For the mop:
2 cups apple cider
1/4 cup minced shallots
1 tablespoon minced jalapeño pepper, seeds removed
1/4 cup ketchup
2 tablespoons white wine vinegar
2 tablespoons tomato paste
1 tablespoon dark brown sugar
1/4 teaspoon kosher salt
1/4 teaspoon freshly ground black pepper
2 to 3 slabs baby back pork ribs, about 4 pounds
Kosher salt
Freshly ground black pepper
To make the mop: In a small saucepan combine the apple cider, shallots, and jalapeño. Bring to a boil and cook over medium-high heat until about 1 cup of the liquid remains, 15 to 20 minutes. Add the remaining mop ingredients, bring to a boil, and remove from the heat. (The mop may be made ahead and refrigerated until ready to use.)
Allow the ribs to stand at room temperature for 20 to 30 minutes before grilling. Season with salt and pepper. Grill, rib side down, over indirect low heat until the meat is very
natural_image
Close-up of a braised pork belly with glossy sauce, garnished with corn and lettuce (no text or symbols visible)Baby Back Ribs with Spiced Apple-Cider Mop
tender and has pulled back from the ends of the bones, 1-1/2 to 2 hours. Baste the ribs frequently with the mop throughout grilling time, but stop basting during the last 10 minutes. Remove from the grill and allow to rest for 5 to 10 minutes before slicing into individual ribs. Serve warm.
Makes 4 servings.


natural_image
Plate of skewers with sliced meat and red chili peppers, served on a white rice dish (no text or symbols visible)Spicy Lamb Kabobs
SPICY LAMB KABOBS
Direct Medium
For the marinade:
1/2 cup olive oil
1/4 cup red wine vinegar
1 tablespoon lemon juice
2 tablespoons grated orange rind
1 green onion and top, chopped
1/4 teaspoon ground cinnamon
1/8 teaspoon ground cloves
2 pounds lean lamb, cut into 1-1/2" cubes
To make the marinade: Combine the marinade ingredients in a shallow, glass baking dish or plastic bag. Add the lamb. Refrigerate, covered, 4 to 6 hours. Drain lamb; reserve marinade. Pour reserved marinade into a small sauce pan. Bring to a boil over high heat and boil for 10 seconds.
Arrange lamb on 4 to 6 skewers. Grill lamb over direct medium heat to medium doneness, about 10 minutes, turning and basting with the reserved marinade once. Serve warm.
Makes 4 to 6 servings.
LEG OF LAMB
Indirect Medium
1 leg of lamb, boned, rolled and tied, 5 to 6 pounds
2 cloves garlic, cut into 8 slivers Olive oil
1 tablespoon grated lemon peel 3/4 teaspoon salt
1 teaspoon dried rosemary leaves
1/4 teaspoon freshly ground black pepper
Using a small pointed knife make 8 small slits in surface of leg of lamb. Insert a sliver of garlic into each slit. Brush roast with oil. Sprinkle lemon peel, salt, rosemary, and pepper over top. Grill over indirect medium heat, about 2-1/2 hours, for medium doneness 160°F (71°C). Remove from the grill and let rest for 5 to 10 minutes. Remove the twine. Cut the lamb crosswise into 1/4-inch slices and serve warm.
Makes 10 to 12 servings.

RACK OF LAMB
Sear: Medium, Cook: Indirect Medium
1 cup fresh bread crumbs
1/4 cup snipped parsley
1/2 teaspoon salt
1/4 teaspoon freshly ground black pepper
2 racks of lamb, 1 to 1-1/2 pounds each
2 tablespoons Dijon mustard
2 tablespoons melted butter
1 clove garlic, crushed
In a small bowl combine the bread crumbs, parsley, salt, and pepper.
Allow the lamb to stand at room temperature 20 to 30 minutes before grilling. Sear lamb racks, fat side down, over direct medium heat for 5 minutes. Remove from grill. Spread 1 tablespoon of the mustard over each lamb rack. Sprinkle the bread crumb mixture evenly over the lamb racks. Combine melted butter and garlic and drizzle on top. Continue grilling over indirect medium until medium rare, 145°F (63°C), about 20 minutes. Remove from the grill and let rest for 5 minutes before cutting into chops. Serve warm.
Makes 4 servings.
PECAN-STUFFED PORK CHOPS
Sear: Direct High, Cook: Indirect Medium
For the stuffing:
1/2 cup coarsely chopped pecans
1/4 cup sliced green onions and tops
1/4 cup chopped green pepper
3 tablespoons butter
1/4 teaspoon dried rosemary leaves
1/8 teaspoon white pepper
2 cups cubed stale whole wheat bread (1/2" cubes)
1/3-1/2 cup chicken broth
6 pork loin chops with pockets for stuffing, 1-1/2" thick
To make the stuffing: In a small frying pan, sauté pecans, onions and green pepper in butter until onions are tender; stir in rosemary and pepper and sauté 1 minute longer. Combine pecan mixture and bread cubes in medium bowl; toss with enough chicken broth just to moisten.
Spoon stuffing into pockets of pork chops and secure edges with wooden picks. Allow chops to stand at room temperature for about 20 minutes before grilling. Sear chops over direct high heat for 6 minutes, turning once. Continue grilling over indirect medium heat until no longer pink in the center, 12 minutes turning once. Remove from the grill and let rest for 3 to 5 minutes.
natural_image
Plated dish of Here-Corned Rhode Island marces with garnish and knife (no text or symbols visible)Rack of Lamb
Remove wooden picks before serving.
Makes 6 servings.


natural_image
Two roasted chicken pieces on a wooden cutting board, one with a saw and the other with a wooden stick (no text or symbols visible)Ricotta Chicken
RICOTTA CHICKEN
Indirect Medium
1 whole chicken, 4 to 5 pounds
12 ounces ricotta cheese
1/3 cup grated Parmesan cheese
1 egg
1-1/4 teaspoon dried basil leaves, divided
3/4 teaspoon dried tarragon leaves, divided
2 tablespoons minced parsley
1 large clove garlic, minced Olive oil
1/4 teaspoon paprika
With poultry shears, cut along both sides of backbone the entire length of chicken. Remove whole backbone and tail. Skewer neck skin to back. Twist wing tips under back.
- Place chicken, skin side up, on counter; press down on chicken with palms of hands to "pop" bones so that chicken will lie flat.
- Using a sharp paring knife and your fingers, loosen skin over top of chicken and drumsticks starting at neck edge. Be careful not to tear or cut the skin. Mix ricotta, Parmesan cheese, egg, 1 teaspoon of the basil, 1/2 teaspoon of the tarragon, parsley, and garlic. 3. Carefully spoon cheese mixture under skin of chicken, pressing with your fingers to distribute evenly over the chicken and drumsticks. Brush chicken lightly with oil; sprinkle with the remaining 1/4 teaspoon basil, 1/4 teaspoon tarragon, and the paprika.
Place chicken, skin side up, on cooking grate. Grill over indirect medium heat until chicken legs move easily and skin is well browned, 1-1/4 to 1-1/2 hours. Transfer chicken to a cutting board; rest for 10 minutes. Cut into quarters, cutting lengthwise and crosswise. Reassemble chicken on serving platter.
Makes 4 servings.
1
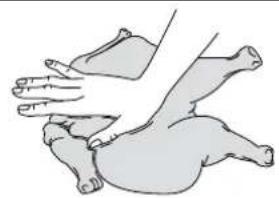
natural_image
Illustration of a person performing a seated leg lift exercise (no text or symbols)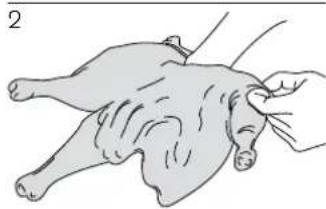
natural_image
Illustration of a person performing a medical or therapeutic procedure on another person (no text or symbols present)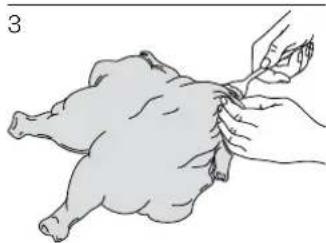
natural_image
Illustration of a hand holding a chicken being held, no text or symbols presentCHICKEN FAJITAS
Direct Medium
For the marinade:
1/4 cup olive oil
3 tablespoons fresh lime juice
2 tablespoons red wine vinegar
2 tablespoons finely chopped onion
1 clove garlic, minced
1/2 teaspoon sugar
1/2 teaspoon dried oregano leaves
1/4 teaspoon salt
1/4 teaspoon freshly ground black pepper
1/8 teaspoon ground cumin
6 boneless,
skinless chicken breast halves, about 6 ounces each
1 red onion, cut into 1/2" slices
4 plum tomatoes, cut into 1/2" slices
1 red or yellow bell pepper, stem and seeds removed and cut into quarters
6 large flour tortillas
1 avocado, sliced Salsa
To make the marinade: In a shallow, non-metal container combine the marinade ingredients. Add chicken to the marinade, turning to coat each side. Cover and refrigerate for 4 hours, turning occasionally. Remove chicken breasts from the marinade and discard the marinade. Grill the chicken breasts, onion slices, tomato slices, and bell pepper quarters over direct medium heat until the meat is no longer pink and the vegetables are tender, turning once. The chicken and onion will take 8 to 12 minutes and the tomato and bell pepper will take 6 to 8 minutes. Wrap tortillas in foil and place on cooking grate. Heat for about 1 minute. Cut the bell pepper into strips and slice the chicken. Place chicken, onion, tomatoes, bell pepper and avocado in warm tortillas and roll up to eat. Serve with salsa.
Makes 6 servings.

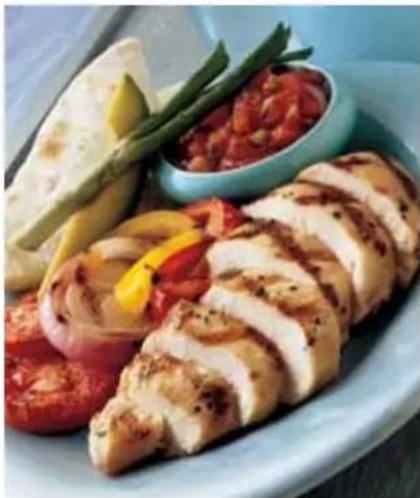
natural_image
Plated dish of grilled chicken with tomato, onion, and chili garnish (no text or symbols visible)Chicken Fajitas

Weber Tip
If a sauce will be brushed on meat during grilling, divide the sauce, using one part for brushing and the other for serving at the table. Vigorously boil marinades that were used for raw meats, fish, or poultry for 10 seconds before using as a baste or sauce.


natural_image
Close-up of a plated dish featuring sliced meat with garnishes and herbs, served on a green plate (no text or symbols visible)Sea Bass with Roasted Pepper Vinaigrette
SEA BASS WITH ROASTED PEPPER VINAIGRETTE
Direct High
from www.weber.com
For the vinaigrette:
3 bell peppers, preferably red, yellow, and orange
3 tablespoons extra-virgin olive oil
2 tablespoons fresh orange juice
2 tablespoons finely chopped Italian parsley
1 tablespoon fresh lemon juice
1/2 teaspoon minced garlic
1/2 teaspoon ground cumin
1/4 teaspoon kosher salt
1/4 teaspoon freshly ground black pepper
1/4 teaspoon Tabasco sauce
4 skinless sea bass fillets, about 6 ounces each and 1 inch thick
Extra-virgin olive oil
Kosher salt
Freshly ground black pepper
To make the vinaigrette: Grill the bell peppers over direct high heat until the skins are evenly charred on all sides, 10 to 12 minutes, turning every 3 to 4 minutes. Remove from the grill and place in a paper bag; close tightly. Let stand 10 to 15 minutes to steam off the skins. Remove the peppers from the bag and peel away the charred skins. Cut off the lops and remove the seeds. Cut the
peppers into 1/4-inch strips and set aside. In a medium bowl, whisk together the remaining vinaigrette ingredients. Add the peppers and set aside for as long as 1 day.
Lightly brush or spray the fish fillets with olive oil. Season them with salt and pepper to taste. Grill over direct high heat until the flesh is opaque in the center, 5 to 7 minutes, turning once. Remove from the grill and serve warm with the roasted pepper vinaigrette spooned over the top.
Makes 4 servings.

SHRIMP KABOBS WITH CURRY BUTTER
Direct High
For the curry butter:
1/2 cup butter
2 tablespoons finely chopped onion
1 teaspoon snipped fresh dill
1 to 1-1/2 teaspoons curry powder Dash garlic powder
16 to 20 jumbo shrimp
(1-1/2 to 2 pounds),
peeled and deveined
Olive oil
Lime or lemon wedges
Fresh dill or parsley sprigs
To make the curry butter: Melt the butter in a small pan over medium-high heat. Stir in onion, dill, curry powder, and garlic powder; cook 5 minutes.
Thread shrimp on skewers, leaving space between pieces. Lightly brush or spray the shrimp with olive oil. Grill over direct high heat until the shrimp turn pink and are tender, 2 to 5 minutes, turning and brushing with the curry butter once. Arrange shrimp on serving plate. Garnish with lime wedges and dill.
Makes 4 servings.

SALMON STEAK KYOTO
Direct High
For the marinade:
1/3 cup soy sauce
1/4 cup orange juice concentrate
2 tablespoons olive oil
2 tablespoons tomato sauce
1 teaspoon lemon juice
1/2 teaspoon prepared mustard
1 tablespoon spring onion and top, minced
1 clove garlic, minced
1/2 teaspoon minced ginger root
4 salmon steaks, about 1" thick Olive oil
To make the marinade: In a shallow, glass baking dish, combine the marinade ingredients. Add the salmon and turn to coat each side. Cover and refrigerate 30 to 60 minutes. Remove the salmon and reserve the marinade. Pour the reserved marinade into a small saucepan. Bring to a boil over high heat and boil for 10 seconds.
Lightly brush or spray the steaks all over with the oil. Grill over direct high heat until cooked to desired doneness, 6 to 8 minutes
natural_image
Plated dish of grilled fish with asparagus and garnish (no text or symbols visible)Salmon Steak Kyoto
for medium-rare, turning once (make sure you leave the salmon grilling long enough on the first side so that it releases from the grate and is easy to turn). Serve warm.
Makes 4 servings.


natural_image
Close-up of a tomato topped with shredded vegetables and herbs, presented on a wooden post (no text or symbols visible)Roasted Tomatoes Stuffed with Ratatouille
ROASTED TOMATOES STUFFED WITH RATATOUILLE
Direct Medium
from www.weber.com
4 large, ripe tomatoes
Kosher salt
For the stuffing:
1 medium red onion, cut crosswise into 1/3-inch slices
1 medium red bell pepper, stem and seeds removed, cut into flat pieces
1 medium zucchini, cut lengthwise in 1/3-inch slices
Extra-virgin olive oil
Freshly ground black pepper
2/3 cup grated mozzarella cheese
1 tablespoon finely chopped fresh basil
1 teaspoon balsamic vinegar
Cut a 1/2-inch slice off the top of each tomato. Discard the tops. With a small knife cut around the inside of the fleshy part of the tomato (do not cut through the bottom of the tomato) to within 1/2 inch of the skin. With a teaspoon, scoop out the tomato flesh, leaving about 1/2 inch of flesh attached to the skin. Discard the juice and seeds to make room for the stuffing. Lightly salt the inside of the tomatoes and turn them, cut side down, on a plate lined with paper towels while you prepare the stuffing.
To make the stuffing: Lightly brush or spray the onion, pepper, and zucchini with olive oil. Season with salt and pepper to taste. Grill over direct medium heat until tender, turning once. The onions will take 8 to 10 minutes. The peppers and zucchini will take 6 to 8 minutes. Transfer to a cutting board and cut into 1/3-inch pieces. In a medium bowl, combine the grilled vegetables with the cheese, basil, and vinegar.
Spoon the vegetable stuffing into the tomatoes. Grill the tomatoes over indirect medium heat until the cheese is melted and the vegetables are warm, 8 to 12 minutes. Serve immediately.
Makes 4 servings.

GRILLED STUFFED POTATOES
Indirect Medium
3 large baking potatoes
3 tablespoons softened butter or margarine
2 egg yolks
1/2 cup sour cream
1 tablespoon snipped chives
3/4 teaspoon salt
2 tablespoons grated sharp cheddar cheese
1/4 cup broccoli flowerets
Wash and dry potatoes. Prick potatoes with fork. Grill over indirect medium heat until done, about 1 hour. Halve potatoes lengthwise. Carefully scoop out pulp, reserving 6 shells. Mash potatoes with butter while still hot. Blend egg yolks and sour cream; mix with potatoes, chives and salt. Mound mixture into reserved shells.
Grill stuffed shells over indirect medium heat until potatoes are heated through, about 10 minutes. Top each potato with cheese and continue to grill until cheese has melted. Garnish top with cooked broccoli flowerets before serving.
Makes 6 servings.
PARADISE GRILLED
Indirect Medium from Weber's Big Book of Grilling™
For the glaze:
3/4 cup fresh orange juice
1 tablespoon honey
1 tablespoon fresh lime juice
2 teaspoons cornstarch
4 slices fresh pineapple, about 1/2 inch thick each
1 teaspoon cracked dried green peppercorns or cracked black peppercorns
4 scoops vanilla ice cream
To make the glaze: In a small saucepan combine the glaze ingredients and whisk until smooth. Bring to a boil over medium-high heat and cook until thickened, 1 to 2 minutes. Keep the glaze warm or reheat when ready to serve.
Season both sides of the pineapple slices with the peppercorns. Grill over indirect medium heat until well marked, 6 to 8 minutes, turning once. Serve each pineapple slice with a scoop of ice cream and some of the glaze drizzled over the top.
Makes 4 servings.
natural_image
Close-up of a golden-brown fried dessert with whipped cream and mint garnish, served on a green plate (no text or symbols visible)Paradise Grilled

GRILLING GUIDE
The following cuts, thicknesses, weights, and grilling times are meant to be guidelines rather than hard and fast rules. Cooking times are affected by such factors as altitude, wind, outside temperature, and desired doneness. Two rules of thumb: Grill steaks, fish fillets, boneless chicken pieces, and vegetables
using the direct method for the time given on the chart or to the desired doneness, turning once. Grill roasts, whole poultry, bone-in poultry pieces, whole fish, and thicker cuts using the indirect method for the time given on the chart or until an instant-read thermometer reaches the desired internal
temperature. Cooking times for beef are for the USDA's definition of medium-rare doneness unless otherwise noted. Let roasts, larger cuts of meat, and thick chops and steaks rest for 5 to 10 minutes before carving. The internal temperature of the meat will rise by 5 to 10 degrees during this time.
| Beef | ing Time |
| Steak: New York, porterhouse, 3/4 inch thick 4 to 6 minutes direct high rib-eye, T-bone, or tenderloin | |
| 1 inch thick 5 to 8 minutes; sear 4 to 6 minutes direct high, grill 1 to 2 minutes indirect high | |
| 1-1/2 inches thick 10 to 14 minutes; sear 6 to 8 minutes direct high, grill 4 to 6 minutes indirect high | |
| Flank steak 1-1/2 to 2 pounds, 8 to 10 minutes direct high 3/4 inch thick | |
| Ground beef patty 3/4 inch thick 8 to 10 minutes direct high | |
| Pork | Thickness/Weight Approximate Grilling Time | |
| Chop, boneless or bone-in: | 3/4 inch thick 6 to 8 minutes direct high | |
| 1 inch thick 8 to 10 minutes direct medium | ||
| Ribs, baby back | 1-1/2 to 2 pounds 3 to 4 hours indirect low | |
| Ribs, spareribs | 2-1/2 to 3-1/2 pounds | 3 to 4 hours indirect low |
| Ribs, country-style, bone-in | 3 to 4 pounds | 1-1/2 to 2 hours indirect medium |
| Poultry | Drilling Time | |
| Chicken breast, boneless, skinless 6 to 8 ounces 8 to 12 minutes direct medium | ||
| Chicken thigh, boneless, skinless 4 ounces 8 to 10 minutes direct high | ||
| Chicken breast, bone-in 10 to 12 ounces 30 to 40 minutes indirect medium | ||
| Chicken pieces, bone-in leg/thigh 30 to 40 minutes indirect medium | ||
| Chicken wing 2 to 3 ounces 18 to 20 minutes direct medium | ||
| Chicken, whole 3-1/2 to 4-1/2 pounds | 1 to 1-1/2 hours indirect medium | |
| Cornish game hen | 1-1/2 to 2 pounds | 50 to 60 minutes indirect high |
| Turkey, whole, unstuffed | 10 to 12 pounds | 2-1/2 to 3-1/2 hours indirect low |
| 13 to 15 pounds | 3-1/2 to 4-1/2 hours indirect low | |
| Fish & Seafood | Thickness/Weight Approximate Grilling Time | |
| Fish, fillet or steak | 1/4 to 1/2 inch thick | 3 to 5 minutes direct high |
| 1 to 1-1/4 inches thick | 10 to 12 minutes direct high | |
| Fish, whole | 1 pound | 15 to 20 minutes indirect medium |
| 3 pounds | 30 to 45 minutes indirect medium | |
| Note: General rule for grilling fish: 4 to 5 minutes per 1/2 inch thickness; 8 to 10 minutes per 1 inch thickness. | ||
| Vegetables | Approximate Grilling Time |
| Asparagus 1/2 inch diameter | 6 to 8 minutes direct medium |
| Corn, in husk / husked | 25 to 30 minutes direct medium / 10 to 15 minutes direct medium |
| Mushroom, shiitake or button / portabello | 8 to 10 minutes direct medium / 10 to 15 minutes direct medium |
| Onion, halved / 1/2-inch slices | 35 to 40 minutes indirect medium / 8 to 12 minutes direct medium |
| Potato, whole / 1/2-inch slices | 45 to 60 minutes indirect medium / 14 to 16 minutes direct medium |
CONTIENTS
natural_image
Simple line drawing of a roof structure with upward arrows and flame symbols at the base (no text or labels)natural_image
Simple line drawing of a house with arrows indicating flow or movement, no text or symbols presentnatural_image
Plate of raw steak with garnish, including tomato and onion (no text or symbols visible)Biftecks Aux Trois Poivres
BIFTECKS AUX TROIS POIVRES
natural_image
Close-up of a braised pork belly with glossy sauce, garnished with corn and lettuce (no text or symbols visible)natural_image
Plate of grilled meat skewers with chili peppers and rice, garnished with herbs (no text or symbols visible)natural_image
Plated dish of Here's-Romaf-Oal Rhode Island with garnish and knife (no text or symbols visible)
Carré D'agneau
natural_image
Two cooked poultry pieces on a wooden cutting board, one with a cleaver (no text or symbols visible)Poulet Au Fromage Ricotta
POULET AU FROMAGE RICOTTA
Indirecte Moyenne
natural_image
Illustration of a person performing a physical maneuver or massage technique (no text or symbols present)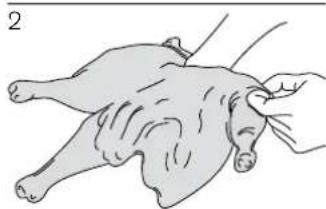
natural_image
Illustration of a hand holding a chicken being held, no text or symbols present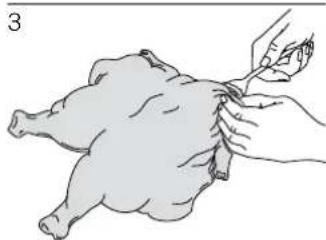
natural_image
Illustration of a hand holding a chicken being handled with a tool (no text or symbols present)FAJITAS AU POULET
Directe Moyenne
Marinade:
natural_image
Plated dish of grilled chicken with tomato, onion, and chili garnish (no text or symbols visible)Fajitas Au Poulet

Conseil Weber
natural_image
Close-up of a plated dish featuring sliced meat with garnishes and herbs (no visible text or symbols)natural_image
Plated dish of grilled fish with asparagus and garnish (no text or symbols visible)Darne De Saumon Kyoto
natural_image
Close-up of a tomato topped with shredded vegetables and herbs, presented on a wooden post (no text or symbols visible)natural_image
Close-up of a golden-brown dessert with whipped cream and mint garnish, served on a green plate (no text or symbols visible)Paradis Griller

GUIDE DE CUISSON AU BARBECUE
natural_image
Simple line drawing of a roof structure with upward arrows and flame symbols at the base (no text or labels)Método Indirecto
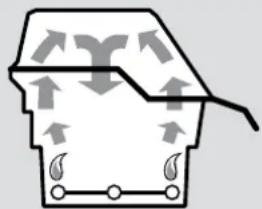
natural_image
Simple line drawing of a house with arrows indicating flow or movement, no text or symbols presentnatural_image
Plate of raw steak with garnish, including tomato and onion (no text or symbols visible)natural_image
Close-up of a braised pork belly with glossy sauce, served on a plate with corn and lettuce in the background (no text or symbols visible)Costillas Dorsales Con Salsa Picante De Sidra
natural_image
Plate of grilled meat skewers with chili peppers and rice, garnished with herbs (no text or symbols visible)natural_image
Plated dish of raw bacon and Hereford's Best-case meat cut with garnish, served on a white plate (no text or symbols visible)Costillar De Cordero
natural_image
Two cooked poultry pieces on a wooden cutting board, one with a saw and the other with a wooden stick (no text or symbols visible)Pollo Al Queso Ricotta
POLLO AL QUESO RICOTTA
natural_image
Illustration of two hands performing a physical maneuver on a person lying down (no text or symbols)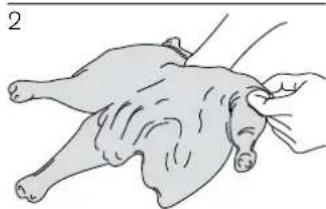
natural_image
Illustration of a person performing a medical procedure on a chicken (no text or symbols present)
natural_image
Illustration of a hand holding a chicken being handled, no text or symbols presentFAJITAS DE POLLO
natural_image
Plated dish of grilled chicken with tomato, onion, and chili garnish (no text or symbols visible)Fajitas De Pollo

Consejo Weber
natural_image
Close-up of a plated dish featuring sliced meat with garnishes and herbs (no visible text or symbols)natural_image
Steamed fish fillet garnished with asparagus and parsley on a white plate (no text or symbols visible)natural_image
Close-up of a tomato topped with shredded vegetables and herbs, presented on a wooden post (no text or symbols visible)Tomates Rellenos Asados Con Ratatouille
TOMATES RELLENOS ASADOS CON RATATOUILLE
Directo Calor Medio de www.weber.com®
4 tomates rojos grandes sal
Para el relleno:
natural_image
Close-up of a golden-brown fried dessert with whipped cream and mint garnish, served on a green plate (no text or symbols visible)Paraíso A La Parrilla

©2011 Weber-Stephen Products LLC, Weber, the kettle silhouette and the kettle configuration are registered trademarks of Weber-Stephen Products LLC, 200 East Daniels Road, Palatine, Illinois 60067 USA. 10750 01/11