
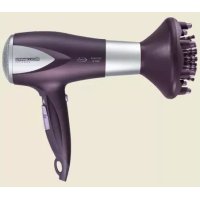
CV8050 - Hair dryer ROWENTA - Free user manual and instructions
Find the device manual for free CV8050 ROWENTA in PDF.

| Product type | Hair dryer |
| Brand | Rowenta |
| Model | CV8050 |
| Power supply | 220-240 V ~ 50/60 Hz |
| Vital function | Automatic temperature of 59°C and air speed of 15 m/s for protective drying |
| Available settings | 6 temperature/air speed combinations |
| Ionic system | Emits negative ions to eliminate static electricity and facilitate detangling |
| Cold air button | Yes, to set the hairstyle |
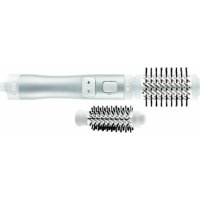
| Included accessories | Concentrator, movable finger diffuser, styling diffuser |
| Accessory attachment | Bayonet (turn to attach/remove) |
| Rear grille | Removable for cleaning |
| Thermal safety | Automatic shutdown in case of overheating (e.g., blocked grille) |
| Maintenance | Clean with a slightly damp cloth; remove the grille to remove hair |
| Use | Household use only |
| Warranty | See conditions in the manual |
Frequently Asked Questions - CV8050 ROWENTA
User questions about CV8050 ROWENTA
0 question about this device. Answer the ones you know or ask your own.
Ask a new question about this device
Download the instructions for your Hair dryer in PDF format for free! Find your manual CV8050 - ROWENTA and take your electronic device back in hand. On this page are published all the documents necessary for the use of your device. CV8050 by ROWENTA.
USER MANUAL CV8050 ROWENTA
G - "Ionic"-Schalter
D-Schieber fur
Please read the safety instructions before use.

A - Concentrator
F - Position indicator
B - Cold air shot
G - "Ionic" Button
C - "Vital" switch
H - Removable grid
D - Temperature control
I-Hanging loop
E - Fan power control
2 - SAFETY
- Ensure that the voltage of your electrical installation corresponds to that of your appliance. Incorrect connection may cause irreversible damage which will not be covered by the guarantee.
-
Don't use your appliance and contact a service Centre if:
-
your appliance is dropped
- if it doesn't work normally
- Never use the dryer with wet hands or near water in a bath, washbasin or any other recipient.
- If the hair dryer is used in a bathroom, disconnect after use since water can present a danger even when the hair dryer is not being used.
-
The dryer must be disconnected:
-
before cleaning and maintenance.
- in the event of a malfunction
- as soon as you have finished using it
- if you have to leave it unattended, even for a few moments.
To ensure additional protection, we recommend that you have a differential residual circuit breaker installed, with an operating differential of no more than 30mA . Contact your installer for advice.
- If the power cable is damaged, it must be replaced by the manufacturer, its after-sales service or a person with similar qualifications to avoid any danger.
- Your appliance can only be repaired using special tools.
- The dryer is equipped with a heat-sensitive safety device. In the event of overheating (for example if the rear grill is blocked), the dryer will stop automatically: contact the After-Sales Service.
GUARANTEE
This appliance has been designed for a domestic use only. It can not be used in any professional application.
The guarantee becomes null and void in case of incorrect use.

3 - USE

This hairdryer gives you professional results while maintaining the vitality of your hair:
- "Vital" Function: the central slide automatically programmes a temperature of 59^ combined with an air speed of 15m / s . This ideal combination allows rapid drying while preventing the appearance of cracks and ensuring that the scales on the hair's surface remain smooth.
- What's more, you have a large choice of temperatures and air speeds for drying and styling that are perfectly adapted to your needs.
- "IONIC" system: press the "IONIC" button and your hair dryer will automatically disperse negative ions which eliminate static electricity, add shine to your hair and make it easier to manage.
1) "VITAL" SETTING (figure n° 2):
- Switch on the appliance (speed control in position 1)
- Slide the central switch C to the upper position:
-
the pictogram is displayed in the window and you have selected the automatic position: the temperature of 59^ is moderate so as to protect your hair, and the air speed of 15m / s is fast for effective drying.
-
the side slides (temperature, speed) are not operational.
2) SEPARATE SPEED AND TEMPERATURE SETTINGS (FIGURE N°3):
When the central slide C is in the lower position, you have a choice of 6 temperature / air speed settings for your hairdryer:
-For drying:
Hair is at its most vulnerable when it is wet.
A gentle temperature is advisable:
- Ultra-gentle drying
Drying for normal hair
A strong blast of air is recommended (speed 2).
-For styling:
On hair that is already dry, it is possible to use a higher heat setting (temperature ) for easier styling and hold. Pressing the Cold air button every so often helps to fix your style.
An average blast of air is recommended so as not to ruin your hairstyle (speed 1).
3)“IONIC” SETTING (figure n° 4):
- Push the "IONIC" slide found on the top of the hair dryer forward: the light comes on, indicating that the ionic function is activated. The static electricity of your hair is reduced.
- To deactivate the ionic setting, carry out the same procedure in reverse
4 - ACCESSORIES:

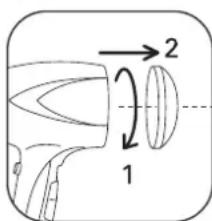
CAUTION: BAYONET FITTING: ROTATE THE ACCESSORIES TO ATTACH OR REMOVE FROM THE HAIRDRYER.
Concentrator: (A)
To blow dry or to dry a specific area of hair, use the concentrator nozzle, which will direct the hot air flow onto the required spot.
"Moving Massager" diffuser (drawing n^5 )
- To add volume to your hair, without damaging it, use the mobile finger diffuser. The round-tipped fingers gently grasp your hair at the roots and lift it. The massaging action provides bouncy, long-lasting volume from the very root of your hair (7/8).
- Use your diffuser after shampooing and thoroughly towel-drying your hair.
- On shoulder-length or long hair, it is preferable to pre-dry lengths and tips.
- Short and shoulder-length hair provides the best results. "Classic Volume" diffuser (drawing n°6)
- Curled effect (naturally curly or permed hair), (drawing n^9 )
Hold your head down and pass the diffuser through the lengths and tips.
- Natural volume effect (short or shoulder-length hair) (drawing n^10 )
Apply the diffuser to the root and make circular movements.
5 - CLEANING:
CAUTION: always unplug your appliance before cleaning.
- Your hair dryer requires very little attention. You can clean it, together with its accessories, using a slightly damp cloth to remove hair or impurities trapped in the rear grid.
- Never clean your appliance with alcohol.
- Never immerse your appliance or its
accessories in water.
- Carefully dry all parts you have just cleaned.
6 - PROTECTION OF THE ENVIRONMENT
At the end of the life of your product, it should go to a specially-adapted waste recycling centre.


7 - TROUBLESHOOTING
- Your appliance does not work in the VITAL position: check that the air speed control is not at 0.
- Your hairdryer stops automatically: check that the rear grille is not blocked with hair; if this is the case, take off the removable rear grille and remove the hair.
WIRING INSTRUCTIONS - FOR U.K. ONLY.SAFETY NOTES - FOR REWIREABLE OR MOULDED PLUG
The mains lead of this appliance may be already fitted with a BS 1363 13 A plug. Should the fuse need to be replaced, a 13 A ASTA approved BS 1362 fuse must be used.
If your socket outlet is not suitable for the plug, then the plug must be removed (cut off if it is a moulded on plug) and an appropriate one fitted. Warning : dispose of a plug that has been cut from the power supply cord, as such a plug is hazardous if inserted in a live 13 A socket outlet elsewhere in the house.
Always replace the fuse cover after fitting a fuse. The plug must NOT be used if the cover is omitted or lost until a replacement is obtained - make certain that only the correct fuse cover is used and fitted.
For plugs with a detachable fuse cover the replacement must be the same as the colour insert in the base of the plug, or as directly by the embossed wording on the base of the plug.
If the detachable fuse cover is lost, a replacement may be purchased from an approved Rowenta Service Centre (see enclosed Service Information leaflet). Information for supply may also be obtained from the plug manufacturer.
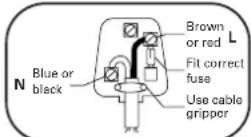
U.K ONLY-FITTING A PLUG
Important : the wires in this lead are coloured in accordance with the following codes Blue, Neutral, Brown, live. Please read the instructions given below before connecting the cord to a plug. If in doubt, please consult a qualified electrician.
As the colours of the wires in the mains lead of this appliance may not correspond with the coloured markings identifying the terminals in your plug, proceed as follows:
- the wire which is coloured BLUE must be connected to the terminal which is marked with the letter " N " or coloured BLACK.
- the wire which is coloured BROWN must be connected to the terminal which is marked with the letter "L" or coloured RED.
Neither core is to be connected to the earth terminal of a three-pin plug.
This appliance requires a 13 fuse ASTA approved to BS 1362.
A dire attentivement avantemploi...

1 - DESCRIPTIF (dessin n^1
A - Concentrateur
7 - RESENI PROBLEMU:

Brand : ROWENTA
Model : CV8050
Category : Hair dryer