HarleyDavidson - Smartphone NGM-Mobile - Free user manual and instructions
Find the device manual for free HarleyDavidson NGM-Mobile in PDF.
| Product Type | Smartphone |
| Brand | NGM-Mobile |
| Model | HarleyDavidson |
| Operating System | Windows Phone 8.1 |
| SIM Card Type | Dual SIM (2 × SIM standard) |
| Battery Type | Rechargeable lithium-ion, removable |
| Battery Charging | Via micro USB cable (wall charger or PC) |
| Display | Capacitive touchscreen |
| Rear Camera | Yes, with flash |
| Front Camera | Yes |
| Expandable Memory | Yes, via micro-SD card (dedicated slot) |
| Wireless Connectivity | Wi-Fi 802.11, Bluetooth, GPS |
| Connector | Micro USB |
| Headphone Jack | Yes, 3.5 mm |
| Speaker | Built-in |
| Microphone | Main + secondary (noise reduction) |
| Sensors | Ambient light, proximity |
| Care and Cleaning | Use a soft, dry cloth; avoid liquids |
| Safety | Turn off the device before removing the battery; use original chargers |
| Repairability / Spare parts | Removable battery; visit www.ngm.eu for support |
Frequently Asked Questions - HarleyDavidson NGM-Mobile
User questions about HarleyDavidson NGM-Mobile
0 question about this device. Answer the ones you know or ask your own.
Ask a new question about this device
Download the instructions for your Smartphone in PDF format for free! Find your manual HarleyDavidson - NGM-Mobile and take your electronic device back in hand. On this page are published all the documents necessary for the use of your device. HarleyDavidson by NGM-Mobile.
USER MANUAL HarleyDavidson NGM-Mobile
English - Quick Guide......38
text_image
Screenshot of a mobile app interface showing a grid of apps including Spotify, Facebook, and others with their logos and names.Copyright © 2014 NGM Italia
natural_image
3D diagram of a device casing with internal compartments and a red arrow indicating a specific section (no text or symbols present)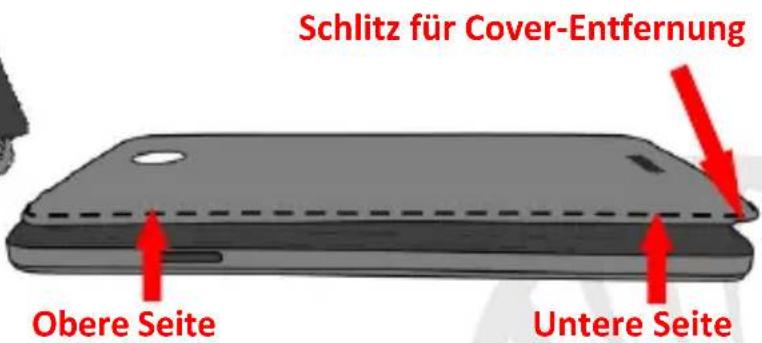
text_image
Screenshot of a mobile app interface displaying app icons and prices, including Spotify, Skype, and iTunes.Copyright © 2014 NGM Italia
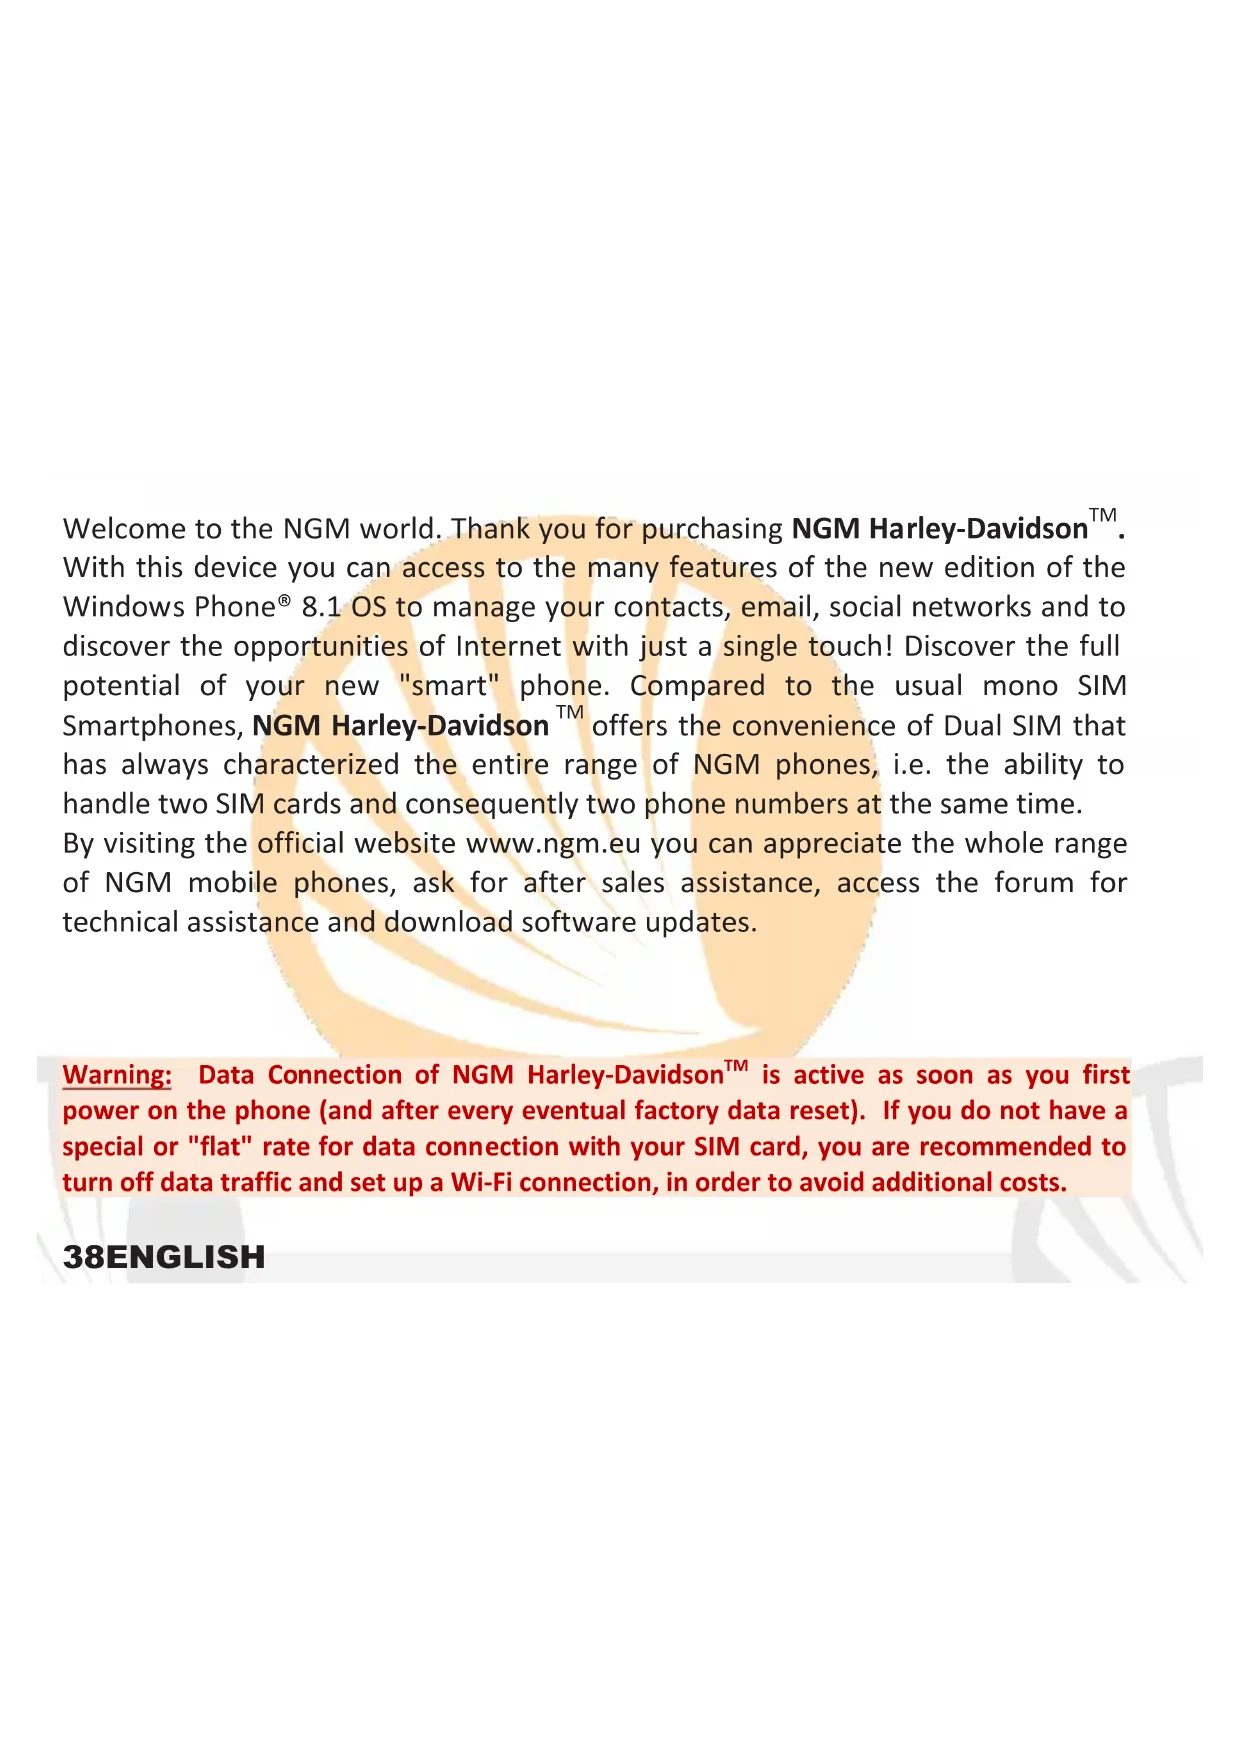
Welcome to the NGM world. Thank you for purchasing NGM Harley-Davidson™. With this device you can access to the many features of the new edition of the Windows Phone® 8.1 OS to manage your contacts, email, social networks and to discover the opportunities of Internet with just a single touch! Discover the full potential of your new "smart" phone. Compared to the usual mono SIM Smartphones, NGM Harley-Davidson™ offers the convenience of Dual SIM that has always characterized the entire range of NGM phones, i.e. the ability to handle two SIM cards and consequently two phone numbers at the same time. By visiting the official website www.ngm.eu you can appreciate the whole range of NGM mobile phones, ask for after sales assistance, access the forum for technical assistance and download software updates.
Warning: Data Connection of NGM Harley-Davidson™ is active as soon as you first power on the phone (and after every eventual factory data reset). If you do not have a special or "flat" rate for data connection with your SIM card, you are recommended to turn off data traffic and set up a Wi-Fi connection, in order to avoid additional costs.
38ENGLISH
Set up
Warning: insert SIM and SD Card only after removing the battery, in order to prevent data loss.
Insert SIM card: SIM cards contain your phone number, PIN codes, links to external services, contacts and other important details. To access the compartment containing the SIM slots, turn off the phone and lift up the cover from the bottom of the phone. Remove the battery. Insert the SIM cards into the slots with their gold contacts facing downwards.
Insert SD card: to use all the functions of NGM Harley-Davidson ^TM , we recommend the use of an SD card: insert it into the back side of the phone after removing the back cover and the battery; its slot is close to those of the SIM cards.
text_image
Slot 1: SIM 1 SD card slot Slot 2: SIM 2 SIM 2 SIM 1Inserting the battery
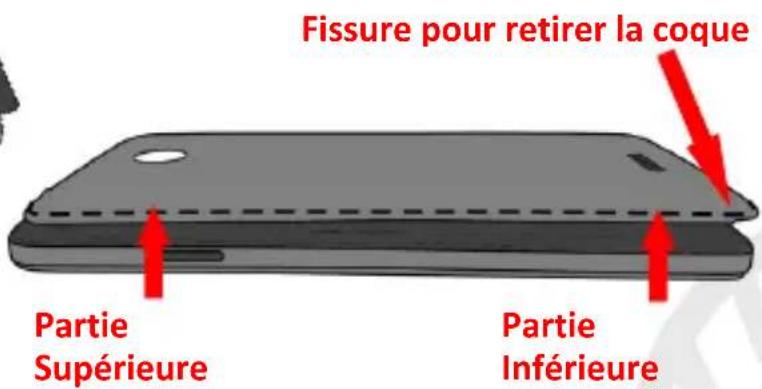
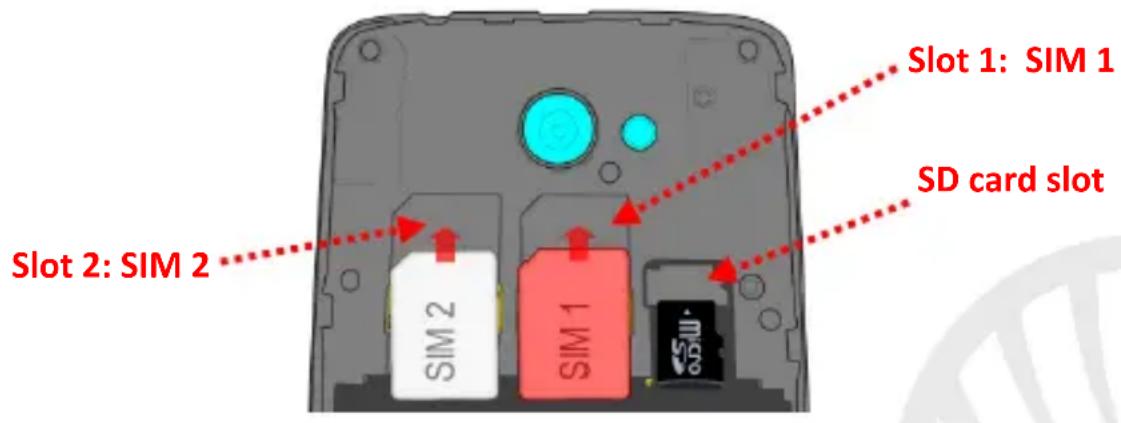
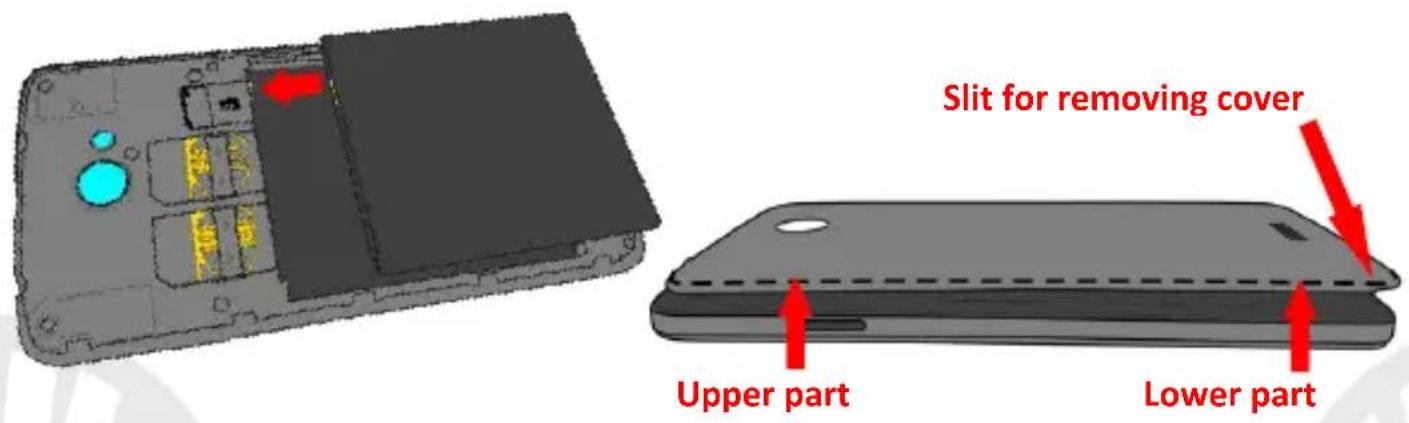
Your device is provided with a lithium-ion battery and is designed to be used exclusively with original NGM batteries and chargers. The battery must be inserted into the backside of the phone. Insert the battery into the battery compartment with its contacts facing those of the phone. Then, restore the back cover by first inserting it on the bottom of the phone and then pressing it on the top to completely fit it onto the phone. To remove the cover, start from the slit in the lower left part of the phone and remove the cover first from the bottom and then from the upper part, as shown below.
text_image
Slit for removing cover Upper part Lower part40ENGLISH
Charge the battery
Charge the battery before starting to use the device. Use the supplied USB cable and the USB connector on the top side of the phone. Connect the charger to the provided wall socket adapter, and then the device to the USB cable. You can also charge the phone by connecting it with the PC USB port, but in this case charging will take longer. When the battery is charging, an animated icon on the screen will show the charging progress if the phone is on. Once the battery icon is filled, it is fully charged and the phone can be disconnected from the grid.
Warning: Do not connect the phone to a booting-up or running down PC to avoid voltage jumps. To preserve the functionality of the product and the integrity of the warranty, we recommend the use of original NGM chargers. Please charge the battery indoors, in a dry and favorable environment. It is normal for the battery to get slightly warm during the charging process. The battery will reach its full capacity when cycled several times.
Power on, power off and standby
To turn on the phone, press and hold the power on/off key. To turn off your device, press and hold the same key and confirm the shutdown by scrolling downwards. A quick pressure sets the phone into stand-by mode (screen off) or allows you to go back to the lock screen (see below).
The Start screen
Use the touch screen by tapping, holding or dragging a finger across the screen. The Start screen contains the shortcuts to favorite the main system applications (Tiles), which can also be accessed from the main menu simply by moving the Start screen to the left. From the app list, press and hold the desired icon and select "Add to Start" from the popup which appears; you can add new tiles until the there is available space. You can also modify the tile-size of the applications by long pressing them and selecting the @ icon; select the @ icon instead, to remove them from the Start screen. From Settings > (system tab) > Start + theme, you can change the color of some tiles, other tiles have a default color and cannot be modified.
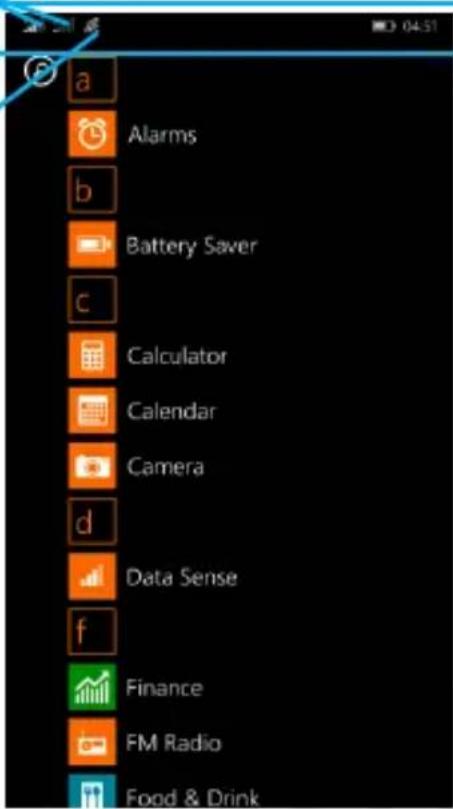
The main menu
Scroll from right to left in order to display the main menu where you will find all your applications listed in alphabetical order. Press the back key to return to the previous screen, press the Start key to return to the Start screen.
42ENGLISH
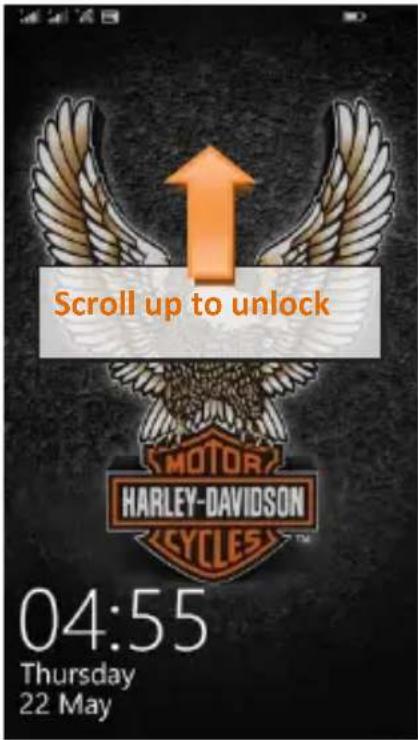
Lock Screen
text_image
Scroll up to unlock MOTOR HARLEY-DAVIDSON CYCLES™ 04:55 Thursday 22 MayThe Start screen
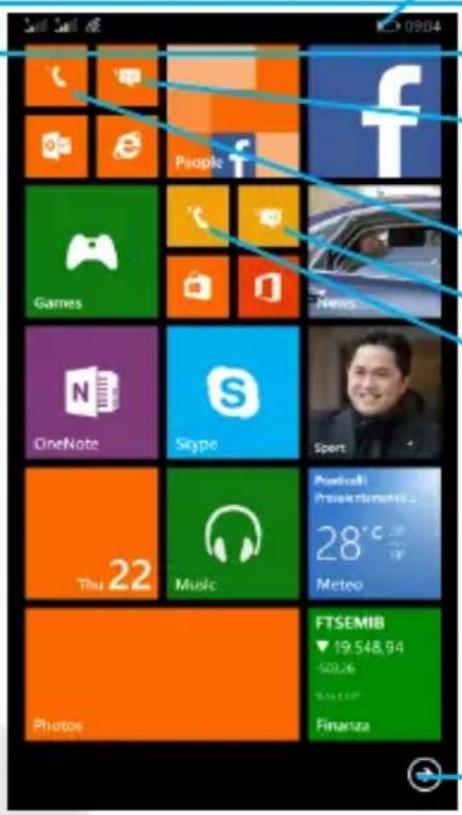
text_image
Screenshot of a mobile app interface displaying app icons and status bar, including Facebook, Google, and others.SIM signal intensity and battery level
Notification panel
SIM1 Messaging
WiFi Signal Intensity
SIM1 Phone
SIM2 Messaging
SIM2 Phone
You can also manage calls and messages from SIM1 and SIM2 with a single tile (see paragraph [*])
Main Menu
Main Menu
text_image
a Alarms b Battery Saver c Calculator Calendar Camera d Data Sense f Finance FM Radio Food & Drink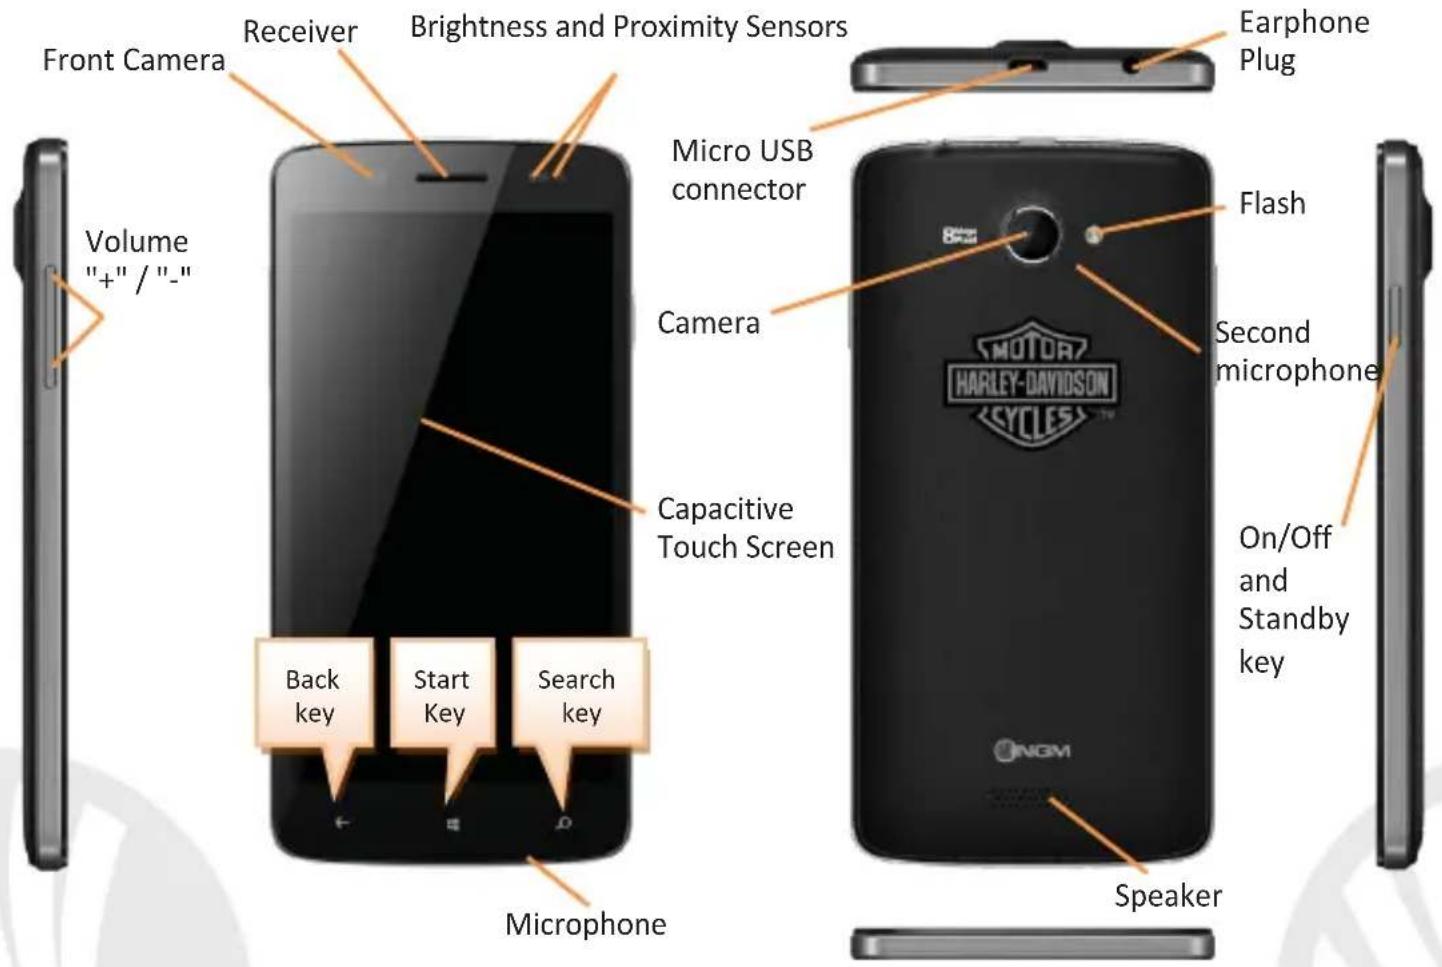
text_image
Front Camera Receiver Brightness and Proximity Sensors Airplane Plug Micro USB connector Camera Volume "+" / "-" - Flash Second microphone Capacitive Touch Screen Back key Start Key Search key Microphone ONGM Speaker On/Off and Standby key44ENGLISH
RAPID ACCESS
Notification panel: to open the Notifications panel, touch the upper area containing the battery and signal-intensity icons and drag it downwards. You can lock the panel immediately under the quick setting keys, or completely drag it down to view the notifications. Touch the Settings icon ✪ to open the phone settings menu, and select the quick setting buttons to activate the related functions. To hide the panel, drag up the bottom of the panel or tap the Back key.
Recent applications: when you are within any application, long press the Back key: a list of the applications you have recently accessed will be shown; by selecting one of them you can access or delete it.
Contextual Menu: most applications have a Contextual Menu .... By clicking on that icon, you can display a contextual menu that refers to the application itself, with related functions.
Lock screen: From the main menu, select Settings > (system tab) > Lock screen. Within this menu you can set a lock screen wallpaper and the period of time after which the screen automatically is locked.
Quickly turn on/off the vibration mode: to quickly turn off the ringer for calls and messages press the Volume +/- key and select the small white arrow that appears in the notification bar to expand the volume control menu. Touch Vibrate on/off to deactivate/activate the vibration. In the same way you can also adjust the volume of applications and media files.
Managing the two SIM cards: from the Settings menu, select the System tab and then Mobile + SIM. Within this menu you can also choose a default SIM for data connection from the drop-down menu that appears by selecting the SIM for data connection option. By selecting the submenu SIM1/SIM2 Settings, you can selectively enable and disable SIM cards at any time by pressing the SIM status switch.
[*]DUAL SIM CALL MANAGEMENT: calls can be handled separately for each SIM card by accessing the related menus from the dedicated tiles in the Start screen. However, in Phone > Contextual Menu > Link tiles, you can join the tiles and a single icon will manage the call logs of both SIM cards. In case of linked tiles, a switch will allow you to choose the SIM from which to make calls 1 2. The operation remains the same even if the phone is used with a single SIM card. In this case, if you try to call with the missing SIM card, a popup will alert you of the error and will invite you to select the inserted SIM.
46ENGLISH
Making a call
To make a call from the main screen, tap the Phone icon related to the desired SIM (in case of unlinked tiles);
In the case of linked tiles select the SIM with the SIM switch at the top right corner
Type the phone number with the virtual keypad
Press the Call key.
To end the call, tap the End call button.
To answer a call, tap the Answer button; to refuse it touch the Ignore key, to reject with a message select Text reply. If you receive a call with locked screen, scroll up to display the answer options.
Call a number from the call log
From the main menu, select the Phone icon related to the desired SIM (in case of unlinked tiles) to view the list of received, outgoing, and missed calls.
In case of linked tiles select the SIM to call from, by the switch at the top right.
Select the desired number to place the call.
MANAGE CONTACTS
Add a new contact
Note: In the contextual menu of the contacts you can access the Import/Export functions and several other settings.
From the main menu or from the Start screen, select the Contacts icon. Scroll right the menu if you have groups or clubs to access the contacts list.
Press the icon with the "+" symbol on the bottom bar.
Choose where you want to save the contact (Microsoft® Account, Other accounts, SIM1 or SIM2).
Insert Name, Number and any other contact detail (if the contact is saved on the SIM card, only name and phone number can be saved) and confirm with Done.
Add a new contact from call log
From Phone menu, access the Call Logs
Touch the 📄icon close the number you want to save among the Missed, Received or Outgoing calls
Choose 📄 on the bottom bar to open the contacts list, and select the + icon to add the number to the list. Once you selected the saving path and added name and any further information (when saving in Account), confirm with Done.
48ENGLISH
Set ringtones
From the main menu, select Settings > (System tab) > Ringtones + sounds.
Select Ringtone, and choose the desired ringtone.
Sending and reading SMS and MMS
The messages management logic is the same used for calls management, described above in Dual SIM calls management paragraph.
Sending SMS and MMS: from the Start screen or from the main menu, choose the Messaging icon related to the desired SIM (in case of unlinked tiles) and then the + icon at the bottom.
Type the first letters of a name in the recipient field to search for a contact and select it from the pop-up or directly enter the recipient number, otherwise select the contacts icon and select the recipient(s).
Write the text into the dedicated space with the virtual keypad.
Select the clip icon in the bottom bar to include any multimedia attachments (the message will be converted into MMS) and press the icon, after selecting the SIM from the switch at the top.
Reading SMS and MMS: when you receive a new SMS or MMS, an icon appears in the notification panel. By clicking on the displayed icon, you can directly access the conversation and read the incoming message. In any case, you can view the incoming messages from the Start screen or from the menu by selecting Messaging.
CONNECTIVITY
To better use the potentiality provided by the device and its operating system, an active data connection is requested; data connection of NGM Harley-Davidson ^TM is ON when you first power on the phone. If it is not included into your mobile phone plan, data traffic may cause you extra costs, so it is recommended to configure an Internet connection via WiFi. To enable the data traffic and the 3G connection on a SIM, select Settings > (system tab) > Mobile + SIM > Data Connection (On/Off).
In the same menu and you can decide on which SIM to activate data connection.
Connect to the Internet using Wi-Fi®
You can connect to the WLAN using Wi-Fi option. To activate it, from the main menu, choose Settings > (System tab) > WiFi (On/Off). Please follow all warnings and indications concerning the use of wireless devices in areas where the use of such functions is restricted (airplanes, hospitals, etc.). Enter the offline mode when you only have to use the functions that do not require Network access.
50ENGLISH
Connecting to a Bluetooth ^® device
Turn on the Bluetooth device you want to connect with. Refer to the device documentation.
From the main menu, choose Settings > (System tab) > Bluetooth (On/Off) to turn Bluetooth on. By selecting the Advanced key, you can find further functions and settings. The device search will automatically start.
Among the discovered devices, select the device name to associate with. The phone will attempt to associate with the device, which may be asked for a pairing code.
Connect to the Internet: from the Start screen or from the main menu, choose Internet Explorer. Type the URL into the address bar to start browsing. If you choose to navigate using data connection, be aware of costs or choose a "flat" data contract with your service provider. Alternatively, use WiFi (see "Connectivity") where possible.
Account setup: in order to better manage OS Windows® functionalities, it is recommended to configure a default account. When you first power on the phone, it will guide you through configuring a default Microsoft® account that allows you to access all Windows® applications, like email and contacts sync service and the use of Windows Store®, to download additional applications. The account is configurable at any time on Settings > (system tab) > Email + accounts.
Email: By configuring a default account you can easily manage your e-mails and display them automatically on your phone. If you want to use also a different Email account, you can configure a new account with another provider within the Email app from the Start screen or from the Main Menu.
Change the language: To change system language, go to Settings > (system tab) > Language. If the desired language is not displayed on the screen, select Add languages and choose it from the list. Then you have to restart the phone to apply the language change. Otherwise, to set an already added language, you have to long press on it and select Move up, until the chosen language does reach the first position of the languages list, then restart the phone to confirm the choice.
Change keyboard language: for each system language there are some available keyboard languages, which are listed within Settings > (system tab) > Keyboard in alphabetical order. When you change the system language, the keyboard will automatically keep the language that is placed at the top of this list, so it is possible that system and keyboard do not have the same language. If this happens, on the above mentioned menu, long press the language at the top of the list and select Remove. Proceed in the same way for all the languages that are listed before the one you want to set, until it reaches the first position.
52ENGLISH
Synchronization
Synchronization is the most efficient approach to manage your useful data because it allows you to make a backup of the data on your device with an internet account. In case of replacement, loss or damage of the phone you will not experience loss of data. Once you set up a Microsoft® account, the Outlook stored contacts and calendar events synchronization with your device will automatically start. To manually activate it, go into Settings > (system tab) > Email + accounts, to view currently activated accounts on your phone; long press onto the Microsoft® account and select Sync from the drop down menu. To add an account select Add an account.
The synchronization uses an active data connection, which could result in data traffic costs. It is advisable to use a WiFi connection when available.
In addition to contacts and events, you can also synchronize the phone settings, to use them with other Windows Phone ^® devices. On Settings > (system tab) > Sync my settings, you can choose to synchronize the menu theme, the app settings, Internet Explorer history and bookmarks, or passwords. In this way, by configuring your account on another device with a Windows Phone ^® OS, you will find all your settings, as previously configured.
GPS geolocalization: The Global Positioning System (GPS) is a satellite-based positioning system, with a global and continuous coverage. To access the GPS, select Settings > (system tab) > Location (On/Off). When the GPS function is activated, the phone starts to collect data from satellites and determines the current position. The Fix Times (position detection) are variable and can be affected by several external factors (clouds, high buildings, etc.). Limit the use of battery and memory by switching off this function when you don't need it.
Warning: formatting and delivery of this user manual is based on the Windows Phone ^® operating system, NGM Italia will not bear responsibility for any incompliance with the above guidelines or improper use of the mobile phone NGM reserves the right to modify any of the content in this user guide without previous public announcement. The content of this manual may vary from the actual content displayed in the mobile phone. In that case, the latter shall govern.
Copyright © 2014 NGM Italia
No part of this manual may be reproduced, distributed, translated, or transmitted in any form or by any means, electronic or mechanical, including photocopying, recording, or storing in any information storage and retrieval system, without the prior written permission of NGM Italia. All trademarks are the property of their respective owners.
Bluetooth® is a registered trademark of the Bluetooth SIG, Inc. worldwide.
Wi-Fi® and the Wi-Fi logo are registered trademarks of the Wi-Fi Alliance.
54ENGLISH
natural_image
3D rendered diagram of a device casing with highlighted internal components (no text or symbols)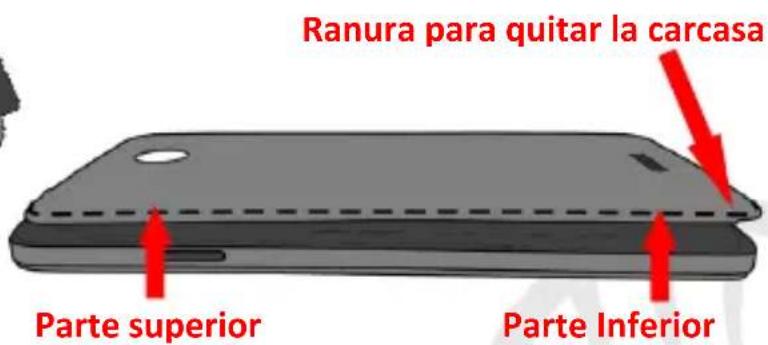
text_image
Ranura para quitar la carcasa Parte superior Parte InferiorCargar la batería
Copyright © 2014 NGM Italia
natural_image
3D rendering of a device casing with highlighted internal components and a red arrow indicating a specific area (no text or symbols present)