RCT 200 - Alarm clock radio Dexford - Free user manual and instructions
Find the device manual for free RCT 200 Dexford in PDF.
| Product Type | Alarm Clock Radio |
| Brand | Dexford |
| Model | RCT 200 |
| Power Supply | 1 x 1.5V AAA/LR03 battery (not included) |
| Time Display | 12h or 24h |
| Date Display | Day, month, year |
| Temperature Display | °C or °F |
| Radio Reception | DCF (German time signal) |
| Automatic Synchronization | Daily at 02:00 |
| Number of Alarms | 2 (A1 and A2) |
| Snooze Function | 5 minutes |
| Illumination | SNOOZE/LIGHT button, 5 seconds |
| Thermometer | Built-in, display in °C/°F |
| Adjustable Time Zone | Yes, offset from DCF |
| Weekday Languages | German, English, French, Danish, Dutch, Italian, Spanish |
| RESET Button | Yes, for factory reset |
| Cleaning | Soft, lint-free cloth, no solvents |
| Safety | Do not immerse, protect from moisture, do not open |
| Warranty | 24 months from date of purchase |
Frequently Asked Questions - RCT 200 Dexford
User questions about RCT 200 Dexford
0 question about this device. Answer the ones you know or ask your own.
Ask a new question about this device
Download the instructions for your Alarm clock radio in PDF format for free! Find your manual RCT 200 - Dexford and take your electronic device back in hand. On this page are published all the documents necessary for the use of your device. RCT 200 by Dexford.
USER MANUAL RCT 200 Dexford
This device serves as a radio controlled clock with alarm function and temperature display. Its compact size means it can easily be taken on journeys and the time zone function enables quick adjustment to new time zones.
Safety information
- Read this operating manual thoroughly before putting the clock into operation.
- If the device is transferred to others, this operating manual must be handed over with it.
- The device complies with all technical standards and applicable safety requirements for electrical devices.
- The manufacturer is not deemed liable for damage resulting from improper use or failure to observe information in this manual.
- Keep the device out of reach of children.
- Children and persons who lack knowledge or experience of handling such devices or who have restricted physical, sensory or mental capabilities must not use the device without supervision or instruction from persons responsible for their safety.
- Children must be supervised to ensure they do not play with the device.
- The device may only be used in temperate climate zones; avoid tropical and extremely damp climates.
- NEVER IMMERSE THE DEVICE IN WATER. RISK OF ELECTRIC SHOCK!
- The device must never be used near a bathtub or shower or a sink filled with water.
- If the device should fall into water, have it checked by a specialist before putting it into operation again.
- Protect the device from contact with any liquids, including spray and moist conditions. Pay particular attention that no liquids enter into the openings in the device.
- Do not expose the device to direct sunlight. Do not use the device directly beside sources of heat, such as an oven or cooking range.
- Do not place objects with an open flame, e.g. candles, in the direct vicinity of the device.
- Do not place objects filled with water, e.g. vases, in the direct vicinity of the device.
- Do not expose batteries to extreme heat, such as direct sunlight, fire, etc.
- Please dispose of used batteries ecologically and according to applicable legal regulations.
- Do not use the device if it is damaged. To prevent risks, defective components may only be replaced by the manufacturer, their service personnel or similarly authorised persons.
- Do not open the device. Never attempt to repair the device yourself. Repairs may only be completed by persons with the necessary skills.
- Do not cover the sensor opening (17) on the rear side of the device.
- Do not let the device fall, do not allow any liquids or objects to get into the inside of the device.
Risk of suffocation! Keep all packaging material out of reach of children.
Notes on batteries
- Only use batteries of the highest quality. Batteries of an inferior quality could cause equipment damage through leaking.
- If batteries should leak, clean the battery compartment with a cloth and dispose of it according to the legal requirements. Avoid battery acid coming into contact with the skin and eyes. If battery acid does come into contact with the eyes, rinse them thoroughly with lots of water and seek medical attention immediately. If battery acid comes into contact with the skin, wash the area thoroughly with soap and water.
- If the device will remain out of operation for a longer period, remove the battery because the device could be damaged should the battery leak. Change the battery when the power deteriorates.
- Batteries are very dangerous if swallowed. Keep batteries and the device out of reach of children. If batteries are swallowed, seek medical attention immediately.
- Batteries must not be recharged, reactivated or disassembled by any means, thrown into a fire or short circuited.
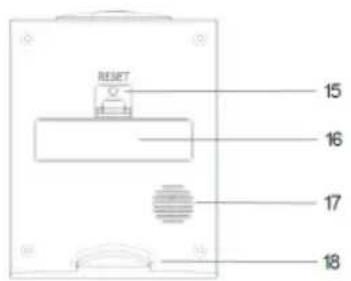
Operating elements
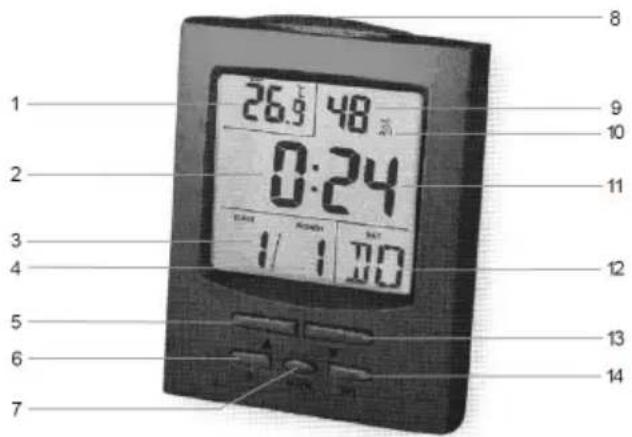
| 1. TEMP display (temperature) 10. Alarm icon | ||
| 2. Hour display 11. Minute display | ||
| 3. | DATE display | 12. DAY display (weekday, abbreviated) |
| 4. | MONTH display | 13. button |
| 5. | ▲ button | 14. WAVE button |
| 6. | SET button | 15. RESET button |
| 7. ALARM button 16. Battery compartment | ||
| 8. SNOOZE/LIGHT button 17. Sensor opening | ||
| 9. | Second display 18. Base | |
Automatic time synchronisation
The transmitter for the DCF radio signal in Germany is near Frankfurt and also reaches other European countries. Further information on the DCF radio signal is available in Internet.
After inserting the battery, the device automatically scans for the DCF radio signal to complete synchronisation of the time. The radio signal icon flashes, thus indicating that scanning for the signal has started. When the radio signal icon is displayed continually, the DCF radio signal has been received.
To ensure that time deviations are kept as small as possible, a daily time synchronisation occurs at night at 2:00 a.m. If this synchronisation is unsuccessful (the radio signal icon disappears from the LC display), 4 further attempts are made at the top of the next hours. A time synchronisation once a day normally suffices to keep the time accurate to the second.
- Press the WAVE button (14) to start the time synchronisation manually. Press the WAVE button again to interrupt time synchronisation. If no signal is received within 7 minutes, signal scanning stops (the radio signal icon disappears) and restarts at the top of the next hour.
- Since there is less atmospheric disturbance at night, signal reception should be possible during the night.
- Signal reception is weaker in buildings with cement walls, e.g. office buildings or basements. If no signal is received in such cases, position the device in the vicinity of a window.
Inserting the battery
Open the battery compartment (16) on the rear side of the device and insert a 1.5 V battery, type AAA/LR03 (not supplied with the device). Pay attention to correct polarity (+/-) as indicated in the battery compartment. After inserting the battery, an acoustic signal is issued and the radio signal icon appears in the LC display above the Alarm icon (10) at the top right. Close the battery compartment. The device then automatically attempts to receive the DCF radio signal in order to display the time. If no signal is received, set the time manually.
Setting the time
The device can display the time in 12 or 24-hour format. When the 12-hour format is selected, "AM" (morning) or "PM" (afternoon) appears beside the time display.
- Press and hold the SET button (6) until the year display flashes. Use the button (5) or (13) to set the year. Press the button to increase the year by one. Press the button to reduce the year by one. Press the SET button to confirm the setting.
- The MONTH (4) indicator then flashes. Use the or button to set the month in the same way and confirm the setting by pressing the SET button.
- Proceed in exactly the same way for the other settings. Setting the time zone is described in Section Setting the time zone. Therefore, press the SET button first to skip to the next point (Hour). The sequence of time and date settings is as follows:
Year Month Day Language Weekday (abbreviated) 12/24 Hr (12/24-hour format) Time zone Hour Minute
Note:
- The following language settings are available for the weekday: German, English, French, Danish, Dutch, Italian and Spanish.
- If there is no input for a period of 30 seconds while making a setting, the LC display automatically switches from Setting mode to Display mode. The entries made to that point are discarded.
- If you press and hold the or button when in Setting mode, the corresponding menu options are run through the display quickly.
- The device can be reset by pressing the RESET button (15). All the settings made are reset to their default status. The device then scans for the DCF radio signal.
Setting the time zone
If you are not in Germany and want to adjust the clock to the time zone you are currently in or you simply want to display the time from another country, you can use this function to set the time difference from the DCF radio signal transmitted in Germany (German time).
- Press and hold the SET button until the year flashes.
- Press the SET button 5 times until the time zone setting flashes. "TZ" (Time Zone) appears in the LC display.
- Press the button once to set the difference, e.g. -1 (hour) for England, or the button 7 times (+7 hours) for Hong Kong.
- Press the WAVE button (14) to confirm the setting.
Setting the alarm time
You can set two alarm times on the device.
- Press and hold the ALARM button (7) until the time flashes and "A1" appears in the LC display for alarm time 1.
- Use the buttons (5) and (13) to set the hour and confirm it by pressing the ALARM button.
- The display switches to the minute display.
- Set the minute in the same way as the hour and confirm by pressing the ALARM button.
- Use the button to activate the alarm time and the alarm icon (10) appears in the display for the first alarm time. Press the button again to deactivate the alarm time and the alarm icon disappears from the display.
- The time and "A2" for the second alarm time flash in the display. If so required, set a second alarm time. Press the button to activate the alarm time. The alarm icon for the second alarm time appears in the LC display. Proceed in the same way as for the first alarm time.
- Otherwise, press the ALARM button as often as necessary until the current time reappears in the display.
- A beep tone is issued at the alarm time set which starts slowly then sounds at increasingly shorter intervals. Press any button to deactivate the alarm signal or the SNOOZE/LIGHT button (8) to activate the Snooze function (refer to Section Snooze function).
Displaying the alarm time
Press the ALARM button to display the alarm times set. "A1" appears in the display together with the set alarm time. Press the button to activate or deactivate the alarm time. Press the ALARM button again to display the 2nd alarm time set. "A2" appears in the display together with the set alarm time. Press the ALARM button to return to the standard display.
Snoopze function
When the acoustic alarm signal is sounded, press the SNOOZE/LIGHT button (8). The acoustic alarm signal is switched off and starts again after 5 minutes. Press any button to deactivate the Snooze function.
Back-lighting
Press the SNOOZE/LIGHT button (8) to switch on the back-lighting. The back-lighting goes out after approx. 5 seconds.
Thermometer
The thermometer indicates the temperature in ^ C (Celsius) or ^ F (Fahrenheit). Press the button (13) to switch between ^ C and ^ F .
Summer time
When the device is within range of a DCF radio signal and receives the summer time, the summer time icon appears to the left of the hour display.
Changing the battery
The battery must be changed when the battery status indicator in the LC display appears or the LC display quality becomes weaker. To change the battery, proceed in exactly the same way as described in Section Inserting the battery.
Cleaning
Clean the housing surfaces with a soft, fluff-free cloth. Do not use any cleaning agents or solvents.
Technical Data
| Power supply: | 1 x 1.5 V battery, type AAA / LR03 |
| Time display: 12/24-hour format | |
| Time unit: 1 second | |
| Time synchronisation: | 1 x daily (at night) |
Specifications subject to change without notice!
Declaration of Conformity
This device fulfils the requirements stipulated in the EU directive. To view the complete Declaration of Conformity, please refer to the free download available on our web site at www.dexford.com.

Disposal
In order to dispose of your device, take it to a collection point provided by your local public waste authorities (e.g. recycling centre). According to laws on the disposal of electronic and electrical devices, owners are obliged to dispose of old electronic and electrical devices in a separate waste container. The adjacent symbol indicates that the device must not be disposed of in normal domestic waste! Risks to health and the environment from batteries! Never open, damage or swallow batteries or allow them to pollute the environment. They could contain toxic and ecologically harmful heavy metals. You are legally obliged to dispose of power packs and batteries at the point of sale or in the corresponding containers provided at collection points by local public waste authorities. Disposal is free of charge. The above symbols indicate that the batteries must not be disposed of in domestic waste and that they must be disposed of at an authorised collection point.
Packaging materials must be disposed of according to local regulations.


Guarantee
DEXFORD equipment is produced and tested according to the latest production methods. The implementation of carefully chosen materials and highly developed technologies ensure trouble-free functioning and a long service life. The terms of guarantee do not apply to the batteries or power packs used in the products. The period of guarantee is 24 months from the date of purchase. All deficiencies related to material or manufacturing errors within the period of guarantee will be redressed free of charge. Rights to claims under the terms of guarantee are annulled following tampering by the purchaser or third parties. Damage caused as the result of improper handling or operation, normal wear and tear, incorrect positioning or storage, improper connection or installation or Acts of God and other external influences are excluded from the terms of guarantee. In the case of complaints, we reserve the right to repair defect parts, replace them or replace the entire device. Replaced parts or devices become our property. Rights to compensation in the case of damage are excluded where there is no evidence of intent or gross negligence by the manufacturer. If your device does show signs of a defect within the period of guarantee, please contact the sales outlet where you purchased the DEXFORD device, producing the purchase receipt as evidence. All claims under the terms of guarantee in accordance with this agreement can only be asserted at the sales outlet. No claims under the terms of guarantee can be asserted after a period of two years from the date of purchase and hand-over of the product.
Hotline
In the case of technical problems, you can contact our hotline service, Tel. 0900 00 1675 within Switzerland (Swisscom fees at time of going to print: CHF 2.60/min).