
Forno Classico 7315 42 45 - Oven TRISA - Free user manual and instructions
Find the device manual for free Forno Classico 7315 42 45 TRISA in PDF.
| Product type | Electric oven with forced air and rotisserie spit |
| Brand | Trisa |
| Model | Forno Classico 7315 42 45 |
| Volume | 23 liters |
| Temperature range | 100 - 250 °C |
| Timer | 60 minutes with automatic shut-off |
| Voltage | 230 V |
| Power | 1500 W |
| Heating functions | Top heat, bottom heat, top and bottom heat |
| Forced air | Yes, automatically activated with the timer |
| Rotisserie spit | Yes, with hooks and support |
| Included accessories | Baking tray, grid, rotisserie spit, tongs, meat hook |
| Oven door | Glass, with handle |
| Control type | Temperature regulator, heating function switch, rotary timer |
| Safety | Automatic shut-off at the end of the timer, hot surface (do not touch) |
| Cleaning | Tray, grid and spit hand-washable; housing cleaned with a damp cloth |
| Maintenance | Do not clean the heating elements; degrease after each use |
| Intended use | Household only, for cooking and roasting |
Frequently Asked Questions - Forno Classico 7315 42 45 TRISA
User questions about Forno Classico 7315 42 45 TRISA
0 question about this device. Answer the ones you know or ask your own.
Ask a new question about this device
Download the instructions for your Oven in PDF format for free! Find your manual Forno Classico 7315 42 45 - TRISA and take your electronic device back in hand. On this page are published all the documents necessary for the use of your device. Forno Classico 7315 42 45 by TRISA.
USER MANUAL Forno Classico 7315 42 45 TRISA
Thank you for choosing the "Forno Classico". The Trisa Electro team would like to take this opportunity to wish you pleasure with this appliance and "BON APPETIT!"
Before use
Please read these instructions carefully. They will give you important advice for the use, security and maintenance of the appliance. Keep the instructions carefully and, should the situation arise, pass them on to further users.
The appliance must only be used for the intended purpose according to these instructions.
Observe the notes on safety regulations.
Dispose the packaging properly.
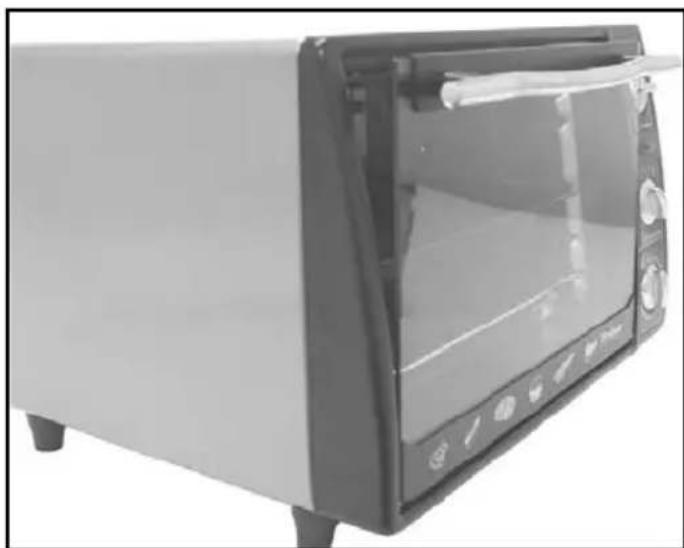
Description
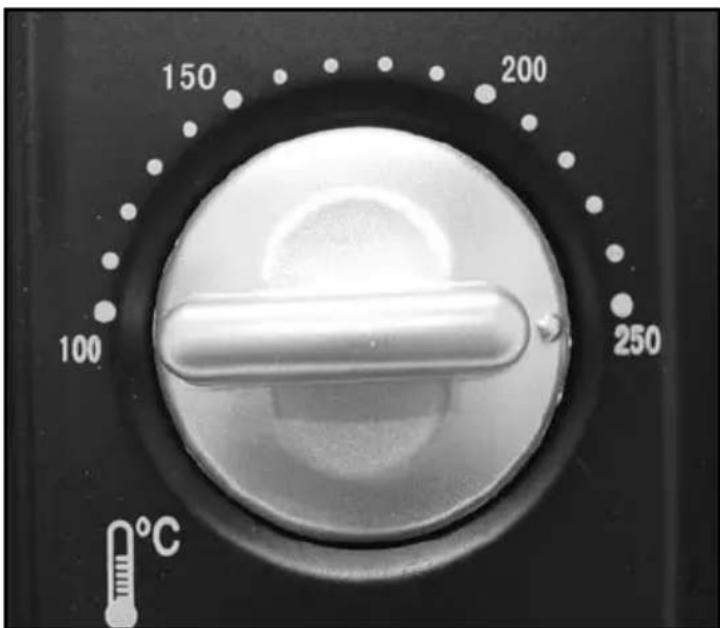
1 Temperature controller
2 Control light
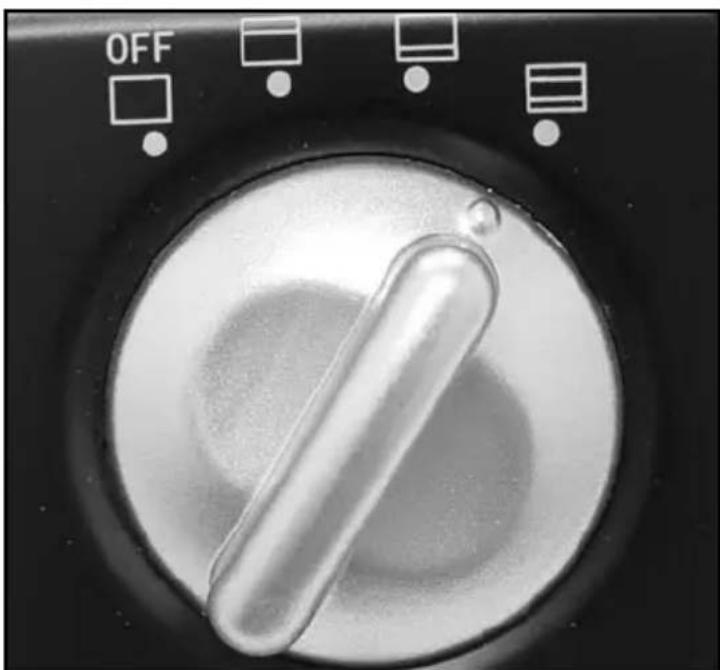
3 Heating function rotary switch
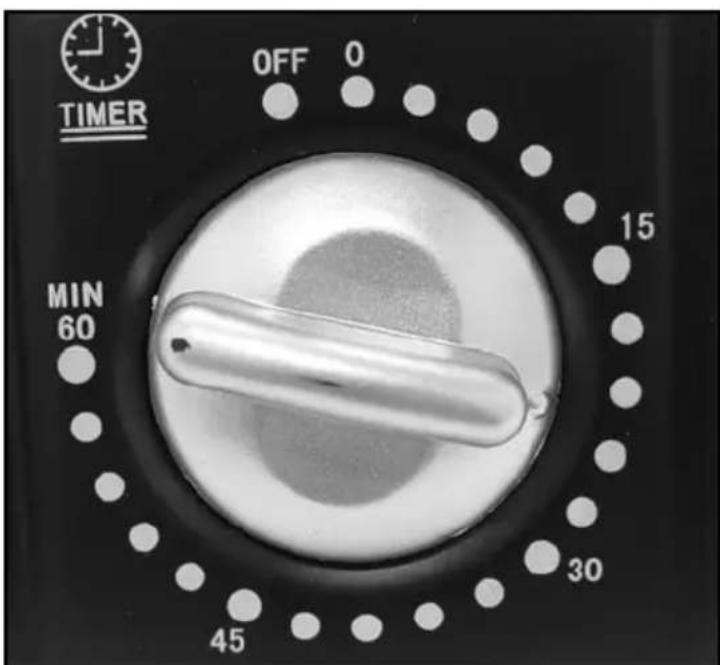
4 Timer
5 Glass oven door
6 Handle
7 Baking tray
8 Baking tray tongs
9 Grill
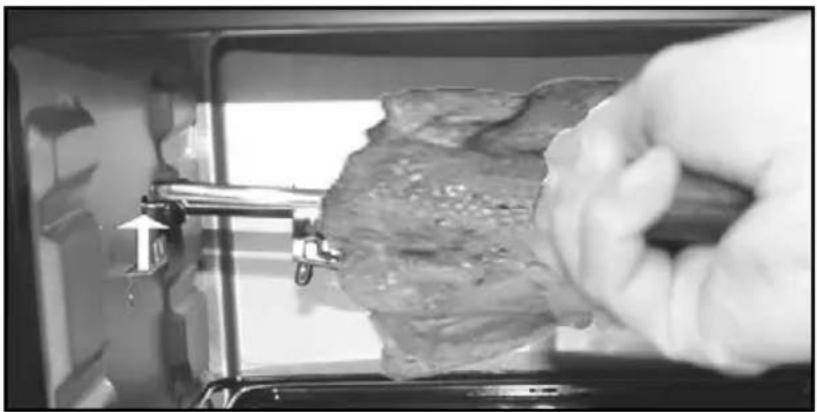
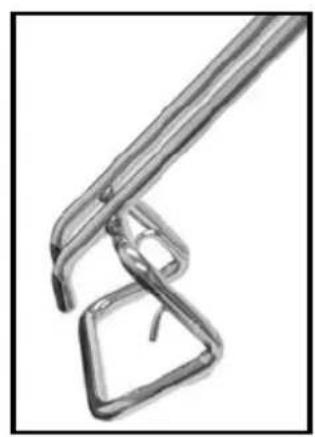
10 Meat holder including 2 wing nuts
11 Grill spit
12 Spit holder
Technical data
apacity: 23 litres
Temperature regulation up to: 100 - 250^
Timer: 60 min.
Voltage: 230 Volt
Output: 1500 Watt

Do not touch the housing when hot. Danger of burns! Always use the oven door handle provided.
Before using for the first time
Check when you are unpacking the appliance whether all the accessories are included in accordance with these instructions for use and that the appliance is not damaged in any way. The baking tray (7), the grill (9) and the grill spit (11) should be thoroughly cleaned with detergent and hot water and then dried.
Before using clean it thoroughly of any manufacturing residues:
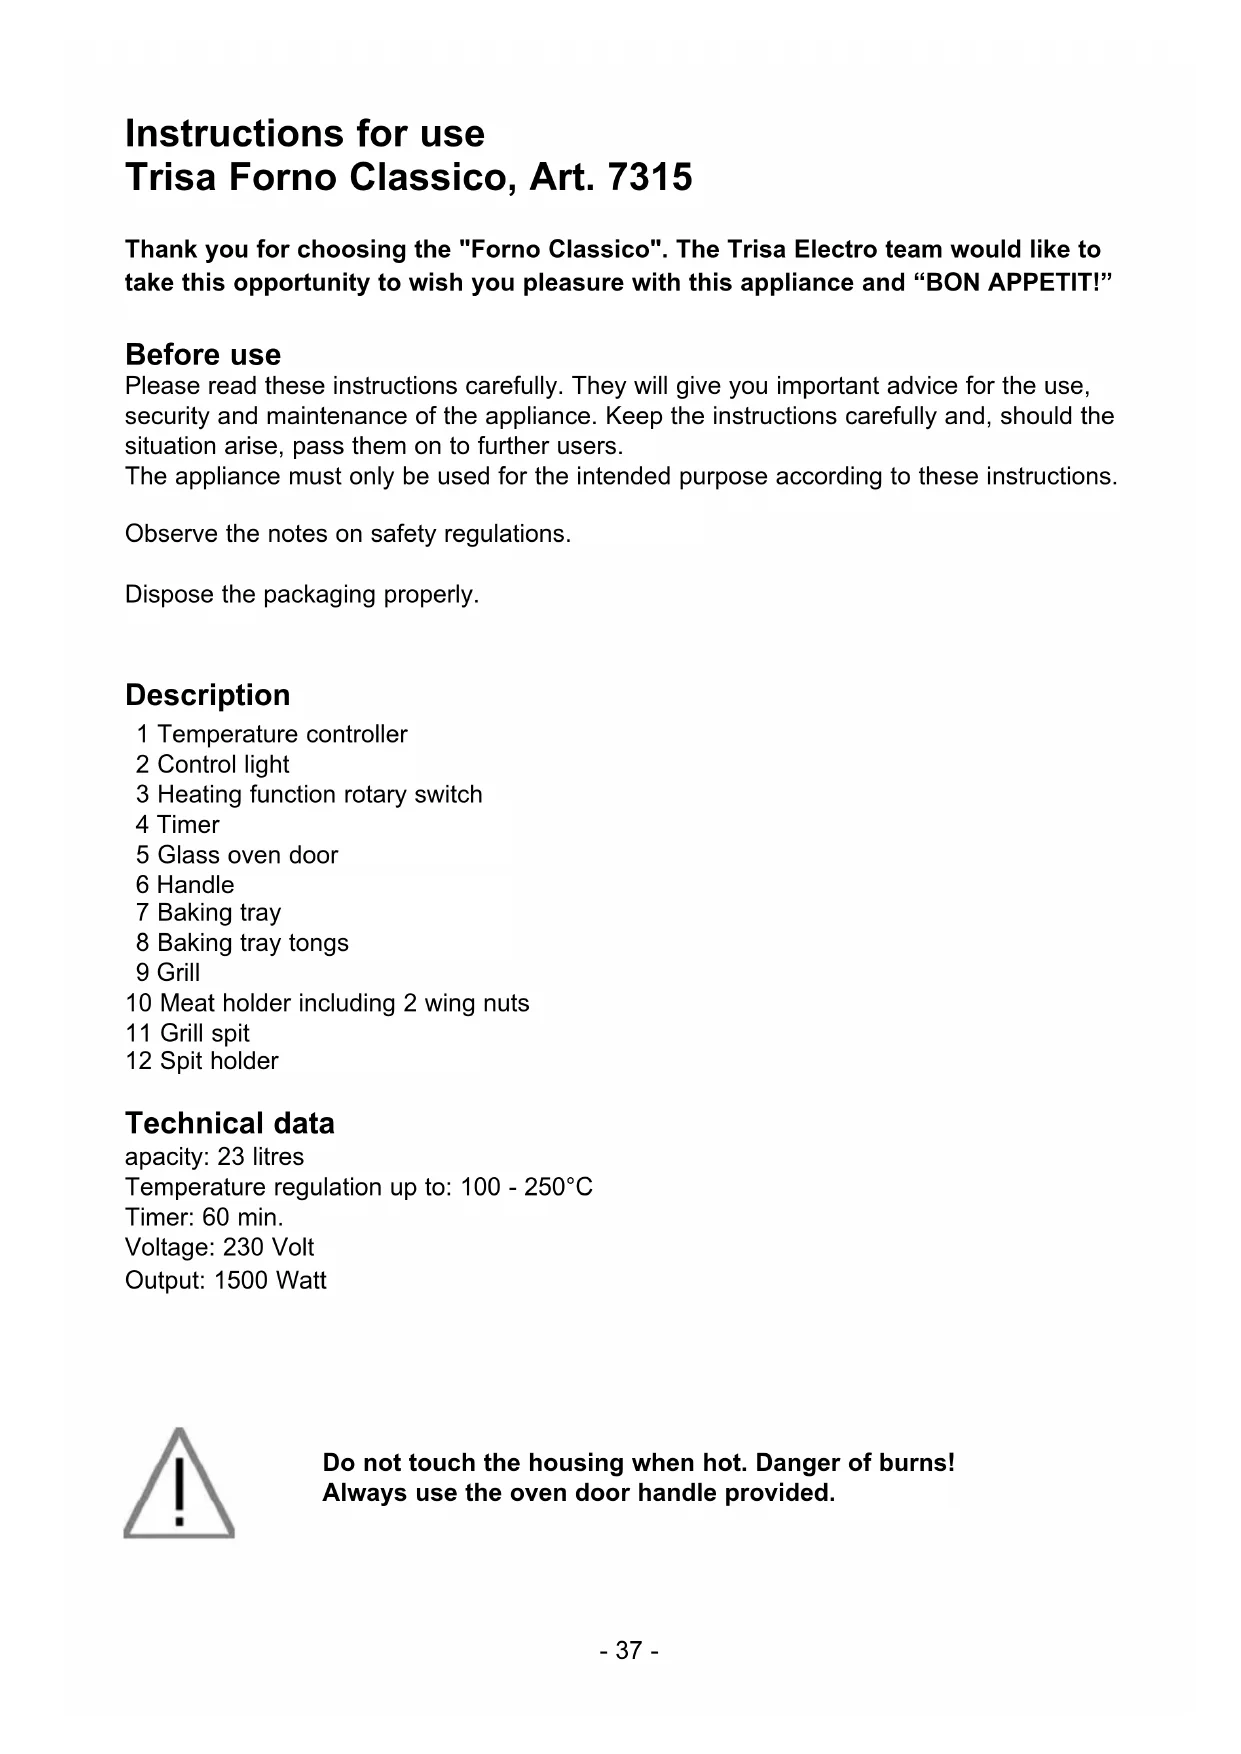
Place the appliance on a even fireproof surface.
The distance of 10 to 30 cm to other appliances / wall etc. must be kept.
Check that the timer (4) is in the "off" position before plugging the appliance in to the mains power supply. (Only use a 230v AC supply).
Slide the baking tray (7) and the grill (9) into the oven and close the door.
Set the temperature controller (1) to 250^ .
Set the heating function rotary switch (3) on the position "upper and lower heat".
Set the timer (4) on position "20".
Allow the oven to run for about 20 minutes.
Note: Open a window as unpleasant smells and smoke (manufacturing-residues) may develop. This is perfectly normal.
Your oven is now ready for use.
Description of controls

Temperature controller (1)
for selecting the required temperature 100 - 250°C
Heating function rotary switch (3)
a) Off
b) Upper heat
c) Lower heat
d) Upper and lower heat
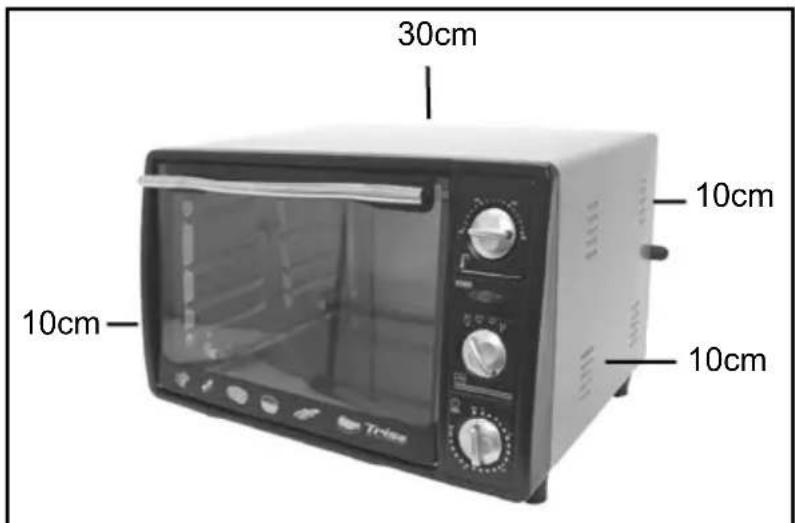
Timer (4) (60 min)
To set cooking times.
This rotary switch controls the cooking times by switching the oven on and off.
At the same time activation the convection and the grill spit function.
Note:
If the set cooking time is exceeded the oven will turn off automatically.
The oven has convection heat and grill spit and is perfect for baking, gratinate, grilling, roasting, cooking etc.
Whether meat, vegetables, pasta, pastry or cakes, everything is fast and easy to prepare.
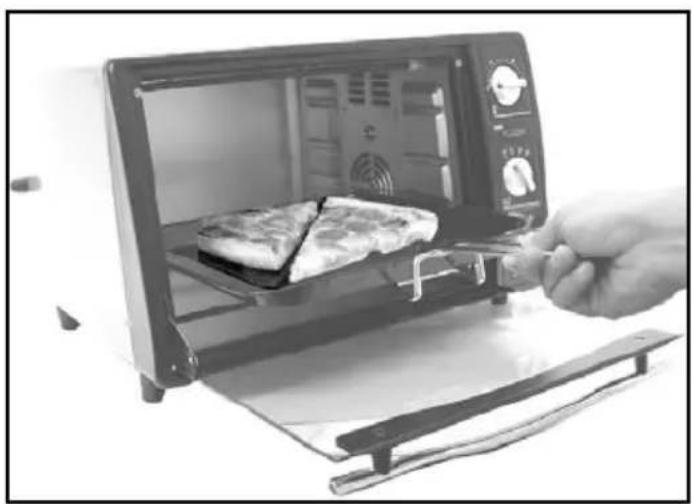
How to use (Grill spit)
Because this appliance is used with convection heat, no preheating is required.
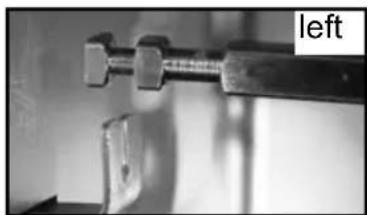
Place one meat holder (10) on the spit (11)
and secure with the wing nuts.
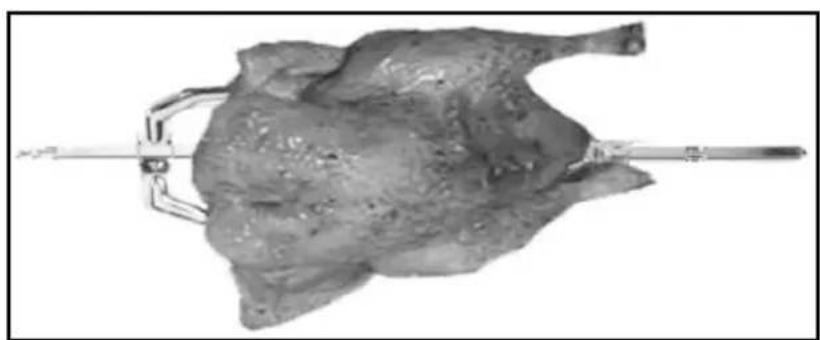
Centre the food to be grilled on the spit (11) property.
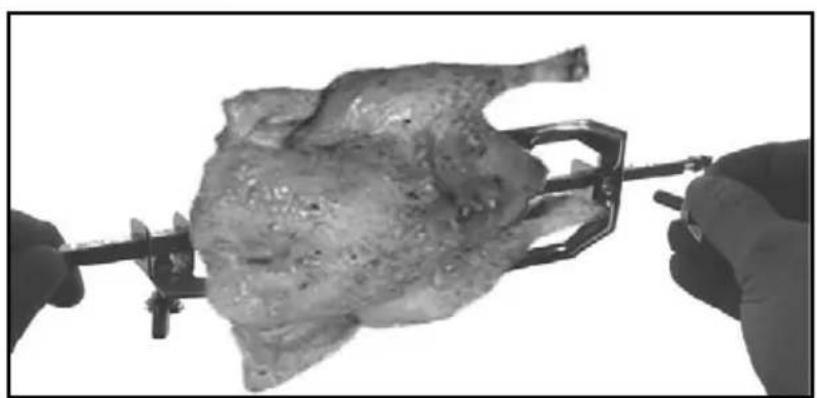
Place the second meat holder (10) on the spit (11) and secure with the wing nuts.
Make sure the food to be grilled is properly secured through the two meat holders (10)
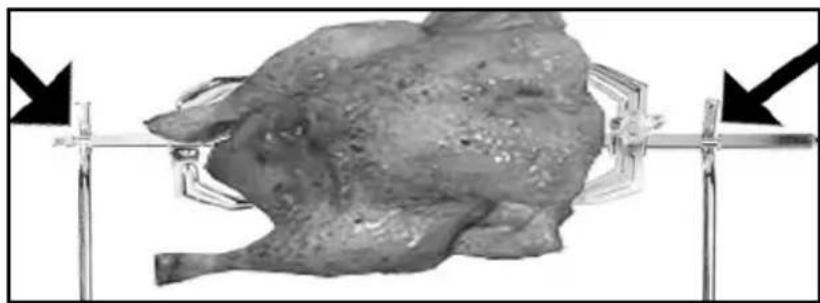
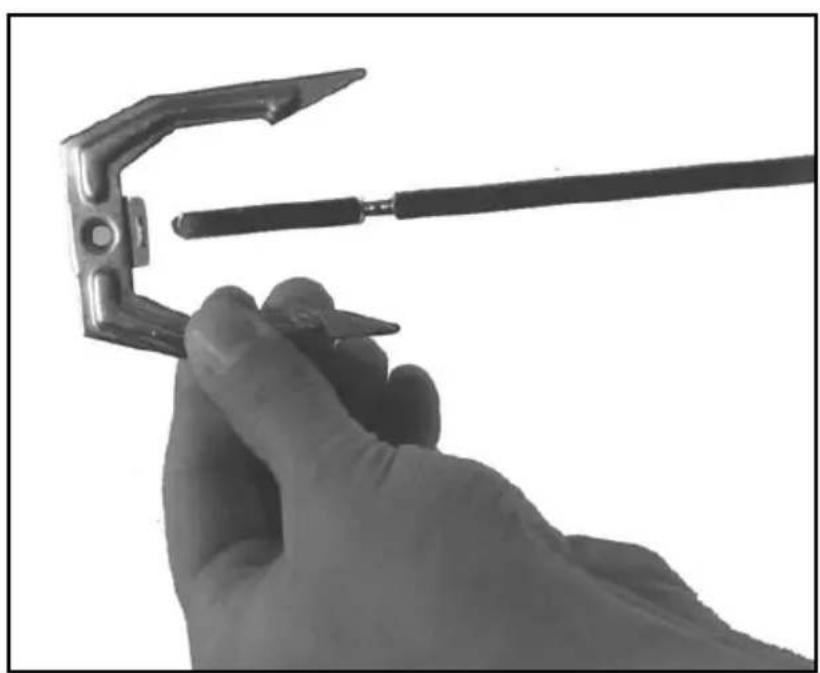
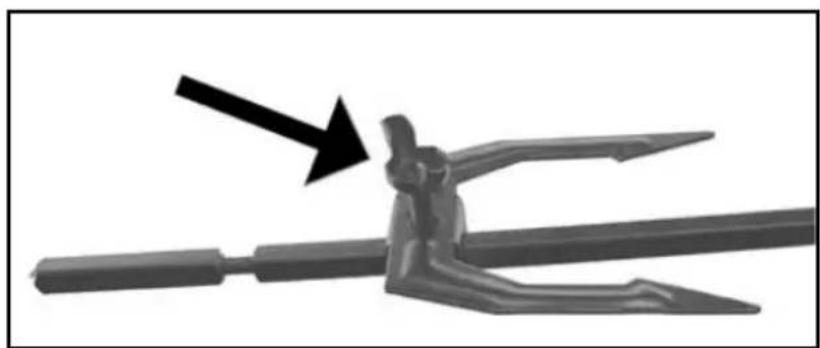
Hold the spit (11) with the help of the spit holder (12). Important! Make sure that the hooks of the holder are placed in the notches of the spit.
This prevents the spit from slipping.

First slide the spit (11) in the rotational direction towards the inner wall of the oven, then the position other end with the notch opposite the spit holder.
Note: In order to catch the grill juices slide the oven shelf (7) into the lowest position in the oven.
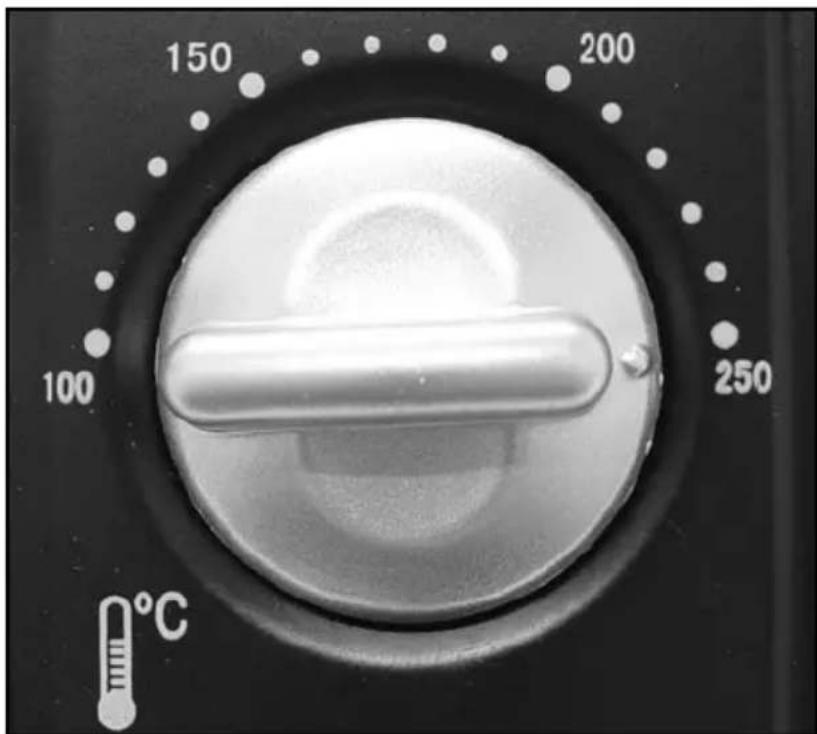
Select the required temperature with the temperature controller (1).
Note: Set the temperature controller higher or lower, depending of what you want to grill.
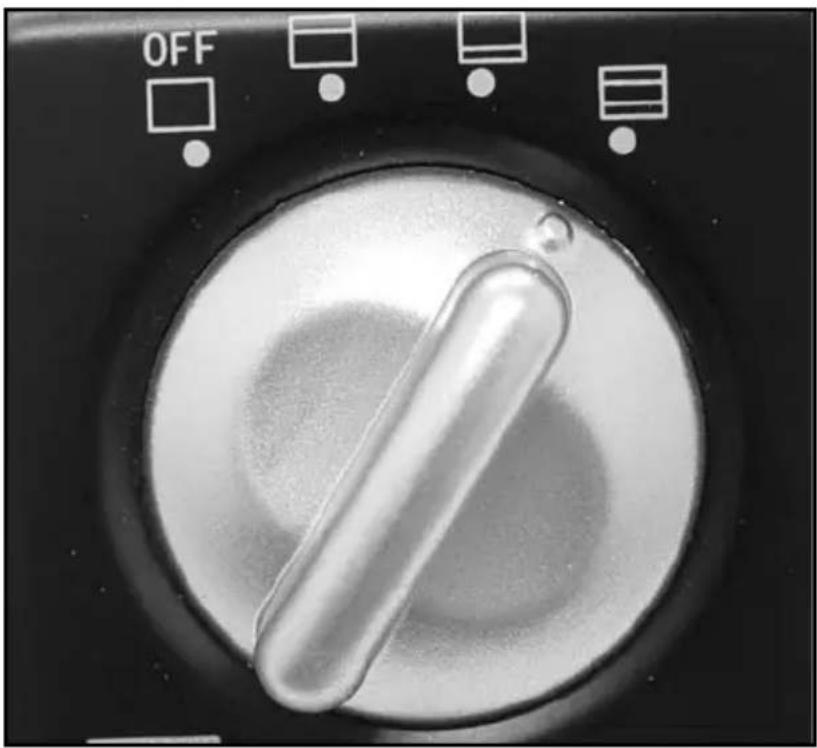
Set the heating function rotary switch (3) on position "upper and lower heat".
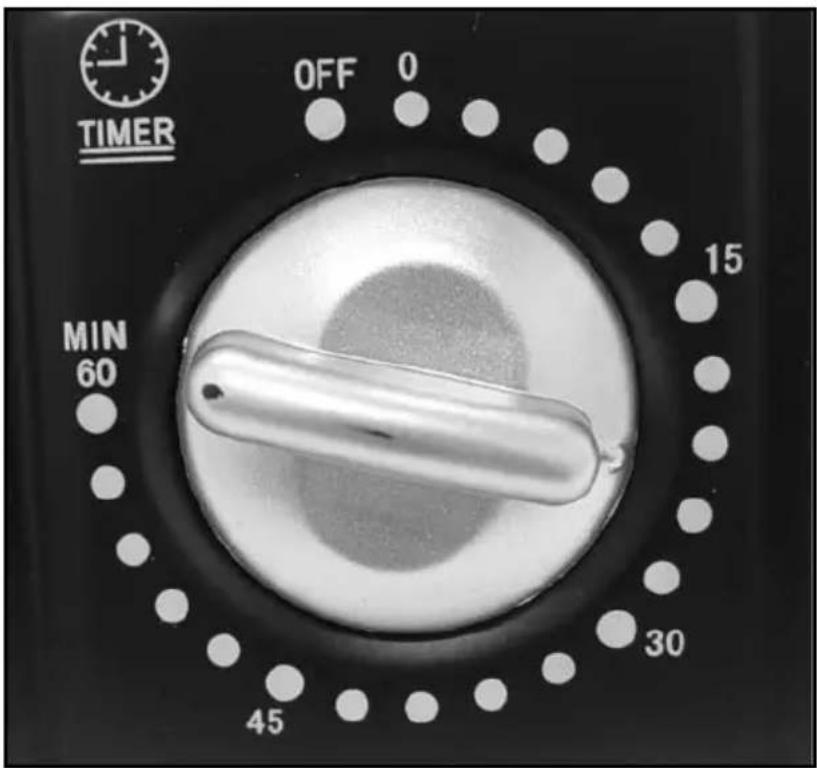
Set the timer (4) for the required grill time.
Note: The grill time depends on the size and type of food you want to grill.
If your food is grilled before the set time run off set the timer (4) to position "0". Otherwise when the grill time run off signal will be heard and the oven will switch off automatically.
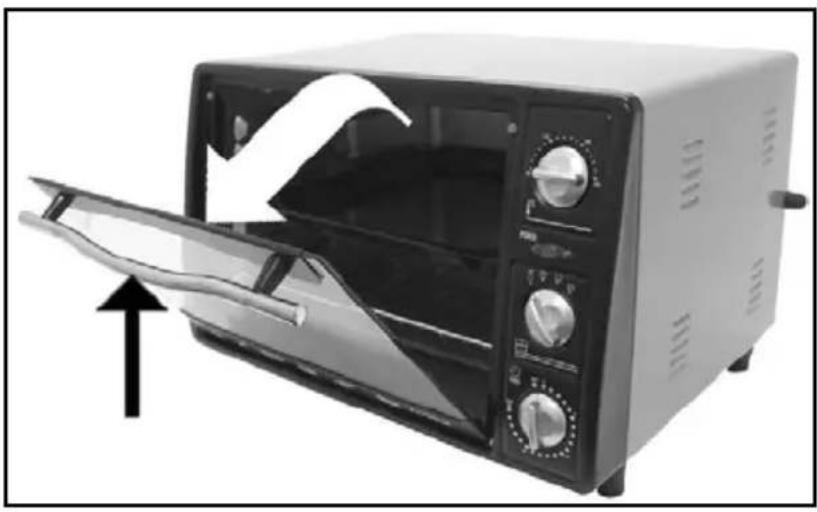
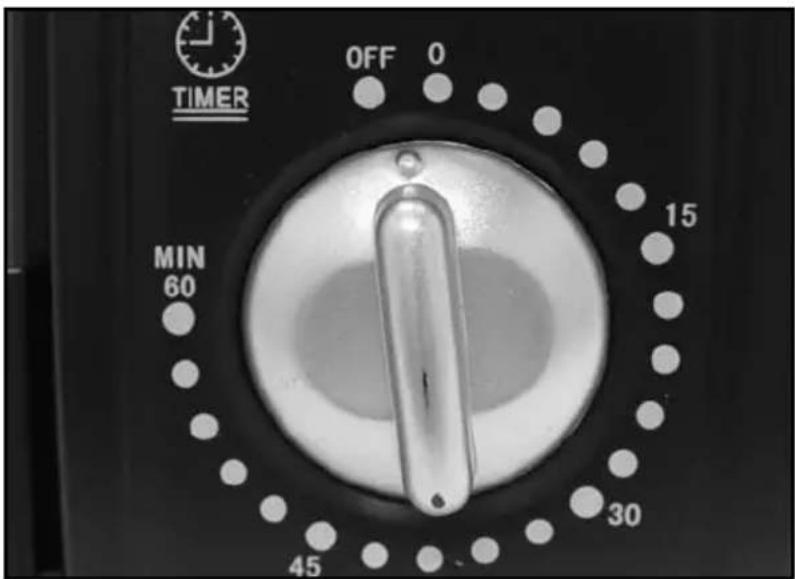
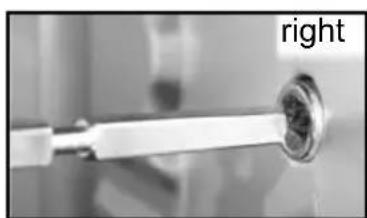
Open the oven door (5) with the handle (6).
Caution:
The equipment can get very hot! Danger of burns! Only touch the oven door by the handle. During the grill process hot steam escapes. Do not put your face near of the oven. Hot steam can cause burns.
First lift the spit (11) with help of the spit holder (12) to the left
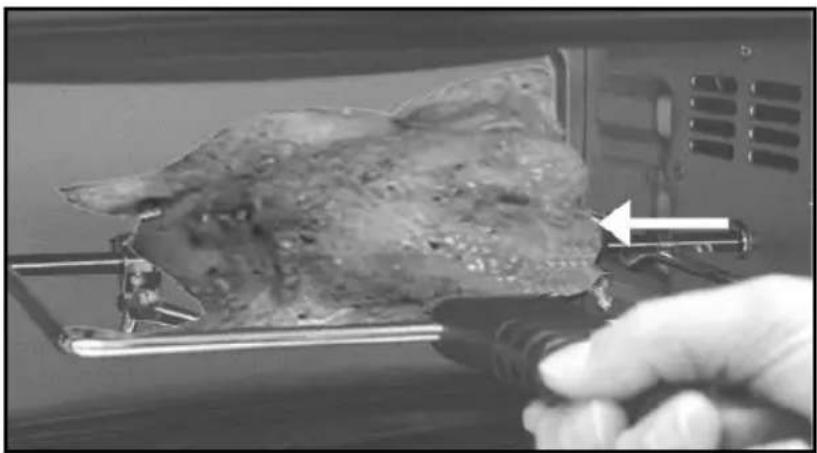
then remove the spit with pulling from right to left side, and place it on a tray or plate
Tip:
If you want to control if a chicken is properly cooked, you can do so by turning it so the juice runs out. If the juice is clear, your chicken is well done.
General information:
- In order to allow the interior of the to oven cool down, open the oven door slightly in the correct position it will click into place.
- To ensure that the appliance works correctly, the temperature (1), the required heating function (3) and the timer (4) must be set.
- With the timer the convection function is automatically on. (This cannot be set separately)
- Similarly with the timer the spit will also turn on. So if the spit is not in use it should be removed.
- The heating function (3) cannot be switched on separately. This program runs in conjunction with the convection.
- When setting a time of less than 15 minutes. First set the timer to 15 minutes and then set it to the actual time required, e.g. 10 minutes, otherwise no audible signal will be heard.
- For settings of over 60 minutes, it will be necessary to set the timer more than once to set the required time.
- Tongs (8) for removal of the oven shelf (7).
Cleaning and care
It is important to clean the interior of the oven of fat and food residues after each use.
Before cleaning and storage remove the plug from the mains power supply completely and allow the appliance to cool down. Caution! The housing becomes hot during use and needs some time to cool down completely! Danger of burns!
Remove all parts (Baking tray (7), grill (9), grill spit (11)) from the oven. These can all be rinsed in a soap solution.
Clean the appliance with a moderately damp cloth and rub dry. Do not use steel wool cleaning pads or abrasive cleaning solvents.
During extended periods of non-use, protect the appliance against dust or dirt.
The high-grade steel heating elements should not be cleaned.
Disposal
Make worn out appliances unusable. Pull out the mains plug and sever the cord.
Electric appliances are to be returned to a shop of sale or handed over to an official dump.
Safety regulations
- The equipment can get very hot! Danger of burns! Only touch the oven door by the handle.
- Plug the appliance only in on outlet as mentioned on the rating plate and only plus it into an earthed, three-pin socket.
- An electric appliance is not a children's toy. Children are not aware of the hazards of electrical appliances. Therefore close supervision is necessary when the appliance is used by children. Keep children away from packing material, e.g., plastic bags.
- The installation of a faulty current protective device with a rated breaking current offers you additional safety by ensuring that 30mA will not be exceeded in the house installation. Let your installation electrician advise you. Danger also exists with appliance which have been switched off, this is why, after use, the plug should be removed for the mains.
- Do not use this appliance near the water contained in bath-tubs, washbasins or other receptables nor expose it to rain or other humidity.
- Should however the appliance fall into water, only take it out after pulling the plug. Then do not use the appliance anymore, but first have it checked by an authorized service department.
- Regular check if the main cable is defective. In this case the appliance must not be put into operation (immediately pull the plug). Send it to the manufacturer for repair.
-
The appliance must not be operated (disconnect the mains plug immediately) when:
-
the appliance, casing or cable is damaged.
- the appliance shows visible signs of damage.
- a fault is suspected after a fall or the like.
- in case of faults during use.
- before cleaning or moving the appliance from place to place.
-
after use.
-
Never pull the plug out of the socket with wet hands.
- Never carry nor pull the appliance by the flex.
- Don't pull the flex over sharp edges. Don't wedge it.
- Do not bend the flex nor wind it around the appliance.
- Never put the appliance on hot surfaces nor near open flames. Lay the cord so that it does not touch hot or sharp-edged objects. Do not use the appliance while standing on a humid floor or when your hands or the appliance are wet.
-
Never put the appliance on the edge of the table and avoid the contact with hot surfaces.
-
Do not leave the appliance unattended while it is connected to the power source.
- Allow to cast before putting on or taking off part, and before cleaning this appliance.
- Never cover the appliance with a cloth or other materials such as paper. Fire hazard!
- Do not use the equipment in the open air.
- Do not place any containers that may melt or ignite inside the oven.
- Do not place any other devices on the oven.
- This appliance is not meant for commercial use only exclusively for private use.
- Use this appliance only for its intended use as described in this manual. Do not use attachments not recommended by the manufacturer.
- Do not place chemicals, living organisms (animals or plants) or non-food items of any kind in the microwave.
- Only trained personnel should repair electrical appliances. Unskilled repairs can cause considerable danger to the user.
- In case of damage to the power cable this may only be replaced by a customer service authorized by the manufacturer.
- No warranty for any possible damage can be accepted if the appliance is used for improper per purpose, wrongly operated or unprofessionally repaired. In such a case, any warranty claim is void.
Switzerland Trisa Electro AG
Kantonsstrasse 121
CH-6234 Triengen
info@trisaelectro.ch
++41419330030
Austria Franz Holzbauer
Service GmbH
Unterhaus 33
A-2851 Krumbach
service@trisaelectro.at
++ 43 (2647)4304070