
DVD 210ZU - DVD player NPG - Free user manual and instructions
Find the device manual for free DVD 210ZU NPG in PDF.

| Product type | DVD Player |
| Brand | NPG |
| Model | DVD 210ZU |
| Power supply | AC 110-240 V ~50/60 Hz |
| Supported formats | DVD, Audio CD, MP3, WMA, JPEG |
| Video outputs | Composite (CVBS), SCART (RGB) |
| Audio outputs | Stereo analog audio (via SCART or composite) |
| Remote control | Yes, included |
| Language setup | OSD, audio, subtitles, disc menu |
| TV system | PAL / NTSC |
| Display format | 4:3, 16:9 |
| Dimensions (approx.) | 43 x 26 x 5 cm |
| Weight (approx.) | 2.5 kg |
| Laser class | Class 1 |
| Maintenance | Clean with a soft, dry cloth. Unplug before cleaning. |
| Safety | Do not open the casing. Avoid exposure to moisture. Use only on a stable surface. |
Frequently Asked Questions - DVD 210ZU NPG
User questions about DVD 210ZU NPG
0 question about this device. Answer the ones you know or ask your own.
Ask a new question about this device
Download the instructions for your DVD player in PDF format for free! Find your manual DVD 210ZU - NPG and take your electronic device back in hand. On this page are published all the documents necessary for the use of your device. DVD 210ZU by NPG.
USER MANUAL DVD 210ZU NPG
1.1 Caution 3
1.2 Safety instructions 3
- Cautions and safety instructions 3
- System elements 4
2.1 Remote control unit 4 - Connections 4
3.1 Audio and video output connections 4
3.2 A/V output connections 4 - Playback types 5
4.1 DVD discs 5
4.2 MP3 and WMA files 5
4.3 CD audio discs 5
4.4 JPEG pictures 5 - System settings 5
5.1 Language setup
5.2 Video setup - Trouble shooting
5
5
6
1. Caution and safety instructions
1.1 Caution
Please, read this User Manual carefully before using the product. Keep the user manual in a safe place to future advice.
- There are high voltage areas inside this equipment that may injury people. Therefore, please do not open the product on any account. In case of any technical failure, please get in contact with our technical service.
- In order to avoid either an accidental fire or electric shock, please do not place the product under the rain or in moist zones.
- This device uses a laser system. To prevent a direct exposure to the laser beam, please neither open the product nor stare at laser beam.
- In case of being necessary any technical maintenance, please contact with our technical service.
- This product has been tested according to the B-Class of digital devices and it meets all the CE specifications.
- If the cable is damaged, it must be repaired by the manufacturer, the after sales service agent or similarly qualified person to avoid danger.
1.2 Safety instructions
It is very important to read attentively and follow out the instructions of this user manual. Keep the manual for future consultation.
- Do not place the unit on uneven surfaces because the player may fall to the ground and suffer a breakdown or damage to people or pets.
- Disconnect the product from the mains before cleaning it. Do not use cleaning liquid or sprays. Use only a moist cleaning rag.
- To avoid possible damage to equipment, please unplug it, when it is not going to be used for a long time or in case of storms.
- Do not introduce any object into the product by means of the ventilation slots since it could cause a short-circuit and start a fire. Do not pour liquids on the DVD player
- The mains socket must be close to the equipment and be easily accessible.
Do not either step on the powering cable or place objects on it. - To avoid interferences, the active devices such as TV amplifiers, Home Theater Systems, ... must be kept away from the unit.
- The powering supply of this product is, AC 110-240V ~ 50/ 60Hz. Do not use any other power source.
- Do not either obstruct the ventilation slots or place the device near heating sources.
- Children should be monitored to make sure they do not use the device as a toy.
2. System elements 3. Connections
3.1 Audio and video output connections
Use 2.1-channel surround sound and enjoy your own home cinema. You can connect the video between the DVD player and TV using composite video or SCART terminal
3.2. A/ V output connection SCART connector (Good quality) You can connect the DVD to the TV with a SCART video and audio output or Euroconnector.
You should select the "RGB" option to set up the video output.
4. Playback types
4.1 DVD discs
The DVD will start running automatically after you insert it into the player by opening the disk's home menu. From here, depending on the disk, you can select various options such as starting playback of the DVD film, audio language and home menu language, etc.
4.2 MP3 and WMA files
Once you insert a CD in MP3 or WMA format, the system will start to play the first title in the first directory.
- Use the cursor keys to select the song you want and press "ENTER" to start playback.
4. Playback types
4.3 CD audio discs
Once you insert the CD, the system will begin to play the first track on the disc.
- You can use the normal playback functions such as play, pause, stop, next track (NEXT) and previous track (PREV), skip and repeat.
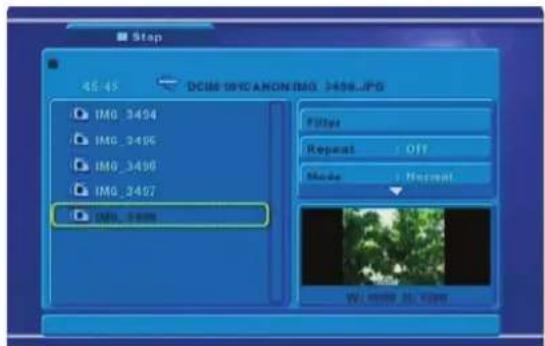
4.4 JPEG picture
After inserting a CD with JPEG pictures on it, the system will start to display a slideshow.
5. System settings
Press the "SETUP" key to go to the system setup menu to change the different options in the following submenus:
5.1 Language setup
This option allows you to select your preferred languages for the OSD menus, the subtitles, the audio and the DVD disk menu. There are various languages to choose from including english.
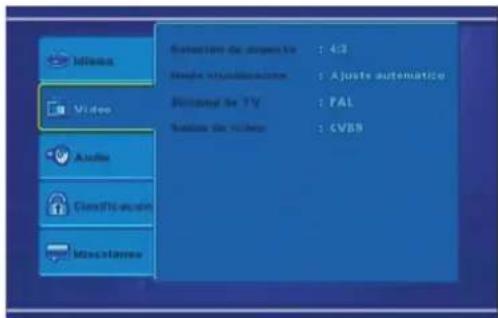
5.2 Video setup
A. Aspect Ratio: Use this to select the TV Shape that matches the screen setting of your TV set and the DVD that is playing.
B. View mode: With this option you can select the video vision mode on the screen.
C. TV system: Use this option to select either PAL or NTSC video format.
D. Video output: With this option you should choose the type of video output that your installation is using: CVBS (Composite Video Signal) or RGB (RGB video signal).
6. Trouble shooting
In the event that you detect a problem, we suggest that you check the following list before requesting technical service.
| Symptom Possible cause Remedy | ||
| No power | 1. Power supply not connected.2. Bad contact between the power plug and the receptacle.3. The power of the receptacle is off. | 1. Connect to the power supply.2. Plug again or replace a receptacle.3. Switch on the receptacle. |
| No sound | 1. Incorrect signal connection.2. The disc is deformed or get dirty.3. The system is inhte mute sta-tus. | 1. Connect the signals properly.2. Clean or fix the disc.3. Press the "MUTE" button again. |
| No picture | 1. Incorrect signal connection.2. Incorrect TV status. | 1. Connect the signals pro-perty.2. Adjust the TV/ AV status. |
| No color | 1. Wrong selection of TV system.2. Improper color adjustment.3. Incorrect video output set-tings. | 1. Setup the system by pres-sing the "System" button of the Remote Controller.2. Readjust the color3. Check if the video output settings are correct. |
| Disc cannot be pla-yed | 1. No disc in the drive.2. Disc place wrongly.3. Moisture has condensed in the unit.4. Not in a playing status.5. Wrong disk format.6. Disk is dirty. | 1. Insert a disk.2. Put the disk on the disk tray properly with the label side up.3. Leave the unit on for about an hour (without disk) and before using it again.4. Press the "Play" button to switch to playing status.5. Replace it with a supported disk.6. Clean the disk with a soft cloth from the centre to the edge. |
| Symptom Possible cause Remedy | ||
| Remote controller malfunction | 1. The remote controller is not directed at the sensor. 2. The receiving distance is more than 8 meters. 3. Low voltage of the RC batteries. 4. There is an obstacle between the unit and the RC. | 1. Direct the remote controller at the sensor. 2. Reduce the receiving distance. 3. Replace all the batteries. 4. Remove the obstacles. |
| Sudden malfunction | 1. Bad disc quality. 2. Press other button by mistake. 3. Static from the outside. | 1. Wait for 5-10 seconds and the playing will be restored. 2. Operate again. 3. Shut off the unit for 1-2 minutes and open it again. |
| Picture dividing | 1. The selected system is incompatible with the disc. | 1. Set up the correct system. |

Disposal of old appliance.
According to the European standard 2002/96/EC on waste electrical and electronic equipment (WEEE), the old appliance can not be placed in the municipal standard, must be collected separately in order to optimize the recovery and recycling of components and materials they contain, and reduce the impact on human health and the environment. The symbol of the trash bin with a cross on top is placed on all products to remind consumers of the obligation to separate them for collection.
Consumers should contact the local authority or retailer for information concerning the disposal of your old appliance.

manuel D'Instruction DVD

Table des matieres
- Caution and safety instructions
- Caution
- Safety instructions
- System elements 3. Connections
- Audio and video output connections
- A/ V output connection SCART connector (Good quality) You can connect the DVD to the TV with a SCART video and audio output or Euroconnector.
- Playback types
- DVD discs
- MP3 and WMA files
- CD audio discs
- JPEG picture
- System settings
- Language setup
- Video setup
- Trouble shooting
- Disposal of old appliance.
- Table des matieres
Brand : NPG
Model : DVD 210ZU
Category : DVD player