
CMP 570 BT - Cd player/recorder Trevi - Free user manual and instructions
Find the device manual for free CMP 570 BT Trevi in PDF.
| Product type | CD player/recorder |
| Brand | Trevi |
| Model | CMP 570 BT |
| Power supply | AC 220-230V / 50Hz |
| Backup power | 6 C batteries (UM-2) |
| Standby consumption | < 0.5 W |
| Radio bands | FM stereo, AM |
| Disc compatibility | CD audio, CD-R, CD-RW, MP3, WMA |
| Connectivity | Bluetooth, USB, AUX IN (3.5 mm) |
| Playback functions | Programming (20 CDs / 99 MP3s), repeat, random, track skip |
| FM antenna | Telescopic |
| Display | LCD |
| Maintenance and cleaning | Soft cloth slightly damp; avoid solvents and abrasive substances |
| Safety | Class 1 laser warning; do not open; avoid moisture, magnetic fields and heat sources |
| Spare parts and repairability | Repairs exclusively by a Trevi authorized service center |
| General information | Brand: Trevi; Model: CMP 570 BT; Category: CD player/recorder |
| Automatic standby | After 15 minutes of inactivity in CD/USB/AUX/BT mode |
Frequently Asked Questions - CMP 570 BT Trevi
User questions about CMP 570 BT Trevi
0 question about this device. Answer the ones you know or ask your own.
Ask a new question about this device
Download the instructions for your Cd player/recorder in PDF format for free! Find your manual CMP 570 BT - Trevi and take your electronic device back in hand. On this page are published all the documents necessary for the use of your device. CMP 570 BT by Trevi.
USER MANUAL CMP 570 BT Trevi
BLUETOOTH FM RADIO AUX-IN
Bluetooth: V2.1 + EDR
AUX-IN: Presa Jack 3.5mm
Dimensioni: 240x210x115mm
NOTES OF USE
Do not listen at high volume for a long time may damage your hearing.
Avoid placing the player:
- Close to magnetic fields.
- Near heat sources such as heaters and stoves.
- In places with high humidity such as bathrooms, swimming pools, etc. ...
- In dusty places.
- In areas subject to strong vibration.
- Place the set on its side so that there is always enough
space for the free movement of air (at least 5cm
- If any water gets inside the unit, immediately disconnect the power plug from the outlet and take it to the nearest authorized service center TREVI.
- Always check that the power cables are installed correctly.
CARE AND MAINTENANCE
For cleaning we recommend the use of a soft, slightly damp cloth. Avoid solvents or abrasives
IMPORTANT
The good construction of this machine guarantees the perfect functioning for a long time. However, should any problem arise, you should consult your nearest authorized service center.
TREVI pursues a policy of continuous research and development. Therefore, the products may have different features from those described.
PACKAGE CONTENTS
- unity player
manual - Mains Power Cord
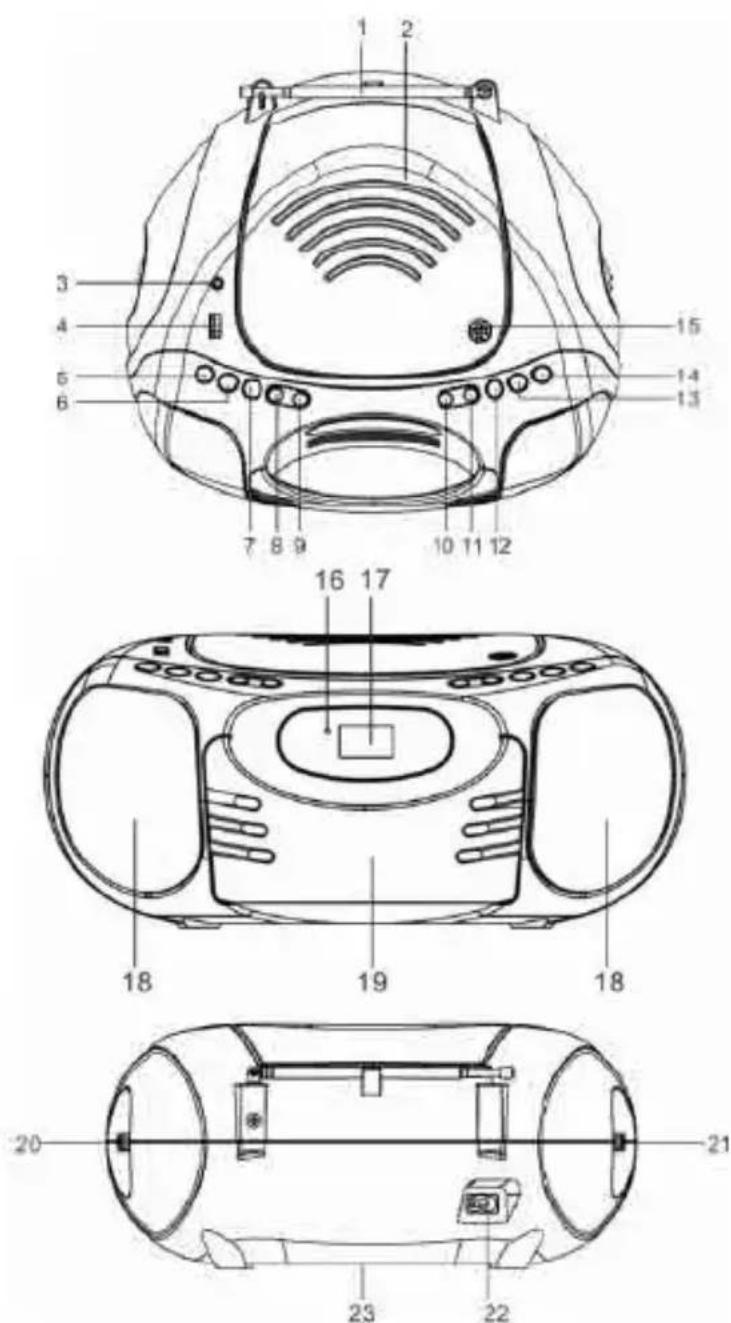
CMP 570 BT
- FM TELESCOPIC ANTENNA
- CD COMPARTMENT
- AUX-IN JACK
- USB PORT
- STANDBY BUTTON
- FUNCTION BUTTON
- BAND BUTTON
- FOLD.-/-10 BUTTON
- FOLD. + / + 10 BUTTON
- CD SKIP/SEARCH BACKWARD BUTTON
-
CD SKIP/SEARCH FORWARD BUTTON
12.PROG./P-MODE BUTTON -
CD STOP BUTTON
- Play/Pause /PAIR BUTTON
- CD DOOR OPEN/CLOSE
- STANDBY/PAIR INDICATOR
- LCD DISPLAY
- SPEAKERS
- HANDLE
- TUNING CONTROL
- VOLUME CONTROL
- AC SOCKET
- BATTERY COMPARTMENT

POWER SOURCE
- Open the BATTERY COMPARTMENT DOOR by pushing the catches downwards.
- Install 6 × UM2 batteries carefully as indicated in battery compartment.
-
Close the BATTERY COMPARTMENT DOOR.
-
Remove batteries if they are flat or not being used for a long period of time.
- Batteries contain chemical substances, so they should be disposed of properly.
BASIC FUNCTION
SWITCHING ON THE UNIT
- Plug the AC MAIN POWER PLUG into the standard household AC receptacle.
- Press the STANDBY button to switch the unit on or off.
NOTE: In CD/USB/AUX/BT mode when the unit is not providing the main function for 15 minutes, the unit will automatically switch into standby mode. To turn on the unit again, press "STANDBY" button or replug the unit.
ESD hints – The product maybe reset or not reset to operation of control due to electrostatic discharge, just switch off and reconnect again.
TO ADJUST VOLUME
Rotate the VOLUME CONTROL back and forth to increase and decrease volume.
AUX-IN OPERATION
This unit has provided special AUX-IN jack, through this jack other audio sources can be connected to this unit and be amplified.
- Press the FUNCTION button to AUX position.
- Connect the audio cable into the AUX-IN jack and the other end connect to the AUDIO OUT jack of the external audio source. The unit will change to AUX mode automatically.
- Adjust the volume of the main unit to your desired level.
- Press PLAY of the external audio source (eg. MP3 player) to start playback.
USING THE RADIO
TUNING IN RADIO STATIONS
- Press the FUNCTION button to FM mode. Press the BAND button to select the desired wave band: AM/ FM ST..
- Tune to required station by rotating the TUNING CONTROL.
- Rotate the VOLUME CONTROL to comfortable volume level.
- Extend the TELESCOPIC ANTENNA to its full length if you are listening to FM broadcasting. Gently rock the unit back and forth to get the best reception when you are listening to AM program, or place the unit in an open place.
Note: The STEREO indicator will be on if you are receiving FM stereo program.
- Turn off the radio by press the STANDBY button.
USING THE CD/MP3
DISCS FOR PLAYBACK
This system can playback all digital audio CD, MP3, WMA finalized digital audio CD-Recordable (CD-R) discs, finalized digital audio CD-Rewritable (CD-RW) discs and CD-DA format digital audio CD/CD-R/CD-RW discs.
LOADING A DISC
- Press the FUNCTION button to CD mode.
- Press the CD DOOR OPEN/CLOSE to Open the CD door.
- Place an audio CD/MP3 disc into the tray with the label side facing up.
- Close the CD door.
The total number of tracks will appear on the display after several seconds.
5. To remove the CD/MP3 disc, press the CD DOOR OPEN/CLOSE to open CD compartment lid, grasp the CD/MP3 disc by its edges, and carefully take it out.
Note:
To ensure good system performance; wait until the disc tray completely reads the disc before proceeding.
- If no disc is loaded into the compartment, or the disc is placed upside down, the display will show No.
PLAYING A DISC
- The playback starts from track 1 automatically when reading the disc.
To pause playback, press /PAIR button. The current track will flash on the display.
To resume playback, press /PAIR button again. - To stop playback, press STOP button and the display will show the total number of tracks.
SELECTING A DESIRED TRACK/PASSAGE
To select a desired track
- Press the CD SKIP/SEARCH FORWARD /BACKWARD button repeatedly in stop mode or during playing until the desired track appears on the display.
- Press the /PAIR button to start play.
To search for a particular passage during playback (track scanning at high speed)
Press and hold the CD SKIP/SEARCH FORWARD /BACKWARD button to scan the current playing track at high speed until desired point passage, and then release the button.
Playback will start again from this point.
To select a desired folder (for MP3 disc only)
(if the MP3 disc contains more than one folder)
Press and hold the FOLD. + / + 10 or FOLD.-/-10 button to skip next/previous folder. Until the desired folder number appears on the LCD display, then release the button,
To select a song which track number exceeds 10
To select a song/track which number exceeds 10, Press the FOLD. + / + 10 or FOLD. - / - 10 button each time to skip forward or backward 10 tracks, then press the or button to select desired track. For example: to select the 17th track from the 1st track, press FOLD. + / + 10 button, and then press the button six times immediately.
PROGRAM TRACKS
Programming tracks of disc are possible when playback is stopped. Up to CD 20 tracks /MP3 99 tracks can be stored in the memory in any order.
- In stop mode, press the PROG.-/MODE button, the "PROGRAM" will flash and the P01 indicator will be on.
- Press the CD SKIP/SEARCH FORWARD button to select the first desired track to be programmed.
- Press the PROG./P-MODE button to enter. The display changes to show P02.
- Repeat steps 2 & 3 to store other desired tracks until all tracks are programmed.
- Press the /PAIR button to start playback from the first programmed track.
- Press the STOP button to stop program playback.
To Erase the Memory (Program)
To clear the program, you have two options:
- Press the STOP button when the disc is stopped, or
- Open the CD compartment lid, program will be erased.
REPEAT
To Repeat a Single Track
- Press the PROG./P-MODE button once in play mode, " will flash on the dispa The current track will be played repeatedly until the STOP button is pressed
- To cancel repeat play press the PROG./P-MODE button until the " " disappear on show.
To repeat all the Tracks
-
In playing mode press PROG./P-MODE button until the “ ” shows steady on the display, all tracks on the disc will be played repeatedly until the STOP button is pressed.
-
To cancel repeat play, press the PROG./P-MODE button until the “ ” disappear on show .
To repeat current Directory (for MP3 only)
- Press PROG./P-MODE button twice in play mode, "FOLDER" shows steady on the display, The current directory will be played repeatedly until the STOP button is pressed.
- Press the PROG./P-MODE button till the " FOLDER" disappear to cancel.
RANDOM PLAY
Press the PROG./P-MODE button in play mode till the "RAND" shows steady on the display, the random play will start from next track automatically (or press CD skip forward button), until all tracks are played over and then stop. Press the PROG./P-MODE button once to cancel.
USB OPERATION
USB PLAYBACK
- Press the FUNCTION button to USB mode.
- Connect the USB to the USB INPUT. The LCD will display total number of tracks stored inside the USB. The playback stars from track 1 automatically after reading the USB.
- Press the /PAIR button to temporarily stop. The track number will flash.
- Press the STOP button to stop playing. The display will show total number of tracks.
- Proceed repeat play (repeat 1/repeat all/repeat folder)/program play/random play/skip up and down operation as the same described in above "USING THE USB/MP3".
CAUTION:
Do not use any USB extension cable for connecting the USB bar which may cause harmful interference.
BLUETOOTH OPERATION
- Set the FUNCTION switch to BLUETOOTH function, the LCD will display “ ” and the light will flash at high speed.
- Turn on the Bluetooth function on mobile, scan the device "CMP 570BT/F-3086" and connect, then input the password 0000 if required, the light will light up to indicate connection done. Press Play button on mobile to start playback. If the unit can't connect the relative Bluetooth within 2 minutes, the indicator light will flash each 2'nds. Then press and hold the PLAY/PAUSE/PAIR button to reconnect.
- Adjust the volume of the main unit to your desired level.
-
Press and hold the PLAY/PAUSE/PAIR button about 2`nds to disconnect Bluetooth. to select the desired track no.
-
Press once the PROGRAM BUTTON again to memorize the first selected track
-
Repeat steps 2 and 3 until all desired tracks are programmed.
- Press the PLAY / PAUSE BUTTON to start playing..
- Press the STOP BUTTON to stop programmed playback.
- Open the CD DOOR or turn off the unit to clear the programmed memory.
NOMINAL SPECIFICATIONS
Power Sources: AC230V~50Hz (UM2X6 Batteries - not included)
Power Consumption: .........Standby < 0.5W
Bluetooth: V2.1 + EDR
AUX-IN: Presa Jack 3.5mm
Dimensions: 240x210x115mm

VOLTAGE DANGEREUX
Bluetooth: V2.1 + EDR
AUX-IN: .Prise Jack 3,5 mm
Dimensions: 240x210x115mm

Bluetooth: V2.1 + EDR
Bluetooth: V2.1 + EDR
Line IN: Toma Jack 3,5 mm
Dimensiones: 240x210x115mm

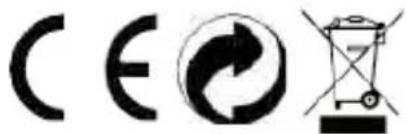
Precautions for correct disposal of the product.
The symbol shown on the equipment indicates that waste must be disposed of in "separate collection" and so the product must not be disposed of together with urban waste.
The user must take the product to special "separate waste collection centres" provided by local government, or deliver it to the retailer against the purchase of a new product.
Separate collection of waste and subsequent treatment, recycling and disposal operations promotes the production of equipment with recycled materials and limits negative effects on the environment and on health caused by improper handling of waste.
Illegal disposal of the product leads to the enforcement of administrative penalties.

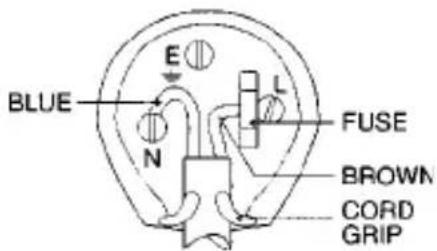
WIRES CONNECTIONS TO A UK THREE-PIN PLUG
The wires in this mains lead are coloured in accordance with the following wiring codes:
Blue: Neutral
Brown: Live
The wires in this mains lead must be connected to the terminals in the plug as follows:
Blue wire: N or Black
Brown wire: L or Red
Neither wire is to be connected to the earth (E or W) terminal of three-pin plug.
Should the fuse fail in the plug remove the plug form the wall socket and replace the fuse with a 3 Amp. ASTA approved BS 1362 fuse.
MADE IN CHINA


- BLUETOOTH FM RADIO AUX-IN
- NOTES OF USE
- CARE AND MAINTENANCE
- IMPORTANT
- PACKAGE CONTENTS
- CMP 570 BT
- POWER SOURCE
- BASIC FUNCTION
- SWITCHING ON THE UNIT
- USING THE RADIO
- TUNING IN RADIO STATIONS
- USING THE CD/MP3
- DISCS FOR PLAYBACK
- LOADING A DISC
- Note:
- PLAYING A DISC
- SELECTING A DESIRED TRACK/PASSAGE
- To select a desired track
- To select a desired folder (for MP3 disc only)
- PROGRAM TRACKS
- REPEAT
- To Repeat a Single Track
- RANDOM PLAY
- USB OPERATION
- USB PLAYBACK
- CAUTION:
- BLUETOOTH OPERATION
- NOMINAL SPECIFICATIONS
- VOLTAGE DANGEREUX
- Precautions for correct disposal of the product.
- WIRES CONNECTIONS TO A UK THREE-PIN PLUG
Brand : Trevi
Model : CMP 570 BT
Category : Cd player/recorder