TX22 - DJ Equipment TECHNAXX - Free user manual and instructions
Find the device manual for free TX22 TECHNAXX in PDF.
| Product Type | Bluetooth turntable and cassette digitizer |
| Brand | Technaxx |
| Model | TX22 |
| Dimensions (L x D x H) | 32.3 x 31.1 x 13.2 cm |
| Weight | 3 kg |
| Power supply | DC 12V / 2A (power adapter included) |
| Bluetooth version | 4.2 |
| Bluetooth range | Approx. 10 m (open areas) |
| Bluetooth output power | 2.5 mW max. |
| Built-in speakers | 2 x 3 W stereo, ø 7 cm, impedance 4 Ω |
| Speaker frequency response | 80 Hz - 15 kHz |
| Recording | MP3 to USB flash drive or SD card up to 32 GB |
| Playback | MP3/WMA from USB flash drive or SD card up to 32 GB |
| Turntable speeds | 33, 45, 78 rpm (switchable) |
| Cassette deck | Playback and recording of audio cassettes |
| Inputs | AUX-IN 3.5 mm, headphone jack 3.5 mm, USB port, SD card slot |
| Outputs | 2 x RCA (400 mV) for connection to HiFi system |
| Material | MDF, PVC, plastic |
| Special features | Digitization of vinyl and cassettes to USB/SD, automatic turntable stop, Bluetooth recording |
| Display | Backlit LED screen |
| Package contents | TX-22+, 45 RPM adapter, DC 12V/2A power adapter, user manual |
| Care and cleaning | Clean with a soft dry cloth. Do not use solvents or abrasive cleaners. |
| Safety | Do not open the device. Use only with the supplied adapter. Unplug during thunderstorms or extended absence. |
| Spare parts and repairability | Replacement needle (lifespan ~250 h), replaceable drive belt. Technical support: 01805 012643 (Germany) |
| General information | 2-year warranty. Declaration of conformity available at www.technaxx.de |
Frequently Asked Questions - TX22 TECHNAXX
User questions about TX22 TECHNAXX
0 question about this device. Answer the ones you know or ask your own.
Ask a new question about this device
Download the instructions for your DJ Equipment in PDF format for free! Find your manual TX22 - TECHNAXX and take your electronic device back in hand. On this page are published all the documents necessary for the use of your device. TX22 by TECHNAXX.
USER MANUAL TX22 TECHNAXX
Technaxx® \* User Manual
Bluetooth Vinyl Record and Cassette Converter TX-22+
The manufacturer Technaxx Deutschland GmbH & Co.KG hereby declares that this device, to which this user manual belongs, complies with the essential requirements of the standards referred to the Directive RED 2014/53/EU. The Declaration of Conformity you find here: www.technaxx.de/ (in bar at the bottom "Konformitätserklärung"). Before using the device the first time, read the user manual carefully.
Service phone No. for technical support: 01805 012643 (14 cent/minute from German fixed-line and 42 cent/minute from mobile networks).
Free Email: support@technaxx.de
Keep this user manual for future reference or product sharing carefully. Do the same with the original accessories for this product. In case of warranty, please contact the dealer or the store where you bought this product. Warranty 2 years
Before usage
- Choose the installation location of your unit carefully. Avoid placing it in direct sunlight or close to a source of heat. Also avoid locations subject to vibrations and excessive dust, heat, cold or moisture.
- Do not install the unit in a inclined position, It is designed to be operated in a horizontal position only.
- If the unit is brought directly from a cold to a warm location, moisture may condense inside the player, and cause damage it. When you first install the unit, or when you move it from a cold to a warm location, wait for 30 minutes before operating the unit.
- The ventilation holes should not be covered. Make sure there is enough space above and beside the amplifier/receiver. Do not place a CD player or other equipment on top of the device.
- Do not open the cabinet. This might cause a damage to circuitry or electrical shock.
- If you are not going to use the player for long time, be sure do disconnect the player from the AC power source. When removing the power plug, never yank the cord.
- To prevent fire or shock hazard, disconnect your unit from the AC power source when cleaning. Use caution when cleaning and wiping the plastic parts. Do not attempt to clean the unit with the chemical solvents as this might damage the finish.
V2.0
natural_image
Black vinyl record with open lid and digital display (no visible text or symbols)Features
- Digitizing vinyl records & audio cassettes to USB or SD card up to 32GB
● Music playback & recording via Bluetooth 4.2
● Recording from external devices via AUX-IN connection
● Music files: recoding (MP3) & playback (MP3/WMA) from USB or SD card up to 32GB
● No computer/notebook required
● RCA outputs for connection to HiFi systems
● Record player with automatic stop & 3 speeds: 33, 45, 78 rpm
● Built-in cassette player
● Built-in stereo loudspeakers - LED display with backlight
● Functional and easy handling
Technical specifications
| Bluetooth | V4.2 / profil A2DP & HFP / distance ~10m open areas |
| Bluetooth transmitting frequency 2.4GHz | |
| Radiated output power max. 2.5mW | |
| Mode | Phono, Cassette, USB, SD card, AUX-IN, Bluetooth |
| Lautsprecher | 2x 3W stereo (∅=7cm), SNR ≤ 80dB, impedance 4Ω |
| Frequency range | Speakers 80Hz-15kHz |
| Recording | MP3 music files on USB or SD card up to 32GB |
| Playback | MP3/WMA music files from USB or SD card up to 32GB |
| Mechanics | Belt-driveSemi-automatic play tone pickup armCeramic stereo cartridge with sapphire stylus |
| Connections | 3.5mm AUX-IN jack & 3.5mm headphone jack2x RCA outputs for connection to HiFi systems 400mVUSB port & SD card slot (up to 32GB) |
| Input device | DC12V / 2A |
| Material | MDF + PVC + Plastic |
| Weight/Dimensions | 3kg / (L) 32.3 x (W) 31.1 x (H) 13.2cm |
| Package Contents | Bluetooth Vinyl Record and Cassette Converter TX-22+,Adapter for small vinyl records with 45 RPM, Power adapter DC12V/2A, User Manual |
Product Overview
Front View
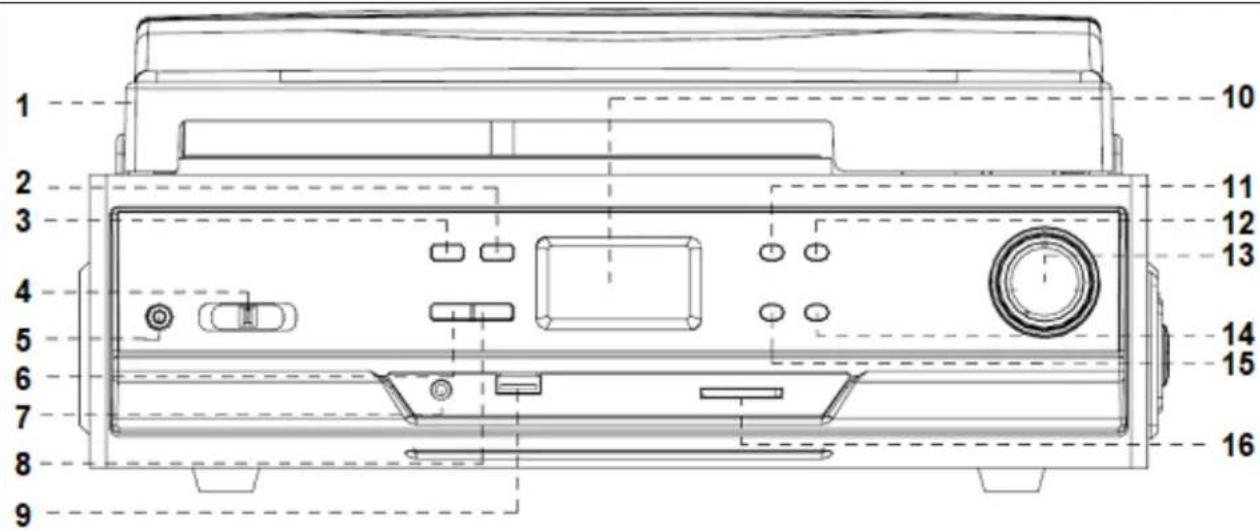
text_image
1 2 3 4 5 6 7 8 9 10 11 12 13 14 15 16| 1 | Dust cover | 9 | USB port |
| 2 | Source/ Mode (USB/SD) | 10 | LCD display |
| 3 | Record button | 11 | Play/Pause button |
| 4 | Function selector | 12 | Stop button |
| 5 | AUX–IN jack | 13 | Volume knob / ON / OFF |
| 6 | Delete button | 14 | Next/ Skip up button |
| 7 | 3.5mm headphone jack | 15 | Previous/ Skip down button |
| 8 | Rep/Ran (Repeat /Random) | 16 | SD card slot |
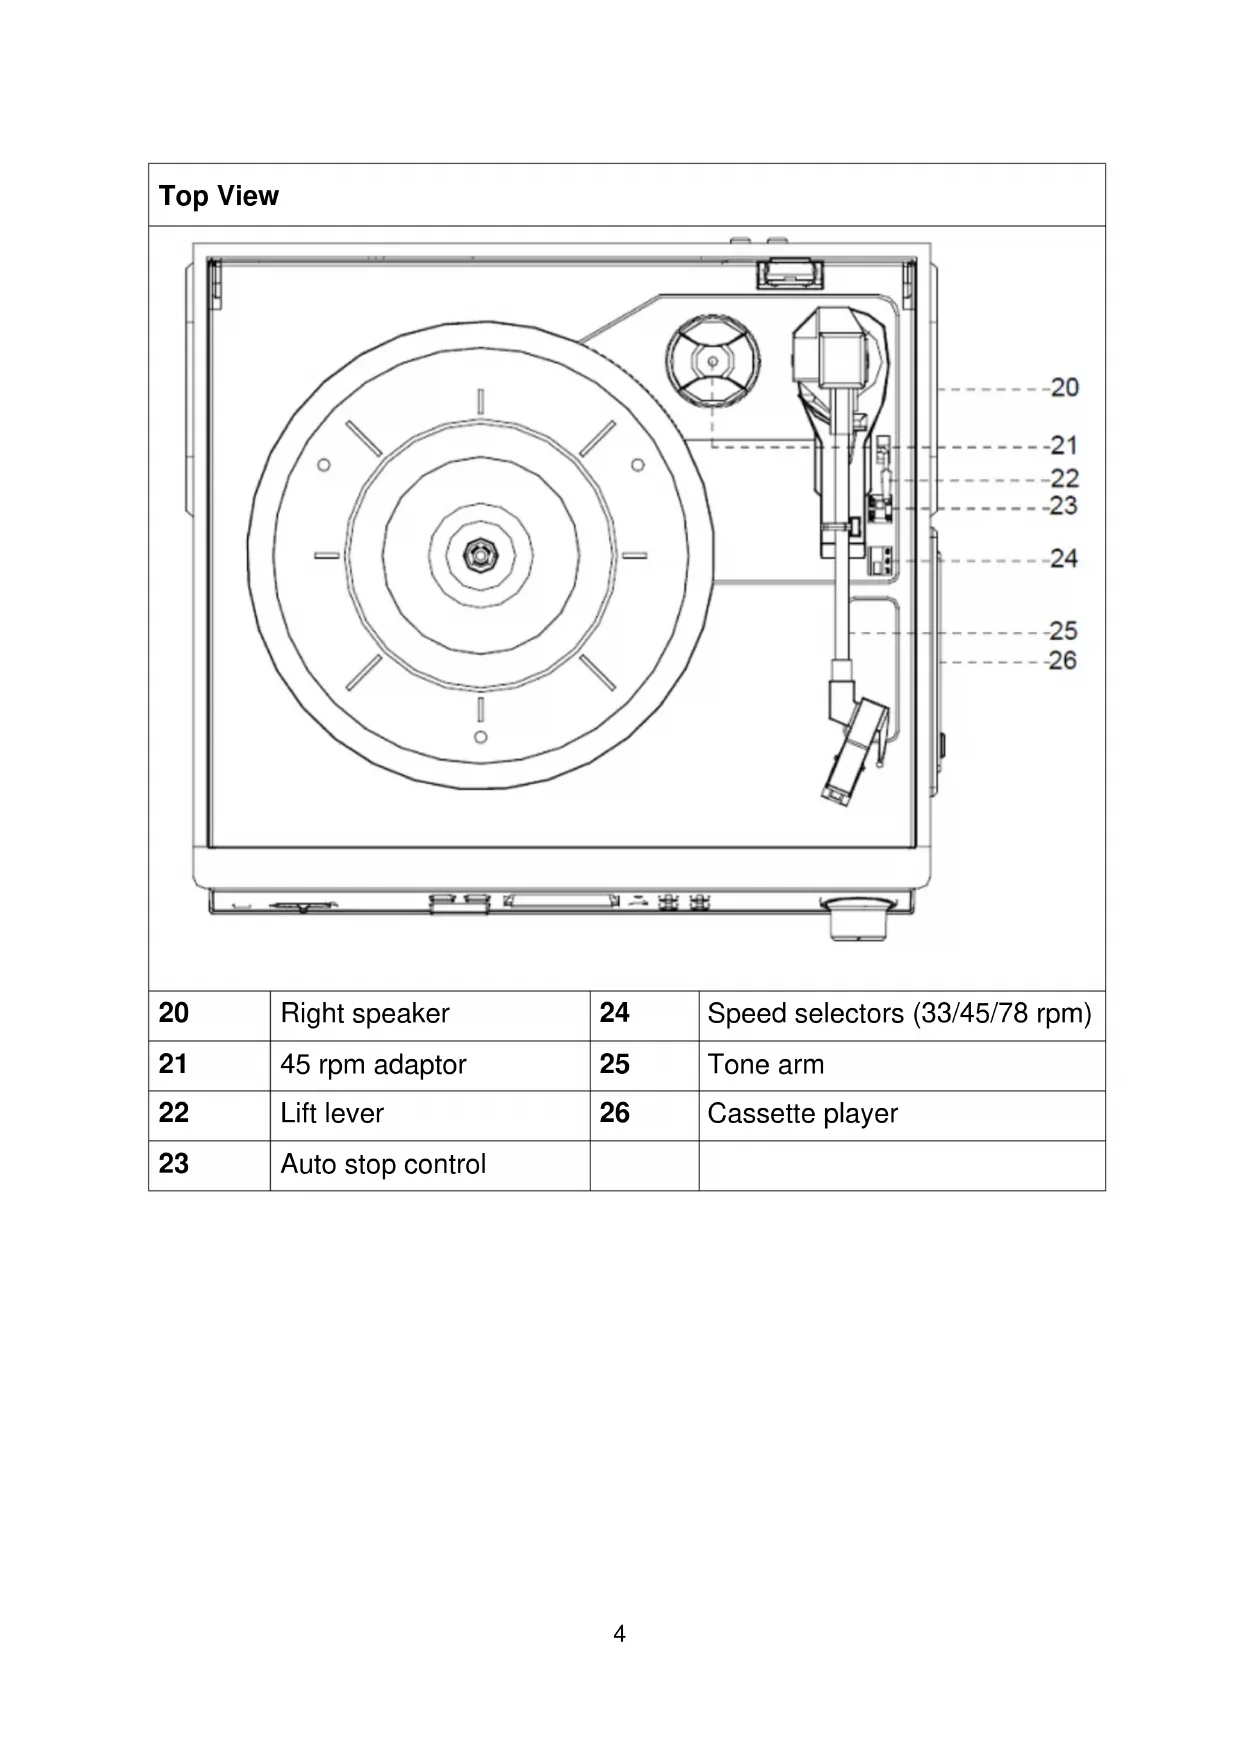
Top View
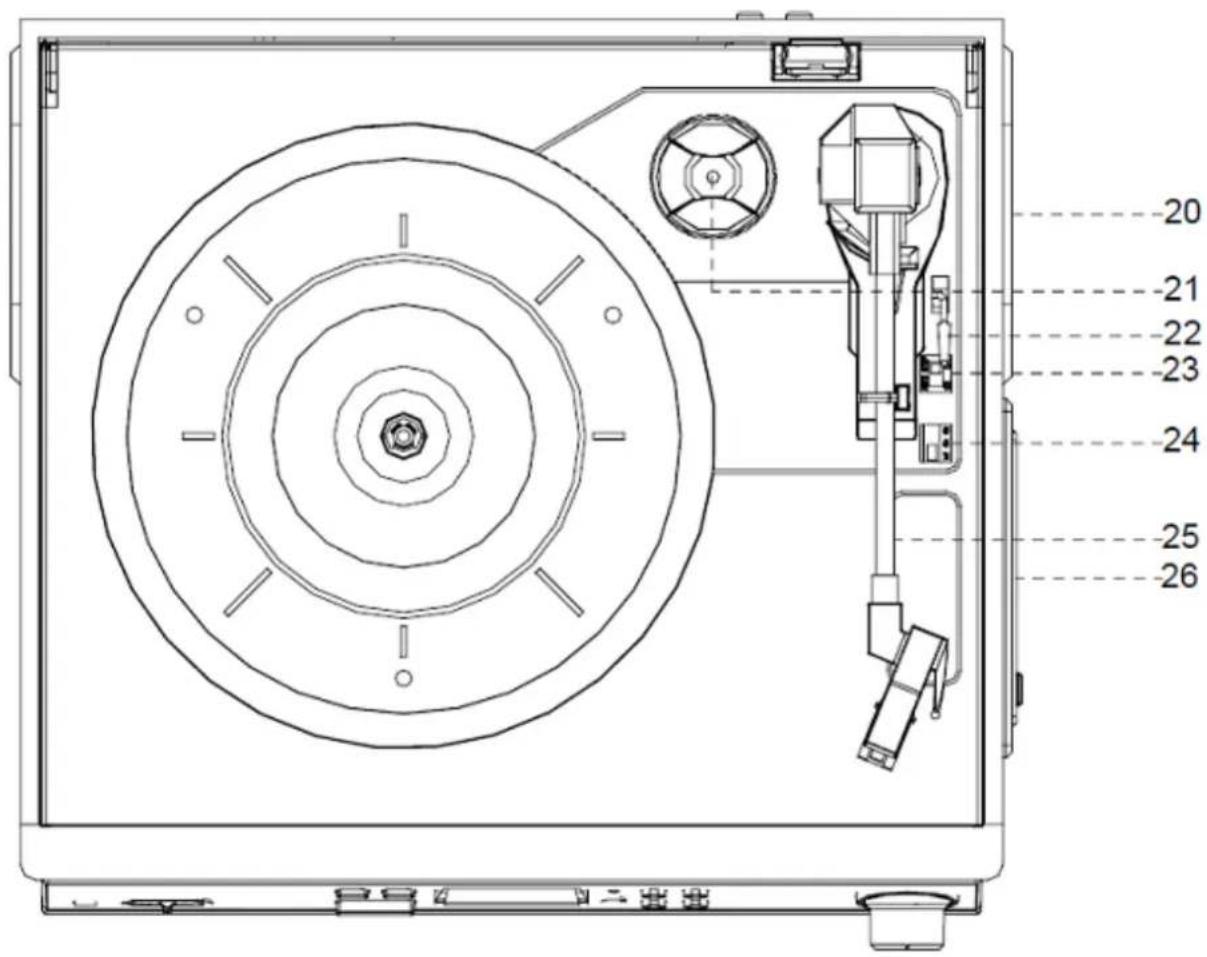
text_image
20 21 22 23 24 25 26| 20 | Right speaker | 24 | Speed selectors (33/45/78 rpm) |
| 21 | 45 rpm adaptor | 25 | Tone arm |
| 22 | Lift lever | 26 | Cassette player |
| 23 | Auto stop control | ||
| Rear View | |||
| 27 | RCA output | 28 | DC connection 12V/2A |
First start
- Carefully read the user manual. Insert the power adapter of the device into a socket with AC 220–240V and the other side to the TX-22+. Be reminded: "Non-connected devices always work faulty!"
- Attach the dust cover to the holder. Just slide the cover slowly and carefully over the holder on the back of the TX-22+. You will hear a click when the cover is safely attached.
Phono Mode
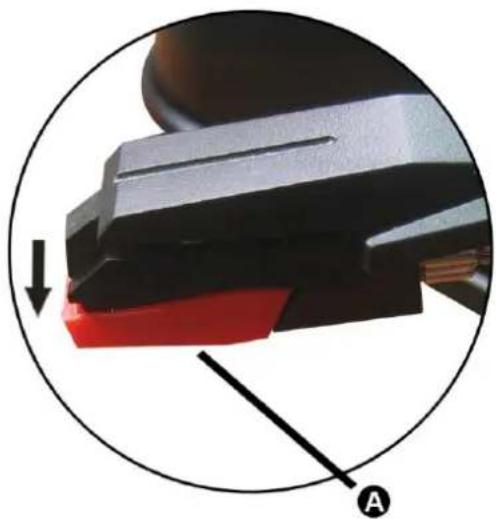
IMPORTANT! When using the turntable:
● Make sure to remove the stylus protector, as illustrated on the left picture (it should easily slide off the stylus assembly).
● Make sure to unclip the tone arm lock before use and to secure it again after use.
| 1 | Cartridge | 2 | Needle protection | |
Playing in Phono mode (Vinyl)
- Open the dust cover. Turn the volume knob (14) to turn the device on.
- Use the function selector (4) to select PHONO mode.
- Set the speed selector to the appropriate position: 33, 45 or 78, depending on the record to be played.
- Set the auto stop control to ON if you want the turntable to stop turning when it has reached the end of the record. If the switch is set to OFF, the turntable will continue turning at the end of the record.
- Place the record on the turntable (use the 45 rpm adaptor, if required).
- Remove the needle protection. Move the lift lever towards the back to raise the tone arm from the arm park, then slowly move the arm to the record, as illustrated on the right picture above. The turntable will start rotating.
- Move the lift lever towards the front, the tone arm will gently drop onto the record and playback will start.
- To stop playback, move the lift lever towards the back to raise the tone arm. The turntable will still be rotating but the record will stop playing. To continue playback, move the lift lever towards the front.
- To play a different piece on the record, move the lift lever towards the back, move the raised tone arm to the start of the piece and then move the lift lever towards the front to lower the tone arm and start playback.
- To adjust the volume level, turn the volume knob to the right or left.
- At the end of the record, move the lift lever towards the back to raise the tone arm and move it back to the tone arm park, and then move the lift lever towards the front to lower the arm onto its rest.
- Alternatively, lift the tone arm off the record and return it to the arm rest manually.
- When you have finished playing records, engage the tone arm lock to protect it from accidental movement. Turn the volume knob switch the unit off. Unplug it from the power supply if you are not going to use it for a while.
NOTE: Should your record stop before the last track finishes, set the auto stop control to OFF. Your record will now play to the end, but you will have to stop the turntable rotation manually. (Return the tone arm to its rest manually and if the turntable is still rotating, switch off the unit by pressing the volume control knob. Then set the auto stop control back to ON.)
Recording in Phono mode (Vinyl)
Firstly insert memory device (USB drive or SD card). When turntable is working, press the REC key on the top control board of the unit, (between step 5 and 7 from “Playing a record”) now recording will begin and USB or SD symbol is flashing. To finish the work just need to press the STOP key.
How to replace a needle
 | 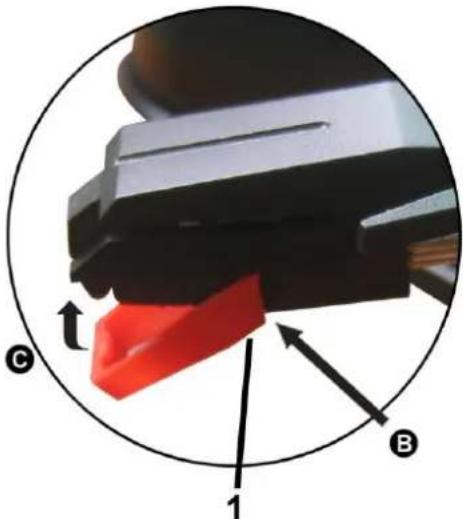 |
| Removing the needle from the cartridge: | Inserting the needle:1. Guide Pins (inside) |
| Place a screwdriver at the tip of the needle heads hell and push downwards in the direction shown in sketch “A”. Remove the needle head shell by pulling it forwards and pushing downwards. | Hold the tip of the needle head shell and insert it by pressing in the direction illustrated by “B”. Push the needle head shell upwards in the direction illustrated by “C” until the needle locks into the tip position. |
Tape Mode → When using the cassette player:
● Make sure to insert the cassette in the correct direction.
● To avoid damaging the cassette, we strongly recommend taking it out of the device after playing the cassette.
natural_image
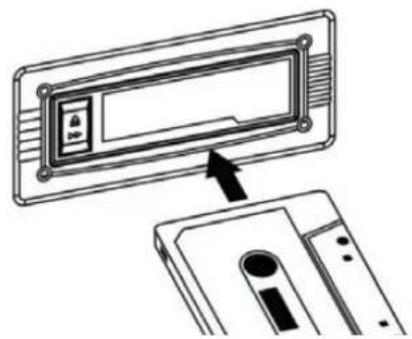
Diagram showing a device panel with an arrow pointing to its front panel (no text or symbols present)Playing a cassette
- Turn the volume knob (14) to turn the device on.
- Use the function selector (4) to select TAPE/AUX mode.
- Insert a cassette with the tape facing away from you, as illustrated in the picture above. The EJECT/FAST FORWARD button will pop out and the system will start playing the tape automatically.
- Turn the volume knob to your desired level.
- To fast forward the cassette tape, press the EJECT/FAST FORWARD button halfway down while the cassette is playing. The tape will be advanced forward rapidly.
- To resume normal playback, slightly press the EJECT/FAST FORWARD button again. The button will fully pop out again.
- To stop playback, press the EJECT/FAST FORWARD button completely. Playback will be stopped and the cassette tape will be ejected.
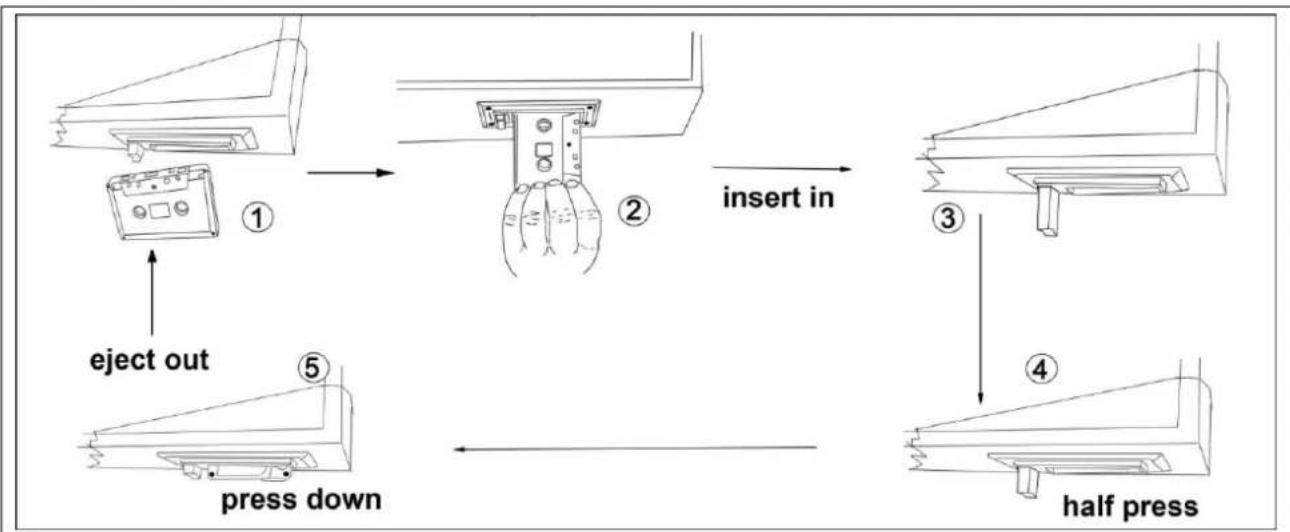
flowchart
graph TD
    A["① eject out"] --> B["② insert in"]
    B --> C["③ half press"]
    C --> D["④ press down"]
    D --> A
Record a cassette
- Set the function button to TAPE/AUX mode and then insert a memory device (USB drive or SD card).
- Press the record REC button, it will take 3 - 4 second to read the memory device, then the USB or SD icon will be flashing on the LCD display.
- Music will be recorded to the last inserted flash drive (USB or SD).
- The system will start the recording mode after a few seconds. Insert your cassette into the playback slot. During encoding, the USB or SD icon will be flashing on the display.
- To finish the recording, press the stop button. The display will show "END" and return to TAPE/AUX mode.
NOTE:
- The recording speed is 1:1. Recording will take as long as playing the cassette.
● The recording format is preset at MP3 bit rate 128Kbps.
AUX-IN Mode
Reproduction via AUX-IN
- Turn the volume knob (14) to turn the device on.
- Use the function selector (4) to select TAPE/AUX mode, then connect the external audio device (such as a CD player, Smartphone, etc.) to the AUX-IN socket at the front of the device. The audio signal from the external audio device will now be played through the system.
- If an external audio device is connected to the AUX IN socket, playing of the AUX-IN mode takes priority over cassette playback.
Recording AUX IN
- Set the function button to TAPE/AUX mode and then insert a memory device (USB drive or SD card).
- Press the record REC button, it will take 3 - 4 second to read the memory device, then the USB or SD icon will be flashing on the LCD display.
- Music will be recorded to the last inserted flash drive (USB or SD).
- The system will start the recording mode after a few seconds. Insert your cassette into the playback slot. During encoding, the USB or SD icon will be flashing on the display.
- To finish the recording, press the stop button. The display will show "END" and return to TAPE/AUX mode.
NOTE:
- The recording speed is 1:1. Recording will take as long as playing the CD (or other auxiliary input).
● The recording format is preset at MP3 bit rate 128Kbps. - To enjoy the function, user need to select the function switch to AUX-IN position, and AUX-IN source will be prior to tape play.
- When you insert both USB drive and SD card, the recorded file will be saved into the latter inserting device.
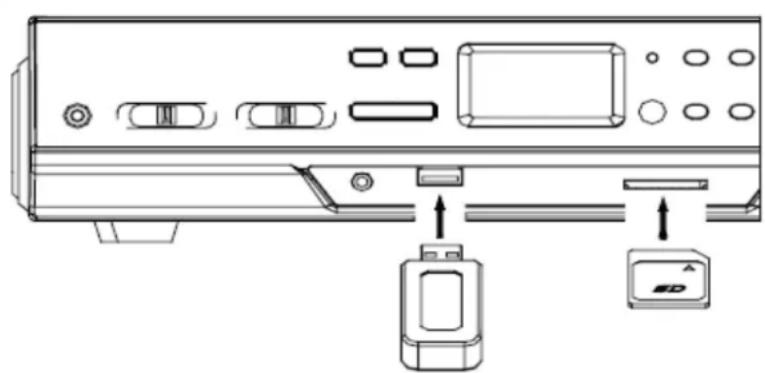
The USB Port and SD Card Slot
The system is able to decode and playback all MP3/WMA files stored in the memory media connected to the USB port or SD card slot.
natural_image
Diagram of a computer monitor rear panel with ports and connectors, showing internal components and connection points (no text or labels)Playback MP3/WMA format via USB device or SD card
- Turn the volume knob (14) to turn the device on.
- Following the illustration above, insert a USB device face up into the USB port, making sure it is fully inserted. Alternatively, insert a memory card in the direction of the arrow (as shown on the label next to the memory card slot), making sure to insert it straight without bending.
IMPORTANT: Connecting the USB device upside down or backwards could damage the audio system or storage media (USB drive, SD card). Check to ensure the direction is correct before connection.
-
Set the function selector to USB/SD mode. (If you have both a USB device and a memory card inserted, press the MODE button to toggle between USB and SD mode.) The system will start reading the storage medium automatically after mode selection and will display the total number of MP3/WMA files.
-
The system will then start audio playback from the media storage device (USB or SD card) automatically.
Playback from Bluetooth enabled Smartphone's
- Turn the volume knob (14) to turn the device on.
- Set the function selector (4) to BT mode.
- Open the Bluetooth on your Smartphone and search for the Bluetooth name "Technaxx TX-22+" to connect.
- When successfully connected you hear a confirmation sound.
- Select NEXT+ or PREV− (Skip+ or Skip−), Play/Pause key, to navigate to your playlist.
Note:
● Under this function, turntable function will be stopped automatically.
- When you turn on the device and activate “Bluetooth mode” again, the last connected Smartphone will be connected automatically!
Playback controls
PLAY/PAUSE: Press this button once to stop playing, press it again to continue.
STOP: Press this button to stop audio playback, the display will then show the total number of MP3/WMA files.
SKIP UP/NEXT: Press this button once to play the next file, press and hold this button to fast forward through the files/tracks.
SKIP DOWN/PREVIOUS: Press this button once to play the previous file, press and hold this button to fast reverse through the files/tracks.
MODE: Press this button to toggle between USB and SD Card mode.
Important notes:
- The system can detect and read files in MP3 / WMA format only via the USB port or SD card slot.
- You can connect an MP3 player to the system via the USB socket; however, some MP3 players may not be able to play via the USB socket. This is due to variances in the MP3 encoding format; it is not a malfunction of the system.
- There are numerous USB and SD device producers and their products vary in solution and format. We therefore cannot guarantee that this unit will support all USB and SD devices from every brand.
● This system supports USB drives/SD cards up to 32GB. - MP3 / WMA track format requirements: MP3 bit rate: 32 Kbps\~256 Kbps; WMA bit rate: 32 Kbps\~320 Kbps.
Deleting files (USB/SD card)
The system is able to erase files stored on the USB drive or SD card. You can delete a single file/track on the storage medium.
Deleting a single file/track
- Insert the USB storage device or SD card, then select USB/SD mode (as described previously).
- Press the delete DEL button during the playback of the track you want to delete: The title number will be flashing on the display. Press the delete DEL button again to confirm.
Removing the USB flash drive or SD card
- First move the function selector (4) to another mode (phono or cassette), then turn the volume knob (14) to turn off the power.
● To remove the USB flash drive, pull it out of the USB port.
● To remove the SD memory card, pull it out of the SD card slot.
Amplifier connection (if required)
● While listening to your new turntable using the built in speakers you may wish to connect it to your existing HiFi system.
- Connect the audio plugs to the Line input on your mixer or amplifier using an RCA cable (*not included)
Red plug into R channel input.
White plug into L channel input.
FAQs
If you are experiencing problems with your USB Turntable with Cassette Deck, check in the section below whether there are any quick and easy checks you can do that may help you solve the problem. If you cannot solve the problem by yourself, contact our after sales support line for advice. Do not attempt to open, repair or modify the device yourself.
The device will turn into standby mode automatically after not playing music for 10 minutes. To wake it up from standby mode move the function selector (4).
Problems with sound
- Clockwise rotate the power/volume knob to increase the volume.
- Make sure the power cord of the device is connected to an appropriate electrical outlet and make sure the wall socket is switched on.
- Make sure the function switch is set to your desired function: PHONO, TAPE/AUX, USB/SD, BT.
- When playing records, make sure you have selected the correct speed (33, 45 or 78 rpm).
- When playing a cassette, make sure it is properly inserted.
- When playing a CD via the AUX IN connection, make sure the cable is firmly connected, all controls on the CD player are properly set, the disc tray is closed and the disc is clean and undamaged.
- When playing music from a USB device (or SD card), make sure the memory device is properly inserted in the USB port (SD card slot) and the correct MODE is selected.
Electrical safety and cord handling
● Before installing this device, make sure your outlet voltage corresponds to the voltage stated on the appliance rating label.
- To prevent contact with high voltage components inside, do not attempt to open the device.
- When connecting the device, align the plug properly and insert it fully to prevent electric shock.
- Only use this device with the cord and plug supplied, and do not overload the power outlet.
- If the power cord is damaged, do not use the device. The cord must be replaced by the manufacturer or similarly qualified personnel in order to avoid a hazard.
Note:
- We advise you to clean your records with an anti-static cloth to gain maximum enjoyment from them and to make them last. We would also point out that for the same reason your stylus should be replaced periodically (approximately every 250 hours) Dust the stylus from time to time using a very soft brush dipped in alcohol (brushing from back to front of the cartridge).
- When transporting your LP player do not forget to: 1. Replace the protective cap on the stylus. 2. Put the rest clip into the pick-up arm.
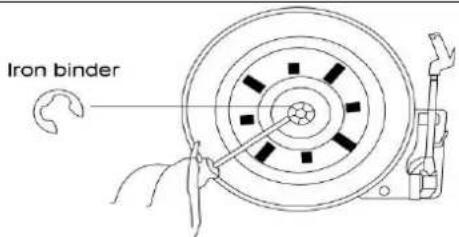
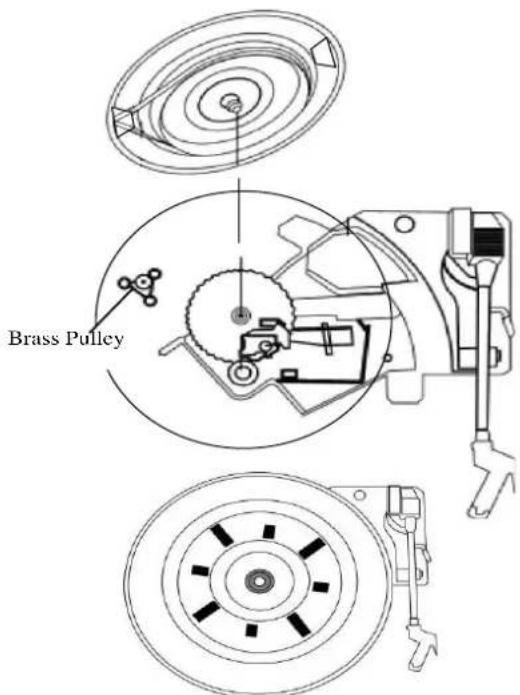
Reattaching the turntable belt-drive
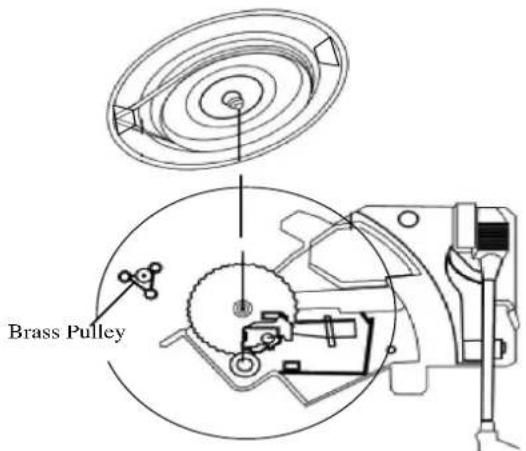
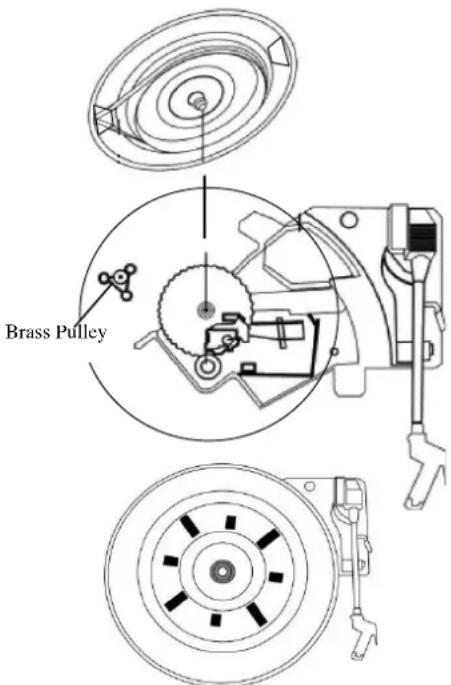
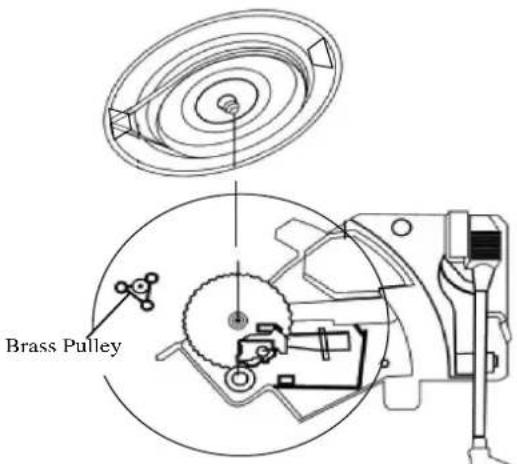
The turntable drive belt is factory fitted - use these instructions only if the turntable fails to revolve.
STEP 1
Remove the turntable anti-slip mat from the platter. looking through one of the holes in the platter, check if the belt has indeed come off the turntable pulley. Use a screwdriver to remove the black iron 'C'-clip (iron binder) and lift the turntable off the Turntable mechanism.
STEP 2
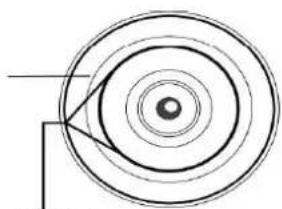
Retrieve the dropped black rubber band (the drive belt) and place it around the platter base - then pull the belt out gently without overstretching. Turn the platter over while holding on to the belt.
STEP 3
Looking through one of the holes in the platter, locate the small Brass Pulley (the pulley is attached to the turntable motor). Then proceed to hook the pulled out part of the rubber belt by hand around the Pulley and then line up the Centre of the platter with the silver turntable spindle. Lower the platter gently onto the deck and let go until it is back in position.
STEP 4
When the urntable platter is in the correct position, check the belt is still around the pulley and then replace the 'C'-clip to secure the turntable to the spindle.
text_image
Iron binderRubber
Drive Belt
natural_image
Abstract concentric circle diagram with radial lines and a small dot at center (no text or symbols)Pull belt out gently
text_image
Brass Pulley
text_image
CEHints for Environment Protection: Packages materials are raw materials and can be recycled. Do not disposal old devices or batteries into the domestic waste. Cleaning: Protect the device from contamination and pollution (use a clean drapery). Avoid using rough, coarse-grained materials or solvents/ ggressive cleaner. Wipe the cleaned device accurately. Distributor: Technaxx Deutschland GmbH & Co.KG, Kruppstr. 105, 60388 Frankfurt a.M., Germany
natural_image
Vintage gramophone with open lid and digital display (no visible text or symbols)Besonderheiten
natural_image
Diagram showing a device with an arrow pointing to a rectangular panel, no text or symbols presentKassettenwiedergabe
natural_image
Diagram of a computer monitor rear panel with ports and indicator lights (no text or labels)text_image
Pull belt out gently
text_image
Brass Pulley
text_image
CEnatural_image
Black vinyl record with open lid and digital display (no visible text or symbols)Particularités
natural_image
Diagram showing a device with an open lid and a button, no text or symbols presenttext_image
Diagram of a computer monitor rear panel with labeled ports and an attached USB drive, showing connection arrows.Lecture via Smartphone's compatible Bluetooth
natural_image
Abstract concentric circle diagram with radial lines and a small dot at center (no text or symbols)Pull belt out gently
text_image
Brass Pulley
natural_image
Black vinyl record with open lid and digital display (no visible text or symbols)Descripción
natural_image
Diagram showing a device with a label and an arrow pointing to a component (no text or symbols present)natural_image
Diagram of a computer monitor rear panel with ports and connectors, showing internal components and connection arrows (no text or labels)natural_image
Abstract concentric circle diagram with radial lines and a small dot at center (no text or symbols)Pull belt out gently
text_image
Brass Pulley
natural_image
Technical line drawing of a mechanical component with concentric circles and a handle (no text or symbols)

natural_image
Black vinyl record with open lid and digital display (no visible text or symbols)Cechy
natural_image
Diagram showing a device with an arrow pointing to a screen (no text or symbols present)natural_image
Diagram of a computer monitor rear panel with ports and control buttons, showing no text or symbolsnatural_image
Abstract concentric circle diagram with a small dot at center, no text or symbols presentPull belt out gently
text_image
Brass Pulley
natural_image
Diagram showing a device with an open panel and a close-up view of its internal components (no text or symbols)Een tape afspelen
natural_image
Diagram of a computer monitor rear panel with ports and indicator lights (no text or labels)natural_image
Abstract concentric circle diagram with a small dot at center, no text or symbols presentPull belt out gently
text_image
Brass Pulley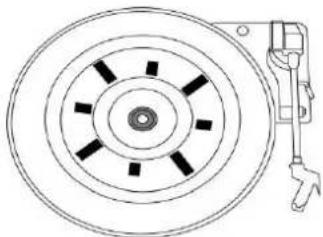
natural_image
Technical line drawing of a mechanical component with concentric circles and a handle (no text or symbols)

natural_image
Black vinyl record with open lid and gold coin slot (no visible text or symbols)Vlastnosti
natural_image
Diagram showing a device with an arrow pointing to a screen and a slot (no text or symbols present)natural_image
Diagram of a computer monitor rear panel with ports and connectors, showing internal components and an external device (no text or labels)text_image
Rubber Drive Belt Pull belt out gently
text_image
Brass Pulley