
STEALTH1 - Surveillance Camera Defender - Free user manual and instructions
Find the device manual for free STEALTH1 Defender in PDF.
| Product Type | Hidden surveillance camera with built-in DVR |
| Brand | Defender |
| Model | STEALTH1 |
| Sensor | 1/6" Color CMOS |
| Recording resolution | 640 x 480 (VGA) |
| Viewing angle | 66° |
| Minimum illumination | 2 lux |
| Video compression | MPEG-4 |
| Recording modes | Manual, scheduled, motion detection |
| Storage media | SD/SDHC card up to 32 GB |
| Video output | 1 x Composite RCA (NTSC/PAL) |
| Power supply | 4 AA batteries or 12V/180mA AC adapter |
| Battery life | Up to 12 hours (lithium batteries) |
| Dimensions | 12.7 x 7.6 x 7.0 cm (5 x 3 x 2.75 in) |
| Weight | 0.18 kg (0.4 lb) |
| Housing material | ABS plastic |
| Operating temperature | 5°C to 45°C (41°F to 113°F) |
| Maximum humidity | 80% |
| Display language | English |
| Motion detection | Yes, with adjustable sensitivity |
| Warranty | 1 year |
| Maintenance | Clean with a soft dry cloth. Do not use abrasive products. |
| Safety | Do not open the housing. Risk of electric shock. Refer all repairs to a professional. |
| Reparability | No user-serviceable parts. Contact customer service. |
Frequently Asked Questions - STEALTH1 Defender
User questions about STEALTH1 Defender
0 question about this device. Answer the ones you know or ask your own.
Ask a new question about this device
Download the instructions for your Surveillance Camera in PDF format for free! Find your manual STEALTH1 - Defender and take your electronic device back in hand. On this page are published all the documents necessary for the use of your device. STEALTH1 by Defender.
USER MANUAL STEALTH1 Defender
w/ Built-In Color Camera

EASY setup
INSTRUCTION MANUAL v1.1
PRODUCT WARRANTY INFORMATION
Please visit our website at www.defender-usa.com for information about your product's warranty.
We take quality very seriously. That is why all of our products come with a one year warranty from the original purchase date against defects in workmanship and materials. If you have warranty or support issues please contact us using any of the following methods:
Support: www.defender-usa.com/contact_us
Website: www.defender-usa.com
Cheektowaga, NY Niagara Falls, ON
DEFENDER ^© USA
60 Industrial Parkway #Z64
USA 14227
DEFENDER® CANADA
4080 Montrose Road
Canada L2H 1J9
Warranty Terms
- Defender products are guaranteed for a period of one year from the date of purchase against defects in workmanship and materials. This warranty is limited to the repair, replacement or refund of the purchase price at Defender's option.
- This warranty becomes void if the product shows evidence of having been misused, mishandled or tampered with contrary to the applicable instruction manual.
- Routine cleaning, normal cosmetic and mechanical wear and tear are not covered under the terms of this warranty.
- The warranty expressly provided for herein is the sole warranty provided in connection with the product itself and no other warranty, expressed or implied is provided. Defender assumes no responsibilities for any other claims not specifically mentioned in this warranty.
- This warranty does not cover shipping costs, insurance, or any other incidental charges.
- You MUST call Defender before sending any product back for repair. You will be sent a Return Authorization number with return instructions. When returning the product for warranty service, please pack it carefully in the original box with all supplied accessories, and enclose your original receipt or copy, and a brief explanation of the problem (include RA #).
- This warranty is valid only in Canada and the continental U.S.
- This warranty cannot be re-issued.

CAUTION
RISK OF ELECTRIC SHOCK, DO NOT OPEN MONITOR
TO REDUCE THE RISK OF ELECTRIC SHOCK, DO NOT REMOVE THE COVER (BACK). NO USER SERVICEABLE PARTS INSIDE. REFER SERVICING TO QUALIFIED SERVICE PERSONNEL.

TABLE OF CONTENTS
WHAT'S INCLUDED 1
INTRODUCTION 2
FEATURES 2
BUTTONS AND CONNECTIONS 3
INSTALLATION 4
BUTTON FUNCTIONS 5
POWERING ON 6
MONTITORING MODE 6
SD CARD INFORMATION 6
RECORD MODE 7
PLAYBACK MODE 9
MENUSETUP 11
Main Menu 11
Date/Time Setup 12
Motion Detection Setup 12
Manual & Schedule Record 13
Motion & Continuous Record 14
SD Card Options. 15
System Status 15
Factory Default 16
DVR SPECIFICATIONS 17
CAMERA SPECIFICATIONS 17
RECORDING TIMES 17
WHAT'S INCLUDED
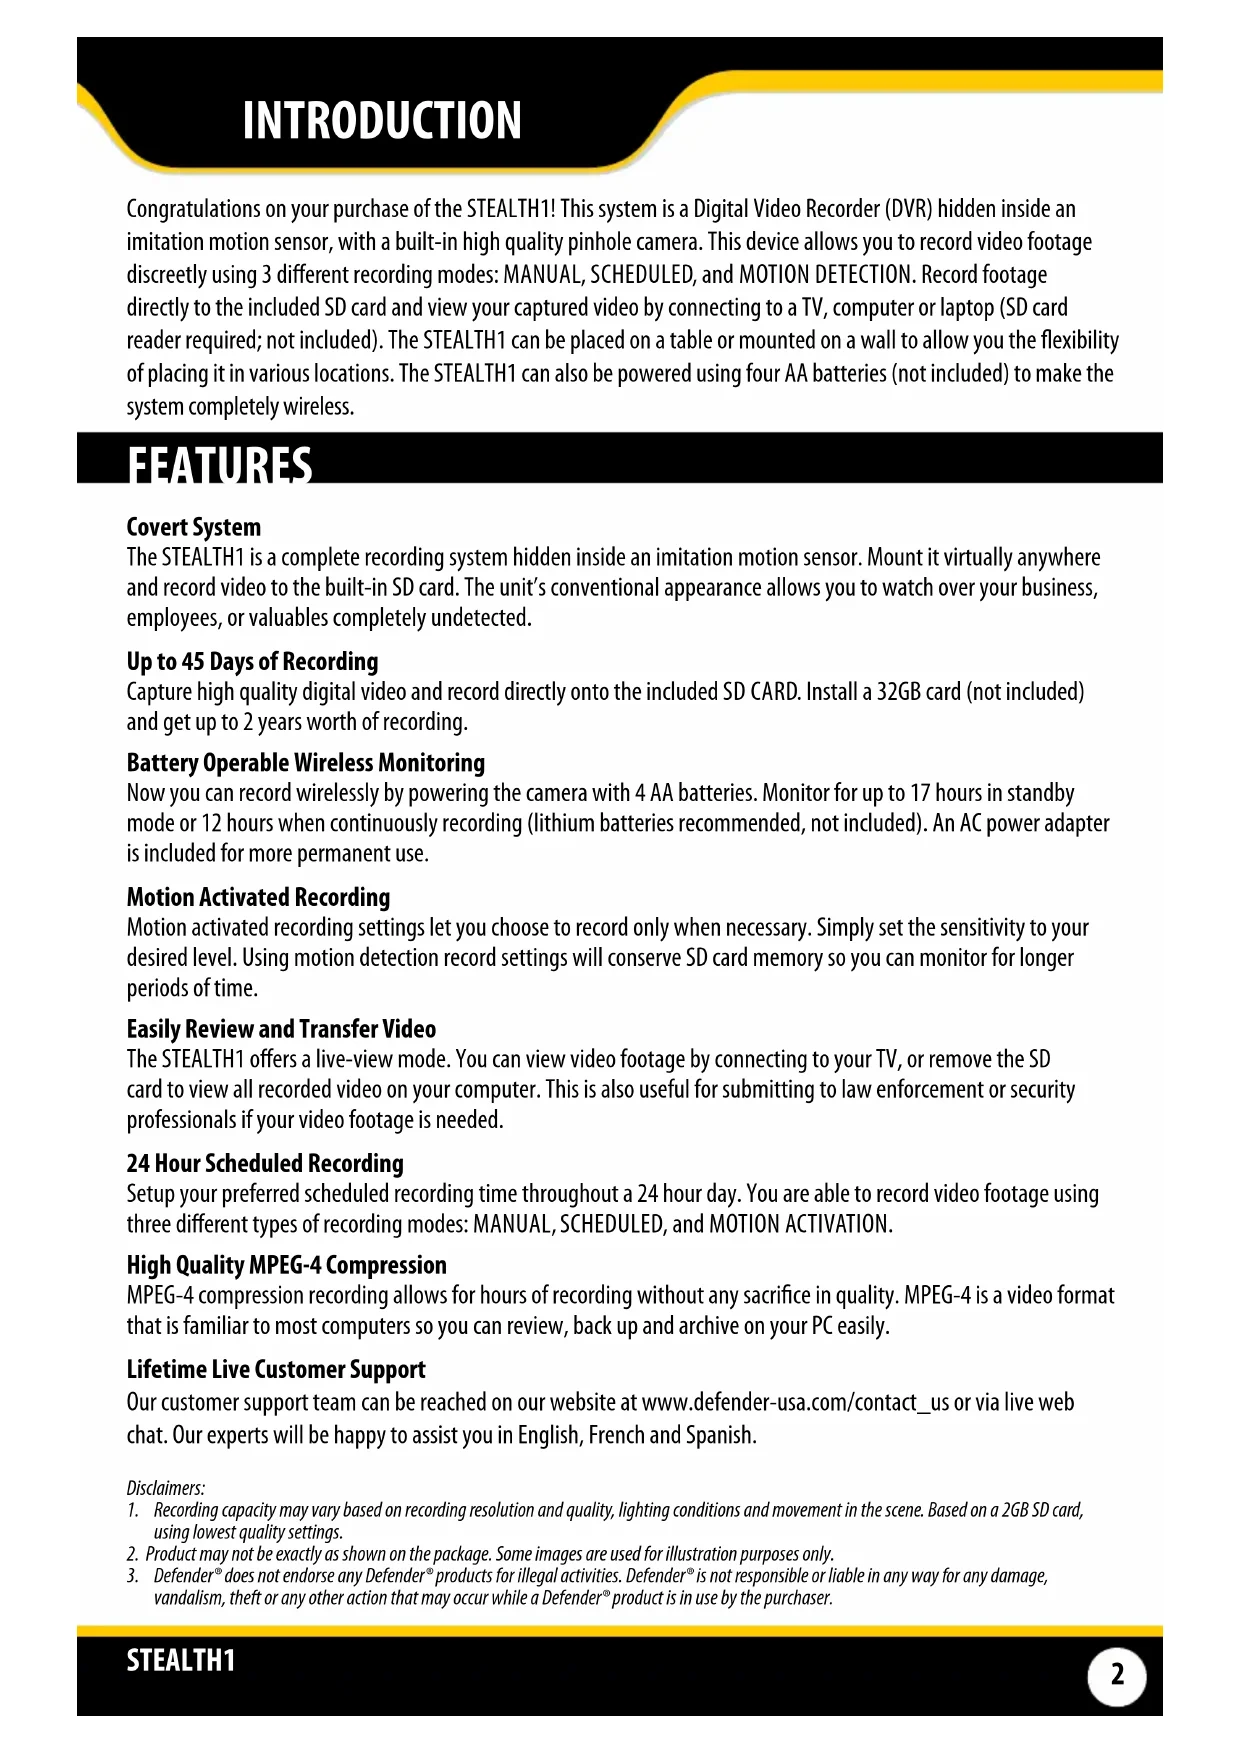
Covert DVR
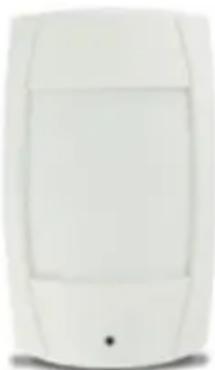
RCA to RCA
(Male) Wire

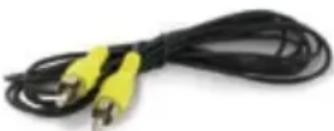
Power AdapterMounting Bracket
SD Card
Power Adapter
3xScrews
3xWallAnchors
1Year Warranty
Instruction Manual
Lifetime Live Customer Support
INTRODUCTION
Congratulations on your purchase of the STEALTH1! This system is a Digital Video Recorder (DVR) hidden inside an imitation motion sensor, with a built-in high quality pinhole camera. This device allows you to record video footage discreetly using 3 different recording modes: MANUAL, SCHEDULED, and MOTION DETECTION. Record footage directly to the included SD card and view your captured video by connecting to a TV, computer or laptop (SD card reader required; not included). The STEALTH1 can be placed on a table or mounted on a wall to allow you the flexibility of placing it in various locations. The STEALTH1 can also be powered using four AA batteries (not included) to make the system completely wireless.
FEATURES
Covert System
The STEALTH1 is a complete recording system hidden inside an imitation motion sensor. Mount it virtually anywhere and record video to the built-in SD card. The unit's conventional appearance allows you to watch over your business, employees, or valuables completely undetected.
Up to 45 Days of Recording
Capture high quality digital video and record directly onto the included SD CARD. Install a 32GB card (not included) and get up to 2 years worth of recording.
Battery Operable Wireless Monitoring
Now you can record wirelessly by powering the camera with 4 AA batteries. Monitor for up to 17 hours in standby mode or 12 hours when continuously recording (lithium batteries recommended, not included). An AC power adapter is included for more permanent use.
Motion Activated Recording
Motion activated recording settings let you choose to record only when necessary. Simply set the sensitivity to your desired level. Using motion detection record settings will conserve SD card memory so you can monitor for longer periods of time.
Easily Review and Transfer Video
The STEALTH1 offers a live-view mode. You can view video footage by connecting to your TV, or remove the SD card to view all recorded video on your computer. This is also useful for submitting to law enforcement or security professionals if your video footage is needed.
24 Hour Scheduled Recording
Setup your preferred scheduled recording time throughout a 24 hour day. You are able to record video footage using three different types of recording modes: MANUAL, SCHEDLED, and MOTION ACTIVATION.
High Quality MPEG-4 Compression
MPEG-4 compression recording allows for hours of recording without any sacrifice in quality. MPEG-4 is a video format that is familiar to most computers so you can review, back up and archive on your PC easily.
Lifetime Live Customer Support
Our customer support team can be reached on our website at www.defender-usa.com/contact_us or via live web chat. Our experts will be happy to assist you in English, French and Spanish.
Disclaimers:
- Recording capacity may vary based on recording resolution and quality, lighting conditions and movement in the scene. Based on a 2GB SD card, using lowest quality settings.
- Product may not be exactly as shown on the package. Some images are used for illustration purposes only.
- Defender® does not endorse any Defender® products for illegal activities. Defender® is not responsible or liable in any way for any damage, vandalism, theft or any other action that may occur while a Defender® product is in use by the purchaser.
BUTTONS AND CONNECTIONS
IMITATION MOTION SENSOR - FRONT
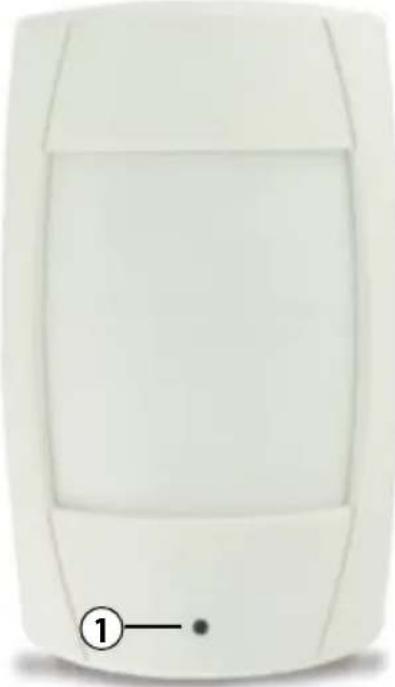
- Pinhole Camera:
The PINHOLE CAMERA is located in this small hole
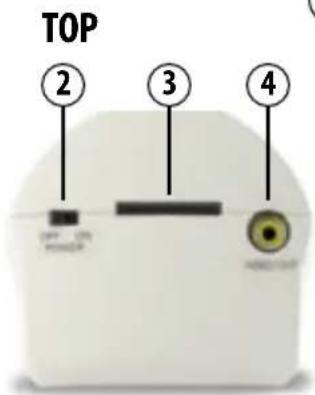
- POWER Switch:
Always stop recording by pressssing the STOP button first BEFORE putting in
-
SD Card Slot: Supports SD and SD-HC memory card
-
VIDEO OUT Jack (RCA):
To view footage, use the RCA video output to connect to your television
Connection to a TV is NOT required when recording
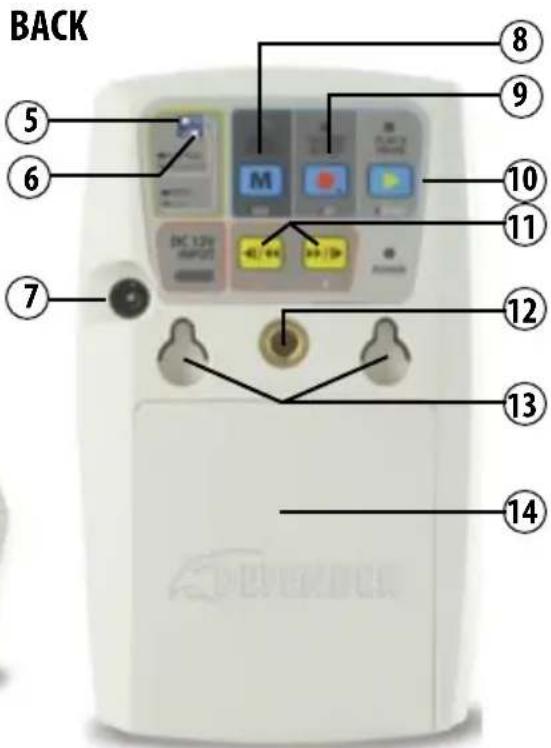
- NTSC/PAL Switch:
NTSC is the video system used in North America. PAL is used in Europe and
- FULL STOP/OVERWRITE:
Select whether to overwrite the recorded SD card or stop recording
completely when the card is full. When you select "Overwrite", the oldest
stored video will be recorded over first.
- POWER Input:
Connect POWER CORD here
- MENU Button:
Opens and exits the menu
- RECORD & STOP Button:
Starts and stops recording; stops playback of recorded footage
- PLAY & PAUSE button:
Play and pause playback of recorded footage
- REVERSE & FORWARD Buttons:
Allows you to navigate through the menu options, and reverses and forwards through footage
-
Mounting Hole: Attach the mounting bracket here
-
Flush Wall Mount Holes:
Allows you to mount the camera directly onto the wall
- Battery Compartment:
Camera can be battery powered so the system is completely wireless
Note: When changes are made to NTSC/PAL or STOP/OVERWRITE functions, you must shut off and restart the unit to save your changes.
INSTALLATION
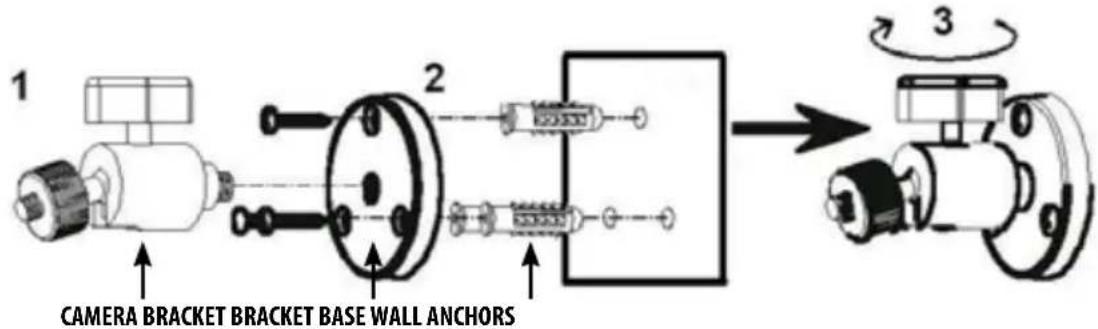
Installing the Mounting Bracket
-
Screw and attach the camera bracket into the bracket base.
-
Screw the bracket base into a wall using the 3 included screws. be sure to use the included wall anchors.
-
Tighten the camera angle adjustment on the top of the bracket to lock the camera in place.
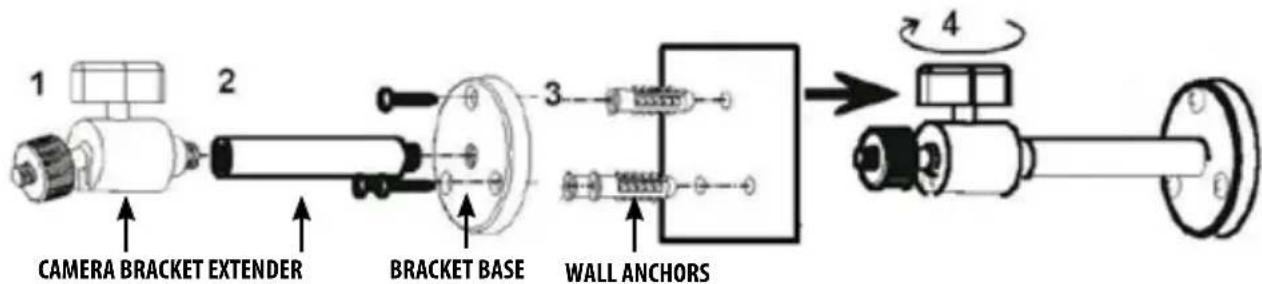
Using the Extended Mounting Bracket
- Screw and attach the camera bracket into the mount extender.
- Screw and attach the mount extender into the bracket base.
- Screw the bracket base into a wall using the 3 included screws, be sure to use the included wall anchors.
- Tighten the camera angle adjustment on the top of the bracket to lock the camera in place.
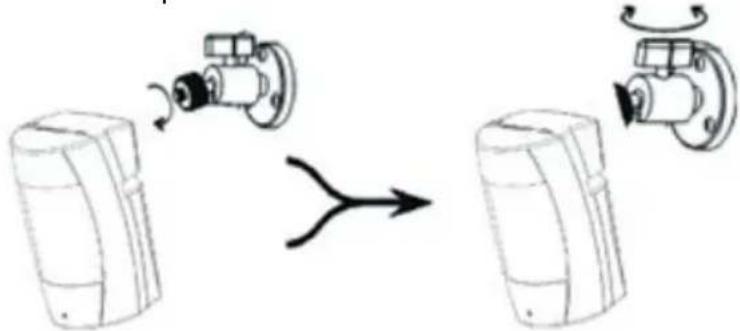
Mounting the Camera
- Screw the camera bracket into the mounting hole on the back of the unit. Be sure to tighten the camera angle adjustment to lock the camera in place.
Video Output and Power Adapter Connection
- Connect the video cable to the video input jack on the back of your television.
- Connect the power adapter to a wall outlet.
- Plug both the video cable and the power adapter into the corresponding jacks on the covert DVR unit.
INSTALLATION
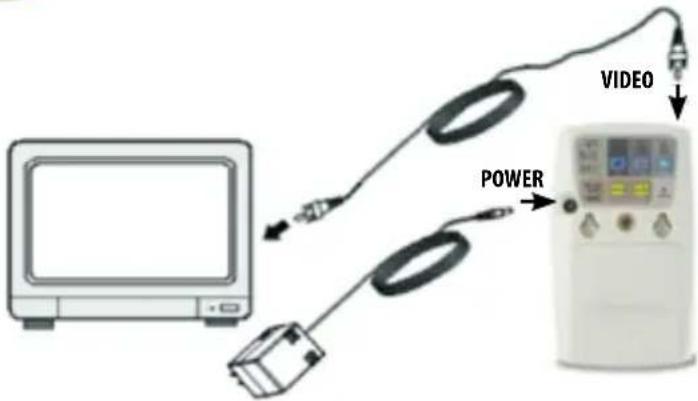
Video Output and Power Adapter Connection
- Connect the VIDEO CABLE to the VIDEO INPUT on the back of your television and the other end to the VIDEO INPUT on the top of the COVERT DVR unit.
- Connect the POWER ADAPTER to a wall outlet then connect the other end to the corresponding input on the back of the COVERT DVR unit.
BUTTON FUNCTIONS
There are 5 buttons that control the DVR. Depending on if the menu is open or if the footage is paused, the buttons have different functions.
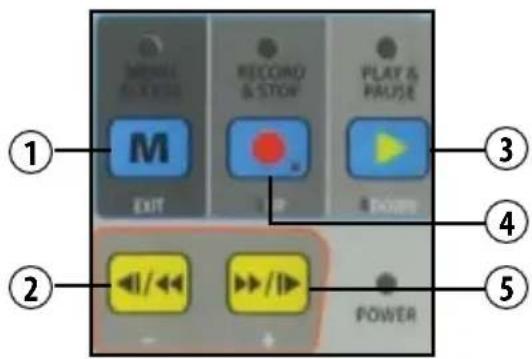
| 1 | MENU: | • OPEN / ExITS the main menu |
| 2 | REWIND: | • When video is paused, footage REWINDS and remains PAUSED. • REWINDS current video NORMALLY; FAST REWINDS when pressed several times. • DECREASES values in the MENU, or is a BACK button. |
| 3 | PLAY & PAUSE: | • PLAYS recorded footage. • PAUSES recorded footage. • Moves cursor DOWN when MENU is open. |
| 4 | RECORD & STOP: | • STARTS/STOPS recording. The recording will start based on your recording schedule. • Moves cursor UP when MENU is open. • STOPS video playback and switches to live vue. |
| 5 | FAST FORWARD: | • When video is paused, footage MOVES FORWARD and remain PAUSED. • FAST FORWARDS current video NORMALLY. ACCELERATES FAST FORWARD when pressed several times. • INCREASES values in the MENU, or is an ENTER button. |
POWERING ON
- To turn the device ON, connect the power adapter or insert batteries into the battery compartment.
- Slide the POWER SWITCH on the top of the device to the ON position.
- To view the menus and adjust settings, you will have to attach the included RCA cable to the VIDEO OUTPUT of the COVERT DVR, and connect it to the VIDEO INPUT on the back of your television.
- After powering on the system, it will automatically enter live monitoring. If the system was previously set to SCHEDULE or MOTION, it will automatically return to that recording mode.
- After a power outage, the system will reboot and return to the previously set recording mode.
MONITORING MODE
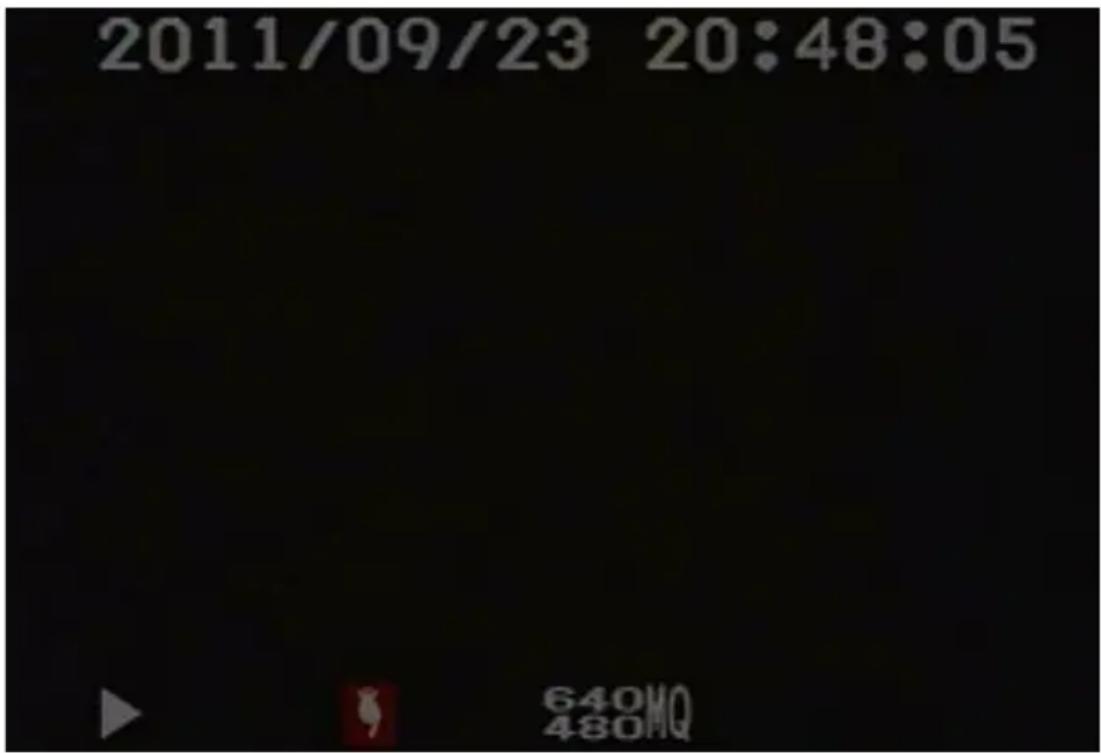
After start up, the system will automatically enter live monitoring mode, with the following status indicators:
- Date and Time: Current DATE AND TIME
- Record Status: MANUAL RECORD settings
Record Resolution
640 Please refer to RECORD SETUP for VIDEO
480 SIZE setup instructions.
Record Quality
MQ Please refer to RECORD SETUP orVIDEO
QUALITY setup.

3. SD Card Status:

No SD card installed or the card is malfunctioning

SD card is functioning normally
Reading SD

NOTE: Each time the unit is powered on, the system will auto-detect the SD CARD. When the RECORD LED is flashing, this indicates that the SD CARD is currently being read. ALL LEDs will flash when a memory card error is detected.
SD CARD INFORMATION
- The SD CARD icon shown on the status line, indicates that the SD CARD is operating normally.
-
If there is a problem or error with the SD CARD, the PLAY, MENU, and REC LEDs will flash quickly. If this happens, please re-format the SD card before proceeding (all saved video will be lost).
-
To quickly format the SD CARD, turn the DVR off. Then hold the REWIND and FAST FORWARD buttons (at the same time) and move the switch on the DVR to the ON POSITION. A "Format OK" message will be displayed when the SD card is successfully formatted
- When the SD CARD is recording video successfully, the RECORD LED will be lit.
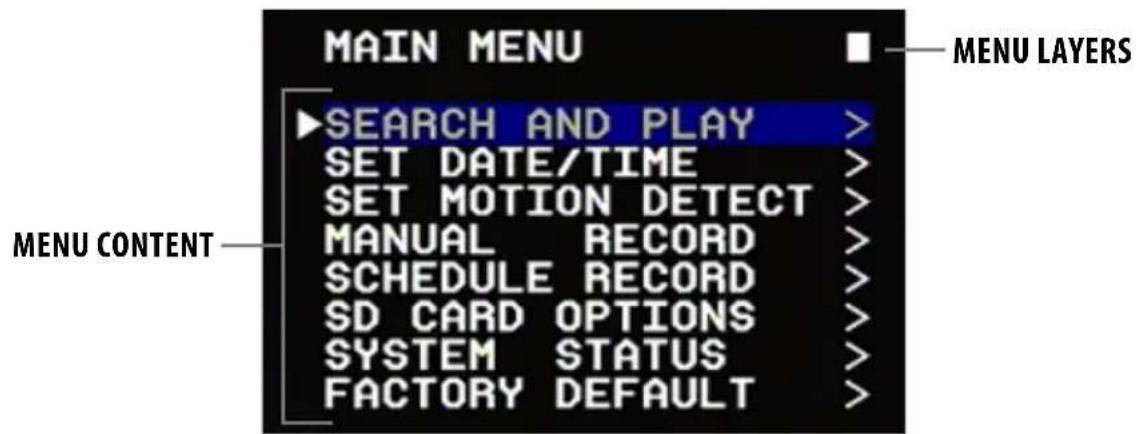
MENUSETUP
MENULAYERS
There are three MENU screens available; the MAIN MENU and two SUBMENUS:

MENUCONTENT
- From the MAIN MENU, move the the highlight bar up or down to your MENU selection.
- Press RECORD to move the highlight bar UP or PLAY to move the highlight bar DOWN.
- Once your selection is highlighted, press the FAST FORWARD button to select the item.
- While in the SUBMENU, use the FAST FORWARD (+) or REWIND (-) buttons to increase or decrease values or change settings.
- To exit the menu you are currently in, press the MENU button.
DATE & TIME SETUP
Date Format:
The DATE FORMATS are: Year/Month/Day Month/Day/Year Day/Month/Year
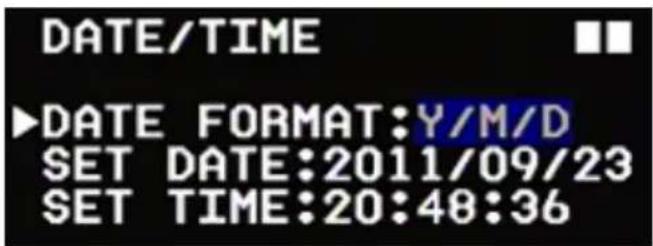
Date/ Time Settings:
The time is based on a 24-hour clock; for example: 16:00 would be 4:00pm ) and the year range is 2000 to 2099.
Setting the Date/Time:
- Use the RECORD/UP AND PLAY/DOWN buttons to move to the digit that you want to change.
- Press the FAST FORWARD (+) or REWIND (-) buttons to INCREASE or DECREASE the value.
- To confirm your settings, press the MENU button.
MOTION DETECTION SENSITIVITY SETUP
MOTION DETECTION allows you to set your DVR to record ONLY when motion is detected. It allows you set the MOTION THRESHOLD you set. This is a good option to save space on your SD card.
- Press RECORD to move the highlight bar UP or PLAY to move the highlight bar DOWN.
- Once your selection is highlighted, press the FAST FORWARD button to select the item.
- While in the SUBMENU, use the FAST FORWARD (+) or REWIND (-) buttons to increase or decrease values or change settings.
- To exit the menu you are currently in, press the MENU button.
DATE & TIME SETUP
Date Format:
The DATE FORMATS are: Year / Month / Day
Month / Day / Year
Day / Month / Year
Date/ Time Settings:
The time is based on a 24-hour clock; for example: 16:00 would be 4:00pm ) and the year range is 2000 to 2099.
Setting the Date/Time:
- Use the RECORD/UP AND PLAY/DOWN buttons to move to the digit that you want to change.
- Press the FAST FORWARD (+) or REWIND (-) buttons to INCREASE or DECREASE the value.
- To confirm your settings, press the MENU button.
MENUSETUP
Manual Record
This menu allows you to adjust the video size (resolution), frame rate and image quality of manual record footage.
To start or stop manual record, press the record button.

Video Size/Frame Rate:
Resolution: 320x240 640x480
Frame Rate (Max.): 30 fps 12 fps
Image Quality:
High Quality (HQ): High image quality but uses more memory storage
Medium Quality (MQ): Default quality
Low Quality (LQ): Low image quality but uses less memory storage
Image Size/Frame Rate/Quality: To adjust these settings, use the Record and Play buttons to scroll to
which setting you want to change, then press the fast forward (+) and
rewind(-) buttons to increase or decrease the setting.

Schedule Record (Motion Detection or Continuous)
This menu allows you to adjust the time you would like to record video, as well as how you would like to record at those particular times (continuous or motion detection). The DVR will only record within the set time range.
- To adjust the settings use the Record or Play buttons to scroll to what type of recording you would like to use.
- Press the fast forward (+) button to enter the time menu.
- Press the fast forward (+) and rewind (-) buttons to adjust the time you would like video to be recorded.
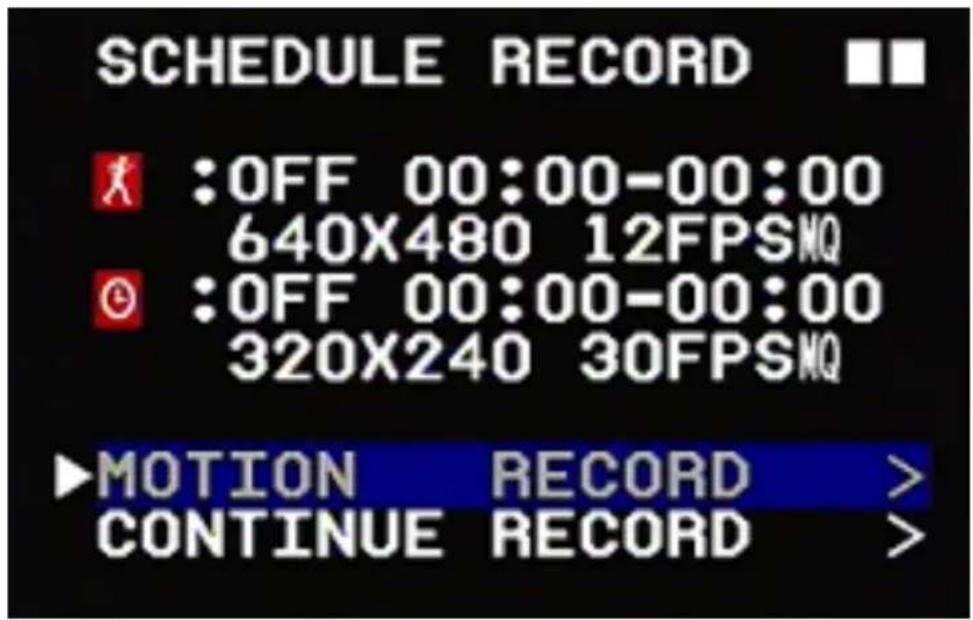
Motion Record
This menu allows you to enable or disable motion record as well as adjust the record time and video settings
Record: Enable or disable scheduled recording by selecting ON or OFF with the fast forward (+) and
rewind(-)buttons.
Schedule: This function is based on a 24 hour clock.
For example, Setting the clock to 08:00-12:00 will record between 8 AM and 12 PM.
To adjust the time you want the DVR to record using motion detection, use the Record and Play buttons to move to the time setting, then press the fast forward (+) and rewind (-) buttons to adjust to the time you want to record.
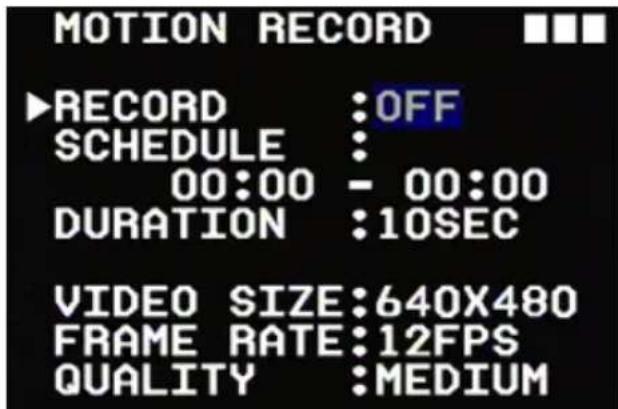
Duration: This option allows you adjust the duration which the DVR will record for, after motion has been detected. You can choose between 5 sec, 10 sec, 15 sec, 20 sec and 30 sec use the fast forward (+) and rewind (-) buttons to scroll through the times.
Image Size/Frame Rate/Quality: To adjust these settings, use the Record and Play buttons to scroll to which setting you want to change, then press the fast forward (+) and rewind (-) buttons to increase or decrease the value of setting.
Continuous Record
This menu allows you to enable or disable continuous record as well as adjust the record time and video settings
Record: Enable or disable continuous recording by selecting ON or OFF with the fast forward (+) and rewind (-) buttons.
Schedule: This function is based on a 24 hour clock.
For example, setting the clock to 08:00-12:00 will record between 8 AM and 12 PM.
To adjust the time you want the DVR to be on motion record use the Record and Play buttons to scroll through hours and minutes, then press the fast forward (+) and rewind (-) buttons to change the times you want recorded.
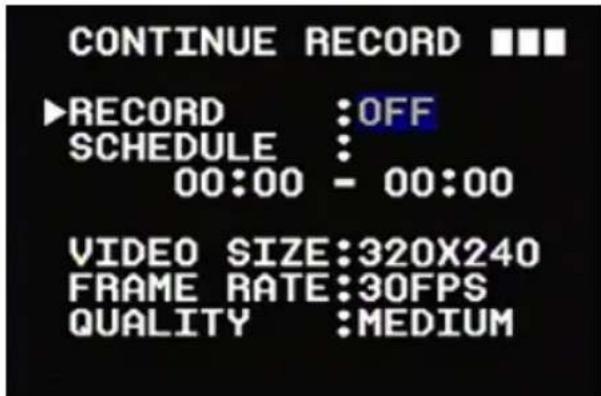
Image Size/Frame Rate/Quality: To adjust these settings, use the Record and Play buttons to scroll to which setting you want to change, then press the fast forward (+) and rewind (-) buttons to increase or decrease value of the setting.
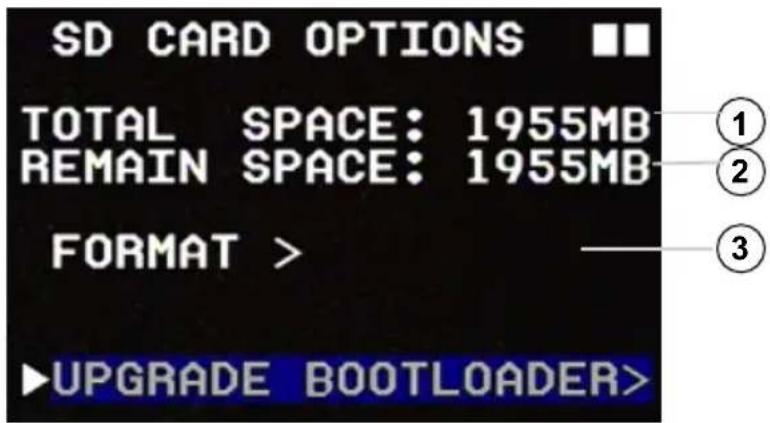
SD CARD OPTIONS
The SD card is the included memory card that stores your recorded video. This menu shows how much total space is on the SD card, how much space is currently available, and allows you to format the SD card. Formatting the SD card will erase all footage on the DVR.
- Total space available on the SD Card
- Remaining space left on SD Card
- Format the SD card (delete all video)
Formatting the SD card:
- Highlight FORMAT.
- Press the fast forward (+) button to enter into the format warning screen.
- The warning screen will read "WARNING! DO YOU WANT TO ERASE ALL VIDEO?"
- To continue with formatting the SD card, press the fast forward (+) button.
- To exit without formatting the SD card press the menu button and you will return back to the SD card main menu.
SYSTEM STATUS
The system status menu displays your current DVR settings for each record mode.
- System version
- Resolution, FPS and video quality of Manual record
- ON/OFF Status, set record time, resolution, FPS and video quality of Motion Detection record
- ON/OFF Status, set record time, resolution, FPS and video quality of Continuous record
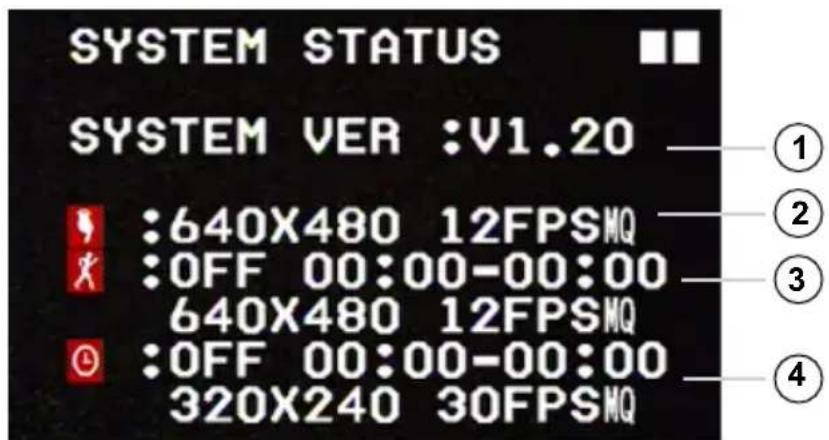
The example photo shows:
- Firmware version 1.06 is installed on the unit.
- Manual record is set to a resolution of 320 × 240 , at 30 frames per second and medium quality video.
- Motion record is ON and records from 11:00am till 3:00pm with a resolution of 640 × 480 , 12 frames per second and medium quality video.
- Continuous Record is ON and records from 1:00pm till 3:00pm with a resolution of 320x240, 30 frames per second and medium quality video.
There are three different recording modes available: MANUAL, CONTINUOUS, and MOTION DETECTION.
MANUAL Record
Start and stop recording anytime manually. Press the RECORD recording.

button to start recording. Press again to stop
CONTINUOUS Record
Schedule a START and STOP time to record; the DVR will CONTINUOUSLY record during the preset time.
MOTION DETECTION Record
Preset a time to record only when movement is detected. MOTION DETECTION will START RECORDING when movement is detected and exceeds a preset motion detection threshold. (See MOTION DETECTION SETUP Pg. 12 for more information)
STOP RECORD
button while in SCHEDULE MODE will interrupt recording and switch to
- Pressing the RECORD

button again, and it will return you to SCHEDULE mode (if a schedule is set).
START/STOP RECORDING:
Manual Record
To start MANUAL recording press the RECORD

button. Pressing the RECORD

button again will stop MANUAL
recording and resume to SCHEDULE mode. To completely stop all recording, you must shut the schedule record off.
Motion Detection Record
Once motion detection has been set in the schedule record section of the menu, the DVR will start recording every time motion is detected. To completely stop motion detect recording, you must shut the schedule option off.
Continuous Record
Once continuous record has been set in the schedule record section of the menu, the DVR will start recording using the continuous record settings. To completely stop recording, you must shut the schedule option off.
Note: For more information see RECORD SETUP on Pg 13
If there are multiple recording modes set to record at the same time, the DVR will record using one mode, based on the level of importance.
The order of importance is:
- Manual Record
- Motion Detection
- Continuous Record
RECORDING MODES
Different recording modes have different recording settings, including video size, frame rate and video quality.
When a recording mode is triggered, the system starts recording according to that specific setup. This ensures efficient recording duration and video quality.
For example: To schedule the unit to record while you are at work (9:00AM-5:00PM), you can set up the schedule to record at low video quality with less frames per second to extend recording time. During the hours you are at home, you can set the unit to record when motion is detected with the highest recording quality and frame rate.
Note: Do not shut off the unit while recording. Press the menu button to stop recording, then turn the system off. Power loss during recording may result in incomplete videos or errors.
-
- Recording in Progress - The DVR is currently recording footage
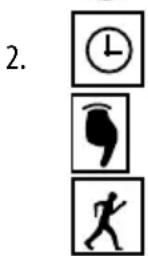
- Schedule Record - The DVR will record based on its set schedule
- Manual Record - The DVR will record when the record button is pressed
-
Motion Record - The DVR will begin recording when motion is detected
-
Overwrite Mode - The DVR will overwrite the oldest footage once the SD card is full
PLAYBACK MODE
There are two playback modes:
Normal Playback:
Press the play button on the back of the DVR, the unit will play back all footage starting with oldest footage
Search and Play:
Accessed through the main menu, this option allows you to search and play footage from a particular date and time, organized by type of recording (manual, continuous or motion)
NORMAL PLAYBACK DISPLAY
- To start normal playback, press the play/pause button and the recorded footage will begin to play, starting with the oldest footage first.
- During playback, press the rewind or fast forward buttons to fast forward or rewind the footage. (Speed: x2/ x4/ x8/ x16/ x32)
- Press the play/pause button again, to stop fast forward/rewind.
- To pause playback press the play/pause button.
- To stop playback, press the record button which will bring you back to live view. If your schedule is set to record at that time (motion or continuous), the scheduled recording will begin
PLAYBACK MODE
SEARCH AND PLAY MENU
To access the search footage list go to the main menu and select Search and Play
The Search and Play screen will list all of the recordings you have, starting with the oldest footage
-
Date/Time/Files - The footage directory shows dates and the number of video files recorded on that date. Press the record and play buttons to move the cursor up or down.
-
Page number - shows the current and total number of pages that have recorded footage.
- Video Type - Each color distinguishes the mode in which the files were recorded.
| Blue: Manual | Record | |
| Red: Motion | Detection Record | |
| White: Schedule Record | ||
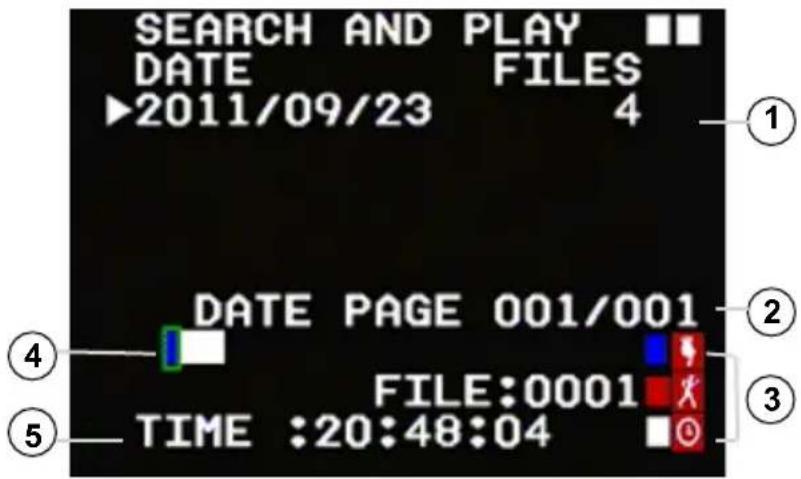
- Video Type Indicator Bar - Indicates the mode that the DVR recorded with for each file. Press the rewind button or fast forward button to move the green cursor along the event bar to select footage, then press the menu button to start playback of the selected footage.
- Video Start Time - Start time of the recorded footage that is highlighted on the event bar.
To Play Searched Footage:
- Highlight the desired playback start time.
- Press the menu button to select that file.
- Use the rewind and fast forward buttons to scroll to the PLAY option.
- Press the menu button to start playback.
To Stop Playback of Searched Footage:
- Press the record/stop button to stop playback and the system will return to the Search and Play list.
To Exit the Search and Play Menu:
- To return to the main menu, press the menu button.

- Use the rewind and fast forward buttons to scroll to ExiT.
- Press the menu button again this will bring you back to the main menu.
FACTORY DEFAULT
This menu allows you to restore the settings on your DVR back to original default settings.
Once you enter this menu the words "RECALL DEFAULT NOW?" appear on screen:
- Press the fast forward (+) button to restore the DVR back to factory default settings.
- Press the menu button to exit and keep your settings, this will return you to the main menu and no changes will be made.
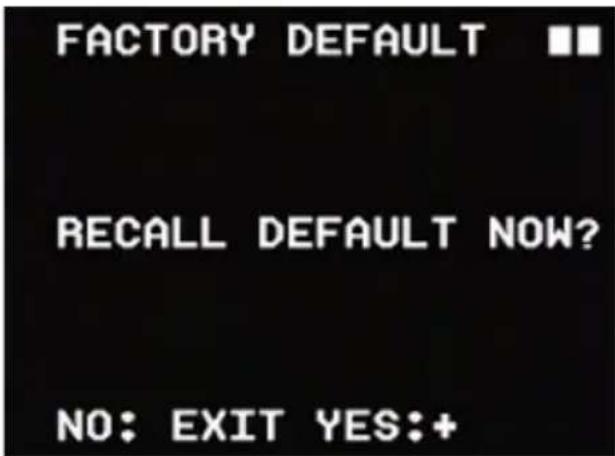
Note: Returning to factory default will erase all your settings (except date and time setup).
DVR SPECIFICATIONS
| Functionality Simplex | |
| Video Compression MPEG-4 | |
| Resolution 640 x 480, 320 x 240 | |
| Recording Frame Rate 320x240: 1~30FPS, 640 x 480: 1~12FPS | |
| Recording Resolution VGA (640x480)/ QVGA (320x240) | |
| Recording Qualities High, Medium, Low | |
| Recording Modes Manual/ Schedule/ Motion Detection | |
| Recording Media SD1.1/2.0 SD/SDHC Card, Max 32GB | |
| Video Format NTSC/PAL | |
| Video Display Output | 1 CH RCA Composite |
| Live Viewing | Single Screen |
| Live Resolution | 640 x 480 |
| Live Frame Rate | 30 FPS |
| Play Search Mode | By Date, Time |
| Play Speed | Forward/Rewind: x1/x2/x4/x8/x16/x32 |
| Play Mode | Single Screen |
| OSD and System Menu Display | Yes |
DVR SPECIFICATIONS
| OSD Language Display English | |
| Disk Full Warning Full Stop / Overwrite (Selectable) | |
| Automatic Overwrite Option Yes | |
| LED Indicators Power, Record, Play, Menu | |
| Housing Material ABS Plastic | |
| Battery Operable Yes, 4 x AA | |
| Battery Life 12 hours (lithium batteries) | |
| Power Input DC 12V 180mA | |
| Power Adapter Input AC 110-240V (switching mode) | |
| Operating Temperature 41°F ~ 113°F | |
| Operating Humidity 80% | |
| Dimensions 5" x 3" x 2.75" | |
| Weight 0.4lbs |
CAMERA SPECIFICATIONS
| Image Sensor | 1/6" Color CMOS Sensor |
| Resolution | 640 x 480 |
| Focal Length | Board Lens f3.62mm / F2.8 |
| Focus Type | Fixed |
| Min. Illumination | 2 lux |
| Motion Detection | Yes |
| Viewing Angle | 66 Degrees |
| White Balance | Auto |
| Signal/Noise Ratio | 46 dB |
RECORDING TIMES
| QUALITY | 2GB SD Card | 32GB SDHC Card |
| 320 x 240 @ 1FPS | 320 x 240 @ 1FPS | |
| Low | 45 days | 720 days |
| Medium | 22 days | 360 days |
| High | 17.2 days | 300 days |
www.defender-usa.com
Disclaimer
Defender does not endorse the use of any Defender products for illegal activities. Defender is not responsible or liable in any way shape or form for any damage, vandalism, theft or any other action that may occur while a Defender product is in use by the consumer.
VISITEZ- NOUS SUR LE WEB!
www.defender-usa.com
AVERTISSEMENT
2. Énergie MD (MD energy):
3. Seuil MD (MD Threshold):
INFORMATIONS DE LA GARANTIE DU PRODUIT
Site Web: www.defender-usa.com
60 Industrial Parkway #Z64
4080 Montrose Road
Cheektowaga, NY Niagara Falls, ON
USA 14227 Canada L2H 1J9
Conditions de garantie
MANUEL D'INSTRUCTIONS v1.1
- PRODUCT WARRANTY INFORMATION
- Please visit our website at www.defender-usa.com for information about your product's warranty.
- Warranty Terms
- CAUTION
- TABLE OF CONTENTS
- WHAT'S INCLUDED
- INTRODUCTION
- FEATURES
- Covert System
- Up to 45 Days of Recording
- Battery Operable Wireless Monitoring
- Motion Activated Recording
- Easily Review and Transfer Video
- Hour Scheduled Recording
- High Quality MPEG-4 Compression
- Lifetime Live Customer Support
- Disclaimers:
- BUTTONS AND CONNECTIONS
- IMITATION MOTION SENSOR - FRONT
- INSTALLATION
- Installing the Mounting Bracket
- Using the Extended Mounting Bracket
- Mounting the Camera
- Video Output and Power Adapter Connection
- BUTTON FUNCTIONS
- POWERING ON
- MONITORING MODE
- Record Resolution
- Record Quality
- SD Card Status:
- SD CARD INFORMATION
- MENUSETUP
- MENULAYERS
- MENUCONTENT
- DATE & TIME SETUP
- Date/ Time Settings:
- Setting the Date/Time:
- MOTION DETECTION SENSITIVITY SETUP
- Date Format:
- Manual Record
- Video Size/Frame Rate:
- Image Quality:
- Schedule Record (Motion Detection or Continuous)
- Motion Record
- Continuous Record
- SD CARD OPTIONS
- Formatting the SD card:
- SYSTEM STATUS
- The example photo shows:
- STOP RECORD
- START/STOP RECORDING:
- Motion Detection Record
- Note: For more information see RECORD SETUP on Pg 13
- The order of importance is:
- RECORDING MODES
- PLAYBACK MODE
- There are two playback modes:
- NORMAL PLAYBACK DISPLAY
- SEARCH AND PLAY MENU
- To Play Searched Footage:
- To Stop Playback of Searched Footage:
- To Exit the Search and Play Menu:
- FACTORY DEFAULT
- Once you enter this menu the words "RECALL DEFAULT NOW?" appear on screen:
- DVR SPECIFICATIONS
- CAMERA SPECIFICATIONS
- RECORDING TIMES
- Disclaimer
- VISITEZ- NOUS SUR LE WEB!
- AVERTISSEMENT
- Énergie MD (MD energy):
- Seuil MD (MD Threshold):
- INFORMATIONS DE LA GARANTIE DU PRODUIT
- Conditions de garantie
Brand : Defender
Model : STEALTH1
Category : Surveillance Camera