
GTB 16 - Drill Güde - Free user manual and instructions
Find the device manual for free GTB 16 Güde in PDF.

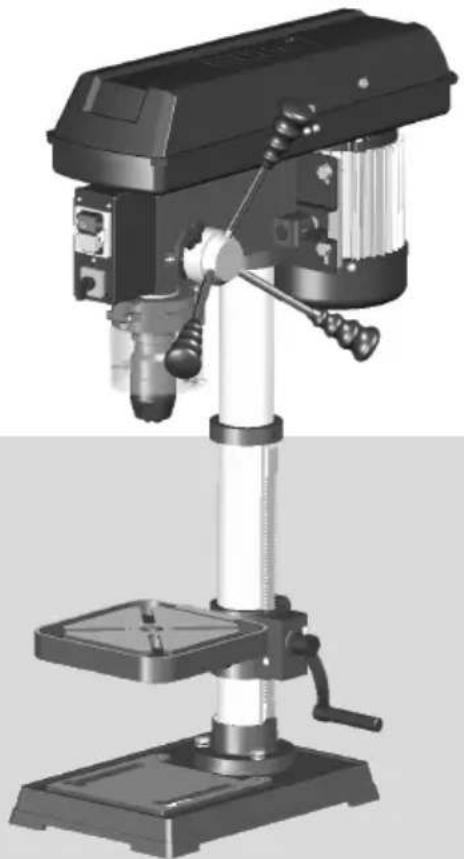
| Product type | Drill press |
| Brand | Güde |
| Model | GTB 16 |
| Supply voltage | 230 V / 400 V (depending on variant) |
| Frequency | 50 Hz |
| Motor power | 600 W (S1) |
| Rotation speed | 630 - 2700 min⁻¹ (5 speeds) |
| Spindle stroke | 60 mm |
| Throat depth | 125 mm |
| Chuck clamping range | 1 - 16 mm |
| Chuck | B16 (Morse taper) |
| Spindle holder | MK2 |
| Max. drilling diameter in steel | 16 mm |
| Work table | 200 x 200 mm |
| Base plate | 235 x 355 mm |
| Column diameter | 60 mm |
| Cable length | 2 m |
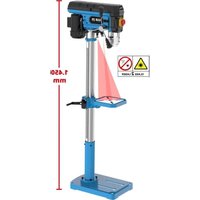
| Dimensions (L x W x H) | 540 x 270 x 850 mm |
| Net / gross weight | 31 / 32 kg |
| Sound pressure level | 62 dB(A) |
| Sound power level | 75 dB(A) |
| Protection class | I |
| Application | Light and medium drilling in wood, metal, and plastic |
Frequently Asked Questions - GTB 16 Güde
User questions about GTB 16 Güde
0 question about this device. Answer the ones you know or ask your own.
Ask a new question about this device
Download the instructions for your Drill in PDF format for free! Find your manual GTB 16 - Güde and take your electronic device back in hand. On this page are published all the documents necessary for the use of your device. GTB 16 by Güde.
USER MANUAL GTB 16 Güde
natural_image
3D rendering of a mechanical drill press with base and spindle (no text or symbols visible)GTB 16/605
55202
natural_image
3D rendering of a mechanical drill press with adjustable arms and base (no visible text or symbols)GTB 16/612 R+L
55204


ENGLISH Please read the instructions carefully before starting the machine.
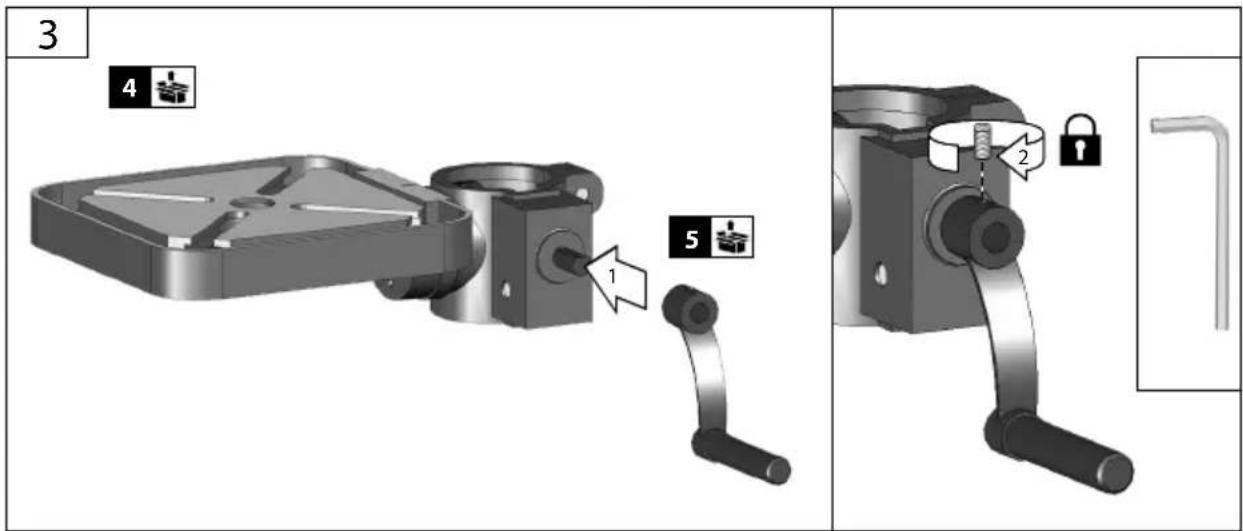
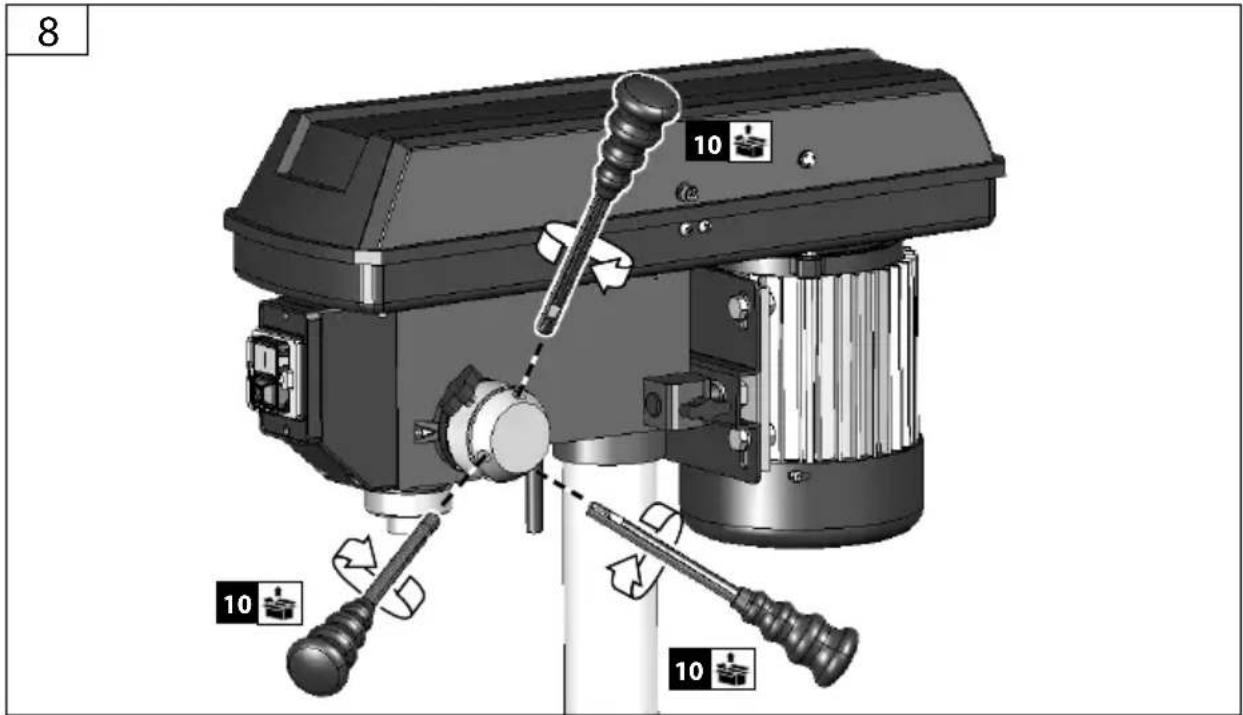
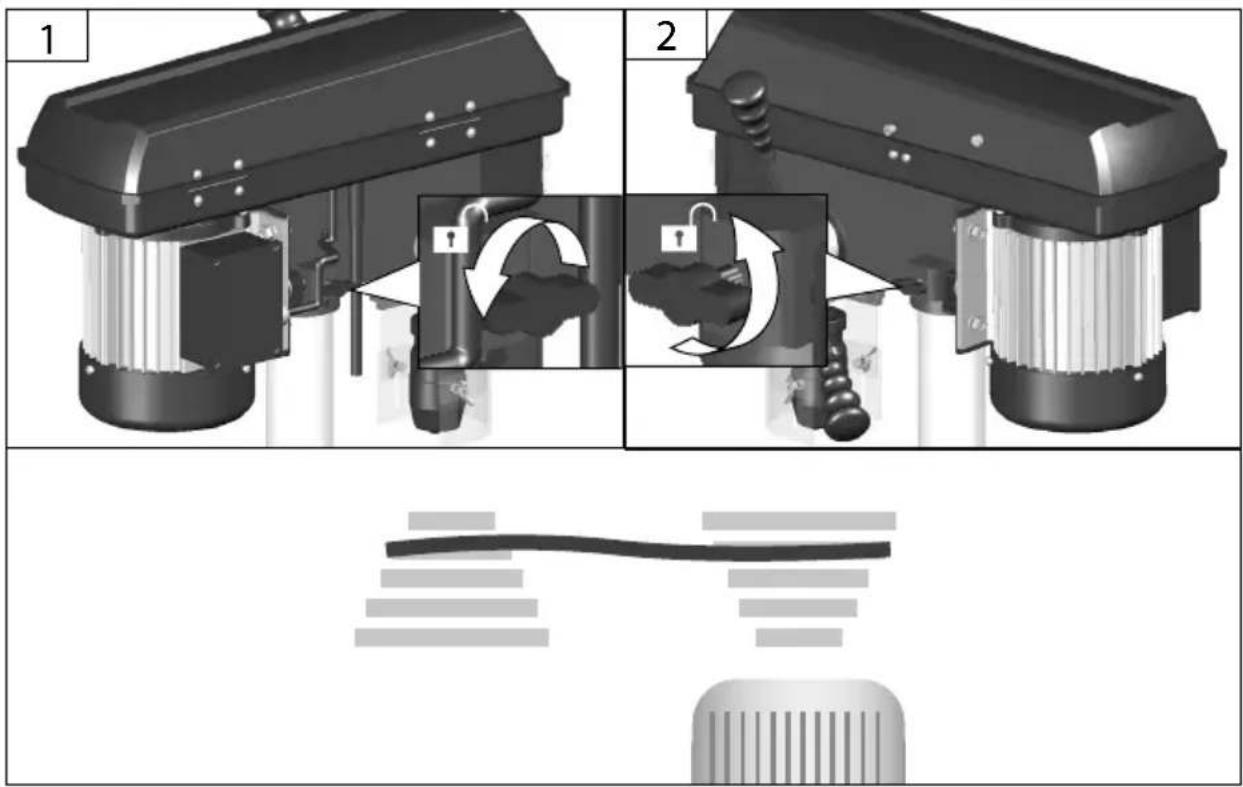
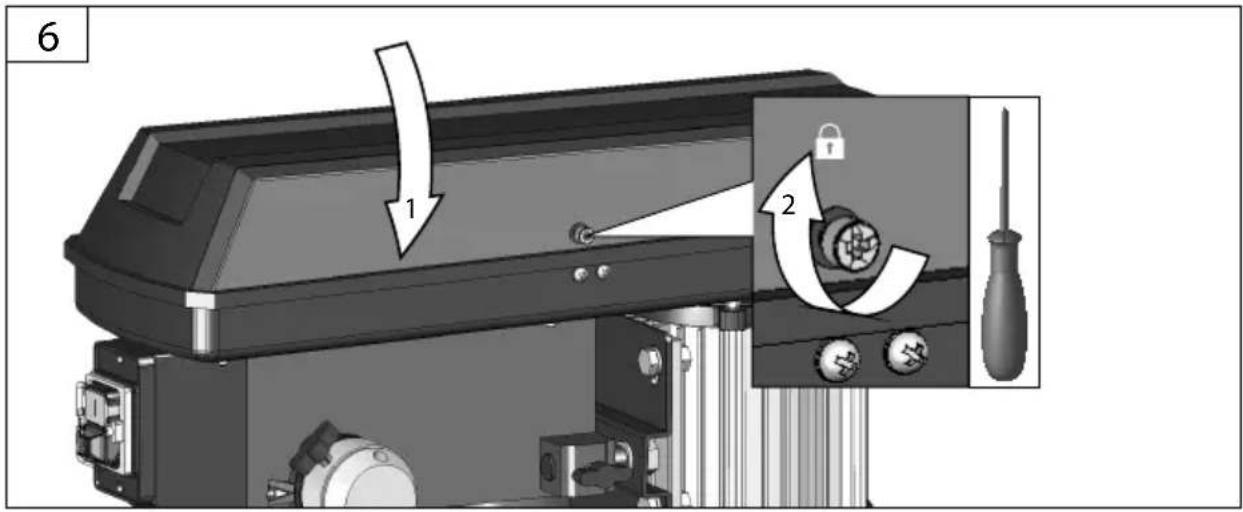
D Montage
SLO Montaža
GB Assembly
HR Montaža
F Assemblage
BG Монтаж
Montaggio
RO Montaj
NL Montage
cz Montáž
SK Montáž
H Szerelés
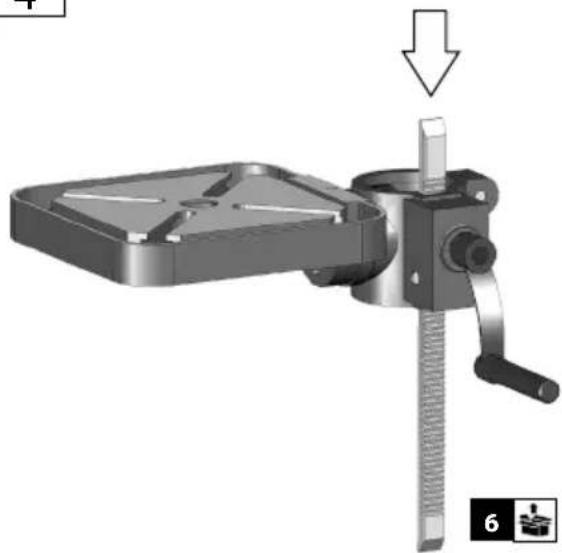
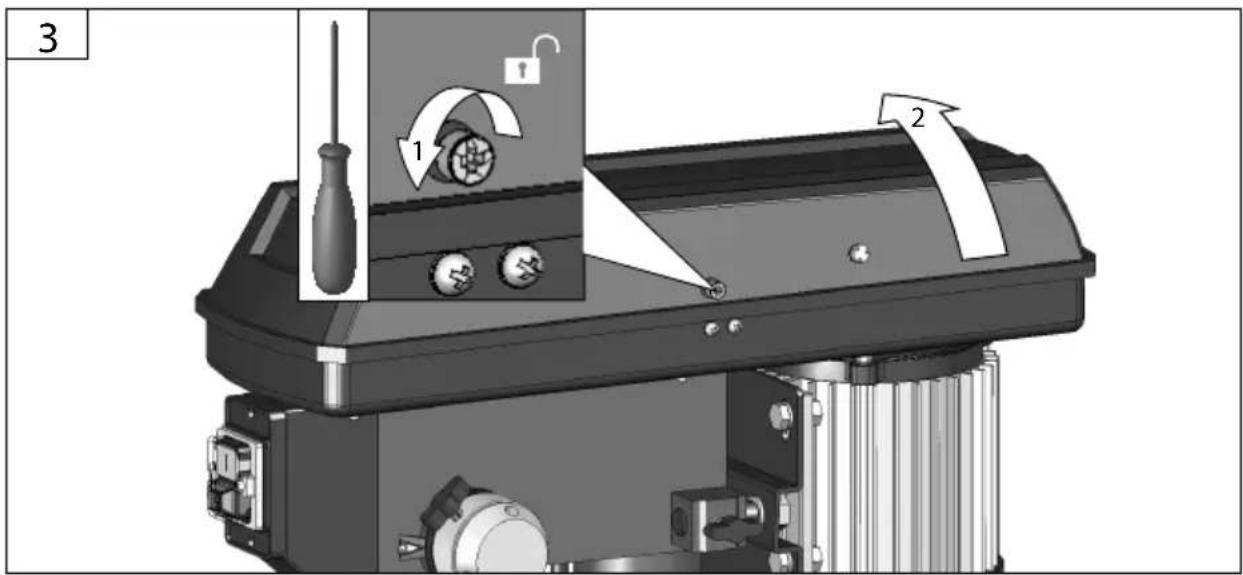
4
natural_image
Mechanical clamp tool assembly with a bracket and handle, showing a downward force arrow (no text or symbols)5
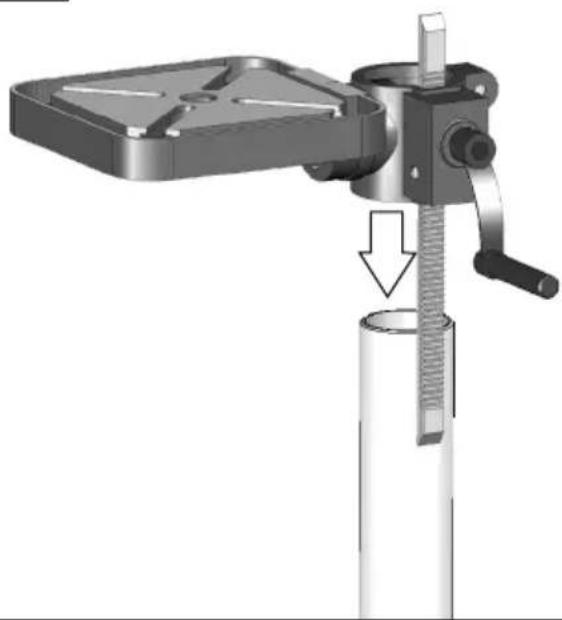
natural_image
Mechanical assembly diagram showing a clamp tool inserted into a cylindrical component (no text or symbols visible)6
| 1 | D | Montage | SLO | Montaža |
| GB | Assembly | HR | Montaža | |
| F | Assemblage | BG | Монтаж | |
| I | Montaggio | RO | Montaj | |
| NL | Montage | |||
| CZ | Montáž | |||
| SK | Montáž | |||
| H | Szerelés |
D Montage
GB Assembly
F Assemblage
Montaggio
NL Montage
cz Montáž
SK Montáž
H Szerelés
SLO Montaža
HR Montaža
BG Монтаж
RO Montaj
9

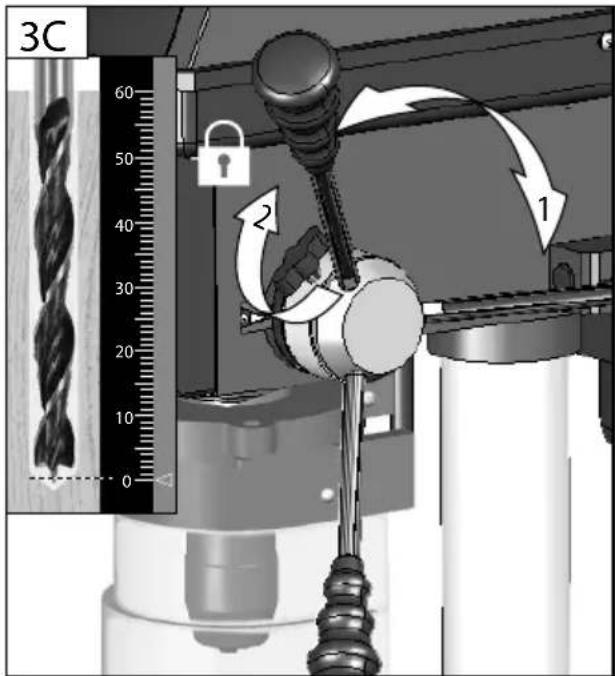
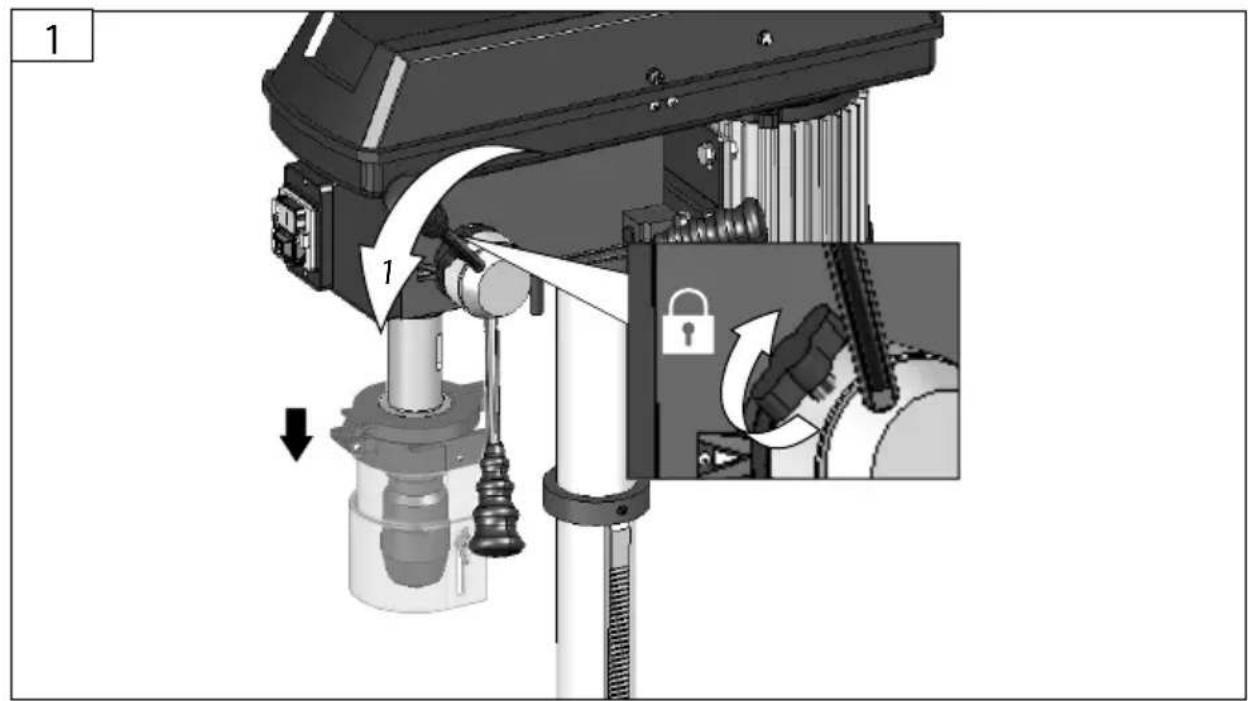
| 2 | D | Bohrspindeldrehzahl | SLO | Število vrtljajev vretena |
| GB | Spindle speed | HR | Broj okretaja vretena | |
| F | Vitesse de rotation de la broche | BG | Брой на оборотите на вретено | |
| I | Numeri di giri mandrino | RO | Turație pivot | |
| NL | Spiltoerental | |||
| CZ | Počet otáček vřetena | |||
| SK | Počet otáčok vretena | |||
| H | Orsó fordulatszáma |
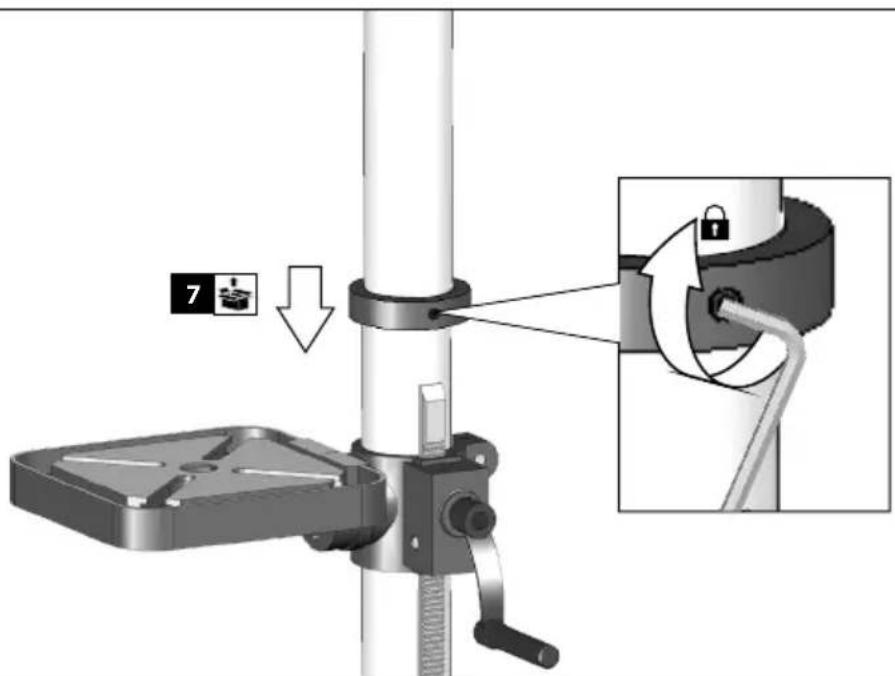
natural_image
Mechanical assembly diagram showing a motor with rotating components and lock mechanism (no text or symbols)
natural_image
Abstract geometric pattern with layered horizontal bars and a central black bar (no text or symbols)
 | D | Bohrspindeldrehzahl | SLO | Število vrtljajev vretena |
| GB | Spindle speed | HR | Broj okretaja vretena | |
| F | Vitesse de rotation de la broche | BG | Брой на оборотите на вретено | |
| I | Numeri di giri mandrino | RO | Turație pivot | |
| NL | Spiltoerental | |||
| CZ | Počet otáček vřetena | |||
| SK | Počet otáčok vretena | |||
| H | Orsó fordulatszáma |

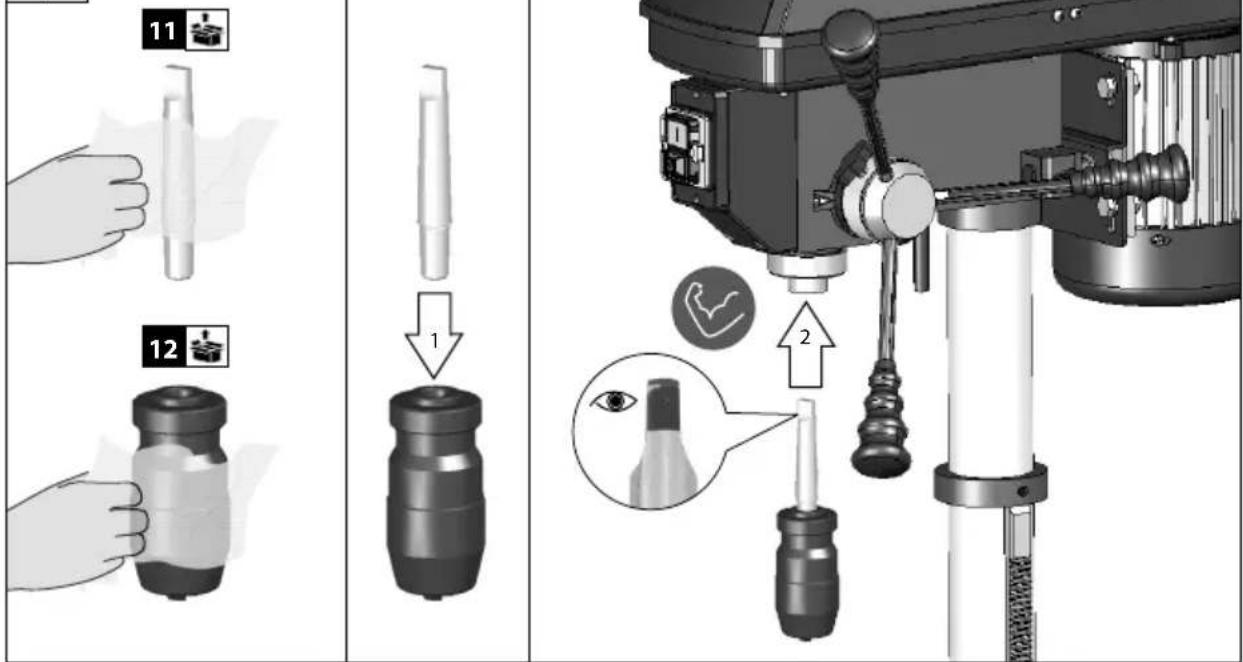
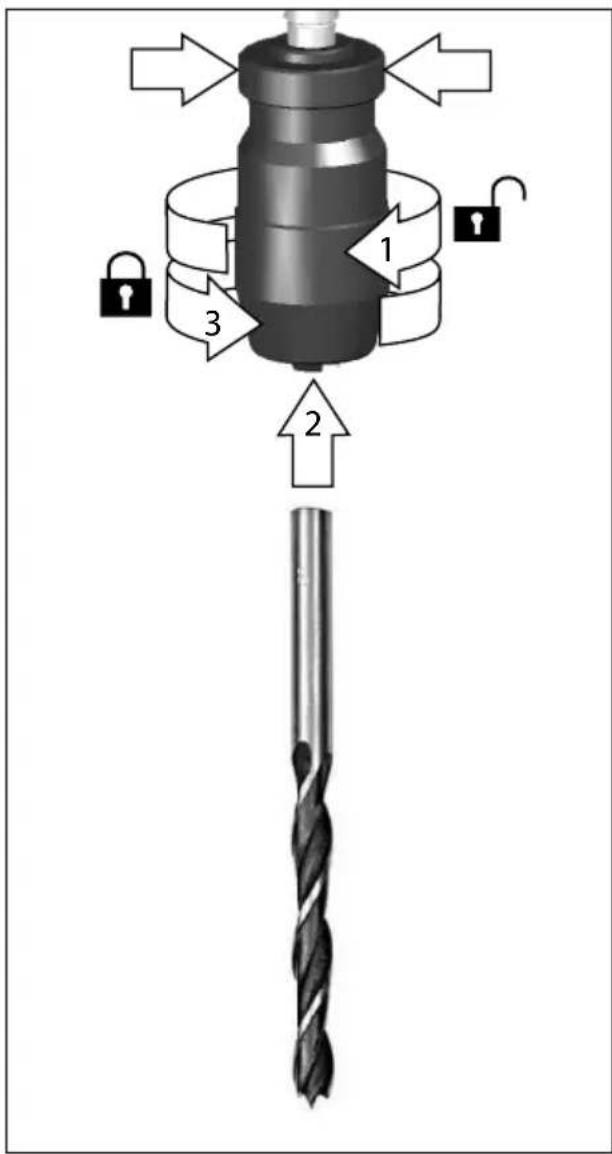
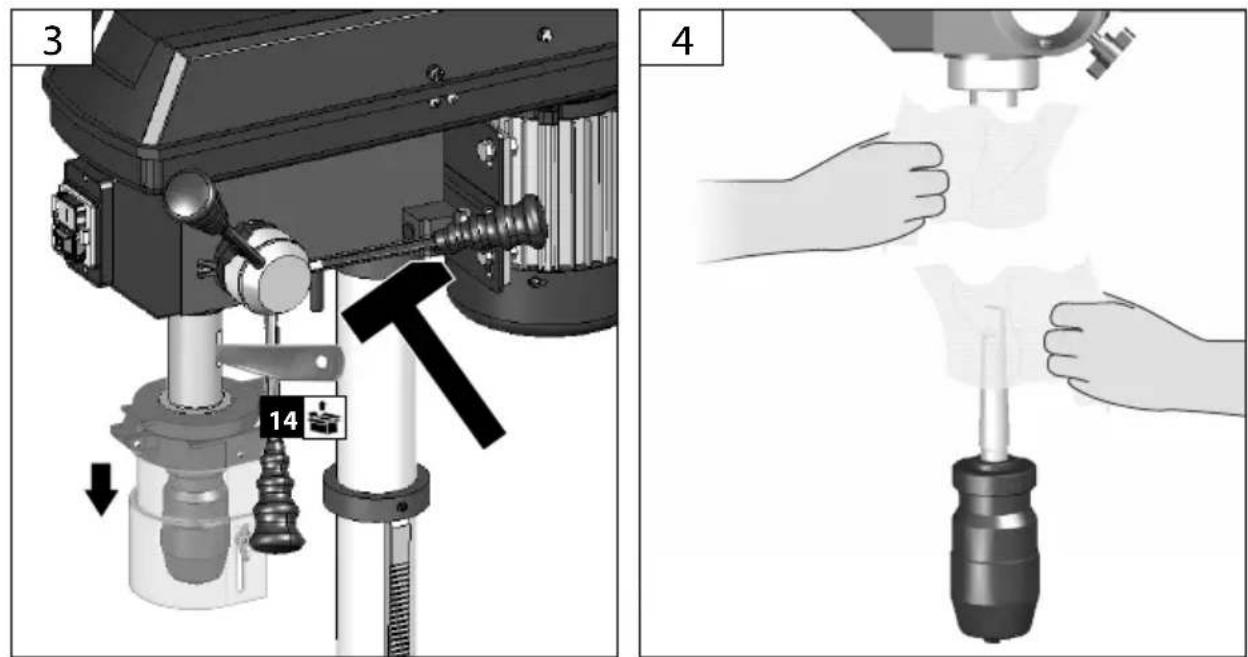
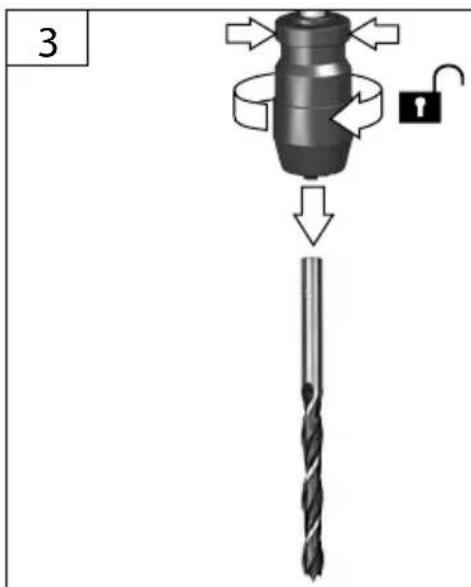
D Bohrer einspannen
SLO Objemka Vrtalni stroj
GB Clamp drill
HR Obujmica za Izbušite
F Clamp perceuse
BG Стяга бормашина
Morsetto Trapano
RO Clemă Burghiu
NL Klem Boor
cz Upínací Vrtačka
SK Upínacie Drill
H Bilincs Fúrjon
2
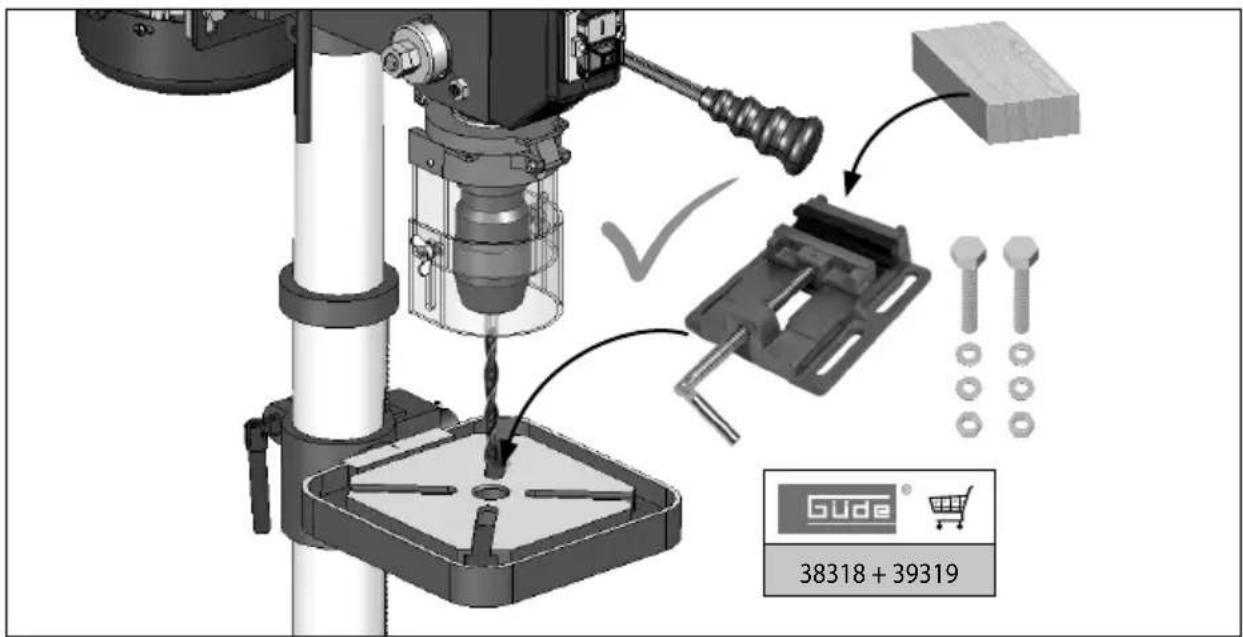
| 2 | D | Werkstück einspannen | SLO | Pritrdite obdelovanec |
| GB | Clamp the workpiece | HR | Učvrstite obradak | |
| F | Fixez la pièce | BG | Затегнете детайла | |
| I | Fissare il pezzo | RO | Fixați piesa de prelucrat | |
| NL | Werkstuk inspannen | |||
| CZ | Upněte obrobek | |||
| SK | Upnite obrobok | |||
| H | Fogja be a munkadarabot |
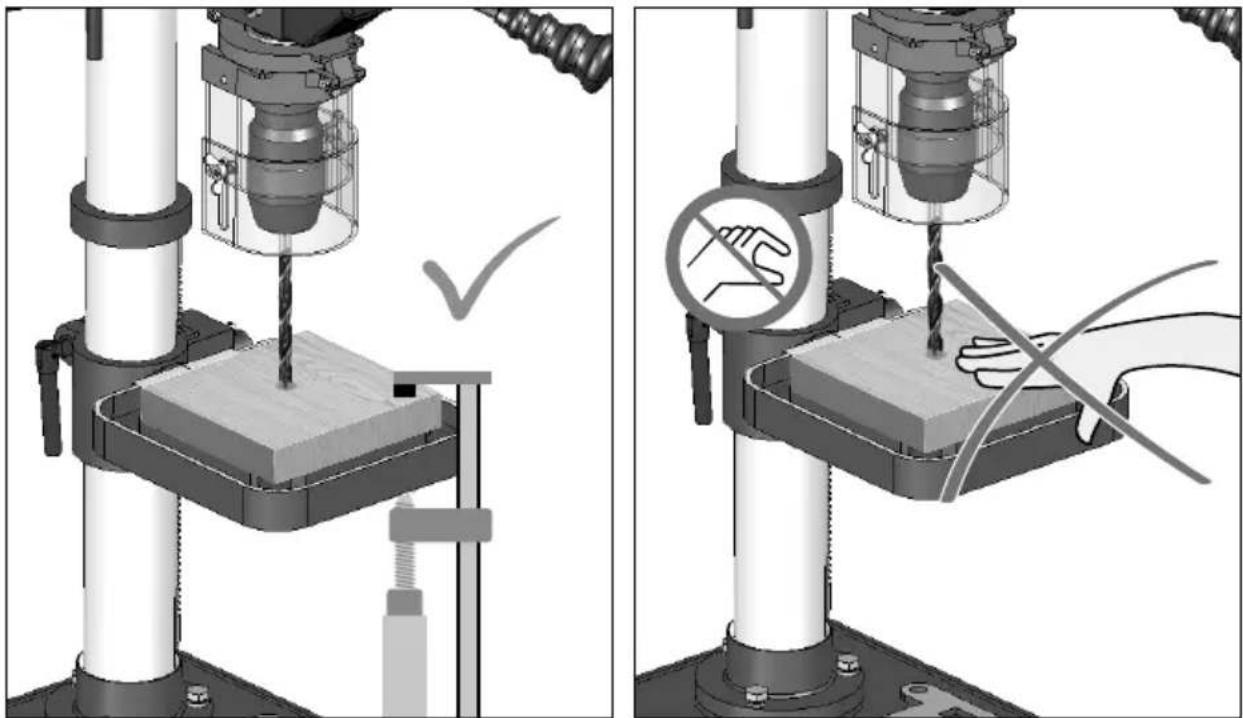
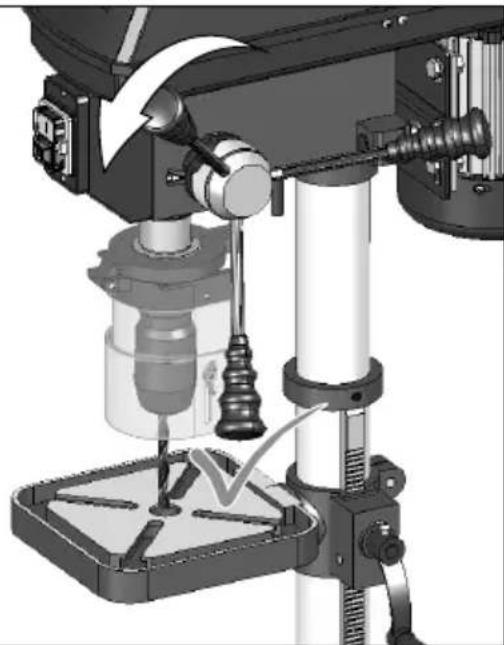
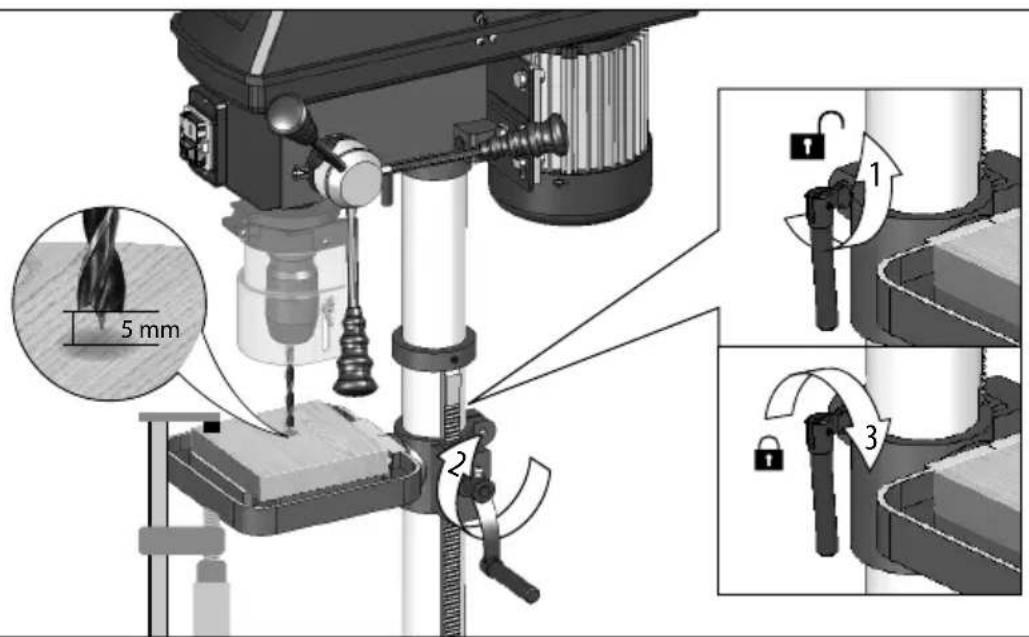
natural_image
Two-step industrial drilling process diagram showing tool positioning and hand protection (no text or symbols)D Inbetriebnahme
GB Starting-up the machine
F mise en service
1 Messa in funzione
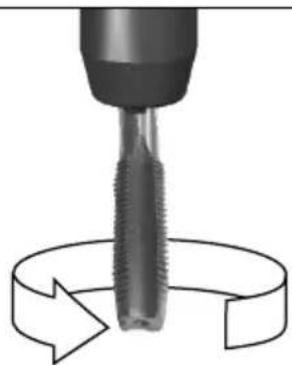
natural_image
Illustration of a drill bit being cut with a circular motion arrow (no text or symbols)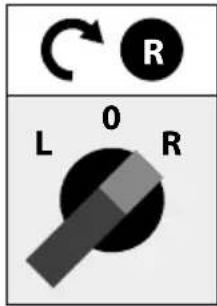
natural_image
Close-up of a mechanical component with threaded shaft and circular arrow indicating rotation (no text or symbols)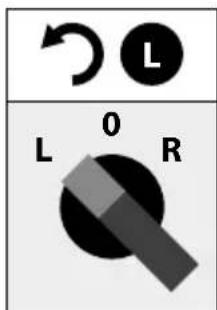
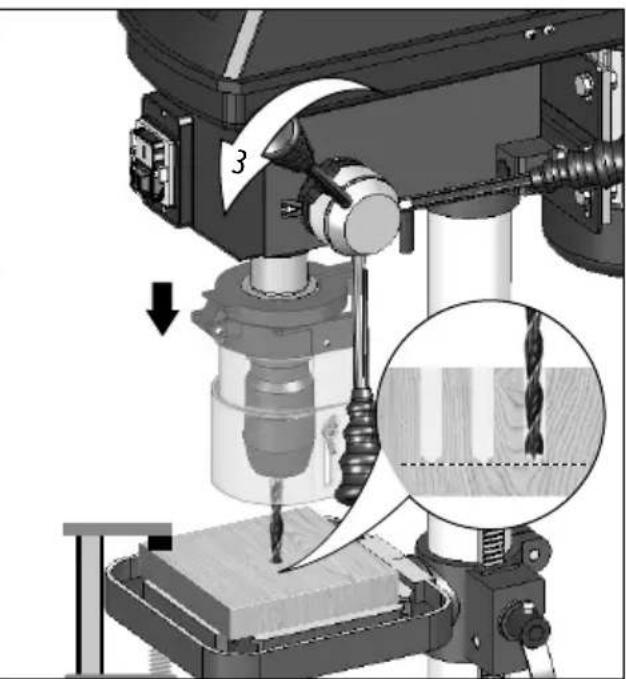
 | D | Betrieb | SLO | Delovanje |
| GB | Operation | HR | Rad | |
| F | Fonctionnement | BG | Pábota | |
| I | Esercizio | RO | Functionare | |
| NL | Gebruik | |||
| CZ | Provoz | |||
| SK | Prevádzka | |||
| H | Üzemeltetés |
natural_image
Mechanical assembly diagram showing a valve mechanism with a lock and gear (no text or symbols)
D Betrieb
SLO Delovanje
GB Operation
HR Rad
F Fonctionnement
BG Работа
Esercizio
RO Functionare
NL Gebruik
cz Provoz
SK Prevádzka
H Üzemeltetés

TEST
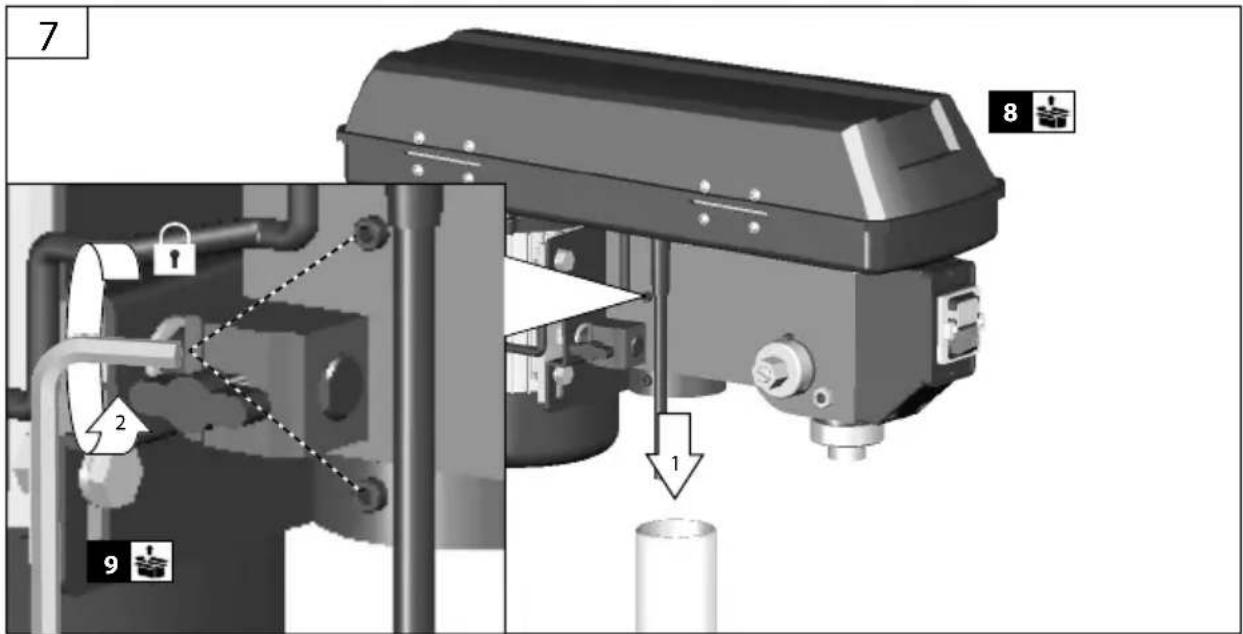
natural_image
Mechanical assembly diagram showing a drill press with tool and base components (no text or symbols visible)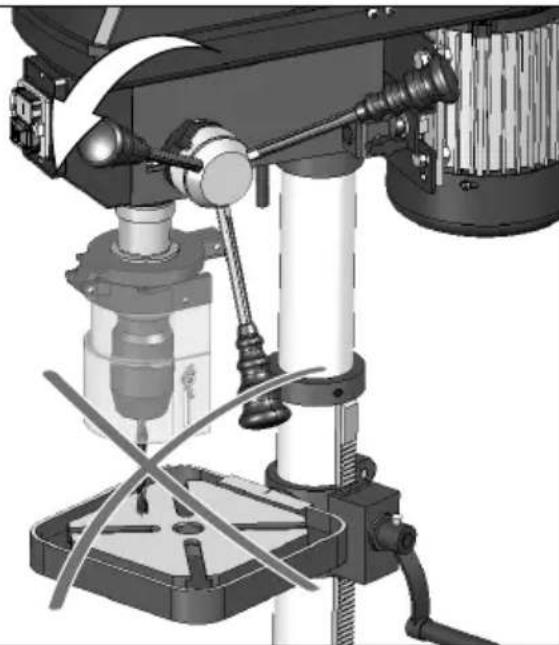
natural_image
Mechanical assembly diagram showing a drill press and mechanical components (no text or symbols visible)1
 | D | Betrieb | SLO | Delovanje |
| GB | Operation | HR | Rad | |
| F | Fonctionnement | BG | Pábota | |
| I | Esercizio | RO | Funcționare | |
| NL | Gebruik | |||
| CZ | Provoz | |||
| SK | Prevádzka | |||
| H | Üzemeltetés |


| D | Betrieb | SLO | Delovanje |
| GB | Operation | HR | Rad |
| F | Fonctionnement | BG | Pábota |
| I | Esercizio | RO | Functionare |
| NL | Gebruik | ||
| CZ | Provoz | ||
| SK | Prevádzka | ||
| H | Üzemeltetés |


natural_image
Mechanical drilling process diagram showing tool path and cutting tool (no text or symbols)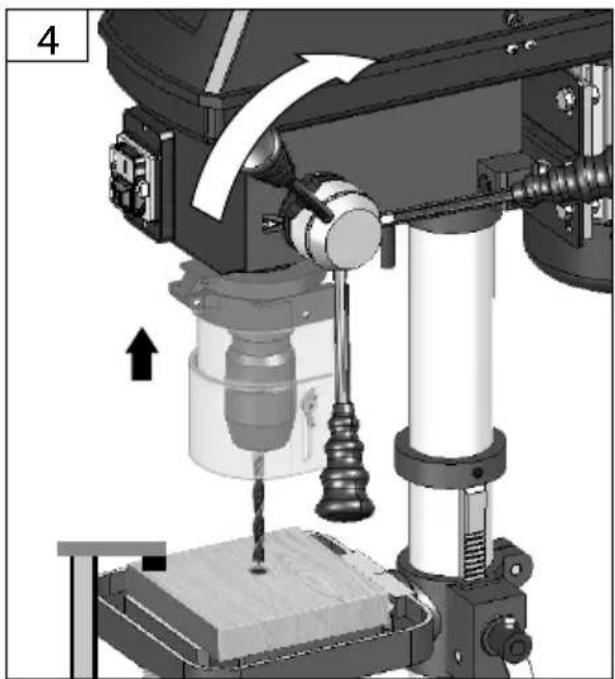
natural_image
Mechanical assembly diagram showing a CNC milling machine with tool path and motion arrows (no text or symbols)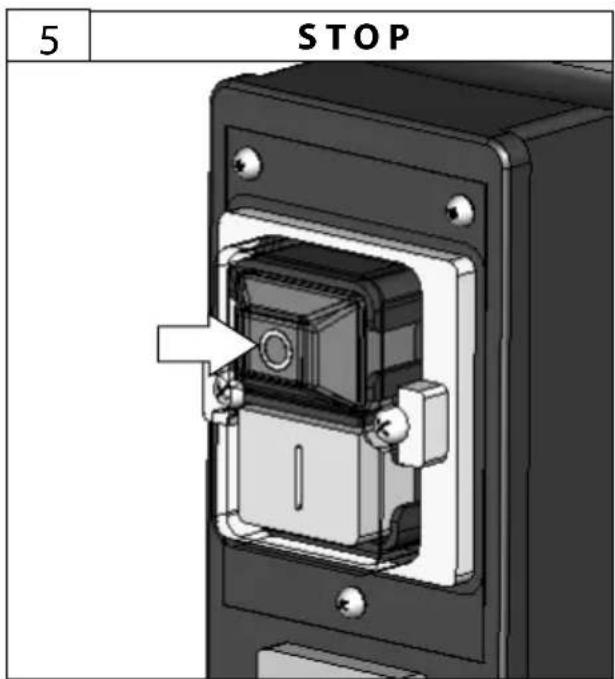
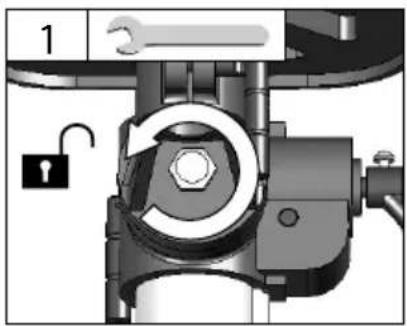
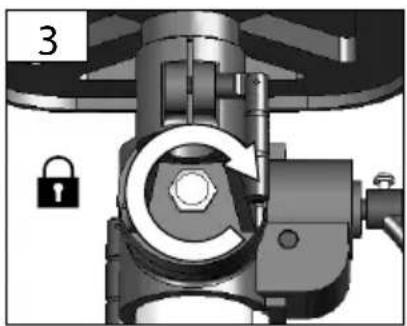
 | D | Spindelarretierung | SLO | Blokada vretena |
| GB | Spindle lock | HR | Vretena zaključavanje | |
| F | Blocage de la broche | BG | Блокировка на шпиндела | |
| I | Blocco del mandrino | RO | De blocare a axului | |
| NL | Asvergrendeling | |||
| CZ | Aretace vřetena | |||
| SK | Aretácia vretena | |||
| H | Tengelyreteszelés |

D Wartung
SLO Vzdrževanje
GB Maintenance
HR Održavanje
F Entretien
BG Поддръжка
Manutenzione
RO Întreținere
NL Onderhoud
cz Údržba
SK Údrzba
H Karbantartás

1
natural_image
Industrial drill press machine with adjustable shaft and base (no visible text or symbols)2
Technische Daten
The numerical values given are emission levels and not necessarily safe working levels. Although there is a correlation between the emission levels and the acceptable exposure levels, they cannot be reliably used to determine whether or not any additional safety measures are necessary. The characteristics of the work space, other sources of noise, i.e. the number of machines and other processes running in the vicinity and so on, are all factors that can influence the actual exposure levels of the employees. Moreover, the acceptable exposure levels can vary from country to country. This information should enable the machine's operator to carry out a better assessment of the risks and hazards.


Read and understand the operating instructions before using the appliance. Familiarise with the control elements and how to use the appliance properly. Abide by all the safety measures stated in the service manual. Act responsibly toward third parties.
The operator is responsible for accidents or risks to third parties.
Persons over 16 years of age can only work on the appliance. An exception includes youngsters trained in order to reach knowledge under supervision of the trainer during occupational education.
In case of any doubts about connection and operation refer please to our customer center
Specified Conditions Of Use
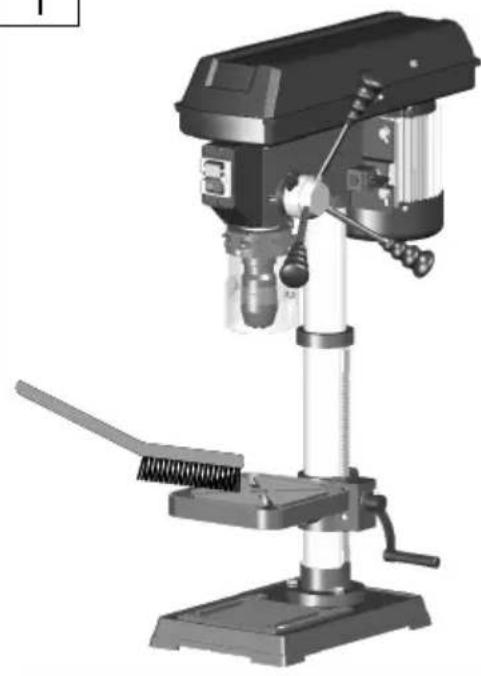
Bench drilling machine for light and medium drilling work in wood, metals and plastics.
The machine may only be used in a technically perfect condition and taking into account all safety information.
Do not use this product in any other way as stated for normal use. Not observing general regulations in force and instructions from this manual does not make the manufacturer liable for damages.
⚠ It is strictly prohibited to disassemble, modify and purposely remove the protective equipment on the unit and fit other protective equipment instead.
Even when the device is used properly and all safety regulations are complied with, there still may be some residual risks.
- noise emissions
- dust emissions
• vibrations to hand and arms - Danger of burns Tool and workpiece heat up during operation.
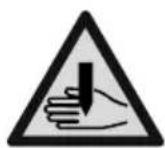
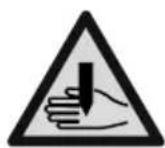
- Risk of injury Sharp tools and workpiece edges
Emergency procedure
Conduct a first-aid procedure adequate to the injury and summon qualified medical attendance as quickly as possible. Protect the injured person from further harm and calm them down. If you seek help, state the following pieces of information: 1. Accident site, 2. Accident type, 3. Number of injured persons, 4. Injury type(s)
Symbols

WARNING/CAUTION!

Warning against cutting injury

Warning against dangerous electric voltage

Warning against thrown-off items

<

Unplug the machine before any work on it.

Wear eye protective goggles! Wear ear protectors!

Keep dry at all times. Never expose tool to rain.

Always keep children and unauthorised persons out of reach of the appliance.

Forbidden operation for persons with chainlet

Forbidden operation for persons with long hair.

Do not operate the power tool when wearing a tie
Any damaged or disposed electric or electronic devices must be delivered to appropriate collection centres.

CE marking
General safety information

WARNING!
When using electric tools the following general safety instructions must be obeyed to protect yourself from electric shocks, injury and fire risks.
Read all these instructions before using this electric tool and keep the safety instruction in a safe place.
Keep your work area clean and tidy. Untidy workplaces and workbenches increase the risk of accidents and injuries.
Do not expose the appliance to rain and do not use it in wet or moisture conditions.
Provide adequate lighting or good lighting conditions when working with the machine.
Do not work with electric tools in conditions with flammable liquids, gases or dust. Electric tools produce sparks able to ignite dust or fumes.
Protect yourself from electric shock.
Avoid body contact with earthed objects (for example pipes, radiators, electric stoves and cooling units). There is an increased risk of electric shock if your body is earthed.
Keep children and bystanders away while operating a power tool. Do not touch the electric tool or the cable. When not concentrated, you may lose control over the machine.
Ensure that you store electric tools in a safe place. Tools which are not in used must be stored in a dry place as high as possible out of the reach of children or in an inaccessible place.
Do not overload the machine. Use appropriate electric tools for your work. Working with appropriate electric tools is better and safer when within the specified power range. They will work better and more safely in the specified power range.
Do not use the electric tool for purposes for which it is not designed. For example, do not use a manual circular saw for cutting branches or logs.
Dress properly. Do not wear loose clothing or jewellery. Keep your hair, clothing and gloves away from moving parts. We recommend that you wear non-slip shoes when working outdoors. Wear a hairnet if you have long hair.
Use protective equipment which fit you. Wear safety goggles and ear protection at all times. A dust mask or respirator is also required. Wear tight-fitting gloves at all times when handling sharp blades and saw blades,
If dust exhausters and catchers are to be installed, make sure they are fitted and used properly. Using a dust exhauster may reduce the exposure to dust.
Do not use the cable in conflict with its designation, to carry or hang electric tools or to pull the plug out of socket. Protect the cable against high temperatures, oil, sharp edges or moving parts of the machine. Damaged or entangled cables increase the risk of electric shock.
Secure the workpiece. Use clamping equipment or a vice to secure the workpiece. This will be safer than holding it in your hand.
Avoid any abnormal body posture. Provide good stability and keep balance at all times. By this, electric tools are better controlled in unexpected situations.
Treat electric tools carefully.
Keep the cutting tools sharp and clean. Carefully treated cutting tools with sharp edges get stuck less often and are easier to guide.
Follow the instructions for lubricating and changing tools.
Check the connection cable on the electric tool at regular intervals and have it replaced by an expert if it is damaged.
Check the extension cables at regular intervals and replace them if they are damaged.
Keep the handles dry, clean and free of oil and grease.
Pull the plug out of the socket and/or remove the battery when the tool is not in use before you make machine settings or change accessories, such as the saw blade, drill bit or cutter. This safety measure prevents unintentional starting of the electric tool.
Before starting any electric tool, remove any adjusting wrenches and screwdrivers. A tool or a wrench present in the rotating part of the machine may lead to injuries.
Prevent the machine from unintentional starting. Before plugging and/or connecting the machine to battery, handling or carrying, make sure the electric tools are switched off. Having a finger on the switch when carrying the electric tool or when the machine is on when plugging it may lead to injuries.
If you wish to work outdoors with an electric tool, only use extension cables which are approved for outdoor use and are marked accordingly. Using an extension cable suitable for outdoor use reduces the risk of electric shock.
Be careful, pay attention to what you are doing and use common sense when working with electric tools. Do not use electric tools when you are tired or under the influence of drugs, alcohol or pharmaceuticals. A moment if inattention when using electric tools may lead to serious injuries.
Check the machine for any damage:. Before using the equipment again, the protective equipment must carefully be checked if safe and working as designated.
Check the moving parts for perfect functioning, if working smoothly and if no parts are damaged. To provide safe operation of the equipment, all parts must be installed properly and meet all conditions.
Damaged protective equipment and parts must be professionally repaired or replaced by a recognised professional workshop, unless otherwise specified in the Operating Instructions.
Do not use electric tools with a defective switch. An electric tool that cannot be switched on or off is dangerous and must be repaired.
Have your electric tool repaired by an electrician. This electric tools complies with the relevant safety regulations. Repairs may only be carried out by an electrician using genuine spare parts; otherwise the user may suffer accidents.

Caution!
The machine must be secured to the floor using suitable screws since otherwise there is a risk that it will tip over.
Inspect before each use.
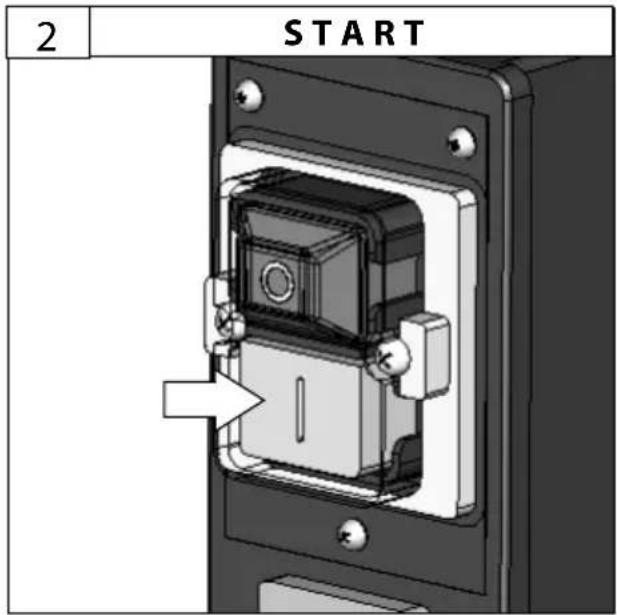
- Proper function of the on and off button, incl. the emergency switch.
- Carry out a visual inspection before switching the appliance on.
- Check especially the safety equipment, electrical control elements, power lines and screw couplings for any damage and if they are tightened appropriately. If necessary, replace damaged parts before operation.
- Ensure that the bench clamping lever is tightly secured before starting up the machine.
- Ensure that the drill is safely secured in the clam-ping chuck.
- REMOVE ADJUSTING KEYS AND WRENCHES. From habit of checking to see that keys and adjusting wrenches are removed from tool before turning it "ON".

Risk of injury!
Keep body parts and clothes away from rotating parts of the device.
Use protective equipment which fit you.
Wear a hairnet if you have long hair.
Do not wear gloves when operating a drill.
Do not attempt to drill into a material that does not have a flat surface, unless you are using a suitable support.
Never start the drilling machine with the drill pressed against the workpiece.
Always use clamps, chuck jaws or a vice to secure the workpiece to the bench.
Set the drilling machine to a speed that is appropriate for the specific job.
In the event of a blockage, switch off the machine immediately. Pull out the mains plug and remove the jammed workpiece.
Chips and splinters must not be removed while the machine is running.
Mains Connection

Operation is only allowed with a safety tch against stray current (RCD max. stray rent of 30mA).
Connect only to a single-phase AC current supply and only to the mains voltage specified on the rating plate. Must only be used from sockets with earth wire.
Only plug-in when machine is switched off.
Maintenance

Unplug the machine before any work on it.
Carry out a visual inspection before switching the appliance on.
The appliance must not be used if damaged or safety equipment is defective. Replace any worn-out and damaged parts.
Caution! If the power cord of the appliance gets damaged, it must be replaced by the manufacturer or its customer service or a similarly qualified person to avoid danger.
Repairs and works specified in these Instructions may only be performed by qualified authorised staff.
Use only original accessories and original spare parts.
Keep the device, in particular the air vents, clean at all times. Never spray water on the device body!
Do not clean the plastics with solvents, flammable or toxic fluids. For cleaning, use a damp cloth only.
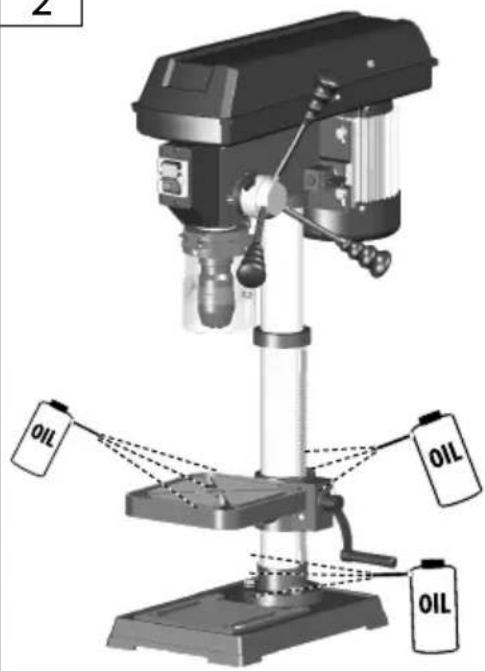
Apply environment-friendly oil to all moving parts.
Only a regularly maintained and treated appliance can serve as a satisfactory aid. Insufficient maintenance and care can lead to unforeseen accidents and injuries.
If necessary, a list of spare parts can be found at www.guede.com.
Guarantee
Warranty period of 12 months applies to commercial use and 24 months applies to private use and commences on the day of purchase of the device.
The guarantee solely covers inadequacies caused by material defect or manufacturing defect. Original payment voucher with the sales date needs to be submitted for any claim in the guarantee period.
The guarantee does not cover any unauthorised use such as appliance overloading, use of violence, damage as a result of any unauthorised interference or caused by foreign items. Failing to follow the operating and assembly instructions and common wear are also not included in the guarantee.
Important information for the customer
Please be sure to know that returning the product in or after the warranty period must be made in the original packaging.
Service
Do you have any technical questions? Any claim? Do you need any spare parts or operating instructions? We will quickly help you and without needles bureaucracy at our web pages at www.guede.com in the Servicing part. Please help us be able to help you. In order to identify your device in case of claim we need the serial No., product No. and year of production. All this data can be found on the type label.
Tel.: +49 (0) 79 04 / 700-360
Fax: +49 (0) 79 04 / 700-51999
E-Mail: support@ts.guede.com
Inspection and maintenance plan
| Regular servicing period Before any | start-up | After every start-up | If necessary |
| Check the safety devices | √ | ||
| Inspect and, if necessary, tighten the fan belts | √ | ||
| Lubricate the columns and the bench with a thin layer of oil | √ | ||
| Clean the tapered mandrel | √ | ||
| Clean the machine of drilling dust or metal shavings | √ |
WAARSCHUWING /OPGELET!

Translation of the EC-Declaration of Conformity
We, hereby declare the conception and construction of the below mentioned appliances correspond - at the type of construction being launched - to appropriate basic safety and hygienic requirements of EC Directives.
In case of any change to the appliance not discussed with us the Declaration expires.
Notified Body Name: Adress:No:
Type Ex. Cert.-No.:
□97/68/EC_
Emission No.:
2000/14/EC_2005/88/EC


Brand : Güde
Model : GTB 16
Category : Drill