
Alarmbox - Docking station INTENSO - Free user manual and instructions
Find the device manual for free Alarmbox INTENSO in PDF.
| Product Type | Docking Station / Alarm Clock Radio |
| Brand | Intenso |
| Model | Alarmbox |
| Dimensions (L x H x D) | 90 x 90 x 88 mm |
| Weight | Approx. 300 g |
| Power Supply | USB 5V 1A mains adapter (included); rechargeable Li-Ion battery (approx. 5h music playback) |
| Display | 2.8 inches (7.11 cm) |
| Speakers | 2 x 3W |
| Supported Audio Formats | MP3, WMA |
| Storage Media | SD / SDHC card up to 32 GB |
| Radio | FM 87.5 - 108 MHz |
| Main Features | Alarm clock radio, dual alarm (music or radio), snooze, MP3 player, Line In input, clock with date |
| Connectivity | Mini USB (charging), 3.5 mm Line In jack |
| Box Contents | Alarmbox, USB mains adapter, USB cable, Line In cable, user manual, warranty card |
| Care and Cleaning | Clean with a soft, dry cloth; do not use solvents; protect from moisture, extreme heat and direct sunlight |
| Safety | Do not open the casing, do not repair yourself; do not use near water; unplug before cleaning; use only the supplied adapter |
| Repairability and Spare Parts | No user-serviceable parts; in case of problems, contact customer service |
| General Information | Operating temperature: -10°C to +40°C; relative humidity 5% - 95%; CE marking; WEEE compliant recycling |
Frequently Asked Questions - Alarmbox INTENSO
User questions about Alarmbox INTENSO
0 question about this device. Answer the ones you know or ask your own.
Ask a new question about this device
Download the instructions for your Docking station in PDF format for free! Find your manual Alarmbox - INTENSO and take your electronic device back in hand. On this page are published all the documents necessary for the use of your device. Alarmbox by INTENSO.
USER MANUAL Alarmbox INTENSO
natural_image
Simple line drawing of a trash bin with crossed lines indicating no waste or discharge (no text or symbols)- Contents.... 1
- Indications.... 2
- Functions 2
- Packaging content 2
- Control elements.... 3
- Operation 4
a) Turning on and off 4
b) Charging the battery....4
c) Insert a memory card 4
d) Play music directly from the device 5
e) Play music over the Line In connection 5
f) Radio....6
g) Set date and time....6
h) Set the alarm....7 - Technical data....8
2. Indications
- Avid hard collisions of the device.
- Do not use the device in extremely cold, hot, humid or dusty environments. Neither should it be exposed to direct sunlight.
- Avoid use in extremely strong magnetic fields.
- Protect the device from moisture. If moisture penetrates the device, turn it off immediately and clean and dry the device thereafter.
- Please do not use any chemical solutions in order to clean the device. Please clean only with dry towels.
- We are not responsible for any damages or data losses due to malfunctioning, incorrect operations, self-authorized repairs or change of the batteries of the device.
- Please do not disassemble the device into its individual components and do not try to repair it by yourself, as this would lead to voiding of the guarantee.
3. Functions
- Alarm function / radio alarm clock
- MP3 / WMA Player
- FM Radio
- Portable speaker
• Rechargeable Li-Ions Battery
4. Packaging content
Please check the package contents for completeness
- Intenso ALARMBOX
• USB network adapter (5V 1A) - USB cable
- Line In cable
- Manual + Warranty card
5. Control elements
text_image
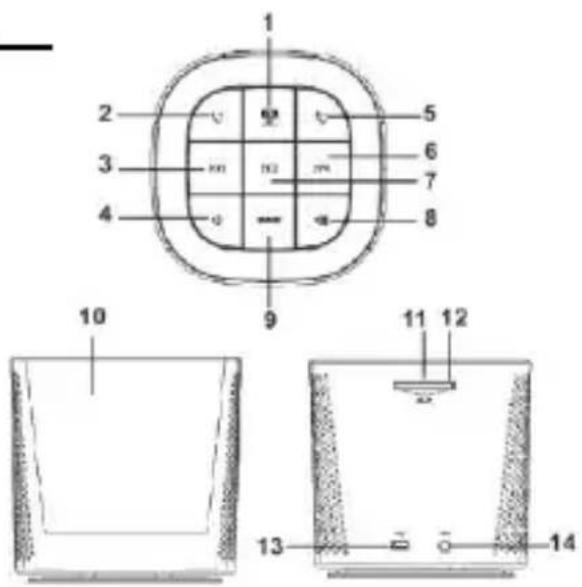
1 2 3 4 5 6 7 8 9 10 11 12 13 14- Menu Button – Press this button to change between the different functions of the device. The modus symbol, which is located on the lower line of the display, indicates the selected modus.
- Alarm 1 Button – Press this button to set alarm 1.
- Back button
- Volume [-] button – Press this button to reduce the playback volume.
- Alarm 2 Button – Press this button to set alarm 2.
- [▶▶] Forward button
- Play/Pause Button – Press this button to pause or to continue playback. It also serves to confirm your setting.
- Volume [+] button – Press this button to increase the playback volume.
- Snooze Button – Press this button to interrupt the alarm for an interval (Snooze) of 5 minutes.
- Display
- Reset hole
- Memory card slot
- Mini USB port – Over this port, the integrated battery of the device is charged.
- Line in port – Over this port, external devices such as MP3 Player can be connected to the device.
6. Operation
a) Turning on and off
Keep the - button pressed for 2 seconds in order to turn the device on or off.
Please note:
- If the device doesn't respond, first make sure that the battery is charged or that an external power supply is established. In this case, briefly press the reset button by inserting a thin object (such as a needle) into the reset hole and then press the - button again for 2 seconds. The device should now turn on.
b) Charging the battery
When the state of charge is low, please connect the device with the included USB cable and via the USB port to a computer, or use the included network adapter to charge the batteries.
c) Insert a memory card
Insert the memory card with the brand logo facing down completely into the designated card reader, until it perceptibly and audibly clicks into place. To remove the SD card, gently press it into the card reader. The spring mechanism releases the card until it comes forth. Now you can easily pull out the card.
d) Play music directly from the device
To play music directly from the device, please insert a memory card with music saved in MP3 or WMA format. Now follow the indicated steps below in order to initiate the music reproduction.
- Insert the memory card recorded with supported music titles
- Turn the device on.
- Press the - button to switch to the SD Card reproduction mode.
- Press the - button to initiate playback.
- Press the - button again to pause or continue playback.
- Briefly press the / - buttons to witch to the next or previous music title. Keep the button pressed to rewind or fast-forward the title.
- Keep the / - buttons pressed to adjust the volume.
e) Play music over the Line In connection
- Connect the USB cable to any desired music source.
- Turn the device on.
- Press the - button to switch to the Line In mode.
- Now start the playback on the connected device.
- Press the / - button to adjust the volume. Through pressing the - button, you can mute the device. By pressing the button again, music is reproduced at the same volume as previously set.
f) Radio
- Please connect the included USC cable into the Line In port. This cable serves as antenna for a better radio reception.
FM
-
Press the - button to switch to the radio mode.
-
Press the ◀◀◀ / ▶▶▶ - button to adjust the frequency manually in a range from 87.5 MHz and 108 MHz
FM
- Hold the - button pressed to initiate the automatic search option.
The device saves automatically all available radio station.
- By briefly pressing the -button the device switches between the saved radio stations.
g) Set date and time
- Press the - button, to switch to the date/time mode.
FM
-
Hold the - button, until the hour display starts to flash.
-
Press the / - buttons to switch between year, month, day, hour and minute. The value to set is flashing.
-
With the / - buttons the values can be adjusted.
-
Press the - button to save the selected settings.
h) Set the alarm
The device is equipped with two different alarm modes. If you activate alarm 1, with inserted memory cart you will be woken up with a musical title of your choice. If the memory card is not inserted, the standard alarm one will sound. If you activate the alarm mode 2, you will be woken up with the radio channel of your choice.
Adjustment of Alarm Time.
- Press the - button, to switch to the alarm mode.
- Press the alarm 1/2 shortly to display the actually adjusted alarm time. Now hold the alarm key of 1/2 until the hour display starts flashing.
- Press the / - buttons to switch between hour and minute. The value to set is flashing.
- With the / - buttons the values can be adjusted.
- Press the - button to activate the alarm. An alarm bell is now indicated in the display. Press the button again to deactivate the alarm. The alarm bell in the display fades out.
- Press the - button to save the selected settings.
Please note:
- If the memory card is inserted, you can adjust an audio file of your choice as alarm sound. For this purpose, interrupt the audio reproduction of the desired title with the key play/pause and hold the alarm 1 key until the selection will be confirmed on the display.
- To select the channel for alarm 2 mode go to the radio mode and hold the alarm 2 key during the reproduction of the desired channel until the selection will be confirmed on the display.
- The alarm is equipped with a “snooze” function. If you press the “snooze” key during the reproduction of the alarm sound, it will sound for 5 minutes without interruption
and then sound again. To deactivate the alarm, simply press the alarm key 1/2 according to the chosen alarm mode.
7. Technical data
Battery type
Rechargeable Li-Ion battery
Battery life
\~ 5 hours music
Display
2,8" inches (7,11 cm)
Speakers
3W × 3W
Supported card formats
SD up to 2 GB & SDHC up to 32 GB
Audio Format
MP3, WMA
SNR
85 dB
Operational between
\~ -10 Celsius - \~ +40 Celsius
Operational at a rel. humidity of
5% - 95%
Storable at a rel. humidity of
5% - 95%
Dimensions
90 x 90 x 88 mm
Weight
\~ 300 gr
CARE AND MAINTENANCE
• To avoid electrical discharges, do not extract the screws or casing.
- Do not use the device near water. Do not expose the device to rain or humidity. Do not place any objects that contain water or any other liquids near the device.
- Do not open the casing. Do not attempt any repairs on the device. Refer all repairs to qualified technical personnel.
- Please plug the network adapter completely into the designated port. Only in this way, electrostatic charges are prevented.
- Connect all connections correctly and safely.
• Please do no press on the display. Protect the display from direct sun light.
- Please do not extract the memory card while being lectured. Otherwise, this may result in system breakdown and data loss.
- Please do not repack the device after prolonged use. Be sure of sufficient cooling. Otherwise there is danger of overheating.
• To guaranty a better service, the manual might be modified.
Maintenance of the device
• The device has to be turned off.
- Never spray or apply any liquids onto the display or casing.
Cleaning the display / casing / frame
- Clean the casing, frame and LCD display carefully by using a soft, lint- and chemical-free cloth. Do only use special detergents for cleaning LCD displays.
Disposal of old electronic devices
natural_image
Simple line drawing of a trash bin with crossed handle and no text or symbolsDevices that are marked with this symbol are subject to the European Directive 2002/96/EC.
All electronic and old electronic devices must be disposed of separately from household garbage, at specially provided public locations.
A proper disposal of old electronic devices avoids damage to the environment.
(Intenso)®
49377 Vechta
Germany
www.intenso.de

text_image
CE1. Indice
natural_image
Simple line drawing of a trash bin with crossed lines indicating no waste or discharge (no text or symbols)Accu Li-Ion rechargeable
Durée d'accu
natural_image
Simple line drawing of a trash bin with no text or symbolsnatural_image
Simple line drawing of a trash bin with crossed lines indicating no waste or discharge (no text or symbols)natural_image
Simple line drawing of a trash bin with crossed lines indicating no waste or plastic (no text or symbols)natural_image
Simple line drawing of a trash bin with crossed lines indicating no waste or plastic (no text or symbols)text_image
Warning sign depicting a flame inside a triangle with radiating lines, symbolizing hazard or danger.1. Сожержание
natural_image
Simple line drawing of a trash bin with crossed lines indicating no waste or plastic (no text or symbols)Thank you for opting for a high-quality Intenso product. All Intenso products are subject to constant quality inspections and the legal warranty period applies, of course, from the date of purchase. Please be sure therefore to save the sales receipt as proof of purchase.
Warranty conditions
The warranty only covers material and production defects. Intenso GmbH is not liable for the loss of data in units sent to us. The free of charge warranty service covers the repair or replacement of defective parts. Please understand that we cannot render any warranty services, e.g. in case of:
- Misuse or improper handling, installation or use
■ Damages, scratches or wear - Modifications, manipulation or repairs by third parties
- Damages through force majeure or transport
Your Intenso GmbH
CLAIM PROCEDURE
In case of a claim, please proceed as follows:
- Only returns accompanied with all accessories and sales receipt are accepted.
- In addition, a RMA number is absolutely required for return shipments. You can request this RMA number via e-mail or through the service hotline.
- Please package the product including all accessories and the sales receipt safe for transport. Please stamp the package.
- Please affix the RMA number clearly visible on the outside of the package.
Please send to the following service address:
INTENSO GMBH
Service Center (your RMA-No.)
Service Hotline: +49 (0) 900 - 1 50 40 30
(0.39 € / min. from the landline in Germany.
Usual costs apply.)
Email: support@intenso.de