
HAVCR32S - Radio KONIG - Free user manual and instructions
Find the device manual for free HAVCR32S KONIG in PDF.

User questions about HAVCR32S KONIG
0 question about this device. Answer the ones you know or ask your own.
Ask a new question about this device
Download the instructions for your Radio in PDF format for free! Find your manual HAVCR32S - KONIG and take your electronic device back in hand. On this page are published all the documents necessary for the use of your device. HAVCR32S by KONIG.
USER MANUAL HAVCR32S KONIG
text_image
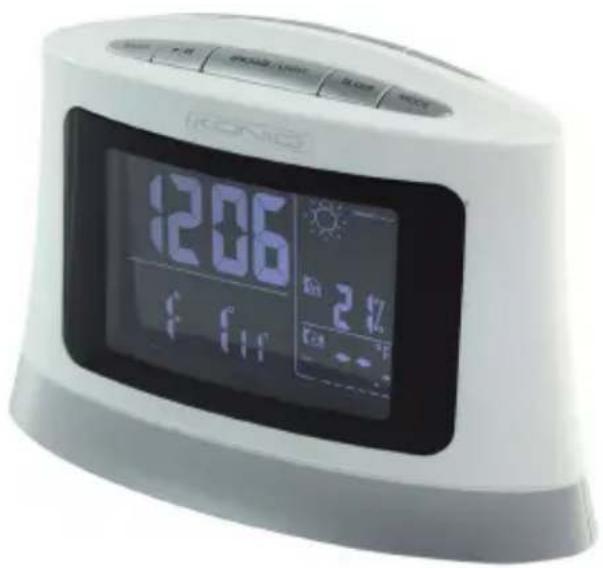
KÖNIG ELECTRONICHAV-CR32
text_image
206 24hMANUAL (p. 2)
Clock Radio
MODE D'EMPLOI (p. 10)
MANUAL DE USO (p. 23)
Radio Reloj
KÄYTTÖOHJE (s. 31)
Kelloradio
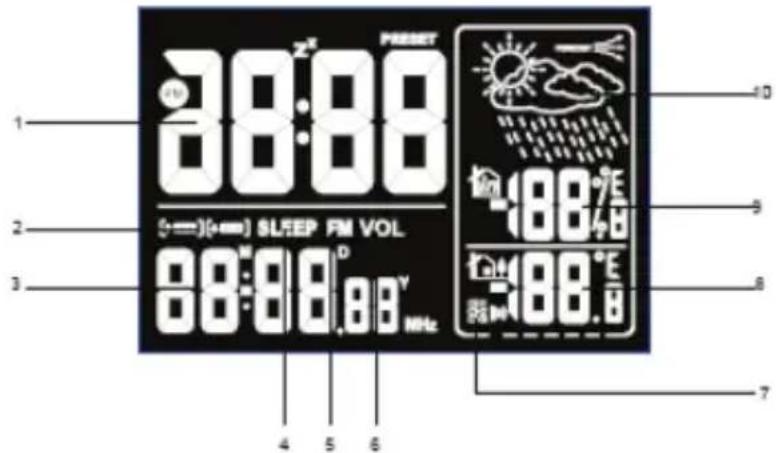
- Time display
- Dual-alarm icon
- Date display, display range: January 1, 2010 to December 31, 2099
- Sleep icon
- Radio (PLL radio, FM frequency display)
- Volume icon
- 433 MHZ Wireless frequency to receive 3 channels of outdoor temperature
- Outdoor temperature display
- Indoor humidity/temperature recorded
- Weather forecast and trend display
text_image
1 2 3 4 5 6 7 88:00 88:00 88:00 88:00 88:00 88:00 88:00 88:00 88:00 88:00 88:00 88:00 88:00 88:00 88:00 88:00 88:00 88: 9 10 11 12 13 14 15 16 17 18 19 20 21 22 23 24 25 26 27 28 29 30 31 32 33 34 35 36 37 38 39 40Outdoor Sensor
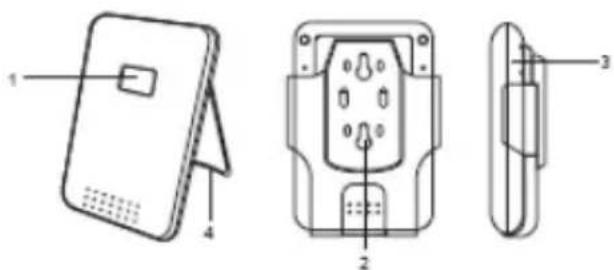
- LCD display
- Wall mount
- Battery compartment
- Iron holder
text_image
Technical diagram of a device with labeled parts, showing front, side, and top views with numbered annotations.GETTING STARTED
BACK UP POWER
If the rechargeable battery is flat or nearly flat, 3 AAA batteries will act as a back-up power supply for the main unit.
- Remove the battery compartment.
- Insert the batteries, matching the correct polarities.
NOTE: Do not use rechargeable batteries. We recommend that you use alkaline batteries with this clock for longer life, and lithium batteries in temperatures below freezing.
AC/DC Adapter
A 9V adapter powers the unit. Plug the adapter into a wall socket, making sure the adapter is not obstructed and is easily accessible to the clock.
To completely disconnect from the power, the adapter should be disconnected from the clock.
NOTE: The clock and adapter should not be exposed to wet conditions. No objects filled with liquid, such as vases, should be placed on the clock or adapter.
Setting the Outdoor Sensor
- Remove the screws from the battery door.
- Insert 3 AAA batteries, matching the polarity (+/-).
- Select a channel CH1/CH2/CH3.
- Close the battery door and tighten the screws.
- Select temperature units: °C/°F.
- Do not place the sensor more than 30.0 m (98 ft) from the main (indoor) unit.
Date Setting
- Press [SET] for setting the date. The clock display will blink QUICK USER GUIDE CLOCK/CALENDAR
- Press [UP] or [DOWN] to change value settings. Hold to adjust the frequency
Time Setting
- Press [SET] to set clock, Select 12/24H format, hour, minute, Press [UP] or [DOWN] to change. Hold to adjust the frequency
- Press [SET] to confirm
NOTE:
1) In date and time setting mode, the clock will automatically return to time mode if no keys are pressed for more than 1 minute, and will reset to the time last used.
2) The settings order is: year, month, day, 12/24 hr format, hour, minute.
CLOCK ALARM
To set the alarm
For the dual-alarm function, use either a beep or the radio.


flowchart
graph TD
    A["Press MODE to set Alarm"] --> B["[▲ AL-1"] Blink]
    B --> C["Press SET to change the clock setting"]
    C --> D["Hour will blink, press UP / DOWN to chose"]
    E["Press MODE to toggle between alarm 2"] --> F["[▲ AL-2"] Blink]
    F --> C
    G["Press SET and the minute will blink"] --> H["Press UP / DOWN to chose minute"]
    H --> I["Press SET to enter music setting node"]
    I --> J["Alarm sound for Radio"]
    I --> K["Press RADIO to enter radio mode"]
    K --> L["Press UP / Down to chose radio frequency"]
    K --> M["Press SET to confirmed"]
    N["Alarm sound"] --> K
    O["Press RADIO again. Return to alarm sound modes"] --> K
Notice:
1) If the alarm clock has not previously been set, --:-- is displayed. If the alarm clock has been set, the alarm time and alarm symbols group will be displayed, press [SET] key. Ring switch on and off, if off, it will show --:--.
2) In the alarm setting mode, if a button is not pressed for more than one minute, the settings will automatically return to the time.
3) If alarm clock is set to radio mode, the radio will turn on to the frequency that was last used. When the alarm time is reached, it will automatically turn on the radio. Press [MODE] to turn off.
SNOOZE
- When the alarm is ringing, press any key except [SNOOZE/LIGHT] and the alarm will be turned off
- When the alarm is ringing, "Snooze" will ring again after 5 minutes when pressing SNOOZE/LIGHT] and then display the "ZZ". This can be repeated 5 times
- In snooze mode, if the alarm state is turned off, the snooze mode will be cancelled
Radio Function
Search the radio station
- Press [RADIO] to enter the radio process.
- Press [UP] or [DOWN] manually to select radio frequency. Press long time to enter auto-search mode.
Preset the radio station
- If you like to save a radio station, press [SET] to save. FM will flash. Press [UP] or [DOWN] to save the channel (total of 10 channels). Press [SET] to confirm and save.
Select the radio station
- In radio mode, press [RADIO] to the transfer station to listen to the last search.
- Press [SET] to select, then press [UP] or [DOWN] to select the saved channel.
Select the radio sleep
- In radio mode, press [SLEEP] to set the radio sleep time, from 15 to 90 minutes. "00" closes the sleep function. When the radio sleep time has passed, the radio will turn off and return to the time mode.
EXTERNAL AUDIO PLAYER
- In any mode, you can plug in an external audio player.
- Please do not use an external sound source or remove the audio cable, as this may affect the machine functions.
- In order not to affect the function, please disconnect the audio cable when not in use with an external audio source.
- This product forecasts the next 12 or 24 hours weather:

Sunny

Cloudy

Rainy
- The trend lines are shown next to the weather forecast. The trends are shown as follows:
RISING

STEADY

FALLING

The weather station displays the indoor and outdoor reading for:
- Current temperatures and relative indoor humidity.
Safety precautions:


To reduce risk of electric shock, this product should ONLY be opened by an authorized technician when service is required. Disconnect the product from mains and other equipment if a problem should occur. Do not expose the product to water or moisture.
Maintenance:
Clean only with a dry cloth. Do not use cleaning solvents or abrasives.
Warranty:
No guarantee or liability can be accepted for any changes and modifications of the product or damage caused due to incorrect use of this product.

General:
- Designs and specifications are subject to change without notice.
- All logos brands and product names are trademarks or registered trademarks of their respective holders and are hereby recognized as such.
- This manual was produced with care. However, no rights can be derived. König Electronic can not accept liability for any errors in this manual or their consequences.
- Keep this manual and packaging for future reference.
Attention:
This product is marked with this symbol. It means that used electrical and electronic products should not be mixed with general household waste. There is a separate collections system for these products.
DEUTSCH
LCD-Display
text_image
Technical diagram of a device with labeled parts, showing front, side, and top views with numbered annotations.INBETRIEBNAHME
RESERVE ENERGIE
text_image
Technical diagram of a device with labeled parts, showing front, side, and top views with numbered annotations.AVANT DE DÉMARRER
ALIMENTATION DE SECOURS
text_image
Technical diagram of a device with labeled parts, including front panel, internal socket, and side view.AAN DE SLAG
BACK-UP-VOEDING
text_image
Technical diagram of a device with labeled parts, showing front, side, and top views with numbered annotations.INIZIO
text_image
1 2 3 4 5 6 7 88:88 98:88 0.0V MHz 0 1 2 3 4 5 6 PRESET SL/SEP FM VOL. 08:88 0.0V MHz -88.0E -88.0E -88.0ESensor exterior
text_image
Technical diagram of a device with labeled parts, including a card, socket, and connector housing.PASOS INICIALES
text_image
Technical diagram of a device with labeled parts, showing front, side, and top views with numbered annotations.ELSŐ LÉPÉSEK
text_image
Technical diagram of a device with labeled parts, showing front, side, and top views with numbered annotations.KÄYTTÖÖNOTTO
VARAVIRTA
text_image
Technical diagram of a device with labeled parts, showing front, side, and top views with numbered annotations.KOMMA IGÅNG
RESERVSTRÖM
text_image
Technical diagram of a device with labeled parts, showing front, side, and top views with numbered annotations.ZAČÍNÁME
ZÁLOŽNÍ ZDROJ
text_image
1 2 3 4 5 6 7 8 9 10 SLEEP FM VOL 88:88,88Y MHzSenzor exterior
text_image
Technical diagram of a device with labeled parts, showing front, side, and top views with numbered annotations.PORNIRE
ALIMENTARE CU ELECTRICITATE DE REZERVĂ
text_image
Technical diagram of a device with labeled parts, including front panel, internal socket, and side view.ΕΕΚΙΝΩΝΤΑΣ
ΕΦΕΔΡΙΚΗ ΕΝΕΡΓΕΙΑ
text_image
1 2 3 4 5 6 7 88:88 98:88.88 Mhz Preset SLEEP FM VOL -88.76 -88.76 -88.76 10 9 8 7Udendørssensor
- LCD-display
- Vægbeslag
- Batteriskuffe
- Jernholder

text_image
Technical diagram of a device with labeled parts, showing front, side, and top views with numbered annotations.KOM I GANG
N∅DSTR∅M
text_image
1 2 3 4 5 6 7 8 9 10 SLEEP FM VOL 88:88.88V MHz
Utendørssensor
- LCD-display
- Veggmontering
- Batterideksel
- Jernstøtte

text_image
Technical diagram of a device with labeled parts, showing front, side, and top views with numbered annotations.KOMME I GANG
RESERVESTR∅MFORSYNING
Description: Clock Radio