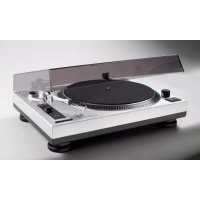
DT 210 USB - DJ Equipment DUAL - Free user manual and instructions
Find the device manual for free DT 210 USB DUAL in PDF.

| Product type | Turntable with USB connection |
| Brand | Dual |
| Model | DT 210 USB |
| Dimensions (W x H x D) | 350 mm x 95.4 mm x 348 mm |
| Weight | 2.75 kg |
| Power supply | 230 V ~, 50 Hz |
| Power consumption | 3 W |
| Speeds | 33 ⅓ rpm and 45 rpm |
| Drive | Belt drive |
| Operation | Automatic and manual |
| Connectivity | USB 1.1, RCA audio output (Line/Phono) |
| Stylus type | Diamond |
| Speed fluctuation | < 0.25% WRMS (JIS WTD) |
| 45 rpm adapter | Included |
| Provided software | Audacity® on CD |
| Operating temperature | +5 °C to +35 °C |
| Allowed humidity | 45% to 85% (without condensation) |
| Safety functions | Auto-stop at end of record, shock protection |
| Maintenance | Clean stylus and record before each playback |
| Spare parts | Replacement stylus, belt |
| Repairability | Only repair by a specialist |
| General information | Compliant with EU directives (low voltage, EMC) |
Frequently Asked Questions - DT 210 USB DUAL
User questions about DT 210 USB DUAL
0 question about this device. Answer the ones you know or ask your own.
Ask a new question about this device
Download the instructions for your DJ Equipment in PDF format for free! Find your manual DT 210 USB - DUAL and take your electronic device back in hand. On this page are published all the documents necessary for the use of your device. DT 210 USB by DUAL.
USER MANUAL DT 210 USB DUAL
www.nbxsoft.com/sound-recorder.php
Inhaltsverzeichnis
www.nbxsoft.com/sound-recorder.php.
Table des matieres
www.nbxsoft.com/sound-recorder.php
Indices
Automatic record player
with USB terminal
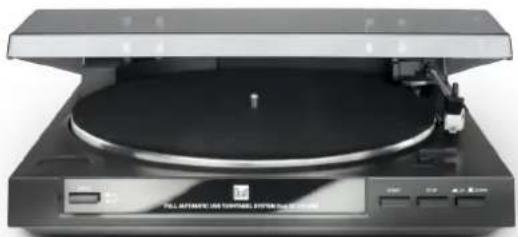
Operating manual
Preface
This operating manual outlines
proper and
- safe
use of your DT 210 USB record player, referred to below as "record player" or "unit".
Take note of the Audacity software on the CD and the instructions for using the USB terminal on p. 14.
Target group of this operating manual
This operating manual is intended for everyone who
- sets up,
- operates,
- cleans
- or disposes of the unit.
All brand and product names are trademarks or registered trademarks of their respective manufacturer.
Layout features of this operating manual
Various items in the operating manual are provided with set layout features. This ensures you can easily determine whether you are dealing with
normal text,
a list or
steps to be carried out.

Install the supplied Audacity® software on a PC or Mac before connecting and operating the unit.
An alternative program, for example, is the "Free MP3 Sound Recorder".
You can download it on the Internet at
www.nbxsoft.com/sound-recorder.php
Contents
Important notes for users in the U.K. 4
Mains plug 4
How to connect a plug. 4
Safety and setting up the record player. 5
Safety 5
Setup. 6
Description of the record player. 7
Included in delivery 7
Special characteristics 7
The front of the unit 8
The rear of the unit. 9
How to prepare the record player for operation.....10
Belt and turntable 10
Turntable mat. 10
Spindle adapter 10
Tone arm. 10
Connecting the record player 11
Connection to the amplifier 12
Connection to the computer 12
Mains connection 12
How to set the PHONO/LINE switch 12
Removing/attaching the stylus protection cap. 12
Playing a record. 13
Automatic start. 13
Manual start 13
Stop button 13
Before establishing the USB connection. 14
System requirements 14
How to digitalise your music. 15
Installing the software 15
Connecting the record player. 15
Setting up the software 15
Recording and saving music. 16
How to clean the record player 17
Electric shock. 17
Cleaning the stylus and the record 17
Replacing the stylus. 17
Troubleshooting 18
Technical specifications 19
Disposal instructions 20
Important notes for users in the U.K.
Mains plug
This apparatus is fitted with an approved 13 Amp plug. To change a fuse in this type of plug proceed as follows:
- Remove fuse cover and fuse.
- Fix new fuse which should be a BS1362 3 Amp, A.S.T.A. or BSI approved type.
- Refit the fuse cover.
If the fitted plug is not suitable for your socket outlets, it should be cut off and an appropriate plug fitted in its place. If the mains plug contains a fuse, this should have a value of 3 Amp. If a plug without a fuse is used, the fuse at the distribution board should not be greater than 5 Amp.
Note:
The severed plug must be disposed of to avoid a possible shock hazard should it be inserted into a 13 Amp socket elsewhere.
How to connect a plug
The wires in the mains lead are coloured with the following code:
blue = neutral (N), brown = live (L).
-
As these colours may not correspond with the colour markings identifying the terminals in your plug, proceed as follows:
-
Connect the blue wire to the terminal marked N or coloured black.
-
Connect the brown wire to the terminal marked L or coloured red.
-
Do not connect either wire to the earth terminal in the plug, marked E (or e) or coloured green (or green and yellow).
Before replacing the plug cover, make certain that the cord grip is clamped over the sheath of the lead - not simply over the two wires.
Copyright in the U.K.
Recording and playback of material may require consent. See Copyright Act 1956 and The Performer's Protection Acts 1958 to 1972.
Safety and setting up the record player
Please read through all of the safety instructions carefully and keep them for questions that may arise later. Always observe all warnings and instructions in this operating manual and on the rear of the unit.

Safety
- The unit should only be connected to a mains voltage supply of 230V 50Hz . Never try to operate the unit with a different voltage.
- The mains plug should only be connected after installation has been completed according to the instructions.
- If the mains plug of the unit is defective or if the unit shows other damage, it must not be operated.
- When unplugging the mains cable from the socket pull on the mains plug, not on the cable.
- In order to avoid fire hazards and the risk of electric shock do not expose the unit to rain or moisture.
- Do not touch the mains plug with wet hands—risk of electric shock!
-
In the event of malfunctions or smoke and odour coming from the housing remove the mains plug from the socket immediately!
-
Before a thunderstorm breaks, pull the mains plug.
- If the unit is not going to be used for a prolonged period, e.g. in the event of a long trip, remove the mains plug from the socket.
- Remove the mains plug from the socket if you do not intend to use the unit for a prolonged period. Only pull on the plug itself.
- Lay the mains cable in such a way that no one can trip over it. Do not place any heavy objects on the mains cable.
- Make sure the power cable or plug is always easily accessible so that the unit can be disconnected quickly from the power supply!
- This socket should be as close to the unit as possible.
- Fully insert the mains plug into the socket.
- Use a suitable, easily accessible mains connection and avoid using multiple sockets!
- Prevent the unit from coming into contact with water or moisture.
- Do not operate the unit in the vicinity of bathtubs, swimming pools or spraying water.
- Do not place any containers which contain a liquid on the unit, such as a flower vase. These could fall over and the spilled liquid could lead to severe damage on the risk of electric shock.
- If any foreign material or liquid enters the unit, remove the plug from the socket immediately. Get the unit
checked by a specialist before starting to use it again.
Otherwise you are at risk of receiving an electric shock!
- Do not open the housing. Otherwise you are at risk of receiving an electric shock!
- Never attempt to repair a defective unit yourself.
Always contact one of our customer service locations.
- Never open the unit under any circumstances - this should only be undertaken by a specialist.
- Foreign material, e.g. needles, coins, etc., should not be allowed to enter the unit.
- No open flames, such as burning candles, are permitted to sit on the unit.
- Never let children use this unit unattended.
- Always leave maintenance tasks to a qualified technician. Otherwise you put yourself and others in danger.
- Use only appropriate cleaning agents (antistatic) to clean the unit and the records. These are available in an accessories store.
Setup
- The record player must be set up only on a sturdy horizontal, vibration-free surface.
- Do not set up the unit in the vicinity of heat sources, such as radiators. Avoid direct sunlight and excessively dusty places.
-
You should only operate the unit when it is positioned horizontally.
-
Keep the unit away from devices that produce strong magnet fields.
- Do not place any heavy objects on the unit.
- If you bring the record player from a cold into a warm environment, moisture may form on the inside of the unit. In this case, wait about an hour before you operate it.
- Lay the mains cable in such a way that no one can trip over it.
- Fully insert the mains plug into the socket.
- Use a suitable, easily accessible mains connection and avoid using multiple sockets!
- Do not touch the mains plug with wet hands—risk of electric shock!
- In the event of malfunctions or smoke and odour coming from the housing remove the mains plug from the socket immediately!
Before a thunderstorm breaks, pull the mains plug. - If the unit is not going to be used for a prolonged period, e.g. in the event of a long trip, remove the mains plug from the socket.
Description of the record player Included in delivery
Remove the unit and all accessory parts from the packaging.
Keep the box and the packing material so that you can repack the unit securely for any later transport.
Please ensure that all of the accessory parts in the following list are present:
The record player
- Turntable with drive belt
- Turntable mat
- Dust cover with 2 hinges
- Adapter for single (45 rpm) records
USB cable
- Software CD
- This operating manual.
Special characteristics
- This unit allows you to: play records for 33 and 45 rpm.
- It offers fully automated control functions.
- The tone arm is retracted automatically when the end of a record has been reached.
- Using the USB terminal and the Audacity software, you can transfer your records to your computer and digitalise them.
- The record player has an integrated equaliser/preamplifier and can be connected to a phono input as well as an audio input (AUX-In).
The front of the unit
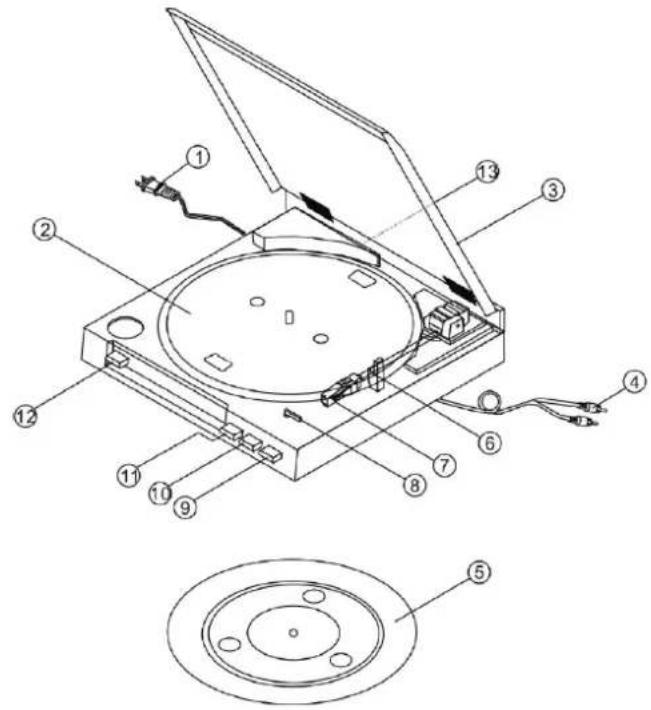
1 Mains cable
2 Turntable
3 Dust cover
4 Cinch audio cable (with white and red connectors)
5 Turntable mat
6 Tone arm
7 Stylus with system
8 Record size selector lever (SIZE 30/17)
9 Tone arm lift button (UP/DOWN)
10 Stop button (STOP)
11 Start button (START)
12 Speed button (SPEED 33/45)
13 USB port
The rear of the unit
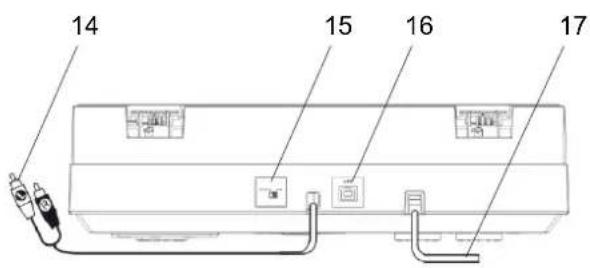
14 Cinch audio cable (with white and red connectors)
15 PHONO/LINE switch
16 USB terminal
17 Mains cable
How to prepare the record player for operation
Belt and turntable
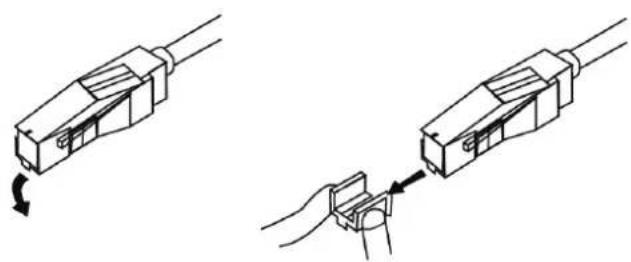
The drive belt is delivered already seated on the belt contact surface of the turntable 2. The belt is equipped with a clip with which the belt is laid onto the drive axle of the motor (pulley).
Set the turntable onto the axle. Turn the turntable until the cut-out stands over the drive motor. Use the clip described above to pull the belt off of the contact surface and lay it centrally over the drive roller of the motor pulley. Remove the clip.

Turntable mat
Now lay the turntable mat 5 right-side-up onto the turntable.
Spindle adapter
The spindle adapter is required, for example, for singles without their own plastic spindle adapter. When the spindle adapter is not in use, you can store it in the designated area.
Tone arm
The tone arm 6 is secured for transport using a clip. Remove this clip before operating the unit for the first time. To transport the unit later, secure the tone arm again using this clip to prevent damage from vibrations.
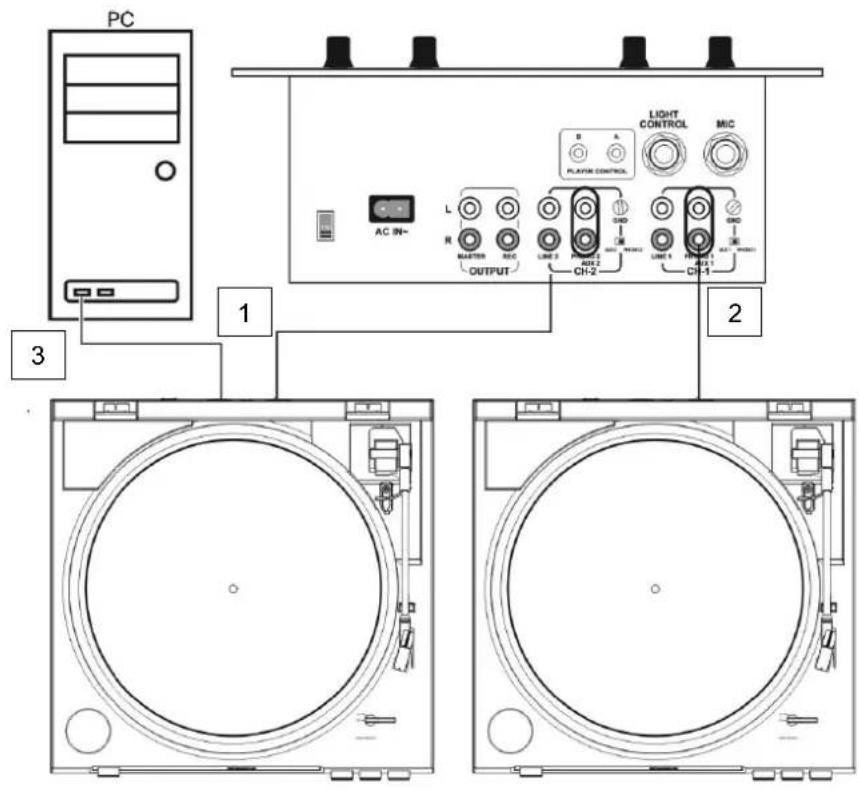
Connecting the record player
PHONO/LINE switch:
1-to LINE
2-to PHONO
3-USB port to computer
Connection to the amplifier
Connect the cinch (RCA) audio cable 14 to the LINE/AUX or phono jack on the amplifier.
Note:
Make sure that you make the correct left and right channel connections (red = right channel, white = left channel).
Connection to the computer
Connect the USB terminal 16 with a free USB port on your computer. Follow the instructions on p. 14.
Mains connection
Insert the mains plug into a socket.
How to set the PHONO/LINE switch
Move the PHONO/LINE switch 15 to PHONO if the record player is connected to the PHONO jacks.
Move the PHONO/LINE switch 15 to LINE if the record player is connected to the LINE jacks.
Removing/attaching the stylus protection cap
Before playing a record, you must remove the stylus protection cap from the pickup 7. To do so, pull off the cap forwards.
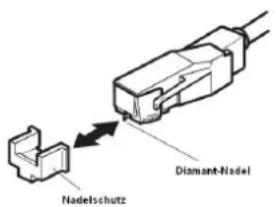
It is recommended that you put the stylus cap back on after playing a record to protect the stylus.
Playing a record
Automatic start
Put on a record. For singles, put on the spindle adapter if necessary. Use the selector lever 8 to set the corresponding record size to 30 or 17~cm in diameter. Close the dust cover. Use the SPEED button 12 to set the turntable speed to 33 or 45~rpm . Ensure that the LIFT button 9 is in the DOWN position.
Press the START 11 button. The turntable begins turning at the set speed. The tone arm automatically sets itself onto the record. Playback begins.
Manual start
Put on a record. Use the selector lever 8 to set the corresponding record size to 30 or 17~cm in diameter. Use the SPEED button 12 to set the turntable speed to 33 or 45~rpm . Ensure that the LIFT button 9 is in the UP position.
Press the START 11 button. The turntable begins turning at the set speed. The tone arm automatically sets itself onto the record. Playback begins.
Take the tone arm from its support and swivel it over the record's lead-in groove. The turntable begins turning at the set speed. Pressing the LIFT (DOWN) button 9 again lowers the tone arm.
Using the lift button 9, the tone arm can be lifted at any point—even to interrupt play temporarily (lift lever in the UP position). The turntable keeps turning.
Stop button
When the end of the record is reached, the tone arm automatically returns to its support and the unit switches off.
Note:
You can also switch off the record player by pressing the STOP button 10 or by pressing the Lift button 9, moving it into the UP position and returning the tone arm to its support.
Before establishing the USB connection
System requirements
Before making the connection, please ensure that the computer system fulfils the following requirements:
Intel Pentium or AMD Athlon, 1GHz or higher
- (or corresponding Mac computer)
- USB 1.1 or USB 2.0 terminal (2.0 recommended)
- Operating system: Windows 2000/XP or higher; Mac OSX or higher
- Compatible sound card
Memory: >512 MB
CD or DVD burner for creating audio CDs
- Loudspeaker, mouse
- 10 MB of free hard drive space for the software installation
Additional free hard drive space for digitalising your music
Note:
- Install the supplied Audacity® software on a PC or Mac before connecting and operating the unit.
- The Audacity® software is freeware. Please check their website to see if an update is available. Newer versions or updates are available from http://audacity.sourceforge.net as needed.
- An alternative program, for example, is the "Free MP3 Sound Recorder". Download on the Internet at www.nbxsoft.com/sound-recorder.php.
How to digitalise your music Installing the software
Start your computer, insert the CD and install the Audacity software.
Check the website to see if an update is available (http://audacity.sourceforge.net) and if there is, install the update.
Connecting the record player
Connect the record player's USB terminal 15 with an open USB port on your computer. Use the USB cable provided.
Setting up the software
- Start the Audacity software.
- In the menu, select [Edit] and [Preferences]. The software settings open.
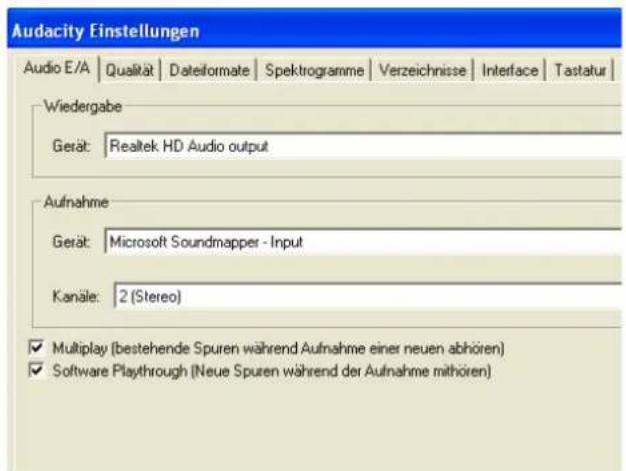
- Click the [Audio I/O] tab:
- Select your internal sound card as the playback device.
- Select USB Audio CODEC or "Microsoft Soundmapper Input" as the recording device.
- Select [Channels] 2 (Stereo).
- Click [Play other tracks while recording new one], so that a tick appears in front of it.
- Click [Software Playthrough], so that a tick appears in front of it.
- Click OK.
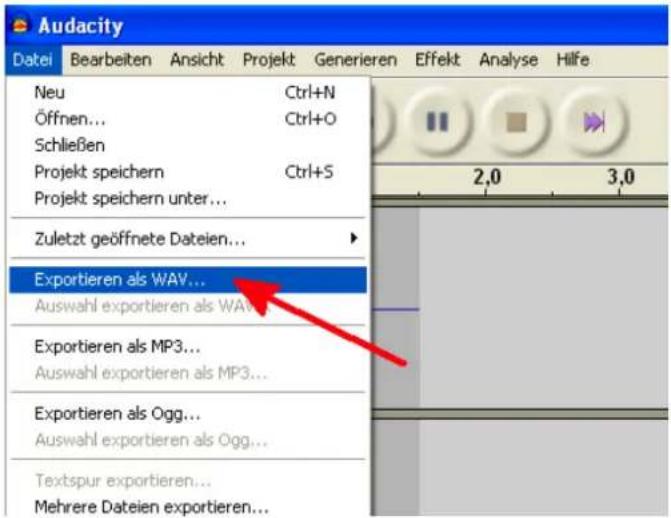
Recording and saving music
- Put on a record. Start the playback.
- Click the red record button in the software.
- Click the blue PAUSE button to interrupt the recording temporarily.
- Click the yellow STOP button to end the recording.
- Click the green PLAY button to play the completed recording.
- Click "File" and select "Export As WAV..." to save the recording on the computer.
- To export the recording as an MP3 file, you need to install the LAME encoder first. To do this, please read the instructions on the software CD.
Note:
A detailed manual for the Audacity software is also on the software CD.
How to clean the record player

Electric shock
To avoid the danger of an electric shock, you must not clean the unit with a wet cloth or under running water.
CAUTION!
Do not use any scrubbing sponges, cleaning powder or solvents such as alcohol and petrol.
Clean the housing with a soft cloth moistened with water.
Cleaning the stylus and the record
Always clean the stylus and record before playback to prevent premature wear.
Use a cleaning brush to wipe from back to front over the stylus.
To clean a record, use a record cloth to wipe lightly and diagonally over the record.
Replacing the stylus
The stylus is naturally exposed to wear by the playback process. Therefore we recommend regular inspection, which for diamond styluses should take place after at least 500 playing hours.
Note:
Worn or damaged (splintered) styluses ruin records.
When you need to replace a stylus, use the original type if possible.
Remove the stylus by pulling diagonally downwards.
Insert the stylus by doing the reverse of this.
Troubleshooting
If the unit does not function as intended, perform checks using the following tables.
If the malfunction cannot be fixed even after these checks, please contact the manufacturer.
Problems with the unit
| Symptom Possible cause/remedy | |
| The tone arm skips grooves, slides over the record or does not move | The record player is not sitting horizontally. Put the record player on a horizontal base support. The record is dirty or scratched. Clean the record with a record cleaner or play a different record. |
| Symptom Possible cause/remedy | |
| Poor tone quality, loud static noise, sound dropouts etc. | The stylus is dirty or worn. Clean the stylus with a brush or replace it. The record is dirty or dusty. Clean the record with a record cleaner. |
| The speed is incorrect. | Adjust the speed according to the specification on the record. (33 rpm or 45 rpm) |
| The sound drones. | The drive belt is too loose and must be changed. |
| The sound is too quiet or loud and distorted. | The record player is not connected to the correct input. (see page 12) |
| It is not possible to record using the recording software | Perform a computer system restore (via "Programs", "Accessories", "System Tools"). |
Technical specifications
| Dimensions (width x height x depth): | 350 mm x 95.4 mm x 348 mm |
| Weight: (without batteries) | 2.75 kg |
| Voltage: 230 V AC, 50 Hz | |
| Power consumption: 3 W | |
| Ambient conditions: +5 °C to +35 °C 45 % to 85 % relative humidity (non-condensing) | |
| Stylus tip: Diamond stylus | |
| Wow, flutter < 0.25% WRMS (JIS WTD) at 331/3 rpm | |
| USB terminal | USB 1.1 for WINDOWS, MAC OSX |
We reserve the right to make technical modifications and correct errors.
The dimensions are approximate values.
Directives and standards

This product conforms to
the Low Voltage Directive (2006/95/EC),
der ErP Directive 2009/125/EC,
the EMC Directive (2004/108/EC) and the
- CE Marking Directive.
How to contact the manufacturer
DGC GmbH
Disposal instructions
Disposing of the packaging
Your new unit was protected on its way to you by the packaging. All materials used are environmentally safe and can be recycled.
Please help and dispose of the packaging in an environmentally responsible manner.
To learn about current disposal methods, contact your dealer or your local disposal facility.

Risk of suffocation!
Keep the packaging and its parts out of the reach of children.
Risk of suffocation from foils and other packing materials.
How to dispose of the unit
Old units are not worthless garbage. Through environmentally friendly disposal, valuable raw materials can be regained. Inquire at your city or municipal administration about possibilities for disposing of the unit properly and in an environmentally sound manner.
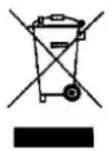
This unit is labelled according to 2002/96/EC, the Waste
Electrical and Electronic Equipment Directive (WEEE).
This product must not be disposed of with normal household waste. Instead it must be deposited at a recycling station for electrical and electronic devices.
The symbol on the product, the instructions for use or the packaging indicate this. The materials can be recycled in accordance with their marking. By reusing, recycling or
processing old units in another way, you make an important contribution to protecting our environment.

Danger to life!
Pull out the mains plug of worn-out units. Cut through the mains cable and remove it with the plug.