
DJ015LPS - Camera LEXIBOOK - Free user manual and instructions
Find the device manual for free DJ015LPS LEXIBOOK in PDF.

| Product type | Compact digital camera |
| Brand | Lexibook |
| Model | DJ015LPS |
| Maximum resolution | 1280 x 960 pixels (high resolution) |
| Low resolution | 640 x 480 pixels |
| Storage capacity (high resolution) | Approximately 90 photos |
| Storage capacity (low resolution) | Approximately 200 photos |
| Power supply | 2 AAA batteries (not included) |
| Estimated battery life | Up to 2 hours of continuous use |
| Connectivity | USB 2.0 (cable included) |
| PC compatibility | Windows only (not Mac) |
| Included software | PhoTags Express, WebCam Express |
| Main functions | Photo taking, AVI video recording, webcam, MSN chat, video conferencing |
| Built-in flash | No |
| Interchangeable cover | Yes (1 cover provided) |
| Tripod mount | Yes (slot on the back) |
| Approximate dimensions | 10 x 6 x 3 cm |
| Approximate weight | 100 g (with batteries) |
| Housing material | Plastic |
| Cleaning | Soft dry cloth, avoid solvents |
| Usage precautions | Avoid moisture, shocks, and excessive heat |
| Available spare parts | Batteries, USB cable (standard) |
| Repairability | No user-serviceable parts except batteries |
| Warranty | 2 years (manufacturing defects) |
Frequently Asked Questions - DJ015LPS LEXIBOOK
User questions about DJ015LPS LEXIBOOK
0 question about this device. Answer the ones you know or ask your own.
Ask a new question about this device
Download the instructions for your Camera in PDF format for free! Find your manual DJ015LPS - LEXIBOOK and take your electronic device back in hand. On this page are published all the documents necessary for the use of your device. DJ015LPS by LEXIBOOK.
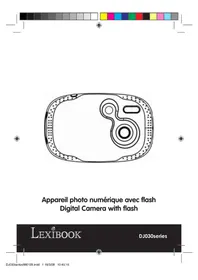
USER MANUAL DJ015LPS LEXIBOOK
natural_image
Line drawing of a cylindrical device with a central control knob and circular indentations (no text or symbols)Digital Camera
User Guide
Mode d'emploi
LEXIBOOK®
A
B
C
natural_image
Technical illustration showing a mechanical assembly before and after assembly, with no visible text or symbols.PRESENTATION DE VOTRE APPAREIL PHOTO
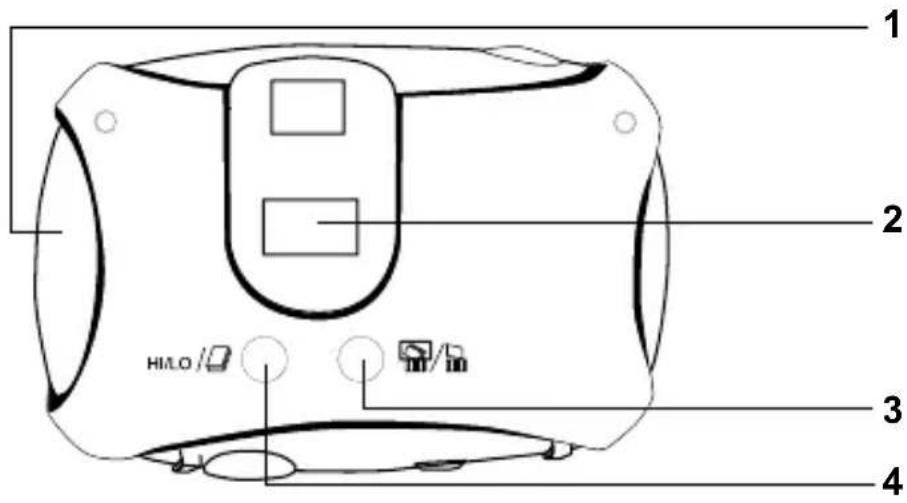
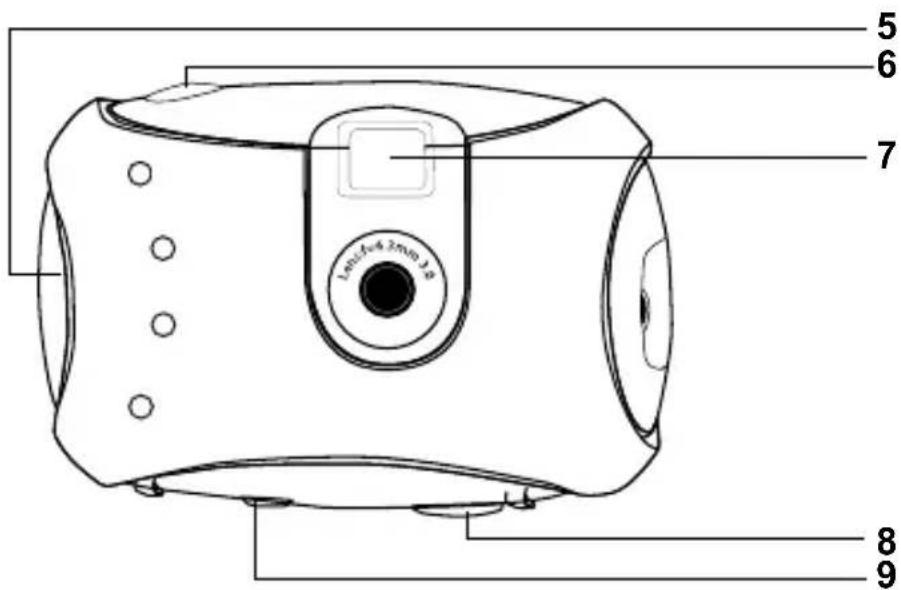
Please refer to images A & B located at the back of the cover page.
- USB socket cover 2. LCD display 3. delete button 4. HI/LO/ button
- Strap mount 6. Shutter button 7. Viewfinder 8. Brace hole 9. Battery compartment
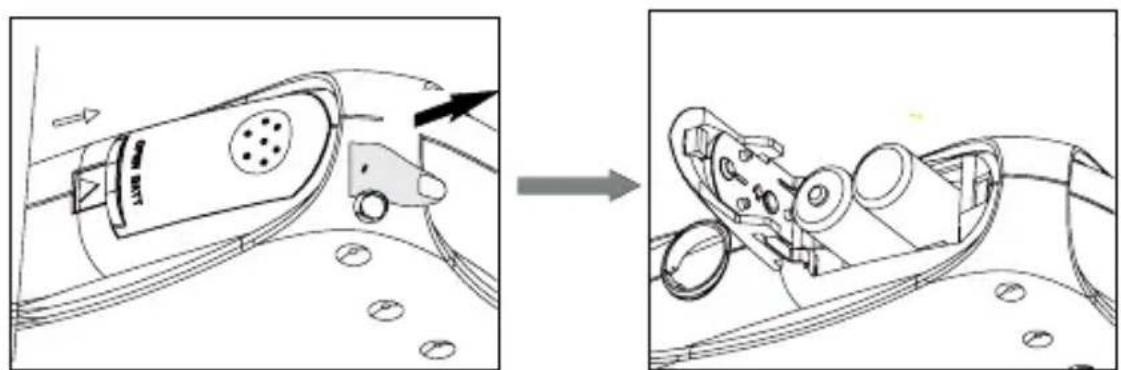
INSERTING NEW BATTERIES
Please refer to image C located at the back of the cover page.
- Make sure the camera is off.
- Open the battery compartment by sliding the cover off.
- Note the polarity of the batteries (+/- signs) inside of the battery compartment.
- Insert 2 new AAA batteries. Replace and close the battery cover by sliding it into place.
Warning: If the unit malfunctions or receives an electrostatic shock, remove the battery and insert it again. Important note: all files will be lost when replacing the batteries. Make sure you transfer the files to your PC before changing the batteries.
INSTALLING THE CAMERA DRIVER AND SOFTWARE
Follow these instructions to install the camera driver and application software on your PC system.
- Insert the CD Software (included) in your CD-ROM drive. The CD will auto run, and the following installation menu will appear:
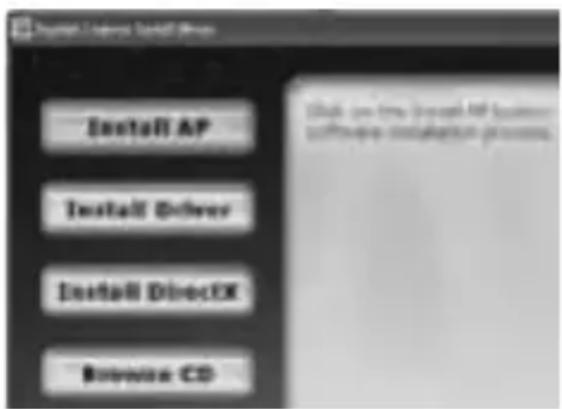
Click on "Install AP" on the "Digital Camera Install Menu" window and select a language from the drop down list.

Click on "Install PhoTags Express" and follow the instructions to install PhoTags Express and WebCam Express. PhoTags Express and WebCam Express software offer many applications for photo editing and printing.
When the installation is completed, a confirmation window will be displayed. Untick the "Start the application" option and click the "Finish" button to close the window and go back to the installation menu. Now you can install the camera driver.
- Click on "Install Driver", and then follow the instructions to install it. You will need to reboot your computer after the driver installation.
Notes:
- You must install the driver before downloading pictures from the camera.
- If you are using Windows VISTA™, please download the driver update from the Lexibook website at: http://www.lexibook.com.
- If the CD does not auto run, click Start -Run, type in "D:\autorun.exe" in the Run dialog text box (where D:\ is your CD-ROM drive).
TURNING THE CAMERA ON AND OFF
Press the Shutter button [6] for 5 seconds to turn the camera ON.
Note: The camera will auto power off after 60 seconds of inactivity.
SELECTING THE PHOTO RESOLUTION
There are 2 resolution modes:
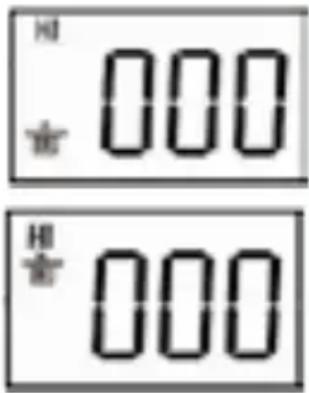
High resolution: pictures of 1280*960 pixels. The camera can store about 90 pictures in this mode.
Low resolution: pictures of 640*480 pixels. The camera can store about 200 pictures in this mode.
Press the HI/LO/ button [4] to select HI (high) or LO (low) resolution on the upper left corner of the LCD screen.
TAKING PHOTOS
To take a photo, press and hold the Shutter button [6] for about 2 seconds, until you hear a “beep” sound. The number of pictures you took is shown on the LCD screen.
Note: make sure there is a reasonable level of lighting when taking photos. If there is not enough light, you will hear a “double beep” sound indicating the picture hasn’t been taken.
DELETING FILES
Deleting the last picture taken
Press the button [3] to select the lower trash can icon as shown on the LCD screen. Press the Shutter button [6] within 5 seconds to delete the last picture taken. You will hear a "beep" sound each time you delete a picture.
Deleting all files
Press the button [3] twice to select the upper trash can icon as shown on the LCD screen. Press the Shutter button [6] within 5 seconds to delete all the pictures stored in the camera.
Note: if you press the button by mistake, just wait 5 seconds to cancel this operation.
Continuous Picture Shots
This mode allows you to take a succession of quick shots which the camera will save as short video clips in AVI format.
Press and hold the HI/LO/ button [4] to select the icon on the LCD screen. Keep the Shutter button [6] pressed to take several photos continuously and automatically.
- Connect the camera to your computer via the USB cable provided. You will hear a small beep sound and the LCD screen will turn on when the camera is connected to your PC.
- Launch the "PhoTags Express" program.
A widow will appear and you will have the choice to:
- click on “register online” and then fill in the informations required. The Main Menu will open and this window will not appear anymore.
- click on “continue”. The Main Menu will open and this window will appear at your next use.
- Click on the "Get Photos" button on the Main Menu.
- The “Get Photos Wizard - Device Selection” window will appear. Select the “Dual Camera” driver from the list of Active Devices on the left of the screen.
Note: Make sure you have selected the “Dual Camera” driver or you won’t be able to download your pictures.
- Select the "Custom" or the "Express" copy method and click on the "Next" button.
- With the “Custom” method, you can sort the photos by name, keyword and categories. Click on the “Next” button to continue. With the “Express” copy method, you will go directly to the following step.
- Choose where to place your photos. Click the "Browse" button to select the destination folder where you want all your photos to be saved.
- Click the "Finish" button to transfer the photos from your camera to the destination folder.
PC CAM MODE
Connected to your PC, your camera can be used as a webcam. In PC Cam mode, you can also capture short video clips and take snapshots.
Webcam mode
- Connect the camera to your computer via the USB cable.
- In "My Computer", double click on a new drive called "Dual Camera" or double click the Webcam Express icon on your desktop to launch the Webcam Express software. You will be in webcam mode.
Capture a video clip
- Connect the camera to your computer via the USB cable.
- Launch the Webcam Express software.
- Click on the « Capture » button to start the video capture.
- Click on the « Stop » button to stop the video capture.
Take snapshots
- Launch the Webcam Express software.
- In « Capture » mode, click the « Snapshot » button to take a snapshot.
Video Conference
- Set your digital video camera to PC Cam mode.
- Run the video conference software Microsoft NetMeeting on your computer.
- Input the IP address of the computer you wish to dial in the address bar.
- Select tool/accept/transfer options. When the other parties have accepted your call, you can now hold a video conference.
MSN Chat
- Make sure the digital video camera is OFF.
- Press and hold the Power/Shutter button [7]. Plug the USB jack into the USB port of your PC.
- Sign in MSN.
- Connect the digital video camera to your computer using the USB cable.
- On the MSN interface, select Action/Start a video conversation.
- Select the person you want to chat with, and press OK.
INTERCHANGEABLE COVER
Your digital camera comes with 1 interchangeable cover. To take off the cover, use a sharp instrument to unsnap the cover on each corner of the camera.
TROUBLESHOOTING
« Can I use the digital camera with my Mac? »
Unfortunately, the camera is compatible with Windows only. There is no Mac driver available.
« Can I use the digital camera with Windows VISTA™? »
If you have an old version of the driver and want to use the camera with Windows VISTA™, please download the camera driver update from Lexibook website: http://www.lexibook.com.
« I can't install the software and the camera driver on my computer. »
- Make sure you have followed carefully all the steps listed in p.11 to install the software and the camera driver.
- Make sure you have enough free space available on your hard drive. If necessary, free up some space.
« I can't display or download the pictures on my computer. »
- Try to plug the camera to all the USB ports available on your computer.
- Make sure you have selected the correct source (Dual Camera) from the "Active Devices" list.
« Can I use a flash with the digital camera? »
There is no flash available on the DJ015 Series. Please make sure there is a reasonable level of lighting when taking photos.
WARRANTY
NOTE: Please keep this instruction manual, it contains important information. This product is covered by our two-year warranty. To make use of the warranty or the after-sales service, please contact your retailer and supply proof of purchase. Our warranty covers material or installation-related defects attributable to the manufacturer, with the exception of wear caused by failure to respect the instructions for use or any unauthorised work on the equipment (such as dismantling, exposure to heat or damp, etc.).
LEXIBOOK UK Ltd, Unit 10 Petersfield Industrial Estate, Bedford Road, Petersfield, Hampshire,
GU32 3QA, United Kingdom
Freephone helpline: 0808 100 3015, http://www.lexibook.com
Environmental Protection
Unwanted electrical appliances can be recycled and should not be discarded along with regular household waste! Please actively support the conservation of resources and help protect the environment by returning this appliance to a collection centre (if available).

CONOCE TU CÁMARA
The Ground Truth image displays a single, solid horizontal line, which is a stylistic or background element (like a rule line on paper). According to Rule 2, such lines must be ignored by the OCR result. The OCR content provided is "", which consists of no characters. Since the OCR output correctly ignores the stylistic line, it complies with Rule 2. Therefore, the OCR result is consistent with the Ground Truth.
First name/Prénom :
Address/Adresse :
Average/Moyen □
Average/Moyen
Average/Moyen
Average/Moyen □
Average/Moyen □
Average/Moyen □
Average/Moyen □
Average/Moyen □
Average/Moyen □
Average/Moyen □
Average/Moyen □
Average/Moyen □


- Digital Camera
- User Guide
- Mode d'emploi
- LEXIBOOK®
- PRESENTATION DE VOTRE APPAREIL PHOTO
- Please refer to images A & B located at the back of the cover page.
- INSERTING NEW BATTERIES
- Please refer to image C located at the back of the cover page.
- INSTALLING THE CAMERA DRIVER AND SOFTWARE
- Notes:
- TURNING THE CAMERA ON AND OFF
- SELECTING THE PHOTO RESOLUTION
- TAKING PHOTOS
- DELETING FILES
- Deleting the last picture taken
- Deleting all files
- Continuous Picture Shots
- PC CAM MODE
- Webcam mode
- Capture a video clip
- Take snapshots
- Video Conference
- MSN Chat
- INTERCHANGEABLE COVER
- TROUBLESHOOTING
- « Can I use the digital camera with my Mac? »
- « Can I use the digital camera with Windows VISTA™? »
- WARRANTY
- Environmental Protection
- CONOCE TU CÁMARA
Brand : LEXIBOOK
Model : DJ015LPS
Category : Camera