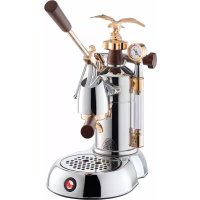
Puccino Dosata PDE - Coffee machine LA PAVONI - Free user manual and instructions
Find the device manual for free Puccino Dosata PDE LA PAVONI in PDF.
Download the instructions for your Coffee machine in PDF format for free! Find your manual Puccino Dosata PDE - LA PAVONI and take your electronic device back in hand. On this page are published all the documents necessary for the use of your device. Puccino Dosata PDE by LA PAVONI.
USER MANUAL Puccino Dosata PDE LA PAVONI
8 – CLEANING OF THE EXTERNAL CHASSIS 37
BUONDI_PUCCINO_2010.indd 31 15/01/10 15.3932 BUONDI_PUCCINO_2010.indd 32 15/01/10 15.3933 English 1 – INTRODUCTION This instruction manual is an integral component of your coffee machine. Please read it with care and keep it readily available for future needs, for the entire lifetime of the machine. Should your manual be lost or damaged you may request a new one from an authorized SERVICE CENTER. The manual contains instructions as to the proper use of the machine and its cleaning and maintenance. It also provides important information on opera- tions requiring special care and the associated risks. The manual is completely up to date as of its printing; the manufacturer reserves the right to make any necessary technical modifications to the product and to update the manual without being under any obligation to revise or replace previous versions of the manual. LA PAVONI S.p.A. declines any responsibility for direct or indirect damages to persons or property occurring as a consequence of: – failure to adhere to any of the provisions of the safety regulations in force; – improper installation; – improper power supply; – improper use; – use different from that specified in this manual; – lack of proper maintenance; – unauthorized modifications or repairs; – the use of non original or non model-specific spare parts; – complete or partial failure to follow the operating instructions; – exceptional events. 2 – MACHINE FUNCTION This machine is designed for the home preparation of espresso coffee using cof- fee blends, for the production of hot water or steam, and the preparation of hot milk. The espresso is prepared by forcing water heated to the proper temperature through ground coffee. The user must carefully read and understand the operating instructions in this manual for proper operation of the machine. BUONDI_PUCCINO_2010.indd 33 15/01/10 15.3934 English 3 – MACHINE PURPOSES These machines can supply: – drinks made up of coffee; – hot water and watery vapour for preparation and heating of hot milk drinks; – drinks made up of milk and coffee. 4 – SAFETY INSTRUCTIONS The user must adhere to all safety regulations in force in the country where the machine is used, as well as to the instructions provided in this manual and to the dictates of common sense. Environmental conditions are important in guaranteeing proper function and long life of the machine. The allowable temperature range is 5°C to 35°C (40°F to 95°F) and the machine must not be placed where it will be exposed to jets of water or outdoors where it will be exposed to atmospheric agents (sun, rain, etc.). After removing the machine from its box, make sure it is intact that is it has not suffered any damage. The packaging must be disposed at a proper waste handling facility and must never be left where children, animals or unauthorized persons may have access to it. Place the machine in a safe location on a solid support, far from heat sources and well out of the reach of children. Before plugging in or unplugging the machine, make sure that the ON/OFF switch is in the OFF position. Unplug the machine when not in use or before any cleaning operations without pulling the power cord. Do not use the machine if it shows anomalous operation or if the main cable or plug show signs of damage; replace the power cord or have the machine checked at an authorized SERVICE CENTRE. BUONDI_PUCCINO_2010.indd 34 15/01/10 15.3935 English Burn risk: Do not touch hot surfaces (coffee group, cupwarmer, filter-holder, steam supply nozzle). Burn risk: Do not remove the filter-holder while coffee is being made. Burn risk: Never place hands under the coffee group or steam supply nozzle; the superheated water or steam may cause severe burns. Burn risk: Do not remove the filter-holder immediately after brew- ing coffee, wait several seconds to ensure that all residual pressure has been released. Make sure there is water in the tank before switching on the coffee machine to avoid damaging the heating element. To avoid damaging the machine, use only manufacturer recommended accessories or replacement parts. This appliance must not be used by persons (children included) with reduced physical, sensorial or mental capacities or with lack of experience and knowledge unless they have been properly instructed or under view of a responsible person for their security. Children must always be under superintendence and must not play with the appli- ance. In case of malfunction do not attempt to repair the machine. Turn it off and contact the nearest authorized SERVICE CENTER for any necessary repairs using original spare parts. Never use the machine if the power cord is damaged. Let an authorized SERVICE CENTRE replace the damaged plug and power cord. Any unauthorized repairs or use of non-original replacement parts will void the warranty and relieve the manufacturer of all responsibility. Do not use the machine outdoors. Do not use the machine for any uses other than those for which it was designed. To avoid fire, electric shock or injury, do not immerse the machine, the main cable or any other electrical components in water. BUONDI_PUCCINO_2010.indd 35 15/01/10 15.3936 English In case of fire, use a carbon dioxide (CO
) fire extinguisher. Do not use water or steam extinguishers. Before performing any cleaning or maintenance on the machine, turn off the ON/OFF switch, unplug the power cord by pulling on the plug, and wait for the machine to cool. Clean the machine with a soft cloth moistened with water. Do not use detergents, alcohol, solvents or abrasives to clean the machine. 5 – IMPROPER USE Any improper use of the machine will void the warranty and relieve the manufacturer of any and all responsibility for damage to persons or property. Improper use includes: - any use other than that specified in the instruction manual; - any operation, adjustment or repair to the machine that differs from the instruc- tions included in this manual; - any use following unauthorized modifications to components or safety devices; - use of the machine outdoors. 6 – RESIDUAL RISKS The user cannot be entirely protected against risks from jets of steam or hot water. Maximum caution must be exercised when using the machine to avoid being scalded or burned. The manufacturer declines any responsibility for damages to persons, animals or property deriving from repairs, adjustments, modifications or any other operations carried out on the machine by unqualified or unauthorized persons. 7 – IMPORTANT PRECAUTIONS Place the machine in a safe location on a solid and dry support, far from heat sources and well out of the reach of children. Control always level of water in the tank; reduced water level while the machine is in use, causes the arrest of the pump or its irreversible damaging. The machine, when on, apart from heating water, it produces steam, which remains compressed inside the boiler; for safety reasons take it out of the reach of children, do not touch hot surfaces such as coffee group, cupwarmer, filter-holder, steam supply nozzle to avoid sever burns. BUONDI_PUCCINO_2010.indd 36 15/01/10 15.3937 English Never remove filter-holder and never place hands under the coffee group or steam supply nozzle while distributing to avoid sever burns. Dripping of water from filterholder is normal after distributing of coffee. If the machine is not frequently used, turn off the ON/OFF switch and unplug the power cord by pulling on the plug. Attention: do not switch on the pump without water.
8 – CLEANING OF THE EXTERNAL CHASSIS
Clean the outside of the machine with a soft damp cloth and then dry it. Never use alcohol, solvents, abrasives or detergents as they may harm the surfaces. Never immerse the machine in water, even partially. 9 – DECALCIFICATION The machine will need to be decalcified periodically depending on how often it is used and the hardness of the water. Use only products that are specific to this purpose that can be found also at the authorized SERVICE CENTRES. Dissolve the decalcifying agent completely in a container of water (1,5 L), then pour the solution into the water tank (1). Place a suitable container under the coffee group (5) and under the turbo steam nozzle (6). Machine (PCN-PCL) Turn on the coffee/hot water switch (14) and let the solution flow through the cof- fee group (5) for 15 seconds. Then turn off the coffee/hot water switch. Turn on the steam switch (15) and the coffee/hot water switch (14) and slowly open the steam knob (anticlockwise) (4) and let water flow through the steam noz- zle (6) for several seconds. Then turn off the steam switch and the coffee/hot water switch. Machine (PDE) Turn on the dose programmig switch/ manual dispenser (20) and let the solution flow through the coffee group (5) for 15 seconds. Turn it off. Open the steam knob (anticlockwise) (4), turn on the hot water switch (23) and let water flow through the turbo steam nozzle (6) for several seconds. BUONDI_PUCCINO_2010.indd 37 15/01/10 15.3938 English Then turn off the steam switch and the hot water switch. Wait 20 minutes and repeat the above steps until the solution in the water tank has reached the minimum water level. Remove the water tank (1), rinse it thoroughly, refill it with clean water and put it back into the machine. 10 – ACCESSORIES Single cup filter/ pods filter. One-cup and two-cup filters. Coffee press. Filterholder. Cappuccino Automatic frother. User’s Manual. BUONDI_PUCCINO_2010.indd 38 15/01/10 15.3939 English
4. Steam/hot water knob
6. Steam/hot water supply nozzle
7. Removable cup grid
9. Single cup filter/pods filter
11. Removable water drainage tray
22. Coffee switch for 1 American coffee/2 American coffees
a) Fill the tank (1) with cold water. b) Switch the machine on by pushing the on/off lever (13) on the position “I”. The lamp (13.a) comes on to confirm the power supply. c) Insert the filter holder in the coffee group. d) Open the steam/hot water knob (4). Machine (PCN-PCL) Place the water/coffee water lever (14) and the steam lever (15) on the position “I” Should water comes out of the turbo steam supply nozzle (6), push the hot water/coffee lever (14) and the steam lever (15) on the position “0” and close the knob (4). Machine (PDE) Press the hot water switch (23). Should water comes out of the turbo steam supply nozzle (6), push the hot water switch (23) and close the knob (4). e) Please, check the tank water (1) level so to prevent from repeating these operations and from empting water circuit. In case it happens, repeat all the above mentioned operations by all means.. f) After doing these operations, wait that the machine builds up the operating temperature to make cof- fee, lamp (15a) on.
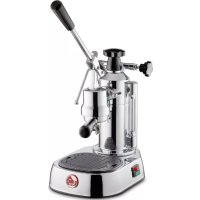
11.2 – MAKING ESPRESSO (PCN - PCL)
Make sure to follow the instructions as per 11.1 “starting of the machine”. To make a good cup of espresso you need good quality coffee, properly roasted and ground. The pump espresso coffee machine requires finely ground coffee. If the coffee is too coarsely ground the coffee will be light and without the froth that marks a good cup of espresso. If the coffee is ground too finely the espresso will be dark and strong and have little froth. We recommend grinding the coffee beans with a traditional grinder (not a grinder that uses a blade) imme- diately before you make the coffee since the coffee quickly loses its aroma after it is ground. A prewarmed cup helps keep the espresso at the right temperature. We recommend placing the cups on the cupwarmer (2) before use. BUONDI_PUCCINO_2010.indd 40 15/01/10 15.3941 English a) Make sure there is enough water in the tank (10). b) Depending on the number of cups of coffee you wish to make, place the one-cup filter (9) or the two- cup filter (10) into the filter-holder (8) and insert the filterholder into the coffee group (5) with a left-to-right turning motion until it locks in order to preheat it. c) Turn on the ON/OFF switch (lever switch/switch) (13). The ON light (13a) will come on to show that the machine is operating. d) Wait the machine reaches the temperature in order to supply a coffee, (15a) warning light lighted. e) Remove the filter-holder (8), fill the filter with one or two measures of ground coffee (one measure per cup) (Photo 4), level and press the coffee firmly but not excessively with the coffee press (12). f) Clean any remaining coffee from the edge of the filter with your hand and insert the filter-holder (8) into the coffee group (5), turning it to the right to lock it. g) Place one or two prewarmed cups on the cup rest grid (7) under the filterholder. h) Turn on the coffee/hot water switch (14). Espresso coffee will begin to flow out of the spout of the filter- holder (8). When the desired amount of coffee is in the cup, turn off the switch (14) to stop the coffee but do not remove the portafilter. Remove the cups from the cup rest and serve immediately. The machine is equipped with an automatic anti-drip valve (only PCL, PDE models) to eliminate most of the residual coffee that might drip from the coffee head. Nevertheless, some dripping from the wet grounds in the portafilter is normal. When you turn on the coffee switch (14) the pump pressure gauge (3) will quickly move into the green area of the scale and then return to zero when you stop making coffee. To prepare other cups of coffee, slowly remove the filter-holder from the coffee group by turning it to the left until it dislodges. Exercise care because the filter-holder will still be hot and some hot water will remain in the coffee grounds. Some water will drip from the coffee group after the filter-holder is removed due to residual water pressure in the system. Remove the grounds from the filter and repeat the procedure as described above.
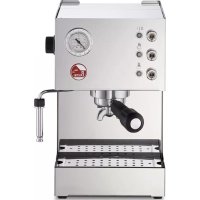
11.2.1 – PREPARING AN ESPRESSO COFFEE (PDE)
Make sure to follow the instructions as per 11.1 “starting of the machine”. To make a good cup of espresso you need good quality coffee, properly roasted and ground. The pump espresso coffee machine requires finely ground coffee. If the coffee is too coarsely ground the
Warning: the coffee emerges from the spout of the portafilter at a temperature
of 75-85°C. Exercise caution to avoid burns. Important: when the steam switch (15) is turned on the coffee function is deactivated (only PCL models). BUONDI_PUCCINO_2010.indd 41 15/01/10 15.3942 English coffee will be light and without the froth that marks a good cup of espresso. If the coffee is ground too finely the espresso will be dark and strong and have little froth. We recommend grinding the coffee beans with a traditional grinder (not a grinder that uses a blade) imme- diately before you make the coffee since the coffee quickly loses its aroma after it is ground. A prewarmed cup helps keep the espresso at the right temperature. We recommend placing the cups on the cupwarmer (2) before use. When the machine is on the stand-by mode and it’s not working, you’ll see the led of the front panel go on in a sequential way.
11.2.1.1 – PROGRAMMING THE COFFEE DOSES
With this machine it’s possible to program two different coffee doses of water in order to obtain one or two cups of coffee. In order to set the water doses and memorize them for future use, follow the present instructions: a) Insert the one cup filter (9) or two cup filter (10) in the filter holder (8). b) Remuve the filter-holder (8), fill the filter with one or two measures of ground coffe (one measure per cup). c) Press well the coffee in the filter holder with the use of the coffee presser (12). d) Place the filter holder (8) under the brewing group (5) turning it from the left to the right with strength. After these operations please act as follows:
1. Press the programming switch (20) for 5 seconds till the led will start to blink. The symbol of the switches
21 and 22 will go on at the same time.
2. Once you have placed the one cup filter, press the switch (21) and let the coffee come out.
3. Press again the same switch (21) once you get the desired coffee quantity.
4. The water dose programmed for one coffee will be memorized on the switch (21) and the relative led
5. Repeat the operations described under point 3 & 4 in order to program the water dose for the switch (24).
6. Each customer is free to program the water doses of the switches (21) and (22)in order to obtain a
stronger or smoother coffee using the one or two cups filter.
7. After the doses have been memorized, press again the switch (20) “MENU” in order to end programming.
8. The switches led will start to go on again in a sequential way. The machine will then be ready for
dispensing excellent coffees. Remove the cups from the cup rest and serve immediately.
Warning: the coffee emerges from the spout of the portafilter at a temperature
of 75-85°C. Exercise caution to avoid burns. BUONDI_PUCCINO_2010.indd 42 15/01/10 15.3943 English The machine is equipped with an automatic anti-drip valve (only PCL, PDE models) to eliminate most of the residual coffee that might drip from the coffee head. Nevertheless, some dripping from the wet grounds in the portafilter is normal. When you turn on the coffee switch (14) the pump pressure gauge (3) will quickly move into the green area of the scale and then return to zero when you stop making coffee. To prepare other cups of coffee, slowly remove the filter-holder from the coffee group by turning it to the left until it dislodges. Exercise care because the filter-holder will still be hot and some hot water will remain in the coffee grounds. Some water will drip from the coffee group after the filter-holder is removed due to residual water pressure in the system. Remove the grounds from the filter and repeat the procedure as described above.
11.2.1.2 – PRE-INFUSION
The machine gives the possibility of programming the doses so that there is a pre-infusion. Pressing the switches (21) and (22), the normal dispensing cycle comes after a short water jet that makes the coffee wet before the water definitively flows through it. In this way there is a better extraction of the coffee from the coffee dose. N.B. The machine is programmed to have this pre-infusion function. Should you want to deactivate it, please follow the instructions below.
ACTIVATION OF THE PRE-INFUSION
When the machine is off, turn it on by pressing the switch (22). The led will go on and this indicates that the pre-infusion function has been activated. Then turn it off and straight way on again.
DEACTIVATION OF THE PRE-INFUSION
When the machine is off, turn it on by pressing the switch (21). The led will go on and this indicates that the pre-infusion function has been deactivated. Then turn it off and straight way on again.
11.2.1.3 – MANUAL EXTRACTION (CONTINUOUS)
By pressing and then releasing for less than 5 seconds the dose programming/manual extraction switch (20) the machine will start dispensing the coffee. Once you got enough coffee, press again the switch (20) in order to stop it. N.B. We advice not to let the coffee come out for more than 40 seconds.
11.2.1.4 – ALARMS/MALFUNCTIONS
If one of the led of the switches, which is functioning, blinks please check the following situations:
- Water tank is empty.
- Boiler is without water.
- Pump noise. BUONDI_PUCCINO_2010.indd 43 15/01/10 15.3944 English Action: fill in the tank with water and repeat the operations for filling the boiler with water.
- Grinding is too fine. Action: modify the grinding.
- Filter is dirty. Action: clean the brewing group filter.
- Coffee is too pressed. Action: do not press the coffee too much.
a) It is not necessary to wash the filters (9 and 10) after every single use. Make sure that the holes are not obstructed. b) For a better result, we suggest warming the cups on the cupwarmer (2) which works by machine on only.
Steam can be used for frothing the milk to obtain cappuccinos or to warm up beverages. Version the turbo cappuccino maker (PCN-PCL)
1. Prepare your espresso in big mugs as already specified.
2. Once the machine is ready to make the coffee, position the steam nozzle on the tray (7), open the hot
water/steam knob (4) for a few seconds so that the few drops of water inside the nozzle come out; after a few second you will get only steam.
3. Close the hot water/steam knob (4).
4. Set the steam lever (15) on the position “I”.
5. After 15-20 seconds, when the led for the correct temperature (15a) goes on, place the mug, filled in
for its half with cold milk, under the steam turbo cappuccino maker (6). IMPORTANT In order to obtain a better cappuccino, make sure that the milk and the mug are cold.
6. Turn slowly the steam knob (4) anticlockwise to make the steam come out.
IMPORTANT More you open the knob, higher will be the steam pressure. N.B. Do not release steam for more than 60 seconds.
7. Move the mug with circular movements and make sure that the tip of the steam nozzle is slightly
immersed in the milk once the foam will start to grow. Do not make the milk boil. Attention! Burn risk: at the beginning there might be hot water sprinkling. The hot water tube might reach high temperatures: do not touch it with hands. BUONDI_PUCCINO_2010.indd 44 15/01/10 15.3945 English Once the milk has been properly frothed, turn the knob clockwise to stop the steam and remove the mug. Push the steam lever (15) on the position “O”.
8. Pout the frothed milk on the coffee. Decorate with cacao, cinnamon, Muscat nuts and then serve.
9. Place an empty cup on the tray without putting the filter holder under the brewing group. Set the coffee
lever (14) on the position “I” and fill the cup with water. Once the cup is full, push the coffee lever (14) on the position “O”. Now you can make another coffee. Version the turbo cappuccino maker (PDE)
1. Prepare your espresso in big mugs as already specified.
2. Once the machine is ready to make the coffee, position the steam nozzle on the tray (7), open the hot
water/steam knob (4) for a few seconds so that the few drops of water inside the nozzle come out; after a few second you will get only steam.
5. After 15-20 seconds, when the led for the correct temperature (15a) goes on, place the mug, filled in
for its half with cold milk, under the steam turbo cappuccino maker (6). IMPORTANT In order to obtain a better cappuccino, make sure that the milk and the mug are cold.
6. Turn slowly the steam knob (4) anticlockwise to make the steam come out.
IMPORTANT The more you open the knob, the higher will be the steam pressure. N.B. Do not release steam for more than 60 seconds.
7. Move the mug with circular movements and make sure that the tip of the steam nozzle is slightly
immersed in the milk once the foam will start to grow. Do not make the milk boil.
8. Once the milk has been properly frothed, turn the knob clockwise to stop the steam and remove the
mug. Press the steam switch (24) again.
9. Pout the frothed milk on the coffee. Decorate with cacao, cinnamon, Muscat nuts and then serve.
10. Place an empty cup on the tray without putting the filter holder under the brewing group. Press the
switch (20) and fill the cup I with water. Once the cup is full, press the switch (20) again. Now you can make another coffee. Attention: for the correct machine operating, please do not release steam longer than 60 seconds. Attention: for the correct machine operating, please do not release steam longer than 60 seconds. BUONDI_PUCCINO_2010.indd 45 15/01/10 15.3946 English
11.4.1 – MAKING CAPPUCCINO WITH THE AUTOMATIC CAPPUCCINO MAKER
1. make sure the steam/hot water knob (4) is closed.
2. loosen (anticlockwise) the upper locking ring (A) of the turbo steam nozzle (6) (Photo 1)
3. slide the turbo steam nozzle (6) down and off the steam pipe.
4. slide the Automatic Cappuccino maker (16) onto the steam pipe up to the stop and tighten the locking
ring (clockwise). After having mode espresso in a cappuccino cup and carried out all the normal steps to bring the machine to the proper temperature for steam production, proceed as follows:
1. briefly open and close two or three times the steam/hot water knob (4) until only steams comes out of
the Automatic Cappuccino maker (16).
2. fill a tall, narrow container halfway with cold milk.
3. put the rubber uptake tube (B) (Photo 2) of the Automatic Cappuccino maker (16) into the milk.
4. place the cup with the espresso under the spout of the Automatic Cappuccino maker (16) and open the
steam knob (4) (anticlockwise) to begin producing thick, hot, frothy milk. When the cup is full, close the steam knob (4) (clockwise). You can adjust the consistency of the froth as desired with the adjusting knob (C) (photo 2) of the Automatic Cappuccino maker (16). Turn clockwise for a denser froth and anticlockwise for o lighter froth (Photo 2). When you are done making cappuccinos you must clean milk residues from the Automatic Cappuccino maker.
11.5 – HOT WATER (PCN - PCL)
a) Make sure to follow the instructions as per 11.1 “ starting of the machine”. b) Open the knob (4) and push the coffee/ hot water lever (14) and the steam lever (15) on the position “I”; the turbo steam lever (6) pour out immediately. c) Fill the cup with the desired water and push the coffee/ hot water lever (14) and the steam lever (15) on the position “0” and close the knob (4). d) After filling the cup, make sure that there is still water in the tank (1). Important to ensure that the machine functions properly, do produce steam for more than 60 seconds. Attention: water temperature is around 90-95°, be careful not to burn yourself. BUONDI_PUCCINO_2010.indd 46 15/01/10 15.3947 English
11.5.1 – HOT WATER (PDE)
a) Make sure to follow the instructions as per 11.1 “ starting of the machine”. b) Open the knob (4) and press the switch (23)”; the turbo steam nozzle (6) pour out immediately. Once you’ve got the desired quantity of water, release the switch (23) to stop hot water coming out and turn the knob(4). d) After getting hot water from the nozzle, always check that there’s still water in the water tank.
12 – ROUTINE MAINTENANCE AND PRECAUTIONS
a) It is recommended to clean the tank periodically by pulling it out carefully by its proper handle and by putting the water tubes into it again being careful not to bend them. b) Clean up the steam tube and the frothing spout regularly. The spout can be removed by pulling it down. c) Use a normal damp cloth to clean both the spout and the pipe. d) Do not leave the machine outdoor. e) Do not immerse the machine in water. f) Use the machine only under adult control and keep away from children. Attention: water temperature is around 90-95°, be careful not to burn yourself. Attention: damages due to the emptiness of the machine water circuit voids warranty; it recommended to read the instruction booklet carefully and to control the tank (1) water level regularly. BUONDI_PUCCINO_2010.indd 47 15/01/10 15.3948 English
12.1 – CLEANING OF THE TURBO STEAM NOZZLE
Always clean properly with a wet cloth the end of the turbo steam nozzle (6) after use to avoid its obstruction and altering of the beverages flavour. Once every now and then clean it more specifically (picture 1):
- Remove the spout cover (E) pulling it downwards.
- Unscrew the threaded nut (A) turning it anticlockwise until the steam nozzle comes out (8).
- Clean the injector (D) in warm water to get rid of possible milk rests and clean with a needle the hole of the steam nozzle. After cleaning please assemble it as follows:
- Insert the threaded nut (A), the gummy rings (B) and (C) on the steam nozzle (8), insert the injector (D) and screw the threaded nut (A) clockwise in order to fix the injector.
- Insert the nozzle cover (E) pushing it upwards.
12.2 – CLEANING OF THE AUTOMATIC CAPPUCCINO MAKER
Apart from cleaning it every time it has been used, please clean it every now and again more accurately (picture 2):
- Remove the silicone tube (B) from the suction tap (D).
- Unscrew the threaded nut (A) turning it anticlockwise until the steam nozzle comes out (8).
- Remove the part (F) pressing on its milled sides from the main frothing unit (E).
- Remove the suction tap (D) from the main frothing unit (E).
- Remove the regulation knob (C) from the suction tap (D). Rinse everything thoroughly with warm water to remove possible milk rests and reassemble the automatic cappuccino maker again. Picture 1 Picture 2
BUONDI_PUCCINO_2010.indd 48 15/01/10 15.3949 English 13 – ESPRESSO COFFEE MACHINE FOR PODS USE WITH E.S.E. SYSTEM (OPTIONAL) The machine suitable for ground coffee use can be modified for E.S.E. pods following this procedure. a) Take away the adapter disc (a) and the shower of the grounded coffee (B), unscrewing the screw (C). b) Place the shower for pod (D) and stop it with the screw (C). c) Use the filterholder (F) with E.S.E. pods (42 mm diameter) actually in the market. BUONDI_PUCCINO_2010.indd 49 15/01/10 15.3950 English 14 – TECHNICAL DATA Power supply: 230-240V 50Hz ; 120V 60Hz Power: 850W Warming time: about 6 minutes Pressure pump: 15 bar Tank capacity: 1,2 litres Dimensions (HxLxD): 370 x 213 x 235 mm Weight: 6,5 kg BUONDI_PUCCINO_2010.indd 50 15/01/10 15.3951 English 15 – TROUBLESHOOTING
PROBLEM CAUSE SOLUTION
The machine does not work and the ON light does not turn on
2. The main cable is not properly
3. The main cables damaged
1. Restore electrical power
2. Plug the main cable in correctly
3. Contact the nearest SERVICE CENTER
for a replacement cable The ON light is on but the water does not heat
1. Thermostat malfunction, or the manu-
al reset thermostat is active
2. Heating element malfunction
1. Contact the nearest SERVICE CENTER
2. Contact the nearest SERVICE CENTER
No coffee pro- duced during the coffee cycle
1. Too little water in tank
2. Coffee too finely ground
3. Too much coffee in the filter
4. Coffee too firmly pressed
6. The lines are not primed
7. Shower plate obstructed
3. Put less coffee in the filter
4. Press the coffee more gently
5. Turn off the steam switch
Loud pump oper- ation
1. Too little water in tank
machine Coffee produced too quickly
1. Coffee too coarsely ground
2. Too little coffee in the filter
3. Coffee not pressed enough
2. Put more coffee in the filter
3. Press coffee more firmly
4. Use different coffee
Coffee is pro- duced in drips
1. Coffee too finely ground
2. Too much coffee in the filter
3. Coffee too firmly pressed
1. Use a coarser grind
2. Put less coffee in the filter
3. Press the coffee more gently
Coffee leaks between the cof- fee group and the filter-holder
1. Filter-holder not properly inserted
2. Too much coffee in the filter
3. Edge of the filter-holder not clean
4. The douche seal is worn or dam-
2. Put less coffee in the filter
3. Clean the edge of the filter-holder
4. Contact the nearest SERVICE CENTER
BUONDI_PUCCINO_2010.indd 51 15/01/10 15.3952 English Coffee is pro- duced without froth
1. Coffee not suitable for machine
3. Too little coffee in filter
1. Use different coffee
2. Adjust coffee grind
3. Put more coffee in the filter
Coffee too cold 1. The machine had not reached the proper temperature
2. Filter-holder not preheated
3. Cups not preheated
2. Filter-holder must be heated together
with the water – see section 11.1
3. Properly heat the cups
4. Contact the nearest SERVICE CENTER
Coffee is too hot 1. Pressure switch malfunction. 1. Contact the nearest SERVICE CENTER The machine does not produce steam
1. The lines are not primed
2. Obstructed outlet hole at end of
3. Too little water in tank
1. See section 11.4 – steam production
2. Clean the outlet hole with a needle
4. Reposition turbo steam nozzle
– ALARMS/ MALFUNCTIONS The switch you are using blinks
1. Empty water tank. Lack of water.
2. Grinding is too fine
4. Coffee is too pressed
1. Fill in the water tank with water and
repeat the procedures to fill the boiler with water.
2. Modify the grinding
3. Clean the brewing group filter
4. Do not press the coffee too much
BUONDI_PUCCINO_2010.indd 52 15/01/10 15.3953 SOMMAIRE