
DD2520 - DJ Equipment Omnitronic - Free user manual and instructions
Find the device manual for free DD2520 Omnitronic in PDF.

| Brand | Omnitronic |
| Model | DD2520 |
| Product type | Manual turntable |
| Transmission method | Direct drive |
| Motor | 24 V DC brushless motor |
| Speeds | 33 1/3 and 45 rpm |
| Speed adjustment | ±10% via fader |
| Starting torque | > 1 kg/cm |
| Wow and flutter | < 0.15% WRMS |
| Start time | < 1 second |
| Stop time | 1 second |
| Rumble | 55 dB DIN B |
| Platter | Diameter 330 mm, weight 728 g |
| Tone arm | S-shaped, gimbal suspension, length 230.5 mm |
| Overhang | 16 mm |
| Stylus force adjustment | 0 to 4 g |
| Anti-skating adjustment | 0 to 7 g |
| Connectors | RCA, USB |
| Dimensions | 450 x 350 x 155 mm |
| Weight | 11 kg |
| Power supply | 115/230 V, 50/60 Hz ~ |
| Power consumption | 12 W |
| Included accessories | S15 pickup system, acrylic cover, rubber mat, 45 rpm adapter |
| Maintenance | Clean with a soft damp cloth, no alcohol or detergent |
| Safety | Double insulation, disconnect before cleaning |
Frequently Asked Questions - DD2520 Omnitronic
User questions about DD2520 Omnitronic
0 question about this device. Answer the ones you know or ask your own.
Ask a new question about this device
Download the instructions for your DJ Equipment in PDF format for free! Find your manual DD2520 - Omnitronic and take your electronic device back in hand. On this page are published all the documents necessary for the use of your device. DD2520 by Omnitronic.
USER MANUAL DD2520 Omnitronic
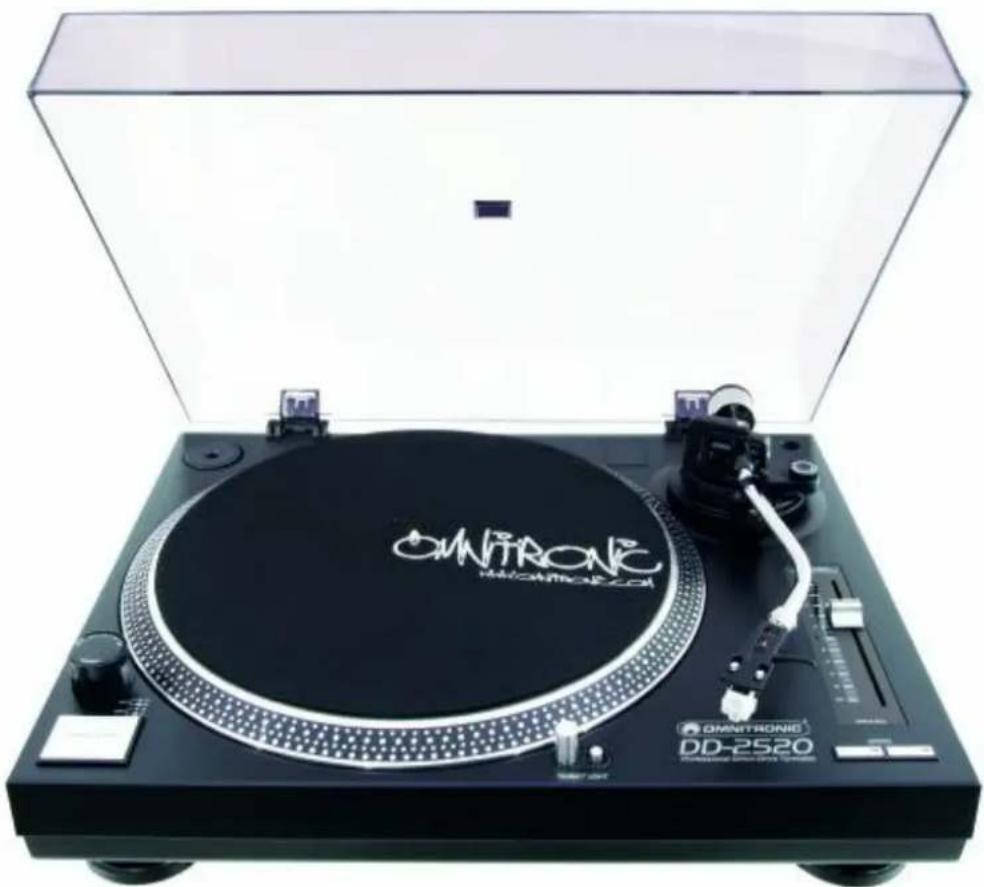
DD-2520/DD-2550 USB Direct-Drive Turntable
natural_image
Top-down view of a vintage QMNTRONIC HHV/CDN2020 dual-tac-toe rotator with visible branding and control buttons (no text-heavy elements)MULTI-LANGUAGE-INSTRUCTIONS
Inhaltsverzeichnis
Table of contents/Sommaire
Deutsch
EINFÜHRUNG 3
CLEANING AND MAINTENANCE 17
TECHNICAL SPECIFICATIONS.... 18
Français
INTRODUCTION 19
INSTRUCTIONS DE SÉCURITÉ ...... 20
EMPLOI SELON LES PRÉSCRIPTIONS 21
MISE EN SERVICE 21
DESCRIPTION 22
CONNEXIONS....22
AJUSTMENT 23
MANIEMENT 23
REEMPLACER LE SYSTEME 24
NETTOYAGE ET MAINTENANCE 24
CARACTÉRISTIQUES TECHNIQUES 25
This user manual is valid for the article numbers 10603060, 10603061
You can find the latest update of this user manual in the Internet under:
www.audacity-forum.de
http://audacity.sourceforge.net
USB Direct-Drive-turntable

CAUTION!
Keep this device away from rain and moisture! Unplug mains lead before opening the housing!
For your own safety, please read this user manual carefully before you initial start-up.
Every person involved with the installation, operation and maintenance of this device has to
- be qualified
- follow the instructions of this manual
- consider this manual to be part of the total product
- keep this manual for the entire service life of the product
- pass this manual on to every further owner or user of the product
- download the latest version of the user manual from the Internet
INTRODUCTION
Thank you for having chosen an OMNITRONIC DD-2520/DD-2550. If you follow the instructions given in this manual, we can assure you that you will enjoy this device for many years.
Unpack your OMNITRONIC DD-2520/DD-2550.
Please make sure that there are no obvious transport damages. Should you notice any damages on the A/C connection cable or on the casing, do not take the device into operation and immediately consult your local dealer.
Features
Direct-drive DJ-turntable
• Built-in USB port and additional phono preamplifier, for a high-quality and convenient digitization of analog vinyl records
- Driver installation not required, unit is identified automatically
- Sampling rates of 44.1 kHz and 48 kHz in stereo, resolution: 16 bits
- Incl. software for recording and editing
- With precision direct-drive
- Delivery includes pick-up system
• 2 speeds, pitch control ±10 %
• Large Start/Stop-button
- Strobe lamp for exact speed adjustment
- Target lamp
- Delivery includes removable dustcover
- Adjustable anti-skating
- Shock-absorbing feet
- Switchable output phono/line
- USB 1.1 support
- Suitable for Windows® XP and Mac OSX
SAFETY INSTRUCTIONS

CAUTION!
Be careful with your operations. With a dangerous voltage you can suffer a dangerous electric shock when touching the wires!
This device has left our premises in absolutely perfect condition. In order to maintain this condition and to ensure a safe operation, it is absolutely necessary for the user to follow the safety instructions and warning notes written in this user manual.

Important:
Damages caused by the disregard of this user manual are not subject to warranty. The dealer will not accept liability for any resulting defects or problems.
Always plug in the power plug least. Make sure that the power-switch is set to OFF position before you connect the device to the mains.
Keep away from heaters and other heating sources!
If the device has been exposed to drastic temperature fluctuation (e.g. after transportation), do not switch it on immediately. The arising condensation water might damage your device. Leave the device switched off until it has reached room temperature.
Never put any liquids on the device or close to it. Should any liquid enter the device nevertheless, disconnect from mains immediately. Please let the device be checked by a qualified service technician before you operate it again. Any damages caused by liquids having entered the device are not subject to warranty!
This device falls under protection-class II and features a protective insulation.
Never let the power-cord come into contact with other cables! Handle the power-cord and all connections with the mains with particular caution!
Make sure that the available voltage is not higher than stated on the AC voltage selector.
Make sure that the power-cord is never crimped or damaged by sharp edges. Check the device and the power-cord from time to time.
Always disconnect from the mains, when the device is not in use or before cleaning it. Only handle the power-cord by the plug. Never pull out the plug by tugging the power-cord.
CAUTION: Turn the amplifier on last and off first!
Please note that damages caused by manual modifications on the device or unauthorized operation by unqualified persons are not subject to warranty.
Keep away children and amateurs!
CAUTION: High volumes can cause hearing damage!
There are no serviceable parts inside the device. Maintenance and service operations are only to be carried out by authorized dealers.
OPERATING DETERMINATIONS
This device is a professional turntable for playing standard LPs or Singles. This product is allowed to be operated with an alternating current of 115/230 V, 50/60 Hz and was designed for indoor use only.
Do not shake the device. Avoid brute force when installing or operating the device.
When choosing the installation-spot, please make sure that the device is not exposed to extreme heat, moisture or dust. There should not be any cables lying around. You endanger your own and the safety of others!
The ambient temperature must always be between -5^ C and +45^ C.
The relative humidity must not exceed 50 % with an ambient temperature of 45^ C.
This device must only be operated in an altitude between -20 and 2000 m over NN.
Operate the device only after having familiarized with its functions. Do not permit operation by persons not qualified for operating the device. Most damages are the result of unprofessional operation!
Never use solvents or aggressive detergents in order to clean the device! Rather use a soft and damp cloth.
Please use the original packaging if the device is to be transported.
Never remove the serial barcode from the device as this would make the guarantee void.
If this device will be operated in any way different to the one described in this manual, the product may suffer damages and the guarantee becomes void. Furthermore, any other operation may lead to dangers like short-circuit, burns, electric shock, etc.
INSTALLATION
Install the turntable on a plane, stable ground.
Place the platter on the holder. Please note that the platter is fixed on the holder via an extremely powerful magnet. Place the rubber mat on the platter.
Remove the hinges from the bottom side of the styrofoam. Install the dust-cover on the two hinges.
Remove the pickup-system from the cartridge holder and screw it on the tonearm.
GENERAL DESCRIPTION
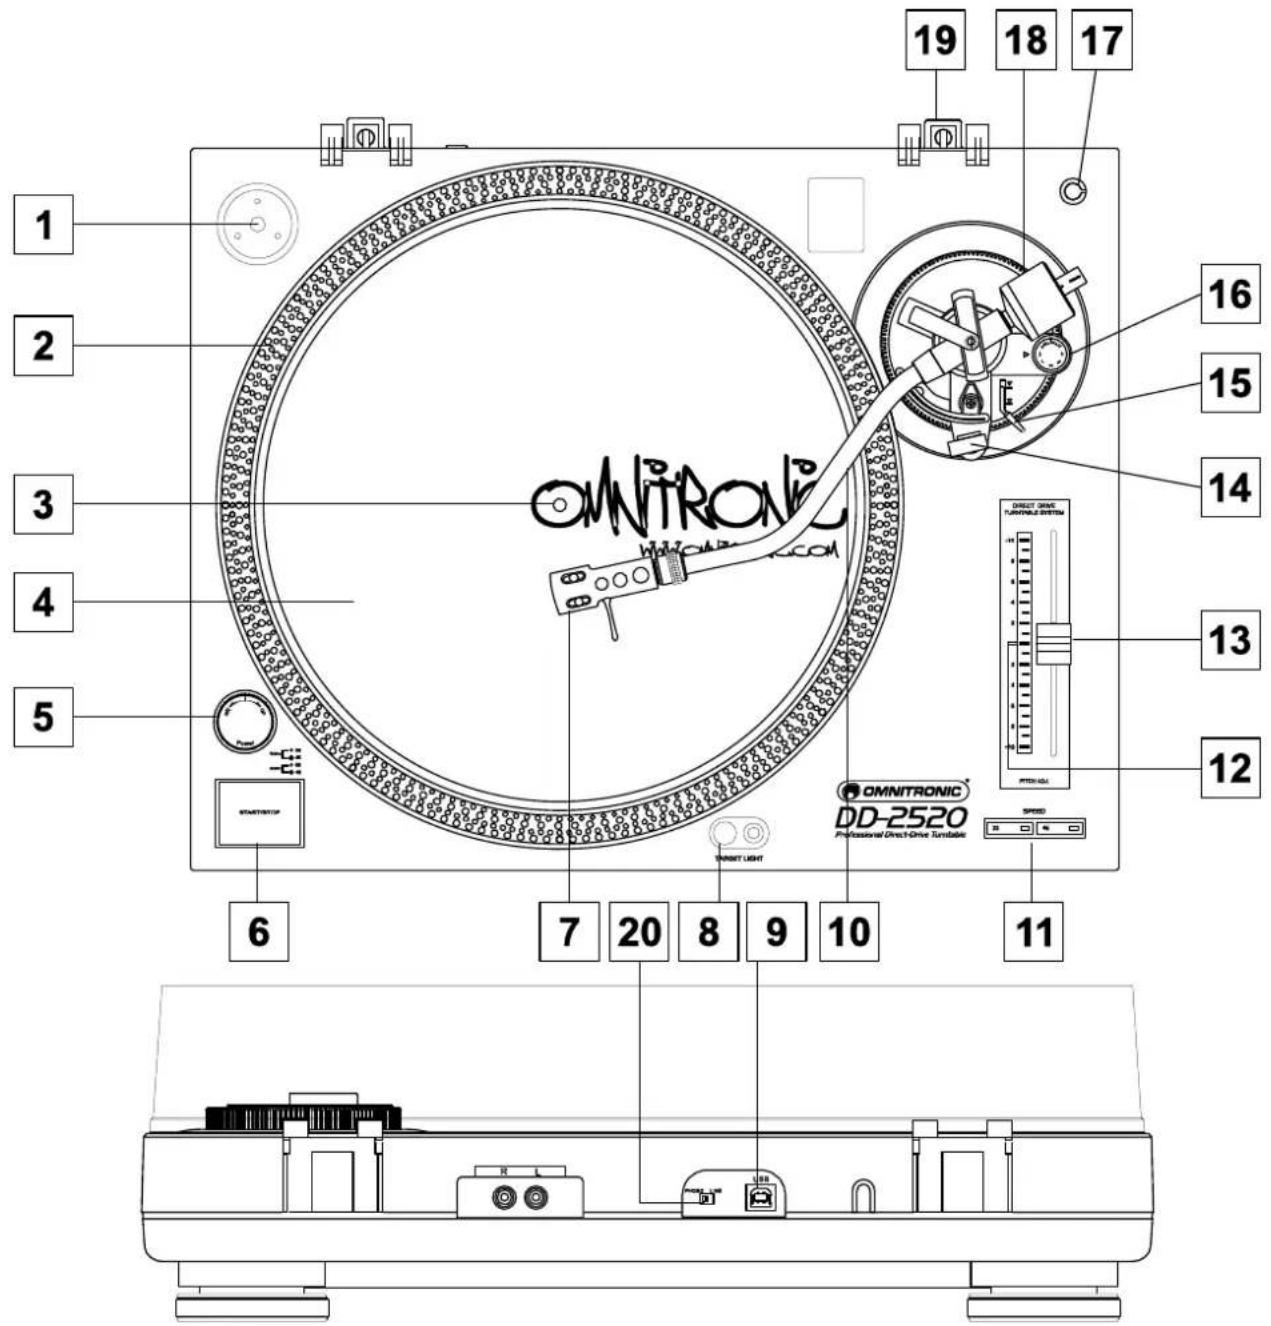
- 45 RPM adaptor
- Platter
- Center
- Voltage selector (underneath the platter)
-
Power switch with strobe-lamp
-
START/STOP-button
- Headshell
- Target light with switch
- USB-port
- Tonearm
11.Speed-selector
12.Pitchdisplay
13.Pitchfader
14.Armrest
15. Tonarm-lift
16. Anti-Skating-wheel
17. Cartridge holder
18. Counterweight
19.Hinge
CONNECTIONS
Connect the RCA-cables (white=left channel, red=right channel) with the PHONO IN-sockets of your amplifier or mixer. You can also use a line input if you set the PHONO/LINE-switch to line.
Connect the turntable via the USB-port to the computer.
Connect the turntable to the mains.
ADJUSTING
A) Adjusting the counterweight
- Remove the stylus cover.
- Set the Anti-skating-wheel to the 0 position.
- Set the tonearm lift to the down position
- Release the tonearm from the armrest and move it to a position between the turntable and the armrest. Make sure that you do not damage the stylus.
- Carefully hold the tonearm and adjust the counterweight by turning it clockwise or anti-clockwise respectively. The tonearm should be balanced to a horizontal position.
- Move the tonearm back to the armrest and clamp it.
- Set the scale on the counterweight to the 0 position without turning the counterweight.
- Turn the counterweight clockwise until the scale shows the value corresponding to the pressure of the used stylus. The stylus pressure of the pick-up system included in the delivery is 2.5 g. Should you use a separate pick-up system, please follow the manufacturer's instructions.
B) Adjusting the tracking force
Set the Anti-skating-wheel to the value equivalent to the pressure of the used stylus. The stylus pressure of the pick-up system included in the delivery is 2.5 g. Should you use a separate pick-up system, please follow the manufacturer's instructions.
C) Adjusting the playback-speed
- Press the START/STOP-button and the turntable begins to rotate.
- Watch the dotted lines on the platter's edge. The numbers next to the strobe-lamp correspond to the playback-speed adjusted via the Pitchfader.
Power supply 230 V, 50 Hz: Should the dots of the upper line seem to be standing still, the playback-speed is 33 1/3 RPM,
Power supply 230 V, 50 Hz: Should the dots of the second line seem to be standing still, the playback-speed is 45 RPM,
Power supply 115 V, 60 Hz: Should the dots of the third line seem to be standing still, the playback-speed is 33 1/3 RPM,
Power supply 115 V, 60 Hz: Should the dots of the lowest line seem to be standing still, the playback-speed is 45 RPM, - If the selected playback-speed (33 or 45 RPM) without pitch-adjustment does not correspond to 0% (Pitch-Control Fader in center position, green LED illuminated), you can adjust the correct playback-speed manually.
OPERATION
- Select the speed required for the record you want to play.
- Put the record on the platter. Use the 45 RPM adaptor if needed (e.g. for singles).
- Remove the the stylus cover and release the tonearm.
- Press the START/STOP-button and the turntable begins to rotate.
- Set the tonearm lift to the up position and move the tonearm to the desired starting position. Under insufficient lighting conditions use the target light for spotting the exact starting position.
- Set the tonearm lift to the down position and the tonearm slowly lowers to the record.
- Should you desire to stop the turntable without removing the tonearm from the record, simply press the START/STOP-button. The electro-brake will immediately stop the rotation.
- Should you desire to interrupt playback for a short period, set the tonearm lift to the up position. When you wish to continue playback, set the tonearm lift back to the down position.
- When you do not need the tonearm lift at all, leave it in the down position.
EXCHANGING THE PICK-UP SYSTEM
Loosen the tightening screws on the headshell and remove the connection-cables of the pick-up system. Remove the old pick-up system from the Headshell.
Read the user manual of the new pick-up system.
Put the stylus cover on the stylus.
English
Connect the Headshell's connection cables with the terminals of the pickup-system and make sure that the occupation of the cables is correct.
The different colours mean:
| Used colour: Channel and poles: | |
| White (L+) Left, | plus-pole |
| Blue (L-) Left, | minus-pole |
| Red (R+) Right, | plus-pole |
| Green (R-) Right, | minus-pole |
Tighten the screws on the Headshell.
Adjusting the overhang
The overhang is the distance between the stylus and the center of the turntable.
For optimized pick-up, the overhang should be set to 16 mm.
Loosen the tightening screws on the headshell and move the system forwards or backwards until you reach the desired position.
Make sure that you tighten the screws before you operate the device again.
AUDACITY QUICK GUIDE
For the complete manual please check
http://audacity.sourceforge.net
Before starting the software
Make sure that your USB turntable is plugged into the computer and both the computer and the turntable are plugged in and on.
To install software (PC)
- Plug in your turntable to an AC outlet and connect the USB port on the Turntable to the USB port of your computer.
- Turn on the power switch to your turntable.
- Windows system will detect a new device and that it is available to use.
- Insert the CD that came with your USB turntable.
- Run the file to install Audacity software. Once installed, run the Audacity program.
Please note: The USBTurntable may show up with a different name in Windows system. This may depend on your computer model and operating system. 99% of the time it will contain USB in the name.
To install software (MAC)
- Insert the included CD
- Open the CD icon on the desktop.
- Drag the installation folder for audacity to your hard drive. We recommend that you move the folder to your Applications folder.
- A window will come up which shows the files copying.
- EJECT the CD.
- Open Audacity from where you moved it to on your hard drive.
English
Software configuration
- Click on Microphone in the drop down menu and select Stereo Mix Figure 1: Select Stereo Mix
- Select the Edit menu and then Preferences
Select the USB audio device under the Recording selection as shown.
Select Software Playthrough to hear the audio while recording.
After completed the above settings, you are ready for recording.
If you are still having difficulty finding the USB Turntable, try to check your system settings or control panel to adjust audio input settings from the sound control panel.
CLEANING AND MAINTENANCE

DANGER TO LIFE!
Disconnect from mains before starting maintenance operation!
We recommend a frequent cleaning of the device. Please use a soft lint-free and moistened cloth. Never use alcohol or solvents!
There are no serviceable parts inside the device. Maintenance and service operations are only to be carried out by authorized dealers.
Should you need any spare parts, please use genuine parts.
Should you have further questions, please contact your dealer.
TECHNICAL SPECIFICATIONS
| Power supply: 115/230 V AC, 50/60 Hz ~ | |
| Power consumption: 12 W | |
| Type: Manual turntable | |
| Drive-method: Direct-drive | |
| Motor: Brushless 24 V DC-motor | |
| Speed: 33 1/3 RPM and 45 RPM | |
| Change-time between speeds: | |
| 33 -> 45 RPM in <1 sec. | |
| 45 -> 33 RPM in <1 sec. | |
| Pitch adjustment: ± 10 % via fader | |
| Initial torque: >1.0 kg/cm | |
| Start time: <1 sec. | |
| Stop time: <1 sec. | |
| Wow and Flutter: <0.15 % WRM$ | |
| Rumble: 55 dB DIN B | |
| Platter: Outer diameter 330 mm | |
| Weight 728 g | |
| Tonearm: S-shape with Cardan's suspension | |
| Tonearm-length: | 230,5 mm |
| Overhang: | 16 mm |
| Adjustable stylus-pressure | 0-4 g |
| Anti-Skating-range: | 0-7 g |
| Phono output level: | 1.5-3.6 mV @ 1 kHz 5 cm/sec |
| Line output level: 90-216 mV @ 1 kHz 5 cm/sec | |
| Frequency range: | 20 Hz - 20 kHz |
| Channel separation: | >15 dB |
| Output connectors: | RCA, USB type B |
| Dimensions: | 450 x 350 x 155 mm |
| Weight: | 11 kg |
Please note: Every information is subject to change without prior notice. 03.12.2008 ©

OMNITRONIC

DD-2520/DD-2550
USB Platine disque Direct-Drive

ATTENTION!
A) Ajustment du contrepoids
- DD-2520/DD-2550 USB Direct-Drive Turntable
- MULTI-LANGUAGE-INSTRUCTIONS
- Inhaltsverzeichnis
- Table of contents/Sommaire
- Deutsch
- Français
- USB Direct-Drive-turntable
- CAUTION!
- For your own safety, please read this user manual carefully before you initial start-up.
- INTRODUCTION
- Features
- Direct-drive DJ-turntable
- SAFETY INSTRUCTIONS
- Important:
- OPERATING DETERMINATIONS
- INSTALLATION
- CONNECTIONS
- ADJUSTING
- A) Adjusting the counterweight
- B) Adjusting the tracking force
- C) Adjusting the playback-speed
- OPERATION
- EXCHANGING THE PICK-UP SYSTEM
- English
- Adjusting the overhang
- AUDACITY QUICK GUIDE
- Before starting the software
- To install software (PC)
- To install software (MAC)
- Software configuration
- CLEANING AND MAINTENANCE
- DANGER TO LIFE!
- TECHNICAL SPECIFICATIONS
- OMNITRONIC
- DD-2520/DD-2550
- USB Platine disque Direct-Drive
- ATTENTION!
- A) Ajustment du contrepoids
Brand : Omnitronic
Model : DD2520
Category : DJ Equipment