KS 130.0 - Fridge PKM - Free user manual and instructions
Find the device manual for free KS 130.0 PKM in PDF.
Pick your language and provide your email: we'll send you a specifically translated version.
| Product Type | Built-in Refrigerator |
| Brand | PKM |
| Model | KS 130.0 |
| Climate Class | N (16°C to 32°C) |
| Total Net Capacity | 130 L |
| Energy Class | A+ |
| Refrigerant | R600a (15 g), CFC-free |
| Dimensions (H x W x D) | 88 x 54 x 54 cm |
| Net Weight | 31 kg |
| Power Supply | 220-240 V ~ 50 Hz |
| Rated Power | 90 W |
| Noise Level | Approx. 39 dB(A) |
| Defrost | Automatic (refrigerator compartment) |
| Reversible Door | Yes (right or left) |
| Glass Shelves | 2 height-adjustable (unbreakable) |
| Vegetable Crisper | 1 bin with glass lid |
| Door Bins | 1 bottle rack, 2 universal |
| Interior Light | Yes |
| Thermostat | Adjustable (positions 1-5) |
| Cleaning | Warm water or mild soapy water, no abrasive products |
| Child Safety | Safety instructions and power off before maintenance |
| Warranty | 24 months (domestic use) |
Frequently Asked Questions - KS 130.0 PKM
How to adjust the refrigerator temperature?
Use the thermostat knob. Position 3 corresponds to normal temperature. Turn to 2 or 1 for warmer, to 4 or 5 for colder. After 5 hours, the appliance reaches its operating temperature.
What to do if the refrigerator does not work?
First check the power outlet (voltage), plug connection, and house fuse. If the problem persists, contact customer service.
How to defrost the freezer compartment?
For models KS-120.4A+ EB: remove food, set thermostat to 0, unplug, remove condensation water and ice pieces with a soft cloth. Never use mechanical objects.
Can I reverse the door opening direction?
Yes, the door is reversible. Follow the instructions in the manual: unscrew the upper and lower hinges, reverse positions and reassemble. For model KS-120.4A+ EB, there is a specific procedure for the freezer compartment.
How to clean the interior of the refrigerator?
Before any cleaning, unplug the appliance. Use warm water or a mild soapy solution. Never use boiling water, abrasive or chemical products. Leave the doors open to air after cleaning.
What refrigerant is used and is it dangerous?
The refrigerant is isobutane R600a, an environmentally friendly but flammable natural gas. Do not damage the refrigeration circuit parts. In case of damage, keep the appliance away from any flame and contact customer service.
What to do if the interior light does not turn on?
First check that the plug is properly connected and that the fuse has not blown. If it is, the bulb is likely defective and must be replaced with an identical bulb.
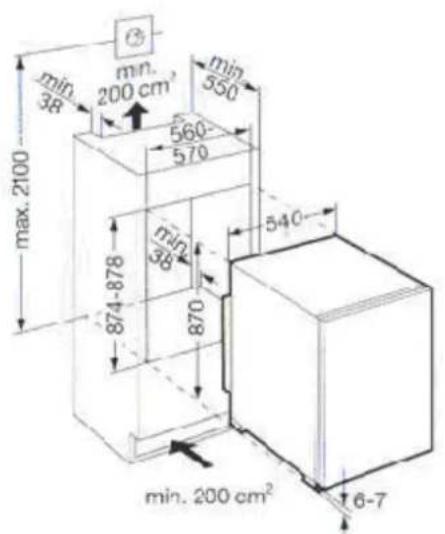
What are the required built-in dimensions?
The built-in requires a niche of at least 88 cm height, 54 cm width, and 54 cm depth. Provide ventilation of at least 200 cm² at the front and rear.
Can I refreeze thawed food?
No, never refreeze partially or fully thawed food. This can pose a health risk.
Where to find customer service?
For France, contact PKM customer service via the number indicated in the manual. Have the appliance type (on the rating plate) and a precise description of the problem.
User questions about KS 130.0 PKM
0 question about this device. Answer the ones you know or ask your own.
Ask a new question about this device
No questions yet. Be the first to ask one.
Download the instructions for your Fridge in PDF format for free! Find your manual KS 130.0 - PKM and take your electronic device back in hand. On this page are published all the documents necessary for the use of your device. KS 130.0 by PKM.
USER MANUAL KS 130.0 PKM
natural_image
Exterior view of a white rectangular refrigerator with blue trim (no visible text or symbols)CE
natural_image
Interior view of a white refrigerator with open shelves holding various food items (no visible text or labels)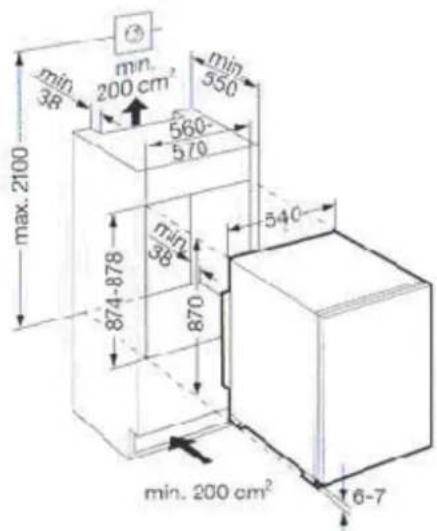
text_image
min. 38 200 cm² 560 570 550 6/4 6/8 874-878 870 540 min. 200 cm² 6-7 max. 2100natural_image
White refrigerator with open shelves displaying fresh produce including green vegetables, fruits, and water bottles (no text or symbols visible)