
AHP612 - Earphones ALTEC LANSING - Free user manual and instructions
Find the device manual for free AHP612 ALTEC LANSING in PDF.
| Product Type | Wireless Stereo Headphones |
| Brand | Altec Lansing |
| Model | AHP612 |
| Transmission Technology | RF 900 MHz |
| Effective Range | Up to 45 meters (depending on environment) |
| Transmitter Power Supply | AC 120V Power Adapter (included) |
| Headphone Power Supply | 3 NiMH AAA rechargeable batteries (included) or 3 AAA alkaline batteries (not included) |
| Battery Charging Time | 10 to 12 hours |
| Battery Life | 6 to 8 hours |
| Speakers | 40 mm Mylar |
| Frequency Response | 30 Hz - 20 kHz |
| Signal-to-Noise Ratio | > 55 dB |
| Channel Separation | > 20 dB |
| Distortion | < 1.5% |
| Transmitter Audio Inputs | RCA (L/R) + 3.5mm Y adapter included |
| Frequency Channels | 3 selectable (912.5 - 914.5 MHz) |
| Headphone Functions | On/Off/Scan, Mute, Volume Control, LINK Indicator, Charge |
| Maintenance and Cleaning | Clean with a soft dry cloth. Do not use abrasive products or liquids. |
| Safety | Do not expose to water. Use only recommended batteries. Do not attempt to charge non-rechargeable batteries. |
| Spare Parts and Repairability | Batteries, power adapter, cables available. For any repair, contact customer service. |
| Warranty | 1 year (2 years in EU and Asia) |
| Customer Service (North America) | Tel: 1-800-258-3288, Email: csupport@alteclansing.com |
Frequently Asked Questions - AHP612 ALTEC LANSING
User questions about AHP612 ALTEC LANSING
0 question about this device. Answer the ones you know or ask your own.
Ask a new question about this device
Download the instructions for your Earphones in PDF format for free! Find your manual AHP612 - ALTEC LANSING and take your electronic device back in hand. On this page are published all the documents necessary for the use of your device. AHP612 by ALTEC LANSING.
USER MANUAL AHP612 ALTEC LANSING
- Wireless stereo headphones
- Transmitter/charging base
RCA cable - 3.5 mm Y-adapter cable
- 3 AAA NiMH rechargeable batteries
- AC power adapter
- User's manual and quick connect card
Introduction
The AHP612 headphones expand and enhance your enjoyment of music or TV sound. Like FM radio, the 900MHz signal travels with ease through walls, floors, ceilings and other obstacles, delivering high quality stereo sound to virtually anywhere inside the house or out.
Delivering drift- and static-free reception along with outstanding range - up to 150 feet (Range may vary according to environment) - the possibilities for enjoying your AHP612 headphones are nearly unlimited.
The AHP612 headphones are compatible with most audio sources, such as TVs, DVD players, VCRs, A/V receivers/amps, stereos, computers, and portable devices (CD players, cassette players, MP3s etc.).
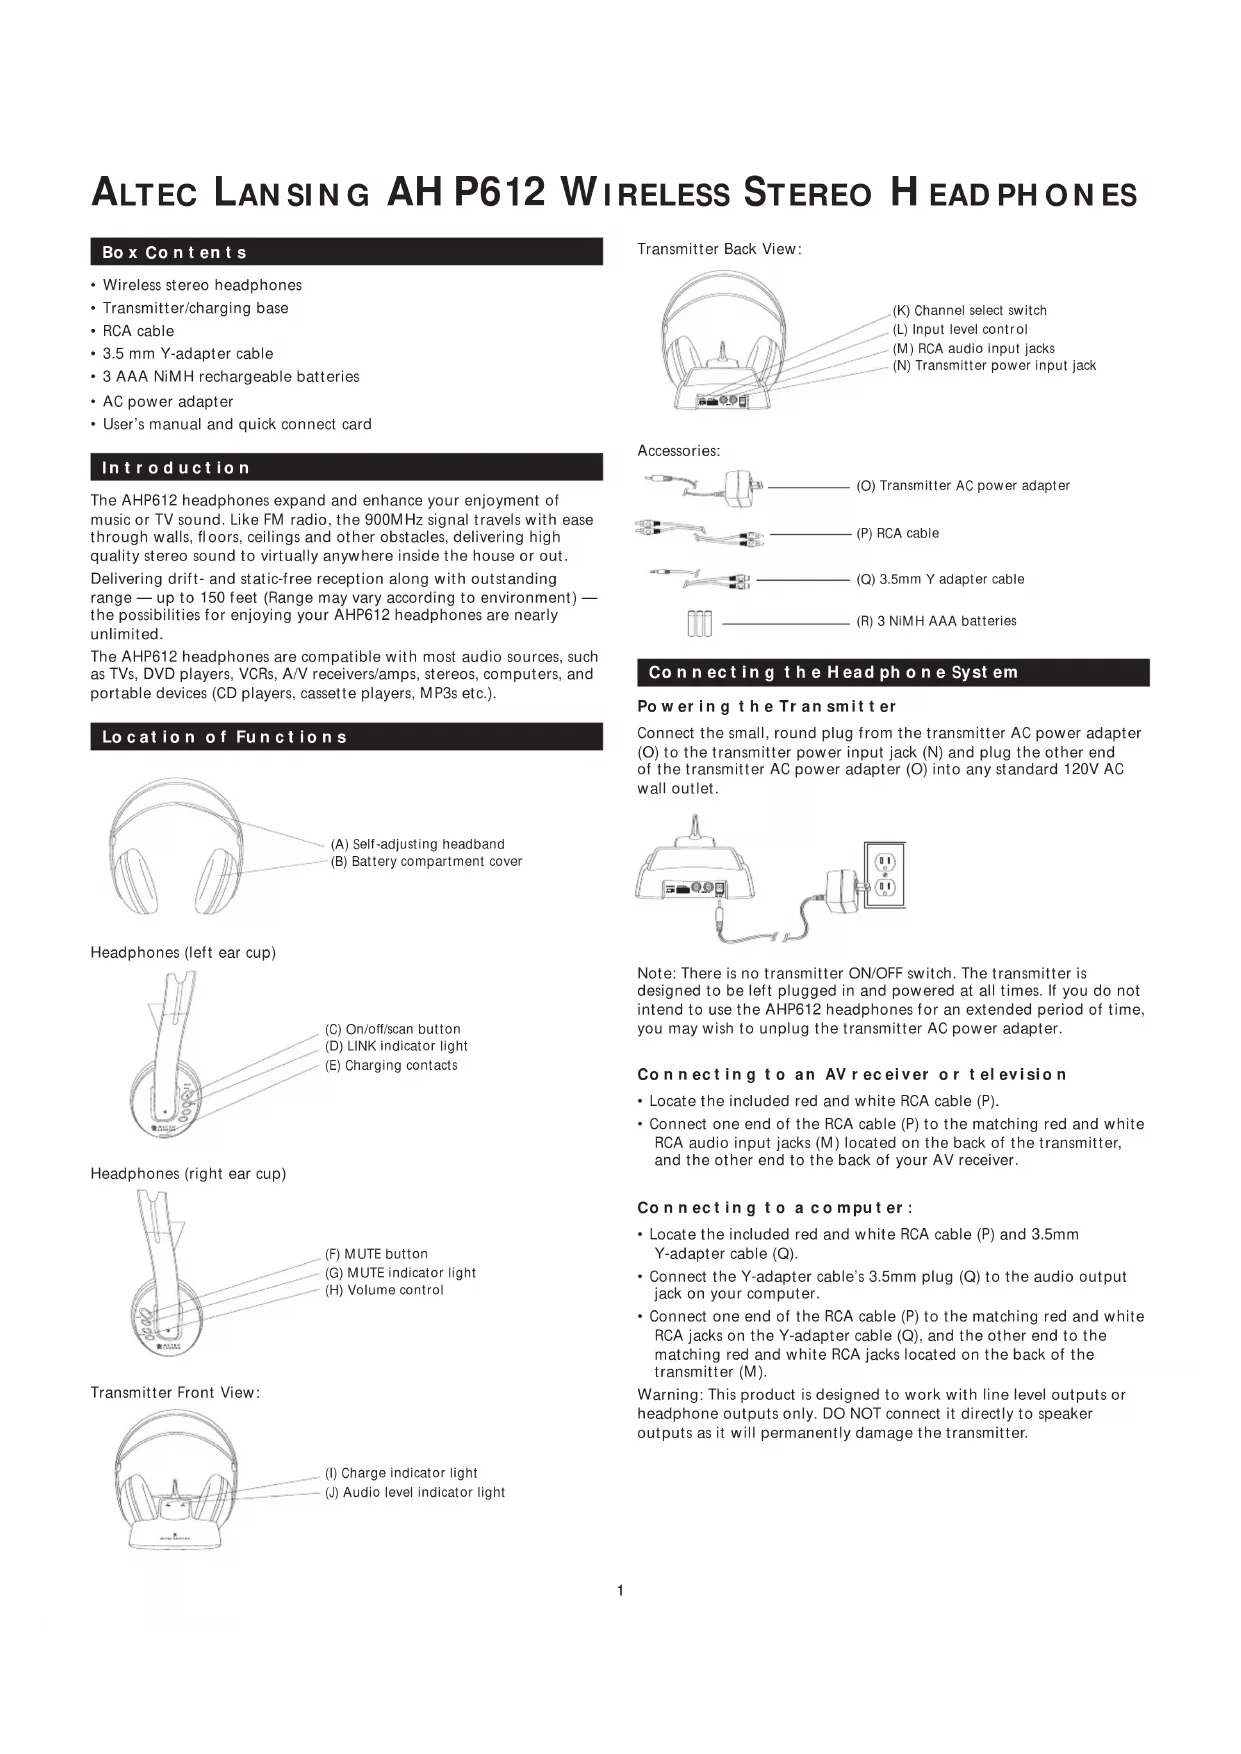
Location of Functions
(A) Self-adjusting headband
(B) Battery compartment cover
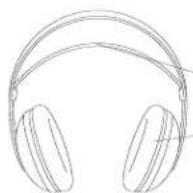
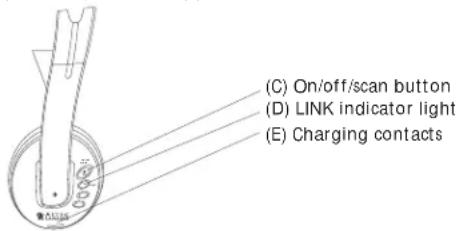
Headphones (left ear cup)
(C) On/off/scan button
(D) LINK indicator light
(E) Charging contacts
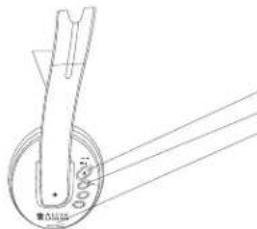
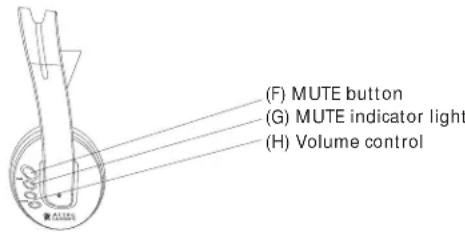
Headphones (right ear cup)
(F) MUTE button
(G) MUTE indicator light
(H) Volume control
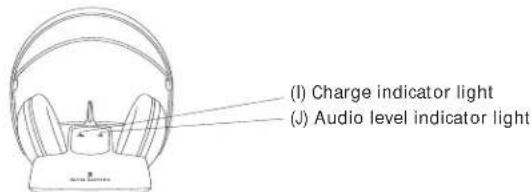
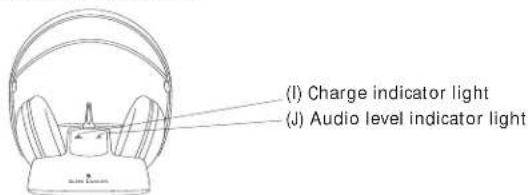
Transmitter Front View:
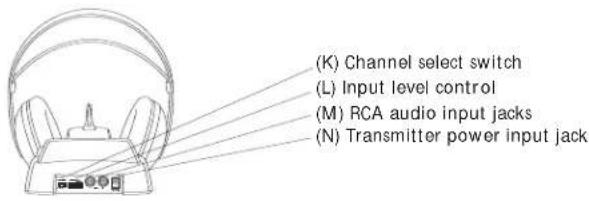
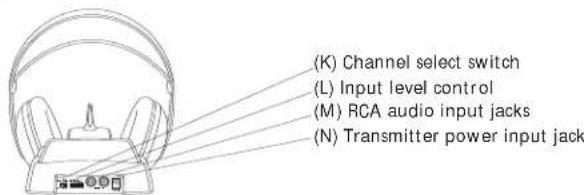
Transmitter Back View:
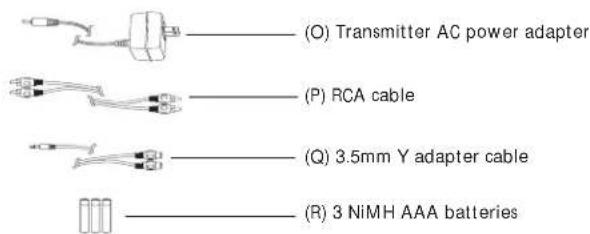
Accessories:
Connecting the Head phone System
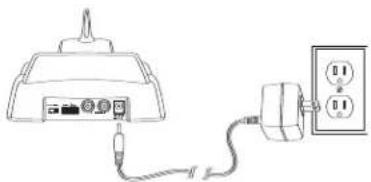
Powering the Transmitter
Connect the small, round plug from the transmitter AC power adapter (O) to the transmitter power input jack (N) and plug the other end of the transmitter AC power adapter (O) into any standard 120V AC wall outlet.
Note: There is no transmitter ON/OFF switch. The transmitter is designed to be left plugged in and powered at all times. If you do not intend to use the AHP612 headphones for an extended period of time, you may wish to unplug the transmitter AC power adapter.
Connecting to an AV receiver or television
- Locate the included red and white RCA cable (P).
- Connect one end of the RCA cable (P) to the matching red and white RCA audio input jacks (M) located on the back of the transmitter, and the other end to the back of your AV receiver.
Connecting to a computer:
- Locate the included red and white RCA cable (P) and 3.5mm Y-adapter cable (Q).
- Connect the Y-adapter cable's 3.5mm plug (Q) to the audio output jack on your computer.
- Connect one end of the RCA cable (P) to the matching red and white RCA jacks on the Y-adapter cable (Q), and the other end to the matching red and white RCA jacks located on the back of the transmitter (M).
Warning: This product is designed to work with line level outputs or headache outputs only. DO NOT connect it directly to speaker outputs as it will permanently damage the transmitter.
Powering the Headphones
The AHP612 headphones can be powered by three rechargeable AAA Nickel Metal Hydride (Ni-MH) batteries (supplied, (R)) or any other NiCd or alkaline batteries.
Inserting the Batteries
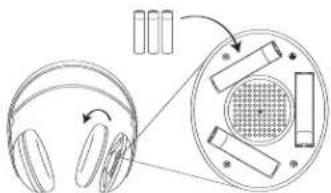
- Remove the left ear-cushion.
- Insert batteries following polarity (^+ + ^- and - ) as diagrammed inside the battery compartment.
Charging batteries
- Make sure that the headphones' "ON/OFF/SCAN" button (C) is turned off and the LINK indicator light is unlit.
- Place the headphones on the transmitter, ensuring that the charging contacts (E) on the left ear cup sit securely on the charging contacts on the transmitter base. The CHARGE indicator light (I) on the transmitter will turn on when the headphones are seated properly.
Charging Schedule:
Use: Charge Time: Average 10-12 hours Play Time: 6-8 hours
Play time as shown above reflects use of batteries in good condition.
Warnings:
- The AHP612 headphones can also be powered by three AAA alkaline batteries (not included). You may experience slightly longer play time with alkaline batteries, but you will not be able to recharge them, as you can with the supplied NiMH or NiCd rechargeable batteries.
The AHP612 built-in charger will charge rechargeable NiMH (supplied, (R)) or NiCd batteries only. DO NOT attempt to charge any other batteries except those specified above. - The included NiMH batteries can be charged at any time, without any adverse memory effect, whereas NiCd batteries must be fully discharged before they can be recharged in order to avoid a reduction in performance. For this reason we recommend continued use of the supplied NiMH.
Over time, with repeated use, even Ni-MH batteries will eventually wear out. If, after a full charge, you notice a) dramatically decreased playing time, b) the power indicator light begins to dim quickly and/or c) static interference occurs within a short time of turning the headphones on, it may be time to replace the batteries.
Notes:
- The charger will not overcharge the batteries if left to charge longer than shown above. However, if you do not intend to use the headphones for an extended period of time, it is recommended that you unplug the transmitter from the AC power outlet.
- Battery life depends on frequency of use, time, and care.
Adjusting the Transmitter
Transmitter Front View:
Transmitter Back View:
- Turn ON your audio source (i.e., A/V receiver, TV, portable CD player, etc.) and play music at a normal listening volume.
- Set the channel select switch (K) on the back of the transmitter to 1, 2 or 3. The transmitter provides three different broadcasting frequencies. In the event that you experience poor reception or interference, try choosing a different frequency by moving the channel select switch to another position.
- Turn the input level control (L) down (all the way to the left — your left when looking at the front of the transmitter).
- Check the audio level indicator light (J) on the front of the transmitter. If the light flickers intermittently (about half the time), proceed to the next section. If the light does not blink or is flickering very rapidly, turn the input level control (L) slowly up (to the right — your right when looking at the front of the transmitter) until the light flickers intermittently.
Note: if the light does not flicker, please check the following:
- Confirm that the transmitter AC power adapter (O) is securely connected.
- Confirm that the audio input cable coming out of the transmitter is securely connected to the audio source output (TV, A/V receiver, etc.).
- Turn the input level control (L) slowly up (to the right — your right when looking at the front of the transmitter) and check if the transmitter is connected to a variable audio output, such as a headphones jack or TV audio output. Adjust the volume on the audio source up or down as necessary to make the audio level indicator light (J) flickers intermittently. If you are unclear as to the kind of output (variable or fixed) you are using, please see the section entitled MORE HELPFUL INFORMATION.
Tuning the Headphones
Headphones (left ear cup)
Headphones (right ear cup)
- Push the ON/OFF/SCAN button (C) on the headphones to turn the headphones on. The LINK indicator light (E) will turn red. The LINK indicator light (D) will turn amber, indicating that the headphones are tuned to the transmitter. You should hear sound coming from the headphones.
- Adjust the volume (H) as desired.
- The headphones will automatically retune if they lose the signal from the transmitter. However, you can also push the ON/OFF/SCAN button (C) to retune the headphones at any time. Allow 10 to 15 seconds for the headphones to lock into the transmitter. The amber "tuned" indicator light will come on after the headphones have been successfully tuned.
Note: Interference in the form of static and/or distortion can sometimes be heard. If this occurs, confirm the transmitter/headphone adjustments and indicators. If the problem persists, refer to the Troubleshooting section of this manual.
Turning the Head Phones Off
- Press and hold the ON/OFF/SCAN button (C) for about 2 seconds to turn the headphones OFF. The LINK indicator light (E) will go off to indicate that the headphones have been turned OFF.
- Place the headphones on the transmitter to recharge the batteries. Note: Only the rechargeable NiMH and NiCd batteries can be charged. Please refer to the Charging Batteries section of this manual for detailed instructions.
Muting the Headphones
- Press the MUTE button (F) to mute the headphones. The MUTE indicator light (G) will turn on to indicate that the headphones have been muted.
- Press the MUTE button (F) again to turn off the mute function.
More Helpful Information
About Fixed-Level Audio Outputs:
A fixed-level, or line-level audio output is considered ideal since it provides an audio signal unchanged by adjustments to the audio source volume control.
Hint: Fixed-level audio outputs from stereo receivers/amps will typically be designated as Tape, Tape 1, and Tape 2 outputs, or VCR audio output connections. These outputs are frequently marked on A/V equipment as 'TAPE OUTPUT,' 'TAPE OUT,' 'TAPE REC,' or 'TAPE RECORD' or REC OUT.'
Please note: Jacks labeled PHONO, CD, LD, DVD or tape or VCR playback (PB) are INPUTS and will not work with the transmitter. Fixed-level outputs from TVs are usually marked as 'Constant,' 'Fixed,' or 'Select.' If they are not marked as such, they are probably variable outputs (see "About Variable-Level Audio Outputs" below). Outputs from VCRs are almost always fixed.
Hint: When connecting to the audio outputs of a VCR, remember that the VCR must be playing a tape or showing a TV channel for sound to be produced.
About Variable-Level Audio Outputs:
A variable-level output, such as a headphone jack or certain line audio outputs, provides an audio signal that changes with the volume level set on the audio source. As the volume of the audio source is adjusted up and down, so does the audio signal strength sent to the transmitter. This can affect the quality of sound generated by the headphones, and may require an adjustment of the volume level of the audio source to produce a signal strong enough for the transmitter.
Hint: On most bookshelf-type or compact stereo systems, inserting a headphone plug into the headphone jack results in automatic cut-off of the regular, or hard-wired speakers.
Hint: Most TVs, regardless of age or price, have variable outputs. If you are unsure which of your TV audio outputs is fixed, refer to the TV instruction manual. Some TVs have outputs that can switch between variable and fixed. When given a choice, fixed is always recommended.
Troubleshooting
The following troubleshooting guide takes you through some of the more common problems associated with the installation and/or operation of these wireless headphones. If the problem persists, please call 1-800-732-6866 and a knowledgeable customer service representative will assist you.
| issue cause and solution | |
| No Sound | Check that the transmitter AC power adapter (O) is fully inserted into the wall outlet and the power cord from the AC adapter is firmly connected to the transmitter power input jack (N). |
| Confirm that the headphones are turned ON and tuned to the transmitter — the amber LINK indicator light should be glowing steadily. | |
| Confirm that the mute function is off by pressing the MUTE button (F) on and off. The MUTE indicator light (G) should be turned off. | |
| Check that the AAA batteries are fresh and inserted with correct polarity (+, -). | |
| Check that the audio source component (stereo, TV, etc.) is turned on and transmitting sound as it normally should. | |
| Check that the headphones volume is turned up (H). | |
| If you are using a Tape 2 Monitor output from your receiver/amp as the audio output, check that you have pressed the Tape Monitor/Tape 2 button on the front of the receiver. This will turn on the Tape 2 outputs, which may not have been active. | |
| No Sound/ Distortion/Static | Check that the audio level indicator light (J) is flickering intermittently. If the light is not intermittent and you know you are using a fixed level audio source, play music on your audio source while adjusting the input level control on the back of the transmitter. Adjust the level control until the light begins to blink intermittently again. OR |
| If the transmitter is connected to a variable output, make sure the input level control (L) is turned up (all the way to the right — your right when looking at the front of the transmitter), and adjust the volume on the audio source up or down as necessary to make the light flicker intermittently. | |
| Change the position of the channel select switch (K) to change the operating frequency. The headphones will detect the loss of signal and retune automatically. However, you can also press the ON/OFF/SCAN button once to make the headphones retune. | |
| Change the location of the transmitter. Place it as high and away from obstructions as possible. Avoid placing the transmitter directly on top of or behind a TV. | |
| Move the transmitter and headphones closer together. Sending the signal through certain materials, such as glass, tile, and metal, can decrease the effective transmitting distance of the system. | |
Specifications & Features
Transmitter
- Omni-directional
- Effective transmitting range: up to 150 feet*
- Adjustable audio level input
- 3 selectable broadcast frequencies (between 912.5 and 914.5 MHz)
- Line-level, stereo audio input with RCA inputs (3.5mm Y-adapter cable included)
- UL-listed AC power adapter
Headphones
- Push-button, auto-lock tuning
Volume control - 40 mm Mylar® driver elements
Frequency response: 30Hz - 20kHz - Signal-to-noise ratio > 55dB
- Stereo separation > 20dB
Distortion: < 1.5%
Maximum range; results may vary according to environment. - This device complies with part 15 of the FCC rules. Operation is subject to the following two conditions: 1) this device may not cause harmful interference; and 2) this device must accept any interference received, including interference that may cause undesired operation.
- Changes or modifications not expressly approved by the party responsible for compliance could void the users authority to operate the equipment.
- Features and specifications subject to change without notice.
Warranty
Altec Lansing Technologies, Inc. One Year Limited Warranty
(Two-Year Limited Warranty In The European Union and Asia)
What Does The Warranty Cover?: Altec Lansing warrants that its products shall be free from defects in materials or workmanship, with the exceptions stated below.
What Is The Period Of Coverage?: For units purchased in European Union or Asia, this warranty runs for two years from the date of purchase. For units not purchased in Europe or Asia, this warranty runs for one year from the date of purchase. The term of any warranties implied by law shall expire when your limited warranty expires. Some states and/or Member States in the European Union do not allow limitations on how long an implied warranty lasts, so the above limitation may not apply to you.
What Does The Warranty Not Cover?: This warranty does not cover any defect, malfunction or failure that occurs as a result of: improper installation; misuse or failure to follow the product directions; abuse; or use with improper, unintended or faulty equipment. (For information on proper installation, operation and use consult the manual supplied with the product. If you require a replacement manual, you may download a manual from www.alteclansing.com.) Also, consequential and incidental damages are not recoverable under this warranty. Some states do not allow the exclusion or limitation of incidental or consequential damages, so the above limitation or exclusion may not apply to you.
What Will Altec Lansing Do To Correct The Problem?: Altec Lansing will, at its option, repair or replace any product that proves to be defective in material or workmanship. If your product is no longer being manufactured, or is out of stock, at its option, Altec Lansing may replace your product with a similar or better Altec Lansing product.
How To Get Warranty Service: To get a covered product repaired or replaced, you must contact Altec Lansing during the warranty period by email (csupport@alteclansing.com). You must include in your email, your name, address, email address, telephone number, date of purchase and a complete description of the problem you are experiencing. In the United States, you may alternatively contact Altec Lansing by telephone at 1-800-ALTEC88 — please be prepared to provide the same information. If the problem appears to be related to a defect in material or workmanship, Altec Lansing will provide you a return authorization and instructions for return shipment. Return shipments shall be at the customer's expense, and the return must be accompanied by the original proof of purchase. You should insure the shipment as appropriate because you are responsible for the product until it arrives at Altec Lansing.
How Will State Law Affect Your Rights?: This warranty gives you specific legal rights, and you may also have other rights which vary from state to state. Please note that in the European Union, you as a consumer might have other legal rights under national legislation of European Union Member States governing the sale of Altec Lansing's goods. Those rights are not affected by this guarantee.
The above limited warranties and remedies are sole warranties and remedies available to purchaser, if, and to the extent, valid and enforceable under the applicable law.
CustomerService
The answers to most setup and performance questions can be found in the Troubleshooting guide. You can also consult the FAQs in the customer support section of our Web site at www.alteclansing.com. If you live in North America and still can't find the information you need, please call our customer service team for assistance before returning the speakers to your retailer under their return policy.
Tel: 800-258-3288
Email: csupport@alteclansing.com
If you live outside of North America, please visit our website at www.alteclansing.com and select your region to locate your country's distributor.
For the most up-to-date information, be sure to check our Web site at www.alteclansing.com.
International customers: For information regarding the distribution of Altec Lansing products in your country, please visit www.alteclansing.com and click on your region.
CASQUE STÉRÉO SANS FIL AH P612 ALTEC LANSING
Contenu delemballage
For exciting offers, register today at:
Eu rope 13 Rue Beaumont, L-1219 Luxembourg, Luxembourg Asia/Pacific 25 Canton Road, Tsim Sha Tsui, Kowloon, Hong Kong
Engineered in USA. Made in China