DC-8600 - Printer Dascom - Free user manual and instructions
Find the device manual for free DC-8600 Dascom in PDF.

| Brand | Dascom |
| Model | DC-8600 |
| Product type | Dot matrix printer |
| Dimensions (W x D x H) | Approx. 400 x 300 x 200 mm |
| Weight | Approx. 6.5 kg |
| Power supply | 230 V AC, 50/60 Hz |
| Print speed | Up to 400 characters per second (CPS) |
| Print resolution | 180 x 180 dpi (maximum) |
| Number of pins | 9 or 24 pins (depending on version) |
| Maximum paper width | Up to 420 mm (continuous form) |
| Number of copies | Original + 5 copies (6 copies) |
| Connection interface | Parallel port (Centronics) and RS-232C serial port |
| Compatible software | EPSON LQ-1600K, IBM ProPrinter |
| Maintenance and cleaning | Clean the exterior with a dry, soft cloth. Do not use solvents or liquids. Clean the platen and paper path with an anti-static brush. |
| Safety | Unplug the printer before any maintenance. Do not touch the print head immediately after use (risk of burns). Do not expose to moisture or liquids. |
| Spare parts and repairability | Ink ribbon, print head, paper guide, power cable, and data cable. For repairs, contact authorized after-sales service. |
Frequently Asked Questions - DC-8600 Dascom
User questions about DC-8600 Dascom
0 question about this device. Answer the ones you know or ask your own.
Ask a new question about this device
Download the instructions for your Printer in PDF format for free! Find your manual DC-8600 - Dascom and take your electronic device back in hand. On this page are published all the documents necessary for the use of your device. DC-8600 by Dascom.
USER MANUAL DC-8600 Dascom
Important Safety Instructions (English)
Read the following instructions thoroughly before starting up your printer.
- Never carry out maintenance or repair work yourself. Always contact a qualified service technician.
- Keep this Operator's Manual in a place which is easily accessible at all times.
- Place the printer on a solid and even base so that it cannot fall.
- Never place the printer in the vicinity of inflammable gas or explosive substances.
- Ensure the printer is connected to a socket with the correct mains voltage.
- Always disconnect the printer from the mains before opening the device to perform maintenance work or remedy errors.
- Do not expose the printer to high temperatures, direct sunlight or dust.
- Keep all liquids away from the printer.
- Protect the printer from shock, impact and vibration.
- Make sure that both of the printer and the computer are switched off before connecting the data cable.
- The print head will become very hot during printing; avoid contact with the print head after printing has finished.
- Do not perform any operation or action in any way other than those provided in this manual. When in doubt, contact your Dascom dealer or your customer support.
"IBM" is a trademark of International Business Machines Corporation.
"EPSON" is a trademark of Epson America Incorporated.
"DEC" is a trademark of Digital Equipment Corporation.
"Centronics" is a trademark of Centronics Data Computer Corporation.
"DOS" is a trademark of Microsoft Corporation.
"SAP" is a trademark of SAP AG.
"Windows", "Windows 7", "Windows 8", "Windows 95", "Windows 98", "Windows NT", "Windows 2000", "Windows 2003/2008/2012/2012R2 Server", "Windows XP" and "Windows Vista" are trademarks of Microsoft Corporation.
All other product names and company names appearing in this manual are the registered trademarks or trademarks of their respective holders.
Approvals

This device fulfils the European standards requirements by complying with the Directive relating to electromagnetic compatibility and relating to low-voltage electrical equipment. Furthermore, it fulfils the requirements for RoHS and RED if applicable.
Conformity with the above-mentioned Directives is indicated by the CE symbol attached to the device.
Note: Conformity may be affected by:
- using interface cables not complying with the specifications
- non-observation of important instructions in the operator's manual
- installing components not approved for this device by the manufacturer
- unauthorized manipulation

This device complies with the requirements of the United Kingdom (UK) legislation of Electrical Safety Regulations, Electromagnetic Compatibility Regulations, if applicable the Radio Regulations and the Restriction of the Hazardous Substances in Electrical and Electronic Equipment Regulations.
About This Manual
This manual provides information to operators of DC-8600 to describe basic operation to enable safe and correct use of the printer.
Symbol Description
The symbols in this manual are identified by their level of importance, as defined below. Read the following carefully before handling the product.

CAUTION: Provides information that must be observed to prevent damage to the equipment or loss of data.

NOTE: Advises you of information that is essential to complete a task.
Related Software and Documents
Related Software and Documents
| Software/document name | Description |
| DC-8600 User Manual | This manual. |
| DC-8600 Maintenance Manual | This manual provides qualified developer/ engineers / technicians with additional technical information. |
TABLE OF CONTENTS
CHAPTER 1. INTRODUCTION
1.1 Unpacking 1
1.2 Operating the Printer Safely 4
1.3 Printer Components 7
1.3.1 The front side of the printer 7
1.3.2 The profile of printer 9
1.3.3 The rear side of the printer 10
1.3.4 Control Panel 11
1.4 Attaching Power 12
1.5 Connecting to Computer 13
1.6 Installing Driver 14
1.6.1 Installing Windows Driver 14
1.6.2 Installing OSx Driver 23
CHAPTER 2. INSTALLATION 31
2.1 Installing Cards 31
2.1.1 Card Specifications 31
2.1.2 Setting the Card Thickness 32
2.1.3 Adjust the card inlet according to the thickness of the cards 34
2.1.4 Face Up/Down Stacking for Output Cards 35
2.1.5 Optimizing Print Quality 35
2.1.6 Managing Rejected Cards 36
2.1.7 200 Cards Hopper Cassette (optional) 37
2.2 Replacing the Ribbon 39
2.3 Replacing the Retransfer Film 42
2.4 Replacing the Cleaning Roller 46
2.5 Installing the Output Tray 49
2.6 Installing the Reject Bin 49
2.7 Card Printing 50
2.7.1 Using Card Editor 50
2.7.2 Using Driver 53
2.8 Firmware update 61
CHAPTER 3. NORMAL MODE AND USER MODE 63
3.1 Normal Mode 63
3.2 Printer Setup 64
3.3 The major menus 66
3.3.1 Local info 66
3.3.2 Basic mode 67
3.3.3 Advanced mode 70
3.3.4 Maintenance mode 70
CHATPER 4. CLEANING 71
4.1 Cleaning with a Cleaning Card 71
4.2 Cleaning the Cleaning Roller 72
4.3 Cleaning the Feeding Roller 72
4.4 Cleaning the Transport Roller 73
CHATPER 5. TROUBLESHOOTING 74
5.1 Warning Messages and Troubleshooting 74
5.2 Valuable Help from You for Troubleshooting 76
5.3 Troubleshooting 77
5.3.1 Faults Related to Printing 77
5.3.2 Clear Jammed Card 80
5.3.3 Change the Print Head 81
5.4 Technical support 82
5.4.1 DASCOM partner network 82
5.4.2 More information 82
CHAPTER 6. SPECIFICATION 83
Appendix I: FCC STATEMENT 84
Appendix II: DASCOM REPRESENTATIVES 85
CHAPTER 1. INTRODUCTION
Thank you for choosing Dascom® DC-8600 card printer. You can print high-quality cards of different colors and styles with this printer. The printer should use the consumables and accessories provided by Dascom. For more details, please visit our website www.DASCOM.COM.
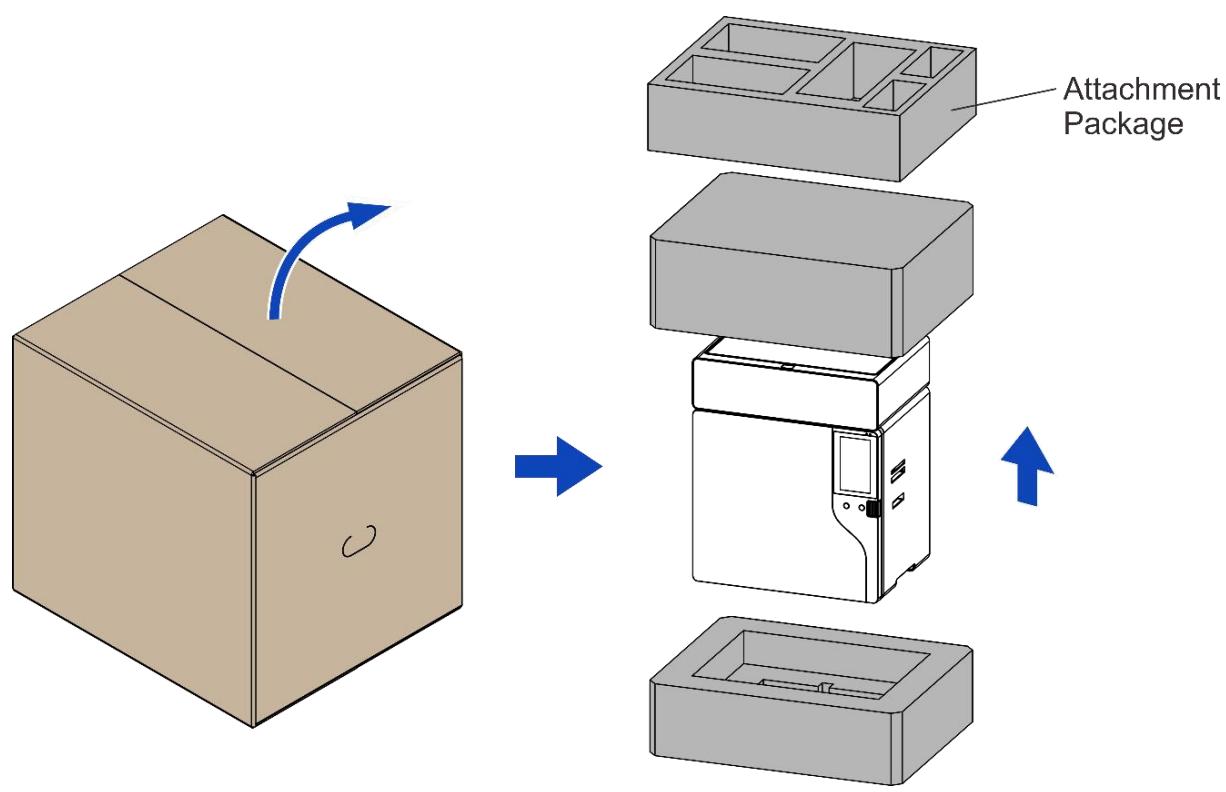
1.1 Unpacking
Open the package, take out the printer and remove the protect material. Check if the parts and accessories in the box are complete as the following picture. If you found any damage, please contact the carrier and notify your authorized Dascom reseller to realize the steps to be taken.

When repairing the printer, you must provide the complete original package (outer crate, wedge and package). If send back the printer without original package, or the accessories are damaged in transit, the warranty of accessories will be invalid. The new packing charge for the printer will be charged by yourself.
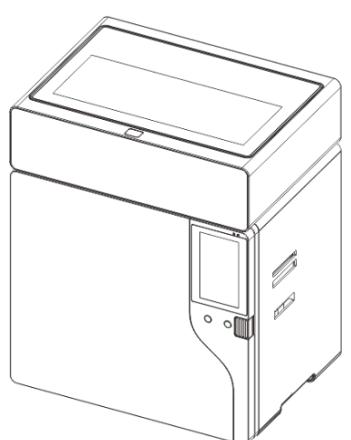
Printer

CD-ROM
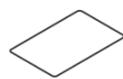
Cleaning Card
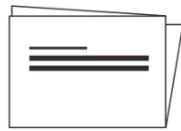
Installation Guide
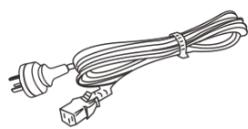
Power Cord
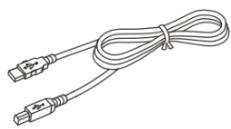
USB Cable

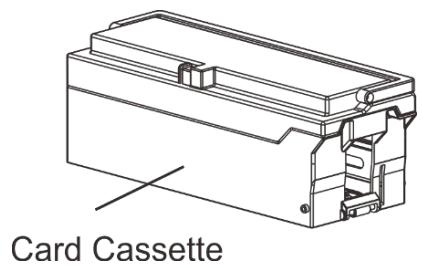
Card Cassette
Output Tray
Reject Bin
Cassette(Optional) *
*The optional 200 Cards Hopper Cassette is only available as/with a separate model!

The package contents vary with different customized order requirements.
Package Contents:
| Standard | Printer | 1 unit | |
| Card cassette | 1 unit | ||
| Reject bin | 1 piece | ||
| Output tray | 1 piece | ||
| Power cord | 1 piece | ||
| USB cable | 1 piece | ||
| Cleaning Card | 1 piece | ||
| Graphic Installation Guide | 1 piece | ||
| CD-ROM | 1 piece | Includes Driver, CardEditor software, User manual |
Remove the packaging
Remove protective material as shown below before the printer power on.
(1) Pinch the box locker, loosen and remove it (2 in front, 2 in the back, 4 in total)
(2) Hold the handles on both sides of the box and then pull up the box.
1.2 Operating the Printer Safely
The following precautions must be observed to assure safe operation of your printer. Do not do anything that is not described in this manual. Doing so could cause an unexpected failure. The manufacturer is not responsible for any problems caused by incorrect operation of the printer.
| Installation location | Do not install the printer in a damp or dusty location. |
| Do not install the printer near flammable or explosive materials or a heater, stove or any other device that produces heat. Do not place the printer near volatile combustible materials such as combustible materials. | |
| Place the printer away from walls, as shown in the diagram below, to maintain air flow. Also, maintain at least 30 cm (12 inches) of open space above the printer. Blocking vents may cause the printer to overheat and fail prematurely. | |
| Do not install printer on an unstable table, on a slant, or any place where there is excessive vibration. | |
| Do not install the printer in a location susceptible to rapid fluctuations in temperature. | |
| Do not install the printer in a location exposed to direct sunlight. | |
| Power supply | Use a dedicated power cable and do not use an extension cord with multiple outlets. |
| Be sure to remove any dust from the plug and electrical outlet. Humidity produces a micro-current on the surface causing overheating. | |
| Do not damage or modify the Power Cable. Also, do not place heavy objects, pull, or bend power cord excessively. | |
| Do not plug in or unplug the Power Cable if your hands are wet. | |
| Ensure a ground wire is connected. When connecting the ground wire, note the following cautions. Recommended connections for ground wires Electrical outlet ground terminal Ground terminals installed as type A, B, or C A copper rod 65 cm (25.6 inches) or longer buried in the ground. Not permitted for ground wires Gas piping (risk of fire or explosion) Water pipes or taps (water pipes that include plastic piping cannot act as a ground However, if a water pipe is configured to act as a ground, then connection of a ground wire is permitted.) Telephone line ground wires or lightning conductors (danger of high current flow in the event of a lightning strike.) | |
| Be sure to turn off power and unplug the plug from electrical outlet before moving the printer. | |
| Pull on the plug or cable when unplugging it from an electrical outlet. | |
| Do not use an under-rated extension cord. | |
| Handling | Do not use flammable sprays near the printer. |
| Do not touch anything inside the printer unless specified in this manual. | |
| Do not place heavy items on the printer and do not lean on the printer. | |
| While the printer is operating, do not turn off the power, unplug the power cable, or look inside (open) the printer. |

WARNING
The lower part of the Top Access Cover, the printer internal heat roller section, and the thermal head section become very hot. Ensure you do not touch these three locations.

- The cooling fan is always running for cooling inside the printer. This is not a malfunction.
- Contact your reseller if there is a current leak.
- The printer may cause static, flickering or interrupt reception of televisions or radios if they are too close to the printer.
- The lower part of cover top, internal heating platen and printer head may produce high temperature, please don’t touch these three parts.

Under the following conditions images on cards may deteriorate or cards may warp after printing:
- The surface of the card is in contact for an extended period with a vinyl card holder or synthetic leather or other material that contains a plasticizer.
- The surface of the card is exposed to direct sunlight for an extended period.
- The card is repeatedly rubbed against a hard object such as a key.
- The faces of two cards are in contact for an extended period.
- The card is kept for an extended period in a very hot location such as a car parked in the sun.
The card is bent, or used with excessive force.
If a card with a magnetic strip is placed near a magnetic source, the data on the strip could become corrupted.
Additionally, if an IC chip card is bent, or used with excessive force, the IC chip may be damaged.
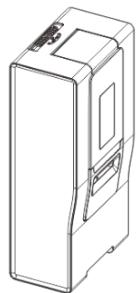
1.3 Printer Components
1.3.1 The front side of the printer
Printer components and their functions are shown as below:
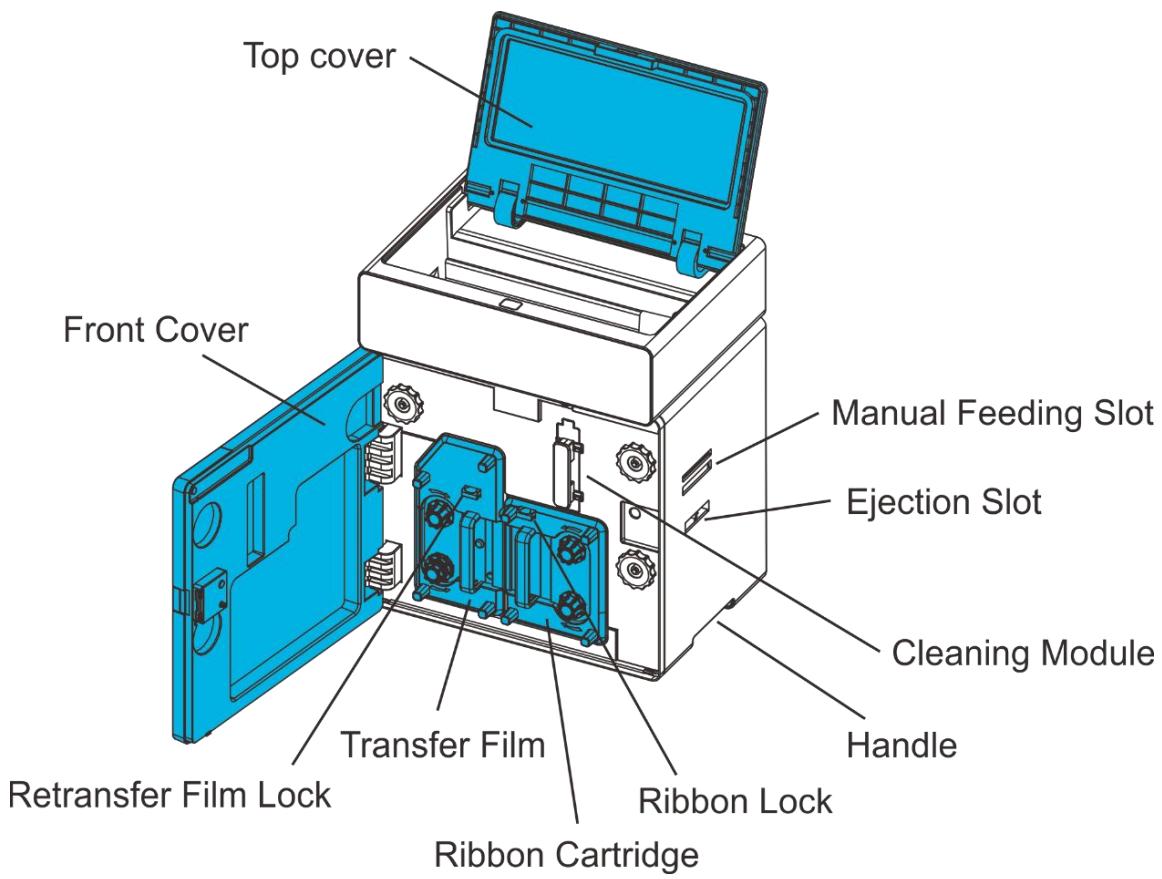
| Component Name | Function |
| Top cover | Open when loading cards or cleaning the feeding roller. |
| Front cover | Open when changing print ribbons and retransfer film, and when cleaning the Cleaning Roller. |
| Retransfer film lock | When loading retransfer film, move the lock switch away from retransfer film cartridge to release. |
| Retransfer film cartridge | Retransfer film. This is where you install retransfer (INTM) film |
| Ribbon cartridge | Ribbon cartridge. This is where you install color print ribbon. |
| Ribbon cartridge lock | When loading ribbon, move the lock switch away from print ribbon cartridge to release. |
| Handle | Move the printer. |
| Cleaning module | Remove when replacing the Cleaning shaft sleeve. |
| Ejection slot | Cards are ejected through this slot. |
| Manual feeding slot | Manually feed cards one at a time, or single-feed. |
1.3.2 The profile of printer
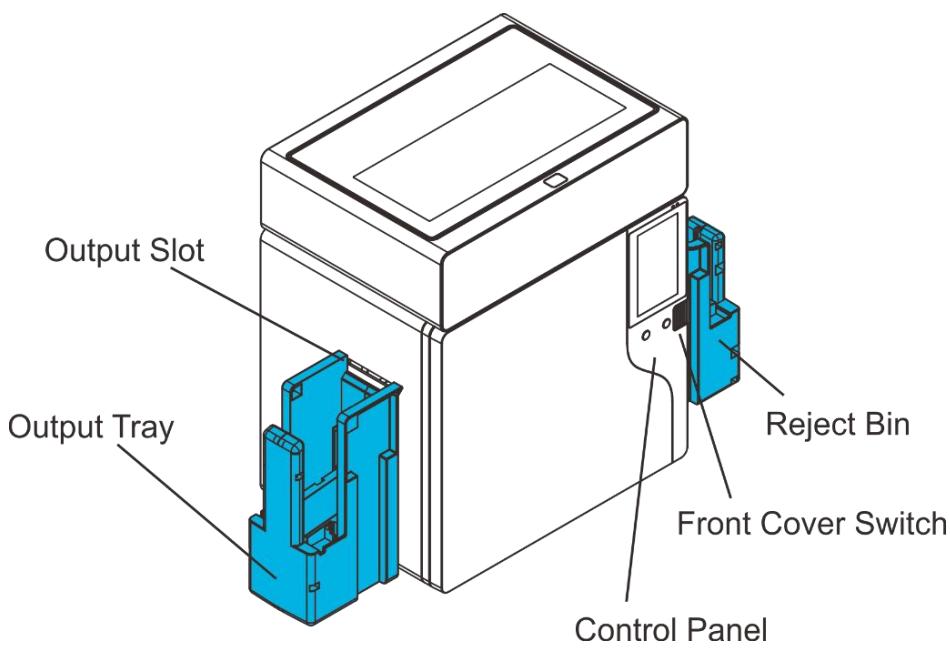
| Component Name | Function |
| Output slot | Ejects correctly printed cards. |
| Output tray | Catches / collects correctly printed cards |
| Reject bin | Cards with errors are placed here |
| Front cover switch | Front Cover opening switch. Press to open the Front Cover. |
| Control panel | Includes the keys, the LCD Panel, and LED indicator for operating the printer. |
1.3.3 The rear side of the printer
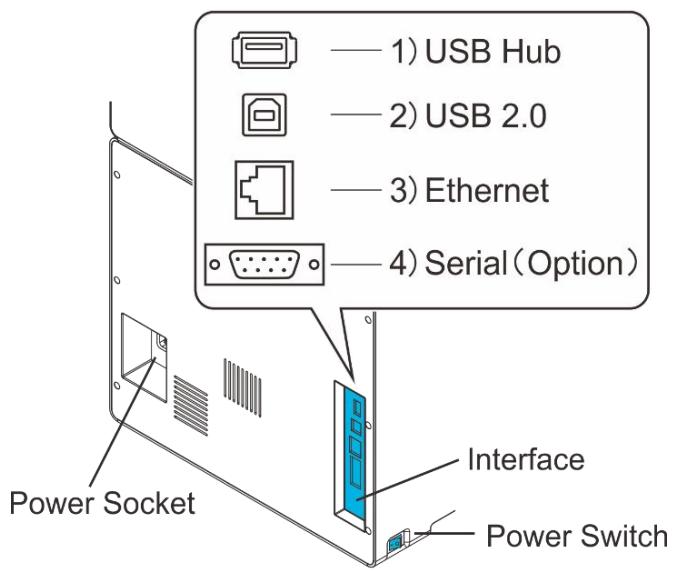
| Component Name | Function |
| Card cassette | Up to 250 0.76mm / 30-mil cards can be loaded at a time. You can adjust the gate gap to match card thickness. Factory default is set so the gap corresponds to feeding of cards of 0.76 mm / 30-mil cards. |
| Interface | USB Hub, USB 2.0 and Ethernet as standard interface, Serial 1 and serial 2 as optional. |
| Power switch | Turns power on and off. |
| Power socket | Used to connect Power Cable. |
1.3.4 Control Panel


Button
There are two buttons.
| Logo | Name | Function |
| Left key | Enter current setup | |
| Right Key | Reset the printer when an error is reported, or perform other specific functions |
Status LED and buzzer
There are two LED lights: blue means ready, red means error;
The combinations of different lights and buzzer mean different status of printer:
| Printer Status | Ready LED (Blue) | Error LED (Red) | buzzer |
| Initiating | Flashes | Flashes | / |
| Heating | |||
| Ready | On | Off | / |
| Menu setup | On | On | / |
| Printing | Flashes | Off | / |
| Warning | Flashes | Flashes | / |
| Error | Off | On | Buzz constantly |
LCD
User can learn status of printer and modify the parameters of printer via the LCD.
1.4 Attaching Power
- Make sure the printer and the computer are powered off.
- Connect the power cord to the printer.
- Connect the power cord to the power socket.
- Ensure the power cord is securely connected. Turn on the printer power button.
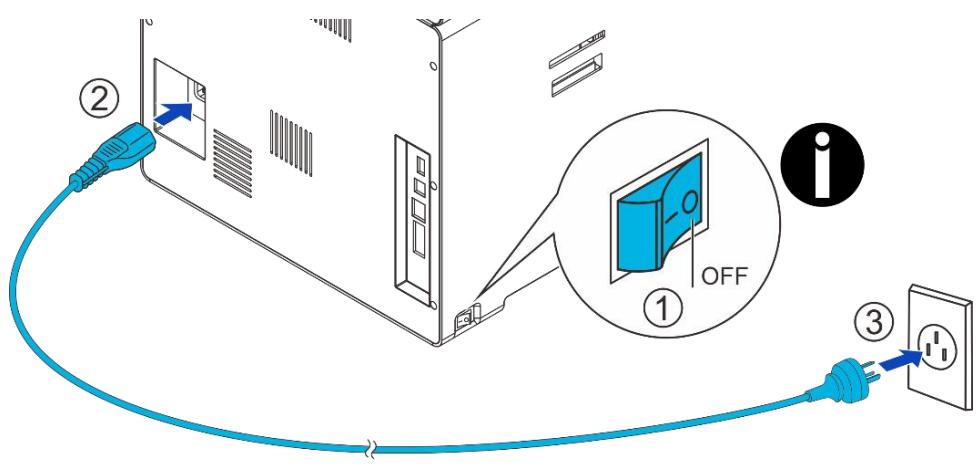
1) Press the power switch: "—", switch on the printer;
2) Press the power switch: "O", switch off the printer.
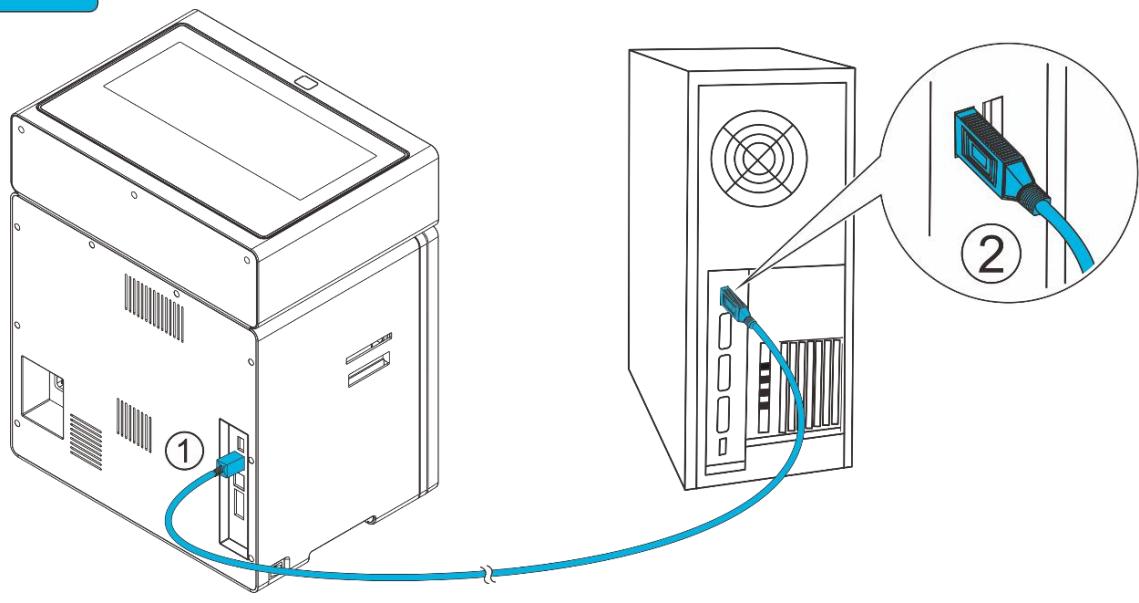
1.5 Connecting to Computer
The standard config ports of this printer are USB port and Ethernet port. All the ports are behind of the printer, please choose the proper port.
- Ensure your printer is switch off.
- Insert the interface cable into the corresponding port.
- Connect the other end of the interface cable to the hostcomputer.
1.6 Installing Driver
The driver is the connection and transformation platform between the card printer and the computer operating system to achieve the interactive processing of the information.
User can set up relevant settings, get print status and etc. via driver. We load the driver on the attached CD.
1.6.1 Installing Windows Driver
The guide steps are operated with Win 10 system.
1.6.1.1 Installing Windows Driver via USB
Connect the USB cable to the computer, put the CD-ROM into the computer, then choose print driver program manual. The program will guide you to finish the whole installation.

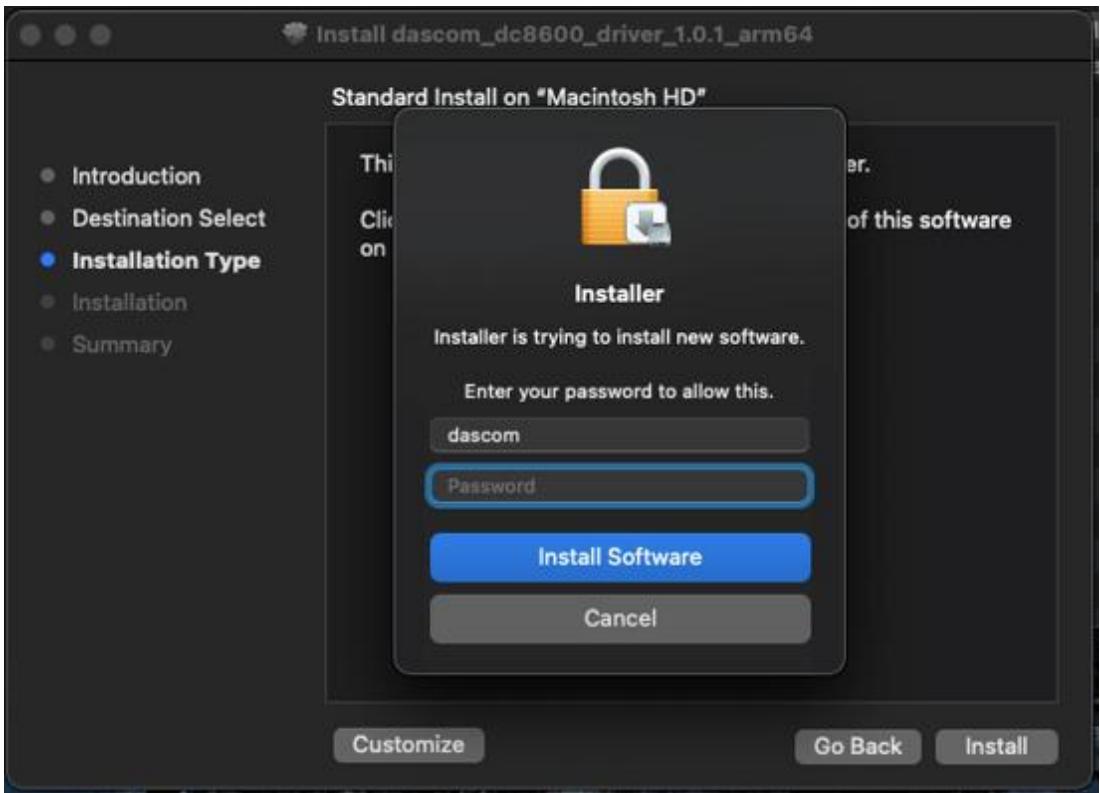
Please follow the installer carefully. Some Windows versions require users to have administrator privileges to install the driver.
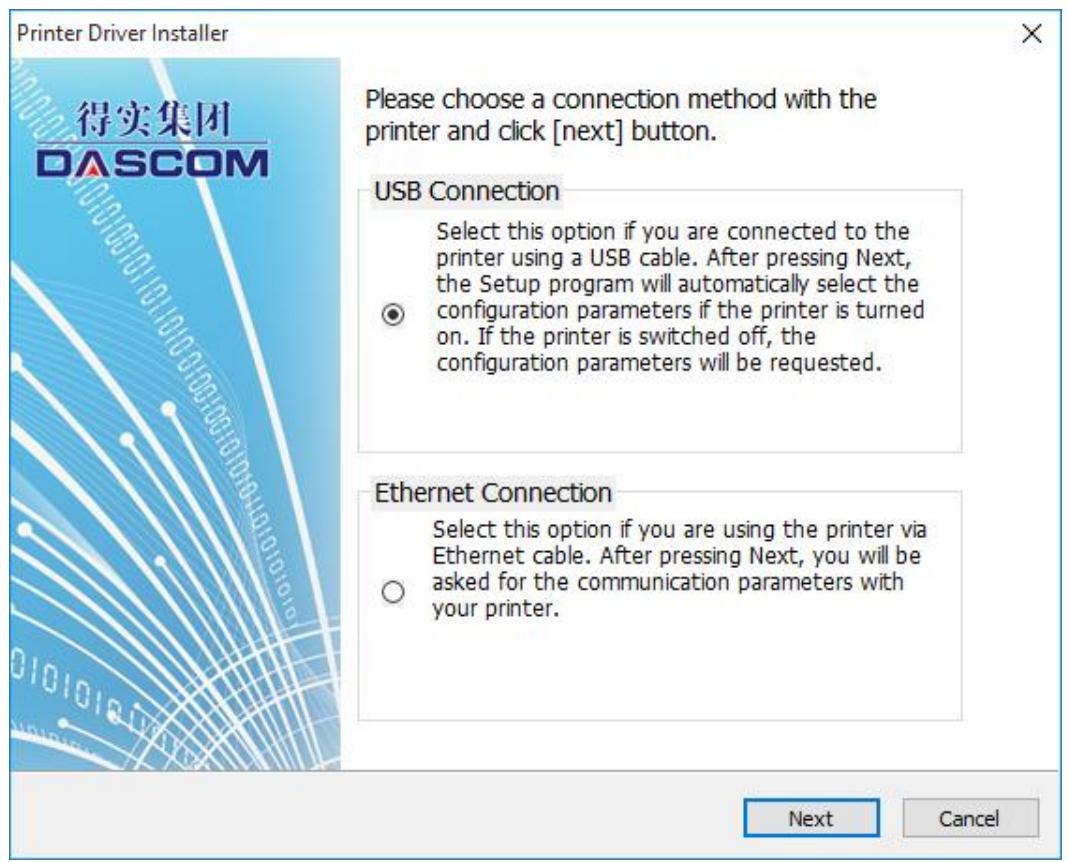
(1) Select USB connection. Click "Next".
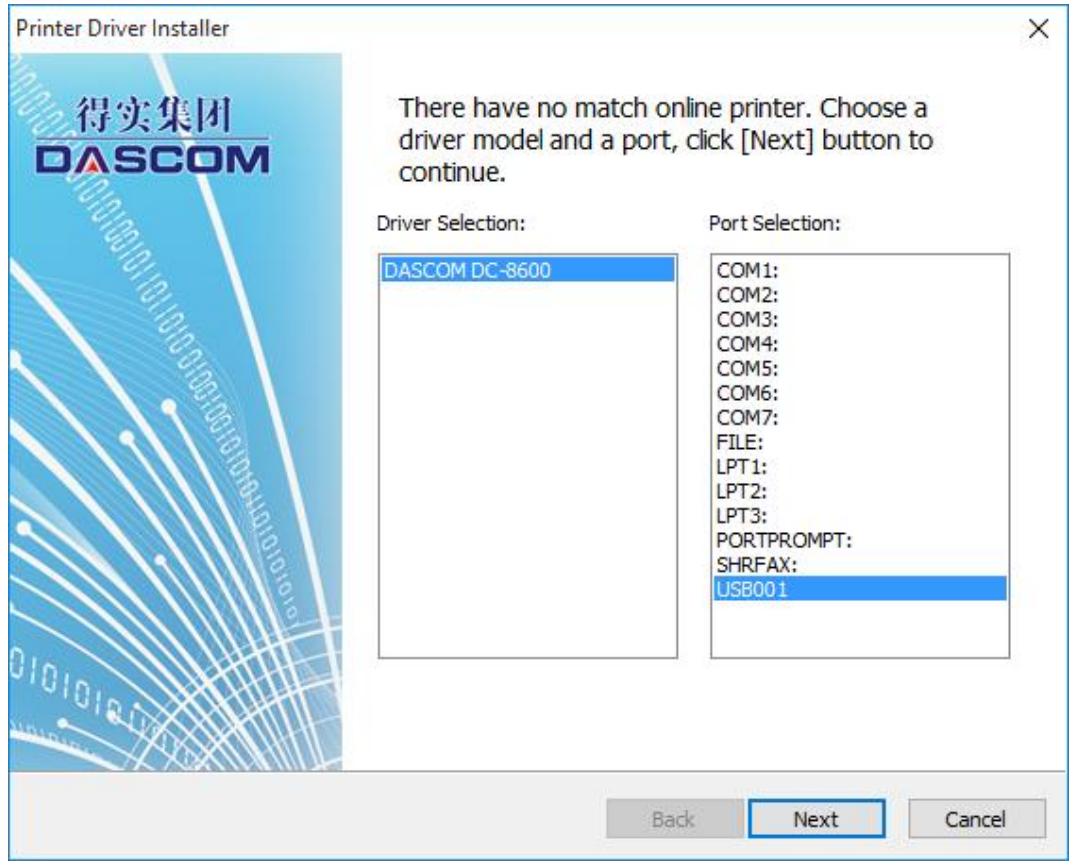
(2) Select the driver selection and port selection, click "Next".
(3) Set up the printer name, click "Start".

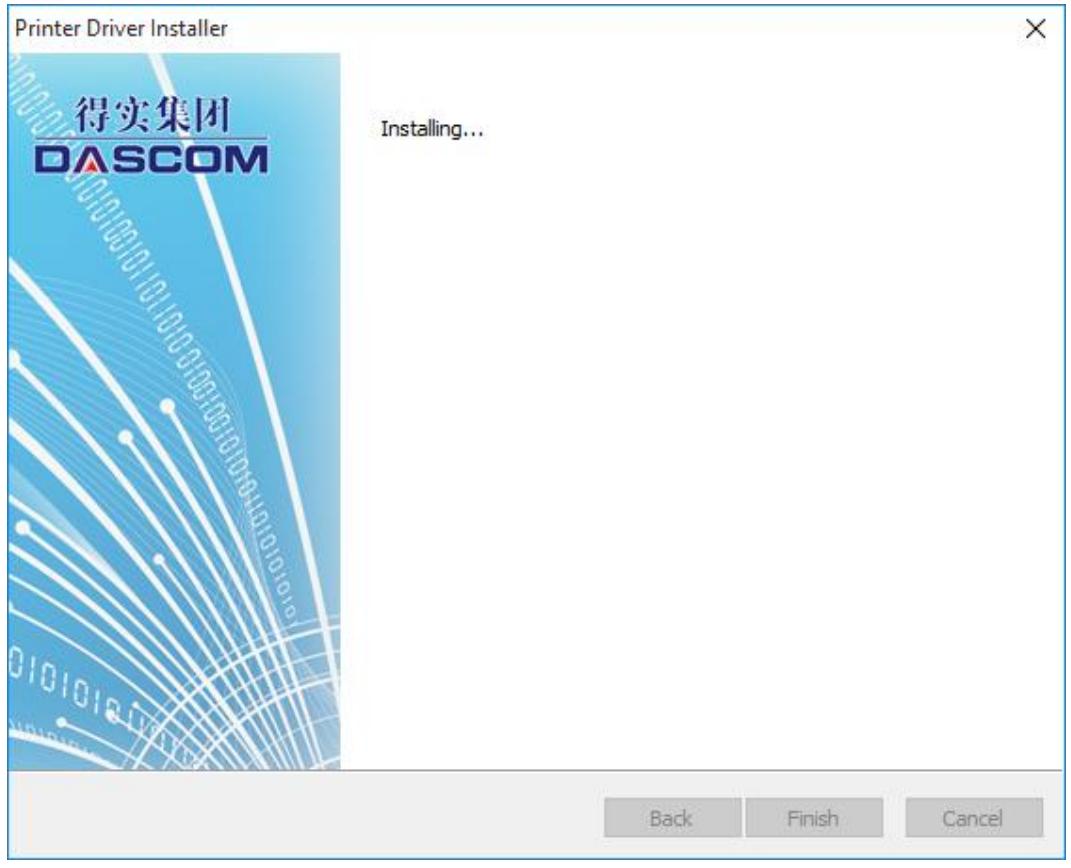
(4) Wait for the installation to finish.
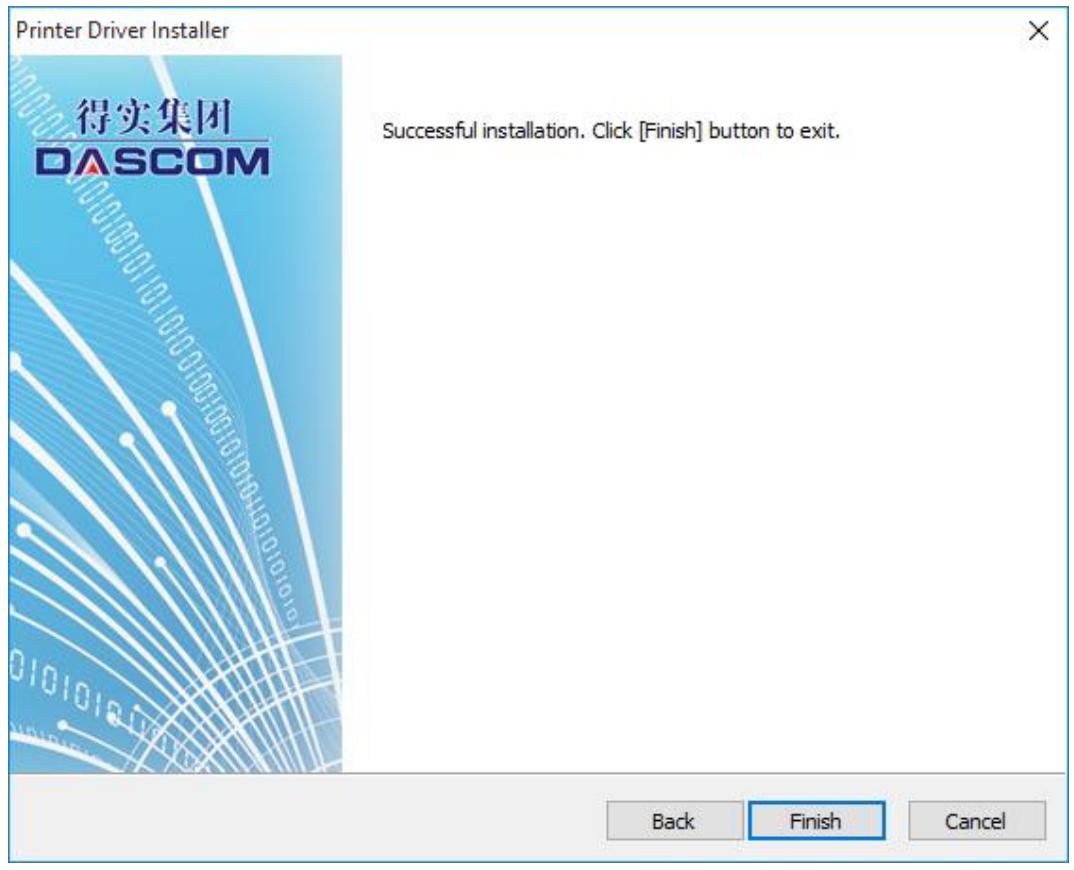
(5) Click the Finish button once the installation ends.

1.6.1.2 Installing Windows Driver via Ethernet
Connect the Ethernet cord to the computer, put the CD-ROM into the computer, then choose print diver program manual. The program will guide you to finish the whole installation.

Ensure the printer and the computer are on the same LAN before installation. Switch on the printer. Please follow the installer carefully. Some Windows versions require users to have administrator privileges to install the driver.
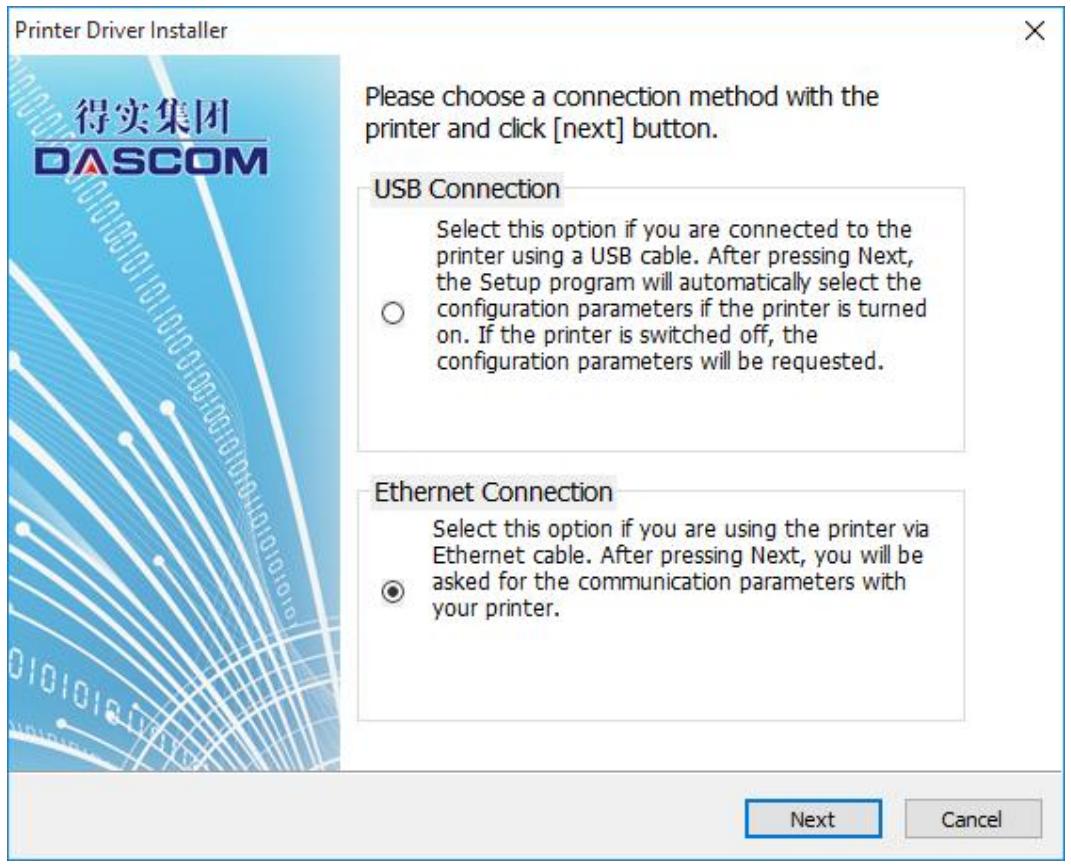
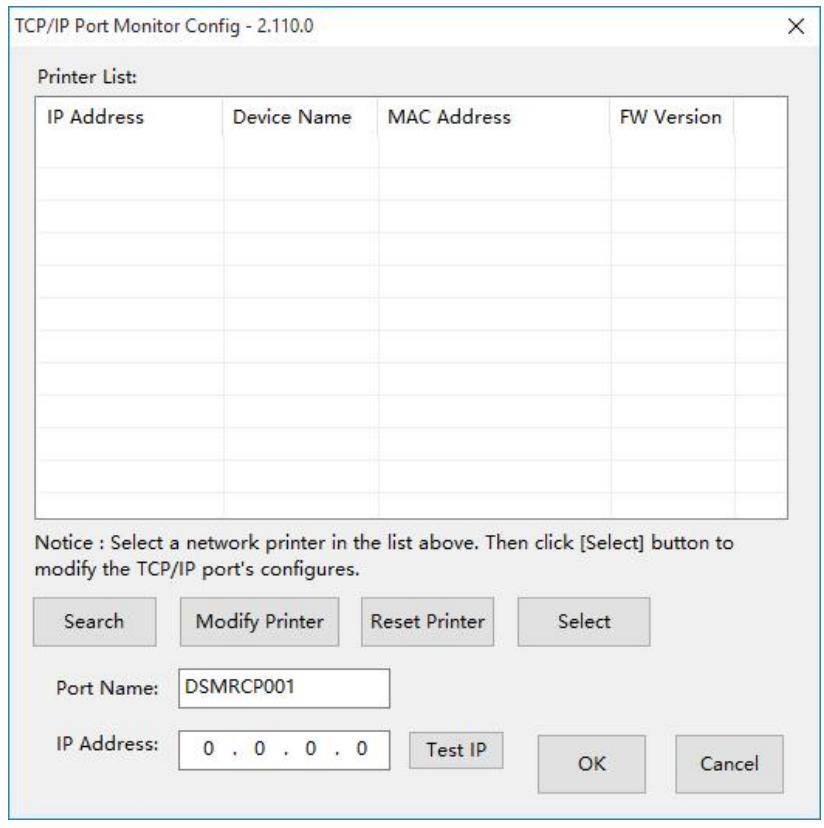
(1) Choose the install port, click "Next".
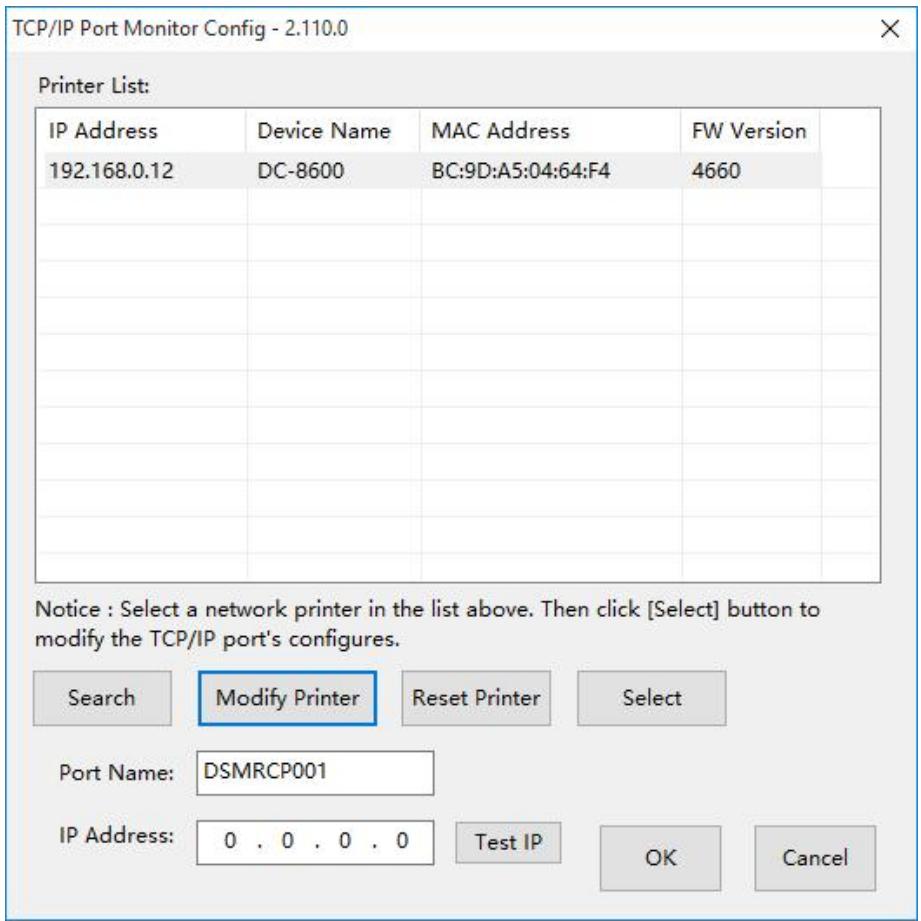
(2) Click Search to locate the printer on your network.
(3) Choose you printer, click "Modify printer".
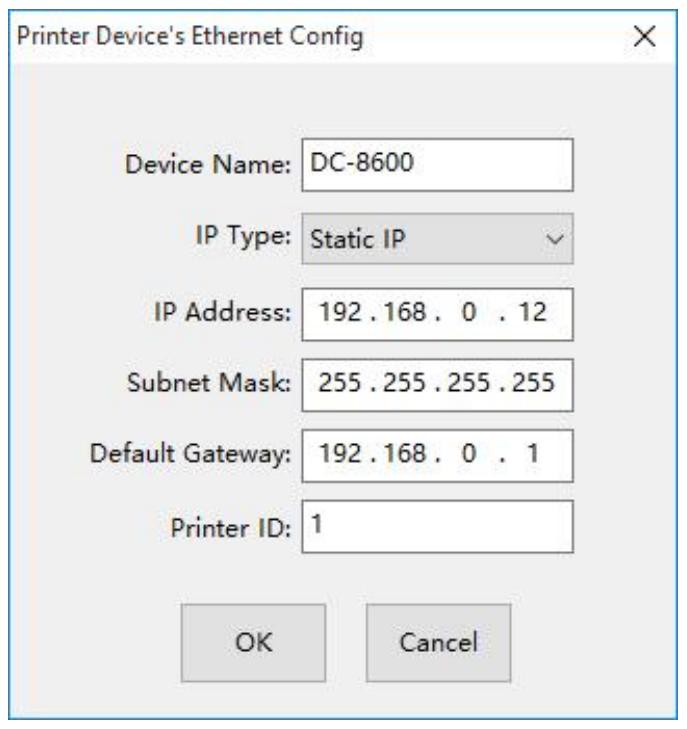
(4) You can modify the Printer name, IP address acquisition mode,IP address, Subnet mask. Click the "OK" when you finish.
(5) Return to the Ethernet port configuration page, wait for a few seconds, you can see the updated Ethernet information.
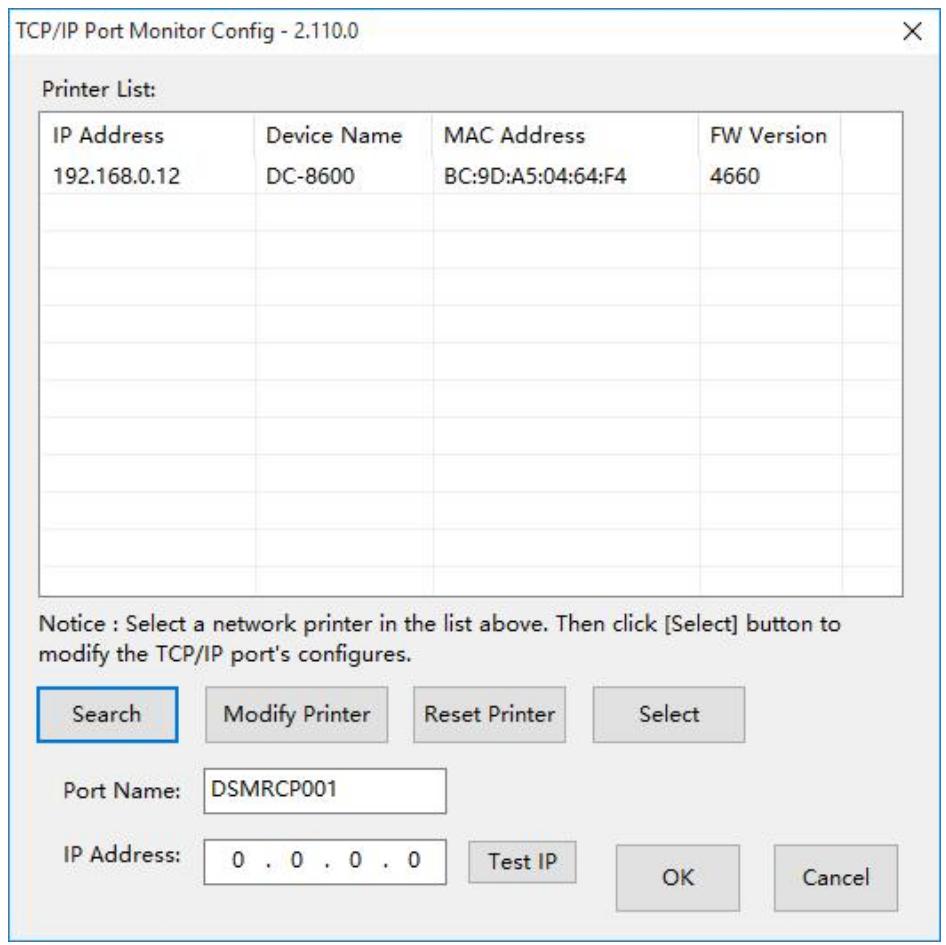
(6) Select you printer, click "Choose", the corresponding IP address information is displayed at the bottom left. Start the installation when you click the "OK".
(7) Select the diver selection and port selection, click "Next".
(8) Set up your printer name, click "Start".
(9) Waiting for the installation.
(10) Finish the installation, click the "Finish".
1.6.2 Installing OSx Driver
1.6.2.1 Installing
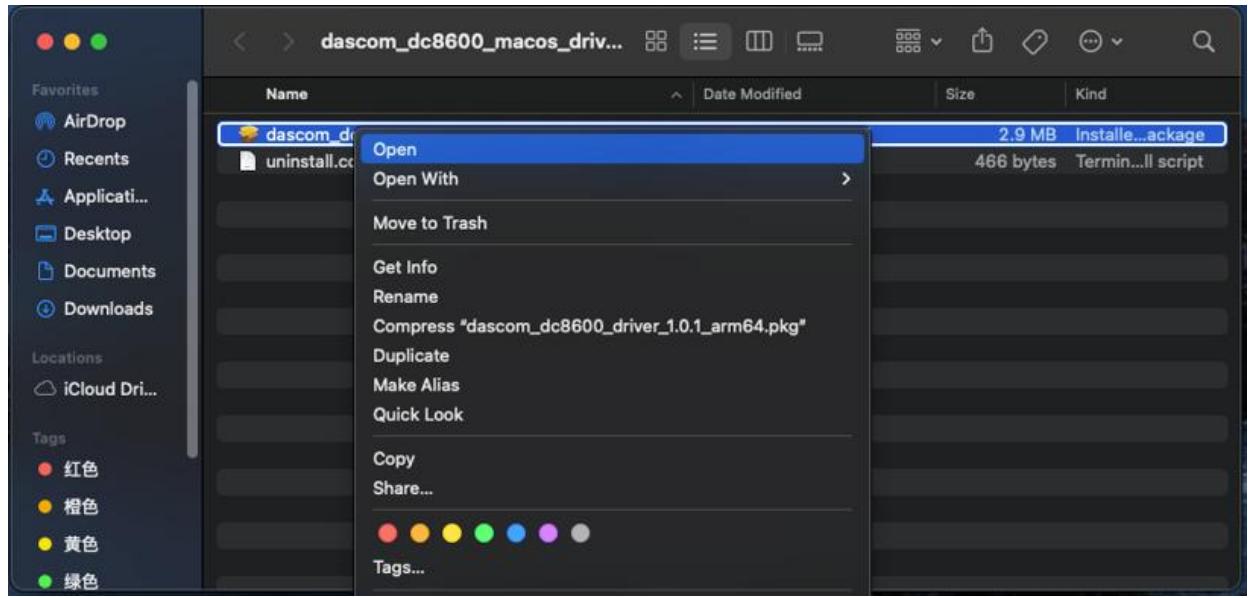
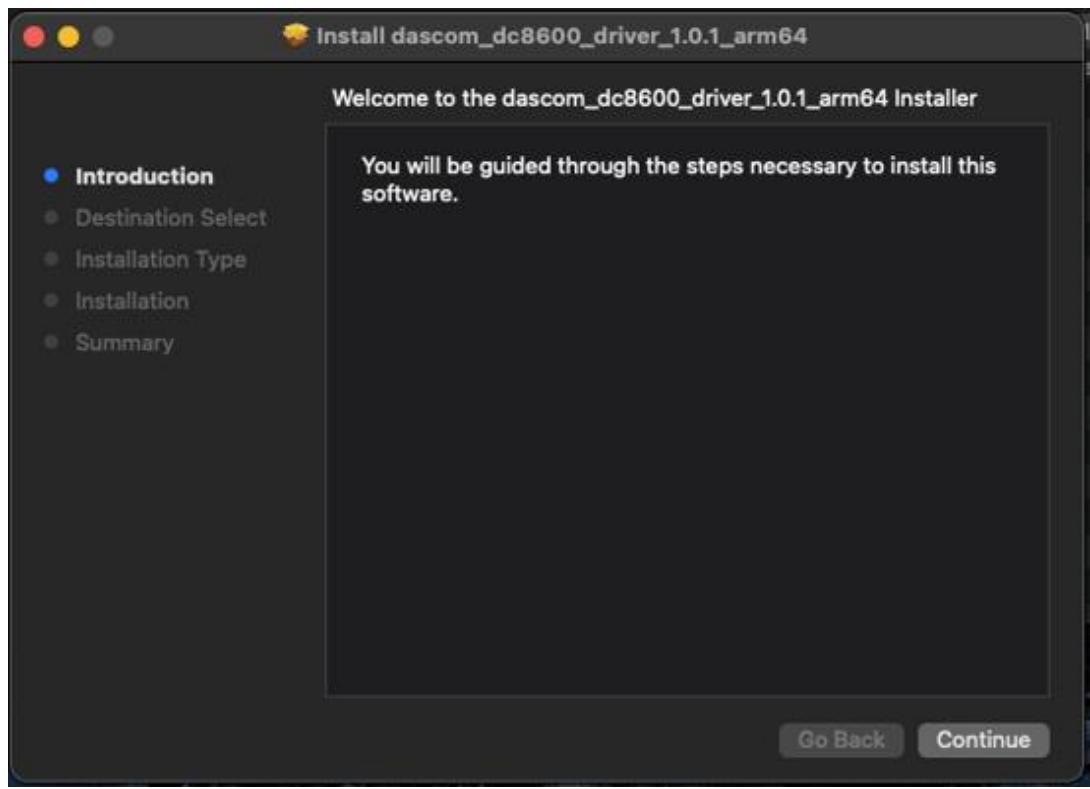
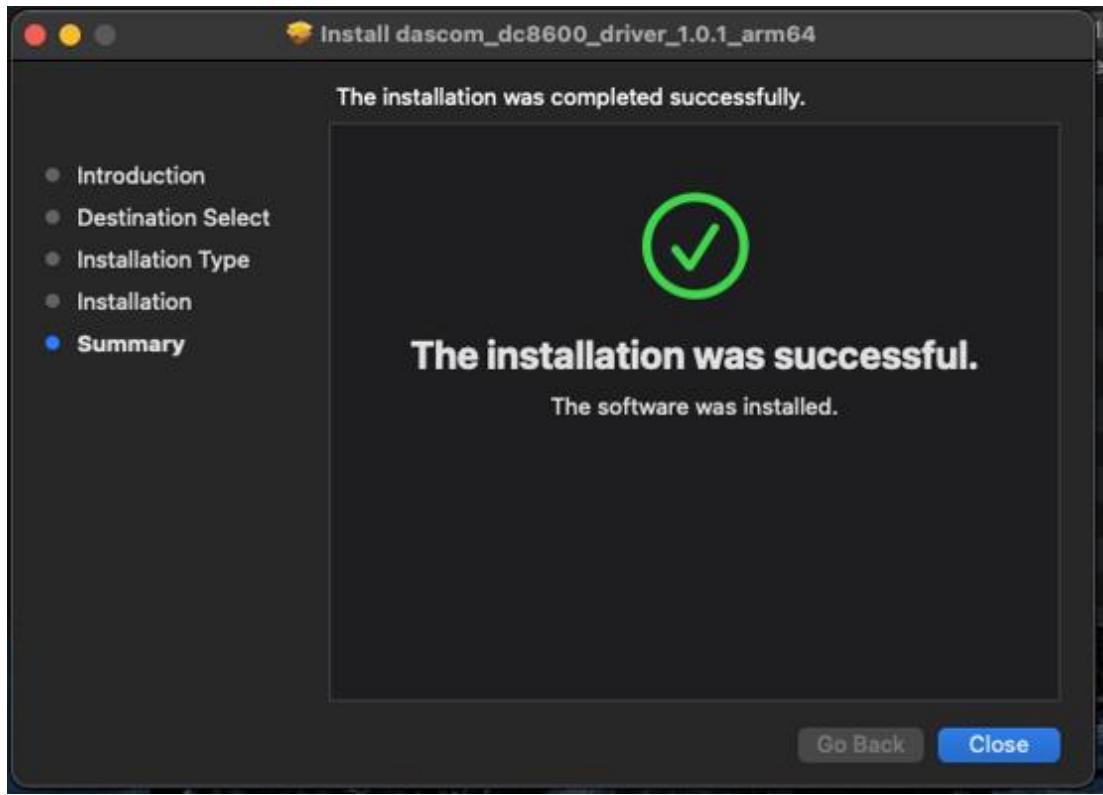
(1) Right click installation package and click "Open"
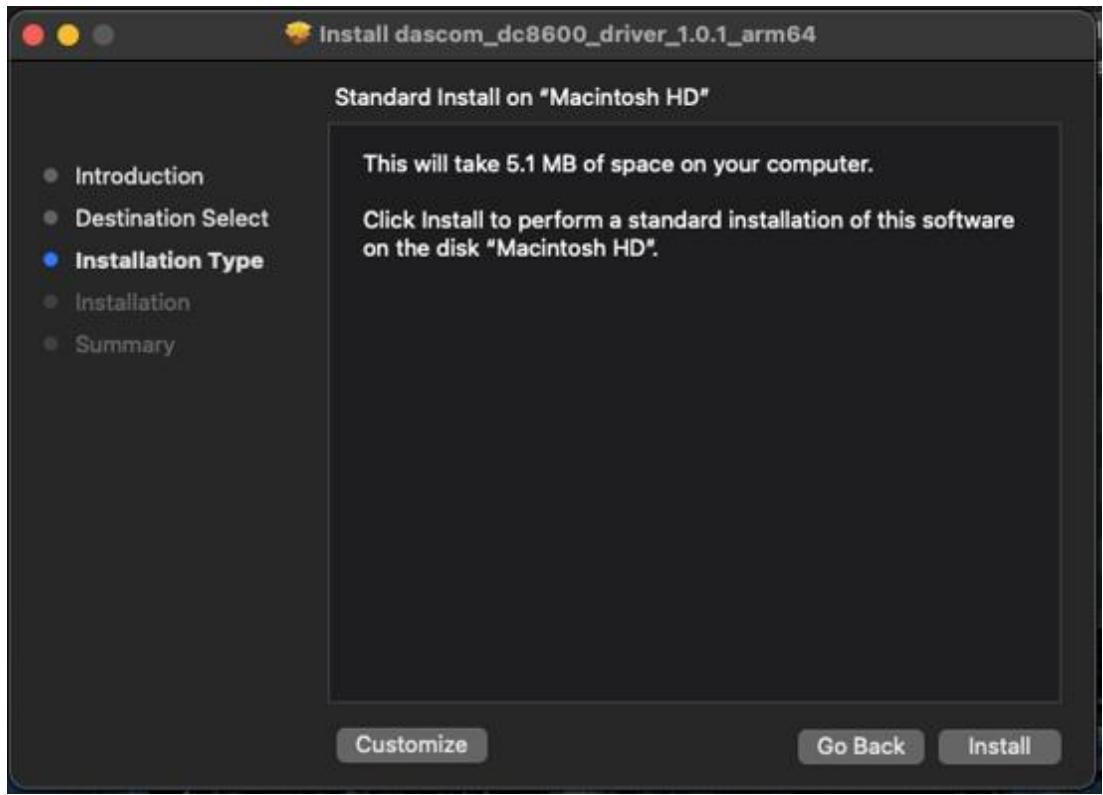
(2) According to the installation waizard to finish installation.
1.6.2.2 Add Driver
A. Manual Addition
(1) Click "Add Printer, Scanner, or Fax..."
(2) Click "Choose a Driver"
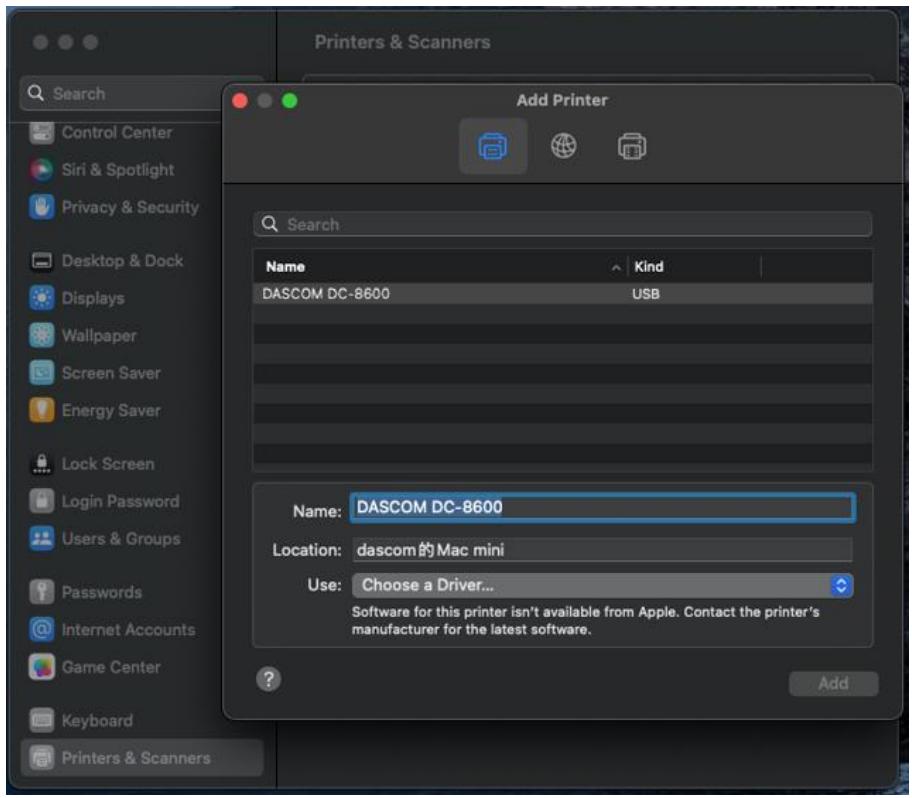
(3) Click "Select Software" in combo box

(4) Choose "DASCOM DC-8600" and click "OK"
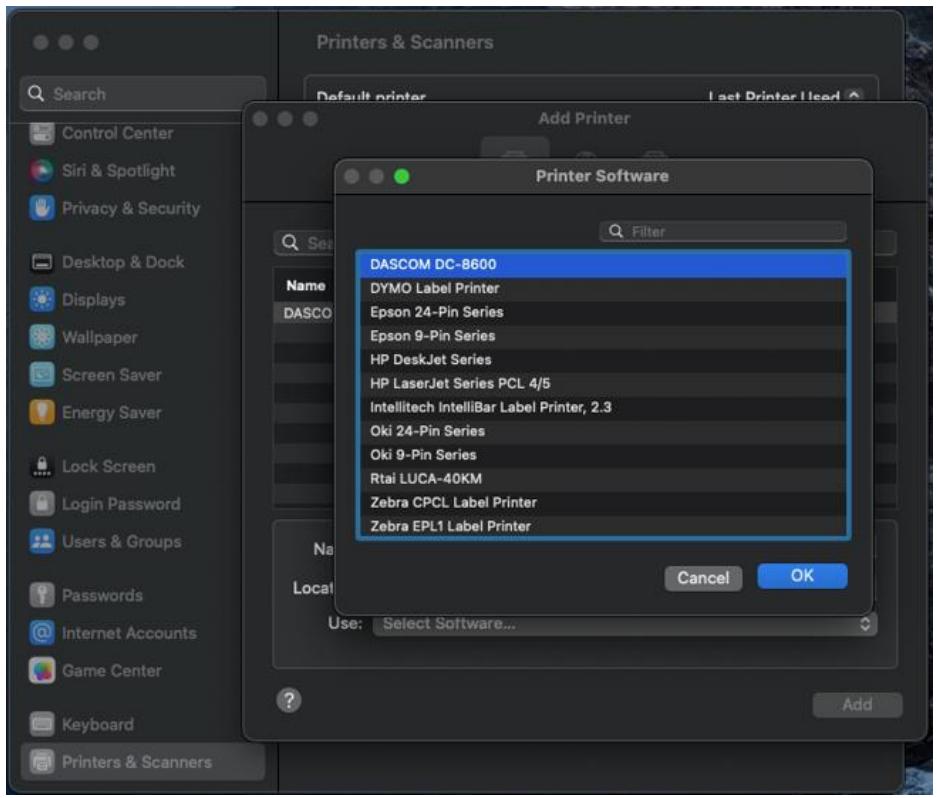
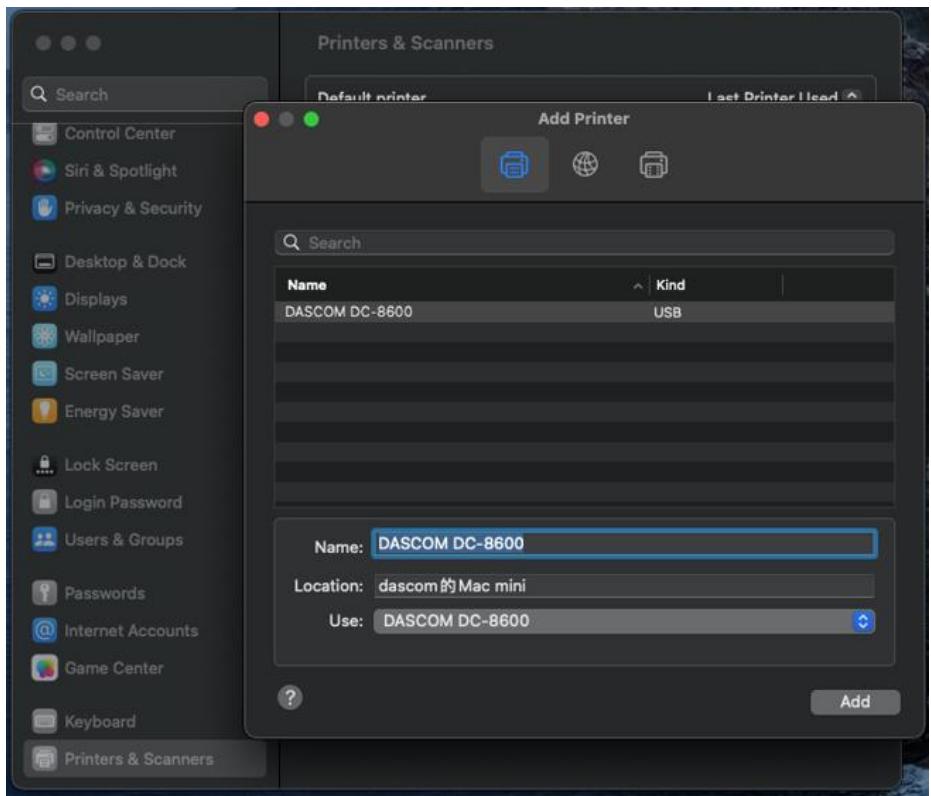
(5) Confirm "Use" is "DASCOM DC-8600" and click "Add"
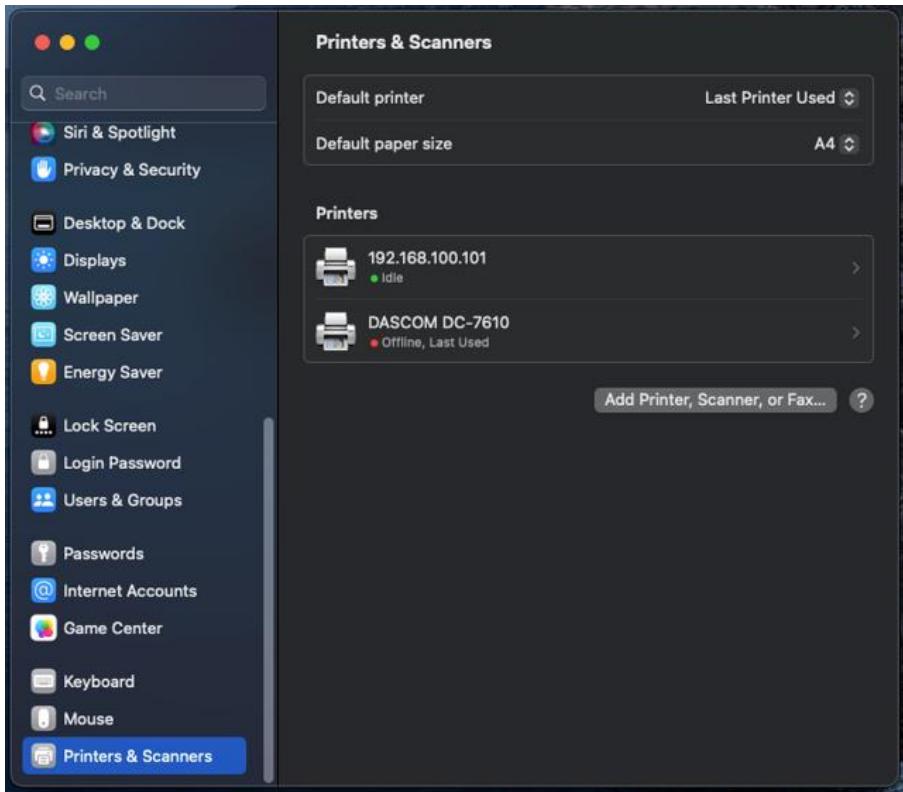
B. Auto Add
(1) Connect the printer to MAC via usb cable
(2) Open "Setting->Printers & Scanners"
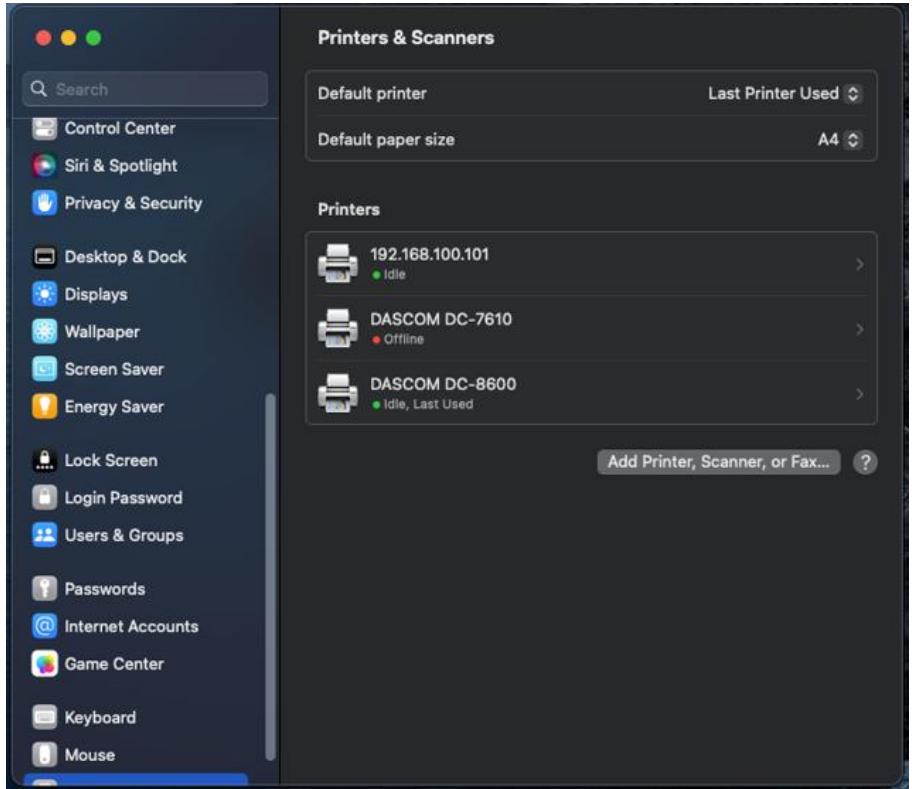
(3) You can find "DASCOM DC-8600" in "Printers" option.
(4) Click "<" icon in "DASCOM DC-8600"
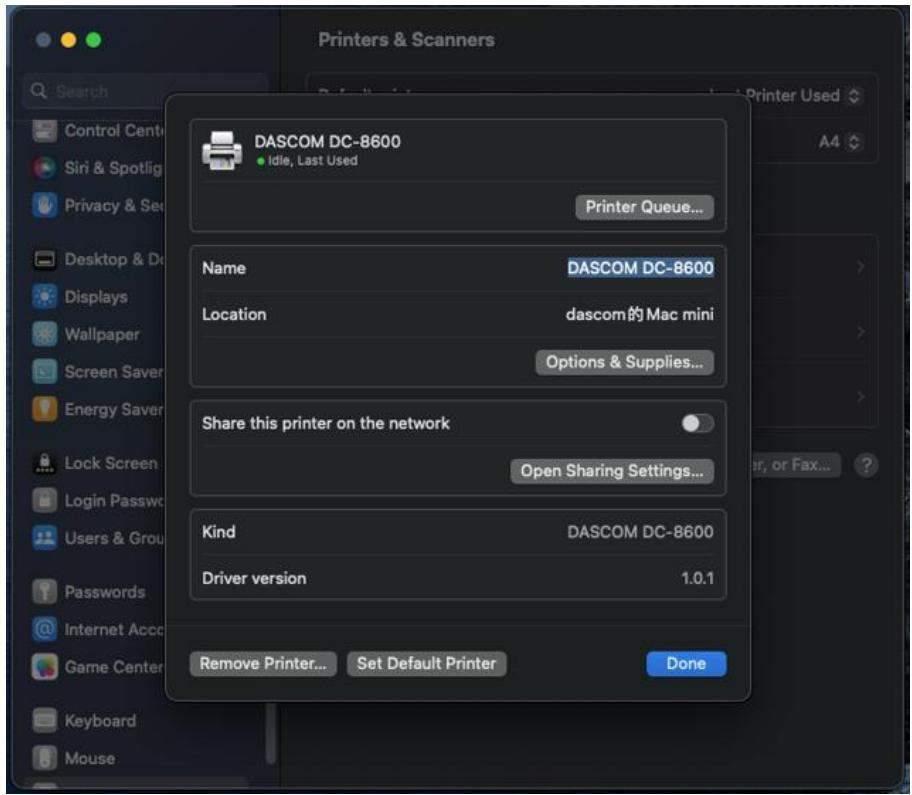
(5) Confirm "Kind" is "DASCOM DC-8600", "Driver version" is as same as the installation package.
1.6.2.3 Print
(1) Open any file and click "File->Print" on the bar. Or press "Command+P" to print file.

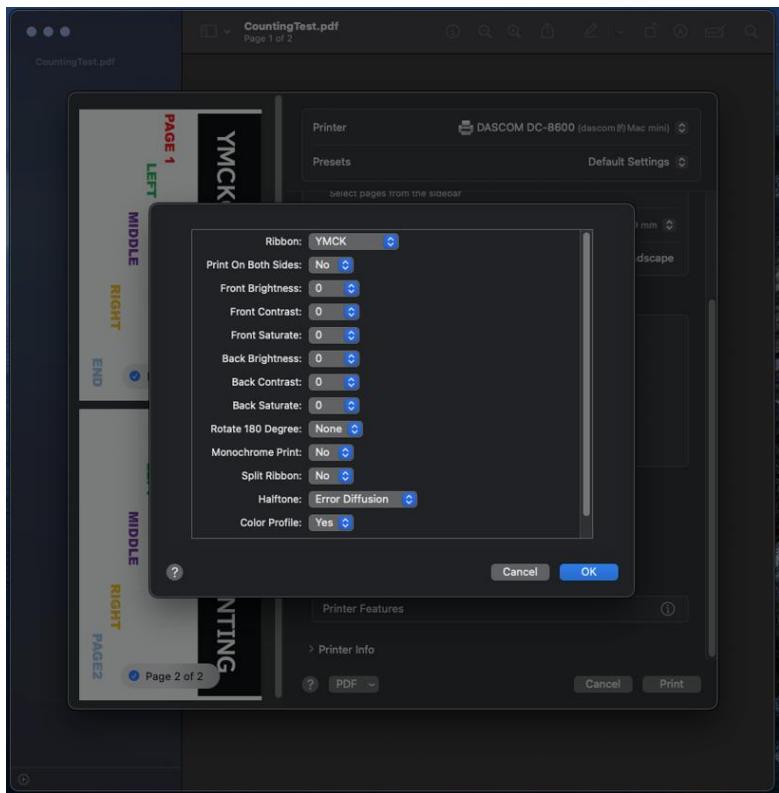
(2) Select printer "DASCOM DC-8600". Click "Paper Size" and choose size "CR80ex".
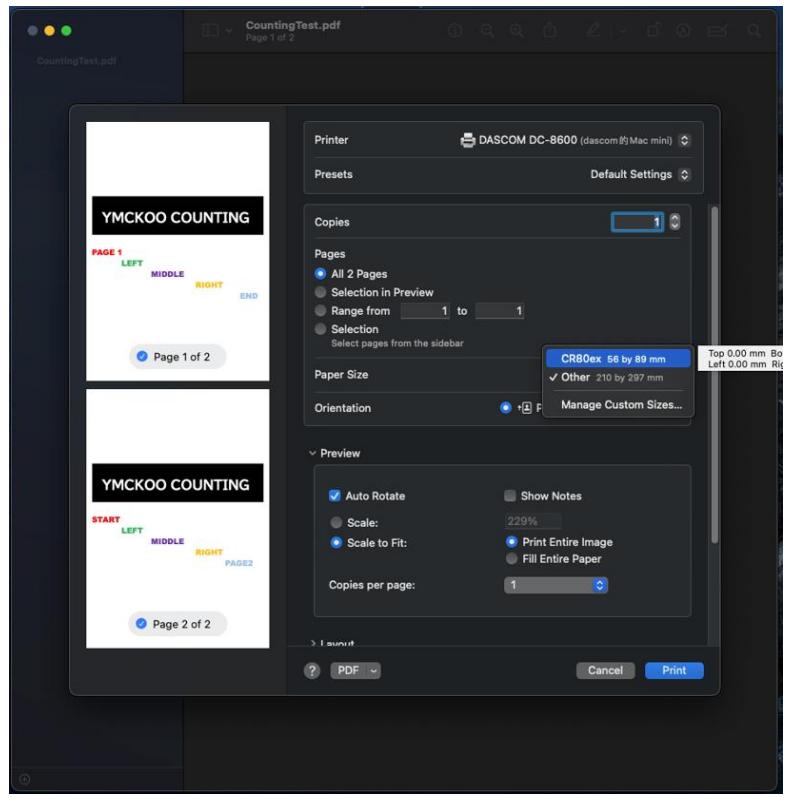
(3) Click "Printer Options". Click "i" icon in "Printer Options" box.
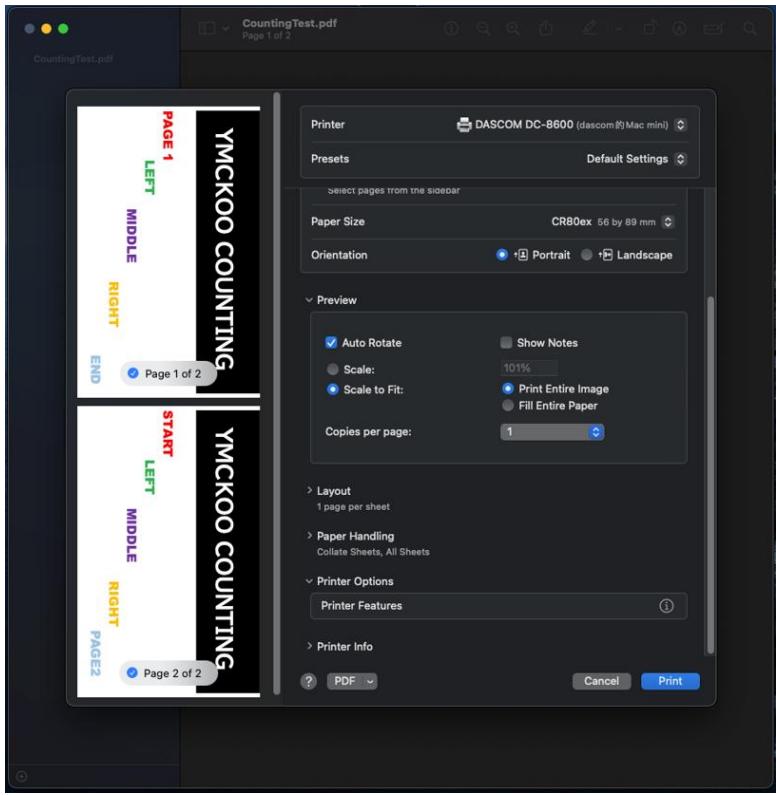
(4) Confirm driver settings and click "OK".
(5) If settings are all correct, click "Print" to start print jobs.
CHAPTER 2. INSTALLATION
2.1 Installing Cards
Cards can be loaded automatically from the card cassette or manually from the manual feed slot.
- The card cassette can hold a large quantity of cards making it convenient for mass or large-scale printing.
- Feeding cards one-by-one manually is well-suited for printing cards with different features such as magnetic stripe, or RFID mifare contactless cards.
2.1.1 Card Specifications
This printer supports CR-80 cards.
Dimensions : 85.6mm × 54mm
Thickness: 0.48 ~mm 1.10 ~mm
Types: blank card, magnetic stripe card, contact smart card, contactless smart card, and pre-printed card.

- Non CR-80 cards may cause defective print results or become stuck or lodged in the printer requiring service.
- Do not use the cards listed below:
- Previously printed cards
- Damp cards
- Cards containing foreign particles, such as glass or metal
- Embossed cards
- Cards contaminated with oil, grease or dirt
Defective cards with damages, cracks, broken corners, or bends
Transparent Cards - Cards with odd shapes that are not CR80 in size
2.1.2 Setting the Card Thickness
Install the card to the Card cassette.
(1) Push the slot button to the right, the slot cover will be released.
(2)
① Open the slot cover backwards;
(2)Move the card block lever to the left;
(3) Press the lever handle with your hand and move the card to the left;
(4) At the same time insert the card into the slot. Release the lever handle, the block returns to the card.
(5)Move the lever to the right, close the cassette.
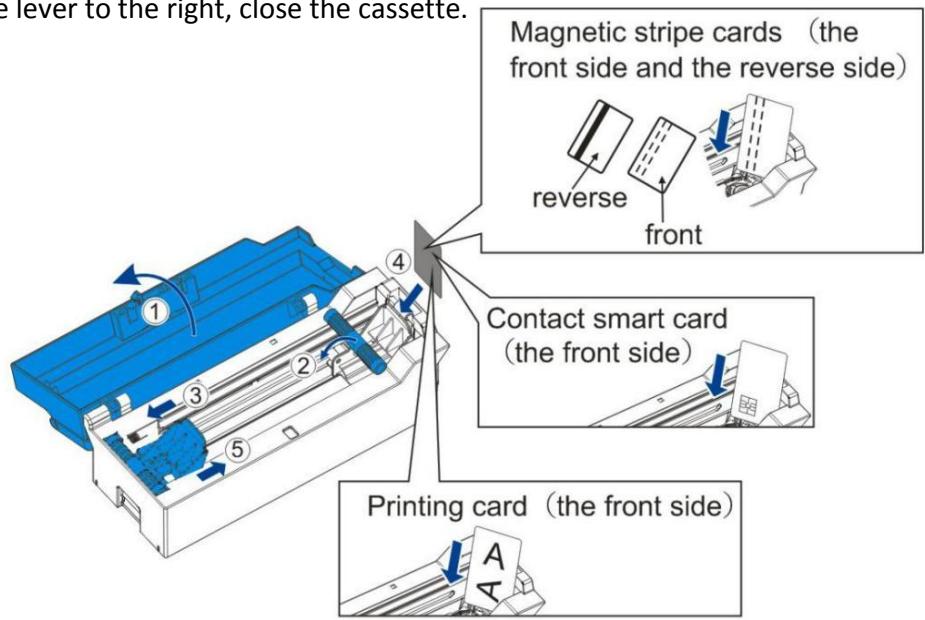

Please put the card carefully. Ensure that magnetic stripe CARDS and contact smart CARDS are properly placed in the card feeder. If the card is inserted in the wrong direction, the code selection may not work properly.
(3) Open the top cover of the card printer
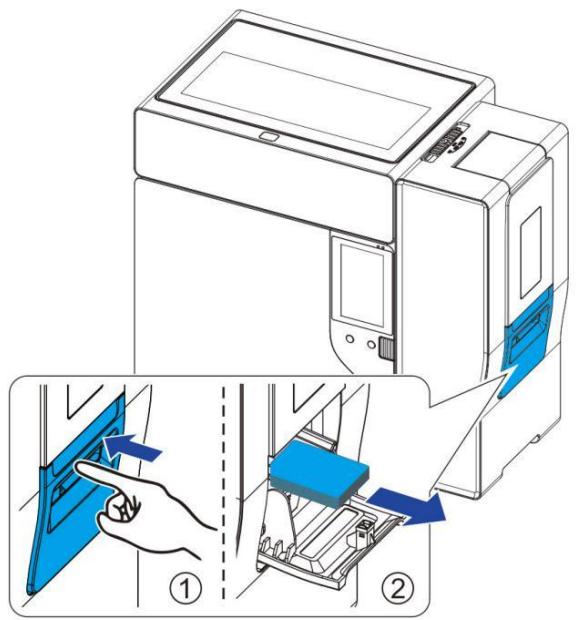
① Firstly, press the right side of the card cassette into the printer;
② Then, press the left side of the card cassette into the printer;
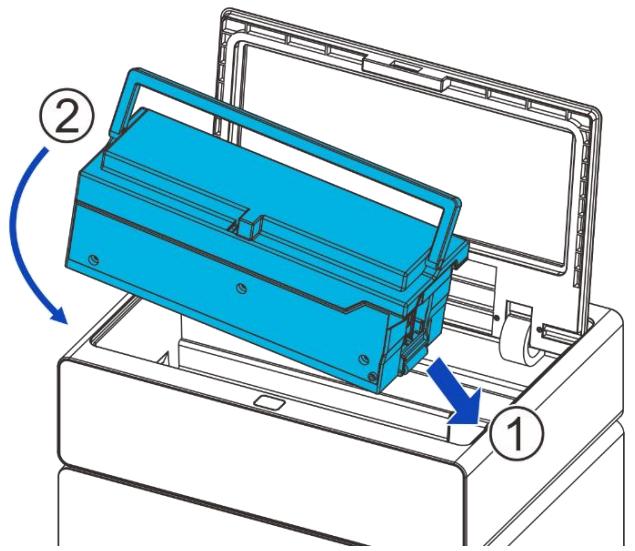
(4) Close the top cover.

When you take out the card cassette, lift the left side of the card cassette first, then lift the left side. In this way, user can easily take out the card cassette.
2.1.3 Adjust the card inlet according to the thickness of the cards
The factory default supports 0.76mm (30mil) card thickness. Confirm the correct thickness setting before installing new cards to the card cassette.
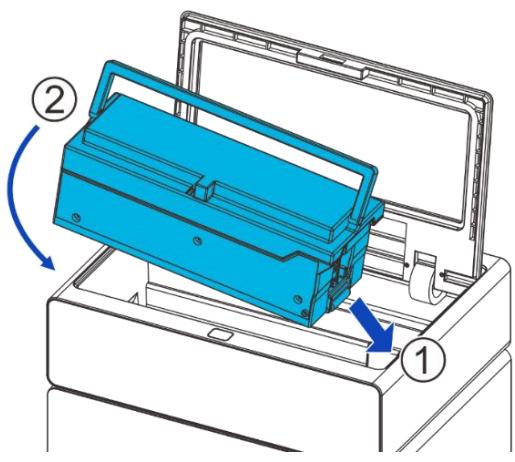
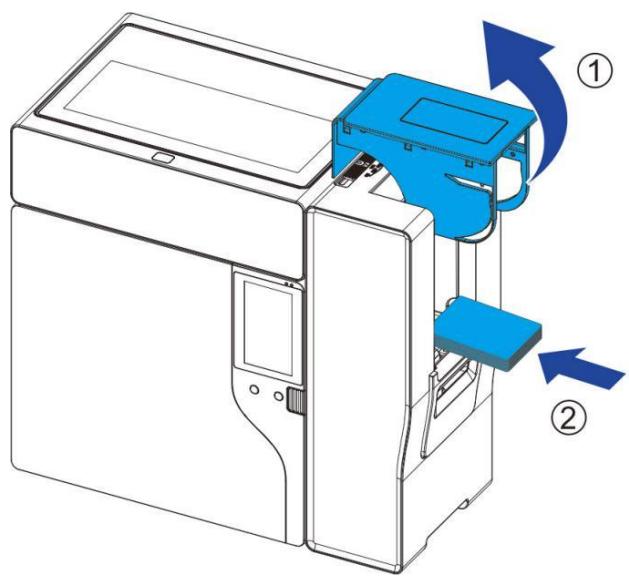
(1) Open the top cover of the printer. Remove the card cassette. Hold the card cassette handle. Lift up left end first①. Then pull out the wholefeeder②.
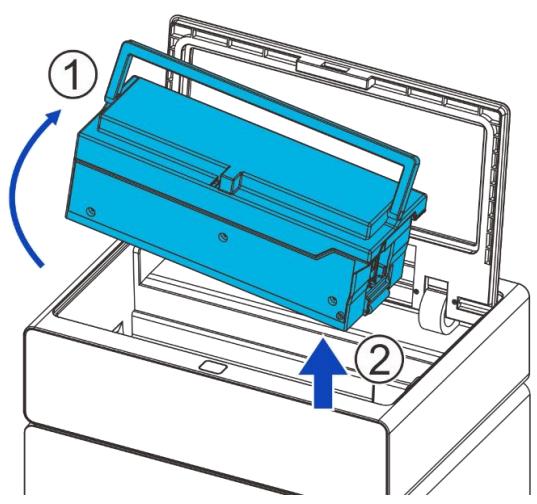
(2) Take out all stored cards, if any.
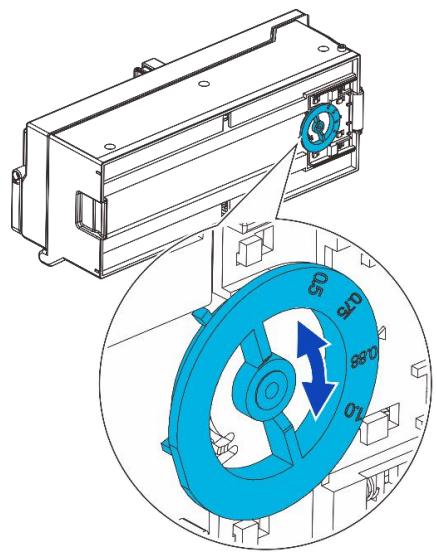
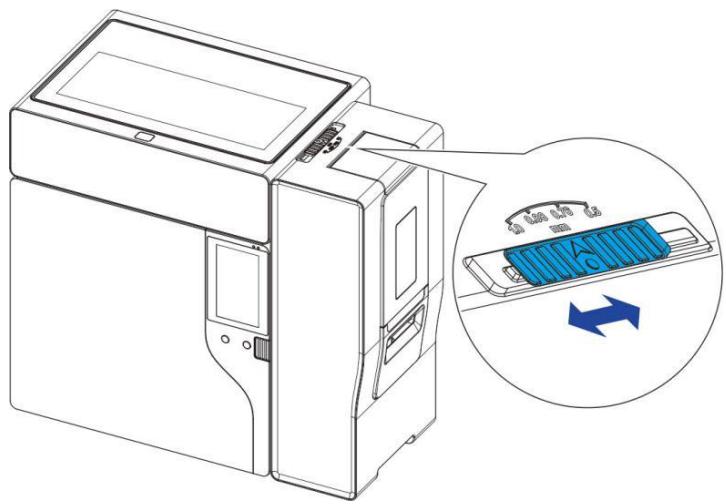
(3) Turn the knob underneath the card cassette right and left to adjust the card inlet.
- The number corresponding to the position of the knob indicates the size of the open gap.
-For thicker cards, turn the knob clockwise.
-For thinner cards, turn the knob counterclockwise.
(4) Put the card cassette in place, close the top cover.
(1) Firstly, press the right side of the card cassette into the printer;
② Then, press the left side of the card cassette into the printer;
2.1.4 Face Up/Down Stacking for Output Cards
User can set up the output cards face up or down.
Auto: Directly ejects the printed cards after printing, no matter the printed surface is faced up or down.
Face Up: Correctly printed cards are arranged with the printed surface facing up after printing.
Face Down: Correctly printed cards are arranged with the printed surface facing down after printing.
Follow the below procedures to change the stacking orientation:
① Click "Settings".
② Click "Basic mode" and then click "Card Setup".
③ Click "Eject Face".
(4) Select "front up" or "back up". Click "Home" to complete the selection.

Auto is the factory default for output cards stacking.
2.1.5 Optimizing Print Quality
For optimizing print quality, you can change the retransfer settings refer to the card you want to print.
You can select proper card type by LCD panel settings or Windows driver software to optimize the print quality, which is determined by the retransfer speed/temperature on various card materials.
Follow the below procedures to change the card type:
① Click "Settings".
② Click "Basic mode" and then click "Card Setup".
③ Click "Card type".
(4) Select the desired card type. Click "Home" to complete the selection.
PVC
PET
PET-G
Card 1 (35,202)
Card 2 (20, 207)
Card 3 (20, 212)
2.1.6 Managing Rejected Cards
This printer is equipped with left and right slots to separate correctly printed cards from rejected ones. By default, rejected cards are ejected from the right slot. However, the two slots are interchangeable for your preference.
Follow the below procedures to assign the location of the Reject Slot:
① Click "Settings".
② Click "Basic mode" and then click "Card Setup".
③ Click "Error card exit" or "Std card exit".
④ Select the desired setting. Click "Home" to complete the selection.

For factory defaults, the printer outputs correctly printed cards and rejected ones to the left and right slots, respectively.
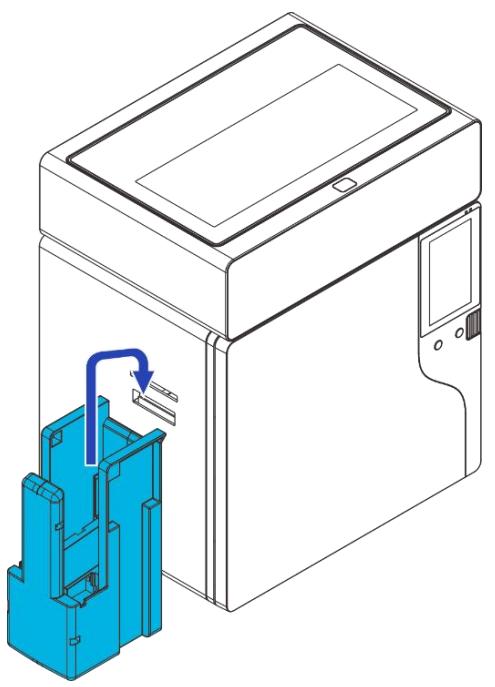
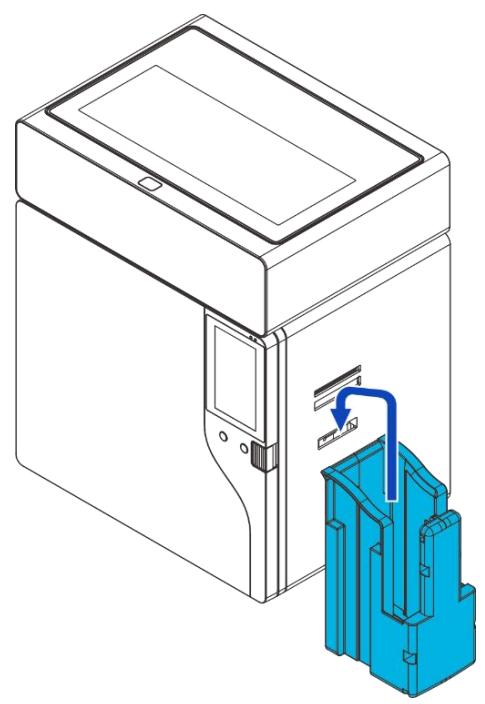
2.1.7 200 Cards Hopper Cassette (optional)
The separate printer model with the already installed right hopper cassette enables you to proceed additionally 200 cards.
(1) Setting Card Thickness
Adjust the gap key to a suitable position according to the thickness of the card.
(2) Insert Cards
① Open the cover upwards;
② Feeding of cards.
(3) Card Output
The printer outputs correctly printed cards to the left slots.

(4) Rejected Cards
① Press the Reject Bin to open it;
② Take the Rejected Cards out.
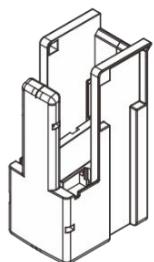
2.2 Replacing the Ribbon
Change the ribbon when the LCD prompts [RIBBON END] message.
Approved ribbons for this printer:
| Type | Description | Product Code |
| YMCK Color Ribbon | ||
| YMCKH Color Ribbon | ||
| YMCKK Color Ribbon | ||
| YMCKI Color Ribbon | ||
| YMCKSI Color Ribbon |
Please contact your local reseller for ribbons not listed above.

- Direct touching contaminates the ribbon/retransfer film and causes uneven print quality.
- Avoid touching the retransfer tape and film excessively when replacing them.
- Using non-genuine products may cause poor print quality and printer malfunction.
Quality and reliability of the non-genuine products are not guaranteed. - Even within the warranty period, fees may be charged on servicing the printer using non-genuine products.

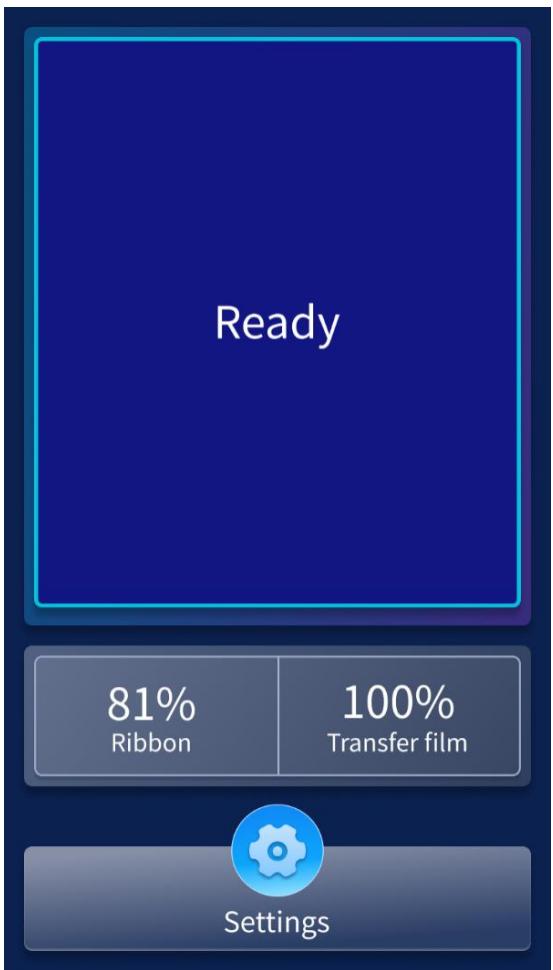
You can get the unused quantity of ribbon and retransfer film.
Refer Section 3.3 to get the unused amount of your ribbon/retransfer film.
LCD Panel operation or the Windows software driver provide an estimation of the remaining ribbon/retransfer film that are sufficient for your current print job. The LCD displays the [RIBBON END] or [FILM END] warnings when they close to running out.
Consume the ribbon/retransfer film as soon as possible after purchase.
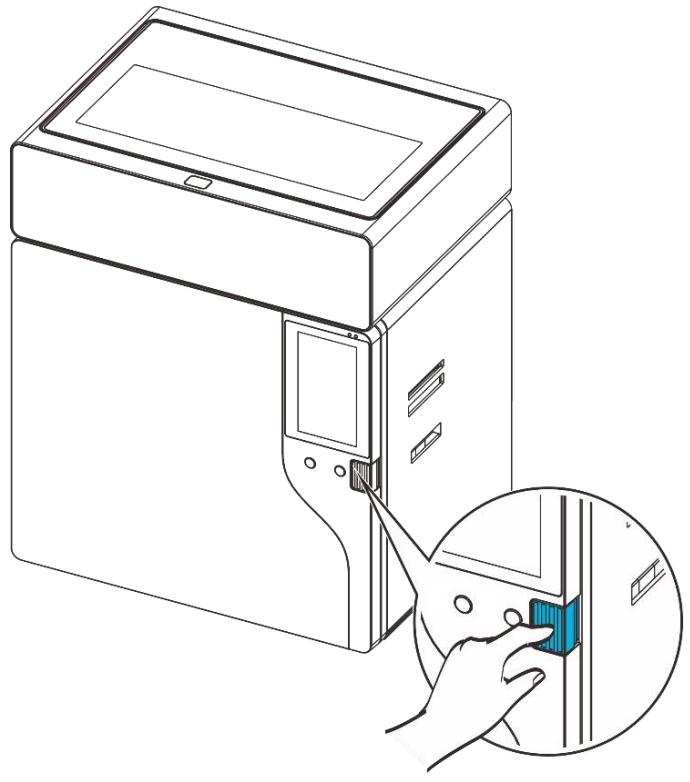
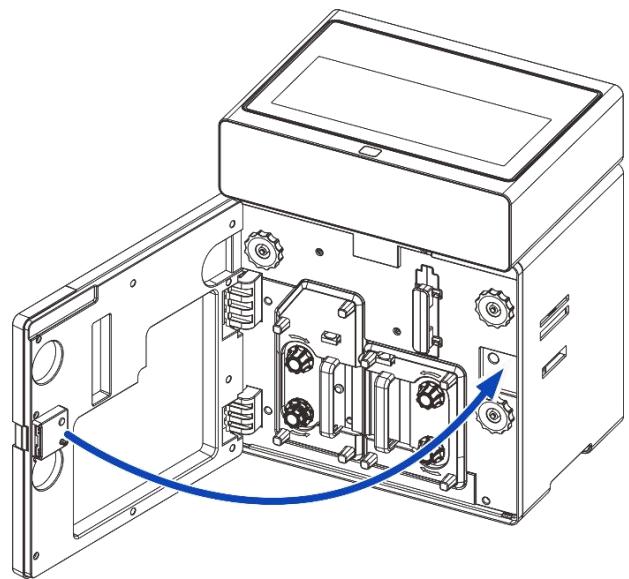
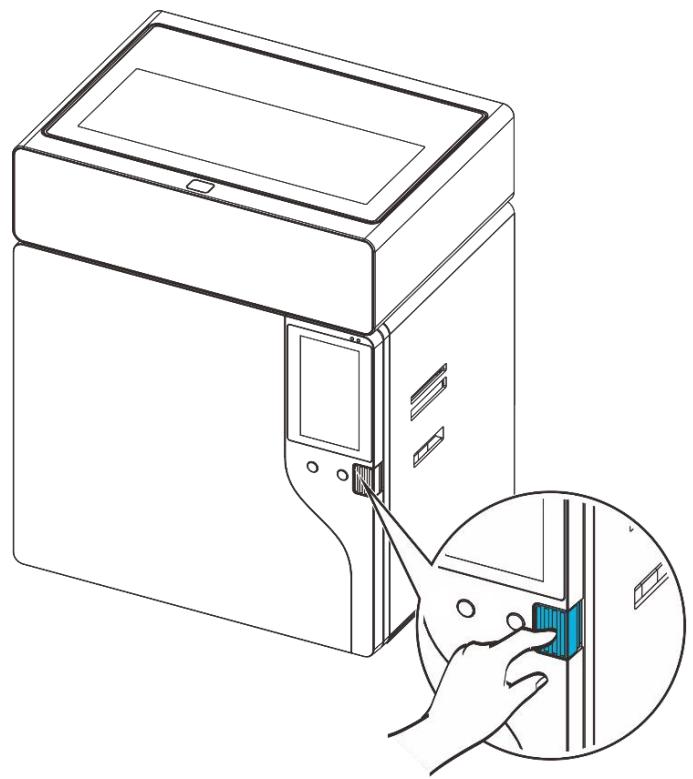
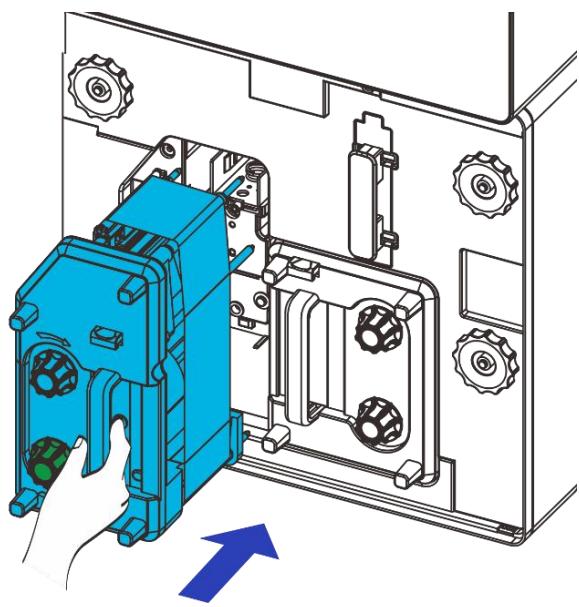
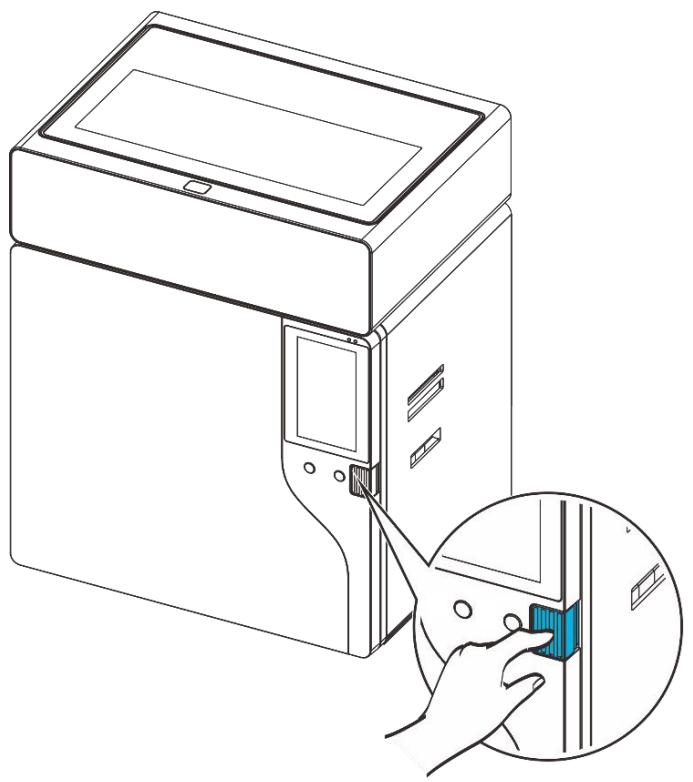
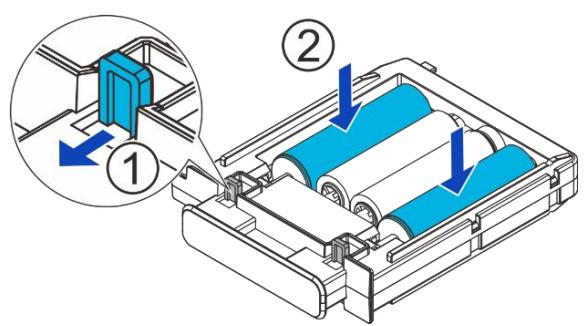
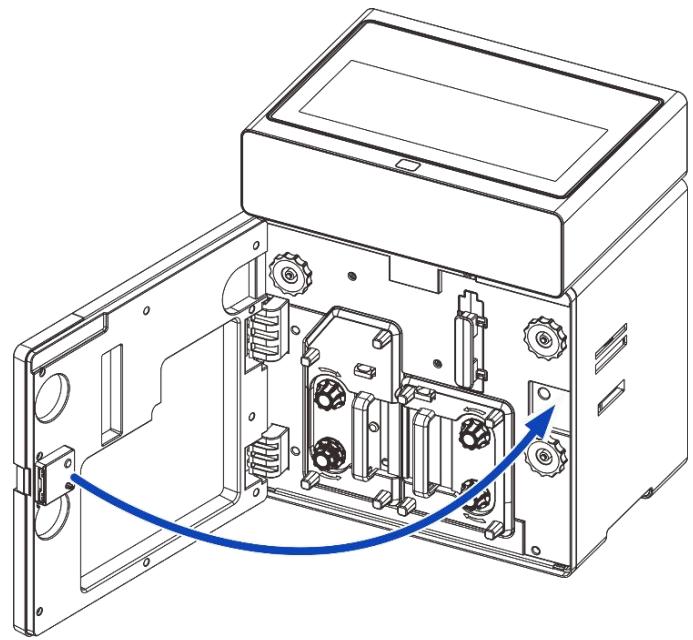
(1) Open the front cover:
Press the front cover switch and open front cover.
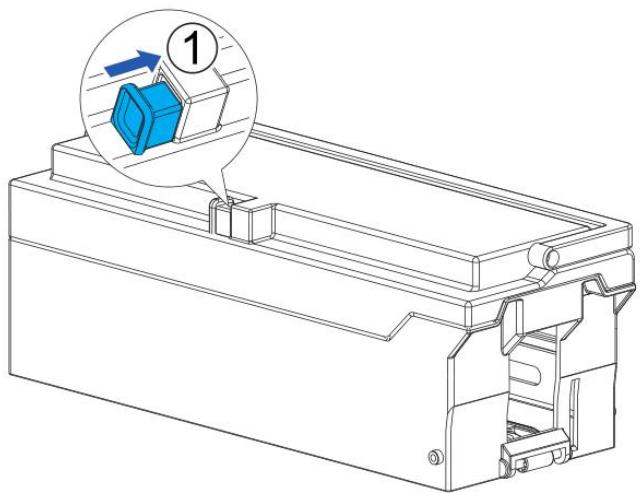
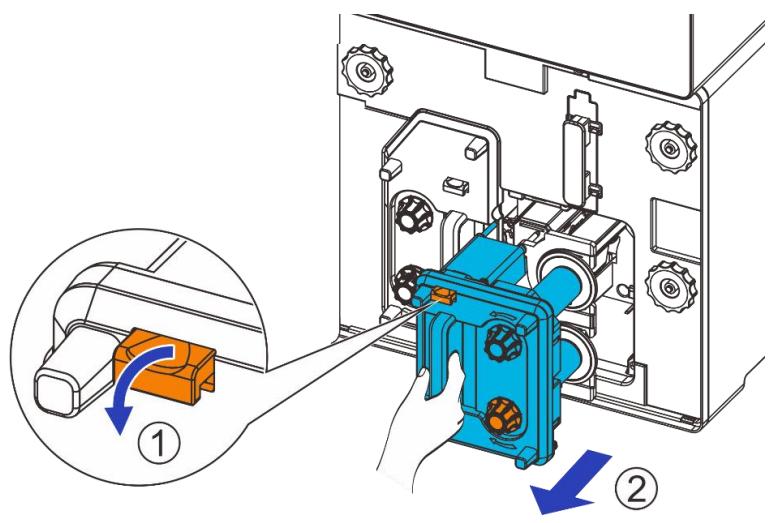
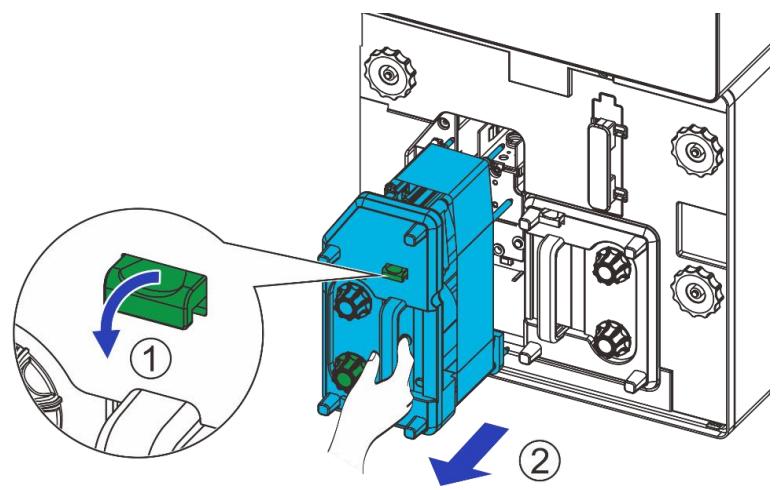
(2) Press the button ① and pull out the whole ribboncartridge ② .
(3)
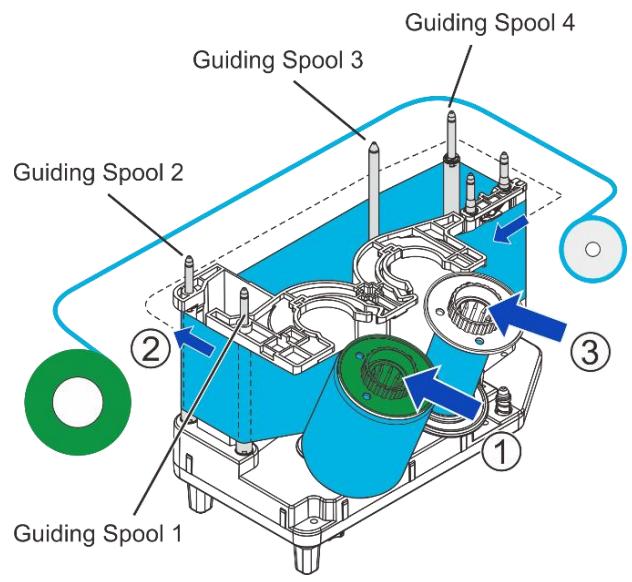
(1) To load a new ribbon onto cartridge, place or engage orange spool (1) of ribbon to feeding hub of the cartridge.
(2) While unwinding the ribbon film, route (2) the film around three guiding poles.
(3) Finally engage the black spool to the winding hub(3) of cartridge.
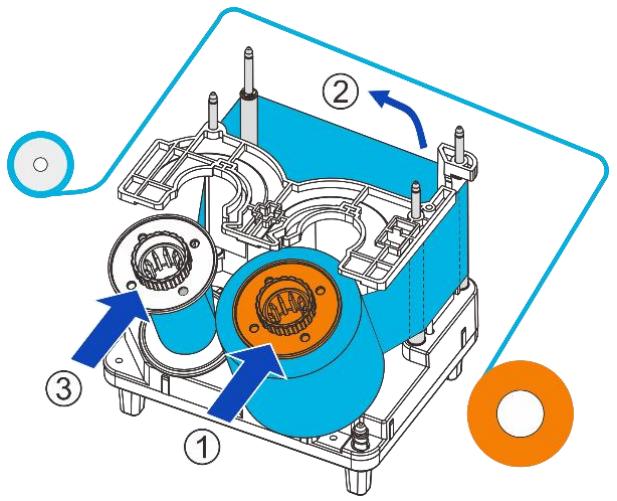

Apply some force to push in the spools to the hubs. The ribbon should be slightly tightened and not slanted.
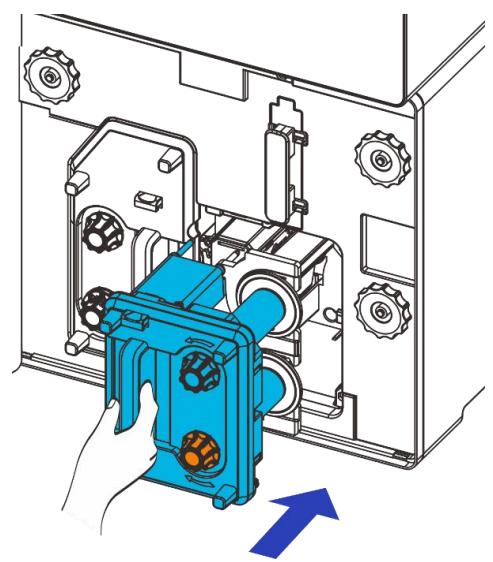
(4)As shown in the right diagram, push in the ribbon cartridge to the far end until a "click" is heard to indicate correct insertion.
(5) Close the front cover to its original position.
(6) Press the Right key when the LCD screen displays [Please press Right key].
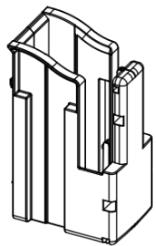
2.3 Replacing the Retransfer Film
You should replace the retransfer film when the LCD shows [FILM END] warning. Care should be taken not to contaminate the film in the replacement process.

You can check the unused amount of your ribbon/retransfer film.
Refer Section 3.3 to get the unused amount of your ribbon/retransfer film.

When removing the film cartridge, do not touch the inside of the printer because it is extremely hot. Read the safety instructions provided.
Approved retransfer film
| Type | Description | Product Code |
| Transparent Retransfer Film | Transparent retransfer film | |
| Security Retransfer Film | Customized retransfer film (INTM) for security purposes. |
Please contact your local reseller for ribbons not listed above.

- Direct touching contaminates the ribbon/retransfer film and causes uneven print quality.
- Avoid dropping or stressing the ribbon/retransfer film when replacing them.
- Using non-genuine products may cause poor print quality and printer malfunction.
Quality and reliability of non-genuine products are not guaranteed. - Even within the warranty period, fees may be charged on servicing the printer using non-genuine products.
(1) Open the front cover:
Press the front cover switch and open front cover.
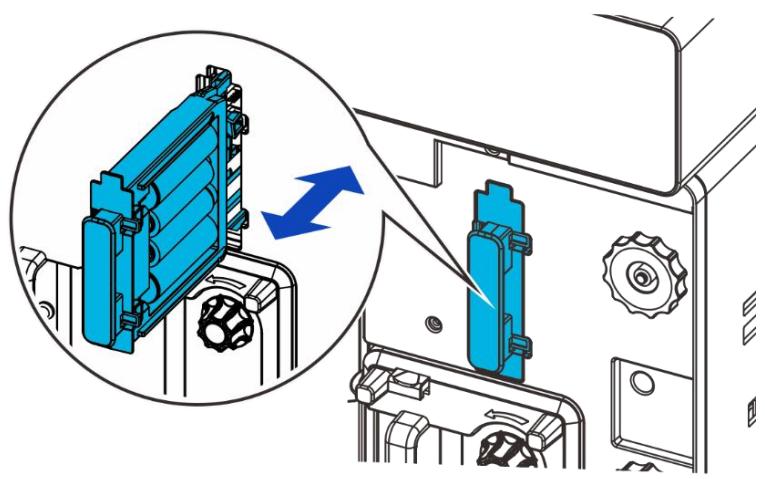
(2) Press the button ① and pull out the whole transfer filmcartridge ② .
(3) To load new retransfer film onto the cartridge, engage the green spool of the retransfer film to the feeding hub of the cartridge.
While unwinding the ribbon film, route② the film around the five indicated guiding poles. Note the change of direction on the 4^th pole.
Finally engage the black spool ③ to the winding hub of the cartridge. (need to show "winding hub" in picture to right)

(4) As shown in the right diagram, push in the retransfer film cartridge to the far end until a "click" is heard to indicate correct insertion.

Avoid the film touching the printer compartment during insertion.
(5) Improper retransfer film installation affects the overall print quality. After inserting the retransfer film cartridge, double-check so that there is no slanted film:
- Open the printer top cover.
Take out the card cassette. - Confirm the retransfer film stays within the area shown in the right diagram. (Between the two stages of guiding spool 5) If not, re-install retransfer film cartridge by following above directions.

(6) Return the front cover to its original position.

(7) Press the Right key when the LCD screen displays [Please press Right key].
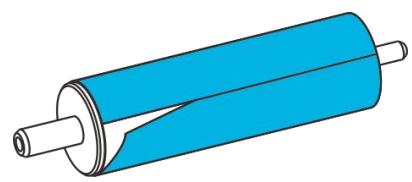
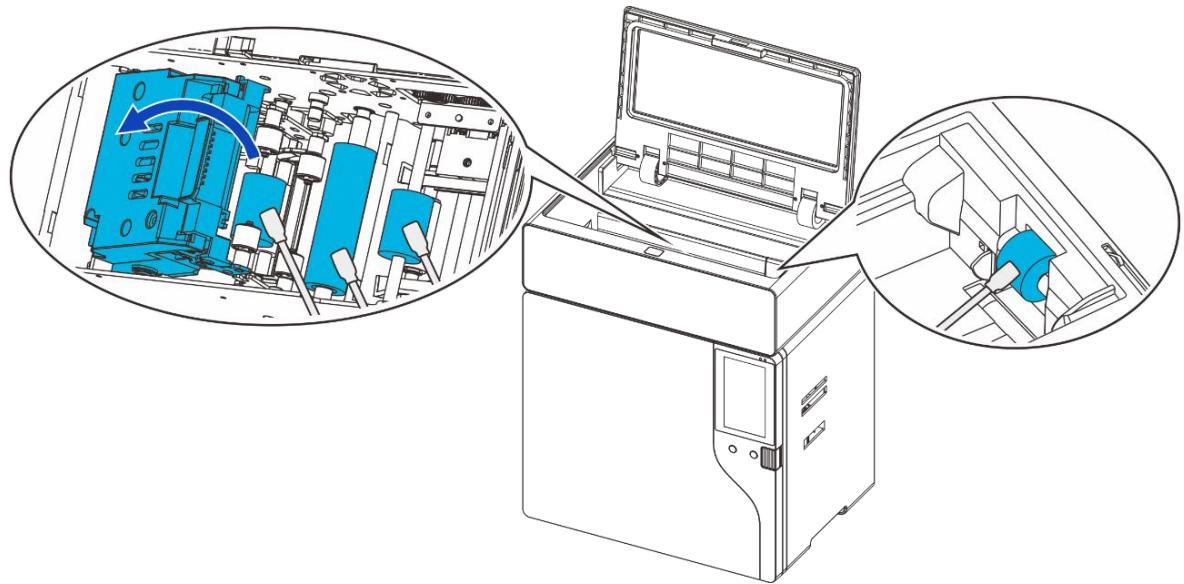
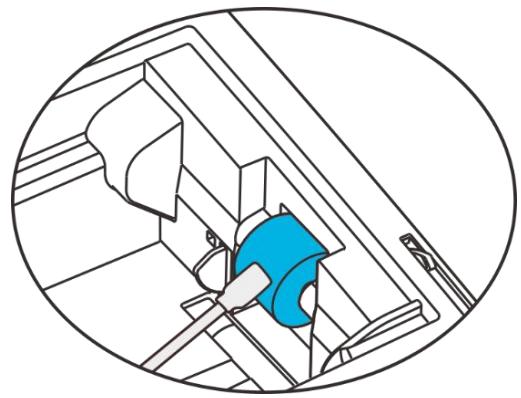
2.4 Replacing the Cleaning Roller
One cleaning roller is shipped with each ribbon in a package.
IMPORTANT: Replace cleaning roller each time you change the ribbon film.
(1) Open the front cover:
Press the front cover switch and open front cover.
(2) Directly pull out the cleaning cartridge to release it from lock position.
(3) Pull the lock① to release the spindle②.
Remove the old cleaning roller.
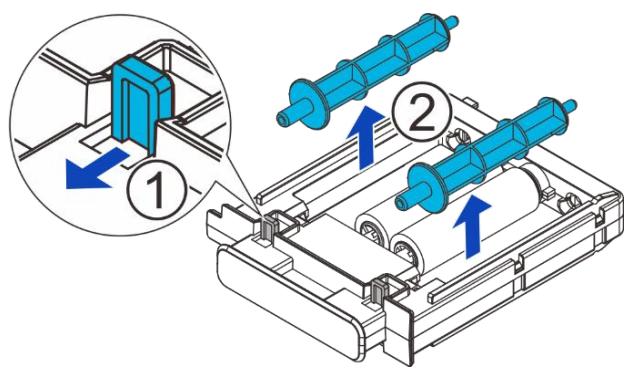
(4) Sleeve a new cleaning roller into the spindle.
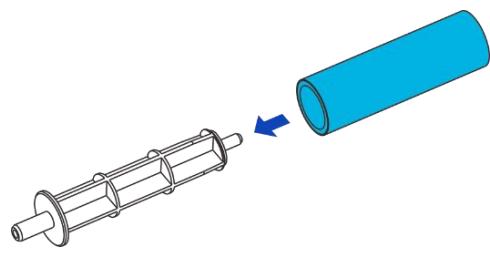
(5) Peel off protective Sheet or coating.
(6) Pull the lock ① and drop the roller ② to its original position in the cleaning cartridge.
(7) After the replacement procedure, restore the cleaning cartridge until you hear a "click" sound.
(8) Return the front cover to its original position.
(9) Press the Right key when the LCD screen displays [Please press Right key].
2.5 Installing the Output Tray
Hook the output tray to the opening next to the output slot.
2.6 Installing the Reject Bin
Hook the reject bin to the opening next to the ejection slot.
2.7 Card Printing
2.7.1 Using Card Editor
All Windows applications with document printing capabilities can be used with the DC-8600 printer. Such as Microsoft Office suite MS-Word, MS-Access, MS-Excel, MS-PowerPoint, and the DASCOM self-designed card editing software CardEditor.
CardEditor is an editing software for Dascom smart card printers. You can quickly create and edit the content that needs to be printed with this software.
(1) Double click "CardEditor" logo to open the software, choose "Create Card", then click "System template", you can select the template you want.
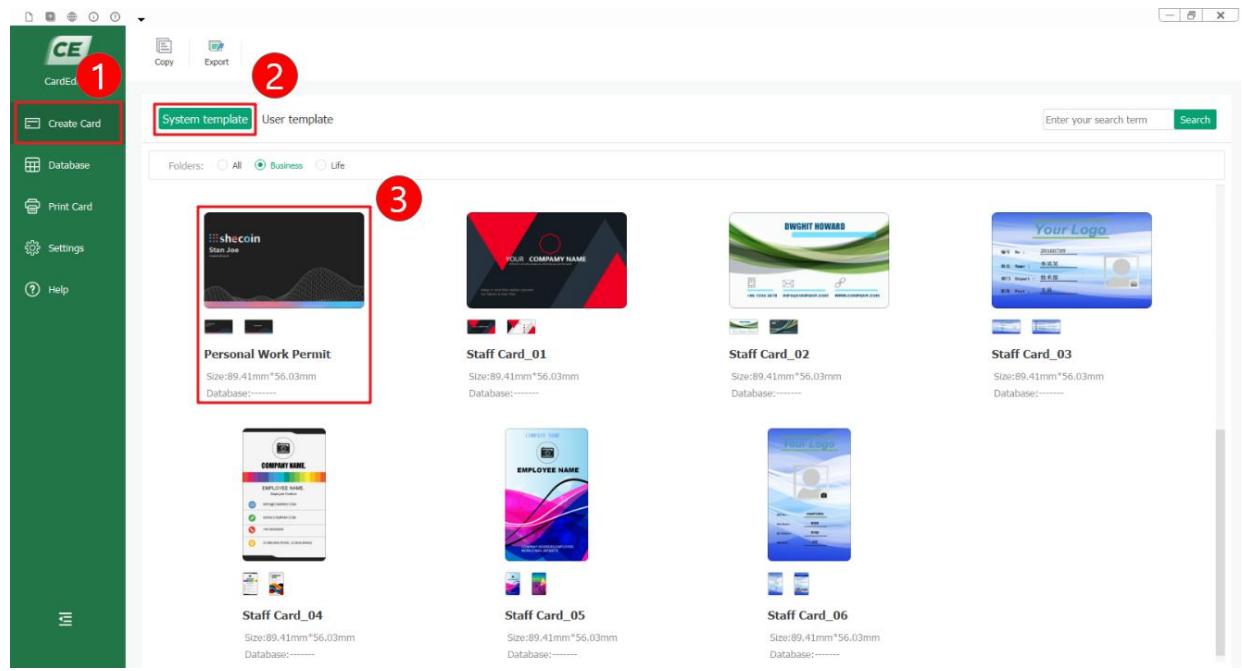
(2) Double click "Design" to enter the design interface:

(3) On the right menu, you can see the items "Attribute", "Background" and "Card Format":
1) Choose "Attribute", you can set the database.
2) Choose "Background", you can change the background of the print content.
3) Choose "Card Format", you can change the card size and print type.
4) Click thumbnail of "Front" and "Back", you can choose the different side to edit.

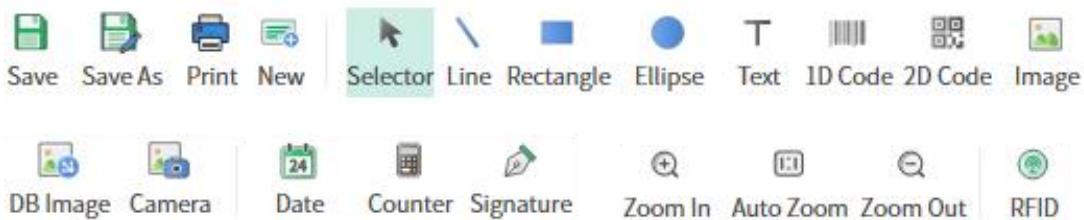
(4) The tool buttons above the working interface, as shown in the following figure, are divided into two categories: "basic editing" and "Advanced tools". "Basic editing" includes line, rectangle, ellipse, text, 1D code, 2D code and image. "Advanced tools" includes DB image, camera, date, counter, signature and RFID. You can choose them according to your need. You can select the object you added, then adjust the position. You can also select the object you added, then delete it.
(5) Double click the template, you can edit the content, then click the "print" logo to print:
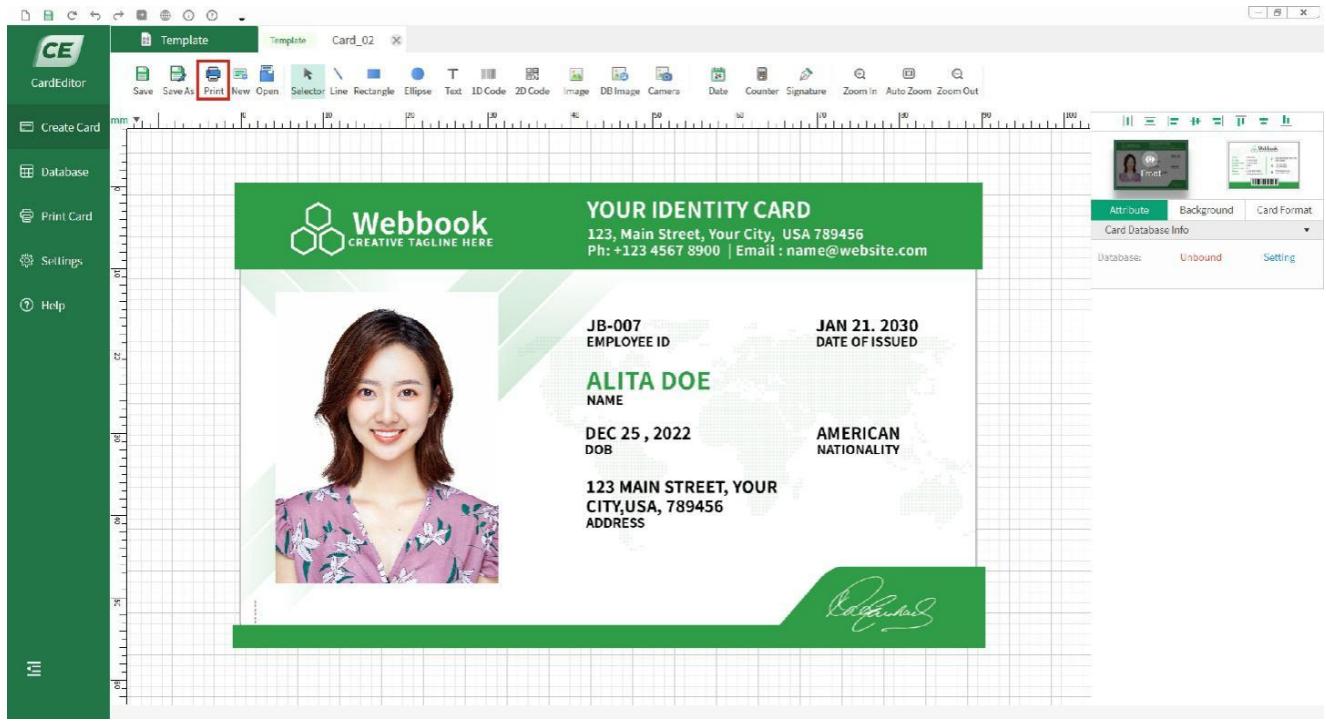
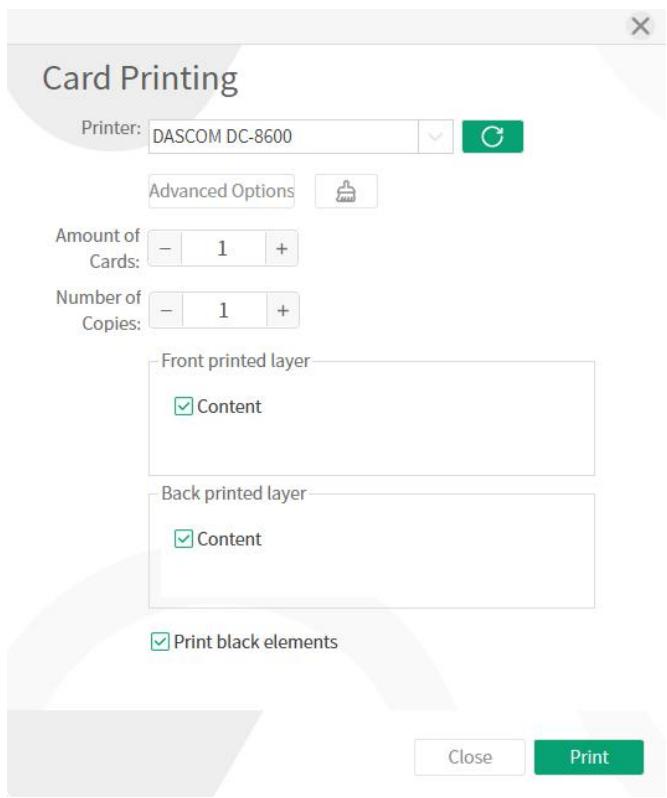
(6) You can set the amount of cards and number of copies before printing:
(Note: If "print black element" is selected, black objects will be printed with priority. That means all the black objects on the card will be placed on top. As an example, there are two objects on the template, one is a black rectangle and the other is text in other colors. When these two objects overlap, even if the text object is above the rectangle object, the printer will only print out the card with black rectangle while no text on it.)
2.7.2 Using Driver
Enter the printer driver from Windows application (any settings you make only apply to the application you are using).
Select "Print" or "Print Settings" from the "File" menu of the application software, and a dialog box appears.
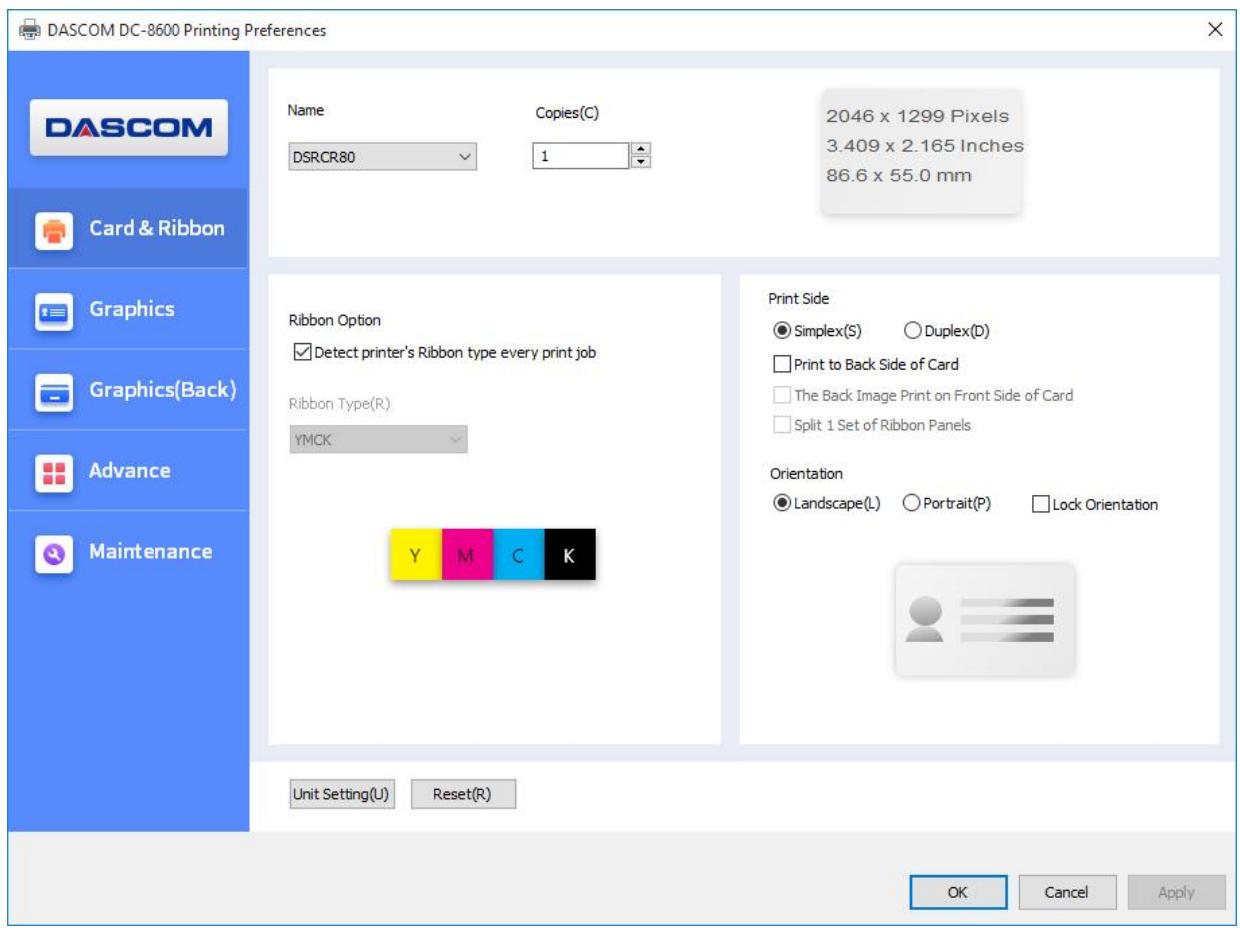
The main selections are "Card & Ribbon", "Graphics", "Graphics (Back)" and "Maintenance".
- Print side User can choose simplex / duplex side to print. Printer can print the image on the card back side and can also split the different color of the ribbon.
- Orientation: Portrait or landscape
- Copies
- Ribbon option User can choose the card type manually and also check the printer ribbon type automatically.
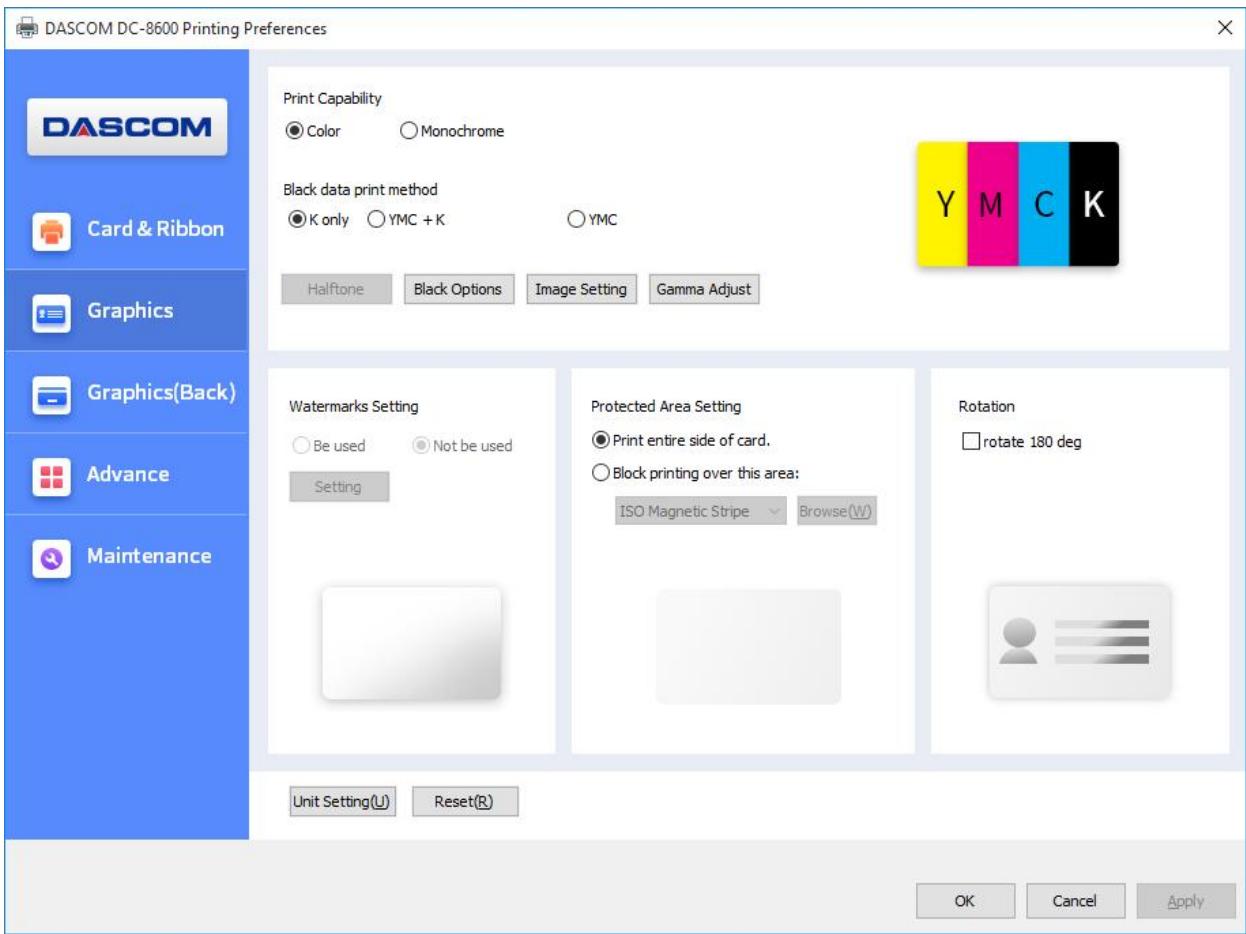
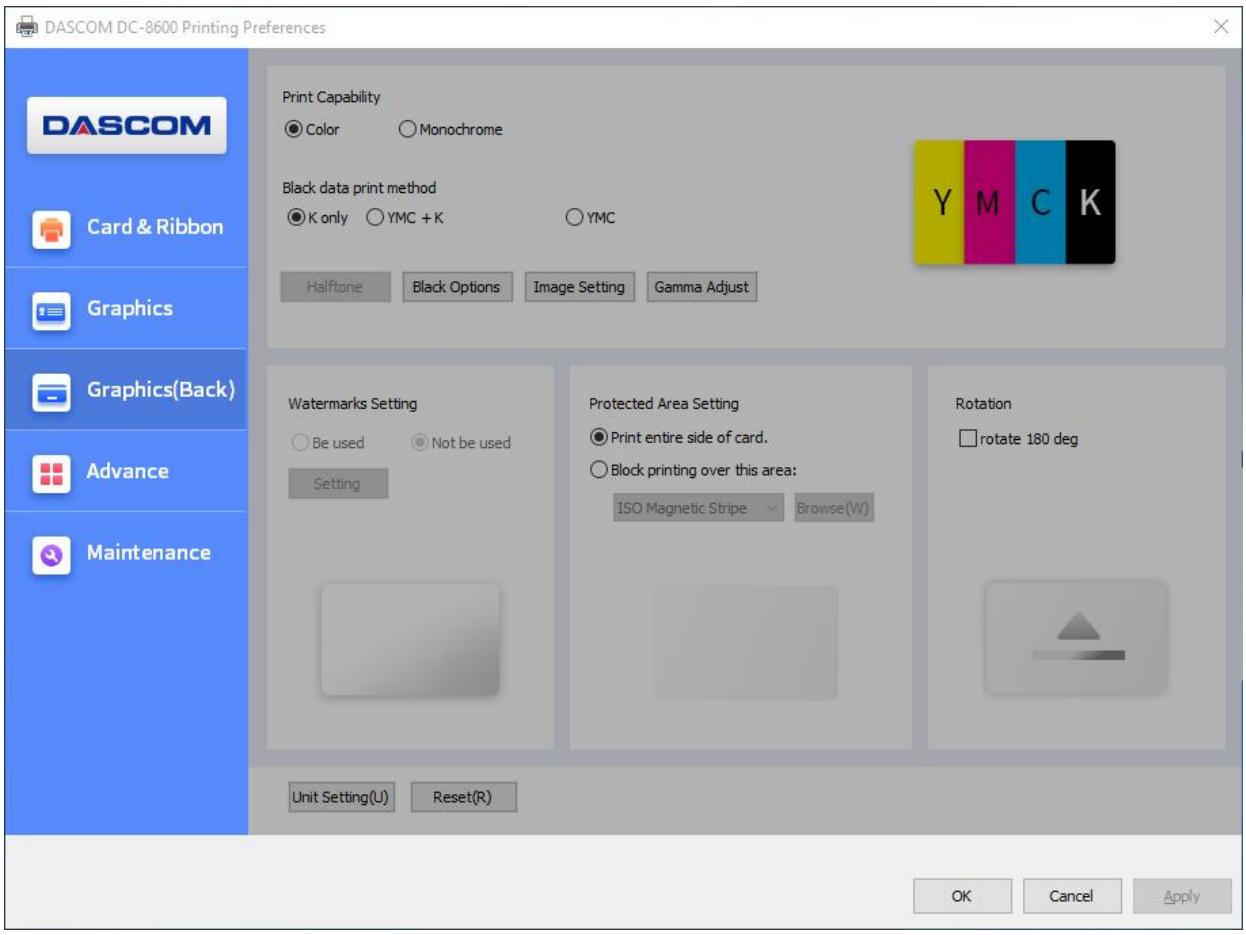
2) "Graphics" Tab
- Print Capability
Choose the card which is monochrome printing or color printing.
- Black data print method
User can print black via print K color or YMC secondary colors and K color. As well as, user can choose monochrome printing, color printing, set the black valid area and the black invalid area.
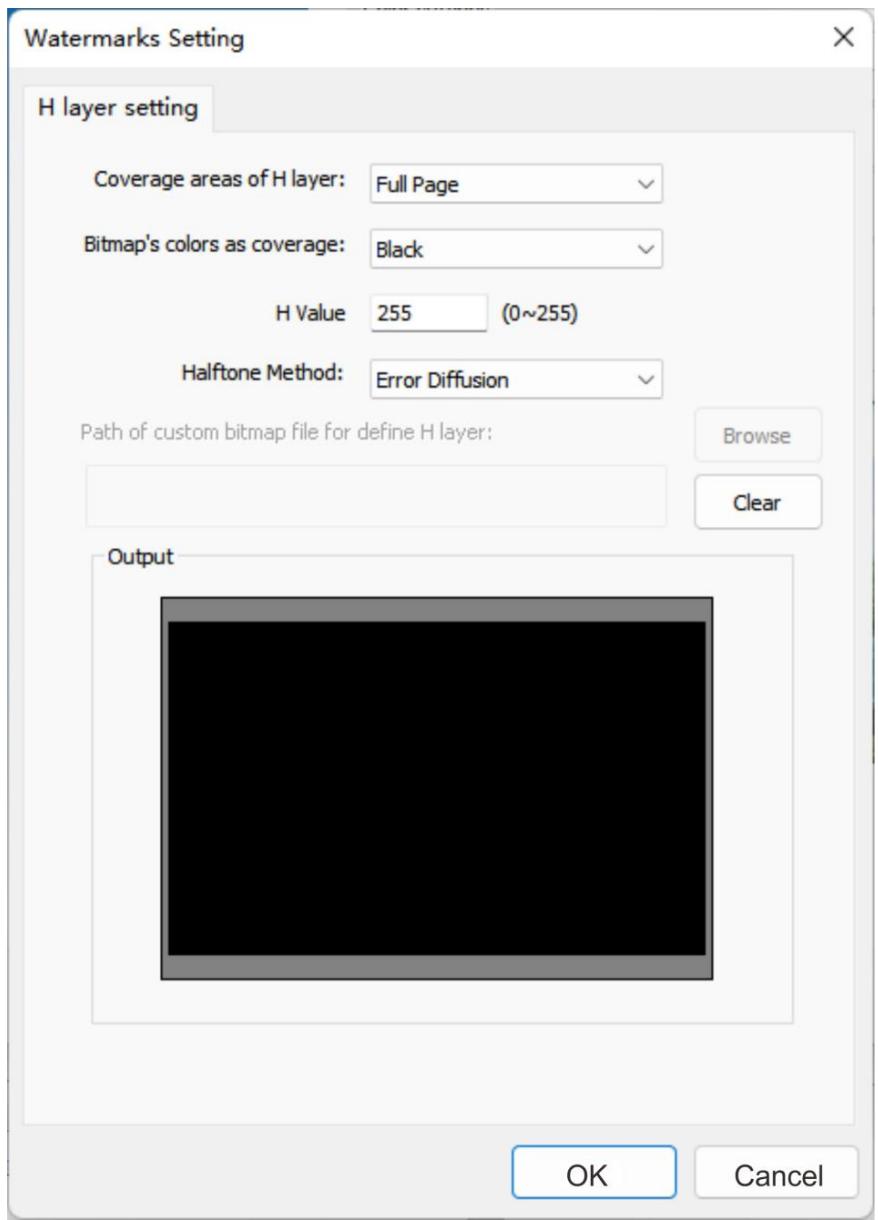
Watermarks Setting
Watermark is a type of graphic, text, or texture mark used to identify and protect copyright. This printer can edit and print data at specific locations on the card, adding specific identification or information.
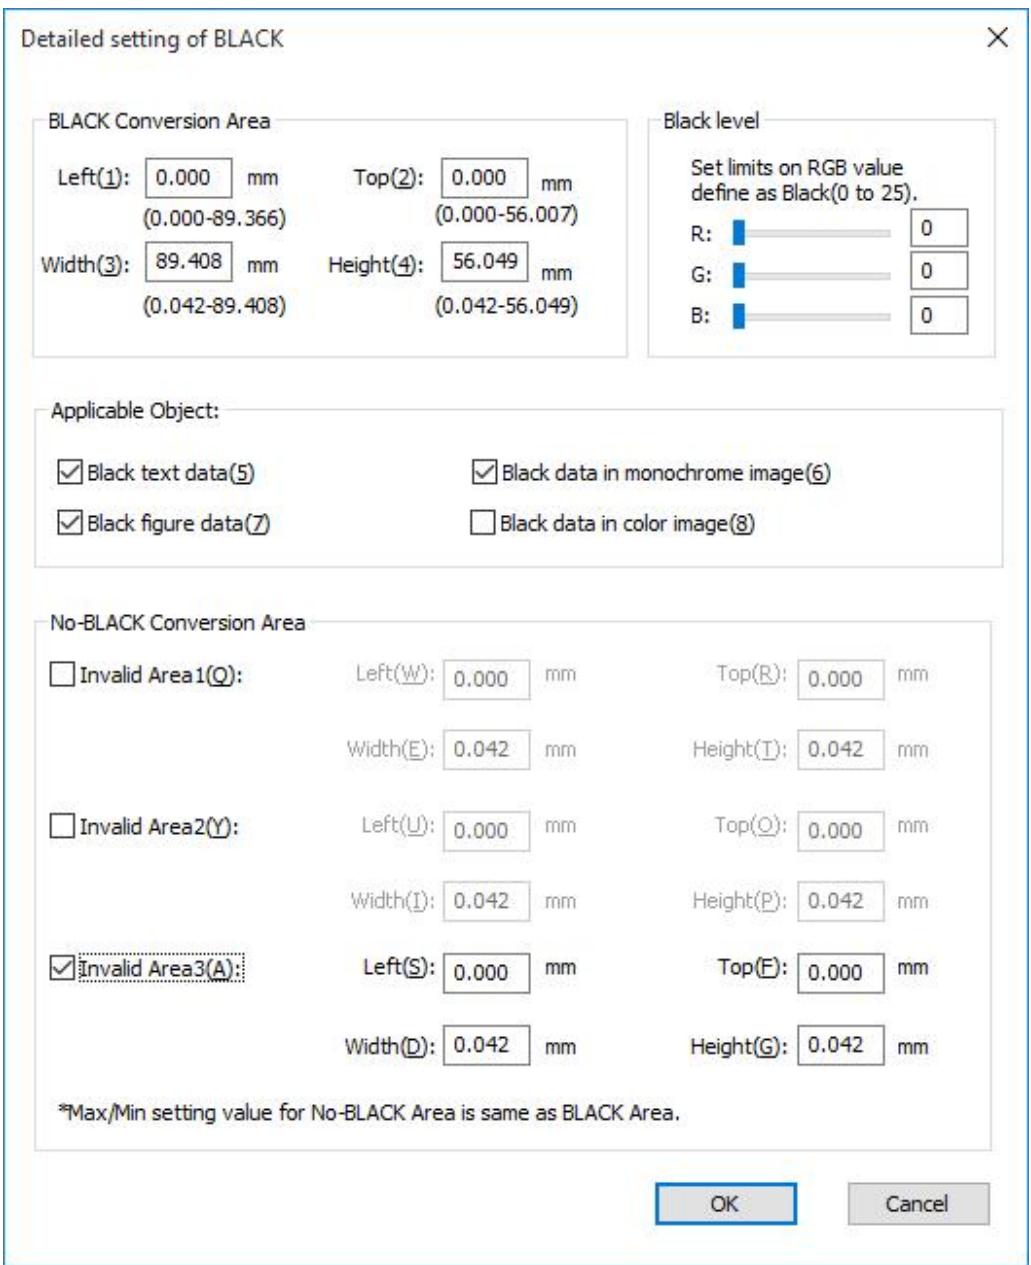
"Detailed setting of BLACK"
Black level
Set up the limits on RGB value defined as Black.
The valid area of black printing
Set up the valid area of K color printing, the area is from the top left corner (0Pixel,0Pixel) to the lower right corner(2112Pixel,1324Pixel) on the card. Use width and height to set the length and width of the valid printing area.
The applicable object in valid area of black printing
Set up the applicable object in valid area of black printing, includes black text data, black figure data, black data in monochrome image and black data in color image.
The invalid area of black printing
Set up the invalid area of K color printing, the area is from the top left corner (0Pixel,0Pixel) to the lower right corner(2112Pixel,1324Pixel) on the card. Use width and height to set the length and width of the invalid printing area.
"Watermarks Setting"
"Ribbon Type (R)" in "Card&Ribbon" Tabs refers to YMCKH, YMCKS, YMCKI, etc. with H, S, I watermark layer, The watermark can only be set on the ribbon of the printing layer, otherwise the "Watermark Setting" area is gray (non editable).
H Value (H):
The threshold range is from 0 to 255, the larger the value is, the more obvious the printing effect of H layer is.
- Coverage areas of H layer:
Users can customize the printing area and content of layer H. For example, user can select "None", "Full Page" and "From bitmap file".
- Bitmap's colors as coverage:
Choose "From bitmap file", if user selects black, that is, printer will print the black area of H layer, if user selects white, printer will print white area.
- Path of custom bitmap file for define H layer:
Click "Browse" to select the path to add a custom bitmap, which must be a monochromatic bitmap with 2112 x 1324 pixels.
3) "Graphics (Back)" Tab
- Print Capability
Choose the card which is monochrome printing or color printing.
- Black data print method
User can print black via print K color or YMC secondary colors and K color. As well as, user can choose monochrome printing, color printing, set the black valid area and the black invalid area.
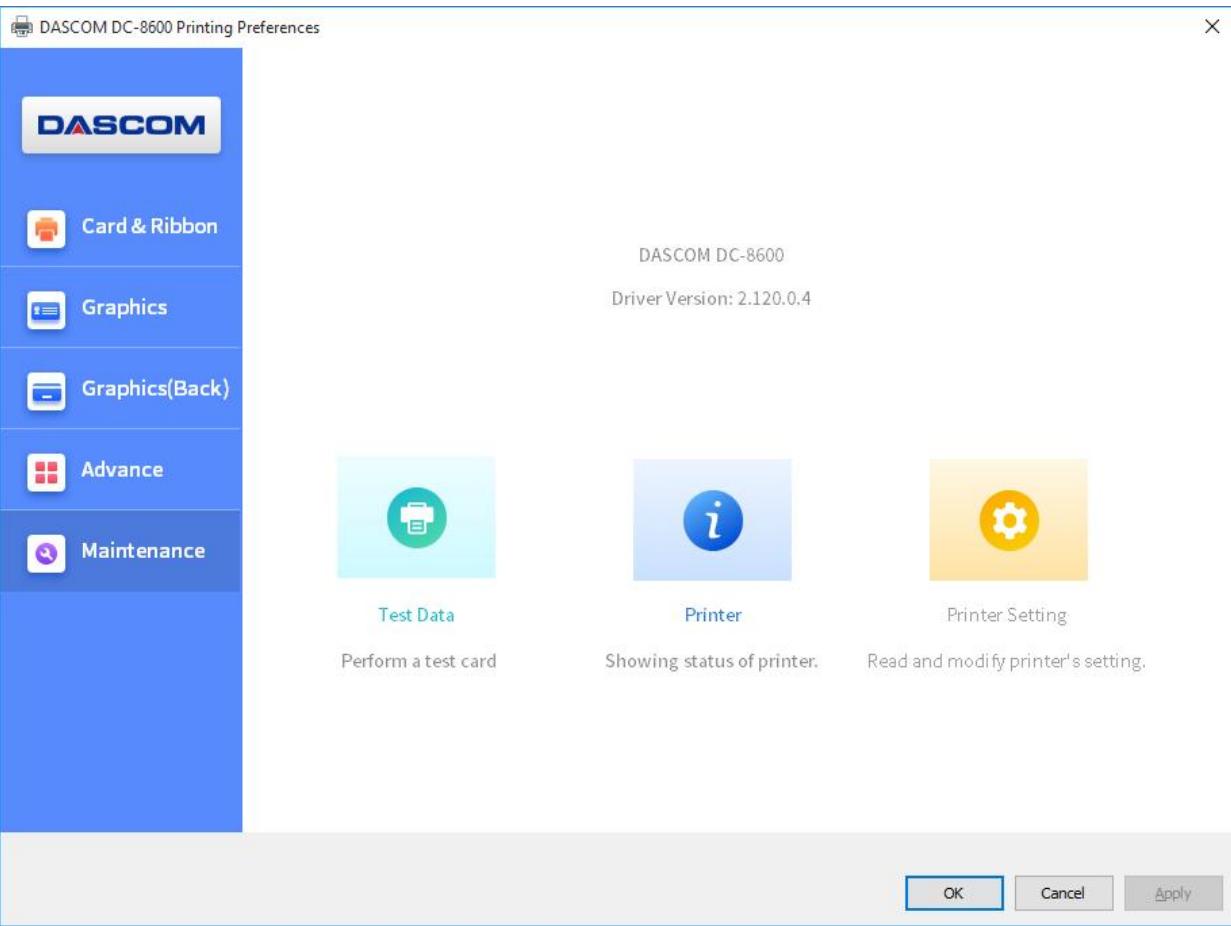
4) "Maintenance" Tab
Test Data
Print the test content.
- Printer
User can check the printer DPI, the maximum printing area and minimum printing area.
- Printer setting
User can read the detailed printer parameter.
"Printer setting"
- User mode
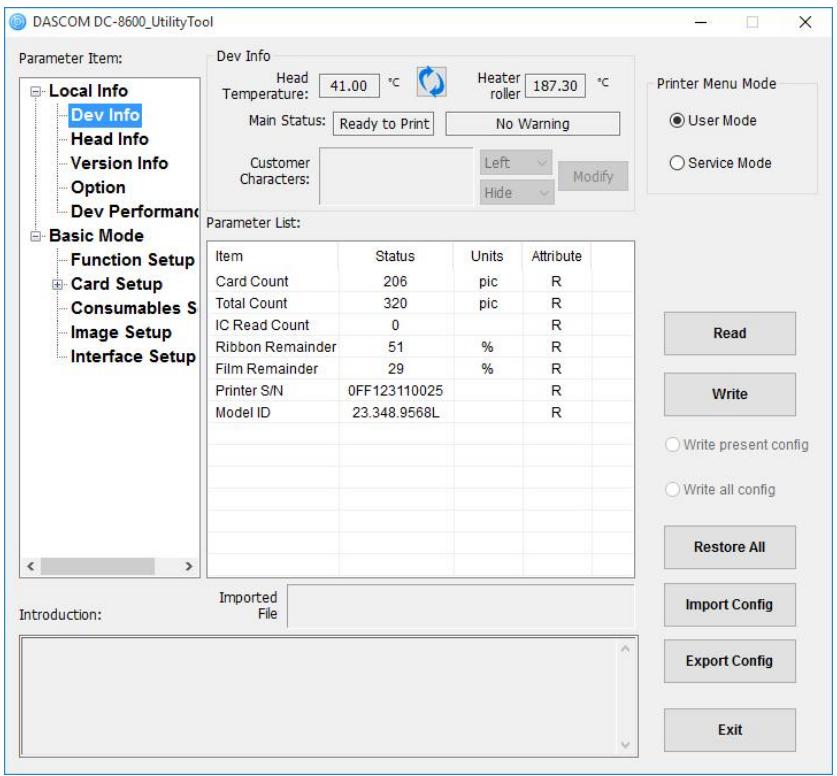
User can read the printer information, options state and various of configuration information. The printer information parameters and options state parameters only support readable. Configuration information support can read and write (reference 3.2 user mode)
Service mode
The password is "123456". If you want to modify it, you can follow the below steps:
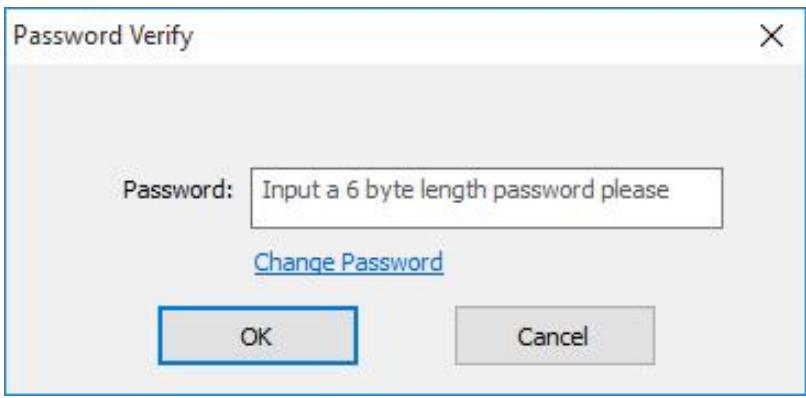
In service mode, user can modify the print position, print density, system settings, print head, option state and configuration. Please don't random change them, it may lead to poor printing effect.

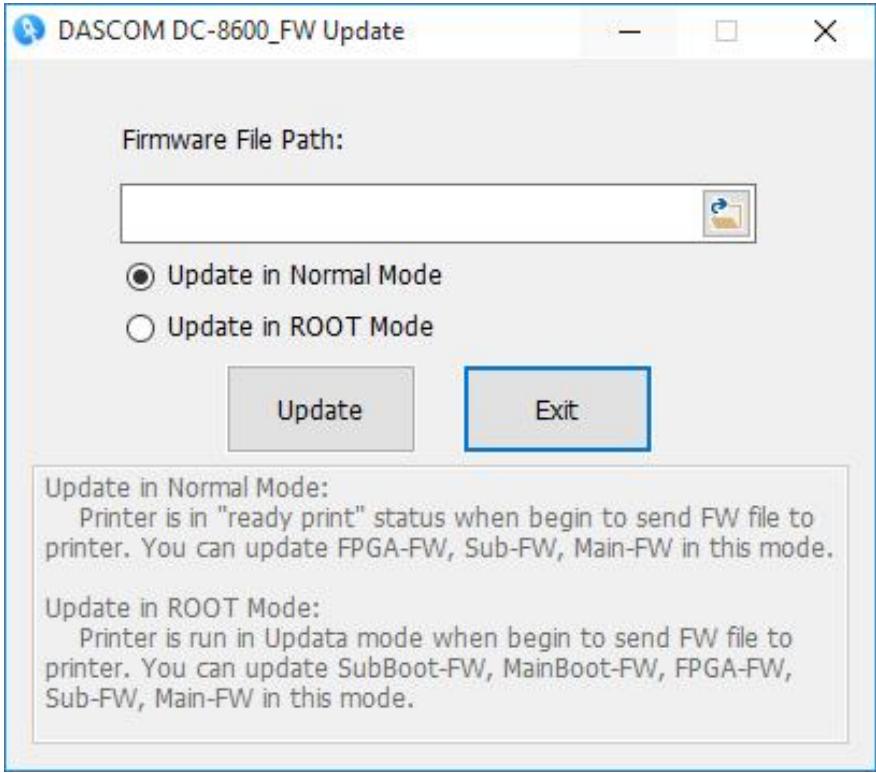
2.8 Firmware update
It's very easy to update the firmware, but if the installation of firmware is incorrect, the printer will be damaged.
Before updating, please contact DASCOM dealer for advice on the implementation of the upgrade. In general, updates are required only when a problem or failure is explicitly identified in DASCOM.
To download the update, please visit WWW.DASCOM.COM:
The steps to update firmware:
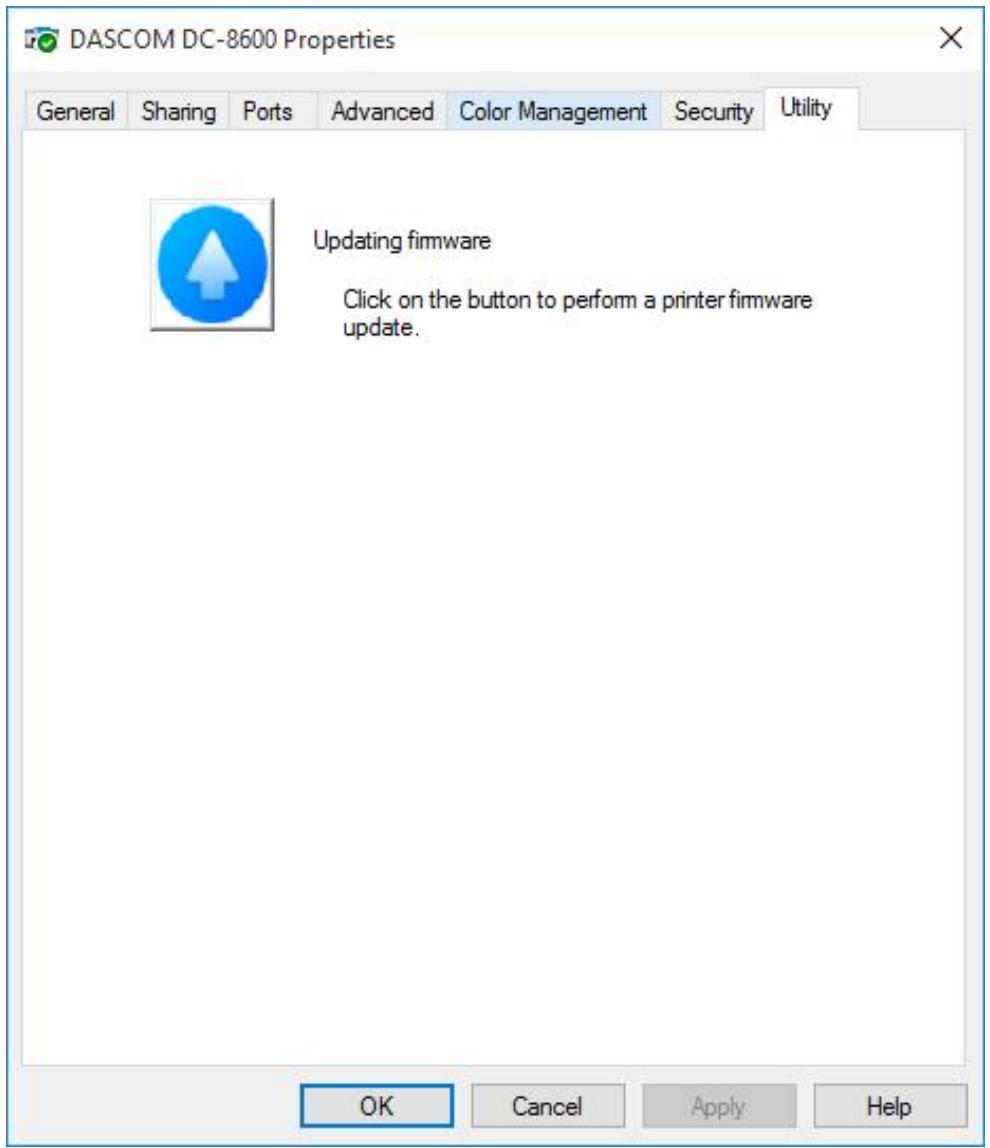
(1) Select the control panel on the start key in the lower left corner of the Windows taskbar.
(2) Select the device and printer, then double clicks.
(3) Choose the printer property on the printer menu.
(4) Select the "tools" label and click the printer icon.
(5) Choose the firmware need to be updated, click "Update". When the update is finished, click "Exit".
(6) After upgrade, you can create the personalization card with this printer.

Do not interrupt the transmission between the computer to the printer during the download. (Such as switch off the printer or computer power, unplug the cable, etc.). Otherwise, printer might not restart. In case of such failure, please contact DASCOM dealer.
CHAPTER 3. NORMAL MODE AND USER MODE
You can change between Normal and User Modes when the printer is operating.
This section outlines the differences between these two modes and how to switch from one to the other.
3.1 Normal Mode
Normal mode: After start up, the printer goes into Normal Mode in which the printer can print cards.
In this mode, the LCD displays the unused ribbon and retransfer film.
Normal Mode Message List:
| Initialize | The printer undergoes system diagnostic and initialization. Cards remaining in printer from a previous irregular session will be ejected. |
| Ready | The printer is awaiting host requests or commands. |
| Printing | The printer is in a printing session. |
3.2 Printer Setup
Printer Setup allows changing the parameters and checking the status.
Steps to change from Normal Mode to Printer Setup:


Even when the printer is in an error state, you can change modes.
Step to return to Normal Mode from Printer Setup:


- Click Home key to return when entering a sub-menu


Right Key must be pressed to return and save the newly changed value.
Switching off the printer will not save any newly changed value(s) if Normal mode is not returned.
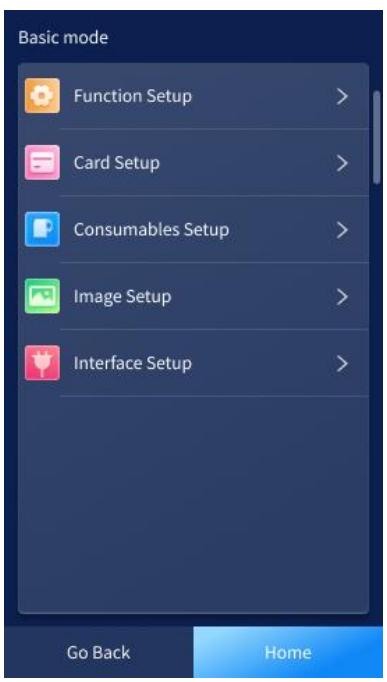
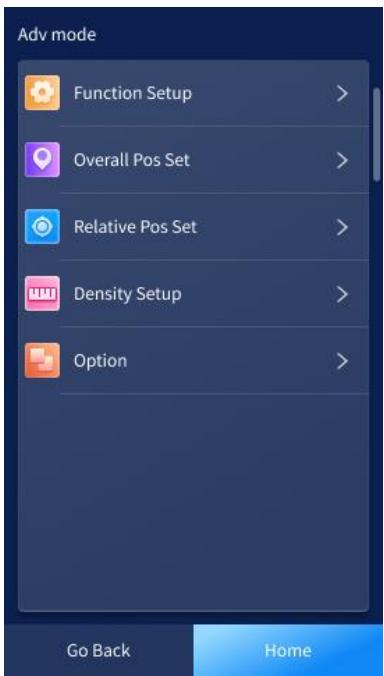
3.3 The major menus
Local info
Basic mode
Advanced mode
Maintenance mode
3.3.1 Local info
Device info
Head info
Version info
Option info
Device performance


For quality assurance at the factory, it is necessary to run various print tests on the printer. A value of tens or more for Card Count is normal during manufacturing of your printer. Record the new print head serial number after replacement; otherwise, failure to do so affects print quality and voids the warranty for this print head.
3.3.2 Basic mode
Function setup
Card setup
Consumables setup
Image setup
Interface setup
Function setup
| Setup | Settings and details |
| Language | Chinese, English |
| Buzzer | On, Off |
| Power Save Mode | Sleep Mode, Delay Power Down, Display Off |
| LCD Light | Adjusts the LCD backlight brightness. |
| Feeder Check | On, Off |
| Card Overflow Detect | When the option "External card cassette" is used, checks whether the card tray on the right side is full of cards. |
| Card Out Nipped | When the card is ejected from the left side, sets the card to be clipped at the slot. |
| Init No CardOut | Sets whether the cards left inside the printer during initialization. |
| Reset Basic Default | Reset the basic mode settings of the printer to factory default settings. |
Card setup
| Setup | Settings and details |
| Card Feed Mode | LEFT AUTO IN, RIGHT AUTO IN, RIGHT MANUAL IN, CASSETTE AUTO IN |
| Std card exit | Sets the port for normal card to eject from the printer. |
| Error card exit | Sets the port for error card to eject from the printer. |
| Eject Face | Auto, Front Up, Back Up |
| Decurl Time(Front) | Corrects the bending of the front side of the card after printing. |
| Decurl Time(Back) | Corrects the bending of the back side of the card after printing. |
| Card Type | PVC , PET, PETG, Card 1(35,202), Card 2(35,207), Card 3 (20,202), the parameter of PVC, PET, PET-G is (20,197), the parameter of card 1,2,3 is settable. |
| Card Thickness | Sets the appropriate transfer conditions to match different card thicknesses. |
| Exact Temp Mode | Adjusts the upper limit of the transfer temperature. |
Consumables setup
| Setup | Settings and details |
| Ribbon Type | Lists the available ribbon type. |
| Film Type | Lists the available film type. |
| Rbn near end(%) | When the ribbon margin is set to a certain value, the LCD prompts "Check the ribbon/transfer film margin". |
| Film near end(%) | When the film margin is set to a certain value, the LCD prompts "Check the ribbon/transfer film margin". |
Image setup
| Setup | Settings and details |
| Yellow Balance | Sets the concentration value of Yellow. |
| Magenta Balance | Sets the concentration value of Magenta. |
| Cyan Balance | Sets the concentration value of Cyan. |
| Black Balance | Sets the concentration value of Black. |
| Color Brightness | Selects the brightness of the print out. |
Interface setup
| Setup | Settings and details |
| USB Setup | Printer ID, USB ID |
| Network Setup | IP Type, IP Address, Subnet Mask, Default Gateway, MAC, Timeout (s) |
3.3.3 Advanced mode
Function setup
Overall position setup
Relative position setup
Density setup
Option
3.3.4 Maintenance mode
Maintenance mode is used for technical support and after-sales maintenance.
CHATPER 4. CLEANING
4.1 Cleaning with a Cleaning Card
Use the Cleaning Card provided to clean the Card Transport Roller if cards do not feed smoothly.
We recommend cleaning the rollers after printing 1,000 cards.

Cleaning Cards can only be used once and cannot be reused. Use a new Cleaning Card with the adhesive side down every time you clean the rollers. Do not touch the platen with hands.
(1) Power on the printer while holding Right Key;
② When finding the "Cleaning" option, press Right Key. The second line of the screen shows "cooling ^ ". "^{\circ}C" indicates current temperature of the heating roller;
③ Wait until the figure drops to 70^ C . When [Remove Film Cartridge] is displayed, open the Front Cover, and remove the Retransfer Film Cartridge;
(4) Close the Front Cover, [Remove Cards] is displayed. (If there's no card in the slot, just ignore this step);
(5) After removing the cards, [Set Cleaning Card] is displayed, put the cleaning Card in the card Feeding Slot;
(6) When [SET : Start] is displayed, press the Right Key to start cleaning;
After cleaning, [Over, Put Film Again] is displayed, open the Front cover and put in the film, then close the cover;
(8) After closing the cover, [Restart Printer] is displayed;
⑨ Restart the printer, the printer will be initialized. After initialization, user can continue printing.
4.2 Cleaning the Cleaning Roller
You can clean the Cleaning Roller before printing.
Clean the cleaning roller if cards are printed with missing colors or if there are foreign objects on them.
Please refer to section 2.4.
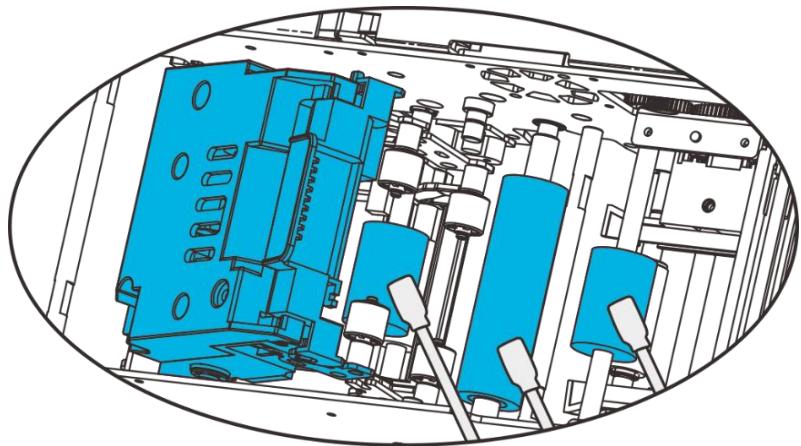
4.3 Cleaning the Feeding Roller
Clean the Feeding Roller under the Card Feeder Cassette if cards do not feed smoothly into the printer.
(1) Turn off the power.
(2) Open the top cover, and remove the Card Case.
③ Wipe the roller clean with cleaning stick.
④ Load the Card Feeder Cassette.
(5) Close the Top Cover.
Wait for 2 minutes, if you want to use the printer.
You can clean the feeding roller of the secondary transfer part at the bottom of the top cover when you find the printing position on the printed card is beyond the scope of adjustment or there is a blank on the edge of the printed area.
4.4 Cleaning the Transport Roller
① Turn off the power.
② Open the top cover, and remove the Card Feeder Cassette.
(3) Open the Front Cover and Top Access Cover.
(4) Lift the de-curl section.
(5) Wipe the roller clean with cleaning stick.
(6) Close the Top Access Cover and Front Cover.
CHATPER 5. TROUBLESHOOTING
5.1 Warning Messages and Troubleshooting
This printer is designed for minimal user intervention. Occasionally, the LCD displays messages to advise users to take corrective actions.
After clearing an error, press SET to initialize the printer and [Ready] will be displayed.
- Warning/Error List
| Display | Solution |
| Press Right Key | Push the Right Key once |
| Feeder empty | Card cassette is empty. Refill cards to the feeder. Press Right Key to resume printing. |
| Cover Open | Close the front cover tightly |
| Temp Disorder | Ensure the printer is operating at the specified ambient temperature. Then restart the printer |
| Check Ribbon/Film | Cause: The unused ribbon/retransfer ribbon reached the levels set in “Ribbon Near End” or “RTM Near End”. Action: Beware if unused ribbon/retransfer film is sufficient for your print job. |
| Ribbon End | Do not turn off power. Refer to Section 2.2 to replace a new ribbon. Press Right Key to clear this warning and the printer resumes the previous printing after initialization. |
| Film End | Do not turn off power. Refer to Section 2.3 to replace a new retransfer film. Press Right Key to clear this warning and the printer will resume previous printing after initialization. |
| Invalid Ribbon | Probable Cause: Unrecognized ribbon. Action: Do not turn off power. Refer to Section 2.2 to reload the ribbon if ribbon is skewed. Or, check if ribbon type is YMCK/YMCKK. Press Right Key to clear this warning and the printer will resume previous printing after initialization. |
| Invalid Film | Do not turn off power. Open the front cover to check if any abnormality with the retransfer film. Correct the fault and close the top cover. Press Right Key to clear this warning and the printer resumes the previous printing after initialization. |
| Film Jam | Probable Cause: Retransfer film winding problem. Action: Do not turn off power. Refer to Section 2.3 to reload the retransfer film. Press Right Key to clear this warning and the printer will resume previous printing after initialization. |
| Ribbon Jam | Probable Cause: Ribbon winding problem. Action: Do not turn off power. Refer to Section 2.2 to reload the ribbon. Press Right Key to clear this warning and the printer will resume previous printing after initialization. |
| Feeder Card Jam | Pressing SET as LCD display shown may eject jammed card after initialization. If the fault is not cleared after initialization, turn the rollers manually to clear jammed card |
| Flip Card Jam | Pressing SET as LCD display shown may eject jammed card after initialization. If the fault is not cleared after initialization, turn the rollers manually to clear jammed card |
| Printer Card Jam | Do not turn off power. Open the front cover. Turn the rollers to clear jammed card. Close the front cover. Press Right Key to clear this warning and the printer will resume previous printing after initialization。 |
| Magnetic Card Jam | Pressing SET as LCD display. The error may be corrected after initialization and printing resumes. If initialization cannot clear the fault, manually turn the rollers to clear jammed card. |
| Heating | Wait for the printer to warm up to its operating temperature. |
| RFID_AUTH_E RROR | Check if genuine ribbon is used. Next, check if the ribbon has an RFID ring. Press Right Key as the LCD shown to initialize the printer. |
| Call Support | Contact your reseller's service support team to report Error Code(s) displayed on the lower right. |

Contact your reseller's service support team if you find errors not listed above. Please inform Error Code displayed on the lower right of the LCD.
5.2 Valuable Help from You for Troubleshooting
Help us identify the following for us to resolve your problem(s):
- The version number of the software installed.
- You can confirm the version number of driver installed in your Microsoft Windows PC as follow steps:
(1) Press the start button in the lower left corner of the Windows taskbar to select the printer and fax.
(2) Select the printer, double clicks.
(3) Select the printing preferences on the printer menu.
④ Turn to the card TAB, then click the version.
5.3 Troubleshooting
Do not attempt to use any tool to fix any problem. This may cause serious damage to the printer.
5.3.1 Faults Related to Printing
No print out?
(1) Check the printer driver
Check compatible printer driver for Microsoft Windows
Check if this printer is the default driver in Microsoft Windows.
(2) Check if power is connected to the printer.
Check if the printer is connected correctly to power.
Check if the LCD display shows: READY.
Confirm power accessories provided for this printer are correctly installed.
(3) Check the USB cable
Check if the USB cable is connected to your printer and your host.
(4) Check the ribbon and the retransfer film
Check if the ribbon and retransfer film are properly installed. Check if associated parts are locked in properly.
(5) Check card jam
Check if any cards remains in transport area. Check if any card jam.
(6) Print the test card
You can realize the reverse steps refer to this section.
Blank card ejected?
(1) Check the ribbon and retransfer film
Check if ribbon/ retransfer film run out or are damaged. Replace them if necessary.
(2) Check if print head is damaged. Print test pattern.
If failed to print the test pattern, contact local reseller for support.
Is the printing quality dissatisfactory?
| Faults | Probable Cause | Corrective Actions |
| Defective Spots | Dirty Card Surface | Check that card surfaces are clean and dust free. Use new, clean cards. |
| Cleaning Roller | Clean the transport rollers | |
| White Line | Ribbon not properly installed | Check the proper installation of the ribbon and retransfer film. Check if ribbon/retransfer film are folded up. |
| Dirty or defective print head | Please contact local reseller. | |
| Vague or Light Image | Improper ribbon/retransfers film installation | Check the proper installation of the ribbon and retransfer film. Check if ribbon/retransfer film are folded up. |
| Ribbon not synchronized | Open and close the front cover to synchronize the ribbon. | |
| Dirty printer or cleaning rollers | Clean printer | |
| Non-genuine cards | Check if your cards meet specifications. Recommend that you purchase cards from Dascom authorized reseller. If the problem persists, please contact your Dascom reseller. | |
| Bent Cards | Substandard retransfer process. | Set de-curl time. Correct card curl from Section 5.3.1. |
| Print peels off | Substandard retransfer process. | Make sure ribbon and film are installed correctly. And set the retransfer parameters. |
| Blank Cards | Improper ribbon installation | Check that print ribbon and retransfer film are installed properly. |
Incomplete printout?
(1) Check manual settings
Check card software design layout matches card dimensions.
Check the landscape/portrait orientation in the driver.
(2) Check interface cable
If the text is printed in strange colors, use the USB cable supplied with the printer.
Check secure and proper connection between printer and your computer.
Try another cable.
③ Check if the printer is clean
See Section 2.3 to clean/replace cleaning rollers.
(4) Check if cards are clean.
Take precautions to keeps cards free from dust and contamination.
(5) Check ribbon and retransfer film
Check if ribbon and retransfer film are installed properly. Check that the ribbon and retransfer film are running smoothly.
(6) Check print head
If a straight white line(s) travels across the length of your card, the print head may be dirty or defective. If the problem persists after cleaning, please contact your Dascom reseller.
Card bent?
(1) See Chapter 4.2 to change from Normal mode to Basic mode.
(2) Click "Card Setup", and then press Right Key.
(3) Click "Decurl Time(s)", and then press Right Key.
(4) Select the 0 -5 seconds flattening time to correct bending card. 0 value represents no flattening.
(5) Click "Home" to save bending correction setting and return to Normal mode.
The factory default value is "0" or "1".
You may use the driver to configure this parameter as well.
Improper secondary retransfer parameters can overheat and cause card bending as well.
Trying different retransfer conditions may reduce card bending as well.
5.3.2 Clear Jammed Card
Do not turn off the power. The print job will be lost.
Do not attempt to use any tool (screwdriver or sharp object) to remove a jammed card. Sharp objects may damage the rollers and heating rollers. Damages caused by such action may void the warranty.
To reduce the chance of card jamming:
(1) See Section 2.1.3 to set the proper card thickness dial
(2) Use cards with thickness specified in the specifications.
(3) Check that cards are not bent.
(4) Before putting the cards to the card cassette, shuffle the cards by holding the outside edges to prevent sticking cards.
To take out jammed card
When card jam occurs, the LCD display prompts "Printer Card Jam" and the print job stops. Do not turn off the power as the uncompleted print job will be lost.
(1) Open the top cover and front cover.
(2) Take out the card cassette.
(3) If the last card is completely fed into the printer, pull it out slowly by hand.
④ Replace jammed card back to the card cassette.
(5) Close the card feed cover and the printer covers.
(6) Press the Right Key. The error message disappears from the LCD display and the printer restarts.
To take out jammed card in the thermal retransfer unit
When card jam occurs, the LCD display prompts "Feeder Card Jam" and the print job stops. Do not turn off the printer as the uncompleted print job will be lost.
(1) Open the top cover.
② Take out the card cassette.
③ Rotate the feeding knob in counter-clockwise direction. Take out the jammed card from the cleaning section.
(4) Replace jammed card back to the card cassette.
(5) Close the card feed cover and the printer covers.
(6) Press the Right Key. The error message disappears from the LCD display and the printer restarts.
To take out card jammed in the reverse section
(1) Open the top cover and front cover.
(2) Take out the card cassette.
(3) Release the lock and lift it up as shown in the diagram.
(4) Take out the cleaning roller and cleaning cartridge.
⑤ Rotate the reverse knob. Turn the feeding knob back and forth. The jammed card may
come out from the left or right card slot.
(6) Replace jammed card back to the card cassette.
⑦ Make sure the retransfer film is not shifted by this process. Put flattening part, cleaning roller/cartridge, and card cassette back in place. Close the printer cover.
⑧ Press the Right Key. The error message disappears from the LCD display and the printer restarts.
Beware the thermal unit may be hot. Turn off power and let it cool down for a few minutes. If card jam persists, please contact your Dascom reseller.
5.3.3 Change the Print Head
The print head is a heating element and directly affects print quality. A dirty or dusty environment seriously affects its life and can cause damage to the print head.
Consult your Dascom reseller if print head replacement is necessary.
To meet DASCOM's warranty policy for print head replacement, you must:
- Use Dascom approved consumables, including cards, ribbons and service parts.
- Maintain regular cleaning and maintenance of the printer.
Install the printer in a dust free environment as detailed in the specifications - Use good well-conditioned cards: clean, without deterioration causing head damage.
5.4 Technical support
If you have trouble configuring and using a printer, read this manual carefully.
If you still can't solve the problem, you can get detailed information and help via the DASCOM partner network.
5.4.1 DASCOM partner network
If you have any problem can't be solved, please contact the DASCOM dealer. If you don't know any DASCOM dealer, please visit www.DASCOM.COM to tell us your problems.
DASCOM will inform you of the detailed contact of your local DASCOM dealer. When you call the DASCOM dealer, you must provide the information as following:
(1) The printer model and serial number.
(2) The current configuration and operating system.
(3) A description of what happened.
(4) A description of the steps taken to address this problem.
In addition, to help answer your questions around the clock, WWW.DASCOM.CN provides a variety of explanations for the daily use of printers.
5.4.2 More information
If additional technical assistance is required, you can visit DASCOM website www.DASCOM.COM, and find information about the use and troubleshooting of DASCOM printers in the driver and support section.
You can download the latest version of firmware, print driver and use manual, DASCOM printer usage and maintenance related video, and FAQ (FAQ) section.
CHAPTER 6. SPECIFICATION
| Function | Double-sided printing (full color) |
| Printing system | Indirect retransfer system |
| Printing material | Material: PVC, PET, PET-G |
| Card thickness | 0.48 ~ 1.10mm |
| Card size | ISO CR-80 - ISO7810 (53.98 x 85.60mm) |
| Printing density | 600dpi (23.6 dots/mm) |
| Print tones | Input tones: RGB, 256 tones/color, K2 tones Output tones: YMC 256 tones/color,K2 tones |
| Print range | 53.98mm x 85.60mm |
| Print time | Single sided: 170 cards/hour Double sided: 83 cards/hour |
| Ribbon | YMCK YMCKK YMCKH YMCKI YMCKSI |
| Film | Clear with optional hologram layer |
| Card feeding system | Automatic feed from Card Cassette Manual feed(single page) |
| Card feeding capacity | Card cassette: 250cards 0.76mm Outer tray: 250cards 0.76mm Reject bin: 140cards 0.76mm |
| Standard interface | USB2.0 Ethernet 100BASE-TX,IEEE802.3u RS-232C x 2(Port for extended users) USB-Hub |
| Option | Card cassette lock, auto card cassette, contact card reader, contactless card reader, magnetic stripe reader |
| Supported OS | Windows 8/8.1/10/11 and Server 2012/2016/2019/2022(32 and 64 bit) |
| Power source | AC100V~240V, 50/60Hz |
| Device size | 411mm (height) × 339mm (width) × 248mm (deep) |
| Weight | 13.3KG |
| Operating environment | Temperature: 10 ~ 35 °CHumidity: 20 ~ 80 % (no moisture condensation) |
| Storage environment | Temperature: -20 ~ 60 °CHumidity: 0 ~ 90 % (no moisture condensation) |
Appendix I: FCC STATEMENT
- This device complies with Part 15 of the FCC Rules. Operation is subject to the following two conditions:
i. This device may not cause harmful interference.
ii. This device must accept any interference received, including interference that may cause undesired operation.
- Changes or modifications not expressly approved by the party responsible for compliance could void the user's authority to operate the equipment.

This equipment has been tested and found to comply with the limits for a Class B digital device, pursuant to Part 15 of the FCC Rules. These limits are designed to provide reasonable protection against harmful interference in a residential installation.
This equipment generates uses and can radiate radio frequency energy and, if not installed and used in accordance with Dascom instructions, may cause harmful interference to radio communications. However, there is no guarantee that interference will not occur in a particular installation. If this equipment does cause harmful interference to radio or television reception, which can be determined by turning the equipment off and on, the user is encouraged to try to correct the interference by one or more of the following measures:
- Re-orientate or relocate the receiving antenna.
- Increase the separation between the equipment (printer) and receiver.
- Connect the equipment into an electrical outlet on a circuit different from that to which the receiver is connected.
- Consult your dealer or an experienced radio/TV technician for help.
RF Exposure
This equipment complies with FCC radiation exposure limits set forth for an uncontrolled environment. This equipment should be installed and operated with minimum distance of 20~cm between the radiator and your body. This transmitter must not be co-located or operating in conjunction with any other antenna or transmitter.
Appendix II: DASCOM REPRESENTATIVES
GERMANY
DASCOM Europe GmbH
Heuweg 3
D-89079 Ulm
Deutschland
Tel.: +49 (0) 731 2075 0
Fax: +49 (0) 731 2075 100
www.dascom.com
UNITED KINGDOM
DASCOMGBLtd
Hart House, Priestley Road,
Basingstoke, Hampshire
RG24 9PU, England
Phone: +44 (0) 1256 355130
Fax: +44 (0) 1256 481400
www.dascom.com
SINGAPORE (ASIA PACIFIC)
DASCOMAP PteLtd
2 Jurong East Street 21
05-42, IMM Building
Singapore 609601
Phone: +65 6760 8833
Fax: +65 6760 1066
www.dascom.com
AMERICAS
Dascom Americas Corporation
34 Lakeview Court
Verona, VA 24482
USA
Phone:+1 (877) 434 1377
Fax: +1 (540) 242 7221
www.dascom.com
FRANCE
DASCOM Europe GmbH
117 Avenue Victor Hugo
92100 Boulogne-Billancourt
France
Phone: +33 (1) 73 02 51 98
www.dascom.com
CHINA
JIANGMEN DASCOM COMPUTER
PERIPHERALS CO., LTD
No.399, jinxing Road,
Jianghai District Jiangmen,
P.R. China
www.dascom.com
All rights reserved. Translations, reprinting or copying by any means of this manual complete or in part or in any different form requires our explicit approval. We reserve the right to make changes to this manual without notice. All care has been taken to ensure accuracy of information contained in this manual. However, we cannot accept responsibility for any errors or damages resulting from errors or inaccuracies of information herein.
© 2024 DASCOM