A13 Tab - Tablet UMIDIGI - Free user manual and instructions
Find the device manual for free A13 Tab UMIDIGI in PDF.



| Product Type | Tablet |
| Brand | UMIDIGI |
| Model | A13 Tab |
| Operating System | Android™ 13 |
| Processor | T616 2 x A75@2.0GHz + 6 x A55@1.8GHz |
| GPU | Arm Mali G57 1Core @750MHz |
| RAM | 6 GB / 8 GB |
| Internal Storage | 128 GB / 256 GB |
| Battery | 7500 mAh |
| Screen Size | 10.5 inches |
| Screen Resolution | 1920 x 1200 pixels |
| Rear Camera | 13 MP + 5 MP |
| Front Camera | 8 MP |
| Connectivity | WiFi 802.11 a/b/g/n/ac, Bluetooth 5.0, GPS/Glonass/Galileo/Beidou |
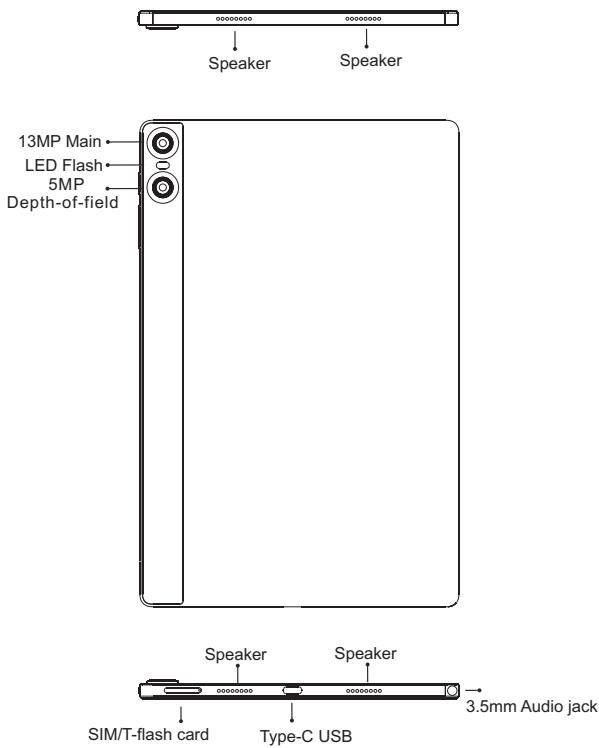
| SIM Cards | 2 Nano SIM or 1 Nano SIM + 1 TF card |
| Ports | USB Type-C, 3.5mm headphone jack |
| Sensors | Accelerometer, compass |
| Dual Standby | Dual SIM, dual standby, single pass |
| Box Contents | Tablet, Type-C cable, power adapter, quick guide, phone case |
Frequently Asked Questions - A13 Tab UMIDIGI
User questions about A13 Tab UMIDIGI
0 question about this device. Answer the ones you know or ask your own.
Ask a new question about this device
Download the instructions for your Tablet in PDF format for free! Find your manual A13 Tab - UMIDIGI and take your electronic device back in hand. On this page are published all the documents necessary for the use of your device. A13 Tab by UMIDIGI.
USER MANUAL A13 Tab UMIDIGI
Thanks for choosing UMIDIGI products.
Thanks
Building a great tablet is hard enough, so building agreat tablet on a budget should be infinitely more difficult. Big thanks to all who mdae this supertablet super awesome by contributing valuable time and developing hardware, software & other developments. Thanks for choosing UMIDIGI products, thanks to your support our value can be realized and we acn constantly move forward to create smart devices with better user experience.
www.umidigi.com
Scan following QR-codes to follow us and enter giveaway to win a UMidIGI smart device for free!




VK: vk.com/umidigi
YouTube: youtube.com/umidigi
Facebook: facebook.com/Umidigi
Twitter: twitter.com/umidigi
Instagram: instagram.com/umidigi
English- 1
Deutsch 7
Italiano- 13
Espanol 19
Francais 25
日本語- 31
UMIDIGI is registered trademark by
Shenzhen Youmi Intelligent Technology Co.,Ltd.
All other trademarks are the property of their respective owner.
Visit www.umidigi.com for more information
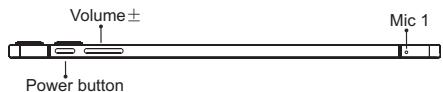


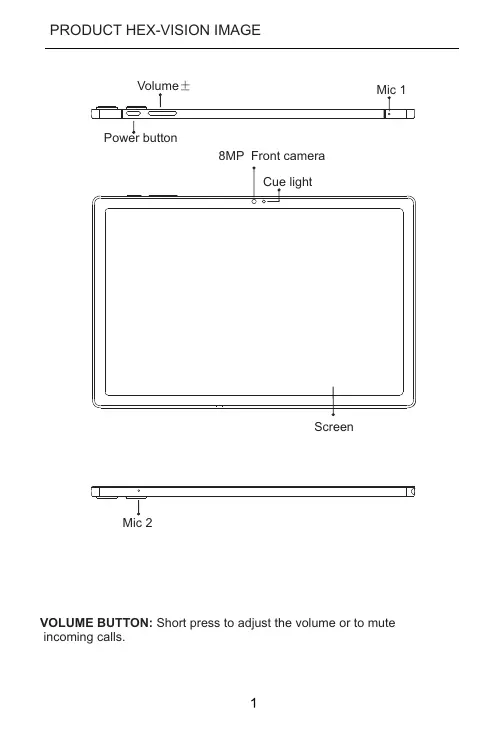
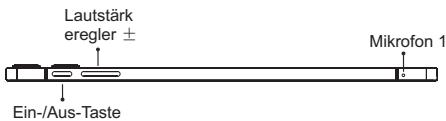
VOLUME BUTTON: Short press to adjust the volume or to mute incoming calls.
POWER BUTTON: Long press to turn on the device; When the device is on, short press Power Button to shutdown or turn on the screen.
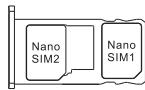
Insert Nano-SIM Card
Please face the chip side of the Nano-SIM card adown when inserting into the slot. Be aware of the direction of the cut edge when placing the Nano-SIM card into the slot.
Reminder:
Please use standard Nano-SIM card. Please don't use a non-standard card that is hand-cut, in Irder to prevent the SIM slot and card tray from being damaged and card-rejecting situating that amy cause damage to the tablet.
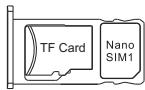
TF Card Installation
Please place the metal contact of the TF card adorn, be aware of the direction of the cut edge. Place the card onto the tray and insert into the device.
Reminder:
Please turn off the tablet before cheanging or replacing the TF card.TF card does not come with the tablet please purchase separately.
Please do not plug in and out of the SIM card tray when the tablet is on.Be careful when using the slot thimble from scratchiein the tablet.
DUAL-SIM MANAGEMENT
Please choose which SIM card slot to be the main one to be for 4G network via Setting > SIM Card. Choose your preferde network types of 4G/3G/2G via Setting > Network & Internet >Mobile network >Preferred network type.
Connecting WLAN
Into the setting of WLAN via Settings > Network & Internet > Wi-Fi When WLAN is on, a list available WiFi connection will appear.
Click on the one you want to connect to enter the password if tet network isencrypted, then click Connect .When it's a public network,just click Connect When the network shows "connected", it is available to use.
Bluetooth Function
Into the setting of Bluetooth function via Settings > Connected devices > Bluetooth Enable the Bluetooth function by clicking the Menu Button then select "Refresh", then the tablet will search for available Bluetooth devices for pairing and list on the screen. Click on the one you want to pair with, then click "Pair" on the dialog pop-up. Documents are available for transmission after Bluetooth pairing.
Reminder :
Slide down the status bar to open the shortcut switches for Bluetooth and other functions.
WLAN Hot-spot Setting
Click on via Settings > Network & tethering > Wi-Fi hotspot to turn on the Portable WLAN Hot-spot function .
When setting up WLAN hot-spot , enter your user name in "Network Name"and password ,then click Save .Another device password of the password .
Reminder :
Please enable the Data Connection before enabling the network sharing function. Your mobiletraffic will be shared by other devices, so please use it carefully .The signal of the WLAN hot-spot depends on the signal strength and devices .
Aim the camera at the shooting object, the tablet will start focus automatically ; or you can click on the screen to choose the object you want to focus on, then click " Capture" icon to take photos .You can also choose other modes such as video recording,beautiful , panorama to take photos/videos.
INSTRUCTIONS FOR DUAL-CARD STANDBY
"Dual card, dual standby, single pass" means you can insert two SIM cards and have them both "standby", but cannot make phone calls at the same time. During the standby mode both cards are available for receiving phone calls, but once one of the cards is activated, the other one cannot receive phone calls nor make phone calls.
SECURITY INFORMATION
Security information (including BS, ES, battery security information) of third-party software installation and function may vary in different regions or by different hardware specifications. UMDIGI holds disclaimer for the performance problem or incompatibility caused by third-party applications, registry editing, OS software modifying. Customizing the OS may cause the device or some applications fail to work properly.
Please prevent the device or the battery in extreme cold/hot condition. Then extreme temperature will lead to deformation of the tablet and reduce the charging capacity and battery life.
Please only use the custom designed and approved battery and recharger by UMIDIGI. Incompatible battery and recharger may cause damage to the tablet . Please abide by local regulation when disposing of the used batteries and tablet.
Please do not place the battery or the tablet onto or inside heating devices such as microwave, oven or radiator. The battery may explode if it gets too hot.
Please do not crush or pierce the battery . Prevent the battery fromgetting high pressure from outside , it may cause internal short andoverheating .
| BASIC INFORMATION | |
| Model | A13 Tab |
| Operating System | Android™ 13 |
| CPU | T616 2 x A75@2.0GHz + 6 x A55@1.8GHz |
| GPU | Arm Mali G57 1Cocre @750MHz |
| RAM | 6GB/8GB |
| ROM | 128GB/256GB |
| Battery | 7500mAh |
| Display | |
| Screen Size | 10.5 inch |
| Resolution | 1920*1200 Pixels |
| Touch | Capacitive multi-touch |
| Cameras | |
| Rear Camera | 13MP+5MP Camera |
| Front Camera | 8MP Camera |
| Connection(I/O) | |
| Band | GSM:B2/5 WCDMA :B2/5 FDD:B2/5/7/12 TDD:B41F(2535-2655) |
| SIM/TF card | 2 Nano SIM Card Or 1 Nano SIM Card and 1 TF Card |
| WiFi | IEEE802.11 a/b/g/n/ac |
| Bluetooth | Bluetooth 5.0 |
| GNSS | GPS/Glonass/Galileo/Beidou |
| FM | YES |
| Earphone Port | 3.5mm |
| USB Port | Type-C USB |
| Other Features | |
| Video File Format | 3GP/MPEG4,etc |
| Audio File Format | WAV/MP3/AAC/AMR/MIDI/APE/WMA,etc |
| Card Extend | Support TF card up to 512 GB |
| Language | Support Multi-language |
| Sensor | G-Sensor,Compass. |
| In the box | |
| 1*tablet | |
| 1*Type-c Cable | |
| 1*Power Adapter | |
| 1*Quick Start Guide | |
| 1*Phone case | |
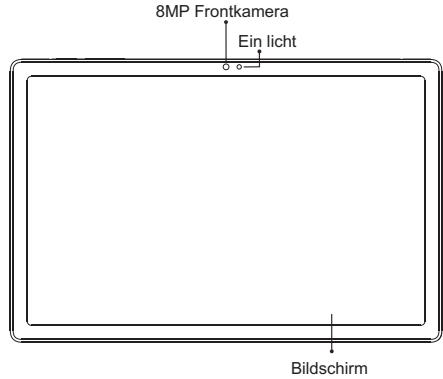

TF Card Installation:
Any Changes or modifications not expressly approved by the party responsible for compliance could void the user's authority to operate the equipment.
This device complies with part 15 of the FCC Rules. Operation is subject to the following two conditions: (1) This device may not cause harmful interference, and (2) this device must accept any interference received, including interference that may cause undesired operation.
Note: This equipment has been tested and found to comply with the limits for a Class B digital device, pursuant to part 15 of the FCC Rules. These limits are designed to provide reasonable protection against harmful interference in a residential installation. This equipment generates, uses and can radiate radio frequency energy and, if not installed and used in accordance with the instructions, may cause harmful interference to radio communications. However, there is no guarantee that interference will not occur in a particular installation. If this equipment does cause harmful interference to radio or television reception, which can be determined by turning the equipment off and on, the user is encouraged to try to correct the interference by one or more of the following measures:
—Reorient or relocate the receiving antenna.
—Increase the separation between the equipment and receiver.
Connect the equipment into an outlet on a circuit different from that to which the receiver is connected.
—Consult the dealer or an experienced radio/TV technician for help.
ISEDC Warning
Operation of 5150-5250 MHz is restricted to indoor use only. This device complies with Innovation, Science, and Economic Development Canada licence-exempt RSS standard(s). Operation is subject to the following two conditions:
(1) this device may not cause interference, and
(2) this device must accept any interference, including interference that may cause undesired operation of the device.
For body worn operation, this device has been tested and meets the FCC/ISEDC RF exposure guidelines when used with an accessory designated for this product or when used with an accessory that contains no metal.
In all EU member states, operation of 5150-5250 MHz is restricted to indoor use only.
Follow UMIDIGI community.a place where you can share and discuss with UMIDIGI user keep posted with the most up-to-day news.

Google™ app and Google Chrome™ pre-installed Android is a trademark of Google LLC.
Manufacturer:Shenzhen Youmi Intelligent Technology Co.,Ltd. Add:406-407 Jinqi Zhigu Building,4/F,1 Tangling Road,Nanshan District, Shenzhen City,China.
Amazon service Email :amazonservice@umidigi.com

Brand : UMIDIGI
Model : A13 Tab
Category : Tablet