
Rome X - Smartphone UMIDIGI - Free user manual and instructions
Find the device manual for free Rome X UMIDIGI in PDF.


| Product Type | Smartphone |
| Brand | UMIDIGI |
| Model | Rome X |
| Dimensions | 158.7 x 74.9 x 8.6 mm |
| Weight | 192 g |
| Display Size | 6.53 inches |
| Display Type | IPS LCD capacitive touchscreen |
| Resolution | 1080 x 2280 pixels |
| Operating System | Android 9.0 (Pie) |
| Processor | MediaTek Helio P23 MT6763 octa-core 2.0 GHz |
| RAM | 4 GB |
| Internal Storage | 64 GB |
| Expandable Storage | microSD, up to 256 GB |
| Rear Camera | 16 MP + 8 MP dual |
| Front Camera | 16 MP |
| Battery Capacity | 3850 mAh Li-Ion |
| Charging | Standard USB Type-C, 10W |
| Connectivity | 4G LTE, Wi-Fi 802.11 a/b/g/n, Bluetooth 4.0, GPS |
| SIM Card | Dual SIM (Nano-SIM, dual stand-by) |
| Sensors | Accelerometer, gyro, proximity, compass |
| Features | Fingerprint (rear-mounted), face unlock |
| Accessories Included | Phone, charger, USB cable, protective case, screen protector, user manual |
Frequently Asked Questions - Rome X UMIDIGI
User questions about Rome X UMIDIGI
0 question about this device. Answer the ones you know or ask your own.
Ask a new question about this device
Download the instructions for your Smartphone in PDF format for free! Find your manual Rome X - UMIDIGI and take your electronic device back in hand. On this page are published all the documents necessary for the use of your device. Rome X by UMIDIGI.
USER MANUAL Rome X UMIDIGI
1. Appearance and Keypad Operations
| Keys | Functions |
| home | ● Press this button to return home from any application or interface. ● Press it to open recently opened application window. |
| menu | ● Press it to start the menu, which allows you to perform actions in the current interface or options’ menu. |
| back | ● Press it to return to the previous interface, or to close dialog box、options’ menu、notification panel or the keypad. |
| power | ● Press it to open the phone’s menu, then you could choose to lock the screen、turn off the phone, or set it to the silent mode. |
| up | ● Press it to increase the volume ● Press it to turn the phone to vibration mode from the silent mode. |
| down | ● Press it to decrease the volume. |
| P-Serson | ● Cover it, and then the phone’s backlight will turn off |
| front camera | ● Entering the camera interface, switched to the front camera can photo yourself. |
2. Using Memory Card as U Disk
If you want to send music, pictures or other files to the phone's memory card from the computer, you should set memory card as u disk first.
Set memory card as u disk
1) Connect the phone to the computer with USB cable. The notification icon will appear in the status box.
2) Use USB mobile transmission line will connected to the computer
3) In the notification panel, touch USB is connected, And then touch the USB connected as a media device
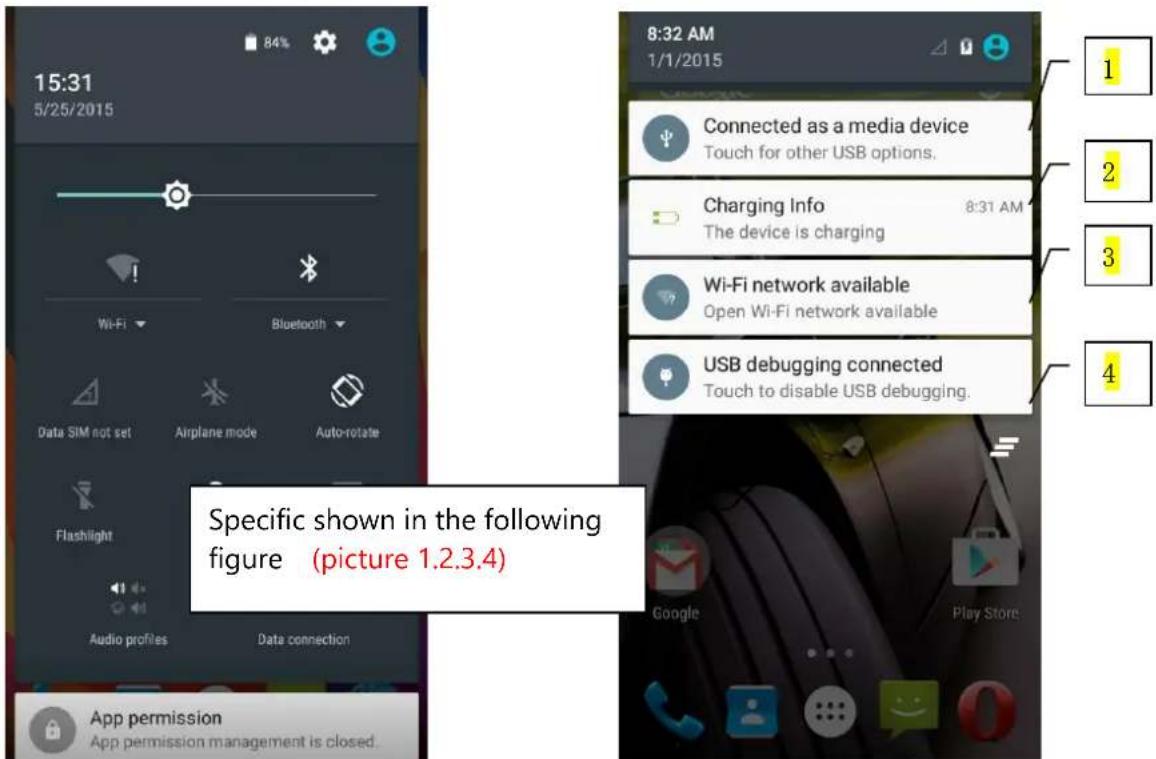

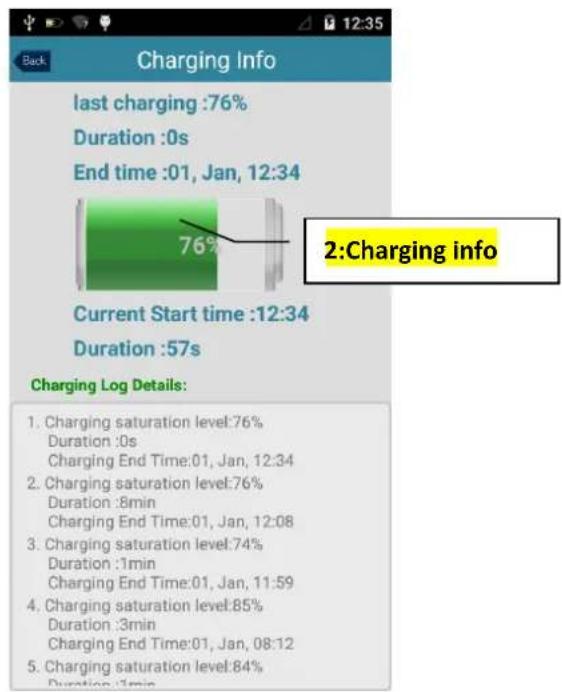
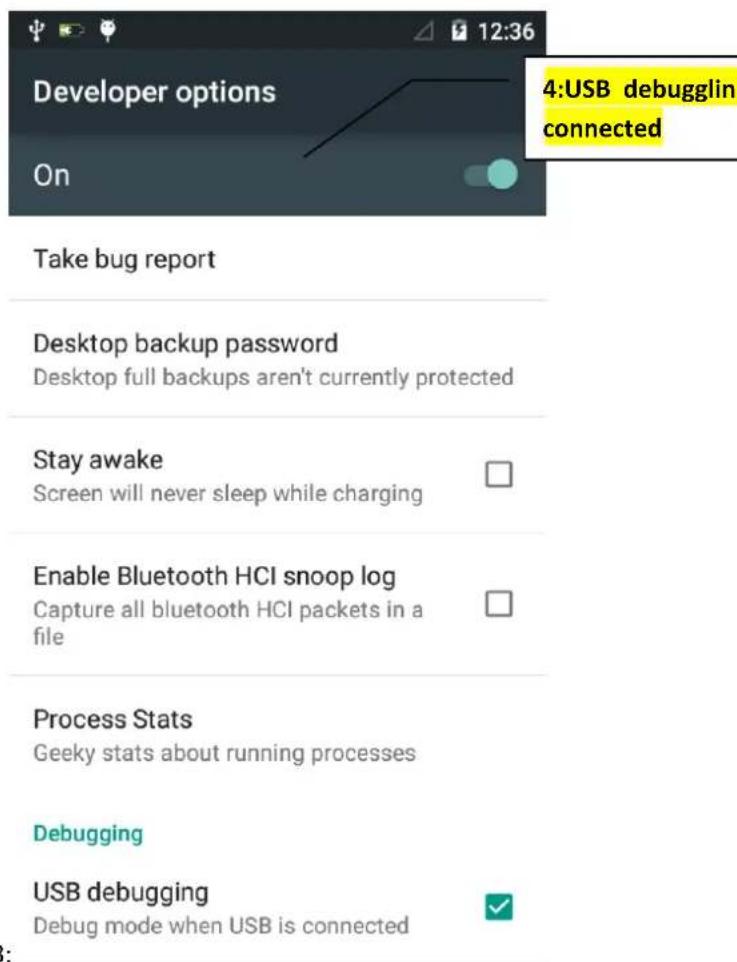
4) Insert the SD Card.
Open USB connected.

2) After the connection can be directly in the PC check images captured on camera.

- Notice: different PC operating system to how to operate to normal use the U disk.
1) WIN7 Can directly use
2) XP update windows media player to 11
3) Install wpdmtp.inf driver
4) Vista Unconfirmed
- Notice: On the PC operation assistant tool such as mobile phone, Must be open the USB debugging.
3. WiFi
Wifi provides as far as 300 feet (100M) range of wireless network access. If you use cell phone to connect wifi, you should connect to the wireless access point or 「hot spots」.
- Notices: The availability and coverage of Wi-Fi signal depend on the number, infrastructure and other objects penetrated by the signal.
Open Wi-fi and to connect to the wireless network
1) Press home>menu, then touch settings>wifi and internet
2) Select the wi-fi box, to open Wi-Fi. Phone will automatically scan for available wireless networks.
3) Touch Wi-Fi settings. Then a list of Wi-Fi network will show the founded network name and security settings. (open network or WEP、WPA/WPA2 with password). If you enable the notification in Wi-Fi settings, The status box will show this
icon () when open available wireless network founded.
4) Touch one of the Wi-Fi choices to connect the network. When you choose open network, phone will connect to it automatically. If you choose WEP、WPA/WPA2 with password, you should type the password first, then touch to connect it.
- Notices: when the phone is connected to the wireless network,
The status box will show this Wi-Fi icon (M), and the approximate
signal strengthen (the number of lit bars). If touch the connected network, will display the name of Wi—Fi network, status, speed, signal,

strength, security, information and IP address.
If you want to delete the wireless settings, please touch "not reserve"
as in the right picture. If you want to connect to this network, you
should re-enter these settings.
- Notices:
Unless you choose not to reserve the network, otherwise, there is no need to re-enter the corresponding password when next time connecting to the previously encrypted wireless network. Wi-Fi will search automatically, that is, phone needn't to perform additional steps to connect Wi-Fi networks.
- Notices:
Unless you choose not to reserve the network with password, otherwise, there is no need to re-enter the corresponding password when next time connecting to the previously encrypted wireless network. Wi-Fi will search automatically, that is, phone needn't to perform additional steps to connect Wi-Fi networks.
- Connect to other Wi-Fi networks
1) In the interface of wireless and network, touch Wi-Fi settings. The founded Wi-Fi networks will show on the Wi-Fi network list.
2) Touch other Wi-Fi networks, and then you can connect to this network.
- Notices: in addition, mobile phone can also surf the Internet by GPRS. Our current SIM card GPRS to open after the default boot. Users can manually choose to open data connection, when for the single card, direct drop down the status bar, touch "data connection" is open, when for the card, location in "Settings > SIM card > cellular data > select SIM1 or SIM2", touched the drop-down "data connection" of the status bar is open the current selected SIM card data connection, and then touch "data connection" close this SIM card data connection..
4. Bluetooth
Turn on Bluetooth or set the phone can be detected
1) Press home>menu, the touch settings.
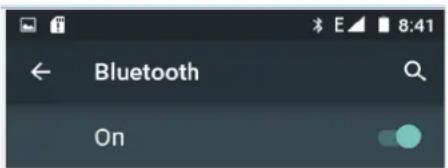
2) Touch wireless and internet, then choose Bluetooth box to open the Bluetooth function. After started, the status box will
show this icon ( ). Touch “scan for devices” the it starts to scan for all devices within range.
3) Touch Bluetooth settings, all the devices founded will display in the list under the icon.
(bluetooth device is set open and visible to a nearby equipment work, other equipment as long as open the bluetooth can search to the bluetooth and matching, open as long as the other devices can be detected at the same time, you can search for other equipment and matching use)
After a paired devices, the system will show the paired and other equipment available
Paired devices

GT-19300

Available devices

SKY 4.5Q
Aqua Speed is visible to nearby devices while Bluetooth Settings is open.
• Pairing and connection of Bluetooth headset
1) Press home>menu, then touch settings.
2) Touch wireless and internet>Bluetooth settings, then select Bluetooth box, then your phone will scan for the
Bluetooth devices within range, and show the founded devices in the list under the icon.
- Tips:
a. If the list can't find your equipment, touch scanning equipment to re-scan it.
b. Make sure that the devices wanted are under the detected mode.
3) Touch headset in the equipment list to finish the connection.
- Notices: generally Bluetooth devices need password to be paired, often use [0000] as the default password.4) The pairing and connecting status will show under the headset in the Bluetooth devices list. When the headset
connected to your phone, the status box will show this icon (✗) means connected. Then you can use the headset to make or receive callings.


Cut the connection to the Bluetooth
1) Press home>menu>settings>wireless and internet>Bluetooth settings.
2) In the list of Bluetooth equipment, touch or tap and hold the connected hand-free headset.
3) Press and select "cancel the pairing".
- Bluetooth proximity sensor
After pairing the two device, you can test out the signal is strong or weak by the Bluetooth proximity sensor device
5.Mail
5.1 Gmail
• Create an electronic mail account
Select mail> settings. You can activate or edit existing e-mail accounts as well as create a new e-mail account.
a. Select mail, Google account setting interface appears. Then touch 'next step' > create account>enter name, last name and e-mail account.
b. Google servers determine whether the name can be used, if so, new interface appears prompting enter password, then judge the password' security, users who doesn't meet the requirements need to re-enter the password.
c. Successfully register a new Gmail account, a messenger created automatically for testing.
- Loading mail account
a. Open Gmail skip introduction screen>loading interface appears >select load
b. Enter name, password then load
E-mail account initialization, prompting "login successful" All Google accounts will be synchronized.
- Creating and sending ,mails
When creating mails, select mail > creating mails. Enter the address(recipient)、theme and contents. Press MENU you could ‘append’、‘Add Cc/Bcc’,select send or discarded.
- Receive mails
There is tone for new mails, in the status box will show this button update the number of the unread mails in a proper way.

Press Menu > ‘refresh’, refresh and
- Delete mails
When loading a mail account, if you want to delete it, you need to restore factory settings. When loading a second one, you could press the menu button to delete it.
Notices: many functions depend on Gmail Account, for example: Electronic Market、Google Talk、Sync Contact and Calendar.
5.2 Email
- Load Email.
c. Open network connection,
d. In setting the account interface, input the correct email address and password and click next mobile phone automatically complete the sending and receiving server Settings. Pop-up mail find frequency, and user Settings interface, complete Settings, click next.
e. For account creation name, the editor of the law that email user name, and click next. Complete set, synchronous mailbox.
- Create and send Email
When creating mails, select mails > create mails. Enter the address(recipient)、theme and contents. Press MENU you could 'append'、'Add Cc/Bcc', select send or discarded or save as draft.
- Check the Email files
- Click the inbox to the left of the small buttons, list all the folder options

6. Dialling
When the icon of internet server appears in the screen, you could dial or receive callings. The signal bar on the top right corner show the strength of network signal (When the signal with the strongest signal).
- Start dialing
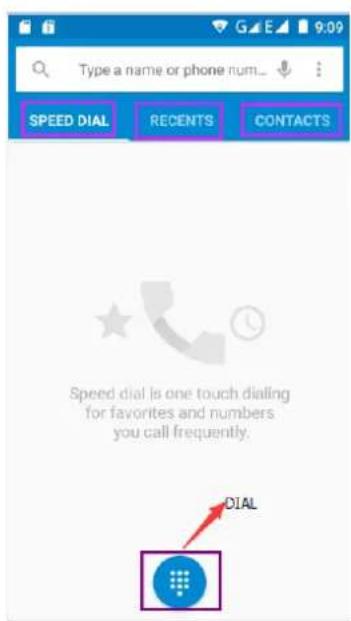
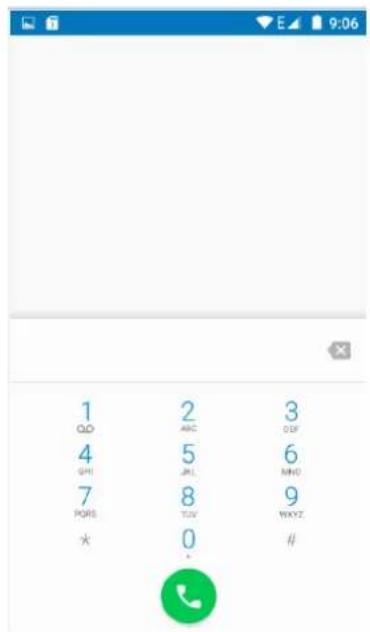
Open application's main menu>dial >Dial the keyboard. You could choose SIM1 or SIM2 to do the dialing.

- Dialling
At the dialing Keboard , enter the phone number, and then click the dialing key, after that,you should choose
one SIM card or internet call. If needed to call the extension, you could click the "dial pad" in the bottom of the screen to open the interface or press menu key to select "delay 2 seconds", and then enter the number of the extension.
The dialup keyboard input number, click Menu can IP dial-up or speed dial
- Video call: video call usually refers to the Internet and mobile Internet based on (3 G Internet) end, through the phone between the speech of the real-time transmission and image (user of bust, photographs, items, etc.) of a way to communicate. Only 3 G to support this function. Input a number click video dial-up, each other answers the phone after both can through camera for video calls.
- Telephone calls in the call log
Every telephone number called and received in “SIM1、SIM2” will reserved in phone’s menu of call log. Each call to record recently will show “SIM1 or SIM2”
All numbers in the call log can be dialed by clicking the button "dial" on the right side of the screen.
When number list appearing, click it to catch details; press it for long you could dial via “SIM1 or SIM 2”, meanwhile you can edit, delete, save the number or do other operations.
- Receive callings
When calling comes (top left will show from which SIM card) press "Answer" and slide towards right until the middle button, then you can receive callings.
- Refuse to answer the phone,
Have a telephone call in, hold down the "call" button to the left sliding contact can decline a call.
Have a telephone call in, hold down the "call" button sliding upwards to contact messages can be resisted. Choose reject content, the other phone, will receive the corresponding text messages.
•
- Proximity sensor
- According to the distance between phone and human body, it will adjust automatically the switch of the backlight.
- During the call, close the phone to the ear, the backlight will turn off automatically, which could save batteries and prevent inadvertently touching.
•
- Refuse to answer the phone
a. When standby, calling comes, press "refuse" button and slide towards left side until the middle button, then you could refuse the calling.
b. When using, calling comes, click on the "refuse" button to refuse the calling.
- Two-way call/multiparty call(conference call)
- Notices: this function needs that SIM card open multiparty call features.
1) Already exist a call in the phone
2) Click “Add calls”, dial another call (or receive another call, phone default open "call waiting" (settings-dialing settings-other dialing settings), after both connected, could view the status of calling.


- Telephone recording
During the call, more>start record, you could record the dialog of the call.
1) settings>set other functions of the call in the dialing settings, for example: Call Transfer—after all the settings finished and turned on, you could transfer the call to a certain number.
2) In settings>dialing settings >other dialing settings, open “call waiting”. After turned on, you can receive another call when already exist one. The answering and rejecting functions are just like the ordinary phone.
Call settings
Voice Call
1) Voice Mail: The voice mailbox in setting in the input voicemail number.
2) IP prefix number: Setting the different of SIM cards IP prefix numbers
3) Call forwarding: Can set respectively 2 a SIM card, the line is busy, and no one has to receive, not be connect four connecting way
3) Call barring: Can set respectively two to the SIM card call restrictions
4) Additional Settings: a. My phone number b. Call waiting.
Internet call
1) Account
2) Use Internet calling
Other Settings
1) Fixed Dialing Numbers
2) Minute Reminder: Turn on minute reminder at 50s of every minute.
3) Quick Response: Can edit the text messages rejected by the information when content.
7. Messaging
- Important: the message title of this phone is the phone number, will be reserved in a similar for of dialog, instead of the usual folder structure. Messages with blue background are those received, and messages with white background are those sent.
- Send SMS to certain phone number
1) Press home> messaging, touch "new messages".
2) In the interface of "edit":
a. Click “recipient” box to start input method, you can also click “enter” box to start input method, in that way you can .enter characters.
b. Click the button of "send from SiM1 or SIM2" to start sending.
c. when the receiver and the input are not empty, click the send button, sending a message.
- Send MMS to certain phone number
When creating message, it was defaulted as SMS, it will be turned to MMS when following operations were done. You can send MMS via clicking "send" after editing.
1) in the "writing" screen, press the Menu button, click "add theme", automatic into the MMS message:
2) click on "write" interface "plus" icon on the left, to the following attachment, the attachment after adding the message will be automatically converted into MMS.


- Send messages to multiple numbers
Enter multiple numbers in the box of entering, each number is divided by the comma in English.
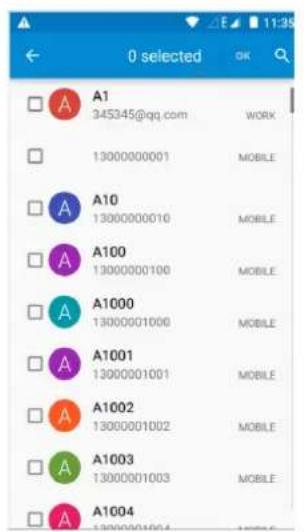
Click on the right side of the head with the receiver plus icon, can choose contact group in the address book
Notices: At present the orbit can only support up to 100 recipients.
While the number of contacts added more than 100, will be prompted to "recipient" too much, after contacts without success. You must manually add again.
add

Notices:
a, If you want send MMS with many pages, you should select "append PPT" in the "append" interface.
b, You can append 10 pictures, with the form of GIF, JPEG.
c, Click "adding themes", the box of "theme" will appear under the box of "recipient", meanwhile it is turned to MMS automatically.
• information edit Menu with Menu functions

1) When the message is sent after the success, according to China unicom mobile SIM1 or SIM2 sends a message of time, there will be a checkmark beside the little symbol.
2) When message sending failed, a red triangle with exclamation will appear. when editing information other functions of Menu button
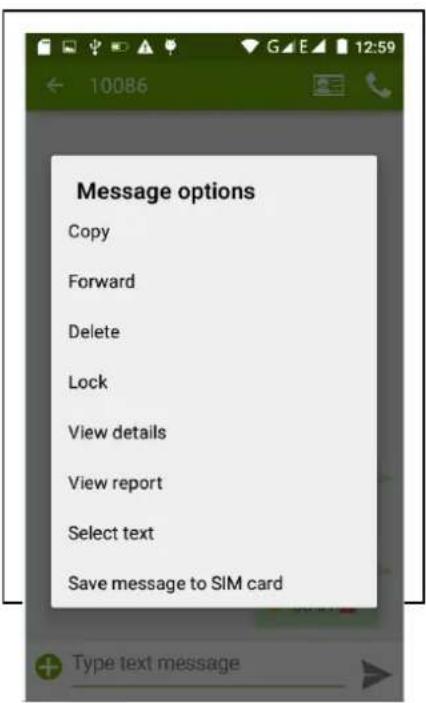
3) Hold the certain information, can carry out selective operation
8. Cont


3) Click Search Icons, You can enter the contact search interface.
Enter the list of Numbers or letters and part name, that will be shown in search results. If no search to match the contact interface will appear 'was not found any contact.
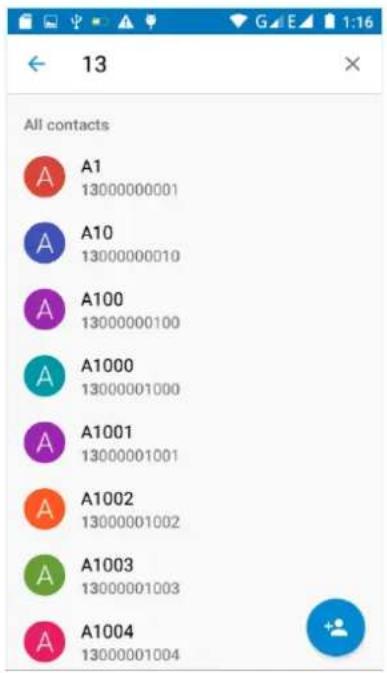
3) Click "Add Contact" Icons, Can create New Contacts
Select save contacts to phone or a SIM card, into contact editing interface.
You can edit contact head, name, telephone number, group, save to and more, and then click "finish".


4) In contact interface, click on the Menu button

a. Menu >Delete contacts
Can "All" Icons checked, click the delete button, delete all the contact person, including cell phone and SIM card of contact.
Can separate check one or more contacts, click the delete, delete the selected all contacts.

b. Menu> To display of the contact
You can choose all contact, one a SIM card of contact, the mobile phone contacts
Choose from the definition, but also on lone contacts.
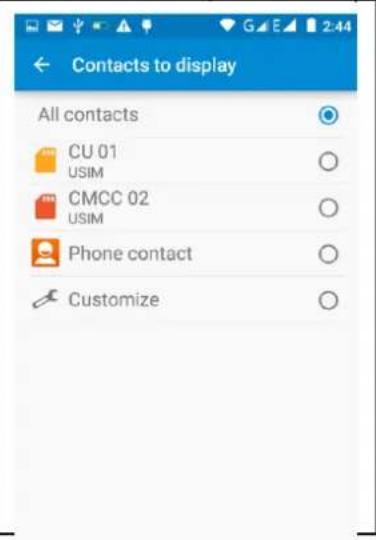
whether or not to show that all the
c. Menu >Import/export
In the mobile phone can local, SIM card and SD card three parties achieve contact information of the copy each other.
First choose the "copy source" and then select the next step, selecting copy contact to, can complete the contact's copy.

d. Menu > Groups
Click on the "group" icon to the new group.
In "the group name" column input group name, in "type in the contact's name" column input contact key word, can be in all of contact search, and added to the group. Finally click "finish".
1) In a group, click on the Menu button, Menu functions
2) Menu>Update
You can modify the group name, delete or add group of contacts
3). Menu >Delete
You can delete the group, and will not delete the contact itself.
4). Menu >Send messaging by group.
Automatic new information, and the group added to contact the address bar recipients
5). Menu >Send Email by group
If contact group have the same email address, the automatic new mail, and E-mail address in the address
bar add to the receiver

No groups.
e. Menu >Accounts
Account and synchronization set routine synchronization.
ose background data and automatic

9. Internet Explorer
Internet explorer
1) In the browser screen, and then touch input url address bar.
2) Using the keyboard input web address. At the same time, in the address you entered is in line with web address will appear on the screen. You can touch the url directly to the page or continue to enter url.Homepage
3) the page when browsing the Menu button Menu function
a.Menu >Refresh
Refresh the current browsing web pages
b.Menu > Stop
Stop the current in the loading state of a web page
c.Menu >Home
If you don't have a set, will use the preset site. The default home page is the page navigation
d.Menu >Save to bookmarks
Will send the address of the current window as a bookmark. Click the bookmark list of bookmarks, open the bookmark url.
e.Menu >Close
Exit the browser or minimize the browser.
f.Menu >Save for offline reading
Automatically save the current page and content, in order to browse next time.
g.Menu >Share page
Select the bluetooth, email, SMS or other ways to share the current web page
h.Menu >Find on page
The current visit web pages can be find
i.Menu >Request desktop site
Browse the pages in the form of PC
j.Menu >Bookmarks/History
Switch to the bookmarks/history/save the web interface
k.Menu >Settings
Browser contains a variety of Settings

Browser Settings
1) general Settings, including home page set functions such as below.
2) privacy and security, including clear historical record, clear the cache, and other functions
3) auxiliary functions, including size, click operation scale, and other functions.
4) advanced, including web browsing, page adjustment, plug-in enabled, and other functions.
5) bandwidth management, switch whether to load the picture when loading the page.
6) lab, including open fast control and full screen display function.
10. Recorder
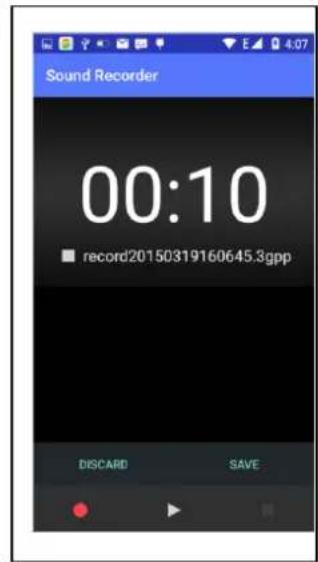
Recorder can record voice, and send it quickly via Bluetooth or MMS as well as make it as ring tone.
- Notices: recorder can only save the audio files as AMR format.
1) Click the recorder application.
2) Keep the phone's microphone near the voice source.
3) Click recorder to record voices, and click to stop or Recordinglist.
All recordings save in my recording folder in the default music program.


- Clock
1) Open the menu of application, click

The alarm clock Settings into the interface


- Alarm
After functions set, phone will arrive in the setting time to alert you by ringing or vibrating to achieve it's function. Press Menu to add alarm, you can also add it from the adding interface. You could set the alarm according to your needs.
In the interface of alarm will show three closed alarms (two alarm clocks are Monday to Friday 8:30,9:00).
Edit
You can edit the current alarm, you could edit time, ringing tones, vibration, repeat form and tabs.
12. Caculator
calculator
this function can turn your phone into calculator, it can do some simple calculations.
- Touch the number keys to make it appear in the blank box.
In the interface of calculator, press MENU button or hold down the screen to the left, then the senior panel appears.


13. Camera
13.1 camera
- Prior preparation Install memory card before using the camera or video camera. All your photos or videos taken by the phone are stored in memory card.
- Open camera
Press home, touch menu, select camera. Take pictures
1) Aim your object with the screen.
2) Touch the "shutter" button on the screen.
3) After taking, photos will save to the camera's galley folder with the name of taking time.
4) You can view the photos by touching the preview box button.
5) Camera settings
You can touch the button of "setting Menu" in the interface of camera to do the settings
Under camera viewfinder mode, press Menu, you can switch to video or photos' gallery.
On the top right of camera viewfinder mode, display the preview of the previous picture. Touch preview box, the photo display on full screen and you can enlarge it to view details.

User Manual

• Shared Settings of Camera and Video camera
1) Flash mode: Auto、On、off.
2) GPS location info :on off
3) exposure:-3 -2 -1 0 +1 +2 +3
7) image properties: Low Medium High
7) anti-flicker: Auto Off 50HZ 60HZ
- Camera Settings
1) Capture mode: normal、Live Photo、Motion Track、Face beauty、Panorama、HDR、Multi angle view
2) Zero shutter delay: on off
3) Voice capture:ON---Capture and Cheese, off
4) Face Detection: ON、Off
5) self timer: off, 2 seconds, 10 seconds
6) Auto scene detection: ON、Off
7) continuous shot: 40 shots, 90 shots
8) picture size: QVGA, VGA, 1M pixels, 1.3M pixels, 2M pixels, 3M pixels, 5M pixels, 8M pixels
9) Preview size: Full screen, Standard(4:3)
10) ISO:ON、100、200、400、800、1600
13.2 Video camera
- Prior preparation
Install memory card before using the camera or video camera. All your photos or videos taken by the phone are stored in memory card.
- Take video
Press the home page, touch the menu, se
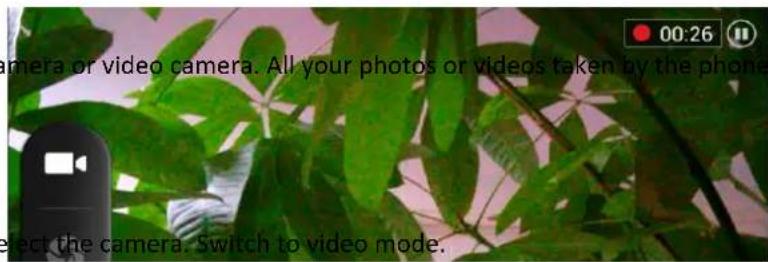
1) with the screen on your subject.
2) directly on the screen touch the shutter button.
3) after the shooting, video automatically taken as file name, save to the gallery by default camera photo folder.
4) on the top right-hand corner photo viewing images, a video preview before display. Touch the preview box, the full screen video, touch play button can broadcast video.
You can touch the button of "set" in the interface of camera to do the settings
Under camera viewfinder mode, press Menu, you can switch to video or photos' gallery.
On the top right of camera viewfinder mode, display the preview of the previous video. Touch preview box, the video will display on full screen and you can touch the play button to view it.
- Videos settings
1) Noise reduction: ON OFF
2) EIS: ON OFF
3) Microphone: off, on
4) audio mode: meeting, normal
5) time lapse interval: off, 1s, 1.5s, 2s, 2.5s, 3s, 5s, 10s
6) video quality: low, medium, high, fine
14. Images
- Open images
Press home, touch label of applications, then touch photos' galley.
In the interface of camera, Press menu to open it, then touch to operate.
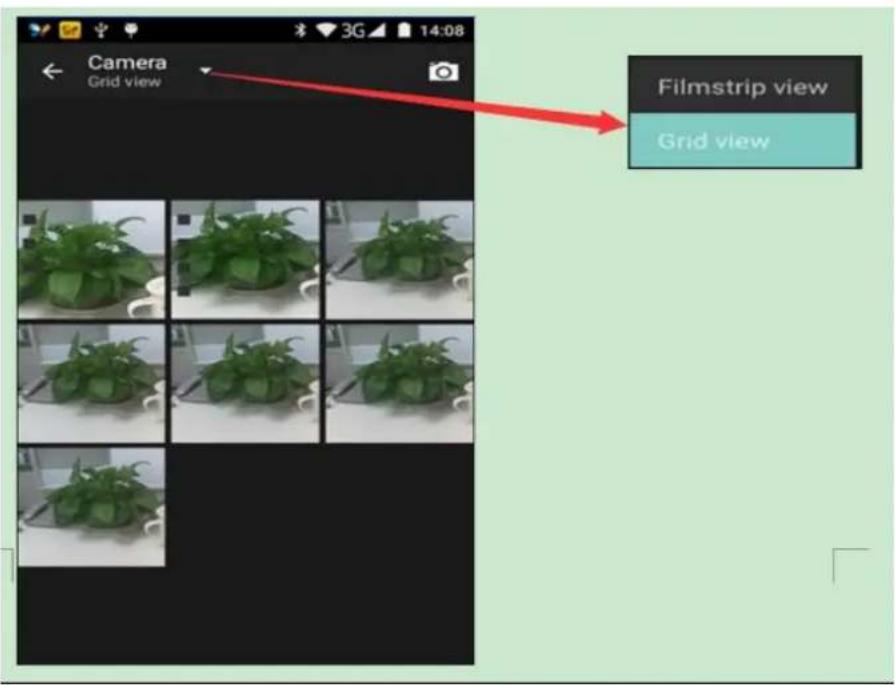
Gallery interface
A. in the gallery main interface, the upper right corner of the camera button, can quickly switch to the camera application
B. folder tile in the gallery main interface, folder thumbnail displayed on the folder name and the number of embedded file.
Files Interface
a. In the library the interface, upper right a slide show the play button, click on the way to the slide circulation play all image files.
b.Click on the images, enter the picture to see interface.
c.Choose a long press image files, pop-up corresponding operation.

share photos
- In long according to the selected folder or photos in picture viewer interface, choose to share. Methods include bluetooth, mail, and information sharing.
- A. use email to send pictures: choose Gmail or E-mail, pictures will be automatically attached to the email. Write your information, and click send.
- B. using information sending pictures: select information, images will be automatically attached to the MMS. Write your information, and click send.
- C. use the bluetooth to send images: under the list of bluetooth, choose paired bluetooth devices, pictures to be transmitted via bluetooth.
see photo
- In photos look at interface, sliding around on the screen, can be forward or backward view the photos
edit pictures
- A. color effects: no, stamping, restore ancient ways, white and black, drift in addition to silver shadows, instantaneous, latte, blue, edition print, negative impact
• B. clip: straight, pruning, rotate, mirror
C. editor brightness: automatically adjust color, exposure, halation, contrast, shadow, nature saturation, sharpness, curves, hue, saturation, black and white filter
- check pictures
In the photo view interface, on the screen or so slip, can forward or backward view photosEdit picture.
a. Edit light: Fill Light Highlights Shadows Auto-Fix.
b. Edit image effects: Cross-process Posterize Lomo Documentary and so on.
c. Color Effects: Warmth Saturation B & W Sepia Negative Tint Duo-tone Doodle.
d. Crop:Crop Red Eye Straighten Rotate Flip Sharpen.

- Clip pictures
a. If you want to adjust the size of the clip, please hold the edge of the cutting tools. The arrow appears clip, from the trim your fingers inside or outside the center to drag, can adjust its size.
b. If you want to adjust the big hours in the clip that keep proportion, please hold down any of the four corners of the one.
c. If you move to the clip of the picture area of the other, please hold cutting is internal, then move to drag the fingers to the position.
d.
- shooting video
1) in a picture of a photo gallery, touch video album, and then choose the video you want to watch, you can start playing video.
2.) the touch screen will display playback controls.
A. schedule control: dragging the control bar can be moved to any play point.
B. screen zoom button: press ratio play, full-screen playback, maximum play.
C. suspended or continue to play: play when click pause video, pause when click continue to play the video.
- View images
1) In the picture interface, touch photo album to view images.
2) Touch the thumbnail to view pictures on full screen.
You can choose to display small or large thumbnails. Hold down the screen towards the left side to view the next photo or towards right to view the previous one.
In the photo album or list, press and hold down the picture towards left to view the next picture, or towards right to view the previous one.

15. Music
The phone can play digital audio files in memory card. The following formats are available: AMR, M4A, MIDI, MP3, WAV, OGG.
- Open Music
Press home, touch the label of applications, touch music. Then the interface of Music Media appears.
- Music Media
Your music files are classified according to the following four categories, albums, songs and play lists. Touch one of these categories; you can view the list inside.
The right display the current playback mode, looping, random play or lined up to play, etc.
The progress bar at the bottom of the can control the broadcast schedule, and can be shown in the queue to realize fast forward fast rewind, and so on.
Continue the operations, until your wanted music appears. Such as, if you choose Artists a list of artists sorted by the numbers in English will appear. Choose any on to open the list, then all the albums and songs will appear. Select one album,

then the songs in it will be played.
- Tips: You can play all of the songs in the interface of music media, in random sequence. Press Menu, and then touch the Party Shuffle. Then will start playing the first song randomly selected. To close the Party Shuffle, press Menu, then touch to turn off the Party Shuffle.
a. the Menu button > party shuffle
Tip you can in the music library or play screen, all songs in the broadcast media library in a random order. Press the Menu button, and then touch party shuffle. Will start playing randomly selected from the first song. If you want to close the party random broadcast, please press the Menu button, then touch close party shuffle.
b. the Menu button > add to the playlist Add the current playing song playlists to users.
c. the Menu button > as a bell Set the current song into a cell phone rings
d. the Menu button > delete to delete the current playback songs, and permanently removed from memory.
e. the Menu button > sound Can open the equalizer, the user can adjust the effect of music.
f. the Menu button > music library Back to music main screen

- build playlists
1) touch music library on any of the categories.
2) in the list, can hold the screen up and browse to the new you want to play lists of the artist, album or song.
3) hold the artist, album or song, and then touch the options menu is added to the playlist.
4) is added to the playlist window, touch the new playlist.
5) enter the name of the new playlist, and then touch save.
•manage playlists
Enter the music library, then touch the playlist.
1) if you want to play songs in the playlist, please touch the name of the playlist.
2) if you want to delete the playlist, please hold the playlist, then deleted the touch.
3) if you want to rearrange the song in the list of songs or remove, please hold the playlist, then touch the options menu editor.
4) to delete a playlist of songs, please hold down the songs, and then touch is removed from the playlist.
5) if you want to rename playlists, please hold the playlist, then touch the options menu to rename. Enter the new playlist name, and then touch save.
6) if you want to set songs into a cell phone rings, and then the touch menu as a cell phone rings. The song will be set to the default ringtone.
16. Calender
Calendar program, main interface
Enter the calendar program, use white color on the surface of the month or perimeter to highlight on the same day, the default to display this week.
In the calendar interface, click the small arrow years the lower right corner, four kinds of display mode:
1), interface display on the day of the schedule on the month or perimeter use white to highlight on the same day.
2) week interface shows the schedule for this week (click date) recently about sliding according to weeks turn pages.
3) on the interface display and month schedule (date) recently click slide up and down can flip on a monthly basis.
4) schedule interface shows the schedule for a certain time space (click can see forward initial time point, click can see back end time point).
- new activities
1) click the MENU button > new activities.
2) in the event details box Enter the name.
Note: if special occasions, such as birthday or a whole day's activity, set the options as throughout the day. Such as activity is in a certain period of time, select the start time and end time.
3) enter the activity location, illustration, invited object, repeat, remind of time.
4) click on to complete the return to the calendar.
Note: all the title of the event is displayed in the calendar. There will be no calendar time period show.

17. FM Radio
FM Radio
Through this program, you may listen to FM radio on the device, FM radio use the wired headset as an antenna to receive signals, before opening this program, you can install the original equipment-headphones, when listening, you can switch it manually to speakers or the mode with wired headphones.
- Open FM radio

Touch this label
to open the application of FM radio.
1) Click on the "search", automatic scanning search FM channel, and channel in list interface, list all channels
2) Click "FM recording", listening to the radio to the current can be recorded. The tape recording to default file name can be arbitrary well-preserved input filename. Save to FM recording the default file.
3) Click "exit" closed FM radio, cannot listen to in the background.
4) Must be insert cable headphones as antenna, but click on the horn button, can put the FM radio.
5) Click on the frequency of the rear of the five-pointed star icon, channel was added to the collection channel list.
- Listen to FM radio background
Click to return to key, the radio program moved to the background, right now you can still continue to listen to the show, and can also carry out any other program.
18. Settings
Your service provider may default some device settings, so you may not be able to change these settings.
Wireless & internet
•Wi-Fi

1) Flight mode Touch to open or close.
2) Wi-Fi and Wi-Fi settings Touch Wi-Fi

Open Wi-Fi, it can search for available networks automatically, networks without password can be used directly, others need to enter the password first.

Notice: Open Wi-Fi then the flight mode, Wi-Fi will close automatically; Open flight mode then connect Wi-Fi, it can be used normally.
- Bluetooth

Bluetooth switch and setting up the touch bluetooth open, will automatically be search nearby bluetooth open the equipment.
•SIM cards

- Touch can choose the SIM card or stop using a SIM card
- The default SIM card, can choose a voice call, information, and choose which SIM CARDS to use data connection, SIM choose set up call and information
Data usage

- Data usage set up mobile data traffic limit, flow more than limit will be close mobile data services.
•More
Wireless & networks
a. Airplane mode
b. Default SMS app
c. VPN
d. Tethering&portable hotspot
e. Cellular networks
Device
- Display

a.rightness level
b. Adjustive brightness
c. wallpaper
Adjust the screen brightness
According to the light source the best brightness adjustment
Can the wallpaper gallery, gallery program or dynamic library set in the mobile phone wallpaper wallpaper
Adjust the delay before the screen automatically lock.
d.Sleep
e.Daydream
f.Font size
g.When device is rotated
h.Cast screen
Set the font size of the system
Rotate the content inside
- Sound&NOTIFICATION

This option gives the phone tones' settings under the status of receiving calls or notification. Including: Vibration, volume, ring tones, ring tones notification and feedback (Button operation tone, select Sound, screen lock tone, touch). To adapt every environment.
1) Select “Standard / Mute / Conference / Outdoor, Touch the spot on the right, when turns green, it opens.
2) Volume: Including the ring volume and alarm clock settings, you can manually slide to select.
3) call: voice phone ring, video phone ring
4) notice: default notification sound
5) sound improvement: in view of the headphones sound, trumpet volume booster
6) Notification and interference

- Storage
a. Can view the SD card and cell phone memory usage.
b. Can Unmount SD card or Erase SD card.
c. Can choose the default memory.

- Battery
Boot time that use and each module to use power in general
- Apps

a. management application and delete installed applications.
b. the running services Click on the 'stop' running services, confirmed the service disappear from the list of "running" service.
Personal
- Location

1) Use wireless Use wireless to find locations in the application (Google map).
Touch it to open or close
2) When using the GPS satellite positioning, set accuracy to street level(cancel it to save battery).
Touch it to open or close
3) GPS EPO assistance, use GPS assistance data(EPO) to speed uo GPS positioning
4) A-GPS Use auxiliary data can accelerate the process of GPS positioning.
Open it and remind you “it produce GPRS flows when using A—GPS”.
- Security

1) Set up screen locks Use images、PIN or password to lock the screen.
a. Touch "images", the first time there will be a simple unlock instructions and examples, click "next step" to continue the step "make the unlocking image".
b. Touch PIN Enter PIN numbers to unlock the screen.
c. Touch password Set password to unlock the screen.
d. Touch "no" Stop this application.
2) Set up SIM card lock Enter (4-8numbers) PIN to set the lock of SIM.
SIM card PIN (Personal Identification Number) is to prevent unauthorized use of SIM cards.PIN code provided with
SIM. The service provider gives the initial value.
Change a blocked PIN code, you need to open the "SIM Lock", then go to Change Password screen, the phone will automatically prompt enter the old PIN code and asked to enter a new PIN code twice, finally the phone will prompt that change the code successfully. If you enter the PIN with error for three times, SIM card PIN codes will be automatically locked, PUK codes is usually supplied with SIM card. If no, you should go to the service provider for the codes.
If you enter 10 times wrong PUK code, the SIM card will be permanently locked.
3) Password visible Password visible when enter it
4) Select device administration Add or delete device manager.
5) Use security credentials Allow application visit security credentials or other credentials.
6) Install from SD card Install the encrypted certificate from SD card.
7) set password Set or change Certificate store password
8) clear storage Clear all the contents of the certificate store and reset their passwords.
a. Unknown sources Allow to install non-electronic market applications
b. Manage applications Manage and delete the installed applications.
c. Running services Touch any of the services listed in> pop up 'to stop the service? 'two-button operation box, touch the 'Stop 'the service is stopped, and disappear from the "running services" list.
d.Storage use you can view the program of downloaded, all, on sd card or running how many memory space they occupy
e.Battery use you can see the using power situation of cell Standby,Phone idle,Display and Browser.
f.development a. USB debug : USB debug only apply in the develop process. This function allows copy data in computer and mobile devices.
- Accounts

Add account
a. Corporate
b. IMAP
c. Google
d. Personal(IMAP)
e. Personal(PoP3)
f. POP3

- Languagesand &input
1) Selecting Language District Include all the languages on the phone and totally amount of 12 kinds.
2) Custom Dictionary Add words to custom dictionary or delete.
3) Keyboard Settings Vibrating when buttons are pressed, Playing sound when buttons are pressed, Capitalizing automatically, Speech Input(by microphone on the keyboard), Inputting words(speech can be altered by sliding finger on space key), Displaying tips(activate predictive function when you input words); Auto-Text(Automatically input certain words when press space key or specified keys)
4) Input method you can select Android keyboard or google pinyin input method.

- Backup & reset
1) Backup I data will application data, WLAN password and other Settings backup to Google's servers
2) Resetting to Factory Settings, Clear all data stored on the phone.
System
- Date and Time
1) Automation Use date and time provided by Network.
2) Setting Date Touch "+" and "-" to set date.
3) Selecting Time Zone Select Time Zone according to where you are. For China please select "GMT+08:00, China Standard Time".
4) Setting Time Touch "+" and "-" to set time.
5) Use 24 Hour Time Format ON/OFF
6) Select Date Format There are 3 kinds of formats you can choose from: Month-Day-Year, Day-Month-Year and Year-Month-Day, among which Year-Month-Day is the default setting.

- Schedule power on/off
You can set time of boot or shutdown by touching it. You may also select to repeat it or a certain day during a week.

- Accessibility
1) Large text
2) Power button ends call: According to the "power" button to end the call to open, call, press the "power" will end the call and not shut down the screen
3) Auto-rotate screen
4) Speak passwords
5) Touch & hold delay
6) Install web scripts
7) Quick boot
- Printing

a. Can search a printer for printing

• Developer options
b. USB Debugging: USB debugging only for development and USB disk.
c. Stay awake: Screen will never sleep while charging.
d. Alow mock locations
e. Desktop backup password
f. Strict mode enabled
g. Pointer location
h. Show touches
i. Show screen updates
j. Show CPU usage
k. Force GPU rendering
I. Window animation scale:
m. Transition animation scale
n. Don't keep activities
o. Background process limit
p. Show all APRs
- About phone

You can check the information on status bar and remaining power.
- Notices for the use of phone
Your phone is a product of superior design and craftsmanship and should be treated with care. The following suggestions can help you comply with the terms of repair kits, to extend the life of mobile phone.
1) Place the mobile phone and their parts and components out of reach of small children.
1) Keep the phone dry, rain, humidity and all types of liquids which contain minerals will corrode electronic circuits.
2) Don't touch the phone with wet hands when charging, it will cause electric shock or damage the phone.
3) Avoid place the device in high temperature environment. Temperatures will shorten the life of electronic devices, damage batteries, and warp or melt certain plastics.
4) Avoid place the device in too low temperature environment. When the temperature rises, the phone will produce water vapor that may damage electronic circuit.
5) Avoid place the phone in dusty, dirty places, otherwise parts may be damaged.
6) To avoid the phone in a lit cigarette, near open flame or any heat source.
7) Do not open the device, non-professional approach will do damage to the phone.
8) Do not throw it from height, knock or shake the phone, rough handling can damage internal circuit boards.
9) Do not paint the phone, because the paint will block headphones, microphones or other removable parts, and lead it not work.
10) Use clean, soft, dry cloth to clean the camera, light sensor lenses. Prohibit the use of harmful chemicals and cleaning agents, cleaning fluids to clean the phone
11) If mobile phone, battery, charger, or mobile phone accessories are defective, send to the nearest qualified service center for inspection.
12) If nessary, Service Centre staff will assist you and will arrange for phone repairs.
- Appearance and Keypad Operations
- Using Memory Card as U Disk
- 4) Insert the SD Card.
- 2) After the connection can be directly in the PC check images captured on camera.
- WiFi
- Bluetooth
- After a paired devices, the system will show the paired and other equipment available
- Cut the connection to the Bluetooth
- 5.Mail
- Gmail
- Dialling
- - Start dialing
- - Dialling
- Call settings
- Messaging
- - Send SMS to certain phone number
- - Send MMS to certain phone number
- - Send messages to multiple numbers
- Notices:
- Cont
- d. Menu > Groups
- e. Menu >Accounts
- Internet Explorer
- Internet explorer
- Browser Settings
- Recorder
- - Alarm
- Caculator
- calculator
- Camera
- camera
- Video camera
- Images
- Gallery interface
- Files Interface
- share photos
- see photo
- edit pictures
- - check pictures
- - Clip pictures
- - shooting video
- - View images
- Music
- - build playlists
- •manage playlists
- Calender
- Calendar program, main interface
- - new activities
- FM Radio
- FM Radio
- Touch this label
- Settings
- Wireless & internet
- •Wi-Fi
- - Bluetooth
- •SIM cards
- Data usage
- Device
- - Display
- - Sound&NOTIFICATION
- - Storage
- - Battery
- - Apps
- Personal
- - Location
- - Security
- - Accounts
- - Languagesand &input
- - Backup & reset
- System
- - Date and Time
- - Schedule power on/off
- - Accessibility
- - Printing
- • Developer options
Brand : UMIDIGI
Model : Rome X
Category : Smartphone