
KMR-XM500 - Digital media receiver KENWOOD - Free user manual and instructions
Find the device manual for free KMR-XM500 KENWOOD in PDF.
| Product Type | Digital Media Receiver |
| Brand and Model | KENWOOD KMR-XM500 |
| Display | 2.7-inch color TFT, LED backlight |
| USB Port | USB 2.0 (full speed), compatible with mass storage, FAT16/FAT32/exFAT, max 32 GB, 255 folders, 999 files per folder, power supply 5V=1.5A |
| Bluetooth | Version 5.0; profiles A2DP, AVRCP (v1.5); codecs SBC, AAC; range max 10 m (line of sight) |
| FM Tuner | Range by region: 87.5-108 MHz (50 kHz steps) or 87.9-107.9 MHz (200 kHz steps) |
| AM Tuner | Range by region: 530-1700 kHz (10 kHz steps) or 531-1611 kHz (9 kHz steps) |
| Weather Band (WB) | 162.400-162.550 MHz (25 kHz steps) |
| SiriusXM | Integrated satellite radio (requires optional tuner and subscription) |
| Maximum Audio Power | 34 W × 4 (4 Ω, peak) / 50 W × 4 (2 Ω, peak) |
| RMS Power (1% THD) | 19 W × 4 (4 Ω) / 28 W × 4 (2 Ω) |
| Equalizer | 13 bands (62.5-16000 Hz), gain -9 to +9 dB |
| Pre-amp Level | 5000 mV/10 kΩ (XM500 model) |
| AUX Input | 3.5 mm stereo mini-jack (via RCA adapter) |
| Camera Input | Yes, automatic activation in reverse or manual |
| Protection Rating | IP66 (front panel), IPX4 (chassis) |
| Power Supply | 12 V DC (car battery) |
| Included Accessories | Mounting plate, U-bracket, screws, extraction key, trim plate, etc. |
| Maintenance | Clean with a soft, dry cloth; avoid solvents and abrasive products |
| Safety | Do not install metal objects inside; follow wiring instructions |
| Repairability | Consult an authorized KENWOOD dealer for any repairs |
Frequently Asked Questions - KMR-XM500 KENWOOD
You can also perform a manual search or use Auto Store.
User questions about KMR-XM500 KENWOOD
0 question about this device. Answer the ones you know or ask your own.
Ask a new question about this device
Download the instructions for your Digital media receiver in PDF format for free! Find your manual KMR-XM500 - KENWOOD and take your electronic device back in hand. On this page are published all the documents necessary for the use of your device. KMR-XM500 by KENWOOD.
USER MANUAL KMR-XM500 KENWOOD
KMR-XM500 KMR-M300BT
DIGITAL MEDIA RECEIVER
INSTRUCTION MANUAL
RéCEPTEUR MÉDIA NUMÉRIQUE
MODE D'EMPLOI
RECEPTOR DE MEDIOS DIGITALES
How to read this manual. 2
Precautions 2
Getting Started. 3
Set the general settings 3
Basics 4
Common operations. 4
Select a source. 4
USB 5
Preparation. 5
Playback operations 5
Function settings 5
iPhone 6
Preparation. 6
Playback operations 6
Function settings. 6
Radio 7
Radio basic operations 7
Function settings. 7
SiriusXM 8
Activating subscription. 8
NOTE. 8
SiriusXM® basic operations. 8
Function settings 9
Parental Control 9
Reset to the default settings 10
External Components 10
Using external audio players. 10
Camera. 10
Bluetooth® smartphone 11
Register your smartphone to the unit 11
Playing Bluetooth Audio Device 11
Function settings 11
Setup. 12
Settings. 12
Remote control. 13
Functions of the remote control buttons. 13
Installation 14
Before installation. 14
Installing the unit. 15
About this Unit. 17
Maintenance 17
More information. 17
Troubleshooting 17
Specifications 19
Copyrights 20
Before use
How to read this manual
-
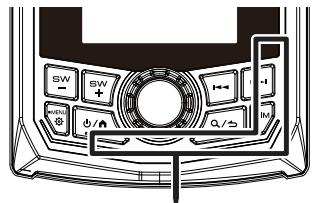
The panels shown in this guide are examples used to provide clear explanations of the operations. For this reason, they may be different from the actual panels.
-
In operation procedures, bracket shape indicates the item you should control.
[ ]:indicates the selected items or menu.
< >: indicates the name of panel buttons.
This symbol on the product means there are important operating and maintenance instructions in this manual. Be sure to carefully read instructions in this manual.
Precautions
WARNING
To prevent injury or fire, take the following precautions:
- To prevent a short circuit, never put or leave any metallic objects (such as coins or metal tools) inside the unit.
- Do not watch or fix your eyes on the unit's display when you are driving for any extended period.
- If you experience problems during installation, consult your KENWOOD dealer.
Precautions on using this unit
- When you purchase optional accessories, check with your KENWOOD dealer to make sure that they work with your model and in your area.
- You can select a language to display menus, audio file tags, etc. See Set the general settings(P.3)
- The Tuner Data System or Tuner Broadcast Data System feature won't work where the service is not supported by any broadcasting station.
Protecting the monitor
- To protect the monitor from damage, do not operate the monitor using a ballpoint pen or similar tool with the sharp tip.
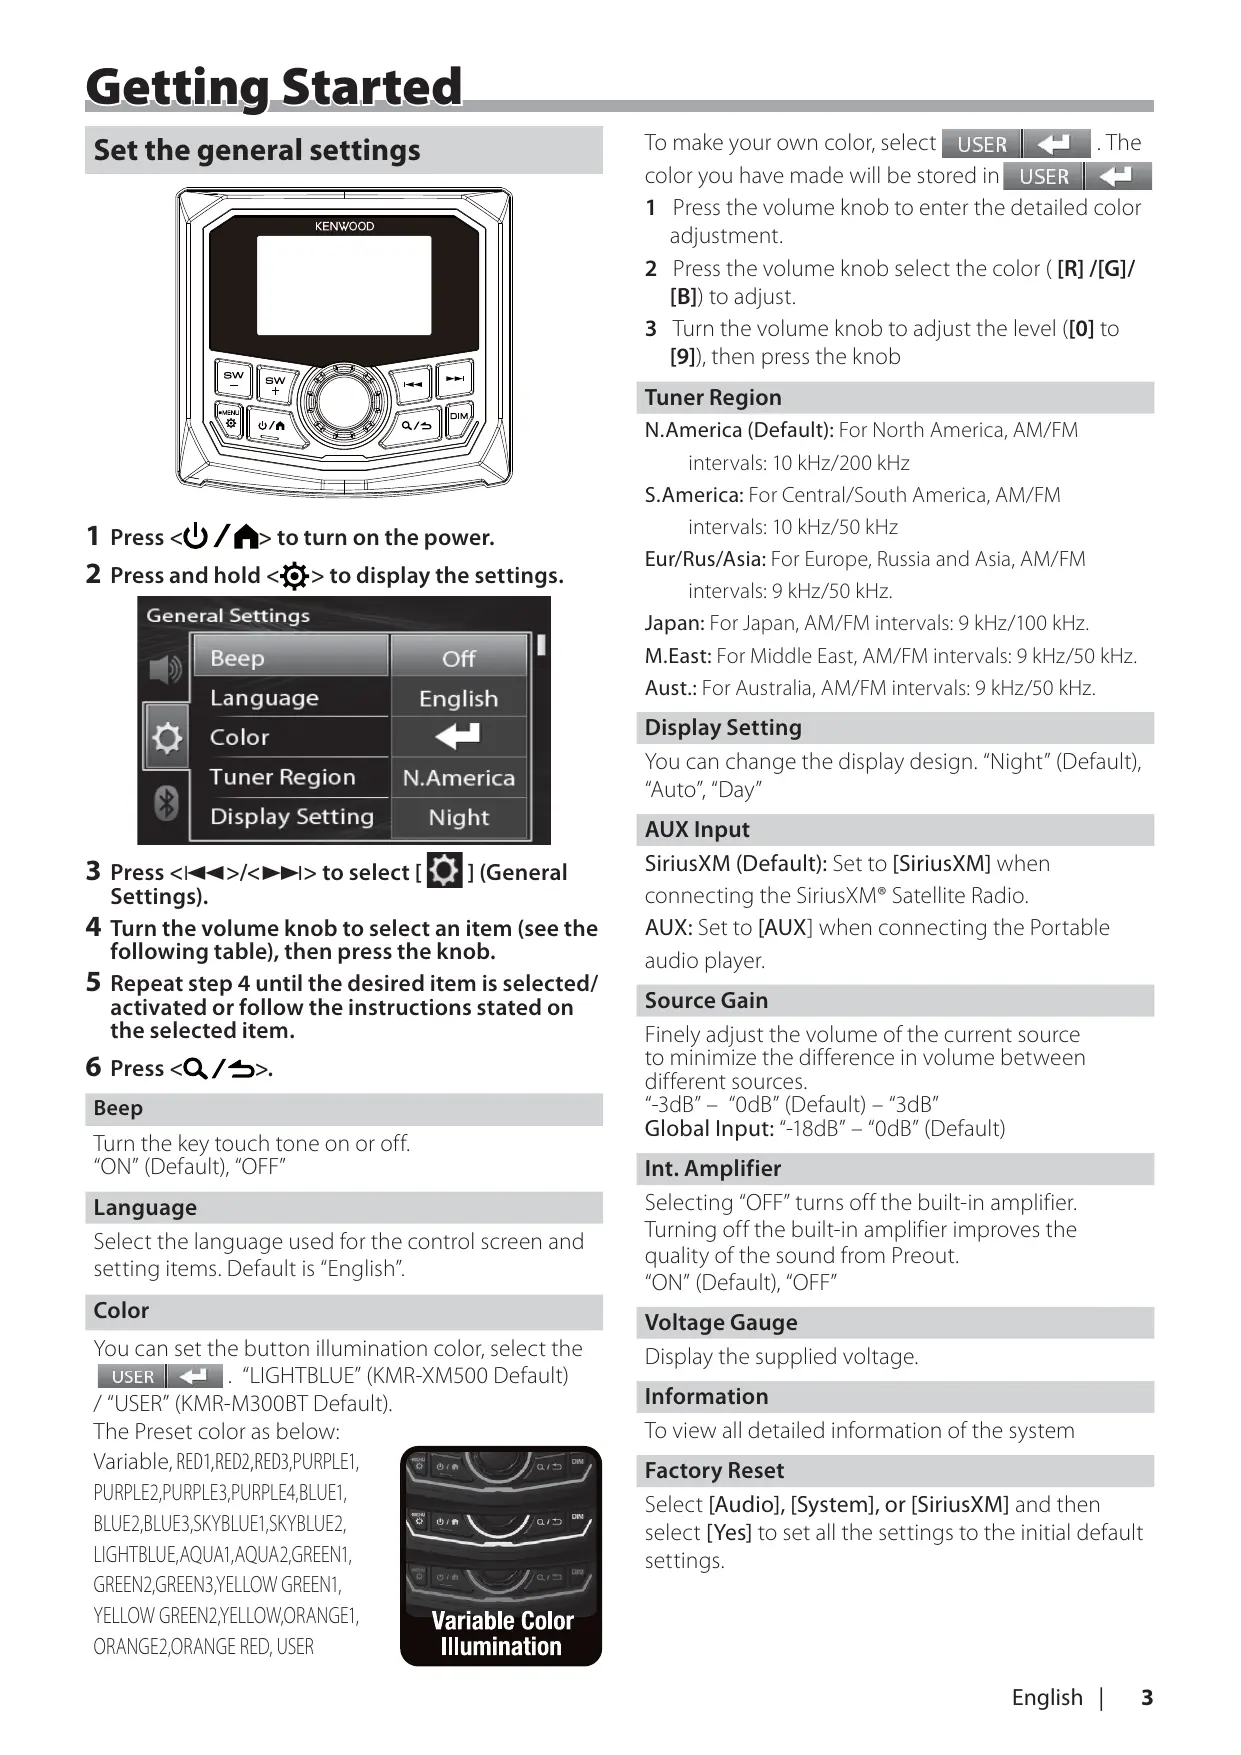
Set the general settings
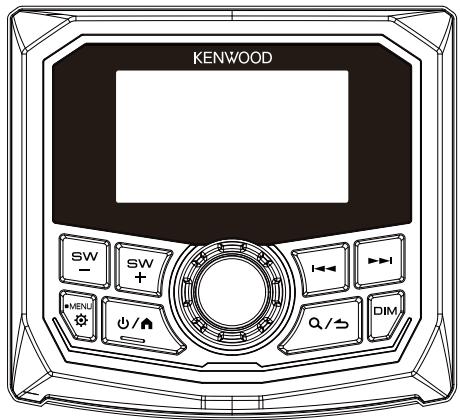
1 Press </> to turn on the power.
2 Press and hold <> to display the settings.
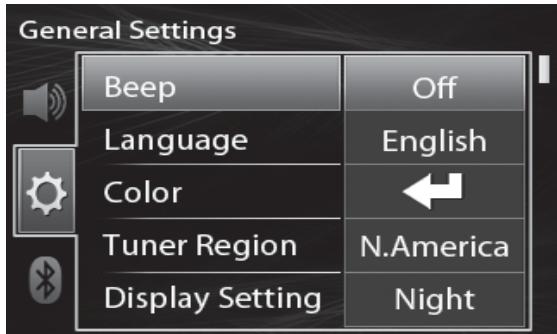
3 Press <> / <> to select [ ] (General Settings).
4 Turn the volume knob to select an item (see the following table), then press the knob.
5 Repeat step 4 until the desired item is selected/ activated or follow the instructions stated on the selected item.
6 Press <Q/>.
Beep
Turn the key touch tone on or off. "ON" (Default), "OFF"
Language
Select the language used for the control screen and setting items. Default is "English".
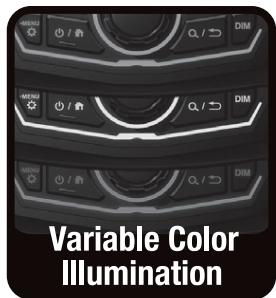
Color
You can set the button illumination color, select the USER "LIGHTBLUE" (KMR-XM500 Default)
/“USER”(KMR-M300BT Default).
The Preset color as below:
Variable, RED1,RED2,RED3,PURPLE1, PURPLE2,PURPLE3,PURPLE4,BLUE1, BLUE2,BLUE3,SKYBLUE1,SKYBLUE2, LIGHTBLUE,AQUA1,AQUA2,GREEN1, GREEN2,GREEN3,YELLOW GREEN1, YELLOW GREEN2,YELLOW,ORANGE1, ORANGE2,ORANGE RED,USER
To make your own color, select USER . The
color you have made will be stored in
1 Press the volume knob to enter the detailed color adjustment.
2 Press the volume knob select the color ([R] /[G]/[B]) to adjust.
3 Turn the volume knob to adjust the level ([0] to [9]), then press the knob
Tuner Region
N.America (Default): For North America, AM/FM intervals: 10 kHz/200 kHz
S.America: For Central/South America, AM/FM intervals: 10 kHz/50 kHz
Eur/Rus/Asia: For Europe, Russia and Asia, AM/FM intervals: 9 kHz/50 kHz.
Japan: For Japan, AM/FM intervals: 9 kHz/100 kHz.
M.East: For Middle East, AM/FM intervals: 9 kHz/50 kHz.
Aust.: For Australia, AM/FM intervals: 9 kHz/50 kHz.
Display Setting
You can change the display design. "Night" (Default), "Auto", "Day"
AUX Input
SiriusXM (Default): Set to [SiriusXM] when connecting the SiriusXM® Satellite Radio.
AUX: Set to [AUX] when connecting the Portable audio player.
Source Gain
Finely adjust the volume of the current source to minimize the difference in volume between different sources.
“-3dB” - “0dB” (Default) - “3dB”
Global Input: "18dB" - "0dB" (Default)
Int. Amplifier
Selecting "OFF" turns off the built-in amplifier. Turning off the built-in amplifier improves the quality of the sound from Preout.
"ON" (Default), "OFF"
Voltage Gauge
Display the supplied voltage.
Information
To view all detailed information of the system
Factory Reset
Select [Audio], [System], or [SiriusXM] and then select [Yes] to set all the settings to the initial default settings.

Common operations
Turning on the power
1 Press / >
Turning off the power
1 Press and hold </> .
Adjusting the volume
1 Turn the volume knob.
Mutes the sound or Play/pause
1 Press the volume knob.
Radio/AUX
- ^× appears when the mute function is active.
- To restore the sound, press again, or adjust the volume.
- USB/iPhone/SiriusXM
- Plays or pauses.
Select dimmer mode
1 Press the
Select a source
1 Press </> to display the HOME screen.
HOME screen appears.
2 Turn the volume knob to select the source, then press the knob.
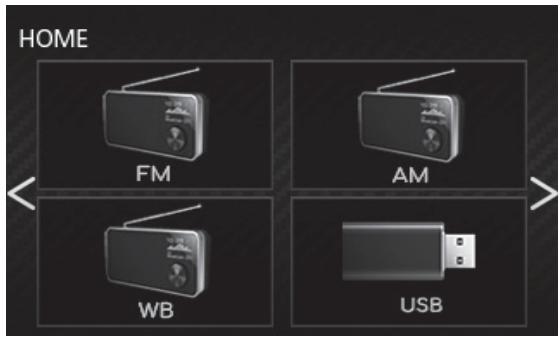

Switches to the FM radio broadcast. (P.7)

Switches to the AM radio broadcast. (P.7)

Switches to the WB (Weather Band) radio broadcast. (P.7)

[USB]
Plays files on a USB device. (P.5)

[iPhone]
Plays an iPhone. (I
When iPhone is connected.

Plays a Bluetooth audio player. (P.11)

[SiriusXM]
Switches to the SiriusXM® satellite radio broadcast. (P.8)

[AUX]
Switches to an external component connected to the AUX input terminal. (P.10)
Displays the view camera screen. (P.10)
Preparation
Connecting a USB device
1 Connect the USB device with the USB cable (sold separately).
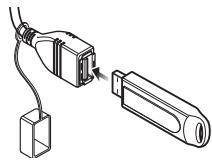
- USB maximum power supply current : DC 5 V = 1.5A
2 Press / to display the HOME screen.
3 Turn the volume knob to select [USB], then press the knob.
To disconnect the USB device:
1 Press / to display the HOME screen.
2 Turn the volume knob to select other than [USB], then press the knob.
3 Detach the USB device.
NOTE
- For playable file types and other information, see (P.17)
Playback operations
Source screen
List screen
| To | Do this |
| Play/pause | Press the volume knob. |
| Select a file | Press <I▲> repeatedly. |
| Fast-backward/ Fast-forward | Press and hold <I▲> / <I▲> |
| Previous/next folder | Press and hold <SW->/<SW+>. |
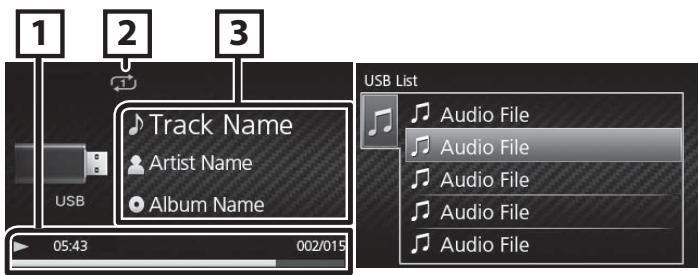
Source screen
1 Playback status/Playing time Play time bar : For confirmation of current playing position
2:Repeat playback mode indicator
X: Random playback mode indicator
3 Displays the information of the current file.
Selecting a track in a list (Searches file)
1 Press <Q/S> to display the List screen.
2 Turn the volume knob to select the desired folder, then press the knob.
- When you select a folder its contents are displayed.
- To return to the previous layer, press <空/空> .
3 Turn the volume knob to select the desired item, then press the knob.
Function settings
1 Press <> to display the function menu.
2 Turn the volume knob to select the item to set (see the table below), then press the knob to make a selection.
3 Press <Q/>.
Browsing See Selecting a track in a list (P.5).
Repeat All: Repeats all files. ()
One: Repeats the current file. (
Folder: Repeats all files in the current
folder. (u)
Random Off: Normal playback.
Folder: Randomly plays all files in the
current folder. (空)
Preparation
Connecting iPhone
1 Connect the iPhone using the Lightning-USB cable (sold separately).
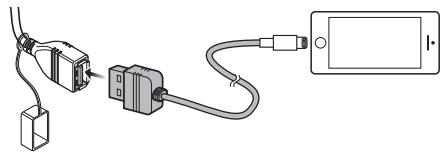
- USB maximum power supply current : DC 5 V = 1.5 A
2 Press </> to display the HOME screen.
3 Turn the volume knob to select [iPhone], then press the knob.
To disconnect the iPhone
1 Press </> to display the HOME screen.
2 Turn the volume knob to select other than [iPhone], then press the knob.
3 Detach the iPhone.
Connectable iPhone
The following models can be connected to this unit. Made for
- iPhone 14 Pro
- iPhone 12 Pro
- iPhone XR Max
- iPhone 12
- iPhone X
· iPhone 14 Pro · iPhone 12 mini · iPhone 8 Plus - iPhone 14 Plus
- iPhone SE (2nd
- iPhone 8
iPhone 14 generation) - iPhone 13 Pro
- iPhone 11 Pro
- iPhone 7 Max Max
- iPhone SE
· iPhone 13 Pro · iPhone 11 Pro · iPhone 6s Plus - iPhone 13
- iPhone 11
- iPhone 6s
· iPhone 13 mini • iPhone XS Max • iPhone 6 Plus - iPhone 12 Pro
- iPhone XS
- iPhone 6 Max
NOTE
- If you start playback after connecting the iPhone, the music that has been played by the iPhone is played first.
Playback operations
| To | Do this |
| Play/pause | Press the volume knob. |
| Select a file | Press <▲> / <▲> repeatedly. |
| Fast-backward/ Fast-forward | Press and hold <▲> / <▲> . |
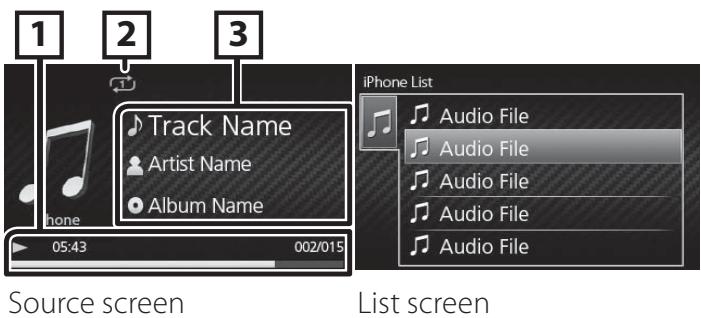
Source screen
- Playback status/Playing time/File number
Play time bar : For confirmation of current playing position
2:Repeat playback mode indicator
X: Random playback mode indicator
3 Displays the information of the current file.
Selecting a content in a list
1 Press <Q/> to display the List screen.
2 Turn the volume knob to select category, then press the knob.
- To return to the previous layer, press < Q / S > .
3 Turn the volume knob to select the desired item, then press the knob.
Function settings
1 Press <> to display the function menu.
2 Turn the volume knob to select the item to set (see the table below), then press the knob to make a selection.
3 Press <Q/>.
| Browsing | See Selecting a content in a list (P.6). |
| Repeat | All: Repeats all files. (◯) One: Repeats the current file. (◯) Off: Repeat off. |
| Random | Off: Normal playback. All: Functions the same as "Shuffle Songs". (◯) |
Radio basic operations
1 Press </> to display the HOME screen.
2 Turn the volume knob to select [FM], [AM], or [WB], then press the knob.
3 Press <> / <> to search for a station automatically.
"Auto Seek" appears.
(or)
Press and hold < > / < > repeatedly to search for a station manually.
"Manual Seek" appears.
Source screen
List screen
NOTE
- The ST indicator lights up when receiving an FM stereo broadcast with sufficient signal strength.
- To store stations, perform [Add Presets] or [Auto Store].
- To select a stored station: Press and hold <SW-> / <SW+> .
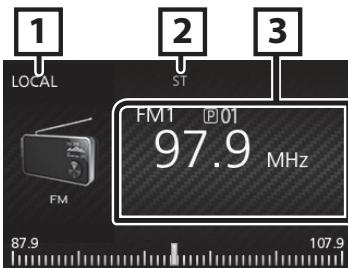
Source screen
LOCAL indicator
ST (Stereo) indicator
3 Displays the information of the current station: PS name, Frequency, PTY Genre, Indicator Items
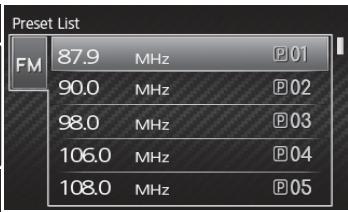
Select a stored station of the current band
You can preset 6 stations for the current band (FM1/ FM2/FM3/AM1/AM2/WB).
1 Press <Q/> to display the List screen.
2 Turn the volume knob to select a preset number, then press the knob.
NOTE
To exit, press <Q/S> .
Function settings
1 Press <> to display the function menu.
2 Turn the volume knob to select the item to set (see the table below), then press the knob to make a selection.
3 Press <Q/>.
| Add Presets | Stores a station manually to the current band. While listening to a station you want to store, turn the volume knob to select a preset number, then press the knob. |
| Remove Presets | Remove stored a station to the current band. Turn the volume knob to select a preset number, then press the knob. |
| FM *1 | Select the preset band (FM1/FM2/FM3). |
| AM *2 | Select the preset band (AM1/AM2). |
| Auto Store *1*2 | Automatically searches and stores the 6 stations with the strongest signals for the selected band. • "Auto Store" appears. |
| Local *1*2 | Tunes in only to the stations with sufficient signal strength. (LOCAL indicator lights up.) “ON”, “OFF” (Default) |
| RBDS *1 | ON (Default): Activates FM Radio Broadcast Data System features. OFF: Deactivates the function. |
1 FM only
2 AM only
Only SiriusXM® brings you more of what you love to listen to, all in one place. Get over 140 channels, including commercial-free music plus the best sports, news, talk, comedy and entertainment. Welcome to the world of satellite radio. A SiriusXM Connect Radio and Subscription are required. For more information, visit www.siriusxm.com.
Activating subscription
- Check your Radio ID.
The SiriusXM Satellite Radio ID is required for activation and can be found by tuning in Channel 0 as well as on the label found on the SiriusXM Connect radio and its package. The Radio ID does not include the letters I, O, S or F.
-
Activate the SiriusXM Connect Connect Radio using either one of the two methods below:
-
For users in U.S.A.
Online: Visit www.siriusxm.com/activatenow
Phone: Call SiriusXM Listener Care at 1-866-635-2349
- For users in Canada:
Online: Visit www.siriusxm.ca/activate
Phone: Call SiriusXM Customer Care at 1-888-539-7474
NOTE
- To use SiriusXM® Satellite Radio, the optional accessory is necessary. "Supplied accessories for installation" (P.14)
- To select the SiriusXM source, it is necessary to set "AUX Input" to "SiriusXM" in [General Settings]. (P.3).
SiriusXM® basic operations
1 Press < / > to display the HOME screen.
2 Turn the volume knob to select [SiriusXM], then press the knob.
3 Press <> to display the function menu.
4 Turn the volume knob to select [CATEGORY], then press the knob.
5 Turn the volume knob to select a category, then press the knob.
6 Turn the volume knob to select a channel, then press the knob.
7 Press <|▲> / <▲> to search for a channel info.
- Pressing and holding <口 口> changes the channel rapidly.

NOTE
To select a stored station: Press < / > .
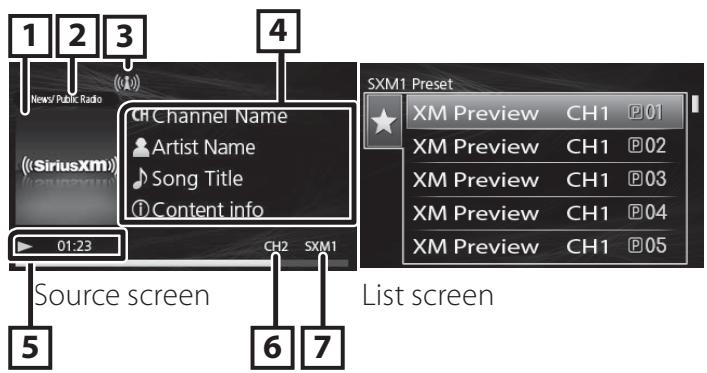
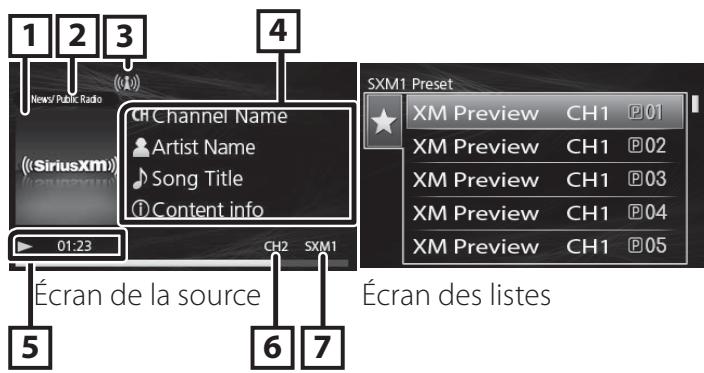
Source screen
1 Album Art
Category Name
3 Signal Strength indication
4 Displays the information of the current channel: Channel name, Artist name, Song title, Content Info
ReplayPlayback
6 Channel Number
SiriusXM Band
Select a stored channel of the current band
You can preset 6 channels for the current band (SXM1/SXM2/SXM3).
1 Press <Q/> to display the List screen.
2 Turn the volume knob to select a preset number, then press the knob.

NOTE
To exit, press <Q/S> .
Direct Access Tuning
You can tune in a channel directly.
1 Press <> to display the function menu.
2 Turn the volume knob to select [Direct Tuning], then press the knob.
3 Turn the volume knob to select the entry position, then press the knob.
4 Turn the volume knob to select a number, then press the knob.
5 Repeat step 3 to 4 until the channel number is completed.
Replay
1 Press the volume knob.
| To | Do this |
| Play/pause | Press the volume knob. |
| Select a file | Press <▲> repeatedly. |
| Fast-backward/ Fast-forward | Press and hold <▲>/<▲>. |
To return to live music/content
1 Press <> to display the function menu.
2 Turn the volume knob to select [Jump to Live], then press the knob.
Function settings
1 Press <> to display the function menu.
2 Turn the volume knob to select the item to set (see the table below), then press the knob to make a selection.
3 Press <Q/S>.
| SXM | Select the preset band (SXM1/SXM2/ SXM3). |
| Add Presets | Stores a channel manually to the current band. While listening to a channel you want to store, turn the volume knob to select a preset number, then press the knob. |
| Remove Presets | Remove stored a channel to the current band. Turn the volume knob to select a preset number, then press the knob. |
| Channel | Displays a complete listing of channels. • To switch the information on the list (channel name/artist name/song title/ content information/ category), press.<▶>/. |
| Category | You can specify the desired category and select a channel. 1) Select a category. 2) Select a channel. |
| Direct Tuning | Display the direcchannel search screen. (P.8) |
| Parental Contr. | See Parental Control (P.9). |
Parental Control
Parental Control is a feature that provides the user with the ability to prevent unauthorized access to mature content and user selected channels.
Activating parental control
1 Press <> to display the function menu.
2 Turn the volume knob to select [Parental Contr.], then press the knob.
3 Enter the initial parental code ("1111")
1) Turn the volume knob to select a number, then press the knob.
2) Repeat step 1 until the parental code is completed.
Parental Lock channel selection
1 Press <> to display the function menu.
2 Turn the volume knob to select [Parental Contr.], then press the knob.
3 Enter the initial parental code ("1111")
4 Turn the volume knob to select [Lock Channels], then press the knob.
5 Enter the parental code.
1) Turn the volume knob to select a number, then press the knob.
2) Repeat step 1 until the parental code is completed.
6 Turn the volume knob to select a channel you want to lock, then press the knob.

7 Press <Q/> .
Changing the parental code
1 Press <> to display the function menu.
2 Turn the volume knob to select [Parental Contr.], then press the knob.
3 Enter the initial parental code ("1111")
4 Turn the volume knob to select [Change Code], then press the knob.
5 Enter the old parental code.
1) Turn the volume knob to select a number, then press the knob.
2) Repeat step 1 until the parental code is completed.
6 Enter a new four-digit code.
7 Repeat step 6 above to confirm the new code.
Reset to the default settings
1 Press and hold <> to display the settings.
2 Press <> / <> to select [General Settings].
3 Turn the volume knob to select [Factory Reset], then press the knob.
4 Turn the volume knob to select [SiriusXM], then press the knob.
5 Turn the volume knob to select [Yes], then press the knob.
External Components
Using external audio players
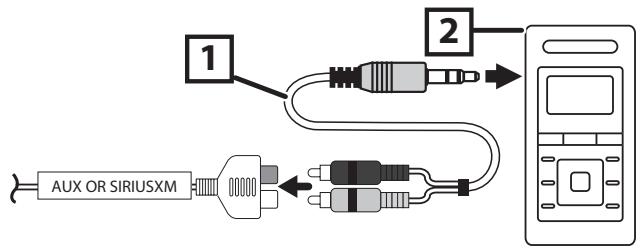
1 3.5 mm stereo mini plug to RCA plug (Sold separately)
2 Portable audio player (Sold separately)
Starting playback
1 Connect an external component to the AUX input terminal.
2 Press <Q/> to display the HOME screen.
3 Turn the volume knob to select [AUX], then press the knob.
4 Turn on the connected component and start playing the source.
NOTE
- To select the AUX source, it is necessary to set "AUX Input" to "AUX" in [General Settings]. (P.3).
Camera
A reverse trigger is provided to activate the camera when putting the vessel in reverse or you may select the camera from the source menu.
Displaying the picture from the camera
The camera screen is displayed when you shift the gear to the reverse (R) position.

To display the picture from the camera manually
1 Press </> to display the HOME screen.
2 Turn the volume knob to select [Camera], then press the knob.
Bluetooth® smartphone
About the Bluetooth smartphone and Bluetooth audio player
This unit conforms to the following Bluetooth specifications:
Version
Bluetooth 5.0
Profile
Audio player:
A2DP (Advanced Audio Distribution Profile)
AVRCP (V1.5) (Audio/Video Remote Control Profile)
Sound codec
SBC
AAC
Register your smartphone to the unit
You can use your Bluetooth smartphone when paired to this unit.
- You can pair the device and the unit using SSP (Secure Simple Pairing) which only requires confirmation.
- One device can be connected at a time.
- When you register a new Bluetooth device, disconnect the Bluetooth device currently connected and then register the new device.
1 Turn on the Bluetooth function on your smartphone.
2 Search the unit ("KMR-M300BT" / "KMR-XM500") from your smartphone.
If a PIN code is required, enter the PIN code ("0000").
Disconnecting the device
- Turn off the Bluetooth function from your smartphone.
- Turn off the ignition switch.
Playing Bluetooth Audio Device
1 Press </> to display the HOME screen.
2 Turn the volume knob to select [Bluetooth Audio], then press the knob.
Source screen
List screen
| To | Do this |
| Play/pause | Press the volume knob. |
| Select a file | Press <▲> repeatedly. |
| Fast-backward/ fast-forward | Press and hold <▲> / <▲> |

NOTE
- Operations and display indications may differ according to their availability on the connected device.

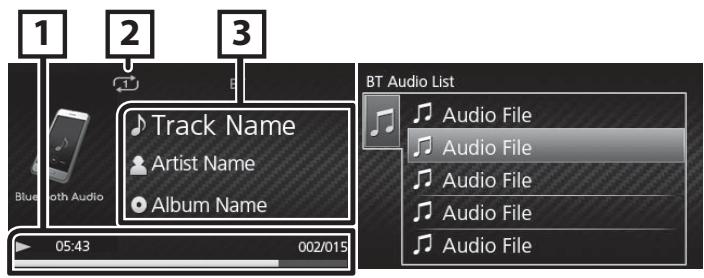
Source screen
1 Playback status/Playing time/File number Play time bar : For confirmation of current playing position
2:Repeat playback mode indicatorX:Random playback mode indicator
3 Displays the information of the current file.
Selecting a content in a list
1 Press <Q/S> to display the List screen.
2 Turn the volume knob to select an item, then press the knob.
- To return to the previous layer, press <0.5> .
Function settings
1 Press <> to display the function menu.
2 Turn the volume knob to select the item to set (see the table below), then press the knob to make a selection.
3 Press <Q/> .
| Browsing | See Selecting a content in a list (P.11). |
| Repeat | All: Repeats all files. (◯) One: Repeats the current file. (◯) Off: Repeat off. |
| Random | Off: Normal playback. All: Randomly plays all files. (◯) |
Settings
1 Press and hold <> to display the settings.
2 Press <|▲▲> / <▲▲>> to select the category.

3 Turn the volume knob to select an item (see the following table), then press the knob.
4 Repeat step 3 until the desired item is selected/ activated or follow the instructions stated on the selected item.
5 Press < Q / S>
Audio Settings
| Fader | F12 — R12 (F0/R0): Adjusts the front and rear speaker output balance. |
| Balance | L12 — R12 (L0/R0): Adjusts the left and right speaker output balance. |
| Graphic Equalizer | Selects a preset equalizer suitable to the music genre. Flat / Hard Rock / Classical / Pop / Dance / Electronic / Hip Hop / User Select [User] to use the settings made 1) Press the volume knob to select the frequency. 2) Turn the volume knob to adjust the level. 3) Press <Q/Δ>. |
| Loudness | Sets the amounts of boost of low and high tones. “ON”, “OFF” (Default) |
| X'over | You can set the crossover frequency of speakers. 1) Press <▲> to select the speaker. 2) Press the volume knob to select the item. 3) Turn the volume knob to adjust the value. 4) Press <Q/Δ>. |
General Settings (P.3)
Bluetooth Settings
| Discoverable | Enable (Default)/Disable: Set whether to pair or not. |
| Device Name | The Bluetooth device name of this unit is displayed. |
This unit can be operated using the remote control. The wired remote control KCA-RC35MR (optional accessory) can be used.
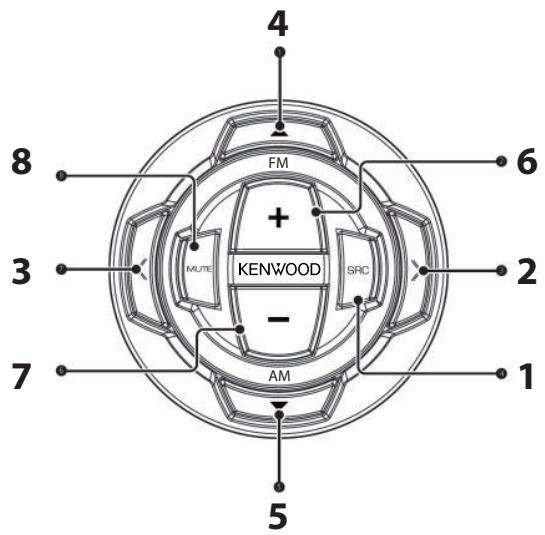
Functions of the remote control buttons
| 1 | SRC | Switches to the source to be played. (excluding Camera) |
| 2/3 | » | Selects the track or file to be played. |
| « | During radio source, switches to broadcast stations received by the unit. | |
| During SiriusXM source, search for a channel. | ||
| 4/5 | ▲ | During radio/SiriusXM source, selects preset station. |
| ▼ | ||
| 6/7 | VOL + - | Adjusts the volume. |
| 8 | MUTE | Press mutes/restores the sound. |
| USB/iPhone/Bluetooth Audio | ||
| Press and hold plays or pauses. | ||
| SiriusXM | ||
| Press and hold Replay mode. |
Before installation
Before installation of this unit, please note the following precautions.
WARNING
- If you connect the ignition wire (red) to the negative ground point, you may cause a short circuit, that in turn may start a fire. Always connect those wires to the power source running through the fuse box.
- Do not cut out the fuse from the ignition wire (red). The power supply must be connected to the wires via the fuse.
NOTE
- Mounting and wiring this product requires skills and experience. For best safety, leave the mounting and wiring work to professionals.
- Make sure to ground the unit to a negative 12V DC power supply.
- Do not use your own screws. Use only the screws provided. If you use the wrong screws, you could damage the unit.
- If your vessel ignition does not have an ACC position, connect the ignition wires to a power source that can be turned on and off with the ignition key. If you connect the ignition wire to a power source with a constant voltage supply, such as with battery wires, the battery may be drained.
- If the console has a lid, make sure to install the unit so that the front panel will not hit the lid when closing and opening.
- If the fuse blows, first make sure the wires aren't touching to cause a short circuit, then replace the old fuse with one with the same rating.
- Insulate unconnected wires with vinyl tape or other similar material. To prevent a short circuit, do not remove the caps on the ends of the unconnected wires or the terminals.
- Secure the wires with cable clamps and wrap vinyl tape around the wires that comes into contact with metal parts to protect the wires and to prevent short circuit.
- Connect the speaker wires correctly to the terminals to which they correspond. The unit may be damaged or fail to work if you share the wires or ground them to any metal part in the vessel.
- When only two speakers are being connected to the system, connect the connectors either to both the front output terminals or to both the rear output terminals (do not mix front and rear). For example, if you connect the connector of the left speaker to a front output terminal, do not connect the connector to a rear output terminal.
-
After the unit is installed, check whether the signal lamps, wipers, etc. on the vessel are working properly.
-
Reception may drop if there are metal objects near the Bluetooth antenna.
Bluetooth antenna unit
Supplied accessories for installation
| ① | x1 | ② | x1 |
| ③ | x1 | ④ | x4 |
| ⑤ | (M4) x8 | ⑥ | x2 |
| ⑦ | x1 | ⑧ | x1 |
Installation procedure
1) To prevent a short circuit, remove the key from the ignition and disconnect the terminal of the battery.
2) Make the proper input and output wire connections for each unit.
3) Connect the wire on the wiring harness.
4) Connect the wiring harness wires in the following order; ground, battery, ignition.
5) Connect the wiring harness connector to the unit.
6) Install the unit in your vessel.
7) Reconnect the terminal of the battery.
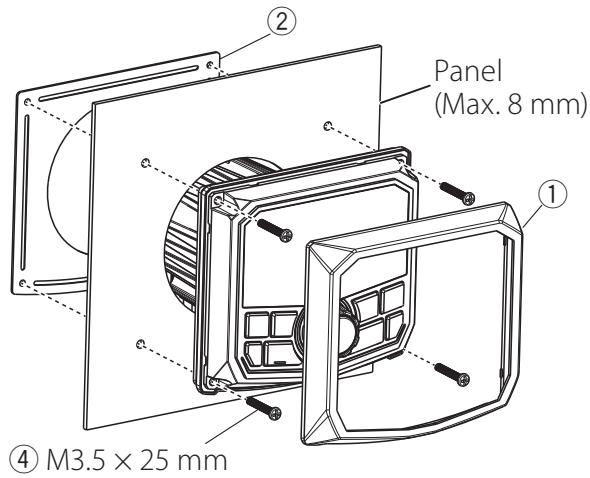
Installing the unit
Mounting (Using Mounting Plate)
To mount the unit, you will need to find a flat surface with adequate clearance behind it that provides enough clearance for the unit and all it's necessary wiring.
1) Once you have determined a mounting location, you will need to cut a circular hole 77 ~mm (3inch) in diameter.
2) After the hole is cut slide the unit and wiring through the hole.
3) Slide the mounting plate (accessory ②) over the backside of the unit and secure with the supplied screws (accessory ④).
4) Press on the trim plate (accessory ①) to the front side of the unit.
5) Plug in all wiring harnesses and cables. Refer to the wiring diagram for wire harness connection types.
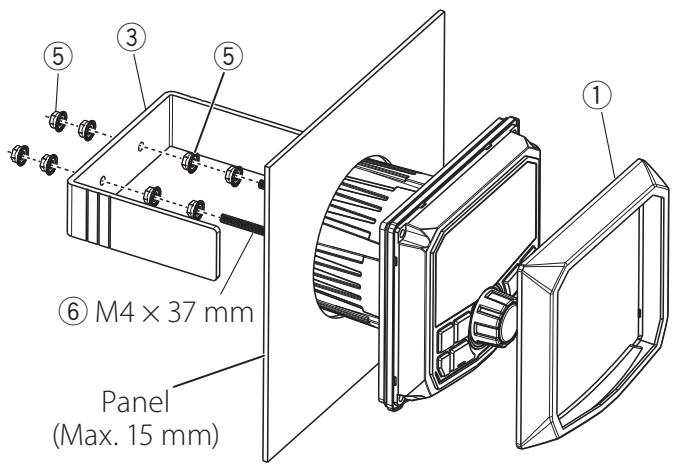
Mounting (Using U Bracket)
To mount the unit, you will need to find a flat surface with adequate clearance behind it that provides enough clearance for the unit and all it's necessary wiring.
1) Attach the screw with nut (accessory ⑥) to the back of the unit.
2) Once you have determined a mounting location, you will need to cut a circular hole 77 ~mm (3inch) in diameter.
3) After the hole is cut slide the unit and wiring through the hole.
4) Take the bracket (accessory ③ ) and slide over the two studs on the back of the unit. Tighten down with supplied nuts (accessory ⑤ ).
5) Press on the trim plate (accessory ①) to the front side of the unit.
6) Plug in all wiring harnesses and cables. Refer to the wiring diagram for wire harness connection types.
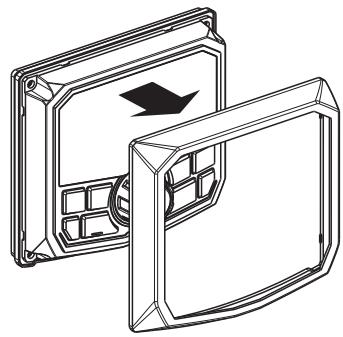
Removing the trim plate
1) Use the extraction key (accessory ⑧ ) to lever out the four tabs (two on the left part, two on the right part).
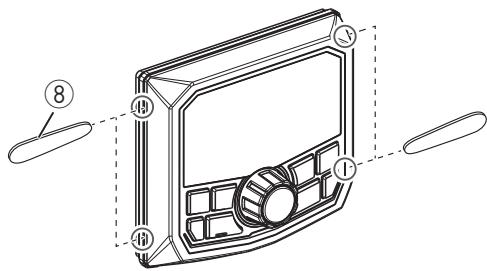
2) Pull the trim plate forward.
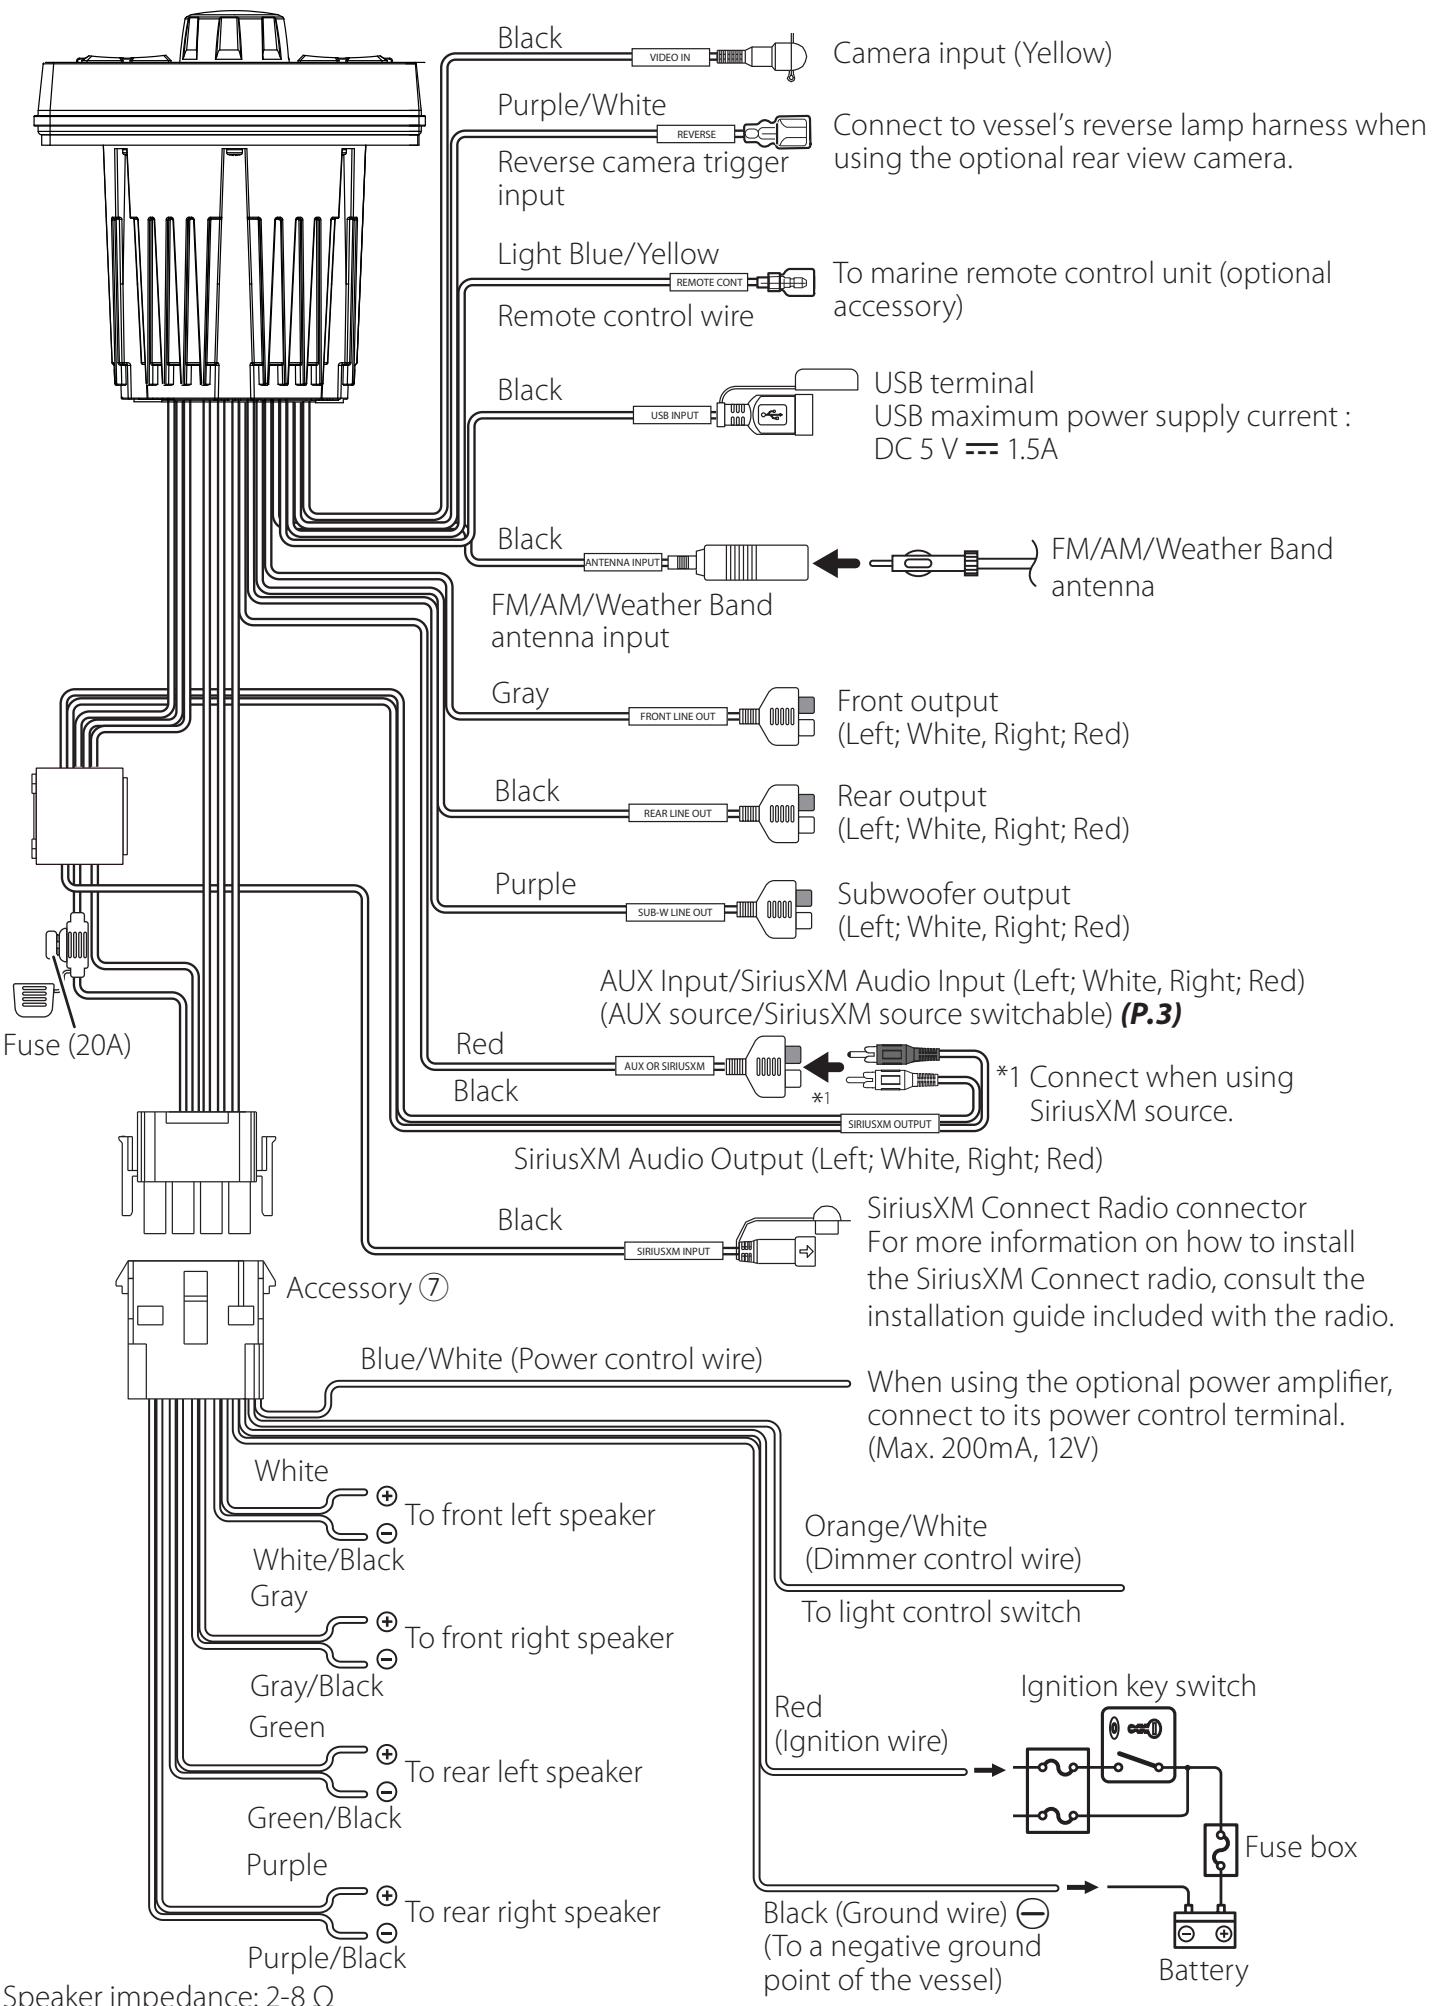
Connecting wires to terminals
Maintenance
Cleaning the Unit
If the front panel of this unit is stained, wipe it with a dry soft cloth such as a silicon cloth. If the front panel is stained badly, wipe the stain off with a cloth moistened with neutral cleaner, then wipe it again with a clean soft dry cloth.
CAUTION
- Applying spray cleaner directly to the unit may affect its mechanical parts. Wiping the front panel with a hard cloth or using a volatile liquid such as thinner or alcohol may scratch the surface or erase screened print.
More information
Usable USB device
This unit can play MP3/ WMA/ FLAC/AAC files stored in a USB mass storage class device.
- File system: FAT16, FAT32, exFAT
- This unit can recognize a total of 999 files and 255 folders (a maximum of 999 files per folder).
The maximum number of characters:
– Folder names : 24 characters
– File names : 24 characters
– Tag : 30 (Title) /30 (Artist/ Album) characters
NOTE
- When the USB device is connected to this unit, it can be charged through the USB cable.
- Install the USB device in the place where it will not affect safe driving.
- You cannot connect a USB device via a USB hub and Multi Card Reader.
- Take backups of the audio files used with this unit. The files may be erased depending on the operating conditions of the USB device.
We shall have no compensation for any damage arising from any erased data.
- No USB device comes with this unit. You need to purchase a commercially available USB device.
- Cap the USB terminal whenever not using.
Playable Audio files
| Audio format | Bit rate/ (Bit count) | Sampling frequency |
| MP3 (.mp3) | 32 – 384kbps, VBR | 16 – 48 kHz |
| WMA (.wma) | 32 – 320kbps | 32 – 48 kHz |
| FLAC (.flac) | (16 - 24 bit) | 8 – 48 kHz |
| AAC-LC (.m4a) | 16 – 320kbps | 16 – 48 kHz |
- This unit can show ID3 Tag Version 1.0/1.1/2.2/2.3/2.4 (for MP3).
- The maximum number of characters:
- Tag : 30 (Title) /30 (Artist/ Album) characters
NOTE
- WMA and AAC of which is covered with DRM cannot be played.
- Although the audio files are complied with the standards listed above, the play may be impossible depending on the types or conditions of media or device.
Troubleshooting
What appears to be trouble is not always serious. Check the following points before calling a service center.
- For operations with the external components, refer also to the instructions supplied with the adapters used for the connections (as well as the instructions supplied with the external components).
General
No sound comes out of the speakers.
- Adjust the volume to the optimum level.
- Check the cords and connections.
The remote controller does not work.
- Check the wiring of the remote controller.
USB
While playing a track, sound is sometimes interrupted.
- The tracks are not properly copied into the USB device. Copy the tracks again, and try again.
iPhone
No sound comes out of the speakers.
- Disconnect the iPhone, then connect it again.
- Select another source, then reselect "iPhone".
The iPhone does not turn on or does not work.
- Check the connecting cable and its connection.
- Update the firmware version of iPhone.
- Charge the battery of iPhone.
- Reset the iPhone.
Sound is distorted.
- Deactivate the equalizer either on this unit or the iPhone.
A lot of noise is generated.
- Turn off (unchecked) "VoiceOver" on the iPhone. For details, visit https://www.apple.com.
Radio
Automatic presetting does not work.
- Store stations manually. (P.7)
Static noise while listening to the radio.
- Connect the antenna firmly.
Bluetooth
The sound is interrupted or skipped while using a Bluetooth audio player.
- Reduce the distance between the unit and the Bluetooth audio player.
- Turn off, then turn on the unit. (When the sound is not yet restored) connect the player again.
The connected audio player cannot be controlled.
- Check whether the connected audio player supports AVRCP (Audio/Video Remote Control Profile).
The Bluetooth device does not detect the unit.
- Make sure that the "Discoverable" in Bluetooth settings is set to "Enable".
The unit does not pair with the Bluetooth device.
- Turn off, then turn on the Bluetooth device.
- Disconnect the Bluetooth device currently connected and then register the new device. (P.11)
SiriusXM
"No Signal" appears.
- Make sure the SiriusXM Satellite Radio antenna is mounted outside the car. Move the car to an area with a clear view of the sky.
"Check Antenna" appears.
- Check the SiriusXM Satellite Radio antenna connection, and make sure the antenna is firmly attached to the radio.
- Check whether the SiriusXM Satellite Radio antenna cable is bent or broken. If it is damaged, replace the whole antenna unit.
"Check Radio" appears.
- Make sure the SiriusXM Connect Vehicle Radio is connected to the unit.
"Channel Not Available" appears.
- The selected channel is no longer available. Select another channel or continue listening to the previous channel.
"Channel Not Subscribed" appears.
The currently selected channel is not subscribed to.
- In the U.S.A., visit www.siriusxm.com or call 1-866-635-2349 if you have questions about your subscription package or would like to subscribe to this channel.
- In Canada, visit www.siriusxm.ca or call 1-877-438-9677.
"Subscription Updated" appears.
- Your subscription has been updated. Press the appropriate button to continue.
"Channel Locked" appears.
- The selected channel has been locked by the parental controls. Enter the unlock code when you are asked.
Specifications
Dust/Water proof
:IP66 for Faceplate
: IPX4 for Body
(Equivalent to IEC standard publication 60529)
Monitor section
Picture Size
: 2.7 inch Color TFT
Back Lighting
:LED
USB interface section
USB Standard
: USB 2.0 (Full Speed)
Compatible Devices
: Mass storage class
File System
:FAT16,FAT32,exFAT
Capacity
: 32GB maximum capacity, 255Folders max, 999
Files per Folder max
Maximum Power Supply Current
:DC5V=1.5A
Frequency Response
: 20 - 20,000 Hz
Audio Decoder
:MP3/WMA/AAC/FLAC
Bluetooth section
Technology
:Bluetooth5.0
Frequency
: 2.4 GHz - 2.48 GHz
Maximum Communication range
: Line of sight approx. 10m (32.8 ft)
Pairing
: SSP(Secure Simple Pairing)
Profile
A2DP (Advanced Audio Distribution Profile)
AVRCP (V1.5) (Audio/Video Remote Control Profile)
FM radio section
Frequency Range (step)
North America: 87.9 MHz - 107.9 MHz (200 kHz)
South America, Europe, Russia, Asia, Middle East,
Australia: 87.5 MHz - 108 MHz (50 kHz)
Japan: 76.0 MHz - 99.0 MHz (100 kHz)
AM radio section
Frequency Range (step)
North America, South America
: 530 kHz - 1700 kHz (10 kHz)
Europe, Russia, Asia: 531 kHz - 1611 kHz (9 kHz)
Japan: 522 kHz - 1629 kHz (9 kHz)
Middle East: 531 kHz - 1602 kHz (9 kHz)
Australia: 531 kHz - 1701 kHz (9 kHz)
Weather Band radio section
Frequency Range (step)
USA/Canada: 162.400 MHz - 162.550 MHz (25 kHz)
Equalizer
Band
: 13 Band
Frequency
: 62.5/100/160/250/400/630/1k/1.6k/2.5k/4k/6.3k/
10k/16kHz
Gain
: -9 — +9 (-9 dB — +9 dB)
Audio section
Maximum Power
: 34 W × 4 (@ 4 Ω, Peak), 50 W × 4 (@ 2 Ω, Peak)
Full Bandwidth Power (1% THD)
: 19 W × 4 (@ 4 Ω, RMS), 28 W × 4 (@ 2 Ω, RMS)
Preout Level/ Load
KMR-M300BT
: 2000 mV/ 10 kΩ (USB)
KMR-XM500
: 5000 mV/ 10 kΩ (USB)
Preout Impedance
:≤500Ω
Speaker Impedance
:2-8Ω
General
Operating Voltage
: 12 V DC battery
Installation Dimensions
Panel (W× H)
: 115× 106mm
4-9/16 x 4-3/16 inch
Body (W× H× D)
:077×077×74mm
03-1/16 × 03-1/16 × 2-15/16 inch
Weight
: 0.9 kg (2.0 lbs)
Copyrights
- The Bluetooth® word mark and logos are registered trademarks owned by the Bluetooth SIG, Inc. and any use of such marks by JVCKENWOOD Corporation is under license. Other trademarks and trade names are those of their respective owners.
- Use of the Made for Apple badge means that an accessory has been designed to connect specifically to the Apple product(s) identified in the badge, and has been certified by the developer to meet Apple performance standards. Apple is not responsible for the operation of this device or its compliance with safety and regulatory standards. Please note that the use of this accessory with an Apple product may affect wireless performance.
- Apple, iPhone and Lightning are trademarks of Apple Inc., registered in the U.S. and other countries.
- Microsoft and Windows Media are either registered trademarks or trademarks of Microsoft Corporation in the United States and/or other countries.
Sirius, XM and all related marks and logos are trademarks of Sirius XM Radio Inc. All rights reserved.
NOTE
- Although the effective pixels for the liquid crystal panel is given as 99.99% or more, 0.01% of pixels may not light or may light incorrectly.
- Specifications subject to change without notice.
For USA

FCC CAUTION
Changes or modifications not expressly approved by the party responsible for compliance could void the user's authority to operate the equipment.
NOTE
- This equipment has been tested and found to comply with the limits for a Class B digital device, pursuant to Part 15 of the FCC Rules. These limits are designed to provide reasonable protection against harmful interference in a residential installation.
-
This equipment may cause harmful interference to tuner communications, if it is not installed and used in accordance with the instructions. However, there is no guarantee that interference will not occur in a particular installation. If this equipment does cause harmful interference to tuner or television reception, which can be determined by turning the equipment off and on, the user is encouraged to try to correct the interference by one or more of the following measures:
-
Reorient or relocate the receiving antenna.
- Increase the separation between the equipment and receiver.
- Connect the equipment into an outlet on a circuit different from that to which the receiver is connected.
- Consult the dealer or an experienced tunes /TV technician for help.
This transmitter must not be co-located or operated in conjunction with any other antenna or transmitter.
For Canada

ISED CAUTION
This device contains licence-exempt transmitter(s)/ receiver(s) that comply with Innovation, Science and Economic Development Canada's licence-exempt RSS(s).
Operation is subject to the following two conditions:
(1) This device may not cause interference.
(2) This device must accept any interference, including interference that may cause undesired operation of the device.
CAUTION
This equipment complies with FCC/ISED radiation exposure limits set forth for an uncontrolled environment and meets the FCC tuner frequency (RF) Exposure Guidelines and RSS-102 of the ISED tuner frequency (RF) Exposure rules. This equipment should be installed and operated keeping the radiator at least 20cm or more away from person's body.
Supplier's Declaration of Conformity
Trade Name: KENWOOD
Products: DIGITAL MEDIA RECEIVER
Model Name: KMR-M300BT/KMR-XM500
Responsible Party: JVCKENWOOD USA
CORPORATION
4001 Worsham Avenue,
Long Beach, CA 90808, U.S.A.
PHONE: 1-800-252-5722
THIS DEVICE COMPLIES WITH PART 15 OF THE FCC RULES. OPERATION IS SUBJECT TO THE FOLLOWING TWO CONDITIONS:
(1) THIS DEVICE MAY NOT CAUSE HARMFUL INTERFERENCE, AND
(2) THIS DEVICE MUST ACCEPT ANY INTERFERENCE RECEIVED, INCLUDING INTERFERENCE THAT MAY CAUSE UNDESIRED OPERATION.
For Argentina

3 Débranchez I'iPod/I'iPhone.
iPhone connectables
- Pressing and holding <口 口> changes the channel rapidly.
REMARQUE
Procedure installation
Section interface USB
Norme USB
: SSP (Secure Simple Pairing)
Profil
Japon : 76,0 MHz - 99,0 MHz (100 kHz)
Section Syntoniseur AM
Bande de frequencies (step)
- La marque et les logos Bluetooth® sont des marques déposées apparentant à Bluetooth SIG, Inc. et toute utilisation de ces marques par JVCKENWOOD Corporation est sous licence. Les autres marques déposées et appellations commerciales
- Use of the Made for Apple badge means that an accessory has been designed to connect specifically to the Apple product(s) identified in the badge, and has been certified by the developer to meet Apple performance standards. Apple is not responsible for the operation of this device or its compliance with safety and regulatory standards. Please note that the use of this accessory with an Apple product may affect wireless performance.
- Apple, iPhone and Lightning are trademarks of Apple Inc., registered in the U.S. and other countries.
- Microsoft and Windows Media are either registered trademarks or trademarks of Microsoft Corporation in the United States and/or other countries.
Sirius, XM and all related marks and logos are trademarks of Sirius XM Radio Inc. All rights reserved
REMARQUE
Conceptos batics. 44
PURPLE1, PURPLE2, PURPLE3, PURPLE4,
: SSP (Secure Simple Pairing)
Perfil
Japon: 76,0 MHz-99,0 MHz (100 kHz)
Australia: 531 kHz-1.701 kHz (9 kHz)
- Lamarca denominativa y los logos de Bluetooth® son MARCAS registradas propidad de Bluetooth SIG, Inc. y cadaquier uso de dichas MARCAS por JVCKENWOOD Corporation está sujeeto a los tiérminos de licencia. El resto de MARCAS commerciales y nombres commerciales corresponden a sus respectivos propietarios.
- Use of the Made for Apple badge means that an accessory has been designed to connect specifically to the Apple product(s) identified in the badge, and has been certified by the developer to meet Apple performance standards. Apple is not responsible for the operation of this device or its compliance with safety and regulatory standards. Please note that the use of this accessory with an Apple product may affect wireless performance.
- Apple, iPhone and Lightning are trademarks of Apple Inc., registered in the U.S. and other countries.
- Microsoft and Windows Media are either registered trademarks or trademarks of Microsoft Corporation in the United States and/or other countries.
Sirius, XM and all related marks and logos are trademarks of Sirius XM Radio Inc. All rights reserved.
NOTA
Para accomplishment de la IFT:

- KMR-XM500 KMR-M300BT
- INSTRUCTION MANUAL
- MODE D'EMPLOI
- Before use
- How to read this manual
- Precautions
- WARNING
- To prevent injury or fire, take the following precautions:
- Precautions on using this unit
- Protecting the monitor
- Set the general settings
- Beep
- Language
- Color
- Tuner Region
- Display Setting
- AUX Input
- Source Gain
- Int. Amplifier
- Voltage Gauge
- Information
- Factory Reset
- Common operations
- Select a source
- Preparation
- Connecting a USB device
- To disconnect the USB device:
- Playback operations
- Source screen
- Selecting a track in a list (Searches file)
- Function settings
- Connecting iPhone
- To disconnect the iPhone
- Connectable iPhone
- NOTE
- Selecting a content in a list
- Radio basic operations
- Select a stored station of the current band
- Press <Q/>.
- Activating subscription
- SiriusXM® basic operations
- Select a stored channel of the current band
- Direct Access Tuning
- Replay
- To return to live music/content
- Parental Control
- Activating parental control
- Parental Lock channel selection
- Changing the parental code
- Reset to the default settings
- External Components
- Using external audio players
- Starting playback
- Camera
- Displaying the picture from the camera
- To display the picture from the camera manually
- Bluetooth® smartphone
- About the Bluetooth smartphone and Bluetooth audio player
- Version
- Profile
- Sound codec
- Register your smartphone to the unit
- Playing Bluetooth Audio Device
- Settings
- Audio Settings
- General Settings (P.3)
- Bluetooth Settings
- Before installation
- Supplied accessories for installation
- Installation procedure
- Installing the unit
- Mounting (Using Mounting Plate)
- Mounting (Using U Bracket)
- Removing the trim plate
- Maintenance
- Cleaning the Unit
- CAUTION
- More information
- Usable USB device
- Troubleshooting
- General
- No sound comes out of the speakers.
- The remote controller does not work.
- USB
- While playing a track, sound is sometimes interrupted.
- iPhone
- The iPhone does not turn on or does not work.
- Sound is distorted.
- A lot of noise is generated.
- Radio
- Automatic presetting does not work.
- Static noise while listening to the radio.
- Bluetooth
- The sound is interrupted or skipped while using a Bluetooth audio player.
- The connected audio player cannot be controlled.
- The Bluetooth device does not detect the unit.
- The unit does not pair with the Bluetooth device.
- SiriusXM
- "No Signal" appears.
- "Check Antenna" appears.
- "Check Radio" appears.
- "Channel Not Available" appears.
- "Channel Not Subscribed" appears.
- "Subscription Updated" appears.
- "Channel Locked" appears.
- Specifications
- Dust/Water proof
- Monitor section
- USB interface section
- Bluetooth section
- FM radio section
- AM radio section
- Weather Band radio section
- Equalizer
- Audio section
- Operating Voltage
- Installation Dimensions
- Weight
- Copyrights
- For USA
- FCC CAUTION
- For Canada
- ISED CAUTION
- Supplier's Declaration of Conformity
- For Argentina
- Débranchez I'iPod/I'iPhone.
- iPhone connectables
- REMARQUE
- Procedure installation
- Section interface USB
- Section Syntoniseur AM
- Perfil
- NOTA
- Para accomplishment de la IFT:
Brand : KENWOOD
Model : KMR-XM500
Category : Digital media receiver