
MFP6500SSB4 - Built-in oven PROLINE - Free user manual and instructions
Find the device manual for free MFP6500SSB4 PROLINE in PDF.
| Product type | Built-in oven |
| Brand | PROLINE |
| Model | MFP6500SSB4 |
| Dimensions (W x D x H) | 595 x 575 x 595 mm |
| Built-in compartment dimensions | 560 x 570 x 600 mm |
| Net weight | 37.6 kg |
| Usable volume | 65 L |
| Power supply | 220-240 V ~ 50-60 Hz |
| Maximum power | 3.2 kW |
| Energy class | A |
| Energy consumption (conventional mode) | 0.99 kWh/cycle |
| Energy consumption (fan-assisted) | 0.77 kWh/cycle |
| Bulb power | 25 W (class G) |
| Heating elements | Top 950 W, Grill 2000 W, Bottom 1100 W, Convection 2000 W |
| Convection motor | 34 W |
| Cooling fan | 30 W |
| Cleaning | Pyrolysis |
| Functions | Lamp, Defrost, Natural convection (bottom heat), Natural convection, Forced air circulation, Grill, Turbo Grill, Turbo Grill with ventilation, Pulsed hot air, Pyrolysis, Economy mode |
| Safety | Child lock, Open door detection (on some models) |
| Supplied accessories | Cooking grid, Drip tray / roasting pan support |
| Repairability | Bulb replaceable by a professional |
| Country of origin | People's Republic of China |
Frequently Asked Questions - MFP6500SSB4 PROLINE
User questions about MFP6500SSB4 PROLINE
0 question about this device. Answer the ones you know or ask your own.
Ask a new question about this device
Download the instructions for your Built-in oven in PDF format for free! Find your manual MFP6500SSB4 - PROLINE and take your electronic device back in hand. On this page are published all the documents necessary for the use of your device. MFP6500SSB4 by PROLINE.
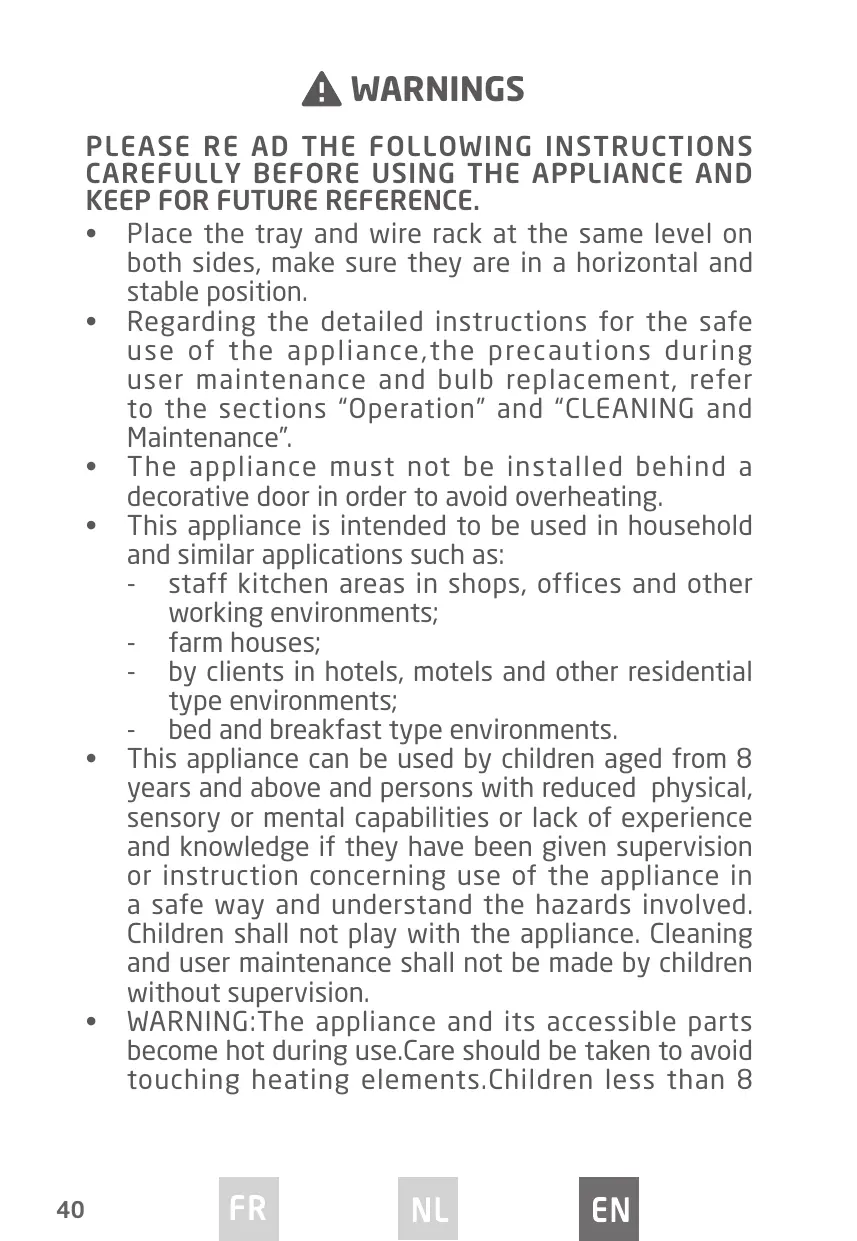
USER MANUAL MFP6500SSB4 PROLINE
FOUR ENCASTRABLE INBOUWOVEN
MFP6500SSB4
MANUEL D'UTILISATION
HANDLEIDING
TABLE DES MATIÈRES
ATTENTION P.02
MISES EN GARDE IMPORTANTES P.06
DESCRIPTION DU FOUR P.07
PANNEAU DE COMMANDE P.07
ÉCRAN P.07
ACCESSOIRESDUFOUR P.09
INSTALLATION. P11
FONCTIONNEMENT P.12
RéGLAGE DE L'HORLOGE P.12
CUISINE P.12
MINUTERIE P.12
FONCTION SECURITE ENFANTS P.13
MODEECONOMIE D'NERGIE P.13
FONCTION DE RÉSERVATION P.14
NETTOYAGE ET ENTRETIEN P.15
SPÉCIFICATIONS TECHNIQUES P.17
MISE AU REBUT
ATTENTION
MERCI DE BIEN VOULOIR LIRE LES CONSIGNES DE SECURITE ATTENTIVEMENT AVANT L'UTILISATION DE L'APPAREIL ET DE LES CONSERVER POUR CONSULTATION ULTERIEURE.
Attention, surface chaude
MISES EN GARDE IMPORTANTES
Hotline Darty France
PLEASE RE AD THE FOLLOWING INSTRUCTIONS CAREFULLY BEFORE USING THE APPLIANCE AND KEEP FOR FUTURE REFERENCE.
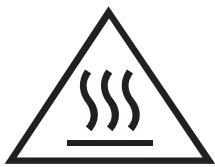
- Place the tray and wire rack at the same level on both sides, make sure they are in a horizontal and stable position.
- Regarding the detailed instructions for the safe use of the appliance, the precautions during user maintenance and bulb replacement, refer to the sections "Operation" and "CLEANING and Maintenance".
- The appliance must not be installed behind a decorative door in order to avoid overheating.
-
This appliance is intended to be used in household and similar applications such as:
-
staff kitchen areas in shops, offices and other working environments;
- farm houses;
- by clients in hotels, motels and other residential type environments;
-
bed and breakfast type environments.
-
This appliance can be used by children aged from 8 years and above and persons with reduced physical, sensory or mental capabilities or lack of experience and knowledge if they have been given supervision or instruction concerning use of the appliance in a safe way and understand the hazards involved. Children shall not play with the appliance. Cleaning and user maintenance shall not be made by children without supervision.
WARNING:The appliance and its accessible parts become hot during use.Care should be taken to avoid touching heating elements.Children less than 8
years of age shall be kept away unless continuously supervised.
- If the supply cord is damaged, it must be replaced by the manufacturer, its service agent or similarly qualified persons in order to avoid a hazard.
- During use the appliance becomes hot. Care should be taken to avoid touching heating elements inside the oven.
- Do not use harsh abrasive cleaners or sharp metal scrapers to clean the oven door glass since they can scratch the surface which may result in shattering of the glass.
- Do not use a steam cleaner.
- WARNING: Ensure that the appliance is switched off (circuit breaker is open) before replacing the lamp to avoid the possibility of electric shock.
- The door should preferably be closed in all cooking modes.
- Do not hang any cloth or garment to the handle of the oven.
- Do not line the oven's cavity with aluminum foil for easier cleaning: The oven may overheat and the enamel coating of the cavity may be damaged.
- The appliance is not intended to be operated by means of an external timer or separate remote-control system.
- The means for disconnection must be incorporated in the fixed wiring in accordance with the wiring rules.
- The appliance shall be installed in accordance with
- national wiring regulations NF C 15-100.
- Regarding the instructions for the all necessary spaces with dimensions, the method of fixing and how the appliance is to be fixed to its support, refer
to the section "INSTALLATION".
- The temperature of accessible surfaces may be high when the appliance is operating.
- After each cooking cycle, the cooling fan will continue to run for a while to ensure quick cooling and safe operation of the oven.
- Regarding the instructions for the connection of the appliance to the supply mains refer to the section "ELECTRICAL CONNECTION".
- Excess spillage must be removed before operating the oven in self-cleaning function.
- Before starting the Pyrolytic self-cleaning function, REMOVE ALL THE ACCESSORIES FROM THE OVEN to prevent them from getting damaged.
- Under Pyrolytic self-cleaning conditions the surfaces may get hotter than usual and children should be kept away.
- Regarding the instructions for details indicating the correct installation of the shelves refer to the section "Oven accessories".
Caution, hot surface
IMPORTANT SAFETY INSTRUCTIONS
- The oven must be properly installed and grounded by a qualified technician.
- Do not wear loose or hanging garments when using the oven. They could ignite if they touch a hot heating element and this may lead to the risk of burning yourself.
- Do not store flammable materials on or near the oven. This may cause a fire hazard.
Control panel
The oven is designed with push pull control knobs. These knobs can be completely sunken inside the control panel when the oven is not working.


Function control knob

Thermostat control knob

Timer button

Clock time button

Start button

Pause/stop button
Display
| Function indicator lights | Description |
| Oven lamp The function allows the oven lamp to be on without any cooking function except pyrolytic function and ECO function. | |
| Defrosting This function circulates room temperature air around the food. | |
| Bottom heat Ideal for casseroles, curries and any slow cooking. The temperature can be set in the range of 60 to 120°C and the default temperature is 60°C. | |
| Conventional Ideal for single shelf cooking. Good for meat and fruit pies. The oven needs to be preheated. The temperature can be set in the range of 50 to 250°C and the default temperature is 220°C. | |
| Conventional with fan This function uses top and bottom heating elements with a fan to circulate the air. Ideal for grilling or roasting large pieces of meat. The temperature can be set in the range of 50 to 250°C and the default temperature is 220°C. | |
| Three stage variable grill This function provides the precise temperature control for a full width grill. The temperature can be set at 180°C, 210°C or 240°C and the default temperature is 210°C. | |
| Dual grill Ideal for grilling flat food in large quantities and for roasting. The temperature can be set in the range of 180 to 240°C and the default temperature is 210°C. | |
| Dual grill with fan Ideal for roasting large joints of meat. The temperature can be set in the range of 180 to 240°C and the default temperature is 210°C. | |
| Convection In this function the fan automatically turns on to improve air circulation and creates an even heat for cooking. The temperature can be set in the range of 50 to 240°C and the default temperature is 180°C. | |
| Pyrolytic mode | When this function is selected, "PyR" will be shown on the display. The default temperature is 450°C. The cleaning time can be set for 1.5 or 2 hours. |
| This function ensures energy savings during cooking. |
Oven accessories
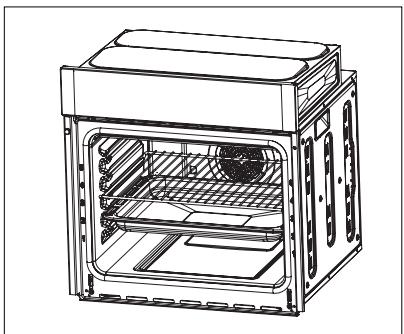
Wire shelf
For dishes, cake tins and items for roasting and grilling
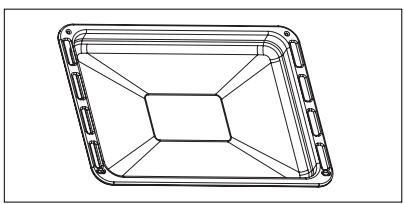
Roasting pan
For baking and roasting or for collecting fat
Push the wire shelf / roasting pan between the guide bars in the oven.
In case that the oven shelf and the roasting pan are inserted together, lay the wire shelf on the roasting pan.
ELECTRICAL CONNECTION
Electrical connections must only be performed by a qualified and authorised electrician.
The brown wire must be connected to the terminal marked L.
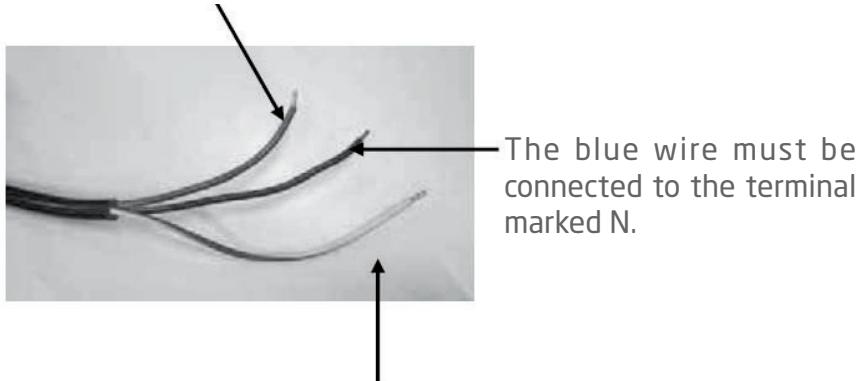
The green and yellow wire must be connected to the letter E or the earth symbol 1一

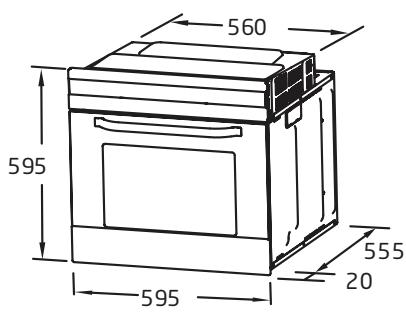
INSTALLATION
The figures below give the dimensions for installation to the furniture.
The attached dimensions are in mm.
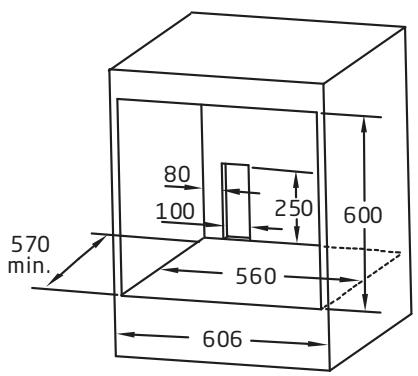
Installation Steps
- Please make cabinets based on the data of "Cabinet diagram".
- Before installation, please check whether the power socket is grounded and the cabinet size meets the installation requirements.
- Install the machine at the designated location in the kitchen and install it in an upright cabinet.
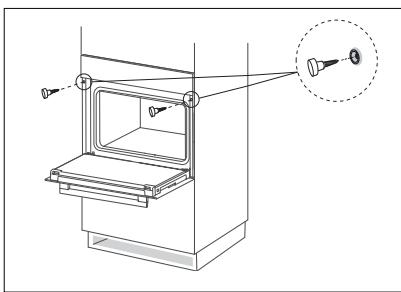
- Open the furnace door, determine the two installation holes on the frame, and fix the machine at the installation position with the screws provided with the product.
Schematic diagram of cabinet fixing
OPERATION
When the oven is operational (power on), the display will show "0:00" and a beep sound will be heard. The clock is set on a 24-hour cycle.
Setting the Clock
- Press 4 , the hour digits will flash.
- Turn the thermostat control knob to set the correct hour.
- Press to confirm then the minutes digits will flash.
- Turn the thermostat control knob to set the correct minutes.
- Press to confirm. "will flash on the display.
Cooking
- Turn the function control knob to select the desired function.
- The corresponding indicator light will be illuminated on the display.
- Turn the thermostat control knob to select the desired temperature.
- To set the desired cooking time, turn the function control knob and press confirm.
- The default cooking time is 9 hours (9:00).
- When the cooking is finished, the oven buzzer will sound five times.
- Press to check the clock time during cooking.
- Press to pause cooking and to resume cooking press
- To stop cooking press twice.
Timer
- In standby mode, press . "Q" will be illuminated on the display
- Turn the thermostat control knob to set the hour. The timer can beset up to 9:59.
- Press to confirm.
-
Turn the thermostat control knob to set the minutes.
-
Press to confirm.":" will flash on the display.
- After the set time has elapsed, the oven buzzer will sound and "D"will go off on the display. To cancel the timer, press II twice.
Child safety Lock function
To lock the buttons and knobs: press l and l simultaneously for about 3 seconds, there will be a long "beeping" sound and the lock indicator light " l " will be illuminated.
Except the button, all other buttons and knobs are locked.
NOTE:
During working mode, the oven is locked. If you want to stop cooking, you can press the button directly (no need to cancel the child lock).
To unlock the buttons and knobs, press l and l simultaneously for about 3 seconds, there will be a long beeping sound indicating the child-lock is released.
The lock indicator light " " will disappear from the display.
Energy saving function
In standby mode press and hold for 3 seconds to enter energy saving mode. The display will be switched off.
If there is no operation in 10 minutes in standby mode, the display will be switched off.
Press any button or turn the control knob to exit the energy saving mode.
Reservation function
- To use the reservation function, you must first set the clock. See "Setting the Clock" for the operation method.
- Press the key to enter the reservation settings.
- Turn knob Thermostat control knob to set the reserved hour time.
- Press the key again.
- Turn knob Thermostat control knob to set the minute time of the reservation.
- Turn knob Function control knob to select the function, and press to confirm.
- Turn knob Function control knob to adjust cooking and turn knob Thermostat control knob to adjust temperature.
- Press the key to start cooking, and the LED shows "区". The appointment time can be checked by pressing the key, and return to the clock display state after 3 seconds.
- When it's time to make an appointment for cooking, the buzzer will beep and start automatic cooking, and the icon "区" will disappear.
Notes
- Reminder function is invalid during reservation status.
- Lamp, defrost, probe can't be reserved.
- If you skip step 7, you will cook according to the default temperature and time.
- During the status of reservation, press key once, time and temperature of reservation menu will be shown with menu icon lighting constantly. Press the key again to return to the clock status, or press the key to return to the reservation status.
Open door detection (Only for some models)
- When the oven door is opened during cooking, the oven will enter a pause state (except the lamp function).
- When the oven door is opened, press the "☑" key, and the screen displays "door". At this time, the oven cannot be started.
- During the reservation process, open the oven door, When the reservation time is reached, the oven will enter a pause state (except pyrolytic, lamp and defrost functions).
- After the booking time of pyrolytic function arrives, if the oven door is in the open state, the oven will return to the standby state.
- Opening the oven door does not affect the operation of the alarm clock function.

CLEANING AND MAINTENANCE
- Switch off the appliance and allow it to cool completely before cleaning.
- Clean the outside of the appliance with a damp cloth. Never use metal polish.
- Wash all the removable parts in mild soaped water. Rinse and dry thoroughly before use.
Pyrolytic self cleaning function
- Turn the function control knob until "PyR" is illuminated on the display.
-
- Press to start cleaning. The default cleaning time is 2 hours (2:00).
- To change the cleaning time, turn the function control knob to select the cleaning time (1:30 or 2 hours).
- Press to confirm the setting.
NOTE:
- When the display shows "door" it signifies that the oven door is open. Please close the oven door properly.
- During the self-cleaning, the oven door cannot be opened for safety reason. In order to open the door the oven must cool down first.
- When the temperature in the centre of the oven is higher than 200^ C , press twice to return to the standby mode.
- When the temperature in the centre of the oven is higher than 300^ C , press to start cooling and the display will show "Cool".
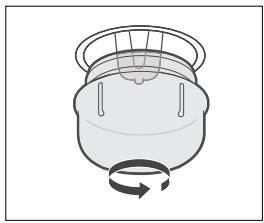
Replacing the oven lamp
- Remove the glass lamp cover by unscrewing it.
- Replace the lamp with a new one.
- Screw the glass lamp over back in place.
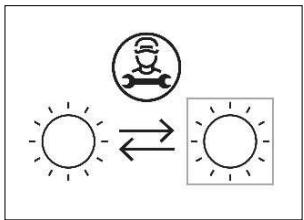
Replaceable light source by a professional.
This product contains a light source of energy efficiency class G.

TECHNICAL DATA SHEET
Below is the sheet of domestic oven according to EU regulation No. 66/2014.
| Model identification | MFP6500SSB4 |
| Type of oven | Electric oven |
| Mass of the appliance (M) | 37.6 kg |
| Number of cavities | 1 |
| Heat source per cavity (electricity or gas) | Electricity |
| Volume per cavity (V) | 65L |
| Energy consumption (electricity) required to heat a standardized load in a cavity of an electric heated oven during a cycle in conventional mode per cavity (electric final energy) (ECeletric cavity) | 0.99 kWh/cycle |
| Energy consumption required to heat a standardized load in a cavity of an electric heated oven during a cycle in fan-forced mode per cavity (electric final energy) (ECeletric cavity) | 0.77 kWh/cycle |
| Energy Efficiency Index per cavity (EELcavity) | 94 |
The test is performed in compliance with the requirements of EN60350-1:2016.1
| Brand | Proline |
| Appliance type | Built-in Oven |
| Rating / Supply Voltage and frequency | 220-240 V~50 Hz - 60 Hz |
| Max power | 3.2kW |
| Oven lamp power | 25W |
| Top heating element (W) | 950 |
| Grill heating element (W) | 2000 |
| Bottom heating element (W) | 1100 |
| Convection heating element (W) | 2000 |
| Convection motor (W) | 34 |
| Cooling fan (W) | 30 |
| Cleaning (Enamel/catalytic/Pyrolytic) | Pyrolytic |
| Net Weight kg | 37.6kg |
| Product dimension (W*D*H) | 595*575*595mm |
| Cabinet/furniture cut-out sizes (W*D*H) | 560*570*600mm |
| Energy Class (letter for the sticker)* | A |
| Energy consumption kWh | |
| Heating function | |
| Conventional | 0.99 |
| Forced air convection | 0.77 |
| Usable volume (litres) | 65 |
| Size : (Small/Medium/Large) | Large |
| Noise Db(A) re1 pw | 58 |
| Made in | PRC |
- Energy class: A+++....D (A++++=economical D=less economical)
As a responsible retailer we care about the environment.
As such we urge you to follow the correct disposal procedure for the appliance and packaging materials. This will help conserve natural resources and ensure that it is recycled in a manner that protects health and the environment.
You must dispose of this appliance and its packaging according to local laws and regulations. Because this appliance contains electronic components, the appliance and its accessories must be disposed of separately from household waste when the appliance reaches its end of life.
Contact your local authority to learn about disposal and recycling.
The appliance should be taken to your local collection point for recycling. Some collection points accept appliance free of charge.
We apologise for any inconvenience caused by minor inconsistencies in these instructions, which may occur as a result of product improvement and development.
EU Declaration of Conformity
Product Description:
The object of the declaration described above is in conformity with the relevant Union harmonisation legislation:
Low Voltage Directive (LVD)
Eco design requirements for energy-related products (ErP)
RoHS
EMC:
EN IEC 50014-1:2021
EN IEC 50014-2:2021
EN 61000-3-3:2013+A1:2019
EN IEC 61000-3-2:2019+A1:2021
LVD:
EN 60335-2-6: 2015 + A1:2020+ A11:2020
EN 60335-1: 2012 + A11: 2014 + A13: 2017 + A1: 2019 + A14: 2019 + A2: 2019 + A15: 2021
EN 62233:2008
ErP:
(EU) No 66/2014
(EU) No 65/2014
2009/125/EC
This declaration of conformity is drawn up under the sole responsibility of the manufacturer.
The person responsible for this declaration is:
Place, Date / Lieu :
Ivry-sur-Seine, mars 20, 2023


PROLINE

- FOUR ENCASTRABLE INBOUWOVEN
- TABLE DES MATIÈRES
- ATTENTION
- MERCI DE BIEN VOULOIR LIRE LES CONSIGNES DE SECURITE ATTENTIVEMENT AVANT L'UTILISATION DE L'APPAREIL ET DE LES CONSERVER POUR CONSULTATION ULTERIEURE.
- MISES EN GARDE IMPORTANTES
- Hotline Darty France
- PLEASE RE AD THE FOLLOWING INSTRUCTIONS CAREFULLY BEFORE USING THE APPLIANCE AND KEEP FOR FUTURE REFERENCE.
- IMPORTANT SAFETY INSTRUCTIONS
- Control panel
- Oven accessories
- ELECTRICAL CONNECTION
- INSTALLATION
- Installation Steps
- OPERATION
- Setting the Clock
- Cooking
- Timer
- Child safety Lock function
- NOTE:
- Energy saving function
- Reservation function
- Notes
- Open door detection (Only for some models)
- CLEANING AND MAINTENANCE
- Pyrolytic self cleaning function
- Replacing the oven lamp
- TECHNICAL DATA SHEET
- EMC:
- LVD:
- ErP:
- PROLINE
Brand : PROLINE
Model : MFP6500SSB4
Category : Built-in oven