HSA 60 - Hedge trimmers STIHL - Free user manual and instructions
Find the device manual for free HSA 60 STIHL in PDF.



| Product type | Battery-powered hedge trimmer |
| Brand | STIHL |
| Model | HSA 60 |
| Cutting length | 600 mm |
| Tooth spacing | 34 mm |
| Weight (without battery) | 3.5 kg |
| Battery voltage | 36 V |
| Battery technology | Lithium-ion |
| Compatible battery | STIHL AK |
| Compatible charger | STIHL AL 101, AL 301, AL 500 |
| Sound pressure level | 77 dB(A) |
| Sound power level | 85 dB(A) (guaranteed 87 dB(A)) |
| Vibration level (control handle) | 1.0 m/s² |
| Vibration level (loop handle) | 1.5 m/s² |
| Operating temperature range (battery) | -10 °C to +50 °C |
| Charging temperature range | +5 °C to +40 °C |
| Handle rotation | 3 positions |
| Blade stopping time | ~1 second |
| Blade type | Steel, sharpenable |
| Sharpening angle | 35° |
| Gearbox lubrication | Every 50 hours |
| Safety | Double trigger, trigger lock |
| Included accessories | STIHL AK battery and STIHL AL 101 charger |
| Guaranteed sound power level | 87 dB(A) |
Frequently Asked Questions - HSA 60 STIHL
User questions about HSA 60 STIHL
0 question about this device. Answer the ones you know or ask your own.
Ask a new question about this device
Download the instructions for your Hedge trimmers in PDF format for free! Find your manual HSA 60 - STIHL and take your electronic device back in hand. On this page are published all the documents necessary for the use of your device. HSA 60 by STIHL.
USER MANUAL HSA 60 STIHL
1 Introduction. 24
2 Guide to Using this Manual. 24
3 Overview. 25
4 Safety Precautions. 26
5 Preparing Hedge Trimmer for Operation.. 33
6 Charging the Battery, LEDs. 33
7 Removing and Fitting the Battery. 34
8 Switching the Hedge Trimmer On/Off....35
9 Testing the Hedge Trimmer and Battery...35
10 Operating the Hedge Trimmer 36
11 After Finishing Work. 36
12 Transporting 36
13 Storing. 37
14 Cleaning. 37
15 Maintenance. 38
16 Repairing. 39
17 Troubleshooting 39
18 Specifications. 40
19 Spare Parts and Accessories. 41
20 Disposal. 41
21 EC Declaration of Conformity 41
22 UKCA Declaration of Conformity. 41
23 General Power Tool Safety Warnings.....42
1 Introduction
Dear Customer,
Thank you for choosing STIHL. We develop and manufacture our quality products to meet our customers' requirements. The products are
designed for reliability even under extreme conditions.
STIHL also stands for premium service quality. Our dealers guarantee competent advice and instruction as well as comprehensive service support.
STIHL expressly commit themselves to a sustainable and responsible handling of natural resources. This user manual is intended to help you use your STIHL product safely and in an environmentally friendly manner over a long service life.
We thank you for your confidence in us and hope you will enjoy working with your STIHL product.
N
Dr. Nikolas Stihl
IMPORTANT! READ BEFORE USING AND KEEP IN A SAFE PLACE FOR REFERENCE.
2 Guide to Using this Manual
2.1 Applicable Documentation
Local safety regulations apply.
Read, understand and save the following documents in addition to this instruction manual:
- Safety notes and precautions for STIHL AK battery.
- Safety information for STIHL batteries and products with built in batteries: www.stihl.com/safety-data-sheets
2.2 Warning Notices in Text

DANGER
This notice refers to risks which result in serious or fatal injury.
- Serious or fatal injuries can be avoided by taking the precautions mentioned.

WARNING
This notice refers to risks which can result in serious or fatal injury.
- Serious or fatal injuries can be avoided by taking the precautions mentioned.
NOTICE
This notice refers to risks which can result in damage to property.
- Damage to property can be avoided by taking the precautions mentioned.
2.3 Symbols in Text

This symbol refers to a chapter in this instruction manual.
3 Overview
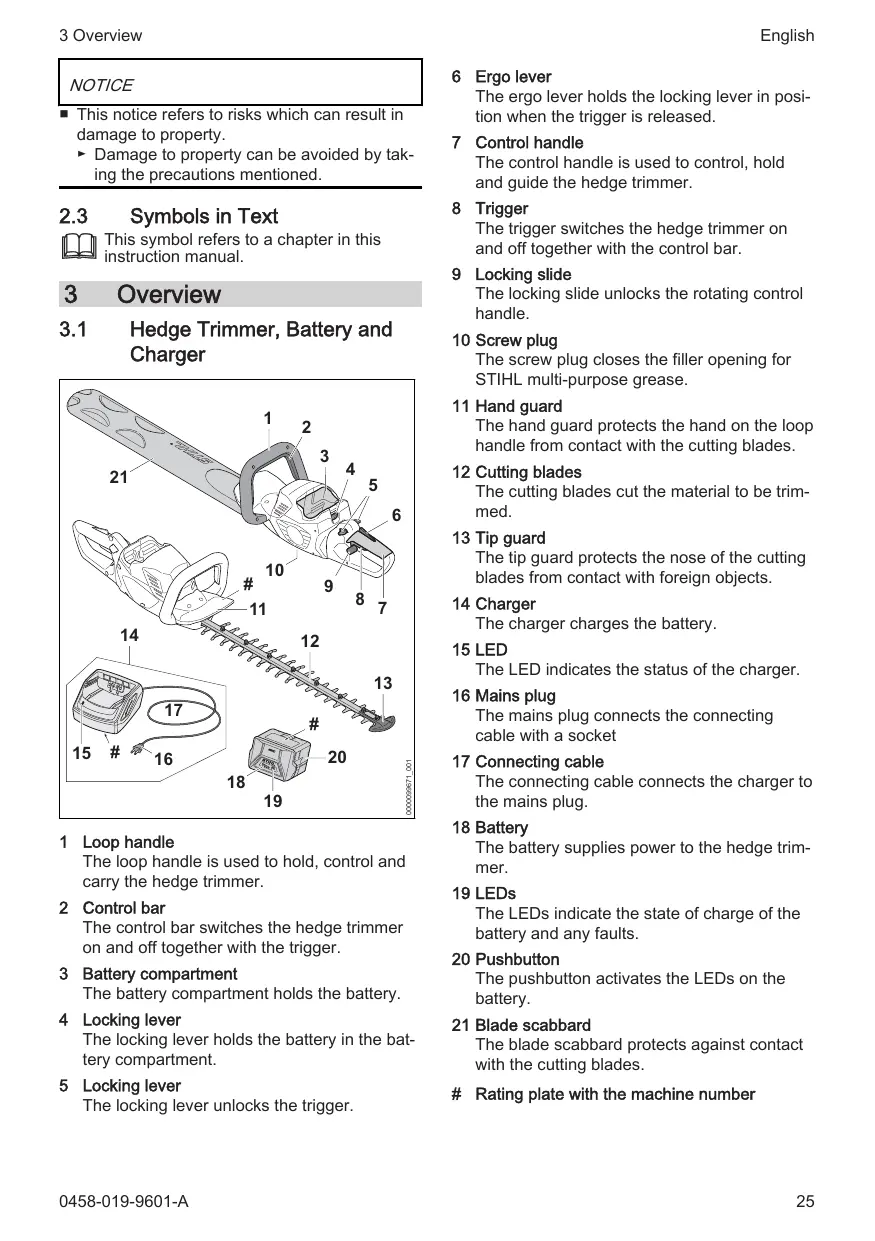
3.1 Hedge Trimmer, Battery and Charger
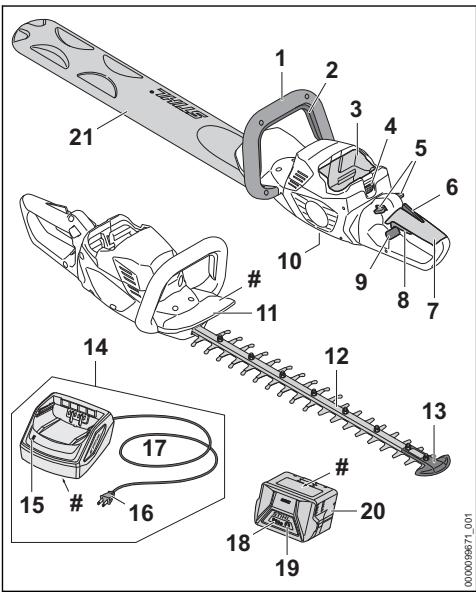
1 Loop handle
The loop handle is used to hold, control and carry the hedge trimmer.
2 Control bar
The control bar switches the hedge trimmer on and off together with the trigger.
3 Battery compartment
The battery compartment holds the battery.
4 Locking lever
The locking lever holds the battery in the battery compartment.
5 Locking lever
The locking lever unlocks the trigger.
6 Ergo lever
The ergo lever holds the locking lever in position when the trigger is released.
7 Control handle
The control handle is used to control, hold and guide the hedge trimmer.
8 Trigger
The trigger switches the hedge trimmer on and off together with the control bar.
9 Locking slide
The locking slide unlocks the rotating control handle.
10 Screw plug
The screw plug closes the filler opening for STIHL multi-purpose grease.
11 Hand guard
The hand guard protects the hand on the loop handle from contact with the cutting blades.
12 Cutting blades
The cutting blades cut the material to be trimmed.
13 Tip guard
The tip guard protects the nose of the cutting blades from contact with foreign objects.
14 Charger
The charger charges the battery.
15 LED
The LED indicates the status of the charger.
16 Mains plug
The mains plug connects the connecting cable with a socket
17 Connecting cable
The connecting cable connects the charger to the mains plug.
18 Battery
The battery supplies power to the hedge trimmer.
19 LEDs
The LEDs indicate the state of charge of the battery and any faults.
20 Pushbutton
The pushbutton activates the LEDs on the battery.
21 Blade scabbard
The blade scabbard protects against contact with the cutting blades.
Rating plate with the machine number
3.2 Symbols
Meanings of symbols that may be on the hedge trimmer, battery and charger:

This symbol marks the filler opening for STIHL multi-purpose grease.

1 LED lights up red. The battery is too warm or too cold.


4 LEDs flash red. There is a fault in the battery.

The LED lights up green and the LEDs on the battery light up or flash green. The battery is charging.

The LED flashes red. There is no electrical contact between the battery and the charger or there is a fault in the battery or in the charger.

LwA Guaranteed sound power level in accordance with Directive 2000/14/EC in dB(A) for the purpose of comparing the sound emissions of products.

The information next to the symbol indicates the energy content of the battery according to the cell manufacturer's specification. The energy content available in operation is lower.

Operate the electric product in a dry place, indoors only.

Do not dispose of the product with domestic waste.
4 Safety Precautions
4.1 Warning Symbols
Meanings of warning signs and labels on the hedge trimmer, battery or charger:

Observe safety notices and take the necessary precautions.

Read, understand and keep the User Manual.

Wear safety glasses.

Do not touch moving cutting blades.

Remove the battery during work stoppages, transport, storage, maintenance or repair.

Protect hedge trimmer and charger from rain and dampness.

Protect battery from heat and fire.

Protect the battery from rain and moisture and do not immerse it in liquids.

Observe the permitted battery temperature range.
4.2 Intended Use
The STIHL HSA 60.0 hedge trimmer is designed for cutting hedges, shrubs, bushes and undergrowth.
The hedge trimmer must not be used in the rain.
The STIHL AK battery supplies power to the hedge trimmer.
The STIHL AL 101 charger is used to charge the STIHL AK battery.
WARNING
-
Batteries and chargers not explicitly approved for the hedge trimmer by STIHL may cause a fire or explosion. Persons may be seriously or fatally injured, and property may be damaged.
-
Use the hedge trimmer with a STIHL AK battery.
- Recharge the STIHL AK battery with a STIHL AL 101, AL 301 or AL 500 charger.
Using the hedge trimmer, battery or the charger for purposes for which they were not intended may result in serious or fatal injuries, and damage to property may occur.
- Use the hedge trimmer, battery and charger as described in this User Manual.
4.3 The Operator
WARNING
- Users without adequate training or instruction cannot recognize or assess the risks involved in using the hedge trimmer, battery and
charger. The user or other persons may sustain serious or fatal injuries.

Read, understand and save the instruction manual.
- If you pass the hedge trimmer, battery and charger on to another person: Always give them the instruction manual.
-
Make sure the user meets the following requirements:
-
The user must be rested.
- The user must be in good physical condition and mental health to operate and work with the hedge trimmer, battery and charger. If the user's physical, sensory or mental ability is restricted, he or she may work only under the supervision of or as instructed by a responsible person.
- The user is able to recognize and assess the risks involved in using the hedge trimmer, battery and charger.
- The user must be of legal age or is being trained in a trade under supervision in accordance with national rules and regulations.
- The user has received instruction from a STIHL servicing dealer or other experienced user before working with the hedge trimmer for the first time.
- The user must not be under the influence of alcohol, medication or drugs.
If you have any queries: Contact a STIHL servicing dealer for assistance.
4.4 Clothing and equipment
WARNING
- Long hair may be pulled into the hedge trimmer while working. This may result in serious injury to the user.
- Tie up and confine long hair above your shoulders.
- Objects can be thrown at high speed during operation. This may result in injury to the user.

Wear close-fitting safety glasses. Suitable safety glasses are tested in accordance with EN 166 or national regulations and available commercially with the corresponding marking.
-
Wear a long-sleeved, close-fitting top and long trousers.
-
Dust can be whipped up during operation. Whipped up dust can damage the respiratory passages and cause allergic reactions.
If dust is generated: Wear a dust respirator mask.
- Unsuitable clothing can snag on wood or scrub and may become caught in the hedge trimmer. Users not wearing suitable clothing are at risk of serious injury.
Wear close-fitting clothing.
Remove scarves and jewelry.
- The user may come into contact with the moving cutting blades while working. This may result in serious injury to the user.
Wear robust footwear.
- Wear long trousers made from resistant material.
-
The user may come into contact with the cutting blades during cleaning or servicing. This may result in injury to the user.
-
Wear work gloves made from resistant material.
Wearing unsuitable footwear may cause the user to slip. This may result in injury to the user. - Wear sturdy, closed-toed footwear with high-grip soles.
4.5 Work Area and Surroundings
4.5.1 Hedge Trimmer
WARNING
-
Bystanders, children and animals cannot recognize or assess the dangers of the hedge trimmer or flying debris. Innocent bystanders, children and animals may be seriously injured and damage to property may occur.
-
Keep bystanders, children and animals away from the work area.
Do not leave the hedge trimmer unattended.
Make sure that children cannot play with the hedge trimmer. -
The hedge trimmer is not waterproof. Working in the rain or a damp location may result in an electric shock. This can result in injuries to the user and may damage the hedge trimmer.

-
Do not work in the rain or a damp location.
-
Electrical components of the hedge trimmer can produce sparks. Sparks may cause a fire or an explosion in an easily combustible or explosive environment. This can result in serious or fatal injuries and damage to property.
- Do not work in an easily combustible or explosive environment.
4.5.2 Battery
WARNING
-
Bystanders, children and animals cannot recognize or assess the dangers of the battery. Bystanders, children and animals may be seriously injured.
-
Keep bystanders, children and animals away from the work area.
Do not leave the battery unattended.
Make sure that children cannot play with the battery. -
The battery is not protected against all ambient conditions. If the battery is exposed to certain ambient conditions, the battery may catch fire, explode or be irreparably damaged. This may result in serious injury to people and damage to property.

Protect battery from heat and fire.
Do not throw the battery into a fire.

Use and store the battery at temperatures between - 10^ and +50^ .

-
Protect the battery from rain and moisture and do not immerse it in liquids.
-
Keep battery away from small metal parts.
Do not expose the battery to high pressure.
Do not expose the battery to microwaves. - Protect the battery from chemicals and salts.
4.5.3 Charger
WARNING
-
Bystanders, children and animals are not aware of and cannot assess the dangers of a charger or electric current. Bystanders, children and animals may be seriously or fatally injured.
-
Keep bystanders, children and animals away from the work area.
Make sure that children cannot play with the charger. -
The charger is not waterproof. If you work in the rain or in a damp environment, an electric shock may occur. The user may be injured and the charger may be damaged.

Do not operate it in the rain or in a damp environment.
-
The charger is not protected against all ambient conditions. If the charger is exposed to certain ambient conditions, it may catch fire or explode. This may result in serious injury to people and damage to property.
-
Operate the charger in an enclosed, dry room.
- Do not operate the charger in a flammable environment or in an explosive environment.
-
Do not operate the charger on a readily combustible surface.
Use and store the charger at temperatures between +5^ and +40^ . -
The connecting cable is a trip hazard. People may be injured and the charger may be damaged.
Lay the connecting cable flat on the floor.
4.6 Safe Condition
4.6.1 Hedge trimmer
The hedge trimmer is in a safe condition if the following conditions are fulfilled:
- The hedge trimmer is undamaged.
Hedge trimmer is clean and dry. - The controls function properly and have not been modified.
- The cutting blades are correctly fitted.
- Only an original STIHL accessory for this hedge trimmer has been fitted.
- The accessories are correctly attached.
WARNING
If not in safe condition, components may no longer operate correctly and safety devices may be disabled. This may result in serous or fatal injury to people.
- Never use a damaged hedge trimmer.
If the hedge trimmer is dirty or wet: Clean the hedge trimmer and allow it to dry.
Do not modify the hedge trimmer.
If the controls do not work: Do not operate the hedge trimmer. - Only fit original STIHL accessories for this hedge trimmer.
- Attach accessories as described in this User Manual or in the User Manual for the accessories.
- Do not insert objects into the openings in the hedge trimmer.
Replace worn or damaged labels.
If you have any doubts, be sure to consult a STIHL dealer.
4.6.2 Cutting Blades
The cutting blades are in a safe condition if the following points are observed:
- Cutting blades are undamaged.
- Cutting blades are not deformed.
- Cutting blades move freely.
- Cutting blades are properly sharpened.
- Cutting blades have no burrs.
WARNING
If they are in an unsafe condition, parts of the cutting blades may come off and be thrown at high speed. This can result in serious injuries.
Work only with undamaged cutting blades.
Make sure the cutting blades are properly sharpened and deburred.
If you have any queries: Contact your STIHL servicing dealer.
4.6.3 Battery
The battery is in safe condition when the following conditions are met:
- The battery is not damaged.
- The battery is clean and dry.
- The battery is working and has not been modified.
WARNING
-
The battery cannot function safely if it is not in safe condition. There is a risk of serious injury to persons.
-
Use an undamaged and functioning battery.
-
Do not charge a damaged or defective battery.
-
If the battery is dirty or wet: clean the battery and allow it to dry.
Do not modify the battery. - Do not insert objects into the apertures in the battery.
-
Never connect the battery terminals to metallic objects and cause a short circuit.
Do not open the battery.
Replace worn or damaged warning signs. -
Fluid may leak from a damaged battery. If the fluid contacts the skin or eyes, this may cause irritation.
Avoid contact with the fluid.
In the event of contact with the skin: wash the affected areas with plenty of soap and water.
In the event of contact with the eyes: rinse the eyes with plenty of water for at least 15 minutes and seek medical attention.
-
A damaged or defective battery may emit an unusual odour, smoke or catch fire. This may result in serious or fatal injury to people and damage to property.
-
If the battery emits an unusual odour or smoke: do not use the battery and keep it away from flammable materials.
- If the battery catches fire: try to extinguish the battery using a fire extinguisher or water.
4.6.4 Charger
The charger is in a safe condition if the following points are observed:
- Charger is undamaged.
- Charger is clean and dry.
WARNING
If components do not comply with safety requirements, they will no longer function properly and safety devices may be rendered inoperative. This can result in serious or fatal injuries.
Do not use a damaged charger.
If the charger is dirty or wet: Clean the charger and allow it to dry.
- Never attempt to modify the charger.
- Never insert objects in the charger's openings.
- Never bridge the charger's contacts with metallic objects (short circuit).
Do not open the charger.
4.7 Operation
WARNING
- The user cannot concentrate on the work in certain situations. The user may stumble, fall and be seriously injured.
Work calmly and carefully.
If light and visibility are poor: Do not use your hedge trimmer.
Operate the hedge trimmer alone.
Watch out for obstacles.
- Stand on the ground while working and keep a good balance. If it is necessary to work at heights: Use a lift bucket or a safe platform.
If you begin to feel tired: Take a break.
- Working above shoulder height can cause you to tire quickly. This can result in serious injuries.
Work above shoulder height for short periods only.
Take regular breaks.
If the moving cutting blades make contact with a hard object they can be brought to a sudden stop. The reactive forces that occur can cause the user to lose control of the hedge trimmer and be seriously injured.
- Hold the hedge trimmer firmly with both hands.
Before starting work, check hedge for hard objects and remove any such objects.
The moving cutting blades can cut the user. This can result in serious injuries.

Do not touch moving cutting blades.
If the cutting blades are blocked by an object: Switch off the hedge trimmer and remove the battery. Then remove the object causing the blockage.
If the behavior of the hedge trimmer changes during operation or feels unusual, it may no longer be in a safe condition. This can result in serious injuries and damage to property.
- Stop work, remove the battery and contact your STIHL servicing dealer for assistance.
Hedge trimmer vibrations may occur during operation.
Wear gloves.
Take regular breaks.
If signs of circulation problems occur: Seek medical advice.
Note that the cutting blades continue to run for about 1 second after you release the trigger. The moving cutting blades can cut the user. This can result in serious injuries.
- Hold the hedge trimmer firmly by the control handle and loop handle and wait until the cutting blades come to a complete stand-still.
DANGER
- Working near live electric cables can result in accidental contact with the cutting blades and damage the cables. This can result in serious or fatal injuries.
Do not work near live electric cables.
4.8 Charging
WARNING
A damaged or defective charger may produce an unusual smell or emit smoke during the charging process. This may result in personal injuries and damage to property.
Disconnect the plug from the wall outlet.
- The charger can overheat and cause a fire if heat dissipation is inadequate. This can result in serious or fatal injuries and damage to property.
Do not cover the charger.
4.9 Connecting to the power supply
Contact with live components may occur for the following reasons:
- The connecting cable or the extension cord is damaged.
- The mains plug of the connecting cable or extension cord is damaged.
- The socket is not properly installed.
DANGER
-
Contact with live parts may result in electric shock. This may result in serious or fatal injury to the user.
-
Make sure that the connecting cable, extension cord and their mains plugs are undamaged.

If the connecting cable or the extension cord is damaged:
Do not touch the damaged area.
- Disconnect the mains plug from the power supply.
- Make sure your hands are dry before touching the connecting cable, extension cord or mains plugs.
Plug the mains plug of the connecting cable or extension cord into a properly installed, shockproof socket with the correct fuse rating.
Install the charger with a ground fault circuit interrupter (30 mA, 30 ms).
A damaged or unsuitable extension cable can result in electric shock. There is a risk of serious or fatal injury.
Use an extension cable with the correct cable cross-section, 18.5.
WARNING
- Overvoltage can occur in the charger if the line voltage or frequency are incorrect during charging. The charger may be damaged.
Make sure that the mains voltage and the mains frequency of the power supply match the data on the rating plate of the charger.
If the charger is connected to a power strip, electrical components may be overloaded during the charging process. The components may overheat and cause a fire. Persons may be seriously or fatally injured, and property may be damaged.
-
Ensure that the technical specifications for the power strip are not exceeded by the information on the rating plate of the charger and of all electrical devices connected to the power strip.
-
An incorrectly routed connecting cable or extension cord may be damaged, and people may trip over it. People may be injured, and the connecting cable or extension cord may be damaged.
-
Route and mark the connecting cable and extension cord so that people will not trip over them.
- Route the connecting cable and extension cord so that they are not under tension or tangled.
- Route the connecting cable and extension cord so that they will not be damaged, kinked or crushed and will not be chafed.
- Protect the connecting cable and extension cord from heat, oil and chemicals.
- Lay the connecting cable and extension cord on a dry surface.
The extension cable warms up in operation. If that heat cannot escape, it may cause a fire.
If using a cable reel: completely unroll the cable reel.
If wiring and pipes are laid in the wall, they may be damaged if the charger is mounted on the wall. Contact with wiring can result in electric shock. This may result in serious injury to people and damage to property.
- Make sure there is no wiring or pipes in the wall at the proposed mounting site.
If the charger is not mounted on the wall as described in this User Manual, the charger or the battery may fall or the charger may over
heat. This may result in injury to people and damage to property.
- Mount the charger on a wall as described in this User Manual.
If the charger is mounted on a wall with the battery inserted, the battery may fall out of the charger. This may result in injury to people and damage to property.
- Mount the charger on the wall first before inserting the battery.
4.10 Transporting
4.10.1 Hedge Trimmer
WARNING
The hedge trimmer may turn over or shift during transport. This may result in injury to people and damage to property.

Remove the battery.
- Fit the blade scabbard so that it completely covers the cutting blades.
- Secure the hedge trimmer with lashing straps or a net to prevent it turning over and moving.
4.10.2 Battery
WARNING
-
The battery is not protected against all ambient conditions. The battery may be damaged if it is exposed to certain ambient conditions, and damage to property may occur.
-
Never transport a damaged battery.
-
The battery may turn over or shift during transport. This may result in injury to people and damage to property.
Pack the battery in packaging in such a way that it cannot move.
- Secure the packaging so that it cannot move.
4.10.3 Charger
WARNING
- The charger may turn over or move while being transported. This may result in personal injuries and damage to property.
Disconnect the plug from the wall outlet.
Remove the battery. -
Secure the charger with lashing straps, belts or a net to prevent it turning over and moving.
-
The connecting cable must not be used for carrying the charger. The connecting cable and the charger may be damaged.
Wind up the connecting cable and attach it to the charger.
4.11 Storing
4.11.1 Hedge Trimmer
WARNING
Children are not aware of and cannot assess the dangers of a hedge trimmer. Children may be seriously injured.

Remove the battery.
- Fit the blade scabbard so that it completely covers the cutting blades.
-
Store the hedge trimmer out of the reach of children.
-
Dampness can corrode the electrical contacts on the hedge trimmer and metal components. This can damage the hedge trimmer.
Remove the battery.

- Store the hedge trimmer in a clean and dry condition.
4.11.2 Battery
WARNING
Children are not aware of and cannot assess the dangers of the battery Children may be seriously injured.
-
Store the battery out of the reach of children.
-
The battery is not protected against all ambient conditions. If the battery is exposed to certain ambient conditions, the battery may be irreparably damaged.
-
Store the battery in a clean and dry condition.
- Store the battery in an enclosed space.
- Store the battery separately from the hedge trimmer.
If the battery is stored in the charger, disconnect the mains plug and store the battery at a state of charge between 40% and 60% (2 lit green LEDs). - Store the battery at a temperature range between - 10 °C and + 50 °C.
4.11.3 Charger
WARNING
Children are not aware of and cannot assess the dangers of a charger. Children can be seriously injured or killed.
- Disconnect the mains plug from the wall outlet.
-
Store the charger out of reach of children.
-
The charger is not protected against all ambient conditions. If the charger is exposed to certain ambient conditions, the charger may be damaged.
-
Disconnect the mains plug from the wall outlet.
If the charger is hot: Allow charger to cool down. - Store the charger in a clean, dry place.
- Store the charger in an enclosed room.
-
Store the charger at temperatures between +5^ and +40^ .
-
The connecting cable should not be used for carrying the charger or hanging up the charger. The connecting cable and the charger may be damaged.
-
Hold the charger by the housing in a secure grip. The charger is provided with a handle recess to make it easy to pick up the charger.
Hang the charger on the wall mounting.
4.12 Cleaning, maintenance and repair
WARNING
- The hedge trimmer may start unintentionally if the battery is left in place during cleaning, maintenance or repair operations. This may result in serious injury to people and damage to property.

Remove the battery.
-
Sharp cleaning agents, cleaning with a water jet or pointed objects can damage the hedge trimmer, the cutting blades, the battery or the charger. If the hedge trimmer, cutting blades, battery or charger are not cleaned correctly, components may no longer function properly or safety devices may be rendered inoperative. Persons may be seriously injured.
-
Clean the hedge trimmer, cutting blades, battery and charger as described in this instruction manual.
If the hedge trimmer, cutting blades, battery or charger are not serviced correctly, components may no longer function properly or safety devices may be rendered inoperative. There is a risk of serious or fatal injury.
- Do not attempt to service or repair the hedge trimmer, battery or charger.
- If the hedge trimmer, battery or the charger require servicing or repairs: Contact your STIHL servicing dealer for assistance.
-
Maintain the cutting blades as described in this User Manual.
-
The user can be cut by the sharp cutting edges while cleaning or servicing the cutting blades. This may result in injury to the user.
Wear work gloves made of robust material.
5 Preparing Hedge Trimmer for Operation
5.1 Preparing Hedge Trimmer for Operation
The following steps must be performed before commencing work:
- Ensure that the following components are in safe condition:
Hedge trimmer, 4.6.1.
- Cutting blades, 4.6.2.
Battery, 4.6.3.
- Charger, 4.6.4.
Check the battery, 9.2.
Fully charge the battery, 6.2.
Clean the hedge trimmer, 14.1.
Check the controls, 9.1.
If you cannot carry out this work: Do not use your hedge trimmer and contact your STIHL servicing dealer.
6 Charging the Battery, LEDs
6.1 Mounting the Charger on a Wall
The charger can be mounted on a wall.
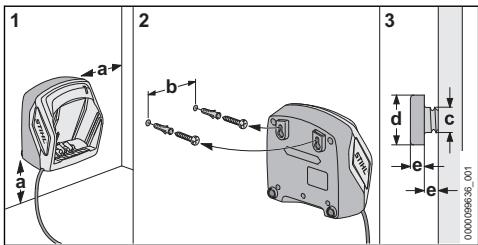
- Check the following points when mounting the charger on a wall:
- Suitable fixing materials.
-
The charger is level.
The following dimensions are observed: -
a = at least 100 mm
- b (for AL 101) = 75 mm
- b (for AL 301) = 100 mm
- b (for AL 500) = 120 mm
- c = 4.5 ~mm
- d = 9 mm
- e = 2.5 mm
6.2 Charging the Battery
The charging time depends on several factors, e.g. temperature of the battery or the ambient temperature. The actual charging time may differ from the specified charging time. For specified charging times see www.stihl.com/charging-times.
The charging process starts automatically when the plug is inserted in a wall outlet and the battery is fitted in the charger. The charger switches itself off automatically when the battery is fully charged.
The battery and charger become hot during the charging process.
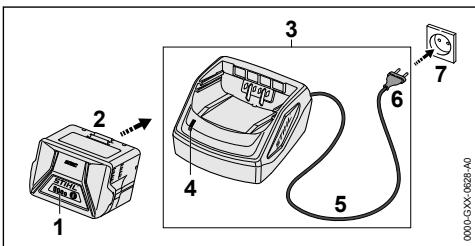
-
Insert the plug (6) in a convenient wall outlet (7).
The charger (3) runs a self test. The LED (4) glows green for about 1 second and then red for about 1 second.
Fit the connecting cable (5). -
Insert the battery (2) in the guides in the charger (3) and press it home as far as stop. The LED (4) glows green. The LEDs (1) glow green and the battery (2) is being charged.
If the LED (4) and the LEDs (1) stop glowing: The battery (2) is fully charged and can be taken out of the charger (3).
If the charger (3) is no longer required. Disconnect the plug (6) from the wall outlet (7).
6.3 State of Charge
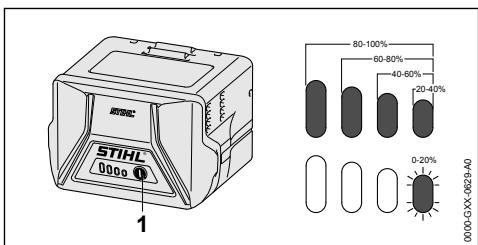
Press the button (1).
The LEDs (5) glow green for about 5 seconds and indicate the state of charge.
If the LED on the right flashes green: Charge the battery.
6.4 LEDs on Battery
The LEDs can show the state of charge or malfunctions. The LEDs can glow or flash green or red.
The state of charge is indicated when the LEDs glow or flash green.
If the LEDs glow or flash red: Troubleshooting, 17.
There is a malfunction in hedge trimmer or battery.
6.5 LED on Charger
The LED indicates the operating status of the charger.
If the LED glows green, the battery is being charged.
If the LED flashes red: Rectify the malfunction. Malfunction in charger.
7 Removing and Fitting the Battery
7.1 Inserting the Battery
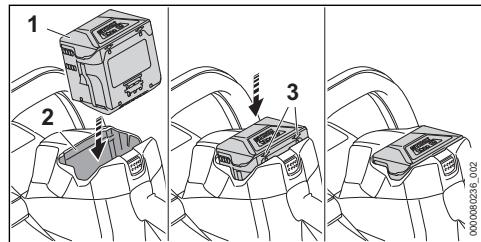
- Insert the battery (1) in the battery compartment (2) and press it home until you hear a click.
The arrows (3) on the battery (1) are still visible and the battery (1) is held securely in the battery compartment (2). There is no electrical contact between the hedge trimmer and battery (1).
- Insert the battery (1) into the battery compartment (2) as far as it will go.
The battery (1) engages with a second click and is flush with the hedge trimmer's housing.
7.2 Removing the Battery
Place the hedge trimmer on a level surface.
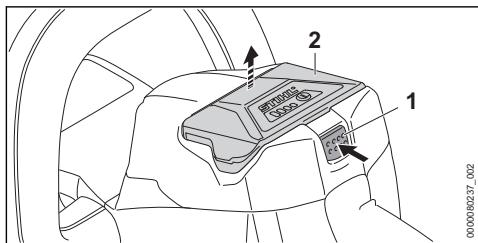
Depress the locking lever (1).
The battery (2) is unlocked and can be removed.
8 Switching the Hedge Trimmer On/Off
8.1 Switch on the hedge trimmer

WARNING
- The motor accelerates and the cutting blades run regardless of the sequence in which the control bar and trigger are depressed. If you depress the trigger first and then the control bar, you may lose control of the hedge trimmer. This may result in serious injury to the user.
Depress the control bar first and then the trigger.
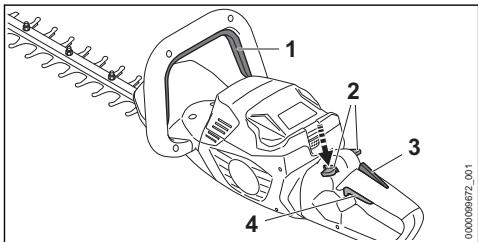
Depress the control bar (1) and hold it in that position.
Press the locking lever (2) down with your thumb and hold it there.
Press the trigger (4) with your index finger and keep it depressed. The hedge trimmer accelerates and the cutting blades run.
The locking lever (2) can be released.
If the ergo lever (3) is pressed, the locking lever (2) remains unlocked. This means the trigger (4) can be released and pressed again without having to press down the locking lever again.
If the trigger (4) and the ergo lever (3) are released, the trigger (4) is locked. The locking lever (2) must be pushed down again and held to unlock the trigger (4).
8.2 Switching off the hedge trimmer
Release the control bar and the trigger.
- Wait for the cutting blades to come to a complete standstill after about 1 second.
If the cutting blades continue to run after about 1 second: Remove the battery and contact your STIHL dealer for assistance. Your hedge trimmer is defective.
9 Testing the Hedge Trimmer and Battery
9.1 Checking the controls
Locking lever, ergo lever and trigger
Remove the battery.
Try pressing the trigger without pressing the locking lever.
If the trigger can be pressed: Do not use your hedge trimmer and contact your STIHL authorized dealer.
The locking lever is defective.
Press the locking lever down with your thumb and hold it there.
Press and hold ergo lever.
Press the trigger.
The locking lever can be released.
Release the trigger and the ergo lever.
- If the locking lever, trigger or ergo lever is stiff or does not spring back to the initial position: Stop using the hedge trimmer and contact a STIHL authorized dealer.
The locking lever, trigger or ergo lever is defective.
Control bar
Remove the battery.
Depress the control bar and release it again.
- If the control bar is stiff or does not spring back to its idle position: Do not use your hedge trimmer and contact your STIHL authorized dealer.
The control bar is defective.
Switching on the hedge trimmer
Insert battery.
Depress the control bar and release it again.
- If the cutting blades have run or are running: Do not use your hedge trimmer and contact your STIHL authorized dealer. The trigger is defective.
Depress the locking lever and hold it in that position.
Press and hold the trigger.
If the cutting blades run: Do not use your hedge trimmer; contact your STIHL authorized dealer.
The control bar is defective.
Depress the control bar and hold it in that position.
The cutting blades run.
- If 3 LEDs flash red: Remove the battery and consult a STIHL dealer.
There is a malfunction in the hedge trimmer.
Release the control bar.
The cutting blades stop running after about 1 second.
- If the cutting blades continue to run after 1 second: Remove the battery and contact your STIHL authorized dealer.
The hedge trimmer is defective.
9.2 Testing the Battery
Press button on battery.
The LEDs glow or flash.
If the LEDs do not glow or flash: Do not use the battery and contact your STIHL servicing dealer.
There is a malfunction in the battery.
10 Operating the Hedge Trimmer
10.1 Holding and Controlling the Hedge Trimmer
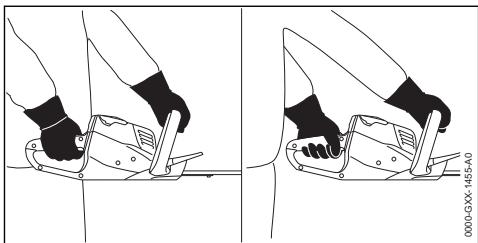
- Hold the hedge trimmer with one hand on the control handle - wrap your thumb around the control handle.
- Hold the hedge trimmer with the other hand on the loop handle - wrap your thumb around the loop handle.
10.2 Turning the Control Handle
The control handle can be set to three (3) positions depending on the application.
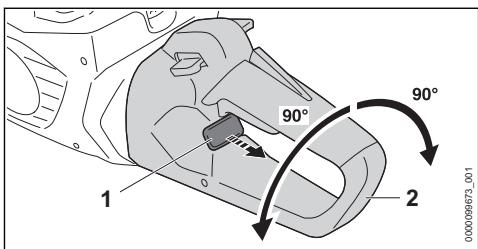
Pull out and hold the locking slide (1).
- Rotate the control handle (2) clockwise or counterclockwise.
Release the locking slide (1).
- Rotate the control handle (2) clockwise or counterclockwise until the control handle (2) snaps into place.
10.3 Cutting
- Use lopping shears or a chainsaw to cut out thick branches first.
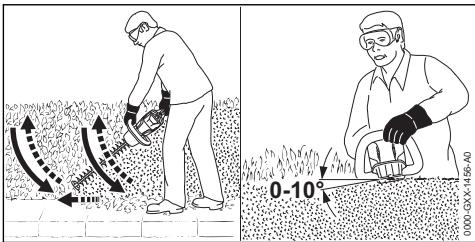
- Swing the hedge trimmer from the bottom upwards in an arc while making the cut.
Lower the nose of the hedge trimmer without cutting.
Walk slowly and steadily forwards. - Swing the hedge trimmer from the bottom upwards in an arc while making the cut.
Cut the other side of the hedge in the same way. - Hold the cutting blades at an angle of 0^ to 10^ to the top of the hedge.
- Swing the hedge trimmer horizontally and in an arc while making the cut.
If cutting performance deteriorates: Sharpen the cutting blades.
11 After Finishing Work
11.1 After Finishing Work
- Switch off the hedge trimmer and remove the battery.
If the hedge trimmer is wet: Allow the hedge trimmer to dry.
If the battery is wet: Allow the battery to dry.
Clean the hedge trimmer.
Clean the cutting blades. - Fit the blade scabbard so that it completely covers the cutting blades.
Clean the battery.
12 Transporting
12.1 Transporting the Hedge Trimmer
- Switch off the hedge trimmer and remove the battery.
- Fit the blade scabbard so that it completely covers the cutting blades.
Carrying the hedge trimmer
- Carry the hedge trimmer by the loop handle with the cutting blades behind you.
Transporting the Hedge Trimmer in a vehicle
- Secure the hedge trimmer to prevent it tipping over and moving.
12.2 Transporting the battery
- Switch off the hedge trimmer and remove the battery.
- Check that the battery is in a safe condition.
Pack the battery in packaging in such a way that it cannot move inside the packaging.
Secure the packaging so that it cannot move.
The battery is subject to the Carriage of Dangerous Goods regulations. The battery is classified as UN 3480 (lithium ion batteries) and has been tested pursuant to UN Manual Tests and Criteria Part III, Subsection 38.3.
The transport regulations can be found at www.stihl.com/safety-data-sheets.
12.3 Transporting the Charger
Disconnect the plug from the wall outlet.
Remove the battery.
Wind up the connecting cable and attach it to the charger.
Transporting the charger in a vehicle: Secure the charger with lashing straps, belts or a net to prevent it turning over and moving.
13 Storing
13.1 Storing the hedge trimmer
- Switch off the hedge trimmer and remove the battery.
- Fit the blade scabbard so that it completely covers the cutting blades.
Make sure the following conditions are met when storing the hedge trimmer:
Hedge trimmer is out of the reach of children.
- The hedge trimmer is clean and dry.
13.2 Storing the Battery
STIHL recommends keeping the battery in a charging state between 40% and 60% (2 green LEDs lit).
The battery should be stored in such a way that the following conditions are fulfilled:
- The battery is out of the reach of children.
- The battery is clean and dry.
- The battery is in an enclosed space.
- The battery is separated from the hedge trimmer.
- If the battery is stored in the charger, disconnect the mains plug and store the battery at a state of charge between 40% and 60% (2 lit green LEDs).
- The battery is in a temperature range between - 10 °C and + 50 °C.
NOTICE
If the battery is not stored as described in this user manual, the battery may become deeply discharged and irreparably damaged.
Charge a discharged battery before storing it. STIHL recommends keeping the battery state of charge between 40% and 60% (2 lit green LEDs).
- Store the battery separately from the hedge trimmer.
13.3 Storing the Charger
- Disconnect the mains plug from the power supply.
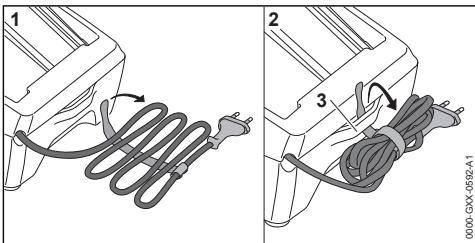
Wind up the connecting cable and attach it to the charger.
- Observe the following points when storing the charger:
- Charger is out of the reach of children.
- The charger is clean and dry.
- The charger is in an enclosed space.
- The charger is not suspended from the connecting cable or the holder (3) for the connecting cable.
- The charger is in a temperature range between +5^ and +40^ .
14 Cleaning
14.1 Cleaning the hedge trimmer
-
Switch off the hedge trimmer and remove the battery.
Clean the hedge trimmer with a damp cloth or STIHL resin solvent.
Clean vents with a paintbrush. -
Remove foreign objects from the battery compartment and clean the battery compartment with a damp cloth.
- Clean the electrical contacts in the battery compartment with a paintbrush or soft brush.
14.2 Cleaning the cutting blades
- Switch off the hedge trimmer and remove the battery.
- Spray both sides of the cutting blades with STIHL resin solvent.
Insert battery. - Run the hedge trimmer for 5 seconds. The cutting blades run. The STIHL resin solvent is distributed evenly.
14.3 Cleaning the Battery
Clean the battery with a damp cloth.
14.4 Cleaning the Charger
- Disconnect the mains plug from the power supply.
Clean the charger with a damp cloth.
Clean vents with a paintbrush. - Clean the charger's electrical contacts with a paintbrush or a soft brush.
15 Maintenance
15.1 Maintenance Intervals
The maintenance intervals are dependent on the environmental and operating conditions. STIHL recommends the following maintenance intervals:
After every 50 hours of operation
Lubricate the gearbox.
Every 12 months
Have hedge trimmer checked by a STIHL servicing dealer.
15.2 Lubricating the Gearbox
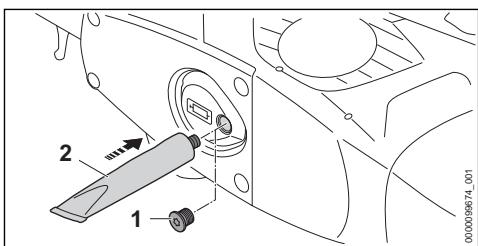
Remove screw plug (1).
If no grease is visible on the end of the screw plug (1):
Screw in the tube of STIHL gear lubricant (2).
- Squeeze 5 g of STIHL gear grease into the gear housing.
Unscrew the tube of STIHL gear lubricant (2).
- Insert and tighten the screw plug (1) securely.
- Run the hedge trimmer for one minute. The STIHL gear lubricant is evenly distributed.
15.3 Sharpening the cutting blades
STIHL recommends you have the cutting blades resharpened by a STIHL dealer.

WARNING
The teeth of the cutting blades are very sharp. There is a risk of cutting oneself.
Wear work gloves made of robust material.
- Switch off the hedge trimmer and remove the battery.
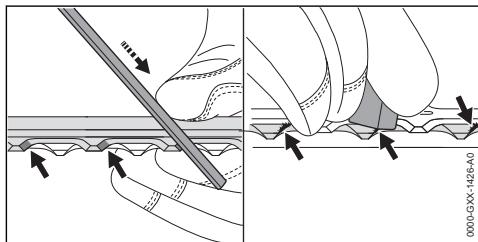
- Use a STIHL flat file to sharpen each cutting edge on the upper blade. The file only sharpens on the forward stroke. Maintain the prescribed sharpening angle, 18.2.
Turn the hedge trimmer over.
Sharpen the remaining cutting edges.
Deburr each cutting edge from below.
Turn the hedge trimmer over.
Deburr the remaining cutting edges. - Use a damp cloth to remove the filing dust.
- Spray both sides of cutting blades with STIHL resin solvent.
Run the hedge trimmer for 5 seconds.
The cutting blades run. The STIHL resin solvent is distributed evenly.
If you are unsure: Consult a STIHL authorized dealer.
16 Repairing
16.1 Repairing Hedge Trimmer, Battery and Charger
The hedge trimmer, cutting blades, battery and charger are not user serviceable.
- If the hedge trimmer or cutting blades are damaged: Do not use your hedge trimmer and contact your STIHL servicing dealer.
If the battery has a malfunction or is damaged: Replace the battery.
If the charger has a malfunction or is damaged: Replace the charger.
- If the connecting cable has a malfunction or is damaged: Do not use the charger and have connecting cable replaced by a STIHL servicing dealer.
17 Troubleshooting
17.1 Troubleshooting Hedge Trimmer or Battery
| Fault | LEDs on the battery | Cause | Remedy |
| Hedge trimmer does not start when switched on. | 1 LED flashing green. | State of charge of the battery is too low. | Charge the battery. |
| 1 LED emits red light. | The battery is too warm or too cold. | Remove the battery. Allow the battery to cool down or warm up. | |
| 3 LEDs flash red. | There is a malfunction in the hedge trimmer. | Remove the battery. Clean electrical contacts in the battery compartment. Insert battery. Switch on the hedge trimmer. If 3 LEDs continue to flash red: Do not use your hedge trimmer and contact your STIHL servicing dealer for assistance. | |
| The cutting blades do not run freely. | Spray both sides of cutting blades with STIHL resin solvent. If 3 LEDs continue to flash red: Do not use your hedge trimmer and contact your STIHL servicing dealer for assistance. | ||
| 3 LEDs light up red. | Hedge trimmer is too hot. | Remove the battery. Allow the hedge trimmer to cool down. | |
| 4 LEDs flashing red. | There is a fault in the battery. | Remove battery and reinsert it. Switch on the hedge trimmer. If 4 LEDs continue to flash red: Do not use the battery; contact a STIHL authorized dealer. | |
| - | No electrical contact between the hedge trimmer and battery. | Remove the battery. Clean electrical contacts in the battery compartment. Insert battery. | |
| - | Hedge trimmer or battery is damp. | Allow hedge trimmer or battery to dry. | |
| Hedge trimmer cuts out during operation. | 3 LEDs light up red. | Hedge trimmer is too hot. | Remove the battery. Allow the hedge trimmer to cool down. |
| - | There is an electrical fault. | Remove battery and reinsert it. Switch on the hedge trimmer. | |
| Hedge trimmer's running time is too short. | - | The battery is not fully charged. | Fully charge the battery. |
| - | The battery life has been exceeded. | Replace battery. | |
| Charging does not start when the battery is inserted into the charger. | 1 LED emits red light. | The battery is too warm or too cold. | Leave battery inserted in charger. Charging starts automatically as soon as the permitted temperature range is re-ched. |
17.2 Troubleshooting the Charger
| Fault | LED on Charger | Cause | Remedy |
| Battery not being charged. | The LED flashes red. | No electrical contact between charger and battery. | Remove the battery. Clean contacts on charger. Insert battery. |
| There is a malfunction in the charger. | Do not use the charger and contact your STIHL dealer for assistance. |
18 Specifications
18.1 STIHL HSA 60.0 Hedge Trimmer
Approved battery: STIHL AK
Weight without battery: 3.5kg
For runtime, see www.stihl.com/battery-life.
18.2 Cutting blades
- Tooth spacing: 34 mm
- Cutting length: 600mm
- Sharpening angle: 35^
18.3 STIHL AK Battery
- Battery technology: Lithium-ion
Voltage: 36 V
Capacity in Ah: see rating label - Energy content in Wh: see rating label
Weight in kg: see rating label - Permissible temperature range for operation and storage: -10^ to +50^
18.4 Charger STIHL AL 101
- Rated voltage: see rating plate
Frequency: see rating plate - Rated power: see rating plate
- Charging current: see rating plate
- Permissible temperature range for use and storage: +5 °C to +40 °C
The charging times are indicated at www.stihl.com/charging-times.
18.5 Extension Cords
If an extension cord is used, the cross sectional area of its conductors must meet the following
minimum requirements - depending on the line voltage and length of the extension cord:
If rated voltage on the rating label is 220V to 240V:
- Cord length up to 20m : AWG 15 / 1.5 mm²
- Cord length 20m up to 50m : AWG 13/2.5 mm²
If rated voltage on the rating label is 100V to 127V:
- Cord length up to 10m : AWG 14 / 2.0 mm²
- Cord length 10m up to 30m : AWG 12 / 3.5mm^2
18.6 Sound Values and Vibration Values
The K-value for the sound pressure level is
2 dB(A). The K-value for the sound power level is
2 dB(A). K-value for vibration level is 2 m/s^2 .
STIHL recommends wearing ear defenders.
Sound pressure level L_p measured according to EN 62841-4-2: 77 dB(A).
Sound power level LWA measured according to EN 62841-4-2: 85 dB(A).
Vibration level ahv measured as specified in EN 62841-4-2
Control handle: 1.0m / s^2 .The K value for the vibration level is 2m / s^2
- Loop handle: 1.5 m/s^2 .
The vibration levels indicated were measured according to a standardized test method and can be used as a basis for comparing electric power tools. The vibration levels actually occurring may vary from the values indicated, depending on the
type of application. The vibration levels indicated can be used for an initial estimate of the vibration stress. The actual vibration stress has to be estimated. The times can be taken into account in the estimate when the electric power tool is switched off and also when it is switched on but running without any load.
For information on compliance with Employers' Vibration Directive 2002/44/EC see www.stihl.com/vib.
18.7 REACH
REACH is an EC regulation and stands for the Registration, Evaluation, Authorisation and Restriction of Chemical substances.
For information on compliance with the REACH regulation see www.stihl.com/reach.
19 Spare Parts and Accessories
19.1 Spare parts and accessories
STIHL These symbols indicate original STIHL spare parts and original STIHL accessories.
STIHL recommends the use of original STIHL spare parts and accessories.
Despite ongoing market observation, STIHL is unable to judge the reliability, safety and suitability of other manufacturers' spare parts and accessories; accordingly, STIHL cannot warrant for the use of those parts.
Original STIHL spare parts and original STIHL accessories are available from STIHL dealers.
20 Disposal
20.1 Disposal of Hedge Trimmer, Battery and Charger
Contact the local authorities or your STIHL dealer for information on disposal.
Improper disposal can be harmful to health and pollute the environment.
Take STIHL products including packaging to a suitable collection point for recycling in accordance with local regulations.
Do not dispose with domestic waste.
21 EC Declaration of Conformity
21.1 STIHL HSA 60.0 Hedge Trimmer
declares under our sole responsibility that
Category: Cordless hedge trimmer
- Manufacturer's brand: STIHL
- Model: HSA 60.0
- Serial identification: HA06
conforms to the relevant provisions of Directives 2011/65/EU, 2006/42/EC, 2014/30/EU and 2000/14/EC and has been developed and manufactured in compliance with the following standards in the versions valid on the date of production: EN 55014-1, EN 55014-2, EN 62841-1 and EN 62841-4-2.
Applied conformity assessment procedure in accordance with Directive 2000/14/EC, Annex V.
Measured sound power level: 85 dB(A)
- Guaranteed sound power level: 87 dB(A)
The technical documents are stored at ANDREAS STIHL AG & Co. KG Produktzulassung.
The year of manufacture, country of manufacture and serial number are shown on the hedge trimmer.
Waiblingen, 2022-05-12
Dr. Jürgen Hoffmann, Director Product Certification & Regulatory Affairs
22 UKCA Declaration of Conformity
22.1 STIHL HSA 60.0 Hedge Trimmer

declares under our sole responsibility that
Category: Cordless hedge trimmer
Manufacturer's brand: STIHL
- Model: HSA 60.0
- Serial identification: HA06
conforms to the relevant provisions of UK regulations The Restriction of the Use of Certain Hazardous Substances in Electrical and Electronic Equipment Regulations 2012, Supply of Machinery (Safety) Regulations 2008, Electromagnetic Compatibility Regulations 2016 and Noise Emission in the Environment by Equipment for use Outdoors Regulations 2001 and has been manufactured in compliance with the following standards in the versions valid on the date of production: EN 55014-1, EN 55014-2, EN 62841-1, and EN 62841-4-2.
Applied conformity assessment procedure in accordance with UK regulations Noise Emission in the Environment by Equipment for use Outdoors Regulations 2001 Schedule 8.
- Measured sound power level: 85 dB(A)
- Guaranteed sound power level: 87 dB(A)
The technical documents are stored at ANDREAS STIHL AG & Co. KG.
The year of manufacture, country of manufacture and serial number are shown on the hedge trimmer.
Waiblingen, 2022-05-12
Dr. Jürgen Hoffmann, Director Product Certification & Regulatory Affairs
23 General Power Tool SafetyWarnings
23.1 Introduction
This chapter reproduces the pre-formulated, general safety precautions specified in the IEC 62841 standard for hand-held motor-operated electric tools.
STIHL is obliged to publish these texts.
The safety precautions and warnings on avoiding an electric shock given under "Electrical Safety" do not apply to STIHL cordless products.

WARNING
- Read all safety warnings, instructions, illustrations and specifications provided with this power tool. Failure to follow all instructions listed below may result in electric shock, fire and/or serious injury. Save all warnings and instructions for future reference.
The term "electric power tool" in the safety warnings refers to mains-operated (corded) power tools or battery-operated (cordless) power tools.
23.2 Work area safety
a) Keep work area clean and well lit. Cluttered or dark areas invite accidents.
b) Do not operate power tools in explosive atmospheres, such as in the presence of flammable liquids, gases or dust. Power tools create sparks which may ignite the dust or fumes.
c) Keep children and bystanders away while operating a power tool. Distractions can cause you to lose control.
23.3 Electrical safety
a) Power tool plugs must match the outlet. Never modify the plug in any way. Do not use any adapter plugs with earthed (grounded) power tools. Unmodified plugs and matching outlets will reduce risk of electric shock.
b) Avoid body contact with earthed or grounded surfaces, such as pipes, radiators, ranges and refrigerators. There is an increased risk of electric shock if your body is earthed or grounded.
c) Do not expose power tools to rain or wet conditions. Water entering a power tool will increase the risk of electric shock.
d) Do not abuse the cord. Never use the cord for carrying, pulling or unplugging the power tool. Keep cord away from heat, oil, sharp edges or moving parts. Damaged or entangled cords increase the risk of electric shock.
e) When operating a power tool outdoors, use an extension cord suitable for outdoor use. Use of a cord suitable for outdoor use reduces the risk of electric shock.
f) If operating a power tool in a damp location is unavoidable, use a residual current device (RCD) protected supply. Use of an RCD reduces the risk of electric shock.
23.4 Personal safety
a) Stay alert, watch what you are doing and use common sense when operating a power tool. Do not use a power tool while you are tired or under the influence of drugs, alcohol or medication. A moment of inattention while operating power tools may result in serious personal injury.
b) Use personal protective equipment. Always wear eye protection. Protective equipment such as a dust mask, non-skid safety shoes, hard hat or hearing protection used for appropriate conditions will reduce personal injuries.
c) Prevent unintentional starting. Ensure the switch is in the off-position before connecting to power source and/or battery pack, picking up or carrying the tool. Carrying power tools with your finger on the switch or energising power tools that have the switch on invites accidents.
d) Remove any adjusting key or wrench before turning the power tool on. A wrench or a key left attached to a rotating part of the power tool may result in personal injury.
e) Do not overreach. Keep proper footing and balance at all times. This enables better control of the power tool in unexpected situations.
f) Dress properly. Do not wear loose clothing or jewellery. Keep your hair and clothing away from moving parts. Loose clothes, jewellery or long hair can be caught in moving parts.
g) If devices are provided for the connection of dust extraction and collection facilities, ensure these are connected and properly used. Use of dust collection can reduce dust-related hazards.
h) Do not let familiarity gained from frequent use of tools allow you to become complacent and ignore tool safety principles. A careless action can cause severe injury within a fraction of a second.
23.5 Power tool use and care
a) Do not force the power tool. Use the correct power tool for your application. The correct
power tool will do the job better and safer at the rate for which it was designed.
b) Do not use the power tool if the switch does not turn it on and off. Any power tool that cannot be controlled with the switch is dangerous and must be repaired.
c) Disconnect the plug from the power source and/or remove the battery pack, if detachable, from the power tool before making any adjustments, changing accessories, or storing power tools. Such preventive safety measures reduce the risk of starting the power tool accidentally.
d) Store idle power tools out of the reach of children and do not allow persons unfamiliar with the power tool or these instructions to operate the power tool. Power tools are dangerous in the hands of untrained users.
e) Maintain power tools and accessories. Check for misalignment or binding of moving parts, breakage of parts and any other condition that may affect the power tool's operation. If damaged, have the power tool repaired before use. Many accidents are caused by poorly maintained power tools.
f) Keep cutting tools sharp and clean. Properly maintained cutting tools with sharp cutting edges are less likely to bind and are easier to control.
g) Use the power tool, accessories and tool bits etc. in accordance with these instructions, taking into account the working conditions and the work to be performed. Use of the power tool for operations different from those intended could result in a hazardous situation.
h) Keep handles and grasping surfaces dry, clean and free from oil and grease. Slippery handles and grasping surfaces do not allow for safe handling and control of the tool in unexpected situations.
23.6 Battery tool use and care
a) Recharge only with the charger specified by the manufacturer. A charger that is suitable for one type of battery pack may create a risk of fire when used with another battery pack.
b) Use power tools only with specifically designated battery packs. Use of any other battery packs may create a risk of injury and fire.
c) When battery pack is not in use, keep it away from other metal objects, like paper clips, coins, keys, nails, screws or other
small metal objects, that can make a connection from one terminal to another. Shorting the battery terminals together may cause burns or a fire.
d) Under abusive conditions, liquid may be ejected from the battery; avoid contact. If contact accidentally occurs, flush with water. If liquid contacts eyes, additionally seek medical help. Liquid ejected from the battery may cause irritation or burns.
e) Do not use a battery pack or tool that is damaged or modified. Damaged or modified batteries may exhibit unpredictable behaviour resulting in fire, explosion or risk of injury.
f) Do not expose a battery pack or tool to fire or excessive temperature. Exposure to fire or temperature above 130^ may cause explosion.
g) Follow all charging instructions and do not charge the battery pack or tool outside the temperature range specified in the instructions. Charging improperly or at temperatures outside the specified range may damage the battery and increase the risk of fire.
23.7 Service
a) Have your power tool serviced by a qualified repair person using only identical replacement parts. This will ensure that the safety of the power tool is maintained.
b) Never service damaged battery packs. Service of battery packs should only be performed by the manufacturer or authorized service providers.
23.8 Hedge trimmer safety warnings
Safety instructions for hedge trimmers
a) Keep all parts of the body away from the blade. Do not remove cut material or hold material to be cut when blades are moving. Blades continue to move after the switch is turned off. A moment of inattention while operating the hedge trimmer may result in serious personal injury.
b) Carry the hedge trimmer by the handle with the blade stopped and taking care not to operate any power switch. Proper carrying of the hedge trimmer will decrease the risk of inadvertent starting and resultant personal injury from the blades.
c) When transporting or storing the hedge trimmer, always fit the blade cover. Proper han
dling of the hedge trimmer will decrease the risk of personal injury from the blades.
d) When clearing jammed material or servicing the unit, make sure all power switches are off and the power cord is disconnected. Unexpected actuation of the hedge trimmer while clearing jammed material or servicing may result in serious personal injury.
e) Hold the hedge trimmer by insulated gripping surfaces only, because the blade may contact hidden wiring or its own cord. Blades contacting a "live" wire may make exposed metal parts of the hedge trimmer "live" and could give the operator an electric shock.
f) Keep all power cords and cables away from cutting area. Power cords or cables may be hidden in hedges or bushes and can be accidentally cut by the blade.
g) Do not use the hedge trimmer in bad weather conditions, especially when there is a risk of lightning. This decreases the risk of being struck by lightning.
Table des matieres
Chere cliente, cher client,
in the Environment by Equipment for use Outdoors Regulations 2001 Schedule 8.
1 led brandt rood. De accu is te warm of te koud.


De schakelbeugel is defect.
De schakelbeugel is defect.
De heggenschaar is defect.
9.2 Accu controlleren/testen
- Introduction
- Guide to Using this Manual
- Applicable Documentation
- Warning Notices in Text
- DANGER
- WARNING
- NOTICE
- Symbols in Text
- Overview
- Hedge Trimmer, Battery and Charger
- Symbols
- Safety Precautions
- Warning Symbols
- Intended Use
- The Operator
- Clothing and equipment
- Work Area and Surroundings
- Hedge Trimmer
- Battery
- Charger
- Safe Condition
- Hedge trimmer
- Cutting Blades
- Battery
- Charger
- Operation
- Charging
- Connecting to the power supply
- Transporting
- Hedge Trimmer
- Battery
- Charger
- Storing
- Hedge Trimmer
- Battery
- Charger
- Cleaning, maintenance and repair
- Preparing Hedge Trimmer for Operation
- Preparing Hedge Trimmer for Operation
- Charging the Battery, LEDs
- Mounting the Charger on a Wall
- - Check the following points when mounting the charger on a wall:
- Charging the Battery
- State of Charge
- LEDs on Battery
- LED on Charger
- Removing and Fitting the Battery
- Inserting the Battery
- Removing the Battery
- Switching the Hedge Trimmer On/Off
- Switch on the hedge trimmer
- Switching off the hedge trimmer
- Testing the Hedge Trimmer and Battery
- Checking the controls
- Locking lever, ergo lever and trigger
- Control bar
- Switching on the hedge trimmer
- Testing the Battery
- Operating the Hedge Trimmer
- Holding and Controlling the Hedge Trimmer
- Turning the Control Handle
- Cutting
- After Finishing Work
- After Finishing Work
- Transporting
- Transporting the Hedge Trimmer
- Carrying the hedge trimmer
- Transporting the Hedge Trimmer in a vehicle
- Transporting the battery
- Transporting the Charger
- Storing
- Storing the hedge trimmer
- Storing the Battery
- Storing the Charger
- Cleaning
- Cleaning the hedge trimmer
- Cleaning the cutting blades
- Cleaning the Battery
- Cleaning the Charger
- Maintenance
- Maintenance Intervals
- After every 50 hours of operation
- Every 12 months
- Lubricating the Gearbox
- Sharpening the cutting blades
- Repairing
- Repairing Hedge Trimmer, Battery and Charger
- Troubleshooting
- Troubleshooting Hedge Trimmer or Battery
- Troubleshooting the Charger
- Specifications
- STIHL HSA 60.0 Hedge Trimmer
- Cutting blades
- STIHL AK Battery
- Charger STIHL AL 101
- Extension Cords
- If rated voltage on the rating label is 220V to 240V:
- If rated voltage on the rating label is 100V to 127V:
- Sound Values and Vibration Values
- REACH
- Spare Parts and Accessories
- Spare parts and accessories
- Disposal
- Disposal of Hedge Trimmer, Battery and Charger
- EC Declaration of Conformity
- STIHL HSA 60.0 Hedge Trimmer
- UKCA Declaration of Conformity
- STIHL HSA 60.0 Hedge Trimmer
- General Power Tool SafetyWarnings
- Introduction
- Work area safety
- Electrical safety
- Personal safety
- Power tool use and care
- Battery tool use and care
- Service
- Hedge trimmer safety warnings
- Safety instructions for hedge trimmers
- Table des matieres
- Accu controlleren/testen
Brand : STIHL
Model : HSA 60
Category : Hedge trimmers