USER MANUAL ED43EA09UHD-GM EDENWOOD
Digital Video Broadcasting
DVB and the DVB logo are trademarks of the DVB Project.
The terms HDMI, HDMI High Definition Media Interface and HDMI trade dress, and the HDMI logos are trademarks and registered trademarks of HDMI Licensing Administrator, Inc.
Manufactured under license from Dolby Laboratories.
Dolby, Dolby Audio, and the double-D symbol are registered trademarks of Dolby Laboratories Licensing Corporation.
Netflix streaming membership required. 4K Ultra HD and HDR availability subject to your subscription plan, Internet service, device capabilities, and content availability. www.nsf1.com/TermsOfUse© 2024 Disney and related entities.
Disney+ subscription required, see terms at https://www.disneyplus.com. ©2024 Disney and its related entities. © 2024 Disney and related entities. Disney+ subscription required, conditions apply. HD and 4K Ultra HD available for select titles.
Amazon Prime membership or Prime Video fees apply.
See primevideo.com/terms for details.
Ventilation adequate
The current picture settings will revert back to the factory default settings. Do you want to continue?
OK
Cancel
Specifications techniques :
Important Safety Instructions
Licensing Information 3
Important Safety Instructions 46
Symbols on the TV 49
CE Declaration of Conformity 50
Installation
Contents in the packaging and accessories 51
Control panel 51
Base Installation 52
Wall Mounting Instructions 53
Connection Cables 53
Remote control 56
Procedure
Basic use 58
Parental controls 59
Live TV 60
Connection 63
Multi screen 66
Smart features 68
Image and sound 71
Accessibility 75
System and support 76
For reference
Troubleshooting 78
Cleaning instructions 79
Informations techniques 80
Important Safety Instructions
Please read these instructions and keep them for future reference

To reduce the risk of fire or electric shock, do not expose this product to water, rain, or moisture. To reduce the risk of electric shock, do not remove the trim or back panel of this product. In the event of a product failure, only qualified personnel can carry out the repair. No parts contained inside can be repaired by the user.

ATTENTION
RISQUE DE CHOC ELECTRIQUE: NE PAS OUVRIR

ATTENTION: POUR ÉVITER TOUT RISQUE DE CHOC ELECTRIQUE, NE RETIREZ PAS LE COUVERCLE (OU L'ARRÊRÉ). L'ENTRETIEN DES PIEÇES INTERNÉS EST INTERDIT AUX UTILISATEURS. VEUILLEZ CONFIER L'ENTRETIEN À UN PERSONNEL QUALIFIÉ.
ATTENTION!
Dangerous tension inside the product! Do not open. Risk of electrocution! No internal parts can be repaired by the user. Only qualified personnel can repair and maintain this product.
If the power cable is damaged, it should be replaced by the manufacturer or an authorized service agent to avoid hazards.
This product must be installed in accordance with local standards. Damaged batteries must be disposed of properly. To protect the environment, please dispose of batteries properly and in accordance with local laws (this information is available from your dealer).
Where to install the product
-Place the device on a flat, rigid, and stable surface. Do not place the appliance on a rug or carpet.
-Do not place the device on top of another product that could cause overheating (e.g., a receiver or amplifier).
-Do not place anything under the product (e.g., CDs or magazines).
Ventilation adequate
- Place the product in a sufficiently ventilated area to prevent overheating. To prevent overheating, leave a space of at least 10cm in front and behind the product, and a space of 5cm on each side.
-Minimum distance around the unit for sufficient ventilation: 10 cm Ventilation must not be hindered by obstruction of the ventilation openings by objects such as newspapers, tablecloths, curtains, etc.
Do not expose the product to high temperatures, moisture, water, or dust.
- The device is intended for use in a temperate climate.
- The appliance should not be exposed to water drips or splashes. No liquid-filled objects such as vases should be placed on the appliance.
- Never place an object containing liquid, such as a vase, near the device.
- Do not place any other objects that could damage it near the product (e.g., objects containing water or burning candles).
- Never place open flame sources, such as burning candles, on the appliance.
Power supply
-Pleases unplug the device in case of prolonged non-use.
-If the power cable is damaged, it should be replaced by the manufacturer or an authorized service agent to avoid danger.
-This product must be connected to a power supply of 100-240V~50/60Hz.
- The power outlet plug must remain easily accessible.
- The appliance must be connected to an electrical outlet equipped with a ground.
In order to avoid high sound pressure and the risk of hearing damage, do not
listen at a high sound level for a long time.
WARNING
A TV is susceptible to falling and causing serious bodily injury or death. Many injuries, especially on children, can be prevented by taking simple precautions such as:
- ALWAYS use the boxes, brackets, or mounting methods recommended by the TV manufacturer.
- ALWAYS use only furniture that can support the TV securely.
- ALWAYS make sure that the TV does not protrude from the edge of the furniture that supports it.
- ALWAYS teach children about the dangers of climbing on furniture to reach the TV or its controls.
- ALWAYS route cords and cables connected to your TV so that you do not step on, pull or tear them off.
- NEVER place a TV in an unstable location.
- NEVER place the TV on tall furniture (e.g., cabinets or bookcases) without hanging the stand and TV on a suitable stand.
- NEVER place the TV on fabric or other materials that may be between the TV and the furniture that supports it.
-
NEVER place objects that could encourage children to climb on the TV or the furniture on which it is placed (a toy or the remote control, for example). If an existing television set is to be moved, the same considerations as given above should be applied.
-
Warning children about the dangers of climbing on the furniture to reach the TV or its control buttons.
- Before moving the TV to a different location, keep in mind and apply all of the following safety instructions.
Changing some parts of your device can lead to a hazard. Make sure you have all the required skills and tools to perform self-healing operations safely. If not, call on a licensed professional.
Symbols on the TV
| CE | This marking indicates that the unit complies with the European Radio Equipment Directive. |
| This logo affixed to the product means that the recycling of this device falls within the framework of Directive 2012/19/EU of July 4, 2012 relating to waste electrical and electronic equipment (WEEE directive). |
| This symbol indicates DC voltage (for USB only). |
| ~ | This symbol indicates AC voltage. |
| This symbol indicates that the user manual supplied with the appliance contains important instructions regarding the use and maintenance of the appliance. |
| This symbol indicates that dangerous voltage posing a risk of electric shock is present in this unit. |
| This symbol indicates “Indoor use only”. |
| Class II equipment: this symbol indicates that the unit has double insulation. |
| Cadmium Free / |
| HDMI™ | The terms HDMI, HDMI high-definition multimedia interface, and HDMI trade dress, and the HDMI logos are trademarks and registered trademarks of HDMI Licensing Administrator, Inc. |
CE This television-type device complies with the essential requirements and other provisions of Directive 2014/35/EU & 2014/30EU as well as the Radio Equipment Directive (RED) 2014/53/EU which was implemented on June 12, 2016.
Contents in the packaging and accessories
Table Stand x 1
Table Bracket Fixing Screws x 4
Instruction Manual x 1
Remote Control x 1
Conditions and options may change depending on the model.
Control Panel
- Standby: To TURN ON/OFF the TV.
- Remote Control Sensor/Power Indicator : In standby mode, the indicator is red; when on, the indicator will be blue.
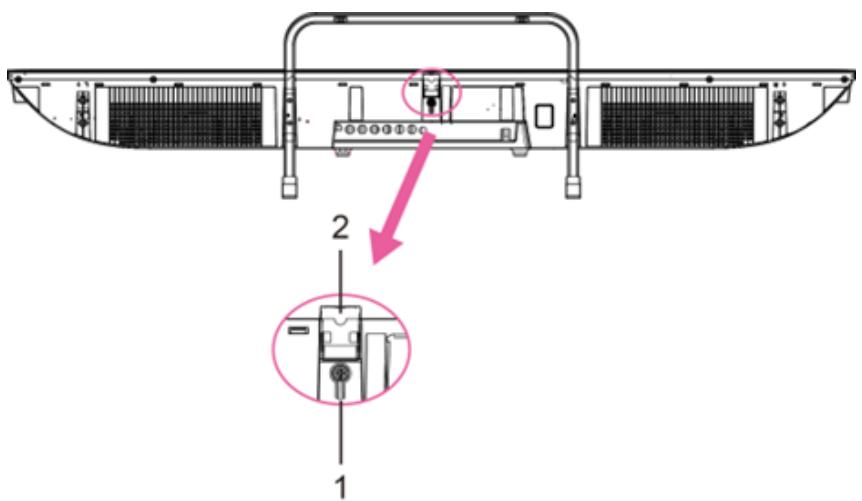
Base Installation
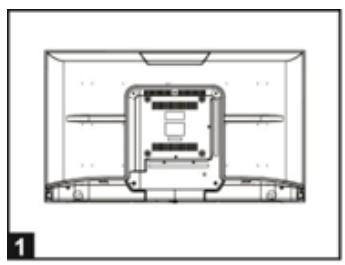
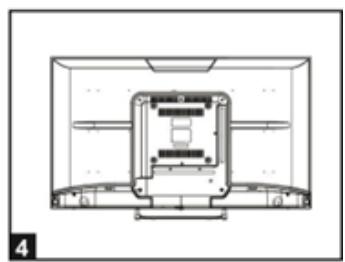
- Place the TV flat on a table (Caution: Place a foam cushion under the machine to prevent scratches.)
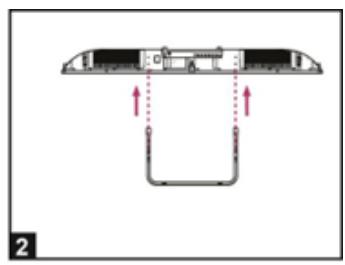
- Align the screw threads on the bracket and the underside of the TV (Figure 2)
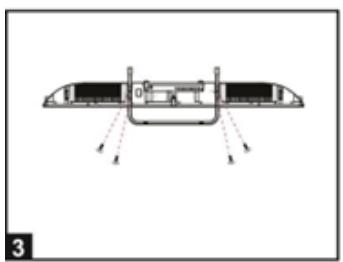
- Secure the stand and display with the 4 screws provided. (Figure 3)
- Appearance after installation. (Figure 4)
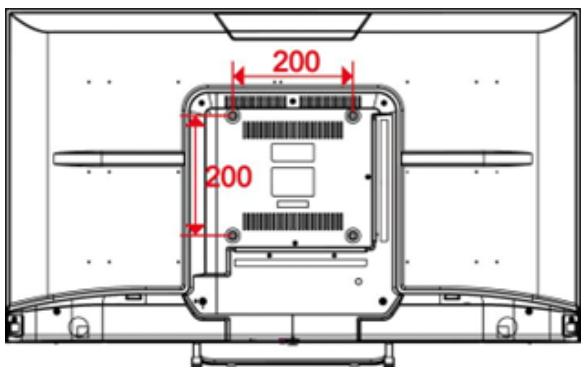
Wall Mounting Instructions
Hanging the TV on a wall
Warning: For safe installation, follow these safety instructions:
- Check that the nature of the wall or partition is able to support the weight of the TV and wall mount.
- Be sure to use the right type of dowel according to the nature of the wall (concrete, brick, plasterboard, plaster tile, etc.). If in doubt, seek professional advice.
- Follow the installation instructions that came with the wall mount and use the screws recommended by the manufacturer.
Install the TV on a vertical wall.
-
Check that the cable routing is safe for people (Stumble, fall).
-
Use standard BM5*12mm screws (4 screws, not included) to mount this TV. The use of different screws of the specified type will damage the wall mount bracket and void the product warranty.
- Contact a professional for help with wall mounting your TV.
- Do not mount the TV on the wall when it is on.
Refer to the instructions for your wall mount bracket.
MAKE SURE THAT ALL EQUIPMENT AND THE POWER PLUG ARE PROPERLY PLugged IN AND THAT THE DEVICE IS SET TO THE CORRECT MODE BEFORE ANY TYPE OF MANIPULATION.
Connection Cables
Connecting to the Power Source
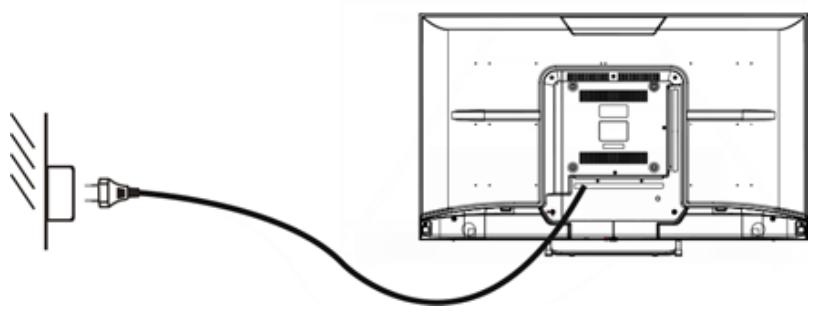
- The TV is in a standby state when no image appears and the red light is illuminated.
- Press the standby button on the TV remote again, the light will light up blue.
Connecting the External Antenna to the Unit
Cable TV
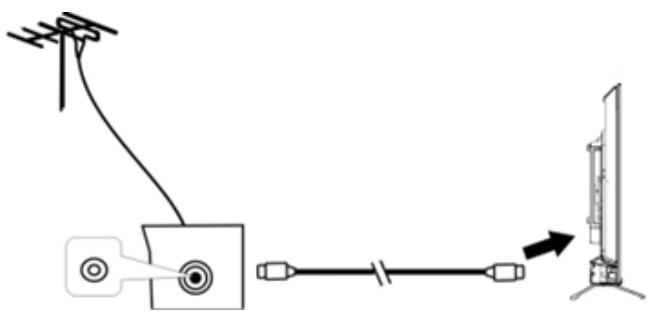
We recommend using a 75 antenna cable to eliminate disturbances caused by impedance mismatching. The antenna cable should not be close to the power cord.
Insert the plug of the 75 antenna cable directly into the antenna jack when using cable TV.
Note: The antenna must be checked periodically. If a clear image is not displayed, turn off the power, and then check the antenna carefully.
Connection Cables
This TV has digital media features and can be connected to multiple external devices. The following diagram shows the connections.
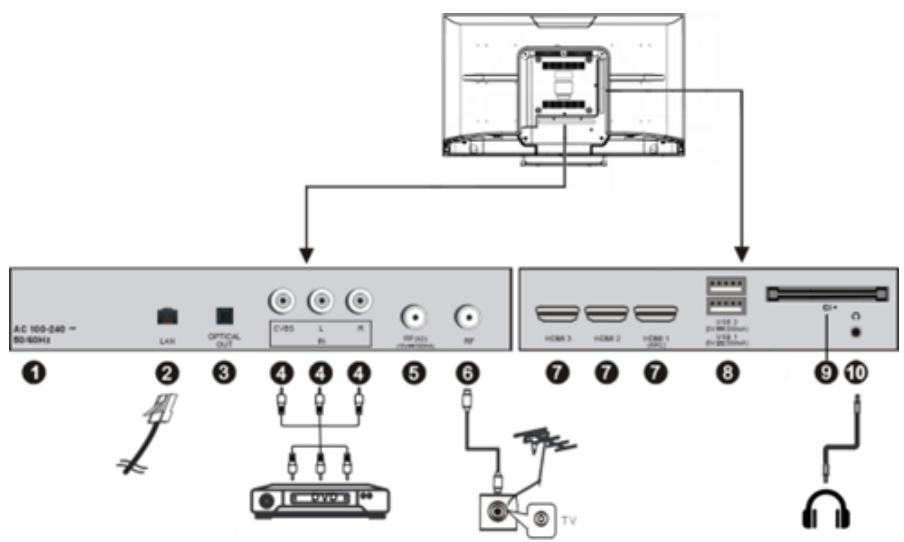
- AC IN
- LAN input terminal
- OPTICAL output terminal
- CVBS and Audio L/R input terminal
- FR IN: Connect to the external Satellite TV Antenna(DVB-S2).
- RF IN: Connect to the external TV antenna.
- HDMI1/2/3 IN : High-definition multimedia interface. ARC is in HDMI 1 only.
- USB IN
- Access multi-media files stored in the USB device.
- CI SLOT: Insert a CI (common interface) card.
- EARPHONE OUTPUT.
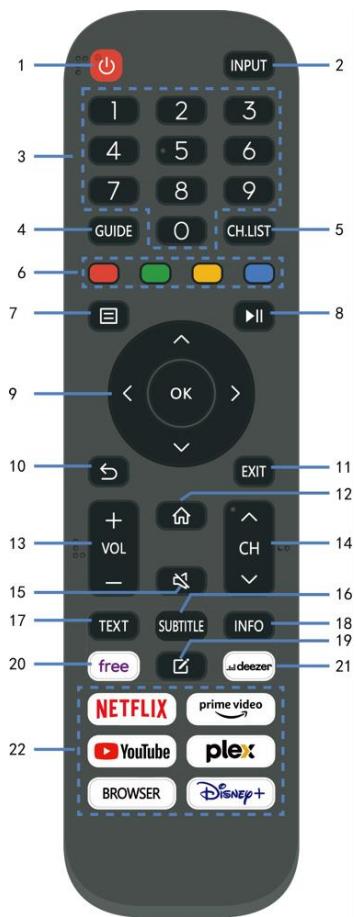
| 1 STANDBY | Set the unit in standby mode; press it again to switch it on |
| 2 INPUT (SOURCE) | Select desired input source. |
| 3 Pavé numériques (0-9) | Input the number information, such as channel number and so on. |
| 4 GUIDE | Launch the Program Guide. |
| 5 CH.LIST | Press to show channel list. |
| 6 Quatre Couleurs | Customized in different page. |
| 7 (MENU) | Call out the main menu or return to previous menu. |
| 8 || | Press to operate start/pause playing; Move fast forward; Move fast backward. |
| 9 DIRECTION/ OK | Move up, down, left, right/Confirm. |
| 10 ← | Return to the previous interface or menu. |
| 11 QITTER | Exit the current interface or menu. |
| 12 ∩ | |
| 13 VOL+/- | Increase/decrease the volume level. |
| 14 CH +/- | Play the next/previous program. |
| MUTE | Mute the sound. |
| 16 SOUS-TITRES | Select available subtitles. |
| 17 TEXTE | Turn on/off the Teletext. |
| 18 INFO | Display the available program information. |
| 19 √ | Set up APP shortcut key. |
| 20 Free | To view free videos. |
| 21 DEEZER | Enter to the deezer directly. |
| 22 Zone de contenu | Six buttons for CSP Apps. |
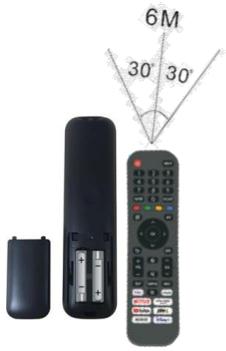
The remote control must be used within the effective reception range of the television. Point the remote control at the TV's infrared receiver and make sure there are no obstacles in between. Its normal operating distance will be reduced by direct sunlight or lamp light. Be careful when using the remote control. Do not drop it, step on it, or expose it to liquids.
Note: The symbols and position of the remote control controls may vary by model.
Preparing the remote control
Insert two AAA batteries into the remote control according to the polarity (+/-) symbols indicated. (Batteries not included)
Different types of batteries or new and used batteries should not be mixed. Batteries must be installed in a polarity manner. Used batteries should be removed from the product. Batteries must be disposed of safely. Place them in the collection bins provided (check with your retailer) to protect the environment.
Warning: Batteries should not be exposed to excessive heat such as that from the sun, fire, or similar origin.
BASICUSE
-Press the Standby button on the device or remote control to turn on the device (the light is blue); Press this key again to turn off (sleep mode) the device (the light turns red).
SELECT THE DESIRED PROGRAM
- Press the CH + key to play the next channel.
- Press the CH- key to play the previous channel.
- Press the number keys on the remote control directly to select the desired program.
VOLUME CONTROL
- Press the VOL+ or VOL button - to adjust the current volume level. Available Adjustment Range: 0-100.
MUTE CONTROL
- Press the MUTE key to mute the sound, press it again to turn the sound back on.
SOURCE SETTINGS
- Press the SOURCE button on the remote control to display the list of sources.
- Press the UP and DOWN navigation key to select the desired input source, and then press OK to confirm the selection.
MULTIAUDIO TUNING
- Press the MENU button on the remote control and use the navigation keys to select the desired audio language.
NOTE: To enable this feature, make sure the channel you're watching supports multiaudio languages.
- Press the INFO button on the remote control to display the current program information.
- Insert a USB storage device into the USB port before performing the following steps.
- Press the SOURCE button on the remote control to switch the unit to USB mode.
- Press the UP/DOWN/LEFT/RIGHT navigation keys to move the cursor.
- Press the BACK button to return to the previous page of the menu.
PARENTAL CONTROLS
Parental controls are set up when you first use your TV. If you want to come back to it later, follow these steps :
Press the buttons / on the remote control and select Settings> System >
Parental Controls.
Turn on parental controls to prevent kids from watching certain programs. If you haven't set the PIN yet, create it and confirm it in the on-screen dialog. Using the D-pad on the remote control, set the password.
If you have already set the PIN, enter it in the on-screen dialog box.
Locking
Turn on the lock to turn on parental controls.
You'll see other parental control settings change from a grayed out state to a highlighted state. When this happens, the Time Block, Channel Block, Content Block, Source Block, App Block, or Reset Settings options can be set.
Time Lock
Block all TV usage for a period of time, including live TV, HDMI sources, and apps.
Block all channels or individual channels when you turn on the parental control feature.
Content Blocking
Some programs are blocked based on age. It is controlled by the broadcaster.
Block content from external devices connected to the TV.
Block access to certain applications. If you don't see an app you want to restrict here, check the Parental safety settings box in the app.
Reset the parental controls to factory settings.
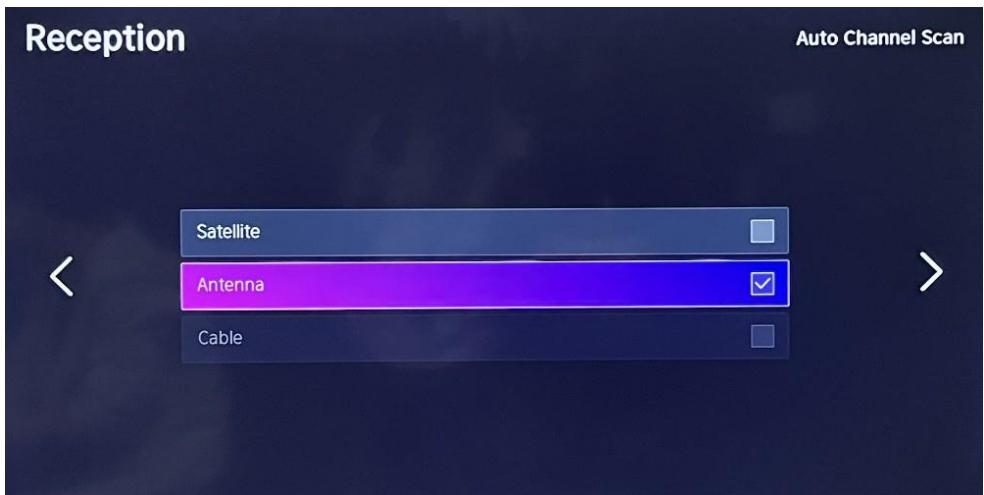
LIVE TV
Channel Search
Automatic channel search

Settings> Channel > Auto scan
Before selecting the automatic channel search, you can tap

Settings> Channel> Auto Search, press the OK button in the submenu, select
Change Configuration, and press the OK button to select Satellite, Antenna, or Cable.
List of channels
Displays the list of favorite channels
When watching live TV, press the key OK on the remote control to bring up the source list menu.

Sideburns
- Add channels to your "Favorites" list.
- Press the button OK to display the list of channels. It appears on the right side of the screen.
- Press l >ok to select your favorite channel.
to select your favorite channel. and choose Add to Favorites, a heart icon will appear next to your favorite channel.

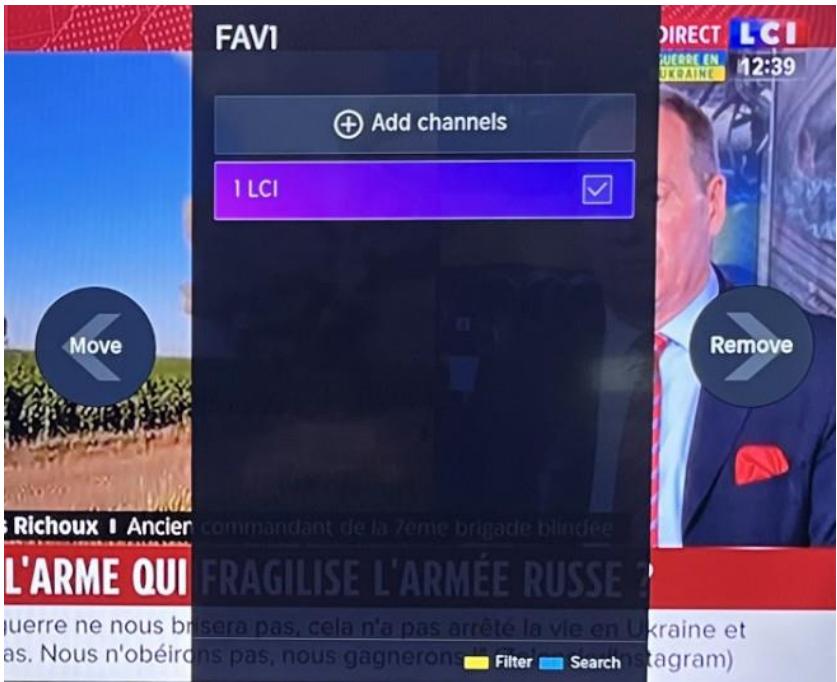
View your "Favorites" list
Press the button OK to display the list of channels. It appears on the right side of the screen.
Tap > Favorites >, press the navigation key, select
FAV1, FAV2, FAV3 or FAV4, press OK and the favorite channel with a heart icon will appear in the favorites list.
Remove channels from your "Favorites" list.
Press the button OK to display the list of channels. It appears on the right side of the screen.
Tap > Favorites, using the navigation key to select
(Edit) from the menu, select the FAV channel you want Press to delete it.
These steps must be performed in the inputs of the television. Search for a channel before editing your favorite channels.
CONNECTION
Wired LAN
Internet connection

Settings > Network > Network Configuration
You can set the TV network by selecting Setup and pressing the button OK to enter the submenu.
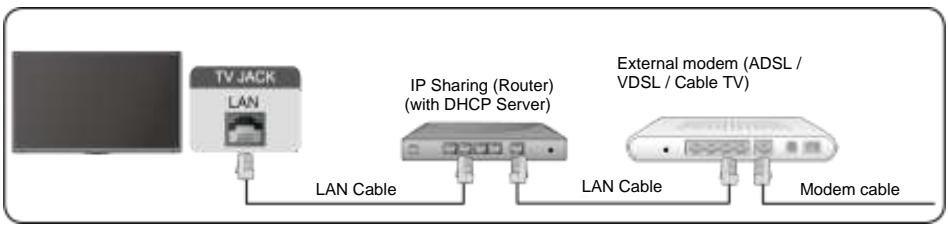
Automatically get IP address
If you-connect to the wired network, the TV will automatically get an IP address and connect to the network.
If the connection cannot be completed, a disconnect message will be displayed for the Ethernet connection. Try again or enter the IP settings, and select Manual to re-enter the information.
Enter the IP address manually.
Go to the IP settings to select Manual.
Enter the IP address, subnet mask, gateway, DNS 1 server, and DNS 2 in this menu.
Remark:
This section is only available for 4K models. You will have access to the internet on your TV.
The default mode for IP tuning is DHCP.
Wireless
Internet connection

Wireless adapter built into the TV
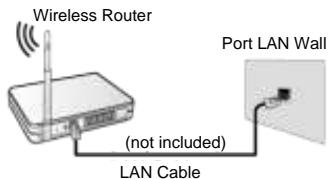
You will have access to the internet on your TV.
Connection to an available wireless network.
Make sure you have the SSID and password to connect to the wireless router before you start the connection.
Connecting to a wireless network

> Settings> Network > Network Configuration
You can set the TV network by selecting Setup and pressing the button OK to enter the submenu.
Choose a wireless network connection to access the Internet.
To refresh the list of wireless networks.
Advanced settings
To configure advanced wireless network settings for TV.
Add
You can add a wireless network.
- If no wireless router is found, select Add and enter the network name in the SSID field.
If no wireless router is found, select Refresh.
HDMI CEC
You can use your remote control to control external devices connected to your TV via HDMI cable. External devices must support HDMI & CEC (HDMI-CEC).
Connect an external device via HDMI -CEC connection > Settings > HDMI&CEC > System
- Turn on HDMI control.
- Connect an HDMI-CEC compatible device to the TV.
- Turn on the connected external device. The device is automatically connected to the TV. Once the connection is complete, you can access the device menu connected to your TV screen using your TV remote control and control the device.
- HDMI cables should be used to connect HDMI CEC-enabled devices to your TV.
- The HDMI CEC function of the connected device must be enabled.
- If you connect an HDMI device that is not HDMI CEC compatible, all HDMI-CEC control functions will be unavailable.
- Depending on the HDMI device connected, the HDMI-CEC control function may not work.
- HDMI CEC function is supported by One Touch Play, Routing Control, System Standby, Device OSD Name Transfer, Remote Control Transfer, Device Power Status, System Audio Control.
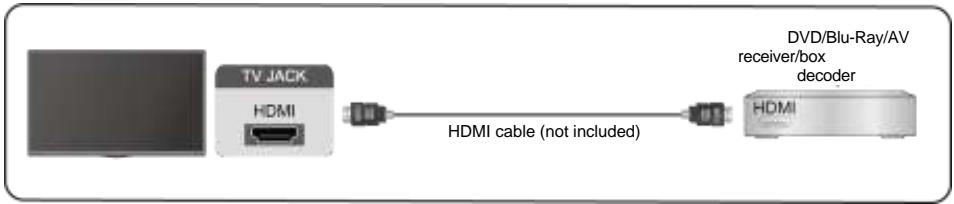
HDMI Device
Connect an HDMI cable from an external A/V device.
Some devices, such as DVD players, require the HDMI signal to be set for output in the device settings. Please refer to your device's user manual for instructions.
Please note that the HDMI connector provides both video and audio signals, so there is no need to connect an audio cable.
USB Device
Connect USB devices such as hard drives, flash drives, and digital cameras to browse photos, listen to music.
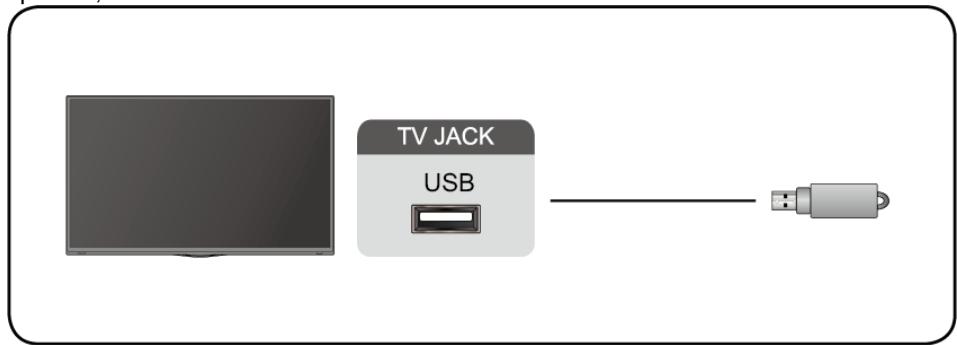
Supported formats: FAT32.
Multi screen
Screen Sharing
Duplicate content from your device to the TV. INPUT > Screen Sharing
- Enable the casting feature on your Android/Windows 10 device.
Find the TV name in your device's search list and select it. Wait for the connection progress to complete and the content on your device will be displayed on the TV.
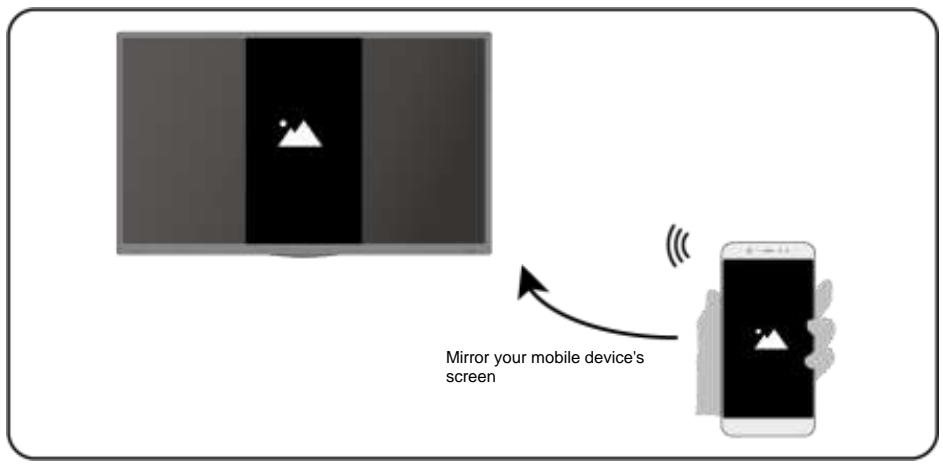
Some Android devices may not support casting.
Content sharing
Share multimedia content, such as videos, music, or photos, from your device to the TV screen.
Before using this feature, enable content sharing in

Settings > System > Mobile
Device Connectivity > Content Sharing.
- Establishing a content sharing connection between the TV and your device
-
Turn on your device's content sharing feature.
Find the TV name in your device's search list and select it.
-
Wait for the connection progress to complete and select the content you want to share
Viewing your device's media
Press the button INPUT on your remote control and select a media content on the screen.
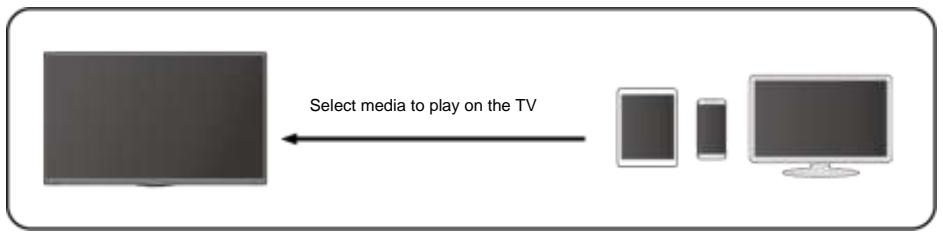
Make sure your device and the TV are connected to the same network.
- Some devices may not support content sharing. If your device doesn't support content sharing, you can download an app that supports the feature.
If you want to mirror the content on your device, go to INPUT
Screen sharing.
Smart features
Playing media

By default, Content Sharing is displayed on the Media screen. If your mobile device is connected to the TV, its name also appears on the Media screen.
Remark:
For more information about sharing content, see its detailed introduction.

Select the content you want to play on the screen, such as images, videos, and music.
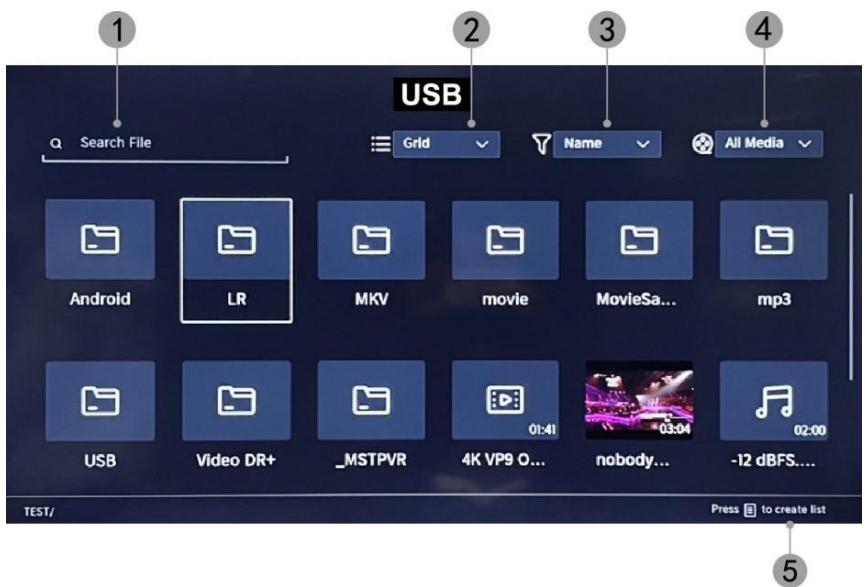
- Enter the name of the content you want to play.
- Organize the content list by Grid, List.
- Organize the content list by Name, Date Modified, Size.
- Filter the content list by All Media, Photo, Video, Music.
- Create a playlist of photos, music, or videos.
Play background music while viewing images You should:
- Choose an image to display.
- Press the A / V to display the playback bar.
- Select Background Music and choose your music to create a music playlist.
- Play background music while viewing images. Remark:
. MP3, . AAC, . wav
- For more information on connecting to another device, refer to the detailed introduction to each component.
Reception
Familiarize yourself with the home screen Use the TV more easily by selecting the corresponding sections.
Press the button
You can always view the time at the top of the home screen.
If your TV is connected to the internet via a wireless connection, the icon appears in the top right corner of the screen.
- Manage applications
- Select the item you want to move, and press and hold the button OK to manage.
Research
To search for the desired app.
Sources
To select the desired source.
Parameters
To display the Settings menu.
Notifications
Allows pop-up notifications to be displayed for useful information and events happening on your TV.
- Select Notifications on the Home screen, select Settings, and then enter
Advertising, What's New,Warnings & Legal, System Message, where you can choose the types of notifications you want to receive.
VIDAA Account
Log in to your VIDAA account.
A VIDAA account gives you all the best features of your smart TV and always keeps it up to date.
Bluetooth
Bluetooth TV Speaker
You can go to > Settings > Network > Bluetooth > TV Bluetooth Speaker TV output: Mobile devices are connected to the TV via Bluetooth. Audio outputs via TV speaker.
- Go to your mobile's settings and open Bluetooth.
- Choose VIDDA TV to connect.
Asset Management
Manage a Bluetooth device
You can go to Settings > Network > Bluetooth > Asset Management
- Turn on the output speaker.
The TV will connect to the output speaker.
Image and sound
Adjust image quality
To adjust the current picture mode to apply to all sources or only to the current source.
The menu is presented for reference only. The following modes may differ from the actual product.
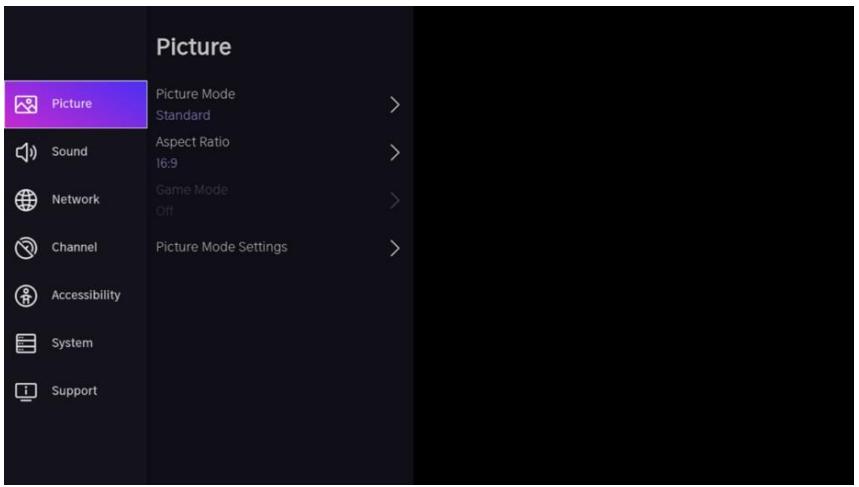
Choose an image mode
Settings >Picture > Picture Mode
You can select the picture mode that provides the best viewing experience.
Standard: The default mode, for high-quality images in normal lighting.
- Cinema Day: Improves contrast, color, and screen clarity to make colors more vivid.
- Cinema Night: Reduces contrast, color, and screen clarity to make the picture look softer.
- Dynamic: Improves the contrast, color, and clarity of the screen, so that the colors in the image are dynamically balanced.
- Sports: This mode is more suitable for sports video content.
Choose an aspect ratio
>Settings>Image Aspect Ratio
You can adjust the aspect ratio to stretch or enlarge the image.
Automatic
16:9
4:3
Video zoom
ON/OFF Game Mode
Settings >Picture > Game Mode
Optimized for PC or game consoles. Reduces order latency and improves responsiveness.
Configuring Advanced Image Settings
Settings > Picture > Picture Mode Settings
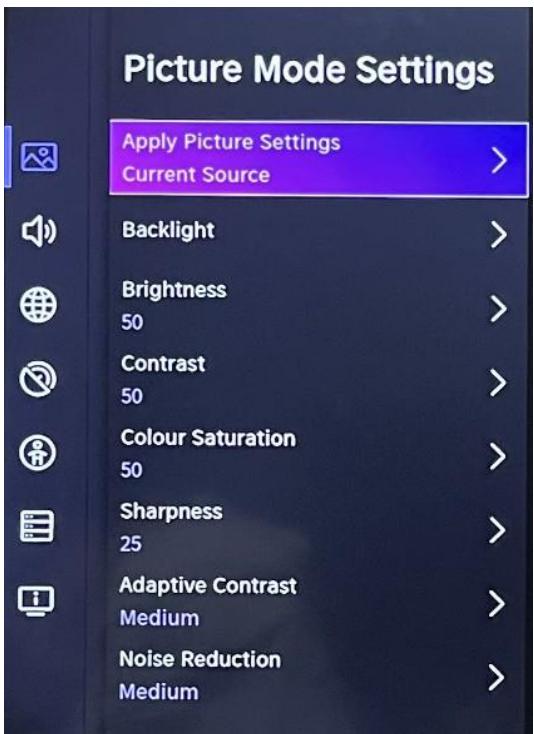
To adjust the display settings for each image mode.
- Apply Image Settings: To adjust the current image mode to apply to all sources or only to the current source.
- Backlight: To adjust the brightness of the image. (Optional: Stop/Low/High)
- Brightness: To adjust the brightness of the image.
- Contrast: To adjust the contrast of the image.
Color Saturation: To adjust the color density of the image.
- Sharpen: To adjust the sharpness of the edges of the image.
- Adaptive Contrast: Automatically adjusts dark and bright areas of the image to distinguish more details. Press the navigation button to select Off/Low/Medium/High.
- Noise Reduction: To improve image quality by reducing noise. (Optional: Off/Low/Medium/High)
- MPEG Noise Reduction: To reduce MPEG block noise to provide sharper border transitions. (Optional: Off/Low/Medium/High)
Color Temperature: To adjust the overall colors of the image. (Optional: Hot1/Hot2/Standard/Cool)
- Expert Settings: To adjust the color space and gamma depending on the content you're viewing.
- Overscan: To change the size setting of the video to crop the edges of the displayed image.
- Reset Current Mode: To restore all image settings in the current Picture Mode to factory defaults.
Reset Current Mode
The current picture settings will revert back to the factory default settings. Do you want to continue?
OK
Cancel
Sound quality adjustment
To adjust the current sound mode to apply to all sources or only to the current source. The menu is presented for reference only. The following modes may differ from the actual product.
Choose a sound mode
> Settings>Sound >Sound Mode
You can select a preferred sound mode that is appropriate for the type of content or listening environment.
Standard: Produces balanced sound in all environments.
Theater: Increases the effect of surround sound and provides a greater bass response.
Music: Preserves the original sound. Suitable for music programs.
Speech: Low and high frequencies are attenuated to improve the reproduction and clarity of the human voice.
Late Night: Improves the reproduction and clarity of the human voice with a low volume level.
Sports: Sound optimized for watching sporting events.
>Settings>Sound>Headphones
To adjust the audio output mode for the headphones.
> Settings > Sound > Sound Mode Settings
To adjust TV audio settings: To apply audio settings/equalizer/wall mount setup/automatic volume control/Reset current mode.
Settings>Sound >Speakers
To select the speakers you want to use.
Accessibility
Tap the navigation button to select Accessibility

Setting> Accessibility
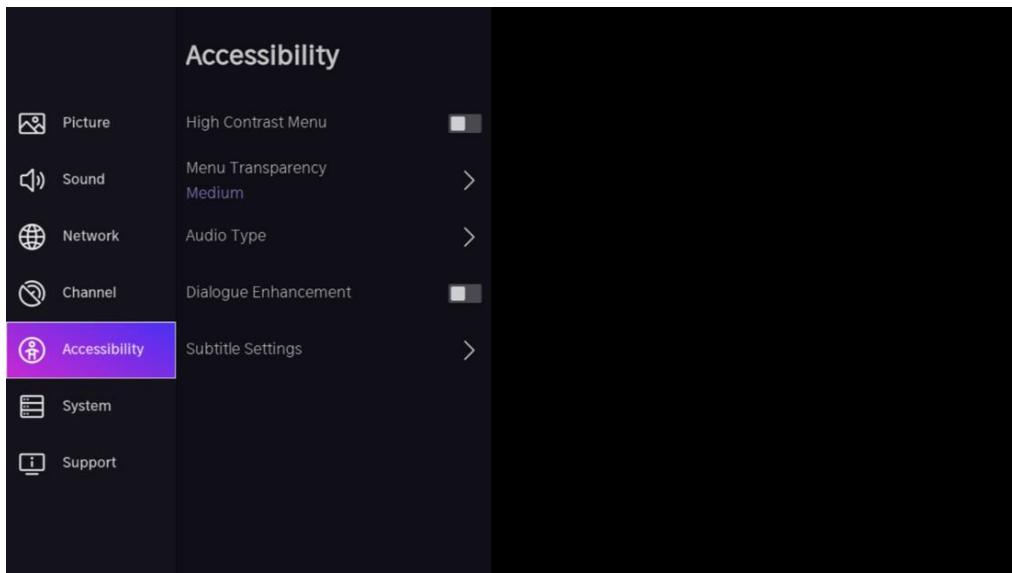
High Contrast Menu: To turn the High Contrast menu on or off.
Menu Transparency: To adjust the transparency of the menu.
(Optional: Off/Medium/High)
Audio Type: Audio accessibility settings.
Dialogue Enhancement: To enable or disable dialogue sound enhancement.
Caption settings: Adjust caption settings for digital content.
System and support
Time setting
Settings >System >Time
To set the current time based on your location.
- To set the time the display to 12 or 24 hour format.
Date/Time
To set the date and time.
Time zone
To set the time zone.
Daylight Savings
To set the television must respect the daylight saving time.
Timer Settings
Settings > System > Timer Setting
To adjust the timer settings to suit your preferences.
- Sleep timer
To set the sleep timer so that the TV turns off after a specified amount of time: Off, 15 minutes, 30 minutes, 60 minutes, 90 minutes,
120 minutes, user-defined.
Power On timer
Set the clock to the time you want the TV to turn on automatically. You can set the time only once or set the time to a specific day each week.
Power Off timer
Set the clock to the time you want the TV to turn off automatically. You can set the time only once or set the time to a specific day each week.
Set the amount of time the menu is displayed: Off, 10s, 20s, 30s, 60s.
Automatic standby
Set how long you want the TV to automatically turn off after a period of inactivity: Off, 3H, 4H.
Automatic standby without signal
The TV will go to sleep if no signal is detected after the set time: Off, 15min.
Setting Operating Mode
Home Mode
For normal use please choose: "Home Mode"
The product is stuck in Store Mode. To return to Home mode, please:
- Do MENU > Setting > System > Advanced Setting > Usage Mode > Choose 'Home Mode'
Improve
>Settings>Support System Update
Set up your TV to receive the latest firmware.
Automatic firmware upgrade
Set your TV to automatically receive the latest firmware.
- Check for firmware upgrade
To verify that your TV has received the latest firmware version. Note: Please make sure your TV is connected to the internet.
Automatic system application upgrade
The automatic upgrade of the app will be done in the background. You may need to confirm acceptance of new privacy statements to complete the current upgrade.
To upgrade the TV software from a USB device. Remark:
- Please make sure that the USB flash drive is inserted into the USB2.0 port on the TV.
The update files must be available in the root directory.
- The USB drive should be formatted in FAT32 and the partition table type should be MBR.
Electronic Manual
> Settings > Support > E-Manual
To view the e-manual and learn more about your TV.
Access to the usage meter
To access the usage meter.
Troubleshooting
No image or sound

Cause possible :
- The power cord, antenna cable, or input source is not plugged in properly.
- The TV is not turned on.
Solution:
- Check the power cord, antenna cable, and input source.
- Press the POWER button on the remote control.
- Turn off the TV and turn it back on five seconds later.
No sound

Cause possible :
Either the volume is too low or the sound is muted.
- The sound system is badly configured. Solution:
- Turn up the volume.
- Unmute by pressing the MUTE button.
- Adjust the sound configuration.
Snow noise or effect
Cause possible :
- The antenna cable is damaged or improperly connected.
- The chain is badly installed.
- The antenna is badly positioned. Solution:
- Check the antenna cable and its connection.
- Adjust the chain manually.
- Adjust the antenna position.
Black and white image
Cause possible :
- The antenna is badly positioned.
Solution:
- Adjust the color configuration.
- Adjust the antenna position.

Remote control not working

Cause possible :
- The batteries are used.
- The batteries are not inserted correctly. Solution:
- Change the batteries.
- Check that the batteries are inserted according to the polarities +/-.
Important Note
The screen of this TV has a large number of color pixels. Although the effective pixel rate is 99.999% or higher, black dots or points of light (red, green, or blue) may appear permanently on the screen. This is a structural property of the display (according to industry standard standards), not a malfunction. Sometimes, the screen may have a pixel that is off. This will be shown by a blue, red, green, or black dot. This does not affect the operation of the product, which should therefore be considered normal.
Cleaning instructions
- Before cleaning this product, press the STANDBY button to put it into standby mode and wait a few minutes before unplugging the power plug.
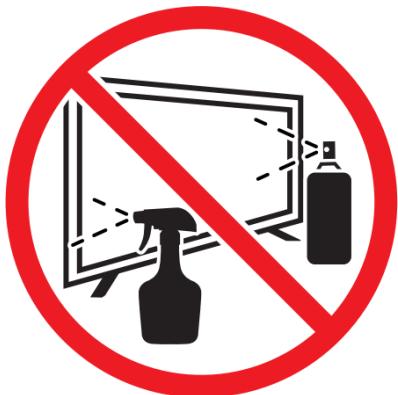
- Wipe this product off with a soft, dry cloth. Do not spray water directly on the TV, but apply a small amount of water to the corner of the cloth and wipe it as gently as possible. Never use cleaning fluids, wax, or chemicals.
- Never use alcohol, benzene, thinner, cleaning fluid, or other chemicals. Do not use compressed air to remove dust.
- If the surface is extremely dirty, wipe it with a cloth dampened with a weak soapy water solution and wrung out well, then wipe again with a dry cloth.
- Before plugging the TV back in, allow the screen to dry completely.
Data Sheet
| Value | Unit |
| Model number | ED43EA09UHD-GM |
| Company name or brand Filed | EDENWOOD |
| Energy efficiency class for dynamic range Standard (SDR) | F | |
| Power demand in on mode for dynamic range Standard (SDR) | 50 | W |
| Energy efficiency class (HDR) | F | |
| Power demand in on mode for high dynamic range (HDR) | 51 | W |
| Power Demand in Off mode | 0 | W |
| Power Demand in Standby mode | 0.5 | W |
| Power Demand in Standby mode with network connection | 0.68 | W |
| Electronic Display Device Category | Television | |
| Size ratio | 16:9 | |
| Screen resolution (pixels) | 3840x2160 | pixels |
| Screen diagonal | 109 | cm |
| Screen diagonal | 43" | inches |
| Visible screen area | 49.8 | dm² |
| Panel technology used | QLED | |
| Automatic brightness adjustment (ABC) available | No | |
| Voice recognition sensor available | No | |
| Presence sensor available | No | |
| Frequency rate of Image refresh | 60Hz | |
| Guaranteed minimum availability of software and firmware updates (from the end of the market) | 11 | Years |
| Guaranteed minimum availability of spare parts | 11 | Years |
| Minimal product support guaranteed | 2 | Years |
| Type d'alimentation : | Internal | |
| Wi-Fi Frequency (Wireless) | 2400 - 2497 MHz5150 - 5350 MHz5470 - 5825 MHz |
| Power of | 2.4G: 17dBm(±2dB)5G:15dBm(±2dB) |
- Energy efficiency class is designated by letters ranging from A (very economical) to G (not very economical).
- TV consumption is based on 1000 hours of use. Actual power consumption may vary depending on run time and contrast or brightness settings.
The product information sheet in accordance with EU Regulation No. 2019/2013 Energy Label for Electronic Display and TV can be found under the URL or QR code indicated on the URL of the energy label: https://eprel.ec.europa.eu/qr/2039533
Auto standby
To save energy, the consumption of this product has been reduced during operation and standby. In addition, if no operation is performed for four consecutive hours, the device automatically switches to standby mode.
INFORMATIONS TECHNIQUES
| Trademark | EDENWOOD |
| Reference | ED43EA09UHD-GM |
| Model | DVB-PM1430302QHCATSBI |
| Display | 43" QLED |
| Resolution | 3840×2160 |
| Color display | 1.07B |
| Contrast | 1100:1 (typique) |
| Ratio | 16:9 |
| Lifetime | 30,000 heures |
| Tuner | DVB - C/T/T2/S2 |
| Food | AC 100-240V, 50/60Hz |
| Consumption | Max.90W |
| Dimensions | 957 x 210 x 597 mm |
| Net weight | Approx. 6.87 kg |
| Basement | 1 pc |
| Operating temperature | 0°C et 35°C |
| Remote control batteries | AAA*2pcs (not included) |
| USB output | 5V,500mA |
| Hotel Lock | YES |
| Loud speaker | 2*8W |
| Starters | RF*2, HDMI*3, AV, LAN, CI, USB*2 |
| Audio Outputs | Prise casque, Port Optique |
| USB Multimedia Formats | Video : mp4 / Audio :mp3 / Picture : jpg |
Thank you!
Thank you for choosing this EDENWOOD product. EDENWOOD products are chosen, tested, and recommended by ELECTRO DEPOT, so you can be sure you are getting a top-quality, easy-to-use product that won't let you down. We're confident your new device will be a pleasure to use every day!
Welcome to ELECTRO DEPOT.
NL
Inhoudsopgave
Slag
RISQUE DE CHOC ELECTRIQUE: NE PAS OUVRIR

ATTENTION: POUR ÉVITER TOUT RISQUE DE CHOC ELECTRIQUE, NE RETIREZ PAS LE COUVERCLE (OU L'ARRÊRÉ). L'ENTRETIEN DES PIEÇES INTERNÉS EST INTERDIT AUX UTILISATEURS. VEUILLEZ CONFIER L'ENTRETIEN À UN PERSONNEL QUALIFIÉ.
AANDACHT!
The current picture settings will revert back to the factory default settings. Do you want to continue?
OK
Cancel
This product is guaranteed against faults caused by defects in manufacturing or the materials used for a period of two years, starting from the date of purchase.* This warranty does not cover defects or damage caused by failure to install the device correctly, incorrect use of the product, or excessive wear and tear.
*proof of purchase required.
FR
CONDITION DE GARANTIE