USER MANUAL ED43EA07UHD-MM EDENWOOD
RISQUE D'ÉLECTROCUTION NE PAS OUVRIR
ATTENTION:POURÉVITER TOUT RISQUE D'ÉLECTROCUTION,NE RETIREZ PAS LE COUVERCLE (NI LE PANNEAU ARRIÈRE). AUCUNE PIECE N'EST REMPLAÇABLE PAR L'UTILISATEUR. CONTACTEZ UN PERSONNEL QUALIFIÉ EN CAS DE PANNE.

Thank you for choosing this edenwood product. Edenwood products are chosen, tested, and recommended by ELECTRO DEPOT, so you can be sure you are getting a top-quality, easy- to- use product that won't let you down. We're confident your new device will be a pleasure to use every day!
Welcome to ELECTRO DEPOT.
SAFETY PRECAUTIONS
SAFETY PRECAUTIONS

The warning sign showing a lightning bolt in a triangle indicates that this product contains "dangerous electrical voltages".
CAUTION
RISK OF ELECTRIC SHOCK DO NOT OPEN
CAUTION: TO AVOID THE RISK OF ELECTROCUTION, DO NOT REMOVE THE COVER (OR THE BACK OF THE DEVICE).
NO PARTS ARE REPLACEABLE BY THE USER. PLEASE CONTACT QUALIFIED PERSONNEL IN CASE OF FAILURE.

The warning sign showing an exclamation point in a triangle indicates that this point of the manual requires special attention.

CAUTION: - TO REDUCE THE RISK OF FIRE, ELECTRIC SHOCK OR SERIOUS INJURY:
Read these safety instructions before using your device and store them for possible future reference.
- This device must only be connected to a mains network whose characteristics are identical to those shown on the device identification plate.
- The mains plug must always be easily accessible. It serves as a mains disconnecting switch of the device.
- To disconnect the device from the mains, the plug must be disconnected. Hold the mains cable by its plug. Do not pull on the mains cable to disconnect the plug.
- The mains cables must be routed so that they are not trampled upon or pinched by objects placed on or against them.
- If the mains cable of the device is damaged, it must be replaced by the manufacturer, its after-sales service or a similarly qualified person to avoid any danger.
- The device must not be exposed to dripping or splashing water, moisture or liquids.
- Do not place the device near water, for example in a bathroom or near a sink.
- No objects filled with liquids such as vases should be placed on or above the device.
- Never touch the mains cable with wet hands, this could cause a short circuit or electric shock.
-
To avoid the risk of fire, do not place sources of open flames, such as lighted candles, or heat sources such as radiators, on or near the device.
-
The device is intended for use only in a temperate climate.
- If smoke, an unusual odour or strange noise is emitted by the device: unplug the mains cable from the electrical outlet and consult the after-sales service or repair center. Never attempt to make repairs yourself, this could be potentially dangerous.
- Do not attempt to open or disassemble the device. This would expose you to dangerous voltages.
- The slots and openings of the device are intended for ventilation and to ensure its operation. To prevent overheating, these openings must not be obstructed or covered in any way, such as by newspapers, tablecloths or curtains.
- Always leave a minimum distance of 10cm around the device for sufficient ventilation.
- Never push any object into the device through one of its openings, as it may come into contact with electrical components, which can cause an electric shock or fire.
- In case of thunderstorm or lightning, immediately unplug the mains cable from the wall outlet.
- Always turn off the device when not in use. Unplug the mains cable from the electrical outlet when the device will not be used for a long period of time.
- Unplug the device from the electrical outlet before cleaning. Do not use liquid or aerosol cleaners. Use a dry, soft cloth for cleaning.
- If the product does not bear the logo, it is a Class I device. It must then be connected to a mains socket with a protective earth connection.
- If it is a class I appliance, the user's protection is grounded. The appliance must be connected to a power supply base with a connection to the protective earth.

CAUTION --: TO AVOID RISK OF INJURY OR DAMAGE TO THE PRODUCT OR OTHER EQUIPMENT:

CAUTION: TO AVOID EYE HAZARDS:
- It is best to have soft indirect lighting to watch TV. Avoid completely dark environments and any reflection on the screen, as these can cause eyestrain.

USE AND HANDLING OF BATTERIES:
- CAUTION: danger of explosion if the batteries are not inserted correctly or if they are replaced by a non-similar or incompatible model.
- Replace the batteries only with batteries of the same type or equivalent type.
- Batteries must not be exposed to excessive heat such as that from the sun, fire or similar origin.
- Never throw batteries into fire and never expose them to heat sources.
- Do not mix different types of batteries, or new and used batteries.
- The batteries must be inserted according to the polarities indicated on the battery and in the battery case of the remote control.
- Used batteries must be removed from the remote control.
- The batteries must be disposed of safely at the assigned specific collection points to preserve the environment. Follow the disposal instructions indicated on the batteries and at the collection points.
- Keep batteries out of the reach of children and animals. Only adults are capable of handling the batteries.
- This device bears the logo, it is a class II electrical device in which the protection against electric shock is not based solely on main insulation but on double insulation. It does not have protective grounding.
For installation, handling, cleaning and disposal of the device, refer to the following chapters of the user manual.
Table of Contents
Specifications and Accessories 5
Stand instructions (optional) 7
General Description 8
Overview of front panel. 8
Overview of back panel. 9
Overview of Remote Control 10
TV Operation 11
Reference 19
Specifications and Accessories
| Reference | ED43EA07UHD-MM |
| Model | 988237 |
| Display | TV QLED UHD 43" |
| Resolution | 3840x2160 pixels |
| Colour display | 1.07G |
| Contrast | 5000:1 |
| Ratio | 16:9 |
| Tuner | UHD DTV (receives digital channels,satellite,TV guide,teletext display,multi-language display) DVB-T/C/T2/S/S2 |
| TV power supply | AC 100-240V 50/60Hz |
| Consumption | 108W |
| Dimensions | 955 mm (L) × 205 mm (D) × 596 mm (H) |
| Weight | 6.7kg |
| Base | Removable, in 2 parts |
| Operating temperature | 0°C to 40°C |
| Remote control power supply | (2xLR03/AAA 1.5V batteries, not supplied) |
| USB ports with voltage and current | 5V---0.5A |
| Speaker | Built-in 2x8W |
| Inputs | Antenas(T2 and S2), HDMI, AV/Audio in, USB, CI+, RJ45 |
| Outputs | Optical, Headphone |
| Functions via USB | PVR(digital video recorder) |
| Multimedia playback formats via USB | Video:MPG,AVI,TS,MOV,MKV,DAT,MP4,VOB |
| Music: MP3 |
| Photos:JPF,JPEG,BMP,PNG |
| Frequency band | 2.400Ghz~2.497GHz(2.4GHz ISM Band)4.900GHz~5.845GHz(5.0GHz ISM Band) |
| Maximum radio-frequency power | ≥13dbm |
Product features, specifications and appearance are subject to change without notice.
ACCESSIONS:
Stand 2 pieces
Remote control 1 piece
User Guide 1 piece
The pictures provided in this manual are for illustrative purposes only, refer to the actual product for confirmation.
| PRODUCT DATA SHEET RELATING TO ENERGY |
| Brand | edenwood |
| Reference | 988237-ED43EA07UHD-MM |
| Energy efficiency grade | F |
| Visible screen diagonal | 109cm;43 inches |
| Energy consumption (kWh per year), based on the power consumption of a TV operating four hours a day for three hundred and sixty-five days.
The actual consumption depends on the conditions of use of the TV. | 50 kWh/1000h |
| Electrical consumption in sleep mode (W) | <0.5W |
| Electrical consumption in off mode (W) | - |
| Screen resolution (pixels) | 3840x2160 |


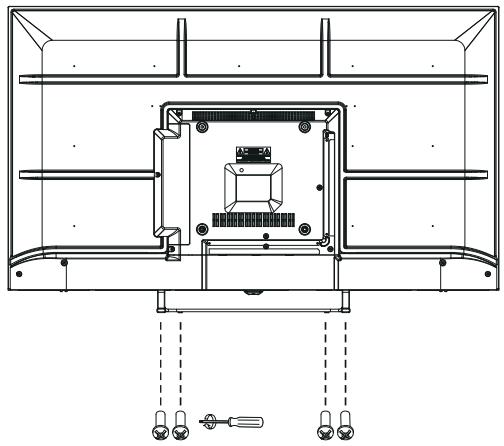
Stand instructions (optional)
How to assemble the stand
If you need to remove or assemble the stand please read the following instructions.
- Before attaching/detaching the stand, make sure to turn off the TV.
- Before performing work, spread cushioning over the base area to lay the LED TV an. This will prevent it from being damaged.
Assembling instruction:
Put the television on the table, fix the stands with four screws given in the carton.
Step1: Fasten the base assembly with 4 screws given in the carton.
Step2: Insert the assembled base into the hole, take out 4 screws provided with TV set and tighten them into screw holes.
- To disconnect the stand from the TV, perform the above steps in reverse order.
Note:
The product and illustrations in this user's manual is only for explanation purposes and may vary depending on model.
General Description
Overview of front panel
The buttons on the lower-right panel control your TV's basic features, including the on-screen menu. To use the more advanced features, you must use the remote control.
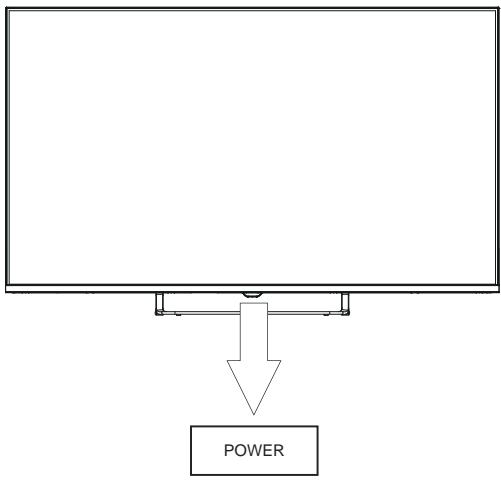
POWER (O): Turns the TV on and off.
Note: The product and illustrations in this user's manual is only for explanation purposes and may vary depending on model.
General Description
Overview of back panel
You can connect the TV with video devices such as DVD/VCD player, VCR and video camera to enjoy the high quality picture.
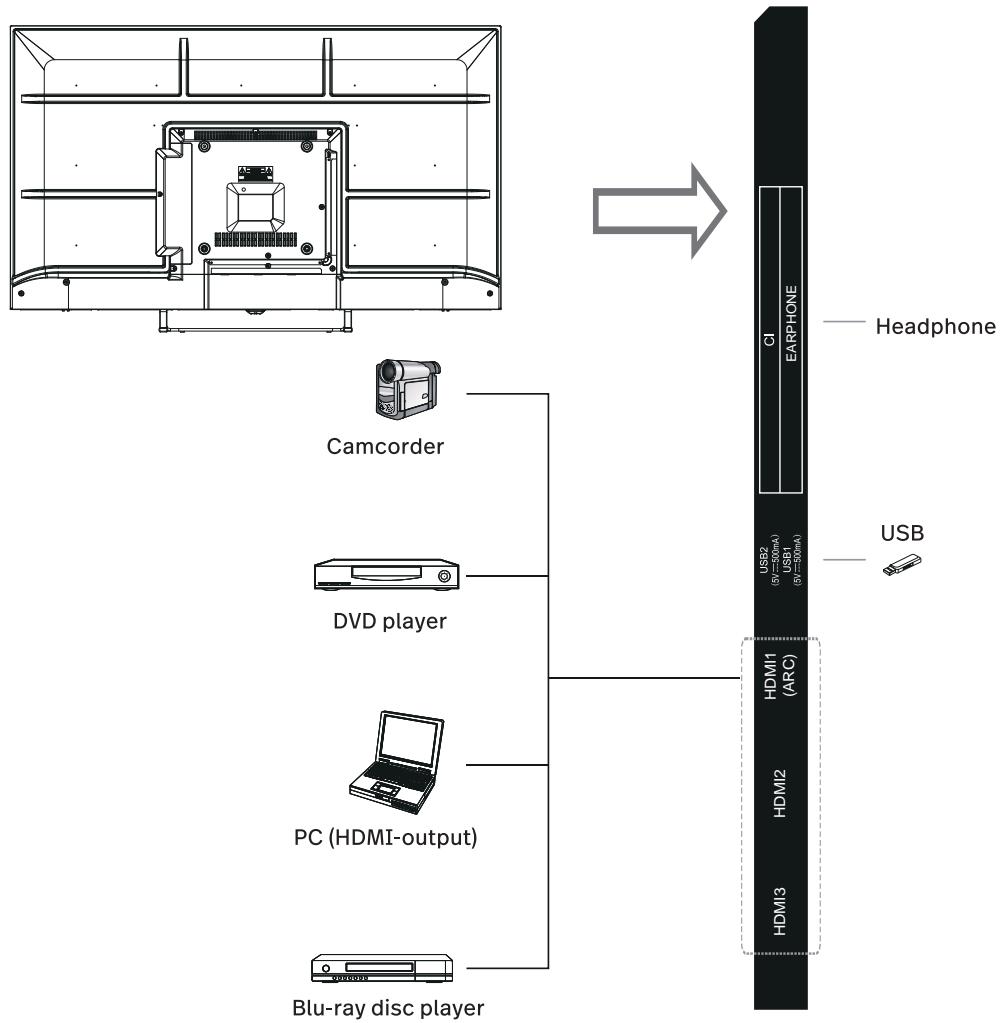

Note:
The product and illustrations in this user's manual is only for explanation purposes and may vary depending on model.
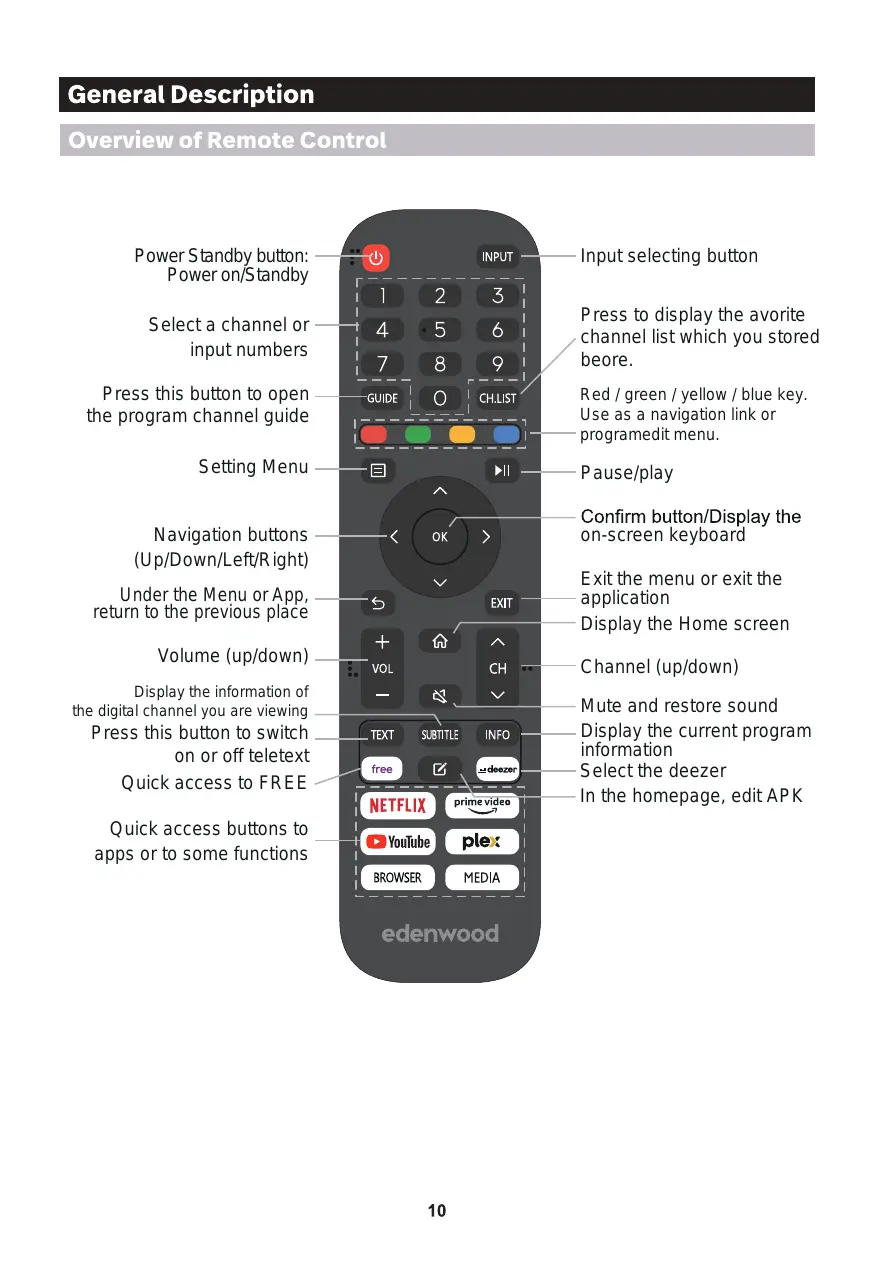
General Description
Overview of Remote Control

Channel Scan

Settings > Channel
Select if you receive TV channels over the air(antenna) or through a cable set top box.
Automatic Scan
Automatically scan for channels to view programming from your TV source.
Manually scan for DTV channels to view programming from your TV source.
Manually scan for ATV channels to view programming from your TV source.
Fine tuning current channel to improve the programme picture.
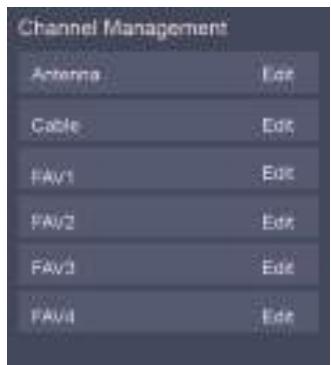
Channel Edit

Settings > Channel > Channel Edit
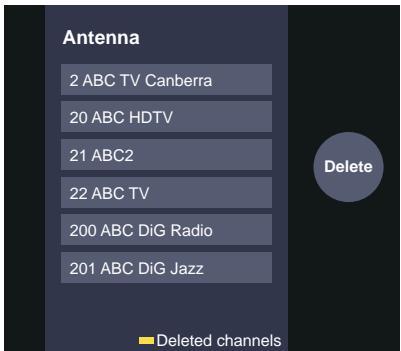
Manually edit the channel list to your preference.
Press OK button on the selected channel then a checkbox will appear. You can select more channels at the same time to delete them.
Delete: Press button to delete the selected channel.
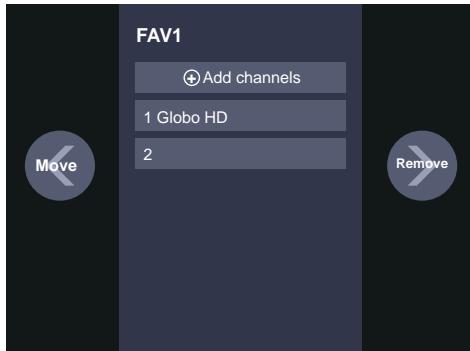
- Edit the favorite channels
You can add favorite channels or move/remove favorite channels.
Channel List
- Display the channel list
In Live TV, press OK button on the remote control to display the channel list menu.
- Introduction of the sub-menu
Favorite
Viewing your 'Favorites' list
Press OK button to call out the Channel list, the channel list appears on the right side of the screen, press button and press button, a heart-shaped icon will appear next to your favorite channel.
Settings > Channel > Channel Edit >
FAV1-FAV4
The Edit Favourites screen appears.
EPG
The EPG(Guide) provides convenience to check TV programs that will be available in the next 7 days. It also provides a simple way to record your favorite programs and a reminder function which can switch channel automatically at scheduled time so that you will not miss programs of interest.
NOTE: The EPG(Guide) function is only available in DTV.
- Press button on the remote control to display channel information on program guide list.
PVR/Reminder
Press / button to select the channels. Press / button to select program based on the time schedule.
Press OK button on the remote control to select PVR or Reminder.
NOTE: The TV will record the program even in standby mode.
- The PVR function is only applicable in some models/countries.
Schedule
Press button and press button to view a list of scheduled reminders and recordings.
24h-
Press button and press v button to select the yesterday programmes.
Press button and press button to select the next day programmes.
PVR
The PVR function allows you to record digital television content for later viewing. The function is only available in DTV source. To use PVR, you must connect a USB storage device for recording (space should be not less than 2GB, transfer rate should be not less than 5MB/s in NTFS or FAT32 format).
If you press the power button during recording, TV will go into standby mode but the recording process is still going on. If you press power button again and wake up the TV, recording process will not be affected. After recording, the recorded file will be automatically saved to the disk.
NOTE
- Some programs may be restricted to record by the content provider.
- When recording is in progress, channels locked with Channel Lock(keyword needed) are disabled to watch.
Recording List
Check the list of recorded programs and scheduled recordings.

Recording List
Watch or delete recorded programs

Recording List > Recorded
- Delete the recorded program
Select Edit and then select recorded program in recording list, press button to remove the recorded program.
Select recorded program in recording list, press OK button to watch the recorded program.

Change or Cancel scheduled recording

Recording List > Scheduled
- Delete the scheduled program
Select Edit and then select scheduled program in schedule list, press × button to remove the scheduled program.
Select scheduled program in schedule list, press OK button to revise the scheduled program.

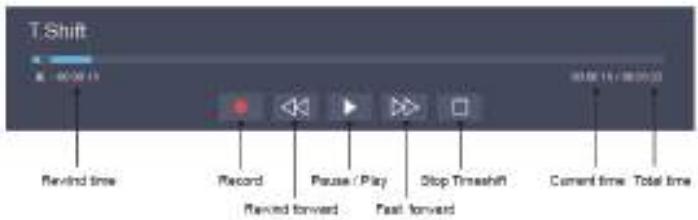
Timeshift
This option allows you to pause and rewind live DTV programs. Please make sure your storage device with min. 1GB free space is connected to activate this function.
Press button on the remote control to select T.Shift and then the menu will appear, press to pause the live broadcast and press to play. Press to watch reverse and press to watch advance playback rapidly. Press to exit the function and watch the current broadcast.
Press to record current broadcast.
Ethernet
Connecting to the Internet

Settings > Network > Network Configuration
You set the TV network by selecting Configuration and press the OK button to enter the menu.
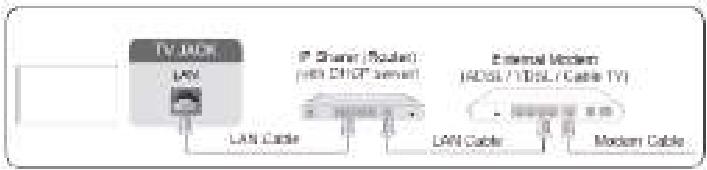
The TV will obtain an IP address and connect to the network automatically. You can also enter the IP Address, Netmask, Gateway, DNS Server 1 and DNS Server 2 in the menu manually.
NOTE
- The default option of IP Setting Mode is DHCP.
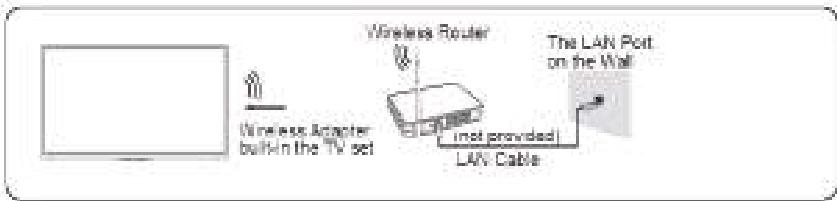
Wireless
Connecting to the Internet
NOTE
- Make sure that you have the wireless router's SSID and password before attempting to connect.
Connecting to a Wireless Network
Settings > Network > Network Configuration
You set the TV network by selecting Configuration and press the OK button to enter the submenu.
Using HDMI & CEC
You can use your TV remote to control the external devices that are connected to the TV by HDMI cable. The external devices need to support HDMI & CEC Function (HDMI-CEC). The HDMI CEC feature are supported One Touch Play, Routing Control, System Standby, Device OSD Name Transfer, Remote Control Pass Through, Give Device Power Status, System Audio Control.
Connecting an external device through HDMI-CEC Function
Settings > System > CEC Function
- Set CEC Function to On.
- Connect an HDMI-CEC-compliant device to the TV.
- Turn on the connected external device. The device is automatically connected to the TV. After connection is finished, you can access the menu of the connected device on your TV screen using your TV remote and control the device.
Connecting with an HDMI(ARC) cable
Connect an HDMI cable from an external digital audio system.
ARC enables the TV to output the digital sound through an HDMI cable directly. Please note that it works only when the TV is connected to the audio receiver that supports the ARC (Audio Return Channel) function.

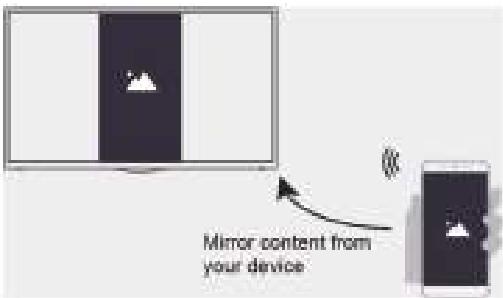
Screen sharing
Mirror content from your device to the TV.
Source > Screen Sharing
- Turn on the casting function of your Android/Windows10 device.
- Find the TV name in the searching list of your device and select it.
Wait for the connection progress to complete and the content on your device will be displayed on the TV.
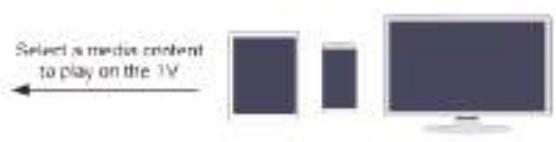
Content sharing
Share media content, like videos, music or photos, from your Android/iOS/PC device to the TV screen.
Before you use this function, turn on Content Sharing at > Settings > System > Application
Settings > Content Sharing.
Viewing media content of your device
Press SOURCE button on your remote, and select Content Sharing on the screen.
NOTE
- Make sure your device and the TV are connected to the same network.
- If your device doesn't support content sharing, you may download an app that supports the function.
Playing Media contents

My Apps > Media
Select the content you want to play on the screen, like pictures, videos and music.
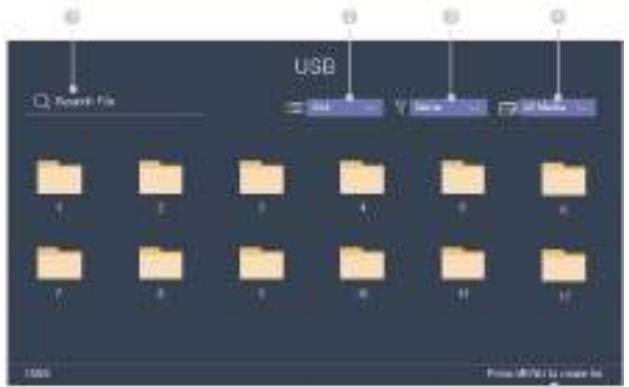
① Input the content name you want to play.
② Arrange the content list by Grid, List.
③ Arrange the content list by Name, Date Modified, Size.
④ Filter the content list by All Media, Photo, Video, Music, Recorded.
⑤ Create a photo, music, or video playlist.
Playing background music during viewing pictures You need to:
- Choose a picture to playback.
- Press / button to call out playbar.
- Select Background Music and choose your music to create a Music Playlist.
- Play the background music during viewing pictures.
NOTE: The TV supports the following file formats:
| Medium | File Format |
| Video | .AVI, .WMV, .MP4, .MOV, .3GP, .MKV, .MPG, .MPEG, .VOB, .FLV, .OGM |
| Picture | .jpeg, .bmp, .PNG, .GIF |
| Music | .mp3, .aac, .wma, .wav |
Adjusting the picture quality
Adjust current picture mode to apply to all sources or just current source.
Choosing a picture mode
Picture Mode / > Settings > Picture > Picture Mode
You can select the Picture Mode that provides the best viewing experience.
Changing the picture size
Settings > Picture > Aspect Ratio
You can change the size of the picture displayed on the TV screen.
Configuring advanced picture settings
Settings > Picture > Picture Mode Setting
Adjust display setting for each Picture Mode.
Adjusting the sound quality
Adjust current sound mode to apply to all sources or just current source.
Choosing a sound mode
Sound Mode / >Settings > Sound > Sound Mode
You can select a favourite sound mode suitable for the content type or the listening environment.
Configuring advanced sound settings
Settings > Sound > Sound Mode Settings
You can change the size of the picture displayed on the TV screen.
Setting Time
Settings > System > Time
Set the current time based on your location.
Time Zone
Select your time zone.
Daylight Savings
Select whether to apply Daylight Savings Time to the TV.
Set the Date and Time. You can set the date and time to automatically sync with Internet/ broadcast or manual setup by yourself.
Time Format
Set the time to display in a 12 or 24-hour format.
Using the timer
Settings > System > Timer Settings
Adjust the timer settings to suit your preference.
Power On Timer
Set the clock for the time you want the TV to turn on automatically. You can set the time only once or set the time in specified date by weekly.
Power Off Timer
Set the clock for the time you want the TV to turn off automatically. You can set the time only once or set the time in specified date weekly.
Set the sleep timer to automatically turn the TV Off within a specified time: Off, 10 Minutes, 20 Minutes, 30 Minutes, 40 Minutes, 50 Minutes, 60 Minutes, 90 Minutes and 120 Minutes.
Set the sleep time that you want: Off, 3H, 4H.
Set the amount of time that you would like for the menu to display: 10s, 20s, 30s, 60s, Off.
Notification
Settings > System > Advanced Settings > Notifications
Allow pop-up notifications to appear for useful information and events that occur with your TV, including: Advertising, New Arrivals,Warnings And Legal Statements and System message. You can enable / disable each of these notifications.
Notifications
You can view the list of event messages generated by the TV.
Upgrade
Settings > Support > System Upgrade
Set your TV to receive the latest firmware.
Set your TV to automatically receive the latest firmware.
Check if your TV needs Firmware upgrade.
NOTE: Please ensure your TV is connected to the Internet.
App auto upgrade will be done in the background. May need your confirmation on new Privacy Notices to complete upgrade in the progress.
Picture problem
When the TV has problem with picture, these steps may help to solve the problem.
Settings > Support > Self Diagnosis > Picture Test
Before you review the list of problems and solutions below, use Picture Test to determine if the problem is caused by the TV. Picture Test displays a high definition picture that you can examine for flaws or faults.
| The Problem | Possible Solutions |
| No picture, or black and white picture. | • Unplug TV from AC outlet and re-plug after 60 seconds.
• Check that the Color is set to 50 or higher.
• Try different TV channels. |
| The picture is distorted. | • The compression of video content may cause picture distortions, especially in fast moving pictures from sports programmes and action movies.
• If the signal reception is weak or poor, screen distortion may be visible but it is not a malfunction.
• Mobile phones used close to the TV (within 1 m) may cause noise on analogue and digital channels. |
NOTE
- If the test picture does not appear or there is noise or distortion, the TV may have a problem. Contact the service company in your country.
- If the test picture is displayed properly, there may be a problem with an external device. Please check the connections.
- If the problem persists, check the signal strength or refer to the external device's user manual.
Sound problem
When the TV has problem with sound, these steps may help to solve the problem.
Sound Test
Settings > Support > Self Diagnosis > Sound Test
If the TV plays the Sound Test melody without distortion, there may be a problem with an external device or the broadcast signal's strength.
| The Problem | Possible Solutions |
| There is no sound or the sound is too low at maximum volume. | Check the volume control of the device (cable or satellite box, DVD, Blu-ray, etc.) connected to your TV. |
| Picture is normal, but no sound. | • Check the volume settings.
• Check if 'Mute' mode is set to on. |
| The speakers are making an odd sound. | • Make sure that the audio cable is connected to the correct audio output connector on the external device.
• For antenna or cable connections, check the signal information.
• A low signal level may cause sound distortions. |
NOTE
- This product does not support decoding of DTS CD bitstreams. Playback of this format may produce undesirable noise.
Other picture and sound problem
When the TV has problem with sound, these steps may help to solve the problem.
| The Problem | Possible Solution |
| No sound and picture. | • Check if the power cord is plugged into a powered AC outlet.
• Press the ⑥ button in the remote control to activate the unit
from standby.
• Check to see if the LED light is on or not. If it is, then the TV is
receoming power. |
| I have connected an internal source
to my TV but I get no picture and/or sound. | • Check the correct connection on the external source and the input
connection on the TV.
• Make sure you have made the correct selection for the input mode
for the incoming signal. |
| Sound and picture distorted or
appear tiny. | • Some electrical appliances may affect TV ac. If you turn off the
applicance and the interference gets away, then record it further away
from TV.
• Insert the power plug of the TV ac into another power outlet. |
| Sound and picture is busy or cuts
out momentarily. | • If you use an external antenna, check the direction, position and
connection of the antenna.
• Adjust the direction of your antenna or reset or fine tune the
channel. |
Internet problem
When the TV has difficulties connecting to the Internet, these steps may help resolve the problem.
Network Test
Settings > Support > Self Diagnosis > Network Test
If the TV network is connected, the screen will display Connected successfully.
| The Problem | Possible Solutions |
| The TV cannot connect to your network or apps. | Make sure the TV has a network connection.
• Run Network Test ( ⑤ > Settings > Support > Self Diagnosis >
Network Test ) .
• Contact your Internet service provider. |
| The wireless network connection failed. | Make sure your wireless modem/router is on and connected to the Internet. |
| The wireless network signal is too weak. | Position your wireless router, modem router, or access point in a central location. Avoid putting it in a corner. |
My life won't play
When files aren't playing, this may help resolve the problem.
| The Problem | Possible Solutions |
| Some files can't be played. | This problem may occur with high-bitrate files. Most files can be played back, but you might experience problems with high-bitrate files. |
Troubleshooting
If you have any problem, check the couter measures for each symptom listed below. The following symptoms may have been caused by inappropriate adjustment rather than actual malfunction of the unit. If the trouble persists, contact the Customer Care Centre, see back page for contact details.
| Symptoms | Possible solutions |
| No power | Please check the power cord plugged in and that the power outlet works.
Unplug the power cord and plug it in after 60 seconds and restart the TV. |
| No picture | Please check antenna connection.
Station may be experiencing problems, please tune to another station.
Please adjust the settings of contrast and brightness. |
| Good picture but no sound | Please increase the volume.
Please check TV is under mute mode, press MUTE button on the remote control.
Please check sound settings
If external devices are being used, check their volumes are not set too low or turned off.
If using AVI or Component inputs, please make sure cables are connected properly and not loose.
If using DVI to HDMI cable, a separate audio cable is required. Make sure a headphone jack is not connected. |
| Good sound but abnormal color or no picture | Please check antenna connection and antenna condition. If using Component input, please check Component connections, incorrect or loose connections may cause colour problems or cause the screen to be blank. |
| No response to remote control | Batteries of remote control may have exhausted, if necessary, please change the batteries.
Clean the remote control lens. The distance between LED TV and remote control should be within 8m, within recommended operating angle and path is free of obstructions. |
| Colored dots may be present on the screen | Although the LED screen is made with high-precision technology and 99.99% or more of the pixels are effective, black dots may appear or bright points of light (red, blue, or green) may appear constantly on the LED screen. This is a structural property of the LED screen and not a malfunction. |
| Picture is breaking up | Keep the TV away from noisy electrical sources such as cars, hair dryers, welders, and all optional equipment.
Electrical atmospheric interference such as local or distant lightning storms may cause picture to break up.
When installing optional equipment, leave some space between the optional equipment and the TV.
Check the antenna and connection.
Keep the antenna away from any power or input/output cables. |
| After Auto Tuning only some channels are available | Check your area is covered by Digital Video Broadcasts. Try re-tuning or manually tuning missing channels.
Check that you are using the correct antenna type - please see pg. 16 'Antenna connection'. |
| Channel cannot be selected | Check if the channel has been blocked in the main menu settings. |
| USB not playing | Please check connecting USB cable and power supply is connected. Hard drive has not been formatted. Please make sure USB disk is compatible and the multimedia data formats are supported. |
| Picture is distorted, macroblock, small block, dots, pixelization, etc | Compression of video contents may cause distortion especially on fast moving pictures such as sports and action movies. |
| Noise from speaker | Check cable connections, make sure a video cable is not connected to an audio input. Low signal level may cause sound distortion. |
| TV turns off automatically | Check if the Off Timer or Sleep timer is turned on. |
| TV turns on automatically | Check if the On Timer is set to On in the Setup menu. |
| Picture is not shown in full screen | First check if it is caused by the input signal. Then try to adjust Zoom in Function menu. |
Picture defects and the reason

Snowy Picture
Snowy picture is usually due to weak signal. Adjust antenna or install an antenna amplifier.

Double Image or Ghosts
Double images are usually caused by reflections from tall buildings. Adjust the direction of the antenna or raise it.
Ghosting may also occur when still pictures are displayed continuously. It may disappear after a few moments.
Radio Wave Interference
Wave patterns are moving on the screen, which are usually caused by nearby radio transmitters or short-wave receiving equipment.

High Temperature Electrothermal Interference
Diagonal or herringbone patterns appear on the screen or part of picture is missing. This is probably caused by high temperature electrothermal equipment in a nearby hospital.
THE DISPOSAL OF ELECTRICAL AND ELECTRONIC EQUIPMENT WASTE PRODUCTS ON THE PART OF FINAL USERS IN THE EUROPEAN UNION
This symbol on the product or on the container indicates that this product cannot be eliminated with the general waste. The user is responsible for eliminating this kind of waste by throwing them away at a "recycling point" specifically for electrical and electronic waste. Selective collection and electrical equipment recycling contribute to preserve natural resources and warrant waste recycling to protect environment and health. In order to receive further information about electrical and electronic waste collecting and recycling, contact your Local Council, the service of household waste or the establishment where the product was acquired.

The CE marking indicates that the product meets the main requirements of the European Directives 2014/35/EU (Low Voltage), 2014/30/EU (Electromagnetic Compatibility), 2014/53/EU (Radio Equipment), 2011/65/EU (Restriction of the use of certain hazardous substances in electronic equipment).

To avoid possible hearing damage, do not listen at high audio volume for long periods of time.

part of the display do not exceed 0,01 % as defined in Directive 2011/65/EU.

This symbol indicate direct current (DC).
This symbol indicate alternative current (AC).
This symbol indicate "Indoor use only".
Muchasgracias!
Installatie-instructions:
- Firmware-upgrade controlleren
This product is guaranteed, for a period of 2 years from the date of purchase*, against any failure resulting from a defect in workmanship or material. This warranty does not cover any defects or damage resulting from improper use installation. incorrect use or abnormal wear of the product.
*on presentation of the receipt.
CONDITION DE GARANTIE
FR
Hereby, ELECTRO DEPOT declares that this device conforms to the essential requirements and EN other relevant provisions of Directive 2014/53 / EU. The declaration of conformity can be consulted on the site: http://www.electrodepot.fr/sav/ notices