USER MANUAL ED55A08UHD-VE EDENWOOD
Assembler le(s) support(s)
Configuration via the telephone portable
- LCN: Activer/désactiver le LCN (Logical Channel Number).
Covered by patents at patentlist.accessadvance.com
Licences
[Union européenne]
Thank you for choosing this EDENWOOD product. EDENWOOD products are chosen, tested, and recommended by ELECTRO DEPOT, so you can be sure you are getting a top-quality, easy-to-use product that won't let you down. We're confident your new device will be a pleasure to use every day!
Welcome to ELECTRO DEPOT.
Table of Contents
Safety Information 49
Introduction 51
Features 51
Ultra HD (UHD) 51
High Dynamic Range (HDR) / Hybrid Log-Gamma (HLG). 51
Dolby Vision. 51
Accessories Included 51
Stand Installation & Wall Mounting. 52
Antenna Connection 52
Turning On/Off the TV 54
TV Control Button & Operation 54
First-Time Use 56
Using the E-Manual 56
Home Screen. 56
Connecting to the Internet 57
Setup via Mobile Phone. 58
Prepare Live TV. 58
Using External Devices. 58
Using the TV Voice Service 59
Guidelines. 59
Enjoy Live TV 60
Channel Scan 60
Live Menu 61
Channel Edit 62
Programme Info 63
Programme Guide (EPG) 63
Programme Recording (PVR). 63
Reminder 64
Timeshift 65
HbbTV. 65
Learn about Live TV Support Settings. 65
Benefits of Smart TV 66
Using a VIDAA Account 66
Voice Service Setup. 66
Content Sharing. 68
Using Apps. 69
Using the Art App 69
Enjoy the Internet 69
Data Protection and Security. 70
Usage Mode Setup. 70
Using the Mobile App. 70
Connecting to External Devices 70
Accessories 70
Connecting a Set Top Box 71
Connecting a Blu-ray or DVD Player. 71
Sharing your Smart Phone/Computer Screen on the TV .71
Connecting USB Devices 72
Connecting Headphones 72
Connecting Audio Visual (AV) Devices 72
Connecting Speakers or Other Audio Receivers.72
Connecting a Digital Audio System with ARC/eARC 73
Connecting a PC. 73
Settings Overview. 73
Picture. 73
Sound 75
Network. 77
Support 79
Using Parental Controls. 80
Reset to Factory Default. 80
Entertainment 80
Game 80
Sports 81
Media. 81
Play Background Music while Viewing Pictures ..81
Photo Format 83
Video Format 83
Accessibility Features. 85
Accessibility Menu Setup. 85
Audio Type Setup 85
Dialogue Enhancement 85
Subtitle Setup 85
Accessible Guide 85
Screen Magnification 85
Troubleshooting 85
FAQ. 85
TV Status Diagnosis 86
Remote Control Service. 86
Licences 87
Licences 88

CAUTION
RISK OF ELECTRIC SHOCK DO NOT OPEN

CAUTION: TO REDUCE THE RISK OF ELECTRIC SHOCK DO NOT REMOVE COVER (OR BACK).
NO USER-SERVICEABLE PARTS INSIDE. REFER SERVICING TO QUALIFIED SERVICE PERSONNEL.
In extreme weather (storms, lightning) and long inactivity periods (going on holiday) disconnect the TV set from the mains.
The mains plug is used to disconnect the TV set from the mains and therefore it must remain readily operable. If the TV set is not disconnected electrically from the mains, the device will still draw power for all situations even if the TV is in standby mode or switched off.
Note: Follow the on screen instructions for operating the related features.
IMPORTANT - Please read these instructions fully before installing or operating
WARNING: This device is intended to be used by persons (including children) who are capable / experienced of operating such a device unsupervised, unless they have been given supervision or instruction concerning the use of the device by a person responsible for their safety.
- Use this TV set at an altitude of less than 5000 metres above the sea level, in dry locations and in regions with moderate or tropical climates.
- The TV set is intended for household and similar indoor use but may also be used in public places.
- For ventilation purposes, leave at least 5cm of free space around the TV.
- The ventilation should not be impeded by covering or blocking the ventilation openings with items, such as newspapers, table-cloths, curtains, etc.
- The power cord/plug should be easily accessible. Do not place the TV, furniture, etc. on the power cord. A damaged power cord/plug can cause fire or give you an electric shock. Handle the power cord by the plug, do not unplug the TV by pulling the power cord. Never touch the power cord/plug with wet hands as this could cause a short circuit or electric shock. Never make a knot in the power cord or tie it with other cords. When damaged it must be replaced, this should only be done by qualified personnel.
-
Do not expose the TV to dripping or splashing of liquids and do not place objects filled with liquids, such as vases, cups, etc. on or over the TV (e.g. on shelves above the TV).
-
Do not expose the TV to direct sunlight or do not place open flames such as lit candles on the top of or near the TV.
- Do not place any heat sources such as electric heaters, radiators, etc. near the TV set.
- Do not place the TV on the floor or inclined surfaces.
- To avoid danger of suffocation, keep plastic bags out of the reach of babies, children and domestic animals.
- Carefully attach the stand to the TV. If the stand is provided with screws, tighten the screws firmly to prevent the TV from tilting. Do not over-tighten the screws and mount the stand rubbers properly.
- Do not dispose of the batteries in fire or with hazardous or flammable materials.
WARNING
- Batteries must not be exposed to excessive heat such as sunshine, fire or the like.
- Excessive sound pressure from earphones or headphones can cause hearing loss.
ABOVE ALL - NEVER let anyone, especially children, push or hit the screen, push anything into holes, slots or any other openings in the TV.
| Caution | Serious injury or death risk |
| Risk of electric shock | Dangerous voltage risk |
| Maintenance | Important maintenance component |
Markings on the Product
The following symbols are used on the product as a marker for restrictions and precautions and safety instructions. Each explanation shall be considered where the product bears related marking only. Note such information for security reasons.

Class II Equipment: This appliance is designed in such a way that it does not require a safety connection to electrical earth.

Hazardous Live Terminal: The marked terminal(s) is/are hazardous live under normal operating conditions.

Caution, See Operating Instructions: The marked area(s) contain(s) user replaceable coin or button cell batteries.

Class 1 Laser Product: This product contains Class 1 laser source that is safe under reasonably foreseeable conditions of operation.
WARNING
- Do not ingest the battery, Chemical Burn Hazard.
- This product or the accessories supplied with the product may contain a coin/bottom cell battery. If the coin/bottom cell battery is swallowed, it can cause severe internal burns in just 2 hours and can lead to death.
- Keep new and used batteries away from children.
- If the battery compartment does not close securely, stop using the product and keep it away from children.
- If you think batteries might have been swallowed or placed inside any part of the body, seek immediate medical attention.
A television may fall, causing serious personal injury or death. Many injuries, particularly to children, can be avoided by taking simple precautions such as:
- ALWAYS use cabinets or stands or mounting methods recommended by the manufacturer of the television set.
- ALWAYS use furniture that can safely support the television set.
- ALWAYS ensure the television set is not overhanging the edge of the supporting furniture.
- ALWAYS educate children about the dangers of climbing on furniture to reach the television set or its controls.
- ALWAYS route cords and cables connected to your television so they cannot be tripped over, pulled or grabbed.
- NEVER place a television set in an unstable location.
- NEVER place the television set on tall furniture (for example, cupboards or bookcases) without anchoring both the furniture and the television set to a suitable support.
- NEVER place the television set on cloth or other materials that may be located between the television set and supporting furniture.
- NEVER place items that might tempt children to climb, such as toys and remote controls, on the top of the television or furniture on which the television is placed.
- The equipment is only suitable for mounting at heights ≤ 2m .
If the existing television set is going to be retained and relocated, the same considerations as above should be applied.
Apparatus connected to the protective earthing of the building installation through the MAINS connection or through other apparatus with a connection to protective
earthing - and to a television distribution system using coaxial cable, may in some circumstances create a fire hazard. Connection to a television distribution system has therefore to be provided through a device providing electrical isolation below a certain frequency range (galvanic isolator).
WALL MOUNTING WARNINGS
- Read the instructions before mounting your TV on the wall.
- The wall mount kit is optional. You can obtain from your local dealer, if not supplied with your TV.
- Do not install the TV on a ceiling or on an inclined wall.
- Use the specified wall mounting screws and other accessories.
- Tighten the wall mounting screws firmly to prevent the TV from falling. Do not over-tighten the screws.
Figures and illustrations in these operating instructions are provided for reference only and may differ from the actual product appearance. Product design and specifications may be changed without notice.
Introduction
Thank you for choosing our product. You'll soon be enjoying your new TV. Please read these instructions carefully. They contain important information which will help you get the best from your TV and ensure safe and correct installation and operation.
Features
- Remote controlled colour TV
- Fully integrated digital terrestrial/cable/satellite TV (DVB-T-T2/C/S-S2)
- Fransat Installation Option
- HDMI inputs to connect other devices with HDMI sockets
- USB input
- OSD menu system
- Stereo sound system
- Teletext
- Headphone connection
Automatic programming system
- Manual tuning
Automatic power down after up to eight hours.
- Sleep timer
Child lock
Automatic sound mute when no transmission.
- NTSC playback
AVL (Automatic Volume Limiting)
- PLL (Frequency Search)
Game Mode (Optional)
- Picture off function
Programme recording
Programme timeshifting
- Ethernet (LAN) for Internet connectivity and service
802.11 a/b/g/n built in WLAN Support
Audio Video Sharing
HbbTV
Ultra HD (UHD)
The TV supports Ultra HD (Ultra High Definition - also known as 4K) which provides resolution of 3840 × 2160 (4K:2K). It equals 4 times the resolution of Full HD TV by doubling the pixel count of the Full HD TV both horizontally and vertically. Ultra HD content is supported via native and market applications, HDMI, some of the Over-the-Top (OTT) services, USB inputs and over DVB-T2 and DVB-S2 broadcasts.
High Dynamic Range (HDR) / Hybrid Log-Gamma (HLG)
Using this feature the TV can reproduce greater dynamic range of luminosity by capturing and then combining several different exposures. HDR/HLG promises better picture quality thanks to brighter, more realistic highlights, more realistic colour and other improvements. It delivers the look that filmmakers intended to achieve, showing the hidden areas of dark shadows and sunlight with full clarity, colour and detail. HDR/HLG content is supported via native and market applications (except Netflix, Prime Video), HDMI, USB inputs and over DVB-S broadcasts. Set the HDMI Format option as Enhanced format from the Settings>System>HDMI & CEC menu in order to watch 4K HDR/HLG content (for 4K models), if the HDR/HLG content is received through an HDMI input. The source device should also be at least HDMI 2.0a compatible in this case.
Dolby Vision
Dolby VisionTM delivers a dramatic visual experience, astonishing brightness, exceptional contrast, and vivid colour, that brings entertainment to life. It achieves this stunning image quality by combining HDR and wide colour gamut imaging technologies. By increasing the brightness of the original signal and using a higher dynamic colour and contrast range, Dolby Vision presents amazing true-to-life images with stunning detail that other post-processing technologies in the TV aren't able to produce. Dolby Vision is supported via native and market applications, HDMI and USB inputs. Set the HDMI Format option in the Settings>System>HDMI & CEC menu as Enhanced format in order to watch Dolby Vision content, if the Dolby Vision content is received through an HDMI input. The source device should also be at least HDMI 2.0a compatible in this case. In the Settings>Picture>Picture Mode menu three predefined picture modes will be available if Dolby Vision content is detected: Dolby Vision Bright, Dolby Vision Dark and Dolby Vision Custom. All three allow the user to experience the content in the way the creator originally intended with different ambient lighting conditions.
Accessories Included
Remote Control
- Batteries: 2 x AAA
Power Cord
- Operating Instructions
Stand Installation & Wall Mounting
Assembling / Removing the stand(s)
Preparations
Take out the stand(s) and the TV from the packing case and put the TV onto a work table with the screen panel down on a clean and soft cloth (blanket, etc.).
- Use a flat and firm table bigger than the TV.
- Do not hold the screen panel part.
- Make sure not to scratch or break the TV.
Assembling the stand(s)
- Place the stand(s) on the stand mounting pattern(s) on the rear side of the TV.
- Insert the screws provided and tighten them gently until the stand(s) is(are) properly fitted.
Removing the stand(s) from the TV
Be sure to remove the stand(s) in the following way when using the wall mount bracket or repacking the TV.
- Put the TV onto a work table with the screen panel down on a clean and soft cloth. Leave the stand(s) protruding over the edge of the surface.
- Unscrew the screws that fix the stand(s).
- Remove the stand(s).
When using the wall mount bracket
Your TV is also prepared for a VESA-compliant wall mount bracket. If it is not supplied with your TV, contact your local dealer to purchase the recommended wall-hanging bracket.
Holes and measurements for wall mount bracket installation;
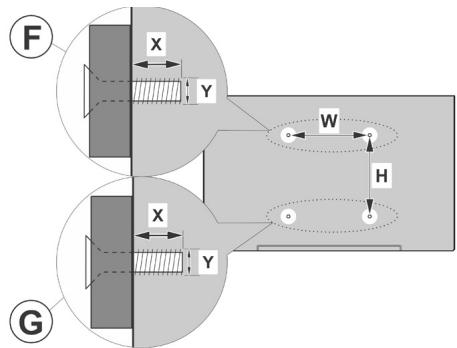
| A | VESA WALL MOUNT MEASUREMENTS |
| B | Hole Pattern Sizes (mm) | W | H |
| 200 | 200 |
| C | Screw Sizes |
| | | F | G |
| D | Length (X) | min. (mm) | 7 | 5 |
| max. (mm) | 10 | 6 |
| E | Thread (Y) | M6 |
Antenna Connection
Connect the aerial or cable TV plug to the aerial input (ANT) socket or satellite plug to the satellite input (LNB) socket located on the rear-left side of the TV.
Rear-left side of the TV

- Satellite
- Aerial or cable
Note:
- You may also connect devices that can receive broadcast signals such as a Set Top Box.

If you want to connect a device to the TV, make sure that both the TV and the device are turned off before making any connection. After the connection is done, you can turn on the units and use them.
Connections
| Connector | Type | Cables(not supplied) | Device |
| HDMI Connection | | |
| SPDIF | SPDIF (Optical Out) Connection | | |
| HEADPHONE | Headphone Connection | |
| USB Connection | | |
| CI Connection | | CAM module |
| LAN | Ethernet Connection | | LAN / Ethernet Cable |
When using the wall mounting kit (available from a third party in the market, if not supplied), we recommend that you plug in all cables before mounting the TV on the wall. Insert or remove the CI module only when the TV is SWITCHED OFF. You should refer to the module instruction manual for details of the settings. The/ Each USB input of your TV supports devices up to 500mA . Connecting devices that have current value above 500mA may damage your TV. When connecting equipment using a HDMI cable to your TV, to guarantee sufficient immunity against parasitic frequency radiation and trouble-free transmission of high definition signals, such as 4K content, you have to use a high speed shielded (high grade) HDMI cable with ferrites.

If you want to connect a device to the TV, make sure that both the TV and the device are turned off before making any connection. After the connection is done, you can turn on the units and use them.
Turning On/Off the TV
Connect power
IMPORTANT: The TV set is designed to operate on 220-240V AC, 50 Hz socket.
After unpacking, allow the TV set to reach the ambient room temperature before you connect the set to the mains.

Plug one end (the two-hole plug) of the supplied detachable power cord into the power cord inlet on the rear side of the TV as shown above. Then plug the other end of the power cord into the mains socket outlet. The TV will switch to standby mode.
Note:
- The position of the power cord inlet may differ depending on the model.
To switch on the TV from standby
If the TV is in standby mode the standby LED lights up. To switch on the TV from standby mode either:
- Press the Standby, Guide, Netflix, Prime Video or Freeview Play button on the remote control.
- Press the control button on the TV.
The TV will then switch on.
Note:
- The remote control buttons may vary depending on models/ countries/regions.
To switch the TV into standby
- Press the Standby button on the remote control.
- Press the control button on the TV, the function options menu will be displayed. The focus will be on the current input source option. Press the button consecutively until the Power Off option is highlighted. The TV will switch into standby mode.
To switch off the TV
To power down the TV completely, unplug the power cord from the mains socket.
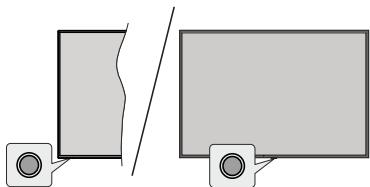
Note: The position of the control button may differ depending on the model.
Your TV has a single control button. This button allows you to control the Standby-On / Inputs / Channel Up-Down and Volume Up-Down and Power Off functions of the TV.
- Press the control button to display the function options menu.
- Then press the button consecutively to move the focus to the desired option if needed.
- To use the Volume Up-Down function, press and hold the button for about 2 seconds.
To turn the TV off: Press the control button to display the function options menu, the focus will be on the current input source option. Press the button consecutively until the Power Off option is highlighted.
To turn on the TV: Press the control button, the TV will turn on.
To change volume: Press the control button to display the function options menu and then press the button consecutively to move the focus to Vol+ or Vol- option. Press and hold the button to increase or decrease the volume.
To change channel: Press the control button to display the function options menu and then press the button consecutively to move the focus to CH+ or CH- option.
To change input source: Press the control button to display the function options menu, the focus will be on the current input source option. Scroll through the available input sources by pressing the button until the desired input source option is highlighted.
Note: Main menu OSD cannot be displayed via the control button.
Operation with the Remote Control
Press the Home button on your remote control to display main menu. Use the directional buttons and OK button to navigate and set. Press Back/Return, Exit or Home button to quit a menu screen.
Once you have connected external systems to your TV, you can switch to different input sources. Select the desired input from the All Inputs menu on the Home screen and press OK.
Changing Channels and Volume
You can change the channel and adjust the volume by using the Programme +/- and Volume +/- buttons on the remote.
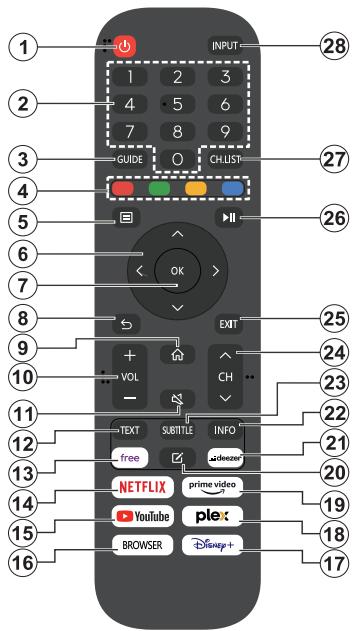
- Standby (^*) : Switches On / Off the TV
- Numeric buttons: Switches the channel, enters a number or a letter in the text box on the screen
- Guide: Displays the electronic programme guide
- Coloured Buttons: Follow the on-screen instructions for coloured button functions
- Menu: Displays TV menu
- Directional buttons: Helps navigate menus, content, etc. and displays the subpages in TXT mode when pressed Right or Left
- OK: Confirms user selections, holds the page (in TXT mode), views Channels menu (DTV mode)
- Back/Return: Returns to previous screen, previous menu, opens index page (in TXT mode). Quickly cycles between previous and current channels or sources
- Home: Opens the Home Screen
- Volume +/-: Increases/decreases the volume level
- Mute: Completely turns off the volume of the TV
- Text: Displays teletext (where available), press again to superimpose the teletext over a normal broadcast picture (mix)
- Free: Launches the Vidaa Free application
- Netflix: Launches the Netflix application
-
YouTube: Launches the YouTube application
-
Browser: Launches the Browser application
- Disney+: Launches the Disney+ application
- Plex: Launches the Plex application
- Prime Video: Launches the Amazon Prime Video application
- Edit (*)
- Deezer: Launches the Deezer application
- Info: Displays information about on-screen content, shows hidden information (reveal - in TXT mode)
- Subtitle: Opens the subtitle menu where you can turn subtitles on or off (where available)
- Channel +/-: Increases/decreases channel number
- Exit: Closes and exits from displayed menus or returns to previous screen
- PlayPad: Select the button you want to use on the PlayPad and press OK Use the media buttons to control the playback of the media. Control elements to play, pause, stop, rewind and fast forward the media will be available Select the record button and press OK to record a programme or select the pause button and press OK to start timeshift recording
- Channel List: Opens the channel list
- Input: Shows available broadcast and content sources
Press and hold the Edit button on the remote control. A menu will appear on the screen where you can change the behaviour of the button. You can select one of the input sources (e.g. HDMI, AV, etc.) or apps (any app that is available at Home>More Apps) shown on the screen.
If the function of the Edit button is changed, the selected app/feature will be launched when the button is pressed. If not, you will see a message stating how to assign a function to this button.
First-Time Use
Using the E-Manual
View the embedded E-Manual that contains information about your TV's key features.
Disclaimer: Instructions and images through this manual are only for reference and may differ from the actual product.
Launch the E-Manual
Press the Home button on your remote control and select Settings>Support>E-Manual.
Enter the Home screen of the E-Manual.
Press the Source button on your remote control and select TV, then press the Menu button on your remote control and select E-Manual.
Enter Enjoy Live TV chapter to learn more about how to set up Live TV features.
Press the Source button on your remote control and select Connection Guide.
Enter Connecting to External Devices chapter to learn more about how to connect external devices to your TV and how to set up.
Search
Search for the product feature information, the E-Manual will provide all the titles and content that contains the search information.
QR Code
Scan the QR Code with your Smart Phone to open the E-Manual on your device.
Select Try Now, and it will guide you to the corresponding TV menu for trying the function.
Home Screen
The Home screen is the centre of your TV. All TV functions can be accessed from the Home screen. Search, Input, Settings, Notifications, VIDAA Account, Voice, Guide, and Live TV icons will be available. You can scroll through them using the directional buttons.
Note:
- Indicators or icons may vary depending on models/countries/ regions.
Display the Home Screen
Press the Home button on your remote control to enter the Home screen.
To exit the Home screen, press the Source button on your remote control or use the navigation buttons to move the focus to the Input icon on the top of the screen, press the OK button to enter and select your desired input source.
Use the Navigation Bar
The navigation bar refers to indicators and icons on the top of the Home screen.
Note:
- Indicators or icons may vary depending on models/countries/ regions.

Search: Search the content you want.

Input: Select the input source depending on the device you have connected to your TV.

Settings: Manage TV configuration.

Notifications: Allow pop-up notifications to appear for useful information and events that occur with your TV, including: Advertising, New Arrivals,Warnings and Legal Statements, System Messages and Alexa Notification.
You can enable/disable each of these notifications within Settings in the notification centre.
You can view the list of event messages generated by the TV.
To delete all notifications, select Clear All.
Note:
- The Alexa Notification may not be applicable in some models/countries/regions.
- When you sign into your VIDAA account, please find Notifications in VIDAA Account on the Home screen.

VIDAA Account: A VIDAA account provides all the best features of your Smart TV and ensures that all services are kept up to date.
For more information about VIDAA account, please refer to Benefits of Smart TV>Using a VIDAA Account in this manual.

Voice: Provides quick access to Voice Service. For more information, please refer to Benefits of Smart TV>Voice Service Setup in this manual.

Guide: Provides quick access to Guide. For more information, please refer to Enjoy Live TV>Programme Guide (EPG) in this manual.

Live TV: Provides quick access to Live TV. For more information, please refer to First-Time Use>Prepare Live TV in this manual.
12:00 PM
Time: On the upper right of the screen, you can always view the current time.

Network: If your TV is connected to the Internet via a wireless connection or an Ethernet cable, the corresponding icon will appear.

Voice Service Indicator: Indicates voice service activity.
Use the shortcuts
You can add inputs, channels and websites to the Home screen to have quick access to them for your convenience.
- Press the Source button.
- Move the focus to an input you want to add to the Home screen and press Menu>Add to home>OK.
The input icon will appear in shortcuts on the Home screen.
Note:
- Some options from the input source page cannot be added to the Home screen.
- To remove the input from shortcuts, move the focus to the shortcut, then press and hold the OK button on your remote control.
Add and remove channels
Note:
- To remove the channel from shortcuts, move the focus to the shortcut, then press and hold the OK button on your remote control.
Add and remove webpages
- In Browser, visit a website you would like to add on the Home screen.
- Use the D-pad to move the focus to the Add to home icon in the top of the Browser navigation bar and select Add to home.
- Select Add and this webpage will appear in the shortcuts on the Home screen.
Note:
- To remove webpages from shortcuts, move the focus onto the shortcut page, then press and hold the OK button on your remote control.
Connecting to the Internet
You can access the Internet via your TV, by connecting it to a broadband system. It is necessary to configure the network settings in order to enjoy a variety of streaming content and internet applications. These settings can be configured from the Settings>Network menu.
Connect to a Wired (Ethernet) Network
To get access to the Internet using a wired connection, it is recommended to use a modem or router that supports Dynamic Host Configuration Protocol (DHCP). Modems and routers that support DHCP automatically provide the IP address, netmask, gateway, DNS Server 1 and DNS Server 2, so you do not have to enter them manually. Most home networks already have DHCP.
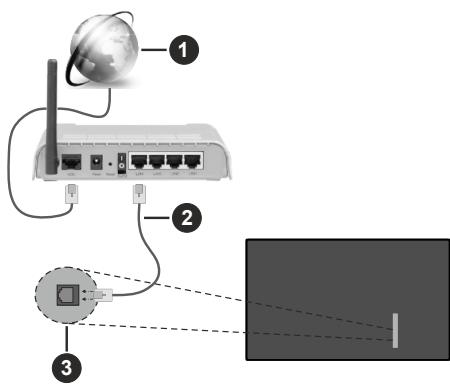
- Broadband ISP connection
- LAN (Ethernet) cable
After connecting to a wired (Ethernet) network, press the Home button on your remote control, and select Settings>Network>Network Configuration.
Set the TV network by selecting Network Configuration and press the OK button to enter the submenu.
- Connection Type
Choose a wired (Ethernet) network connection to access the Internet.
- Ethernet
Display network status.
IP Settings
Configure the IP setting for your network connection.
Connect to a Wireless Network
To connect to an available wireless network, make sure that you turn on your wireless router and have the wireless router'sSSID and password before attempting to connect.
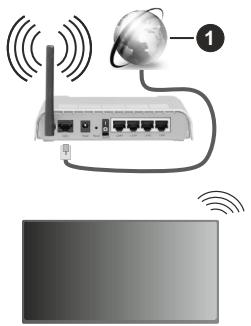
1. Broadband ISP connection
To get access to the Internet using a wireless connection, press the Home button on your remote control, and select Settings>Network>Network Configuration.
Set the TV network by selecting Network Configuration and press the OK button to enter the submenu.
- Connection Type
Choose a wireless network connection to access the Internet.
- Refresh
Refresh wireless network.
Advanced Settings
Configure the advanced wireless network settings for the TV.
Add
You can add a wireless network.
Note:
- If no wireless router is found, select Add and enter the network name in the SSID.
- If no wireless router is found, select Refresh.
Setup via Mobile Phone
When you turn on the TV for the first time, the TV will support setup via your smart device by scanning the QR code.
If you scan the QR code to allow setup via the mobile app, setup of the TV will be more efficient.
Before performing setup with the mobile app, please make sure your mobile device has Bluetooth activated and is connected to the same network as your TV.
Note:
- The setup above is for referencing purpose and may differ depending on models/countries/regions.
Prepare Live TV
Start auto scan or manual scan
- Press the Source button on your remote control and select TV.
- Press the Menu button on your remote control and select Settings>Channel>Auto Scan/Advanced Settings>Manual Scan.
Using External Devices
Access to connected external devices including wireless connected devices.
Switch between external devices connected to the TV
- Press the Source button on your remote control or press the Home button and move the focus to the Input icon on the top of the Home screen, press the OK button to enter.
- Select your desired input source.
Method 1:
- Press the Source button on your remote control or press the Home button and move the focus to the Input icon on the top of the Home screen, press the OK button to enter.
- Move the focus to an input source and press the Menu button on your remote control.
- Select Rename.
Method 2 (for some models):
Press the Home button on your remote control, and select Settings>System>Advanced Settings>Input Labels to edit the name of input sources.
Note:
- Some input sources cannot be renamed.
Using the TV Voice Service
Select Voice Service on the TV
To access the Voice Service and select a voice assistant:
- press the Home button on your remote and select the Voice icon in the navigation bar;
- or press the Microphone button on your remote control;
- or press the Home button and select the Settings icon, and select System>Voice Service.
Use the remote microphone
You can enjoy interacting with voice assistant using your voice by just pressing and holding the Microphone button on your remote control.
Note:
- The Microphone button may not be available on some remote control models.
- Voice Service feature may not be applicable in some models/ countries/regions.
- To use this function, End User Licence Agreement and corresponding Smart feature privacy policy/terms and conditions may be required to be agreed to.
Guidelines
Note:
Guidelines content is only applicable in Germany.
- The actual design of remote control could differ.
How are TV channels sorted and why?
Channel sorting
The availability of individual channel may depend on the selected reception path, such as satellite (DVB-S/ S2), cable (DVB-C) or antenna (DVB-T2) and the signal strength.
Standard or an operator (Astra 19.2^ , Vodafone (NRW, Hessen, BW or Pyur) can be selected for automatic channel search.
To sort channels when selecting an Operator:
When an operator is selected, the channels are sorted based on the operator's criteria.
Channel sorting when selecting Standard:
After a successful channel search, the channels are sorted by genre. These include full programmes, children, sports, documentaries, or regional and local programmes.
Broadcasters with less coverage and, if available, international channels are listed in alphabetical order after the pre-sorted list.
If LCN (Logical Channel Number, only possible with cable reception) is activated during the channel search,
the sorting takes place according to the criteria of the local cable network operator.
Search by Channel name
The search within Live TV can be opened with the Down directional button. Here you can search for individual channels by name.
Radio Transmitter
Radio channels are listed in alphabetical order after the list of TV channels.
To make finding radio channels easier, the filter function of the channel list is recommended (please refer to Display Channel List in this manual).
On the basis of bilateral contracts with the respective broadcasters, individual channels are placed in a position defined by the broadcaster in the channel list.
Sort Manually
The channel list can be manually sorted at any time. More information can be found in Edit Channel List and Edit Favourite Channel List in this manual.
How are apps sorted and why?
The applications on the VIDAA platform are positioned according to the criteria below.
In the Application Docker on the Home Launcher:
To ensure equal representation of apps and provide fair treatment of newly launched content partners, the applications are ordered based on the (i) global number of users, (ii) number of users in Germany, (iii) number of subscribers in Germany, (iv) share of local language content, (v) variety of content, and (vi) novelty of the platform. At all times the Application launcher must include:
- the 2 leading global SVOD platforms
- the 2 leading global TVOD platforms
- the 2 leading global AVOD platforms
- the leading local sports platform
- at least 4 leading local applications with predominantly German content
- at least 1 leading application with children's content
- at least 2 applications that have launched in the last 6 months
The ordering of applications is reviewed every 6 months and a new programming table is issued for newly connected devices.
In the My Apps section:
The applications are ordered in alphabetical order.
How can TV channels and apps be customised?
TV channels
In Live TV, press the OK button on your remote control and press the Right directional button to select a Live TV channel category such as Antenna or Cable, then use D-pad to select Edit.
Alternatively, in Live TV, press the Menu button, select Settings>Channel>Channel Edit, and select a Live TV channel category such as Antenna or Cable.
- Press the OK button on the selected channel, then a checkbox will appear. You can select multiple channels at the same time to move or delete.
- Move: Press the Left directional button to move the selected channel.
Moving the channels could be restricted by the operator. If you want to be able to move channels, it is recommended not to choose an operator during channel scan, LCN should be set to Off.
- Delete: Press the Right directional button to delete the selected channel.
- Restore: Press the Red button to enter the list of deleted channels. Press the Left directional button to restore the deleted channel.
- Filter: Press the Yellow button, the filter screen will pop up. Press the OK button to select options, the channel list will then be updated.
- Search: Press the Blue button to search the channel list.
Favourite list
Viewing your favourite list
In Live TV, press the OK button on your remote control and press the Right directional button, then select FAV1-4 to display the favourite list.
Editing the favourite list
In Live TV, press the OK button on your remote control and press the Right directional button, and select FAV1-4, then use D-pad to select Edit.
Alternatively, in Live TV, press the Menu button on your remote control, and select Settings>Channel>Channel Edit, then select FAV1 - FAV4.
You can add, move or remove favourite channels.
- Select Add channels to add the selected channel to the favourite list.
- Select a channel in a favourite list, press the Left directional button to move it.
- Select a channel in a favourite list, press the Right directional button to remove it.
Apps
Home>More Apps
Factory installed apps:
Select the item you want to move, then long press the OK button, use the D-pad to move it, and press the OK button to store position.
Non-factory installed apps:
Select the item you want to move, then long press the OK button to select Sort, use the D-pad to move it, and press the OK button to store position.
Note: Some Apps cannot be moved.
How are recommendations created?
Recommendations on the platform are dependent on the ability and willingness of partners to provide metadata to the platform. The content is positioned depending on the following criteria:
Above the fold applications:
The recommendations originate from the Content partners that are highlighted. They are in the domain of the end-user.
Below the fold applications:
Recommendation rows are created by the editorial team, following these guidelines:
Content variety - Providing a broad selection of content
- Type of access variety - Providing advertising-supported, subscription, and transactional content
Balance - Providing a balance between global and local content
Enjoy Live TV
Channel Scan
You can scan for channels automatically or manually.
Auto Scan
- Press the Source button on your remote control, and select TV.
- In Live TV, press the Menu button and select Settings>Channel>Auto Scan.
If no TV channels were saved before, you will be prompted to do a channel scan.
Satellite
- Single satellite: You can use single satellite if you only have one satellite installed.
- DiSEqC: You can choose DiSEqC if you have DiSEqC equipment. Up to four satellites in DiSEqC 1.0 mode can be installed.
If you are using a motorised antenna, you can use DiSEqC 1.2 mode.
- Unicable: If your home is equipped with Unicable satellite distribution, you should use this option.
Please make sure that you know the Unicable band and frequency to be used. The information should be available on the equipment or the landlord can provide it.
Antenna
- Channel: Select from All Channels or Free Channels. This option may not be available depending on countries/regions/operators.
- Scan Mode: Select from digital channels only (DTV), digital and analogue channels (DTV+ATV) or analogue channels only (ATV).
If you receive DVB-T or DVB-T2 signal, you can use DTV.
- LCN: Switch on/off LCN (Logical Channel Number).
Please note that some operators are restricted to manually change the channel order. If you switch off LCN, then the channel list can be edited after channel scan.
This function may not be applicable in some models/ countries/regions.
Cable
- Channel: Select from All Channels or Free Channels. This option may not be available depending on countries/regions/operators.
- Scan Mode: Select from digital channels only (DTV), digital and analogue channels (DTV+ATV) or analogue channels only (ATV).
- LCN: Switch on/off LCN (Logical Channel Number).
Please note that some operators are restricted to manually change the channel order. If you switch off LCN, then the channel list can be edited after channel scan.
This function may not be applicable in some models/ countries/regions.
Note:
- Satellite/antenna/cable function may not be applicable in some models/countries/regions.
Manual Scan
Manually scan for channels for DTV or ATV.
- Press the Source button on your remote control, and select TV.
- In Live TV, press the Menu button on your remote control and select Settings>Channel>Advanced Settings>Manual Scan.
DTV Manual Scan
Manually scan for DTV services.
When the DTV Manual Scan screen appears, press the Left/Right directional button to select Antenna, Cable or Satellite and configure corresponding settings. Then select Start to commence the search of that channel. When the signal has been received, the signal strength will be displayed on the screen.
ATV Manual Scan
Manually scan for ATV services.
- Frequency: Input the channel frequency you want.
- Picture System: Select the Colour System.
Sound System: Select the Sound System.
You can obtain quick access to the channel list, favourite channel list or use relevant features with ease when watching TV programmes.
Display Channel List
In Live TV, press the OK button on your remote control to display the Channel List menu.
Alternatively, in Live TV, press the Menu button on your remote control and select Channel List.
In Live TV, press the OK button on your remote control and press the Right directional button.
TV List
Display Live TV channel categories, such as Cable and Antenna.
FAV1-4
Display favourite lists 1 to 4.
Filter
Select channels by Content, HD, Child Lock, Scrambled and Sort.
Some options in Filter may not be available in some models/countries/regions.
Edit
Edit the channel list.
Note:
- The sub-menu options may vary depending on models/ countries/regions.
Display Favourite Channel List
In Live TV, press the OK button on your remote control and press the Right directional button, then select FAV1-4 to display the favourite list.
In Live TV, press the Menu button to access the on-screen menu.
Channel List
Quick access to Channel List.
Guide
Quick access to Guide (EPG).
Subtitle
Turn on Subtitle function or select subtitle option for digital broadcast content.
Recording List
Quick access to Recording List.
PVR
Launch Schedule Recording.
Timeshift
Launch Timeshift.
HbbTV
Enable or disable HbbTV functionality for the current channel (only available for digital channels).
E-Manual
Enter Enjoy Live TV chapter to learn more about how to set up Live TV features.
Audio Only
When you select this option, the screen will not display the picture. You can only listen to the audio.
Press any button except the Standby button, Volume +/- buttons and Mute button to restore the picture.
Settings
Set up picture, sound, channel, network, accessibility, system and support.
Note: Some menus above may not be available in some models/countries/regions.
Channel Edit
Manually edit the channel list or favourite channel list to your preference.
Edit Channel List
Before you can edit the channel list, Channel Scan must be completed first.
In Live TV, press the OK button on your remote control and press the Right directional button to select a Live TV channel category such as Antenna or Cable, then use D-pad to select Edit.
Alternatively, in Live TV, press the Menu button, select Settings>Channel>Channel Edit, and select a Live TV channel category such as Antenna or Cable.
Manage the channels
- Press the OK button on the selected channel, then a checkbox will appear. You can select multiple channels at the same time to move or delete.
- Move: Press the Left directional button to move the selected channel.
Moving the channels could be restricted by the operator. If you want to be able to move channels, it is not recommended to choose an operator during channel scan, and LCN should be set to Off.
- Delete: Press the Right directional button to delete the selected channel.
- Restore: Press the Red button to enter the list of deleted channels. Press the Left directional button to restore the deleted channel.
- Filter: Press the Yellow button, the filter screen will pop up. Press the OK button to select options, the channel list will then be updated.
- Search: Press the Blue button to search for a channel.
Export the channel list to USB
The current channel list can be exported to a USB storage device.
In Live TV, press the Menu button on your remote control and select Settings>Channel>Channel Edit>Export to USB.
Import the channel list from USB
Previously exported channel lists can be imported via a USB storage device.
In Live TV, press the Menu button on your remote control and select Settings>Channel>Channel Edit>Import from USB.
Edit Favourite Channel List
Before you can edit the favourite list, Channel Scan must be completed first.
Add a channel to a favourite list
You can add channels from various reception types to the favourite list.
- In Live TV, press the OK button to display the channel list.
- Press the Menu button and select the channel(s) you want to add to the favourite list.
- Select Add to Favourite and choose from FAV1-FAV4.
- Then, a heart-shape icon will appear next to the added channel.
Move or remove channels in a favourite list
In Live TV, press the OK button on your remote control and press the Right directional button, select FAV1-4, then use D-pad to select Edit.
Alternatively, in Live TV, press the Menu button on your remote control and select Settings>Channel>Channel Edit, then select FAV1-FAV4.
You can add, move, or remove favourite channels.
-
Select Add channels to add the selected channel to the favourite list.
-
Select a channel in a favourite list, and press the Left directional button to move it.
- Select a channel in a favourite list, and press the Right directional button to remove it.
Programme Info
While watching TV programmes, press the Info button to load the programme info bar. The information listed below will be available on the info bar.
- Channel logo
- Channel number
- Channel name
Indicator of Favourite
- Date and time, and channel category
- Current programme
- Next programme
Note:
- The remote control buttons may vary depending on models/ countries/regions.
Programme Guide (EPG)
The Guide (EPG) provides a convenient way to check TV programmes for the upcoming 8 days. The information displayed by the Guide (EPG) is made available by the commercial television networks for digital channels only. The Guide (EPG) also provides a simple way to record your favourite programmes and a reminder function, which can switch channels automatically at scheduled times, so that you will not miss programmes of interest. The availability and amount of programme information will vary depending on the broadcaster.
Note:
- The Guide (EPG) function is only available for digital channels. Analogue channels are not supported.
Launch the Guide
In Live TV, press the Guide button, or press the Menu button and select Guide (EPG) to display programme guide.
- Watch
In Guide (EPG), when a current programme is selected, press OK>Watch to switch to the channel you want to see.
PVR/Reminder
In Guide (EPG), press the Up/Down directional button to select the channels. Press the Left/Right directional button to select programme based on the time schedule.
Press the OK button to select PVR or Reminder.
For more information, please refer to Enjoy Live TV>Programme Recording (PVR) or Enjoy Live TV>Reminder in this manual.
Note: The PVR function may not be applicable in some models/countries/regions.
Scheduled
In Guide (EPG), press the Red button. This will display a list of scheduled reminders and recordings.
Programme Colour
In Guide (EPG), press the Green button. Use the colours to indicate different genres in the Guide (EPG) for quick and easy viewing.
Note: This function may not be applicable in some models/ countries/regions.
24h-
In Guide (EPG), press the Yellow button to select programmes of the previous day.
24h+
In Guide (EPG), press the Blue button to select programmes of the next day.
Programme Recording (PVR)
The PVR function allows you to easily record digital television content for later viewing.
Read before Recording Programmes
To use PVR, you must connect a storage device for recording. PVR will not function if a data storage device has not been connected.
- The format of the storage device can be NTFS or FAT32. The storage space of your device should be no less than 2GB (for 15 minutes high-definition video). It is strongly recommended to use a USB mobile hard disk drive instead of a USB flash drive as the storage device.
- If the transfer rate of your hard disk is too slow, a pop-up notice will be displayed. In this case, you will need to use another disk with higher speed.
- PVR is only available for digital channels and does not support analogue channels.
- Some broadcasters may restrict the recording of programmes.
- If a recording is made from a locked channel, the system PIN will need to be input to playback the recorded content.
- Some channel-related configuration may conflict with background recording. In this case, a reminder window will pop up.
- The PVR function may not be applicable in some models/countries/regions.
Recording
Schedule Recording
In Live TV, press the Menu button and select PVR.
Alternatively, press the Up directional button or the Info button to load the info bar, and select a programme and choose PVR.
If your remote has the Pause/Play button, press it and use D-pad to select record icon to set up PVR.
You can select recording mode from Time, Manual stop and Programme.
When you select time, you can set the booking time and period.
In Guide (EPG), press the Red button to view the scheduled recording. In the schedule recording list, you can readjust the reservation information that has been set.
Standby Recording
If you press the Standby button during recording and select Standby Recording, your TV will go into standby mode, but the recording process will continue. If you press the Standby button again to wake up the TV, the recording process will not be affected. After recording, the recorded file will be automatically saved to the attached USB disk.
Background Recording
When you switch to an App or another source (e.g. HDMI) during recording, the recording process will continue. When the recording has completed, the recorded programme will be automatically saved to the attached USB disk.
If you want to manually stop recording, press the Source button on your remote control and select TV to switch back to the channel that is currently being recorded, and then press the Left/Right directional button and select the stop button icon on-screen to stop.
Learn about the recording control bar
The items listed below will be available on the control bar.
- Recording time
Total time
- Rewind button
- Pause / Play button
- Fast forward button
- Stop button
Note:
- The PVR function may not be applicable in some models/ countries/regions.
Recording List
Access recording list
In Live TV, press the Menu button on your remote control and select Recording List.
Watch recorded programmes
In Live TV, press the Menu button on your remote control and select Recording List>Recorded.
Select a recorded programme in the recording list and press the OK button to watch it.
If you connect more than one storage device to the TV, Recorded (Disk for Recording) and Recorded (All Disk) are available on-screen to select.
Manage recording list
In Live TV, press the Menu button on your remote control and select Recording List>Recorded.
You can sort or delete recorded programmes.
Select All, and you can choose from the list to sort the recorded programmes.
Note:
- This function may not be applicable in some models/ countries/regions.
Delete recorded programme
Select Edit, select a recorded programme in the recording list and press the Right directional button to delete it.
Manage schedule recording list
In Live TV, press the Menu button on your remote control and select Recording List>Scheduled.
You can adjust the schedule recording information or cancel scheduled recordings. Schedule recording items are identified with clock icons.
- Delete scheduled recording
Select Edit, select a scheduled recording in the schedule list and press the Right directional button to delete it.
Select scheduled recording in the schedule list, then press the OK button to edit.
Note:
- The Recording List function may not be applicable in some models/countries/regions.
Reminder
Setup this feature to allow reminders to be displayed of future programmes.
Set up a Reminder
-
In Live TV, press the Guide button, or press Menu > Guide (EPG) to display programme guide.
-
In Guide (EPG), press the Up/Down directional button to select the channels. Press the Left/Right directional button to select a programme that has not been aired.
- Press the OK button to select Reminder.
Note:
- Reminder is only available for programmes that have not been aired yet.
Manage the Reminder List
In Live TV, press the Menu button on your remote control and select Recording List>Scheduled.
You can change reminder information or cancel reminders. Reminder items are identified with clock icons.
Delete reminder
Select Edit, select a reminder in the schedule list and press the Right directional button to delete it.
Edit reminder
Select reminder in the schedule list, then press the OK button to edit.
Timeshift
This option allows you to pause and rewind Live TV. This function operates by recording temporarily to a storage device. Please ensure your storage device is connected and there is enough free disk space, otherwise timeshift will not function.
In Live TV, press the Menu button on your remote control and select Timeshift, then the playback bar will appear.
If your remote control has the Pause/Play button, press it and press the OK button to launch Timeshift.
The items listed below will be available on the playback bar.
- Unwatched time for buffered content
Current time
Total time
- Record button: to convert a Timeshift to a live recording of the current broadcast channel. Select the record button icon and the programme content you have watched in Timeshift will also be saved to the storage device.
- Fast backward button: you can choose 2 ×, 4 ×, 8 × or 16 × .
- Pause / Play button
- Fast forward button: you can choose 2 ×, 4 ×, 8 × or 16 × .
- Stop Timeshift button: to exit the function and watch the current broadcast.
Note:
- The Timeshift function does not support analogue channels.
- The storage space of the device should be no less than 2GB. It is strongly recommended to use a USB mobile hard disk drive instead of a USB flash drive as the storage device.
- The Timeshift function may not be applicable in some models/countries/regions.
HbbTV
Access service from providers through HbbTV.
Press the Home button on your remote control, and select Settings>System>Application Settings>Hb-bTV.
Enable or disable HbbTV functionality for all channels (only available for digital channels).
In Live TV, press the Menu button to select HbbTV.
Enable or disable HbbTV functionality for the current channel (only available for digital channels).
When HbbTV service is enabled and the programme supports HbbTV, follow the instructions on the TV screen to select the corresponding button on the remote control to access the service.
Note:
- This function may not be applicable in some models/ countries/regions.
- Some channels may not support the HbbTV service.
- HbbTV cannot be used during Timeshift or PVR.
Learn about Live TV Support Settings
Press the Menu button on your remote control and select Settings>Channel>Advanced Settings>Channel List Auto Update.
Allow your TV to automatically update the channel list from the content provider.
Programme Guide Auto Update
Press the Menu button on your remote control and select Settings>Channel>Advanced Settings>Programme Guide Auto Update.
TV will automatically update the Programme Guide data overnight while in standby mode.
Press the Menu button on your remote control and select Settings>Channel>Advanced Settings>CI+ Module Settings.
Review the CI+ settings: Common interface, CI card PIN and CAM Profile Search. This function may not be applicable in some models/countries/regions.
Press the Menu button on your remote control and select Settings>System>Advanced Settings>PVR & Time Shift.
Initialise the external USB disk to support PVR and Time-Shift. When you connect more than one USB storage device to the TV, the one selected in PVR Setup or Time Shift Setup is initialised for starting recording or launching timeshift. The recorded programme will be saved in the selected storage device.
When launching timeshift, the programme will be recorded temporarily to the selected storage device.
You can add padding time to start recording before the event starts, or after the event has finished by delaying the end of recording depending on how much Padding time is added, this is setup in Start in advance or Delay Ending.
Search
In Live TV, press the Down directional button to search for channels.
- Parental Control
Turn on Parental Control to prevent children from being able to view certain content. For more information, please refer to Settings Overview>Using Parental Controls in this manual.
Adjust picture or sound mode or other advanced picture or sound settings. For more information, please refer to Settings Overview>Picture or Settings Overview>Sound in this manual.
Benefits of Smart TV
Using a VIDAA Account
Sign into your VIDAA account and create multiple profiles to receive personalised content according to your account preferences.
Sign into an account
Before signing into your VIDAA account, make sure your TV is connected to the network. For more about network settings, please refer to First-Time Use>Connect to the Internet>Connect to a Wired (Ethernet) Network or Connect to a Wireless Network in this manual.
- After the network is connected, press the Home button on your remote control and select the VidAA Account icon in the top navigation bar on the Home screen.
- Register your device to your VIDAA Account. After entering your E-mail and password, select Sign In.
- You can create a profile and give it a name.
If you forget your password and need to change the password, select Forget Password?, input your E-mail address and verification code, then create a new password.
Create a new account
If you do not have a VIDAA account, create a new one to enjoy the best features of your Smart TV.
Before creating a new account, make sure your TV is connected to the network. For more about network settings, please refer to First-Time Use>Connect to the Internet>Connect to a Wired (Ethernet) Network or Connect to a Wireless Network in this manual.
- After the network is connected, press the Home button on your remote control and select the VIDAA Account icon in the top navigation bar on the Home screen.
- Select Create an Account on screen.
- Enter your first name, last name, E-mail address and password. First Name and Last Name are optional.
- Select Create an Account.
Voice Service Setup
Set up voice assistant to control your TV by your voice.
Note:
- Voice Service feature may not be applicable in some models/ countries/regions.
To use this function, End User Licence Agreement and corresponding Smart feature privacy policy/terms and conditions may be required to be agreed to.
Alexa Setup
Set up Alexa, and enjoy Alexa voice service. You can ask for information, streaming music, search for your favourite movies, control your TV and more, just by asking Alexa.
Before setting up the Amazon Alexa Service, connect your TV to the network and sign into your VIDAA Account at Home>VIDAA Account. For more information about how to sign into the VIDAAAccount, please refer to Benefits of Smart TV>Using a VIDAA Account in this manual.
How to set up Alexa
For 4K models
Interact with Alexa by pressing and holding the Microphone button on your remote control. You can ask Alexa to control this TV.
- Press the Home button and select the Settings icon, and select System>Voice Service>Amazon Alexa.
- Select Set voice assistant to Alexa and Set Up Alexa. If you have selected Alexa in the Guide when you turned on the TV for the first time, it will directly guide you to the Set Up Alexa step.
-
Select Amazon Alexa supported voice language from the selection.
-
You are now at the step 'Sign into your Amazon account'. Scan the QR code with your mobile device or visit the website on your mobile device or computer and enter the on-screen code. The code will expire after 10 minutes. If you do not have an Amazon account, create a new one.
- After you have linked the Amazon account, the TV screen will change to the next step. You can sign into your VIDAA account. If you have signed in before, this step will be skipped.
- Now Alexa is set up and ready. You can enjoy interacting with Alexa using your voice by just pressing and holding the Microphone button on your remote control. Ask Alexa after the tone.
For 2K models
- Press the Home button and select the Settings icon, and select System>Voice Service>Amazon Alexa.
- Give your TV a name.
- Download the Alexa app on your mobile device. Open the app and sign in with your Amazon account.
- Search and enable VIDAA Voice skill following the instruction. After the skill is enabled, you will be prompted to finish device pairing. Please finish device pairing with this TV, and make sure this TV is discovered by Alexa before using Alexa service.
- Now Alexa is set up and ready. You can enjoy interacting with Alexa using your voice by just by asking Alexa.
Note:
- The Alexa function may not be applicable in some models/ countries/regions.
- The setup steps above may vary. Please refer to the specific product.
- Shipment with voice remote control varies depending on TV models/countries/regions.
- You can use Alexa without signing into your account by skipping the sign in section. In this case, you can still use your voice to change the channel and control playback. Sign into your account in the settings menu at any time to enjoy more functions of Alexa.
- This feature requires Alexa built-in service. Otherwise, use external Alexa-enabled devices (e.g. Alexa App, Echo) to control your smart TV by using just your voice.
- Download and install the remote control app on your mobile device at Home>Settings>Support>Mobile App Download. Press the Microphone icon in the app to interact with Alexa on your TV.
- You can select the language used by Alexa at Home>Settings>System>Voice Service>Amazon Alexa>Language. This feature requires Alexa built-in service, which varies depending on TV models and countries/regions.
VIDAA Voice Setup
VIDAA Voice is a voice assistant to help you control the TV and search content, supporting several languages.
Before using VIDAA Voice, please check the following:
Network connected
Voice remote paired
- End User Licence Agreement and voice feature privacy policy/terms agreed
To access the Voice Service centre and set voice assistant to VIDAA Voice, you can choose one of following options:
- Just press the Microphone button on your remote control.
- Press the Home button on your remote control and select the Voice icon in the navigation bar.
- Press the Home button and select the Settings icon and select System>Voice Service.
When VIDAA Voice is selected as your voice assistant, select the language of VIDAA Voice in the Voice Service centre. Then press and hold the Microphone button on your remote control to interact with VIDAA Voice.
Note:
VIDAA Voice may not be applicable in some models/ countries/regions.
- Shipment with remote control varies depending on TV models/countries/regions.
- For remote controls without the Microphone button, download and install the app on your mobile device at Home>Settings>Support>Mobile App Download. Press the Microphone icon in the app to interact with your TV.
Google Smart Home Service Setup
For specific models and countries/regions, Google Smart Home Service function is available. Set up Google Smart Home Service to control your smart TV with Google Home devices or the app. You can change channels or inputs, adjust volume and more.
Before setting up the Google Smart Home Service, connect your TV to the network and sign into your VIDAA Account at Home>VIDAA Account. For more information about how to sign into the VIDAA Account, please refer to Benefits of Smart TV>Using a VIDAA Account in this manual.
STEP 1: Set up Google Smart Home Service on TV
- Press the Home button on your remote control and select the Settings icon and select System>Voice Service>Google Smart Home. Select Set up now.
- Sign into your VIDAA account. If you have signed in before, this step will be skipped.
- Give your TV a name.
STEP 2: Set up in Google Home app
Follow the setup instructions on-screen to set up the Google Smart Home Service.
- Download and install the Google Home app on your mobile device, then open the app.
Find and select VIDAA Voice service in the app.
- Follow the instructions in the app to link your VIDAA account signed in on your TV to your Google Account.
Google Smart Home Service is set up and ready. Control your smart TV by using your voice through the Google Home device or App.
Note:
- Google Smart Home Service may not be applicable in some models/countries/regions.
- The setup steps above may vary. Please refer to the actual product.
Yandex Smart Home Service Setup
Yandex Alice voice assistant can obey certain commands to help you change the TV's configuration.
Before setting up Yandex Smart Home Service, connect your TV to the network and sign into your VIDAA Account at Home>VIDAA Account. For more information about how to sign into the VIDAA Account, please refer to Benefits of Smart TV>Using a VIDAA Account in this manual.
STEP 1: Set up Yandex on TV
- Press the Home button on your remote control and select the Settings icon, then select System>Voice Service >Yandex. Select Set up now.
- Sign into your VIDAA account. If you have signed in before, this step will be skipped.
- Give your TV a name.
STEP 2: Set up in Yandex App
Follow the instructions on the TV to enable Yandex Smart Home Service.
- Download the Yandex app on your mobile device.
- Open the app and sign into your Yandex account.
- In the Yandex app, go to "Devices" > "Smart Home", click add device icon and select "VIDAA Voice".
- Merge Account by signing in to your VIDAAAccount.
Yandex Smart Home Service is set up and ready. Now you can control your Smart TV with Yandex Alice devices or the Yandex app to change channel, change inputs, adjust volume and more, just by asking Alice.
Note:
- The Yandex function may not be applicable in some models/ countries/regions.
- The setup steps above may vary. Please refer to the specific product.
Voice Service Other Issues
If you want to turn on your TV with Alexa-enabled devices (e.g. Echo, Echo show) or Google Home devices (e.g. Google Home, Google Nest Hub), please:
- Turn on Wake on LAN and Wake on Wireless Network at Home>Settings>Network.
- Make sure your TV and Alexa-enabled devices/ Google Home devices are connected to the same network environment.
Note:
- Only Alexa (Alexa skill is enabled) and Google Smart Home Service support turning on your TV with Alexa Echo or Google Home.
Content Sharing
Content Sharing allows you to view media content, like videos, music or photos saved on your Android/iOS/PC device on your TV screen.
Share Media Content from your Device
- Connect your TV and Android/iOS/PC device to the same network.
- Turn on Content Sharing at Home>Settings>System>Mobile Device Connection>Content Sharing.
- Turn on the content sharing function in your Android/ iOS/PC device.
- Find the TV name in the search list of your device and select it. Wait for the connection progress to complete.
- On your Android/iOS/PC device, choose the media content you want to share on your TV.
Play Media Content from your Device on the TV
You can connect media content saved on your Android/ iOS/PC device to your local network and play the content on your TV.
- Connect your TV and Android/iOS/PC device to the same network.
- Turn on Content Sharing at Home>Settings> System>Mobile Device Connection>Content Sharing.
- Make sure your media content in your Android/iOS/PC device are visible through the local network.
- On your TV, select a device with media content at Home>Input, or Home>More Apps>Media.
The media content listed on your Android/iOS/PC device appears.
- Select a media content item from the list to play.
Note:
- Some Android/iOS/PC devices may not support content sharing function. If your device does not support content sharing, you can download an app that supports the function
to connect to your TV. For more information, please refer to Benefits of Smart TV>Using the Mobile App in this manual.
- Content may not be played depending on the file format.
- Content may not be played smoothly, or the function may not work properly due to the network condition.
Using Apps
Press the Home button on your remote control and select More Apps.
Numerous factory-installed apps are available for you to choose for your entertainment preferences.
Install an App from App Store
Even though your TV has numerous factory-installed apps, there may be others that you would like to download.
To install an app:
- Press the Home button on your remote control and select More Apps>app store.
- Use the navigation buttons on your remote control to select the app that you want to install.
- Select Install. The selected app is installed on the TV.
Note:
- To use this function, your TV must be connected to the Internet.
- Adding apps is free, but it might cost you money when using some apps.
Manage Apps
- In More Apps, select the app you want to sort, then press and hold the OK button and select Sort.
- Press the Up/Down/Left/Right directional button to move it.
- Press the OK button to store position.
Note:
- Some Apps may not be moved.
Remove an App
You can only delete apps that you have installed to the TV. Factory-installed apps cannot be deleted.
- In More Apps, select the app you want to remove, then press and hold the OK button and select Remove.
- Select OK. The selected app is deleted.
Using the Art App
Press the Home button on your remote control, and select More Apps>VIDAA art.
Numerous artworks created by global artists presented for you to browse or set as a screenshot.
- Browse artworks
- When you select an artwork to browse in full screen mode, press the Left/Right directional button to switch artworks and press the Up/Down/OK button to display detailed information of the artwork. You can communicate with the artist using your mobile device to scan the QR code on the TV screen.
- Add artworks to your favourite list
- Press the Menu button on your remote control to add the selected artwork to your Favourite list.
- ART settings
Select the Settings icon in ART to set up Time until the screen saver starts automatically, Picture switching time, Backlight, and Screen saver selection.
Note:
- This feature may not be applicable in some models/ countries/regions.
Enjoy the Internet
Press the Home button on your remote control, and select More Apps>Browser.
You can enter websites and browse information on the Internet.
Make sure your TV is connected to the network before accessing the Internet via the Browser.
The items listed below will be available on the Browser.
- Address/Search bar: Enter website you want to visit
- Visit/Search button
- Back and Forward: switch among webpages
- Add to Bookmarks/Delete bookmark: Add the website you are viewing to Bookmarks or delete it from Bookmarks
- Homepage: Back to the Homepage
- Reload: Reload the website
- Add to home: This webpage will appear in the shortcuts on the Home screen.
- Menu: Change the zoom level of the browser or enter browser settings
- Tab options: Add/remove webpages, or add private webpages
Management bar: Manage websites in Bookmarks
- Add Website (plus sign): Add websites to Bookmarks Note:
- Some content in the Browser may not be played properly.
Data Protection and Security
Clear Cache
Press the Home button on your remote control and select Settings>System>Application Settings>Clear Cache.
Clear cache, user data and temporary files for browser and applications.
Delete Cookies
Press the Home button on your remote control and select Settings>System>Application Settings>Delete Cookies.
Delete cookies for browser and applications.
Do Not Track
Press the Home button on your remote control and select Settings>System>Application Settings>Do Not Track.
Send a request to websites not to collect or track your browsing data.
Usage Mode Setup
Press the Home button on your remote control and select Settings>System>Advanced Settings>Usage Mode.
Set the TV to use in Home or Store mode.
Home Mode
Select Home Mode for normal TV usage.
If you want to switch to Store Mode when the TV is in Home Mode, press the Home button to select the Settings icon, then select System>Advanced Settings>Usage Mode and choose Store Mode.
Store Mode
Select Store Mode to setup the TV in a retail setting. This mode enables E-Pos and other demo functions and is only intended for use in retail stores.
When Store Mode is selected, press the Menu button on your remote control to enter store mode settings.
If you want to switch to Home Mode when the TV is in Store Mode, press the Menu button on your remote control to enter store mode settings and choose Home Mode. Alternatively, press the Home button and select the Settings icon, then select System>Advanced Settings>Usage Mode and choose Home Mode.
Note:
- Enabling Store Mode could increase energy consumption.
- How to exit Store Mode varies depending on models/ countries/regions.
Using the Mobile App
Press the Home button on your remote control and select Settings>Support>Mobile App Download.
Scan the Mobile App download QR code on screen to install the app on your mobile device. It is a convenient and easy way to control your TV. This app is available on both Android and iOS.
To connect to your TV after installing the mobile app:
- Agree with end user licence, disclaimer and privacy policies on the TV. If you are not sure whether you have agreed, check by pressing the Home button on your remote control and select Settings>Support>Disclaimer and Privacy>Terms & Conditions, Privacy Policy.
- Make sure your mobile device and TV are connected to the same network environment.
- To use this function, switch on Content Sharing by pressing the Home button on your remote control and select Settings>System>Mobile Device Connection>Content Sharing.
- Open the mobile app and select the TV device you want to connect.
What you can do with the app:
- Turn the TV on or off
Volume up or down
- Switch channels
- Input characters with your mobile's keyboard
- Share pictures, music, or videos from your mobile device to the TV
Connecting to External Devices
Accessories
Connect accessories, such as keyboard, mouse and gamepad, to interact with your Smart TV with ease.
Use HDMI & CEC
Use the TV remote to control external devices that are connected to the TV by a HDMI cable. The external devices need to support HDMI & CEC function.
Press the Home button on your remote control and select Settings>System>HDMI & CEC.
Connect an external device through HDMI & CEC function
Press the Home button on your remote control and select Settings>System>HDMI & CEC>CEC Control.
Allow HDMI devices to control each other.
- Set CEC Control to On.
-
Connect a HDMI & CEC compatible device to the TV.
-
Turn on the connected external device. The device will be connected to the TV automatically. After connection is completed, you can access the menu of the connected device on your TV screen using your TV remote and control the device.
- When CEC control is enabled and HDMI & CEC compatible external devices are turned off, the TV will enter the standby mode. The function needs to be supported by the external device.
Enable device auto power off
Press the Home button on your remote control and select Settings>System>HDMI & CEC>Device Auto Power Off.
Set to On to turn off HDMI & CEC compatible external devices when the TV is turned off.
Enable device auto power on
Press the Home button on your remote control and select Settings>System>HDMI & CEC>Device Auto Power On.
Set to On to turn on HDMI & CEC compatible external devices when the TV is turned on.
This feature is applicable when TV input source is preset to the corresponding external device.
Enable TV auto power on
Press the Home button on your remote control and select Settings>System>HDMI & CEC>TV Auto Power On.
Set to On to turn on the TV when HDMI & CEC compatible external devices are turned on.
Press the Home button on your remote control and select Settings>System>HDMI & CEC>HDMI Format.
Please select Enhanced format if your HDMI device supports 4K HDR. If it does not support 4K HDR, please select Standard format. If you are not sure, please select Auto.
Note:
- HDMI cables must be used to connect HDMI & CEC compatible devices to your TV.
- The HDMI & CEC feature of the connected device must be turned on.
- If you connect a HDMI device that is not HDMI & CEC compatible, the HDMI & CEC control features will not work.
- Depending on the connected HDMI device, the HDMI & CEC control feature may not work.
- The HDMI & CEC feature supports One Touch Play, Routing Control, System Standby, Device OSD Name Transfer, Remote Control Pass Through, Give Device Power Status, System Audio Control.
Control the TV with a Keyboard, Mouse or Gamepad
Connect a keyboard, mouse or gamepad to control your TV with ease.
Connect a USB keyboard, mouse or gamepad
Plug the keyboard, mouse or gamepad cable into the USB port of your TV.
Note:
- Keyboard, mouse, or gamepad connected via USB may not be usable with some apps.
Connecting a Set Top Box
Before connecting a Set Top Box to the TV, make sure the TV and Set Top Box are switched off.
Most STB's can be connected via HDMI, HDMI offers the best picture and sound quality. For more information about how to connect a Set Top Box to your TV, please refer to Connecting to External Devices>Connecting Audio Visual (AV) Devices in this manual.
When the connection is completed, turn on your TV and Set Top Box, switch to the input source by pressing the Home button, then select the Input icon on the Home screen or press the Source button to change to the port that you connected your Set Top Box to.
Connecting a Blu-ray or DVD Player
Before connecting a Blu-ray or DVD player to the TV, make sure the TV and Blu-ray or DVD player are switched off.
It is recommended to connect your devices with a HDMI cable (if HDMI port is available) to enjoy better picture and sound quality. For more information about how to connect a Blu-ray or DVD player to your TV, please refer to Connecting to External Devices>Connecting Audio Visual (AV) Devices in this manual.
When the connection is completed, turn on your TV and Blu-ray or DVD player, switch to the input source by pressing the Home button, then select the Input icon on the Home screen or press the Source button to change to the port that you connected your Blu-ray or DVD player to.
Sharing your Smart Phone/Computer Screen on the TV
Before using the feature, please set your TV to the wireless network connection.
Press the Source button on your remote control and select Screen Sharing.
- Turn on the casting function of your Android/Windows 10/computer device. The setting icon may
vary depending on the device. The feature may be called "Wireless display", "Smartview", "Wireless projection", etc.
- Find the TV name in the search list of your device and select it. Wait for the connection progress to complete and the content on your device will be displayed on the TV.
Press the Home button on your remote control, select Setting>System>Mobile Device Connection>Screen Sharing and switch it to on. Then, you can share your device's screen directly without opening the Screen Sharing App on your TV.
Note:
- Some devices may not support casting.
- This function may not be applicable in some models/ countries/regions.
Connecting USB Devices
Connect USB devices, such as hard drives and USB memory sticks for browsing photos or listening to music.
Read before connecting USB devices
USB disk sizes 4GB, 8GB, 16GB, 32GB, 64GB, 128GB and other common market sizes are supported. Up to 8TB hard drives are supported.
Supported formats: NTFS, FAT32.
Select the content you want to play or view. For more information, please refer to Entertainment>Media in this manual.
Use the USB storage device function
The USB storage device function can be used to record and view digital broadcast programmes.
Read the precautions below before recording or viewing programmes by using the USB storage device function.
Note:
- Be sure to select the correct country/region for use.
- Use of the recording function may not be applicable depending on the selected country/region. Use with incorrect settings may violate certain laws or other regulations, and may result in criminal punishment. In such cases, our CORPORATION and the Group shall bear no responsibility whatsoever.
- Recorded programmes saved on the USB storage device can only be viewed on this TV. They cannot be viewed when connected to another TV (including the same model of TV), a PC, or other devices.
- You cannot watch one channel while recording another.
- If the recording time to the USB storage device is too short, no data may be saved.
- You cannot record video input signals on the USB device.
-
Not all types of broadcast may be recordable.
-
After programming the TV to record digital broadcasting, do not disconnect the power plug before recording starts.
- If video or audio recording fail due to malfunction of the TV or poor reception, no compensation shall be paid.
- Certain digital cameras may not be compatible with the TV.
Connecting Headphones
You can connect a pair of headphones (not provided) to the HEADPHONE port on your TV. While the headphones are connected, the sound from the built-in speakers will be disabled.
Note:
- Headphone port may not be available on some models.
- Headphones with microphones are not supported.
- If Headphone with Speakers is selected at Home>Settings >Sound>Headphone>Headphone Mode, the headphones and the TV will have sound output at the same time.
Connecting Audio Visual (AV) Devices
Connect with a composite video cable
To connect an AV device with a composite video cable (not provided), see the Other Connections section.
When the connection is completed, press the Source button on your remote control and select AV as the input source.
Note:
- AV IN port(s) may vary depending on model type.
- AV IN port(s) may not be available on some models. Please use other port(s) to connect AV devices.
- For some models, RCA Jack to AV cable may not be supplied.
Connect with a HDMI cable
To connect an AV device with a HDMI cable (not provided), see the Other Connections section.
When the connection is completed, press the Source button on your remote control and select the corresponding HDMI input.
Note:
- Please refer to the User Manual of your device for step-by-step instructions.
- Some devices, such as DVD players, require the HDMI signal to be set to the correct format in device settings. Please consult your device's user manual for instructions.
- If there is no sound from your TV, configure the device audio settings.
Connecting Speakers or Other Audio Receivers
To connect speakers or other audio receivers with an audio cable (not provided), see the Other Connections section.
Ensure the audio connected devices are switched on before switching on the TV.
When the connection is completed, press the Home button on your remote control, select Settings>Sound>Speakers>Audio Output and select the SPDIF Only option.
When a digital audio system is connected to the DIGITAL AUDIO OUT port, decrease the TV volume and use your digital audio system to control the volume.
Note:
- If you prefer to use Audio Return Channel (ARC) or enhanced Audio Return Channel (eARC), please refer to Connecting to External Devices>Connecting a Digital Audio System with ARC/eARC in this manual.
- You can connect the DIGITAL AUDIO OUT port on the back of the TV to the coaxial port on the amplifier. Then press the Home button on your remote control and select Settings>Sound>Speakers>Digital Audio Output to choose Dolby Audio - Dolby Digital to receive the Dolby Digital audio.
Connecting a Digital Audio System with ARC/eARC
If you would like to use the Audio Return Channel (ARC) or enhanced Audio Return Channel (eARC) feature to send sound from the TV by a HDMI cable to a digital sound system, you can connect it to the HDMI (ARC/eARC) port of your TV.
By using this feature, you can also control the sound system with your TV remote instead of using the remote controls from the connected devices.
After the connection:
- Power on the sound system.
- Press the Home button and select the Settings icon on the Home screen.
- Select Sound>Speakers>Audio Output, and choose ARC option. If the device supports eARC function, press the Home button and select the Settings icon on the Home screen, then select Sound>Speakers>eARC to set eARC to On.
Note:
- Audio receiver must support ARC/eARC function.
- If the device has an Input Selector feature, then make sure to change it to TV.
- When this port is used for ARC/eARC function, it can be used as signal input when a DVD is connected to an amplifier and the amplifier is connected to the TV at the same time. Some amplifiers may not support series connection.
- 5.1 CH (channel) audio is available when the TV is connected to an external device that supports 5.1 channel surround sound. You can press the Home button and select the Settings icon on the Home screen, and select Sound>Speakers>Digital Audio Output to choose Dolby Audio-Dolby Digital Plus to receive the 5.1 channel audio.
Connecting a PC
You can connect a PC to the TV with a HDMI cable to use your TV as a PC monitor.
After connecting the PC, press the Source button and select the connected PC as the input source.
Note:
- For better image quality, set the PC's resolution to a format which is supported by the TV.
- If there is no sound from your TV, change the PC's audio settings.
- If you want to connect your PC and TV wirelessly, please refer to Benefits of Smart TV>Content Sharing or Connecting to External Devices>Sharing your Smart Phone/Computer Screen on the TV in this manual.
Settings Overview
Picture
Adjust picture mode, picture size and other advanced picture settings.
Choose a Picture Mode
Press the Home button on your remote control and select Settings>Picture>Picture Mode.
Select a pre-set picture mode to best suit the content you are viewing.
Note:
- Options may differ depending on your model/country/region and the content you are watching. Please refer to the specific product.
When you use a normal signal
Standard: Use Standard mode for watching normal content, such as News, Drama or Documentaries.
Cinema Day: Use Cinema Day for watching movies in a bright environment.
Cinema Night: Use Cinema Night for watching movies in a dark environment.
Dynamic: Use Dynamic mode for content that requires vivid picture quality.
Sports: Optimised picture for watching sports.
Dolby Vision Modes
If Dolby Vision content is detected Dolby Vision Dark, Dolby Vision Bright and Dolby Vision Custom picture mode options will be available instead of other modes.
Change the Aspect Ratio
Press the Home button on your remote control and select Settings>Picture>Aspect Ratio.
Adjust the Aspect Ratio to stretch or zoom the picture.
Auto: Automatically switch Aspect Ratio between 16:9 and 4:3 based on the signal information.
16:9: Best suited for 16:9 Widescreen content. This will also stretch 4:3 content to Widescreen.
4:3: Best suited for 4:3 content.
21:9: Best suited for 21:9 content, generally used in game scenarios.
Movie Zoom: Fill the entire screen by zooming in to remove horizontal black bars from the top and bottom of the picture.
Dot to Dot: Displays the native signal without any scaling.
Note:
- The options above may not be applicable in some input sources.
- Using special functions to change the size of the displayed image (e.g. changing the height/width ratio) for the purpose of public display or commercial gain, may infringe on copyright laws.
- If the aspect ratio of the selected format is different from the TV transmission or video content, it can distort the picture.
- When connecting a PC to the TV via HDMI input, fast moving images may become distorted.
Smart Scene
Press the Home button on your remote control and select Settings>Picture>Smart Scene.
Smart Scene will enable your TV to continually recognise the scene and enhance the picture quality on all input sources.
Note:
- Some specific applications have explicit constraints meaning content recognition is not allowed.
- This function may not be applicable in some models/ countries/regions.
Advanced Picture Settings Setup
Press the Home button on your remote control and select Settings>Picture>Picture Mode Settings.
Adjust display settings for each Picture Mode. You can personalise the picture quality by adjusting the following settings. Options may not be applicable depending on your model/country/region and the picture mode you selected.
Apply Picture Settings: Apply current picture mode settings to all the input sources or just the current source.
Backlight: Set the overall brightness of the screen.
Note:
- The function name may vary depending on the model type.
The following option may differ depending on model type, please refer to the actual product.
Dynamic Backlight Control
Enhance the contrast ratio between light and dark areas of the picture.
This function may not be applicable in some models/ countries/regions.
Backlight
Adjust how bright you want images to appear, lower settings create darker images.
This function may not be applicable in some models/ countries/regions.
Automatic Light Sensor
TV will automatically adjust the picture settings according to the amount of ambient light in the room.
This function may not be applicable in some models/ countries/regions.
Light Sensor Shift
This feature is adjustable only when Automatic Light Sensor is turned on. If the picture is too bright, decrease the value. If the picture is too dark, increase the value.
This function may not be applicable in some models/ countries/regions.
Local Dimming (or Peak Brightness Dynamic Range for some models)
TV will automatically adjust the backlight in specific areas of the screen according to the contrast changes in the image.
This function may not be applicable in some models/ countries/regions.
Brightness: Adjust the Brightness level to generate lighter or darker images.
Contrast: Adjust the Contrast level to increase or decrease how bright images appear.
Colour Saturation: Adjust the colour intensity of the picture for a more vibrant image.
Sharpness: Adjust how sharp or soft the edges of images appear.
Adaptive Contrast: Automatically adjust dark areas and light areas of the image to see more detail.
Ultra Smooth Motion: Reduce the afterimage effect when viewing fast-moving objects.
This function may not be applicable in some models/ countries/regions.
Clear Motion: Reduce judder and blur from video content.
This function may not be applicable in some models/ countries/regions.
Noise Reduction: Improve the picture quality by reducing noise.
MPEG Noise Reduction: Reduce MPEG block noise to provide clearer edge transitions.
Colour Temperature: Adjust how warm (red) or cool (blue) the white areas of an image appears.
Expert Settings: Adjust advanced picture settings based on your viewing preference.
Overscan: Change the video size setting to crop the edges of the displayed image.
This function may not be applicable in some models/ countries/regions.
Reset Current Mode: Restore all the picture settings in the current picture mode to the factory default values.
Expert Settings Setup
Press the Home button on your remote control and select Settings>Picture>Picture Mode Settings>Expert Settings.
Adjust the colour space and Gamma to best suit the content you are viewing. Options may not be applicable depending on your model/country/region and the picture mode you selected.
Colour Gamut: Change the range of colours the TV displays.
This function may not be applicable in some models/ countries/regions.
Colour Tuner: Adjust the Hue, Saturation and Brightness of colour settings.
White Balance: Adjust the intensity of red, green and blue to view the true colour of all images in the picture.
Black Level: Adjust the HDMI Black Level to enhance current content.
Gamma Adjustment: Adjust the Gamma to alter how the TV will respond to greyscale content. In low ambient light choose a higher number, in brighter ambient light select a lower number. The default setting of 2.2 is recommended for most ambient light conditions.
This function may not be applicable in some models/ countries/regions.
Gamma Calibration: Adjust selected Gamma curve.
This function may not be applicable in some models/ countries/regions.
Viewing Angle: Provide a better viewing experience when watching TV from anywhere in the room.
This function is only available in models supporting the Viewing Angle Control feature.
RGB Only Mode: RGB filter for adjustment and control of colour space and colour saturation.
Low Blue Light: Eye care: reduce the emission of blue light.
This function may not be applicable in some models/ countries/regions.
Sound
Adjust sound mode and other advanced sound settings.
Choose a Sound Mode
Press the Home button on your remote control and select Settings>Sound>Sound Mode.
Select a pre-set sound mode to suit the content you are listening to.
Standard: In Standard mode, the TV delivers a flat frequency response, which preserves the natural characteristics of the original sound.
Theatre: Theatre mode increases the surround sound effect and provides a more prominent bass response.
Music: In Music mode, low and high frequencies are emphasised to enhance musical instrument reproduction.
Speech: In Speech mode, low and high frequencies are attenuated to improve the reproduction and clarity of the human voice.
Late Night: In Late Night mode, the TV will improve the reproduction and clarity of the human voice with a low volume level.
Sports: Optimised sound for watching sports events.
Note:
- Options may differ depending on your model/country/ region and the content you are watching. Please refer to the specific product.
Sound Mode Settings Setup
Press the Home button on your remote control and select Settings>Sound>Sound Mode Settings.
Adjust the audio settings of the TV. You can personalise the sound quality by adjusting the following settings.
Apply Audio Settings: Adjust current sound mode to apply to all sources or just the current source.
Total Sonics: Optimise the overall sound quality by increasing bass and widening the sound field to provide a clear, natural dialogue.
This function may not be applicable in some models/ countries/regions.
Total Volume: Maintain a consistent loudness level for a wide dynamic range of programmes, loud commercials and channel or input changes.
This function may not be applicable in some models/ countries/regions.
Total Surround: Provide surround sound experience with psycho-acoustic processing to place sounds at the side, behind and above the viewer. For best results use with Total Sonics.
This function may not be applicable in some models/ countries/regions.
Bass Boost: Bass Boost uses DTS TruBass™ to enhance the perception of bass frequencies to provide deep, rich bass response from the TV's internal speakers.
This function may not be applicable in some models/ countries/regions.
Surround Sound: Surround sound uses DTS Virtual:X to deliver an immersive surround sound experience from the TV's internal speakers.
This function may not be applicable in some models/ countries/regions.
Dialogue Clarity: Dialogue Clarity uses DTS Dialog Clarity™ to boost the frequency range of the human voice so dialogue is clearly understood and heard above audio or surround effects.
This function may not be applicable in some models/ countries/regions.
TruVolume: Automatic control over large volume changes while watching TV programmes or films, providing a more comfortable and consistent volume.
This function may not be applicable in some models/ countries/regions.
Equalizer: Boost the volume at different frequencies.
This function is only applicable when TV Speaker is selected at Home > Settings > Sound > Speakers > Audio Output.
Subwoofer: Enable / Disable internal subwoofer.
This function may not be applicable in some models/ countries/regions.
Bass Boost Value: Built-in bass adjustment.
This function may not be applicable in some models/ countries/regions.
Wall Mount Setup: Automatically optimise the sound based on the position of the TV.
This function may not be applicable in some models/ countries/regions.
Auto Volume Control: Activate to prevent the volume from changing when switching TV channels.
This function may not be applicable in some models/ countries/regions.
Reset Current Mode: Restore all of the audio settings in the current audio mode to the factory default values.
Note:
- Some models may not support decoding of DTS CD bitstreams. Playback of this format may produce undesirable noise.
Select Speakers
Press the Home button on your remote control and select Settings>Sound>Speakers.
Adjust the settings of speakers.
Audio Output
Select the speakers which you want to use.
Digital Audio Output
Select the digital audio output format that best suits the audio device type.
Auto: the audio device automatically outputs in a supported format.
Pass Through: the audio device outputs without any processing.
PCM: the audio device outputs PCM (pulse code modulation) format.
Dolby Audio - Dolby Digital: the audio device outputs Dolby Digital audio when connected to the TV via the coaxial port.
Dolby Audio - Dolby Digital Plus: the audio device outputs Dolby Digital Plus audio when connected to the TV via the HDMI (ARC/eARC) port.
Note:
- This function is only applicable when Home>Settings>Sound >Speakers>Audio Output is set to ARC or SPDIF Only.
- When external audio devices are connected to the TV via coaxial, PCM and Dolby Audio - Dolby Digital are recommended.
Digital Audio Delay
Adjust the digital audio output delay time to sync audio from an external speaker with the images on the TV.
Note:
- This function is only applicable when Home>Settings>Sound>Speakers>Audio Output is set to ARC or SPDIF Only.
Lip Sync
Synchronise the video and audio.
Note:
- This function may not be applicable in some Audio Output modes.
Balance
Adjust the left and right speaker level to optimise audio for a specific location.
Note:
- This function may not be applicable in some Audio Output modes.
eARC
Connect an audio device that supports eARC via HDMI (eARC) and set eARC to On to enjoy higher sound quality. This feature is available to set when Home>Settings>Sound>Speakers>Audio Output is set to ARC.
Note:
- This function may not be applicable in some models/ countries/regions.
Headphone Settings Setup
Press the Home button on your remote control and select Settings>Sound>Headphone.
Set the sound output mode through headphones.
After connecting your wired headphones, or other external audio amplifiers, you can set up your TV to your preference.
Note:
- This function may not be applicable in some models/ countries/regions.
Headphone Mode
Change Headphone audio settings.
Headphone Only, the TV speakers will be muted when the headphones are being used. Any other connected audio devices will also be muted when headphones are in use.
Headphone with Speakers, the TV speakers, headphones and other connected audio devices will have audio output.
Audio Out with Speakers, the TV speakers and headphones will have audio output simultaneously, and the volume can be adjusted simultaneously.
Note:
- When you set built-in speakers and headphones to have audio output at the same time, the sound effect of the speakers may change.
Headphone Volume
Independently adjust the volume of the headphones.
In Headphone Only mode, you can adjust the volume by the remote or in Headphone Volume menu on screen.
In Headphone with Speakers mode, the TV speaker volume can be adjusted by the remote. The volume of the headphones can be adjusted in Headphone Volume menu on screen.
SoundBar Settings
When a soundbar device is connected to the TV, you can change the Sound Bar Settings via the Settings menu for best device audio quality.
When an ARC device is connected to the TV, the sound output is automatically switched to ARC. If the user switches to other sound output channels, the soundbar menu cannot be adjusted but the sound menu of TV can be adjusted.
Press the Home button on your remote control and select Settings>Sound>Sound Bar Settings.
When you connect a soundbar with a HDMI cable, you should Set CEC Control to On by pressing the Home button on your remote control, then select Settings>System>HDMI & CEC>CEC Control.
EQ Modes: You can select Music, Movie, News, Sport, Night.
Surround Modes: You can set to On to turn on the Surround Modes.
Bass Level/Treble Level/Dimmer Level: You can adjust Bass Level/Treble Level/Dimmer Level
Reset: Reset current Sound Bar Settings to factory mode.
Note:
- This function is only applicable for the specific soundbar types.
Network
You can get access to the Internet through your TV.
Check the Internet Connection Status
Press the Home button on your remote control and select Settings>Network>Internet Connection.
Test the current network connection status and view the current network information.
Connection Test
Press the Home button on your remote control and select Settings>Network>Internet Connection>Connection Test.
Start a network connection test.
Press the Home button on your remote control and select Settings>Network>Internet Connection>Network Information.
View information about your network connection.
Turn on the TV through the Internet
Wake on Cast
Press the Home button on your remote control and select Settings>Network>Wake on Cast.
You can enable or disable Wake on Cast function which is able to remotely wake up the TV through external devices.
Note:
- This function may not be applicable in some models/ countries/regions.
- Enabling this function may result in higher energy consumption.
Wake on Wireless Network
Press the Home button on your remote control and select Settings>Network>Wake on Wireless Network.
With a wireless network connection and enabling Wake on Wireless Network, you can switch on the TV from standby and push content to be viewed on the TV with a mobile device App supporting the screencast function.
Note:
- To use this function, make sure your TV and mobile device are connected to the same network environment.
- Enabling this function may result in higher energy consumption.
- This function may not be applicable in some models/ countries/regions.
Wake on LAN
Press the Home button on your remote control and select Settings>Network>Wake on LAN.
With a wired Ethernet connection and enabling Wake on LAN, you can switch on the TV from standby and push content to be viewed on the TV with a mobile device App supporting the screencast function.
Note:
To use this function, make sure your TV and mobile device are connected to the same network environment.
- Enabling this function may result in higher energy consumption.
- This function may not be applicable in some models/ countries/regions.General
You can set up system settings.
Note:
- The menus displayed vary depending on models/countries/ regions.
Set Time
Press the Home button on your remote control and select Settings>System>Time.
Set the current time based on your location.
Time Format: Set the time display to be 12 or 24-hour format.
Date/Time: Set the Date and Time. You can set the date and time to automatically sync with Internet/broadcast or manually setup by yourself.
This function may not be applicable in some models/ countries/regions.
Time Zone: Select your time zone.
This function may not be applicable in some models/ countries/regions.
Daylight Saving: Select whether to apply Daylight Saving Time to the TV.
This function may not be applicable in some models/ countries/regions.
Use Timer
Press the Home button on your remote control and select Settings>System>Timer Settings.
Adjust the timer settings to suit your preference.
Sleep Timer: Set the sleep timer to automatically turn the TV off at the specified time.
Power On Timer: Set the time you want the TV to turn on automatically. You can set the same time each day or set a different time on different days.
Power Off Timer: Set the time you want the TV to turn off automatically. You can set the same time each day or set a different time on different days.
Menu Timeout: Set the amount of time you would like the menu to remain on the screen.
Auto Sleep: Set the amount of time that you would like the TV to auto power off after a period of no activity.
This function may not be applicable in some models/ countries/regions.
Auto Standby with No Signal: TV will go to standby if there is no signal after the set time.
Use System PIN
Press the Home button on your remote control and select Settings>System>System PIN.
Change the PIN that you use to access Parental Control, Auto Channel Scan and Reset to Factory Defaults.
Set Language and Location
Press the Home button on your remote control and select Settings>System>Language and Location.
Select the language used for this TV and your location.
Location: Choose the location from where you will watch your TV.
Postcode: User can change the Postcode. This function may not be applicable in some models/ countries/regions.
Menu Language: Set the default language for the TV menu.
Primary Audio: Set the default audio output language for the type of digital broadcast content that you are viewing.
Secondary Audio: Set the secondary audio output language for digital broadcast content.
Digital Teletext: Adjust Teletext decoding.
Edit TV Name
Press the Home button on your remote control and select Settings>System>Advanced Settings>TV Name.
You can edit the name for your TV to be used on the network.
Note: Up to 18 characters can be entered.
Power Indicator Mode Setup
Press the Home button on your remote control and select Settings>System>Advanced Settings>Power Indicator.
Set the power indicator display to stay On or Off when in Standby mode.
Press the Home button on your remote control and select Settings>System>Advanced Settings>Indicator Light Setting.
Set the indicator light from Power, Always or Off.
Note: The above functions may not be applicable in some models/countries/regions.
Screensaver
Press the Home button on your remote control and select Settings>System>Advanced Settings >Screensaver.
Activate a screenshot when your TV displays a still image for a period of time. Set the time according to your preference.
Note:
- This function may not be applicable in some models/ countries/regions.
Power on Settings Setup
Fast Power On
Press the Home button on your remote control and select Settings>System>Advanced Settings>Fast Power On.
Enable TV fast start-up feature.
Power On Mode
Press the Home button on your remote control and select Settings>System>Advanced Settings>Power On Mode.
The TV will turn on in the selected mode when the main power is reconnected.
Personalised Ads
Press the Home button on your remote control and select Settings>System>Advanced Settings> Personalised Ads.
Turning off personalised ads will limit the ability to deliver relevant ads to you but will not reduce the number of ads you receive.
Note:
- This function may not be applicable in some models/ countries/regions.
Switch off Curtain
Press the Home button on your remote control and select Settings>System>Advanced Settings>Switch off Curtain.
Enable or disable Switch off Curtain or set how quickly the Screen Curtain will close when entering standby.
Support
You can set up support settings.
Note:
- The menus displayed vary depending on models/countries/ regions.
Check System Info
View system information.
Check Signal Info
Press the Home button on your remote control and select Settings>Support>System Info>Signal Info.
Show the signal information of current input.
Check Network Connection Status
Press the Home button on your remote control and select Settings>Support>System Info>Network Connection Status.
View the TV's network connection information.
Press the Home button on your remote control and select Settings>Support>System Info>Input Connection Status.
View the TV's input connection information.
Check Software Version
To check the current software version of your TV, press the Home button on your remote control and select Settings>Support>System Info>Version.
System Upgrade
Press the Home button on your remote control and select Settings>Support>System Upgrade.
Set your TV to receive the latest firmware.
Auto Firmware Upgrade: Set your TV to automatically receive the latest firmware.
Check Firmware Upgrade: Check to ensure that your TV has received the latest firmware.
Please ensure your TV is connected to the Internet.
Check OAD Upgrade: Check to ensure that your TV has received the latest firmware via the tuner.
Note:
- Please ensure your TV is connected to the Internet.
- This function is only applicable when Thailand and Malaysia are selected in Location.
System App Auto Upgrade: Set your system applications to automatically upgrade to the latest version. App auto upgrade will be completed in the background. Confirmation on new Privacy Notices may be required to complete any upgrades.
Upgrade from USB: Upgrade TV software from USB device.
Note:
Enjoy Safe Use of the TV
Press the Home button on your remote control and select Settings>Support>Disclaimer and Privacy>Terms & Conditions, Privacy Policy.
Read the Disclaimer Details and Data Protection Policy. Allow/Deny your consent to the listed polices relating to the collection of User/Network data.
Press the Home button on your remote control and select Settings>Support>Disclaimer and Privacy>Open Source License.
Display Open Source Software licence information.
Press the Home button on your remote control and select Settings>Support>Disclaimer and Privacy>Remove User Data.
To remove any usage data from the local TV and Cloud storage, select Remove User Data.
Check the TV Running Time
You can access the Status Check page to view the running time of your TV.
- While in an input source, such as Live TV, HDMI and AV, press the Menu button to launch the quick menu.
- Under the quick menu, press and hold the Blue button, the Status Check page will appear on screen for you to check the TV running time.
Note:
- This feature may not be applicable in some models/ countries/regions.
Using Parental Controls
Press the Home button on your remote control and select Settings>System>Parental Control.
Turn on Parental Control to prevent children from being able to view certain content.
If you have not set the PIN code before, create and confirm PIN window will be displayed. Using the D-pad on the remote, create the PIN code.
If you have set the PIN code before, Enter PIN window will be displayed.
Locks
Turn on Locks to enable the Parental Control function.
You will see other Parental Control settings change from a greyed out state to highlighted. When this occurs, Block Time, Channel Block, Content Blocking, Input Block, App Block, or Reset to Default features are available to set.
Block Time: Block the whole TV usage for a defined period of time, including Live TV, HDMI and apps.
Channel Block: Block all or individual channels when you turn on the Parental Control feature.
Content Blocking: Certain programmes are blocked by age rating. This is controlled by the broadcaster.
Input Block: Block content from devices that are connected to external inputs.
App Block: Block access to certain apps.
Reset to Default: Restore Parental Controls back to the factory default setting.
Reset to Factory Default
Press the Home button on your remote control and select Settings>Support>Reset to Factory Default.
Restore your TV to the factory default. Reset will clear your personal settings, information and data. Enter the PIN code on-screen to enable the Factory Reset.
Entertainment
Game
Connect your game console and adjust the settings to optimise the TV screen for better gaming entertainment.
Connect a Game Console
You can connect your game console with a HDMI cable to the TV.
To start a game from a game console:
- Switch on your game console.
- Press the Source button. Select the connected game console as the input source.
- Start the game.
You can enable the game mode to optimise your TV's settings when playing games with a game console.
Game Mode
Press the Home button on your remote control and select Settings>Picture>Game Mode.
Enable Game Mode to optimise the TV's settings to enjoy a better gaming experience with a PC or a game console connected to the TV.
Game Mode will allow:
- Reducing input lag to make sure every press or click matches what is happening on the screen;
- Improving responsiveness to produce very little motion blur;
- Processing YUV 4:4:4 format signals precisely to present accurate image colours.
Note:
- This function may not be applicable in some input sources or applications.
Sports
Sports mode setup in picture or sound settings
Press the Home button on your remote control and select Settings>Picture>Picture Mode>Sports.
Optimised picture for watching sports.
Press the Home button on your remote control and select Settings>Sound>Sound Mode>Sports.
Optimised sound for watching sports events.
Sports Mode Auto Detection
Press the Home button on your remote control and select Settings>System>Advanced Settings>Sports Mode Auto Detection.
When enabled, any sports programmes will automatically switch to Sports mode for both Sound Mode and Picture Mode.
Note:
- This function may not be applicable in some models/ countries/regions.
- Turning on this function could increase energy consumption.
Press the Home button on your remote control and select More Apps>Media.
Media is a central location for you to view or listen to different types of content, such as photos, music and movies. You can view media content through the following methods:
- A USB thumb drive or hard drive.
- Compatible mobile phone, tablet or other personal devices: you can stream movies, music and photos that are stored on compatible personal devices and play or view the content on your TV.
By default, there is Content Sharing displayed on the Media screen. If your mobile device is connected to the TV, its name also appears on the Media screen.
For more information about Content Sharing, please refer to Benefits of Smart TV>Content Sharing in this manual.
Enjoy Photos/Audio/Video Stored on a USB Device
Press the Home button on your remote control and select More Apps>Media>connected devices.
Select the content you want to play on the screen, like pictures, videos and music.
The items listed below will be available on the media browser screen.
-
Search bar: Search the content you want to play.
View style: Arrange the content list by Grid, List.
-
Sort: Sort the content list by Name, Date Modified, Size.
- Filter: Filter the content list by All Media, Photo, Video, Music, Recorded.
- Arrow: When the focus is on the first column, there will be an arrow on the left side. Select the arrow to enter multiple storage sources.
You can also press the Menu button to create a photo, music, or video playlist.
Note:
- Some options listed above may not be available in some models/countries/regions.
- You must obtain any required permission from copyright owners to download or use copyrighted content. We cannot and don't grant such permission.
Play Background Music while Viewing Pictures
- Choose a picture to display.
- Press the Up/Down button to display control bar.
- Select Background Music and choose your music to create a Music Playlist.
Now you can play background music while viewing pictures.
Due to differences in programming tools and other factors, some of the file formats that are listed may not be supported.
The listed formats may not be supported depending on the model.
For 4k models:
| Container | Audio Codec | File Extension Name |
| WAV | Mpeg1/2 Layer1 | .wav |
| MP3 | Mpeg1/2 Layer2 | mp3 |
| Mpeg1/2 Layer3 |
| AAC | AAC, HEAAC | .m4a .aac |
| WMA | WMA | .wma |
| WMA Pro |
| PCM | LPCM | N/A |
| ADPCM |
| AC-3 | AC-3 | .ac3 .m4a |
| FLAC | FLAC | .flac |
| OPUS | OPUS | .opus |
For 2k models:
| Container | Audio Codec | File Extension Name |
| WAV | Mpeg1/2 Layer1 | .wav |
| MP3 | Mpeg1/2 Layer2 | mp3 |
| Mpeg1/2 Layer3 |
| AAC | AAC, HEAAC | .m4a .aac |
| WMA | WMA | .wma |
| WMA Pro |
| PCM | LPCM | N/A |
| ADPCM |
| AC-3 | AC-3 | .ac3 .m4a |
| FLAC | FLAC | .flac |
| OPUS | OPUS | .opus |
Due to differences in programming tools and other factors, some of the file formats that are listed may not be supported.
The listed formats may not be supported depending on the model.
For 4k models:
| Container | File Extension Name | Mode of Operation | Resolution |
| JPEG | .jpg .jpeg | base-line | 15360 x 8640 |
| progressive | 1024 x 768 |
| PNG | .png | non-interlace | 9600 x 6400 |
| interlace | 1200 x 800 |
| BMP | .bmp | - | 9600 x 6400 |
| GIF | .gif | - | 6400 x 4800 |
For 2k models:
| Container | File Extension Name | Mode of Operation | Resolution |
| JPEG | .jpg .jpeg | base-line | 15360 x 8640 |
| progressive | 1024 x 768 |
| PNG | .png | non-interlace | 3840 x 2160 |
| interlace | 1200 x 800 |
| BMP | .bmp | - | 3840 x 2160 |
| GIF | .gif | - | 6400 x 4800 |
Due to differences in programming tools and other factors, some of the file formats that are listed may not be supported.
The listed formats may not be supported depending on the model.
For 4k models:
| Codec Name | File Extension Name | Sampling rate |
| MPEG1/2 | .mp4 | 1920 x 1080p @ 60fps |
| MPEG4 | .mov | 1920 x 1080p @ 60fps |
| AVC(H.264) | .mkv | 4096 x 2160p @ 120fps |
| HEVC(H.265) | /ts | 4096 x 2160p @ 120fps |
| WMV3 | .avi | 1920 x 1080p @ 60fps |
| VC1 | .wmv | 1920 x 1080p @ 60fps |
| VP8 | .flv | 1920 x 1080p @ 60fps |
| VP9 | .webm | 4096 x 2160p @ 120fps |
| AV1 | | 4096 x 2160p @ 120fps |
For 2k models:
| Container | Video Codec | File Extension Name | Resolution and Frame Rate |
| MPEG | Mpeg1/2 | .mpg .mpeg .vob | 1920 x 1080p @ 120fps |
| Mpeg4 |
| MP4 | Mpeg4 | .mp4 .mov | 1920 x 1080p @ 120fps |
| H.264(AVC) | 1920 x 1080 p @ 60fps |
| H.265(HEVC) |
| MKV | Mpeg1/2 | .mkv | 1920 x 1080p @ 120fps |
| Mpeg4 |
| H.264(AVC) | 1920 x 1080p @ 60fps |
| H.265(HEVC) |
| AVI | Mpeg1/2 | .avi | 1920 x 1080p @ 120fps |
| Mpeg4 | 1920 x 1080p @ 60fps |
| H.264(AVC) |
| WMV | WMV3 | .asf .wmv | 1920 x 1080p @ 60fps |
| H.264(AVC) |
| FLV | H.264(AVC) | .flv | 1920 x 1080p @ 60fps |
| TS | H.265(HEVC) | .ts | 1920 x 1080p @ 60fps |
THIS PRODUCT IS LICENSED UNDER THE AVC PATENT PORTFOLIO LICENCE FOR THE PERSONAL USE OF A CONSUMER OR OTHER USES IN WHICH IT DOES NOT RECEIVE REMUNERATION TO (i) ENCODE VIDEO IN COMPLIANCE WITH THE AVC STANDARD ("AVC VIDEO") AND/OR (ii) DECODE AVC VIDEO THAT WAS ENCODED BY A CONSUMER ENGAGED IN A PERSONAL ACTIVITY AND/OR WAS OBTAINED FROM A VIDEO PROVIDER LICENSED TO PROVIDE AVC VIDEO. NO LICENCE IS GRANTED OR SHALL BE IMPLIED FOR ANY OTHER USE. ADDITIONAL INFORMATION MAY BE OBTAINED FROM MPEG LA, L.L.C. SEE HTTP://WWW.MPEGLA.COM
Accessibility Features
Provide menu options to aid the visually or hearing impaired.
Press the Home button on your remote control and select Settings>Accessibility>High Contrast Menu. Improve contrast for the visually impaired.
Press the Home button on your remote control and select Settings>Accessibility>Menu Transparency.
Select menu transparency from Off, Medium, High.
Note: The above functions may not be applicable in some models/countries/regions.
Audio Type Setup
Provide audio description to aid the visually impaired.
Press the Home button on your remote control and select Settings>Accessibility>Audio Type.
Audio Type: Accessibility audio settings.
Audio Format: Select the audio format.
Fader Control: Provide the best sound quality options for the visually impaired.
Note: The above functions may not be applicable in some models/countries/regions.
Press the Home button on your remote control and select Settings>Accessibility>Dialogue Enhancement.
Enable or disable dialogue enhancement.
Note: This function may not be applicable in some models/ countries/regions.
Subtitle Setup
Adjust Subtitle Settings for digital broadcast content.
Press the Home button on your remote control and select Settings>Accessibility>Subtitle Settings.
Subtitle: Enable Subtitle type.
Primary Subtitle: Set the default subtitle language for digital broadcast content.
Secondary Subtitle: Set the secondary subtitle language for digital broadcast content.
Channel Subtitle Storage: Enable the storage of subtitle settings per channel.
Note: The above functions may not be applicable in some models/countries/regions.
Accessible Guide
For the visually impaired.
Press the Home button on your remote control and select Settings>Accessibility>Accessible Guide.
Off, Freeview Accessible Guide and Large Font Guide options are available.
Note: This function may not be applicable in some models/ countries/regions.
Screen Magnification
Press the Home button on your remote control and select Settings>Accessibility>Screen Magnification.
Allow visually impaired/partially sighted viewers to magnify an area of the screen.
Note:
- This function is only applicable for some scenarios.
- This function may not be applicable in some models/ countries/regions.
Troubleshooting
FAQ
In this section you will find the answers to the most frequently asked questions.
There is no picture, or the picture is black and white.
- Check input cable connections.
- Unplug the TV power cord from AC outlet and re-plug after 60 seconds.
- Check if the Colour Saturation is set to 50 or higher at Home>Settings>Picture>Picture Mode Settings>Colour Saturation.
No sound or the sound is too low.
There is no sound or the sound is too low at maximum volume.
- Check if Mute mode is set to on.
- Check the volume settings.
- Check the volume control of the device (cable or satellite box, DVD, Blu-ray, etc.) connected to your TV.
- Make sure that the audio cable is connected to the correct audio output connector on the external device.
- Check whether TV Speaker is selected at Home>Settings>Sound>Speakers>Audio Output.
My TV cannot connect to the network.
- Check network status at Home>Settings>Support> System Info>Network Connection Status.
-
Make sure your modem/wireless router is on and connected to the Internet.
-
Position your wireless router, modem router, or access point in a central location. Avoid putting it in a corner.
External source connected but no picture or sound.
I have connected an external source to my TV but I get no picture and/or sound.
- Check whether the connection between the external device and your TV is correct and secure.
- Make sure you have made the correct selection of input source.
- If the signal is intermittent, unplug the TV power cord from AC outlet and re-plug after 60 seconds.
When devices are connected with HDMI cables
- If there is always no signal, or the signal cannot be restored after plugging and unplugging, you can access Home>Settings>System>HDMI & CEC>HDMI Format, to confirm whether the signal can be recognised.
- Change to another HDMI port.
- Change to another HDMI cable.
The remote control does not work.
- Confirm that TV still has power and is operational. Press the control button on the TV to determine if the problem is with the remote control or not.
- If the TV is not responding to the remote control, then please check if the small light on the remote control flashes when any button is pressed (some remote controls do not support this function).
- If the small light does not flash when the remote control button is pressed, the battery power may be low, please replace the batteries with new ones.
- Check that the orientation of each battery matches the positive (+) and negative (-) symbols in the battery compartment.
- Keep the remote control sensor area clear from obstacles.
Schedule Recording cannot be used.
- Check if there is a storage device connected to the TV.
- Check the free space of the storage device. The function will not work if there is not enough storage space on the device.
- Check whether your storage device is damaged. If so, it is suggested to format your storage device.
- Recording will automatically stop if the signal becomes too weak.
Note:
TV Status Diagnosis
Press the Home button on your remote control and select Settings>Support>Self Diagnosis.
When the TV malfunctions, you can perform some self-diagnosis to find the problem.
Picture Test
When performing the Picture Test, a test picture will be shown on screen. Select OK to start the test. Picture Test displays a high-definition picture that you can examine for flaws or faults. Please check the picture carefully in the next 10s.
Sound Test
When performing the Sound Test, a test sound will be played with the TV Speaker. Select OK to start the test. Please listen to the sound carefully to check whether you can hear the sound problem.
Network Test
When performing a Network Test, the test will confirm whether your TV is connected to a network via the TV screen. If the network test is successful but you still have problems using online services, please contact your Internet provider.
Bandwidth Monitoring
Test the speed with a third-party website.
When performing an Input Connection Test, you can select from the input sources and check related information with external connections.
Status Check
When performing a Status Check, the status of your TV will be displayed showing any error codes.
Remote Control Service
Press the Home button on your remote control and select Settings>Support>Remote Control Service.
Remote Control Service enables your TV to be controlled from the client server to allow service agents to diagnose the problem of your TV and deal with the problem online efficiently.
To use this function:
- Turn on Remote Control Service.
- Select Agree All and Confirm in End User Licence Agreement page.
- Select Generate PIN in Remote Control Service.
- You can initiate a help request to a service agent by the hotline and provide the on-screen PIN.
Note:
- This function may not be applicable in some models/ countries/regions.
Steps above may vary. Please refer to the specific product.
- Keep the network connected when the Remote Control Service is running
Specification
| TV Broadcasting | PAL BG/I/DK
SECAM BG/DK |
| Receiving Channels | VHF (BAND I/III) - UHF
(BAND U) - HYPERBAND |
| Digital Reception | Fully integrated digital terrestrial-cable-satellite TV(DVB-T-C-S)
(DVB-T2, DVB-S2 compliant) |
| Number of Preset Channels | 11 000 |
| Channel Indicator | On Screen Display |
| RF Aerial Input | 75 Ohm (unbalanced) |
| Operating Voltage | 220-240V AC, 50Hz. |
| Audio | German+Nicam Stereo |
| Audio Output Power (WRMS.) (10% THD) | 2 x 10 W |
| Power Consumption (W) | 150 W |
| Networked Standby Mode Power Consumption (W) | < 2 |
| TV Dimensions DxLxH (with stand) (mm) | 266 x 1233 x 749 |
| TV Dimensions DxLxH (without stand) (mm) | 87 x 1233 x 712 |
| Display | 55" |
| Operation temperature and operation humidity | 0°C up to 40°C, 85% humidity max |
Wireless LAN Transmitter Specifications
| Frequency Ranges | Max Output Power |
| 2400 - 2483,5 MHz (CH1 - CH13) | < 100 mW |
| 5150 - 5250 MHz (CH36 - CH48) | < 200 mW |
| 5250 - 5350 MHz (CH52 - CH64) | < 200 mW |
| 5470 - 5725 MHz (CH100 - CH140) | < 200 mW |
(^*) < 100mW for the Ukraine
Country Restrictions
The Wireless LAN equipment is intended for home and office use in all EU countries, the UK and Northern Ireland (and other countries following the relevant EU and/or UK directive). The 5.15 - 5.35 GHz band is restricted to indoor operations only in the EU countries, in the UK and Northern Ireland (and other countries following the relevant EU and/or UK directive). Public use is subject to general authorisation by the respective service provider.
| Country | Restriction |
| Russian Federation | Indoor use only |
The requirements for any country may change at any time. It's recommended that user checks with local authorities for the current status of their national regulations for both 2.4 GHz and 5 GHz wireless LAN's.
Licences
The terms HDMI, HDMI High-Definition Multimedia Interface, HDMI trade dress and the HDMI Logos are trademarks or registered trademarks of HDMI Licensing Administrator, Inc.

HIGH-DEFINITION MULTIMEDIA INTERFAGE
Dolby, Dolby Vision, Dolby Audio, and the double-D symbol are trademarks of Dolby Laboratories Licensing Corporation. Manufactured under licence from Dolby Laboratories. Confidential unpublished works. Copyright © 1992-2022 Dolby Laboratories. All rights reserved.
This product contains technology subject to certain intellectual property rights of Microsoft. Use or distribution of this technology outside of this product is prohibited without the appropriate licence(s) from Microsoft.
Content owners use Microsoft PlayReady™ content access technology to protect their intellectual property, including copyrighted content. This device uses PlayReady technology to access PlayReady-protected content and/or WMDRM-protected content. If the
device fails to properly enforce restrictions on content usage, content owners may require Microsoft to revoke the device's ability to consume PlayReady-protected content. Revocation should not affect unprotected content or content protected by other content access technologies. Content owners may require you to upgrade PlayReady to access their content. If you decline an upgrade, you will not be able to access content that requires the upgrade.
The "CI Plus" Logo is a trademark of CI Plus LLP.
This product is protected by certain intellectual property rights of Microsoft Corporation. Use or distribution of such technology outside of this product is prohibited without a licence from Microsoft or an authorised Microsoft subsidiary.

Licences
[European Union]
These symbols indicate that the electrical and electronic equipment and the battery with this symbol should not be disposed of as general household waste at its end-of-life. Instead, the products should be handed over to the applicable collection points for the recycling of electrical and electronic equipment as well as batteries for proper treatment, recovery and recycling in accordance with your national legislation and the Directive 2012/19/EU and 2013/56/EU.
By disposing of these products correctly, you will help to conserve natural resources and will help to prevent potential negative effects on the environment and human health which could otherwise be caused by inappropriate waste handling of these products.
For more information about collection points and recycling of these products, please contact your local municipal office, your household waste disposal service or the shop where you purchased the product.
Penalties may be applicable for incorrect disposal of this waste, in accordance with national legislation.
[Business users]
If you wish to dispose of this product, please contact your supplier and check the terms and conditions of the purchase contract.
[Other Countries outside the European Union]
These symbols are only valid in the European Union. Contact your local authority to learn about disposal and recycling.
The product and packaging should be taken to your local collection point for recycling.
Some collection points accept products free of charge.
Note: The sign Pb below the symbol for batteries indicates that this battery contains lead.
![EDENWOOD ED55A08UHD-VE - [Other Countries outside the European Union] - 1](/content/2025/01/330036/images/ae169921f0f47d1079b0bf39820b307fd4dc565b35cac4a224bdad9d3ced3c60.jpg)
- Products
- Battery
Vielen Dank!
CLASS 1 LASER PRODUCT
Unterstutz Formate:NTFS,FAT32.
You can connect a pair of headphones (not provided) to the HEADPHONE port on your TV. While the headphones are connected, the sound from the built-in speakers will be disabled.
Hinweis:
This product is guaranteed against faults caused by defects in manufacturing or the materials used for a period of two years, starting from the date of purchase.* This warranty does not cover defects or damage caused by failure to install the device correctly, incorrect use of the product, or excessive wear and tear.
*proof of purchase required.
FR
CONDITION DE GARANTIE