USER MANUAL SE2018WZ BRANDT
Thank you for buying a BRANDT product and for your confidence in our company.
This product has been designed and manufactured for you considering your lifestyle and your requirements, so that it meets your expectations in the best way possible. We have invested it with our expertise, spirit of innovation and all the enthusiasm which has driven us for more than 60 years.
So that we are always able to satisfy your requirements as well as possible, our customer service is available, ready to listen and answer all your questions or suggestions
You can also visit our website www.brandt.com where you will find our latest innovations as well as additional useful information.
BRANDT is happy to support you daily and hopes you will enjoy your purchase to the full.

Important: Before starting your machine, please read this guide for installation and use carefully in order to familiarise yourself with how it operates quickly.
CONTENTS
1) FOR THE USER'S ATTENTION 28
a) Safety Instructions 28
b) Specifications 33
c) Operating principle 33
d) Protecting the environment 34
2) INSTALLING YOUR APPLIANCE 34
a) Before Installation. 34
b) Installation 34
c) Electrical Connection 35
d)Ustensils. 36
d) Description of your appliance. 38
f) Turntable installation. 39
3) USING YOUR APPLIANCE 39
a) Operation instruction 39
b) Menu chart for automatic programmes 44
4) CARING FOR AND CLEANING YOUR APPLIANCE 45
5) TROUBLESHOOTING 46
6) OPERATING PROFICIENCY TESTING 47
1) FOR THE USER'S ATTENTION

Keep these instructions with your machine. If you sell this machine to another person second-hand, make sure you give the new owner these instructions. Please read these instructions before installing and using your machine. They are written for your safety and that of others.
a) Safety Instructions

IMPORTANT SAFETY INSTRUCTIONS PLEASE READ CAREFULLY AND KEEP FOR FUTURE USE
- This machine is exclusively intended for domestic use in private dwellings. It may only be used in a covered, enclosed and heated environment such as a kitchen or any other room meeting the same specifications. Its use in communal or professional premises such as rooms for breaks in offices or workshops, camping or hotel premises, does not represent compliant use as defined by the manufacturer.
- Children must not play with the machine.
Installation:
• Install this oven adhering strictly to the installation instructions supplied with these instructions for use. Refer to the chapter, "INSTALLING YOUR MACHINE".
- Your machine is not intended to be put into operation using an external timer or a separate remote control system.
- Your appliance is not intended to be built-in to kitchen furniture.
- Leave at least 30~cm of free space above the oven
- Please do not obstruct any of the vents on your appliance.
- If this machine is covered or in contact with a flammable material including curtains, drapes and similar items, there is a fire risk when it is working.
- Keep the power supply lead away from hot surfaces
- Keep the machine and its lead out of reach of children under the age of 8.
Use:

The appliance and its accessible parts become hot during use.

This symbol means "Caution, hot surface".

Liquids and other foods should not be heated in sealed containers because they may explode.
The temperature of accessible surfaces may be high when the appliance is in operation.
- This machine may be used by children aged 8 and over and by people with reduced physical, sensory or mental capacities or without experience or knowledge, if they are properly supervised or if they have been given instructions about using the machine safely and if they have understood the risks being run.
- Children should be kept away if they are not continually supervised.
- Do not place anything on the machine when it is working.
- To avoid damaging your appliance, never operate it while empty or without the plate.
-
Only use suitable utensils for use in microwave ovens.
-
Metal containers for food and drinks cannot be used for cooking in a microwave. Remove metal closing ties and metal handles from containers/bags before putting them in the oven.
- Always use insulated gloves to remove dishes from the oven. Some dishes absorb the heat from the food and are therefore very hot.
- To avoid damaging your appliance, never operate it while empty or without the plate.
- If quantities are small, place a glass of water beside the food to increase the load.
- Heating drinks using microwaves can cause a sudden or delayed gush of boiling liquid. For this reason precautions must be taken when handling the container.
- In order to prevent burns, the contents of baby bottles and baby food pots should be stirred or shaken and the temperature should be checked before consumption.
- Heating eggs in their shells and whole hard-boiled eggs in a microwave oven is not recommended as they may explode, even when cooking has finished.
- Do not use aluminium cooking foil to cover food. Do not cover part of the oven with aluminium foil.
- When heating food in plastic or paper containers keep an eye on the oven in case something should catch fire.
- If smoke comes out of the appliance stop or disconnect the machine and keep the door closed to put out any possible flames.
Cleaning:

Failure to maintain the oven in a clean condition could lead to deterioration of the surface, that could adversely affect the life of the appliance and possibly result in a hazardous.

Turn the oven off and remove the power plug from the wall socket before cleaning.

Your machine produces microwaves and contains a high voltage circuit. Do not remove the casing. It is dangerous for any unqualified person to perform maintenance OR repair operations.
- Cleaning and maintenance by the user should not be carried out by children unless they are older than 8 and are supervised.
Cleaning the oven regularly and removing any food deposits is recommended. Your machine must be cleaned regularly. Food deposits must be removed.
- Do not clean the machine with an abrasive sponge or a metal scraper.
- The appliance must not be steam cleaned.
- The door seal and frame must be inspected regularly to ensure they are not damaged. If they are damaged, do not use the machine any more and have it checked by a specialist technician.
- Never pull the lead but disconnect the machine by holding the plug.
-
If the mains lead is damaged it must be replaced by the manufacturer, its representative or any other qualified person to avoid any danger.
-
When you need to change the bulb in your microwave contact a specialist technician.
- Removing the protective casing of the appliance may result in exposure to microwave energy.
- Removing the protective casing from the machine, even if it is disconnected, may cause electrocution from contact with the high voltage circuit.
Improper use:
- The manufacturer denies all responsibility in the event of non-compliant use. Adhere to the general instructions for use and safety instructions listed in this chapter.
- The use of accessories not recommended by the manufacturer of the machine may cause dangerous situations or injuries.
- The microwave oven is intended to heat food and drinks. Only use this appliance for the purposes described in this manual.
- This appliance is not intended for drying foodstuffs or washing, for warming slippers, heating pads, sponges, damp linen and any other similar articles. These uses may cause the risk of burns, catching fire or fire. Nor is it intended for sterilisation.
- Do not use the oven compartment for storage purposes.
- Do not place food such as bread, biscuits, etc. inside the oven.
b) Specifications
| Model | SE2018W |
| Rated Voltage | 230V ~ 50 Hz |
| Rated Input Power(Microwave) | 1,050 W |
| Rated Output Power(Microwave) | 700 W |
| Capacity | 20 L |
| Turntable Diameter | 25.5 cm |
| External Dimensions (L x W x H) | 439.5 x 359 x 258.2 mm |
| Net Weight | 10.2 kg |
c) Operating principle
The micro-waves used for cooking are electro-magnetic waves.
They are commonly found in our environment in the form of radio-electric waves, light or infrared rays.
Their frequency is in the 2450 MHz range.
Their behaviour:
They are reflected by metals.
They travel through all other materials.
They are absorbed by water, fat and sugar molecules.
When food is exposed to micro-waves, its molecules begin moving rapidly, which causes heating.
The penetration depth of waves into the food is approximately 2.5cm ; if the food is thicker, the core of the food will be cooked by conduction, as in traditional cooking.
d) Protecting the environment
It is valuable to note that the micro-waves trigger within the food a simple thermal phenomenon and that they are not harmful to one's health.
At the end of its life this product must not be discarded with household waste. It must be taken to a recycling centre or to your dealer. This makes it possible to avoid consequences resulting from inappropriate disposal that are harmful to health and the environment, and to recycle materials to save energy and significant resources.
A logo appears on the product reminding you not to discard it with household waste. For further information, contact your council offices or the shop where you bought this product.
Your appliance also contains various recyclable materials. Thus it is stamped with this logo to indicate to you that used appliances should be mixed with other waste.
The recycling of appliances organised by your manufacturer will take place under the best conditions, in compliance with European directive 2002/96/CE concerning electrical and electronic equipment waste. Consult your city hall or your retailer to find the drop-off points for used appliances that is nearest to your home. We thank you for your help in protecting the environment.
2) INSTALLING YOUR APPLIANCE
a) Before Installation

Caution:
Check that your machine has not been damaged during transport (door or seals distorted, etc.).
If you note any damage whatsoever before use, do not install the oven if it is damaged and contact your retailer.
Remove the packaging and put the accessories aside.
Control Panel: Remove the protective film from the surface of the control panel.
Do not remove the light brown Mica coating which is found in the cavity of the oven and which protects the magnetron.
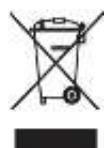
b) Installation
1. This product must not be built in.
Leave at least 30~cm of free space above the oven and 20~cm at the sides (Fig 1).
Do not take the feet off the oven.
Do not obstruct the air vents as you risk early damage to your machine.
Fig. 1
c) Electrical Connection
- It is essential to use a socket with an earthing terminal connected in compliance with the safety standards in force.
- In your electrical installation provide a user-accessible device which must be able to separate the machine from the mains, the contact opening of which is at least 3mm on all poles.
- If the power cable is damaged it must be replaced by the manufacturer, its after-sales service or any other similarly qualified person to avoid any danger.
Check that:
- the power of the installation is sufficient.
- the mains leads are in good condition.
- the diameter of the wires complies with the installation rules.
- your installation is fitted with 16 ampere heat protection.

If in doubt please consult your electrician.
The electrical connection must be carried out before placing the machine in its final position.
Electrical safety must be ensured by a correct connection. During maintenance operations the machine must be unplugged from the mains and the fuses must be cut off or removed.
The machine must be connected with a standardised power cable with three 1.5 ~mm^2 conductors (1 live + 1 neutral + 1 earth) which must be connected to the 220-240V 50Hz single phase mains with a standardised electric socket CEI 60083 fitted with two pins and one earth in compliance with the installation rules in force.
The Earth wire (green/yellow) is connected to the machine's terminal and must be connected to the earth of your electrical installation.
The Neutral wire (blue) must be connected to the mains neutral.
The Live wire (red, black, or brown) must be connected to the mains live.
The plug or any other electrical cut-off device must remain immediately accessible to allow an emergency stop.
In your electrical installation also provide an accessible device which must be able to separate the machine from the mains, the contact opening of which is at least 3mm on all poles.
If the oven has any type of damage, unplug it or disconnect it from the mains.
If the mains lead on your machine is damaged it must be replaced by the manufacturer, its after-sales service or any other similarly qualified person to avoid any danger.
Caution: We cannot be held liable in the event of an accident or incident resulting from non-existent, defective or incorrect earthing.
d) Ustensils
See the instructions on "Materials you can use in microwave oven or to be avoided in microwave oven." There may be certain non-metallic utensils that are not safe to use for microwaving. If in doubt, you can test the utensil in question following the procedure below.
Utensil Test:
- Fill a microwave-safe container with 1 cup of cold water (250ml) along with the utensil in question.
- Cook on maximum power for 1 minute.
- Carefully feel the utensil. If the empty utensil is warm, do not use it for microwave cooking.
- Do not exceed 1 minute cooking time.
Materials you can use in microwave oven
| Utensils | Remarks |
| Aluminum foil | Shielding only. Small smooth pieces can be used to cover thin parts of meat or poultry to prevent overcooking. Arcing can occur if foil is too close to oven walls. The foil should be at least 1 inch (2.5cm) away from oven walls. |
| Browning dish | Follow manufacturer's instructions. The bottom of browning dish must be at least 3/16 inch (5mm) above the turntable. Incorrect usage may cause the turntable to break. |
| Dinnerware | Microwave-safe only. Follow manufacturer's instructions. Do not use cracked or chipped dishes. |
| Glass jars | Always remove lid. Use only to heat food until just warm. Most glass jars are not heat resistant and may break. |
| Glassware | Heat-resistant oven glassware only. Make sure there is no metallic trim. Do not use cracked or chipped dishes. |
| Oven cooking bags | Follow manufacturer's instructions. Do not close with metal tie. Make slits to allow steam to escape. |
| Paper plates and cups | Use for short-term cooking/warming only. Do not leave oven unattended while cooking. |
| Paper towels | Use to cover food for reheating and absorbing fat. Use with supervision for a short-term cooking only. |
| Parchment paper | Use as a cover to prevent splattering or a wrap for steaming. |
| Plastic | Microwave-safe only. Follow the manufacturer's instructions. Should be labeled "Microwave Safe". Some plastic containers soften, as the food inside gets hot. "Boiling bags" and tightly closed plastic bags should be slit, pierced or vented as directed by package. |
| Plastic wrap | Microwave-safe only. Use to cover food during cooking to retain moisture. Do not allow plastic wrap to touch food. |
| Wax paper | Use as a cover to prevent splattering and retain moisture. |
Materials to be avoided in microwave oven
| Utensils | Remarks |
| Aluminum tray | May cause arcing. Transfer food into microwave-safe dish. |
| Food carton with metal handle | May cause arcing. Transfer food into microwave-safe dish. |
| Metal or metal-trimmed utensils | Metal shields the food from microwave energy. Metal trim may cause arcing. |
| Metal twist ties | May cause arcing and could cause a fire in the oven. |
| Paper bags | May cause a fire in the oven. |
| Plastic foam | Plastic foam may melt or contaminate the liquid inside when exposed to high temperature. |
| Wood | Wood will dry out when used in the microwave oven and may split or crack. |
d) Description of your appliance
Names of Oven Parts and Accessories
Remove the oven and all materials from the carton and oven cavity.
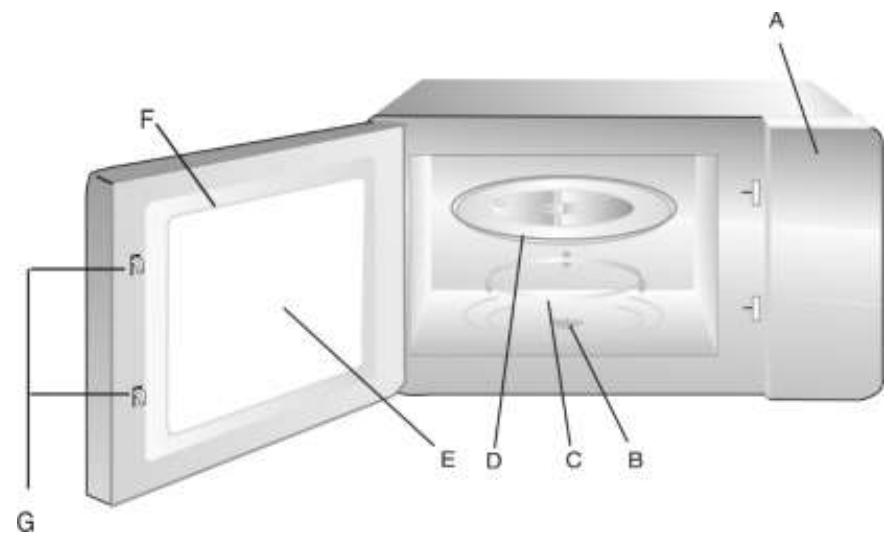
A) Control panel
B) Turntable shaft
C) Turntable ring assembly
D) Glass tray
E) Observation window
F) Door assembly
G) Safety interlock system
e) The Control Panel
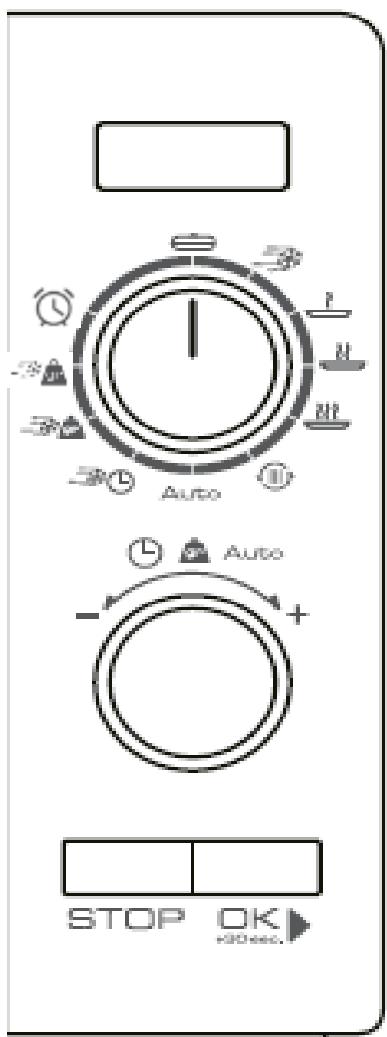
| Symbols | | | | | |
| Power | 70 W | 210 W | 350 W | 560 W | 700 W |
| Power (%) | 10% | 30% | 50% | 80% | 100% |
| Display | P10 | P30 | P50 | P80 | P100 |
| The Reheat function enables food to be reheated. |
| Auto | The Auto-programme function makes it possible to cooking modes depending on the product and weight appliance automatically sets the power and heating. |
| The Defrosting/Time function enables you to defrost food by choosing the duration. |
| The Defrosting/Weight function enables you to of your food according to its weight. |
| The Clock function enables the time to be set. |
| The Alarm function makes it possible to program duration with a countdown. |
| The OK+30s function allows programmes to be lau and starting in 30 second intervals. |
| The STOP function allows programmes to be stopcancelled. |
f) Turntable installation
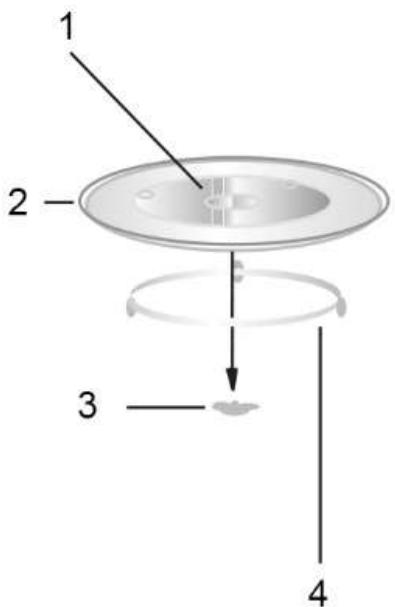
- Hub (underside)
- Glass tray
- Turntable shaft
- Turntable ring assembly
a. Never place the glass tray upside down. The glass tray should never be restricted.
b. Both glass tray and turntable ring assembly must always be used during cooking.
c. All food and containers of food are always placed on the glass tray for cooking.
d. If glass tray or turntable ring assembly cracks or breaks, contact your nearest authorized service center.
3) USING YOUR APPLIANCE
a) Operation instruction
Description of the 2 control buttons
Button 1
Button 2
When the microwave oven is electrified, the oven will display "0:00", buzzer will ring once.
Clock Setting
Display

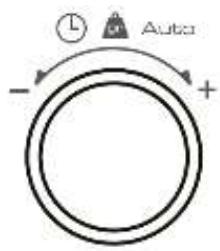
Turn Button 2 to , the hour figures will flash.


Turn Button 1 to adjust the hour figures, the input time should be within 0--23.

Press the key OK, the minute figures will flash.


Turn the Button 1 to adjust the minute figures, the input time should be within 0--59.

Press the OK key to finish clock setting, : will flash, and the time will light.

| Setting the alarm | Display |
| Turn Button 2 to , the hour figures will flash. | |
| Turn Button 1 to set the duration. It must be between 0 and 95 minutes | |
| Press the key OK, the countdown will start. | |
| When the set time has passed, the time will be displayed and a buzzer wil sound 5 times. | |
Microwave cooking
Microwave Power Chart
| Power | 700 W | 560 W | 350 W | 210 W | 70 W |
| Screen display | P100 | P80 | P50 | P30 | P10 |
| Programme | ←→ | ←→ | ←→ | ←→ | ←→ |


Turn the Button 1 to set cooking time (from 0:05 to 95:00).
Press the key OK to start cooking.
At the end of the cooking duration a buzzer will sound 5 times and the time will be displayed.


Note:
The setting intervals for the duration are as follows:
0---1 min: 5 seconds
1---5 min: 10 seconds
5---10 min: 30 seconds
10---30 min: 1 minute
30---95 min: 5 minutes
Reheating
Display
Turn Button 2 to

The screen displays the figure "200".
Turn Button 1 to select the weight (200, 400 or 600).

Press the key

400

Note:
- Halfway through cooking the oven emits two beeps to remind you to turn the food if necessary.
- When Button 2 is already positioned on the sign and the time is displayed, then turn Button 1 to choose the desired weight and press OK
| Quick Cooking Programming | Display |
| When stopped, when the time is displayed press the key OK . You can then choose the time and power by referring to the following table: | 0:30 |
| Programme | Power | Duration of 1stcycle | Duration of the following cycles |
| 70W | 30 seconds | + 30 seconds |
| 210W | 30 seconds | + 30 seconds |
| 350W | 30 seconds | + 30 seconds |
| 560W | 30 seconds | + 30 seconds |
| 700W | 30 seconds | + 30 seconds |
| 700W | 2 minutes | + 30 seconds |
| Auto | 700W | 2 minutes | + 30 seconds |
| 210W | 30 seconds | + 30 seconds |
| * | 3 minutes | - |
| (*): the power alternates according to 4 phases: 700 W for 36 seconds, then 0 W for 18 seconds, then 350 W for 36 seconds, and then 140 W for 1 minute 30 seconds. |
| Each additional press will increase cooking time by 30 seconds up to 95 minutes maximum except for the "Defrosting by weight" programme.
Programming for quick cooking does not operate in "Clock" and "Alarm" mode. |
| Defrosting by Weight Programming | Display |
| Press Button 2 to , the oven will display "dEF1". | DEFI |
| Turn Button 1 to select the weight of food from 100 to 2,000 g. | |
| Press the OK key to start defrosting. | |
| When Button 2 is already positioned on the sign and the time is displayed, then turn Button 1 to choose the desired weight and press OK | |
| Defrosting by Time Programming | Display |
| Turn Button 2 to the oven will display "dEF2". | DEF2 |
| Turn Button 1 to select the defrosting time which goes from 0:05 seconds to 95:00 minutes. | |
| The power is 210 W (programme P30) | |
| Press the OK key to start defrosting. | |
| When Button 2 is already positioned on the sign and the time is displayed, then turn Button 1 to choose the desired time and press OK +OK. | |
| Auto Menu | Display |
| Turn Button 2 to Auto . The "A-1" screen flashes. | A-1 |
| Turn Button 1 to select a menu from "A1" to "A8". | |
| Press the key OK to confirm the menu chosen | 400 |
| Turn Button 1 to select the default weight, as indicated in the menu table (see Page 45). | |
| Press the OK key to start cooking. | |
| When cooking finishes, the buzzer will sound twice. | |
| When Button 2 is already positioned on the sign Auto and the time is displayed, then turn Button 1 to select the desired programme, press OK , then turn Button 1 again to choose the designed weight, and finally press OK +OK. | |
Example: If you want to use the Auto menu to cook 250g of fish.
Display
| Display |
| Auto | Turn Button 2 to Auto . |
| Turn Button 1 to select menu "A3". |
| Turn the key OK▶ to confirm the menu chosen. |
| Turn Button 1 to select 250g. |
| OK▶ | Press the key OK▶ to start cooking. |

Meat cooking: turn the food at mid cooking time to obtain an homogeneous colour and cooking.
| MENU | Weight (g) | Screen Display |
| A-1: Reheat duration (refrigerated food) | 200 | 200 |
| Place the food in a dish suitable for microwaves, cover and place on the turntable | 400 | 400 |
| 600 | 600 |
| A-2: Vegetables (room temperature) | 200 | 200 |
| Place sliced carrots (5-6 mm) in a glass bowl suitable for microwaves, add water (30 ml for 200 g), cover and place on the turntable | 300 | 300 |
| 400 | 400 |
| A-3: Fish (room temperature) | 250 | 250 |
| Put the uncut fish (cod) fillets on a plate suitable for microwaves. | 350 | 350 |
| 450 | 450 |
| A-4: Meat (room temperature) | 250 | 250 |
| Cut the meat (e.g. chicken breasts) into pieces (about 3 cm each), and place them in a container suitable for microwaves | 350 | 350 |
| 450 | 450 |
| A-5: Dry pasta | 50 | 50 |
| Take the pasta out of its cardboard packing, place in a dish suitable for microwaves, add water (450 ml for 50 g, 800 ml for 100 g) and place on the turntable | 100 | 100 |
| A-6: Potatoes (room temperature) | 200 | 200 |
| Wash the potatoes (size 50/70 mm), prick them with a fork and place them on the edges of the turntable | 400 | 400 |
| 600 | 600 |
| A-7: Milk (refrigerated) | 20cl | 20cl |
| Pour the milk (temperature of 5°) into a cup suitable for microwaves and place it on the turntable | 40cl | 40cl |
| A-8: Soup (refrigerated) | 20cl | 200 |
| Pour the soup into a bowl suitable for microwaves and put it on the turntable | 40cl | 400 |
| Lock-out Function for Children | Display |
| STOP | Lock:
In waiting state, press the STOP key for 3 seconds, there will be a beep denoting entering the children-lock state. The oven will display “[ ]” | [ ] |
| STOP | Lock quitting: In locked state, press the STOP key for 3 seconds, there will be a long “beep” denoting that the lock is released. The oven will srtop displaying “[ ]” | [ ] |

Notes:
Buzzer will sound two times when cooking finished.
During cooking, if the door is opened and after closing the door, the OK key must be pressed to continue cooking.
Once the cooking program has been set, if OK key is not pressed in five minutes, the setting will be cancelled.

Notes :
In defrosting and grill mode halfway through cooking the oven will sound two beeps to inform you that the food should be turned if necessary.
4) CARING FOR AND CLEANING YOUR APPLIANCE
It is recommended that you regularly clean your oven and remove any food build-up on the inside and outside of the appliance. Use a damp, soapy sponge. If the appliance is not cleaned regularly, its surface could become damaged, permanently affecting the appliance's lifespan and possibly causing a safety hazard. If the door or door hinge are damaged, the oven should not be used until it has been repaired by an authorised person.
Do not clean the appliance with a steam cleaner.
The use of abrasive products, alcohol or thinner is not recommended; they may damage the appliance.
In the event of odour or caked-on dirt, boil water with lemon juice and vinegar in a cup for two minutes and clean the insides with a bit of dishwashing liquid.
The table can be removed to facilitate cleaning. To do this, handle it by the access zones provided for this purpose. If you remove the turning gear, do not let water penetrate into the motor axle hole.
Don't forget to return the turning gear, wheel guide and turntable.
5) TROUBLESHOOTING
If you have doubts about the proper functioning of your appliance, this does not necessarily mean it is broken. In any event, check the following items:
| You observe that... | What should you do? |
| The appliance does not start. | Check the electrical connection of your appliance.
Ensure that your oven's door is fully closed.
Ensure that the child safety feature is not activated. |
| The appliance is noisy.
The turntable does not rotate properly. | Clean the wheels and the rolling area under the turntable.
Ensure that the wheels are properly positioned. |
| You see steam on the window. | Wipe the condensation away with a cloth. |
| Food is not heated during a microwave programme. | Ensure that the cookware is suitable for microwave ovens and that the power level is appropriate. |
| The appliance is creating sparks. | Thoroughly clean the appliance: remove grease, cooking particles, etc.
Remove any metal items from the walls of the oven.
Never use metal items with the grid. |
| The bulb doesn't work. | Call a qualified professional from a dealer for the brand to replace the bulb. |

Warning:
Be careful, this appliance is equipped with a high tension circuit. Do not make yourself any repairing inside the oven.
6) OPERATING PROFICIENCY TESTING
Operating proficiency testing according to CE/EN/NF EN 60705 standards.
The international Electrotechnical Commission, SC59K, has established a standard relative to comparative performance tests conducted on various microwaves.
We recommend the following for this appliance:
| Test | Load | Approx time | Power | Containers/ recommendations |
| Egg custard (12.3.1.) | 1000g 50 g | 21 min 13-15 min | 500W | pyrex 227 on the turntable pyrex 220 on the turntable |
| Sponge cake (12.3.2.) | 475g | 7 min | 700W | pyrex 828 on the turntable |
| Meatloaf (12.3.3.) | 900g | 14 min | 700 W | pyrex 838 On the turntable cover with cling film |
| Defrosting Meat (13.3.) | 500 g | 10 min 50 + standing 5 min | speed defrost | on the turntable |
| Defrosting Raspberries (B.2.1.) | 250 g | 6-7 min | 200 W | on a flat plate on the turntable |
| Potato gratin (12.3.4.) (Model with grill) | 1100 g | 35 min | G2 | Pyrex dish Ref. 827 on turntable |
| Chicken (12.3.6.) (Model with grill) | 1200 g | 45 min | A4 C 2 | Dish on turntable |
BRANDT FRANCE - Simplified Joint Stock Company with capital of 100,000,000 Euros 89/91 Boulevard Franklin Roosevelt - 92854 Rueil-Malmaison (France)
Estimada(Clienta,estimado Cliente: