USER MANUAL RD-F321W JVC
Hotline Darty France
This product is manufactured, distributed, serviced and warranted exclusively by Etablissements DARTY et Fils. "JVC" is the trademark of JVCKENWOOD Corporation, used by Etablissements DARTY et Fils under license.
WARNING
This appliance is intended for domestic household use only and should not be used for any other purpose or in any other application, such as for non domestic use or in a commercial environment.
Ventilation
Allow at least a 10 cm gap all around the product.
The ventilation should not be impeded by covering the ventilation openings with items, such as newspapers, tablecloths, curtains, etc.
No naked flame sources, such as lighted candles, should be placed on the apparatus.
Attention should be drawn to the environmental aspects of battery disposal.
This apparatus is not suitable for use in a tropical climate.
The apparatus shall not be exposed to dripping or splashing and that no objects filled with liquids, such as vases, shall be placed on the apparatus.
Batteries (battery pack or batteries installed) shall not be exposed to excessive heat such as sunshine, fire or the like.
Where the MAINS plug or an appliance coupler is used as the disconnect device, the disconnect device shall remain readily operable.
IMPORTANT SAFETY INSTRUCTIONS
Symbols
This equipment is double insulated and an earth connection is not required.
CE This mark is applied to show that this product is in compliance with the essential requirements and other relevant provisions of Directive 2014/53/EU.
Dangerous voltage constituting a risk of electric shock is present inside this equipment.
There are important operating and maintenance instructions in the literature accompanying this equipment.
Class 1 laser product

This apparatus contains a low
power laser device. Invisible laser
radiation when the enclosure is opened
and interlocks are defeated. Avoid
exposure to beam.


This digital disc player employs a laser
system. Use of controls, adjustments, or
the performance of procedures other
than those specified herein may result
in hazardous radiation exposure.
To prevent direct exposure to laser
beam, do not open the enclosure.
Never stare directly into the laser beam.
Do not install this apparatus in a
confined space such as a book case or
similar unit.
BATTERY WARNING: Only adults should handle the batteries. Do not allow a child to use this product unless the Battery Cover is securely attached to the Battery Compartment.
The battery type used in this product is six UM-2 size batteries. These batteries are located internally and are readily accessible.
Remove the battery cover on the bottom of the product to remove the batteries.
These batteries must be disposed of at your local recycling point.
CONTROLS
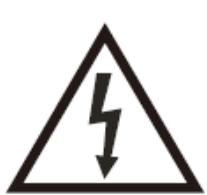
Top
Front
- Handle
- CD door
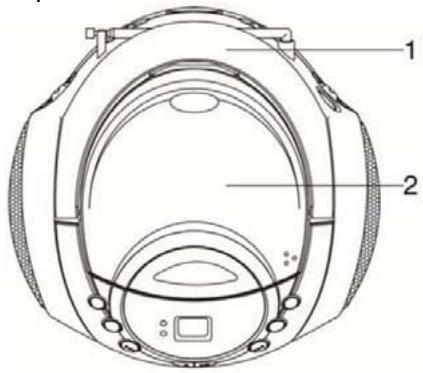
- POWER indicator light
- Display
- FM ST. indicator light
- BBS: Bass boost button
- FOLD-/-10 button
- BACK/按钮
9.PROG./MODE button
10. FOLD+/+10 button
11.▶H/NEXT button
12. Speakers
13. / button
14. STOP/USB button
15. USB port
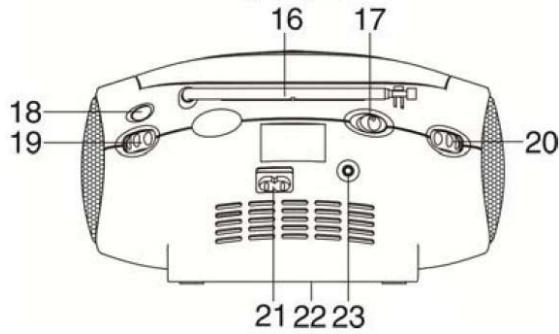
Rear and Bottom
- Telescopic aerial
- FUNCTION switch: TUNER-OFF-CD/MP3/USB/AUX
- Dial scale
- TUNING knob
- VOLUME control knob
- AC ~ jack
- Battery cover (on the bottom)
- AUX IN jack
BATTERY OPERATION (NOT SUPPLIED)
The unit can be operated using batteries alone.
- Remove the battery cover.
-
Insert six UM-2 size batteries into the battery compartment.
-
Make sure all batteries are inserted with the correct polarity as shown on the inside of the battery compartment.
-
Replace the battery cover.

If the unit is not to be used for a prolonged period of time, remove the s to avoid damage by battery leakage.
MAINS OPERATION
- Place the player on a flat stable surface.
- Plug the mains lead into the AC~ jack located on the rear of the player ensuring that the plug is pushed fully into the jack.
- Plug the other end of the mains lead into the mains socket.

The mains socket used for the player must remain accessible during normal
use. In order to disconnect the player from the mains, the mains plug should be removed from the mains power socket completely.
SWITCHING ON THE UNIT
- Set the FUNCTION switch to the TUNER or CD/MP3/USB/AUX position to turn on the unit.
- If there is no operation within about 15 minutes when the FUNCTION switch is set to the CD/MP3/USB/AUX position, the unit will turn off automatically.
- Press to switch on the unit again.
FM RADIO OPERATION
- Extend the telescopic aerial.
- Note: Fully extend and reposition the aerial for optimum reception.
- Set the FUNCTION switch to the TUNER position.
- The POWER indicator light will illuminate.
- Turn the VOLUME control knob to a comfortable volume level.
- Turn the TUNING knob to tune in to the desired FM station.
- The FM ST. indicator light will illuminate for a stereo signal.
- Turn off the radio by setting the FUNCTION switch to the OFF position.
DISCS OPERATION
Compact discs
Use only Digital Audio CDs with the COMPACT DIGITAL AUDIO symbol.
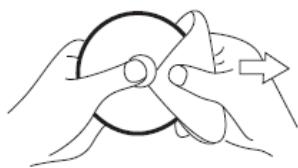
Never write on a CD or attach any sticker to the CD. Always hold the CD at the edge and store it in its box after use with the label facing up.
To remove dust and dirt, breathe on the CD and wipe it with a soft, lint free cloth in a straight line from the centre towards the edge.
Cleaning agents may damage the CD.
Do not expose the CD to rain, moisture, sand or to excessive heat.
CD/CD-R/CD-RW/MP3 discs
The player can playback CD/CD-R/CD-RW/MP3 discs that have been finalised upon completion of recording.
The player may fail to playback some discs due to poor recording and wide variation in quality of the discs.
Inserting a disc
- Push the right corner of the CD door to open it.
- Insert a disc on the disc tray with the label side facing up.
- Close the CD door.
Playing a CD
-
Set the FUNCTION switch to the CD/MP3/USB/AUX position.
-
The player will scan the contents of the CD. The total number of tracks will then be displayed.
-
The player will start by pressing / .
- Playback will start from the first track and the display will show the current track number and the symbol .
- Adjust the volume by turning the VOLUME control knob.
-
You can activate the bass boost function by pressing BBS.
-
The unit will boost the sound output of the bass frequencies.
-
To deactivate this function, press BBS again.
-
To interrupt playback, / .
-
The symbol and the current track number will flash on the display.
-
To resume playback, press again.
- The symbol and the current track number will stop flashing.
- To stop playback, press STOP/USB.
- The total number of tracks will appear on the display.
Note:
- The CD door should only be opened when the CD is in stop mode.
- If no disc is loaded into the compartment or the disc is placed upside down, the display will show “NOd”.
Selecting a track
While the CD is playing, repeatedly press / to play the desired track.
Note: You can also repeatedly press / to select the desired track when the player is in stop mode. Press / to play the selected track.
For MP3 disc, when the number of tracks on the disc exceeds 10, first press
FOLD+/+10 or FOLD-/-10 and then repeatedly press /▶ to select the desired track.
If the MP3 disc contains more than one folder, press and hold FOLD+/+10 or FOLD-/-10 for about 2 seconds to skip next/previous folder.
Search function
While the disc is playing, press and hold / . Release the button when the desired point (passage) of the track is reached.
Playback will start again from this point.
Disc repeat mode
While the disc is playing, repeatedly press PROG./MODE to select the desired repeat mode.
Symbol status on the display Description
| FLASHing | To repeat a single track |
| Stop flashing | To repeat all tracks |
| FOLDER shows | To repeat all tracks in the folder (for MP3 only) |
| RDM | Random playback |
| INTRO | To play the first 10 seconds of each track (for CD disc only) |
| Disappear | Normal playback |
Programmed play
By programming the player you can play up to 20 disc / 99 MP3 tracks in any desired order.
-
In stop status, press PROG./MODE.
-
The text "PROG" will flash and "P01" will appear on the display.
-
Repeatedly press / to select the desired track number.
- Press PROG./MODE again to store the track.
- Repeat the above steps until you have completed your program.
- Press to commence play of selected tracks.
- Playback will start from the first programmed track.
You can repeatedly press /▶ to select the desired track programmed.
To cancel the program play, press STOP/USB twice and the PROG. indicator light will go out.
USB OPERATION
Inserting and removing a USB memory device
Carefully insert a USB memory device into the USB port. To remove the USB memory device simply pull it out.
Selecting USB mode
Set the FUNCTION switch to the CD/MP3/USB/AUX position and then press and hold STOP/USB to select the USB mode.
- The display will show the total number of folders and the total number of tracks. Playback control in USB mode is similar to CD mode.
NOTE: The USB memory device should not be removed during playback as damage or corruption of files may occur.
AUX IN
Connect an audio cable (not supplied) to the AUX IN jack on the rear of the unit. Connect the other end to a suitable output socket on your auxiliary device.
Set the FUNCTION switch to the CD/MP3/USB/AUX position.
You can play music from an auxiliary device through the speakers of the player.
TROUBLESHOOTING
| Problem | Possible Cause | Possible Solution |
| The player will not play. | 1. Unit not in CD mode.
2. CD is not installed or installed incorrectly. | 1. Select CD mode.
2. Load a CD with label side up. |
| CD skips while playing. | Disc is dirty or scratched. | Wipe the disc with a cloth or use another disc. |
| Radio sound distorted. | 1. The station is not tuned in.
2. There is interference. | 1. Fine tune the station.
2. Reposition the unit. |
| No radio sound. | 1. The unit is not in radio mode.
2. The volume is on the minimum setting. | 1. Select radio mode.
2. Adjust the volume level. |
SPECIFICATIONS
| Power Source: | AC 230V~ 50Hz 14W or
DC 9V= U-2 X 6 batteries |
| Radio Frequency Range: | FM 87.5 – 108 MHz |
Direct Current \~Alternating Current
Disposal
As a responsible retailer we care about the environment. As such we urge you to follow the correct disposal procedure for the product, packaging materials and if applicable, accessories and batteries. This will help conserve natural resources and ensure that the materials are recycled in a manner that protects health and the environment. You must follow laws and regulations about disposal. Waste electrical products and batteries must be disposed of separately from household waste when the product reaches the end of its life.
Contact the store where you bought the product and your local authority to learn about disposal and recycling.
The batteries must be disposed of at your local recycling point. See the operating instructions to find out how to remove the batteries for disposal.
We apologize for any inconvenience caused by minor inconsistencies in the operating instructions, which may occur as a result of product improvement and development.
EU Declaration of Conformity
The object of the declaration described above is in conformity with the relevant Union harmonisation legislation:
This declaration of conformity is drawn up under the sole responsibility of the manufacturer.
The person responsible for this declaration is:
Place, Date / Lieu :