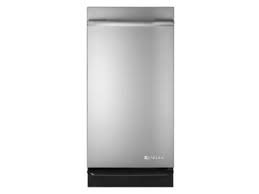
TC707S - Compactor WHIRLPOOL - Free user manual and instructions
Find the device manual for free TC707S WHIRLPOOL in PDF.


| Product Type | Trash Compactor |
| Brand | Whirlpool |
| Model | TC707S |
| Installation | Under counter or built-in |
| Power Supply | 115 V, 60 Hz, 15-20 A, single phase, grounded outlet |
| Dimensions (approx.) | Height: 87-88 cm, Width: 38 cm, Depth: 59 cm |
| Weight (approx.) | 45 kg |
| Compaction Capacity | Reduces waste volume by approximately 75% |
| Compress Cycle (locked) | Maintains pressure to increase bag capacity by up to 25% |
| Charcoal Air Filter | Reduces odors, removable fan |
| Opening | By foot pedal or handle |
| Start | Foot-activated START pedal |
| Safety | Key switch OFF/LOCK, drawer lock in Compress mode |
| Cleaning | Exterior surfaces and interior of drawer and cabinet with mild detergent |
| Maintenance | Replace air filter and bag, regular cleaning |
| Replacement Parts | Replacement bags, charcoal air filters (ref. 4151750), custom panels |
| Service | Authorized Jenn-Air service, tel. 1-800-536-6247 (US) / 1-800-807-6777 (Canada) |
| Warranty | 1-year limited, parts and labor |
| Use | Household use only |
Frequently Asked Questions - TC707S WHIRLPOOL
User questions about TC707S WHIRLPOOL
0 question about this device. Answer the ones you know or ask your own.
Ask a new question about this device
Download the instructions for your Compactor in PDF format for free! Find your manual TC707S - WHIRLPOOL and take your electronic device back in hand. On this page are published all the documents necessary for the use of your device. TC707S by WHIRLPOOL.
USER MANUAL TC707S WHIRLPOOL
For questions about features, operation/performance, parts, accessories, or service in the U.S.A., call:
1-800-JENNAIR (1-800-536-6247) or visit our website at www.jennair.com.
In Canada, call: 1-800-807-6777, or visit our website at www.jennair.ca.
Unpacking 4
Location Requirements 4
Electrical Requirements 5
Undercounter Installation. 6
COMPACTOR USE 8
How Your Compactor Works. 8
Loading. 8
Starting Your Compactor. 8
Using Compress (Locked) Cycle 8
Using the Air Filter. 9
Removing a Filled Bag 9
Installing a New Bag 9
COMPACTOR CARE 10
Changing the Air Filter. 10
Cleaning. 10
TROUBLESHOOTING 11
RECYCLING WITH YOUR COMPACTOR 11
ASSISTANCE OR SERVICE 13
Accessories 13
WARRANTY 14
TABLE DES MATIÈRES
SECURITE DU COMPACTEUR 15
INSTRUCTIONS D'INSTALLATION 16
Your safety and the safety of others are very important.
We have provided many important safety messages in this manual and on your appliance. Always read and obey all safety messages.

This is the safety alert symbol.
This symbol alerts you to potential hazards that can kill or hurt you and others.
All safety messages will follow the safety alert symbol and either the word "DANGER" or "WARNING."
These words mean:
DANGER
WARNING
You can be killed or seriously injured if you don't immediately follow instructions.
All safety messages will tell you what the potential hazard is, tell you how to reduce the chance of injury, and tell you what can happen if the instructions are not followed.
IMPORTANT SAFETY INSTRUCTIONS
WARNING: When using an electrical appliance, basic precautions should always be followed, including the following:
Read all instructions before using the compactor.
- Close supervision is necessary when used by or near children. Do not allow to be used as a toy, or to run unattended at any time. Lock Key Switch when not in use and store key out of reach of children.
- Do not touch moving parts.
- Do not operate with a damaged cord set, plug, motor, or after damage in any manner. Have the compactor examined, repaired or adjusted by an authorized serviceperson.
- Use only for intended use as described in this manual. Do not use other than manufacturer's recommended attachments.
- Do not compact toxic or volatile flammable material such as oily rags and insect sprays. Do not compact lighted cigarettes, cigars, or other hot or burning items. Do not overload the compactor.
- Do not take apart the compactor. Incorrect reassembly can cause electric shock when subsequently used.
■ Handle a loaded trash bag with care. Sharp objects can pierce the bag and cause injury. Do not overload trash bag with heavy material such as glass.
This compactor is intended for household use only.
SAVE THESE INSTRUCTIONS
INSTALLATION INSTRUCTIONS
Installer: Leave Use and Care Guide with the homeowner.
Homeowner: Keep Use and Care Guide for future reference and for local electrical inspector's use, if required.
Unpacking
WARNING
Excessive Weight Hazard
Use two or more people to move and install compactor.
Failure to do so can result in back or other injury.
IMPORTANT:
Do not grasp console to move compactor.
Begin in the room where the compactor will be located.
- Remove compactor from shipping carton. Remove all packaging materials such as tape and shipping pads. Use a mild detergent and warm water to remove waxy residue caused by shipping material. Dry thoroughly with a soft cloth. For more information, see "Cleaning."
- Be sure the power cord is attached to the cord clip on the rear of the compactor.
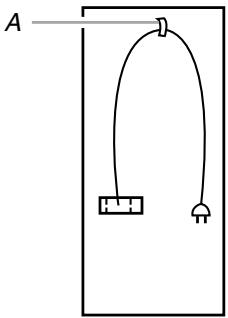
A. Cord clip
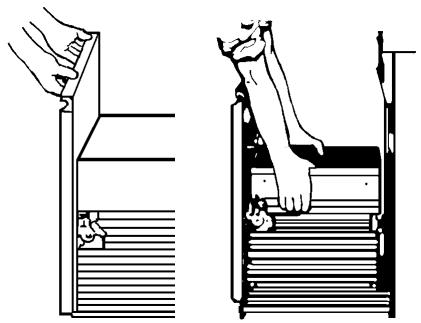
- Place the 2 corner posts from the carton on the floor near the compactor. Open the compactor drawer and remove any shipping materials or other items from the drawer. Do not remove the compactor bag. Grasp the handle and raise the front of drawer until it clears the drawer stops. Grasp sides of drawer and lift drawer out of compactor. Place the drawer on the 2 corner posts.
- Place the other 2 corner posts on the floor to the side of the compactor. Grasp the sides of the compactor cabinet and put compactor on its side on top of the corner posts. Remove the shipping base from the bottom of the compactor.
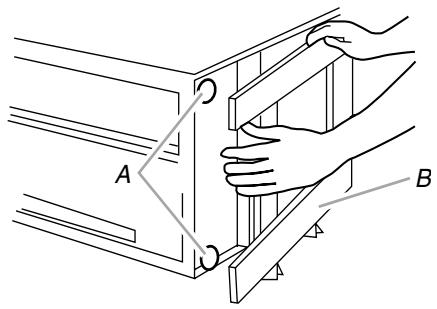
A. Leveling legs
B. Shipping base
Location Requirements
Product dimensions
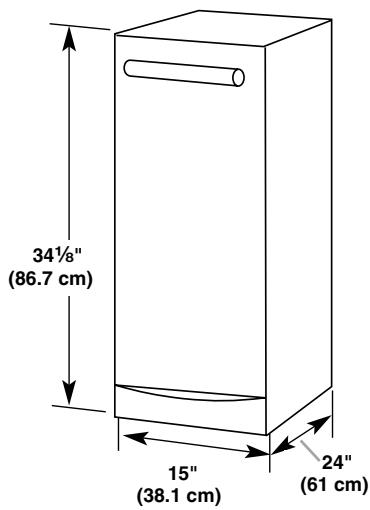
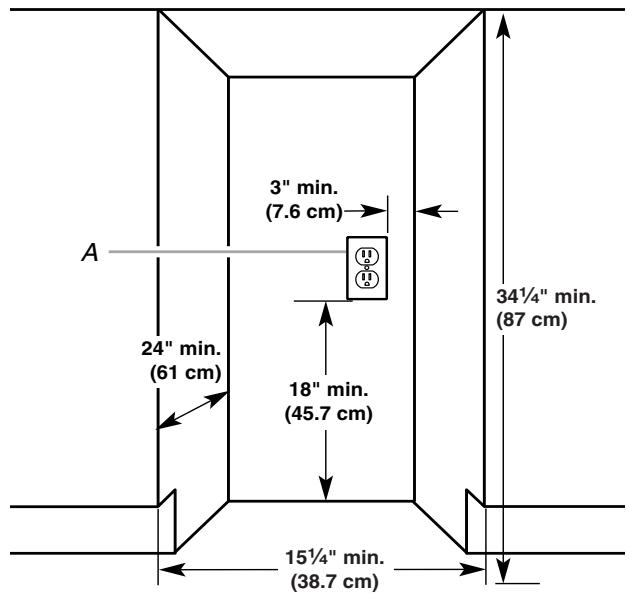
A. Grounded electrical outlet must be a minimum of 3'' (7.6 cm) away from surrounding cabinets or nearby walls as shown. It can be placed either to the left or the right side of the product.
Clearance dimensions
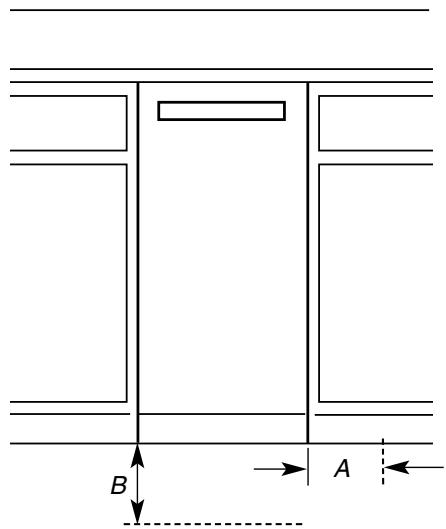
A. Leave 6'' (15.2 cm) of clearance space to the right side of the compactor in order to remove the compactor bags.
B. Leave 23^ (58.4 cm) of clearance in front of the compactor in order to fully open or remove the compactor drawer.
WARNING

Electrical Shock Hazard
Plug into a grounded 3 prong outlet.
Do not remove ground prong.
Do not use an adapter.
Do not use an extension cord.
Failure to follow these instructions can result in death, fire, or electrical shock.
Recommended Grounding Method
This compactor is for use on a single phase, 115-volt, 60Hz , AC only, 15- or 20-amp fused and properly grounded circuit and is equipped with a grounding plug as shown below. It is recommended that a separate circuit serving only this appliance be provided.
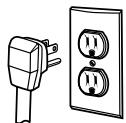
This compactor must be grounded while in use to reduce the risk of electric shock. The compactor is equipped with a three-conductor cord and 3 prong grounding-type plug to fit the proper grounding-type receptacle. The green (or green and yellow) conductor in the cord is the grounding wire. Do not connect the green (or green and yellow) wire to a live terminal.
Undercounter Installation
NOTE: Proper installation is your responsibility. Make sure you have everything necessary for correct installation. It is the personal responsibility and obligation of the customer to contact a qualified installer to assure that electrical installation meets all national and local codes and ordinances.
Tools needed:
Gather the required tools and parts before starting installation.
Level
Phillips No. 2 screwdriver
Tape measure
Flat-blade screwdriver
Pliers
5%6" Box-end wrench
Scissors
Utility knife
IMPORTANT:
- Do not grasp control panel to move compactor.
- To avoid damaging floor covering, slide compactor onto cardboard or hardboard before moving compactor across floor.
- Do not allow the rear frame of the compactor to touch the floor covering when lifting or moving compactor.
Undercounter Installation
- Measure the height of your cabinet opening. The top of the compactor should be at least 18 " (3 mm) from the top of the cabinet opening.
The rear wheels are preset for a cabinet opening of 34 14 (87 cm). See Position "1" in the picture following.
To adjust for other cabinet opening heights:
Loosen self-tapping screw enough to clear stud from hole in Position "1."
- Move the rear wheel and stud to Position "2" or "3" as needed for your cabinet opening measurement:
- Position "2": 341/4 to 347/16 (87 to 87.5 cm)
- Position "3": 347/16 to 345/8 (87.5 to 88 cm)
NOTE: To level the compactor in position "3," you may need to add shims under the leveling legs.
- Tighten screw. Repeat for other rear wheel.
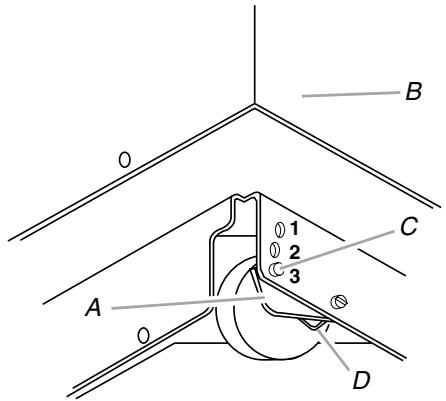
A.Wheelbracketassembly
B. Cabinet
C. Locating stud
D. Self-tapping screw (pivot)
- Use pliers to lower leveling legs away from cabinet. Adjust legs so there will be a 18 (3 mm) to 14 (6.4 mm) space between the top of the compactor and the top of the cabinet opening. Stand the compactor upright.
- Move the compactor close to its final location.
- Plug into a grounded 3 prong outlet.
- Determine whether you want the compactor frame or drawer front flush with the cabinet front.
Using the two # 8 - 18 × 5 116 (8 mm) screws, install the retaining brackets to cabinet top as needed:
If the compactor frame is to be flush with the cabinet front, place retaining bracket screws through "1."
If the compactor drawer front is to be flush with the cabinet front, place retaining bracket screws through "3."
If the compactor is to be midway between "1" and "3," place the retaining bracket screws through "2."
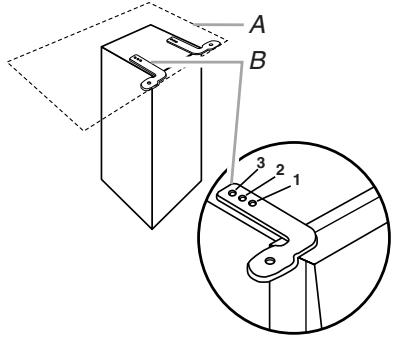
A. Countertop
B. Retaining bracket
- Slowly lift the front slightly and roll compactor into the cabinet opening.
Using the two #8-18 x 12 (12 mm) screws, fasten the retaining brackets to the countertop with the mounting screws.
Countertop Mounting
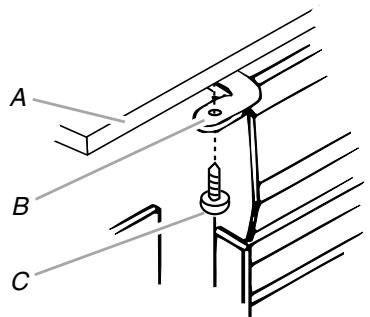
A. Countertop
B. Retaining bracket
C. Mounting screw
If brackets cannot be attached to the underside of countertop, attach mounting clips to brackets. Fasten compactor to cabinet front with mounting screws through mounting clips.
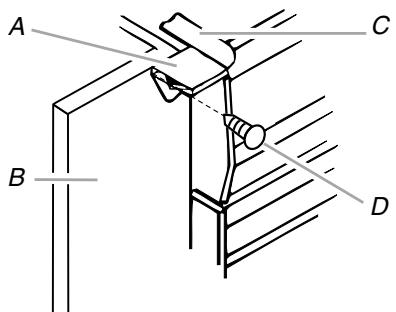
A. Mounting clip
B. Cabinet
C. Retaining bracket
D. Mounting screw
- Grasp sides of compactor drawer and place bottom of drawer into tracks. Lift at the handle so drawer will go over drawer stops. Close drawer. Check that the drawer opens freely. If the toe plate rubs against floor, see "Adjusting the Toe Plate" for further instructions.
Adjusting the Toe Plate
If the toe plate rubs the floor covering, the toe plate clearance may be changed as follows:
- Mark on each side of the toe plate the amount of toe plate that rubs the floor covering.
- Remove the drawer from the compactor. (See Step 3 in the "Unpacking" section.)
- Use a ruler and a pencil or chalk to draw a line between the marks on each side of toe plate.
- Use scissors or utility knife to cut toe plate along line.
- Replace drawer. If toe plate still rubs floor covering, repeat steps 1-4.
Installing a Custom Panel
Dimensions
Use these dimension drawings to create a custom panel for use without a trim kit. The panel should be a minimum of 12 (13 mm) thick.
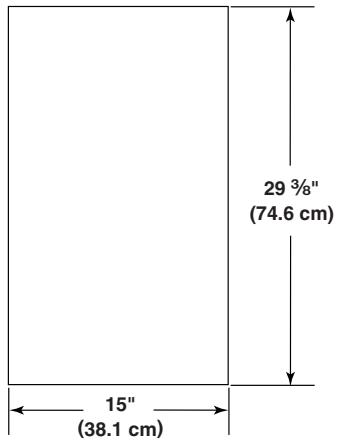
Installation
- Remove the 2 rubber bumpers from the lower corners of the inside drawer front. Set aside the bumpers and discard the screws.
- Align the bottom of the custom panel with the bottom of the exterior drawer front and rest the panel on the rest tab. NOTE: The bottom of the custom panel should not extend below the bottom rest tab at the lower center of the exterior drawer front.
- Secure the custom panel to the exterior drawer front by using four #8 x 1" wood screws from the inside drawer front.
- Attach a 15'' × 112'' quarter-round filler along the top inside edge of the drawer front using glue or screws.
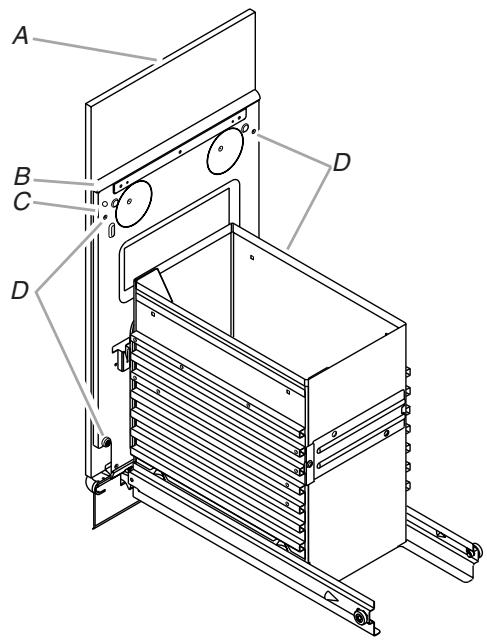
A.Custom panel
B. 15^ x 1 / 2^ quarter round
C. Drawer front
D. Four #8 x 1" wood screws placement
COMPACTOR USE
How Your Compactor Works
The compacting ram is the part of the compactor which compresses the trash. The compacting ram does not go to the bottom of the drawer. You will not see compacting of trash the first few times you load the compactor.
NOTE: The compactor drawer should be more than 1/2 full before the compactor can begin to compress the load.
You may hear a noise when glass breaks. Strong glass bottles may not break at all. The trash in a full compactor bag will be about 14 the size of its original bulk.
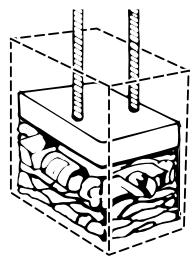
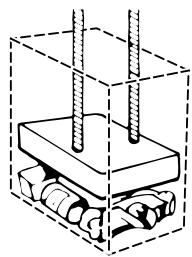
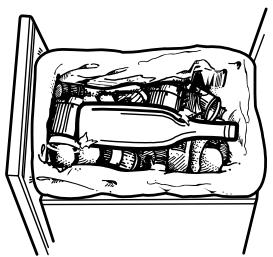
Load bulky trash, bottles, and cans in the center of the drawer. Bottles or cans not placed in the center may become caught between the ram and the drawer. The Analyzer Monitor Switch then senses a "misload" and causes the ram to return to the "up" position without compacting.
Loading
IMPORTANT: Do not push items down into compactor with hands or feet.
NOTE: You will not see compacting of trash the first few times you load the compactor. The compactor drawer should be about 12 full before the compactor can begin to compress the load.
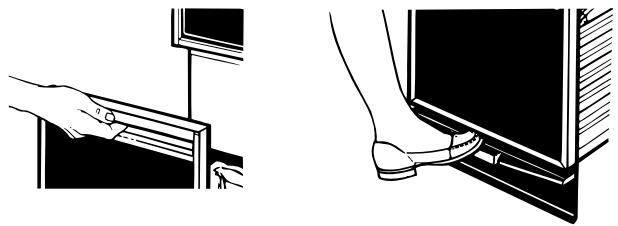
- Open the drawer. Lift and pull the handle or press the foot pedal to open the drawer.
NOTE: Pressing the foot pedal opens the container only 3'' to 6'' (7.6 cm to 15.2 cm), depending on the load.
- Place trash in compactor.
Wrap or cover wet or messy trash.
- Do not compact items that may develop offensive odors such as raw meat, fish, grapefruit rinds, disposable diapers, or personal hygiene items.
- Load bottles or cans on their sides in the center of the drawer. Do not load bottles in an upright position.
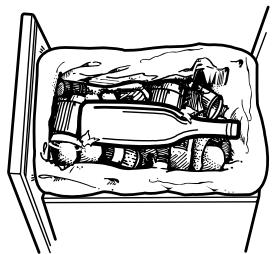
- Close the drawer.
Starting Your Compactor
- Open container. Load trash.
- Leave Key-Knob in ON position.
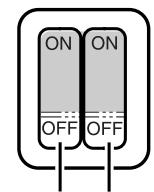
- Set Compress Cycle switch to OFF.
- Close container.
- Press foot-actuated START pedal to begin cycle.
Using Compress (Locked) Cycle
The Compress (Locked) Cycle extends the use of the bag by putting constant pressure on the trash to keep it from springing back. Regular use of a compress cycle can increase bag capacity up to 25 percent.
During Compress Cycle, the ram will stay in the down position for extra compacting. The drawer is locked and cannot be opened when the ram is down.
For best results, use the Compress Cycle for at least 30 minutes at a time.
- Open container. Load trash.
- Set compactor Compress Cycle switch to ON.
Compress Air Cycle Filter
- Close container.
- Press foot-acutated START pedal to begin cycle.
- Container remains LOCKED until you RESET by pressing the foot-actuated START pedal.
Using the Air Filter
- Set the Air Filter switch to ON. The fan creates air movement in the compactor for odor removal.
NOTE: The charcoal Air Filter works only when the Key-Knob is in the ON position.
- Set the Air Filter switch to OFF to turn off the fan.
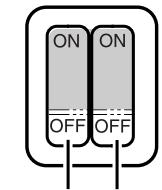
Compress Air Cycle Filter
Removing a Filled Bag
When the trash is compacted to the top of the drawer, remove the bag. If the bag is too heavy, compact less trash before emptying it in the future.
IMPORTANT: Do not push items down into compactor with hands or feet.
- Pull the drawer completely open.
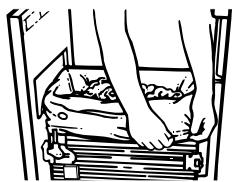
- Remove top of bag from bag retainer buttons. Pull up all four bag cuffs. Close bag with twist tie provided.
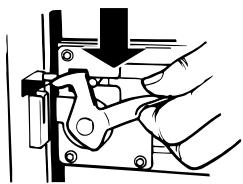
- Push Side-Lock Latch down and tilt drawer side open.
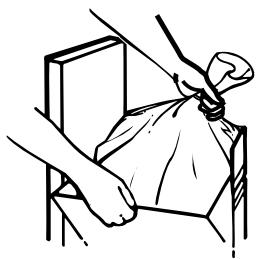
- Lift out bag.
Installing a New Bag
Do not use any kind of bag other than those designed especially for use in your compactor. Order replacement compactor bags through your local dealer or by calling the toll-free number on the cover or in the "Assistance or Service" section.
IMPORTANT:
Before installing a new bag, be sure:
The drawer side is securely locked.
The container is clean and free of debris.
- Place folded bag into the drawer. Open bag and pull top edges over the drawer top.
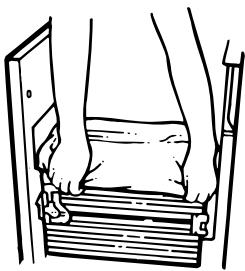
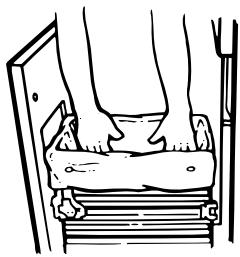
- Lock bag in place by pulling the four prepunched holes over the bag retainer buttons. Holes will expand over the buttons without damaging the bag.
- Press inside of bag against the drawer bottom, sides and corners for a smooth fit.
COMPACTOR CARE
Your new compactor is designed to give you many years of dependable service. However, there are a few things you are expected to do in order to properly maintain your compactor. This section will tell you how to clean and care for your compactor.
Changing the Air Filter
It is recommended that you use the charcoal air filter in the filter compartment.
To order the correct replacement charcoal filters, call the toll-free number listed on the cover or in the "Assistance or Service" section.
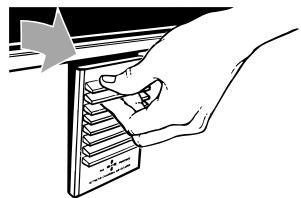
- Insert fingertips in the air filter cover and pull until the side tabs release. Then, lift the cover to release the bottom tabs.
- Remove the air filter by pulling the top edge of the filter. The filter should pull out easily. Throw away used filter.
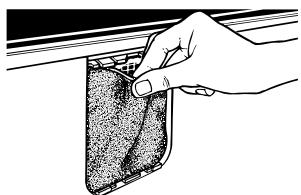
- To replace air filter, push the replacement filter into place.
- Insert the bottom tabs of the air filter cover and push in until the side tabs snap into place.
Cleaning
Before cleaning the compactor, turn the Key-Knob (or Key-Switch) to the OFF & LOCK position and remove it.
NOTE: Any services other than those outlined in this section should be performed by a designated service representative.
Cleaning Exterior Surfaces
- Wash exterior surfaces (including stainless steel) with a clean sponge or soft cloth and a mild detergent in warm water. Do not use abrasive or harsh cleaners. Rinse and dry thoroughly with a soft cloth.
- Wipe up spills right away. Some foods can damage the finish if left on the compactor surface.
Cleaning Inside theDrawer
NOTE: You may want to wear gloves since there may be bits of glass in the drawer.
- Remove the bag. See "Removing a Filled Bag."
- Press down on the lever-action lock (or Side-Lock latch).
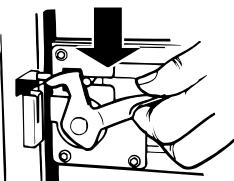
- Hold the lever-action lock down and tilt the side of the drawer out until the lock clears the drawer front.
NOTE: If desired, the drawer side can be removed by tilting it up, then lifting it out.
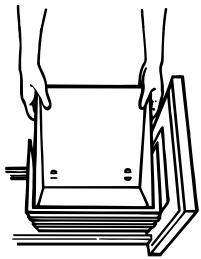
- Wash the interior of the drawer with a clean sponge or soft cloth and a mild detergent in warm water. Rinse and dry thoroughly with a soft cloth.
- If the drawer side was removed, slide it back into the tilted position.
- Press the lever-action lock (or Side-Lock Latch) down while pushing the drawer side to the upright position.
- Latch the drawer side by pushing up the lever-action lock (or Side-Lock Latch).
Cleaning Inside the Cabinet
NOTE: You may want to wear gloves since there may be bits of glass in the cabinet.
- Pull the drawer out until it stops.
NOTE: Look to see how the drawer rollers move in the tracks. It will be easier to replace the drawer after you have finished cleaning.
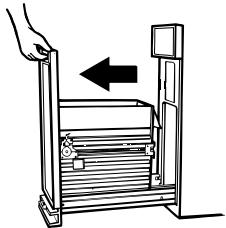
- Lift the front of the drawer to clear the stops.
- Grasp the drawer on the sides and pull it out the rest of the way. Set the drawer down gently.
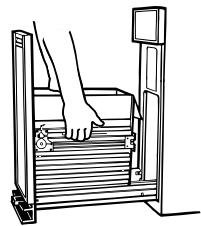
- Vacuum the inside of the cabinet. Liquid spills or wet trash should be cleaned up by hand, or by using a vacuum designed to pick up liquids.
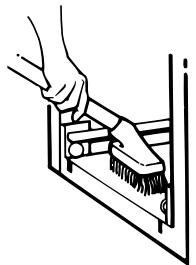
- Wash the inside of the cabinet with a clean sponge or soft cloth and a mild detergent in warm water. Rinse and dry thoroughly with a soft cloth.
- To replace the drawer, grasp it by the sides and insert the rollers onto the tracks.
- Lift the front of the drawer and push it in fully past the stops.
Cleaning the Ram
NOTE: You may want to wear gloves since there may be bits of glass on the ram cover.
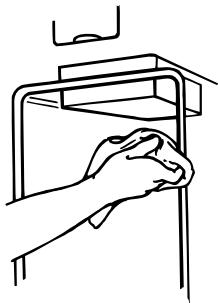
- Wipe glass particles off of the ram cover with a cloth or paper towels.
- Remove foods with a clean sponge or soft cloth and a mild detergent in warm water. Rinse and dry thoroughly with a soft cloth.
Cleaning Before a Vacation
If you will be away for more than a couple of days, remove the compactor bag. Remove the Key-Knob (or Key-Switch) and store it out of children's reach.
TROUBLESHOOTING
Try the solutions suggested here first in order to avoid the cost of an unnecessary service call.
Trash is not compacting
■ Is the drawer less than half-full?Drawer must be more than half full before trash is compacted.
Your compactor won't operate
■ Is the power supply cord unplugged? Plug into a grounded 3 prong outlet.
- Has a household fuse blown, or has a circuit breaker tripped? Replace the fuse or reset the circuit breaker. If the problem continues, call an electrician.
■ Is the drawer completely closed? Close the drawer firmly and start the compactor again.
■ Is the Key-Knob turned all the way to START? Turn the Key-Knob (Key-Switch) fully to START and release (on some models). See "Starting Your Compactor."
Did you press ON before pressing START? Press ON before pressing START (on some models). See "Starting Your Compactor."
The drawer won't open
■ Is the ram all the way up? Drawer will open only when ram is fully raised.
To raise the ram on models with a Key-Knob (or Key-Switch): Turn the Key-Knob (Key-Switch) to START and release. See "Starting Your Compactor."
To raise the ram on models with push button controls: Press OFF, and then press ON. See "Starting Your Compactor."
■ Is the Compress Cycle engaged? Printer remains LOCKED until you reset by lifting the foot pedal up.
There is not enough compaction or force
- Do you use the compacting cycle frequently enough? Compacting works best when only a few items are loaded.
Bottles don't break
How often do you notice this? Bottles will not break every time. The thickness of a bottle's glass and the content of the trash load below it may keep the bottle from breaking.
RECYCLING WITH YOUR COMPACTOR

PETE

HDPE

V

LDPE

PP

PS
These codes indicate which type of plastic was used in manufacturing the container. Your recycling program will confirm which codes are accepted for recycling.

OTHER
Plastics with this symbol cannot be recycled.

Items with this symbol can be recycled or were made from recycled materials.
A compactor makes recycling and landfill reduction efforts more effective and efficient.
Recycling Guidelines
Contact your community recycling program or local recycling organizations to find out which items are accepted for recycling and how they should be prepared and organized. These programs will provide essential recycling guidelines:
Method and frequency of collection—curbside collections and drop-off centers.
- Categories of recyclable items, and how to distinguish between them. Plastic containers are identified by codes on the bottom. Sort by the numbers inside the triangular arrows. For example, most plastic soda bottles and some cleaning bottles have code 1; most milk and water jugs, laundry and personal hygiene product containers have code 2. Paper and cardboard containers (paperboard) also have recycle symbols to indicate a container is recyclable.
Preparations of recyclable items. Most recycling programs provide specific guidelines on preparation. For example, aluminum cans and plastic containers need to be rinsed out, lids removed, but often labels can be left on.
IMPORTANT:
Some items, such as glass, should not be compacted.
Most recycling programs will not accept crushed glass.
- Check with your recycling program for specific guidelines on preparing recyclables.
Organizing the Recycling Workspace
Convenient recycle bins are made to fit in the compactor drawer. These bins, as well as plastic compactor bags, can be purchased in a variety of colors at hardware stores and supermarkets. Set up a system of color-coded bags in an area chosen for processing recyclables. Each color can represent a category of recyclable items, based on types specified by your recycling program. Separate recyclable items from nonrecyclable items:
Recyclable items can be sorted using the color-coded bags. Prepare items according to guidelines provided by your recycling program.
Nonrecyclable items should be compacted because compaction reduces trash volume to its original size: four bags of trash can be compacted into one bag. This contributes to reducing landfill volume and related waste transportation burdens.
REMEMBER: Do not expect items which contain minimal air, such as folded newspapers, to compact significantly.
Compacting Recyclable Items
Most recycling programs want the consumer to crush or flatten recyclable items such as plastics, cans, and paperboard. Compacting recyclable items consolidates volume and thereby reduces transportation costs—and also helps manage recycling workspace more effectively. The compactor is ideal for such a task. When a plastic bag is full enough to require compacting, place the bag in the drawer as shown in "Installing a New Bag." Then follow instructions in "Compactor Use." When the compacting cycle is complete, remove the plastic bag as shown in "Removing a Filled Bag" and return it to storage until it is full enough to recycle.
Reduce - Reuse - Recycle
ASSISTANCE OR SERVICE
Before calling for assistance or service, please check
"Troubleshooting." It may save you the cost of a service call. If you still need help, follow the instructions below.
When calling, please know the purchase date and the complete model and serial number of your appliance. This information will help us to better respond to your request.
In the U.S.A.
If the problem is not due to one of the items listed in the "Troubleshooting" section...
Call the dealer from whom your appliance was purchased, or call Jenn-Air at 1-800-JENNAIR (1-800-536-6247) to locate an authorized service company. When calling, please know the purchase date and the complete model and serial number of your appliance. Be sure to retain proof of purchase to verify warranty status.
If the dealer or service company cannot resolve your problem, write to:
Jenn-Air Brand Home Appliances
Customer eXperience Center
553 Benson Road
Benton Harbor, MI 49022-2692
Web address: www.jennair.com
Or call: 1-800-JENNAIR (1-800-536-6247).
U.S. customers using TTY for deaf, hearing impaired or speech impaired, call: 1-800-688-2080 (Monday - Friday, 8:00 a.m. - 8:00 p.m. Eastern Time).
NOTE: When writing or calling about a service problem, please include the following information:
- Your name, address and daytime telephone number.
- Appliance model number and serial number.
- Name and address of your dealer or servicer.
- A clear description of the problem you are having.
- Proof of purchase (sales receipt).
User's guides, service manuals and parts information are available from Jenn-Air Brand Home Appliances, Customer eXperience Center.
In Canada
If the problem is not due to one of the items listed in the "Troubleshooting" section...
Call the dealer from whom your appliance was purchased, or call Jenn-Air at 1-800-807-6777 to locate an authorized service company. When calling, please know the purchase date and the complete model and serial number of your appliance. Be sure to retain proof of purchase to verify warranty status.
If the dealer or service company cannot resolve your problem, write to:
Jenn-Air Brand Home Appliances
Customer eXperience Centre
200 - 6750 Century Ave.
Mississauga ON L5N 0B7
Web address: www.jennair.ca
Or call: 1-800-807-6777.
NOTE: When writing or calling about a service problem, please include the following information:
- Your name, address and daytime telephone number.
- Appliance model number and serial number.
- Name and address of your dealer or servicer.
- A clear description of the problem you are having.
- Proof of purchase (sales receipt).
User's guides, service manuals and parts information are available from Jenn-Air Brand Home Appliances, Customer Experience Centre.
Accessories
To order a color custom panel and handle, contact your local authorized dealer.
Replacement Bags - Call for Part Number.
Charcoal Air Filter - Part Number 4151750
Color Custom Panel and Handle:
Part Number W10122178 (Black)
Part Number W10122177 (White)
Part Number W10122193 (Oiled Bronze)
Part Number W10122189 (Black Floating Glass)
Part Number W10122161 (Euro Handle)
JENN-AIR® MAJOR APPLIANCE WARRANTY
ONE YEAR LIMITED WARRANTY
For one year from the date of purchase, when this major appliance is operated and maintained according to instructions attached to or furnished with the product, Jenn-Air brand of Whirlpool Corporation or Whirlpool Canada LP (hereafter "Jenn-Air") will pay for factory specified parts and repair labor to correct defects in materials or workmanship. Service must be provided by a Jenn-Air designated service company. This limited warranty is valid only in the United States or Canada and applies only when the major appliance is used in the country in which it was purchased. Outside the 50 United States and Canada, this limited warranty does not apply. Proof of original purchase date is required to obtain service under this limited warranty.
ITEMS EXCUSED FROM WARRANTY
This limited warranty does not cover:
- Service calls to correct the installation of your major appliance, to instruct you on how to use your major appliance, to replace or repair house fuses, or to correct house wiring or plumbing.
- Service calls to repair or replace appliance light bulbs, air filters or water filters. Consumable parts are excluded from warranty coverage.
- Repairs when your major appliance is used for other than normal, single-family household use or when it is used in a manner that is contrary to published user or operator instructions and/or installation instructions.
- Damage resulting from accident, alteration, misuse, abuse, fire, flood, acts of God, improper installation, installation not in accordance with electrical or plumbing codes, or use of consumables or cleaning products not approved by Jenn-Air.
- Cosmetic damage, including scratches, dents, chips or other damage to the finish of your major appliance, unless such damage results from defects in materials or workmanship and is reported to Jenn-Air within 30 days from the date of purchase.
- Any food loss due to refrigerator or freezer product failures.
- Costs associated with the removal from your home of your major appliance for repairs. This major appliance is designed to be repaired in the home and only in-home service is covered by this warranty.
- Repairs to parts or systems resulting from unauthorized modifications made to the appliance.
- Expenses for travel and transportation for product service if your major appliance is located in a remote area where service by an authorized Jenn-Air servicer is not available.
- The removal and reinstallation of your major appliance if it is installed in an inaccessible location or is not installed in accordance with published installation instructions.
- Major appliances with original model/serial numbers that have been removed, altered or cannot be easily determined. This warranty is void if the factory applied serial number has been altered or removed from your major appliance.
The cost of repair or replacement under these excluded circumstances shall be borne by the customer.
DISCLAIMER OF IMPLIED WARRANTY; LIMITATION OF REMEDIES
CUSTOMER'S SOLE AND EXCLUSIVE REMEDY UNDER THIS LIMITED WARRANTY SHALL BE PRODUCT REPAIR AS PROVIDED HEREIN. IMPLIED WARRANTY, INCLUDING WARRANTY OF MERCHANTIBILITY OR FITNESS FOR A PARTICULAR PURPOSE, ARE LIMITED TO ONE YEAR OR THE SHORTEST PERIOD ALLOWED BY LAW. JENN-AIR SHALL NOT BE LIABLE FOR INCIDENTAL OR CONSEQUENTIAL DAMAGES. SOME STATES AND PROVINCES DO NOT ALLOW THE EXCLUSION OR LIMITATION OF INCIDENTAL OR CONSEQUENTIAL DAMAGES, OR LIMITATIONS ON THE DURATION OF IMPLIED WARRANTY OF MERCHANTABILITY OR FITNESS, SO THESE EXCLUSIONS OR LIMITATIONS MAY NOT APPLY TO YOU. THIS WARRANTY GIVES YOU SPECIFIC LEGAL RIGHTS, AND YOU MAY ALSO HAVE OTHER RIGHTS WHICH VARY FROM STATE TO STATE OR PROVINCE TO PROVINCE.
If outside the 50 United States and Canada, contact your authorized Jenn-Air dealer to determine if another warranty applies.
If you need service, first see the "Troubleshooting" section of the Use & Care Guide. After checking "Troubleshooting," you may find additional help by checking the "Assistance or Service" section or by calling Jenn-Air. In the U.S.A., call 1-800-536-6247. In Canada, call 1-800-807-6777.
Keep this book and your sales slip together for future reference. You must provide proof of purchase or installation date for in-warranty service.
Write down the following information about your major appliance to better help you obtain assistance or service if you ever need it. You will need to know your complete model number and serial number. You can find this information on the model and serial number label located on the product.
Dealer name.
Address
Phone number
Model number
Serial number
Purchase date
6/09
SECURITE DU COMPACTEUR
ASSISTANCE OU SERVICE
Customer eXperience Centre
200 - 6750 Century Ave.
Mississauga ON L5N 0B7