
PY55E8B - Crepe maker TEFAL - Free user manual and instructions
Find the device manual for free PY55E8B TEFAL in PDF.
| Product type | Electric crepe maker |
| Brand | TEFAL |
| Model | PY55E8B |
| Power | 1500 W (estimate) |
| Voltage | 220-240 V ~ 50/60 Hz |
| Cooking plate | Non-stick coating |
| Plate diameter | 30 cm (estimate) |
| Capacity | 40-60 mini crepes or 20-25 large crepes |
| Adjustable thermostat | Yes |
| Heating indicator | Thermo-Spot™ (evenly red pattern) |
| Accessories included | 2 spatulas, 1 ladle, 1 spreader (depending on model) |
| Safety | Hot surface, do not immerse, mandatory grounding plug |
| Maintenance | Plate and accessories dishwasher safe (except heating element) |
| Main material | Plastic and metal |
| Weight | Approximately 2 kg |
| Dimensions | Approximately 40 x 30 x 10 cm |
| Usage | Household use only |
| Warranty | 2 years (standard) |
| Repairability | Parts available via TEFAL after-sales service |
Frequently Asked Questions - PY55E8B TEFAL
User questions about PY55E8B TEFAL
0 question about this device. Answer the ones you know or ask your own.
Ask a new question about this device
Download the instructions for your Crepe maker in PDF format for free! Find your manual PY55E8B - TEFAL and take your electronic device back in hand. On this page are published all the documents necessary for the use of your device. PY55E8B by TEFAL.
USER MANUAL PY55E8B TEFAL
-in bed & breakfast locaties.
Póληm oklakw atuxnμatw
H 8eepoakpaia Tnu npoaaauuv wipaveiuv umuoe iiva auenueyn kata nV wpa aleitoupyiac nTc oukeunc. Mny aayieTe Tc Zeotc eiuapveies nTc oukeunc.
Eav xpaonoeite tn oukeun aacmuz ie ta naidwa, va ta eruBentere uoxevuc.
Mvy AyyiTEc TE CTeC ESHTAPVEAE Tc quoKEUc
H oukeun autn dev penei va xpuonaioeia tao atoqa (ouinepeaiauavoeuvowtw naidow) meeuiueveoc aojuatukc n daovontkec kavotntec n ataqua ywicp neipa n ywnnc tnc oukeune, ectac vexox lajolxteok dcnylc vna xynon tnc oukeune n entmuovutai anto atojo uenuvo Tuay aiaeiaouc.
Ta naia npei va mtnpovtai kai va mnu tuc emtpetetai va naouv me uoukeun.
ZE peintwn atuuyjatoc,pieTe aquewKpuo vep oTo Ekyuaia kau evi avaiapantitka aeote yatap.
Oi kavoi ao to yapepema npopei va eival noIeu emikivduovoi yia ta zwaou exouv iiaitepa euaiotno avanveuotko ouotnla, otwca tntyva Stouyoune stouc oikottec nnuv va atoapkuvouv ao tov xwoyapejmuoc.
He BkIIOuayTe pIn6Op BXOIOCTyIO.

RUS
PnirtoBneHne
3aIpeaaeTcCTaBnTb KYHOHYYU YTBapb Ha HArpeBaTeNbHe IIOBepXHoCTn pnp6opa.
Hepekbtpe npdyktbl HenocepdtBENHO ha peueTkax.
PonHocTbIO pa3MOTaIte shHyp.
PnCeoDnHHTe NHPK nPbOpy (B 3abNcMocTn OT mOden), 3aTeM BCTABBe BVNKy B pO3EKY (E).
Ecni Baa np6op opobopyoBaan CbemHbim Hhypom:B cnyae NobpekDHeHH uHpy pNTAHN erO cneIyET 3aMeHnTb hHypOM ININ CNEUAnBbIM bOKOMK, KOTOpBe bbl MoKeTe npNo6pcTyn Opn03BOJnteIN ININ B cepBHcONM cHTpe.
Ecnn Baw np60bop 6obopyoBaan ctauohapnBm shypon mntanHn: ecnn Hyp pntanHn NOpeKJenB, B ceIAX 6e3OAnachocHT ernoAbe bblONHnTeC npo3BODnTeMe, INN B COOTBTCTBYUOcem cepBNCHOM CEHTpe, INN KBaIIncnupOBaHHb CneuaJIncTOM.
Поверет,Чтообын rapанжени Ваши сети COOTBETCTBOBANO yuka3AHOMY на корпус рирбора.
PnpncoeDnHnTe np60k P03eTKe c 3a3emnHeHnEM.
PnIcNIOJIb3OBAHNyUdINHITNEYb6DInTECB,TO,ONCHa6KeB BCTPOENHbIM PA3bEMCm 33AeMIIeHNHe.
Cneinte 3a paacnoonKeHem shHyp nHTAHn, KOtOpBn NCNbLYETcE63 nn BmecTe C yynNHITeMn, co6nOaIte Mepb npedoctoPOXHOCTn, YTObI shHyp nHTAHn He Me mian pncSyCTbyoHUM.
- ModenC T EPMOCTATOM: YCTAHOBITE TEPMOCTAT B NOJOKEHNE MAKCHYMMA (F).
Annapat donjken harpebaTb8 8-10 MNHT C tepMOCTaTOM.
Ппговом Исторьим Annapata MOKET NOВИТСЕ NGKIM 3ларх и дмOK.
Thermo-SpotTM (y COOTBETCTBYOUEN MOJEN): MapKINOBKA TepMo-ONT cTAHOBNTc KPACHOn, KOra pnpbO nparpeBaTeCdo NEH6XoDMIOEM TEMNEPAPTyPi I FOTOB K PnIPOTRBOHNO.
Poncle npedbapentelhoro pa3orpeba np6op rotoK cnOIOB3OBaHIO.
B 3aBcHmOCTn O mOeJIy, pa3NeJIe NIOLOBHINOM HUYKHOE KOJIHcHbTOCTa COrNlACHO BbOpAHOny peuENTY:
Д. Дья 6 МИнБИЛУНСКВ: HOANONHITE NOLOBHNK TECTOM DO HIXKHERO yUPOBRA (2a).
-Дяблновиona'deВ:HaNoJIHnTeNoIHyIIOJOBnIK(2b).
Д. ИбolyшхИМОнВ(ЗавиCMOCTN OМОДEN)ДВБЖДы HANOHNHITE NOHIN NOHONBHK(26)
B 3abcIMOCn OT MOeHb, b6cTPO n paBHOMepHO pacnpednTE TectO hDM NONOBHkA (2) (DnManeHbKIN 6NHNKOB) INN packaTbBaTeEN dNr Tecta (3) (DnM60bnHxN 6NtHOB) KpyRObMM DNBIXEHAMN U3 CEHTPA.
PenebopaHaiBate 6bnH, nCIOb3yJI JONATOHy (1 IIN4), npEHa3aHuenhyo dnn 3toi cien. Bpemn prrnoTobEnna H KaKdoT CTOpHO - OKO2-2X mNHT. ITOe toro, KcBnHrTOBt,
m36eJAHne NOBpeKdEHHN pnpbopa (ycTpoiCTBA), HNKOrJa He nCnObl3yIeERO dnn 6nIoD, Tpe6yUoHx npriroTOBHeHn HA OTKpbITOM OHre.
CNOxHte ERO no CBOEMY JXeAHNIO: B TpyOoKHy NIN NONJOM, B YcTbeP43a H NO IN B VUDE KOHEBPTNA.
B 3aBcIMMOCTN OT MOpEN, JnRA LyuHrero PaCnpeDeneHH Tecta peKOMeHNyETcO KYaTHb IOnOBHmK (2) INI paKaTbBaTeB (3) B BODY neped KAKdON OonePAHn.
ДагпгорханededинКOBьтma Воробхостс BCGERдльэутесьпл actmaccoBи INI DepeBBHNOI NaTkoN.
HaKaIaIbIbTaB HauHky B 6JIINbI IyUwe Ha TaPeJIke, a He Ha IIITKe.
B 3aBcIMOCnT O MOnEN Bb MoKTe TAKKE rTOBNTb 6IIOJa- rPInb.
Pocne nCpOJIb3OBAHnA
3aepnaetaetc tcbntb nntky h xpyknyo nopepxhoctb.
He nomeaie Torepuyu nnTky noKpaH.
3anpeaaetcnoptykaTB npibopBvOy.
HnKoRgHa He norgpykaite np6op u shyp nHTaHnB B BOy.
- Modem C tepMOCTaTOM: YctaHOBnTE TepMOCTaT B nO3nIOB. BvkiIOHeNo.
BbHtBe BnHK m3 pO3eTK. 3aTeM, B 3aBcIMoCTOn oMoJIi, OTOeDnHtI hUpy Ot npri6OpA.
B 3a2bMCIO7 OT M0DJI, CHMIMTE PNTKY DnI npAIGOTOBENH. Ouchntte PNTKY n Cam nPbOp, INcNlB3yra6ky, ropruy BOJn JxNkIOCTb IINMbTBA NOCbdy.
XpaheHne (B 3aBNCMIOCTN OT MOdEJI)
Xpahine tprisbop B meche, HedocytynHom for detei.
Ipepepehnte npie60 npctahobnre ero nctoi,pohoHn uytochnoi noBepxHoctn, Haprrmep cKeptn, TtOb6u 366ekaTb nopekdeHn opepxHoctn pIITKn (A1 u B1 u C1).
XpaHHTe KaKdyu npnHaNDexKHOCTb B ppeHa3NaHuEHOM dIra Hee OTEKe:
1- shHy npHnHn, cnDyIe YKAcAHnHm, IIO6paKeHHbHM HNKe CImBnOAM:A2 B2 B2 C2 (B3ABcIMCOnT O mENJ)
2-Jonatnk(1n4),Tak,KAKNOKACAHOCNMBONAM:A3nB3nC3(babncmocTO mOden);
3- 106OBHnK (2) n pacnpedenitnetb (3), taK, KaK NOk3aHO CUMONAM: A4 n B4 n C4 (B 3abcIMCOnTO mOndoi).
4-ПлNTKY cTAYOBHTb HA hO npriObpa, TAK, KAK nOKa3Ha Ho pCNYKHe C5и C6 (Днг моелуcre'Party Dual).
BnHbI
OT 40 do 60 MNH-6NHNOBK INM TO 20 do 25 60bNsXn6 MHNOB (B COOTBCTBm C Bb6pAHNOH PnIKTK) & BEmP nprTOTObNEHn: 2 MNH. Na KaKDoJ CTOPOE
06bHuOe TcTo Ha MOJoke
- 500 r npoceroHHO npuhenyHou MyKU
·1 monoka·6 nU·COnb - PACTITIELBHOE MNI CNBOHOOE MACIO
B Kepammyecko nocye CmeaTaB npocerHHyIOIueHnHyO MyKc MONOKOM DO NOnyuEHHN XIKDkoT ETeA. I06abHT B36bTIbe KAK DnA MOneta RaCa, 2 UeNOTKn CoIN 2 CTONObBe IOnKKn PactntelBHO macNA.
EcnI TECTO CNIKMOCTGYOE,B MOHENTBIENKU Odoabte HeNoBIOJSTCKAHBOYI NBOHBIpepeMeuAITE TECTO.
Tecno 10a BnHOB,peNaHaeHHbX DN COHENO pInpnpabbl, MOKET 6bItoDOnHHTbNO HOIPOCENHO
TeTo n3 rpeuHeBoM MyKn
Дяпю decorhenbix bInHOBПшeHnHaMyka MoKet 6bItb 3aMeHeHa rpeuHBoM MyKoI.
TecTo Ha nIbe
Дябоюмгкх6лновЗаменгт1/4Л молoka1/4пьа.
Tecto Ha Boe
ДлгболгплгкхблнOBMOТОКOЗAMeHЯOTВОД.
Блнь CBetуновиCBNKamn
- 3 JOMTnka BetuHbI
- 1 MUCKA tepTORO cbipa
-1 yaIka CBexKx CINBOK
PpnilaIra (3anexKHO bID MoJeI)
Mihi-noNatn

ОпJOПИК

P03piBIOBa

Jlonatka 4
BctaHOBJIeHHJ
He CTaBTe npCtpi Ha He3aXuHEni NOBepxHi (CKIaHNcTIn, TKAHHa, NaKoBaHAI Me6nI ...).
Knlo npnaad BINOPOKTOBYeTcB B CEHTPCTOA, BCTAHOBITb Ioro TAKIM YHOM, MO6 BIH 6yB NO3a DOCAXHICTO DItei.
3Hmltb Bc0 ynaokOBky, etnkeTkn a6o npnlaedycepeinHa ta 30BHI npntcpo.
Cnkiyue, 60b ynakobka, npnaiaa, naktei, naketikn 6yni HNDOTynHMM Dn4 dtien.
3HImaiTe pnpiaJaDja OndHe 3a OndHM, y npOdKdy, 3BOPOTHOmy do npOdKy yknaJadhny.
BIMMATE BOIOJONLatKIN [1&4]OONOHK (2)i p03PINHOBA4D (3aneXHO BID MOJI).
3aJIeXHbI Bd MoJeI, po3McITb IIaCTnHy BHarpiBaI.
3aIeXHNO bID eNJI,peKoHaiTeB aTOMU, 0IO nnTKy BCTaHOBHe Nb Hbay pInnady CTiIKO Ta HaneXHMm YHOMB. BkOpncSTOBYnte TINbky nINTKy, HadaHy BnPo6hNKOM y KOMPiNeKTI 3 npinlAon, abo KYNneHy B yNtOBHoaJExHOMy cENTPI cepBICHorO O6cNryOByBaHHa.
P03cmtt bpiptn ha Tepeidni nopebexhi; yHnKaIte KOpNCTyaHNr npAnJAD HA NkI aO xHNIK nopeBxHI.
Дягтого уб He 3aBdAn nOuKoDjEHHbIHy: BkOpNCTObyIte Horo TInbKn pAOM 3nIcTAbKOIO, dNЯ hOoi IHO yO bCyOHe (HaNpRknad, He CTABTe IYO Do dYxOBKn, Ha rAOBy a60 eNEKtPNKHy pNITy ToTO).
Ppeed THM KI BNEPUE KOpEYBATMCIPRINADOM,ONMIITE PNTKTY aBO PNTKTK (DINBHTBCaP03DN iNcII RBNOPCCTAHNA), HAINIte Ha PNTKTK HeBENIKNY KInbKiCTb OJIJI TA nPOPTPiM M'KOIO TKHAHIOHO.
PiiknloeyHraHaarpBaHHa
Uo6 3anobirn neperpribaanIO npnctroIO, He pOzMIyIte Ioro y KtKy nn 6bnCTNIH.
Hikon He 3aIIuai Te npnad, 63e Harnay I cnIkyBAti, 106 npnad He 6yB DOCTynH dITm nI qac BVKOPACTAH.
LcE npnad He nobHeBbMMkATncb che3 3OBHlHiTaiMep a6o chepe3 OKpemyCnCTMY nDCtAHuiHORKepyBaHHra.
He 3aIIwaIte BBIMKHeHn npnaad6eHaarLy.

UA
PnuroToyBaHHa
He KaiaTb 3napaIdI dnn npirotoBaHHa nOBepxHIO npnaIy.
He poaip3yire kky 6e3nocepeHbNo Ha nntuCi rpnna.
BnTnHtB npoBID NOBHCIO.
Плд�ьпгоьд дрпсгюо (anexho biMmoJI) ta CTINHOI pOteKn E.
RJaIO BAVI pnpCTPI OCHaUeHO BVcYBHM UHpyOM: y BNpAdKY, KOJI KAbenBJ ENEKTPONocTauHH NOUKoDKeHJ, HOrO Heo6XiHO 3aMHNi IHNWM KAbelem a60 cneuianbHM 3^ eHaHnHM, HaNanHM BvOoHnKo m a60 horo cepBicHM CEHTPOM.
Kkio Baw npctpi OchaueHO ctaioHApnM Kaebem: y pasi YuokDgeHHN uhyp XbneHHN cnI 3BepHTnco DO BVPoBHNa, CEtpy Cepbicoro 6cnyroByaHHA aOoOCbN, 0o Ma anAholariy Kbanifkaio, 3 NITAHN IYO 3AMHN 3aJn nonpepekeHH TpaBM.
Nepeipte npnaina H cymiCtib 3 iotnykhiCTIO T an hapyioE enektpomepeki, no3haueHHm iN pniIaNAD.
IIqKnIOHbI npnCTpIi Do eNEKTPNHOI PO3ETKN 3a3eMNEHHM.
KkIo BnKOpNCTOBcYbEe CnEeTPNHNI NOOBxByaB, BIn
BOHNHE MAT MBOHTOBAHE 3a3eMNEHH
Po3aOboyouch uHyp jxNBHeHH, nIXKnIOueHn 3a donOMorIO nOdoBxyBaA 6o3 Be3 HbOr, CTeXTe 3a TmM, Uo6 roTcI MORNI 6e3 nepeuKoN pepeMiuaTnc HABKO N cTOny, He cNOTkaOuCb 06 HbOr.
- Modeni 3 nepemukayem "Bkn./bKn." (on/off): nepebeit'd npemekum y nIPOKENKHNBA "BKN." (on): aORapitb IINkKatop (F).
Iihi mojen: npnaad nooHnac npaIOBATN nCIAI NIKIOUOeHNr DO CTiHOH oP3EKN.
I03BONbTe npncpoIO HarpitncBaPnoO8K-10XBNH.
BüIniHn HPrTcPoM IerKOro 3anaxy Ta dmy npri nepiPbOMy BvOKPiTaHJI HiOPMblNbHM VBuIeM.
Thermo-SpotTM (y BiinobiHocti do mojeni): iHnkaTOp TepmoCnot Hbyaeb cyuInbHoro cepBoHoro KOblOpny konn npnaad nonepeHbo niiirpiTn Ta nobHCTIO roTOBn Ira npiroTyBaHH HanoIB.
PnicnnepeHbO rAigbaHAnpIeTPI roTOBnIO do pOboTN. 3aenXho BID moEni, BIKOPCTOBYte BmIPIOBbHNoONoHkN dne OepzhaNNOTpiHOJI KINbKOcTI tCiTa 3oaPbAHMMpeTeNTOM:
Дага 6 Mii-onoANOK: доишу до obilsu Иько рibну onoONHKA (2a).
- IJIaONaIOK Ta MInHicB: 3aIOBHiTb OJIoHOHK (2b) NOBHcITo.
-ДагТOKИХМЛИNHUB(ЗалЕЖHOВ MОДENI):ЗАПОВHITБ OПОLOHIMK dJIi(2b).
3aeneXHO BID MOIeni, HeraiHO pO3piBnIte TICTo 6e3 npNTNcKy HNIXHbO YoACTHIOO OONIOHKA (2) (NIAI MiHi-OJAnOKo) A60 pOPIBIHOBaHEM (3) (NJBENBIKNX OANAO), KPYROBMN PyxAMi BIN CEHTpy. IpeBePertA Te NoTAKIOU (1 a60). Hac pInrOTyBaHNr: Pm6Pi3HO 2 XBNIIHH 3 KOXHORO 60ky. IOTIM 3rOpHITb, Rk Bam NotpioHO: pyNETOM a60 bBOE, yuETBepo a60 y BNRIJI KoHBepa a60 KBJTKn.
L063anobirn
noiokdoxhenH npnaJy
(pnctOHTIO),HKNOI HE
BVKOPNCTOBYIte HOrO dJI
CTPAB,IO BIMARAOJB
pnrHOrTOyBaHHa HbIKPHTOMy
BORHI.
3aeneJHO BID MOden, DnA 3pyHOrO po3piBHBoHHN TicTa, peKOMeHNDcMo TpIMaTH ONoONHk (2) a60 po3piBHOaB (3) y TneuHcy 3 BOIO.
3aBxNk KopCtYNeTec nIaNCTKOBOO a60 depeB'HOIO NaTkoIO, dIro TRO u6e H 3aBdTuN oNIOKoJHNE NOKPNTTO NPTNIK.
OdoabaTe cOnoou O moNiuH IB Taipui NiCn npiroTyBaHHa He Ha nlaacthi.
3aJIexKHO bID moJeni, Bn moKeTe taKoX FOryBaTN cMaJxehi cTpaBn.
Пия BИКОпсТань
He CTABTE PINTKY Ha lamky NOBepxHIO.
He ctabte rapauy nniTky niD body.
3a6b0pOHeTbc83aHypIOBAtn npna.
Hikon He 3aHypoi Te npina Ta unyp y Body.
- Mojeni 3 TepMOCTATOM: BCTAHOBITb TEPMOCTAT y NONOJEHHA "BUNK." (off).
BHTbnpD13tHNOI POETKNI. TImAN, 3aENHO BID MODEI, BHTbNpOIB13 pNCTPQIO. DaJIte pNCTPQIO oxONHYTn.
3aJIeXHO BID MoDEJI, 3HIMITb INaCTnHy.
MmIte pIaTnHy I KpOyncPiNCTPOIO rYbKOIO,rapAHO BOIO TO MIOIOIOPIINHO。
OnolohNK (2), OnaTNK (1 i 4) i ta NpactHny MoKHa MNTN y NocyDAMINH MaHHi (3aJIeXHO BID Moei).
Pe3nctop He nipJrae uHHeHHIO.
B pazi cunbHoro 3a6bpydHnH, 3aekayTe DOKi BIn nobHIcIO octHneTae T aNotpItb Horo cyXIO TKaHHIO.
Hikon He KOpIcTuYTeCm TEaMeBOIy6KIO Hi NopoUkOM JnA uuHeHH, 0oE H3abAtnIoNkoDKeHH BapInbHi NOBepXHi (HanPKiHa, aHTnPnPrarHOMy NKpTTTO Toio).
36epiraHHa (3aJIeXHb BId MoDeni)
36epiraite ckaadeni npnaad noani bid dire.
IpepebHtI pIcTPII naTocTabe Ioro HA YIcTBy, PiBHy taCTiKy NOBepxHNO, HApNkLIck, cKaTePtyN, dIy NHyKHeHHa NsO KoDjE h NpAtnHnI nI prIgOTyBaHHa (A1 a60 B1 a60 C1).
36epiarte KOKHe npinaada y BiiNobiHOMy BIDcIKy.3aBKnjYknaadae npinaada b TAKOMy npoDKy:
1-npobidKJbHnBnHaYoNcIIOBOHCTi,06baJxHeHHaMaIHOHkX: A2 a60 B2 a60 C2 (zaneXHo bIO madoiJI)
2- nonatkn(1)K3o6bpaKeHn MaIIOHKa: A3 a6o B3 a6o C3 (zaneXhoBID MOJJI)
3-ONOJHNIK 2 a6o p03JIbHOBa 3, JIK 3O6paJbeHO Ha ManIOHKY: A4A b60 B4 aC0 F4 (zaneXhoB iD modenii).
4 - Harpiaabha NOBEXHPX BCTAHOBIOCTbK 306paKeHO HA manKOHY C5 Ta C6 (Jra moNero CreP'Party Dual).
ToHKi MInHci
40-60 onaok a6o 20-25 mInuB (bIDNOIBIO DO o6paHOI pnaCTHIN) · Yac npriroTsyBaHH: 2 XB.3 KOKHO6Oky
Knauchne φpaHcy3bke ticTo
- 500 r npociaHoro 6opoSHA
-1 ntp monoka -6 aecb
·cib·macno a6o onir
3MiuaTe 500 r 60poiHa 31 nItpom MoIoka y EMKoCTi do KOHCmCTeHJIiBepuKIB. OdoJIte 63nTHx RcB, 2 iINKn cOni Ta 2 CTOnOBI noKKn oNII a6o pO3TOnPiHeHO macna. DaIte NoCToAtn I- 2rDOHNH.
KIIIO TICTO BIAIBNTBcRA 3AHTAO YCTMnI INI PNIOTGYBAHNA TOHKHX MmIHUIN,DOJAAITE TPOXN BOHN I3HOB MMIAITE.
ConOHJI MInHJI a6O OJaNKo MOnKH pNirGTOyBAtn, DoaABuHo Do Ticta 6bnBe conJe.
TicTo 3 HnnpociaHoro 60puHa
ДиЕснOLOKINxОАДOK a60 mIInHcIb 3aMihTb npOciHe bOPOuHO HenpOciHIMN.
Tohki MmHcI 3 KypkoIO Ta Bepzkamn
- 3 cknbooyk KpyorO m'ra
1чашka Teptoro cnpy - 1 yaška CBiKxB cepkib
PoklaIbT NIOBHy CKN6OoKNI KpyrO O M'cHa HMIInHeCb, KOJI Bn BxE nepeBepHyn INO Ta BI HmJKe roTOBni, nocnnte TepTn CnOM. KOJI KpyrE M'HO SoDe HapriEcb,doJaTe CBIXKs BEpIKBa TA 3rOphIT"KOHBePTNKOM".
ToHKi MInHci 3 pOKΦopOM, CBIXKIMN Bepzkamn i BOJocbKIMN rOpixamn
- 1 mIMATOK pOKΦopy (teptoro) - 1 mana yauka CBIXKx BepuK
- 4-5 TOBENHX BOONCBHX ropiixib
3MiiaIte yci cKlaIobi. BnKlaIaITb MInHeCb Ha TApIky, DOnaiTe HauHKy Ta 3rOpHtB BuTBepo.
ToHki MInHci 3 MeiOM, BOIOcBKMn rOpixamn a6o nICOBIMn rOpixamn
- 3 CTONOBI NOKKI Meуd
- 100 r noipi6henHX bOncbKnx a60 niocBnx ropiXib
3MiuaIte yci cKnaDoBi. IicnnepeBepTaHn MmNtca, KOnn BIn MaJKe roTobuB, BnKnJaITb cyMlHs Ha MmHHeCb Ta 3rOphIt b Horo BuTeBpo. BnPrMaIte KInBa keCyhN ha PnactHi. NpOabaiTe 3 36UttMMBepkKaMn.
PekomeHdaui 3 noJaBaHHa
3akyckn
·KoJIueHnI NOcO6b, Hap3aHnT OTOHkMm CmYJCKaMn (noJIHTn IIMMOHHM COKOM) ·Kpa6n, KpeBETKn a60 IMAtoHcTu Tynu, 3MiUaHni 3 MaIOHe3Om a6o rIpnuHUM COyCOM ·IIMatoKn cnapRi M aHOHe3O· ToHKo HApIaHn ABokAo, pInpPabLeHn OcTOBm COyCOM a6o COyCOM TaTAPr ·NeepuNi "No-roPe2kN"
Ochobhi ctpaBn
- nojdiHHeNe Kpye M'aco y JKOmy coyci kappi · MopnpOyKTu y BepuKOBomy, 61oMy cocy abo npnPabvi "Tcna Octpobib · Oboi, HapnKnad, uHnHaT, MOpKba, pina a60 rap6y3 B coCy3 bepuKAMn a6bITMMn RmAmn
Cnp
- 蒜TIN YIeD,EP, TpOJep a60 napMeaH (DOdABaHTe CHP nAPPKIHUπPnRTOYBAHNH (NcIIN nepeBepTaHH OAnKn A60 MmHnCt) Ta daJIte myo HTOANTnCTC) ·POkFpO, CTInTO h 4pIb6Hn IShBeuApc3Kn CHP (nocMTE A60 HAMaXe THe rTOBOTi oAnKn a60 MnHnCI)
Deceptn
Thank you for buying this TEFAL appliance.
Read the instructions in this leaflet carefully and keep them to hand. They apply to every version depending on the accessories that come with your appliance.
This appliance is intended to be used in the household only.
It is not intended to be used in the following applications, and the guarantee will not apply for:
- staff kitchen areas in shops, offices and other working environments;
-farm houses;
-
by clients in hotels, motels and other residential type environments;
-
bed and breakfast type environments.
For your safety, this product conforms to all applicable standards and regulations (Low Voltage Directive, Electromagnetic Compatibility, Food Compliant Materials, Environment, ...).
TEFAL SAS has an ongoing policy of research and development and may modify these products without prior notice.
Any solid or liquid foodstuff that comes into contact with the parts marked with the logo should not be consumed.
Caution: this appliance is not a toy.
Prevention of accidents at home
- Accessible surface temperatures can be high when the appliance is operating.
- Never touch the hot surfaces of the appliance.
-
Never leave the appliance unattended when plugged in or in use.
-
This appliance is not intended for use by persons (including children) with reduced physical, sensory or mental capabilities, or lack of experience and knowledge, unless they have been given supervision or instruction concerning use of the appliance by an adult responsible for their safety.
Children should be supervised to ensure that they do not play with the appliance. - If an accident occurs, rinse the burn immediately with cold water and call a doctor if necessary.
Cooking fumes may be dangerous for animals with particularly sensitive respiratory systems, such as birds and small mammals. We advise owners to keep them away from the cooking area.
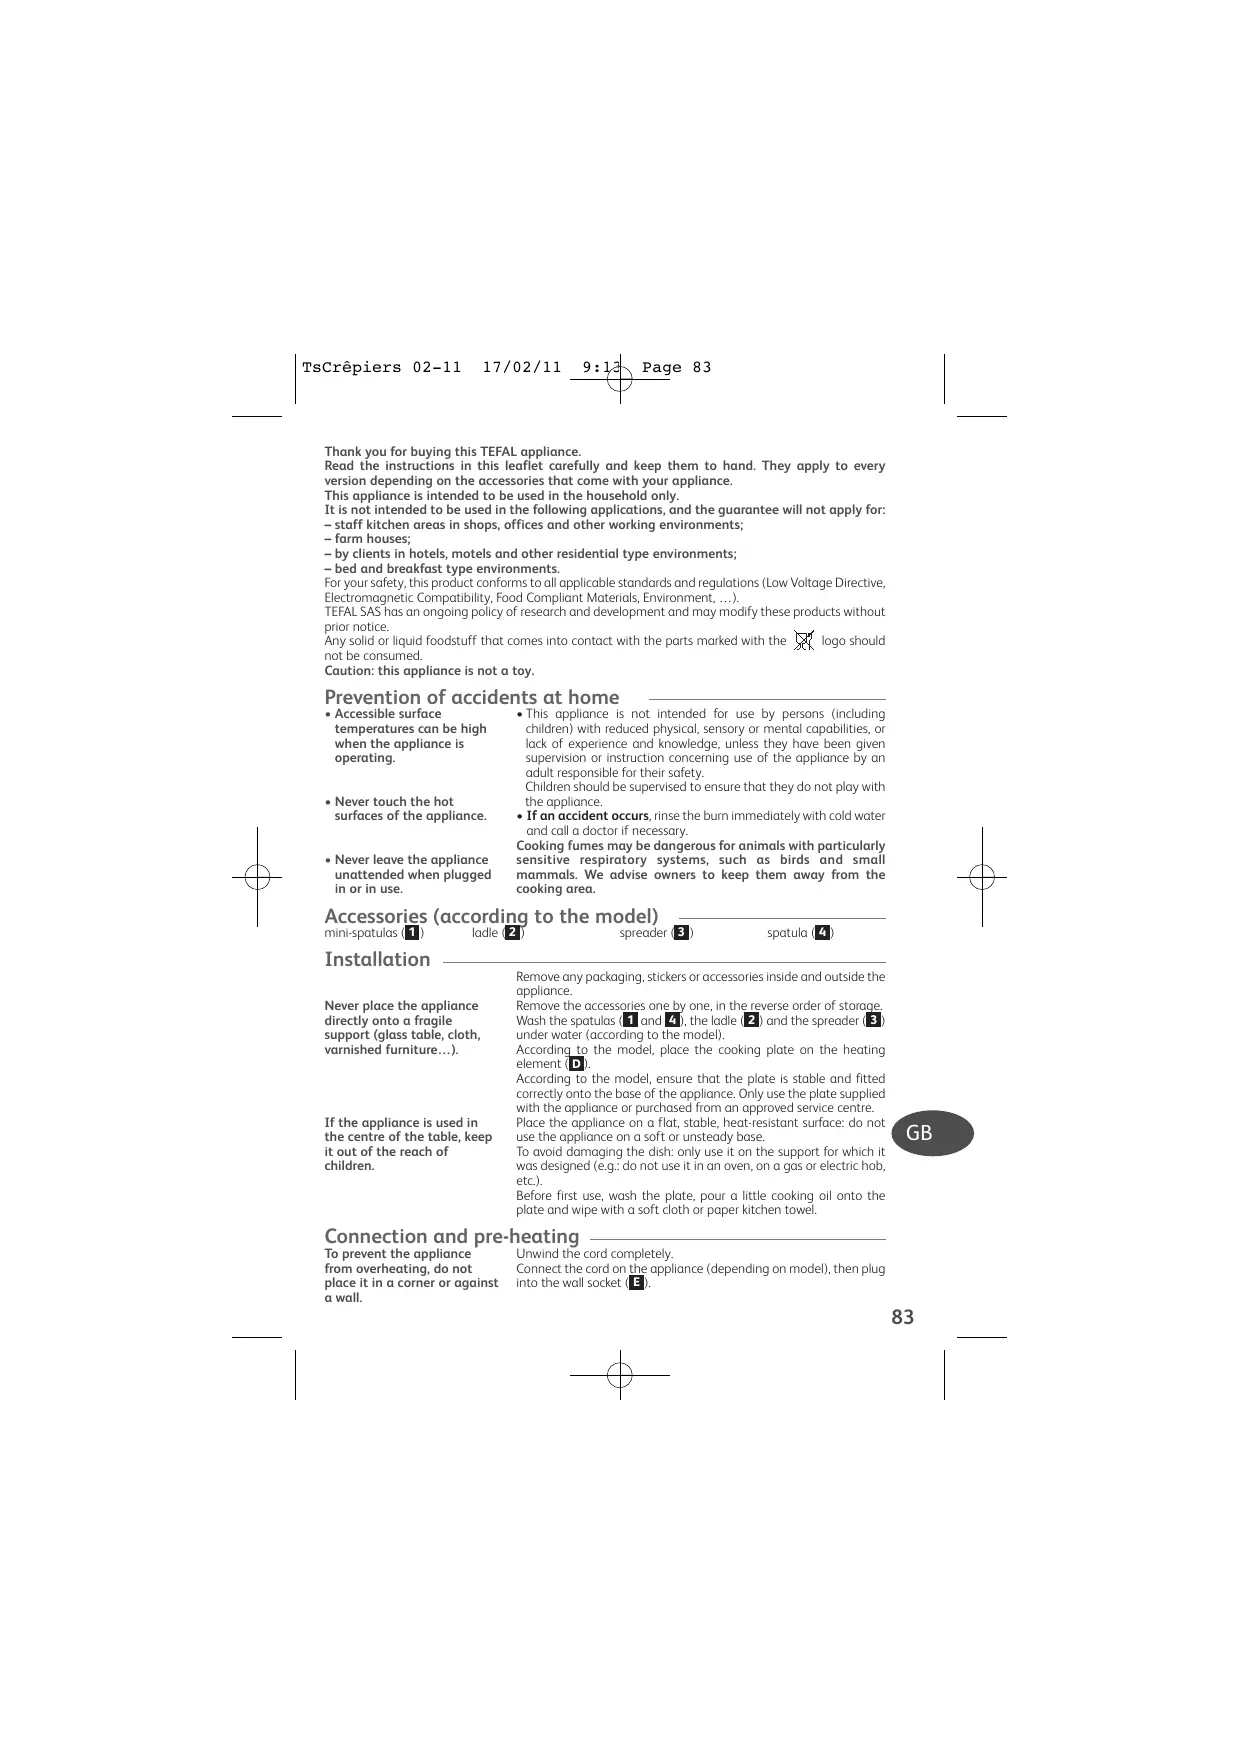
Accessories (according to the model)
mini-spatulas (1)
Iadle (2)
spreader 3
spatula 4
Installation
Never place the appliance directly onto a fragile support (glass table, cloth, varnished furniture...).
If the appliance is used in the centre of the table, keep it out of the reach of children.
Remove any packaging, stickers or accessories inside and outside the appliance.
Remove the accessories one by one, in the reverse order of storage. Wash the spatulas (1 and 4), the ladle (2) and the spreader (3) under water (according to the model).
According to the model, place the cooking plate on the heating element (D).
According to the model, ensure that the plate is stable and fitted correctly onto the base of the appliance. Only use the plate supplied with the appliance or purchased from an approved service centre.
Place the appliance on a flat, stable, heat-resistant surface: do not use the appliance on a soft or unsteady base.
To avoid damaging the dish: only use it on the support for which it was designed (e.g.: do not use it in an oven, on a gas or electric hob, etc.).
Before first use, wash the plate, pour a little cooking oil onto the plate and wipe with a soft cloth or paper kitchen towel.
Connection and pre-heating
To prevent the appliance from overheating, do not place it in a corner or against a wall.
Unwind the cord completely.
Connect the cord on the appliance (depending on model), then plug into the wall socket (B).
Never leave the appliance unattended when in use.
This appliance is not intended to be operated by means of an external timer or separate remote-control system.
Never run the appliance empty.

Cooking
Do not place cooking utensils on the cooking surfaces of the appliance.
Never cut food directly on the plates.
To avoid spoiling your product, do not use flambé recipes in connection with it at any time.
GB
After use
Do not place the plate onto a fragile surface.
Do not place the hot plate in water.
Do not immerse the appliance in water.
If your appliance is fitted with a removable power cord: if the power cord is damaged, it must be replaced by a special cable or unit available from the manufacturer or its after-sales service.
If your appliance is fitted with a fixed power cord: if the power supply cord is damaged, it must be replaced by the manufacturer or its service agent or a similarly qualified person in order to avoid a hazard.
Check that your electric installation is compatible with the power and the voltage indicated under the appliance.
Connect the appliance to a socket with an earth connection. If an extension cord is used, it must be with an incorporated earth connection.
Position the power cord carefully, whether an extension is used or not, so that guests can move freely around the table without tripping over it.
Models with on/off switch: put the switch to on: the indicator will light up (F).
- Other models: the appliance works once plugged into the wall socket.
Allow appliance to pre-heat for 8 to 10 minutes.
During first use, the appliance may give off a slight odour and smoke: this is normal.
Thermo-Spot™ (according to the model): The Thermo-Spot turns sold red when the appliance is perfectly preheated and ready to cook.
After pre-heating, the appliance is ready to be used.
According to the model, use the measuring ladle to obtain the required amount of batter for the chosen recipe:
- For 6 mini pancakes: fill up to the lower level of the ladle (2a).
- For blinis and pancakes: fill the ladle (2b) completely.
- For crêpes (according to the model): fill the ladle completely twice [25].
According to the model, spread immediately, without pressing, with the back of the ladle (2) (for mini-pancakes) or the spreader (3) (for large pancake), in a circular movement from the centre. Turn the pancake over half way through cooking using the spatula (1 or 4) supplied for this purpose. Leave to cook for about 2 minutes each side. Then fold the pancake as you want: as a roll or in half, in quarters or folded as an envelope or flower shape.
According to the model, to spread the batter easily, we recommend placing the ladle (2) or the spreader (3) in a jug of water.
Always use a wooden or plastic spatula to avoid damaging the cooking plate. Garnish the sweet pancakes on your plate after cooking, not whilst it is still on the cooking plate.
According to the model, you can also grill foods.
- Models with thermostat: set the thermostat to the off position. Unplug the cord from the wall socket. Then, depending on model, remove the cord from the appliance. Leave the appliance to cool.
According to the model, remove the cooking plate.
Clean the cooking plate and the base of the appliance with a sponge, hot water and washing up liquid.
The lidle (2), the spatulas (1 and 4) and the cooking plate (according to the model) can be put in the dishwasher.
The heating coil is not to be cleaned.
Never immerse the appliance and the cord in water.
If it is really dirty, wait until it has cooled down and wipe with a dry cloth.
Do not use metal scourers or scouring powders to avoid damaging the cooking surface (e.g.: non-stick coating...).
Storage (according to the model)
Keep the appliance out of the reach of children.
Place the appliance upside down on a clean, flat and stable surface such as a tablecloth, to avoid damaging the cooking surface (A1 or B1 or C1).
Store each accessory in its dedicated compartment. Always store the accessories in the following order:
1 - Power cord, following the steps shown by the symbols: A2 or B2 or C2 (according to the model);
2 - Spatulas (1 or 4), as shown by the symbols: A3 or B3 or C3 (according to the model).
3-Ladle (2) or spreader (3), as shown by the symbol: A4 or B4 or C4 (according to the model).
4- The griddle, to lock the bottom of the base, follow Pictograms C5 and C6 (only for the Crep'Party Dual model).
Environment protection first!
1 Your appliance contains valuable materials which can be recovered or recycled.
Leave it at a local civic waste collection point.

The Crêpes
40 to 60 mini-pancakes or 20 to 25 large pancakes (according to the chosen plate) · Cooking time: 2 min. on each side
The classic French batter
- 500 g sifted plain flour
- 1 litre of milk - 6 eggs
- salt - oil or butter
In a large bowl add 500g plain flour and gradually beat in 1 litre of milk, until the consistency is of a single cream. Graduall beat in the 6 beaten eggs, 2 pinches of salt and 2 tablespoons of oil or melted butter. Leave to stand for 1 to 2 hours.
If the batter is too thick after making the crêpes, add a small amount of water and mix again.
Salty pancakes can be made by adding more salt to the batter.
Buckwheat batter
Beer-based batter
For savoury crêpes, buckwheat flour may be used instead of normal flour.
For sponger crêpes, you may substitute 1/4 litre of beer for 1/4 litre of milk.
Water-based batter
For lighter crepes, you may substitute water for the milk.
Ham and cream crepes
- 3 slices of white ham
- 1 bowl of grated Gruyere (Swiss) cheese - 1 jar of fresh cream
Place 1/2 slice of ham on your crepe with you have nearly finished cooking the second side. Sprinkle with grated Gruyere cheese. When the ham is hot, coat with fresh cream and fold into a wrap.
Crepes with Roquefort cheese, fresh cream and walnuts
- 1 piece of Roquefort, crumbled - 1 small jar of fresh cream - 4/5 crushed walnuts
Mix all the ingredients together. In your plate, garnish the crepe with this mixture and fold over twice.
Crepes with honey, walnuts or hazelnuts
- 3 Tbsp. honey - 100 gr crushed walnuts or hazelnuts
Mix all the ingredients together. When done cooking the second side, garnish the crepe with this mixture and fold over twice. Leave on the griddle for a few seconds. Serve and decorate with whipped cream.
Suggestions for garnishes
Entrées (Starters)
- thinly sliced smoked salmon (sprinkled with lemon juice) - lumpfish eggs (sprinkled with lemon juice), crab, shrimp or shredded tuna with mustard - asparagus tips in mayonnaise
- avocado slices seasoned with vinaigrette or tartar sauce - Greek-style mushrooms
Main Dishes
- chicken breast with curry sauce (béchamel sauce mixed with 1 chopped onion and 1/2 tsp. currypowder) - seafood with béchamel sauce or lobster sauce with cognac - vegetables such as spinach, carrots, turnips or pumpkin in mousseline sauce
Cheeses
- grated Gruyere, Parmesan, Raclette (put the cheese on while cooking once the crepe has been turned, and let melt) - Roquefort, fresh cream, Petit Suisse (creamy, white cheese) - place the Roquefort or Petit Suisse on top of the crepe when it is in your plate
Desserts
- melted chocolate with crushed almonds, walnuts or hazelnuts, brown or white sugar, or jam (blueberry, raspberry, etc.) creamed chestnuts scoop of ice cream (vanilla, chocolate) honey, crushed hazelnuts sliced banana with sugar fresh fruits: strawberries, raspberries, potato puree, etc. fresh lemon juice and sugar
Blinis
To be made with the plate for 6 mini-pancakes only. About 20 blinis
- Cooking time: 21/2 min. on each side
Caucasus blinis
- 300 g plain flour
- 2 separated eggs · 10g fresh yeast · 1 / 2 litre milk
- 1 knob of melted butter
1/2 tsp. salt
Blend the yeast with 3 tablespoons of lukewarm milk and leave to stand for 10 min. Place the flour in a bowl and make a hollow in the centre. A little at a time, mix in the remaining milk. Add the yeast, egg yolk, melted butter and salt. Leave to stand in a warm place for about 1 hour.
Just before cooking the blinis, beat the egg whites until stiff and fold into the batter. Serve the blinis with caviar.
Buckwheat blinis
200 gr buckwheat flour
- 100 gr leavened flour
- 3 eggs (with the whites)
beaten stiff) 300ml milk
- 100 gr brewer's yeast (dissolved in a little water)
1 pinch of salt
Dissolve the yeast in a little warm water. Let sit for about 10 min, then mix the normal and buckwheat flour together in a mixing bowl. Dig a well in the center and stir in the milk, eggs, yeast and a pinch of salt. Let sit for about 1 hour. Just before cooking, beat the egg whites until stiff and fold in. Serve the blintzes with fish (snapper, salmon, eel, halibut) or with lumpfish eggs, or cod liver. In the latter case, it is advisable to season the mixture with salt and pepper.
Pancakes
To be made with the plate for 6 mini-pancakes only. To be prepared 1 hour in advance.
About 20 pancakes · Preparation: 15min . Cooking time: 21 / 2min on each side
- 300 g plain flour · 20 g fresh yeast · 3 eggs · 300 ml milk · 30 g castor sugar
- 2 Tbsp. of melted butter
- 1 pinch of salt - 30 g of butter during cooking
Blend the yeast with 3 tablespoons of lukewarm milk. In a bowl, place the flour, add the castor sugar, salt and melted butter. Make a hollow and add the eggs and the yeast blended in milk. Beat the batter and slowly add the remaining milk. Leave to stand in a warm place for about 1 hour and cover with a cloth. Serve with jam or maple syrup.
Rosti (potato pancakes)
To be made with the plate for 6 mini-pancakes only. 6 rostis
Cooking time: 2 1/2 min. on each side
Traditional rosti
- 600 g old potatoes (unpeeled) · 1 chopped onion · 100 g grated gruyere cheese · 1 egg
Do not peel the potatoes. The day before, cook them whole in salted boiling water for 15 min, so that they are still firm. The next day, peel and then grate them. Mix the potatoes, onion, cheese and egg together. Cook spoonfuls of mixture on the appliance. Flatten so that they are thin. Carefully turn with a spatula half way through cooking.
Basel-style Potato Pancakes
- 600 gr baking potatoes
- 2 onions - 1 Tbsp. cream
1 egg
Peel the potatoes and grate them on a mid-size grater or in the food processor. Slice the onions in fine rounds and lightly sauté. Mix in the grated potato, beaten egg and cream.
Tessin-style Potato Pancakes
- 600 gr potatoes cooked the day before - 200 gr lardons
- 1 egg - fresh or dried rosemary
Peel the potatoes and grate them on a mid-size grater or in the food processor. Lightly sauté the lardons. Mix in the potatoes, beaten egg and lardons. Garnish with rosemary.
Matefaims Crepes ("Hunger-stoppers")
Plan 1 hour in advance · approx. 20 matefains · Cooking time: 2 min. on each side
Matefains batter
250 gr flour · 1 / 2 litre milk
2 eggs · 1 Tbsp. walnut oil
salt
Place the flour in a mixing bowl. Make a well in the middle. Break the eggs into it, add the oil, a pinch of salt, and a cup of milk. Work the batter vigorously using a wooden spoon so that it becomes very uniform. Gradually add the rest of the milk until the batter makes a ribbon when it drips off the spoon. Let sit for 1 hour.
Matefains from the Alps
Cut a 1/2 cm thick slice of ham into tiny cubes. Grate 100 gr of Comte or Beaufort cheese. In a frying pan, melt one pat of butter in 2 Tbsp. of oil and brown in it one cup of large bread crumbs. Mix in the ham, cheese and croutons.
As a variation, you can substitute mushrooms for the ham and cheese.
Crapiaux (thick potato) Crepes
Dice 1 large onion and soften by sautéing in 1 pat of butter. Cut a slice of country ham into tiny cubes. Mix the ham and onion into the batter.
Caroline-style Matefaims
The garnish consists of banana slices sautéed in butter, placed on the gratefaim halfway through cooking with honey poured on top.
Cover with a second ladle of batter and continue cooking the matefaim as indicated previously.
Sprinkle with sugar.
e 1 1 1 1 1 1 1 1 1 1 1 1 1 1 1 1 1 1 1 1 1 1 1 1 1 1 1 1 1 1 1 1 1 1 1 1 1
aill 1
p1y·-o 1
z = r · z = r · z
jLlao 10
- 2.
S OBC = S BOC + S BOC - S BOC
()
10 1234567890
1234567890
1234567890
1234567890
1234567890
1234567890
1234567890
1234567890
1234567890
1234567890
1111111
a#
)
aogdoag
1
.
j 1 1 1 1 1 1 1 1 1 1 1 1 1 1 1 1 1 1 1 1 1 1 1 1 1 1
l2 = S1 + S_2 + 2 = 50
Jalw Jwly wabll chil
aegu wubluy
Luyss JaaLo oJluo
.
"g" (s) "j"
JSL (Y) Jia: gbal cag ● laa "yaua I aI aI aI aI aI aI aI aI aI aI aI aI
Jsc iig jia a s bll ag ● guiy o h 11gaa cily I a
- gllg aal lglz gall lll 10000000000000000000000000000000000000000000000000000000000000000000000000000000000000000000
Sn + 1 - Sn = 1( 2n + 1) ( 2n + 2) - 1( n + 1) ( n^2 + + 12) < 1( n + 1) ( n^2 + + 12)
sbcabp 1.0
clal 1.0 (y) jdua 0
jol jai 0 aJb oJy
djl joo 0 uall
jla aala oJy
. abi 111
aagall (2) aegall aee yaa aee, aegaae gaae gaae gaae gaae
.0L
a a a a a a a a a a a a a a a a a a a a a a a a a a a a a
Lalalall sioi dks, Jgall
Lolal
Lgssal 15
.
caglaiuogjzgl:uluaojjodgajllalglall
"
aal aal aal aal aal aal aal aal
Iolai jlll all jil. jlll no jylll lllll
jilw jalwl, lalg iayiyy ylll scls gell iab
.
jay (yagall yall g 4 1 yilalll.2)
yaaal yaaa aaa
aaii 1
a lal a jlll lll llae al aas jls
aJus Jus aabb
a 1
.()
JLAAUWJSE
a
a
L
sally jiall jaij
all gi jai all yai
salllll
()
psll slll 1sll lssll ss yLgill -
Party Dual 5cB5A5:
(Crep
e iieiie
JlalbJgIoo
ARA
gagill gagill
J 1
13j: a jllg dall Jal gayes dlwu logjo du wll all js 13j g i aalabwgl jilao dllw alui w ldll wll jls
ciialiui iui 1s iie 1aaiy, ibdo Luiu
山山山山山山山山山山
a 1 a 1 a 1 a 1 a 1 a 1 a 1 a 1 a 1 a 1 a 1 a 1 a 1 a 1 a 1 a 1 a 1 a 1 a 1 a 1 a 1 a 1 a 1 a 1 a 1 a 1 a 1 a 1 a 1 a 1 a 1 a 1 a
142 pllll aill l yall jwabw ggi aai all Jgll
alao jbiayi Jell
gagolalai gali daa aayyajgall jn no sall
jlll jaii ojjai jll
ySll jai yai yai yai yai yai yai yai yai yai yai yai yai yai yai
m - 1 0 ; m + 1 ≥ 0 ;
gge gglgge gge gge gge gge gge gge gge gge gge gge gge gge gge gge gge gge gge gge gge gge gge gge gge gge gge gge gge gge gge gge gge gge gge gge gge gge gge
gi alglbl jg oolw yas g aay
paj auiil o jae Jsi
Cai Cai: "agj/luu" CIaay aigai all
F
ylllll lssj ylllll ldd: yllgall a
j
1-1 50s ygill jlll
jldall jiaol jno jlll jiaol joc yd d gdlal rall Jlae
1,2,3,4
-1uXoLcJy: (Thermo-Spot TM) "gogoo" aoLx
aalllgai jai laic gali aai
gabll joljol gall
dulr jn nn dnn
Jaaaunl y jgs loisic
J 1
p2ill j4. p3 i1 abuolg

a1 = 23,a2 = - 43,b1 = 56,b2 = - 34
Jiaiui jai jai jai jai jai jai jai
a aiee eae ee eae eae eae eae eae eae
:3jlailll llll lal
2a
2b
jssy jssy dll yaii ayieal siai: (yajgall) yjll jilbal
.(2b)
aalaaal aaal aalaaal alalal
E_1AJ = 2AE - AH
aalall sLoIg aaiwai gaii gaii gaii gaii gaii gaii
gabill gjuiuuy
jgl . jiaaiial lll jgila ) jaiaiy aiai yaiy iay gall iiai
...a jyj a yj yj yj yj yj yj yj yj yj yj yj yj yj yj yj yj yj yj yj yj yj yj yj yj yj yj yj yj yj yj yj yj yj yj yj yj yj yj yj yj
1 1 1 1 1 1 1 1 1 1 1 1 1 1 1 1 1 1 1 1 1 1 1 1 1 1 1 1
1.4.1.1.2.3.4.5.6.7.8.9.10.11.12.13.14.15.16.17.18.19.20.21.22.23.24.25.26.27.28.29.30.31.32.33.34.35.36.37.38.39.40.41.42.43.44.45.46.47.48.49.50.51.52.53.54.55.56.57.58.59.60.61.62.63.64.65.66.67.68.69.70.71.72.73.74.75.76.77.78.79.80.81.82.83.84.85.86.87.88.89.90
aaiis 1i:
aJzoo gogg aol
y (JiaBj1 paa) oaii aai jaoaie jai iai
gl 3j
a
ciiii aiee iiaai baw
a.s.c.p.a.s.l. 191, p.a.s.l.o. p.a. l.o. a.s.rally s.
J 1
Jalil Jai jao Jgusu aee bawy gill Jaeiw
ailll 2y jiljaiy
Jlll lally 1yol JkLo Loo
yj1 j13j 000
aaii iiaii jilalil g aaiuulagall
aolal oia 1
i
diy jgduai djiy
JLLIgogogosLsic
JUeuiy1 1gj
(4)
3
(1)
2
(1)
1
cilll joljol no alalollllalall lll
y jj j j j j j j j j j j j j j j j j j j j j j j j j j j j j j j j j j j j j j j j j j j j
aJgLo (3) aJgall g (2) aJgall . (4 1) Jgill
(1)
(D)
aie aieeall iKo jia yaiy jaiy jao aiay
aJ no gbl oJy jy j. qall no gjall glll laeal .
S ACD = S COD + S_ BDO
aLg 3gaiall Jaiuiy: aJrall gaoi yai Laiu gaoi ai
4.2.1.2.2.2.2.2.
: (i) d i aiaai lioles ie e laaiai y jy: hlll qal
()
g aalglc pall cui j no Jall ksw yj yll sall laii
acliljlaaably
goo
aalalglb)
Lusgo.
Juswuyu was ciiall jls
gjglglal
Jgliao 1
Jabsl
F p.5-10
NL p.11-16
D p.17-23
I p.24-29
S p.30-34
FIN p.35-40
DK p.41-46
N p.47-52
E p.53-58
P p.59-64
GR p.65-70
RUS p.71-76
UA p.77-82
GB p.83-88
ARAP.94-89

- Póληm oklakw atuxnμatw
- PnirtoBneHne
- Pocne nCpOJIb3OBAHnA
- XpaheHne (B 3aBNCMIOCTN OT MOdEJI)
- BnHbI
- 06bHuOe TcTo Ha MOJoke
- TeTo n3 rpeuHeBoM MyKn
- TecTo Ha nIbe
- Tecto Ha Boe
- Блнь CBetуновиCBNKamn
- PpnilaIra (3anexKHO bID MoJeI)
- BctaHOBJIeHHJ
- PiiknloeyHraHaarpBaHHa
- UA
- PnuroToyBaHHa
- Пия BИКОпсТань
- 36epiraHHa (3aJIeXHb BId MoDeni)
- ToHKi MInHci
- Knauchne φpaHcy3bke ticTo
- TicTo 3 HnnpociaHoro 60puHa
- Tohki MmHcI 3 KypkoIO Ta Bepzkamn
- ToHKi MInHci 3 pOKΦopOM, CBIXKIMN Bepzkamn i BOJocbKIMN rOpixamn
- ToHki MInHci 3 MeiOM, BOIOcBKMn rOpixamn a6o nICOBIMn rOpixamn
- PekomeHdaui 3 noJaBaHHa
- 3akyckn
- Ochobhi ctpaBn
- Cnp
- Deceptn
- Prevention of accidents at home
- Accessories (according to the model)
- Installation
- Connection and pre-heating
- Cooking
- GB
- After use
- Storage (according to the model)
- Environment protection first!
- The Crêpes
- The classic French batter
- Buckwheat batter
- Beer-based batter
- Water-based batter
- Ham and cream crepes
- Crepes with Roquefort cheese, fresh cream and walnuts
- Crepes with honey, walnuts or hazelnuts
- Suggestions for garnishes
- Entrées (Starters)
- Main Dishes
- Cheeses
- Desserts
- Blinis
- Caucasus blinis
- Buckwheat blinis
- Pancakes
- Rosti (potato pancakes)
- Traditional rosti
- Basel-style Potato Pancakes
- Tessin-style Potato Pancakes
- Matefaims Crepes ("Hunger-stoppers")
- Matefains batter
- Matefains from the Alps
- Crapiaux (thick potato) Crepes
- Caroline-style Matefaims
- ()
- "g" (s) "j"
- gagill gagill
Brand : TEFAL
Model : PY55E8B
Category : Crepe maker